anyweb
-
Posts
9255 -
Joined
-
Last visited
-
Days Won
370
Everything posted by anyweb
-
 This list of guides is a living index covering Windows 365 Cloud PC, Microsoft Intune or Configuration Manager. The Configuration Manager Current Branch releases are meant for your production deployments and the Technical Preview releases are for testing new upcoming features in the product, and are aimed at Lab use only. The PKI guides are added as https communication within ConfigMgr and Intune is desired. These guides are broken down into different sections: Windows 365 Microsoft Intune Configuration Manager - Current Branch Configuration Manager - Technical Preview Setting up PKI Note: The guides in each section are (mostly) sorted in the direction of oldest first. Windows 365 How can I delete a Windows 365 Cloud PC How can I use multiple monitors with Windows 365 Using Windows 365 with Linux Introducing the Windows 365 App How can I resize a Windows 365 Cloud PC USA Windows 365 User Group session – video available Windows 365 – Your connection failed – Error Code 0x3000047 How can I configure alerts for Windows 365 activity in Intune Getting started with Windows 365 - Part 1. Introduction Getting started with Windows 365 - Part 2. Provisioning an Azure Ad Joined Cloud PC Getting started with Windows 365 - Part 3. Provisioning a Hybrid Azure Ad Joined Cloud PC Getting started with Windows 365 - Part 4. Connecting to your Cloud PC Getting started with Windows 365 - Part 5. Managing your Cloud PC Getting started with Windows 365 - Part 6. Point in time restore Getting started with Windows 365 - Part 7. Patching your Cloud PCs with Windows Autopatch Getting started with Windows 365 - Part 8. Windows 365 boot Getting started with Windows 365 - Part 9. Windows 365 switch Getting started with Windows 365 - Part 10. Windows 365 offline Windows 365 app not connecting try this Using alternate ANCs in your Windows 365 provisioning policy Location redirection with Windows 365 Troubleshooting Windows 365 connection issues via the troubleshoot option in the Windows 365 app A quick look at some of the new features in the Windows 365 app An update about location redirection on Windows 365 Cloud PCs Windows 365 end user improvements - open in browser, open in desktop app Windows 365 web client can now use your camera New video: Windows 365 Switch in action Windows 365 boot and Windows 365 switch go GA! Automating Windows 365 part 1 - Introducing Graph and setting up Visual Studio code Automating Windows 365 part 2 - Using Graph X-Ray Automating Windows 365 part 3 - Provisioning Cloud PC's Automating Windows 365 part 4 - Managing your Cloud PC Automating Windows 365 part 5 - Cloud PC reports A quick look at Windows 365 Boot dedicated mode A quick look at Windows 365 Boot shared mode Getting more out of Windows 365 – Windows 365 Boot Getting more out of Windows 365 – Windows 365 GPU Getting more out of Windows 365 – Windows 365 Frontline Getting more out of Windows 365 – Windows 365 Switch Getting more out of Windows 365 – Securing your Windows 365 PC’s Updating the Windows app to the latest version A quick look at using Windows 365 Cloud PC’s via Motorola Thinkphone Automated Provisioning of Windows 365 Cloud PCs: Advanced Scripts Moving one or more Windows 365 Cloud PCs to another location Recovering a Windows 365 Cloud PC that was de-provisioned due to license expiration How healthy are your Windows 365 or Azure Virtual Desktop PC’s ? Using remediation scripts in Intune to grab Windows 365 health check logs Windows 365 and the External Identity preview – using a guest account to access Cloud PCs Cloudy With a Chance of Apps Microsoft Intune How can I find out version info about Intune Preview in Azure ? How can I unlock Windows Holographic for Business features in Intune Preview? How can I determine how long a blade loads in Intune Preview in Azure ? How can I check the status of my Intune service ? Intune Preview in Azure get’s a new look and Software Updates for Windows 10 ! What is Windows Information Protection and how can I use it to protect Enterprise data on Windows 10 devices using Intune Using Intune to enable WIP to protect Enterprise data on Windows 10 devices (MAM-WE) Getting started with Microsoft Graph and using PowerShell to automate things in Intune How can I integrate Microsoft Store for Business with Intune in Azure How can I create a dynamic group containing all Windows 10 version 1709 in Intune in Azure ? How can I enable MDM auto-enrollment in Azure How can I customize the start screen in Windows 10 using Intune How can I use Windows AutoPilot with a Proxy ? Troubleshooting “Something went wrong error 801c0003” during enrollment via Windows AutoPilot and Microsoft Intune Configuring BitLocker in Intune - Part 1. Configuring BitLocker Configuring BitLocker in Intune - Part 2. Automating Encryption Configuring BitLocker in Intune - Part 3. Testing the scripts How can I send notification messages using PowerShell in Microsoft Intune How can I deploy custom favorites in Microsoft Edge to Windows 10 devices using Microsoft Intune Managing devices with Microsoft Intune: What’s new and what’s next – my notes (Part 1 – new features) Managing devices with Microsoft Intune: What’s new and what’s next – my notes (Part 2 – iOS) Managing devices with Microsoft Intune: What’s new and what’s next – my notes (Part 3 – Android) Managing devices with Microsoft Intune: What’s new and what’s next – my notes (Part 4 – macOS) Managing devices with Microsoft Intune: What’s new and what’s next – my notes (Part 5 – Windows) Learn how to leverage Intune support for Microsoft Graph and PowerShell to enable powerful automation and IT security- my notes How Microsoft uses Intune internally to manage Windows devices Android device management with Microsoft Intune – Part 1. Partnerships Android device management with Microsoft Intune – Part 2. Deployment Scenarios Android device management with Microsoft Intune – Part 3. Dedicated device management Android device management with Microsoft Intune – Part 4. Coming soon and what’s new How can I create dynamic groups for different HoloLens devices in Microsoft Intune Troubleshooting app deployment in Windows Autopilot Configuring the Registered Owner and Organization in Windows Autopilot delivered PCs Removing company data from Endpoint Manager enrolled phones Office 365 issues after Windows Autopilot Displaying a welcome page after Windows Autopilot completes Adding devices to an Azure AD group after Windows Autopilot is complete - part 1 Adding devices to an Azure AD group after Windows Autopilot is complete - part 2 Gathering logs and sending an email when resetting Windows Autopilot - part 1 Gathering logs and sending an email when you need to reset Windows Autopilot - part 2 Gathering logs and sending an email when you need to reset Windows Autopilot - part 3 Adding devices or users to an Azure AD group after Windows Autopilot is complete but only when the device is marked as Compliant Using the updated & secure Retire My PC app via Company Portal Prompting standard users to confirm or change Regional, Time Zone and Country settings after Windows Autopilot enrollment is complete Encrypting devices during Windows Autopilot provisioning (WhiteGlove) - Part 1 Encrypting devices during Windows Autopilot provisioning (WhiteGlove) - Part 2 Encrypting devices during Windows Autopilot provisioning (WhiteGlove) - Part 3 https://www.niallbrady.com/2024/04/06/pc-buyback-for-windows-autopilot-devices-part-2/ PC Buyback for Windows Autopilot devices – part 1 PC Buyback for Windows Autopilot devices – part 2 PC Buyback for Windows Autopilot devices – part 3 Deploying KB5030310 to devices as a Win32 app for Copilot Using remediation scripts to automate a setting for Copilot How can I disable Copilot ? Getting started with Azure Key Vault Expediting updates using Windows Autopatch August Cumulative update causing Windows reset problems Configuration Manager Current Branch Installation - How can I install System Center Configuration Manager (Current Branch) Configuring Discovery - How can I configure discovery for System Center Configuration Manager (Current Branch) Configuring Boundaries - How can I configure boundaries in System Center Configuration Manager (Current Branch) Using Updates and Servicing in Offline mode - How can I use Updates and Servicing in Offline mode in System Center Configuration Manager (Current Branch) Using Updates and Servicing in Online mode - How can I use Updates and Servicing in Online mode in System Center Configuration Manager (Current Branch) Setting up the Software Update Point - How can I setup Software Updates in System Center Configuration Manager (Current Branch) Installing the Client agent - How can I configure client settings and install the ConfigMgr client agent in System Center Configuration Manager Current Branch Upgrading to System Center Configuration Manager (Current Branch) version 1602 from System Center Configuration Manager (Current Branch) version 1511 How can I use the Upgrade Task Sequence in System Center Configuration Manager (Current Branch) ? How can I use servicing plans in System Center Configuration Manager (Current Branch) to upgrade Windows 10 devices ? How can I deploy Windows 10 with MDT 2013 Update 2 integrated with System Center Configuration Manager (Current Branch) Setting up PKI Part 1 - Introduction and server setup Part 2 - Install and do initial configuration on the Standalone Offline Root CA Part 3 - Prepare the HTTP Web server for CDP and AIA Publication Part 4 - Post configuration on the Standalone Offline Root CA Part 5 - Installing the Enterprise Issuing CA Part 6 - Perform post installation tasks on the Issuing CA Part 7 - Install and configure the OCSP Responder role service Part 8 - Configure AutoEnroll and Verify PKI health How can I configure System Center Configuration Manager in HTTPS mode (PKI) - Part 1 How can I configure System Center Configuration Manager in HTTPS mode (PKI) - Part 2 New video: Fixing expired Root CA CDP and Crypt_E_REVOCATION_OFFLINE problems cheers niall
-
- 4
-

-

-
- current branch
- step by step
- (and 12 more)
-
great stuff !, make sure to also verify that you've installed all prerequisites for the distribution point role as specified here https://learn.microsoft.com/en-us/mem/configmgr/core/plan-design/configs/site-and-site-system-prerequisites#distribution-point
-
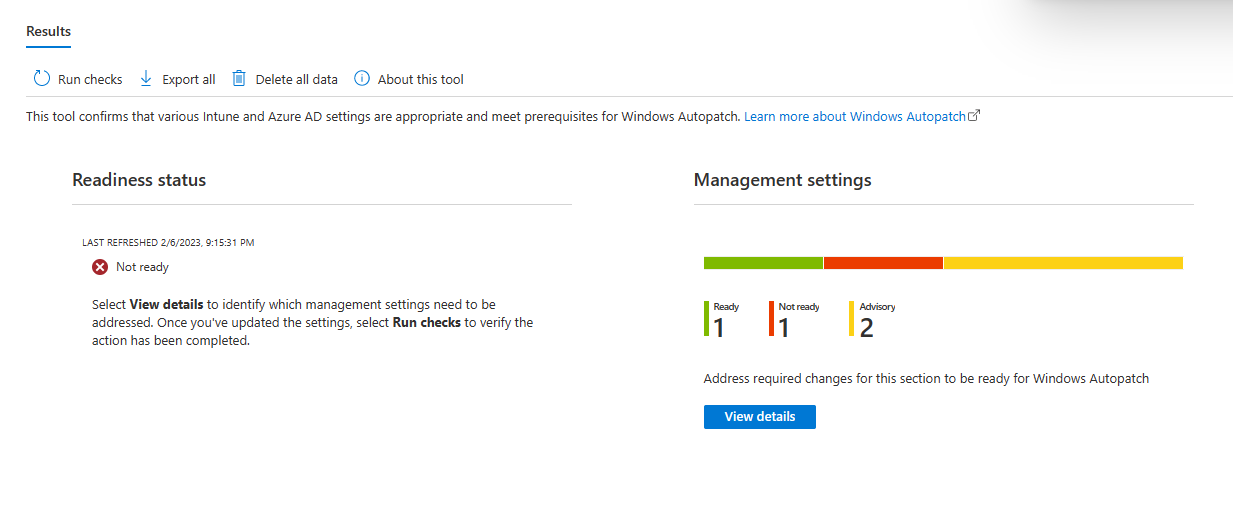
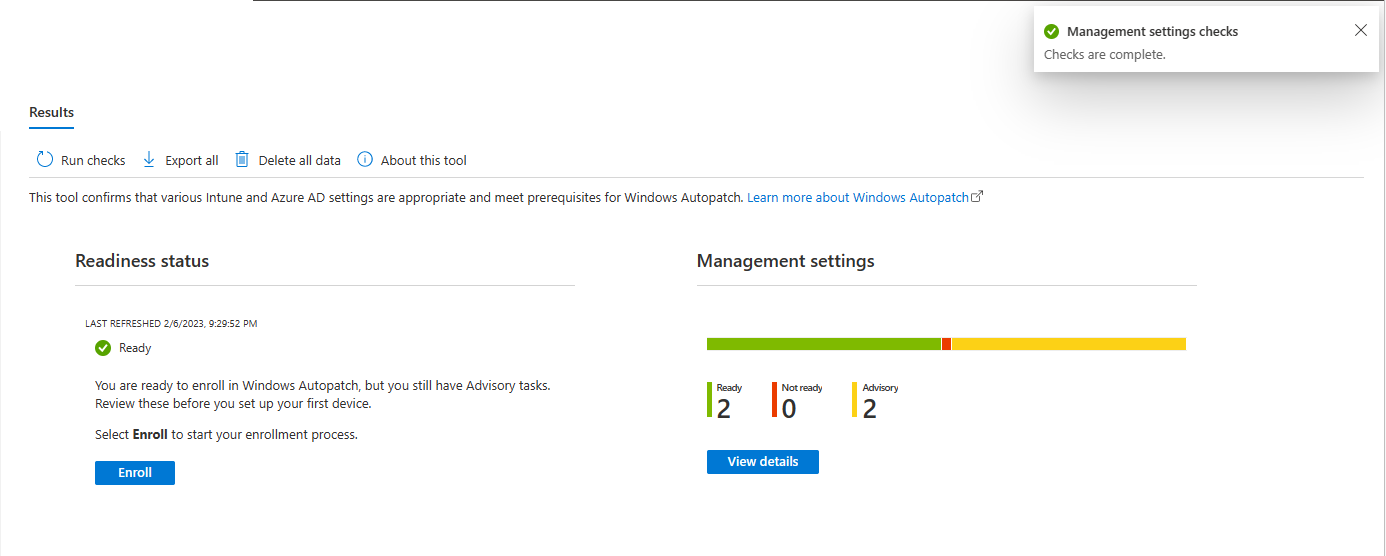
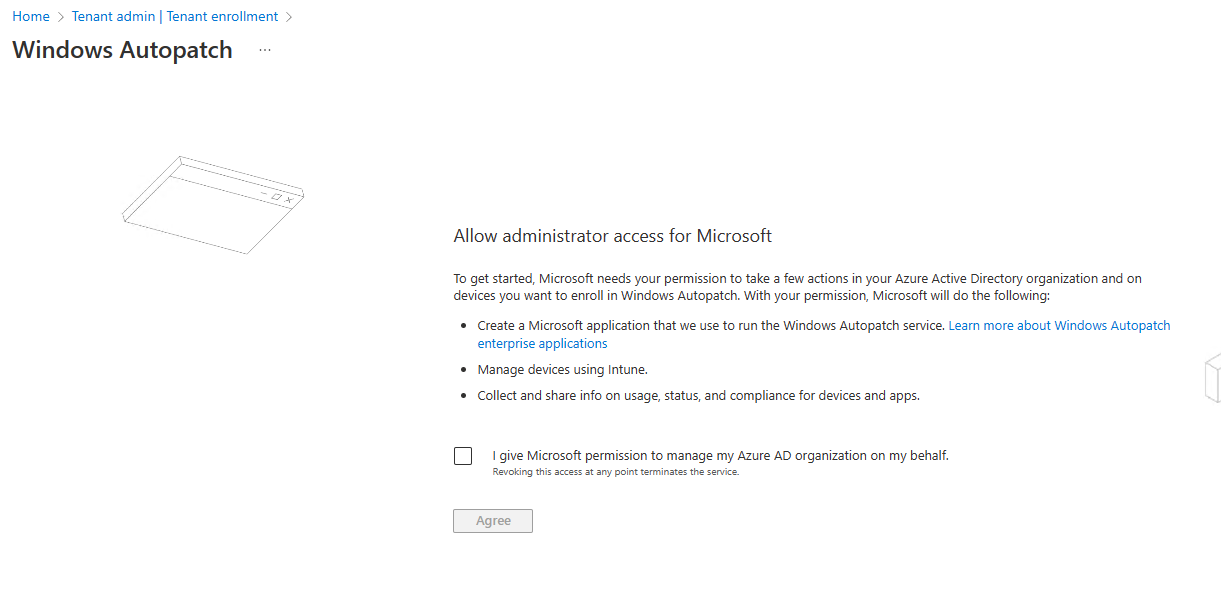
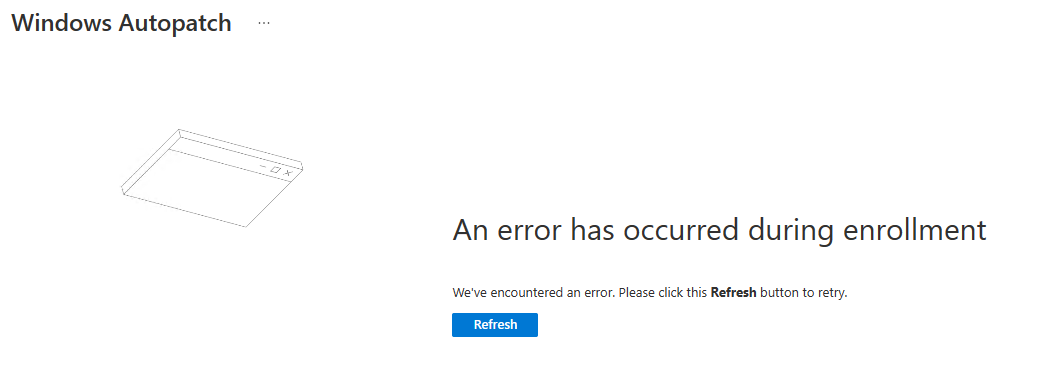
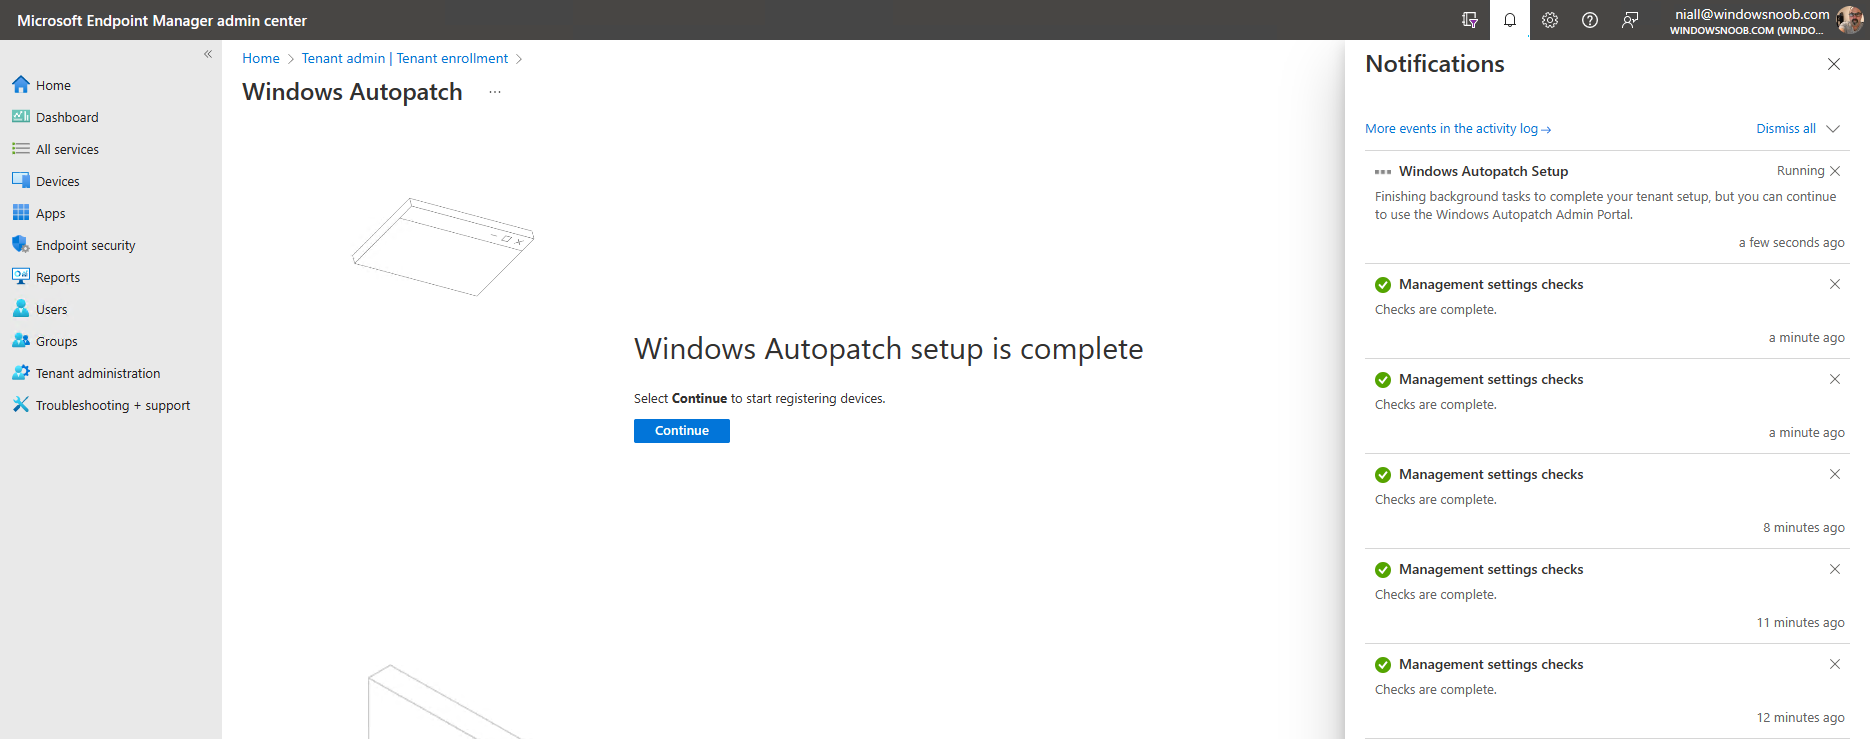
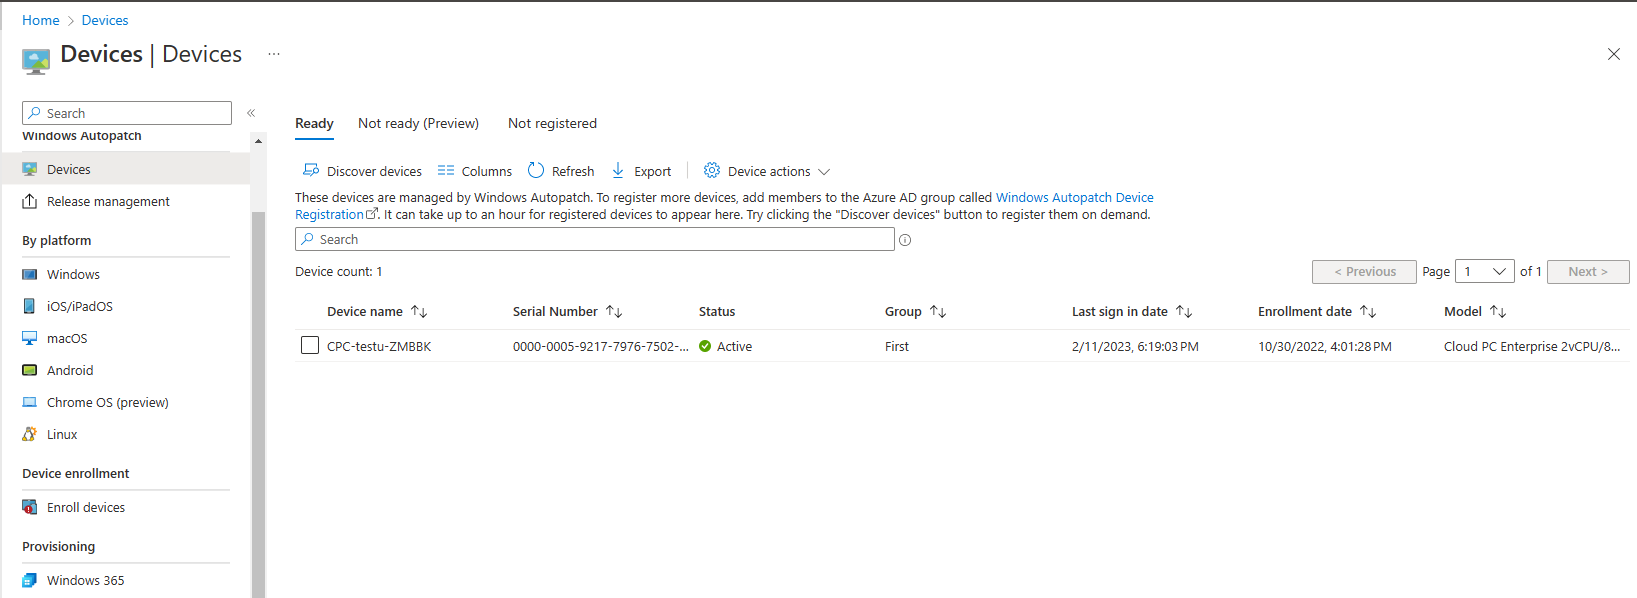
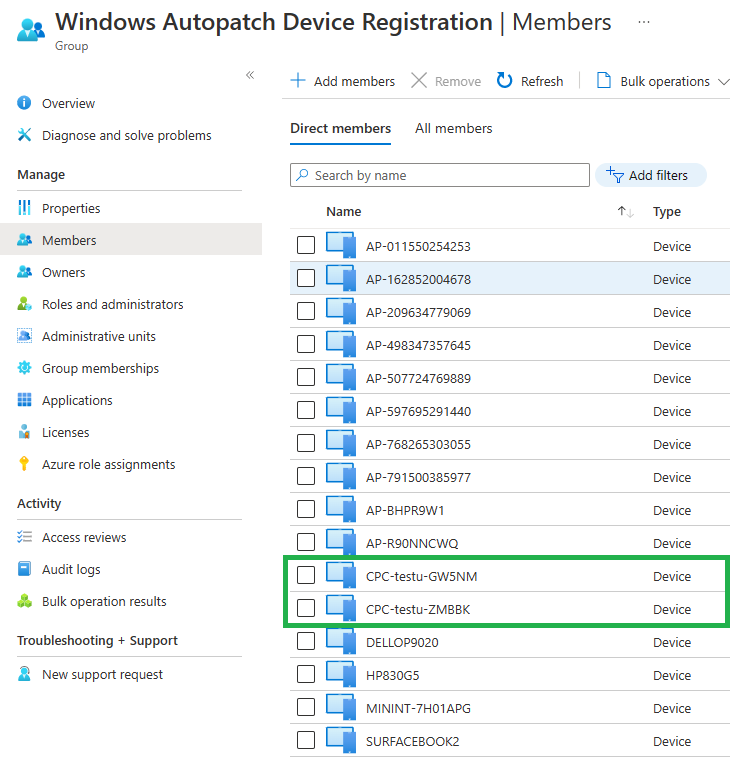
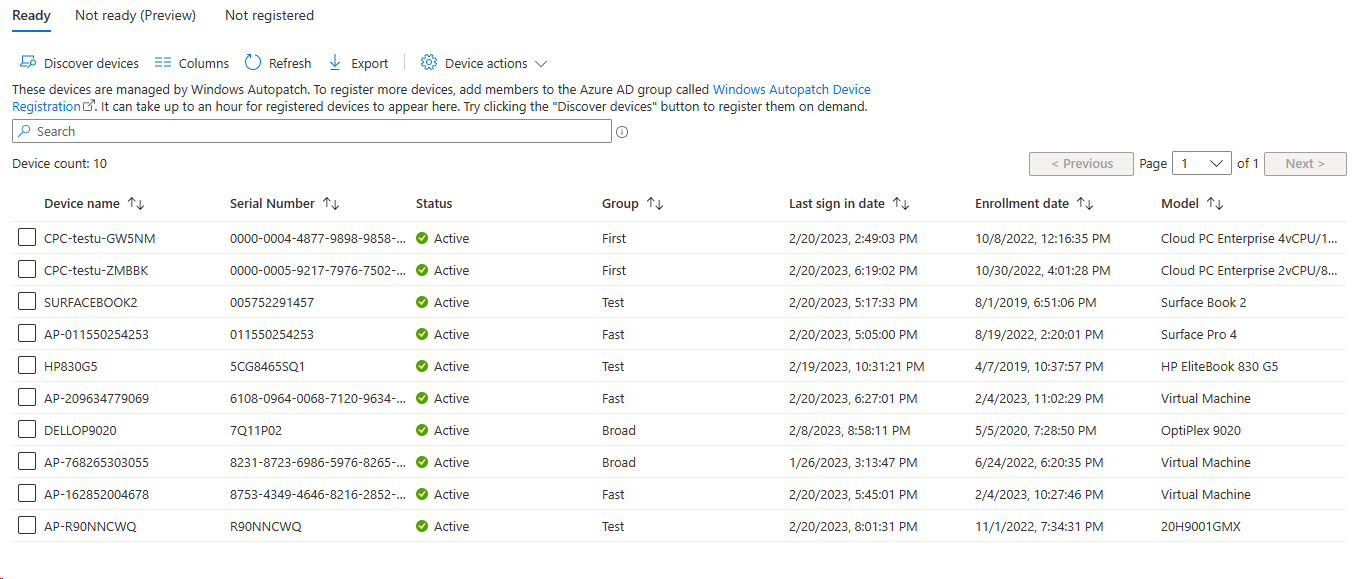
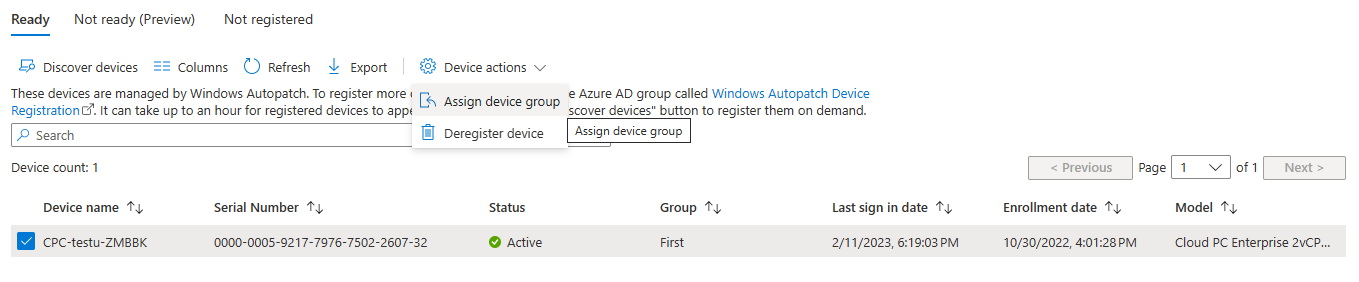
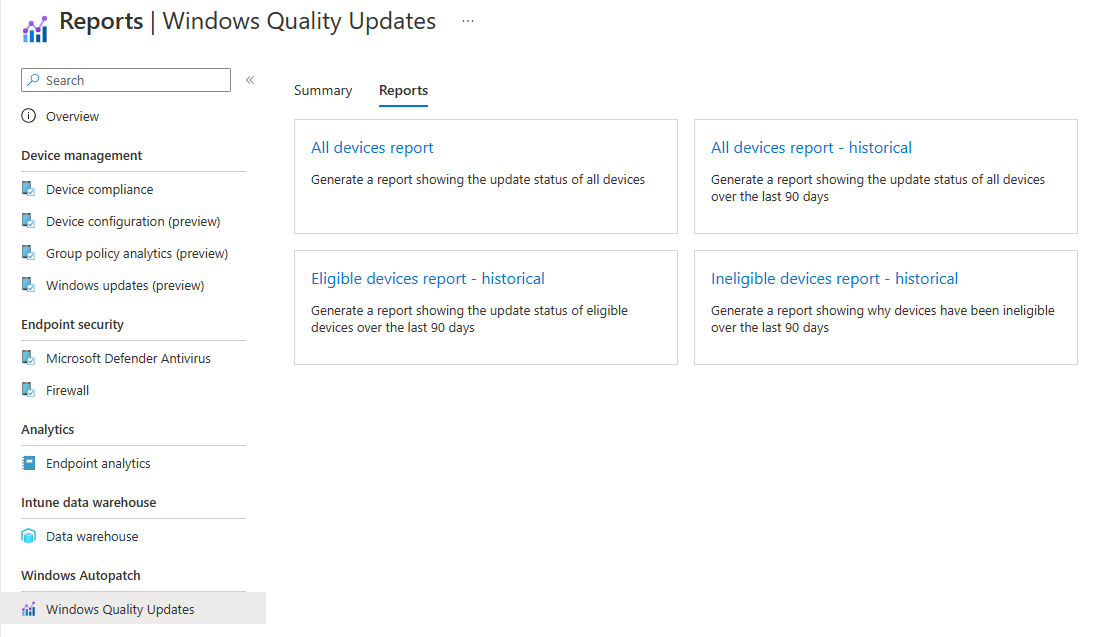
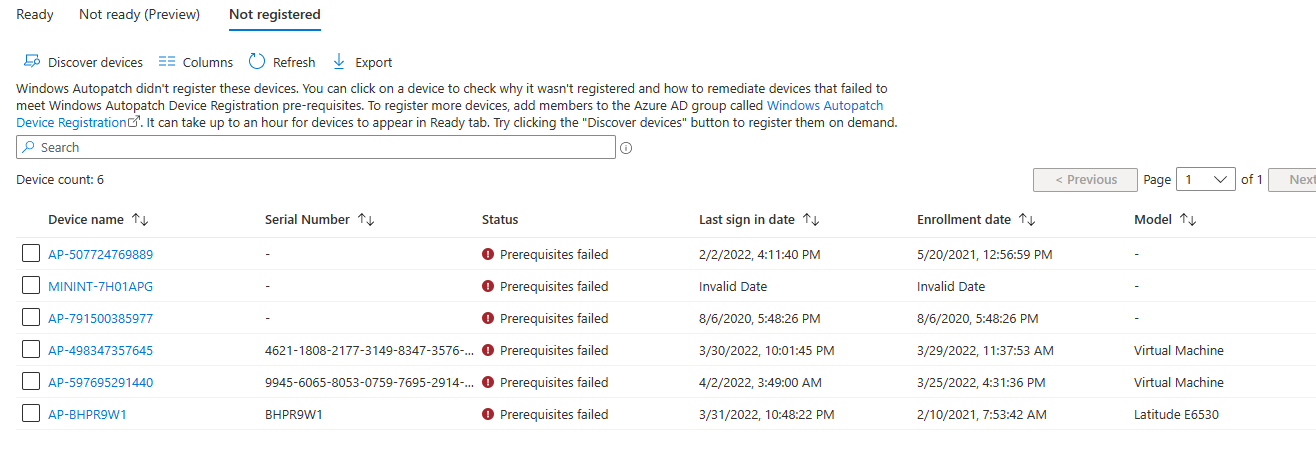
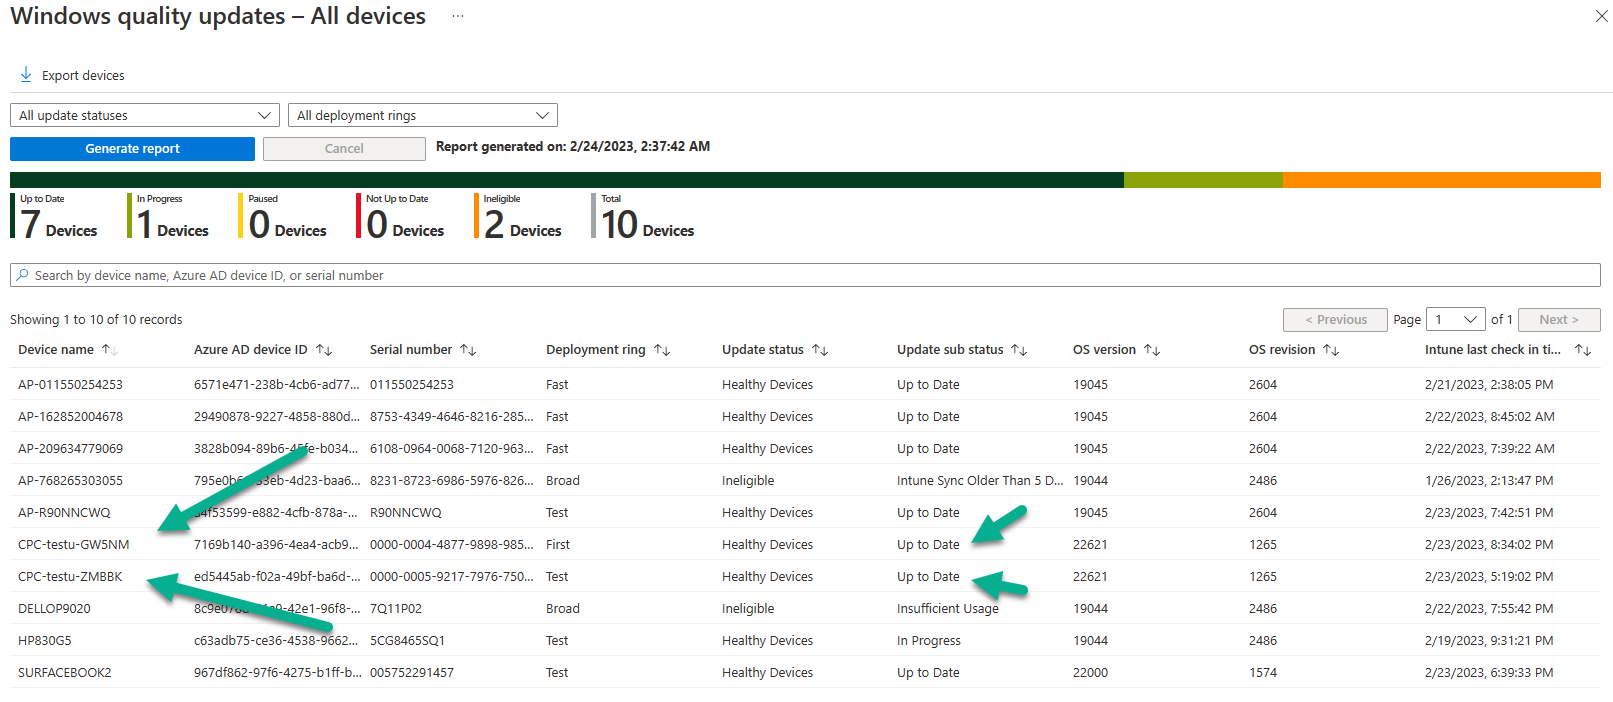
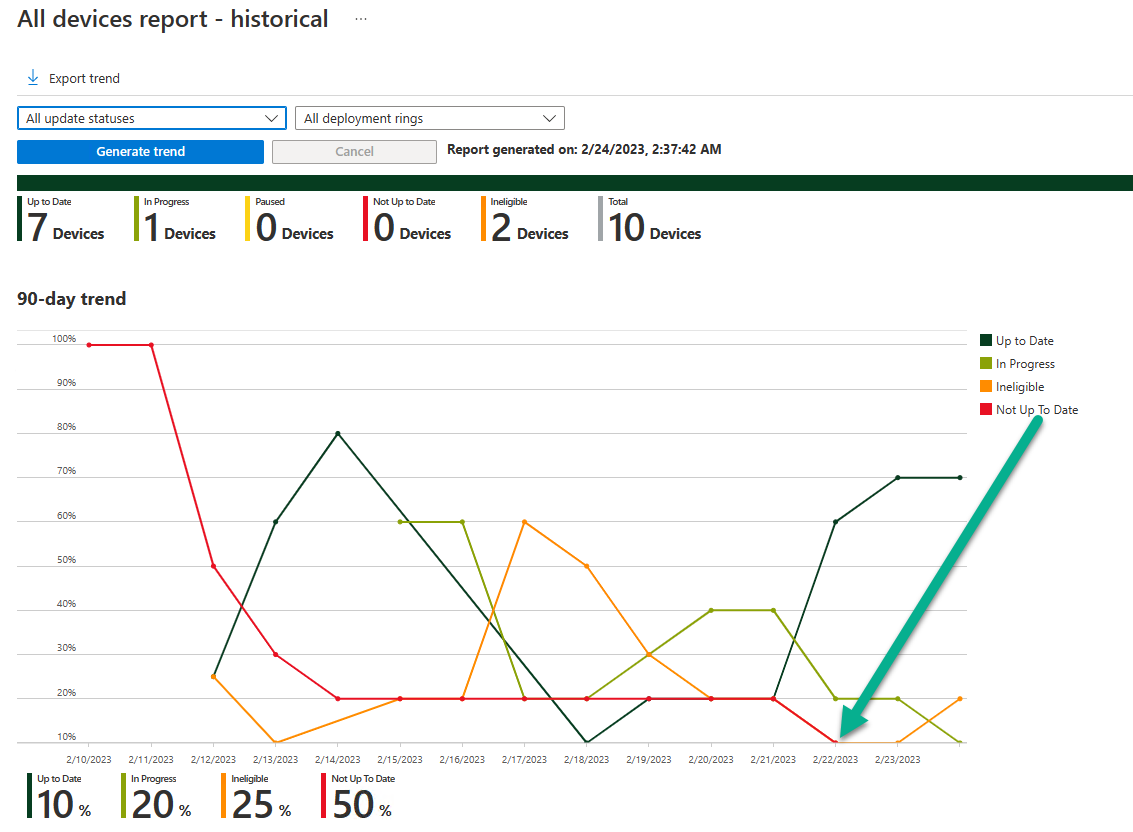
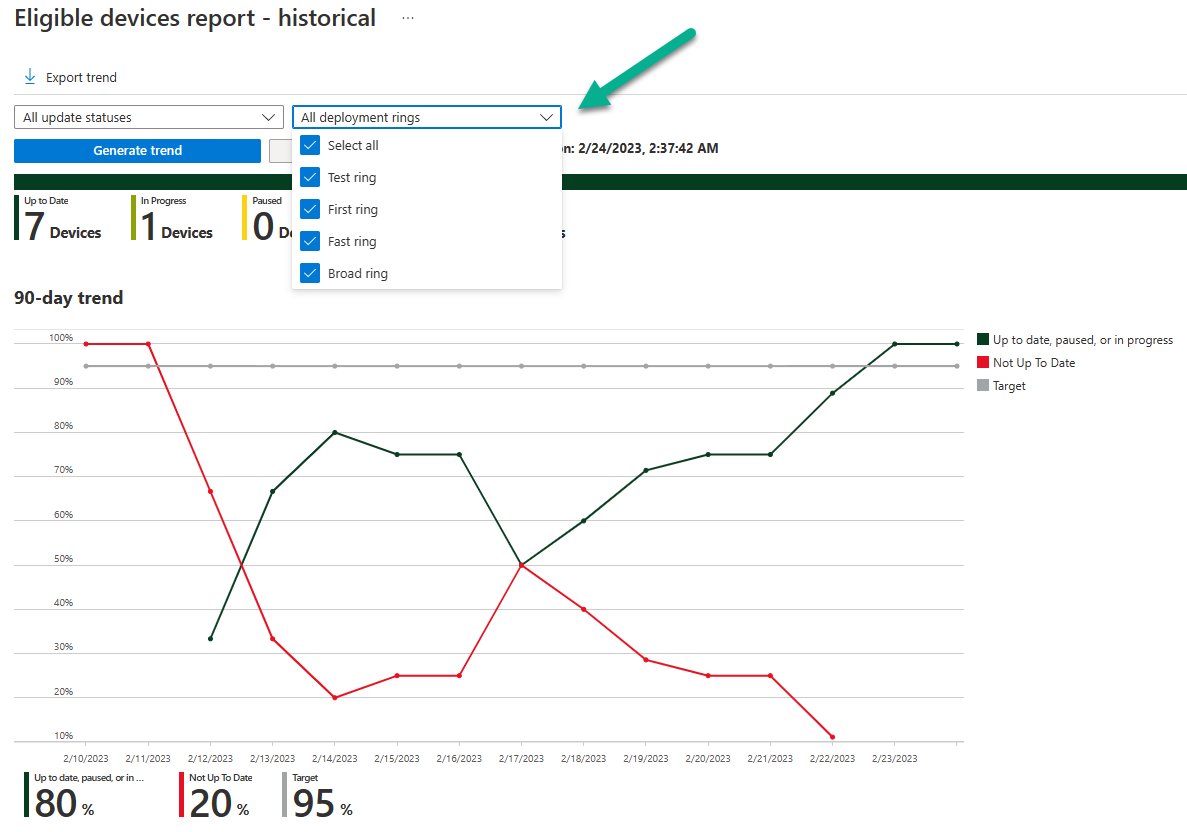
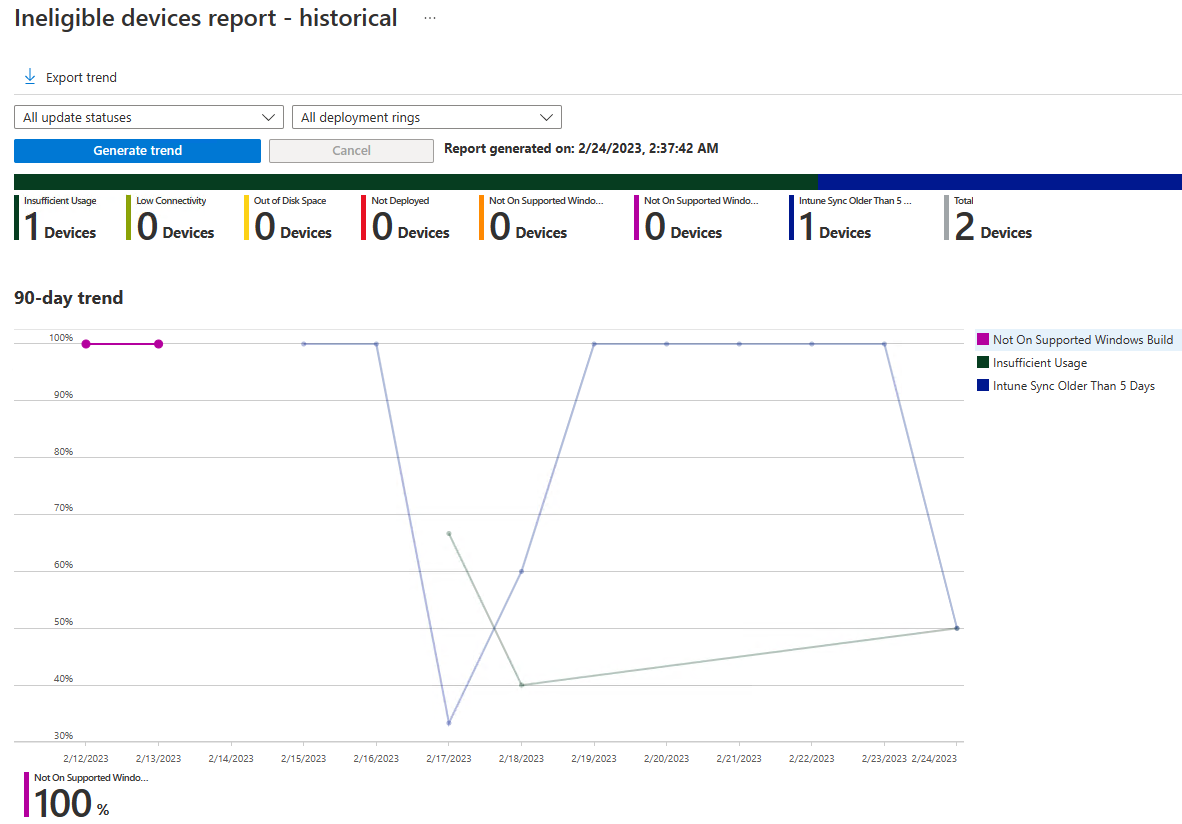
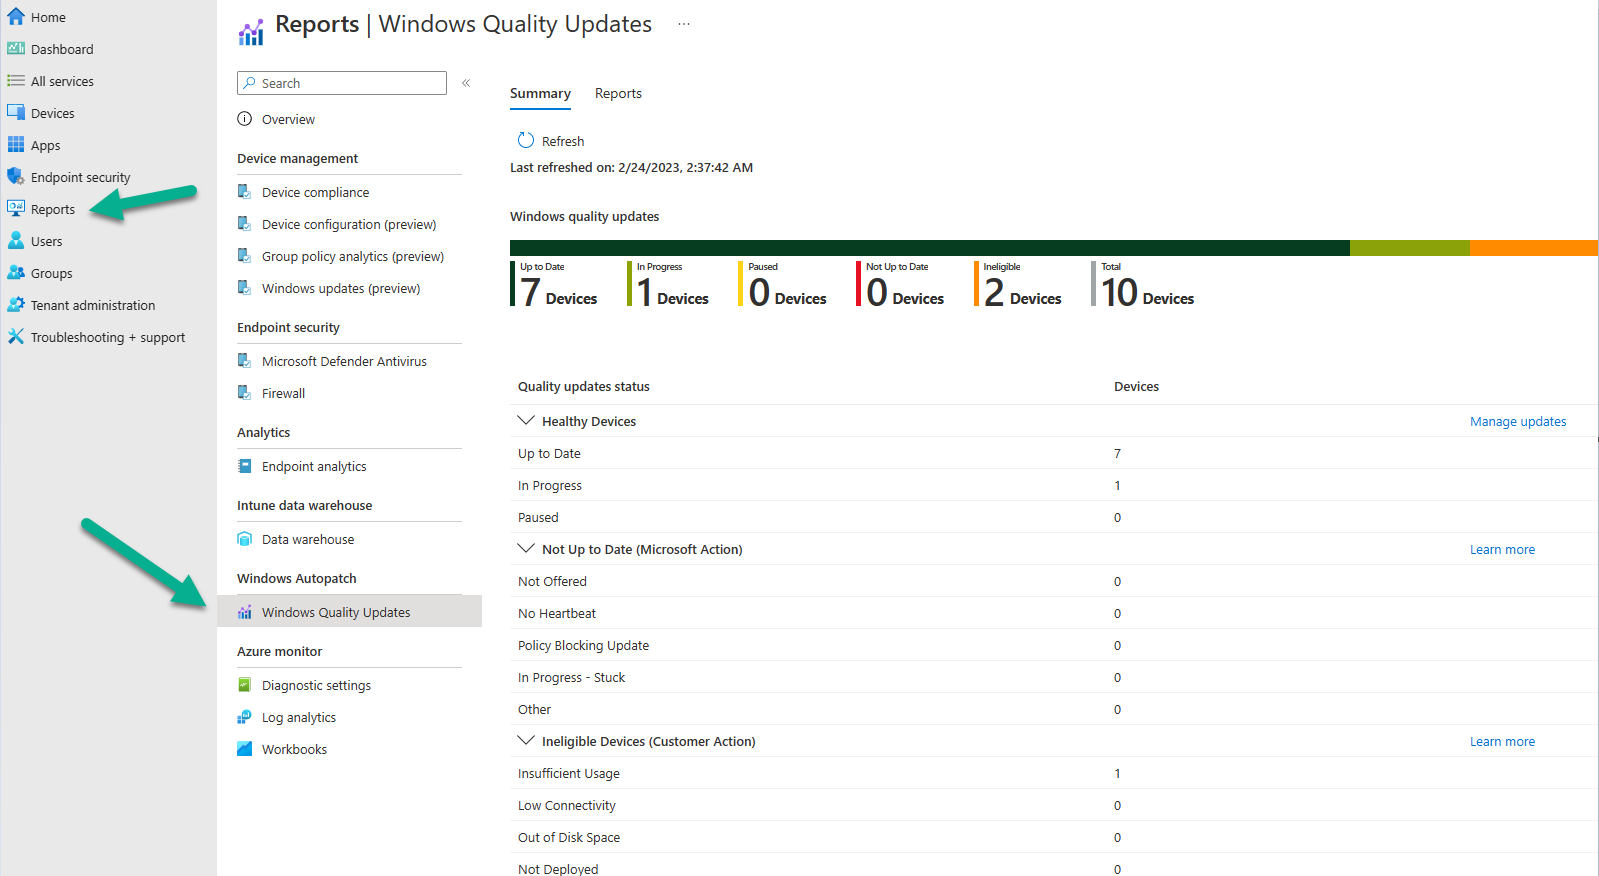
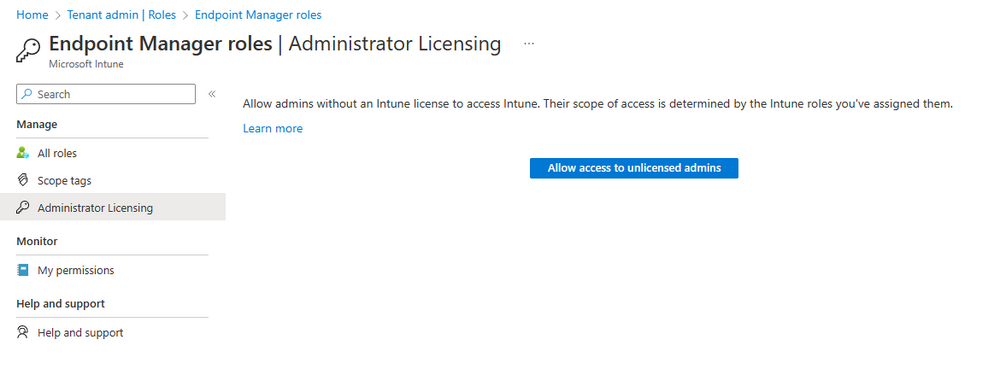
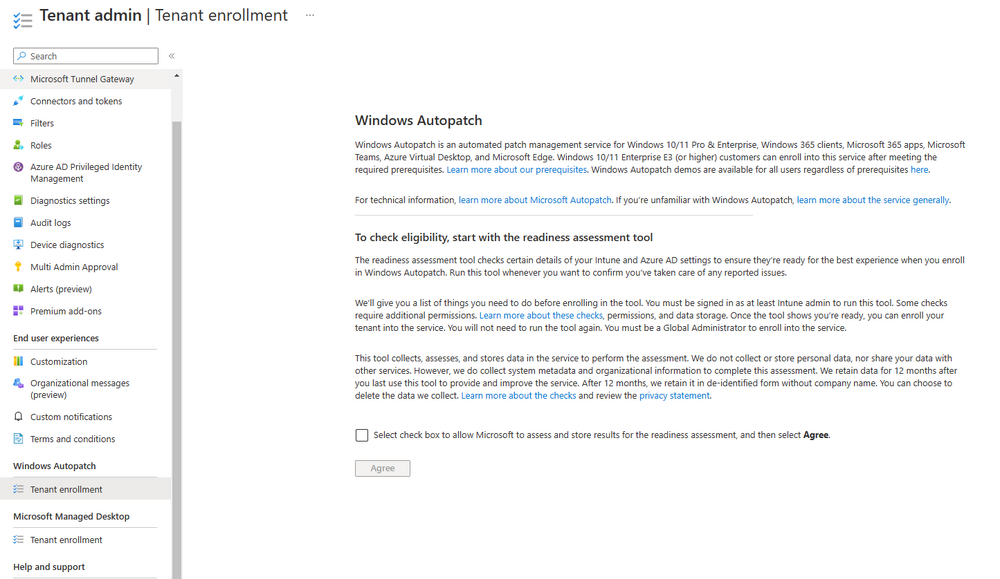
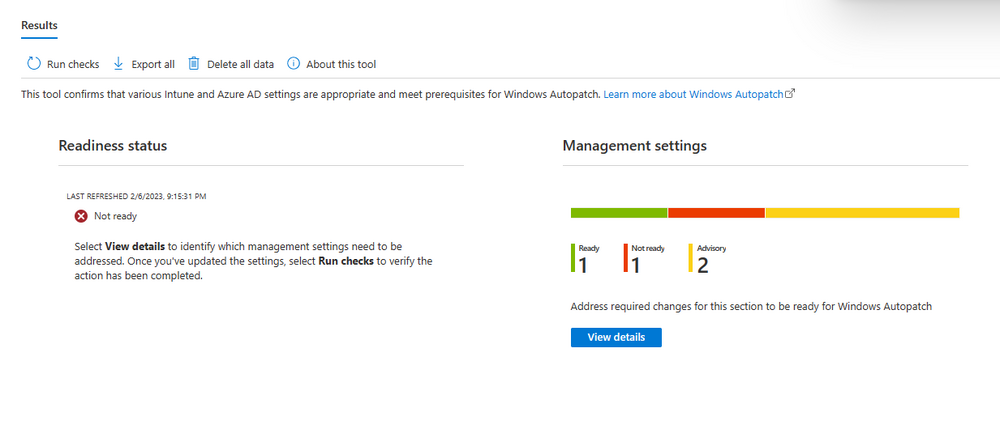
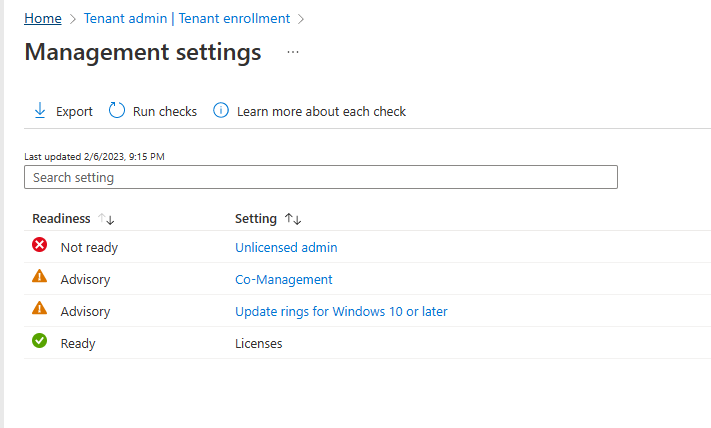
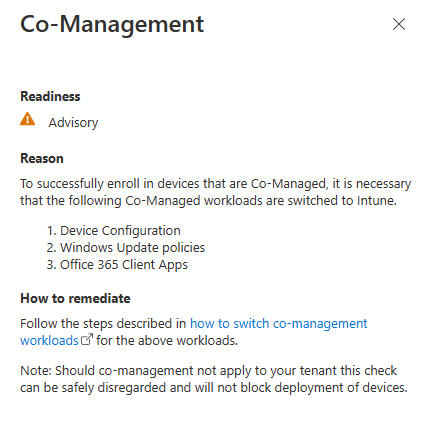
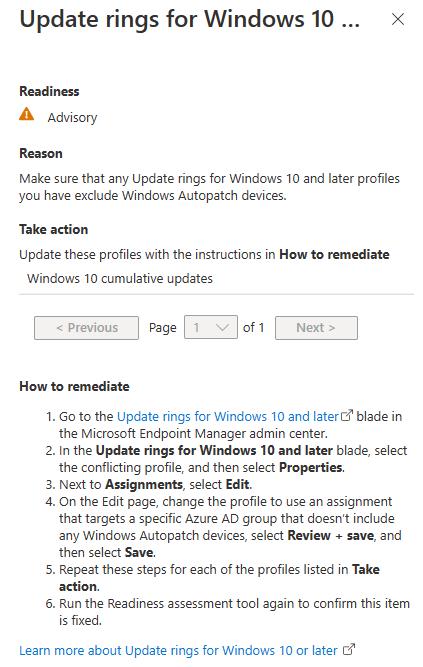
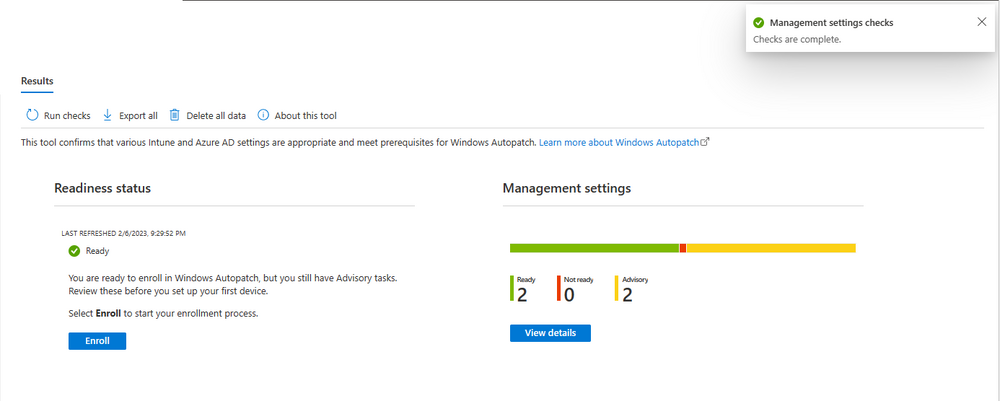
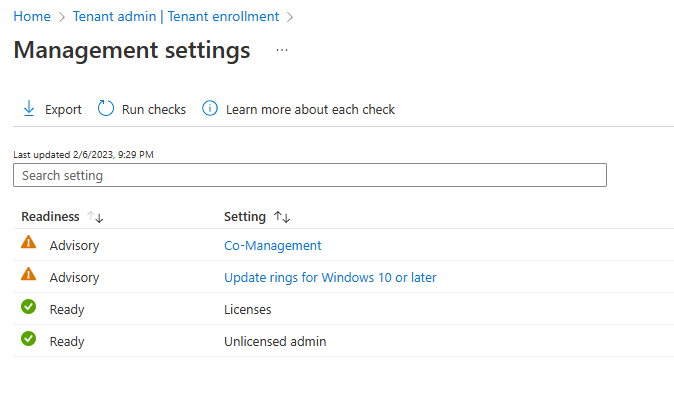
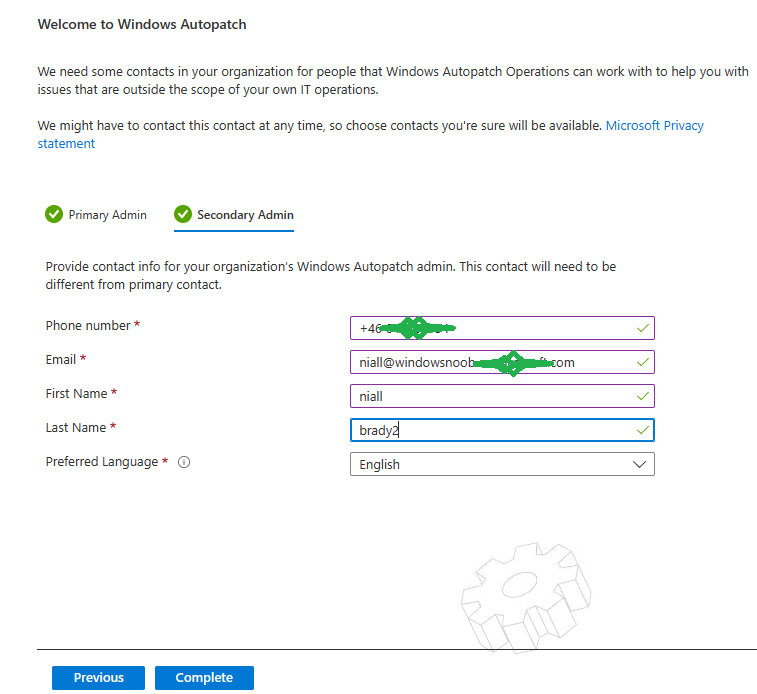
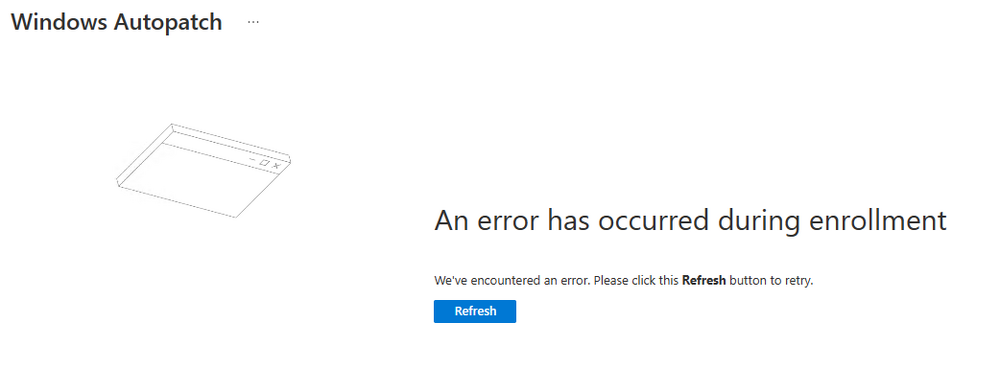
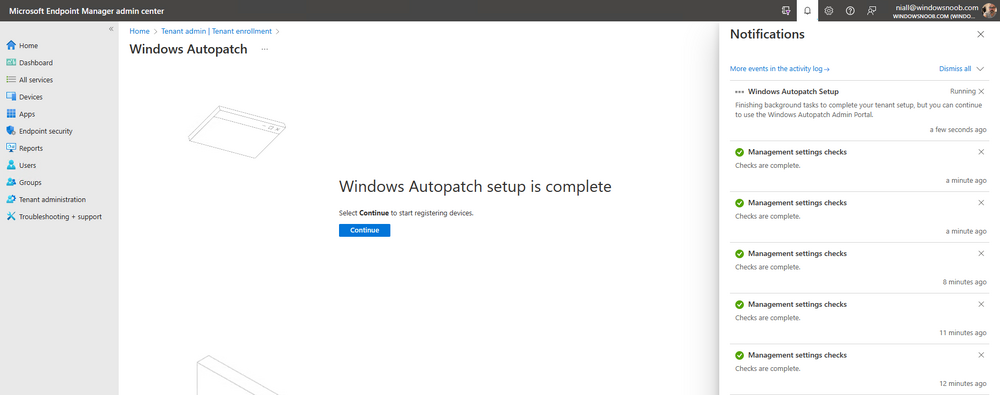
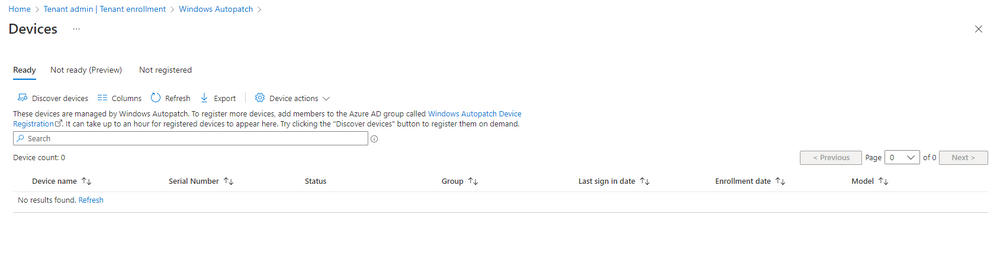
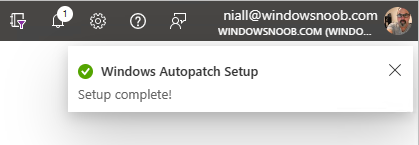
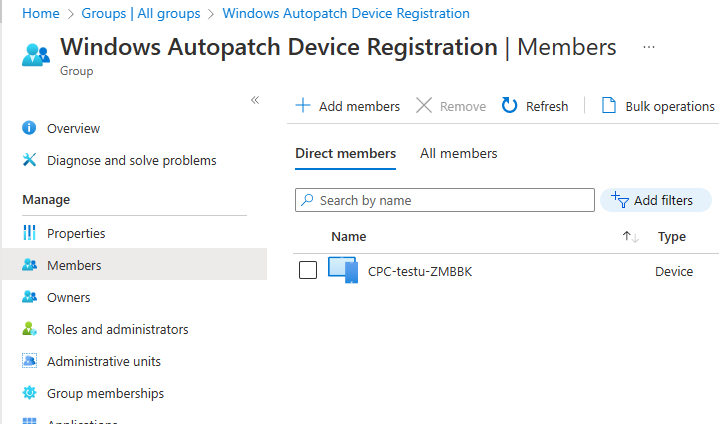
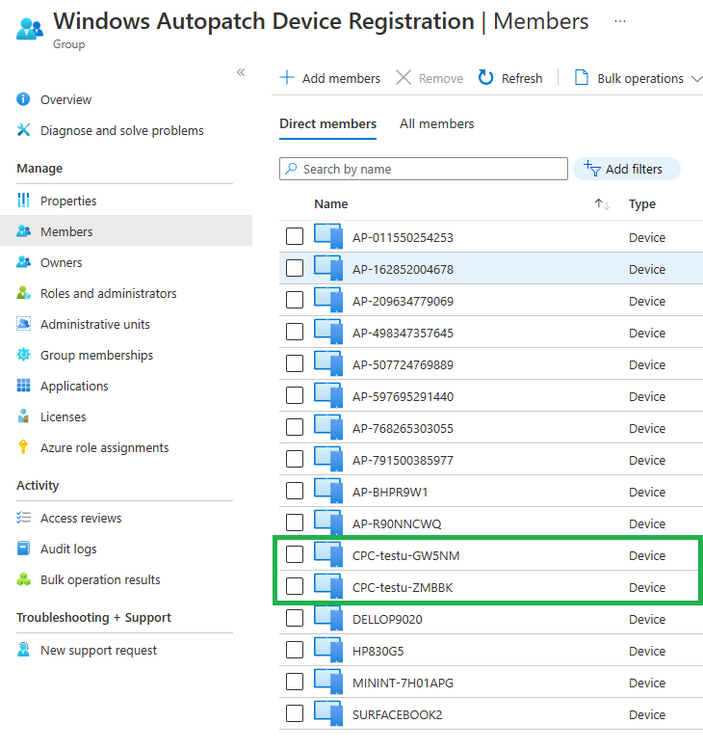
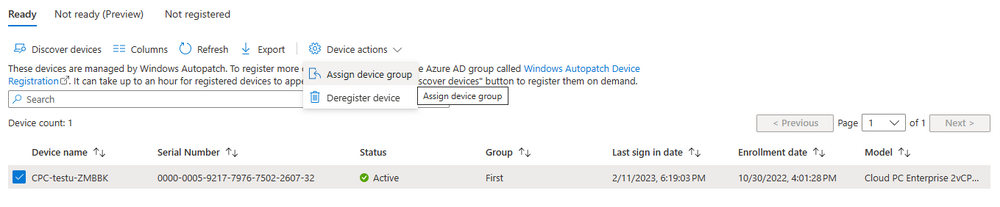
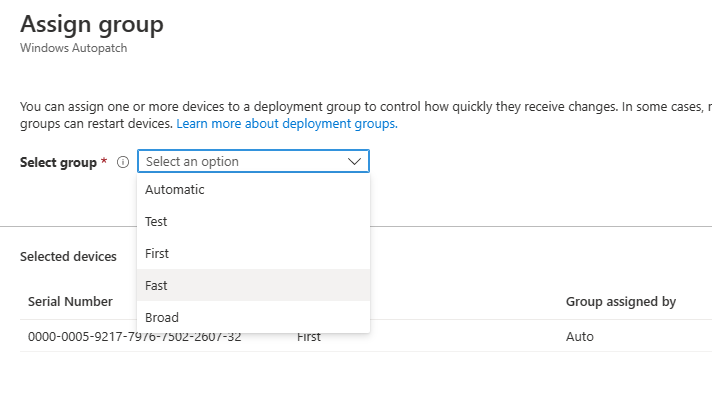
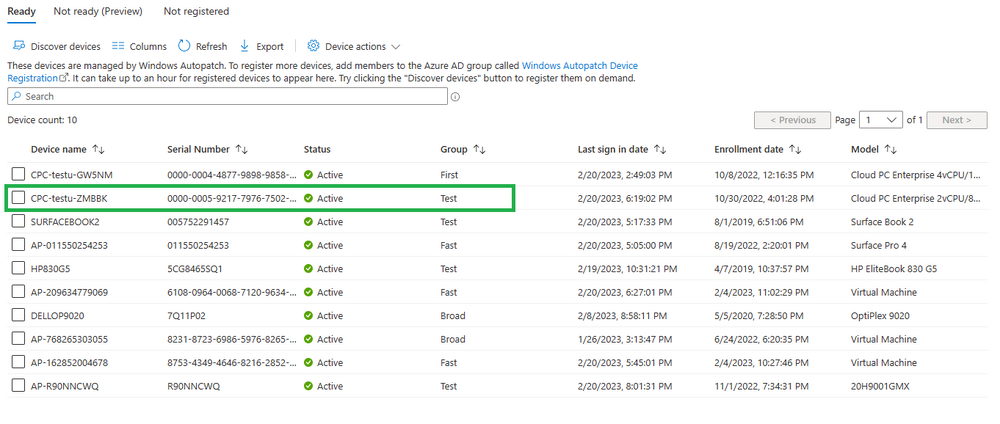
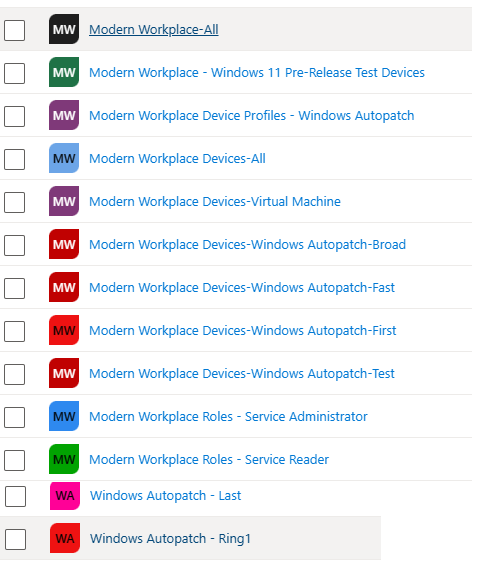
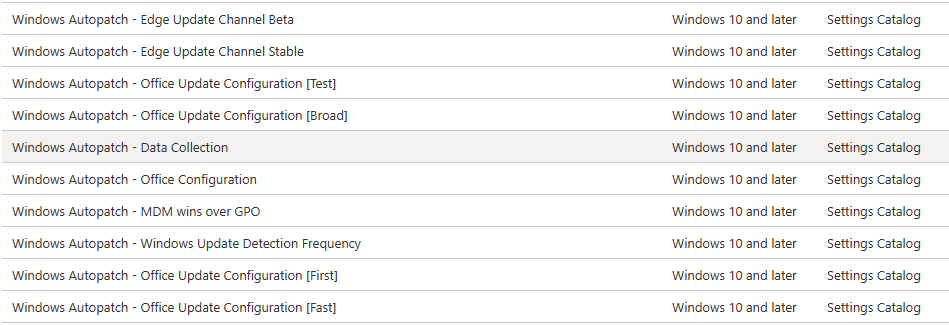
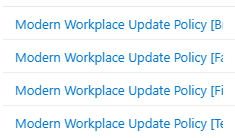
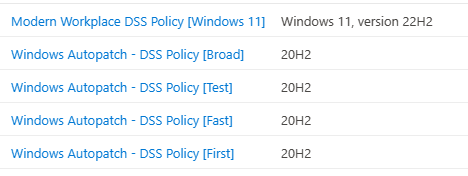
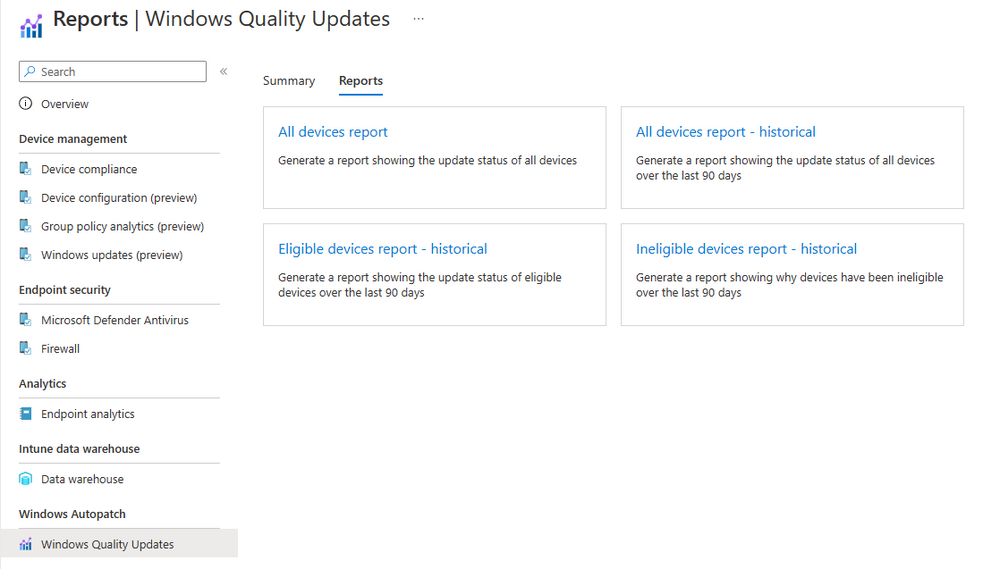
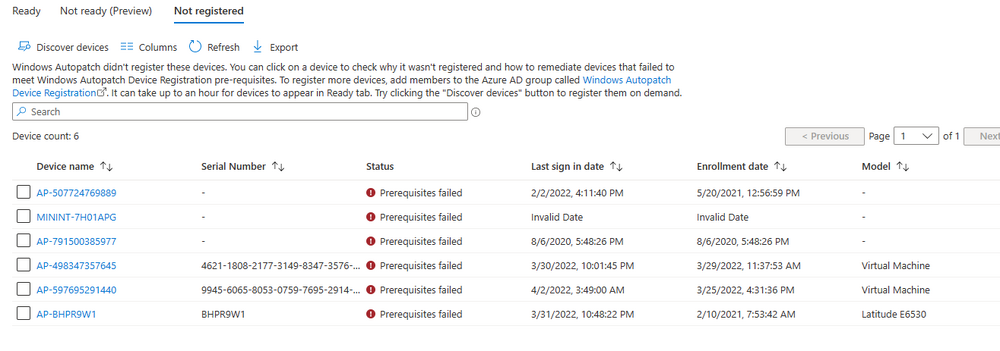
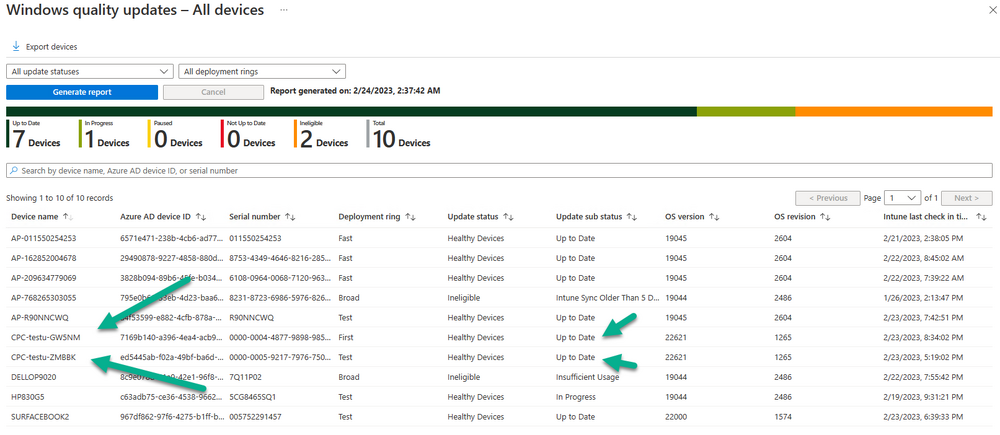
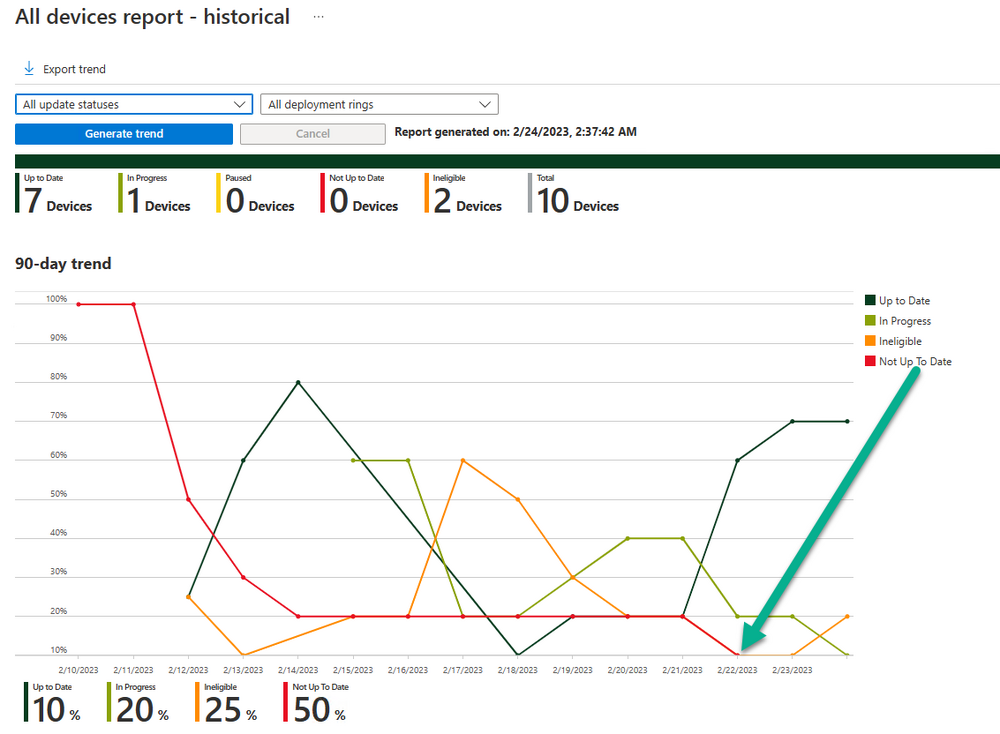
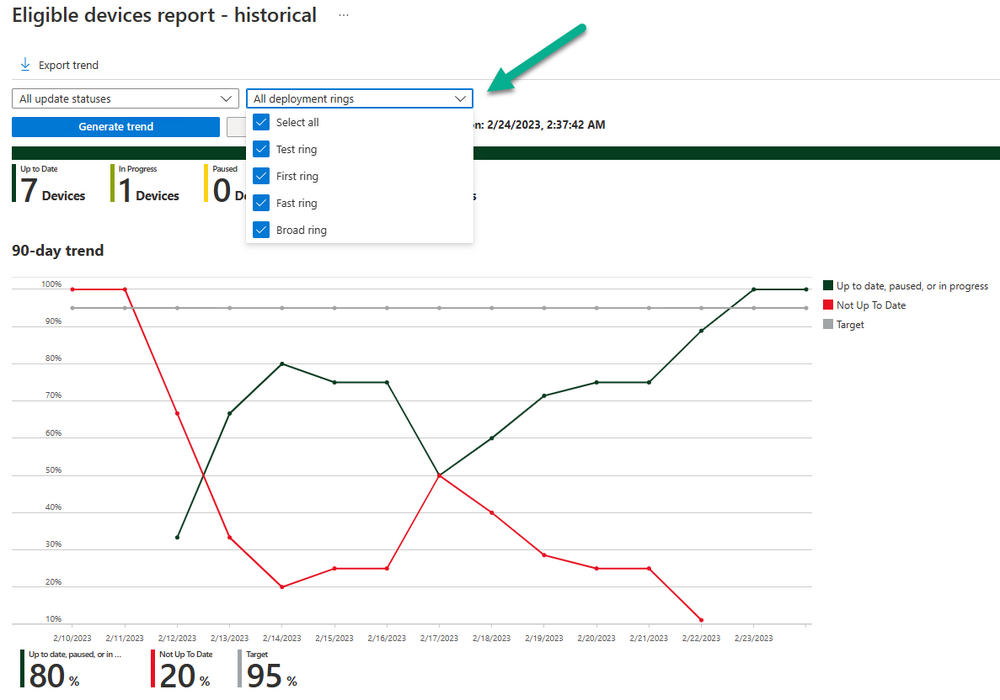
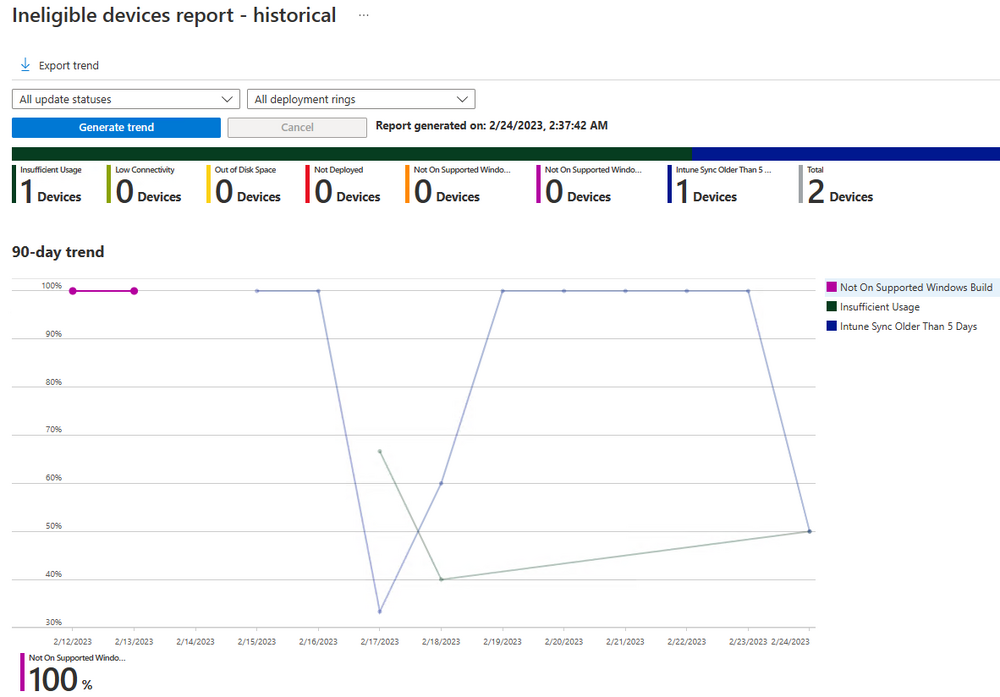
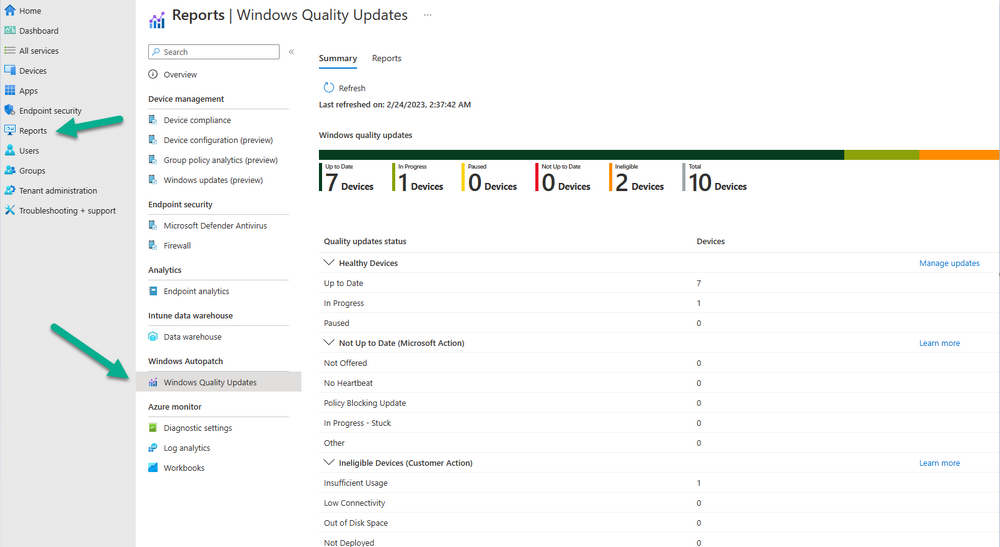
Introduction This is Part 7 in a new series of guides about getting started with Windows 365. This series of guides will help you to learn all about Windows 365 in a clear and insightful way. This series is co-written by Niall & Paul, both of whom are Enterprise Mobility MVP’s with broad experience in the area of modern management. At the time of writing, Paul is a 6 times Enterprise Mobility MVP based in the UK and Niall is a 12 times Enterprise Mobility MVP based in Sweden. In this series we aim to cover everything we learn about Windows 365 and share it with you to help you to deploy it safely and securely within your own organization. In Part 1 we introduced you to Windows 365, selecting the right edition with the level of management that you need, choosing the plan that suits your users needs at a cost you can afford, or modifying the configuration to make it more suited to your individual needs, purchasing licenses and saving money for your organization via the Windows Hybrid Benefit. In Part 2 you learned how to provision an Azure Ad joined Cloud PC and take a look at the different network options available when provisioning an Azure Ad joined Cloud PC. In Part 3 you learned about the steps needed to successfully provision a Hybrid Azure Ad Joined Cloud PC. In Part 4 you saw the many different ways you can connect to your Cloud PC from many device be it Android, Mac, Windows, Linux or iPhone and you learned that not all connection options have the same abilities. In Part 5 we covered the management capabilities of your Cloud PCs and explained the different options available depending on which version (Business versus Enterprise) that you purchase. In Part 6 we looked at the built in configurable backup technology in Windows 365 which is known as Point-in-time restore, which gives the admin (or user) the ability to restore Cloud PC's to an earlier time before a problem such as a Ransomware incident occurred. Below you can find all parts in this series: Getting started with Windows 365 - Part 1. Introduction Getting started with Windows 365 - Part 2. Provisioning an Azure Ad Joined Cloud PC Getting started with Windows 365 - Part 3. Provisioning a Hybrid Azure Ad Joined Cloud PC Getting started with Windows 365 - Part 4. Connecting to your Cloud PC Getting started with Windows 365 - Part 5. Managing your Cloud PC Getting started with Windows 365 - Part 6. Point in time restore Getting started with Windows 365 - Part 7. Patching your Cloud PCs with Windows Autopatch <- you are here Getting started with Windows 365 - Part 8. Windows 365 boot Getting started with Windows 365 - Part 9. Windows 365 switch Getting started with Windows 365 - Part 10. Windows 365 offline In this part we'll cover the following: Introduction to Windows Autopatch Prerequisites Allow access to admins without licenses Enroll into Windows Autopatch Readiness assessment tool Enroll Device registration Moving devices between deployment rings Reports User Experience Create Provisioning policy Recommended reading Summary Introduction to Windows Autopatch Windows Autopatch was created to ease the pain of managing software updates by automating those tasks, improve security and thereby freeing up IT admins time. After registering devices with Windows Autopatch it can deal with multiple areas of update management including: Windows quality updates Windows feature updates Microsoft 365 apps for Enterprise Microsoft Edge Microsoft Teams Windows Autopatch aims to reach the following SLO (Service Level Objective) at the time of writing. Windows quality updates - 95% of eligible devices on the latest quality update within 21 days Windows feature updates - 99% of eligible devices on a supported version Microsoft 365 apps for Enterprise - 90% of eligible devices on a supported version of the Monthly Enterprise Channel (MEC) Prerequisites Windows Autopatch like all Microsoft services has a list of prerequisites and you can review them here and it covers 4 main areas. Licensing Connectivity Azure Active Directory Device Management In a nutshell you must be licensed to use Windows Autopatch, Windows 10/11 Enterprise E3 (or higher) to be assigned to your users. Additionally, Azure Active Directory Premium and Microsoft Intune licenses are required. You must also allow connectivity to all endpoints specified here including mmdcustomer.microsoft.com, mmdls.microsoft.com, logcollection.mmd.microsoft.com and support.mmd.microsoft.com. Your users must be created in Azure Active Directory or synced via the latest version of Azure AD Connect. Last but not least, your devices must already be enrolled into Intune management before you try to register them with the Windows Autopatch service. They can use co-management but, if so, make sure that the following workloads are pointing to Pilot Intune or Intune. Windows Update policies workload to Pilot Intune or Intune. Device configuration workload to Pilot Intune or Intune. Office Click-to-Run apps workload to Pilot Intune or Intune. Allow access to admins without licenses When turning on Windows Autopatch for your Tenant, one of the tests that will be done is admin licensing. You can make things smoother by configuring this setting in advance. You can give administrators access to Microsoft Endpoint Manager without them requiring an Intune license, see Unlicensed admins in Microsoft Intune | Microsoft Learn To flip the setting go to your Tenant admin, click on Roles, and select Endpoint Manager roles, click on Administrator Licensing and you'll see this. read the warning before clicking Yes (or No if you are unsure.) Once done, there will simply be a blank space to greet you in the Administrator Licensing space. Enroll into Windows Autopatch Readiness assessment tool At this point you are hopefully ready to enroll your tenant into Windows Autopatch, so let's do it. In the Tenant Admin node, click on Tenant enrollment and select Windows Autopatch. place a tick in the checkbox and click Agree. this will launch the readiness assessment tool. clicking on View details gives you an overview of what is OK or NOT OK in your tenant in relation to Windows Autopatch. Any errors marked in red must be fixed (notice the unlicensed admin error !) You can click on a linked entry to get details of the problem, for example here is the co-management advisory. and here's the advisory for Update rings for Windows 10, which is odd as you haven't created any for Windows Autopatch yet so how can you exclude them in advance ? After fixing the minor problems noted above, you can click on Run checks again and this time it should report that it is Ready (to enroll). If you are still curious about why there are still 2 advisories you can also click on View details again to review that. Enroll Now that the readiness assessment is happy, go ahead and click on Enroll. You'll have to agree to allow admin access for Microsoft requiring 2 admin users email and phone numbers. supply the details of your Primary admin and the Secondary admin after clicking complete you might see an error, don't panic, we did in both our tenants. but on the second attempt all was good ! Notice all the activity going crazy in the notification area. After some time you should be notified that Windows Autopatch Setup is complete. Changes to your tenant When you enroll into Windows Autopatch the service creates many new objects including Azure AD Groups, policies, update rings and reports, here are a few snippets of some of those many changes. New Azure AD Groups New configuration profiles New PowerShell script Modern Workplace - Autopatch Client Setup v1.1 New Update Rings New Feature Updates New reports Device registration Clicking Continue (in the screenshot above) brings you to the Windows Autopatch devices view which will most likely be empty after enrollment. It's separated into three tabs Ready Not ready (Preview) Not registered After reading the text and clicking the included link it was clear that there was a new Azure AD Group created by the Windows Autopatch service called Windows Autopatch Device Registration. We went ahead and added a Windows 365 Cloud PC to the Windows Autopatch Device Registration group. Next, in the Windows Autopatch devices node, click on Discover Devices to get the service to look for new members in that group. After some time it showed up. We then looked at the Group Membership of that device directly after we registered it with Windows Autopatch. Interesting how it detects that the Cloud PC is a Virtual Machine. You'll notice that the Windows Autopatch service has automatically added this Cloud PC to a group called First, this is one of 4 update ring groups. Modern Workplace Devices-Windows Autopatch-Test Deployment ring for testing update deployments prior to production rollout. Modern Workplace Devices-Windows Autopatch-First First production deployment ring for early adopters. Modern Workplace Devices-Windows Autopatch-Fast Fast deployment ring for quick rollout and adoption. Modern Workplace Devices-Windows Autopatch-Broad Final deployment ring for broad rollout into the organization. Intrigued we added another Cloud PC along with several unpatched, out of date devices in the tenant to see what would happen. within some time the Windows Autopatch service had assigned these devices to groups automatically with both of the Windows 365 Cloud PC's added to the First update ring. In addition to these Ready devices some were Not registered with the service due to not meeting prerequisites. Moving device between deployment rings To change the update ring a device is in you must select one of more devices and use the Device actions dropdown to move to another update ring group, do not simply move the device from one Azure ad group to another (more on those groups later). This brings up a dropdown list of the available rings (update ring groups) We selected the Test ring for this Cloud PC after the change Note that you can only move devices to other deployment rings when they are in an Active state in the Status tab. Reports Windows Autopatch includes new reports to assist with monitoring the effectiveness of automated software update management. Let's take a look. In the Reports node of Intune, select Windows Quality Updates in the Windows Autopatch section. You'll be presented with a summary of Windows Autopatch managed devices in their various states, listed below: Up to Date In Progress Paused Not Up to Date Ineligible Total clicking on the Reports tab (beside summary) will show the actual reports. In the first report, All devices report, you can see our Cloud PCs are currently up to date ! Great. Truth be told however, they had an issue before Windows Autopatch could do it's thing, and that was they were getting a GPO applied (as they are Hybrid Azure AD joined) which was blocking automatic updates. Once that GPO was identified and delinked, they updated very quickly indeed. Below you can see what they looked like before the GPO was identified. Notice how they are both showing with an Update Status of Not Up to Date, and the Update sub status looks confused (Other and No Heartbeat). The offending GPO was setting the following registry key which was blocking Windows Autopatch (highlighted below in bold) HKLM\software\policies\microsoft\windows\windowsupdate WUServer WUStatusServer DoNotConnectToWindowsUpdateInternetLocations DisableWindowsUpdateAccess AU\NoAutoUpdate AU\UseWUServer the next report is the All devices Report - historical which gives you a historical view of how up to date (or not) your devices are over a period of time (90-day trend), notice how currently 7 out of 10 devices are up to date and none are not up to date. You can click on any of the headings in the right pane to get time points and clarity of that section. You can also choose to Export trend to get a CSV file containing this data, unfortunately it doesn't go any deeper than what you see here so you won't for example see device names/serial numbers or anything useful like that. Hopefully we can get that data in a later release. The next report is the Eligible devices report - historical where you can review the effectiveness of any of the Windows Autopatch update rings over a period of time. And finally we have the ineligible devices report historical which shows data about your ineligible devices and whether they are on an unsupported build or not. User Experience the user experience is exactly what you'd expect from WUFB managed clients, you get the normal Windows notifications and they are goverened by the Windows Autopatch update ring policies, which you shouldn't change as they will be overwritten by the Windows Autopatch service. Below is one such notification received by our Cloud PCs over the last few weeks. Create Provisioning policy Lastly, we'd like to mention the Windows Autopatch setting in the Create Provisioning Policy section. It's there, but it's not clear exactly what it does (for example, would it kick off a Windows Autopatch readiness assessment tool if you hadn't yet enrolled into Windows Autopatch. This remains unanswered. We'll update it after getting clarification from Microsoft. Recommended reading What is Windows Autopatch - https://learn.microsoft.com/en-us/windows/deployment/windows-autopatch/overview/windows-autopatch-overview Windows Autopatch fastrack support - https://techcommunity.microsoft.com/t5/windows-it-pro-blog/what-s-new-in-windows-autopatch-january-2023-fasttrack-support/ Windows Autopatch prerequisites - Prerequisites - Windows Deployment | Microsoft Learn Windows Autopatch device status - https://learn.microsoft.com/en-us/windows/deployment/windows-autopatch/operate/windows-autopatch-windows-quality-update-reports-overview Get current and stay current with Windows Autopatch - Blog | Get current and stay current with Windows Autopatch | Tech Community (microsoft.com) Whats new in Windows Autopatch - Fastrack support - https://techcommunity.microsoft.com/t5/windows-it-pro-blog/what-s-new-in-windows-autopatch-january-2023-fasttrack-support/ba-p/3713988?WT.mc_id=EM-MVP-5003580 Windows Autopatch Quality Update reports overview - https://learn.microsoft.com/en-us/windows/deployment/windows-autopatch/operate/windows-autopatch-windows-quality-update-reports-overview Windows Autopatch deployment guide (new) - https://learn.microsoft.com/en-us/windows/deployment/windows-autopatch/overview/windows-autopatch-deployment-guide Summary The Windows Autopatch service is like your very own IT Admin for Software Update Management, much like what you get with Automatic Deployment Rules within Configuration Manager or Windows Intune's quality and feature update rings. The difference here is that when you enable Windows Autopatch, Microsoft define and manage these administrative tasks so you don't have to. Keep in mind that it is not recommended to change any settings in the preconfigured update rings or policies or scripts provided by the service as they could be overwritten by the service when it gets updated by Microsoft. Also, you should not manually populate the Azure AD groups created by the service except the one used for device registration. The fact that you can't really deviate from the settings, policies and parts that make up Windows Autopatch can be a downside for some customers. Hopefully Microsoft reads this and adds this ability going forward. Overall though, a thumbs up from us, well done to all involved with creating Windows Autopatch, it makes the management of updates, security patches and more to your Cloud PC's a walk in the park.


-
have you looked at all services running on that server to see if any are using one or more of the accounts that are getting locked out ?
-
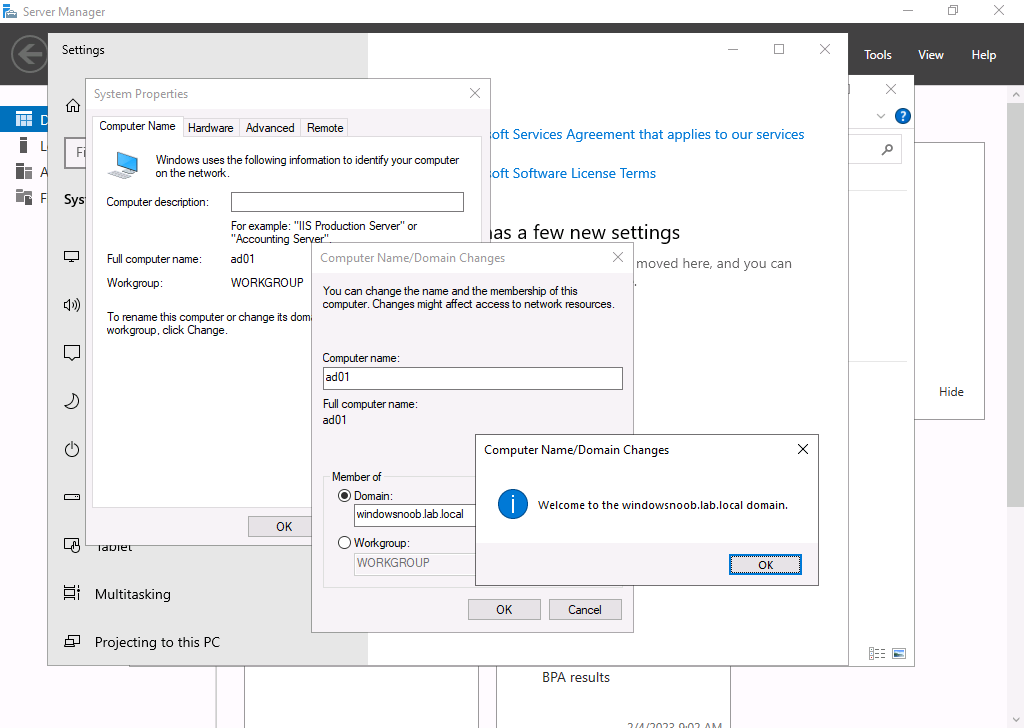
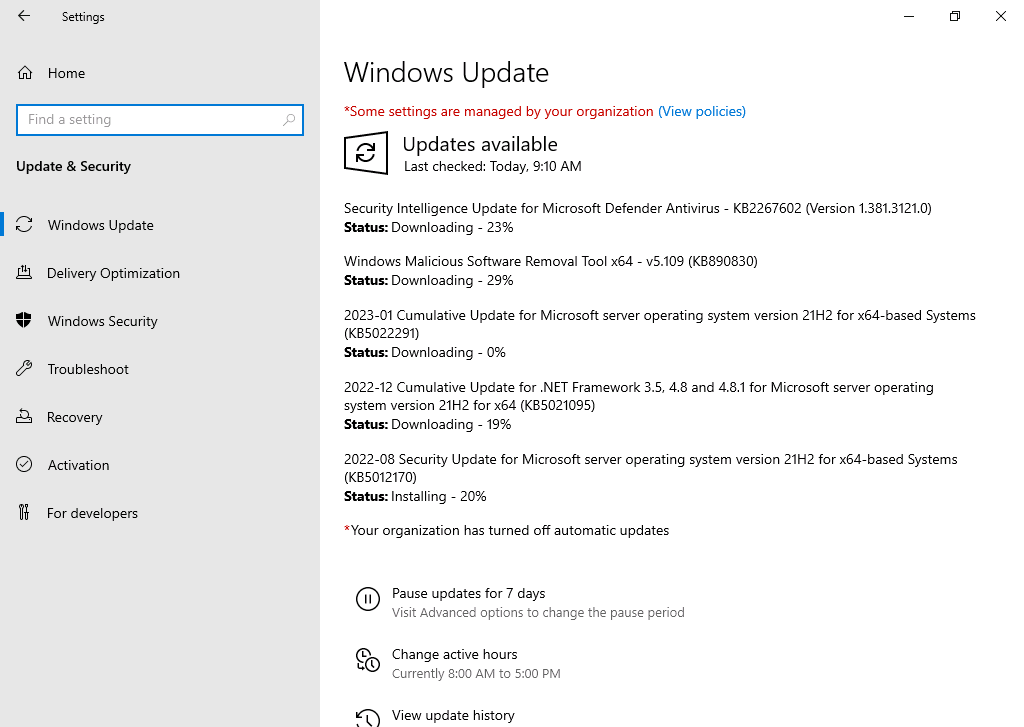
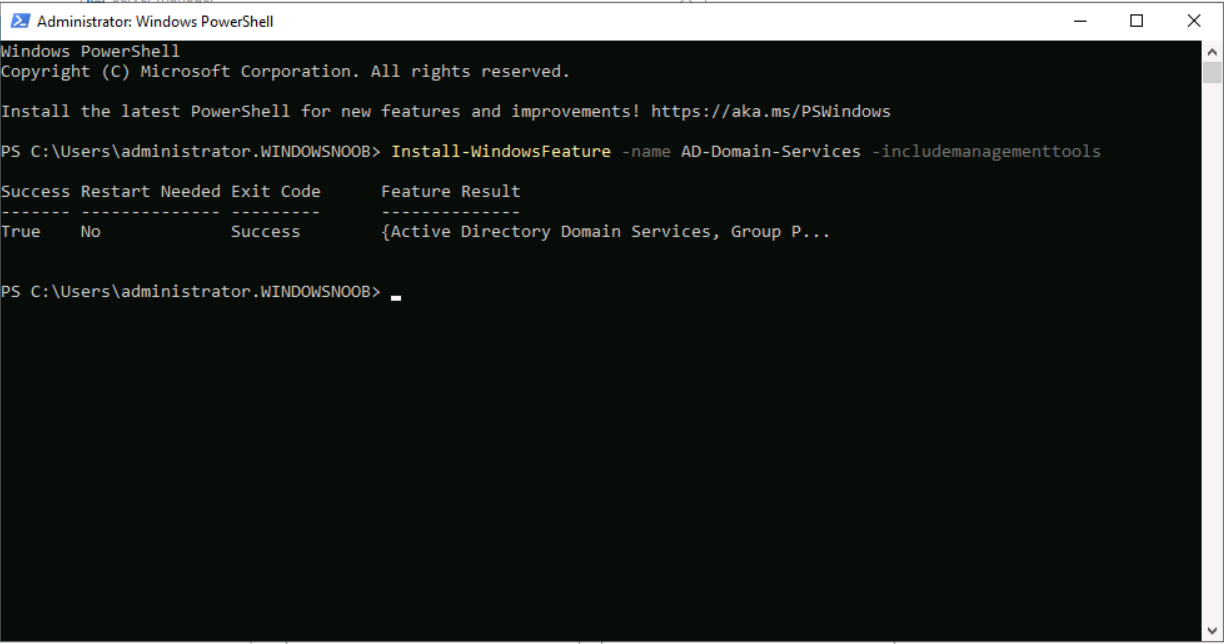
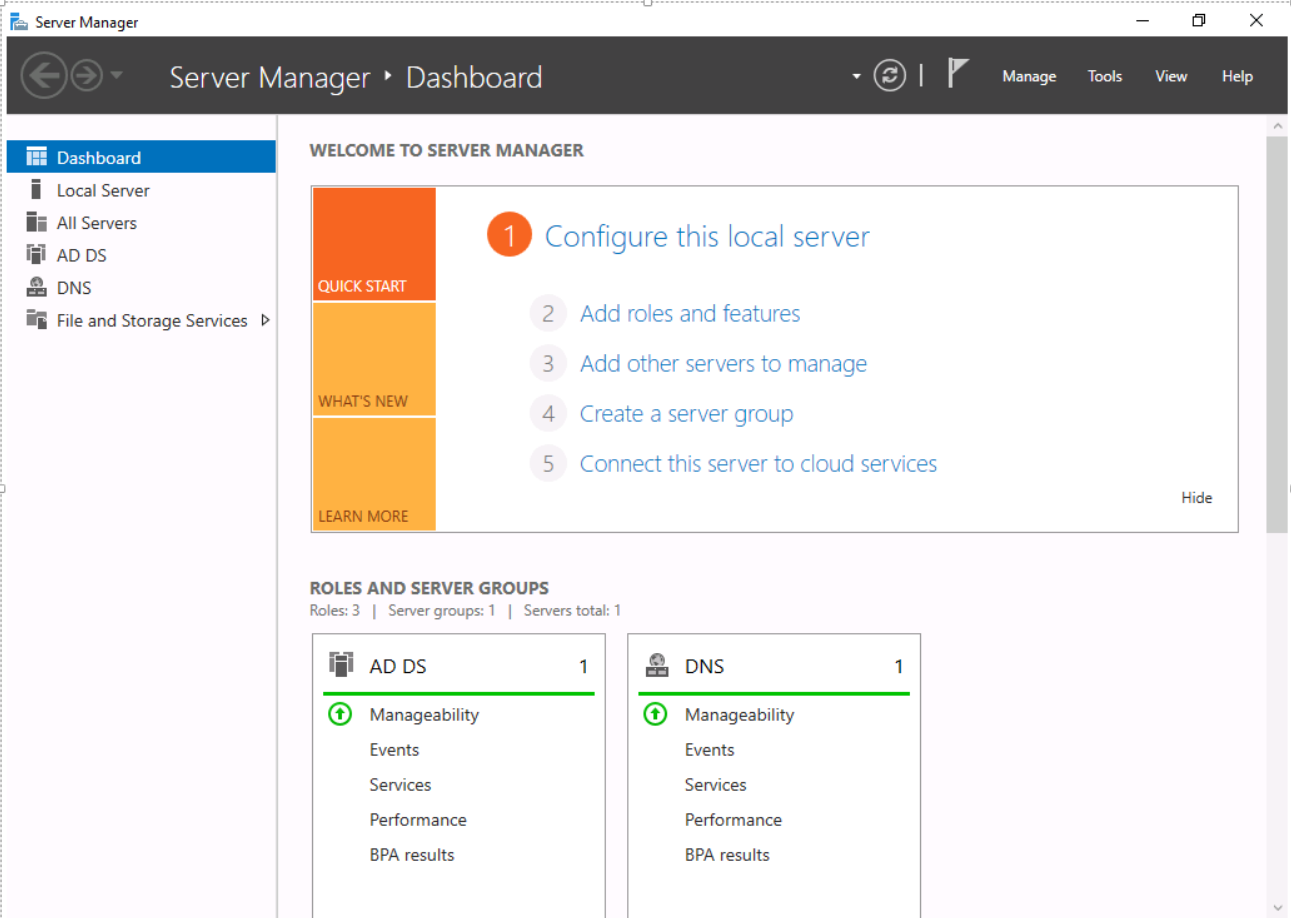
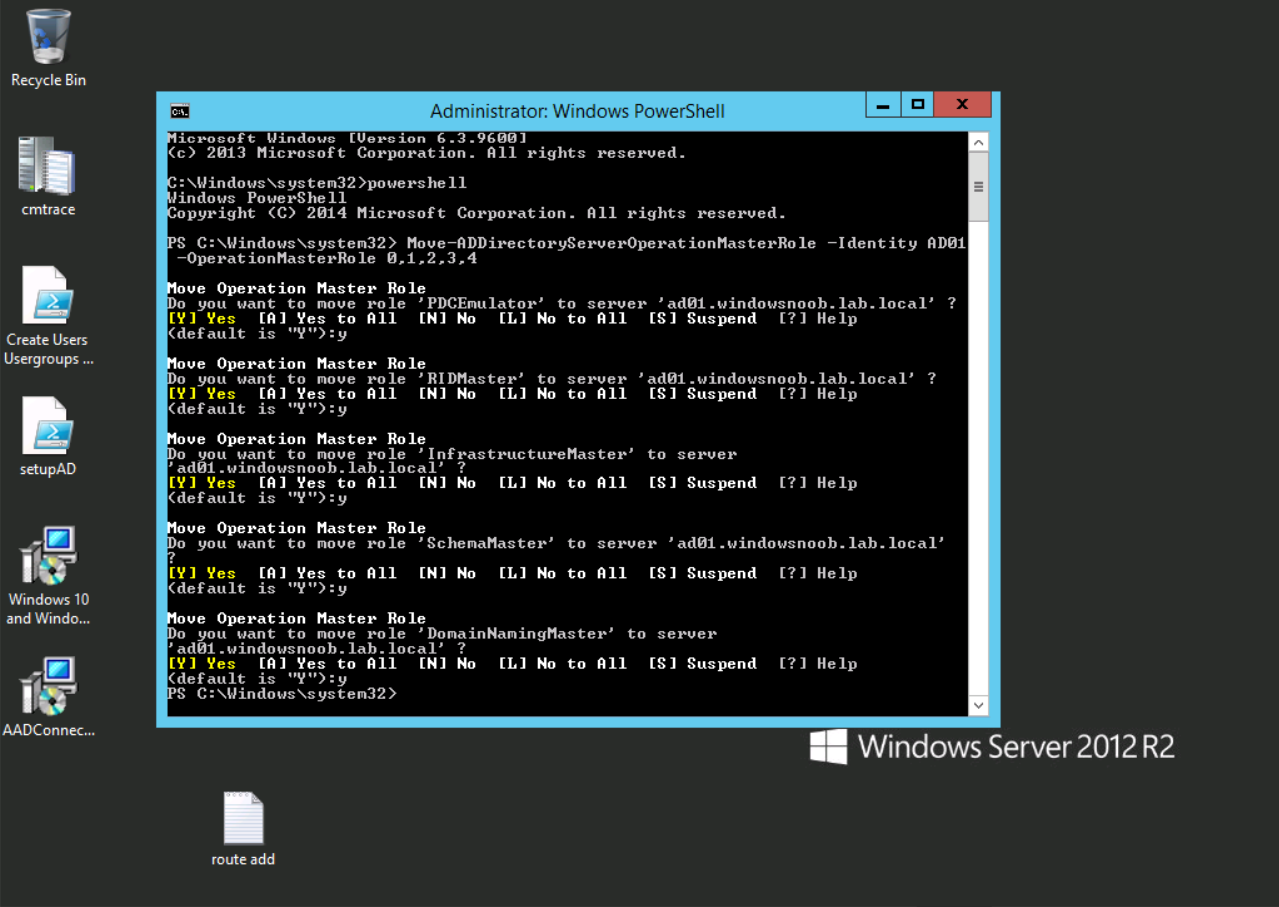
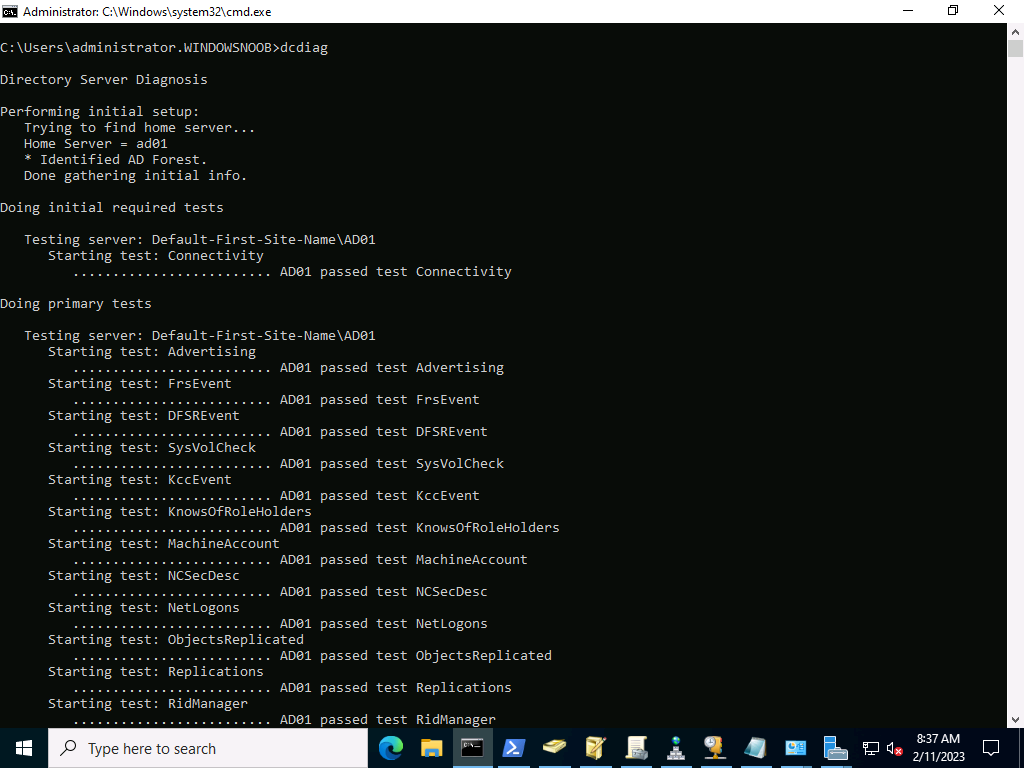
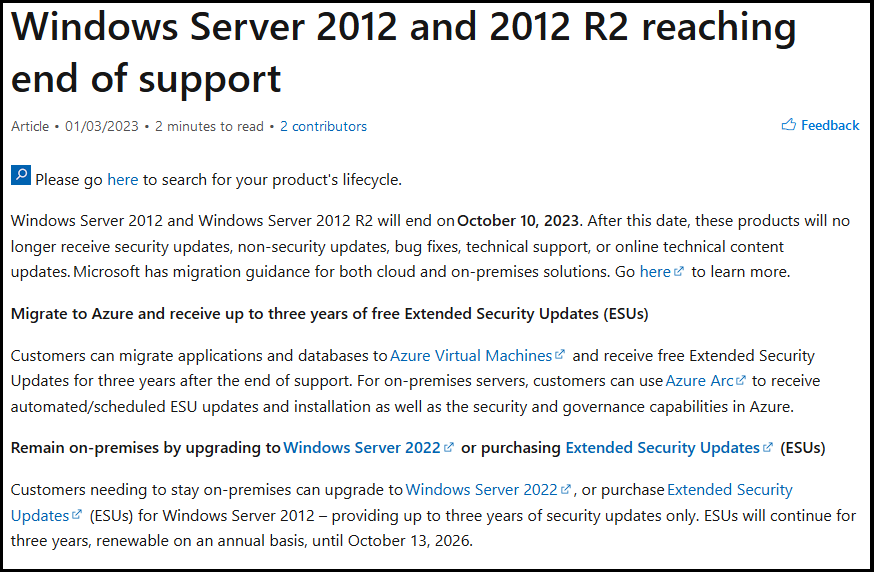
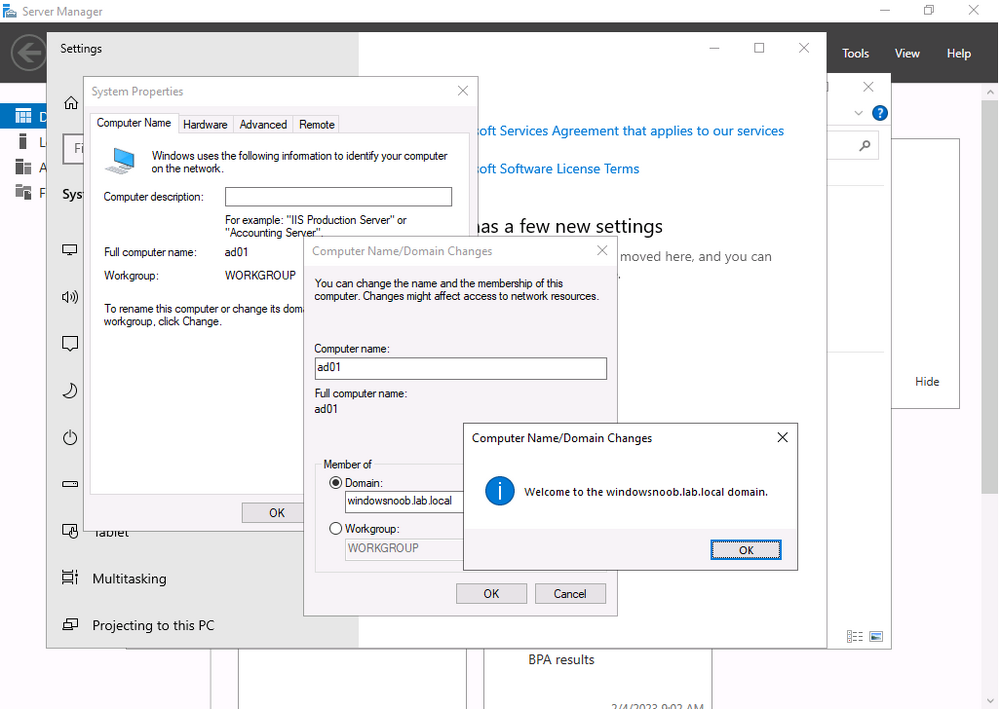
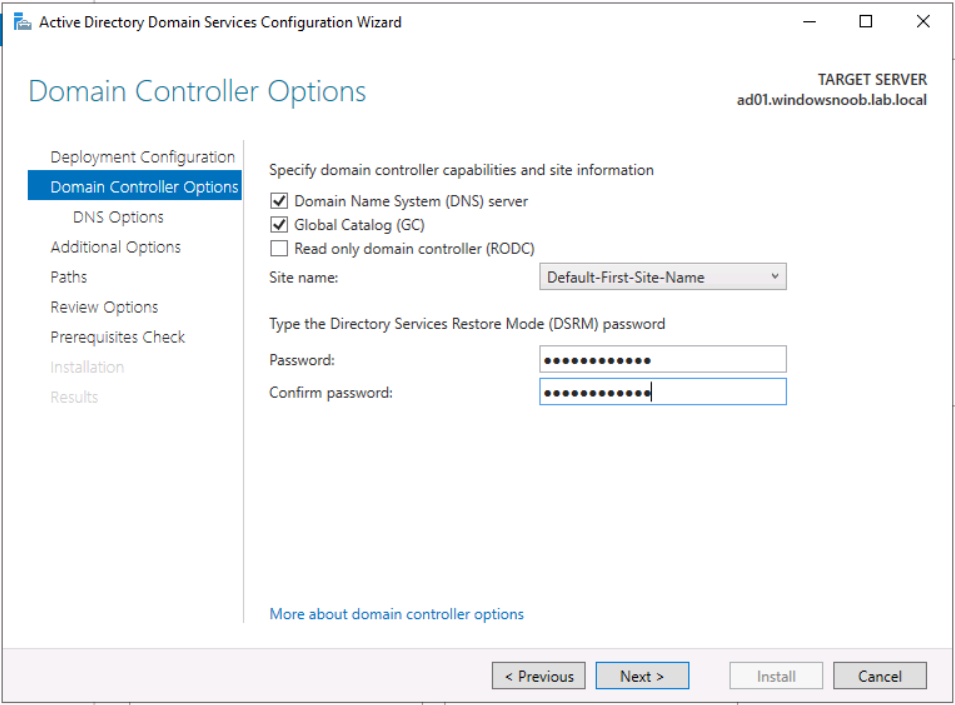
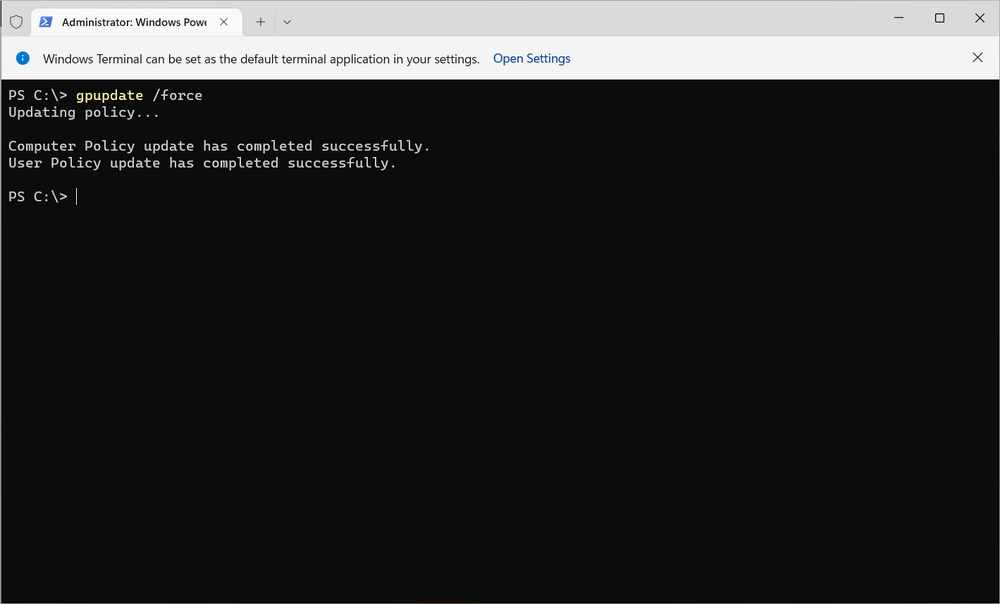
My Configuration Manager Technical Preview lab has been going strong since 2015 and when I installed it Windows Server 2012R2 was the logical choice for the domain controller server in that lab. Fast forward to 2023 and the imminent news that Windows Server 2012 R2 will reach end of support in October 2023. This blog post is a summary of what I did to upgrade my DC to a supported version, read on, and comment ! In this blog post I'll cover the following: Introduction Prerequisites Install a new Windows Server, rename it, join the domain Update the server Install Active Directory Domain Services Promote to a domain controller Move FMSO to the new domain controller Verify FMSO roles Demote the old domain controller Verification Recommended reading Introduction I still use my ConfigMgr labs and update the Technical Preview releases every month since it was first released, so I wanted to keep this on-premises lab going. I decided that it was time to upgrade my Lab's aging domain controller to a newer, more secure operating system. In-place upgrades from Windows Server 2012 R2 to Windows Server 2022 are possible but not recommended for Domain Controllers. Take note of the recommended way to upgrade your domain controller from Microsoft below. Based on that recommendation, that meant deploying a new one side-by-side and migrating things over to the new one before decommissioning the old. As this is an on-premises lab my goal was to upgrade to the latest and greatest Windows Server 2022. Prerequisites Before starting make sure to review the list of prerequisites needed. Microsoft has detailed them here. They are also listed here. You should follow these general steps before you promote a server to a DC that runs a newer version of Windows Server: Verify the target server meets the system requirements. Verify application compatibility. Review recommendations for moving to a newer version of Windows Server. Verify security settings. Check connectivity to the target server from the computer where you plan to run the installation. Check for availability of the necessary Flexible Single Master Operation (FSMO) roles in Active Directory. Note: If you are doing this in a LAB and I'd suggest you take a backup snapshot of your old domain controller before continuing. Install a new Windows Server, rename it, join the domain You can install your new server whichever way that suits you, it's quick. Once done, rename the server to it's new name, and join the domain where you other domain controller(s) reside. Update the server After you've installed the server there will most likely be several updates waiting to be installed, so go ahead and install them, repeat until complete. Install Active Directory Domain Services Next you need to install Active Directory Domain Services (ADDS) on the new server and that can be done easily with PowerShell. In an administrative Windows PowerShell prompt enter the following: Install-WindowsFeature -Name AD-Domain-Services -IncludeManagementTools Promote to a domain controller Once ADDS is complete you'll promote the new server to a domain controller. To do that open Server Manager and you'll see a yellow exclamation mark highlighting Post-deployment Configuration required for Active Directory Domain Services on the new server. Click on Promote this server to a domain controller and this will launch the Active Directory Domain Services Configuration Wizard. From the list of available deployment operation options select Add a domain controller to an existing domain. fill in the Directory Services Restore Mode (DSRM) password If you are using .local FQDN's in your lab like me click OK to the warning. On the Specify Install From Media (IFM) Options screen select the option that suits your scenario best and decide where you want the NTDS, logs file folder and SYSVOL folder to be located (or accept the defaults) take note of the Preparation Options before you see the Review Options screen, at this point you can also click on View Script to get a PowerShell script of your actions which is useful for automating the installation of more Domain Controllers. Clicking Next will bring you to the Prerequisites Check results. and clicking Install will start the promotion of this server to a domain controller. As long as you are signed in with a domain admin account, adprep will automatically prepare your existing domain. After it's completed and restarted, sign in on the new domain controller and there should be no additional configuration tasks waiting in Server Manager. Move FMSO to the new domain controller After the server was promoted to a domain controller it's time to move the Flexible Single Master Operation (FMSO) from the old domain controller to the new domain controller. To do that open an administrative PowerShell window on the old domain controller server. In the PowerShell window, use the Move-ADDirectoryServerOperationMasterRole cmdlet to move the FSMO roles. You can enter the name of each Operation Master Role or use numbers to specify the roles. For more information, see Move-ADDirectoryServerOperationMasterRole. Verify FMSO roles Now that you've moved the FMSO roles you should verify that they are in place correctly on the new domain controller, to do that on the new domain controller open an Administrative PowerShell window and type the following. Get-ADDomain Verify that the following match the FQDN of your NEW domain controller. InfrastructureMaster PDCEmulator RIDMaster Demote the old domain controller Once everything is verified and complete it's time to demote the old domain controller. Only start this part when you are sure that everything you need on the new domain controller is in place and working, for example, in my case I had to manually add the DHCP server options/scope etc to my new domain controller as it was not carried over. On the old domain controller open an Administrative PowerShell window and issue the following command. Uninstall-ADDSDomainController It will prompt you to enter the password of a local administrator user twice and after answering Y it will demote the server and then restart the server. After the server is demoted and removed, you can raise the forest functional and domain functional levels to the latest version of Windows Server. Once done, power off the old domain controller and optionally rename it so you know it's demoted and offline. Verification On the new domain controller use DCDiag to check everything is OK. On any domain joined device (for example on my hybrid Azure AD joined Windows 365 Cloud PC) issue a GPUpdate /force. This will pull group policy from the nearest domain controller (your new domain controller in a one DC environment. You should also verify main services such as DNS DHCP PKI and any other services that were provided on your old domain controller. Job done ! Recommended reading End of Support for Windows Server 2012 R2 - https://learn.microsoft.com/en-us/lifecycle/announcements/windows-server-2012-r2-end-of-support Hardware requirements - https://learn.microsoft.com/en-us/windows-server/get-started/hardware-requirements Prerequisites before upgrading - https://learn.microsoft.com/en-us/windows-server/identity/ad-ds/deploy/upgrade-domain-controllers#prerequisites Recommendations for upgrading Windows Server domain controllers - https://learn.microsoft.com/en-us/windows-server/identity/ad-ds/deploy/upgrade-domain-controllers Move-Active Directory Server Operations Master Role - https://learn.microsoft.com/en-us/powershell/module/activedirectory/move-addirectoryserveroperationmasterrole?view=windowsserver2022-ps Using DCDiag to check domain controller health - https://activedirectorypro.com/dcdiag-check-domain-controller-health/


-
Deploy captured image with Sentinel one
anyweb replied to Zecker's question in Deploy software, applications and drivers
then you need to contact the manufacturer of that software and ask them to clarify exactly how to install it silently with no restart -
Deploy captured image with Sentinel one
anyweb replied to Zecker's question in Deploy software, applications and drivers
have you verified that everything works without the Sentinel software ? if so, use virtual machine(s) to test deploying just that software with different installation switches until you figure out how to do it properly -
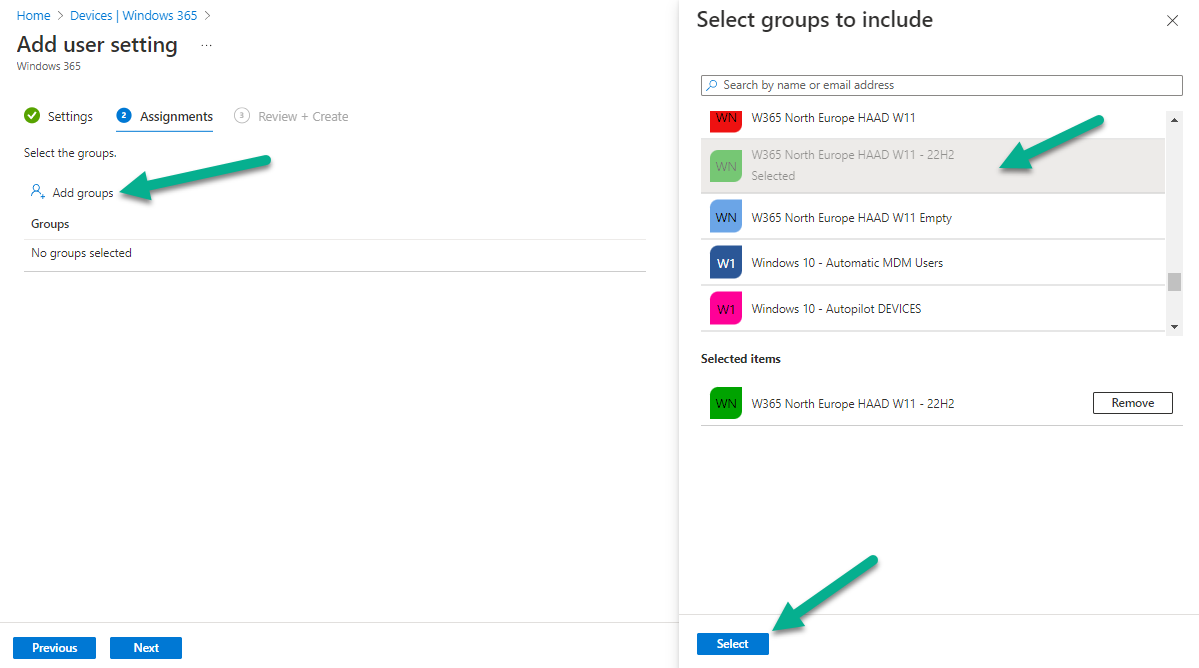
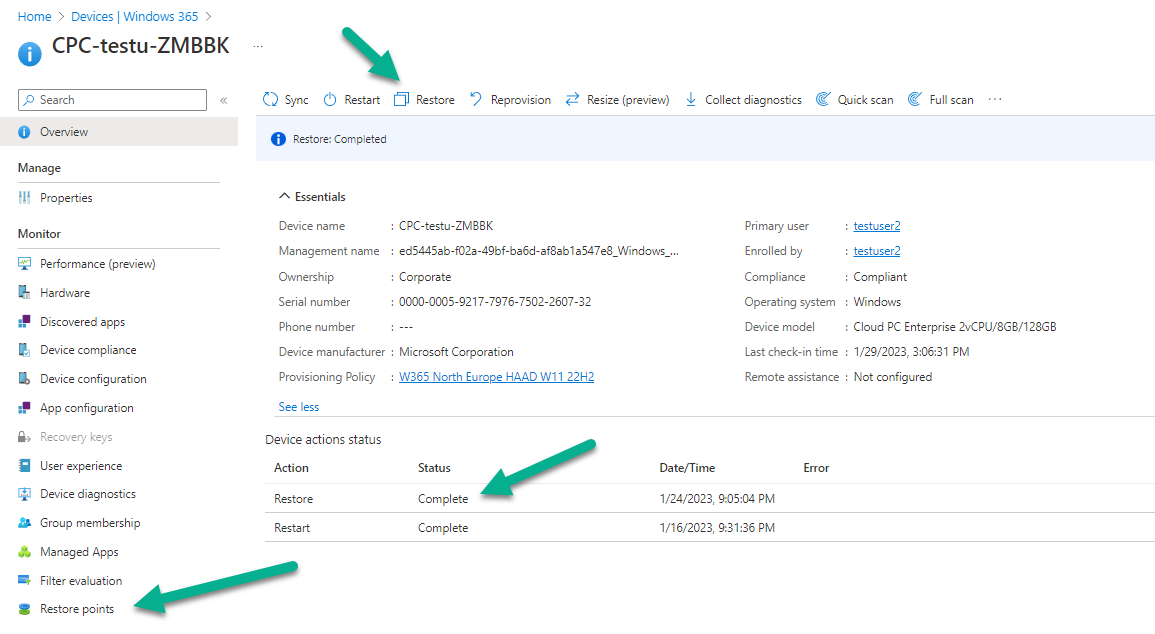
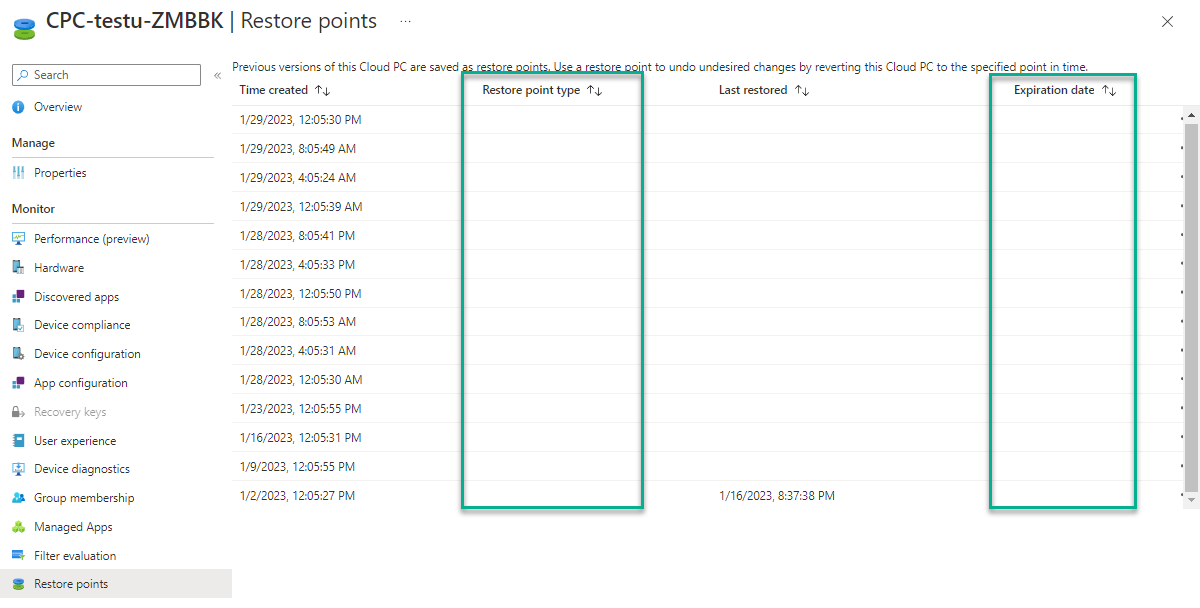
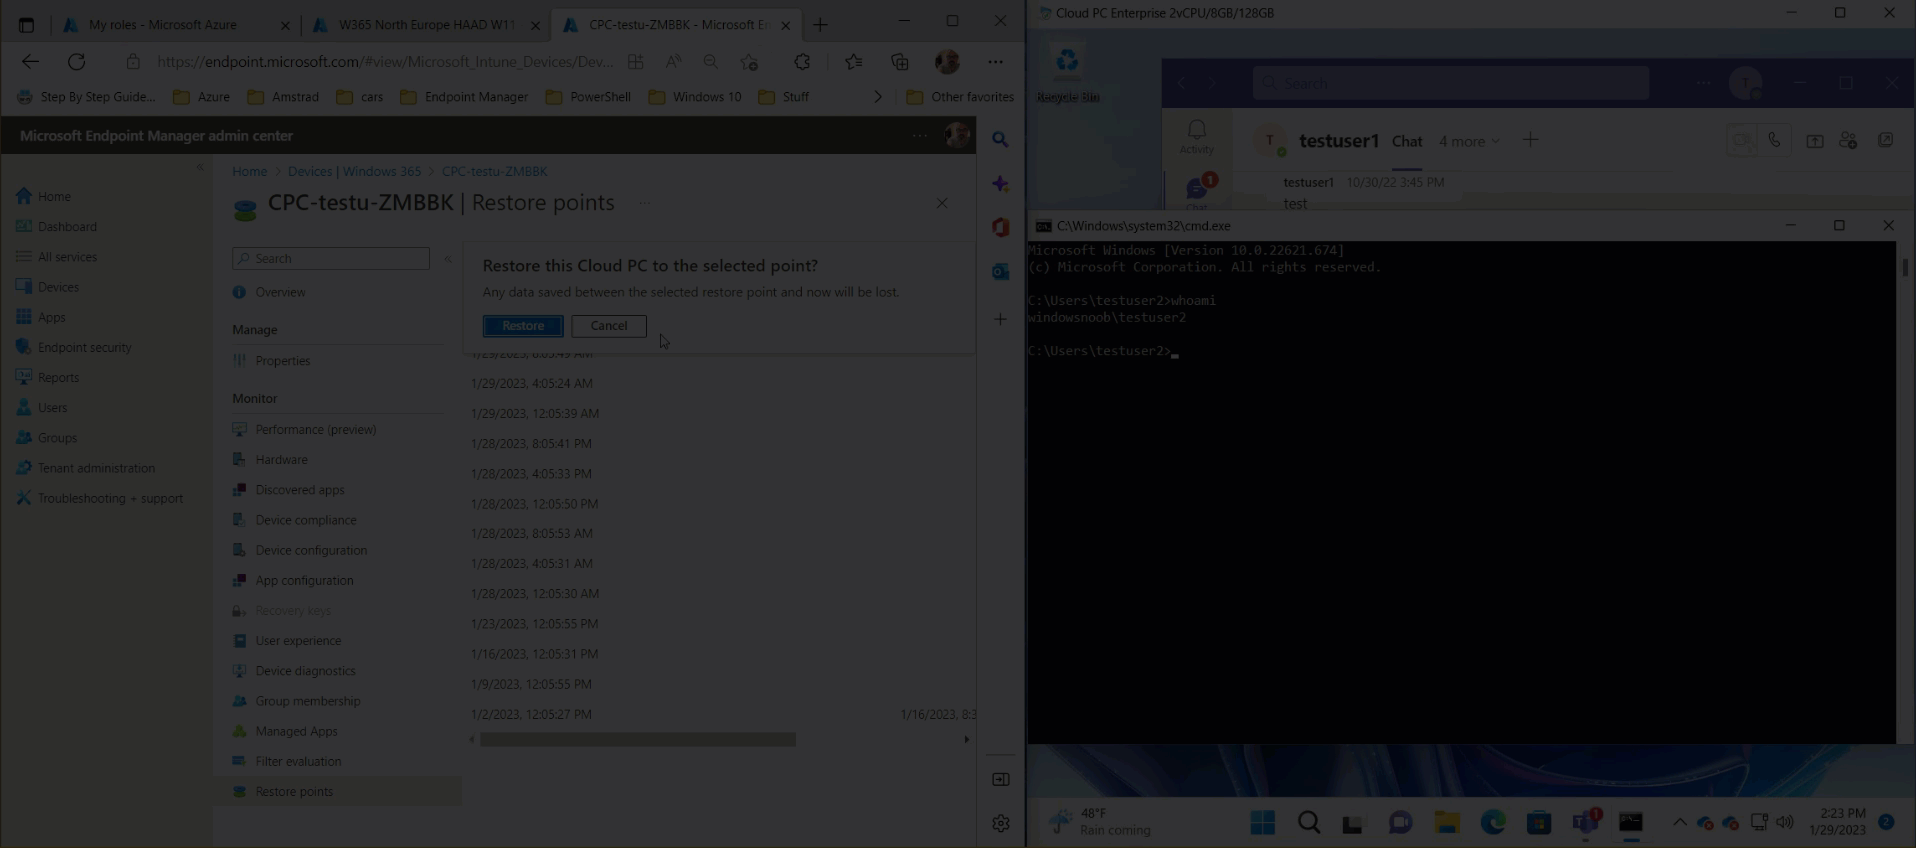
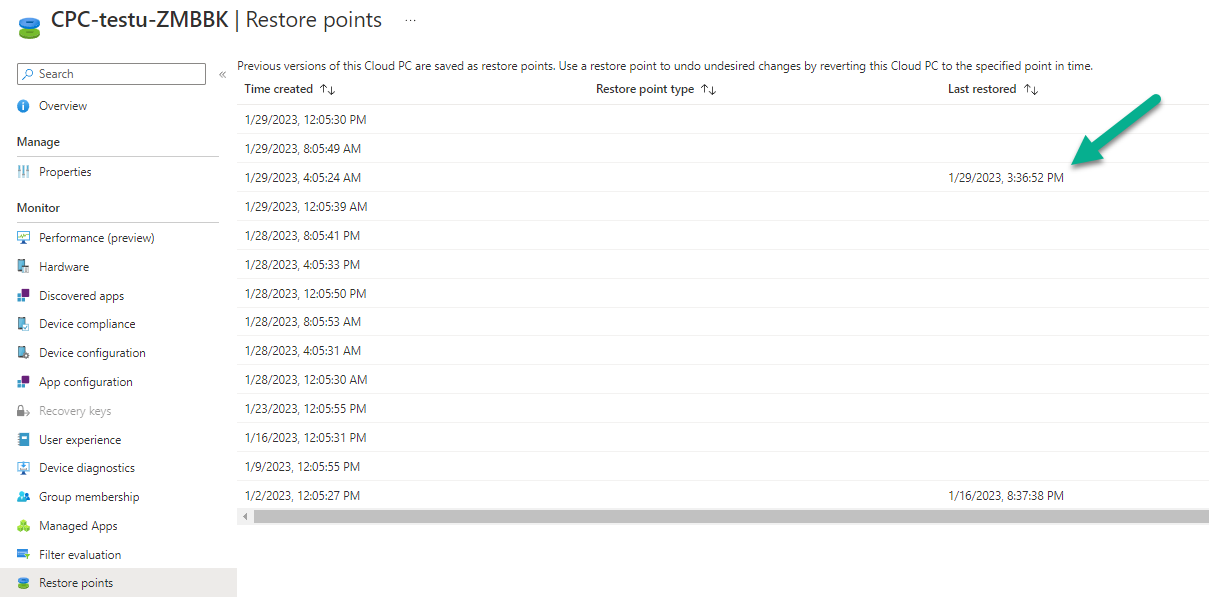
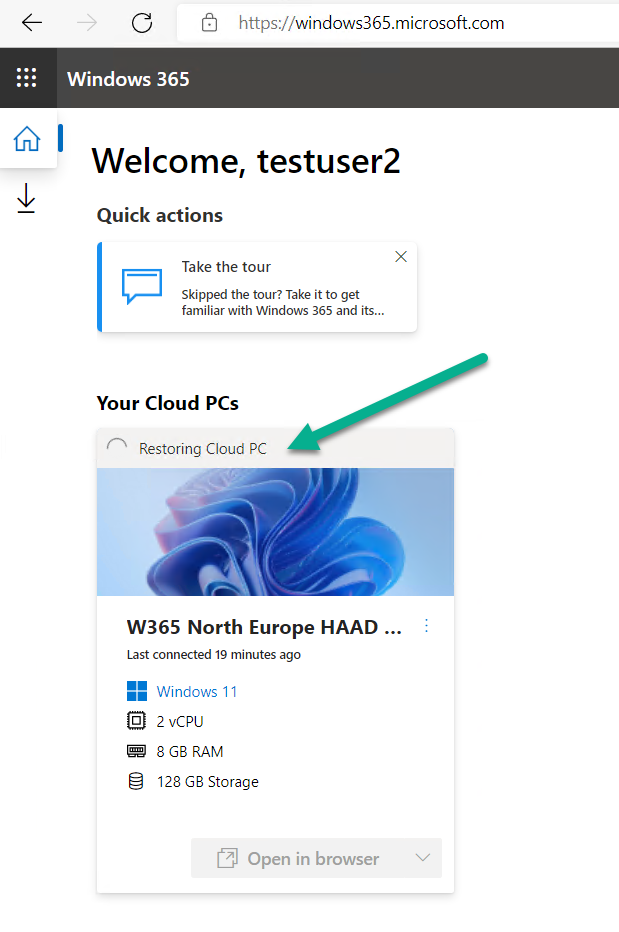
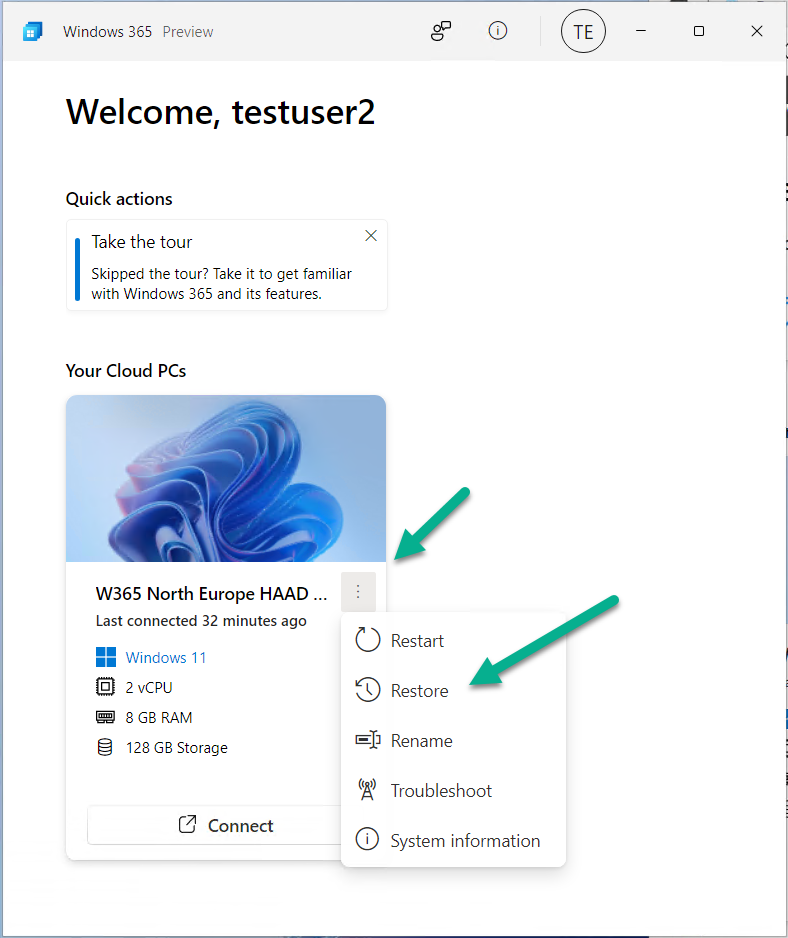
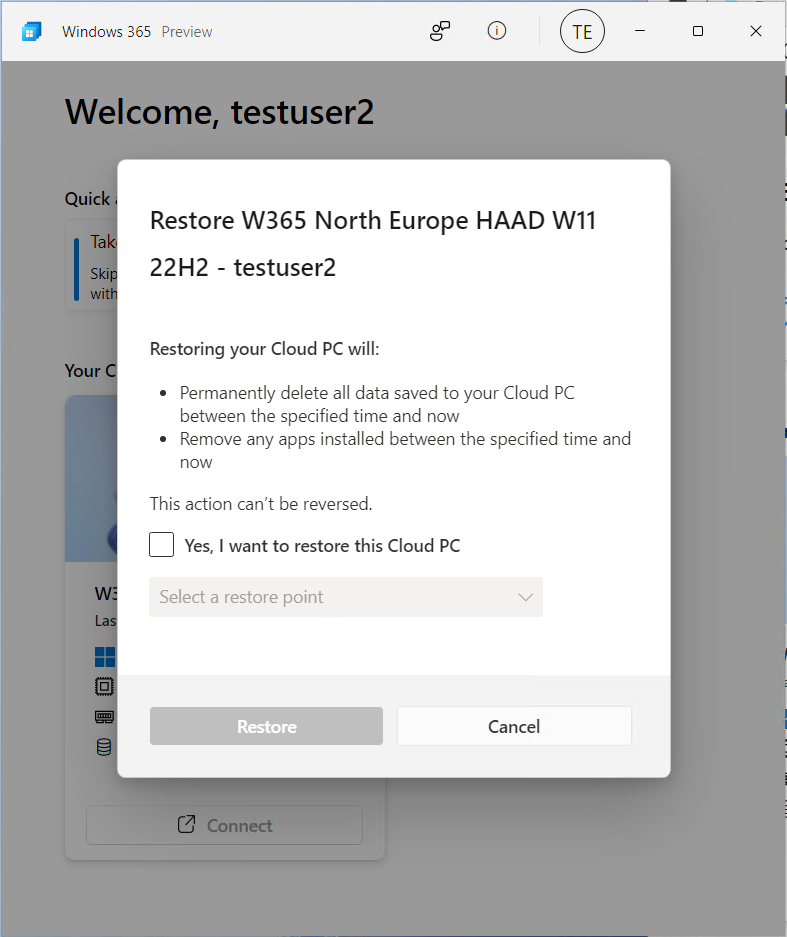
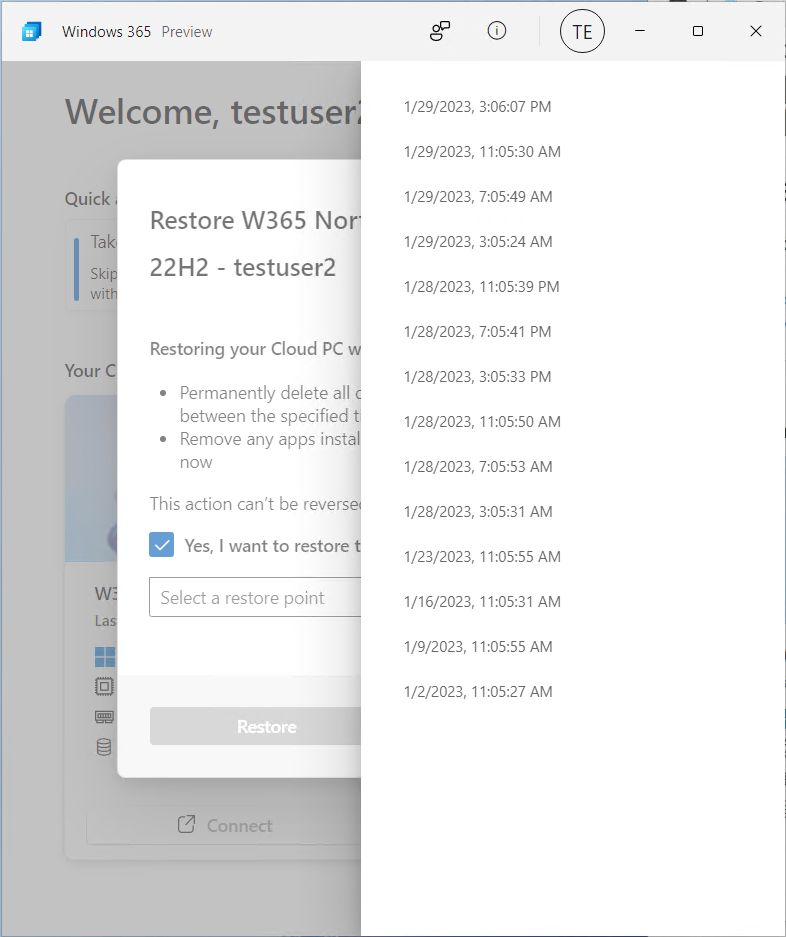
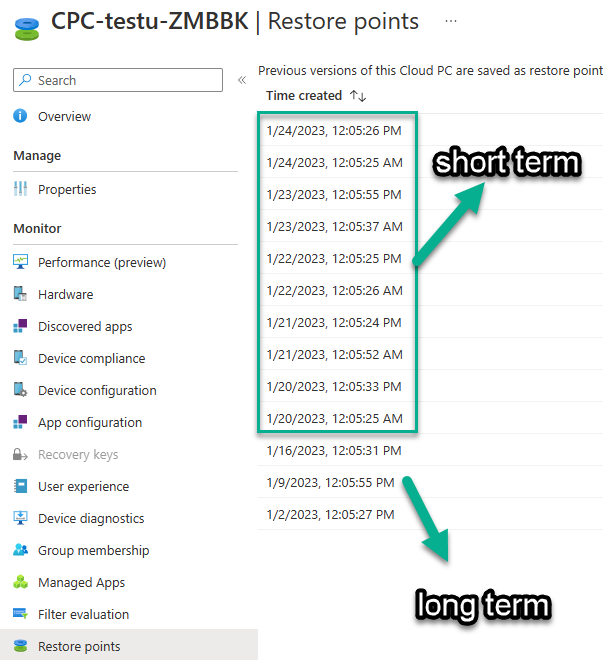
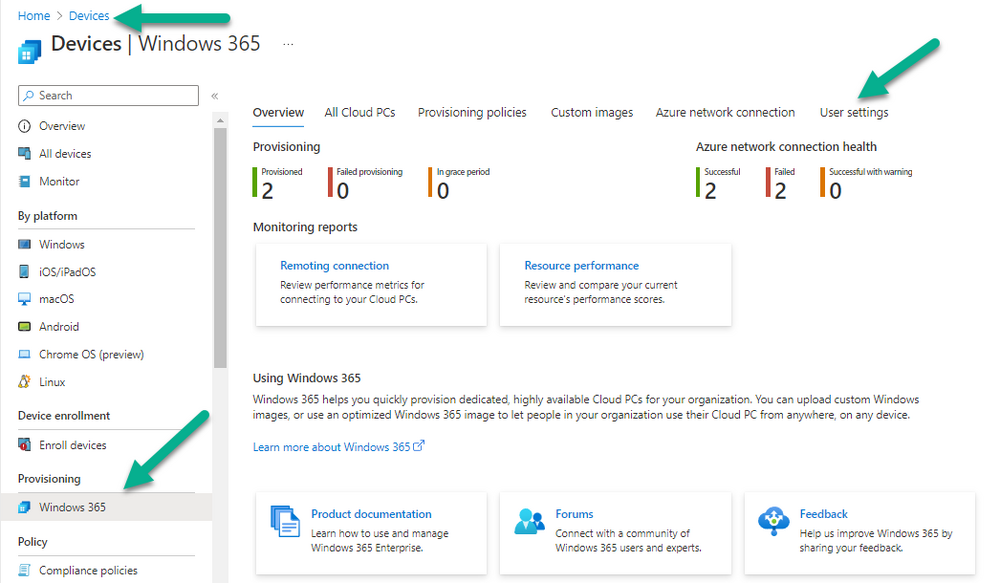
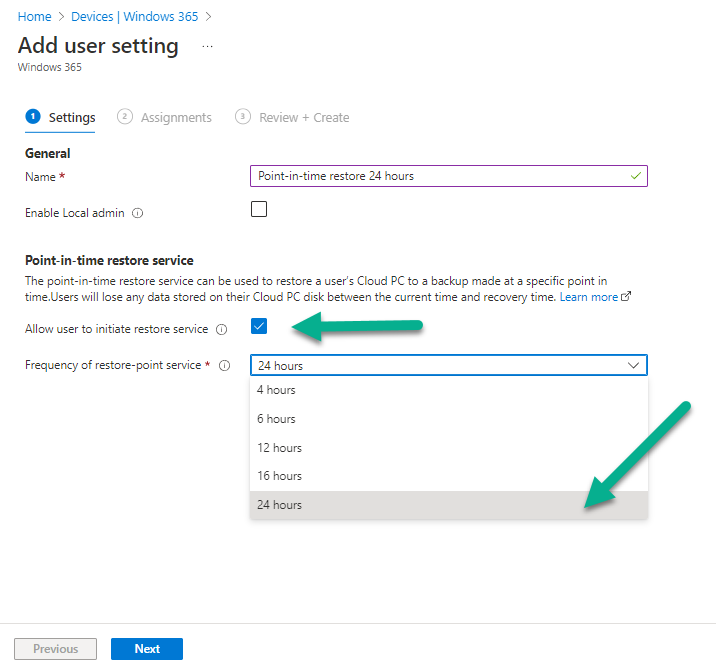
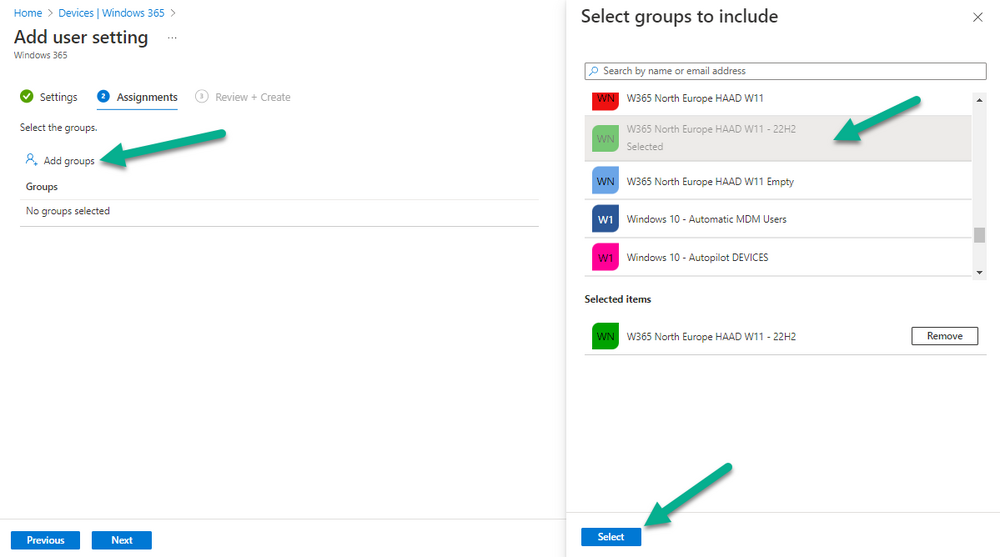
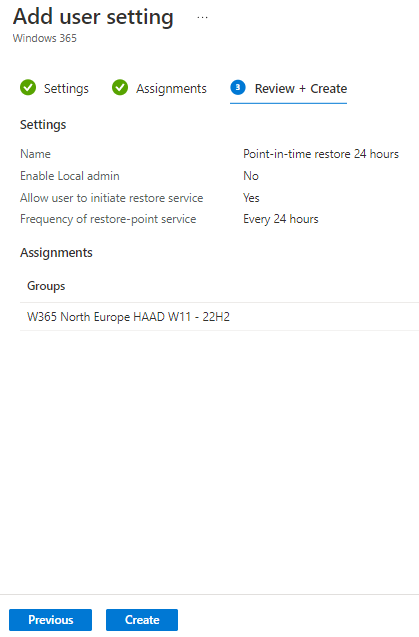
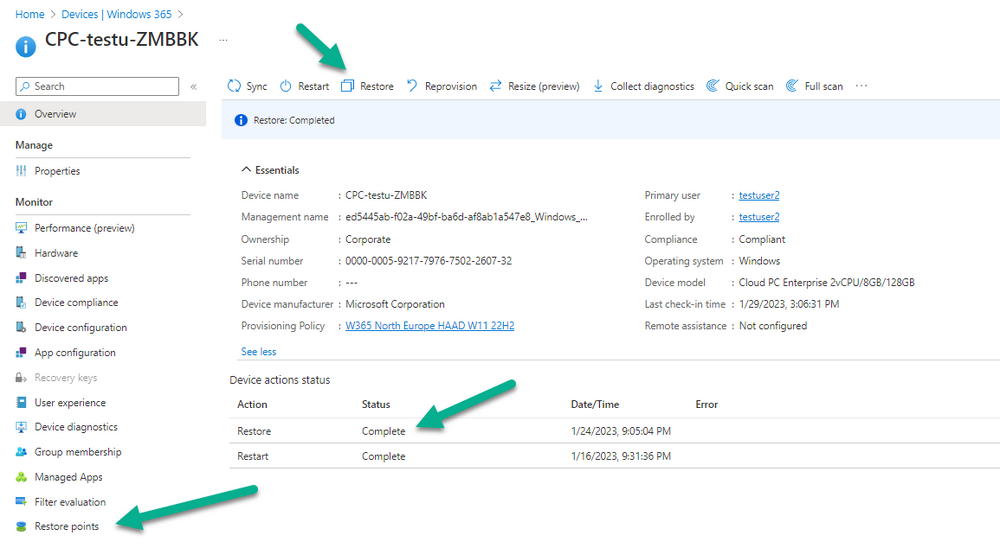
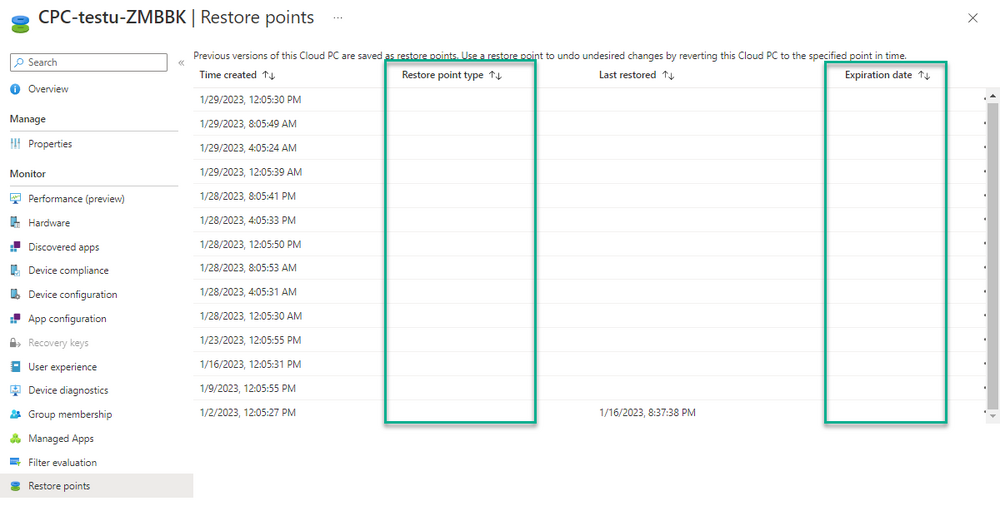
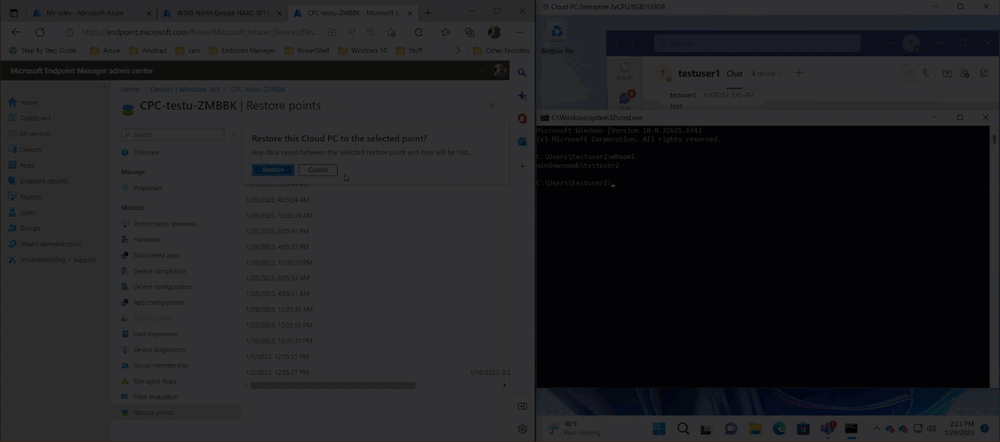
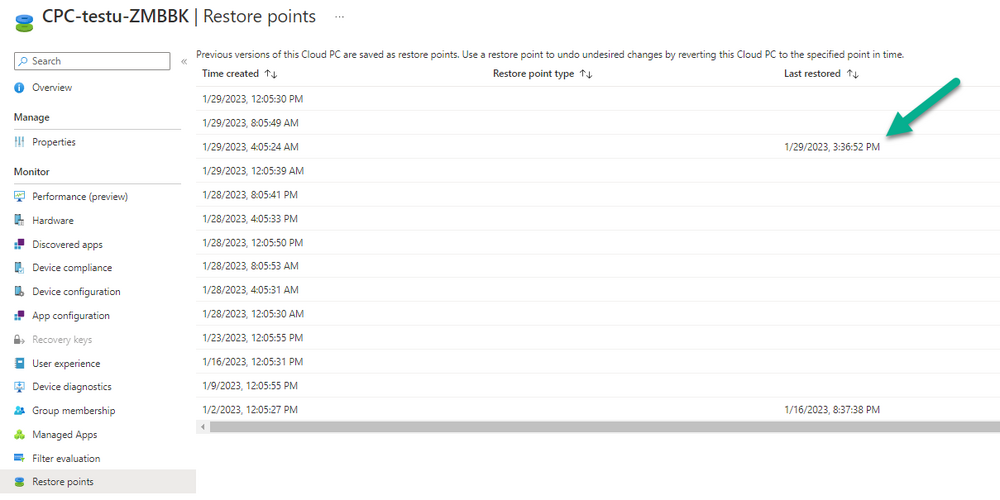
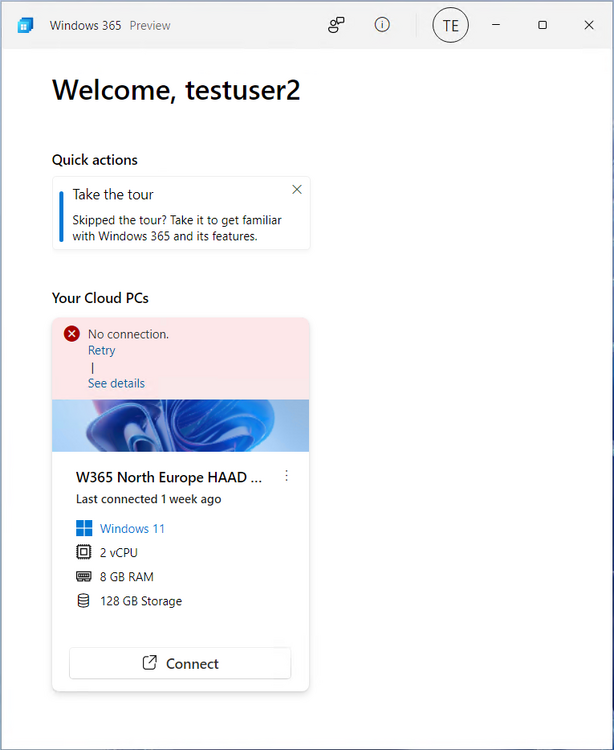
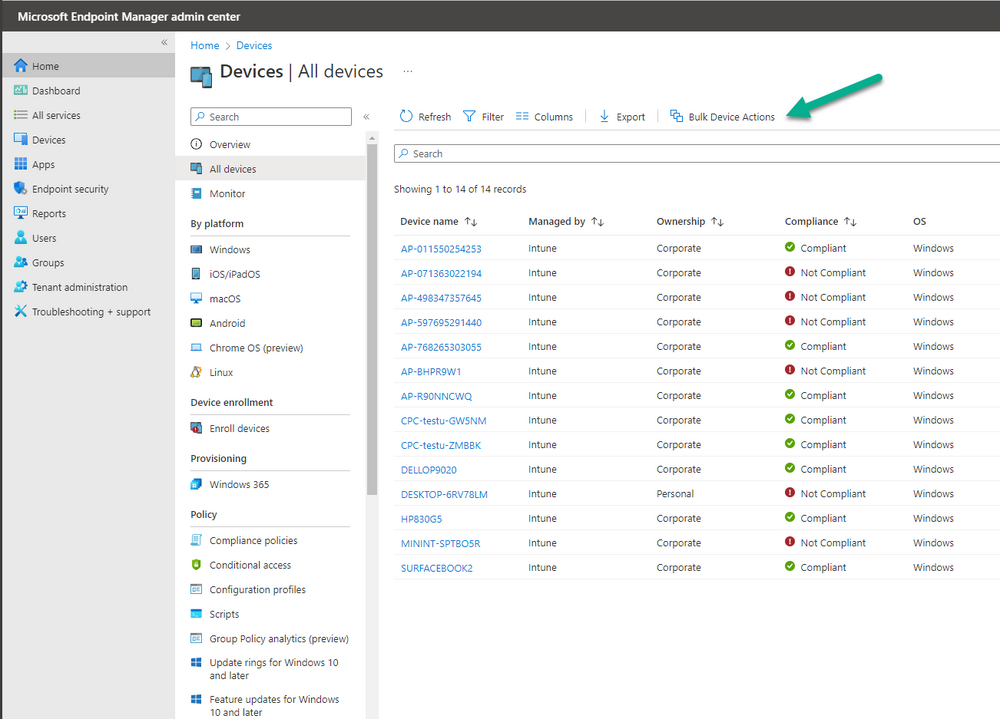
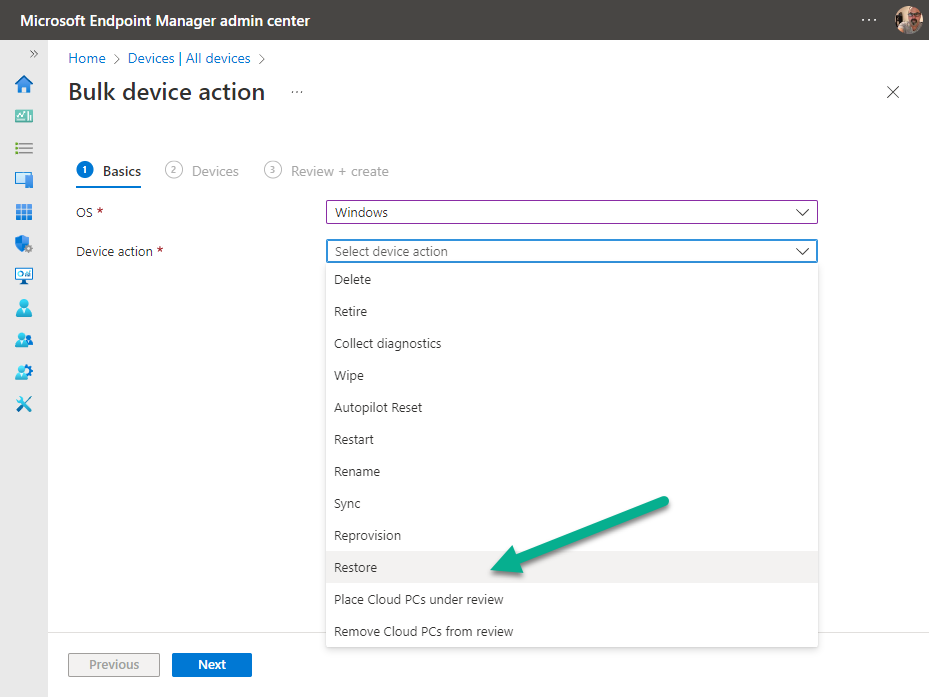
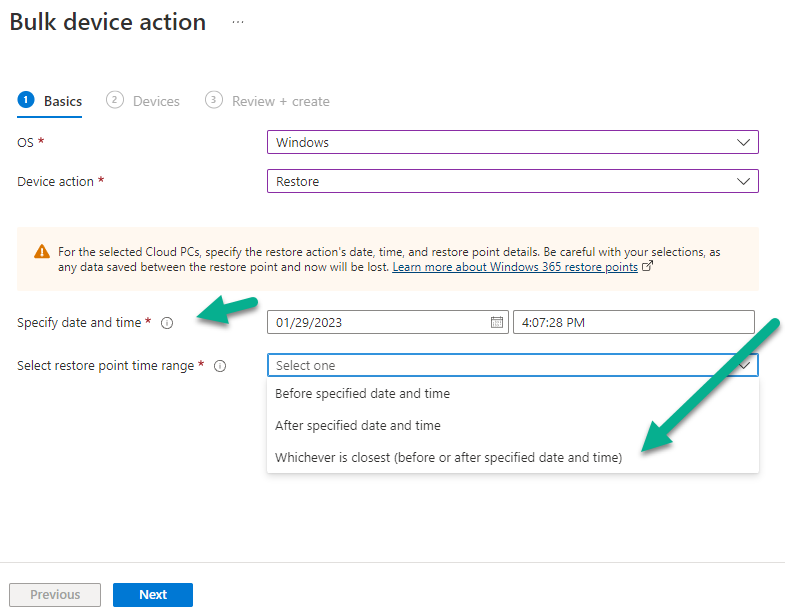
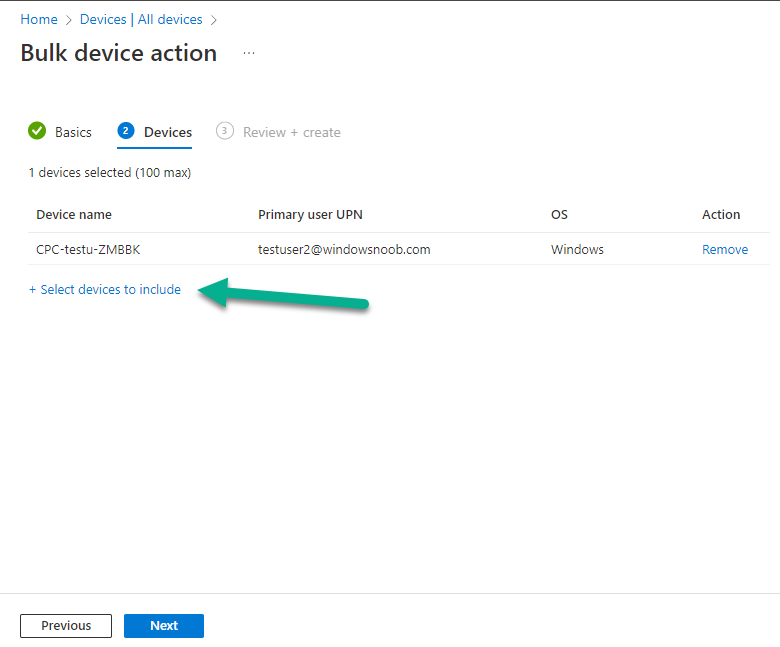
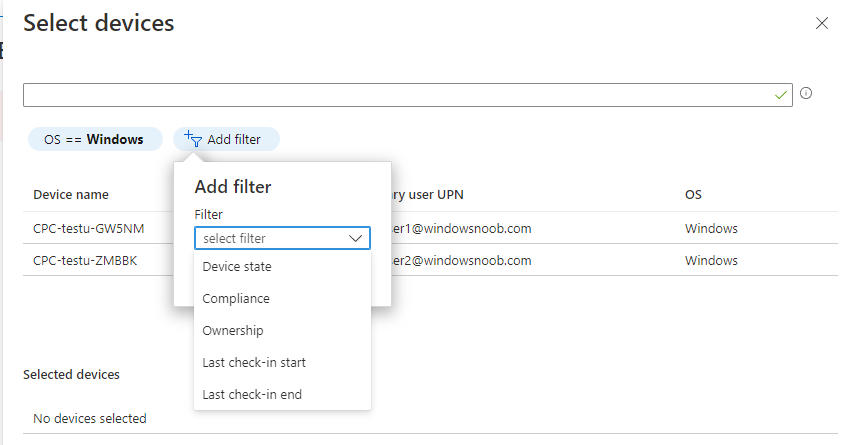
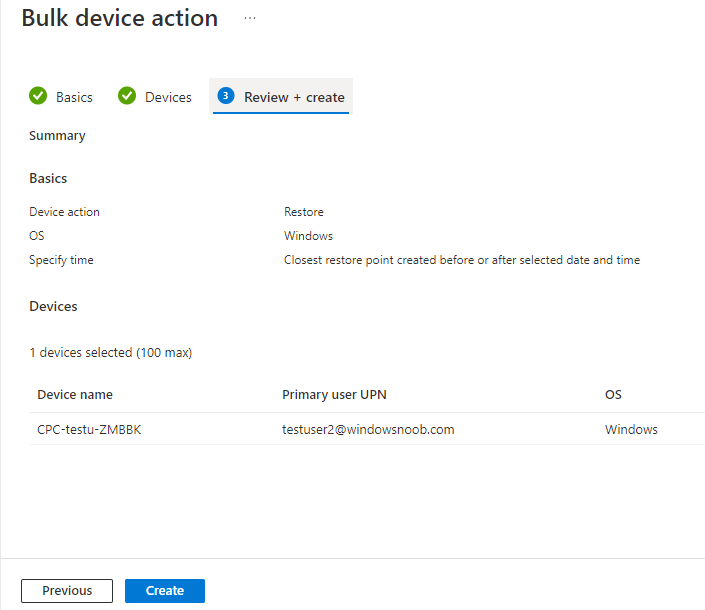
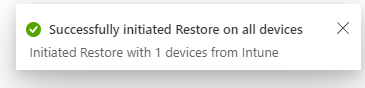
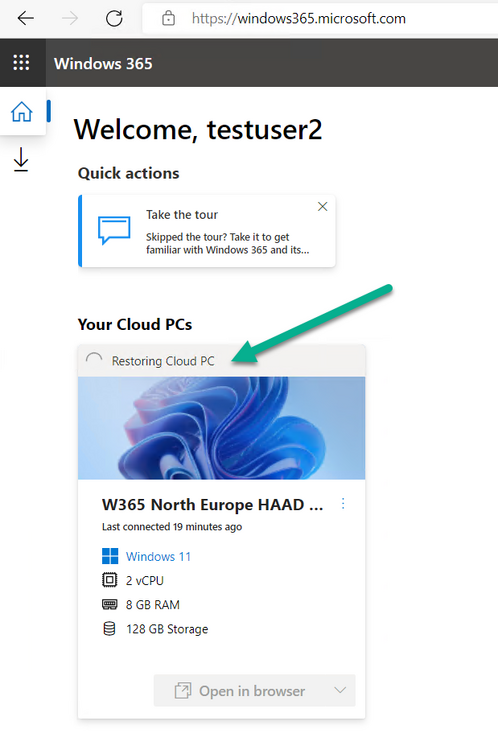
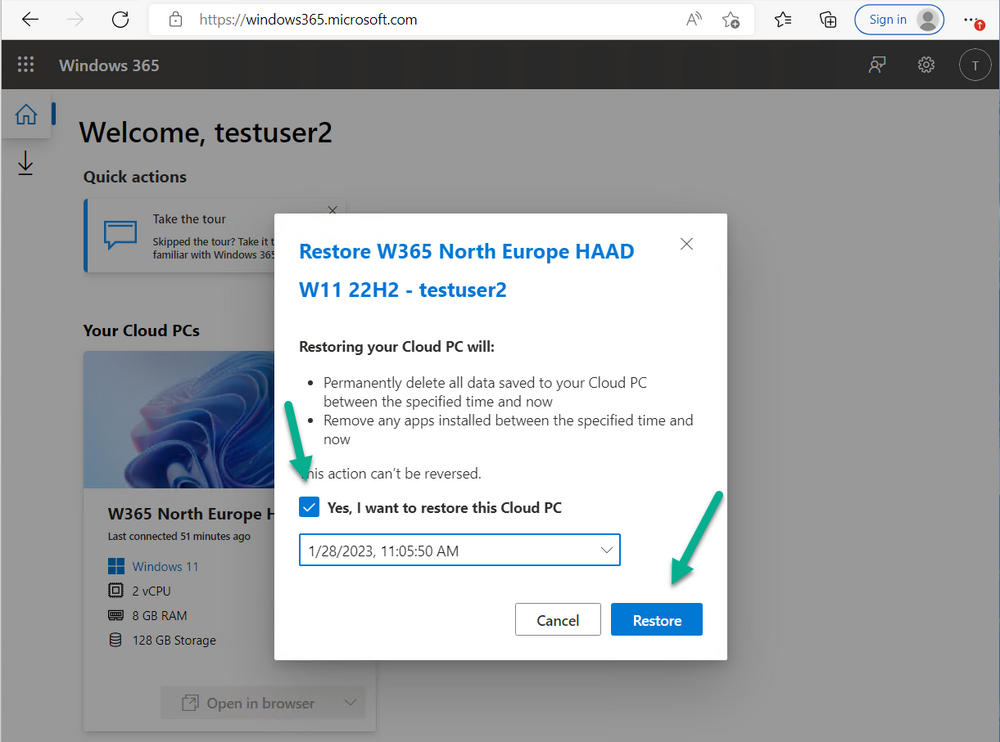
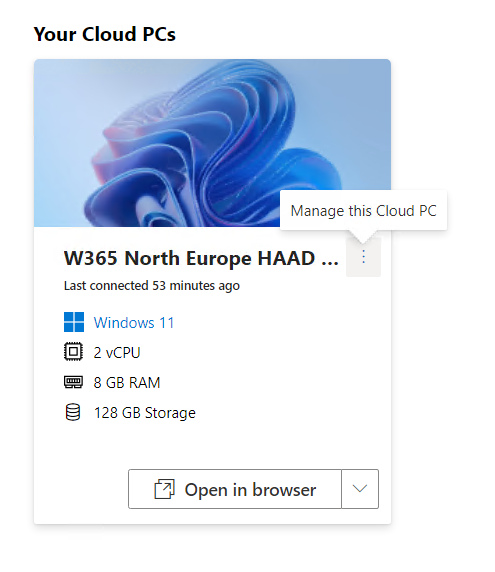
Introduction This is Part 6 in a new series of guides about getting started with Windows 365. This series of guides will help you to learn all about Windows 365 in a clear and insightful way. This series is co-written by Niall & Paul, both of whom are Enterprise Mobility MVP’s with broad experience in the area of modern management. At the time of writing, Paul is a 6 times Enterprise Mobility MVP based in the UK and Niall is a 12 times Enterprise Mobility MVP based in Sweden. In this series we aim to cover everything we learn about Windows 365 and share it with you to help you to deploy it safely and securely within your own organization. In Part 1 we introduced you to Windows 365, selecting the right edition with the level of management that you need, choosing the plan that suits your users needs at a cost you can afford, or modifying the configuration to make it more suited to your individual needs, purchasing licenses and saving money for your organization via the Windows Hybrid Benefit. In Part 2 you learned how to provision an Azure Ad joined Cloud PC and take a look at the different network options available when provisioning an Azure Ad joined Cloud PC. In Part 3 you learned about the steps needed to successfully provision a Hybrid Azure Ad Joined Cloud PC. In Part 4 you saw the many different ways you can connect to your Cloud PC from many device be it Android, Mac, Windows, Linux or iPhone and you learned that not all connection options have the same abilities. In Part 5 we covered the management capabilities of your Cloud PCs and explained the different options available depending on which version (Business versus Enterprise) that you purchase. In this part we'll take a look at the built in configurable backup technology in Windows 365 which is known as Point-in-time restore, this is a great ability to restore your Cloud PC's to an earlier time before a problem such as a Ransomware incident occurred. Below you can find all parts in this series: Getting started with Windows 365 - Part 1. Introduction Getting started with Windows 365 - Part 2. Provisioning an Azure Ad Joined Cloud PC Getting started with Windows 365 - Part 3. Provisioning a Hybrid Azure Ad Joined Cloud PC Getting started with Windows 365 - Part 4. Connecting to your Cloud PC Getting started with Windows 365 - Part 5. Managing your Cloud PC Getting started with Windows 365 - Part 6. Point in time restore <- you are here Getting started with Windows 365 - Part 7. Patching your Cloud PCs with Windows Autopatch Getting started with Windows 365 - Part 8. Windows 365 boot Getting started with Windows 365 - Part 9. Windows 365 switch Getting started with Windows 365 - Part 10. Windows 365 offline In this part we'll cover the following: Introduction to Point in time restore Configuring restore point settings Restoring a single Cloud PC Restoring multiple Cloud PCs at the same time (bulk) End user initiated restore Recommended reading Summary Introduction to Point in time restore Point in time restore for Windows 365 is explained as follows according to Microsoft: However, based on our testing this is not entirely correct as the type of restore points (or snapshots) are similar in concept to hyper-V's production checkpoints. Why does that matter ? Well in hyper-v, production checkpoints capture the current state of the operating system, not the running apps at the time that the snapshot was taken. If you use hyper-v virtual machines then you'll love using standard checkpoints as they capture everything you are doing at the time, including running apps, settings, operating system state. Everything. With Point-in-time restore, you'll get a restore point of a Cloud PC to the exact state it was in at the time the backup was made, however it won't capture the state of any apps that were running at the time the backup was made, the operating system will essentially be in a 'just booted' state with no apps running and that becomes immediately obvious when you restore a point-in-time restore.. Point-in-time restore has 2 different types of restore points, long term and short term. Long term restore points are saved every 7 days and there are a maximum of 4 long term restore points. Short term restore points are saved based on the user settings interval, so can be every 4, 6, 12, 16 or 24 hours. Each Cloud PC will have up to 10 short term restore points saved at intervals defined in user settings configured by the admin and a further (up to) 4 long term restore points making a total of 14 possible restore points. In the screenshot below of a Cloud PC in Microsoft Intune you can see 3 long term restore points (every 7 days) and 10 short term restore points (configured for the default setting of every 12 hours). So now that we know there are different types of restore-points let's take a look at how to configure them. Configuring restore point settings In Microsoft Intune, navigate to Devices, Windows 365 and click on the User Settings tab. Click on Add + and give your User Settings policy a suitable name, keep in mind that if you have multiple policies targeting the same users that there is no way to currently enforce one over the other. In this example we'll configure the restore points every 24 hours (the default setting is every 12 hours), which means one restore point every day. You can also configure whether the user is allowed to restore their own Cloud PC via the Windows 365 portal and you can additionally configure Local Admin Settings. Click Next and then add one or more groups with Users that you wish to target with these settings. When ready, click Select, then click Create. Once done, any users in the Groups added will be able to restore their own restore points and their restore points will be taken every 24 hours. Restoring a single Cloud PC To restore a single Cloud PC simply locate it in the Endpoint Manager console selecting Devices and then clicking on Windows 365, next select All Cloud PC's and select the Cloud PC you wish to restore. Notice that there is a node on the left called Restore Points. You can access the same ability via the Restore option at the top of the screen and the last previous Restore action will listed in the summary. Click on Restore Points in the left pane. This will bring up a new window showing all restore points that have been taken for the Cloud PC. In our testing, the Restore Point type and Expiration date columns never populated with any information. We have informed Microsoft PG about this, however, the Last restored column does populate after a restore is completed. Note: Be careful when restoring a Cloud PC as no indication/message or information will be sent to the user logged on that their Cloud PC is about to be restored. They will simply see the computer shutting down all of a sudden and after that it will be inaccessible for a time. Keeping in mind that Cloud PC's that are domain joined may have rolling passwords/secrets that change causing you to lose the ability to logon to the domain if you restore a Cloud PC from too far back. So let's pick a fairly recent date in the above list and right click, you'll get the option to Restore this version. Continuing the process will give you one last chance to cancel, and if you select restore it will start the restore process which can typically take about 30 seconds. You can see an edited (shortened) video of that process below: After the restore is complete, you can refresh the Intune console and the Last restored column should now indicate the latest restore. The end user may see the following in their Windows 365 app, indicating that there is an error connecting to their Cloud PC. Clicking on details may give you some information like the following. Waiting a minute or so and clicking on retry should be enough to reconnect. If the end user accesses the Cloud PC using the Windows 365 portal, then they'll be correctly informed that the Cloud PC is in the following state: Restoring Cloud PC Restoring multiple Cloud PCs at the same time (bulk) When an admin needs to restore multiple Cloud PC's at the same time (up to 100 at a time) then Bulk PC actions are to the rescue. Let's take a look at that process. In Microsoft Intune, select Devices, and next select All devices. In the top field you'll see Bulk Device Actions. Click on it and it'll bring up the Bulk Device Actions menu. Select Windows as the OS and then select Restore from the options available. Next, select the date and time and the time range from the available options. Next, select which devices to include (up to 100), you can use filters to assist with this or you can simply add Cloud PC's individually by selecting them and adding them to the list Once done, review the summary before clicking on Create to start the Bulk Action. You should then be notified of the success or failure of the action in the Intune console. End user initiated restore Now that you have seen how an admin can restore one or many Cloud PC's, what about the end user's view of things? The end user can restore their Cloud PC either using the Windows 365 app settings or via the Windows 365 portal. In the Windows 365 app, the user can simply click on the 3 dots to gain access to user-initiated actions. After selecting restore, the following window will popup informing the user about what is about to happen if they continue and asking them to confirm the action. After confirming, they can select a restore point before finally clicking on Restore to complete the action. Similarly to the app, in the Windows 365 portal the end user will see their available Cloud PC's and options available based on what was configured by the admin. Clicking on the 3 dots to Manage this Cloud PC brings up the same experience as with the Windows 365 app above. Recommended reading Differences between Production and Standard checkpoints in hyper-v - https://learn.microsoft.com/en-us/windows-server/virtualization/hyper-v/manage/choose-between-standard-or-production-checkpoints-in-hyper-v Point-in-time restore for Windows 365 Enterprise - Overview of restoring a Cloud PC to a previous state with Windows 365 Enterprise | Microsoft Learn Windows 365 app - https://www.windows-noob.com/forums/topic/23113-introducing-the-windows-365-app/ Known issues for Windows 365 Enterprise - Known issues for Windows 365 Enterprise | Microsoft Learn Summary Windows Cloud PC's are more manageable than ever, but sometimes things can and do go wrong. As an admin having the ability to restore one or more Cloud PC's to a previous point-in-time is great, we only wish that we could get more options such as the ability to customize the type of restore point to include say running apps. We've sent the feedback to Microsoft. It would also be nice if the Status of a restore revealed if it was the end-user that initiated it versus the Admin.


-
Move devices from non compliant to compliant
anyweb replied to Deepak Joshi's topic in Microsoft Intune
check Company Portal, click on the devices link, and click on your device, click on Check Access and see what it reveals, it will point to whatever is blocking the device from becoming compliant. you can also review your Compliance Policies in Intune. -
Move devices from non compliant to compliant
anyweb replied to Deepak Joshi's topic in Microsoft Intune
how are you forcing compliance, is it via conditional access policies ? if so, what are those policies looking for in order to be Compliant ? figure that part out first before you can think of speeding up compliance -
Deploying Driver Updates to Existing Machines
anyweb replied to lalajee's topic in Configuration Manager 2012
wufb can deliver driver updates, have you tried that -
Migrate to the cloud - Part 1. Setup
anyweb replied to anyweb's topic in System Center Configuration Manager (Current Branch)
hi @dipalma thank you for trying out my solution, this code is 'as is' and it's up to you to make it work in your environment, you can rem out all the scrolling by editing the associated log file, but what you really should have seen is the full screen status screen and not the powershell logging what that means is something probably failed which is why you are seeing the powershell cmd instead of the status screen, feel free to post your logs here and i can take a look. that said, i'm still working on it and will hopefully have a newer version of it to release in the coming month or two with a LOT of bug fixes and improvements cheers niall -
have you seen the response here ? https://community.spiceworks.com/topic/2320902-wsus-need-starttls-to-send-email-notifications
-
what version of Windows server is this and what version of TLS/SSL is installed ?
-
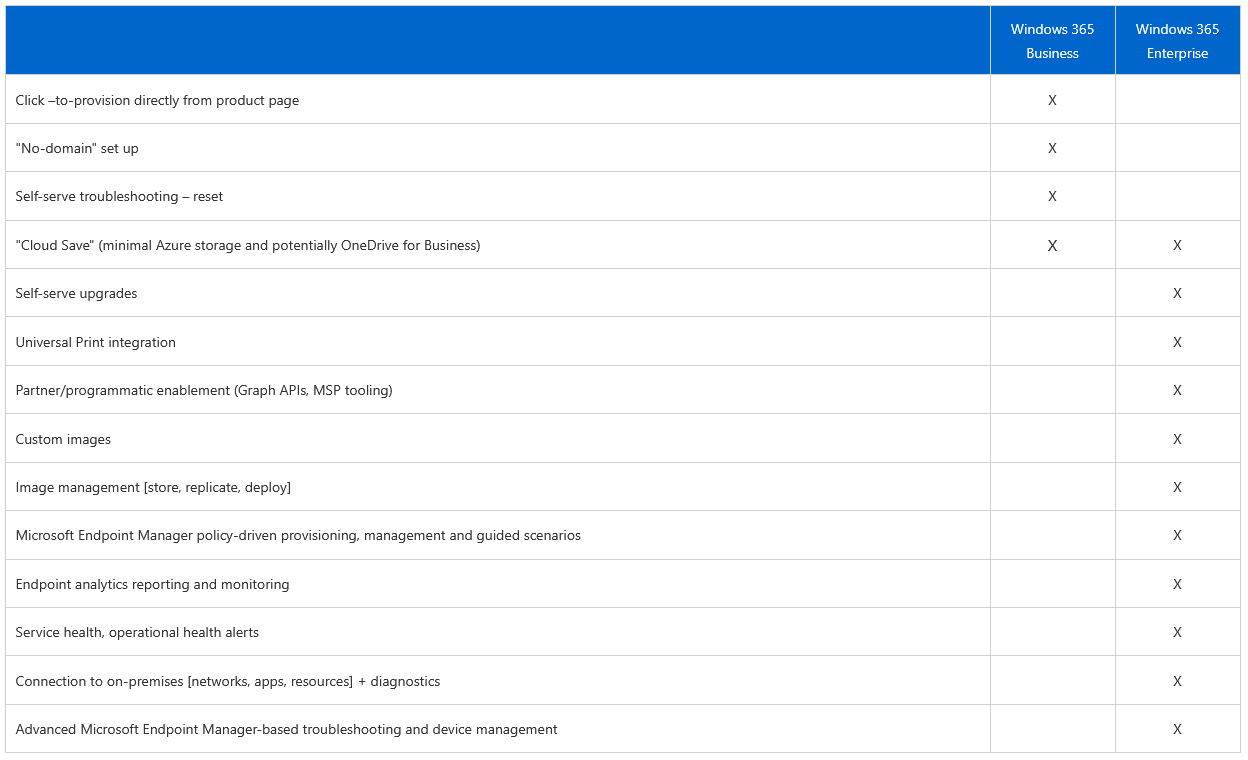
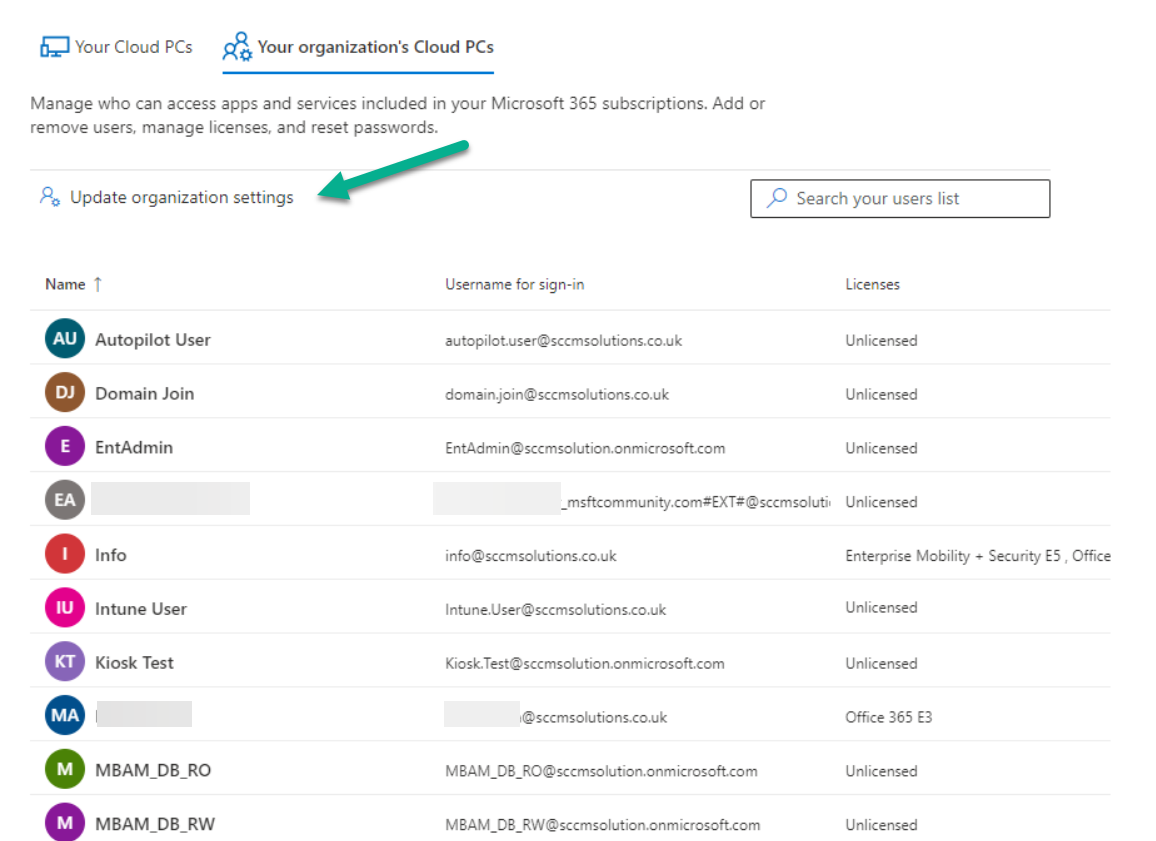
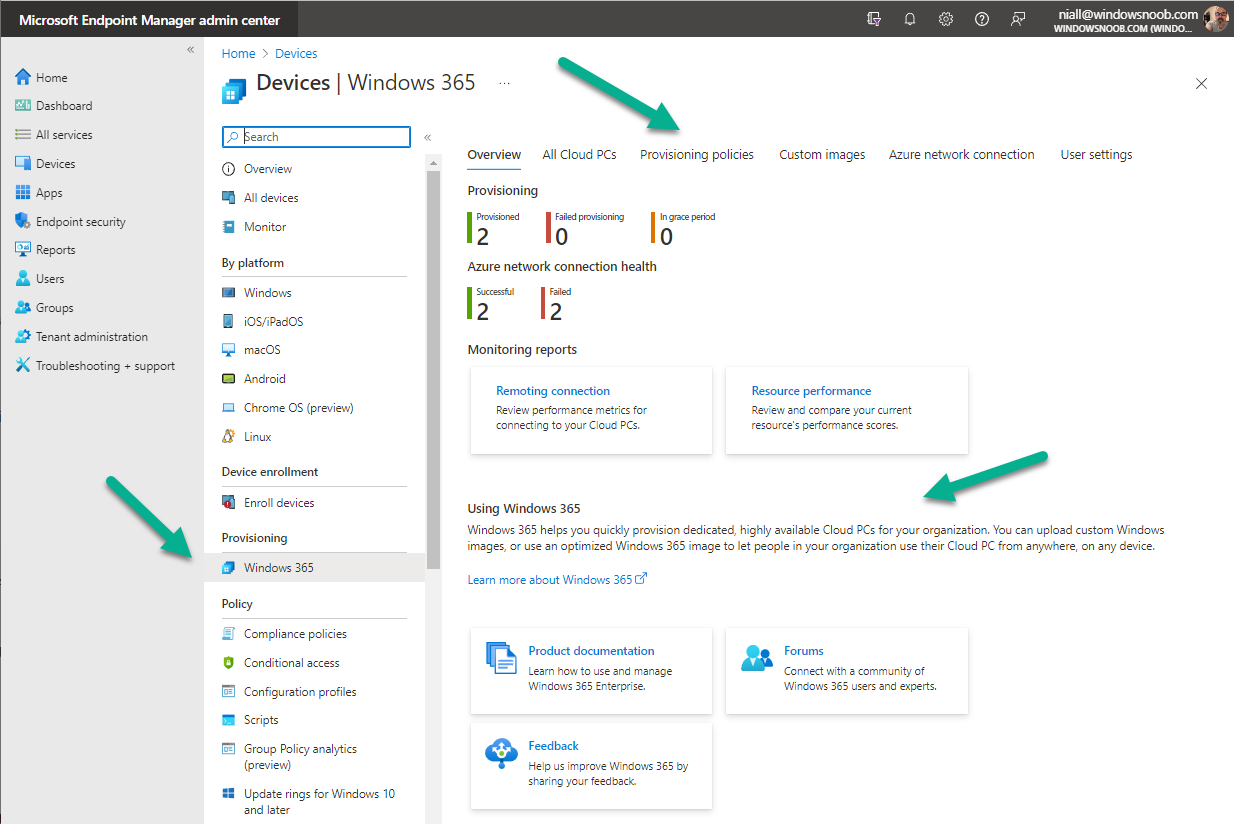
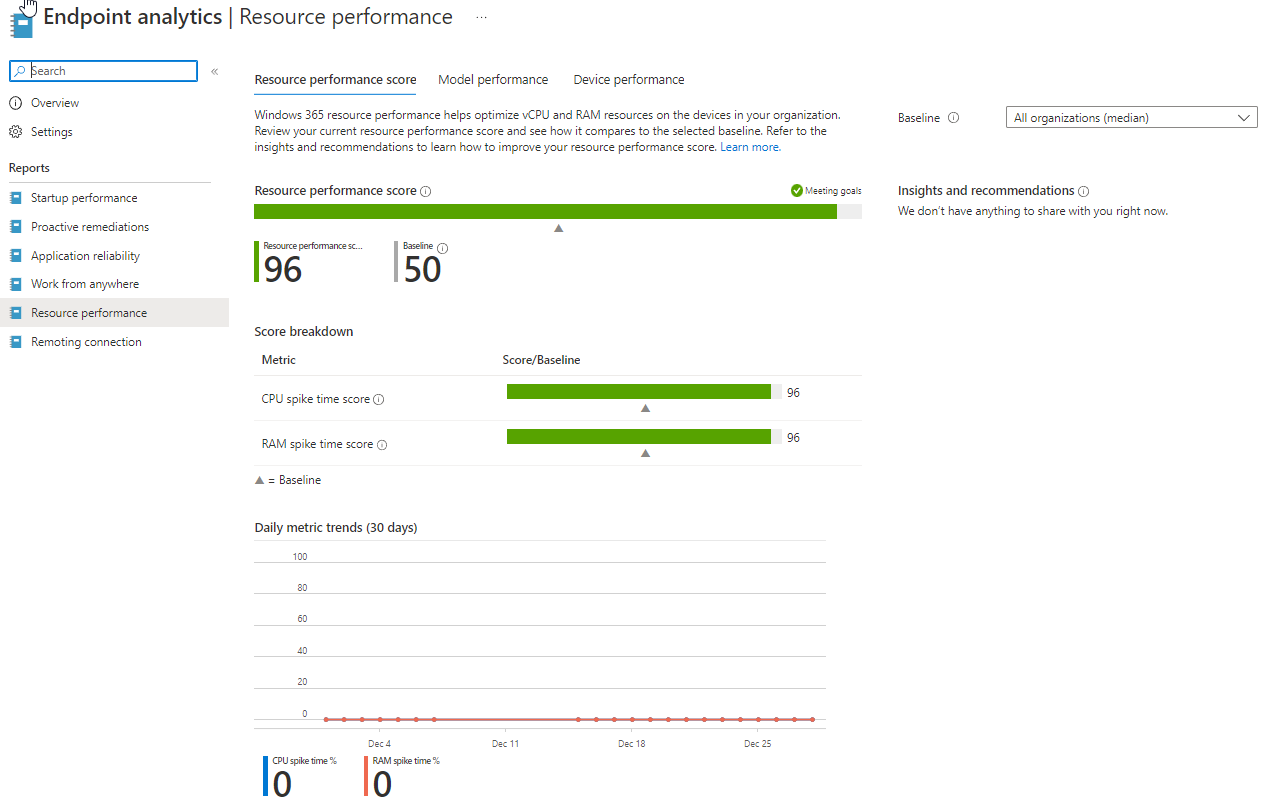
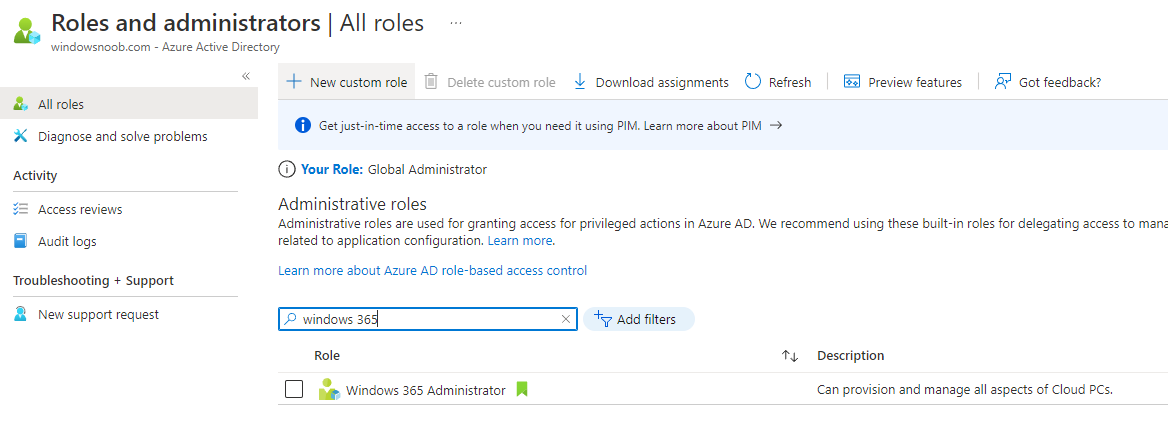
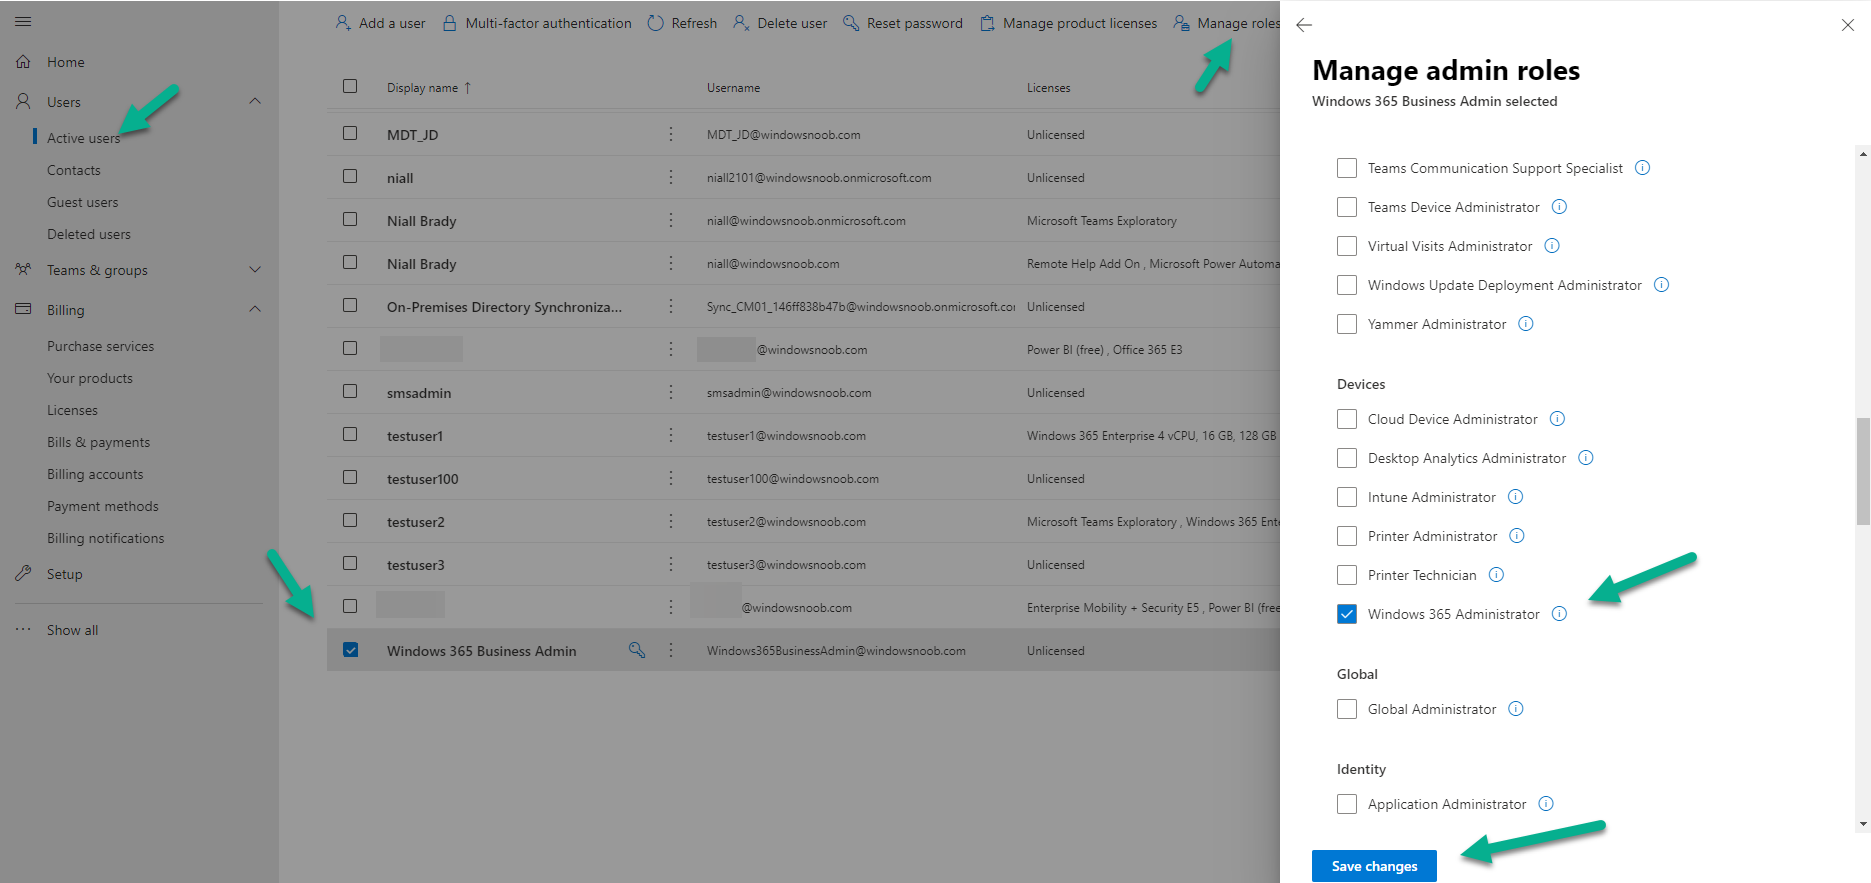
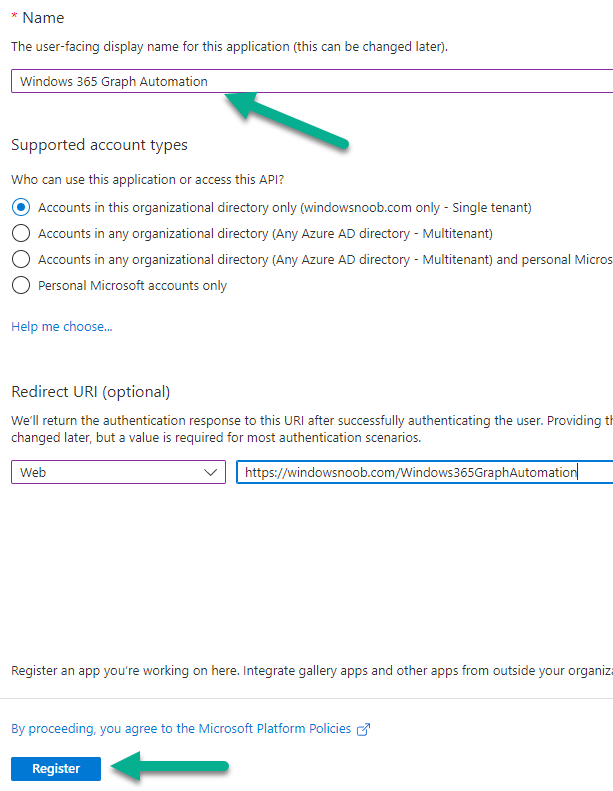
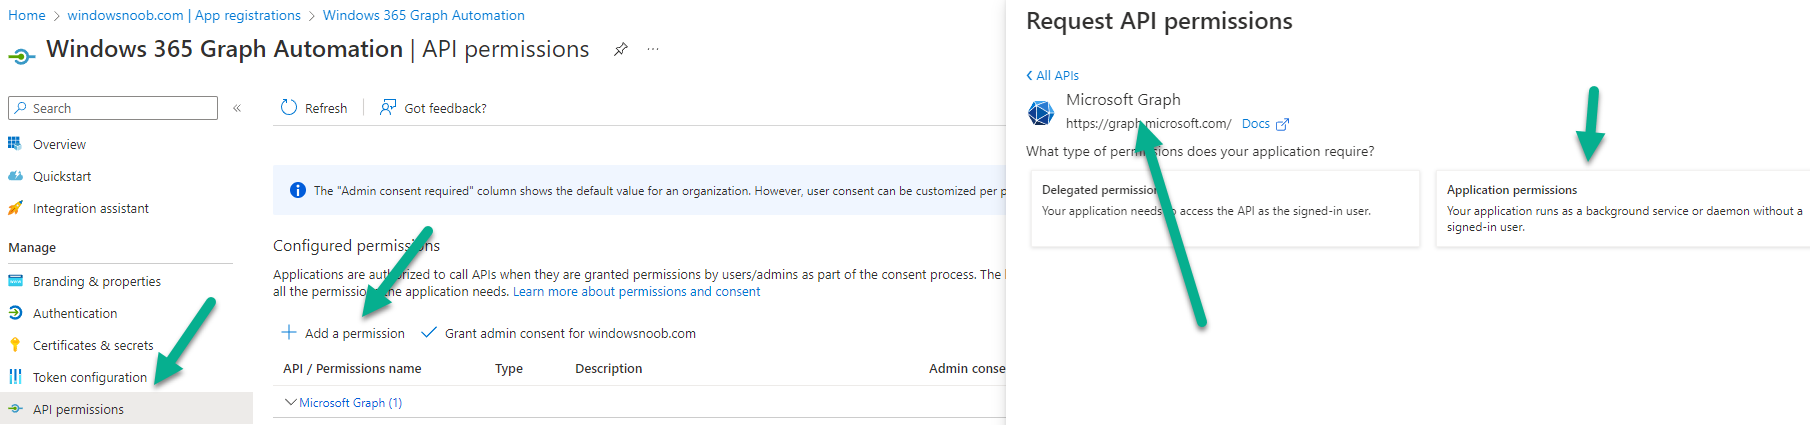
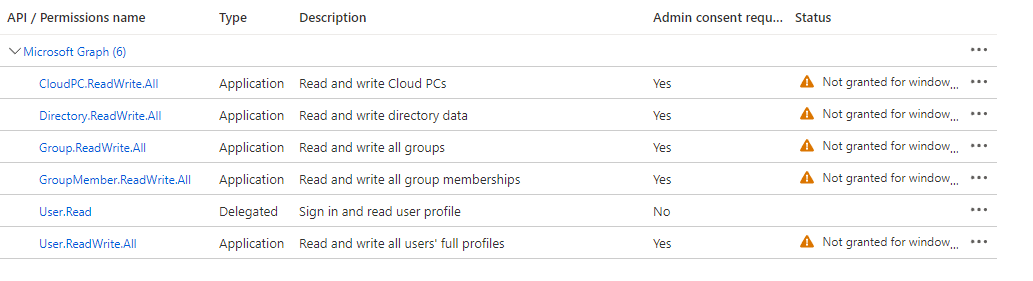
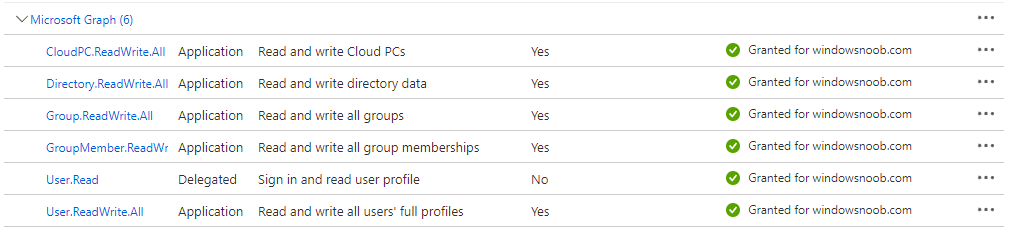
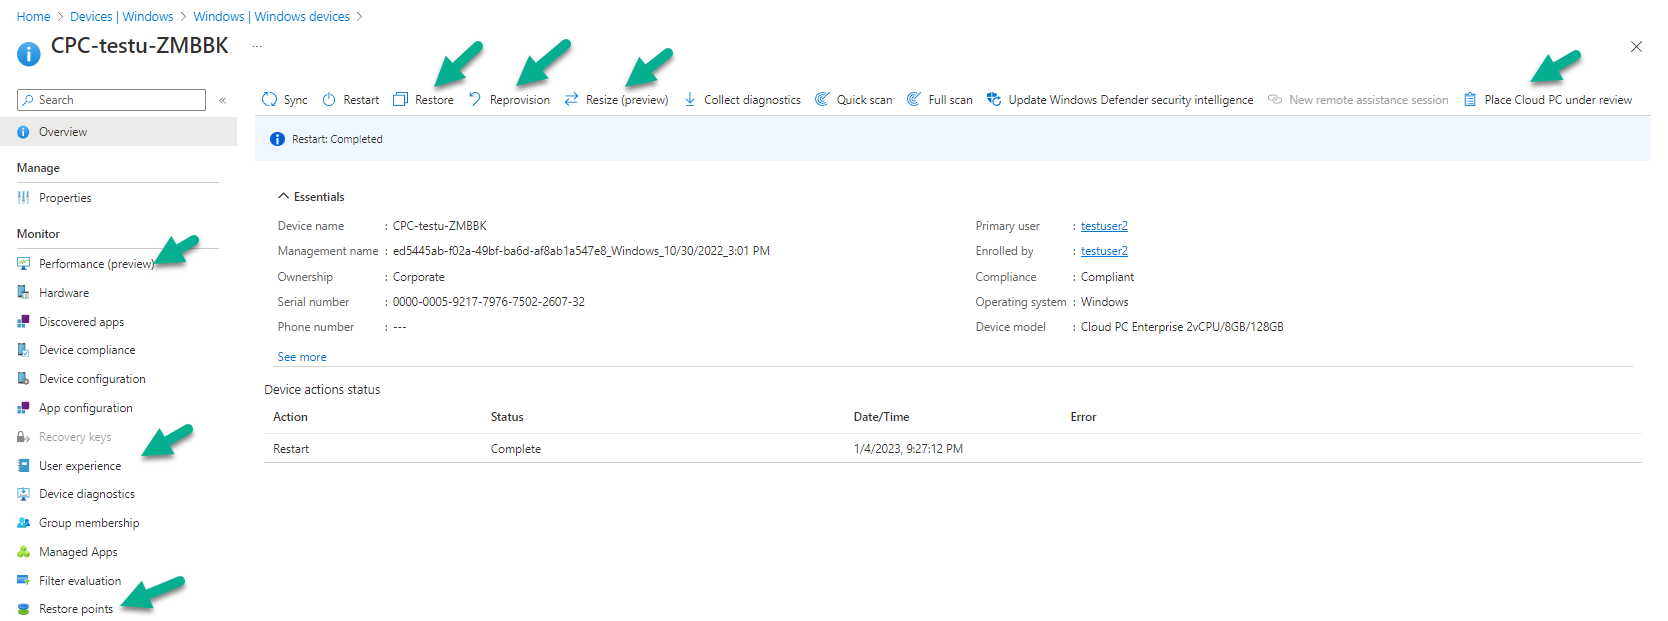
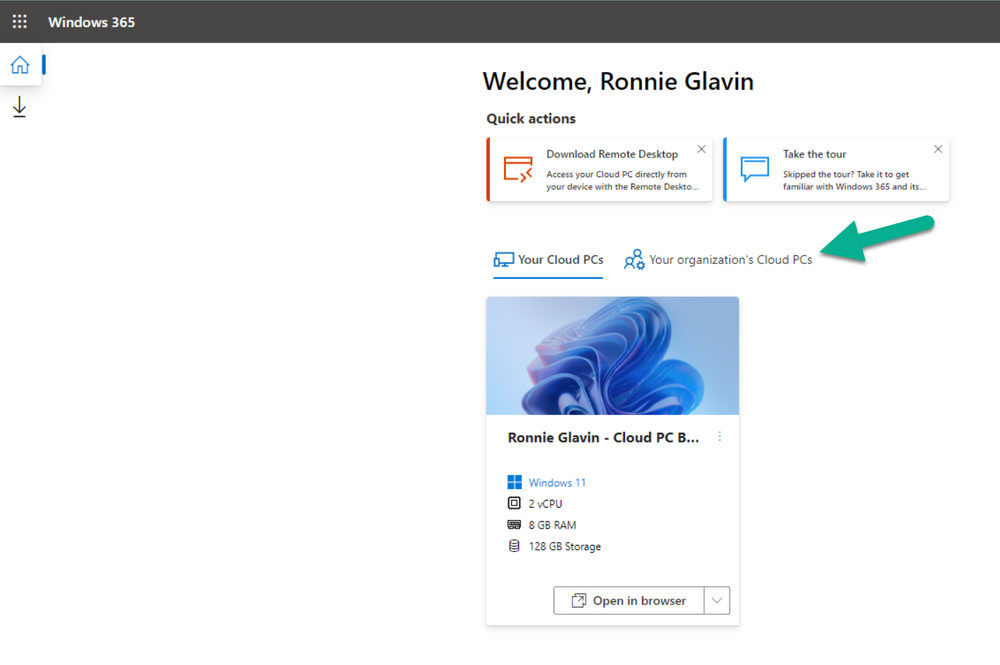
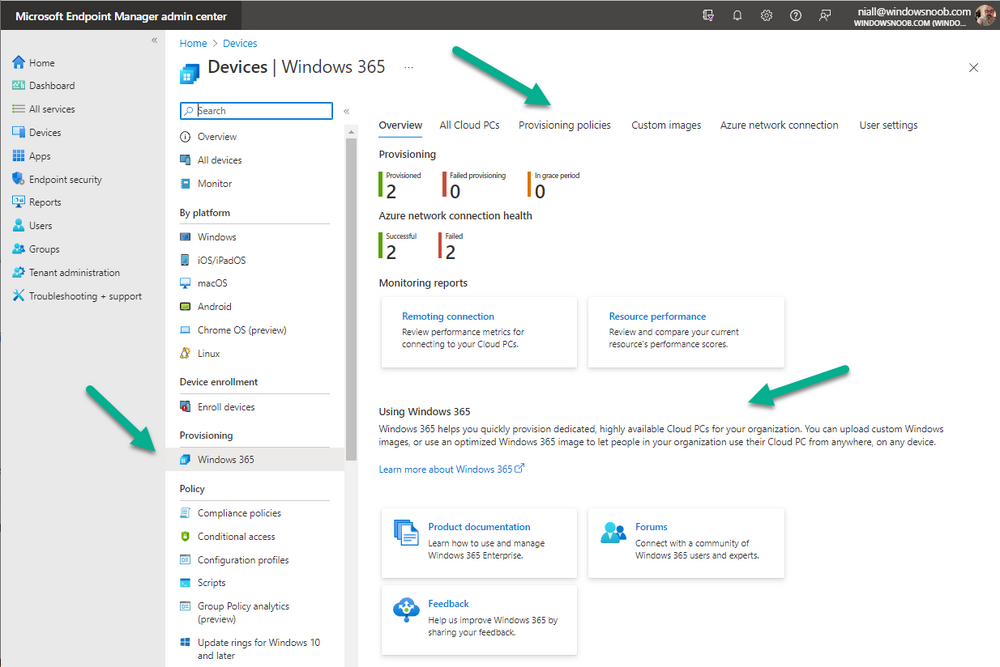
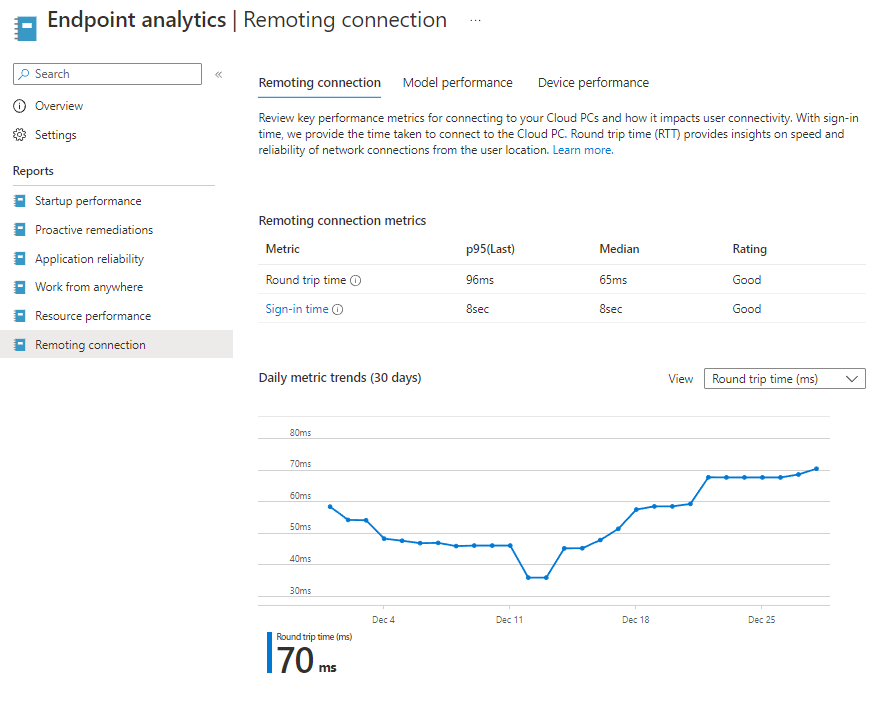
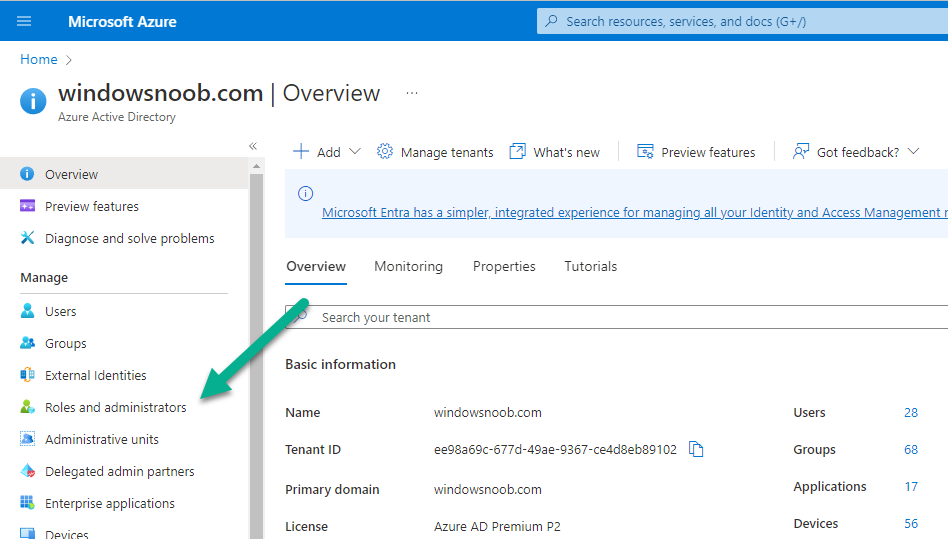
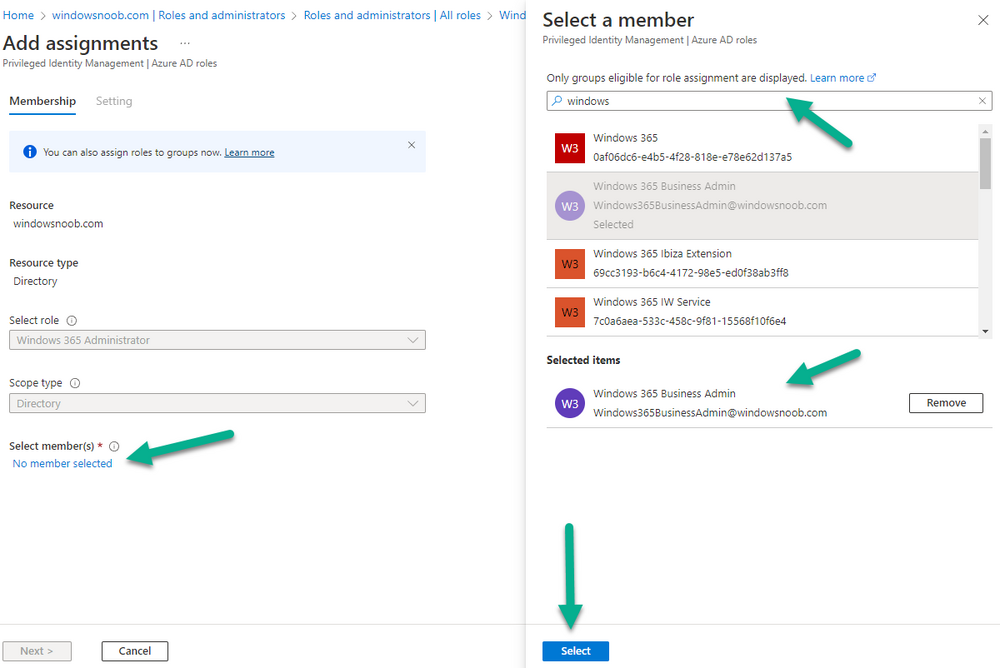
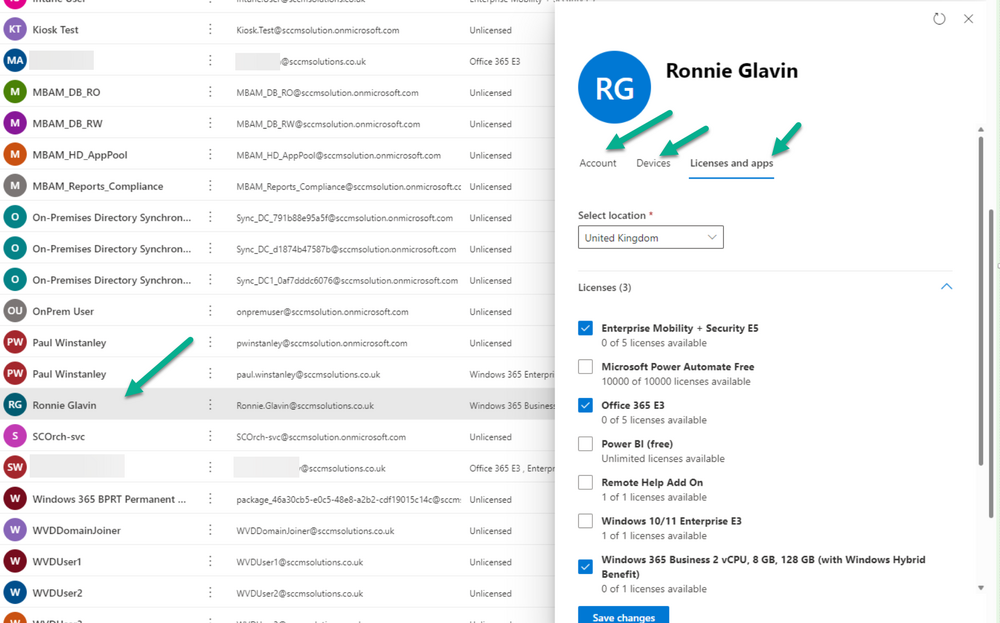
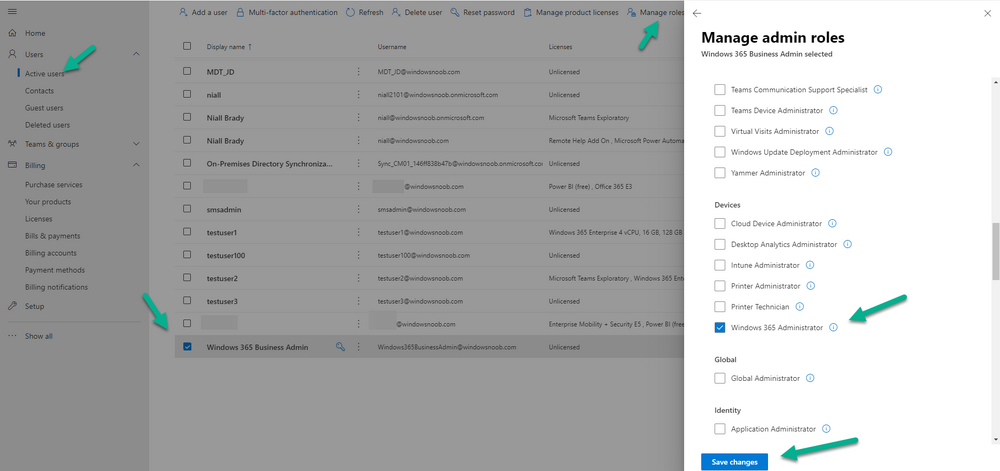
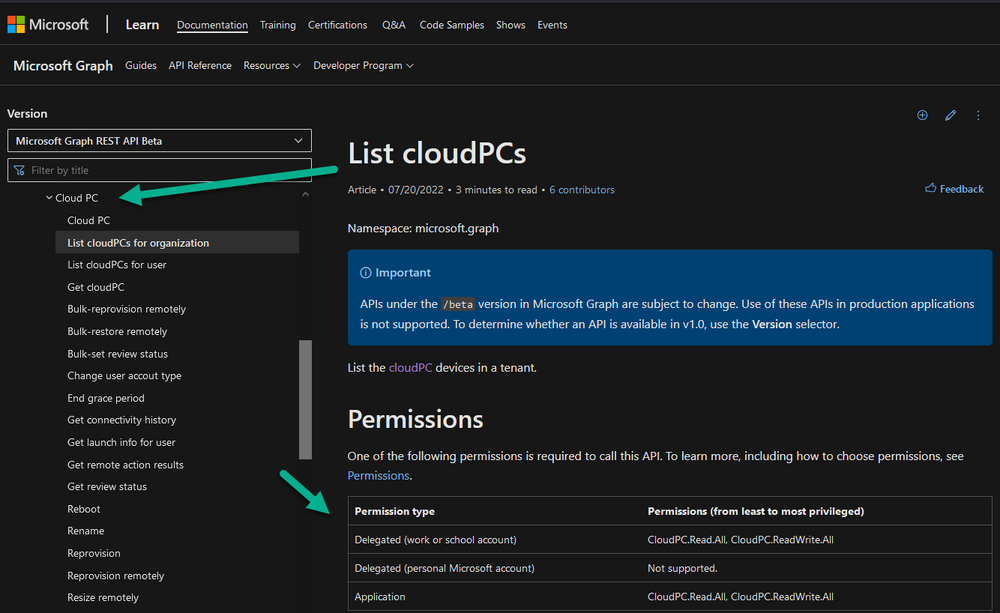
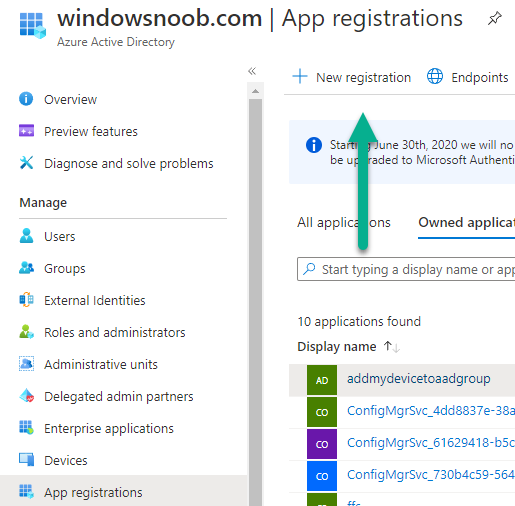
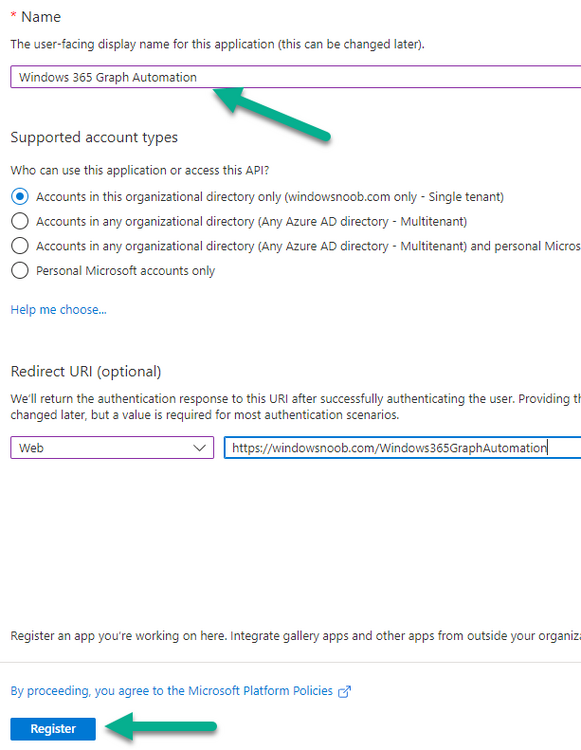
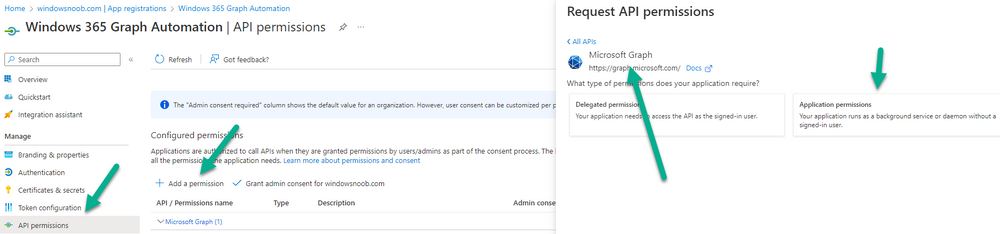
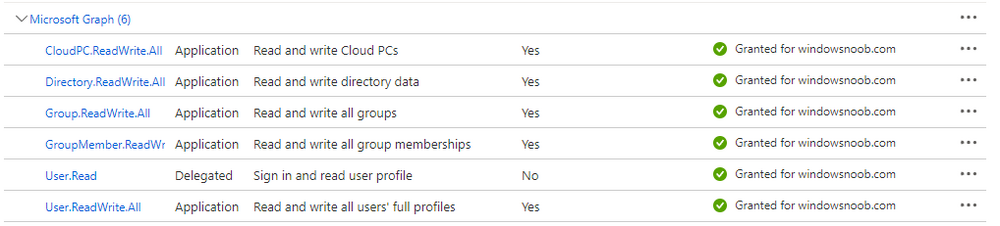
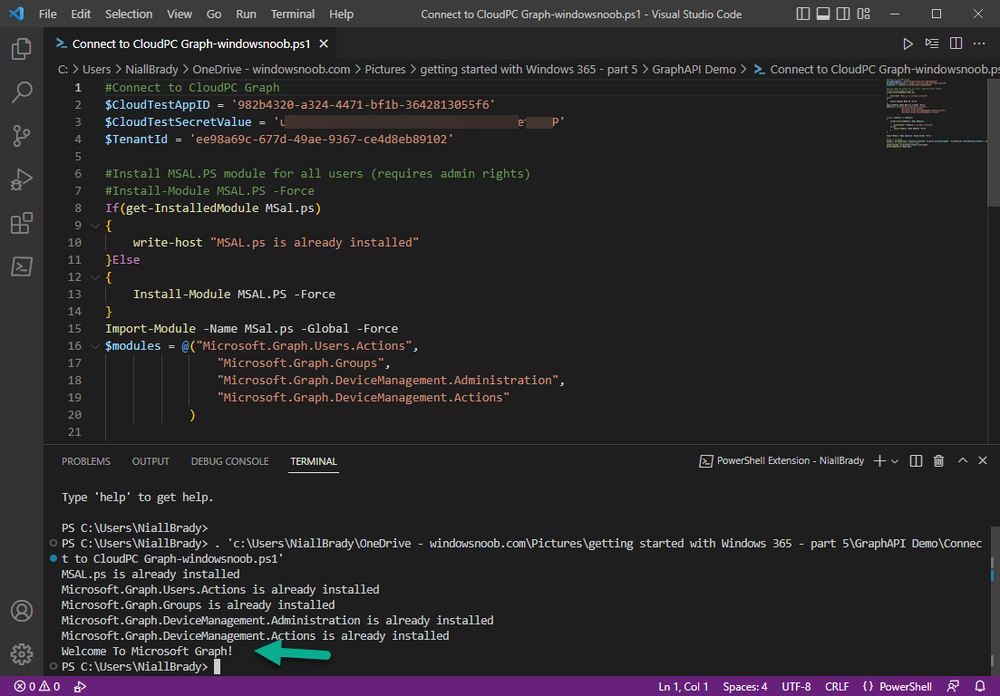
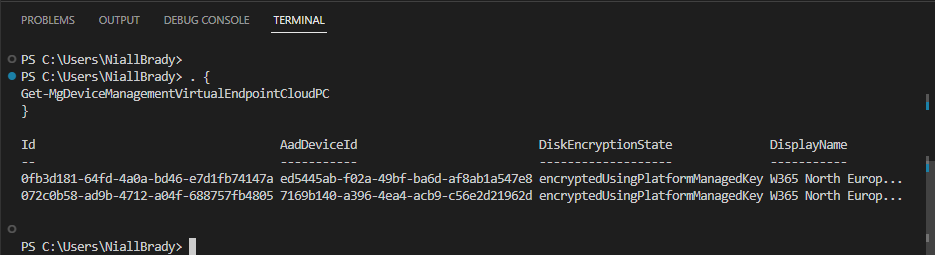
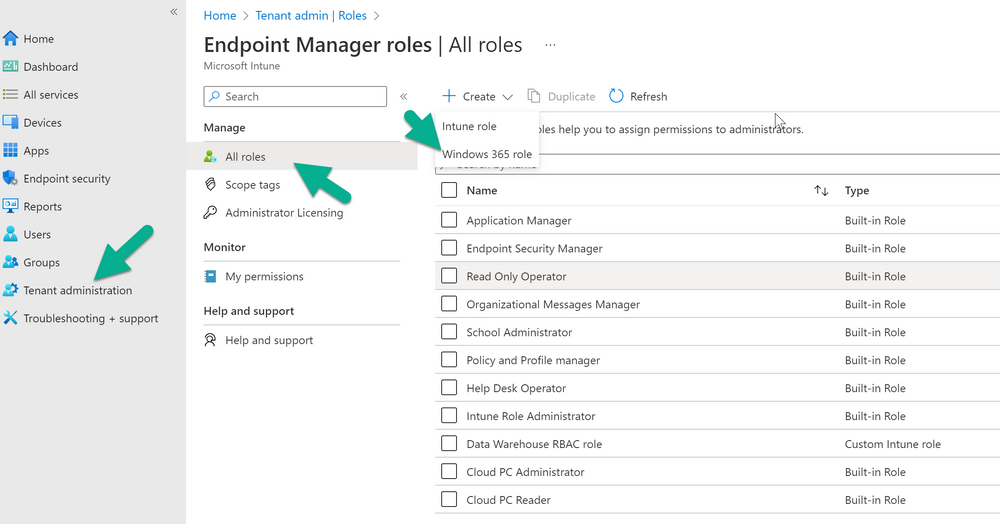
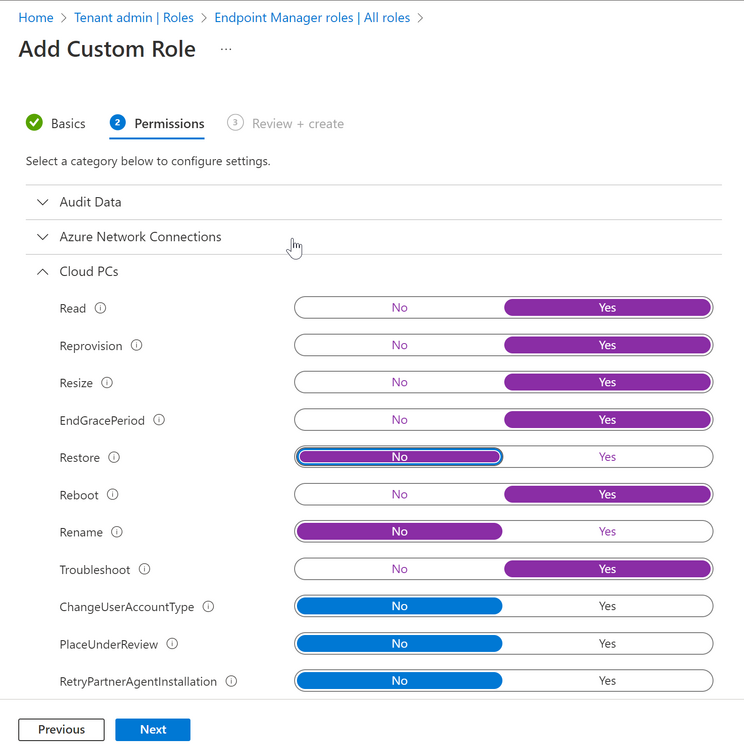
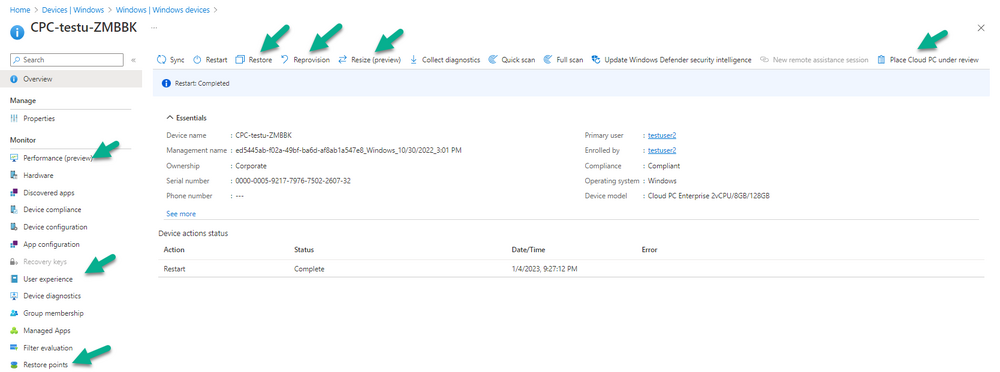
Introduction This is Part 5 in a new series of guides about getting started with Windows 365. This series of guides will help you to learn all about Windows 365 in a clear and insightful way. This series is co-written by Niall & Paul, both of whom are Enterprise Mobility MVP’s with broad experience in the area of modern management. At the time of writing, Paul is a 6 times Enterprise Mobility MVP based in the UK and Niall is a 12 times Enterprise Mobility MVP based in Sweden. In this series we aim to cover everything we learn about Windows 365 and share it with you to help you to deploy it safely and securely within your own organization. In Part 1 we introduced you to Windows 365, selecting the right edition with the level of management that you need, choosing the plan that suits your users needs at a cost you can afford, or modifying the configuration to make it more suited to your individual needs, purchasing licenses and saving money for your organization via the Windows Hybrid Benefit. In Part 2 you learned how to provision an Azure Ad joined Cloud PC and take a look at the different network options available when provisioning an Azure Ad joined Cloud PC. In Part 3 you learned about the steps needed to successfully provision a Hybrid Azure Ad Joined Cloud PC. In Part 4 you saw the many different ways you can connect to your Cloud PC from many device be it Android, Mac, Windows, Linux or iPhone and you learned that not all connection options have the same abilities. The management capabilities of your Cloud PCs are dependent on which edition of Windows 365 you purchase. If you want rich device management, go with Windows 365 Enterprise. If your business is small (less than 300 employees) use the Windows 365 Business option and it's associated (limited) management. Cloud PC's from Microsoft have come about from traditional Desktop as a Service (DaaS) offerings (providing a Windows experience for end users with little or no overhead for IT admins) and an evolution from PaaS offerings (such as Azure Virtual Desktop). Microsoft's definition of Cloud PC is defined as a Windows experience delivered in an elastic way from the cloud while maintaining their full security posture and flexibility and user experiences that they see in the physical world. That flexibility and maintenance is of course done via management and that's our focus in this blog post, managing your Cloud PC's whether you are using the Business or Enterprise edition of the product. Below you can find all parts in this series: Getting started with Windows 365 - Part 1. Introduction Getting started with Windows 365 - Part 2. Provisioning an Azure Ad Joined Cloud PC Getting started with Windows 365 - Part 3. Provisioning a Hybrid Azure Ad Joined Cloud PC Getting started with Windows 365 - Part 4. Connecting to your Cloud PC Getting started with Windows 365 - Part 5. Managing your Cloud PC <- you are here Getting started with Windows 365 - Part 6. Point in time restore Getting started with Windows 365 - Part 7. Patching your Cloud PCs with Windows Autopatch Getting started with Windows 365 - Part 8. Windows 365 boot Getting started with Windows 365 - Part 9. Windows 365 switch Getting started with Windows 365 - Part 10. Windows 365 offline In this part we'll cover the following: Different abilities between editions Management capabilities for Windows 365 Business Sign up for a Windows 365 Business Trial Assigning a user an administrative role Abilities in the Windows365 portal Management capabilities for Windows 365 Enterprise Quick overview of features in Intune Cloud PC related actions on Windows 365 devices Configure Alerts for Windows 365 related issues Custom Windows 365 role-based access control (RBAC) roles Management capabilities via Powershell Create Enterprise app Configure permissions Grant consent Script samples Recommended reading Summary Different abilities between editions In Part 1 of this blog series we highlighted the main differences between the 2 editions. The following table further outlines the different capabilities (including management capabilities) between Windows 365 Business and Windows 365 Enterprise editions. It's clear that if you want image management, device management, connection to on-premises network resources, reporting, monitoring and more that Windows 365 Enterprise is the right choice. Management capabilities for Windows 365 Business Windows 365 comes in two flavors, Windows 365 Business, or Windows 365 Enterprise. With the Enterprise edition you get Intune device management and more included. With the Business edition you are limited to actions (listed below) in the Windows 365 portal or remote actions via the admin console. As there is no Intune management included, there are no licensing prerequisites to set up Windows 365 Business. Sign up for a Windows 365 Business Trial If you'd like to try out the Windows 365 Business for yourself to test Cloud PC's and the management capabilities available to Windows 365 Business, you can sign up for a free 30 days trial if you are in a region where trials are offered. Below are 2 applicable regions (there may be more) where the trial period is currently valid at the time of writing. We signed up for the UK trial. US - https://www.microsoft.com/en-us/windows-365/business/compare-plans-pricing UK - https://www.microsoft.com/en-gb/windows-365/business/compare-plans-pricing For a list of management capabilities for the Business edition via windows365.microsoft.com see below: Add a user and assign a license. Assign or unassign licenses. Change organization default settings. Use remote actions on Cloud PCs. Reset a user's password. Assigning a user an administrative role To avail of this management ability for Windows 365 Business, you'll need a user to be assigned either of the following roles: Global Administrator Windows 365 Administrator In our testing however, there are some scenarios where you'll need more than just the Windows 365 Administrator role and we've asked the Microsoft Product Group for comment. We'll update this blog post when we have more clarity on that. You can assign these RBAC (Role Based Access Control) roles via the admin.microsoft.com portal as a Global Administrator or if the customer has access to Azure Active Directory. To apply the Windows 365 Administrator role using the admin.microsoft.com portal, login as a Global Administrator and click on Users, select Active Users, select the user in question, click on Manage Roles and scroll down to Devices and select the Windows 365 Administrator role before selecting Save Changes. To apply the role to a user in Azure AD, login as Global Administrator, select Roles and administrators Search for the appropriate role, in this example we will apply the Windows 365 Administrator role. Click on + Add assignments and then click on No member selected to add at least one member to this role. Note: If your Windows 365 business admin user does not have either of those roles assigned, then none of the remote actions or additional abilities will be available or visible on windows365.microsoft.com or admin.microsoft.com. We noted that in order to see anything in the admin portal you'd also need to assign the Global Reader role in addition to the Windows 365 Administrator role. Abilities in the Windows365 portal Here we can see a typical view of the windows365.microsoft.com portal and the management capabilities available to a user with one of the roles mentioned above for Windows 365 Business. In this view we can see an additional tab called Your organization's Cloud PCs. Clicking on Your organization's Cloud PCs reveals a list of users in your organization and their assigned licenses and it reveals another option to Update organization settings. From this view the admin can select to manage users by clicking on them directly and accessing the options available, this gives you access to add users, reset passwords, update organization settings or do remote actions on users Cloud PCs all from one place. For example in the screenshot below, clicking on the account the devices or even the licenses and apps tabs will show additional options available for that user. Note: You can only add/remove Licenses if you are logged in with a user that has the appropriate role, for example a Global Administrator or License Administrator role. Management capabilities for Windows 365 Enterprise Windows 365 Enterprise management capabilities take place in Microsoft Intune and as such Intune licensing is required. Windows 365 Enterprise Cloud PC's are managed by Intune so anything you can do in Intune is possible on your Cloud PC's, with a few exceptions currently, such as BitLocker encryption. Logging in to the Microsoft Endpoint Manager portal you can see Windows 365 Enterprise Cloud PC management in various places, so let's take a look at where you can find it. In the portal you can get Windows 365 information easily by clicking on Explore This brings you directly to the Windows 365 provisioning area in Intune which also contains monitoring reports and links to product documentation and forums. For example, the Remoting connection link brings you directly to Endpoint Analytics reports with lots of useful data. and we also have Resource performance. In addition to the above, Windows 365 management is visible in other areas, while we can't take a look at all of them let's review a few. Cloud PC related actions on Windows 365 devices In addition to the standard actions available to regular devices there are several Windows 365 actions available for Cloud PCs in the Intune portal. The following actions are available on the Overview page after selecting a Cloud PC. Restore Reprovision Resize (preview) Place Cloud PC under review and in the left node you have additional related actions such as: Performance (preview) User experience Restore points User experience is available on non Cloud PC's also however Cloud PC's will also see two additional tabs namely Resource performance Remoting connection It's also worth noting that at the time of writing that Recovery keys are greyed out (not available) for Cloud PCs and that is because Bitlocker encryption is not currently supported (but is on the roadmap). Custom Windows 365 role-based access control (RBAC) roles You can create custom RBAC roles for Cloud PC management as explained here. In Tenant administration, click on Roles, select All Roles, click on + Create and select Windows 365 role. Once there, select the abilities you want this role to have access to. Configure Alerts for Windows 365 related issues You can now configure alerts in Intune to notify your admins via email about problems occurring with your Windows 365 Cloud PCs. The following Windows 365 based alert rules are currently available at the time of writing (January 2023) Azure network connection failure Upload failure for custom images Provisioning failure impacting Cloud PCs For details about configuring these alerts see here. Management capabilities via Powershell You can do most Windows 365 Cloud PC tasks automatically using PowerShell via Microsoft Graph. To use this automation however you need to fulfill some requirements. Create an Enterprise app Configure permissions Grant consent Note: Please note that in this example we will use client secrets as it's in a lab, however in production environments please use Azure Key vault to keep this access secure. Create an Enterprise App We'll use app registrations in Azure AD to create an Enterprise app that allows us to use Microsoft Graph to carry out our automation work. In Azure AD go to App registrations. Click on + New registration. In the new app registration, give it a useful name like Windows 365 Graph Automation so that you know what it is for, and choose Accounts in your tenant (first option), and optionally select Web from the Redirect URI (optional)+ choices and point it to a localhost address or one that you have available. Finally click on Register. Next, you'll want to add a secret by clicking on Add a certificate or secret, and then once the secret has been created, copy the following values from this app registration as we'll need them in our PowerShell scripts: Application (client) ID Directory (tenant) ID Client credentials (certificate or secret) Below you can see the secret is created and copied, store that info somewhere safe. Review Permissions To review the permissions see the Graph API Documentation for what permissions are needed, keep in mind that these are currently in Beta and subject to change. Those permissions are basically broken down into three areas, License, Group and Cloud PC License permissions User.ReadWrite.All Directory.ReadWrite.All Group permissions GroupMember.ReadWrite.All, Group.ReadWrite.All Directory.ReadWrite.All CloudPC permissions CloudPC.ReadWrite.All But before we get started with those permissions we need to create an App registration. Configuring API permissions To configure API Permissions for the your app API, Click API permissions, then click + Add a permission, select Microsoft Graph, select Application permissions Next, add the following: User.ReadWrite.All Group.ReadWrite.All GroupMember.ReadWrite.All CloudPC.ReadWrite.All Directory.ReadWrite.All The permissions are now added Grant consent Don't forget to Grant admin consent for your Tenant after doing so otherwise this won't work. after clicking on Yes you can see the scripts are granted Sample scripts We recently hosted a session about troubleshooting Hybrid Azure AD joined Cloud PC's in a USA Cloud PC meetup. Before our session Dawn Wertz did a demo about this automating Cloud PC actions with Graph and PowerShell. She very kindly provided her sample scripts that she used during her demo and you can download them yourself below. We'd highly recommend that you review the included PowerPoint (thanks Dawn) and video. You can download the scripts (and PowerPoint) here. Windows 365 Cloud PC Powershell samples.zip After editing one of the scripts in Visual Studio Code and adding the missing info (tenant id, app id, secret on lines 2-4) we could easily connect to Microsoft Graph. Once connected, it's possible to run commands such as list all the Cloud PCs. Get-MgDeviceManagementVirtualEndpointCloudPC and the output proves it's working. Recommended reading Get started with Windows 365 Business - https://techcommunity.microsoft.com/t5/windows-it-pro-blog/get-started-with-windows-365-business/ba-p/2595485 Remotely manage Windows 365 Business Cloud PCs - https://learn.microsoft.com/en-us/windows-365/business/remotely-manage-business-cloud-pcs Device management overview for Cloud PCs - https://learn.microsoft.com/en-us/windows-365/enterprise/device-management-overview Graph API permissions for Windows 365 Cloud PCs - https://learn.microsoft.com/en-us/graph/api/virtualendpoint-list-cloudpcs?view=graph-rest-beta&tabs=http Azure Key vault - https://learn.microsoft.com/en-us/azure/key-vault/general/overview Visual Studio code - https://code.visualstudio.com/Download Powershell with VisualStudioCode - https://code.visualstudio.com/docs/languages/powershell Custom Windows 365 role-based access control (RBAC) roles - What's new in Windows 365 Enterprise | Microsoft Learn Windows 365 Powershell module - https://www.nielskok.tech/windows-365/deploy-windows-365-via-powershell/ Powershell scripts for Windows 365 - https://askaresh.com/2023/01/18/consolidated-scripts-all-configurational-task-via-powershell-for-windows-365-cloud-pc-under-microsoft-intune-portal-mem/ Add users via Powershell - https://blog.thomasmarcussen.com/script-to-add-a-windows-365-cloud-pc-user/ Summary Managing Cloud PC's as an Admin is possible via a variety of different methods and depending on your subscription level and level of expertise. Windows 365 Business admins can manage their Cloud PC's via two main methods, the Windows365 portal and admin.microsoft.com. Windows 365 Enterprise admins get feature rich device management via Microsoft Intune and can automate repetitive actions using PowerShell scripts and Microsoft Graph. The possibilities are endless !


-
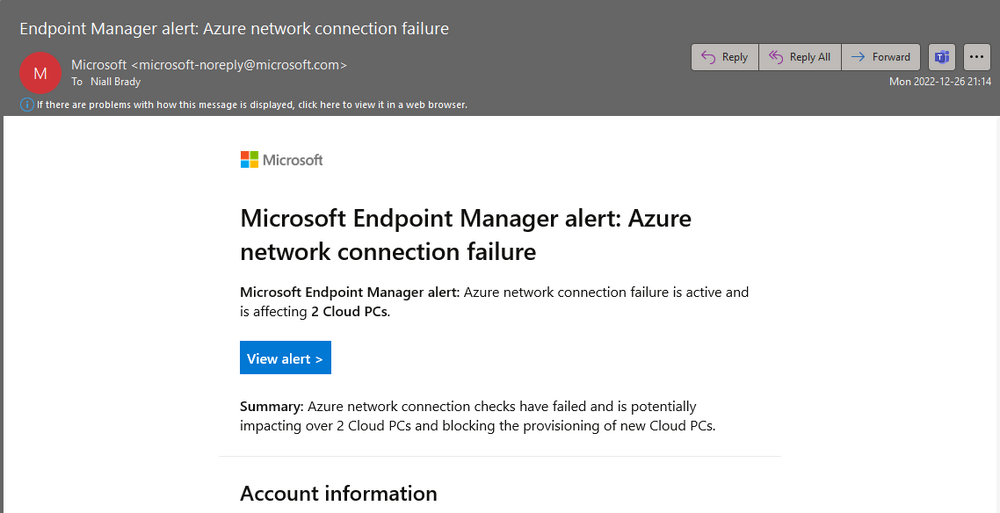
Introduction Microsoft added an ability to configure Alerts (preview) in Intune back in October 2022 and I’ve been using them since then, however I never got around to blogging about it as other things took priority. I was reminded that the alerts feature was configured by an email I received yesterday. clicking on the View alert link in the email brings you to the associated alert info in Intune as shown here. And clicking on the Azure network connection failure alert gives more data. Note: You can further drill down into the details to get more data, and if you click on the linked reports it'll show your fail(ed) Azure Network Connections. So why is this useful ? Well in my particular case I caused the issue by shutting down the Routing and Remote Access (RRAS) server. I was doing some hyper-v maintenance and shut down the RRAS server before exporting it, and i never resumed the virtual machine, meaning that the Azure Network Connection check (ANC) would fail. But let’s imagine that the RRAS server had an issue causing it to fail to start the service(s) or taking it offline. The email alert is yet another way of alerting admins that something is not right. How to configure Windows 365 Alerts In the Intune portal select Tenant admin (1), select Alerts (preview) (2) and finally select Alert Rules (3) as shown in the screenshot below. next, configure the alert making sure to select On for Status and add one or more email addresses. Finally, click on Apply. The following Windows 365 based alert rules are currently available at the time of writing (December 2022) Azure network connection failure Upload failure for custom images Provisioning failure impacting Cloud PCs Currently it seems that the Alert rules are only available for failures or problems. Hopefully we’ll get more alert rules types such as the successful provisioning of a Cloud PC as I requested here. What else do you think we should be alerted about ? until next time, adios !
-
i'm not sure which app you mean, but perhaps you mean this ? https://aka.ms/mfasetup and in there the USER can change to whatever default method they want, this is a user setting and we cannot enforce it (that I am aware of)
-
where did they change the option, at the login to windows screen or somewhere else ?
-
was this question related to Windows 365 or Azure AD ? number matching will be the default method come february 2023, so how can users choose something else ? Can I opt out of number matching? Yes, currently you can disable number matching. We highly recommend that you enable number matching for all users in your tenant to protect yourself from MFA fatigue attacks. Microsoft will enable number matching for all tenants by Feb 27, 2023. After protection is enabled by default, users can't opt out of number matching in Microsoft Authenticator push notifications.
-
Introduction While trying to connect to my Windows 365 Cloud PC using the Remote Desktop app, I got the following error. as shown here clicking on See details revealed some more info. I double checked using the Windows 365 App and it too, produced the same error code. Your connection failed. Error Code: 0x3000047 A guick google revealed similar error codes for AVD (Azure Virtual Desktop) but nothing for Windows 365. And the problem didn’t match my suspected issue. As this Cloud PC is Hybrid Azure AD joined to my lab, I suspected that my external internet facing IP address has changed or access to Routing and Remote Access Server (RRAS) was not working. Logging in to my RRAS server I could see this. checking in Azure, I could clearly see that the the Hybrid Azure AD VPN connection was listed as not connected, and again I suspected that it was due to my external internet facing IP address having changed (it changes often with my current ISP). On my RRAS server I checked my external internet facing IP address using one of the many websites out there to determine your IP address, and it had indeed changed. With the new IP address, I changed the settings in Azure for my Windows 365 Hybrid Local Network Gateway and then clicked on Save. Back on the RRAS server, in routing and remote access, I tried to Connect to the VPN again… and this time it worked ! and after trying the Windows 365 App again, it connected just fine ! problem solved
-
Welcome Austin, i've never heard of Dark Basic, what is it ?
-
I contacted Johan and here's his reply Hmm, I have actually done this once.... He will have to run a ds-Query against Global Catalog, as opposed to Ldap..... Or pay me to give him a custom TSCommander, including him signing a paper that he's responsible for not having several computers with the same samAccountName in multiple Domains
-
why do you tink you need a reboot ? just add a rescan to your diskpart script...
-
hi, i assume you mean this post if you try the net use commands manually what is the output ?
-
Introduction I recently presented a session with Paul Winstanley in a USA Windows 365 User Group meetup focused on all things Windows 365. The meetup included some great ‘what’s new’ content from Microsoft Program Manager Christiaan Brinkhoff and some great Powershell/Graph automation information and demos from Dawn Hertz. Myself and Paul then did a session about Windows 365 Hybrid Azure AD join which is one of the parts of our current series all about getting started with Windows 365 here. The video is now up on youtube and you can review it here. Our session starts at the 1:20 mark here: do us a favor and check it out, oh and do check out our series too ! Below you can find all parts in this series: Getting started with Windows 365 – Part 1. Introduction Getting started with Windows 365 – Part 2. Provisioning an Azure Ad Joined Cloud PC Getting started with Windows 365 – Part 3. Provisioning a Hybrid Azure Ad Joined Cloud PC Getting started with Windows 365 – Part 4. Connecting to your Cloud PC Getting started with Windows 365 – Part 5. Managing your Cloud PC Getting started with Windows 365 – Part 6. Point in time restore Getting started with Windows 365 – Part 7. Windows 365 boot Getting started with Windows 365 – Part 8. Windows 365 switch Getting started with Windows 365 – Part 9. Windows 365 offline Getting started with Windows 365 – Part 10. Patching your Cloud PCs with Windows Autopatch cheers niall