anyweb
-
Posts
9278 -
Joined
-
Last visited
-
Days Won
371
Everything posted by anyweb
-

Failed to Run Task Sequence
anyweb replied to TacomaWA's topic in System Center Configuration Manager (Current Branch)
do you have any boundary added in your boundary group -
Failed to Run Task Sequence
anyweb replied to TacomaWA's topic in System Center Configuration Manager (Current Branch)
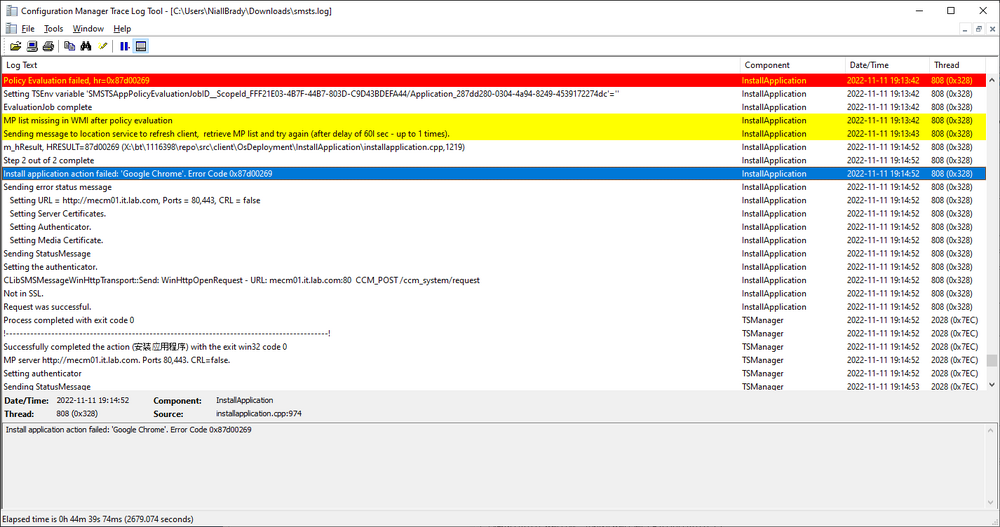
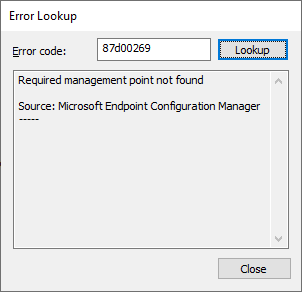
ok we need to see the smsts.log to dig deeper, feel free to clean if of any sensitive info before attaching here -
Failed to Run Task Sequence
anyweb replied to TacomaWA's topic in System Center Configuration Manager (Current Branch)
the content might be on your dp but is it the correct source version ? enable the Source Version column in your boot images to see what source version it is set to did you set boundaries correctly ? -
here you go
-
you forgot to include the smsts*.log and app*.log files, they will show any failure.
-
SCCM 2007 SP2 prerequisites download
anyweb replied to EngiNerd's topic in Configuration Manager 2007
check your pm -
SCCM 2007 SP2 prerequisites download
anyweb replied to EngiNerd's topic in Configuration Manager 2007
i need to check when i get home, i don't have them online... i'll check later tonite and ping you on pm -
SCCM 2007 SP2 prerequisites download
anyweb replied to EngiNerd's topic in Configuration Manager 2007
i'll see if i can find the files and make them available to you -
dont use a task sequence, use a powershell script that runs based on events that are triggered from actions that you are interested in, such as logon, logoff etc...
-
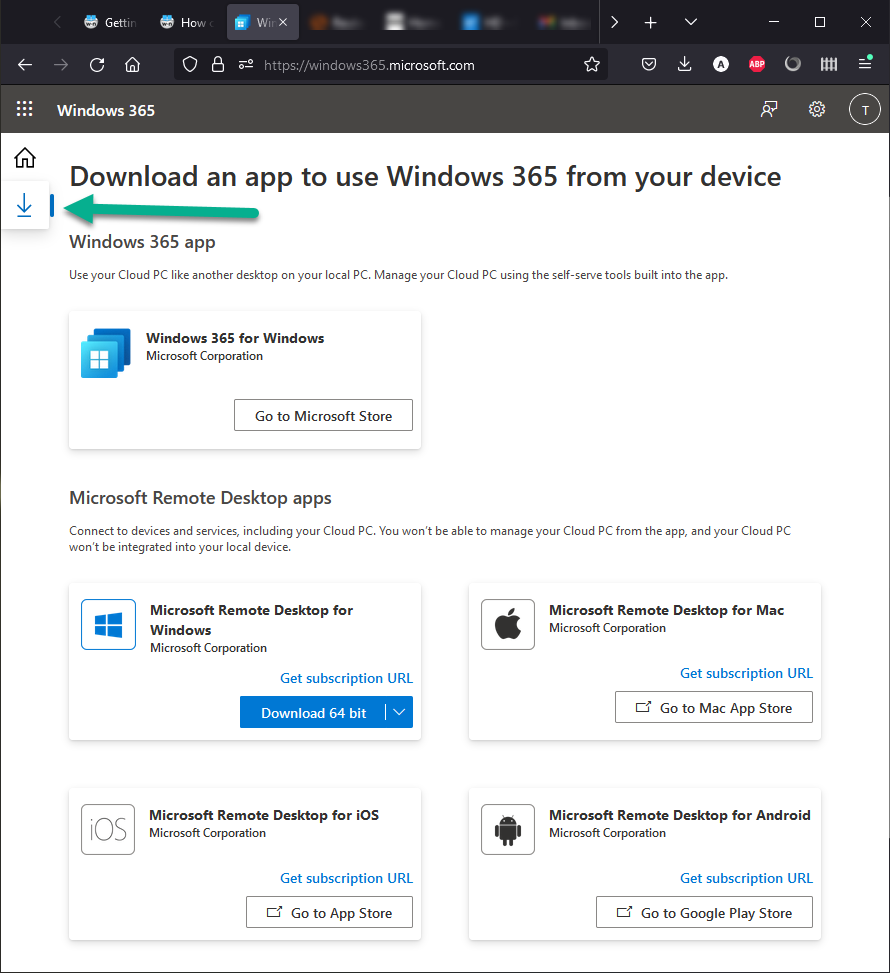
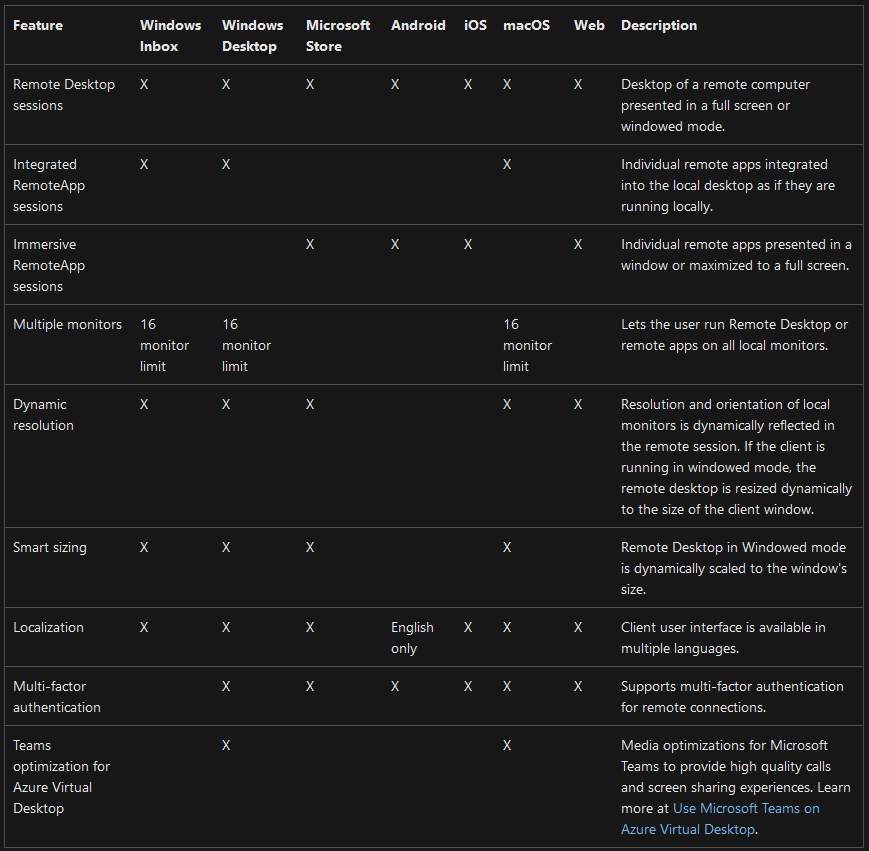
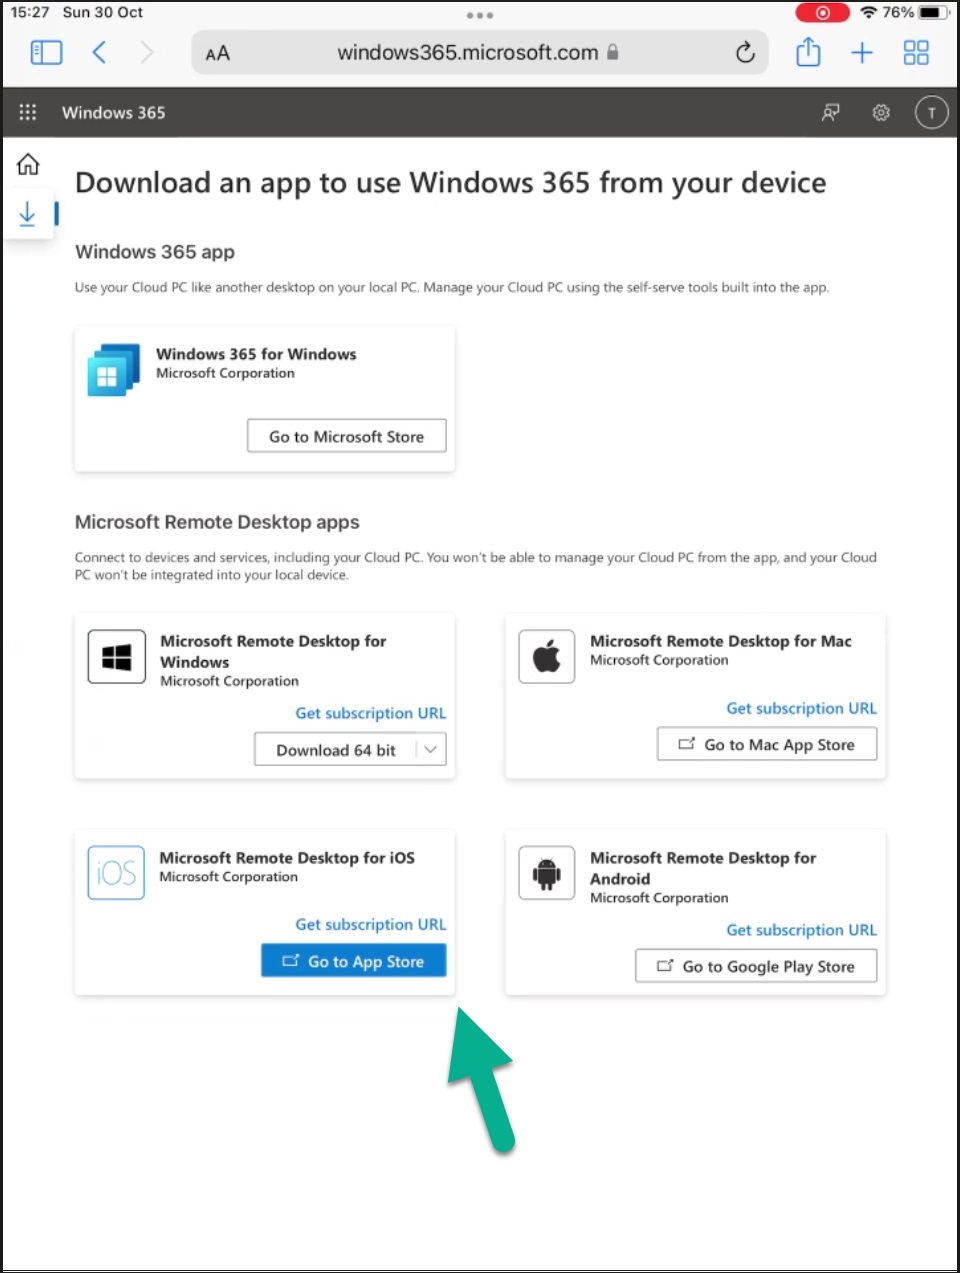
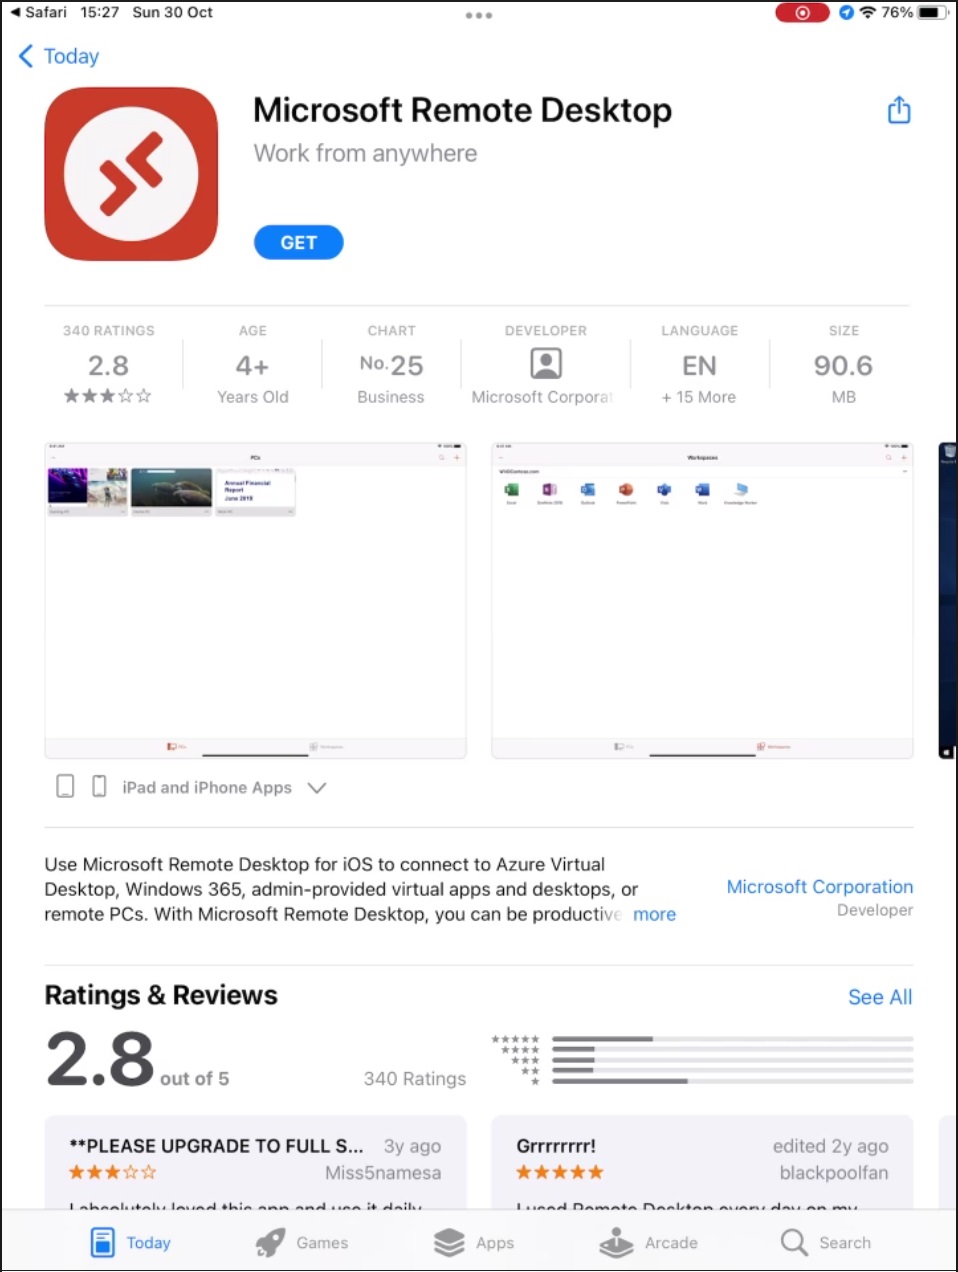
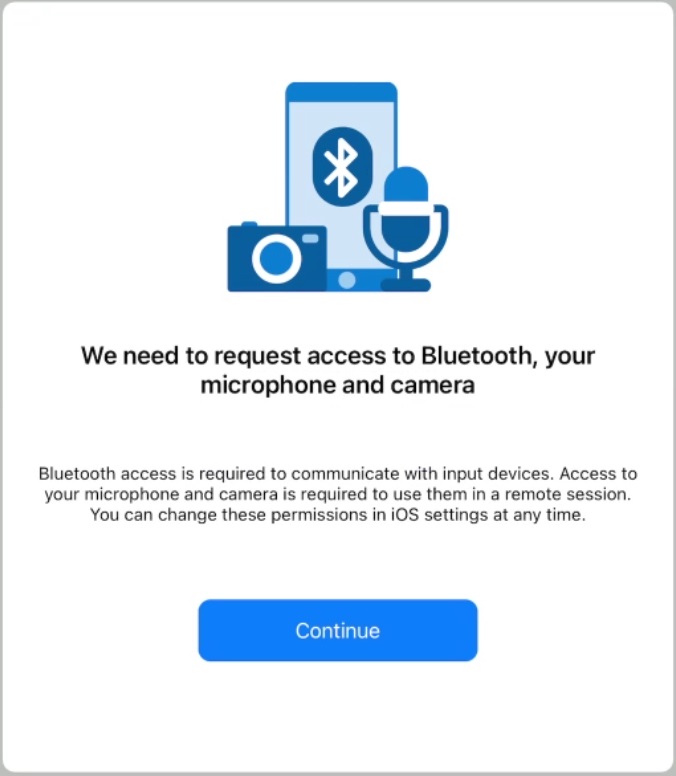
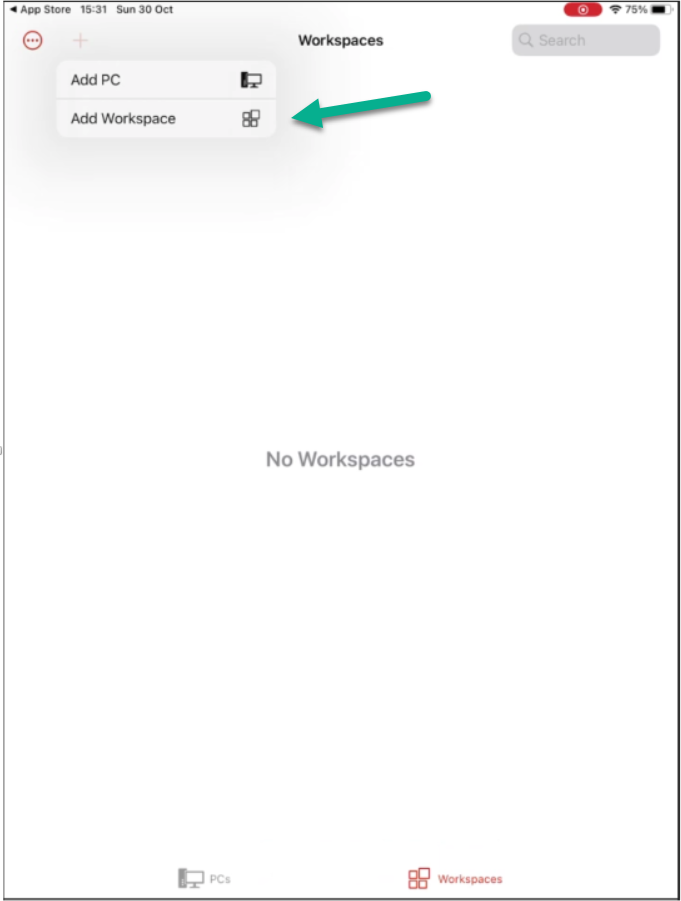
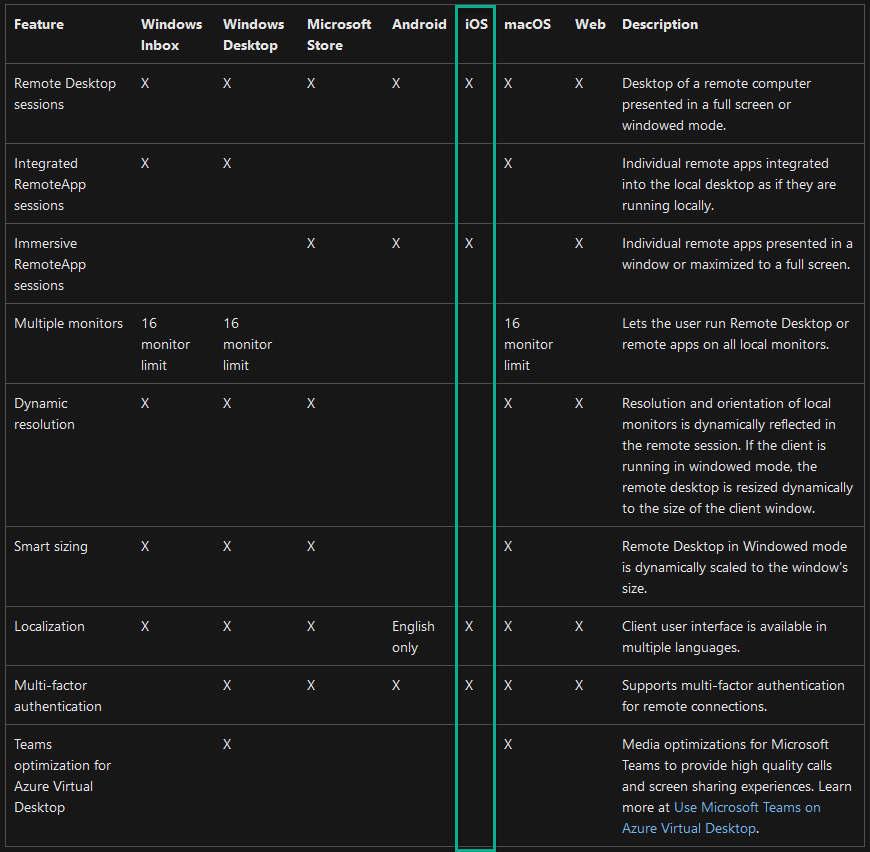
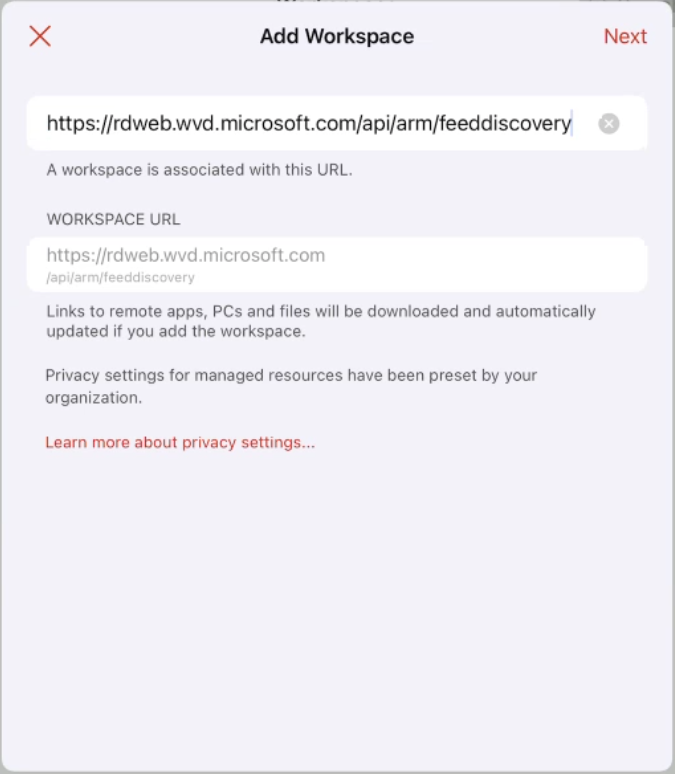
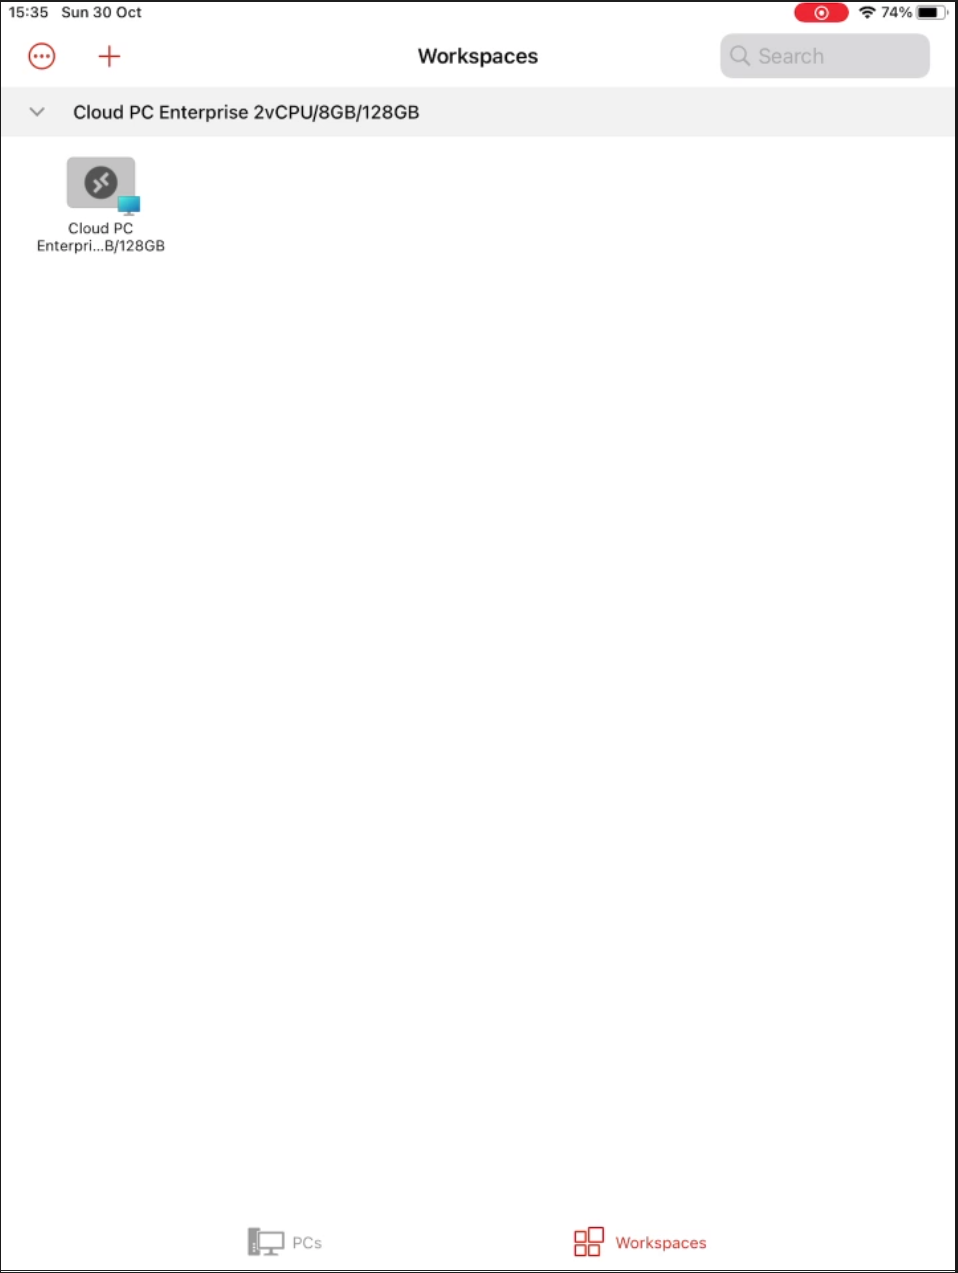
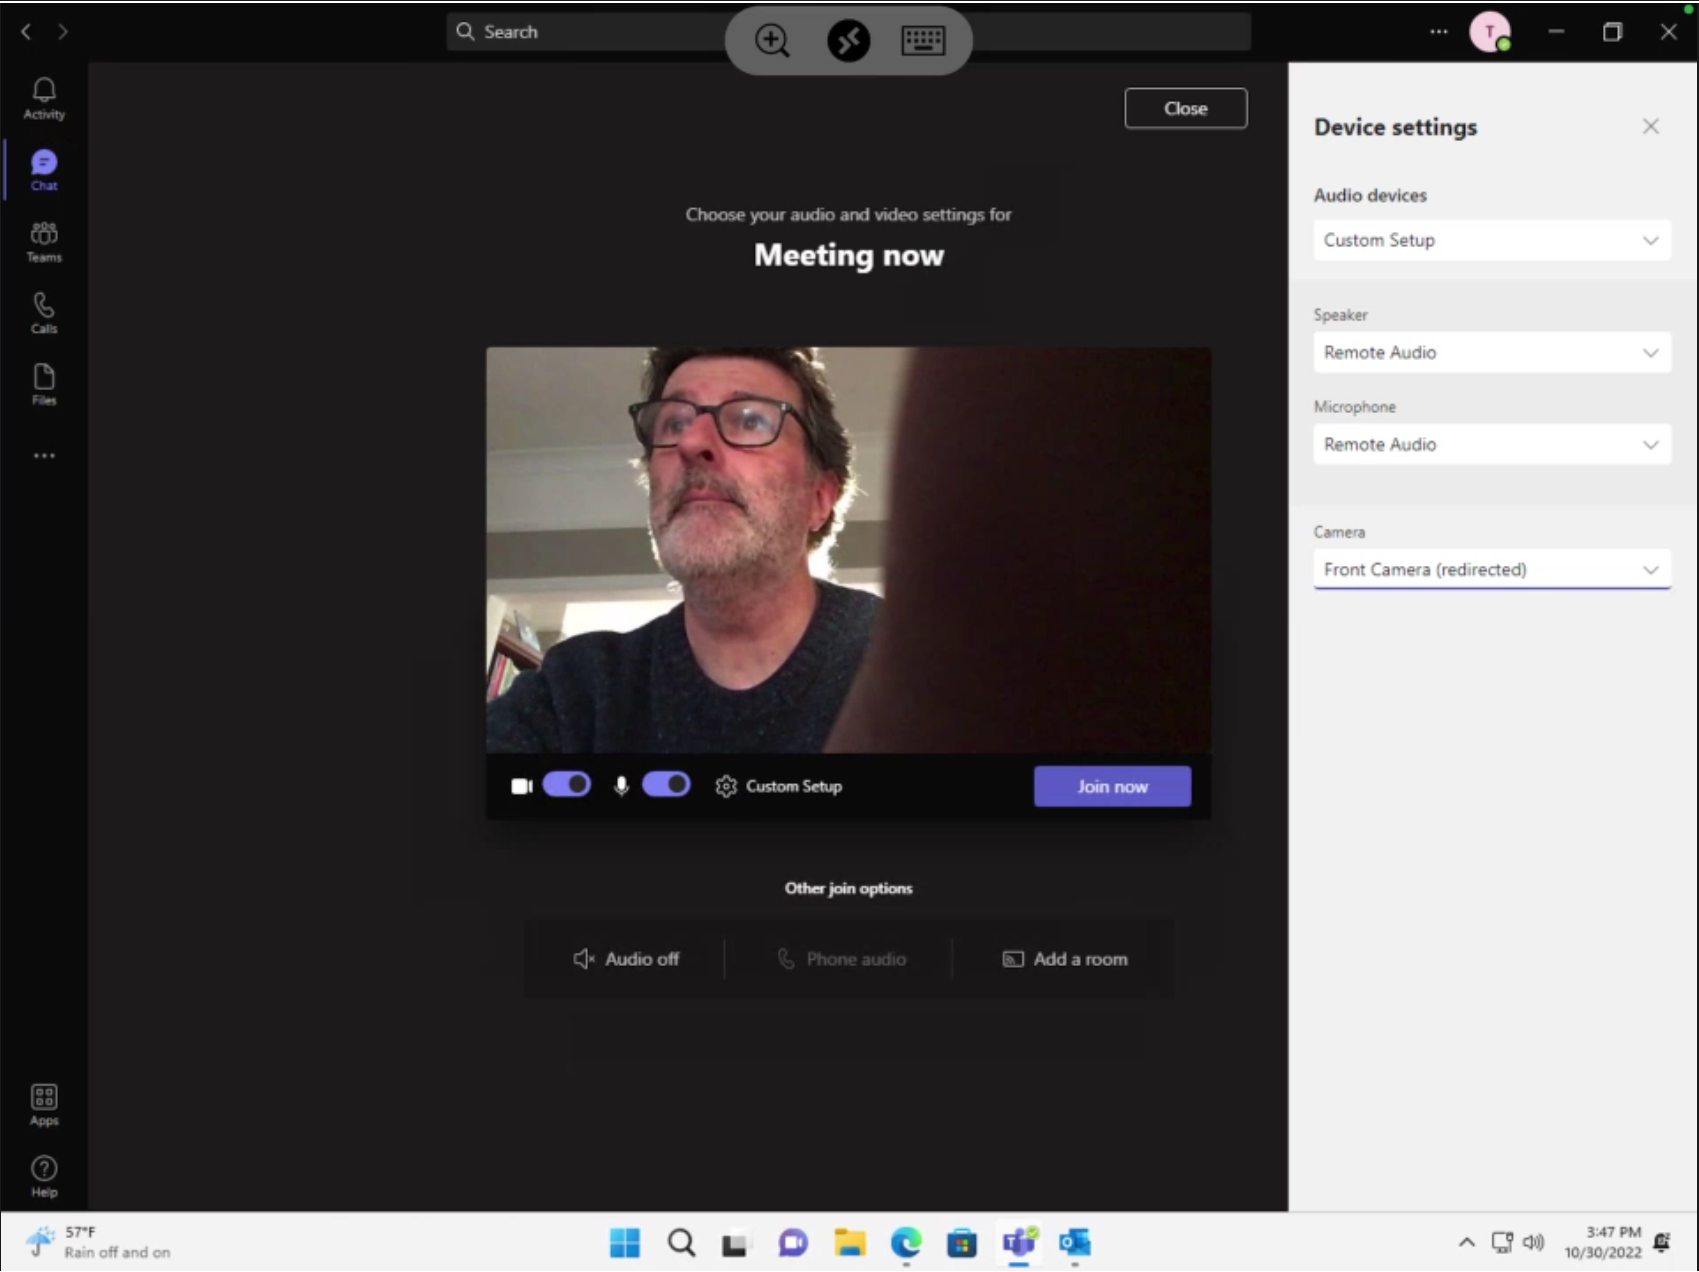
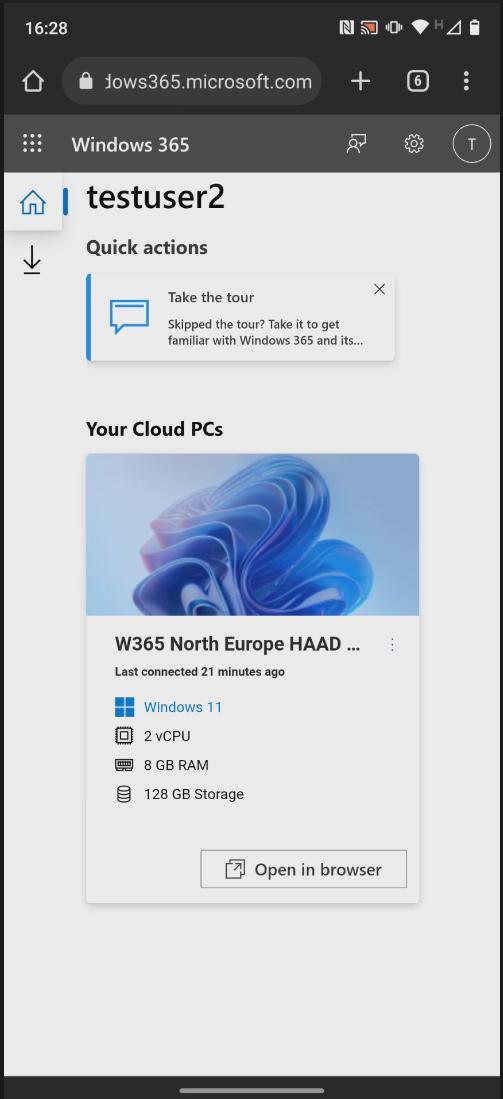
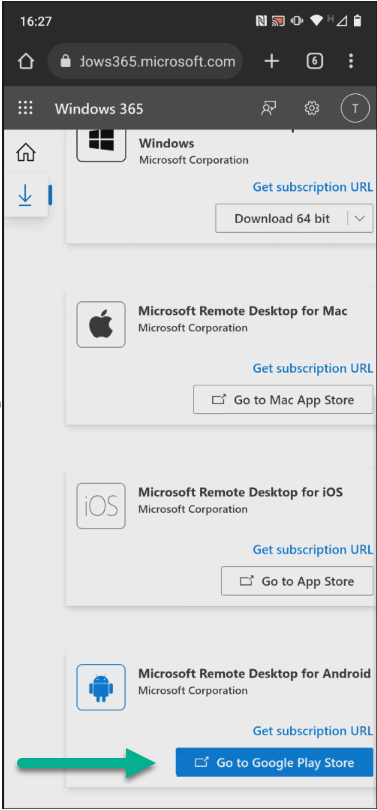
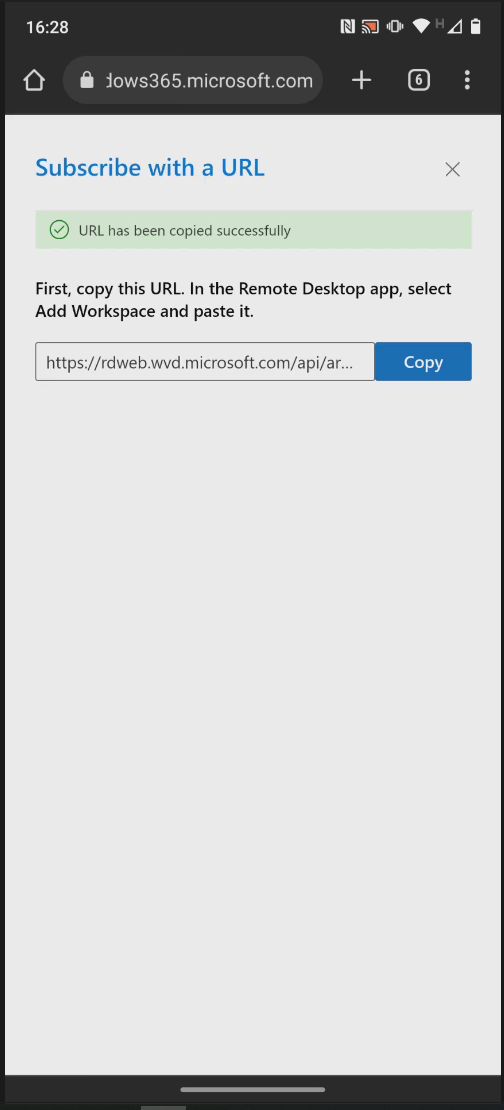
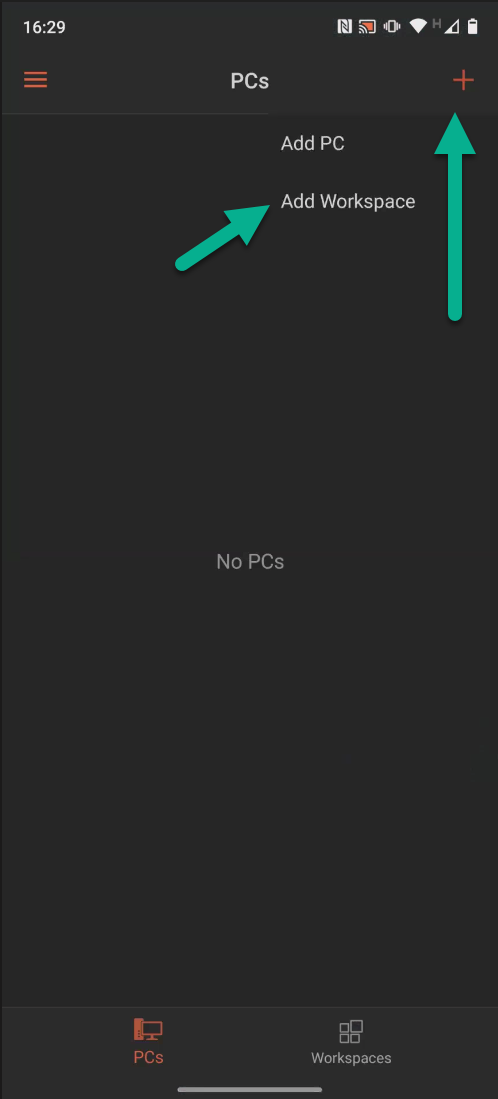
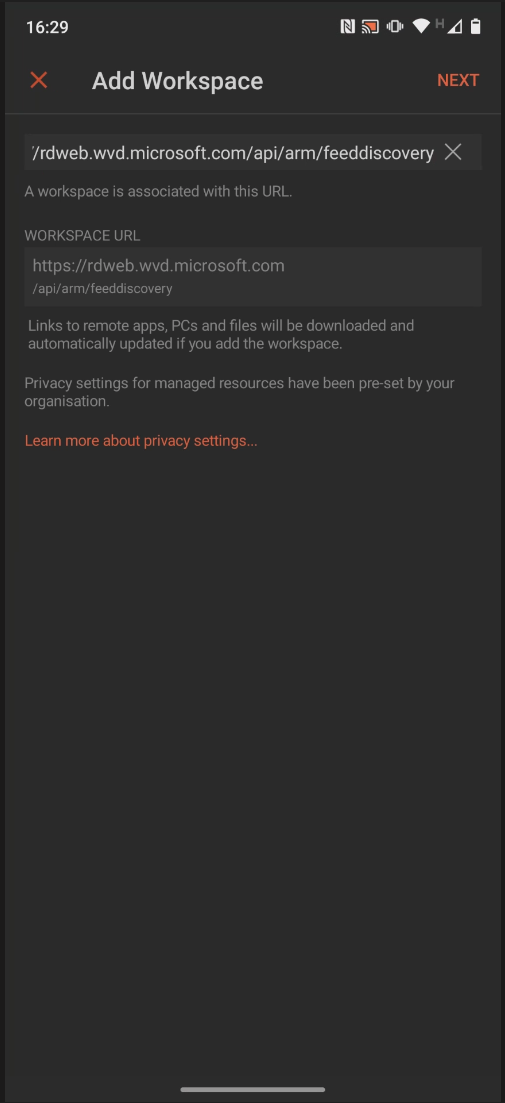
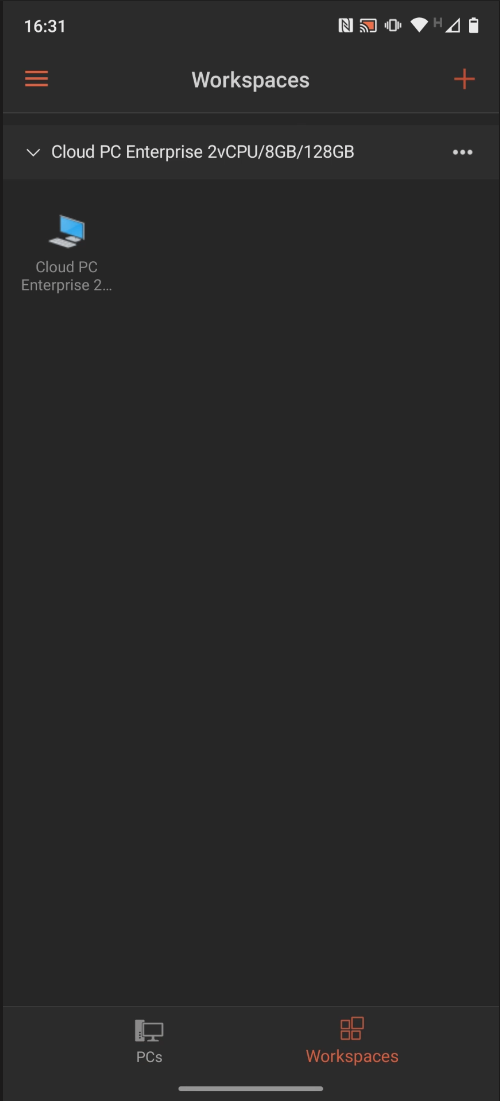
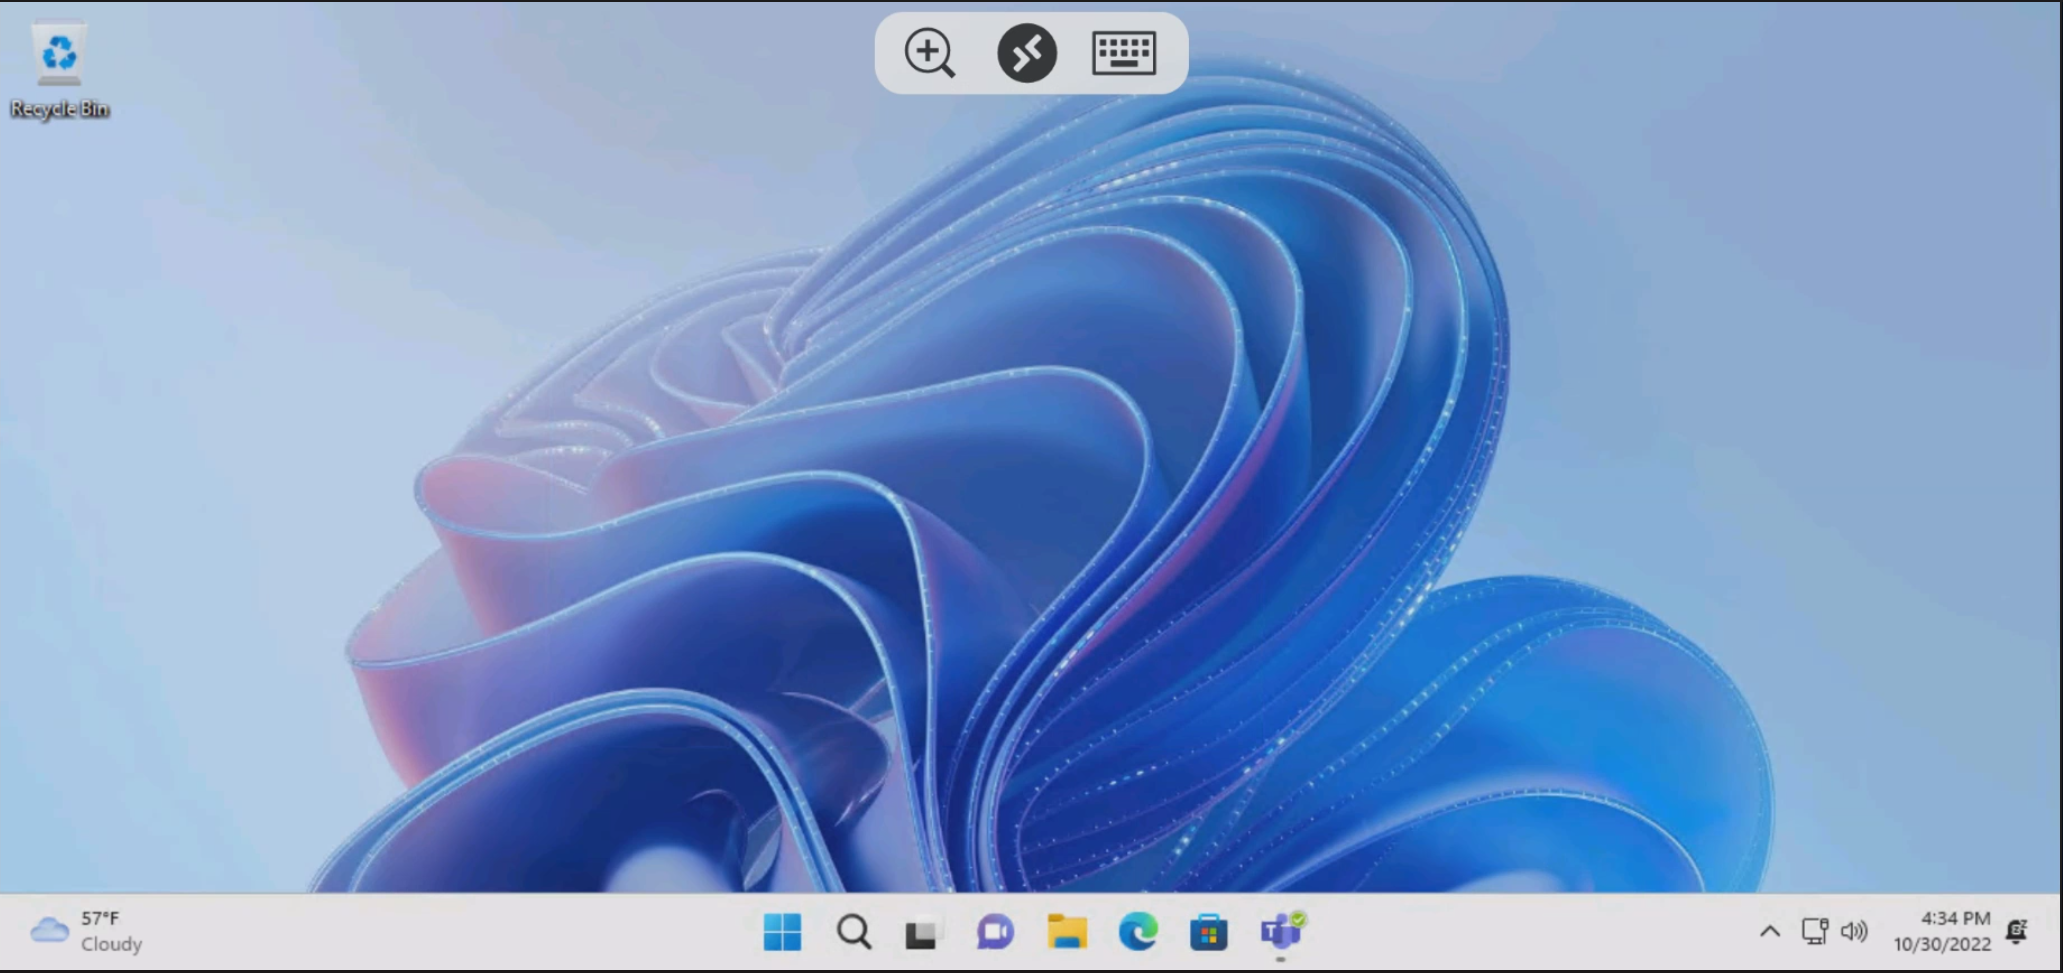
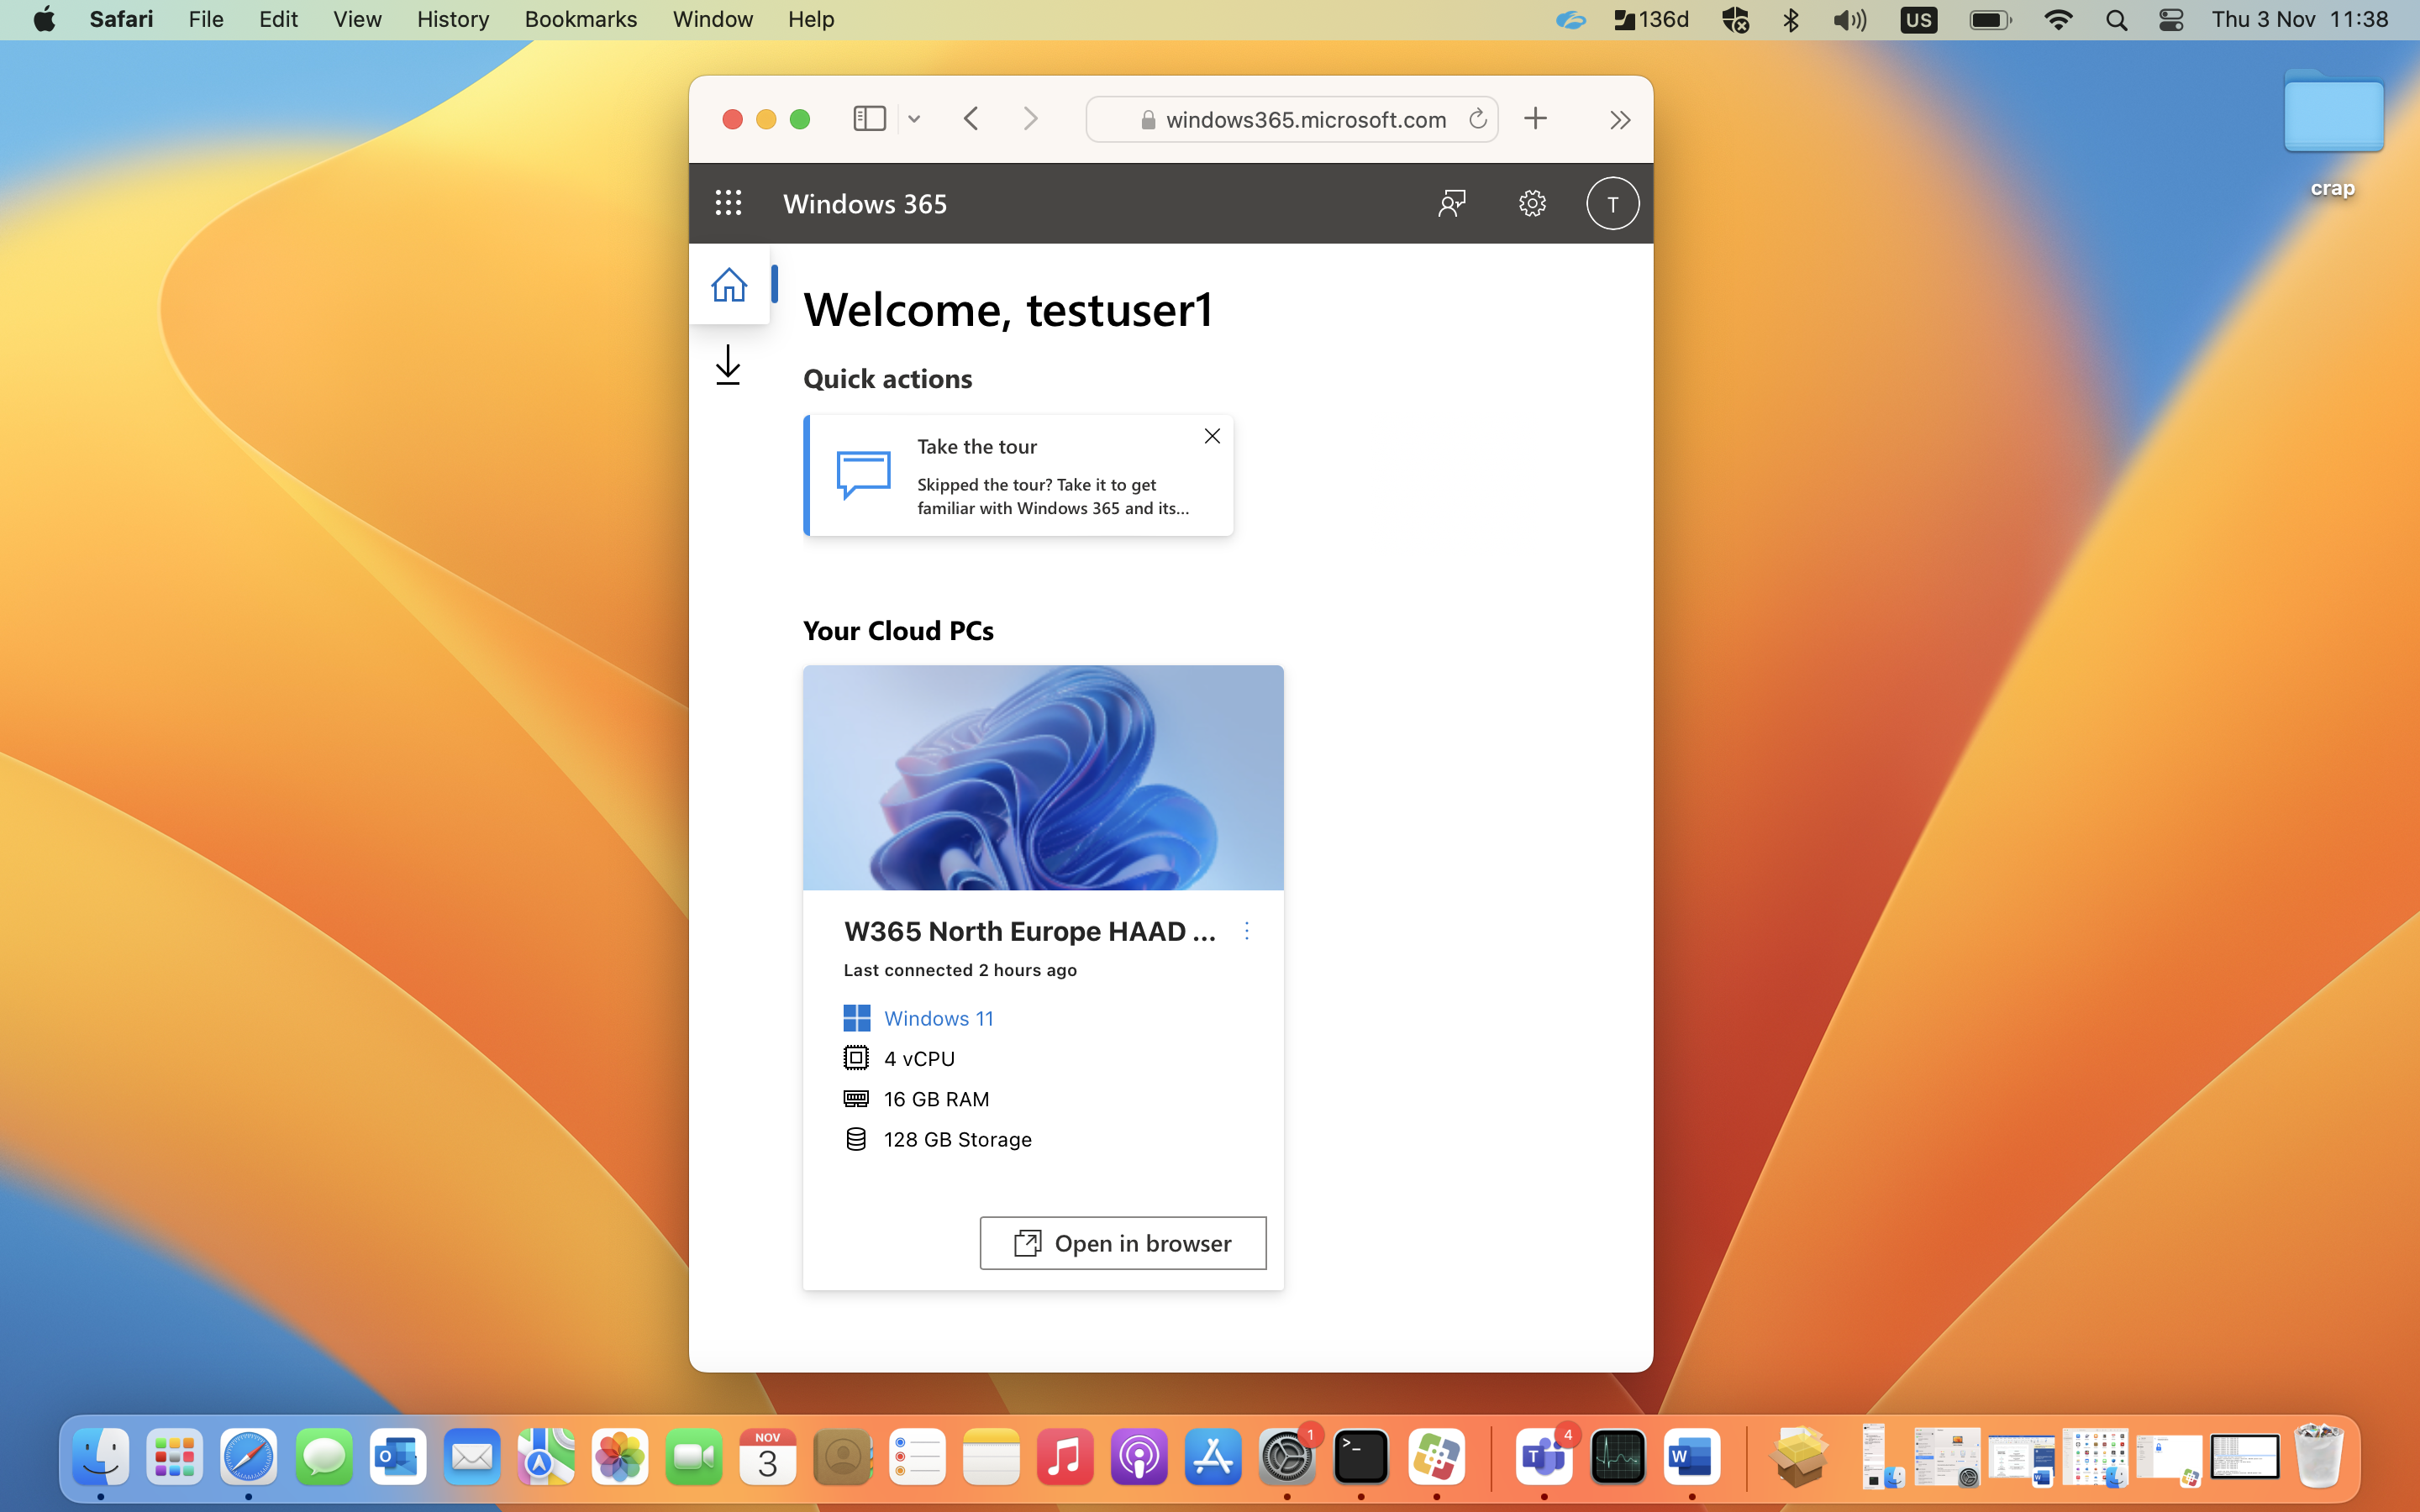
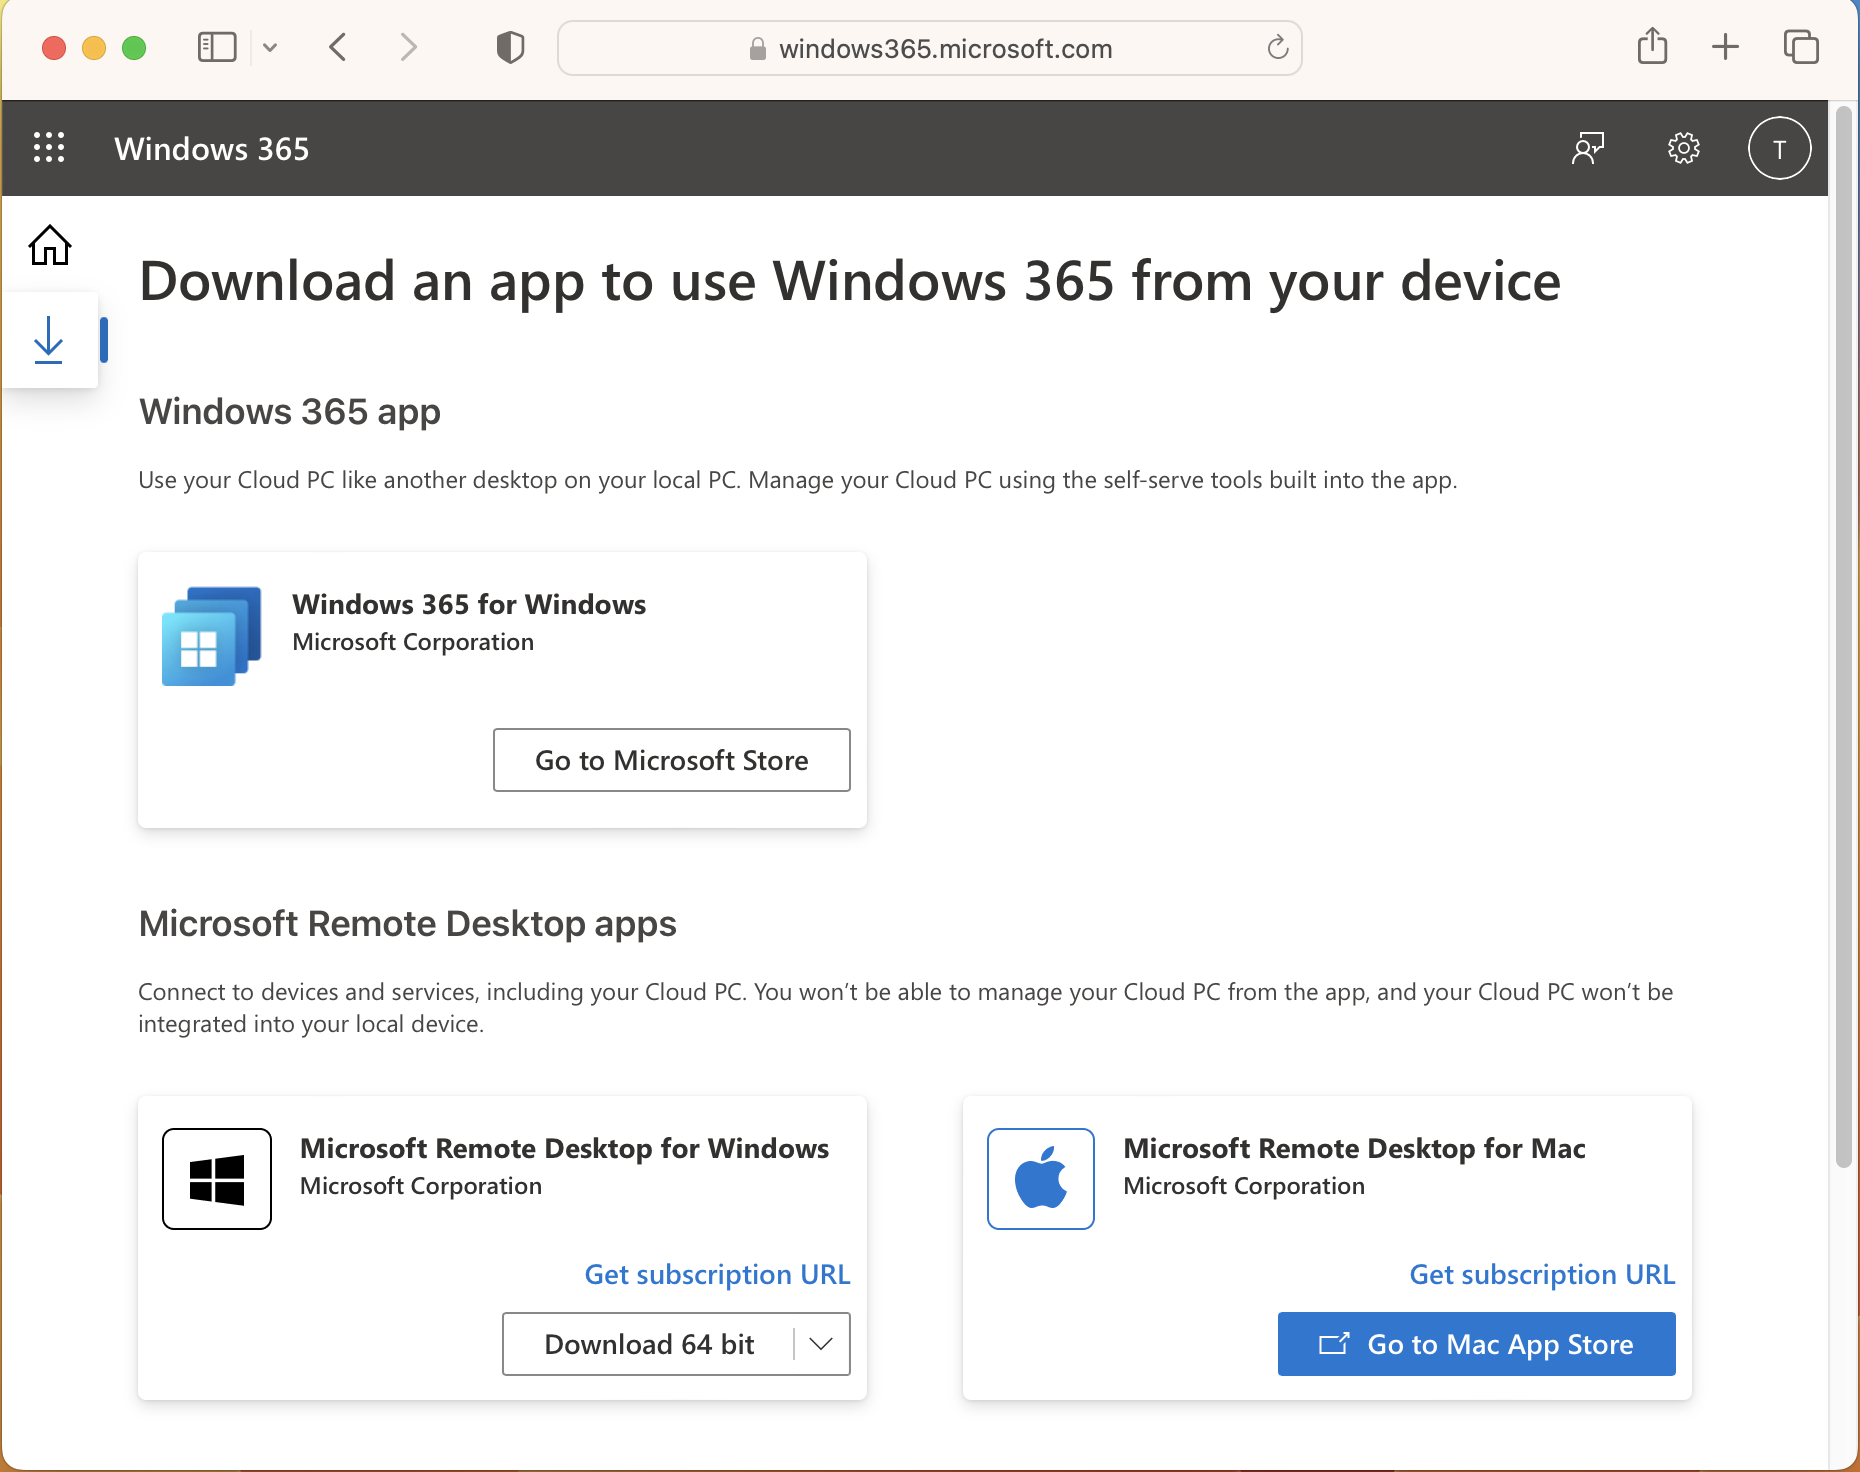
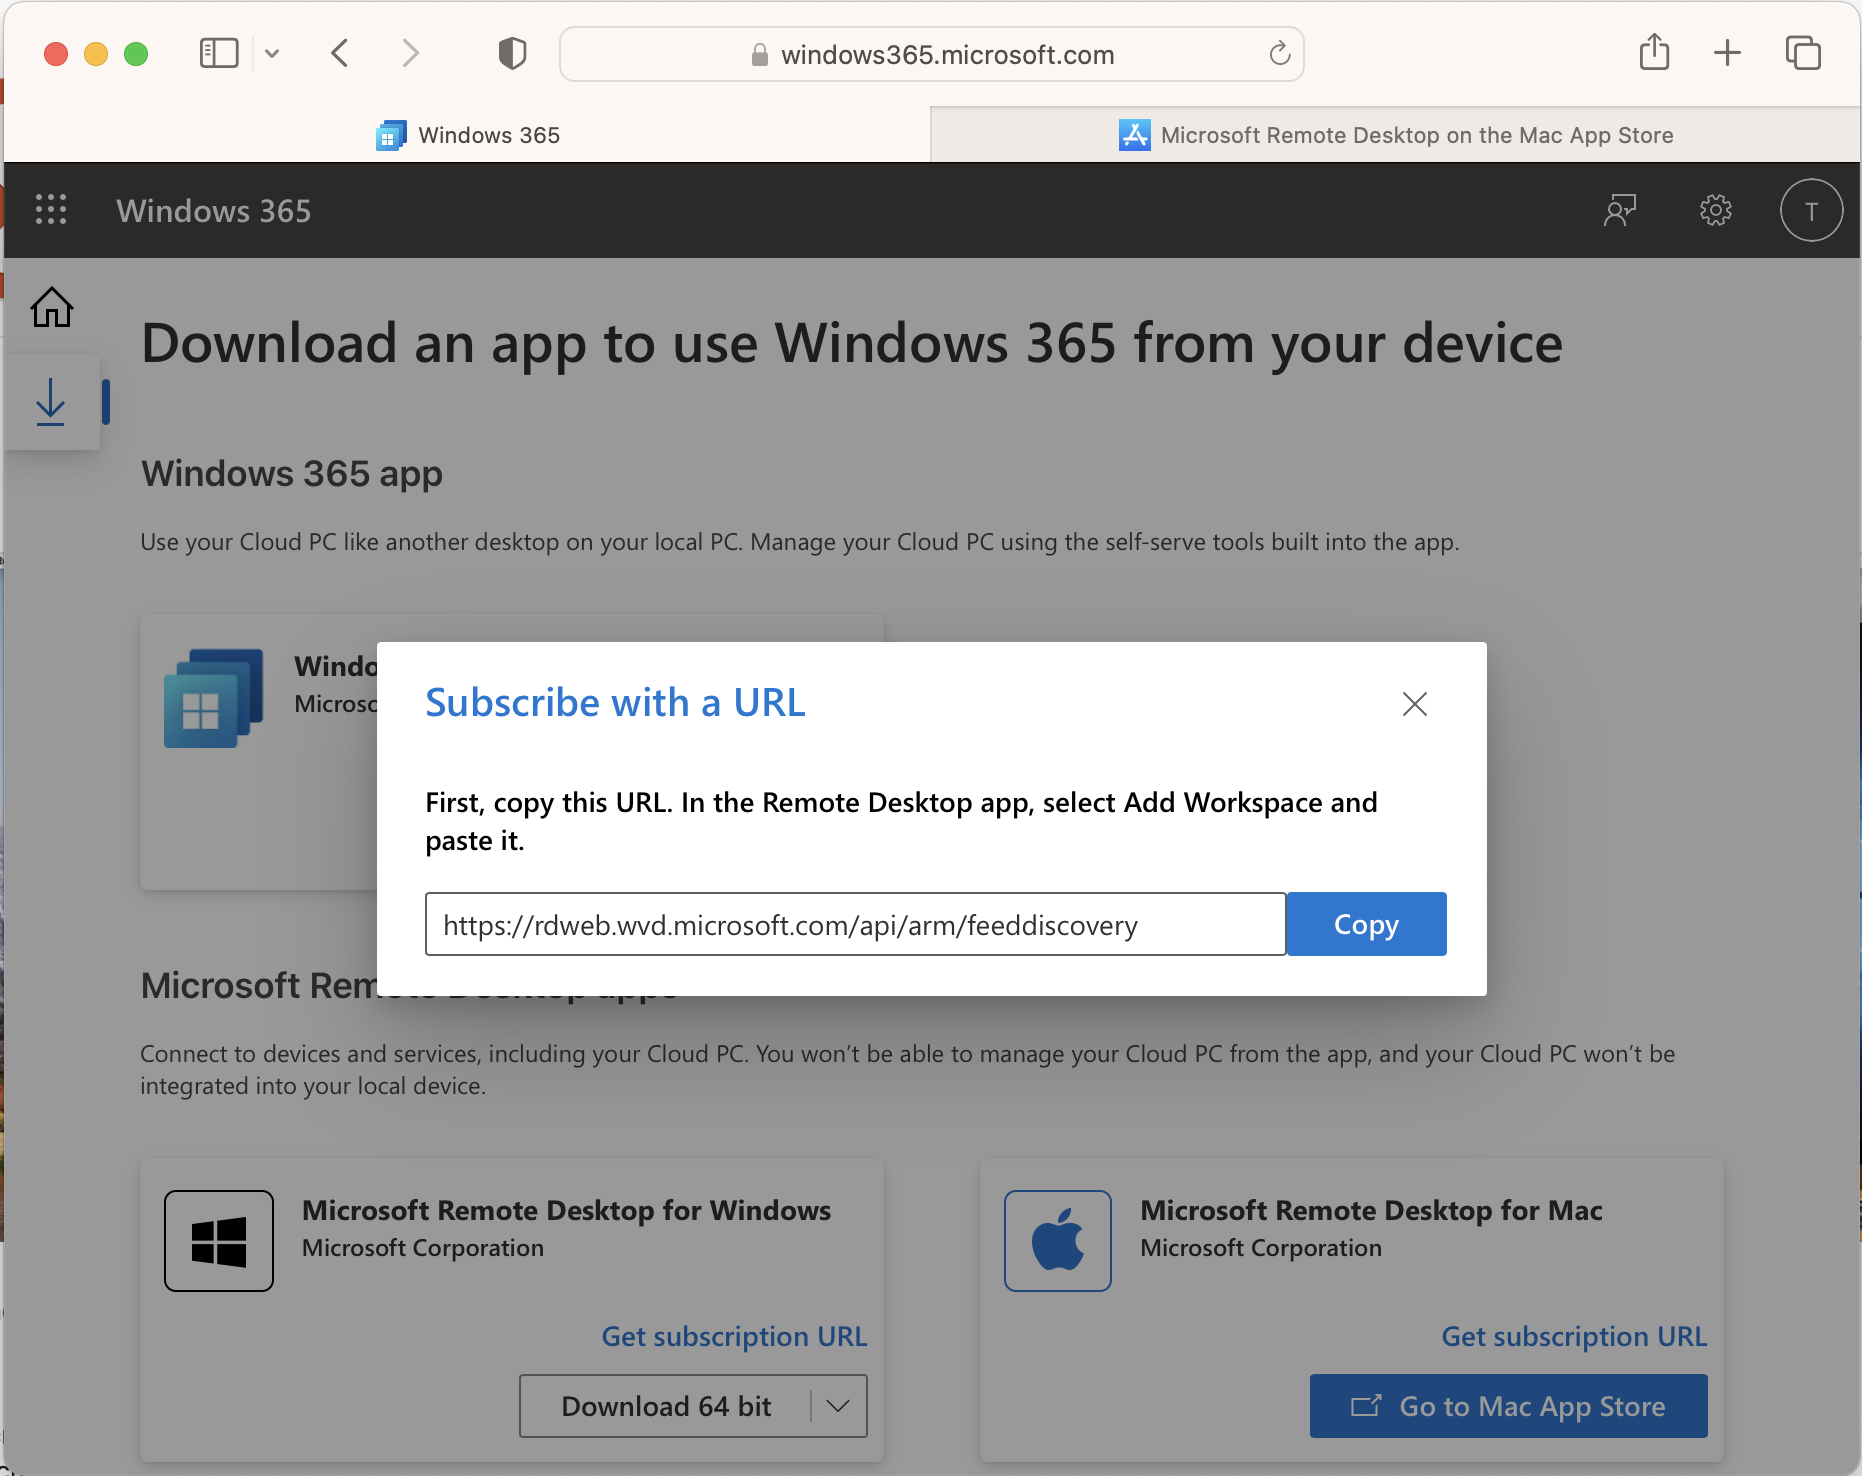
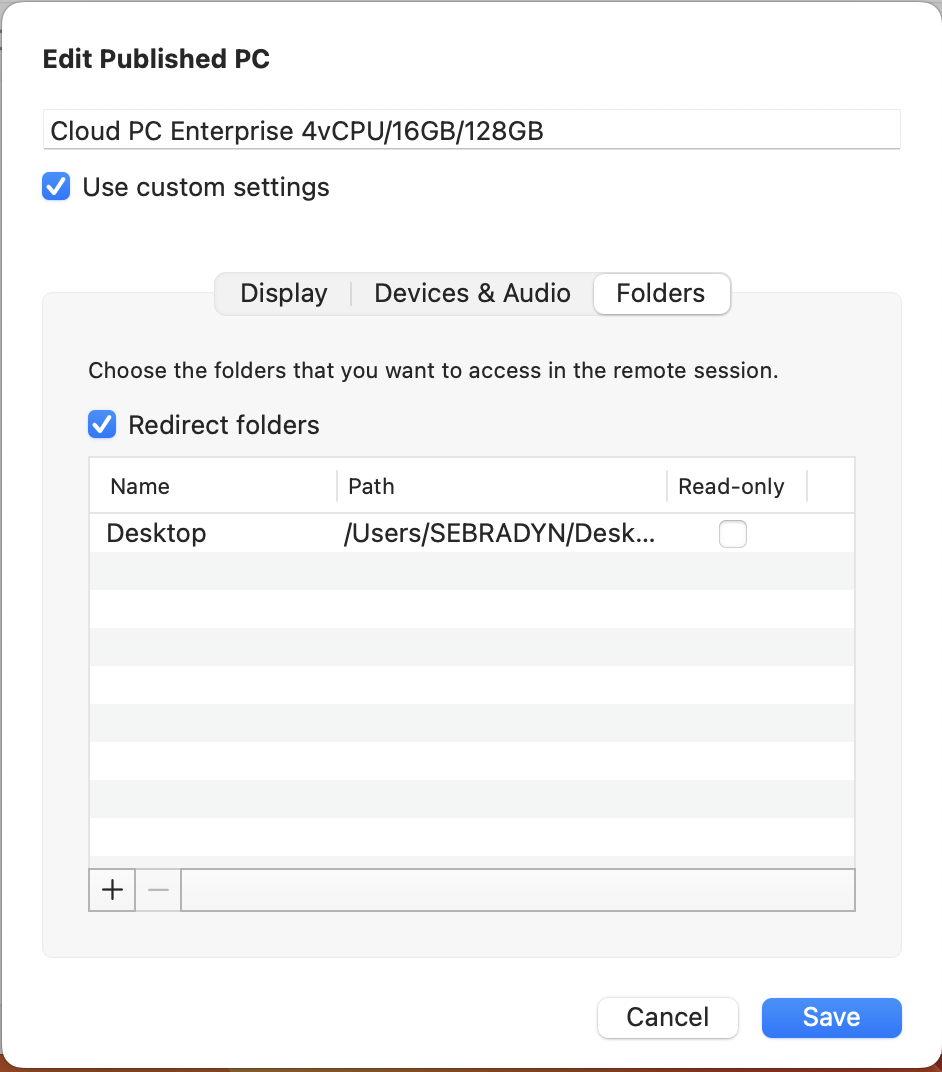
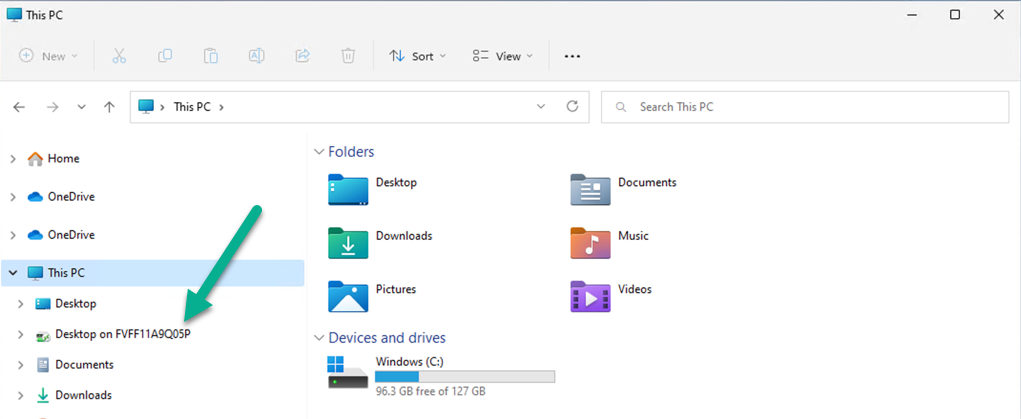
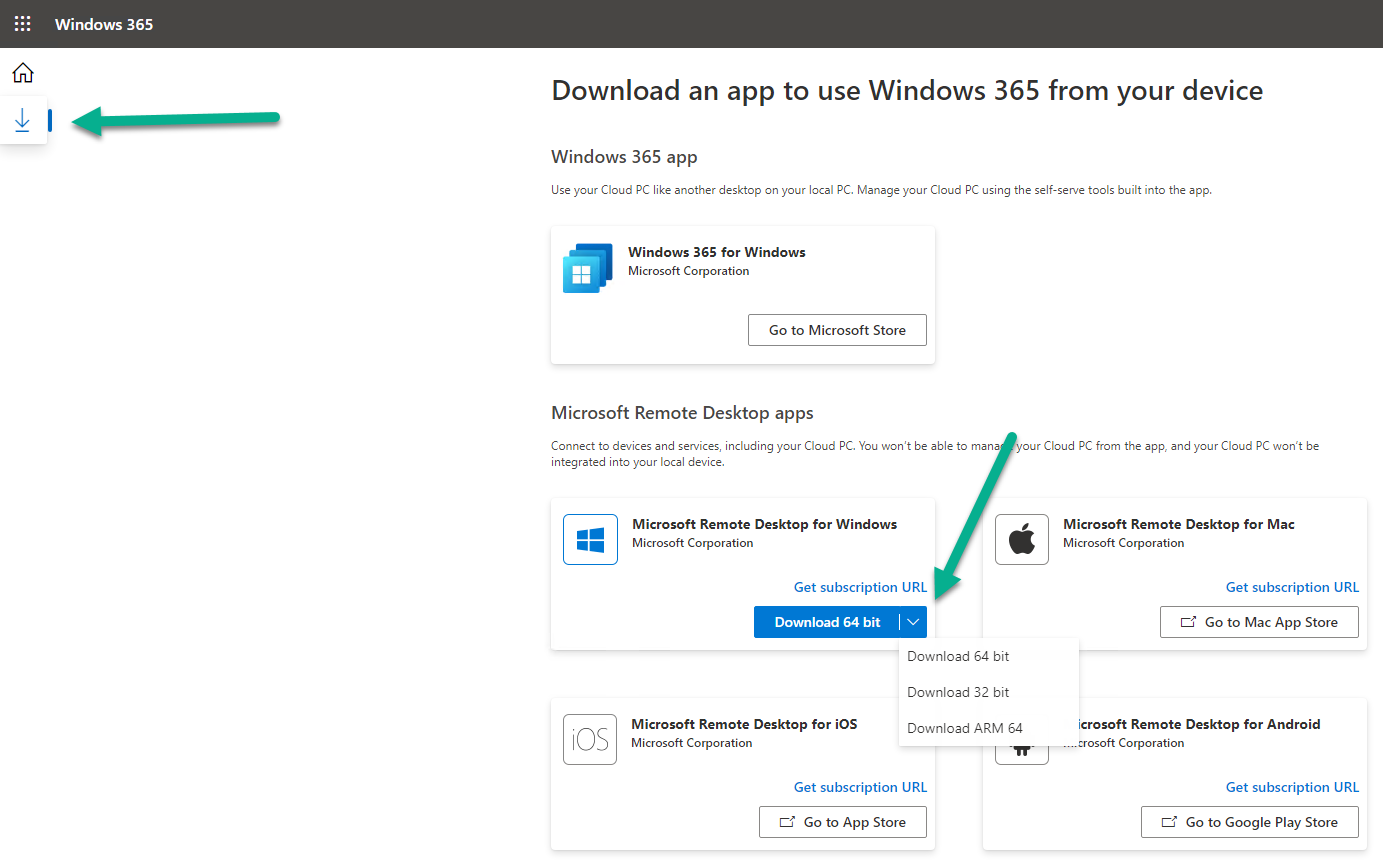
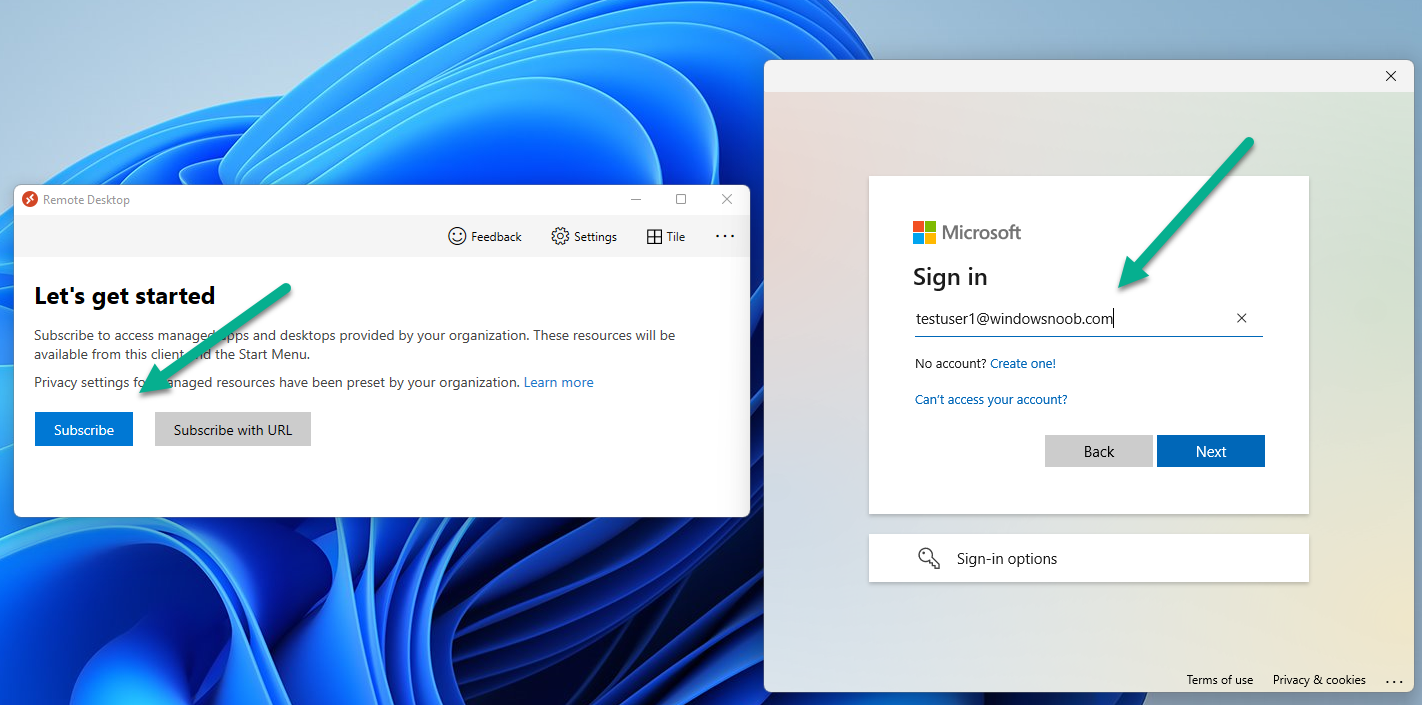
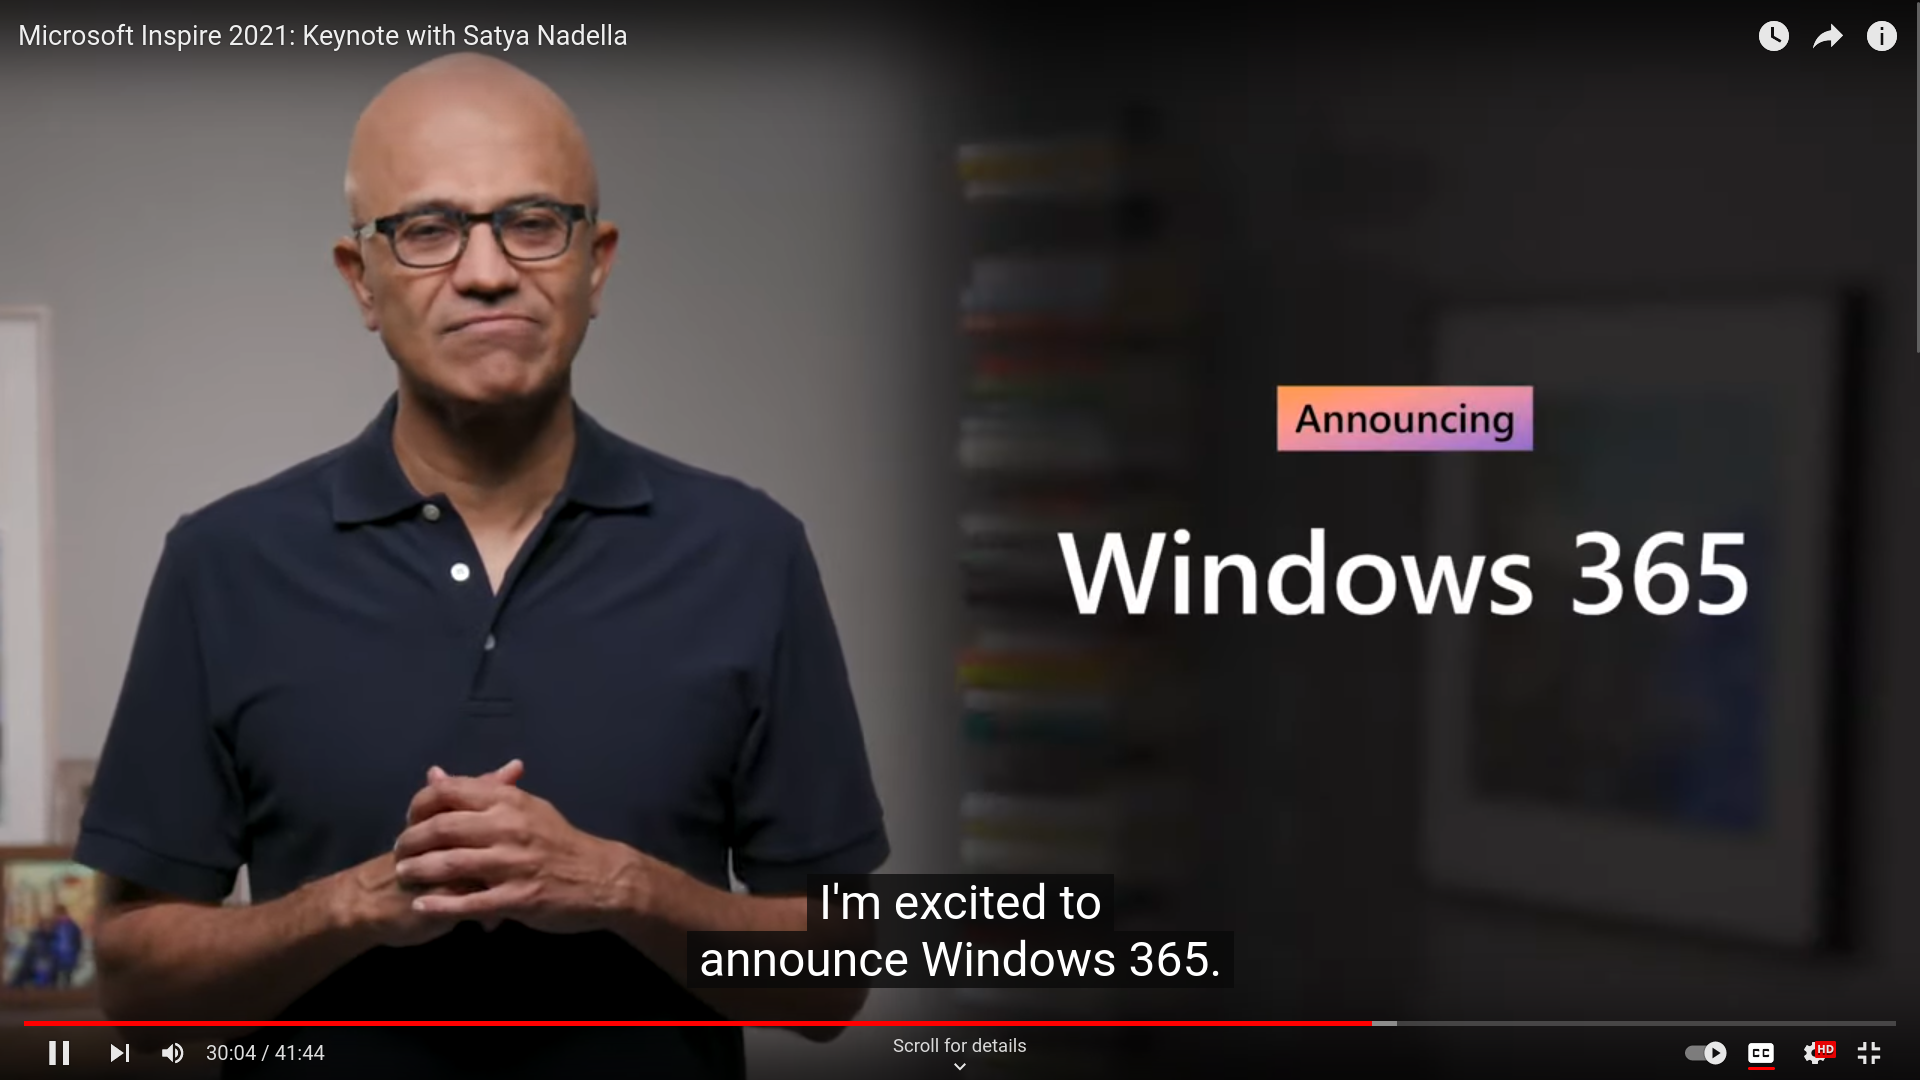
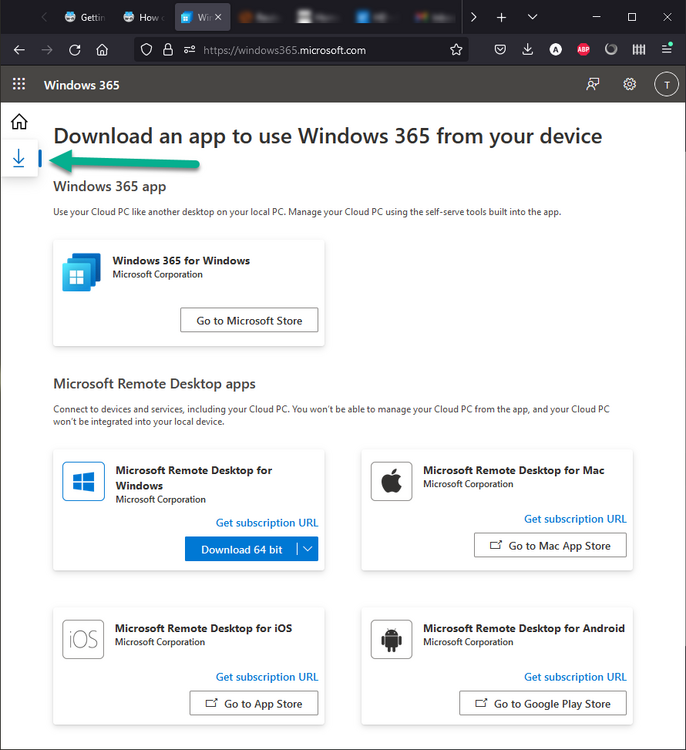
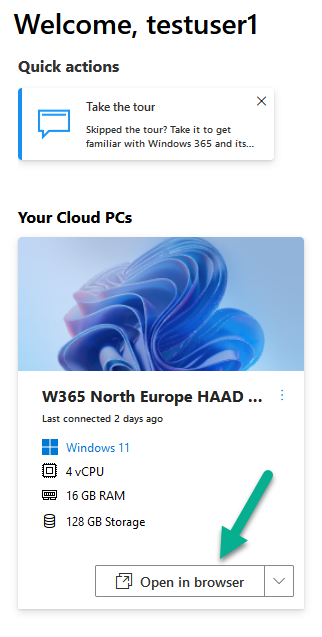
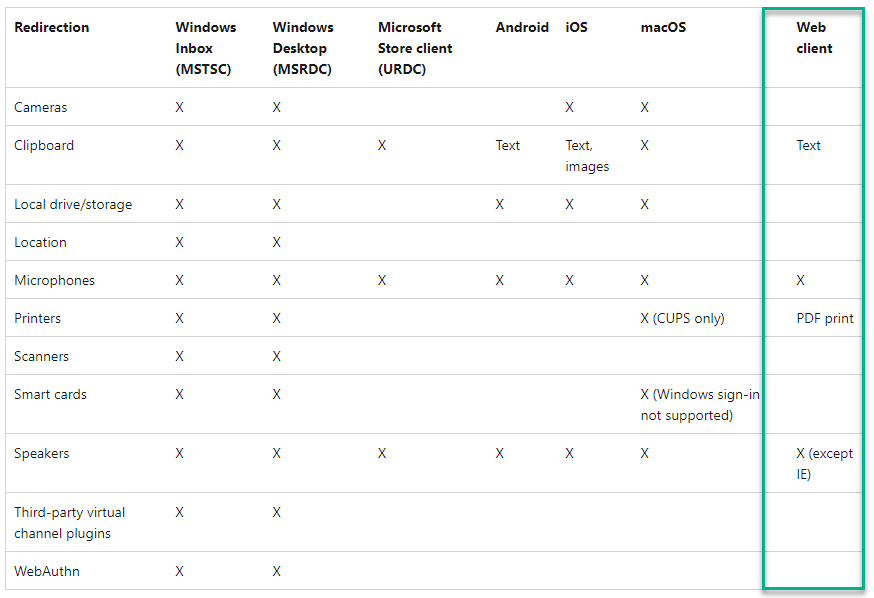
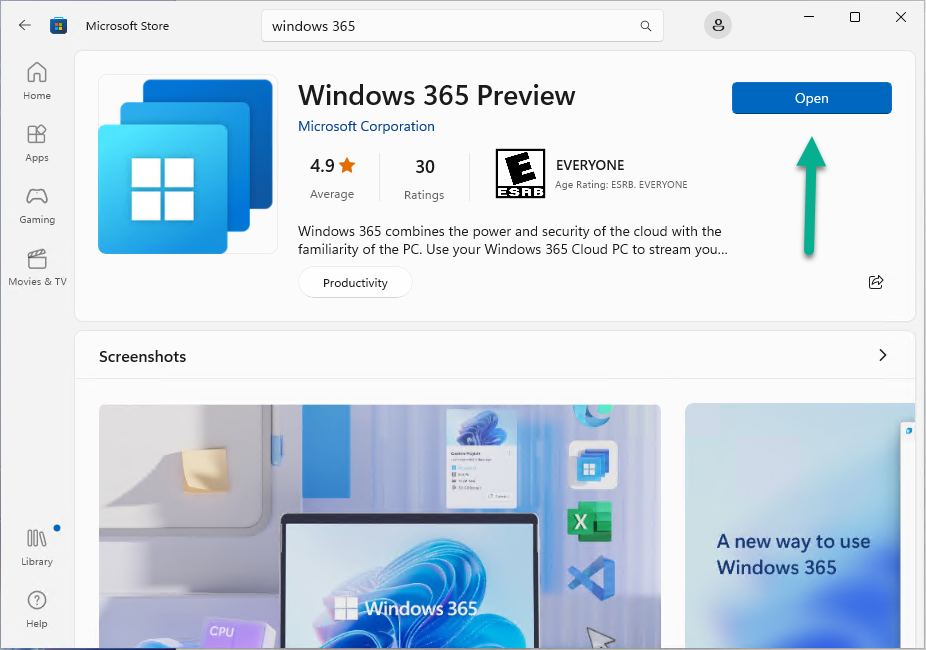
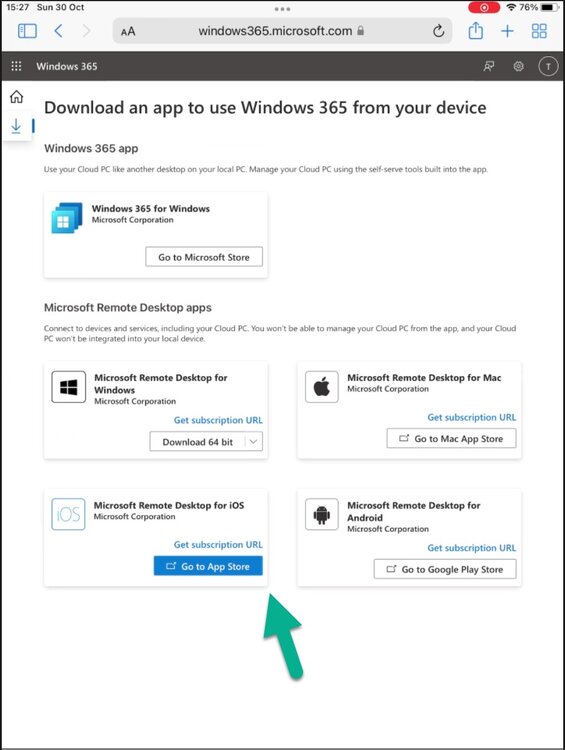
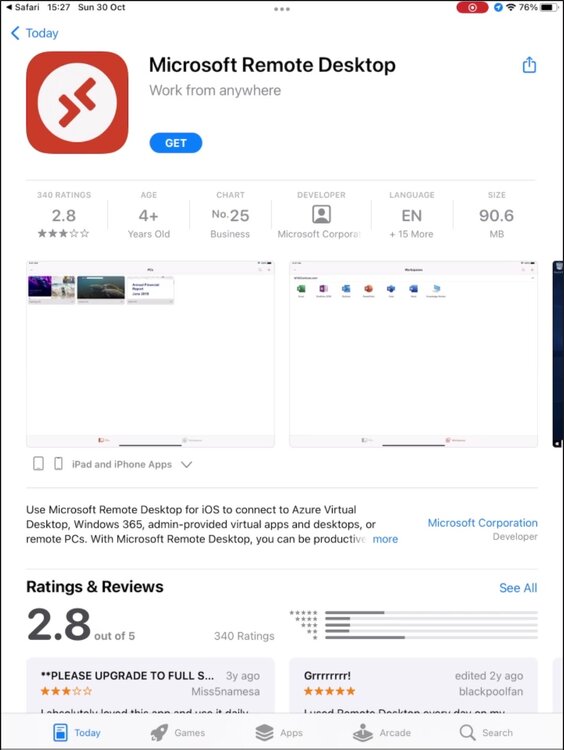
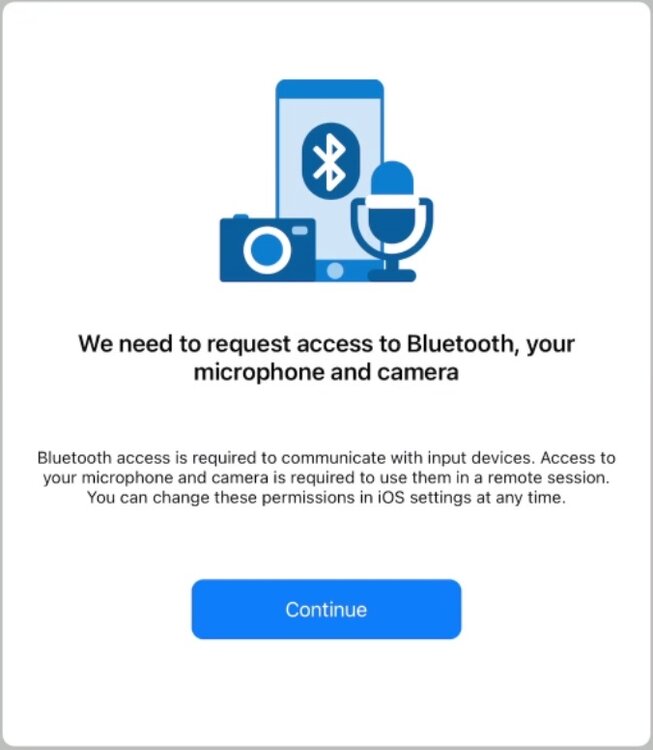
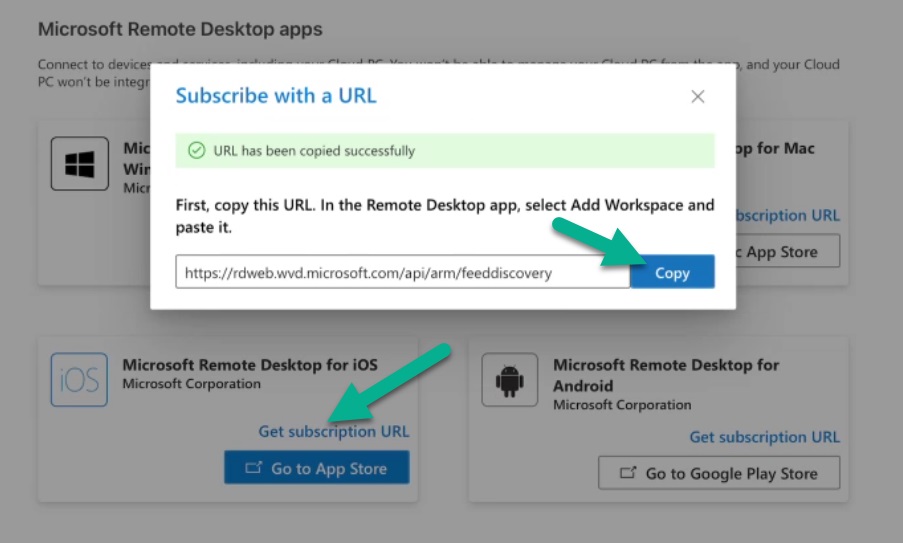
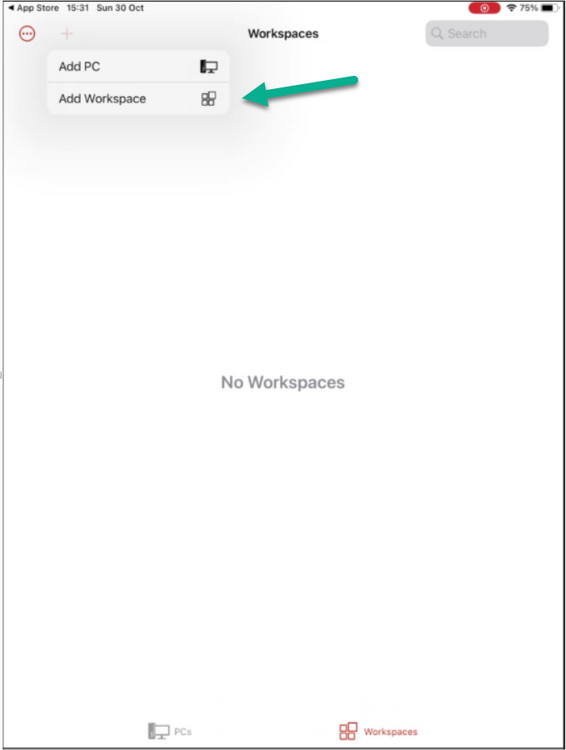
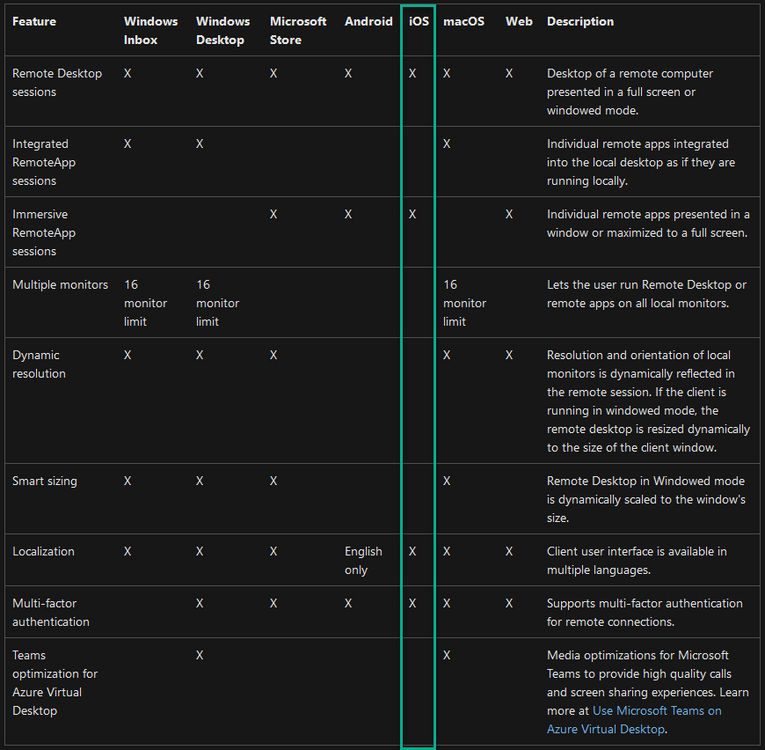
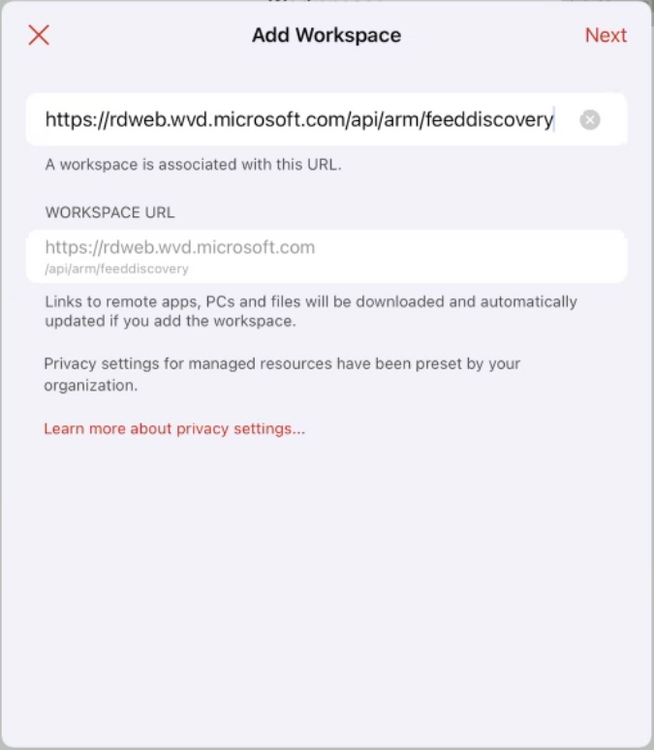
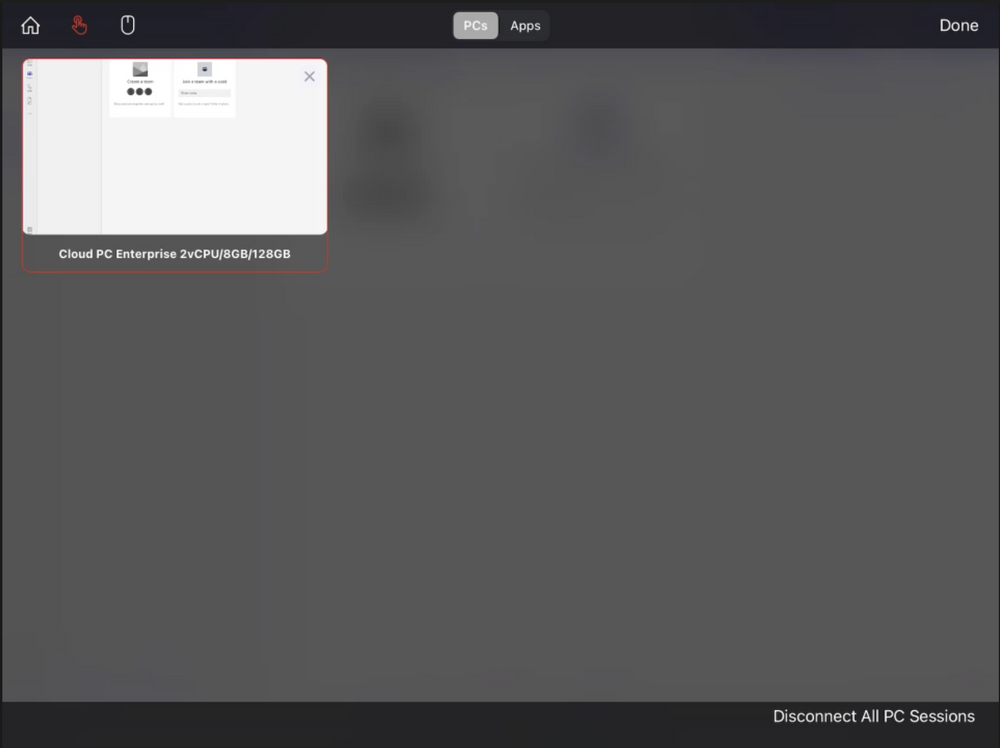
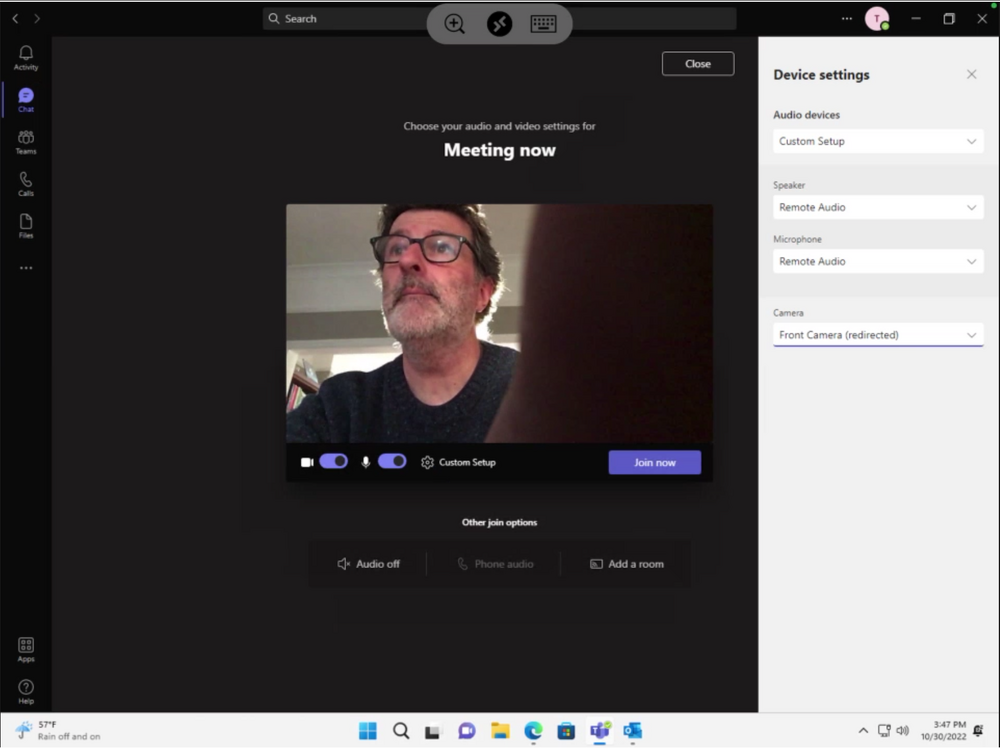
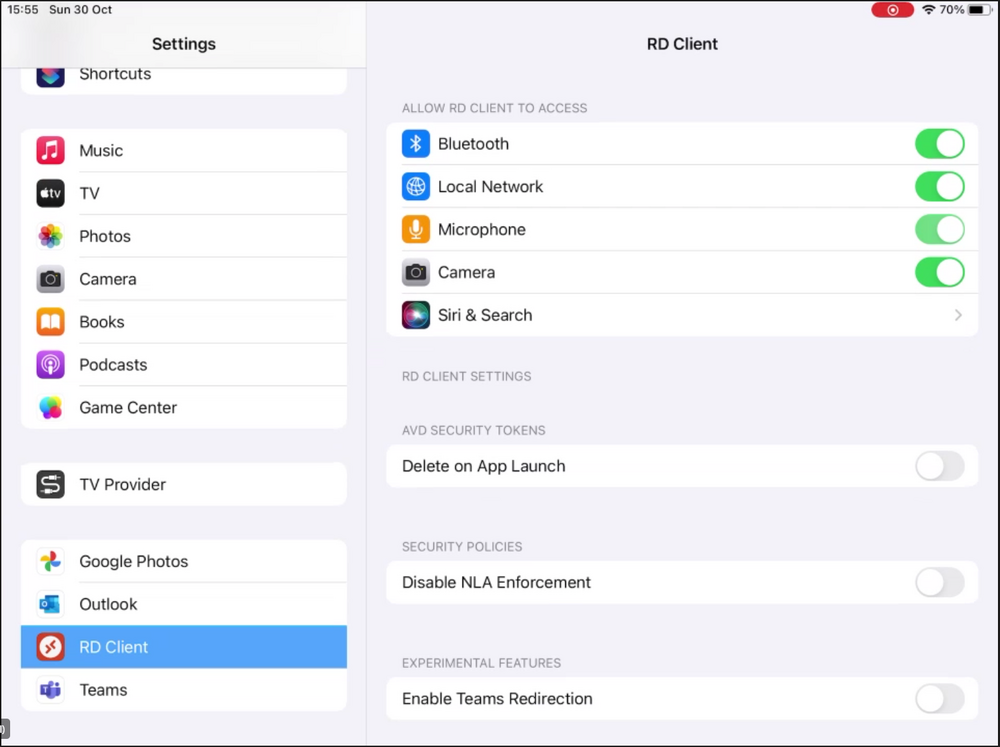
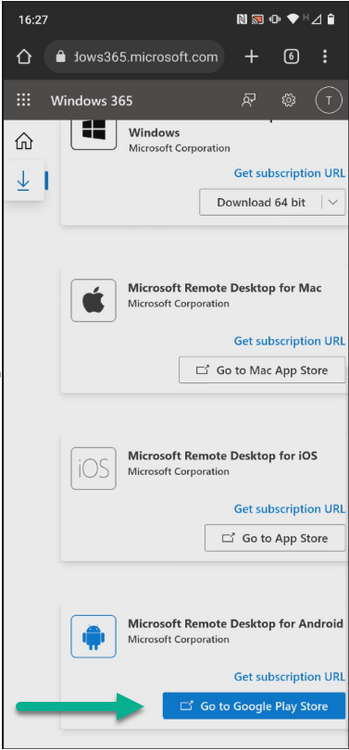
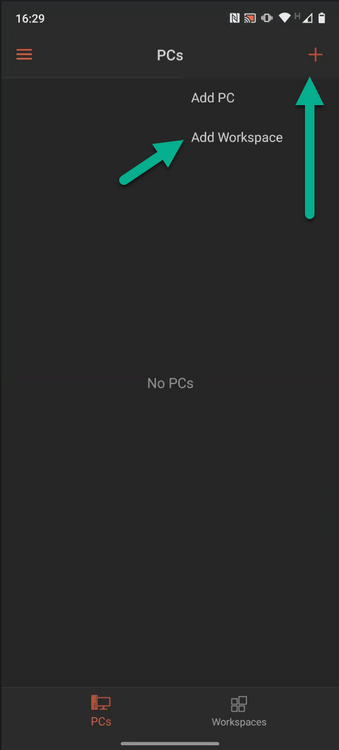
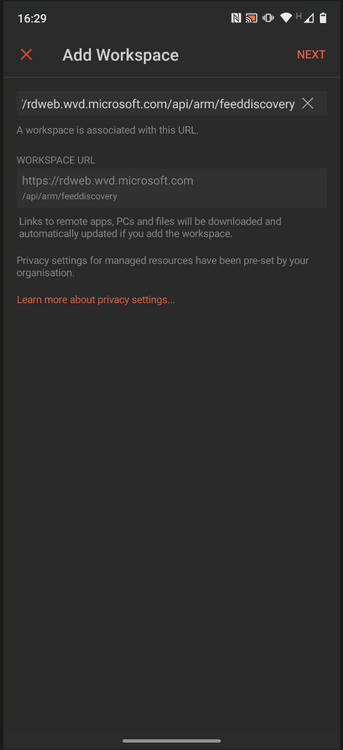
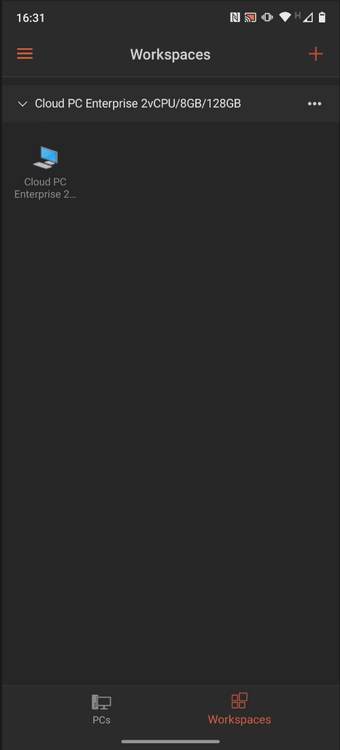
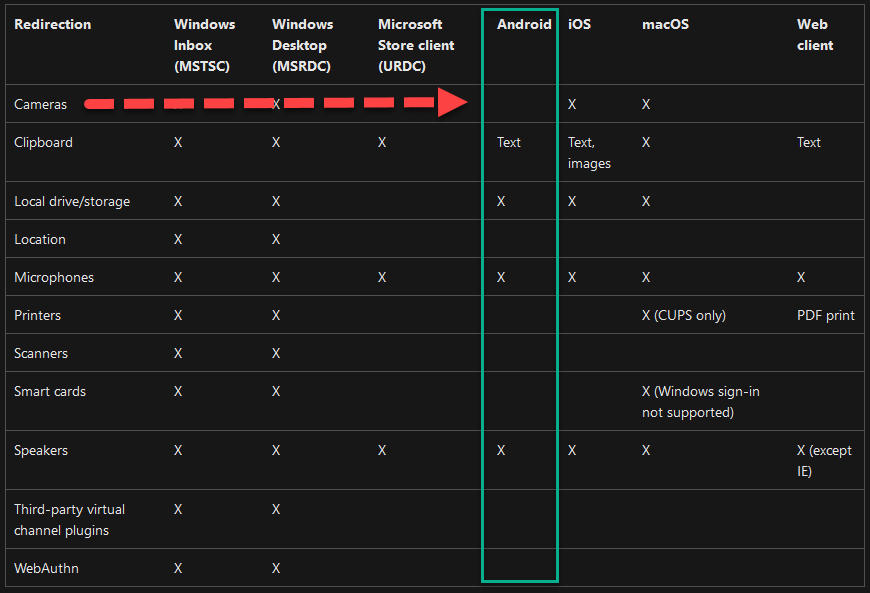
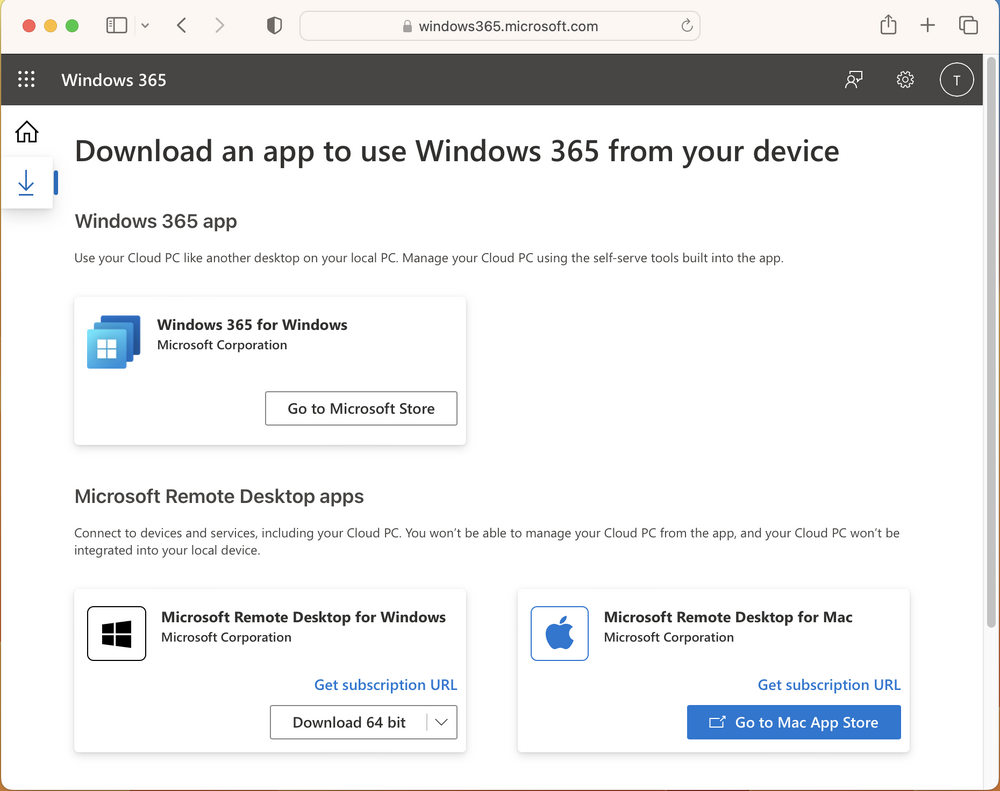
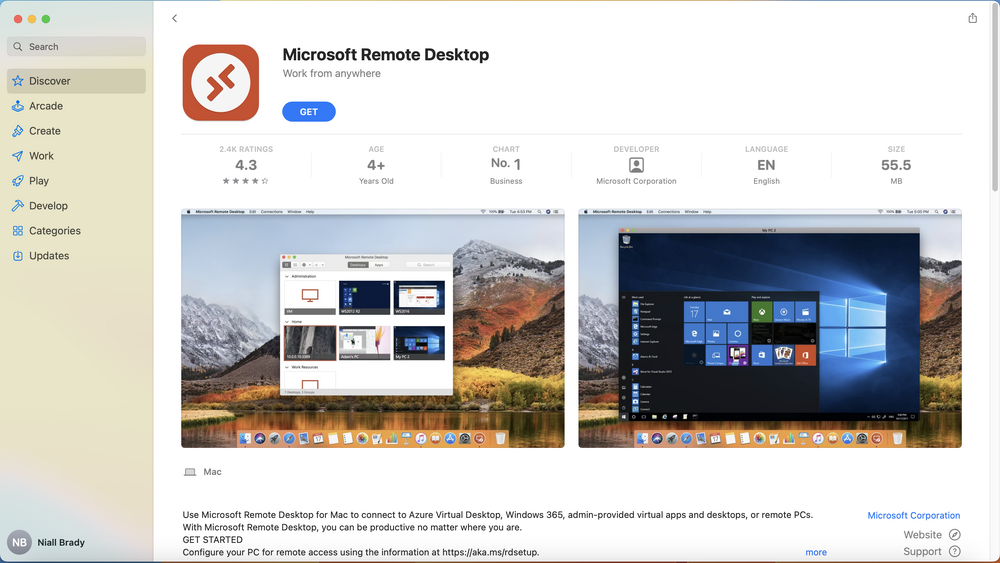
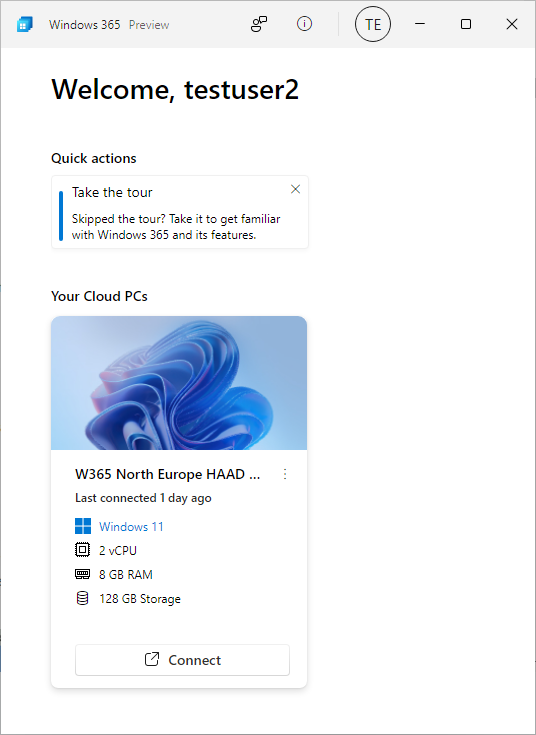
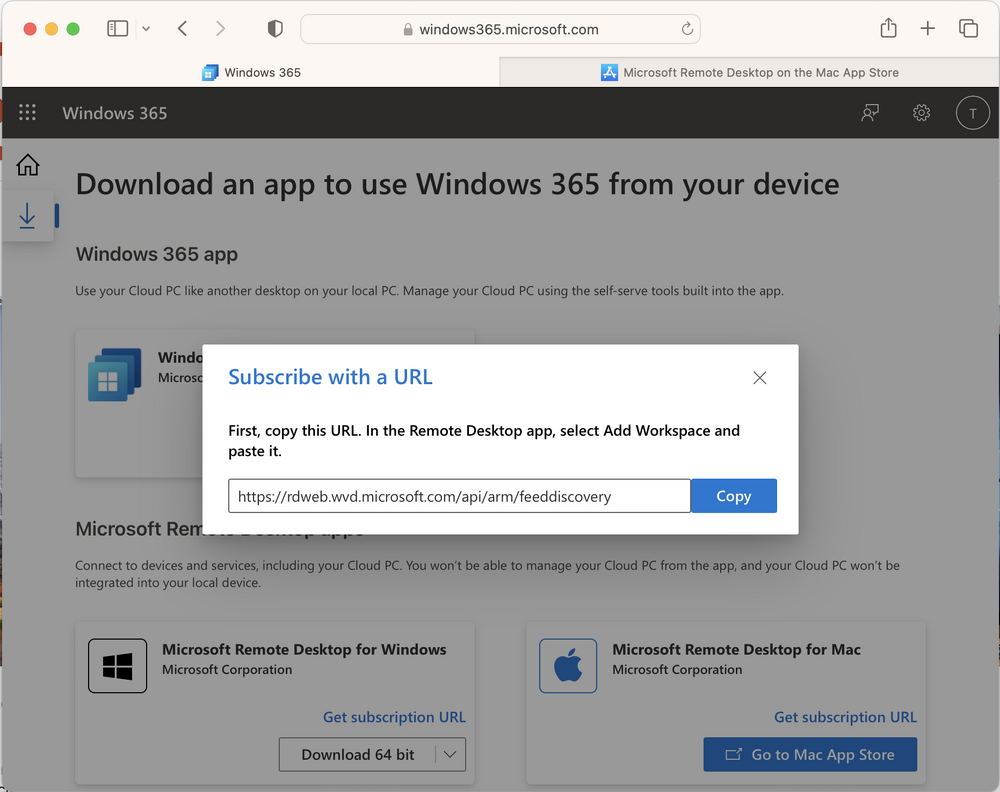
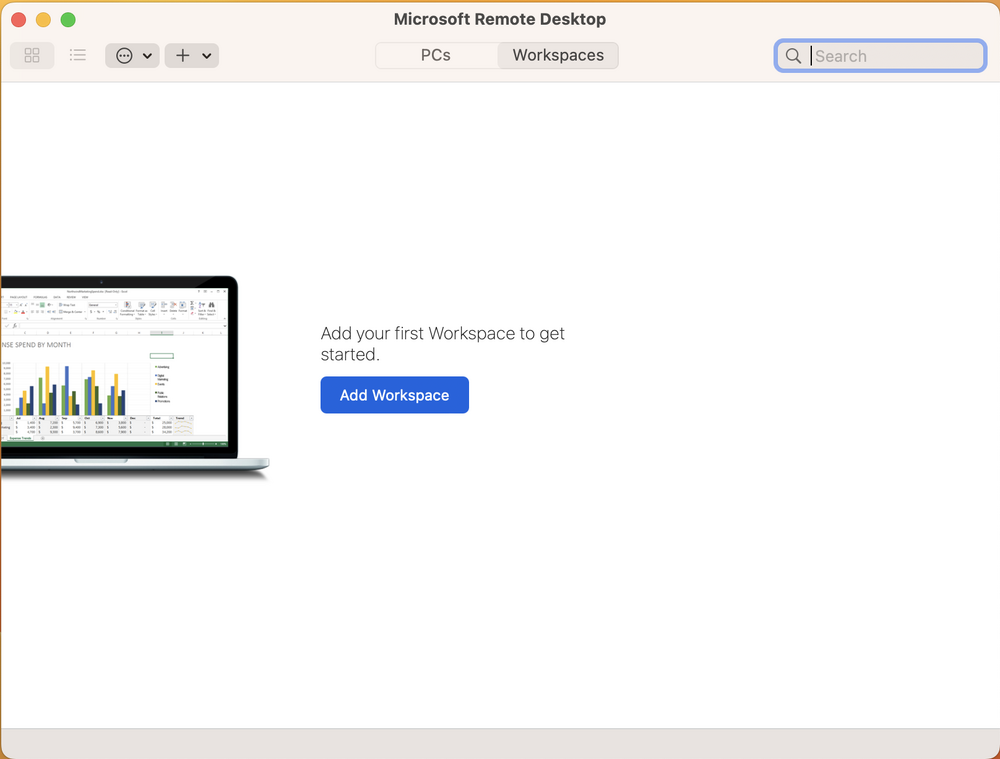
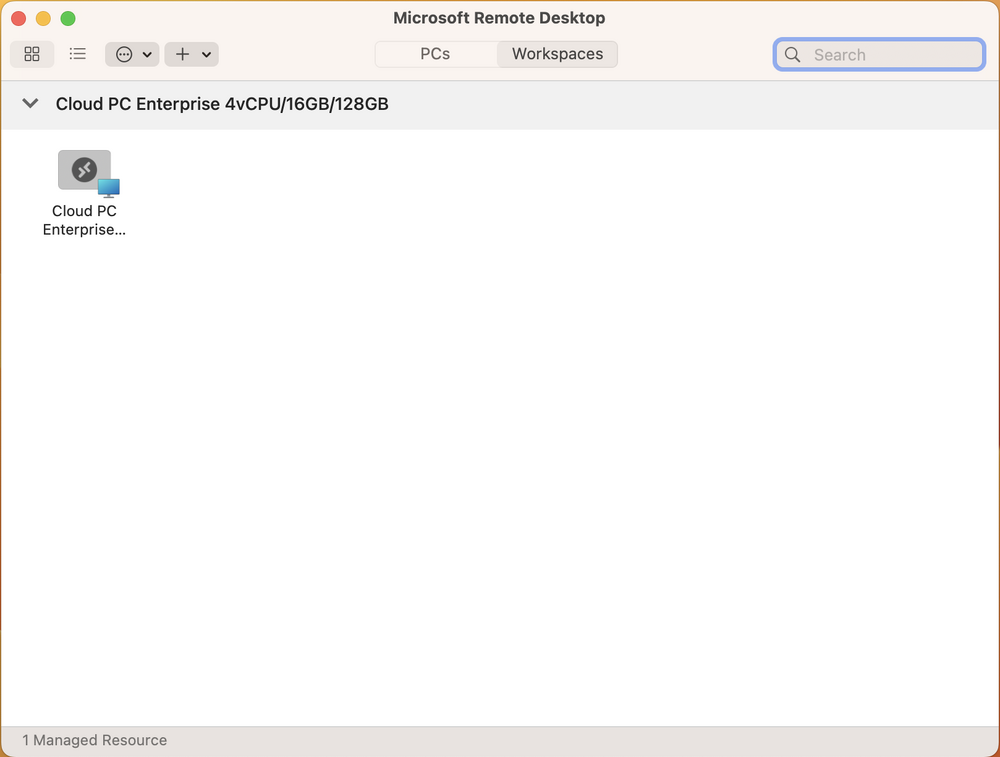
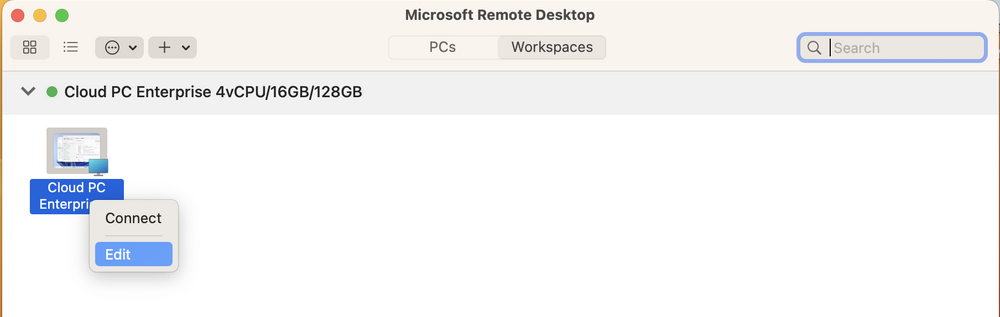
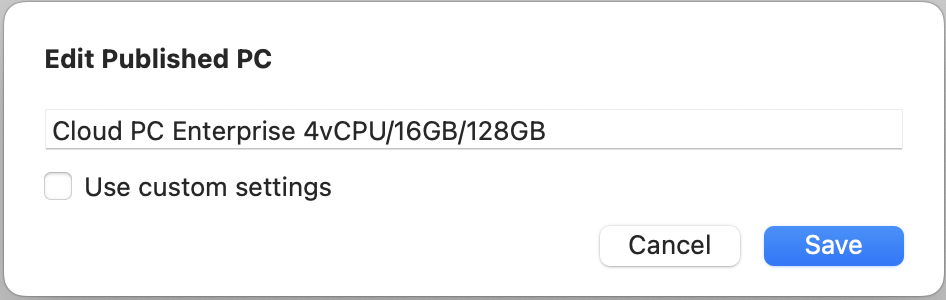
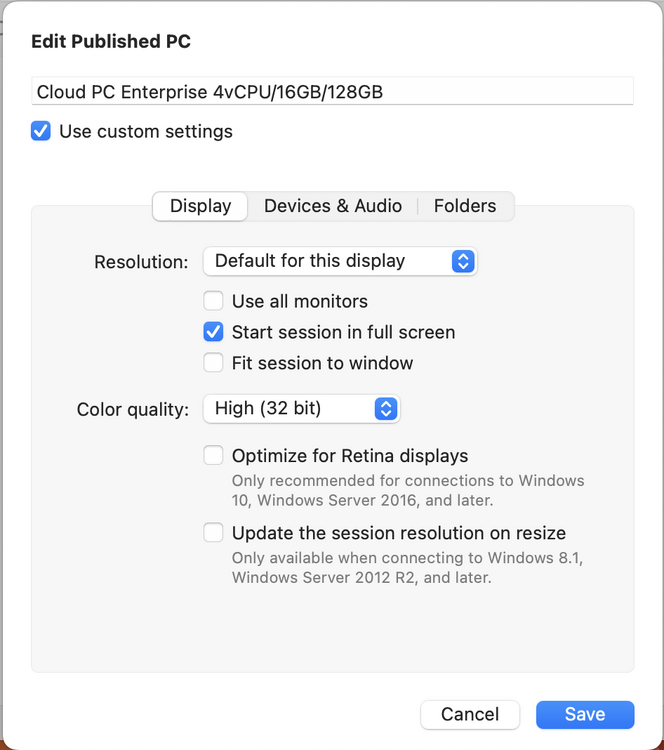
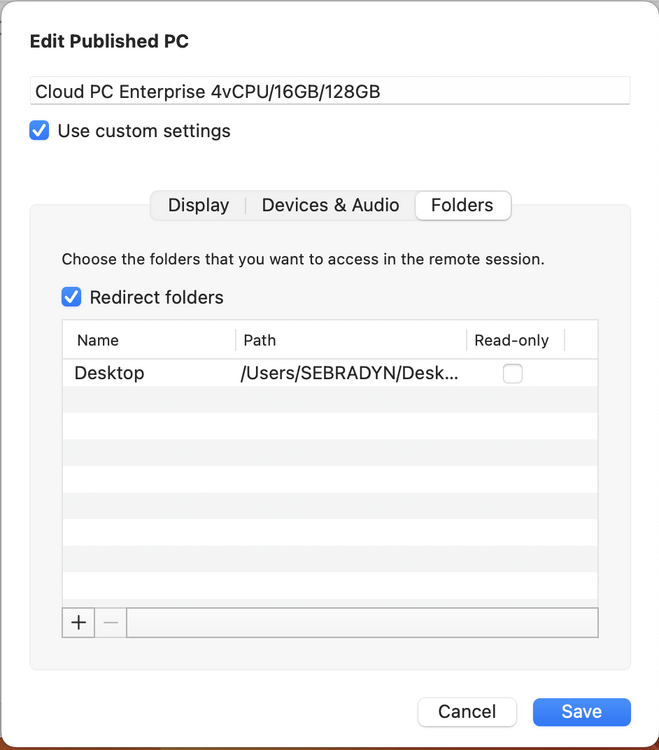
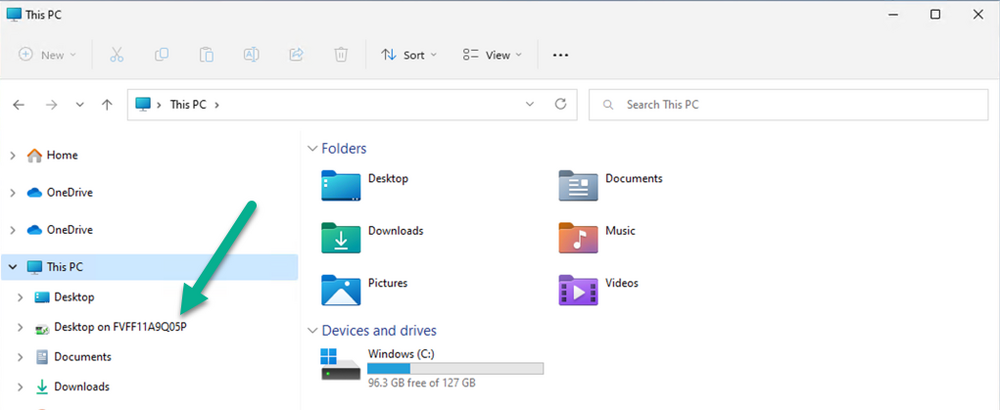
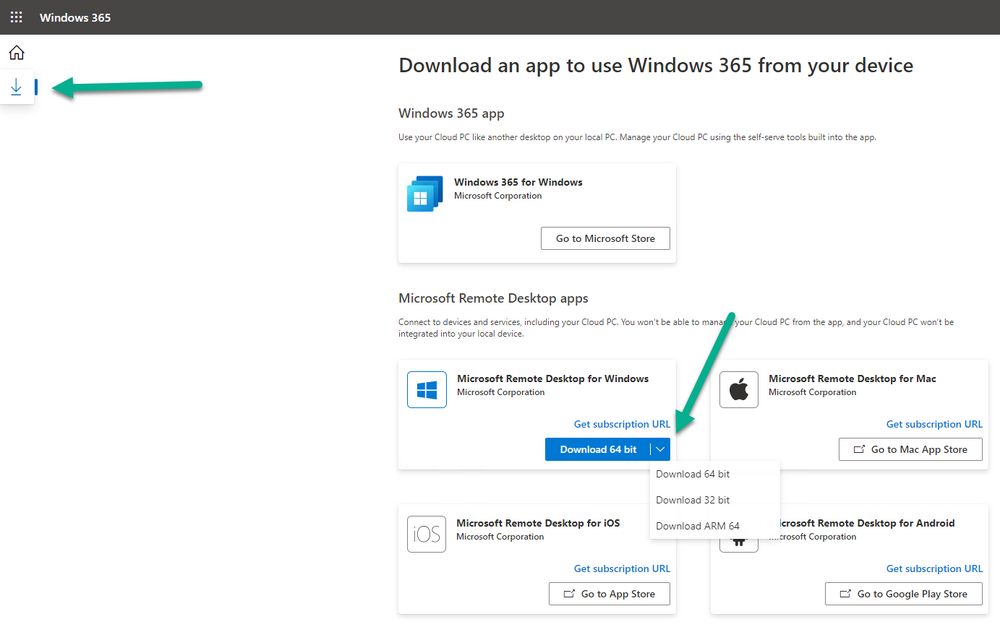
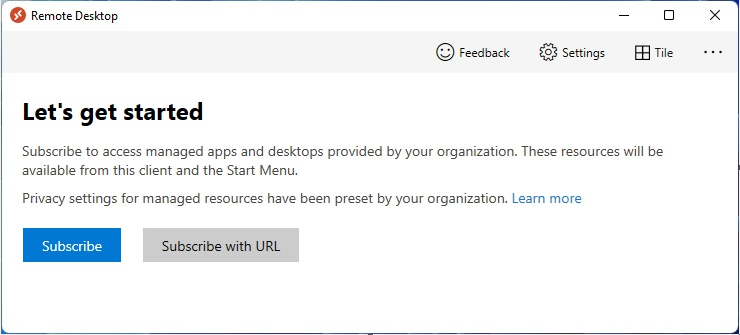
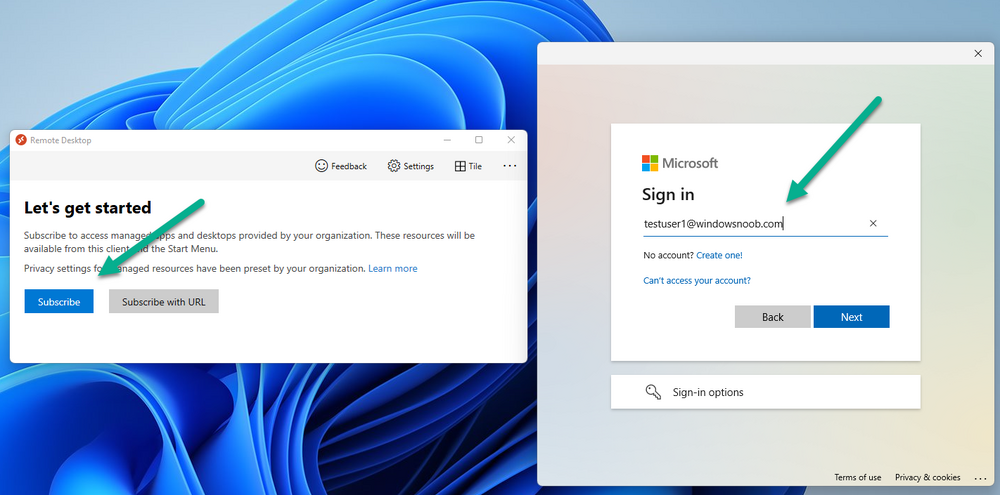
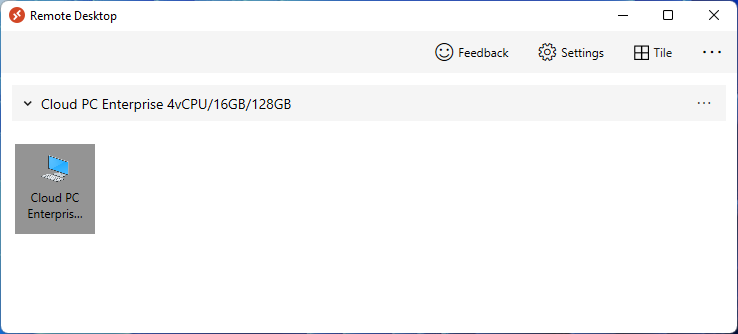
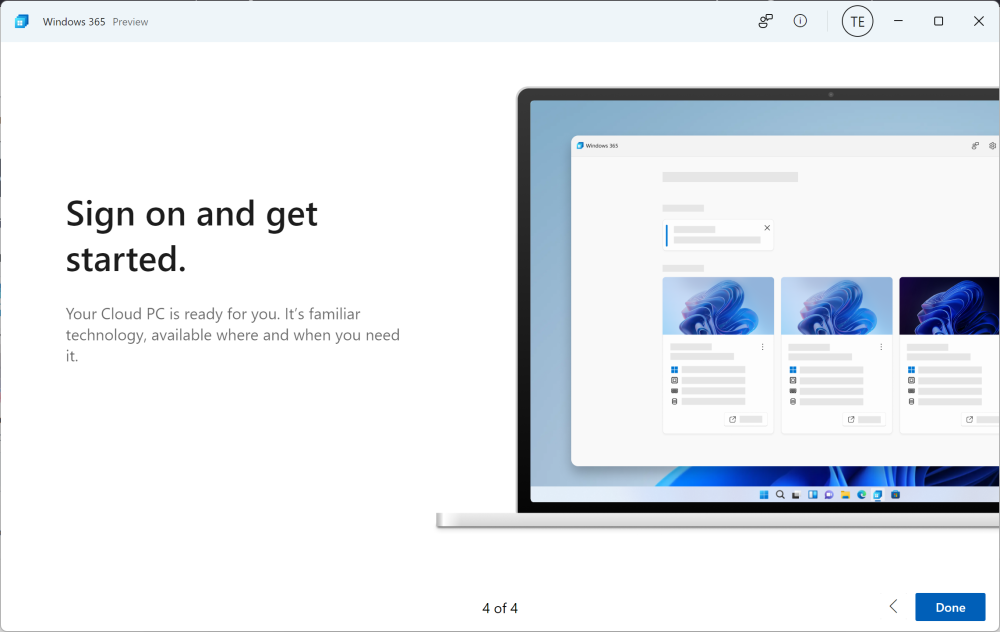
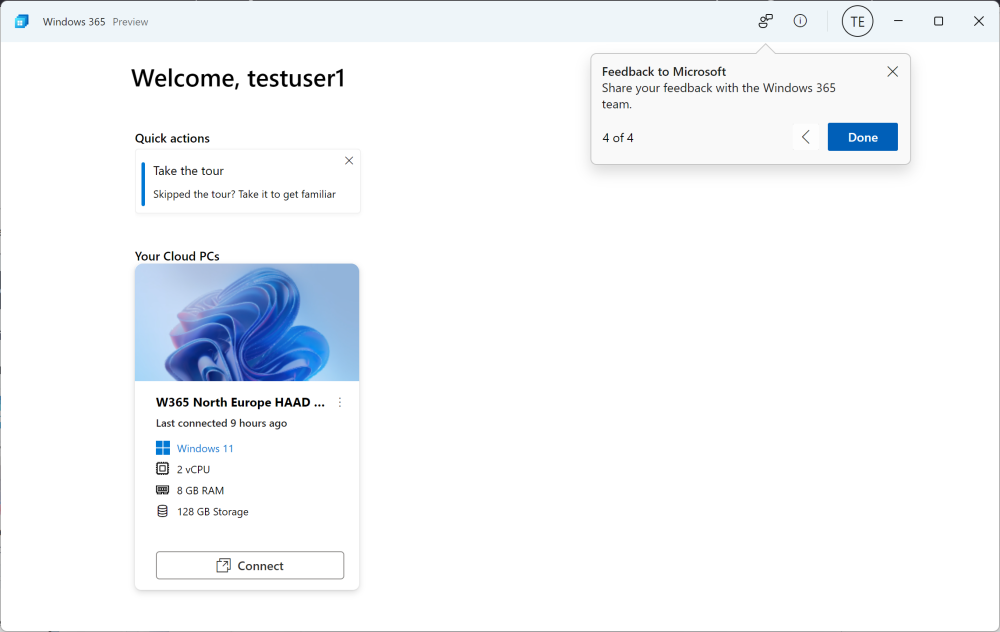
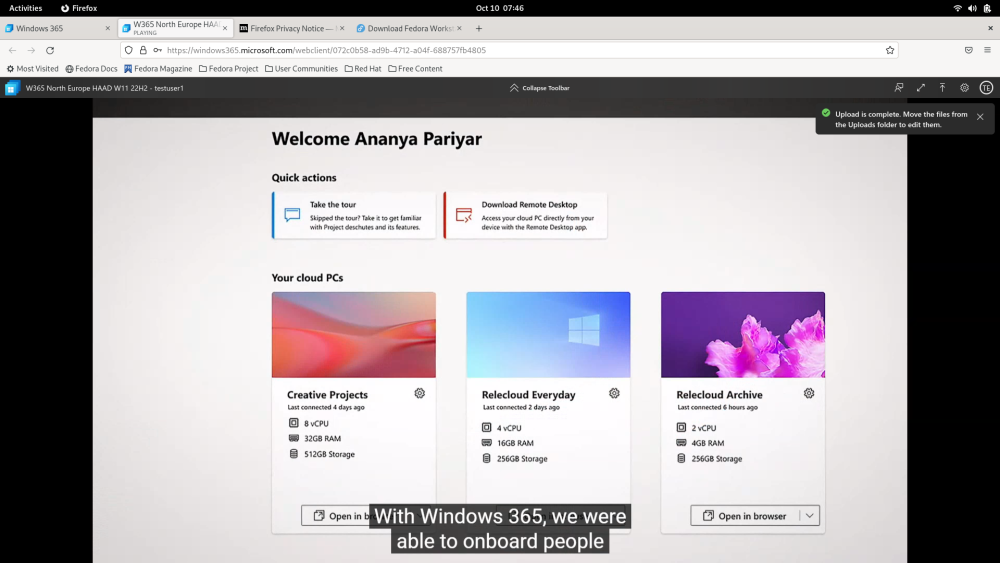
Introduction This is Part 4 in a new series of guides about getting started with Windows 365. This series of guides will help you to learn all about Windows 365 in a clear and insightful way. This series is co-written by Niall & Paul, both of whom are Enterprise Mobility MVP’s with broad experience in the area of modern management. At the time of writing, Paul is a 6 times Enterprise Mobility MVP based in the UK and Niall is a 12 times Enterprise Mobility MVP based in Sweden. In this series we aim to cover everything we learn about Windows 365 and share it with you to help you to deploy it safely and securely within your own organization. In Part 1 we introduced you to Windows 365, selecting the right edition with the level of management that you need, choosing the plan that suits your users needs at a cost you can afford, or modifying the configuration to make it more suited to your individual needs, purchasing licenses and saving money for your organization via the Windows Hybrid Benefit. In Part 2 you learned how to provision an Azure Ad joined Cloud PC and take a look at the different network options available when provisioning an Azure Ad joined Cloud PC. In Part 3 you learned about the steps needed to successfully provision a Hybrid Azure Ad Joined Cloud PC. Below you can find all parts in this series: Getting started with Windows 365 - Part 1. Introduction Getting started with Windows 365 - Part 2. Provisioning an Azure Ad Joined Cloud PC Getting started with Windows 365 - Part 3. Provisioning a Hybrid Azure Ad Joined Cloud PC Getting started with Windows 365 - Part 4. Connecting to your Cloud PC <- you are here Getting started with Windows 365 - Part 5. Managing your Cloud PC Getting started with Windows 365 - Part 6. Point in time restore Getting started with Windows 365 - Part 7. Patching your Cloud PCs with Windows Autopatch Getting started with Windows 365 - Part 8. Windows 365 boot Getting started with Windows 365 - Part 9. Windows 365 switch Getting started with Windows 365 - Part 10. Windows 365 offline In this part we'll cover the following: Connections available Windows 365 app Remote desktop client Web browser Windows Installing the Remote Desktop client Subscribe to the Cloud PC Accessing remote desktop features Windows 365 app macOS Installing the Remote Desktop client Adding a workspace Accessing remote desktop features iOS (iPad/iPhone) Installing the Remote Desktop client Adding a workspace Accessing remote desktop features Android Installing the Remote Desktop client Adding a workspace Accessing remote desktop features Linux Related reading Summary Connections available At the time of writing you can connect to your Windows 365 Cloud PC using the following methods: Using the Windows 365 app (Windows 11, Windows 10 coming soon) Using a Remote Desktop client (Windows, Mac, Android, iOS) Using a HTML 5 capable web browser (Windows, Mac, Android, iOS, Linux, ChromeOS) Windows 365 app The Windows 365 app is currently Windows 11 only and available for download via the Microsoft Store. Search for Windows 365, get the app and click Open once done. In later versions of Windows 11 it'll come bundled as a built-in app and Windows 10 support is coming. The Windows 365 app was introduced during the Microsoft Ignite 2022 Keynote (by Satya Nadella) and it allows a seamless way of connecting to your Cloud PC. There's no need to copy a subscribe URL, just login and your Cloud PC is available. The app can be launched from your start menu or taskbar. For a deeper look at the Windows 365 app (which is still in preview) please click here. Currently the capabilities are not yet on par with the Remote Desktop client but we think that'll change soon. Remote desktop client If you are using Windows, macOS, Android or iOS device then there are remote desktop apps available to download for those devices. At the time of writing the Remote Desktop app is the most feature rich method of connecting to your Cloud PC but it's not without issues, for example on iOS, macOS and Android, you have to copy the subscribed URL and add that to your workspace, it's not automatic. Using the Remote desktop agent will give you the power to use multiple monitors (up to 16 with Windows/macOS) and other hardware, as detailed in the following table. Web browser To access your Cloud PC from any device using a web browser, navigate to https://windows365.microsoft.com using the credentials of a user that has been assigned a provisioned Cloud PC. Click on Open in browser to launch the connection using your web browser. Even though the web browser connection method allows you to connect to your Cloud PC from practically any device, your abilities in that session are limited. Below is a table showing redirection of various devices using different connection methods, look at what the web browser is missing compared to the remote desktop app. For example, when using a web browser, you won't have the same fine control that you have with the Remote Desktop client or via the Windows 365 app. Not only that but things like multi-media redirection or multi-monitor support or using a web camera to enable video for Teams meetings won't be an option if you choose the web browser as the method of connection. To get the most out of your Cloud PC and to use the hardware features of the computer (or tablet/phone) that you are accessing it from, you'll need to install a Remote Desktop client agent or use the Windows 365 app (currently Windows 11 only). You can see the other available connection options by clicking on the download icon shown below. The web page automatically detects the operating system you are running and highlights a suitable client agent if one exists for that operating system. Windows We've already covered the connection types available for Windows in the Connections Available section above, as Windows can handle all three connection methods with ease. To summarize, Windows can connect to Cloud PCs using Windows 365 app (Windows 11 currently, but Windows 10 coming soon) Remote Desktop client Web browser Installing the Remote Desktop client To install the Remote Desktop client for Windows, go to https://windows365.microsoft.com, click on the download icon and select the download for the architecture matching your version of Windows. That will allow you to install the Remote Desktop client. Subscribe to the Cloud PC Once installed you'll need to Subscribe to your Cloud PC. To do that, click Subscribe and enter your Cloud PC credentials. Once you have subscribed to your workspace, your Cloud PC will be listed in the Remote Desktop client. Note: It is also possible to also add the feed URL to a "_msradc" DNS entry to automate the feed discovery for a domain. See the following for more info. Thanks to @novafunction Accessing remote desktop features You can configure settings by right clicking the Cloud PC. You'll get access to settings allowing you to (for example) configure multiple monitors. Multiple monitors are great with Windows 365 (up to 16 supported with Windows/macOS) Windows 365 app If you want the easiest/seamless experience, go for the Windows 365 app but keep in mind that it's still in preview at the time of writing so is subject to change. For an in-depth look at the Windows 365 app (which is still in preview) please click here. macOS Apple's macOS computers are very popular indeed especially with the Apple silicon (M1/M2) chipset. There are two options of connecting to your Cloud PCs from macOS, by using a web browser session or via the Remote Desktop client. Note that web browser session lacks the same abilities as the Remote Desktop client. To access the web browser session, simply open your web browser to https://windows365.microsoft.com and login using the credentials of a user that is licensed to use a provisioned Cloud PC. Installing the Remote Desktop client The Remote Desktop client is available in the Mac App Store. To easily find the download, click on the download link and you'll see the Microsoft Remote Desktop for Mac download link. It will be highlighted as shown in the screenshot below. click on Go to Mac App Store and get the app. The Microsoft Remote Desktop app will launch after installation is complete. Adding a workspace After the app is installed, you'll need to add a workspace. To do that, go back to the web browser session and copy the subscription URL. Then in the app click on the + drop down menu and select Add Workspace. paste in the subscription URL and enter your Windows 365 Cloud PC credentials when prompted. Once done adding the workspace your Cloud PC will be listed in the app. Accessing remote desktop features To access or change the Remote Desktop app features, you'll need to right click the Cloud PC icon in the app (2 fingers on the touch pad). This brings up a drop-down menu with 2 options Connect Edit Select Edit to review or change the connection settings. Next, place a check mark in the box beside your Cloud PC name (by default it's not checked). and this brings up the settings you want to see/change. For example, to add a folder on your Mac for copying files, select Folders and add it as appropriate, it will then appear in Windows File Explorer on your Cloud PC. macOS can also use multiple monitors via the Remote Desktop client, if you want to see that in action click here. iOS (iPad/iPhone) With iOS you have two options of connecting, namely a web browser session and the Remote Desktop client. Keep in mind that the web browser session lacks the same abilities as the Remote Desktop client. Installing the Remote Desktop client For more features use the Remote Desktop client which is available in the App Store. If you browse to https://windows365.microsoft.com and login using the credentials of a Cloud PC user that has a Cloud PC provisioned, you'll see that Microsoft Remote Desktop for iOS is highlighted, and it links to the App Store. clicking on that link opens the App Store. Click Get and install the app. you'll get a few prompts, answer them as appropriate. and Adding a workspace After the app is installed, you'll need to add a workspace. To do that, go back to the web browser session and copy the subscription URL. In the Remote Desktop client, click on Add workspace and paste in the copied subscription URL. Click Next and enter your credentials when prompted. The Cloud PC will be listed in your Workspaces. Accessing remote desktop features After launching the Cloud PC from the Remote Desktop client, you'll notice a toolbar at the top of the screen (screenshot from iPad). There's a magnifier icon to zoom in on sections (useful on a small screen) and a keyboard icon to get a virtual keyboard. Clicking the Remote Desktop icon in the center brings up some additional options. It's useful to note that the touch icon gives you easy control of the mouse pointer, but if you have a Bluetooth mouse connected to your iPad you can use the mouse icon. We tested a Teams video meeting from the iPad Cloud PC and it worked, and streamed video via the iPad camera as you can see here. You can always verify what settings are enabled for the Remote Desktop client in the iPad/iPhone settings. Android (tablet/phone) We also tested connecting to Cloud PCs from Android phones and an Android tablet. You can again access your Cloud PCs via a web browser or via a Remote Desktop client. You'll need a recent release of Android OS however to run the Remote Desktop client. Installing the Remote Desktop client To download the Remote Desktop client, you can get it directly from the Windows 365 web page shown below by clicking on the link or download it from Google Play Store. After installing the Remote Desktop client, you'll be prompted to allow audio etc. Adding a workspace Once again, as with other supported operating systems, you have to subscribe to a workspace URL in order for this to work as simply downloading the app is not sufficient. Copy the URL by clicking on Get subscription URL in the web page. Click on the + symbol, then select Add workspace, Paste in the subscription URL copied from the windows365 web page. Approve the MFA request, and the Cloud PC will appear in the client. Accessing remote desktop features It became obvious quite quickly that Android did not support video (camera) for Teams meetings (or anything else), even with the Remote Desktop client. keep that in mind if you intend to support Android devices for Windows 365. Apart from that missing feature, it acted quite like the iOS equivalent with a toolbar at the top of the screen and worked well in our tests. Linux Niall has taken a look at accessing Windows 365 Cloud PC's using a web browser in various Linux distros here. Linux based Windows 365 support is via a web browser connection, meaning that you are limited to what that provides (no video meetings for example). Related reading Redirection options with Remote Desktop - Remote Desktop - compare the client apps redirections | Microsoft Learn Multi-monitor support - https://learn.microsoft.com/en-us/windows-server/remote/remote-desktop-services/clients/windowsdesktop Multi-media redirection - https://learn.microsoft.com/en-us/azure/virtual-desktop/multimedia-redirection?tabs=edge Using multiple monitors with Windows 365 - https://www.windows-noob.com/forums/topic/23081-how-can-i-use-multiple-monitors-with-windows-365/ Configure DNS Feed Lookup for RemoteApp and Desktop Connections - https://learn.microsoft.com/en-us/previous-versions/windows/it-pro/windows-server-2012-R2-and-2012/hh831442(v=ws.11)#configure-dns-feed-lookup-for-remoteapp-and-desktop-connections Summary Using a Windows 365 Cloud PC gives you the power to get your work done anywhere via the operating system of your choice. We did note some short comings such as the lack of a Remote desktop client from Microsoft for the Linux OS and the lack of video support in the Remote Desktop client for Android. Web based sessions can only do so much and the lack of these features on Linux/Android will leave you with the inability to host video meetings in Teams, Webex or Zoom, so keep that in mind if it's important to you.


-
what exactly are you trying to accomplish ? you can use shutdown events in event viewer to trigger a scheduled task to run a powershell script, that would probably be better, but even so, when a computer starts shutting down, it shuts down services etc that you might need, so again, what are you trying to solve here ?
-
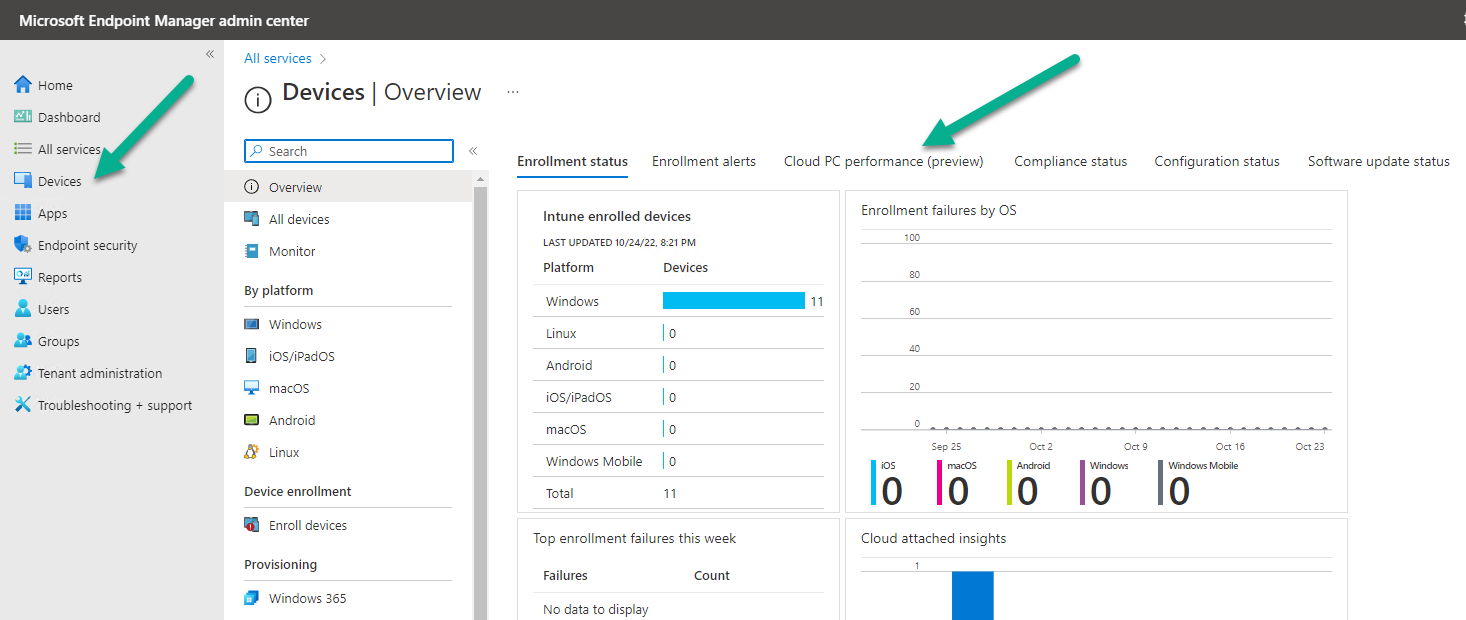
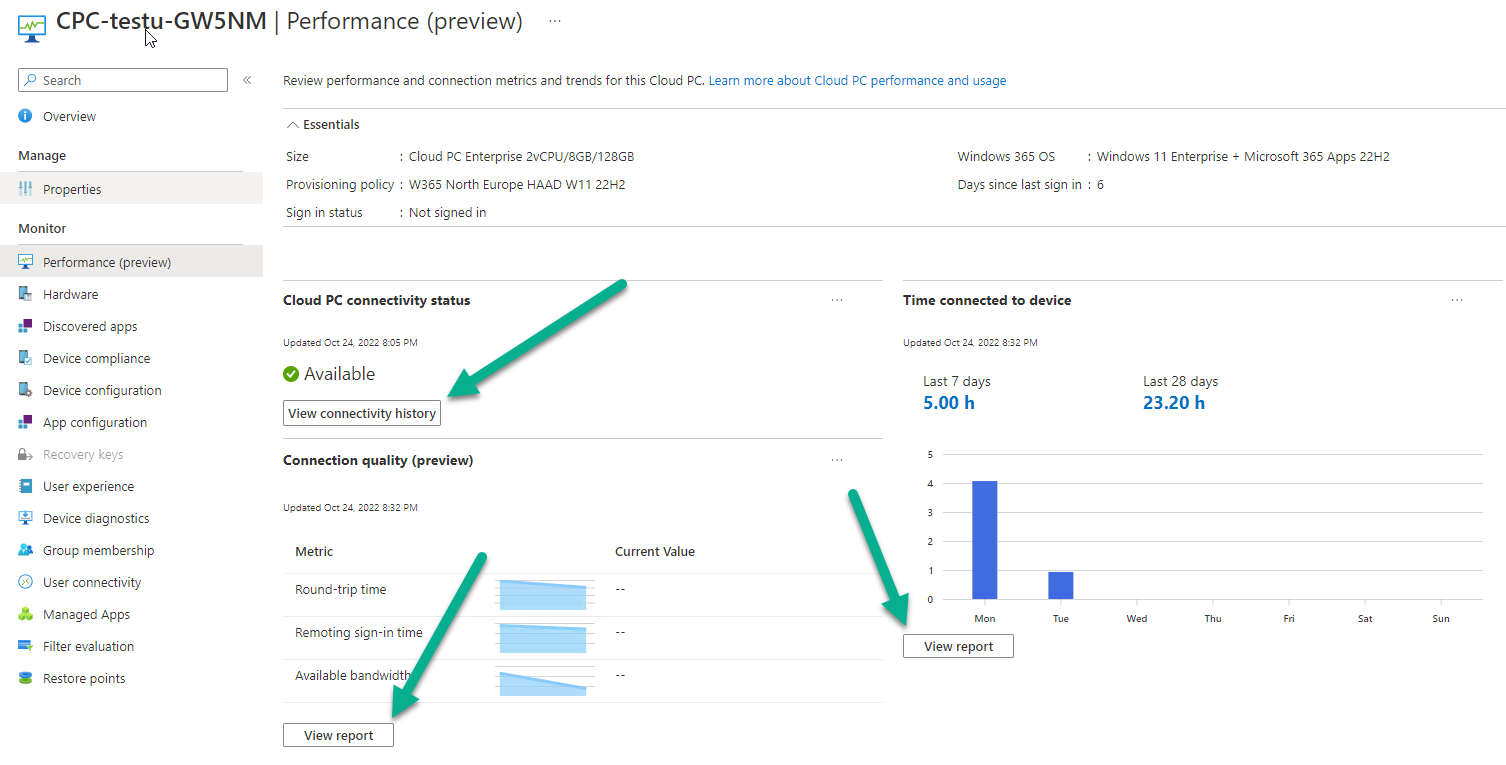
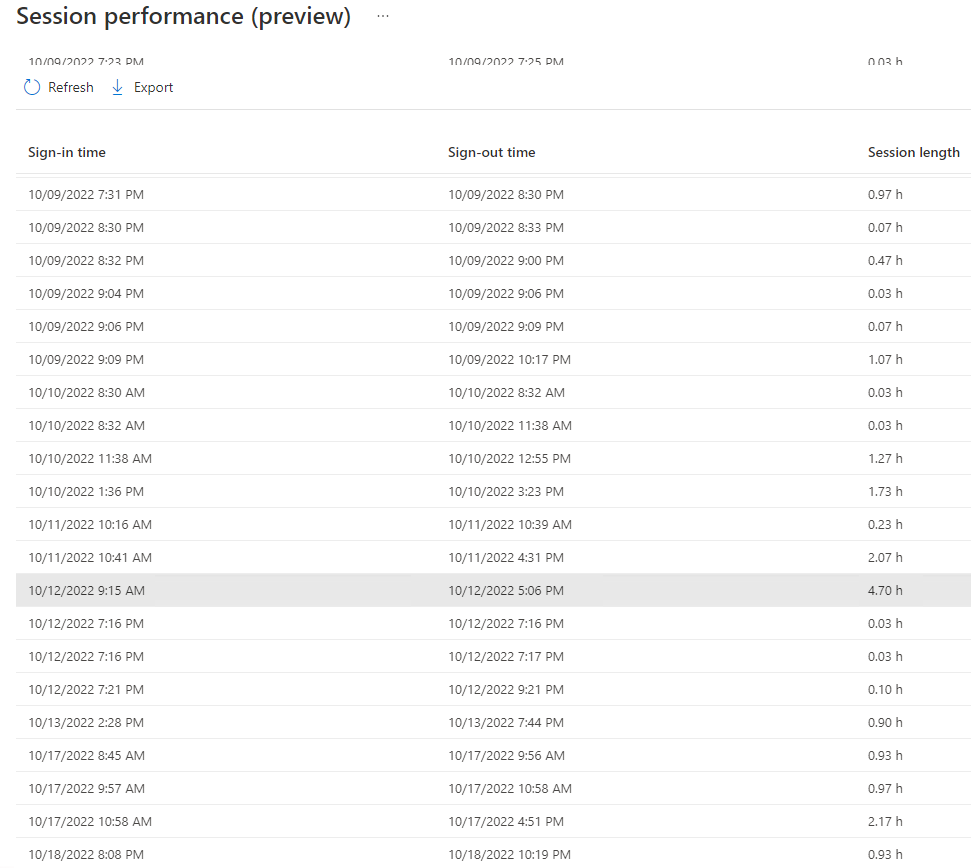
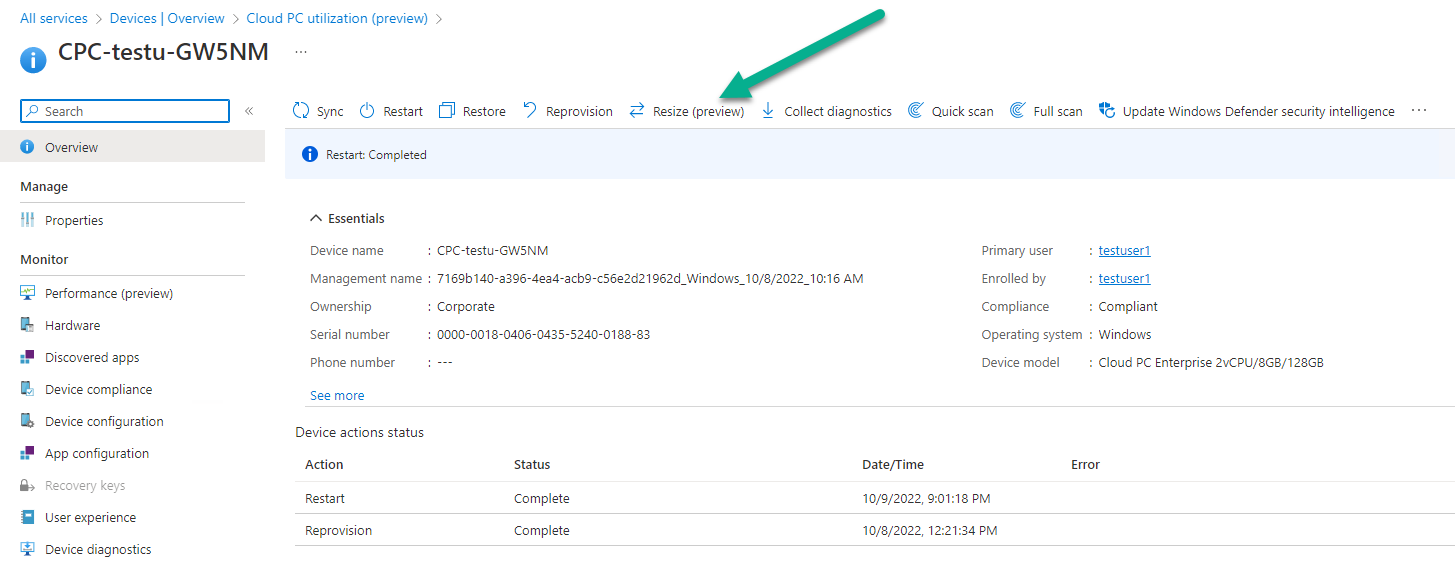
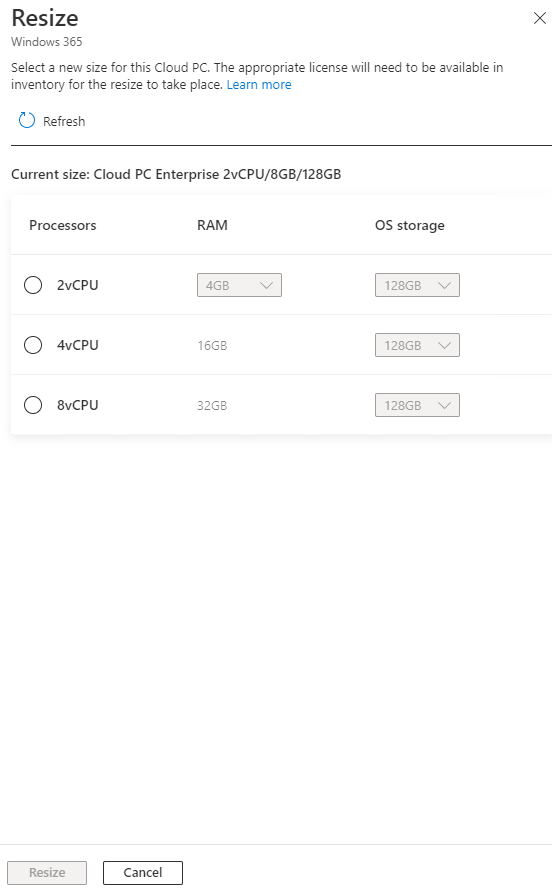
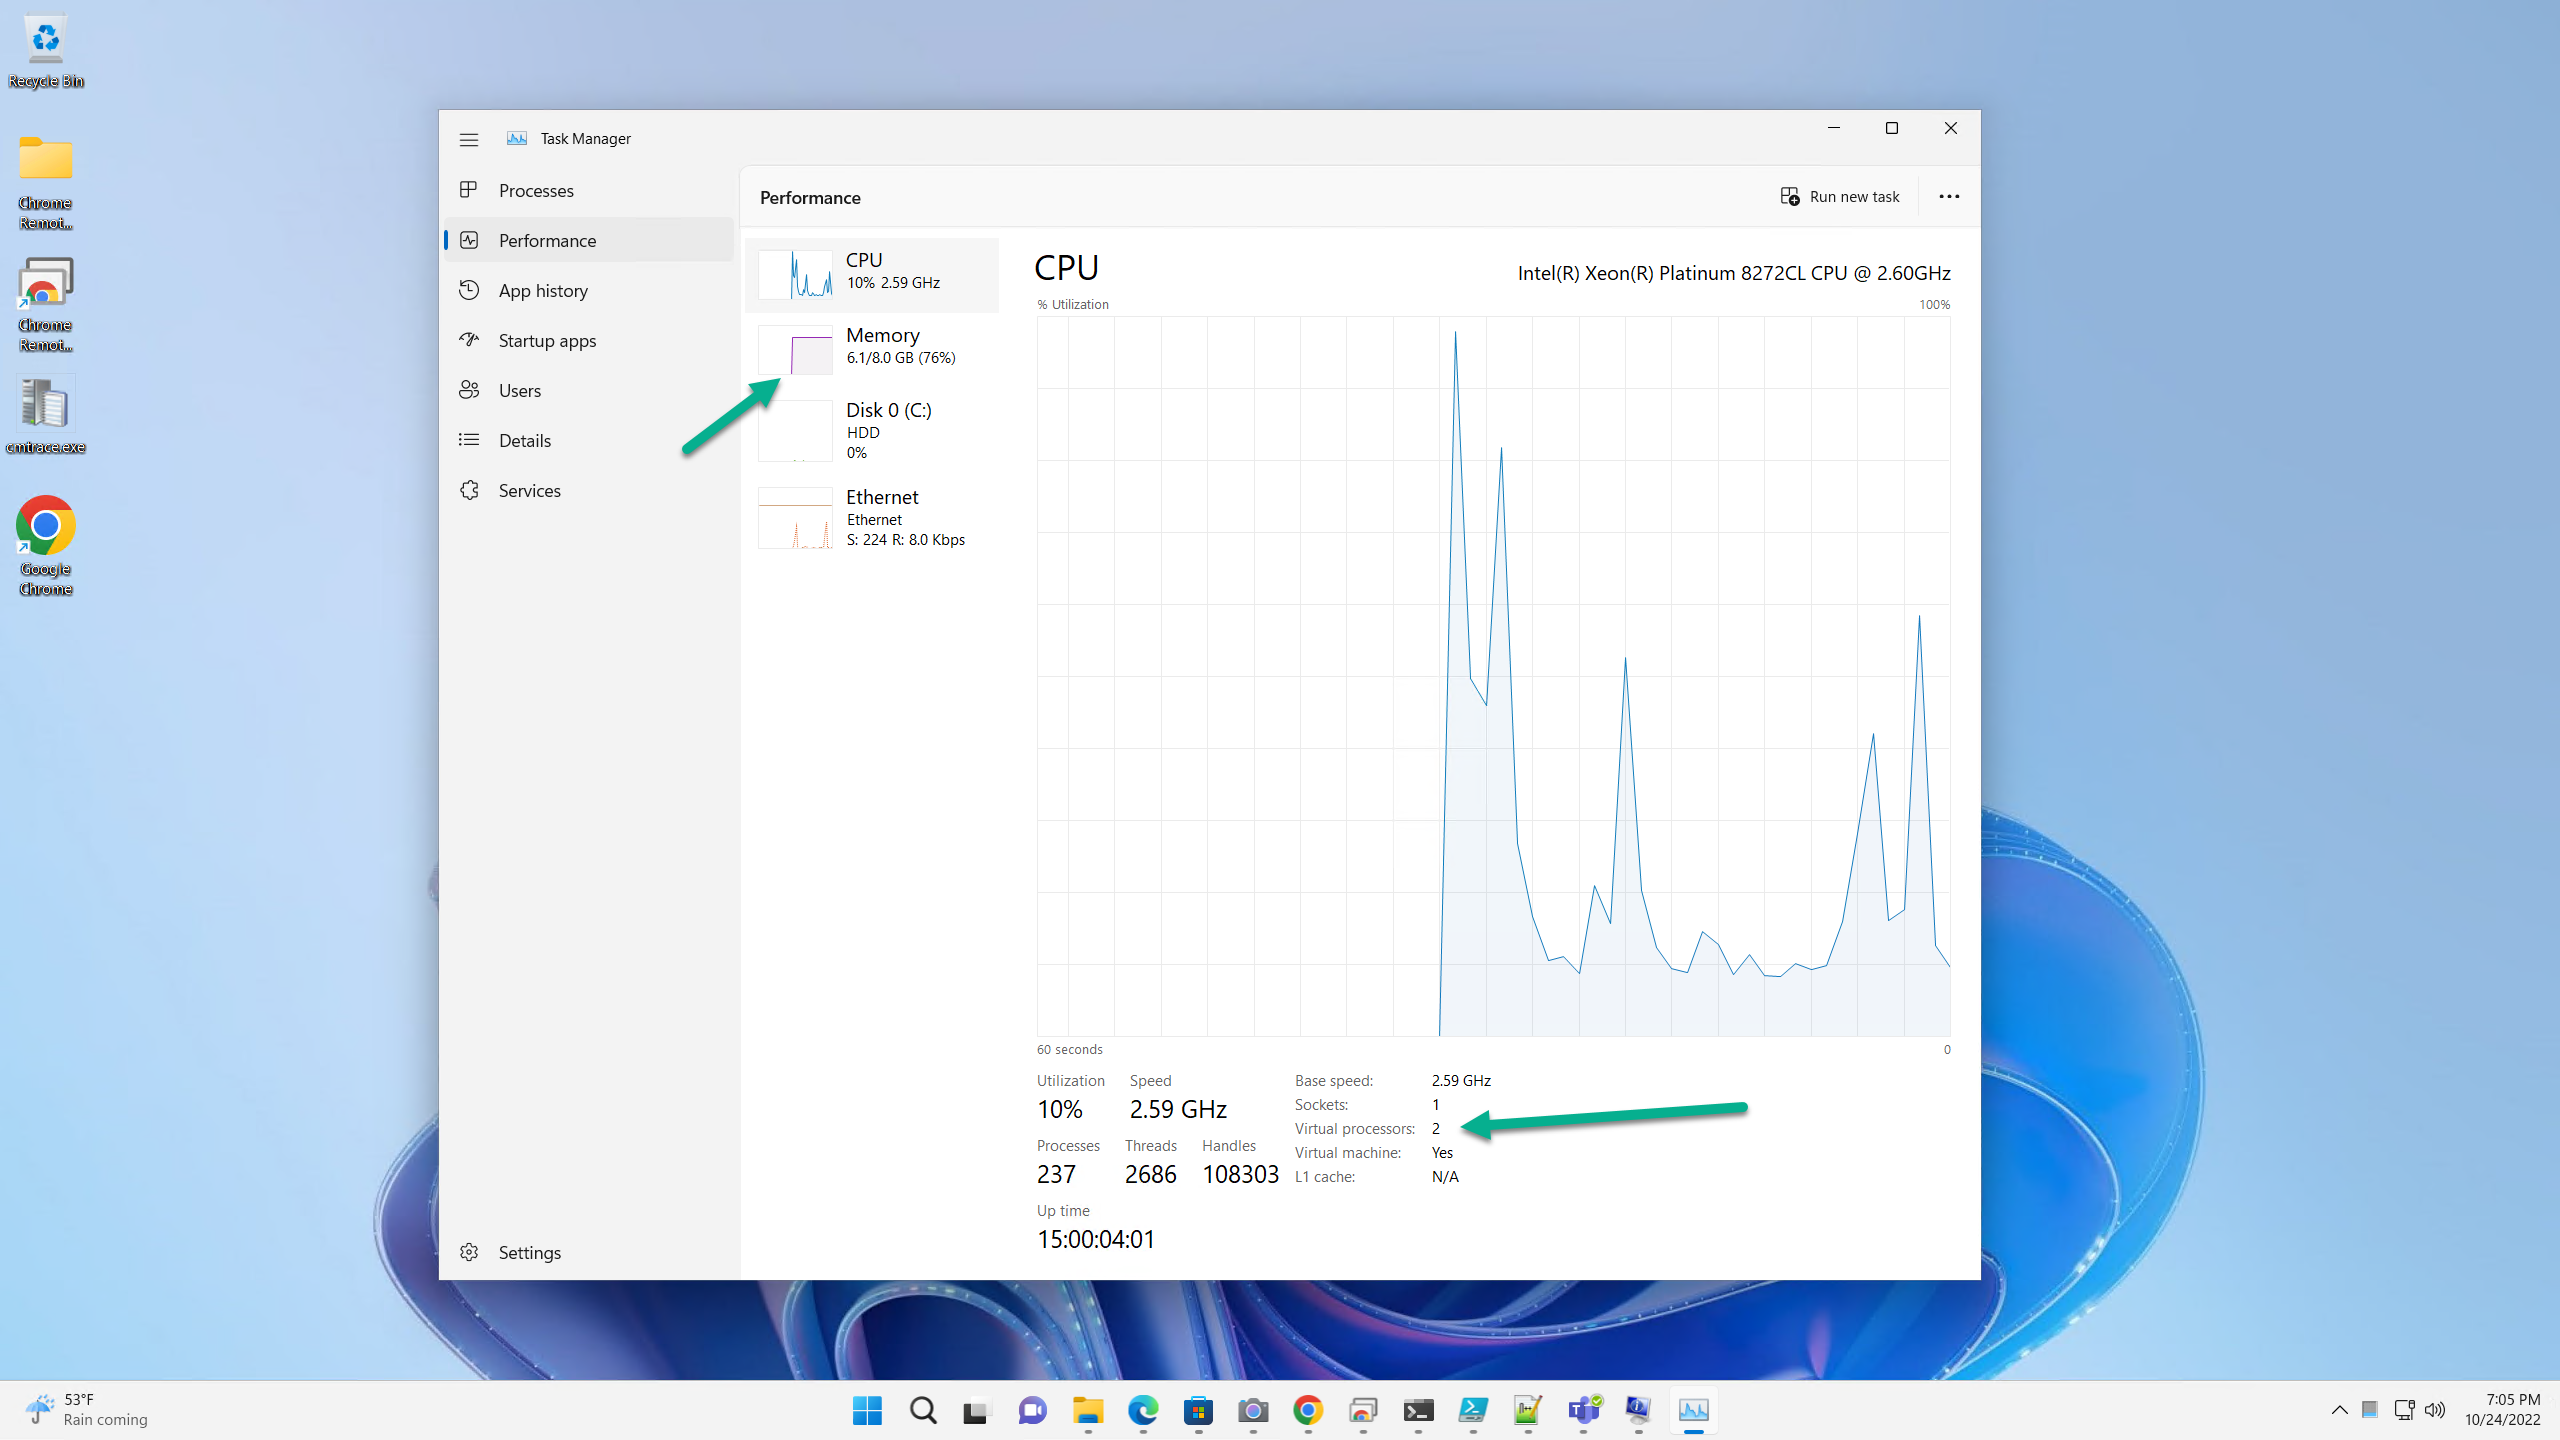
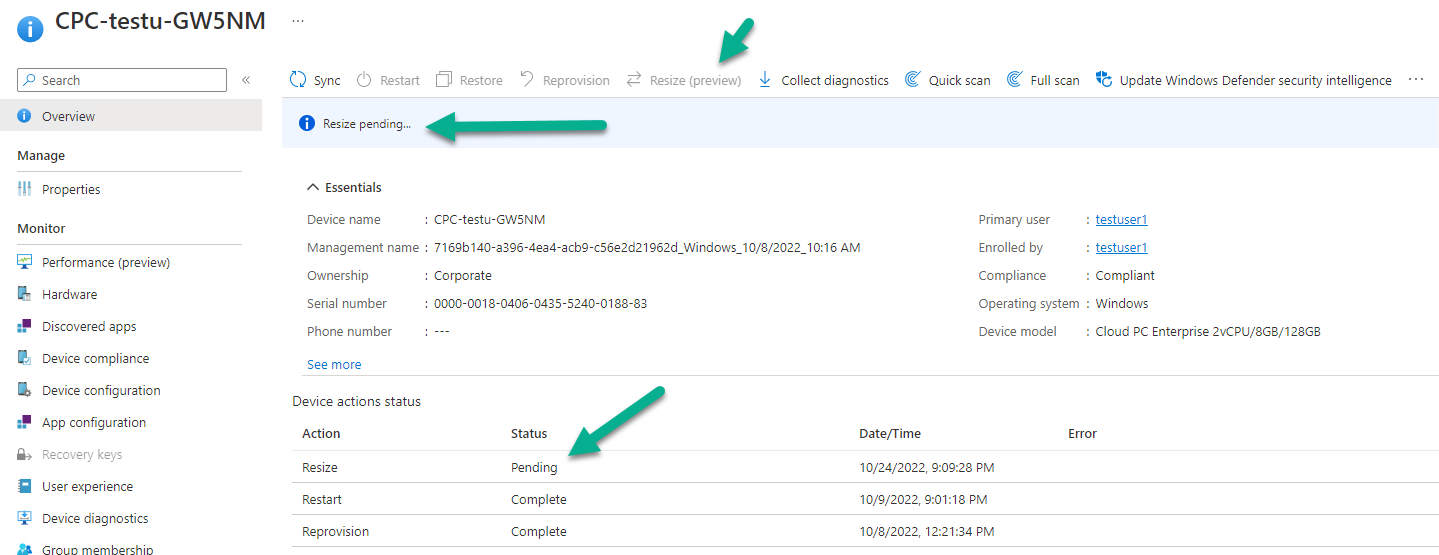
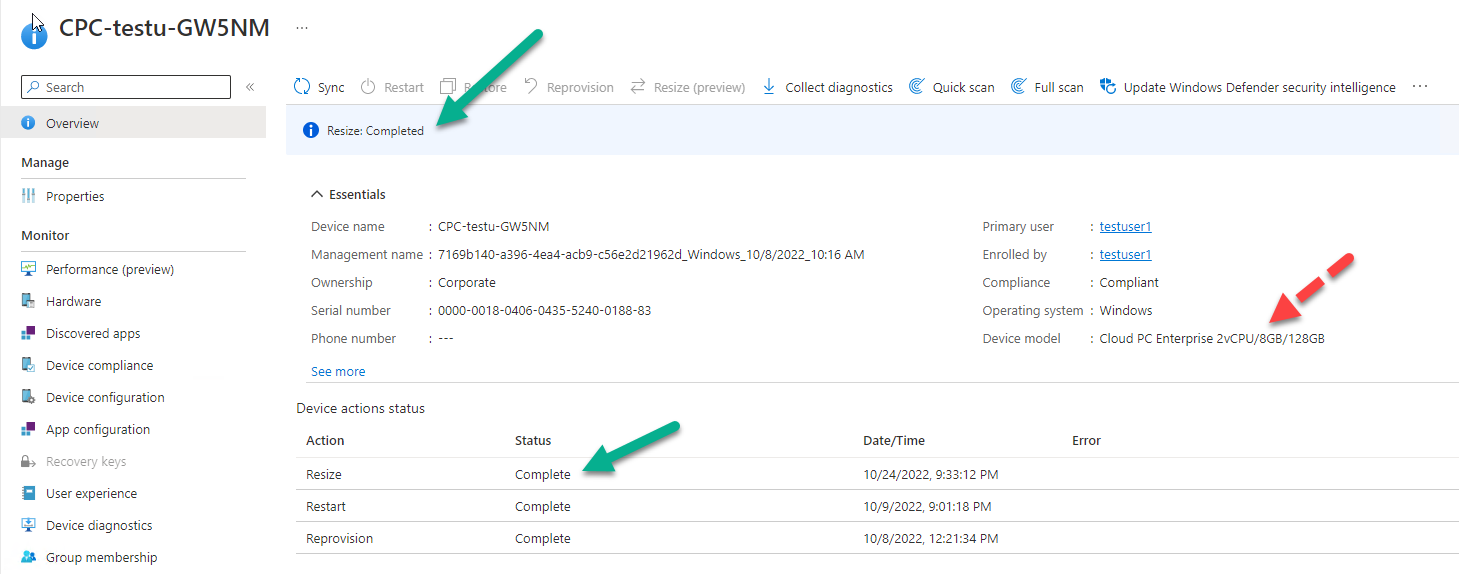
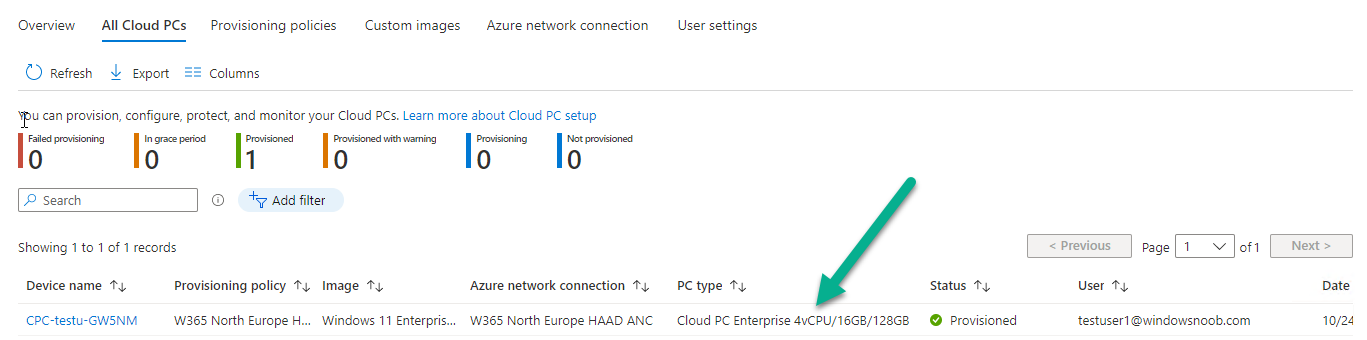
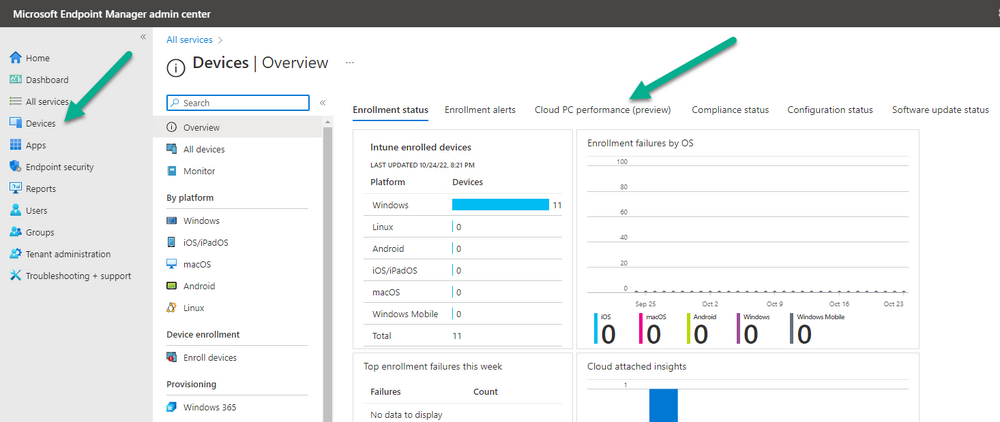
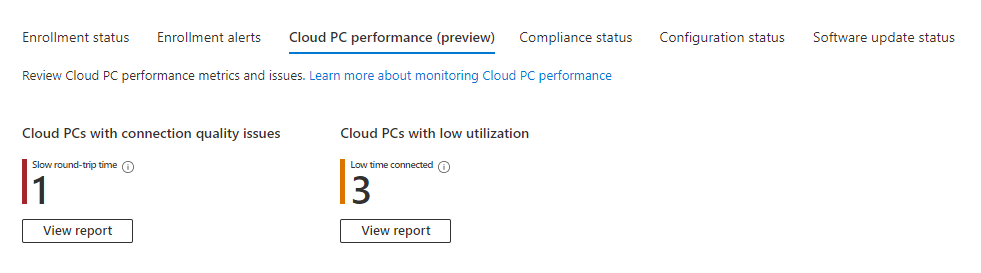
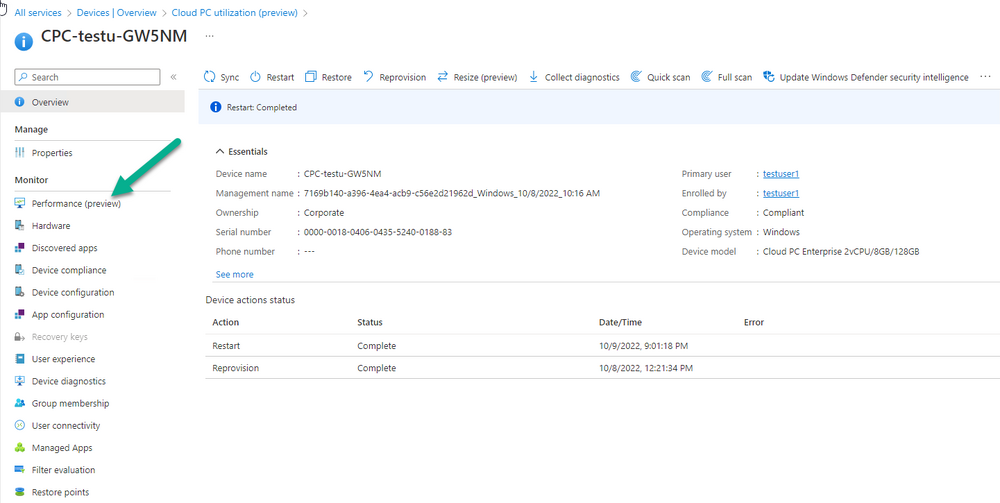
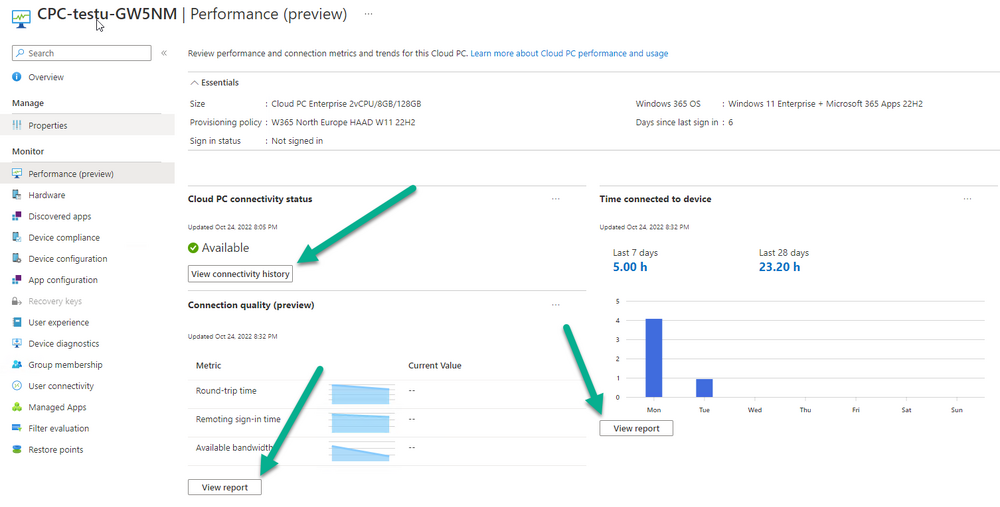
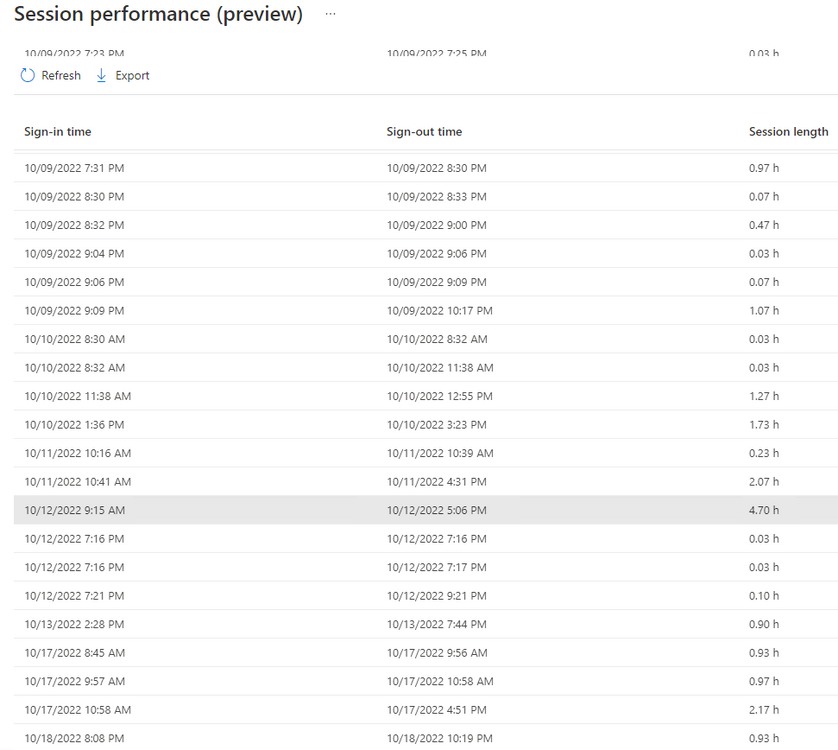
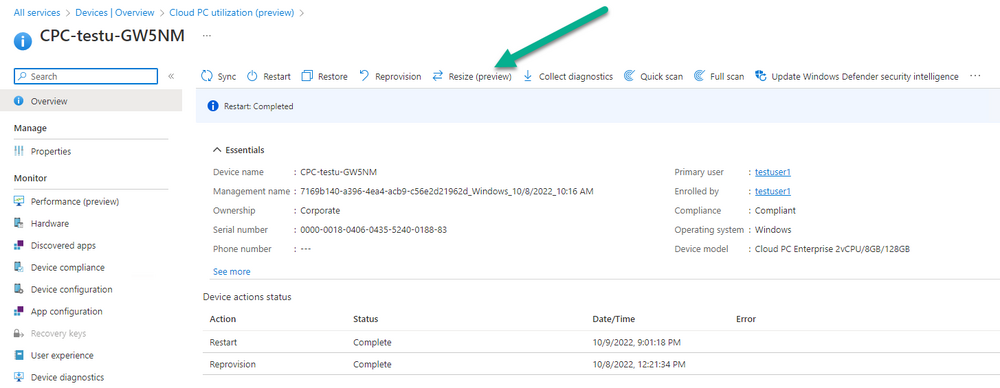
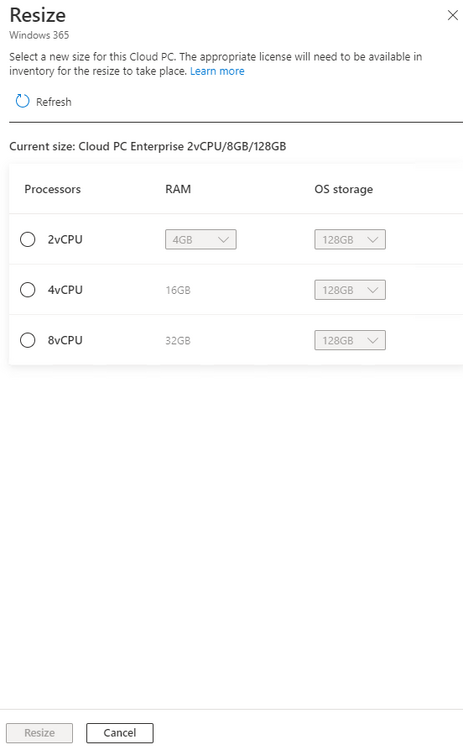
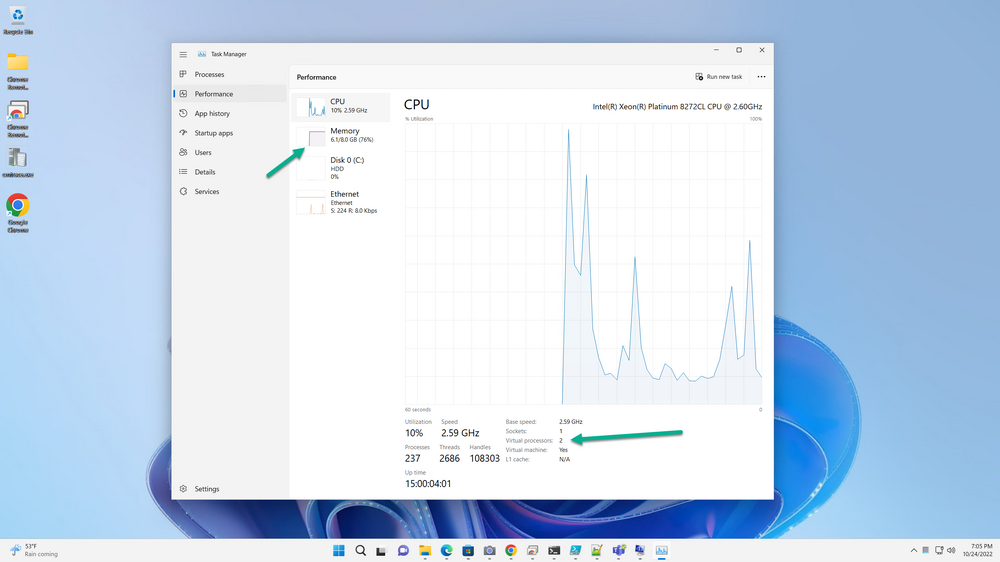
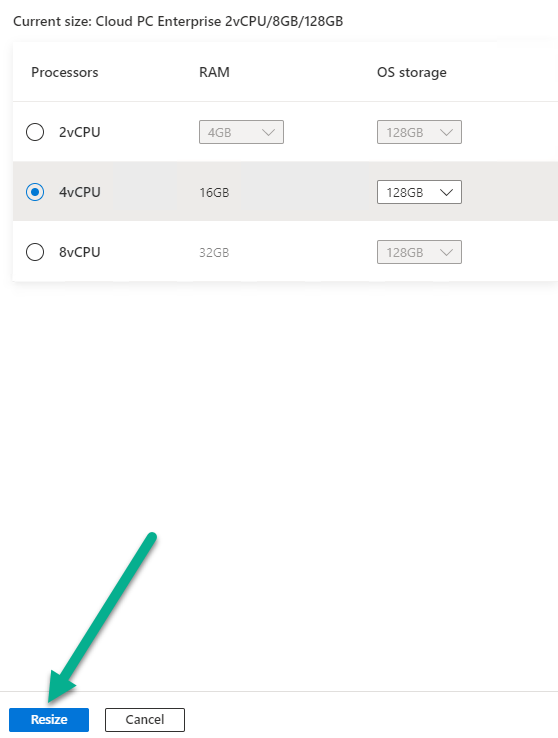
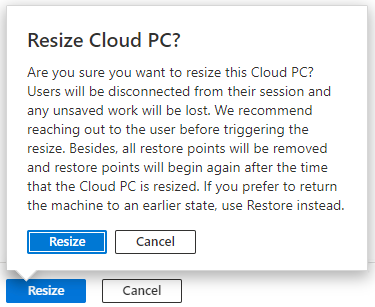
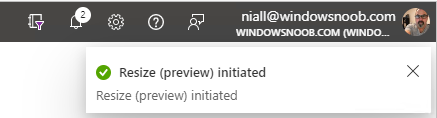
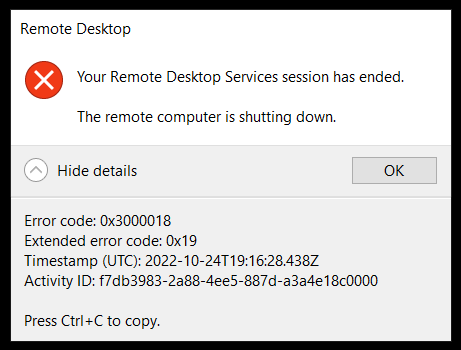
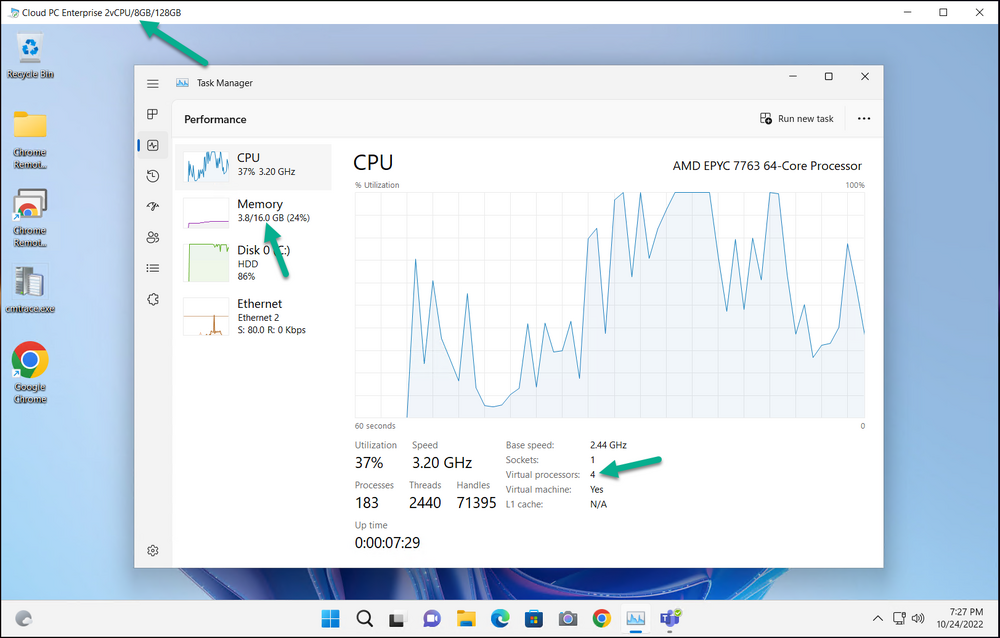
Introduction Cloud PCs can come in certain preset configurations based on templates, or you can choose to customize your own. Sometimes you may find that a Cloud PC is not powerful enough for a user, or is too powerful and not being used to it's full potential (low utilization). With the Windows 365 Cloud PC resize (preview) remote action you can resize low utilization (or high utilization) PCs on the fly to get the most out of your investment. Identifying low utilization You can now identify low utilization on Windows 365 Cloud PCs in the Intune portal directly. In the Devices overview click on the Cloud PC performance (preview) tab highlighted here. This will reveal Cloud PCs with connection quality issues or Cloud PCs with low utilization. clicking on View report under Cloud PCs with low utilization reveals more data. You can see the Total time connected and even the Days since last sign-in which easily gives you an idea of how often your Cloud PCs are used and when they were last used. Clicking on any of the devices will reveal even more data. Below is the overview of one of our low utilization devices. Notice the Performance (preview) option. clicking on Performance (preview) reveals data about it's utilization. And you can dig deeper by clicking on any of the three highlighted reports. for example, in the Time connect to device report, we can see how long a user was actively connected to the Cloud PC over a given period (7 days/28 days) You can use this data to help decide which Cloud PCs are low utilization and based on that resize them to a more cost efficient model. Resizing Cloud PC requirements You'll need one of the following (or custom equivalent) roles: Global Admin Intune Service Admin Intune Reader + Cloud PC Admin roles The Cloud PC must have a status of Provisioned in the Windows 365 provisioning node The Resize remote action supports the following licenses paid preview trial Note: Resizing isn’t supported for Cloud PCs provisioned through group-based licenses. Resizing is only supported for Gen 2 Cloud PCs. I've asked Microsoft PG to explain how we can determine the Generation (Gen 1 versus Gen 2) of a Cloud PC and will update this blog post when they reply. The Resize remote action Now that you've identified a Cloud PC to resize you are ready to perform that action, but before you do it would be a good idea to communicate this to your end user as the resize action will logoff any logged on user. Not only will it logoff the user but that action will not send any notification to the end user on the Cloud PC itself, nothing will popup on the device it will just shutdown. Depending on how the user is connected to the device they might even see the following shortly after the device has shutdown. In the Intune Portal, select the Cloud PC you intend to resize and you'll see the Resize (preview) option. Clicking Resize (preview) brings up available resize options, note that you can resize up or down (the resize down was added based on customer feedback, so yes Microsoft does listen to feedback). Note: You can submit feedback for anything Windows 365 related via https://aka.ms/w365feedback. I have one license available for 4 vCPU, 16GB ram so I'll select that (it's actually an upgrade, but let's give it a test). Here is the current spec of my Cloud PC (8GB ram, 2vCPU). The specs of your existing Cloud PC that you intend to Resize are listed in your Resize options also under the Current size heading. Select a resize option that is available to you and then click Resize. Note that if you click a SKU upgrade that isn't available then you'll get a red warning informing you of that. You'll be prompted to confirm the resize operation, and have to click Resize for a third time. In the Intune portal you'll get a notification that the remote action was started Back in the Intune portal, the resize option is now greyed out for the selected Cloud PC and the status has changed to Resize pending. You can probably refresh this view in Intune for a few minutes/hours, but I got impatient and attempted to RDP back to the device. To my surprise it was already resized, however the RDP session was not yet aware of that. Side note: That disk sure looks busy after the resize ? It did calm down shortly after, but it's probably worth keeping in mind that directly after a resize things might need a few minutes to stabilize. At this point, I went back to Intune and refreshed, and now it updated the remote Resize (preview) action to Completed. However, it still listed the old specs under Device Model. This may change after a hardware inventory is sent back to Intune but I did trigger a SYNC and it's still wrong. Update: After checking the same device the following morning in Intune, it correctly reports the Device Model. If you look at Provisioned PC's, the data there is correct and it shows the new size under PC Type. Licenses As part of the resize the affected user is moved from their current Cloud PC license, to a valid license for the target model. In the resize done previously where we resized a Cloud PC from 2vCPU 8GB Ram to 4vCPU 16GB Ram, the license involved would move from one Cloud PC type to the other, below is a screenshot of the licenses before the resize. Notice how there is one 'free' license available in the Windows 365 Enterprise 4 vCPU, 16 GB, 128 GB. and below is what those same licenses look after the resize is complete. Actually, the license move happens right at the beginning of the operation and if there are no licenses available the resize operation will fail in the Intune portal. I have got to admit the Resize remote action was impressive, and very fast, but I'd like to see some improvements however such as: Custom email notification (to user/group/admin about the resize about to occur) Customizable ALERT toast notification sent to the user warning them to save their data Custom alert/email sent to user/admin notifying them that the resize is completed or if there was an issue, describe it that was it for this blog post, see you in the next one If you'd like to get started with Windows 365, checkout our brand new series here. cheers niall


-
Introduction I use PKI based labs to test various scenarios from Microsoft. I've multiple SCCM (Configuration Manager) labs that are running in HTTPS only mode (PKI) using a two tier PKI infratstructure (Offline Root CA, Issuing CA). Using multiple labs usually means only one lab is online at a time, and as certs expire regularly, an offline lab can mean expired certs. You'll first notice issues if you do OSD regularly as it depends on a healthy PKI infrastructure. If you have expired certs, PXE boot will not work. In this video I show that problem, reveal the expired certificates on the IssuingCA and show you how I fix it. Setting up PKI I've created multiple guides to help you setup PKI in your LAB and to integrate it with SCCM. You can review them below. Part 1 - Introduction and server setup Part 2 - Install and do initial configuration on the Standalone Offline Root CA Part 3 - Prepare the HTTP Web server for CDP and AIA Publication Part 4 - Post configuration on the Standalone Offline Root CA Part 5 - Installing the Enterprise Issuing CA Part 6 - Perform post installation tasks on the Issuing CA Part 7 - Install and configure the OCSP Responder role service Part 8 - Configure AutoEnroll and Verify PKI health How can I configure System Center Configuration Manager in HTTPS mode (PKI) - Part 1 How can I configure System Center Configuration Manager in HTTPS mode (PKI) - Part 2
-
please see my reply above yours
-
hi all, we'll be doing some site maintenance to the server infrastructure Sunday 23rd October, 2022 @ 10am GMT. We hope to complete it in approx one hour, and there may be some disruption to the site during that time I'll update this blog post once the maintenance is completed cheers niall
-
is this a new site you are setting up or an existing site ? how did you configure things ? what version of sccm is it ? do the clients actually fall into an ip address range that you have configured in a boundary ? do your clients have the same version as the site client installed on them ?
-
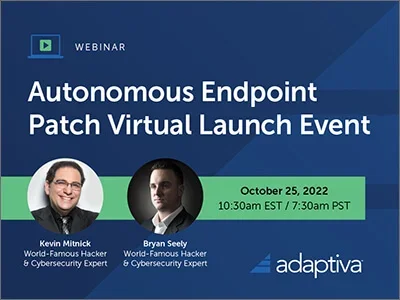
Join our Autonomous Endpoint Patch Virtual Launch Event to see the most significant advancement in 3rd party patching. October 25th,2022 7:30-9:00 AM PST (90 Mins) Kevin Mitnick and Bryan Seely, world-famous hackers, bestselling authors, and cybersecurity experts, will host and keynote our virtual launch event. As industry thought leaders, they'll discuss the newest and most relevant threats and tactics that real hackers will exploit. Mitnick will even demonstrate how simple it is to hack an EDR Sensor vulnerability and 2F authentication in real-time. Whether you’re on SCCM or using a “psuedo-automated” patching tool you won't want to miss the launch of our revolutionary, fully autonomous 3rd party patching solution. Autonomous patching allows you to fully automate one of IT’s most manual and laborious tasks from initial identification to enterprise-wide deployment. With Adaptiva’s new Endpoint Patch you can quickly build custom patching strategies for your unique applications, business units, and users, then sit back and let it automatically execute your patching over and over again. Tune in to: See a real-time demonstration of hackers exploiting common enterprise application vulnerabilities. Learn what makes Adaptiva's Endpoint Patch so visionary compared to existing patching products on the market today. Discover how Endpoint Patch will save your organization hundreds of human hours. And more... Save your seat today!
-
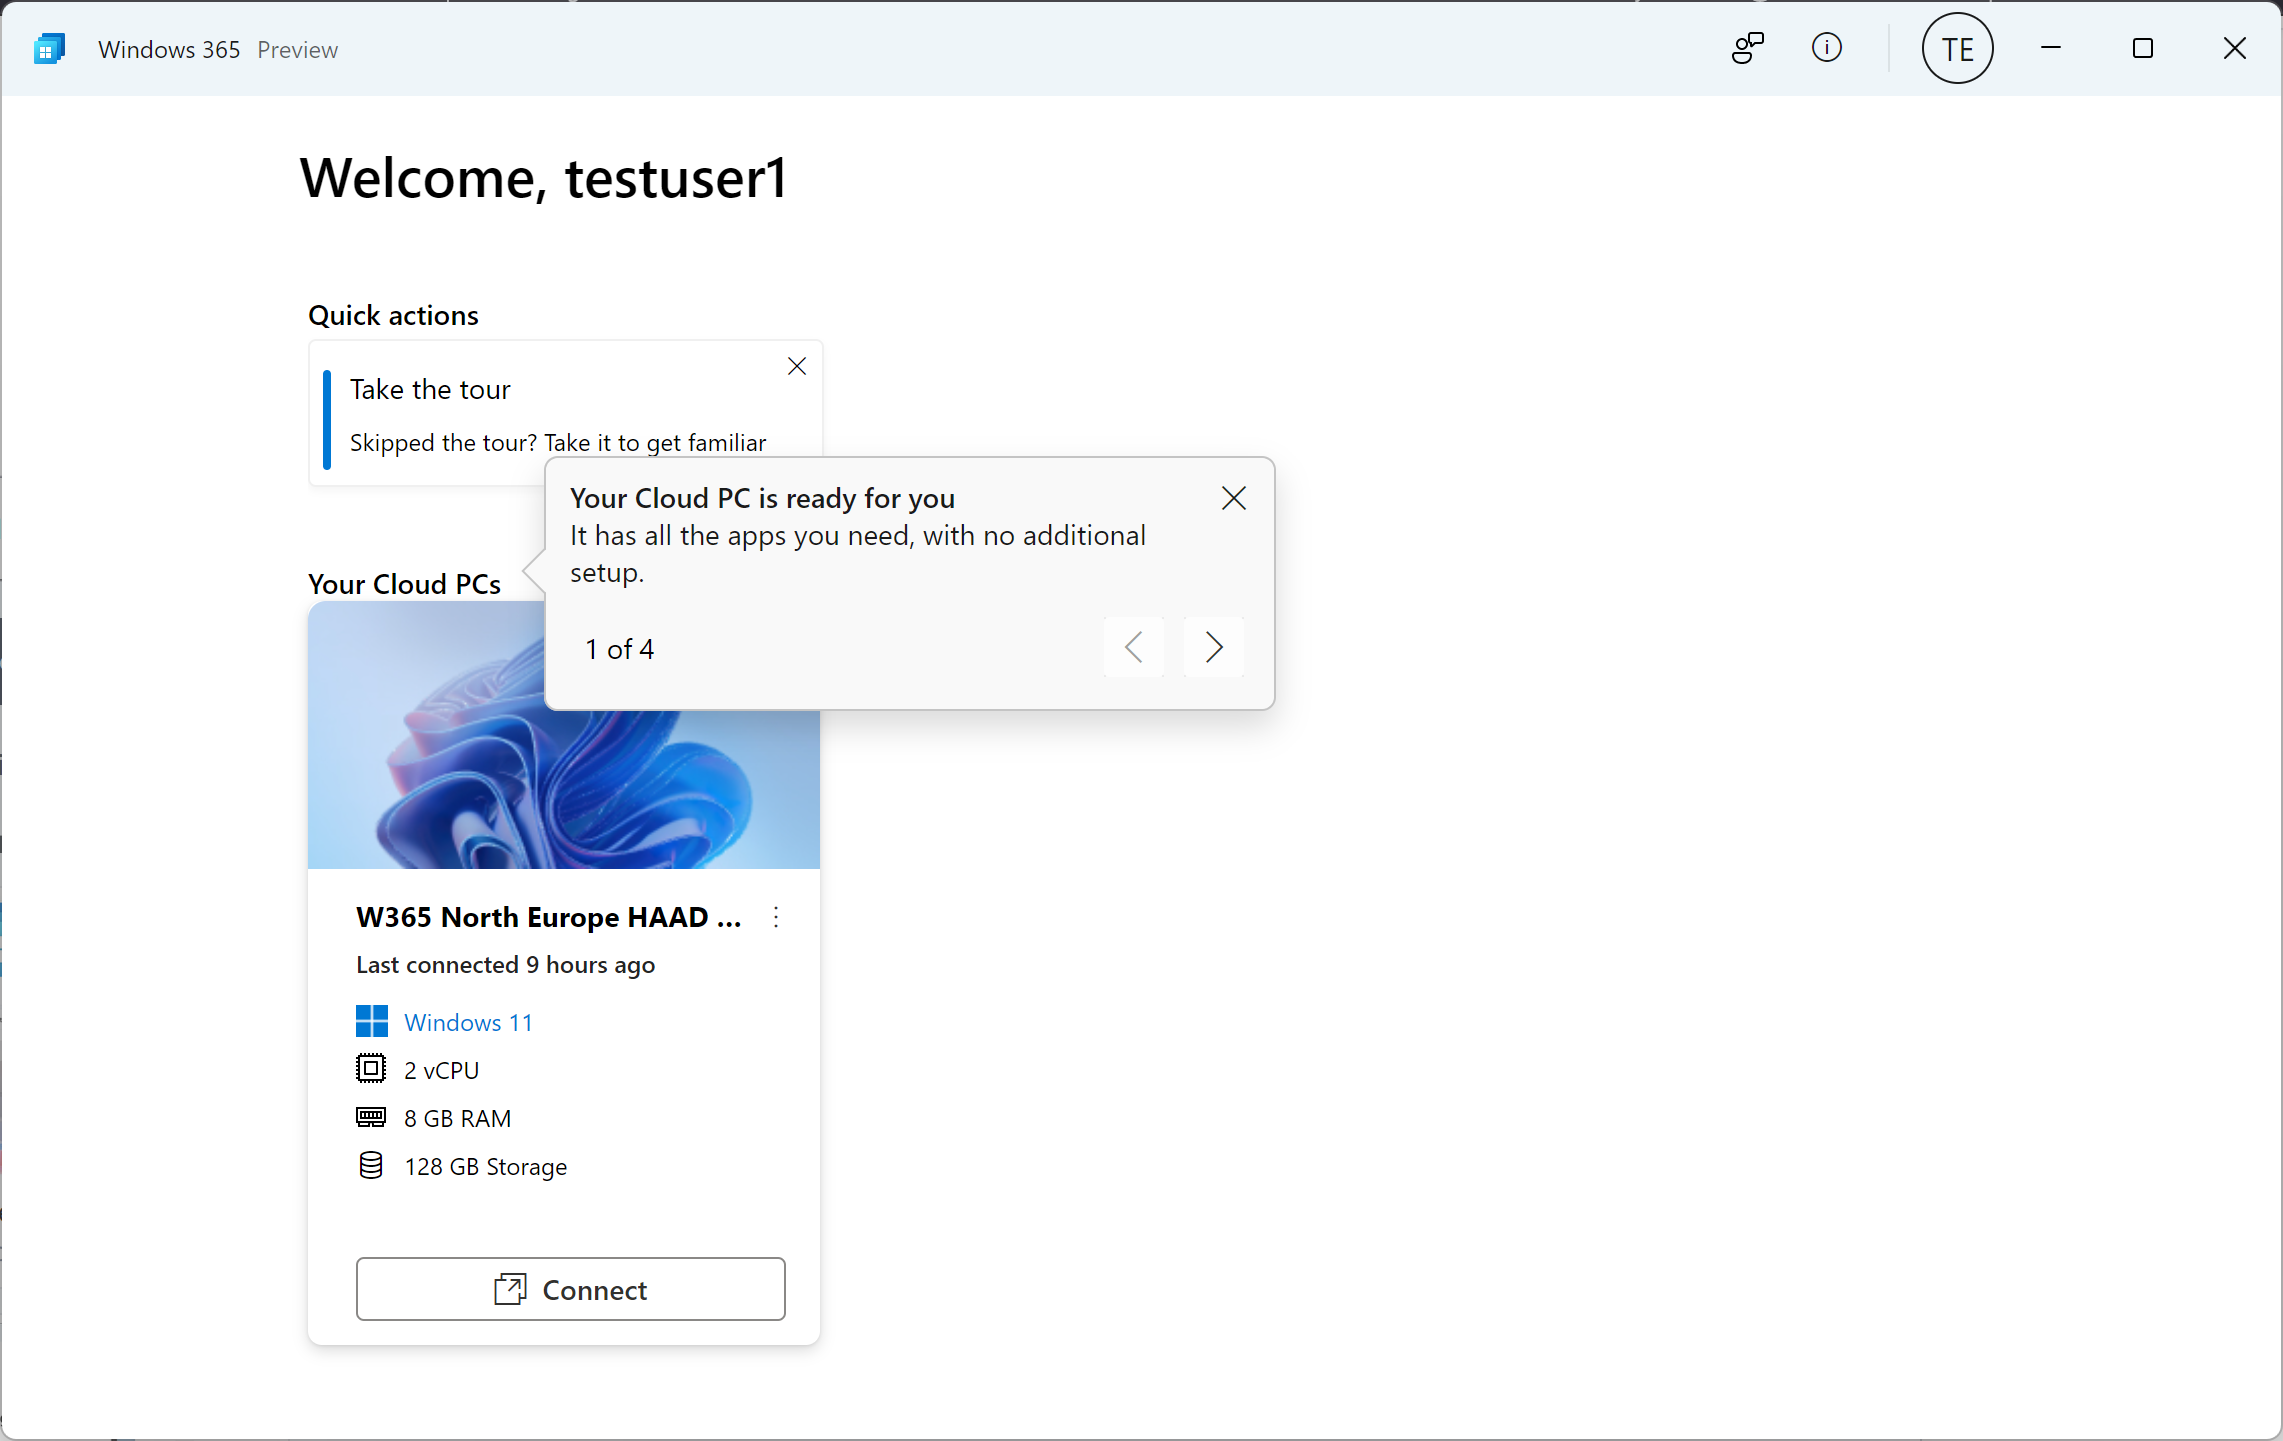
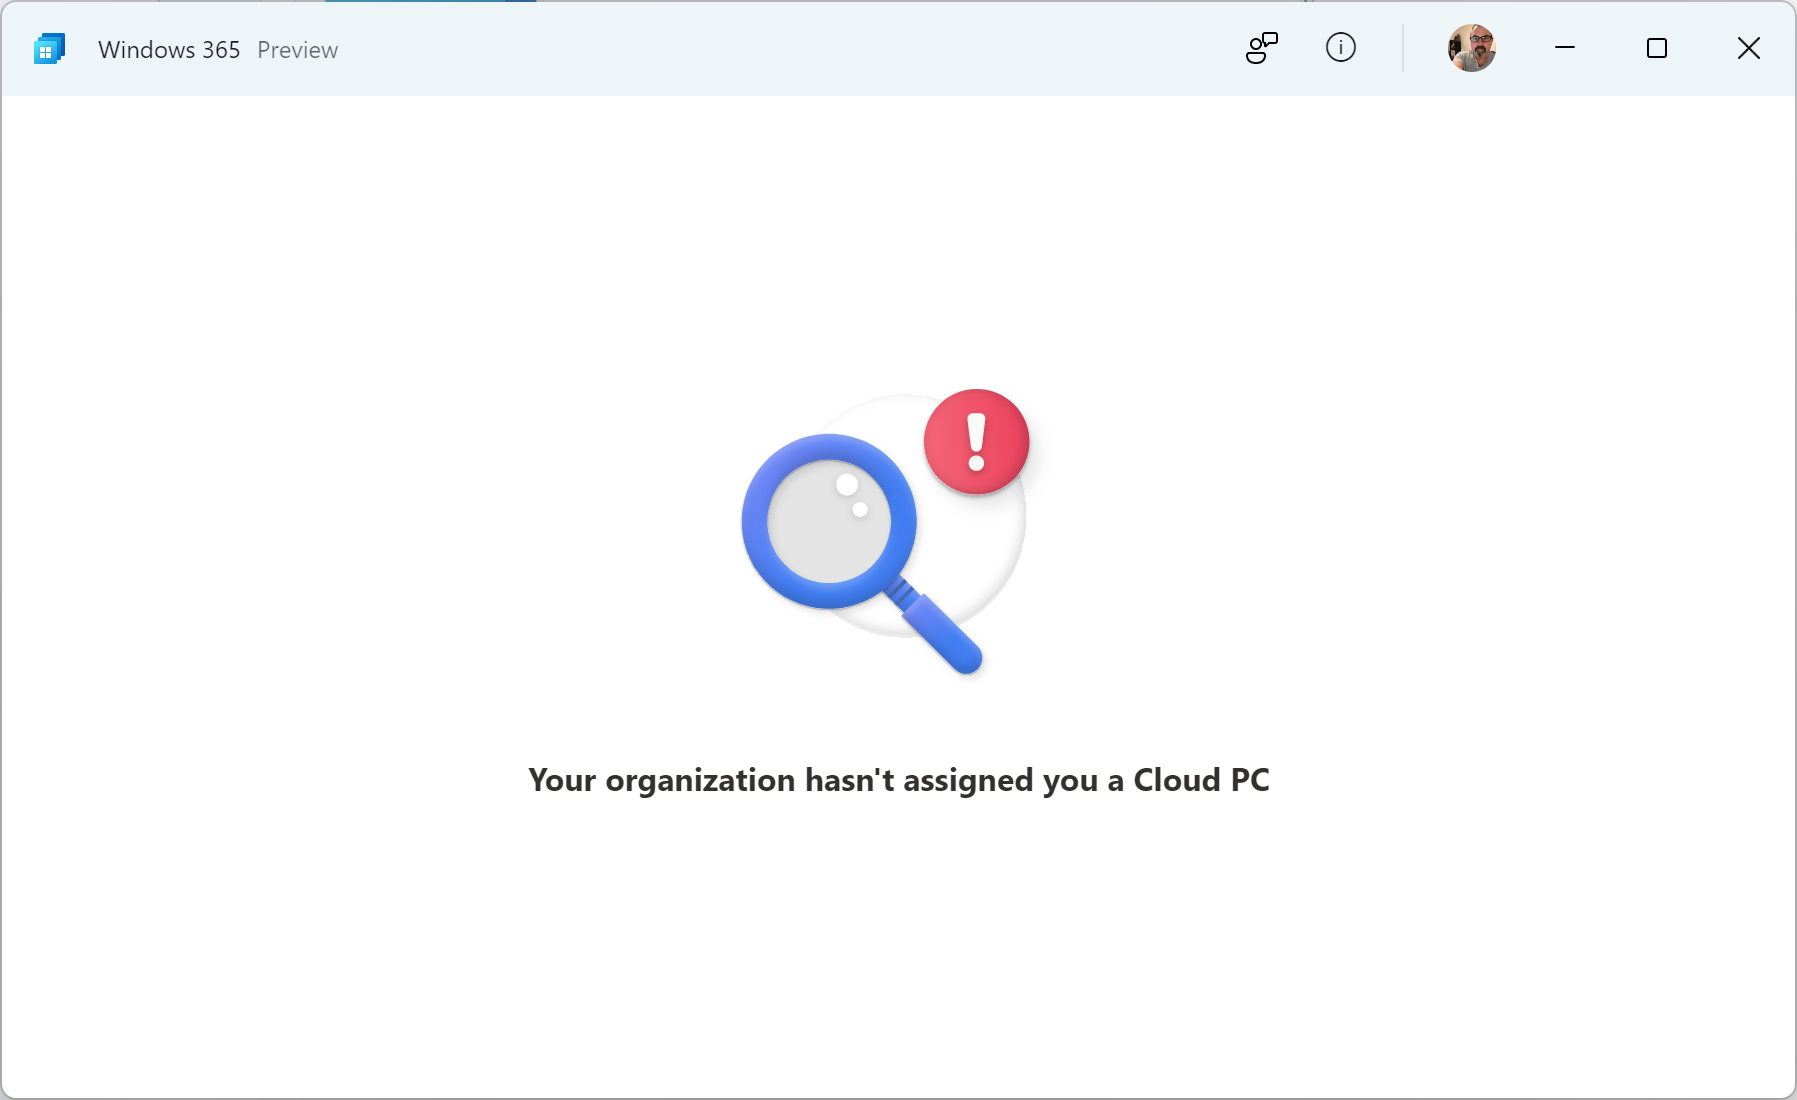
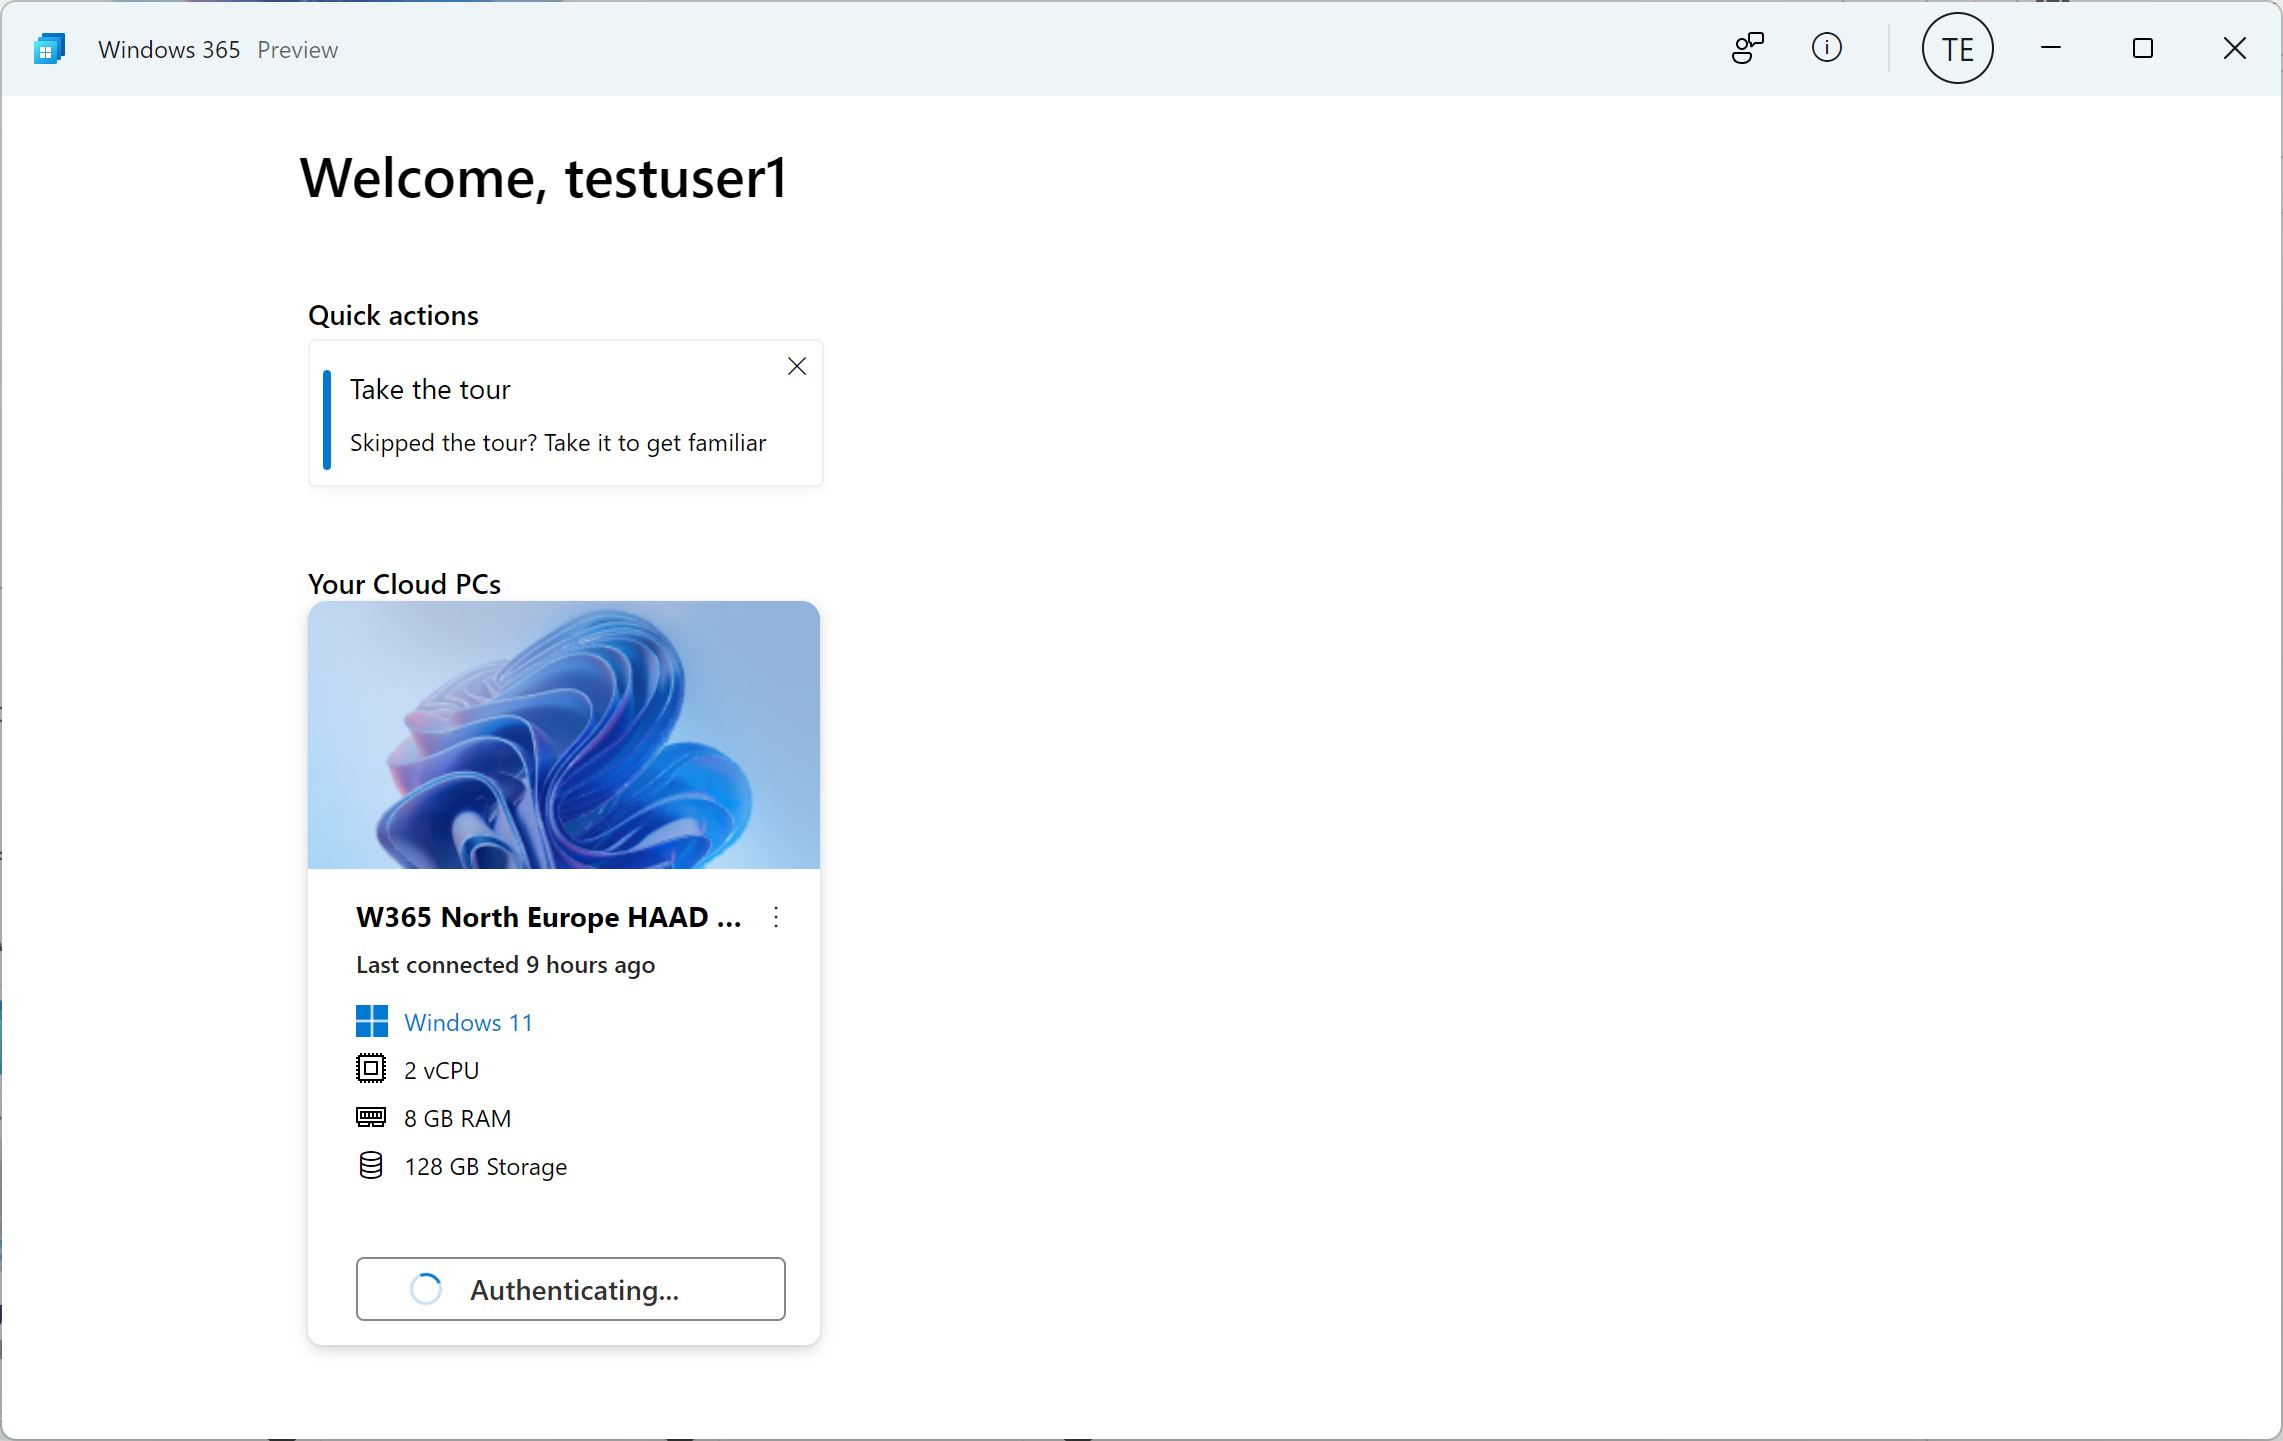
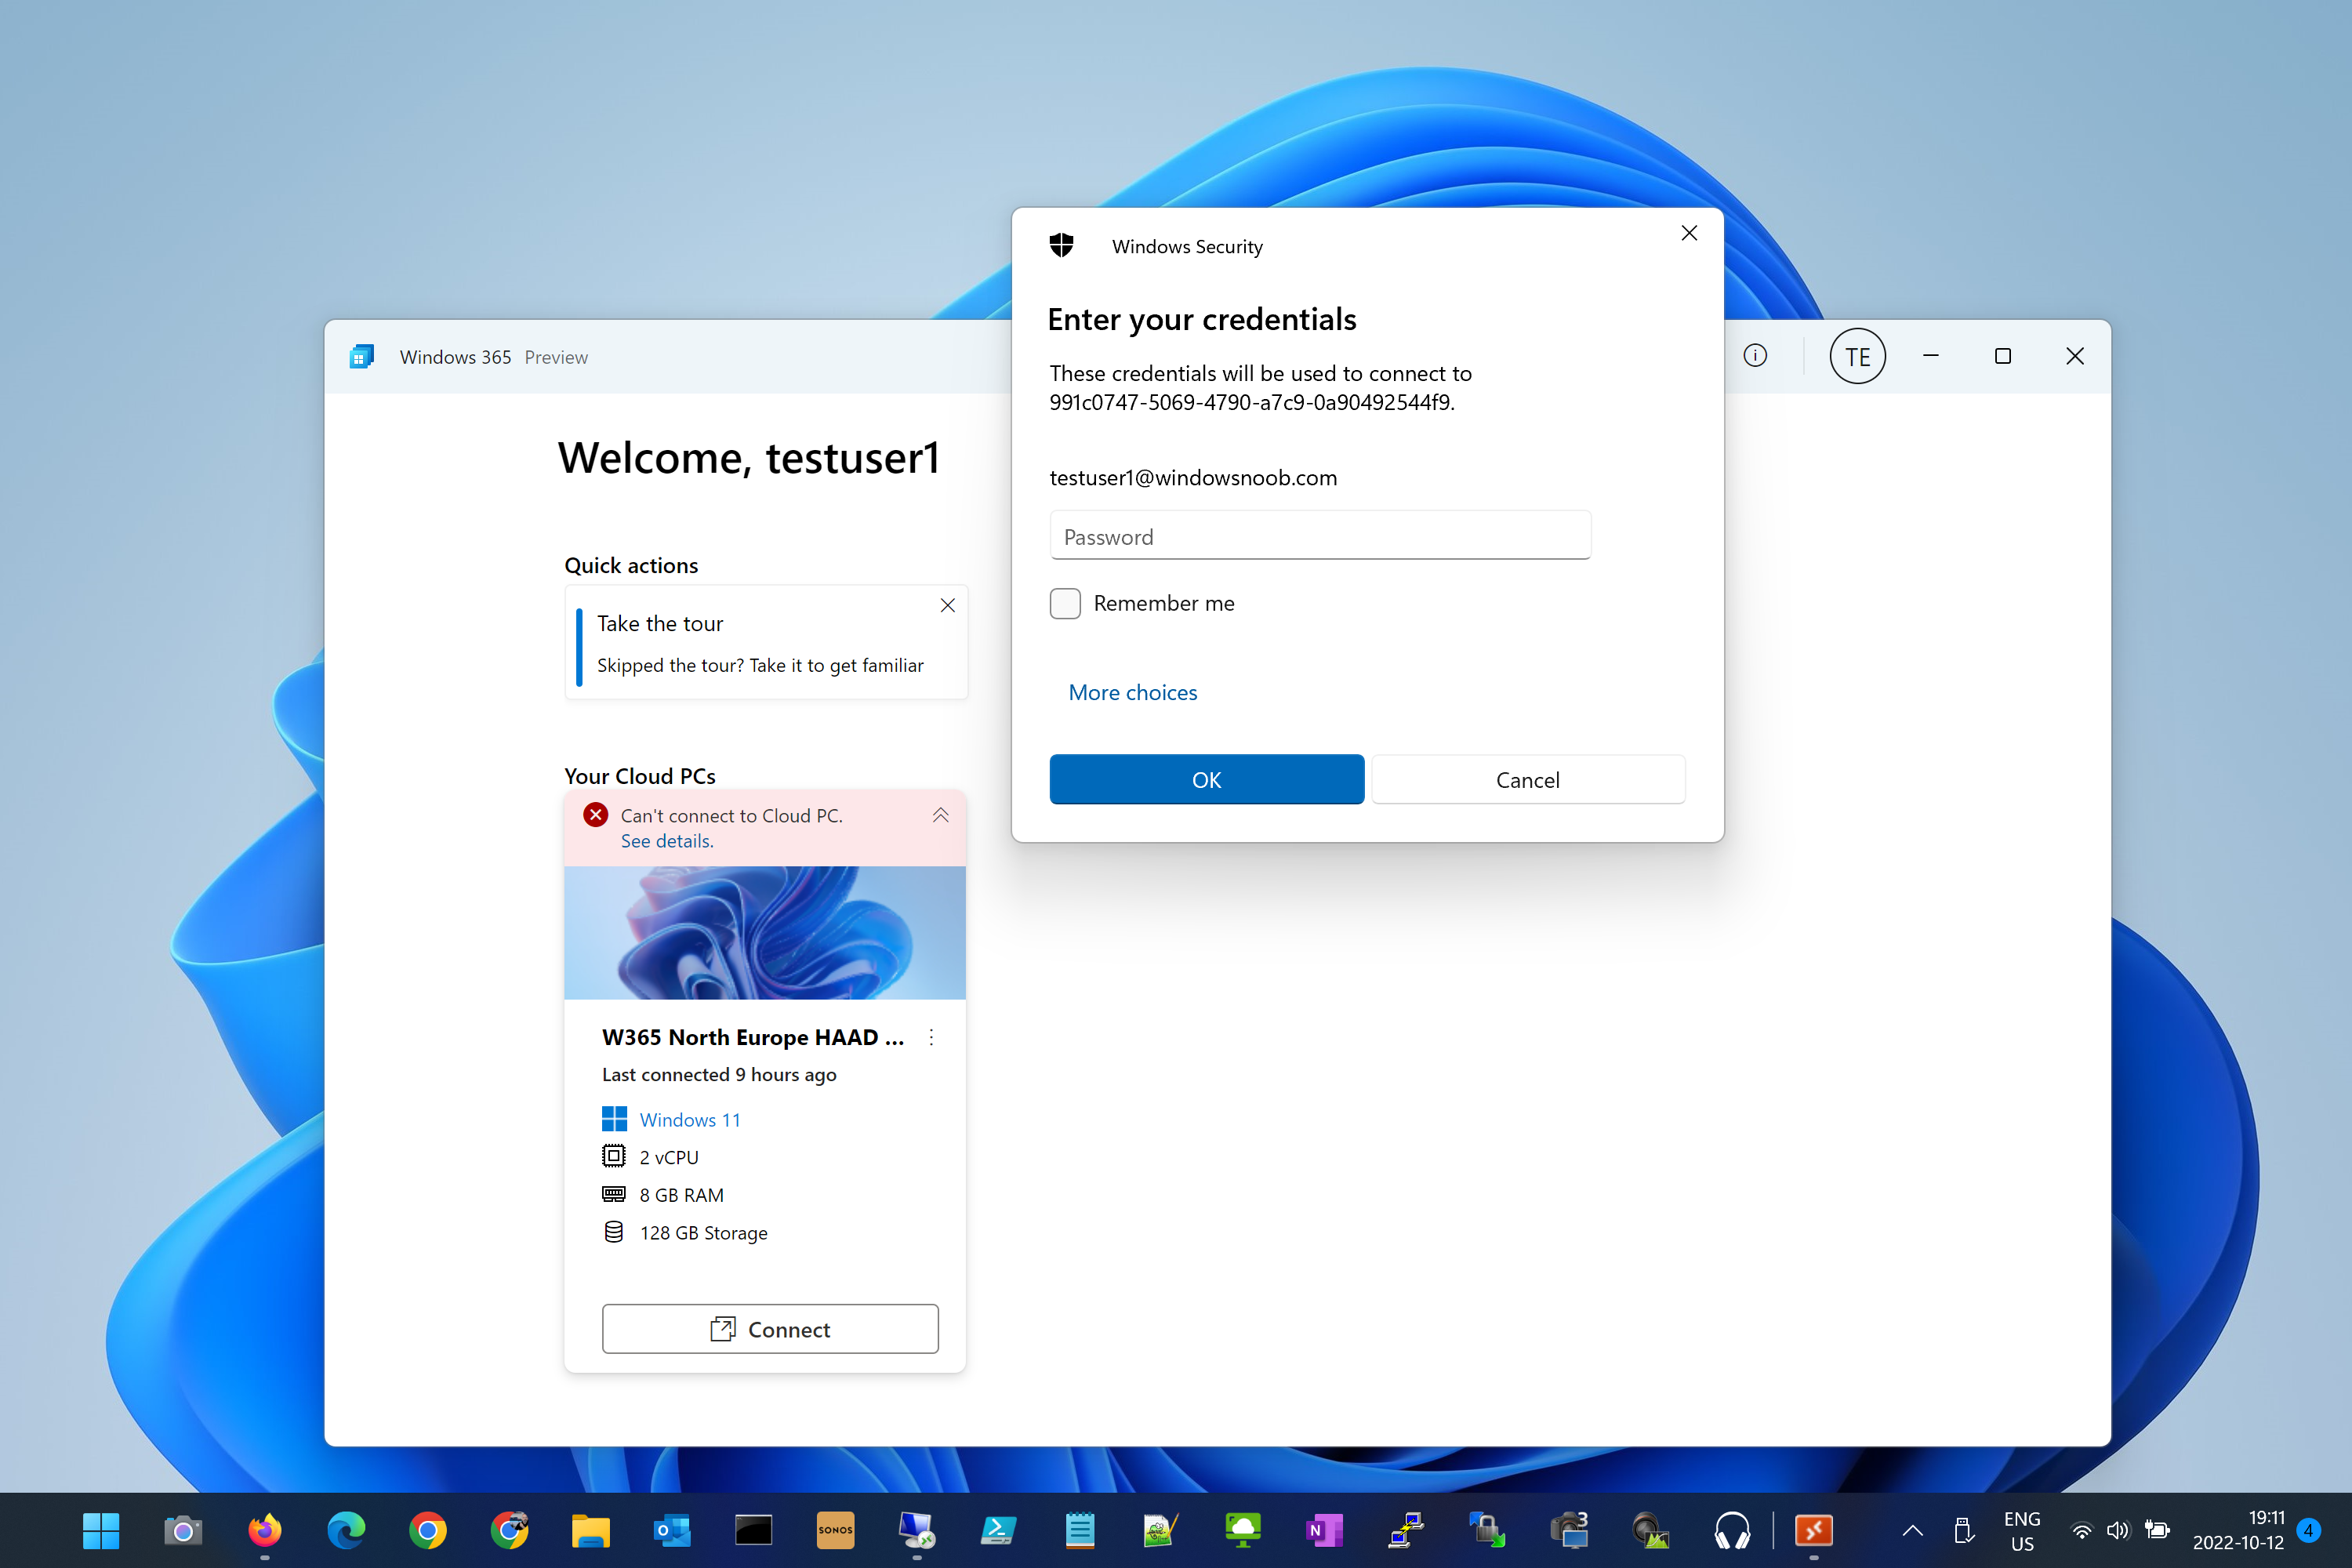
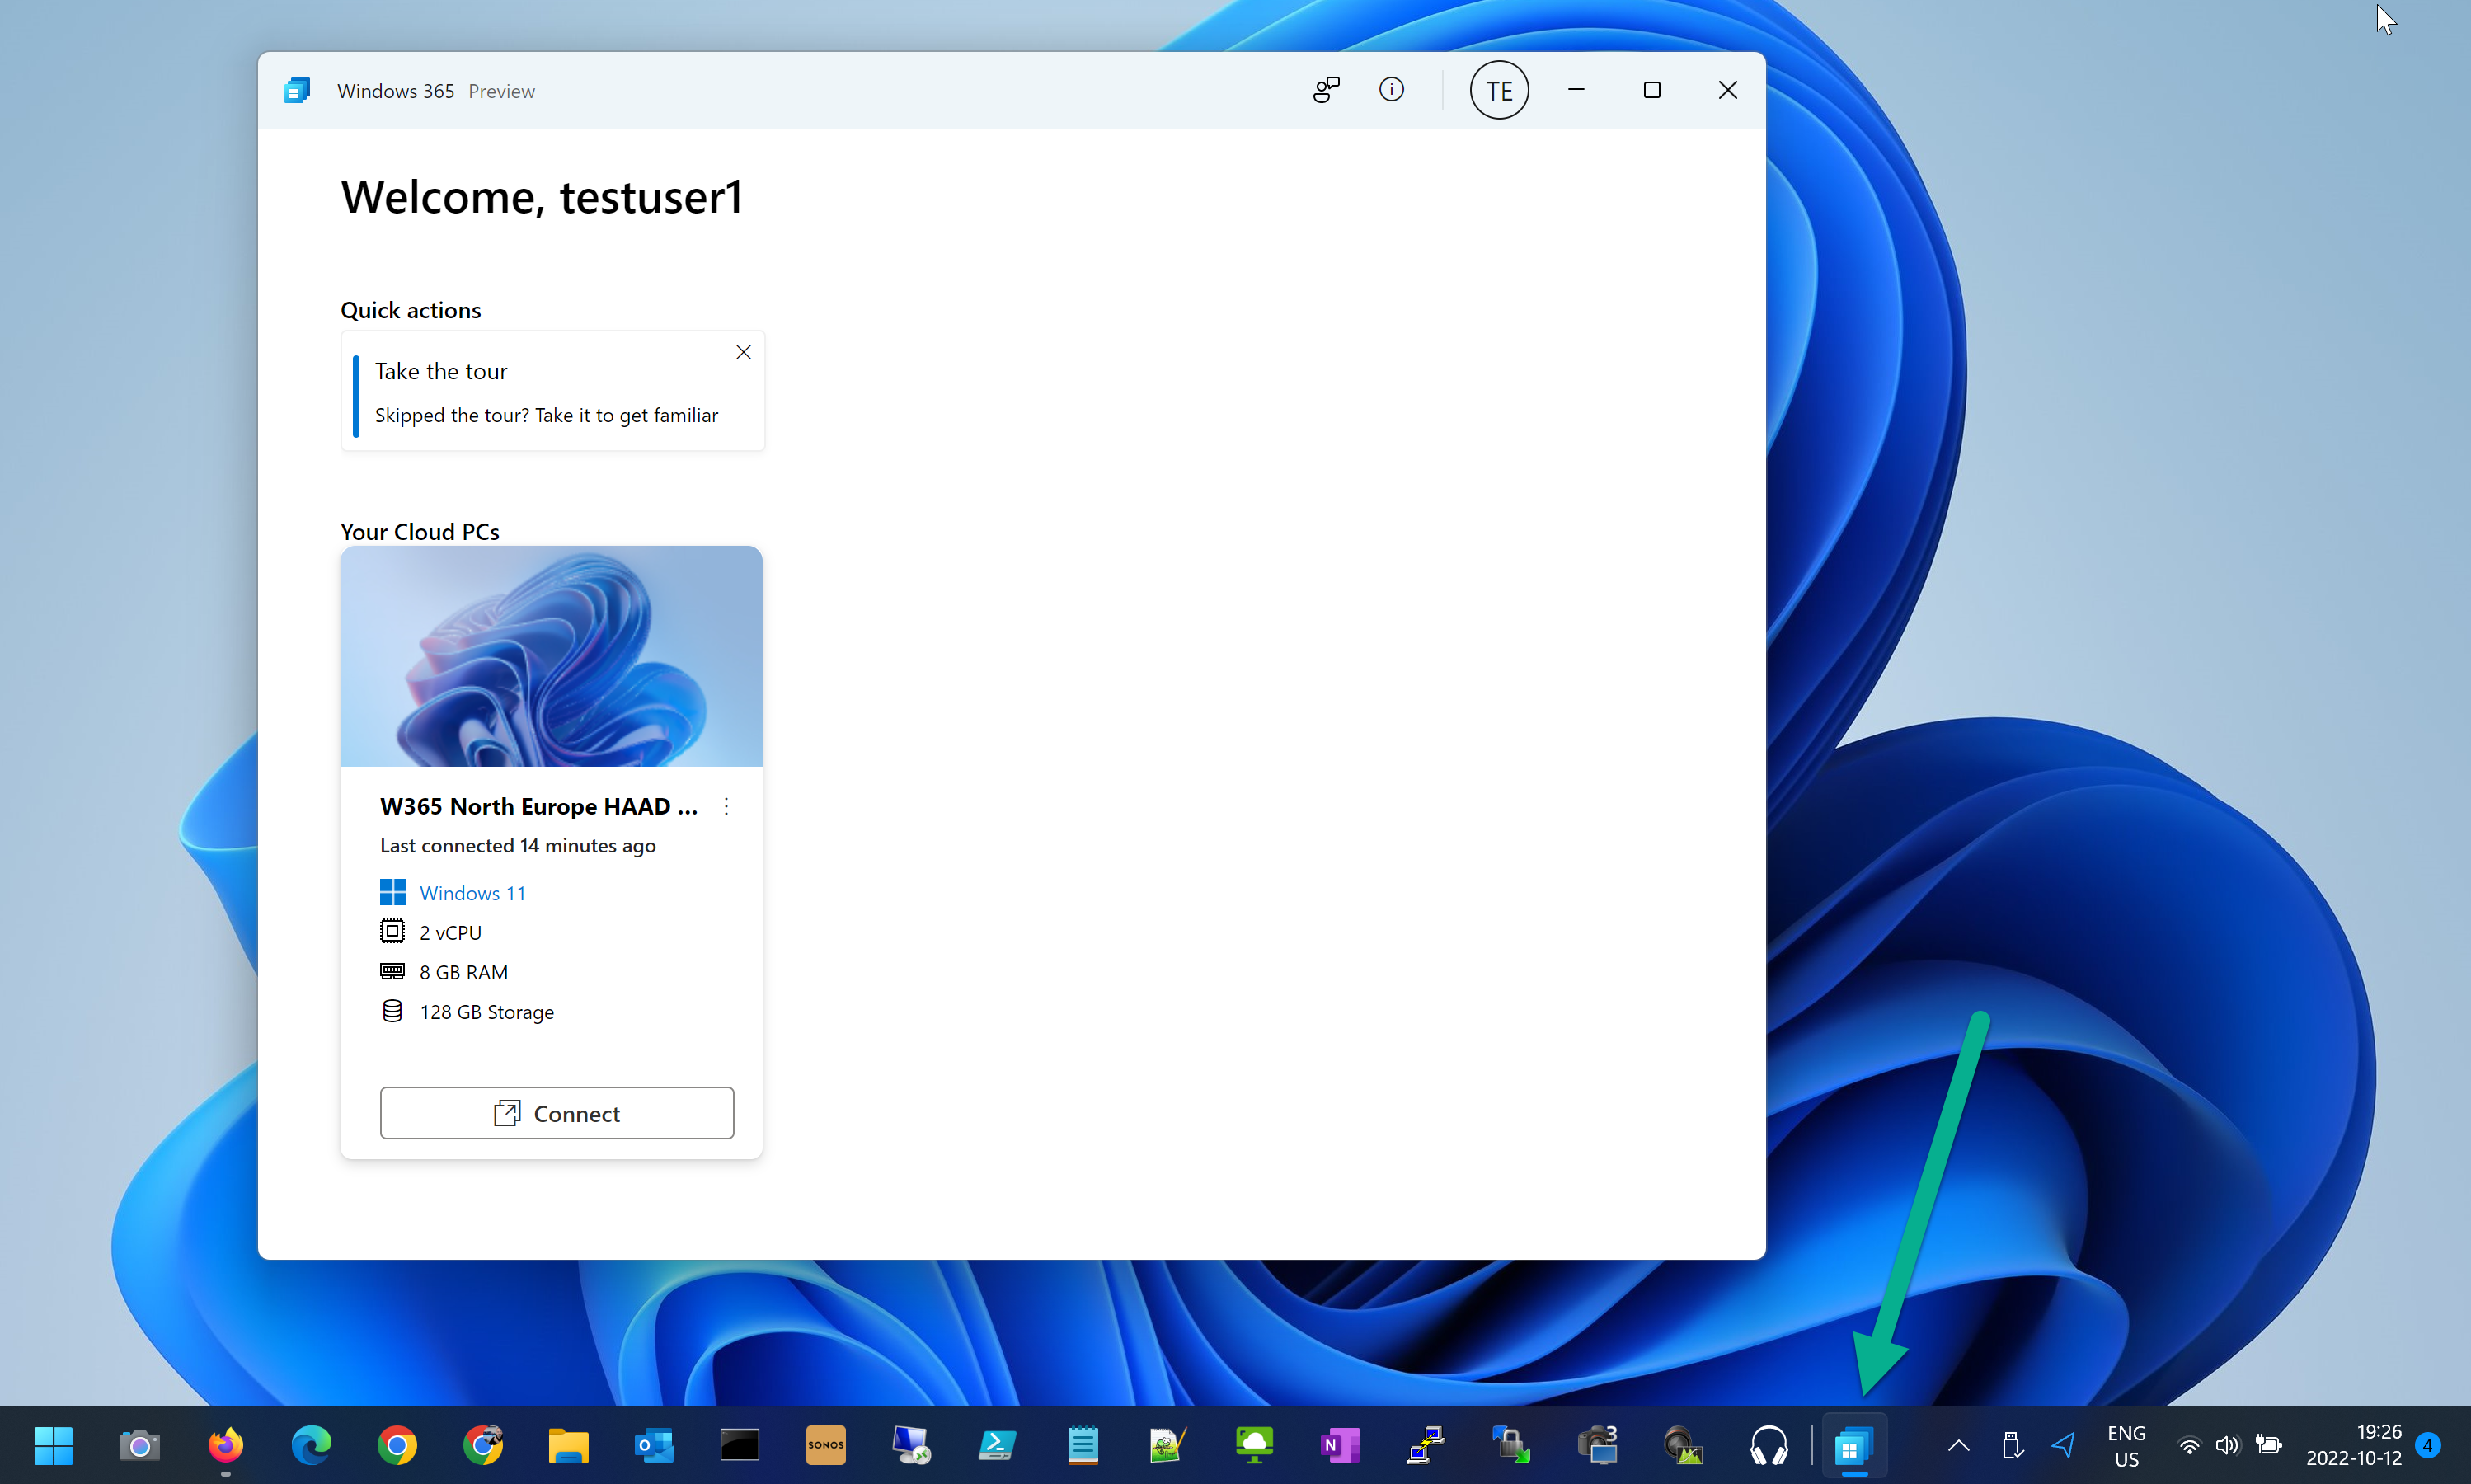
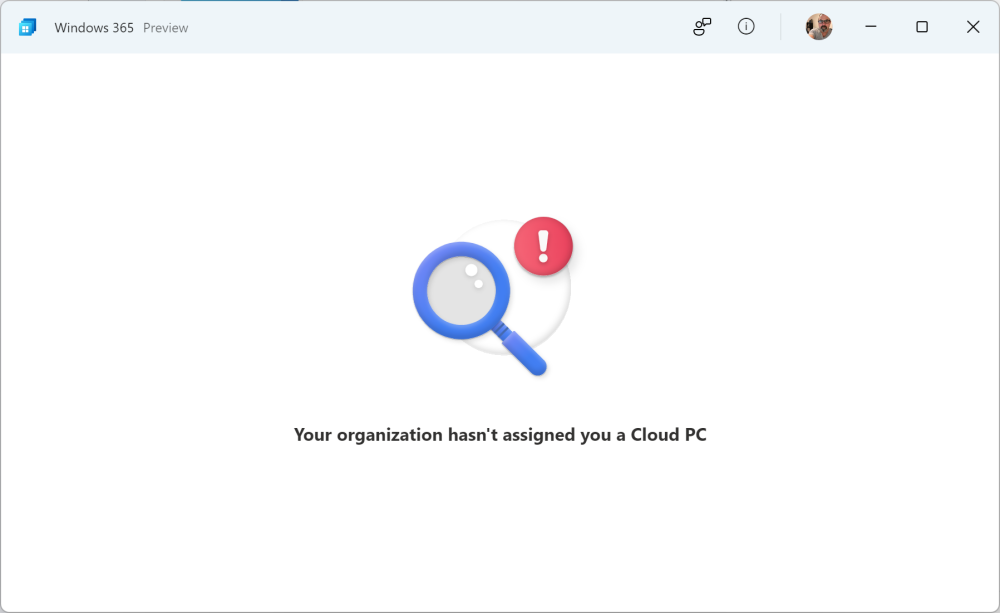
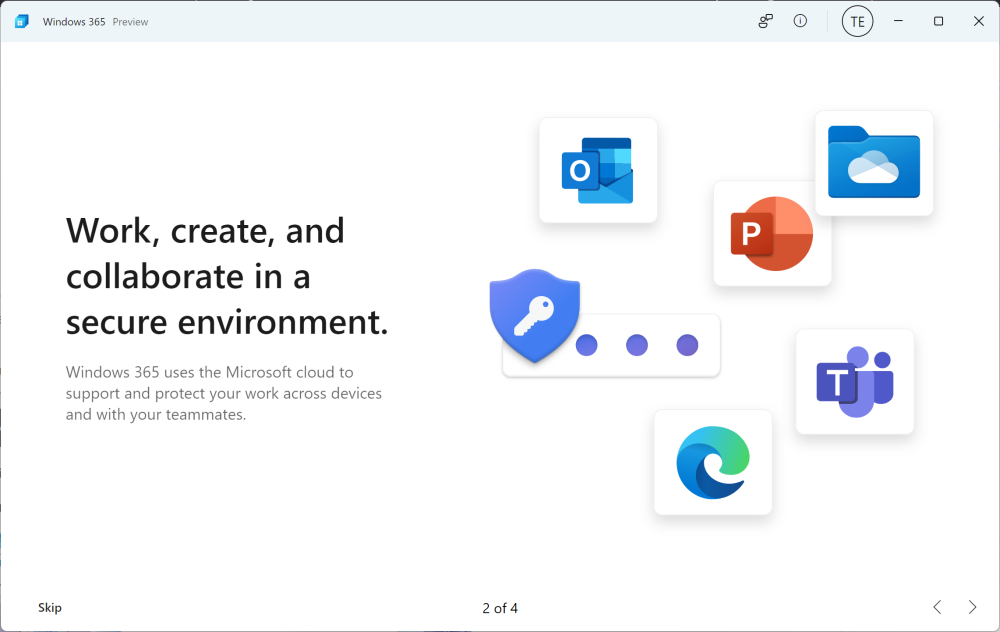
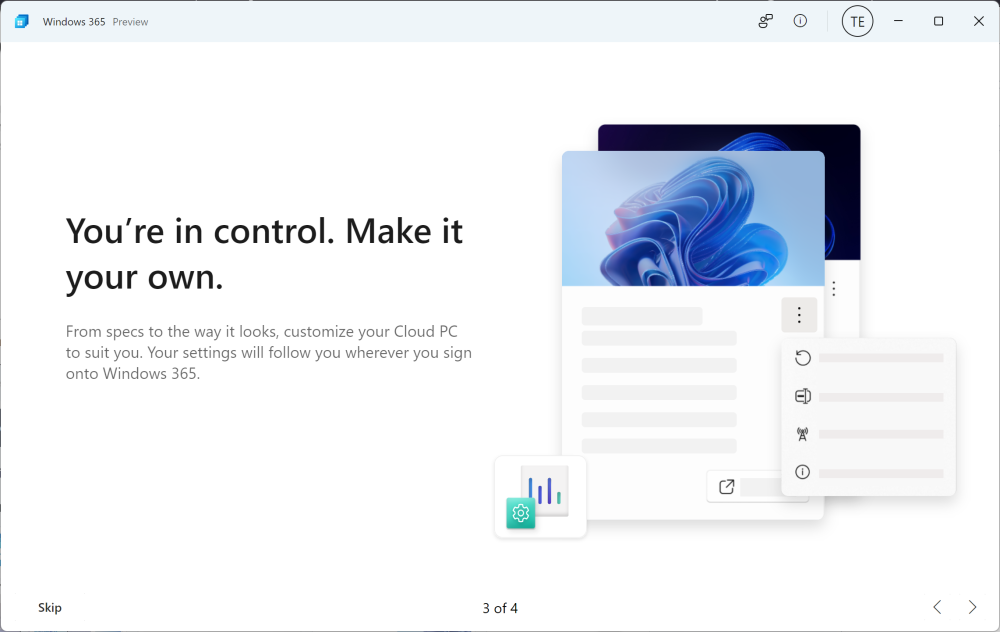
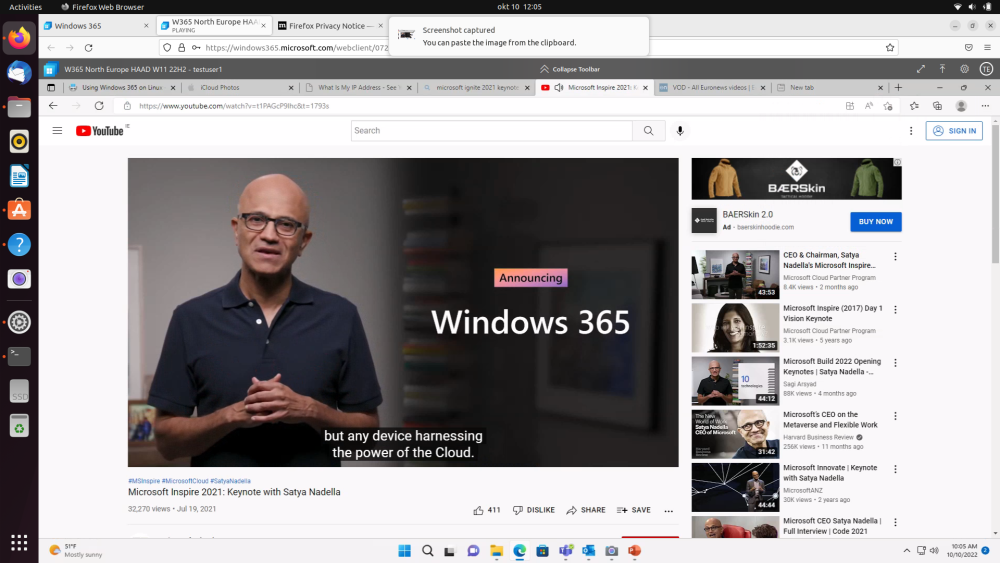
Introduction Satya Nadella just announced the Windows 365 app at Ignite 2022 today, and you can see that in the keynote below. He said that the new app means you can access Windows 365 directly from your taskbar or start menu. The Windows 365 app is now in public preview, providing a direct path to Windows 365 from the Task Bar or Start menu with a personal, customized experience that can be tailored to each individual. Getting the Windows 365 app Note: If you'd like to get started with Windows 365 see here. To get the app, you need to be using Windows 11 and to have a Cloud PC available. Windows 10 does not support the app. On a Windows 11 PC, open Microsoft Store and search for Windows 365, it's currently in preview. Click on Get and it'll start downloading. After that app is downloaded and installed it will auto launch in the context of the user you are logged in as, the user I was using didn't have a Windows 365 Cloud PC assigned so I signed in as a user that did have one available, after doing that I got to see the 4 screen intro which you can optionally skip, it was my first time seeing this so I wanted to see each screen. here's screen 1 here's screen 2 here's screen 3 and the final screen after completing the Intro, you get access to your Cloud PC and are treated to another tour, which you can also skip. The tour has an additional item and that is to provide feedback, shown here. To launch your Cloud PC, click on the Connect button. It will probably say 'Authenticating', in my case nothing happened after that except it failed to connect and showed an error and 'see details'. I determined that the reason it failed to 'Connect' was because the popup asking for the user credentials was behind the Windows 365 app, and therefore I didn't see it. In the below screenshot you can see the error and the Windows Security window which I've now moved on-top of the Windows 365 app After clicking Connect again and entering my credentials all was good and my Cloud PC launched. The connection seems to be an actual RDP session so it's definitely a better option than the default Web browser session which you can launch via https://windows365.microsoft.com If you are docked to multiple monitors it will open the Windows 365 Cloud PC session on all monitors, and in my case that's 3 monitors side by side. pressing ESC when fullscreen allows you to then set settings in the RDP session like below You can always launch the app again from the Start menu as you can see here or via the taskbar as you can see here For more info, see the official Microsoft announcement here. until next time, cheers


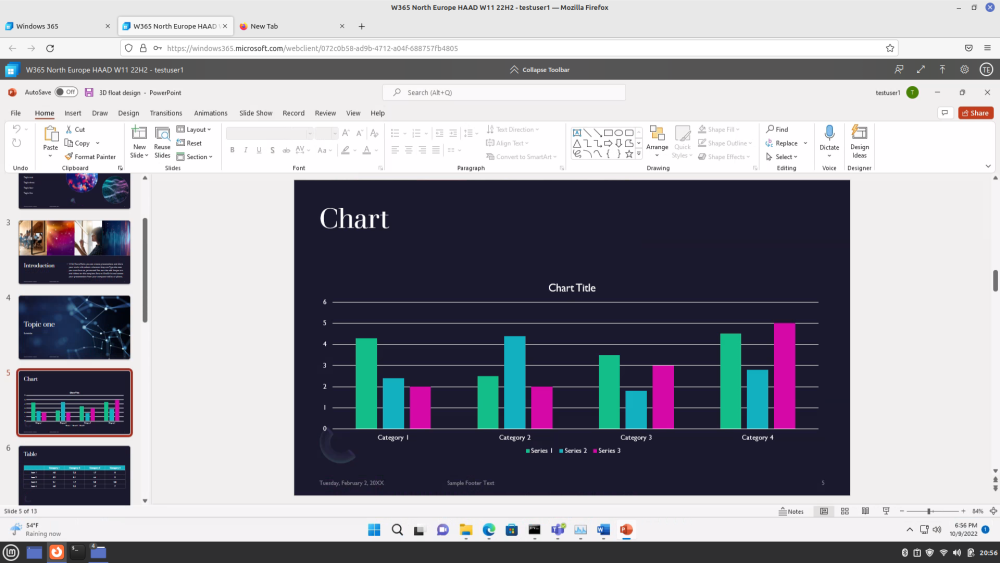
-
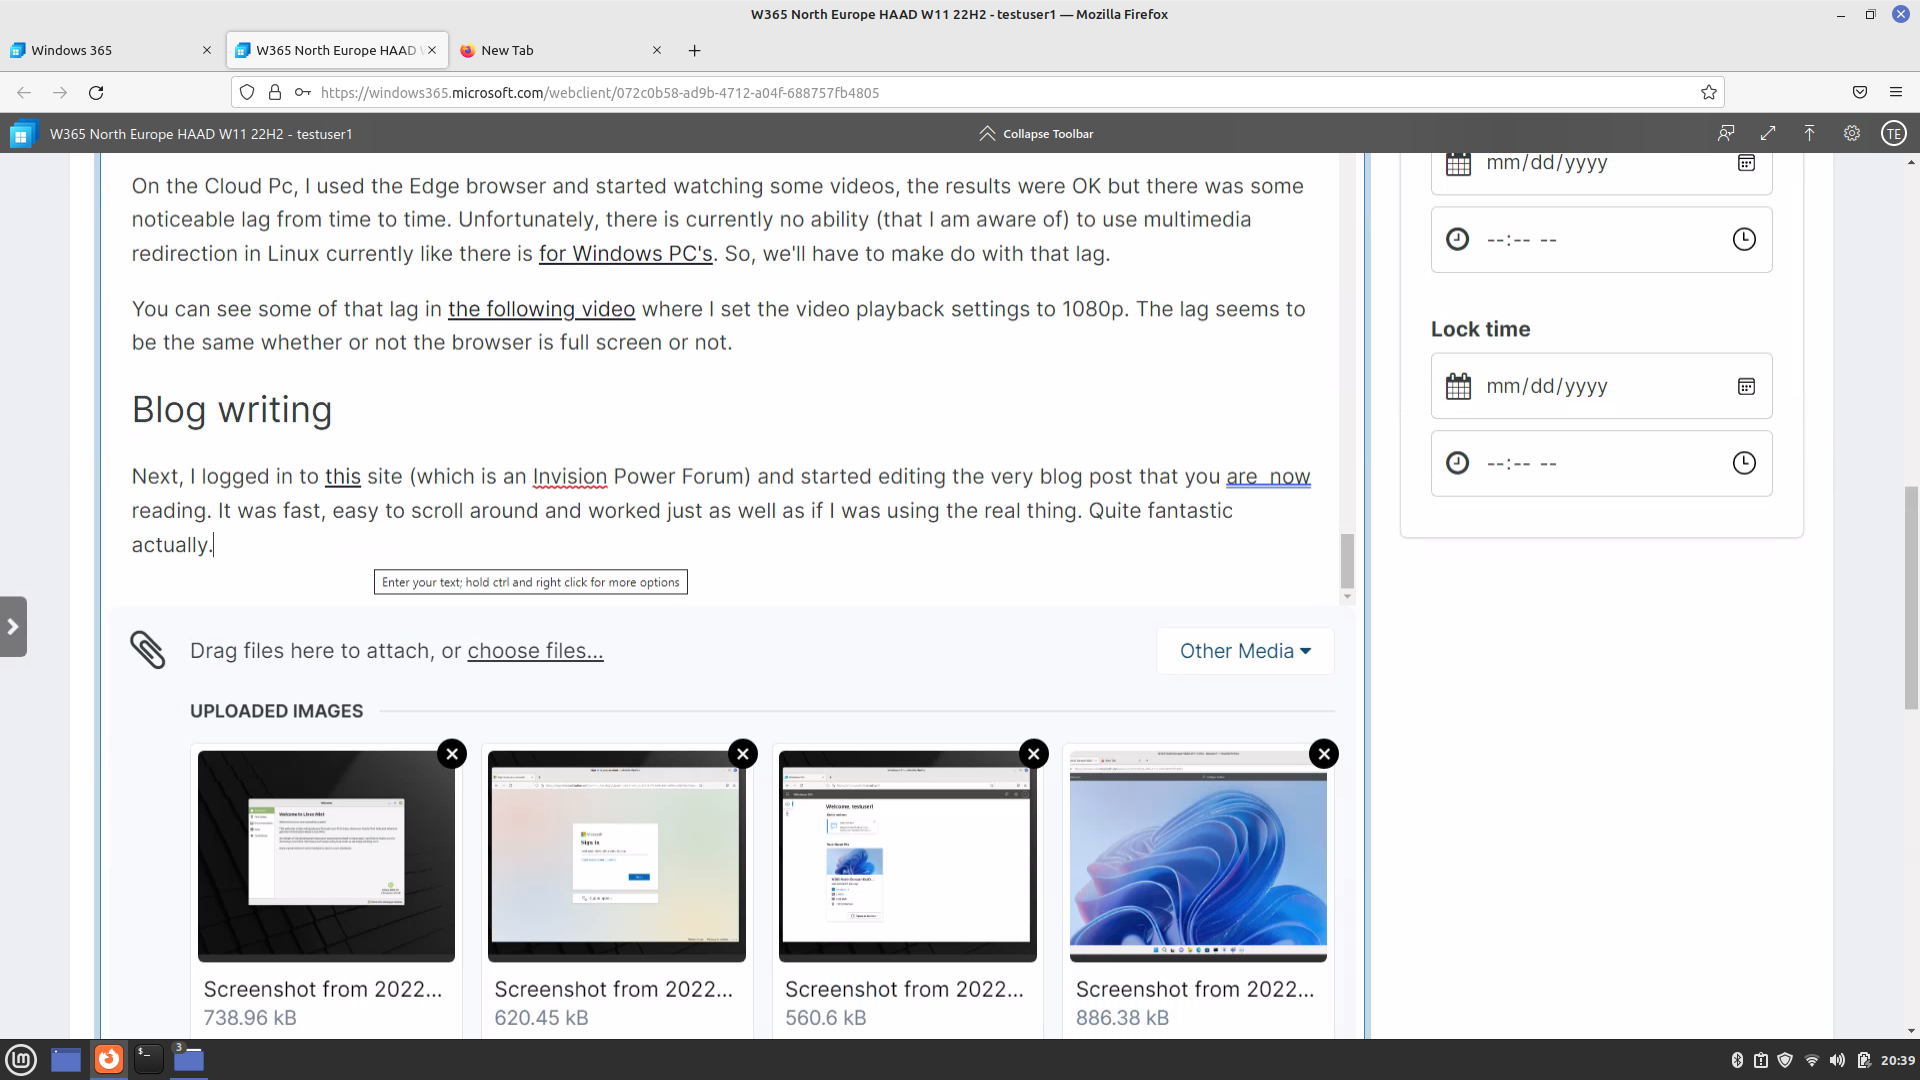
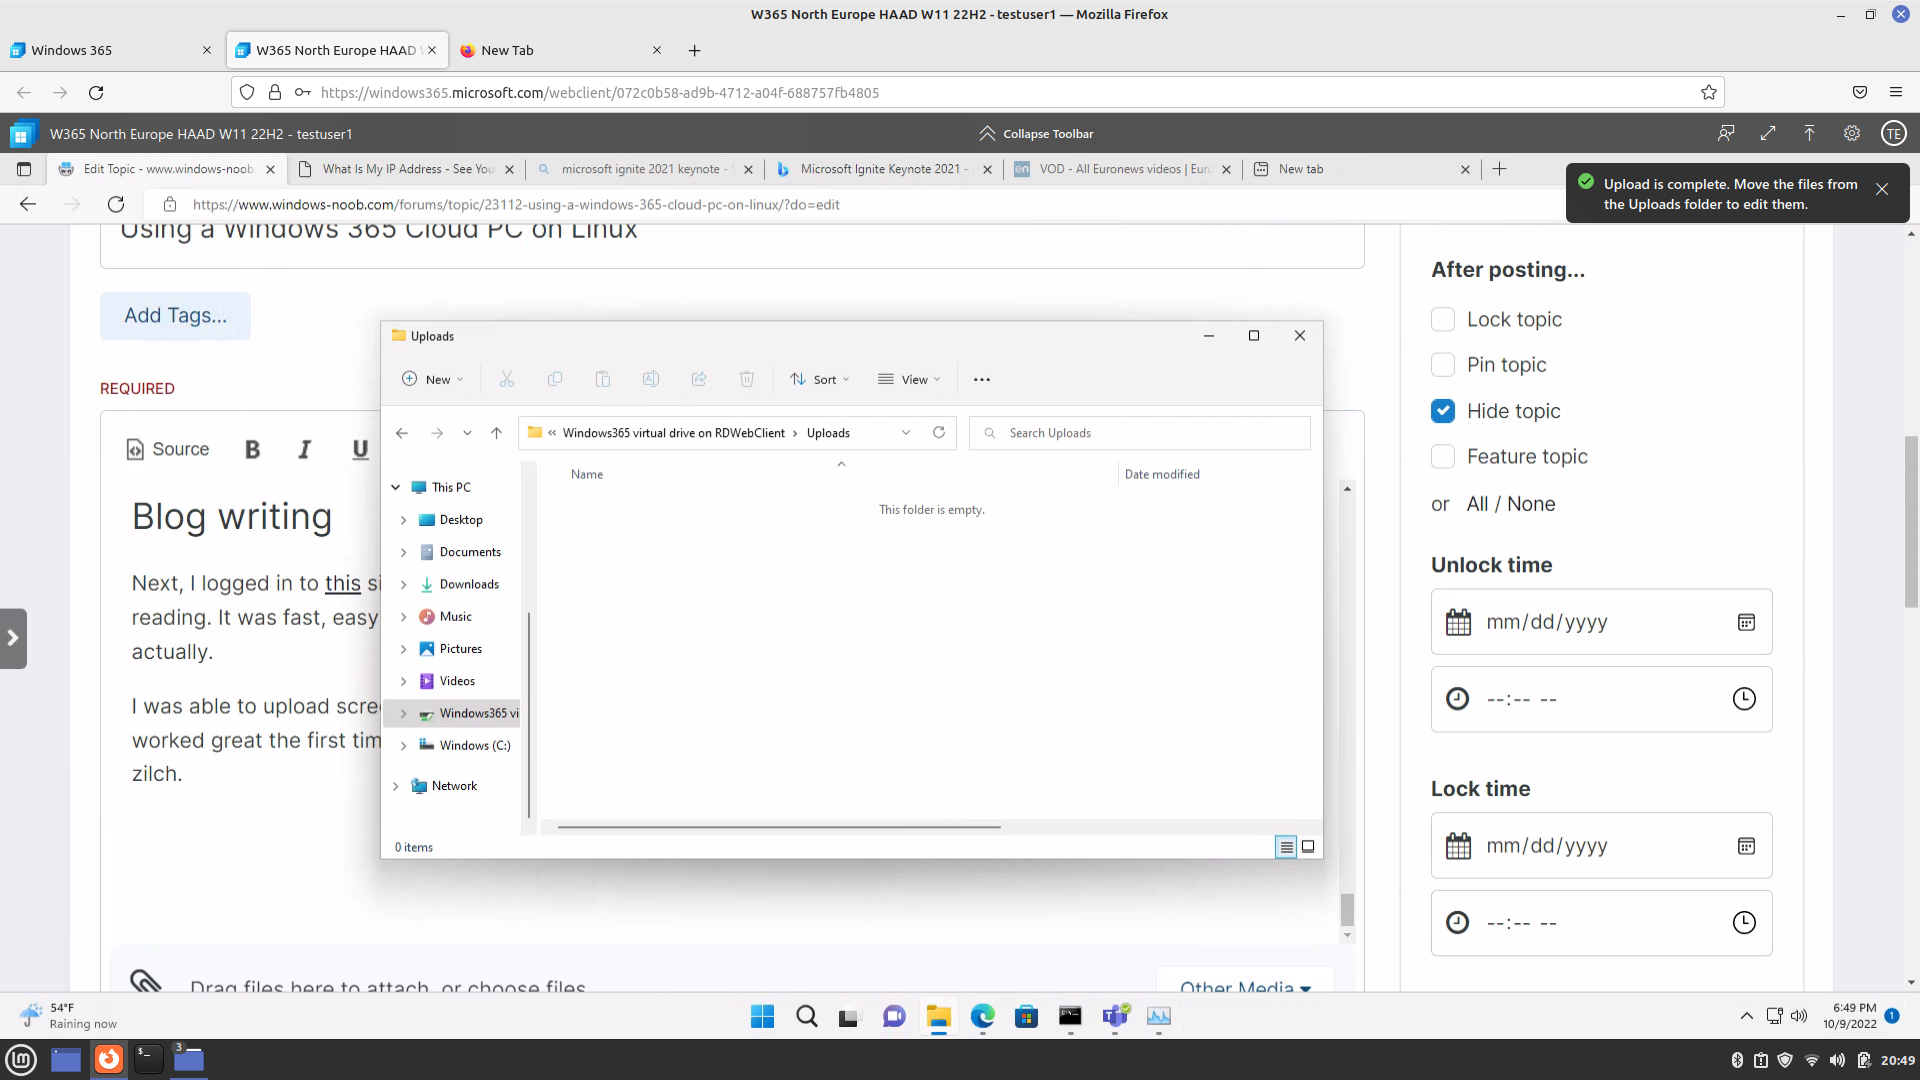
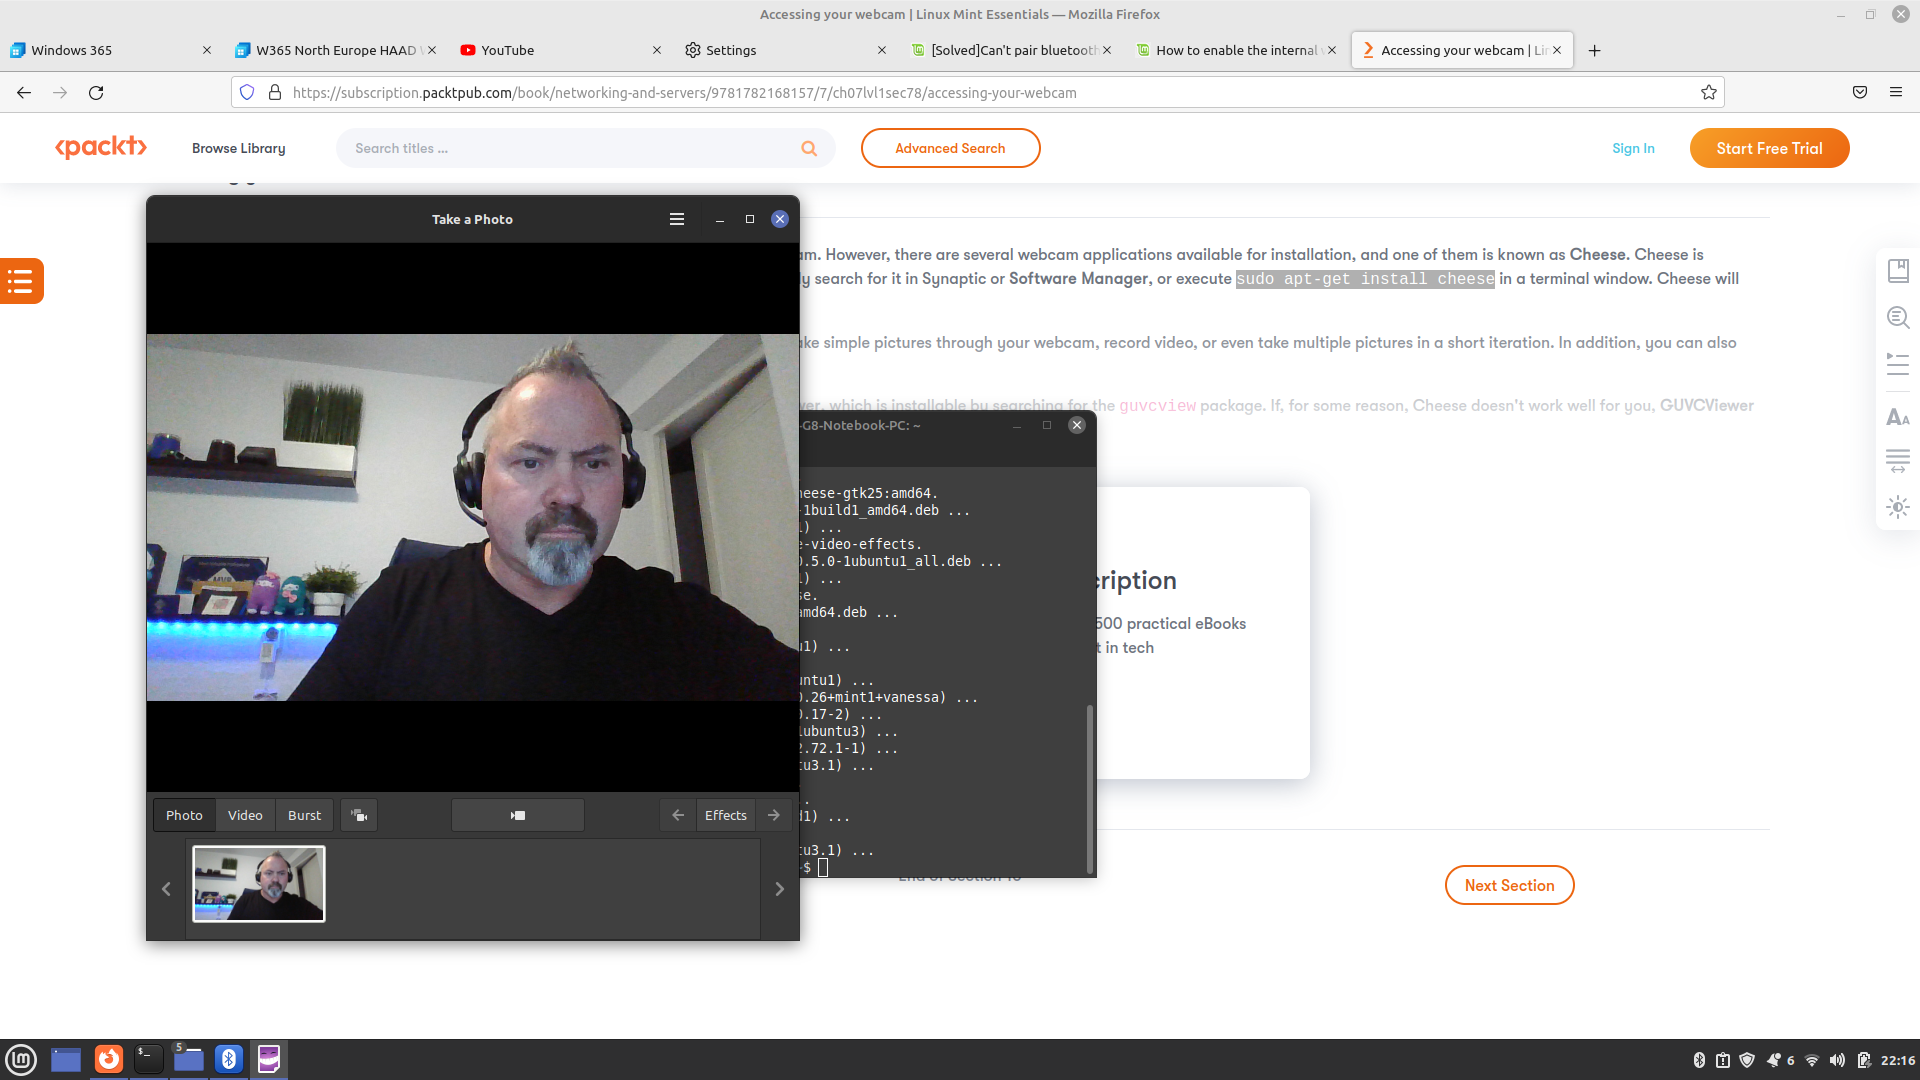
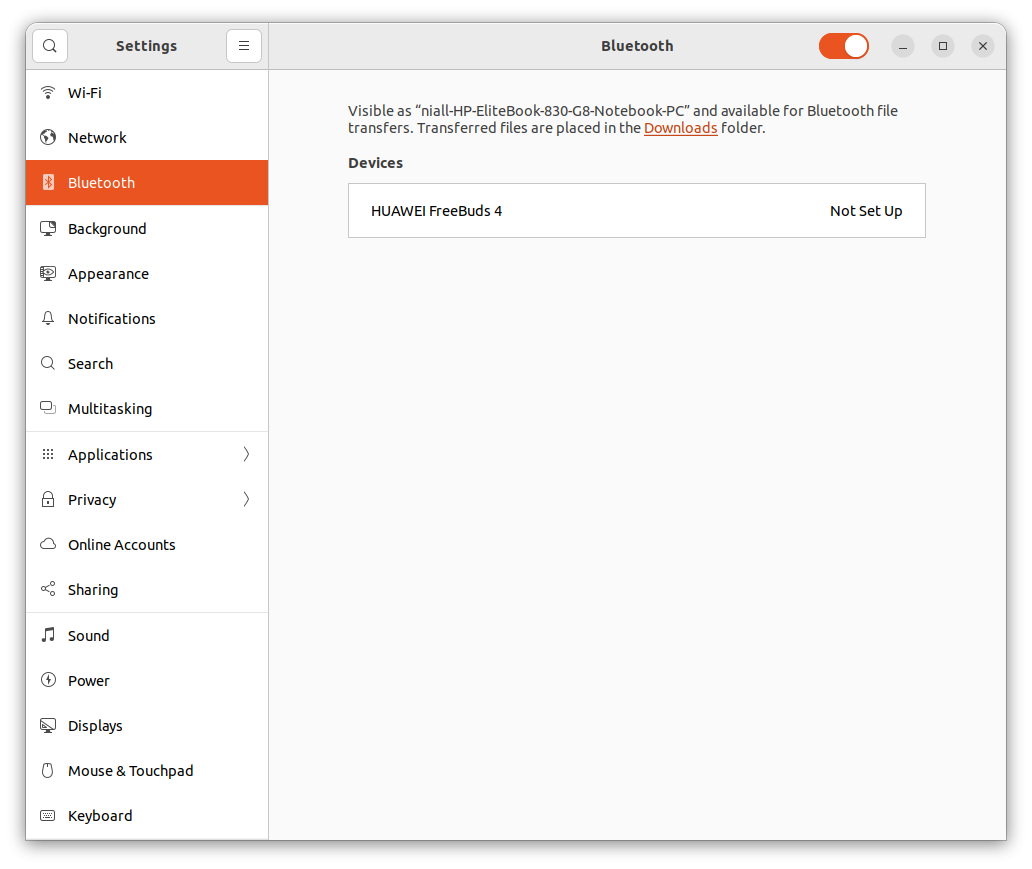
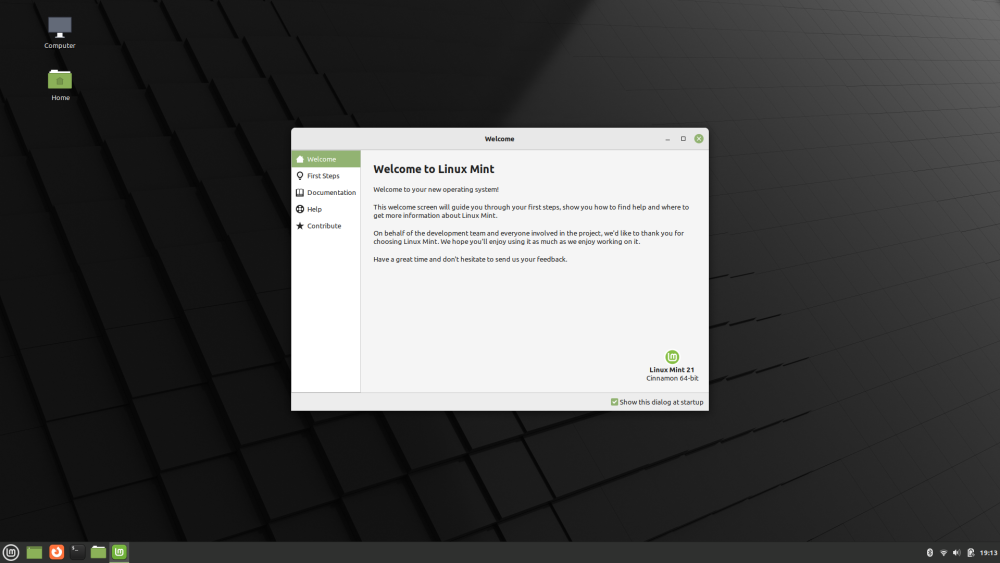
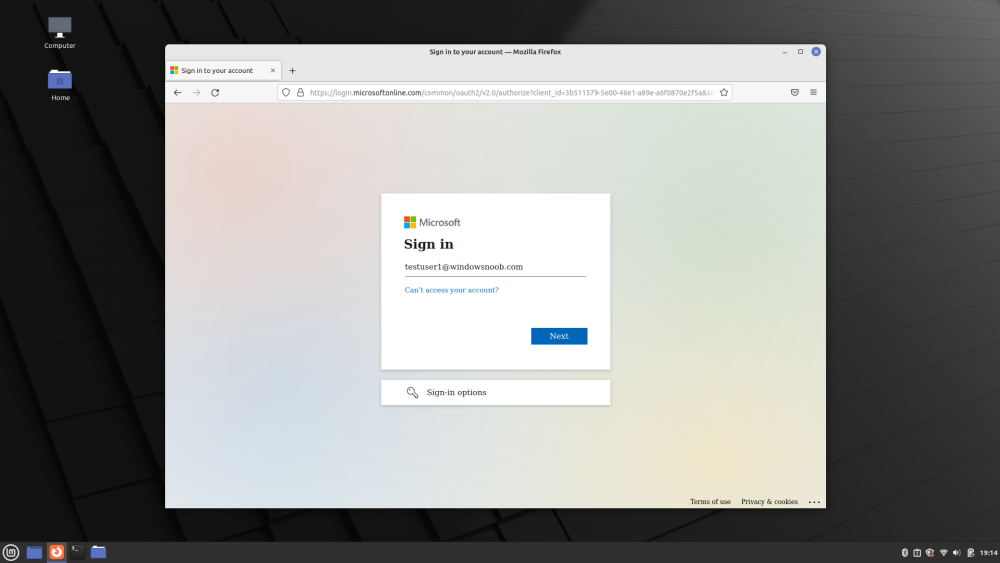
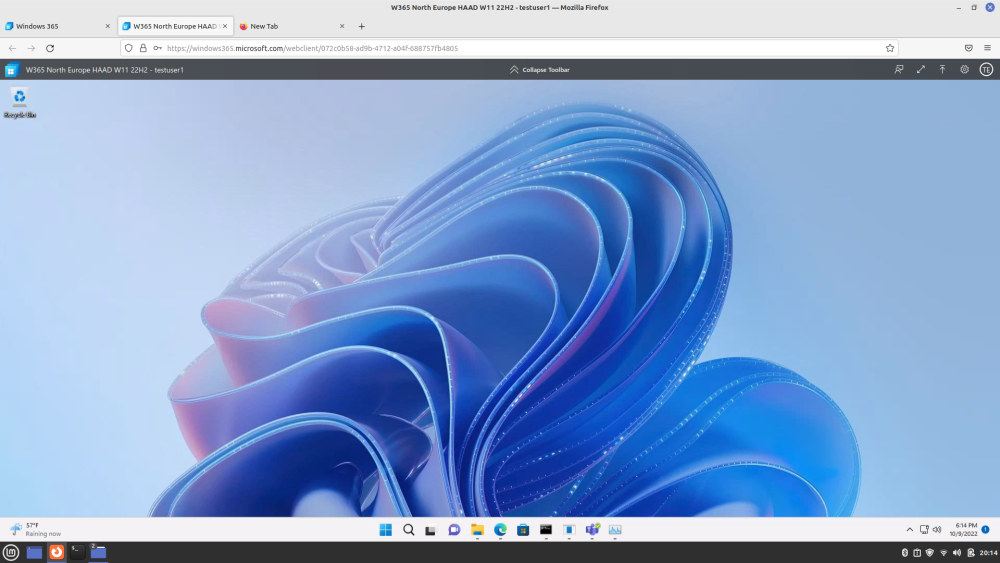
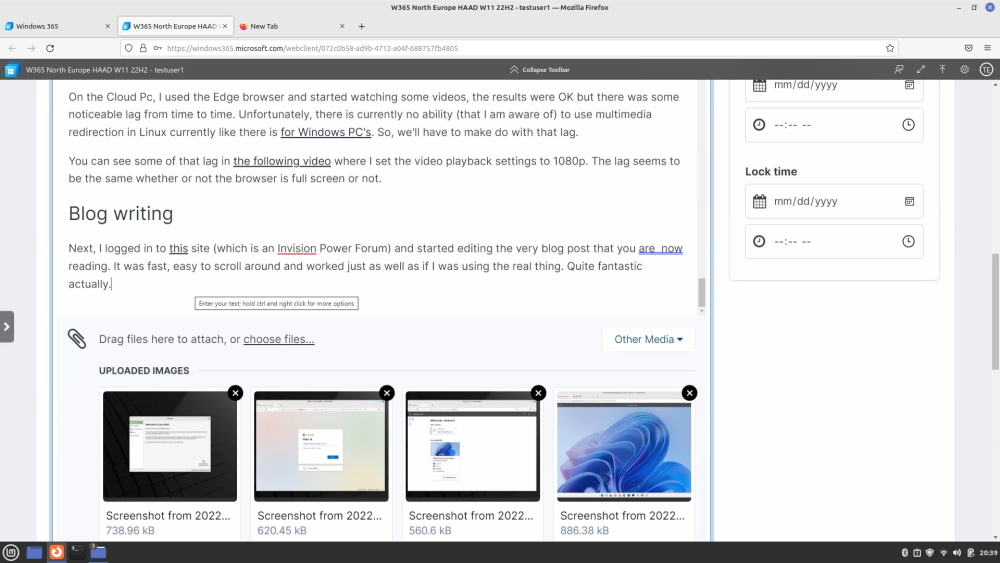
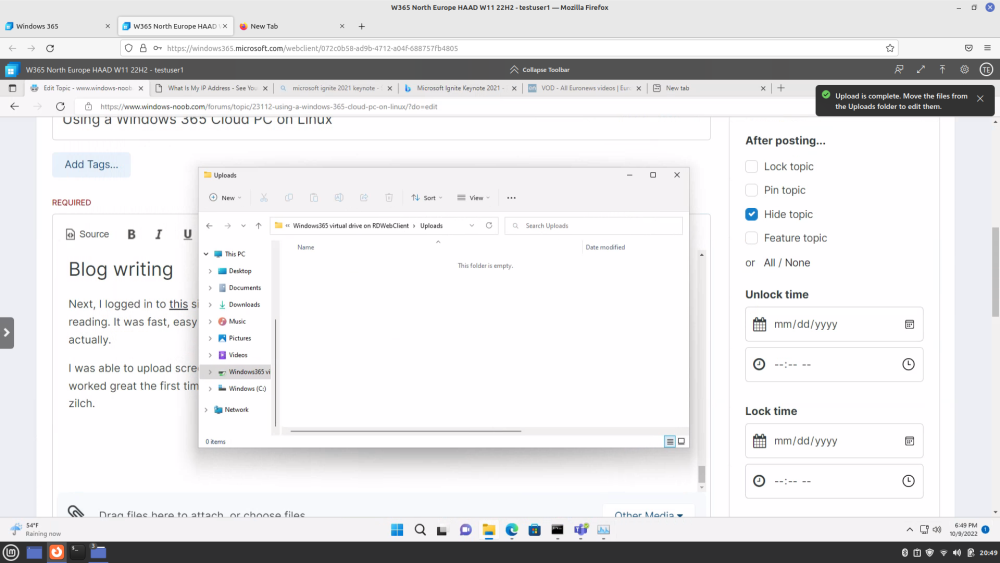
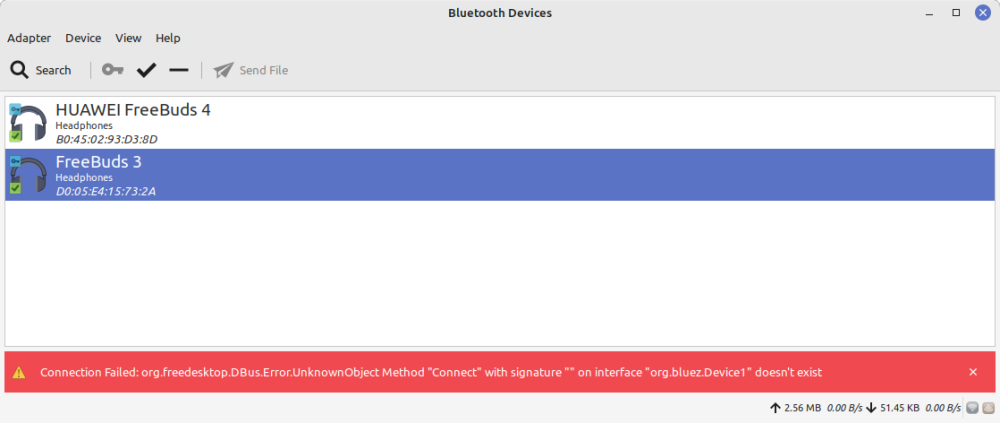
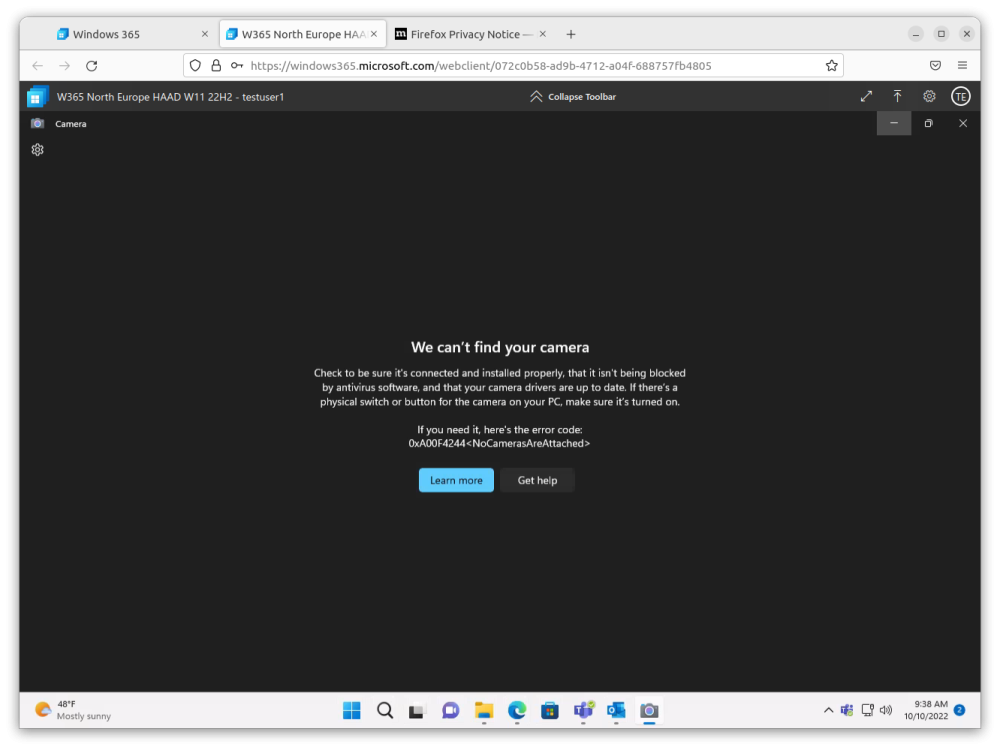
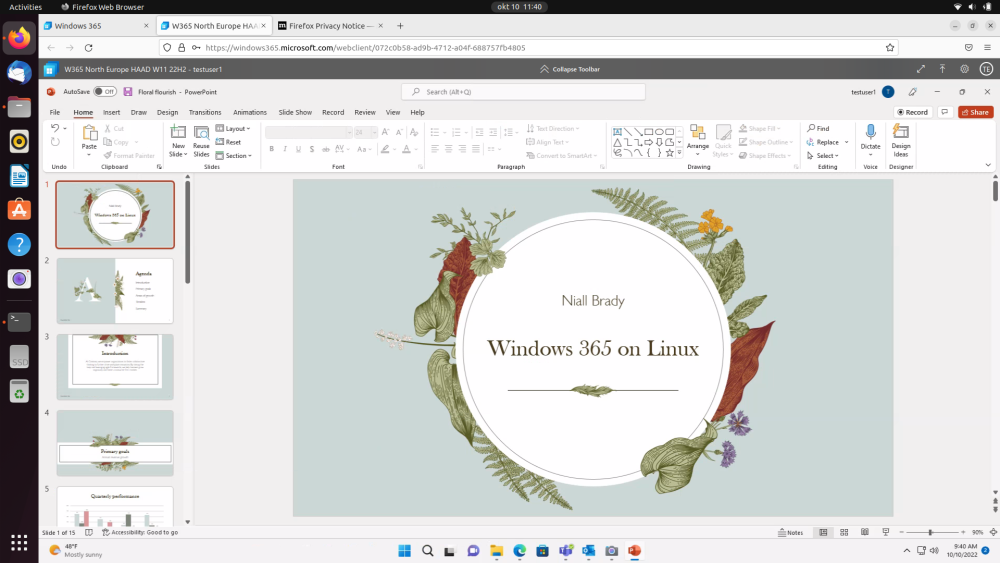
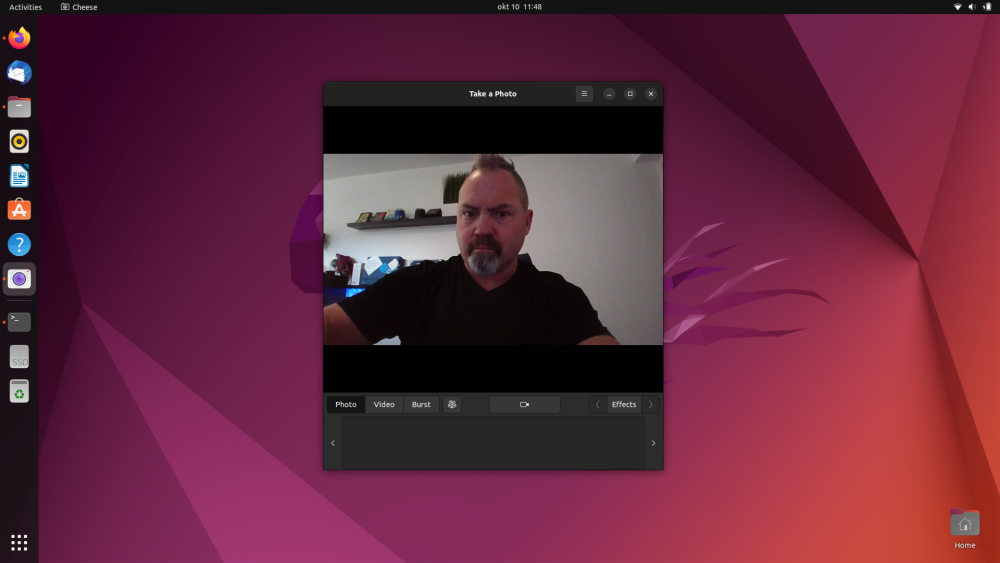
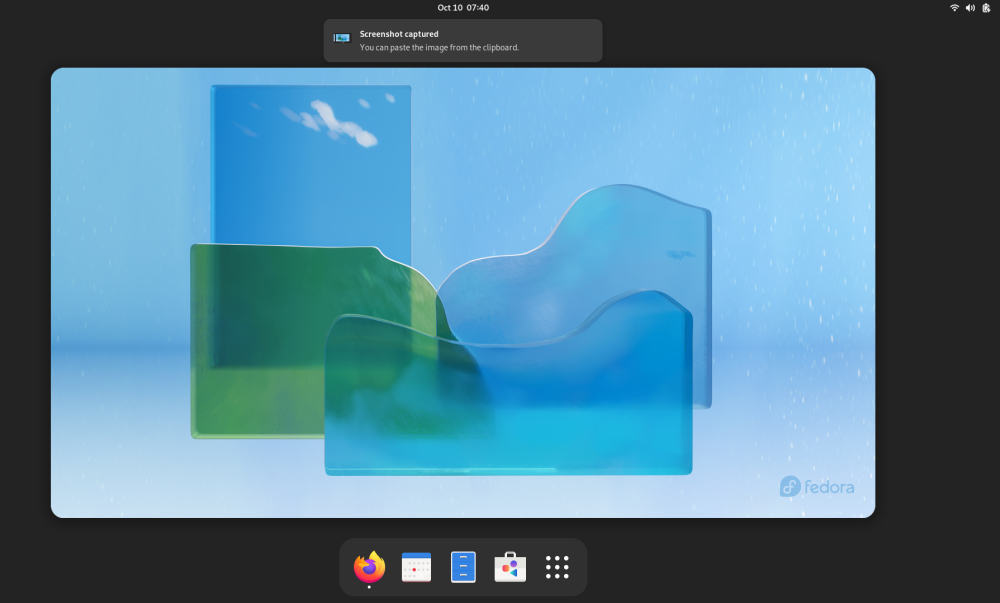
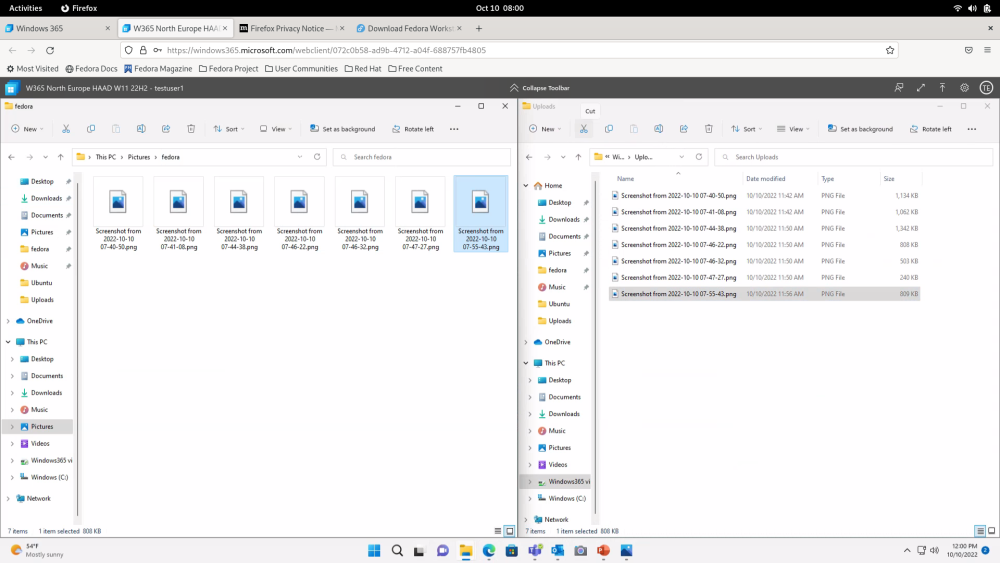
Introduction Linux is a free open-source operating system that has grown in market share over the years and is now found in many different versions (distributions or 'distros'). I wanted to see exactly how well my Windows 365 Cloud PC worked on real hardware when the host OS was running Linux. Windows 365 is a Cloud PC that is accessible from any HTML 5 capable web browser which you'll find on pretty much all modern operating systems including Linux. Please note that this entire blog post was written using the Linux distros below while connected to my Cloud PC. Let's take a look at how well that works using a few popular free Linux distros including: LinuxMint Ubuntu Fedora You might wonder why I am using just the web browser in these tests, the reason, at the time of writing there is no remote desktop app available for Linux. Note: If you'd like to vote for a Linux based RDP client for Windows 365 then click here. LinuxMint LinuxMint is based on Ubuntu, which in turn is based on Debian. I downloaded LinuxMint version 21 from here and installed it on a HP EliteBook 830 G8 via USB bootable media created using http://unetbootin.github.io/. The installation was fast and I selected to also include 3rd party codecs when prompted during installation. After I installed LinuxMint I updated it. That too was quick and painless. Once done, I launched Firefox and browsed to https://windows365.microsoft.com I entered my credentials, satisfied the MFA request and within a few seconds could see the normal Windows 365 welcome screen showing my available Cloud PC. After clicking on Open in browser, I could launch the Cloud PC proper. This particular Cloud PC was a 2vCPU, 8GB RAM, 128GB Storage running Windows 11 22H2 using the Hybrid Azure Ad Join method as described here. As you can see the Windows 365 toolbar is at the top of the web browser session, and you can click on the Collapse Toolbar section to make it hide away. This is better, but to get the best experience out of your Cloud PC via a web browser from Linux, press F11 to maximize the browser window, this will show only the Cloud PC. So now that it looks and feels like Windows 11 (on LinuxMint Linux) it's time to actually use the Cloud PC. Video playback On the Cloud Pc, I used the Edge browser and started watching some videos, the results were OK but there was some noticeable lag from time to time. Unfortunately, there is currently no ability (that I am aware of) to use multimedia redirection in Linux currently like there is for Windows PC's. So, we'll have to make do with that lag. You can see some of that lag in the following video where I set the video playback settings to 1080p. The lag seems to be the same whether or not the browser is full screen or not. Blog writing Next, I logged in to this site (which is an Invision Power Forum) and started editing the very blog post that you are now reading. It was fast, easy to scroll around and worked just as well as if I was using the real thing. Quite fantastic actually. I was able to upload screenshots that I had taken in LinuxMint using the upload ability in the W365 toolbar. That worked great the first time I did it and I uploaded several screenshots successfully, but the 2nd, 3rd and 4th attempt it uploaded nada, zilch. I think this is possibly a bug in the toolbar and I'm not sure if it's related to Linux or the version of the Windows 365 client on Windows 11 version 22H2, I've asked the Microsoft Product Group for comment. Below you can see my later attempts at uploading screenshots, it said it was done and that I should move them but they did not appear in the uploads folder. Using Office 365 apps I started up PowerPoint, Excel and Word and had no issues with creating content on the Cloud PC, it honestly felt very easy indeed and I would forget that I was using Linux at all when creating content using Office 365. Scrolling through Powerpoint was easy and fast and rendered perfectly in the web browser. Word was a breeze And Excel was also equally easy to work with. I launched Outlook and that too worked seamlessly, no issues to report. From an Office perspective, I definitely think this worked just fine in test conditions. That said, my Cloud PC is not laden down with a plethora of security and other agents designed to read every file a million times while consuming every last iota of CPU and storage bandwidth. Hardware support I'm not a touch pad fan so I connected my trustee Think Pad mouse with an USB dongle. It worked perfectly. Next, I tried to connect my Bluetooth headphones (Freebuds 4). But when I tried to connect to them in LinuxMint it failed. Same thing for my Freebuds 3. It seems that this version of LinuxMint has bluetooth issues as reported here: https://forums.linuxmint.com/viewtopic.php?t=378859 Next, I plugged in my Jabra 2 with it's wireless dongle and that worked fine. Teams performed just fine, without any noticeable lag. I held an audio meeting with Paul and it was totally fine, no lag, very little audio issues until the end of the call, in fact it worked better that I'd normally expect a teams meeting to perform. I wasn't however able to to a video meeting as my web camera on the HP was not detected or shared with Teams. sudo apt-get install cheese -y got the camera working in LinuxMint. However I cannot see any way to share that camera with Windows 365 via a web browser session. If you'd like to vote for a Linux client for Windows 365 then click here. Ubuntu Ubuntu is another Debian based distro and a very popular one too, in fact it is the first distro to get Linux management support via Intune as you can read here. I downloaded Ubuntu 22.04.1 LTS from here and set about testing everything I tested above with LinuxMint. During the installation, I split the disk into two, allowing me to keep LinuxMint as well as have Ubuntu, that's a really nice ability with Linux. The installation was very easy and within minutes Ubuntu was installed. I fired up the usual Office 365 apps and all worked as before, no issues there. I even uploaded files (and edited this blogpost) from Ubuntu directly to my Cloud PC using the upload feature, and this time it worked (more than once). Hardware Support I wanted to test the camera and found out that Cheese was already installed. The camera worked fine in the Ubuntu desktop as you can see below without me having to install or configure anything, that was good ! but when I launched Microsoft Teams on my Windows 365 Cloud PC once again the camera was not detected, so that's a no-go for video meetings with Teams on Windows 365 if you are using Linux with your Cloud PC. Once again, as with LinuxMint I had issues with Bluetooth, I couldn't get either of my Bluetooth headphones to work, I plugged in my Jabra 380 wireless USB-C wireless dongle and I got working audio. This means that audio meetings/calls in Teams are at least possible on my Windows 365 Cloud PC when using Ubuntu. Video Playback Video playback while using Ubuntu was certainly OK, I started watching the Inspire 2021 session where Satya announced Windows 365 Cloud PC and played it in a window as well as full screen, the performance was totally acceptable, however I did notice what can only be described as audio ticks when playing back video content, this was also noticeable in LinuxMint. Perhaps there are better audio/video drivers available for my test hardware, but I didn't find them however I did see that according to Ubuntu, this hardware was certified for Ubuntu Linux as of May 2021. The only difference between my test system and the certification was the version of my BIOS. and full screen Fedora I downloaded Fedora 36 from here and proceeded to install it on my HP EliteBook 830 G8. The installation was relatively quick, and I did have to adjust the disk partitions to get it to fit alongside Ubuntu and LinuxMint. As with Ubuntu, Cheese was installed meaning that my camera worked in Fedora Linux, but not in Teams via the web browser on my Windows 365 Cloud PC. ed Video playback via youtube on the Cloud PC worked just fine with the odd audio tick as noticed with the other Linux distros, but overall, it was perfectly acceptable. Setting the web browser settings for Windows 365 to use high dpi does improve the readability somewhat. Uploading files and continuing to edit this blog post also worked with no problem so I was able to be productive on the go using my Cloud PC. Office 365 apps continued exactly where I left them. And I think that is the key differentiator here, being able to use whatever operating system you want on your host computer to connect to your Windows 365 Cloud PC to do your daily work without fuss. It's quite amazing and refreshing. Summary Using Windows 365 Cloud PC on your Linux box gives you the power to get your work done, anywhere using the Operating System of your choice. I did note some short comings with this approach such as the lack of a real remote desktop (RDP) client from Microsoft for the Linux OS. Web based sessions can only do so much and the lack of this RDP client will leave you with the inability to host video meetings in Teams, so keep that in mind if it's important to you. Note: If you'd like to vote for a Linux based RDP client for Windows 365 then click here. Please also note that there are some Linux based distros (which are not free) such as Igel that offer their own AVD/W365 based clients which are optimized for Teams and other meeting-based software (such as Zoom). I'll hope to write about that in a coming blog post.


-
Primary Site unknown in ADR
anyweb replied to Datafast's topic in System Center Configuration Manager (Current Branch)
too little info, have you verified that the client is the right version ? anything else you can share ? -
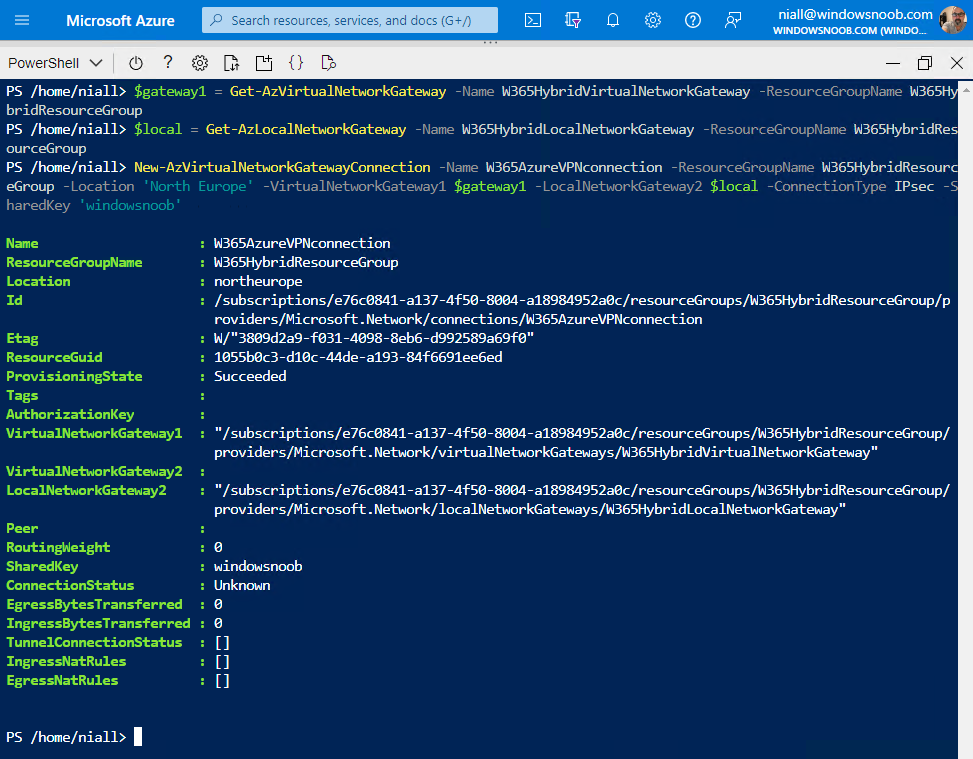
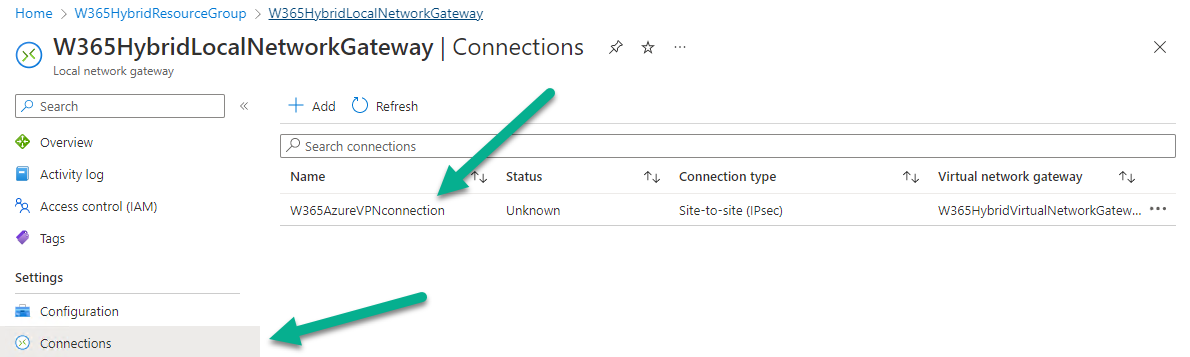
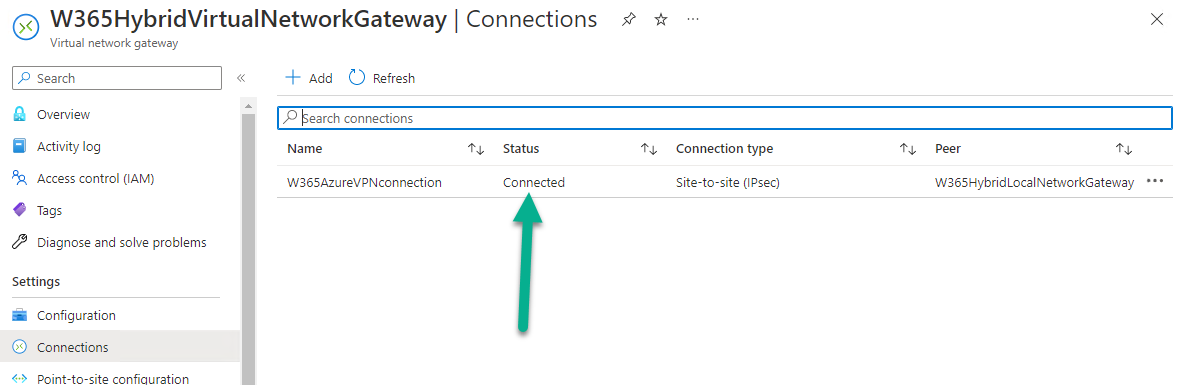
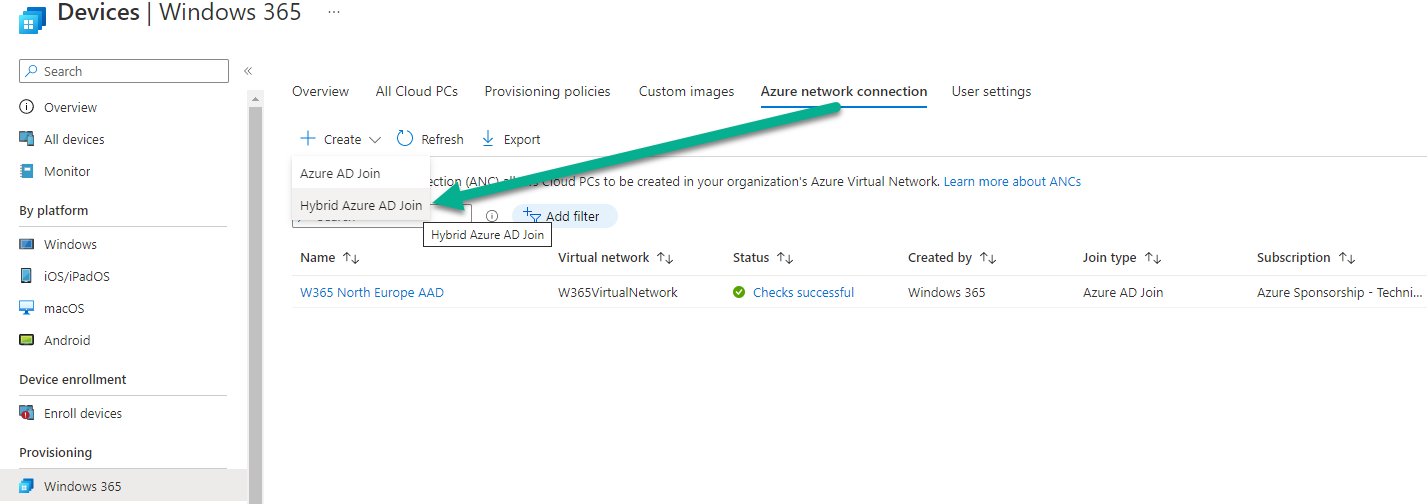
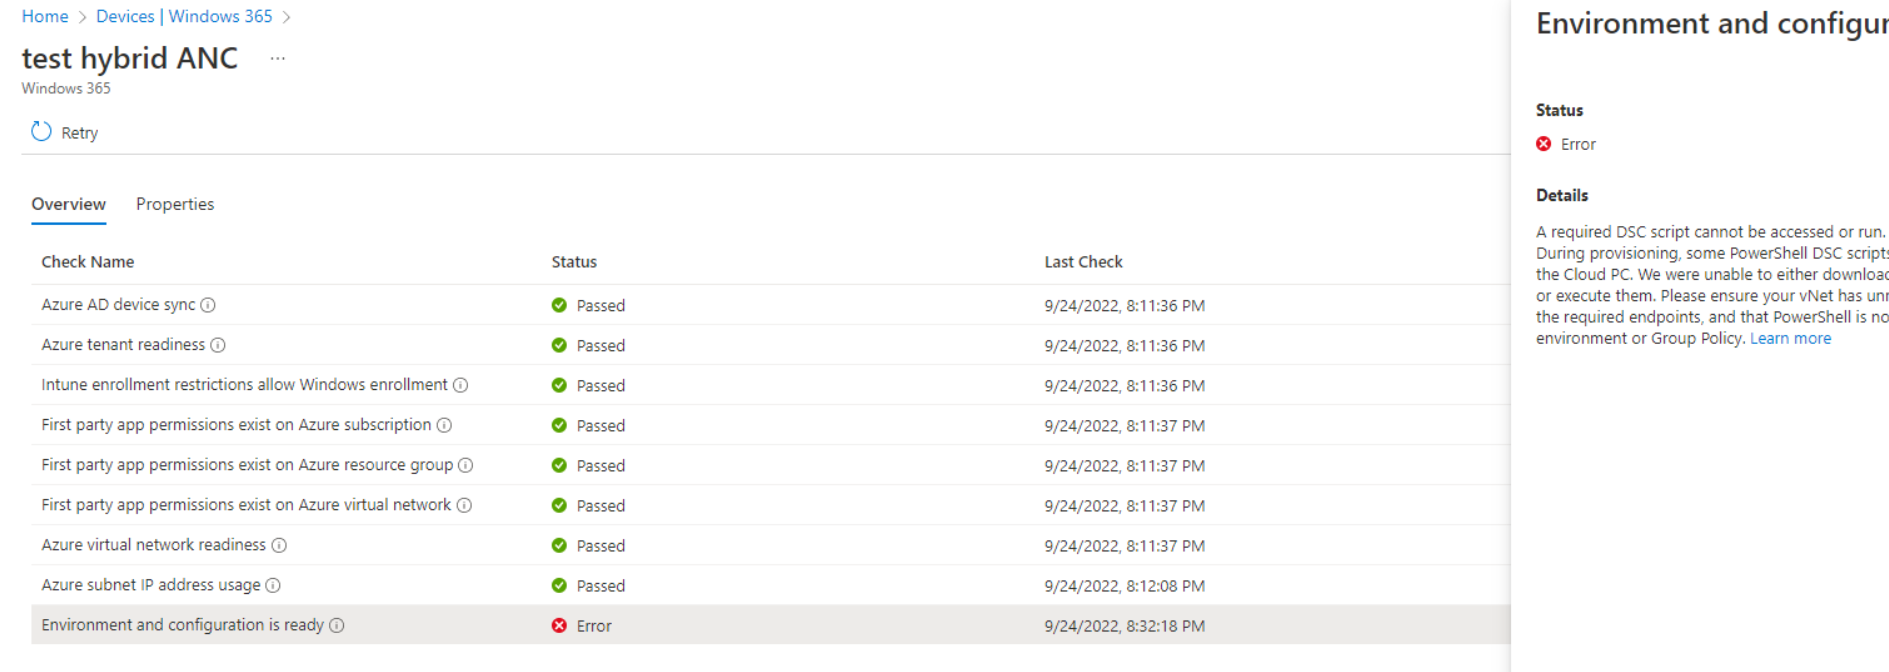
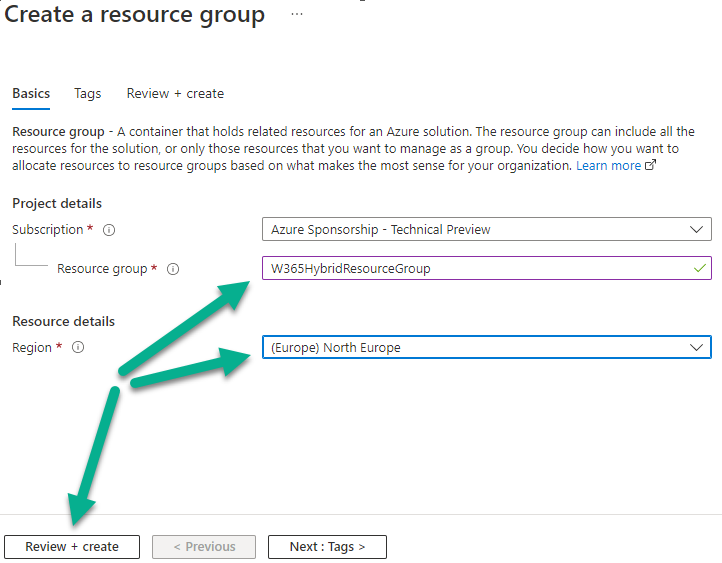
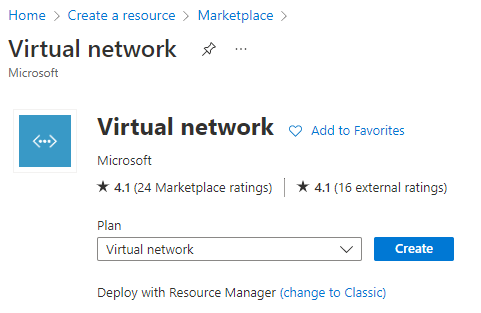
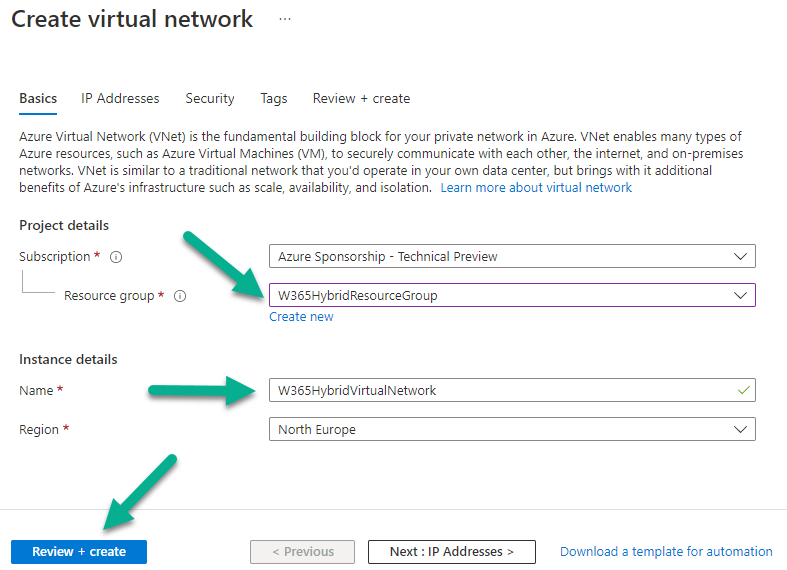
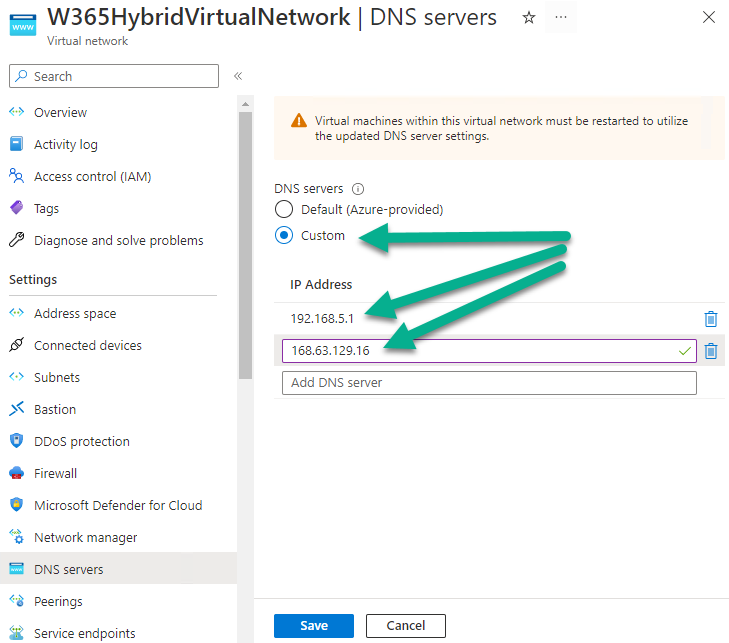
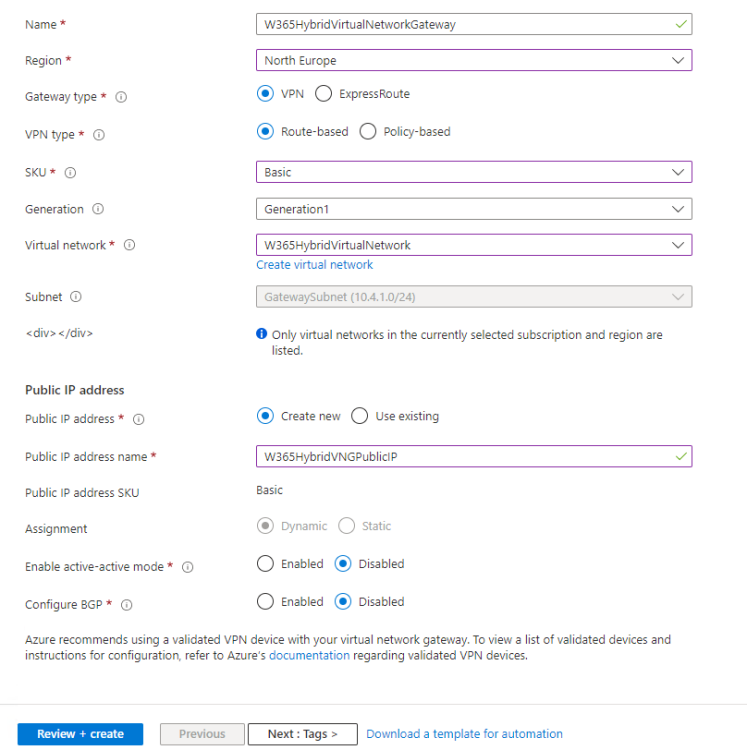
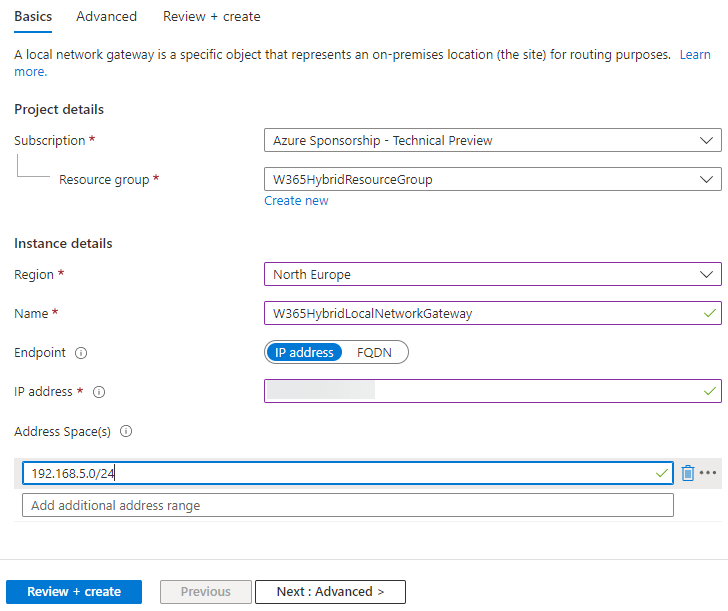
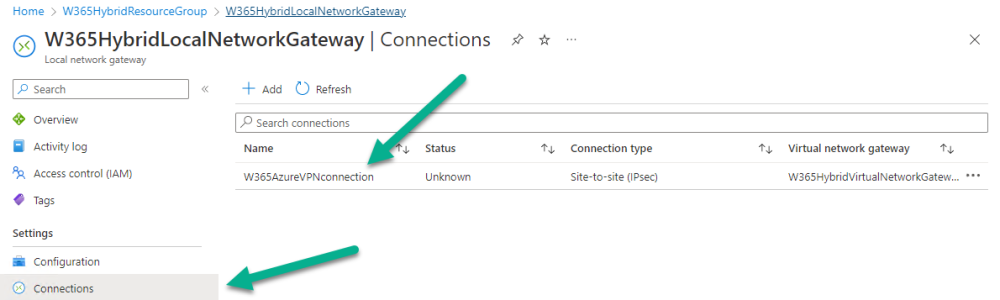
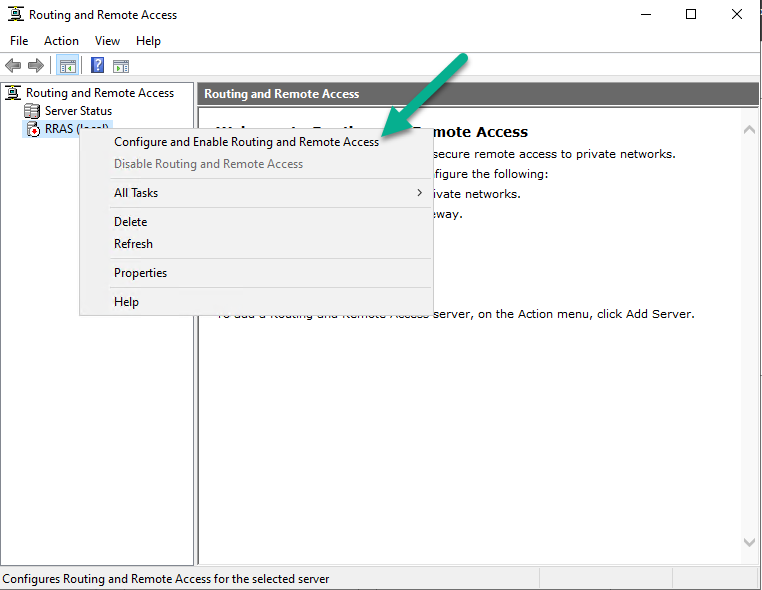
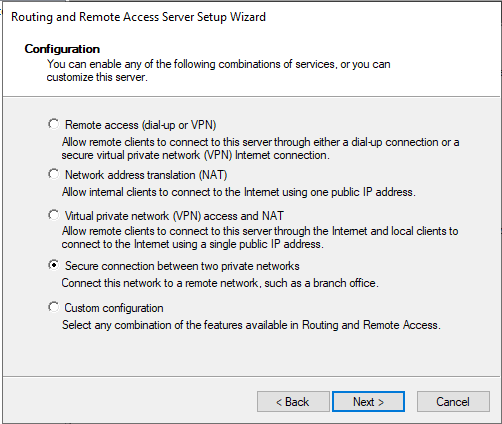
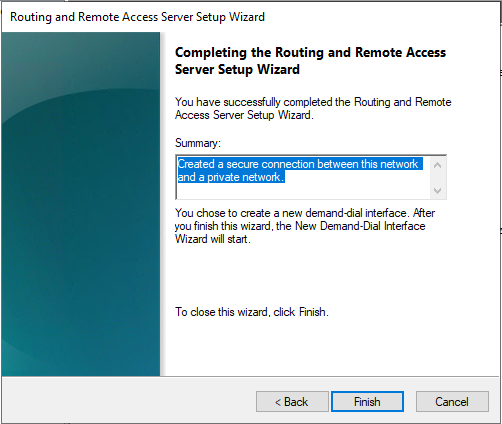
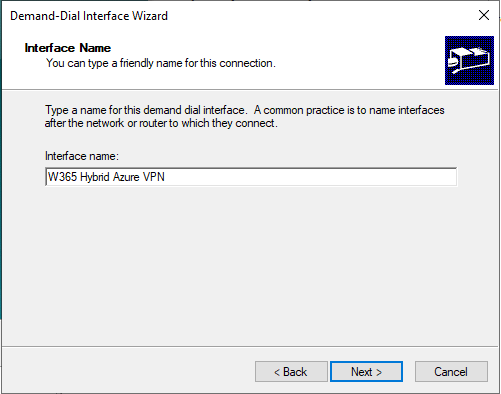
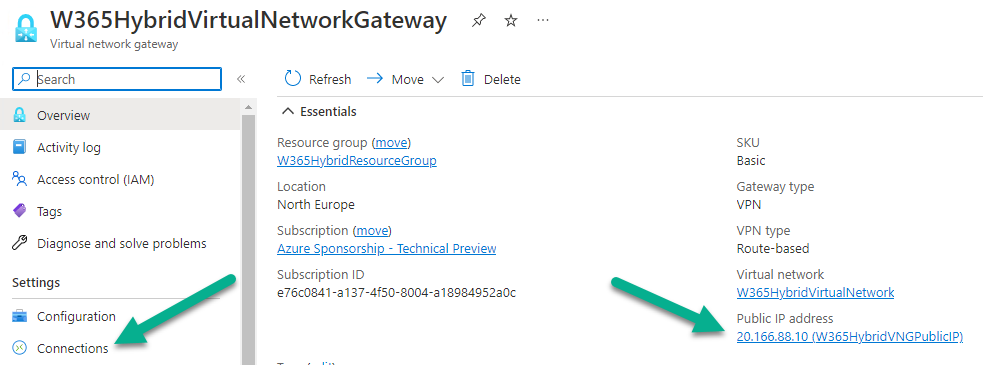
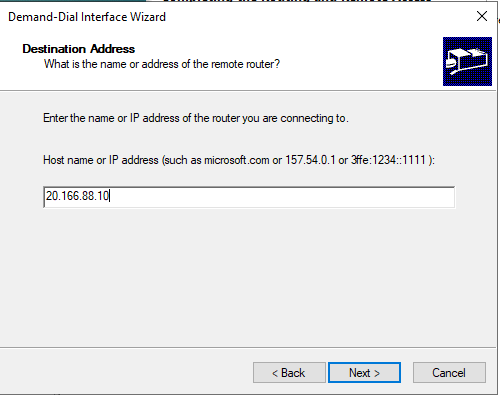
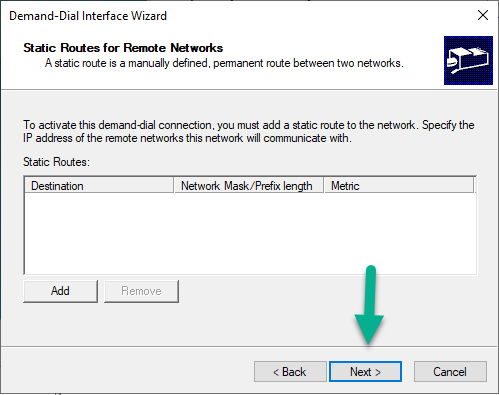
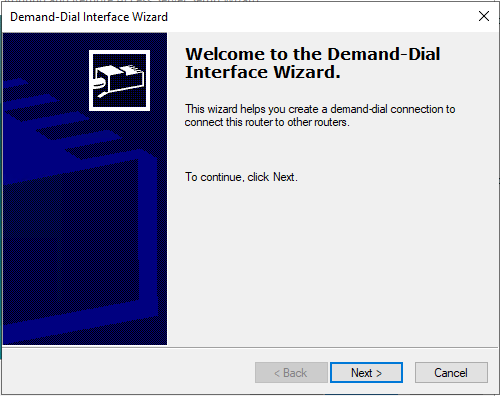
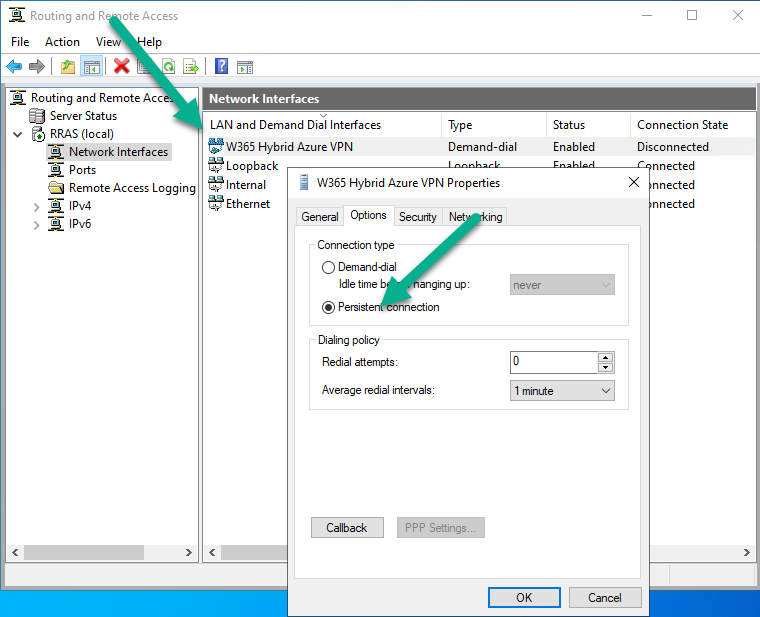
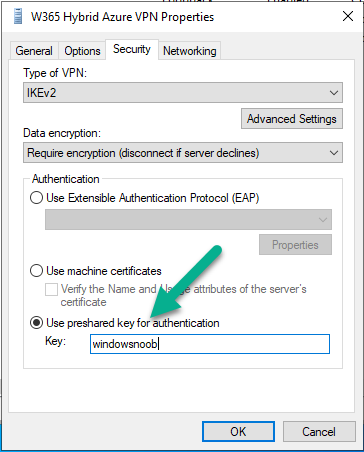
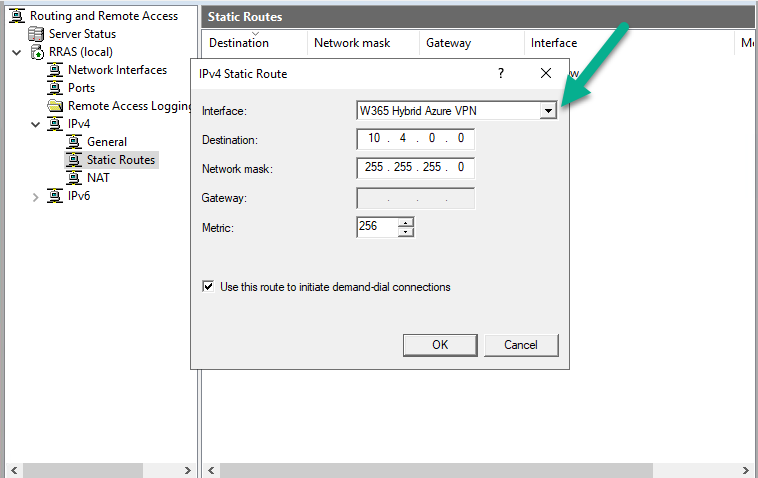
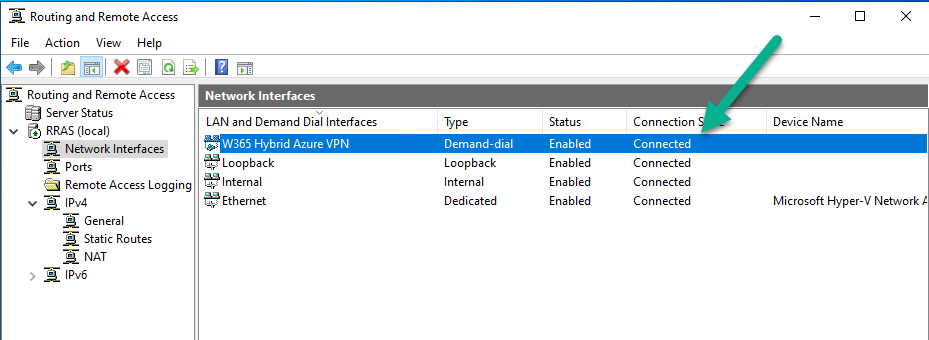
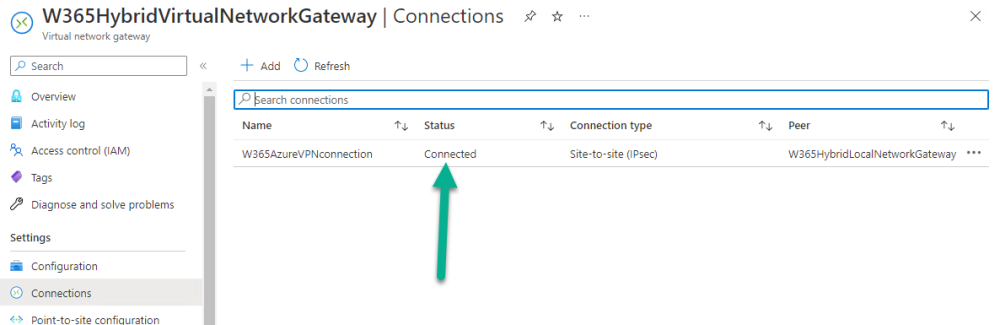
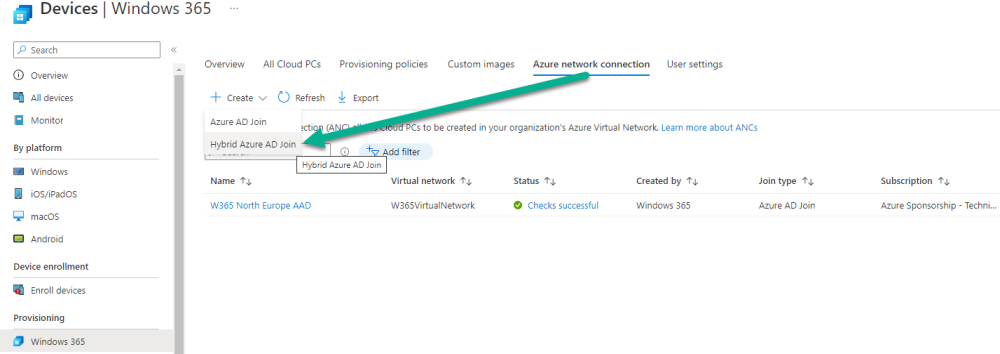
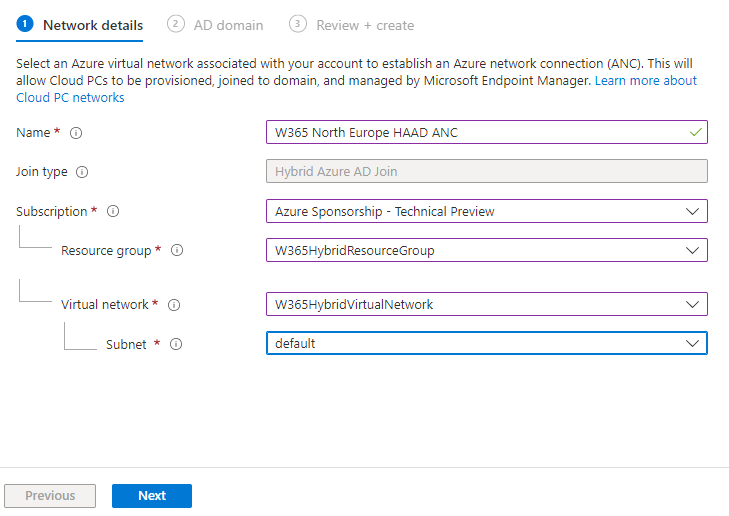
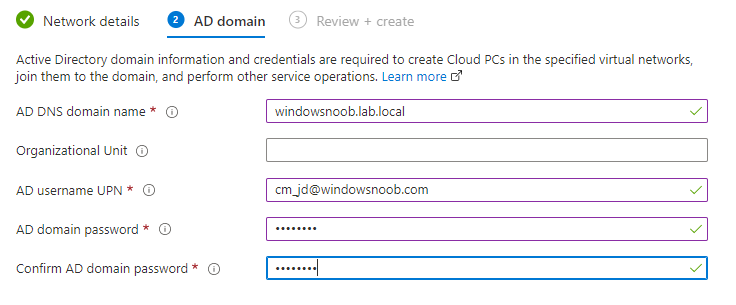
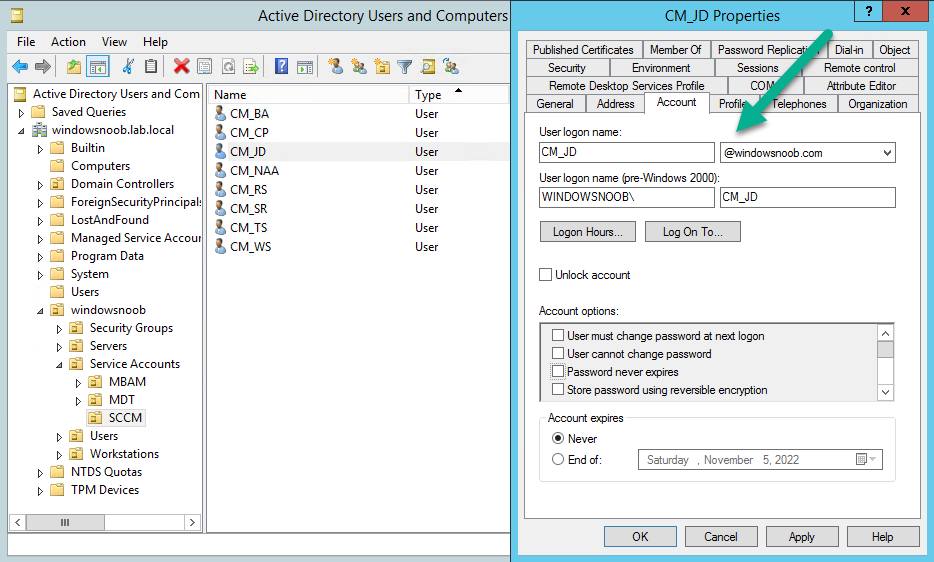
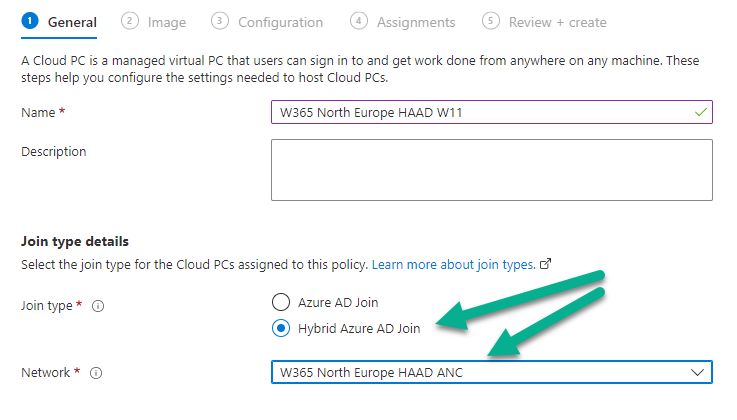
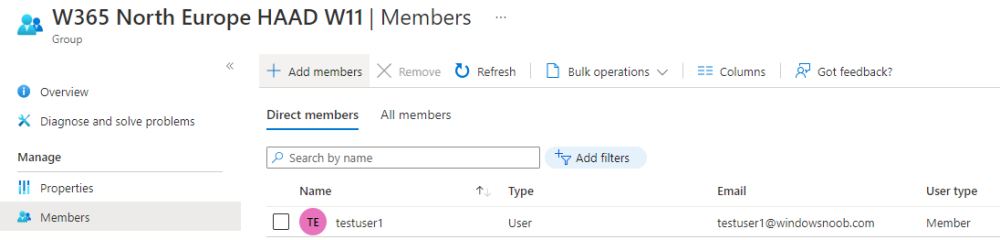
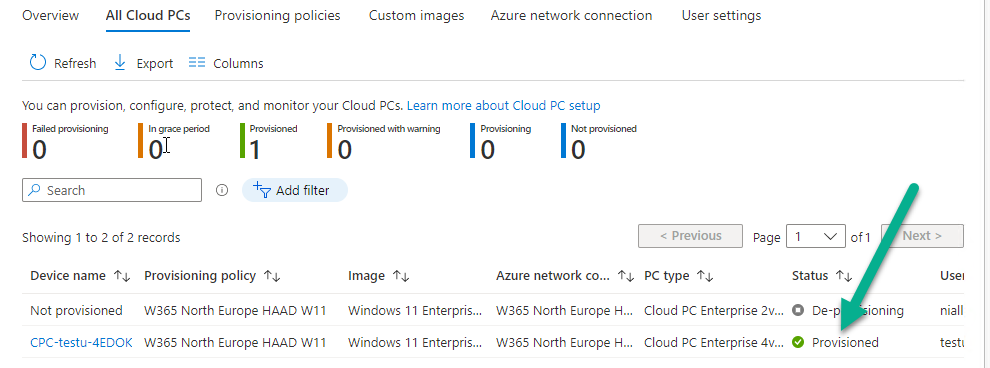
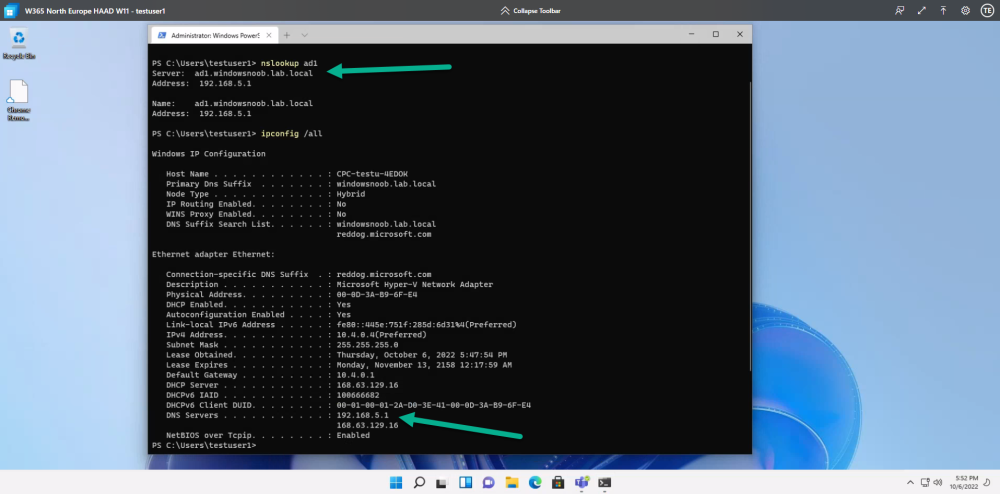
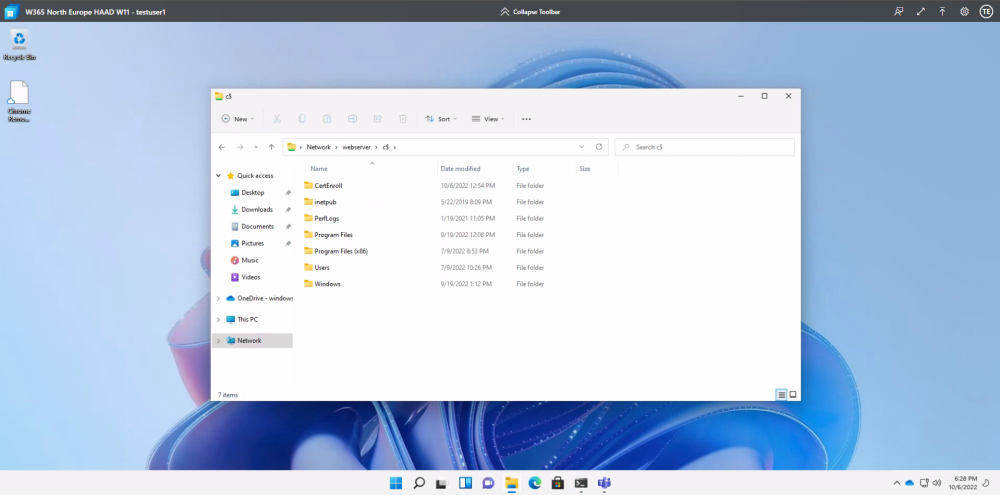
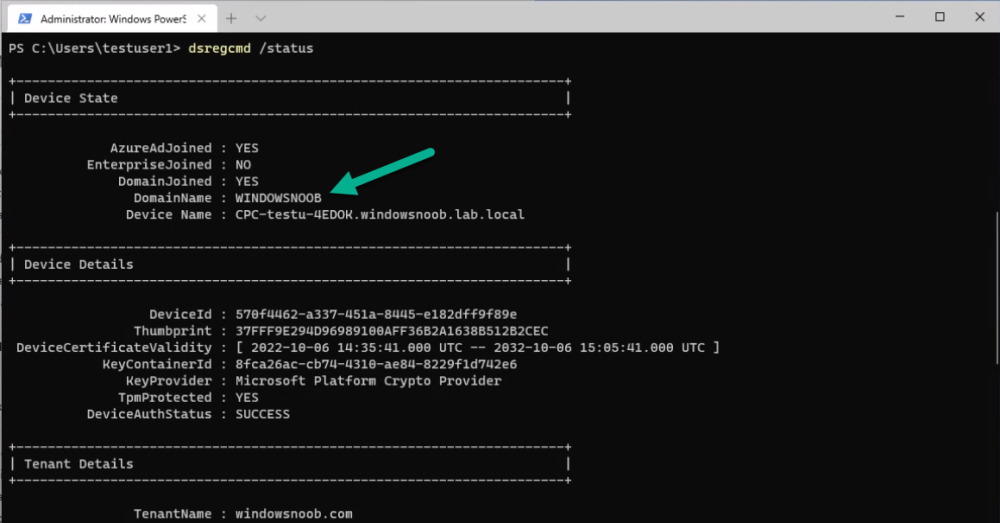
Introduction This is Part 3 in a new series of guides about getting started with Windows 365. This series of guides will help you to learn all about Windows 365 in a clear and insightful way. This series is co-written by Niall & Paul, both of whom are Enterprise Mobility MVP’s with broad experience in the area of modern management. At the time of writing, Paul is a 6 times Enterprise Mobility MVP based in the UK and Niall is a 12 times Enterprise Mobility MVP based in Sweden. In this series we aim to cover everything we learn about Windows 365 and share it with you to help you to deploy it safely and securely within your own organization. In Part 1 we introduced you to Windows 365, selecting the right edition with the level of management that you need, choosing the plan that suits your users needs at a cost you can afford, or modifying the configuration to make it more suited to your individual needs, purchasing licenses and saving money for your organization via the Windows Hybrid Benefit. In Part 2 you learned how to provision an Azure Ad joined Cloud PC and take a look at the different network options available when provisioning an Azure Ad joined Cloud PC. In this part we'll learn about the steps needed to successfully provision a Hybrid Azure Ad Joined Cloud PC. Please allow yourself plenty of time to complete this part as there is a lot to do. Below you can find all parts in this series: Getting started with Windows 365 - Part 1. Introduction Getting started with Windows 365 - Part 2. Provisioning an Azure Ad Joined Cloud PC Getting started with Windows 365 - Part 3. Provisioning a Hybrid Azure Ad Joined Cloud PC <- you are here Getting started with Windows 365 - Part 4. Connecting to your Cloud PC Getting started with Windows 365 - Part 5. Managing your Cloud PC Getting started with Windows 365 - Part 6. Point in time restore Getting started with Windows 365 - Part 7. Patching your Cloud PCs with Windows Autopatch Getting started with Windows 365 - Part 8. Windows 365 boot Getting started with Windows 365 - Part 9. Windows 365 switch Getting started with Windows 365 - Part 10. Windows 365 offline In this part we'll cover the following: Create an Azure Resource Group Create a Virtual Network Configure DNS Create a Virtual Network Gateway Take note of the Public IP address Create a Local Network Gateway Add connection between the local and virtual network gateway Setup static routes Install Routing and Remote Access Configure Routing and Remote Access Configure demand-dial interface Create static route Configure persistent connection Configure preshared key Verify connection Create Azure network connection Provision a Hybrid Azure Ad joined Cloud PC Create an Azure Resource Group Windows 365 uses Resource Groups in Azure to store certain resources, such as Virtual networking, a Virtual Network Gateway or an Azure network connection (ANC). You could use the previously created Resource Group we created in part 2, or keep things orderly and create a brand new one for this part. Let's go ahead and create a new Resource Group in Azure. Login to https://portal.azure.com and click on Create a resource, select Resource Groups, Select Create and create a new resource group in an Azure region close to you. Give the resource group a suitable name like W365HybridResourceGroup Click Review + create to complete the wizard. Create a Virtual Network Windows 365 hybrid azure ad joined Cloud PC's need working DNS to access both the on-premises environment and Internet resources too. After the creation of this virtual network, we'll specify Custom DNS settings to resolve those DNS requirements. Login to https://portal.azure.com and click on Create a resource, select Virtual Network, When the wizard appears, select the previously created W365HybridResourceGroup, select the nearest region, give the virtual network a suitable name such as W365HybridVirtualNetwork and click on Review + Create Once created, select the virtual network, and expand the DNS servers node. Click on Custom and add one or more DNS address of your on-premises DNS server, you should probably also (as a best practice) add 168.63.129.16 which is Azure status DNS as described here = What is IP address 168.63.129.16? | Microsoft Learn. Once you have added your Custom DNS settings, click Save. Create a Virtual Network Gateway In portal.azure.com click on Create a resource, select Virtual Network Gateway and then click on Create. Next, proceed to fill in the following settings, be careful how you enter them as it's not fun trying to delete them afterwards. Also keep in mind that it takes time to create a Virtual Network Gateway: Subscription: <Your Subscription> Resource Group: W365HybridResourceGroup Name: W365HybridVirtualNetworkGateway Region: <Your region> Gateway type: VPN VPN type: Route-Based SKU: Basic Generation: Generation 1 Virtual Network: W365HybridVirtualNetwork Gateway subnet address range: 10.4.1.0/24 Public IP address: Create new Public IP address name: W365HybridVNGPublicIP Public IP address SKU: Basic Enable active-active mode: Disabled Configure BGP: Disabled Finally, click on Review + Create and then click on Create to complete the process. Note: You can click the following link if you'd like to learn more about Azure VPN Gateway settings - About Azure VPN Gateway | Microsoft Learn Take note of the Public IP Next, take note of the Virtual Network Gateway connections Public IP address, you'll need it for later. Create a Local Network Gateway We also need a Local Network Gateway to bridge the gap between cloud and on-premises, and for that to succeed we need a publicly accessible IP address on your on-premises network. In portal.azure.com click on Create a resource, select Local Network Gateway and then click on Create. Note that if your public IP changes over time, you can look at configuring with a FDQN and use a dynamic DNS provider to handle the change in address. Fill in the following values Subscription: <Your Subscription> Resource Group: W365HybridResourceGroup Region: <Your region> Name: W365HybridLocalNetworkGateway Endpoint: IP address IP address: <publicly available IP address on your on-premises network> Address space: IP range of your on-premises IP Finally, click on Review + Create to complete the process. Add connection between the local and virtual network gateway Now that you have configured two network gateways (virtual+local) it's time to create a connection between them. To do that, select the W365HybridLocalNetworkGateway and click on Connections. Click +Add and fill in the following details. Name: W365AzureVPNconnection Connection type: Site-to-site (IPsec) Virtual network gateway: W365HybridVirtualNetworkGateway Local network gateway: W365HybridLocalNetworkGateway Shared key (PSK): <some unique key> IKE protocol: IKEv2 Note: if the Azure portal doesn't allow you to set either the Virtual network gateway or the Local network gateway for this (and it didn't for us), then use the CloudShell with the following PowerShell script. $gateway1 = Get-AzVirtualNetworkGateway -Name W365HybridVirtualNetworkGateway -ResourceGroupName W365HybridResourceGroup $local = Get-AzLocalNetworkGateway -Name W365HybridLocalNetworkGateway -ResourceGroupName W365HybridResourceGroup New-AzVirtualNetworkGatewayConnection -Name W365AzureVPNconnection -ResourceGroupName W365HybridResourceGroup -Location 'North Europe' -VirtualNetworkGateway1 $gateway1 -LocalNetworkGateway2 $local -ConnectionType IPsec -SharedKey 'windowsnoob' To use the Cloud shell go to https://portal.azure.com/#cloudshell/ Note: Make sure to modify the values contained within this script to match your chosen values, and paste in each of the 3 lines one at a time. Once completed without errors, you can review the created local network gateway in Azure. Setup static routes Normally this would be handled by your network team and configured on the network switches. To get this working in a lab you can manually add static routes on each server that you want to access resources from. Below is an example of that on the server hosting the DNS role. route -p add 10.4.0.0 MASK 255.255.255.0 192.168.5.21 Obviously you will need to modify the IP addresses and network mask to suit your setup, in the above example, 10.4.0.0/255.255.255.0 is the ip range in Azure hosting our Cloud PC's and 192.168.5.21 is the IP address of our on-premises Routing and Remote Access (RRAS) server. Note: For the purposes of this guide we are providing this info to get you up and running in a lab. In production adding these routes to each on-premises resource is not scalable, and should instead be configured at the network SWITCH or FIREWALL level in your organization. Install Routing and Remote Access Next, you will install Routing and Remote Access (RRAS) on a workgroup joined server. This is needed to setup a VPN between your on-premises network and the cloud hosting your Cloud PC's. On a server that you'll use for this role, select Add roles and features, click next, next, next, and in the Select server roles screen select the Remote Access role and click Next Click Next at the Features screen, then in the Remote Access screen, in the Role Services screen select Routing which will in turn prompt you to add features that are required for Routing, make sure to select Add Features. Click Next and you'll see that both DirectAccess and VPN (RAS) are now selected, click Next to continue. Click Next at Web Server Role (IIS) and Next again at the Role Services screen. Proceed to Confirmation and then click Install. After the installation is complete, click Close. Configuring RRAS On the server hosting the Remote Access role, click on Tools and select Routing and Remote Access. Right click your RRAS server, select Configure and Enable Routing and Remote Access. Click Next at the introduction and select Secure connection between two private networks. Select the following values: Demand-dial connections: Yes IP Address Assignment: Automatically and then click Finish to close the wizard. Configure demand-dial Interface After clicking Finish above, it will start RRAS associated services and then launch the Demand-dial wizard. Give the demand-dial Interface name a useful name like W365 Hybrid Azure VPN Select the following options for the next screens: Connection Type: Connect using virtual private networking (VPN) VPN Type: IKEv2 and then enter the Public IP address of the Azure Virtual Network Gateway (W365HybridVirtualNetworkGateway) that you captured earlier on. Click Next and enter the following: Protocols and Security: Route IP packets on this interface Next you will be prompted to enter Static Routes for Remote Networks, don't bother as you cannot select the W365 Hybrid Azure VPN you just created (a bug in the UI). You will fill this in later. Just click Next. There is no need to enter any data for the Dial-Out Credentials screen so click Next and then click Finish to complete the Demand-dial wizard. Create Static Route Next, expand the IPv4 node, and select Static Routes. Right click and choose New Static Route. From the drop down menu, select your W365 Hybrid Azure VPN and enter the IP address details of that connection. Configure persistent connection Next, select the W365 Hybrid Azure VPN connection and bring up its properties, set the connection to Persistent connection as below. Configure preshared key On the security tab, select Use preshare key for authentication and enter the key used when we created the W365AzureVPNconnection Close the W365 Hybrid Azure VPN properties. Verify connection Next, select the Network Interfaces node, select your W365 Hybrid Azure VPN and verify the Connection Status. If it says connected, congratulations, if not, you need to verify your IP address settings used earlier. You can also review this connection state in Azure by checking the status of the connection for your W365HybridAzureNetworkGateway. Create Azure network connection Windows 365 in a Hybrid Azure AD Join scenario uses an Azure network connection to allow your Cloud PC's to access your on-premises network resources. To create your own Azure Network connection, open the Microsoft Endpoint Manager console, select the Windows 365 node, and then select Azure network connection. Keep in mind that each tenant has a limit of 10 Azure network connections, if you need more than that you must contact Microsoft support. Next, click on + Create and select Hybrid Azure AD Join from the two available options. Next give the Azure network connection (ANC) a suitable name, before selecting the Resource Group (that you created previously) and the Virtual Network (which you also created earlier). Next enter your on-premises connection info as appropriate. The UPN account specified needs to have permission to allow a Cloud PC to join the on-premises Active Directory Domain. After creating the W365 North Europe HAAD ANC, it will show a status of Running checks and this can take some time to complete. and after some time, if all went well the status will change to Checks successful Note: If you see Checks failed, click on it to review what failed. More than likely DNS settings (and static route) to your on-premises infrastructure is not correct or not working, below is an example of that. Thanks to Donna and Richard Hicks for their help with troubleshooting. We found that the best way to troubleshoot issues like this is to spin up an Azure Virtual Machine in the same Resource Group and Virtual Network as you are working with. If that VM cannot access your on-premises DNS then the ANC checks will fail. Provision a Hybrid Azure Ad joined Cloud PC Once the ANC above is created successfully you should be ready to provision your Hybrid Azure Ad joined Cloud PC. To do that, in Endpoint Manager click on the Devices, select the Windows 365 node, and then select Provisioning Policies. Next, click on + Create policy and select Hybrid Azure AD Join as the Join type and select the W365 North Europe HAAD ANC from the Network drop down menu. fill in your image details, and continue through the wizard until completion. Now all that's required is to add one or more licensed users into the target Azure AD group and access your Hybrid Azure AD Joined Cloud PC. Below is a screenshot of that. The provisioning of that users Cloud PC should begin and if all goes well, succeed ! Logging on to the Cloud PC should also reveal its ability to use to on-premises resources (such as DNS) and the ability to access network shares on another server in the on-premises Domain. Remember that domain join account ? Well you can also see that the Cloud PC is domain joined Job done ! Recommended reading Windows 365 networking deployment options- https://learn.microsoft.com/en-us/windows-365/enterprise/deployment-options?WT.mc_id=windowsnoob.com Windows 365 network requirements - https://docs.microsoft.com/en-us/windows-365/enterprise/requirements-network About VPN devices for connections - Azure VPN Gateway | Microsoft Docs Tutorial - Connect an on-premises network and a virtual network: S2S VPN: Azure portal - Azure VPN Gateway | Microsoft Docs https://charbelnemnom.com/create-site-to-site-vpn-between-azure-and-windows-rras-server/


selected.png.a9a082fe60272dd81482dc77b1891383.png)


-
SCCM PCs discovery
anyweb replied to Datafast's topic in System Center Configuration Manager (Current Branch)
great stuff ! which maintenance task did you configure for this (so others will know) -
SCCM PCs discovery
anyweb replied to Datafast's topic in System Center Configuration Manager (Current Branch)
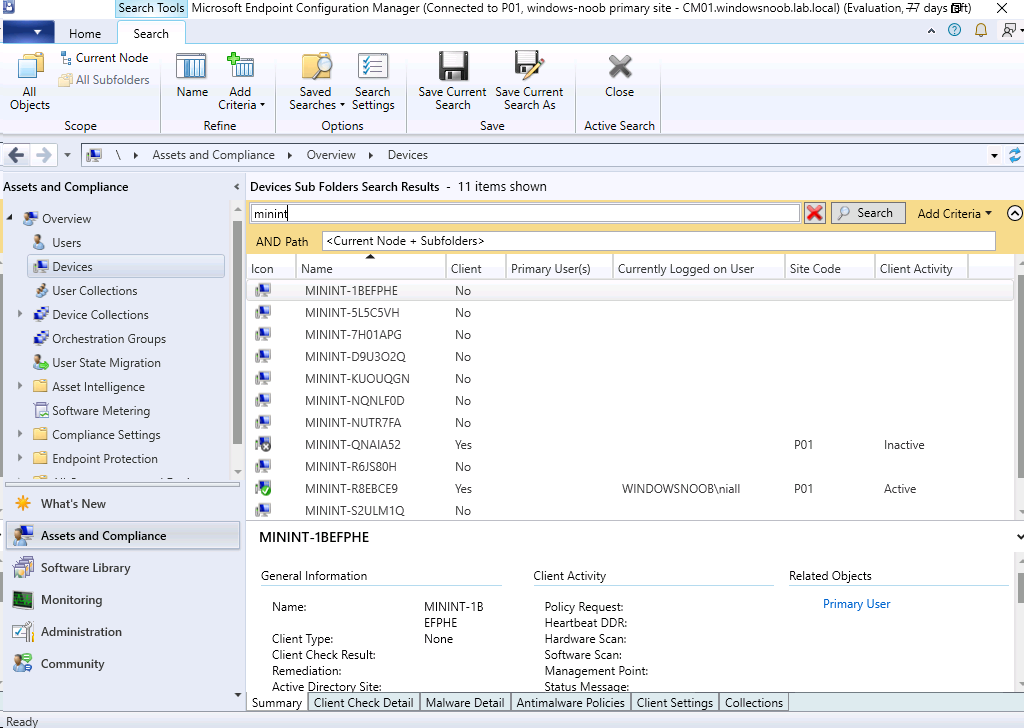
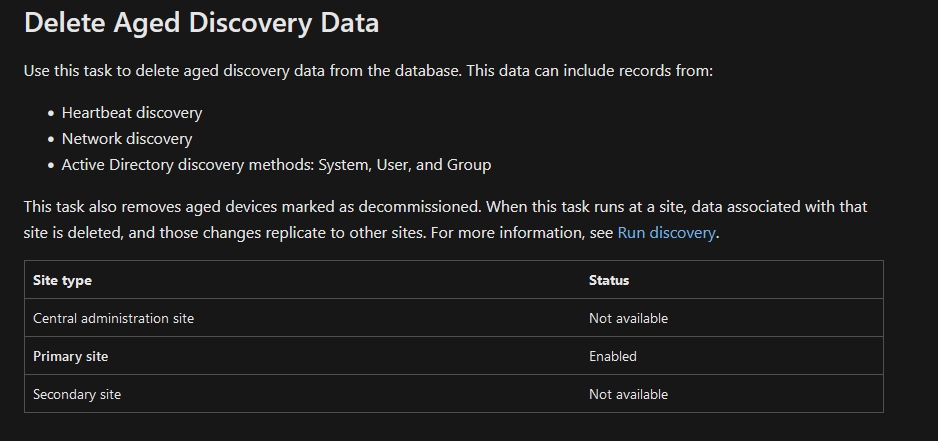
you can review the discovery logs listed in my earlier blog to determine which discovery method is finding those computers. Open them in CMTrace and do some digging. Also, this depends on how you've configured your discovery methods, you can test this by manually deleting some MININT-xxxxxx records in SCCM, then triggering one discovery method by right clicking it and choose Run full discovery now..., then reviewing the logs, and verifying if they populate again in SCCM, below is an example of that...
-
SCCM PCs discovery
anyweb replied to Datafast's topic in System Center Configuration Manager (Current Branch)
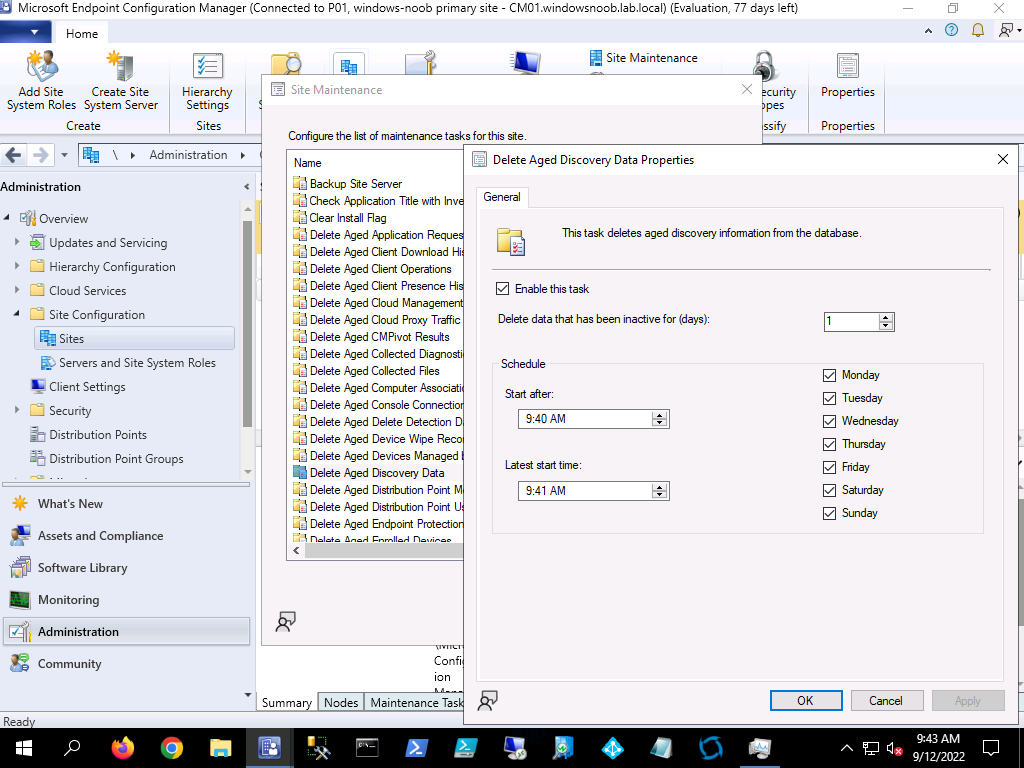
ok in my lab i had 11 minint-xxxxxx devices, and for a test I configured the following maintenance tasks, these settings are not suitable for production, it's only a TEST lab, you need to configure the settings to work with your production setup... Delete Aged Discovery Data https://docs.microsoft.com/en-us/mem/configmgr/core/servers/manage/reference-for-maintenance-tasks and... after running this test in my lab, it deleted all but one active minint-xxxxxx devices, so I thought that I had solved it, but... I did retry this on the same lab after restoring it from a snapshot of BEFORE I configured the maintenance tasks and this time it only removed 2 devices, so give it a try yourself and let me know how it goes you may have to additionally configure the following maintenance tasks, I'd suggest you test in your lab and then provide feedback Delete Inactive Client Discovery Data (was 90, was disabled) now every 1 days Delete Aged Unknown Computers Properties (was 30, eveyr saturday) now every 1 days Delete Aged Inventory history (was 90 days every day, now 1, every day) Delete Aged Discovery data (was 90, every saturday, now 1, every day)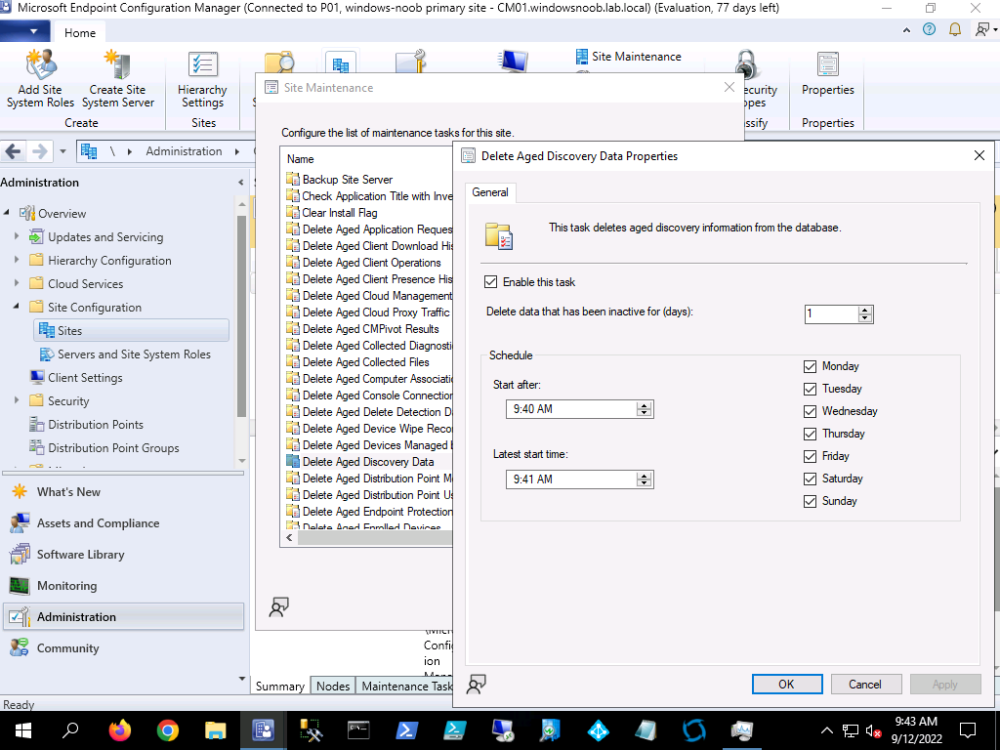

-
SCCM PCs discovery
anyweb replied to Datafast's topic in System Center Configuration Manager (Current Branch)
why not change yours to one day and see what happens