anyweb
-
Posts
9277 -
Joined
-
Last visited
-
Days Won
371
Everything posted by anyweb
-

Migrate to the cloud - Part 1. Setup
anyweb replied to anyweb's topic in System Center Configuration Manager (Current Branch)
ok i've uploaded a new copy of the scripts, it should resolve the devmode issues we saw in your lab last night -
Migrate to the cloud - Part 1. Setup
anyweb replied to anyweb's topic in System Center Configuration Manager (Current Branch)
have you verified it's correctly creating the APSweepback account ? you can place an EXIT 1 just after that section in the takeaction function....to troubleshoot it further and then make sure you have devmode=$true so that you can click abort to the status screen. you can reach me at niall AT windowsnoob.com -
Migrate to the cloud - Part 1. Setup
anyweb replied to anyweb's topic in System Center Configuration Manager (Current Branch)
HI @bondy666 i'm happy to do a remote quickassist session to take a look if you want, and yes the djoin variables are for an on-premises account, ideally i'd like to remove that from the script altogether but haven't got around to that yet when testing the script manually, make sure to run it as Administrator, or better yet, as SYSTEM context (using psexec /i /s cmd.exe) the APIkey is only used for sending emails via Sendgrid (emails are sent when something fails) and this key is generated when you configure sendgrid to send emails, see from point 4 of this blog post -
try tagging him like so @Sokoban maybe he can clarify what he did to resolve it
-
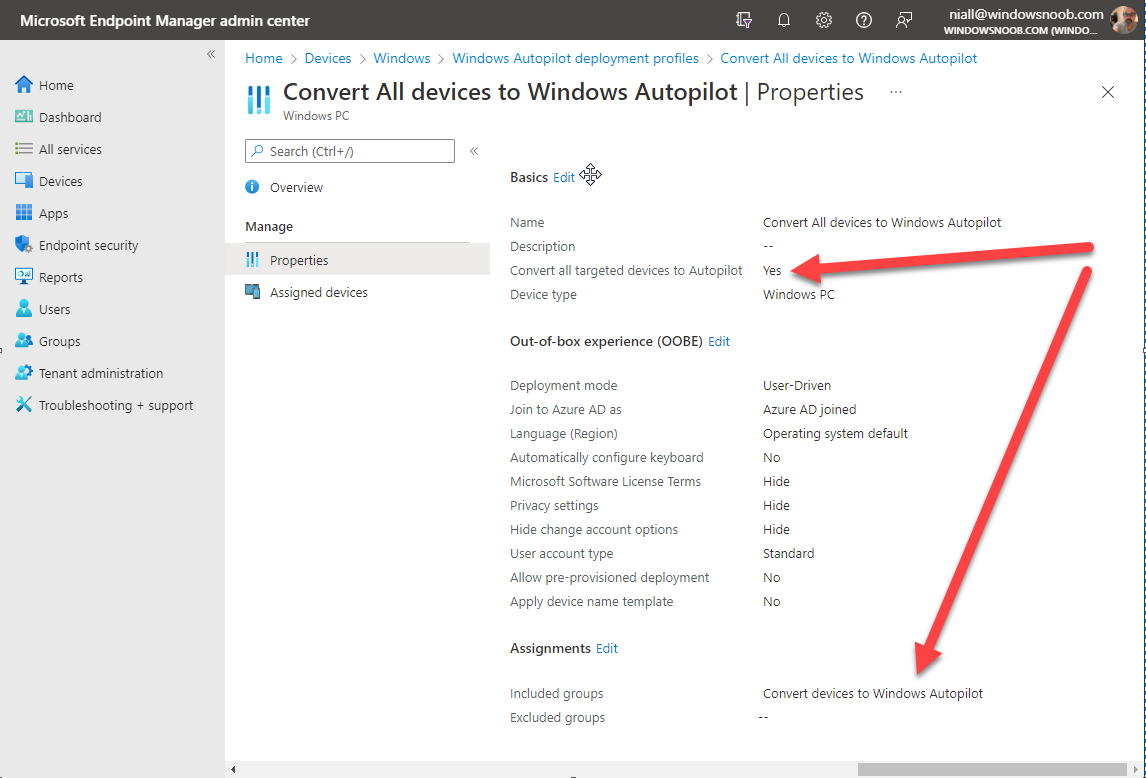
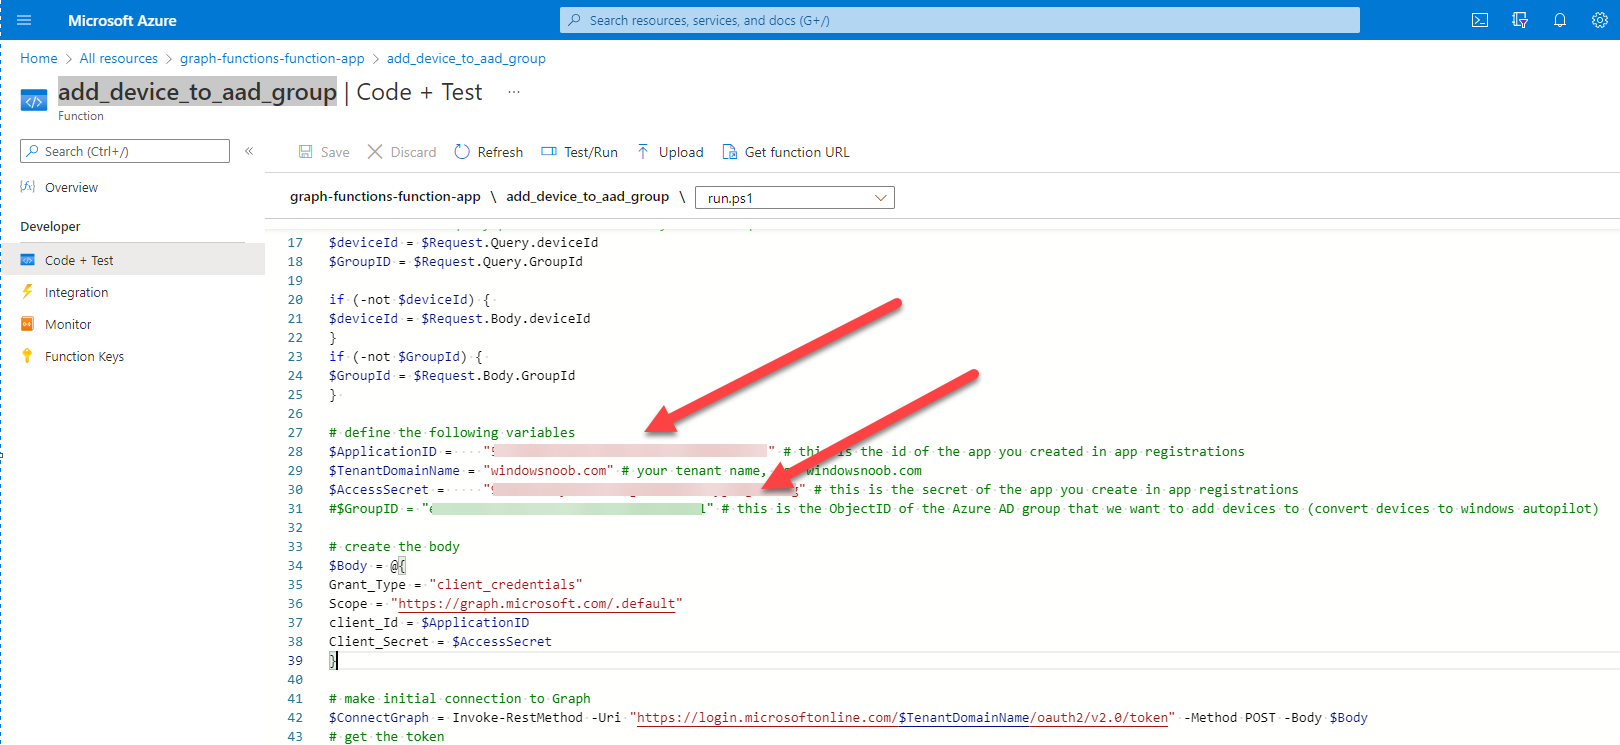
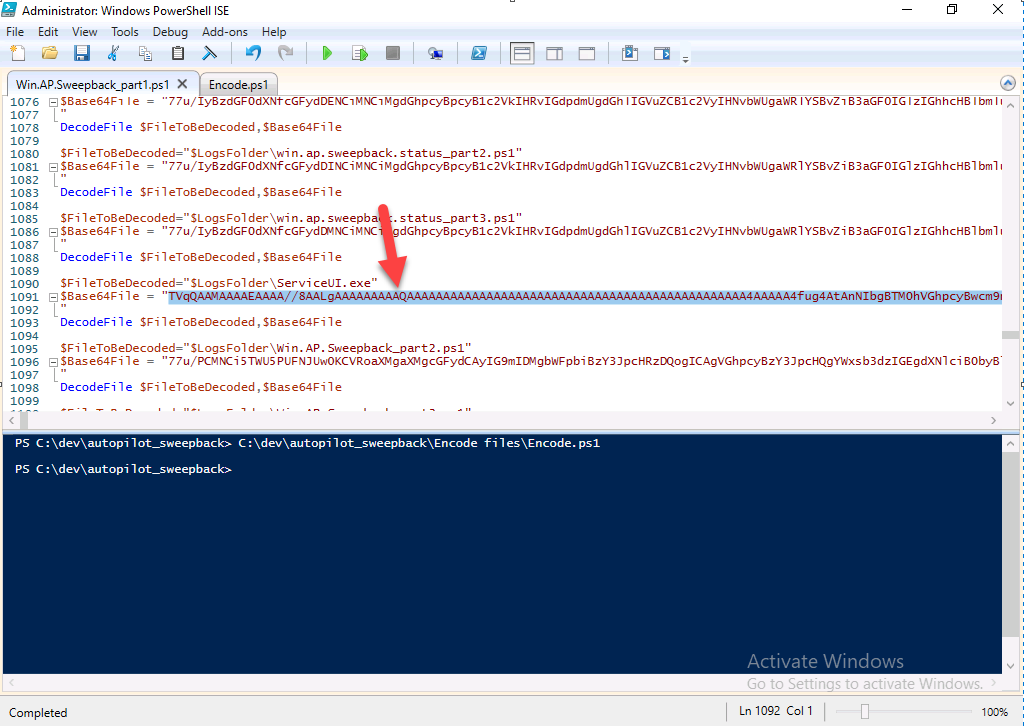
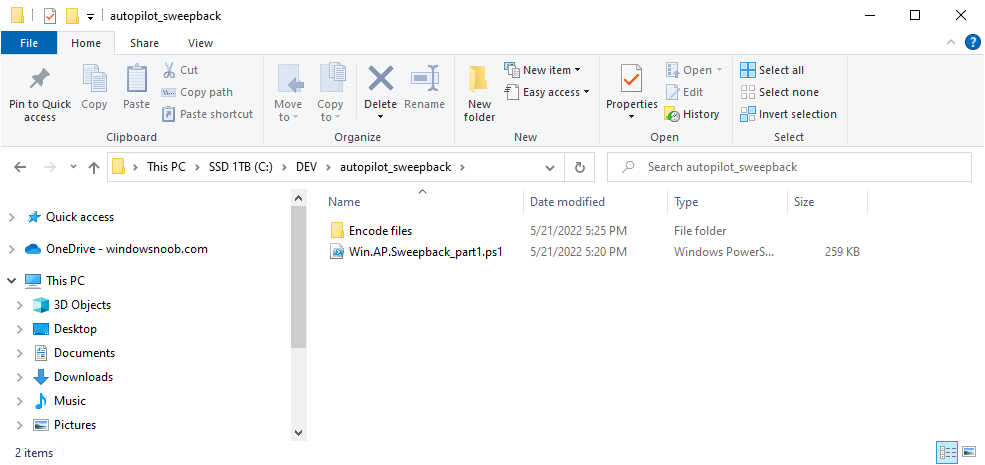
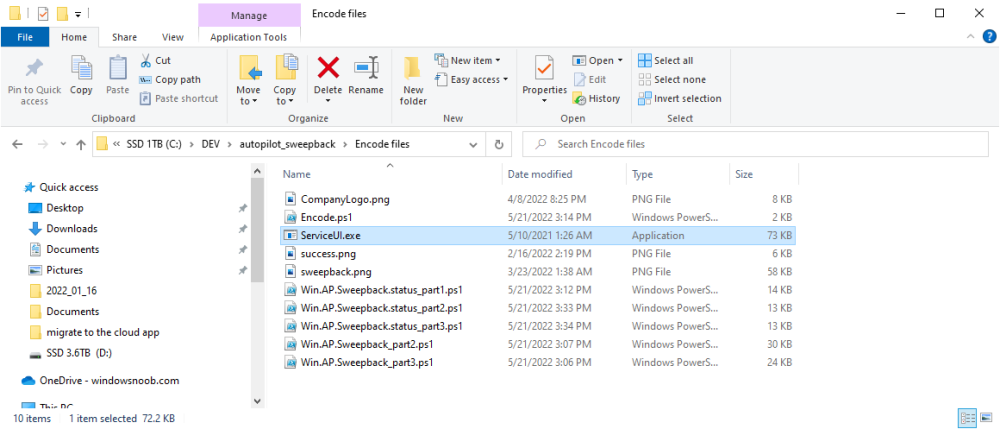
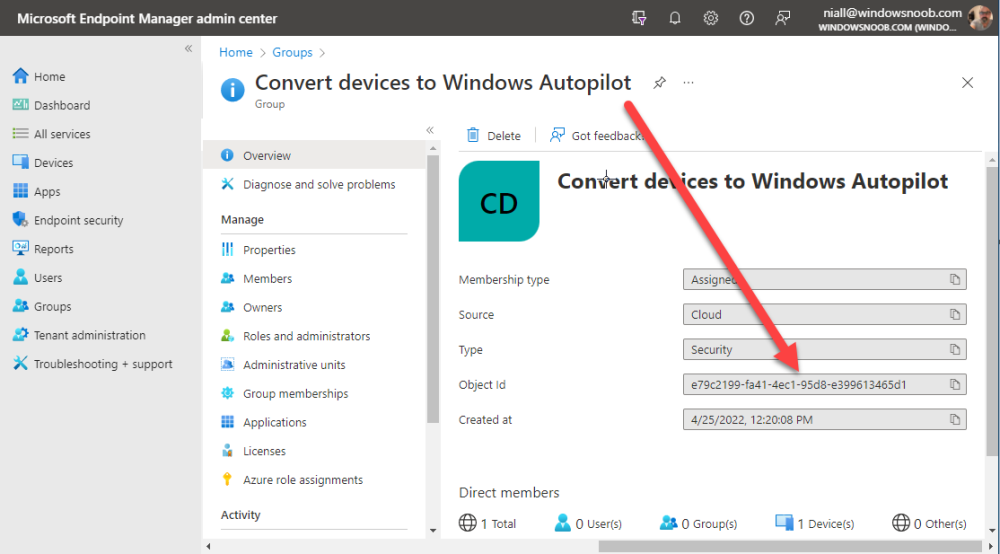
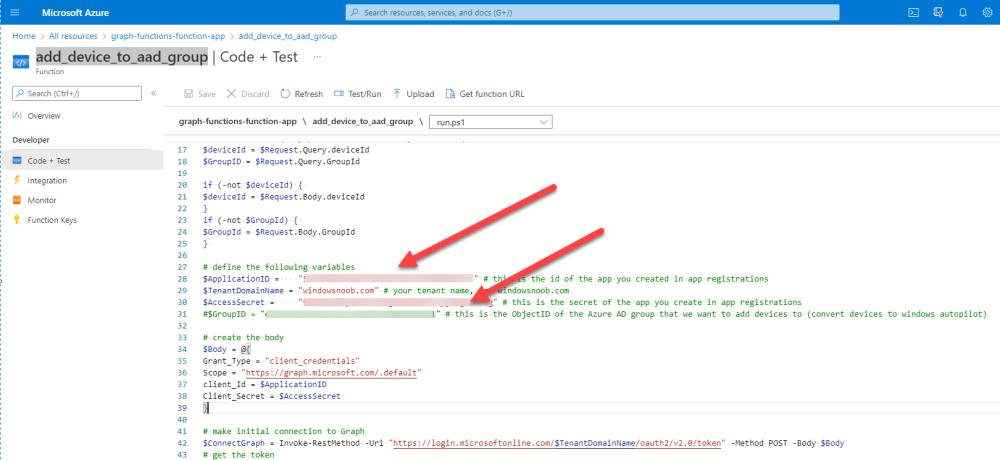
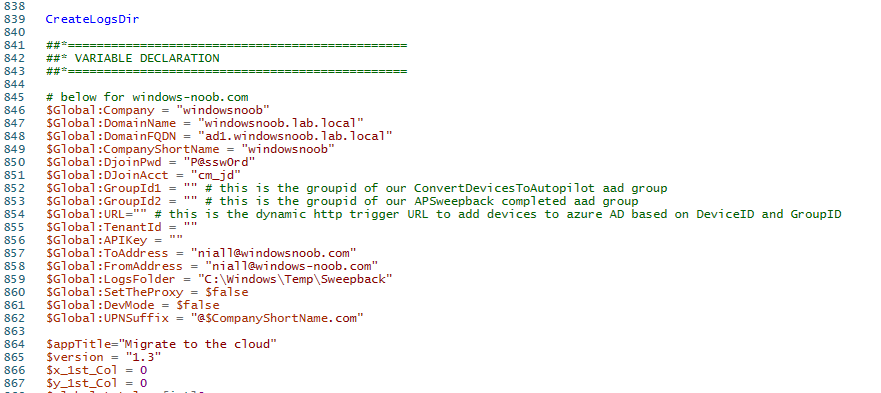
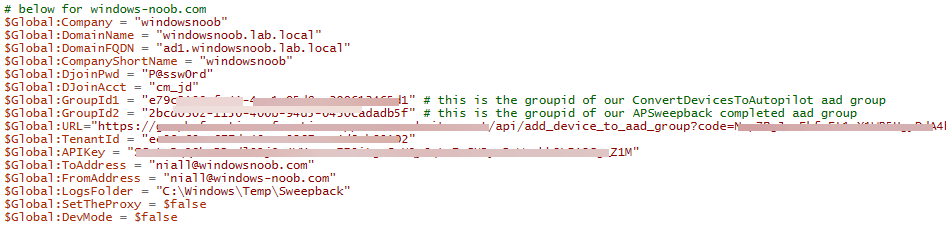
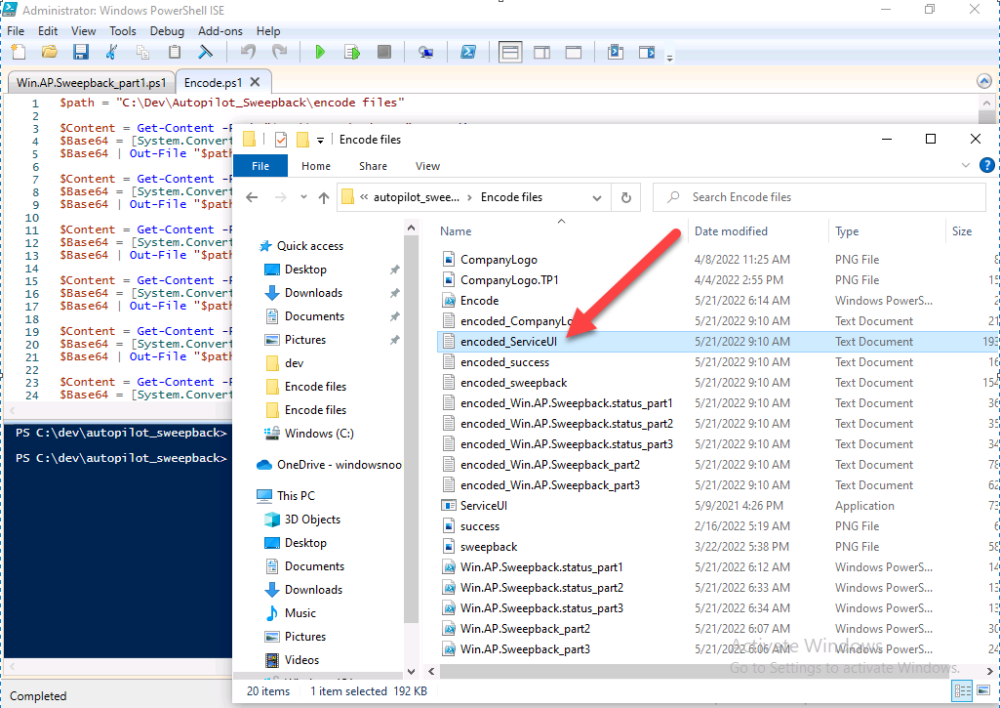
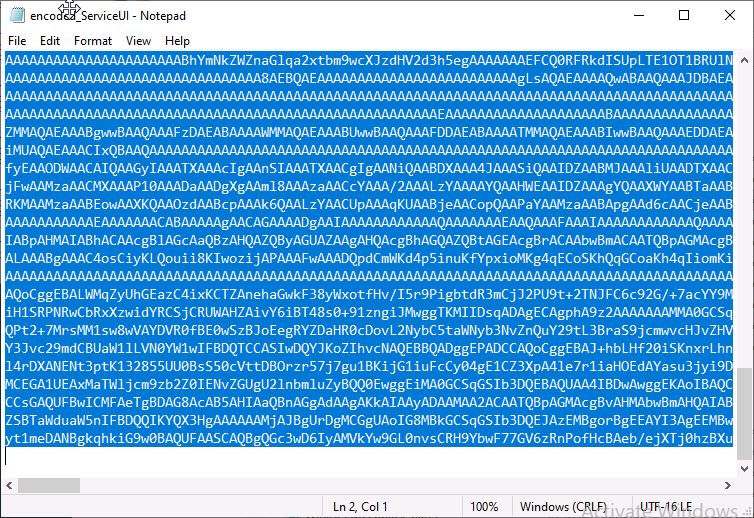
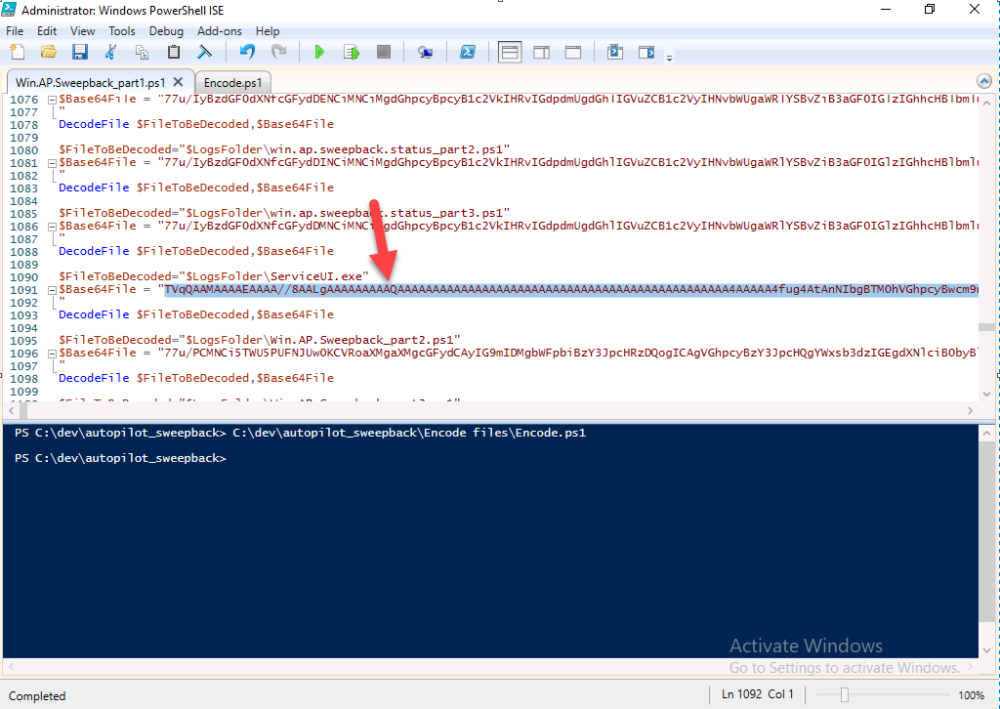
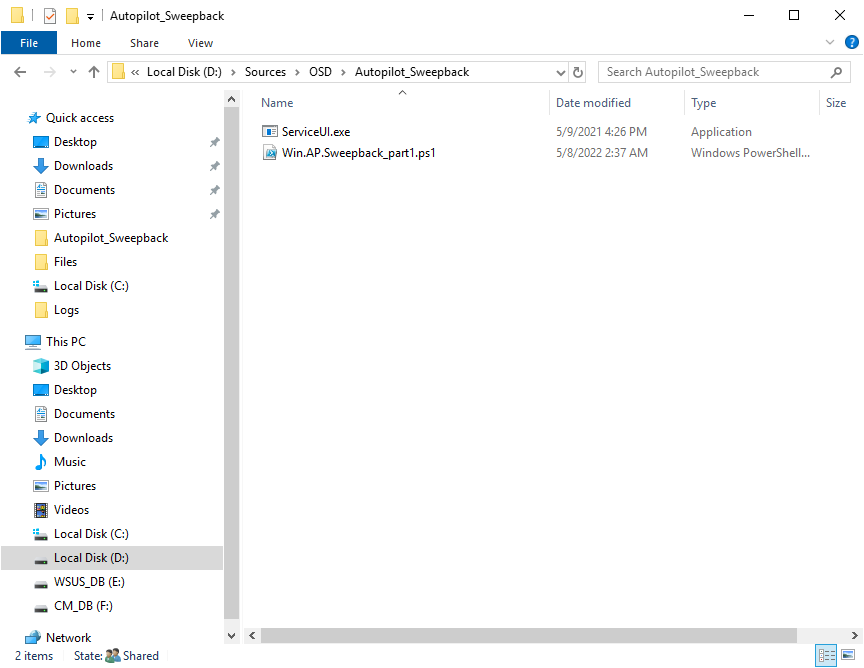
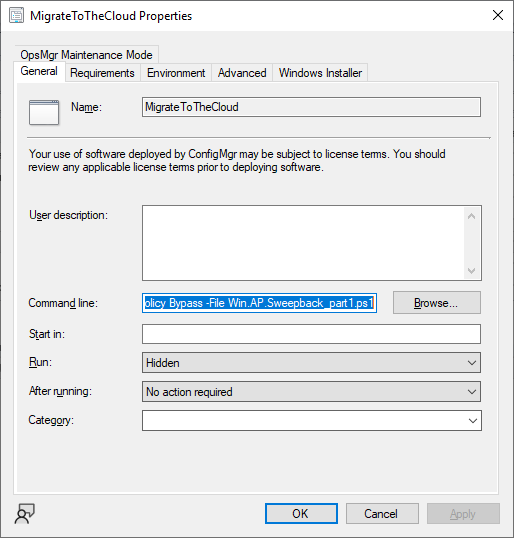
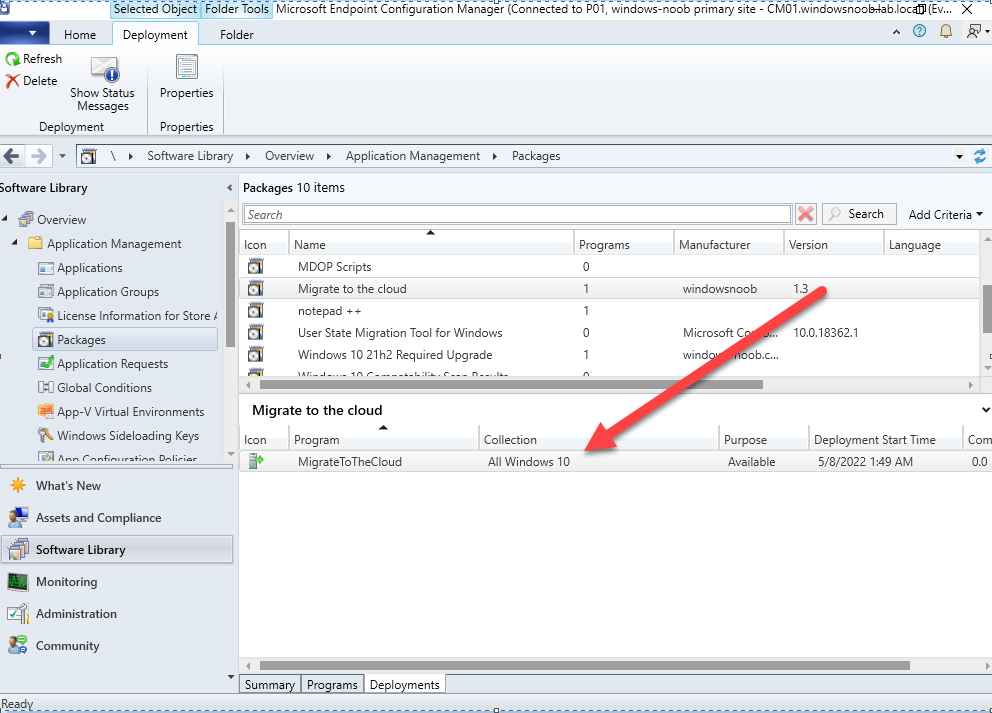
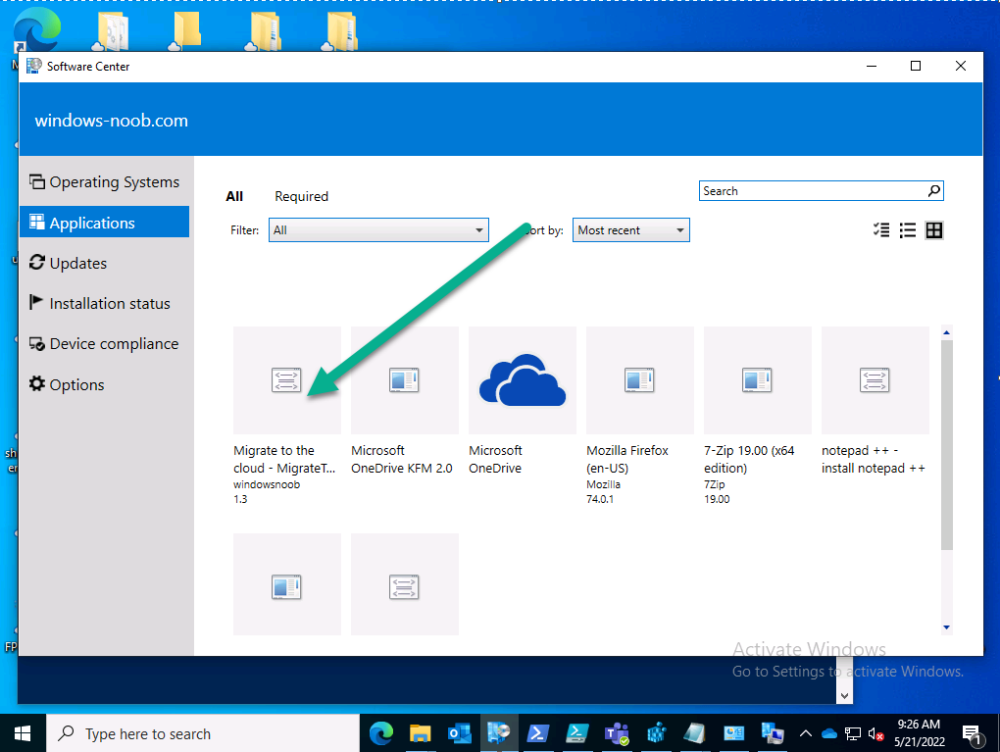
Introduction This blog series is comprised of 3 parts. In this part I'll cover how you can migrate your existing configuration manager managed, domain joined devices to Azure AD joined, and Intune managed devices. During that process the app also converts those devices to Windows Autopilot devices, all with minimal downtime for the end user and via an easy to use self-service app. Migrate to the cloud - Part 1. Setup <- you are here Migrate to the cloud - Part 2. Customization Migrate to the cloud - Part 3. Troubleshooting If you'd like to see a video showing the entire migration process then here it is. Note: In the video, I refer to a Windows Hello for Business problem pin entry, but that was simply because I was restoring a check-pointed virtual machine and testing it over and over. You shouldn't see that problem on regular computers. The app itself is comprised of 3 main parts which does the following: Part #1 1. Create local migration admin account APSweepback, enable Autologin 2. Remove MBAM client 3. Remove SCCM client 4. Change the Windows shell 5. Drop out of the domain 6. Restart computer... Part #2 1. AutoLogin as APSweepback account 2. Start second script (shell) 3. rename old 'on prem' account to xxxxx.OLD 4. popup AADJ wizard asking for credentials 5. convert the device to Windows Autopilot device 6. create scheduled task for part 3 7. restart computer (to reapply UAC settings and for WHFB) Part #3 1. Install Company Portal 2. Launch OneDrive for Business 3. Cleanup registry keys and changes 4. add to Autopilot Sweepback completed AAD group (for reporting and remediation scripts) 5. popup notification that all is done and logoff The app development is mostly done, but it's still evolving based on feedback, if you know of better ways of doing things within the app then do please let me know. Here's a short overview of the apps main features Created with Powershell Uses Azure Functions (HttpTriggers) Disconnects a device from the domain/ConfigMgr Connects to Azure AD/Intune (uses Auto MDM enrollment) Convert device to Windows Autopilot Users data stored in OneDrive Users data remains on the device after migration Installed apps remain installed on the device UI front end for the end user Status screen indicating progress Detailed Logs Email ability (via Azure/Sendgrid) Step 1. Get the scripts Note: You can only download these files when logged on as a member of https://www.windows-noob.com autopilot_sweepback.zip Note: Last updated 2022/05/31 (v1.4 logsfolder bug) Extract the zip to C:\DEV The extracted ZIP files should look something like this Step 2. Get ServiceUI.exe from MDT You'll need the ServiceUI.exe executable file to display user interfaces (UI) to end users in SYSTEM context. As our app will be deployed from ConfigMgr in SYSTEM context, we'll utilize ServiceUI.exe. To get the file, download and install MDT somewhere and navigate to C:\Program Files\Microsoft Deployment Toolkit\Templates\Distribution\Tools\x64. To download MDT click here. Copy the ServiceUI.exe file to your extracted C:\DEV\autopilot_sweepback\Encode files folder so it looks like this. Step 3. create some azure ad groups In Microsoft Endpoint Manager (MEM), create two Static Azure AD groups with the following names: Autopilot Sweepback Completed Convert devices to Windows Autopilot After creating the groups, take note of the ObjectId of each aad group. Step 4. create a Windows Autopilot deployment profile In MEM, navigate to Devices, Windows, Windows Enrollment, and select Windows Autopilot Deployment Profiles, select Create to create a new profile and make sure that Convert all targeted devices to Autopilot is set to YES and that the profile is assigned to the Convert devices to Windows Autopilot Azure AD group created in step 3 above. Step 5. create an Azure function In Azure, I will assume you've already created a functionapp as per Step 4 of this blog post. If not, go ahead and create one and then return to this step. Next create a new httptrigger called add_device_to_aad_group and insert the following code into it. # Niall Brady 2022/05/21 (used by the Check Compliance, Software Updates to devices solutions amongst others...) # Dynamically ADDS a device to an azure ad group # using namespace System.Net # Input bindings are passed in via param block. param($Request, $TriggerMetadata) # Write to the Azure Functions log stream. Write-Host "PowerShell HTTP trigger function processed a request." # Interact with query parameters or the body of the request. $deviceId = $Request.Query.deviceId $GroupID = $Request.Query.GroupId if (-not $deviceId) { $deviceId = $Request.Body.deviceId } if (-not $GroupId) { $GroupId = $Request.Body.GroupId } # define the following variables $ApplicationID = "" # this is the id of the app you created in app registrations $TenantDomainName = "" # your tenant name, eg: windowsnoob.com $AccessSecret = "" # this is the secret of the app you create in app registrations # create the body $Body = @{ Grant_Type = "client_credentials" Scope = "https://graph.microsoft.com/.default" client_Id = $ApplicationID Client_Secret = $AccessSecret } # make initial connection to Graph $ConnectGraph = Invoke-RestMethod -Uri "https://login.microsoftonline.com/$TenantDomainName/oauth2/v2.0/token" -Method POST -Body $Body # get the token $token = $ConnectGraph.access_token $token # to improve logging... $triggerName = "add_device_to_aad_group" $a = Get-Date $body = " `n" $body = $body + "$a Starting the '$triggerName' function...`n" $body = $body + "$a Connected to tenant: $TenantDomainName.`n" #START $FindDevice if ($deviceId -and $GroupId) { $Group = Invoke-RestMethod -Method Get -uri "https://graph.microsoft.com/v1.0/groups?`$filter=Id eq '$GroupId'" -Headers @{Authorization = "Bearer $token"} | Select-Object -ExpandProperty Value $GroupName = $Group.displayName $body = $body + "$a You supplied deviceId: '$deviceId'" + ".`n" $body = $body + "$a You supplied groupId: '$GroupId'" + ".`n" $body = $body + "$a Group.displayName: '$GroupName'" + ".`n" #$GroupMembers = Invoke-RestMethod -Method Get -uri "https://graph.microsoft.com/v1.0/groups/$GroupID/members?$filter " -Headers @{Authorization = "Bearer $token"} | Select-Object -ExpandProperty Value # | Select-Object -ExpandProperty Value # below fixes the 100 members per returned result in AAD problem $GroupMembers2 = Invoke-RestMethod -Method GET -uri "https://graph.microsoft.com/v1.0/groups/$GroupID/members?`$count=true&`$filter=startswith(deviceid,'$deviceId')" -Headers @{Authorization = "Bearer $token";"ConsistencyLevel" = "eventual"} # if found do this if ($GroupMembers2.value.deviceId){ #$body = $body + "--------------------------------------------------------------------`n" #$body = $body + "This device was found in the AAD group so no need to add it again...`n" #$body = $body + "deviceId: " + $GroupMembers2.value.deviceId + "`n" #$body = $body + "displayName: " + $GroupMembers2.value.displayName + "`n" #$body = $body + "--------------------------------------------------------------------`n" Write-Host -ForegroundColor Yellow "$GroupMembers2.value.displayName is in the group" $body = $body + "$a Device: " + $GroupMembers2.value.displayName + " is already in the " + $GroupName + " group, nothing to do.`n" $body = $body + "$a The computer is already in the group, nothing to do.`n" $Status = "Already present in group" } else { $AddDevice = Invoke-RestMethod -Method Get -uri "https://graph.microsoft.com/v1.0/devices?`$filter=deviceId eq '$deviceId'" -Headers @{Authorization = "Bearer $token"} | Select-Object -ExpandProperty Value | %{ Write-Host -ForegroundColor Green "Adding $($_.DisplayName) ($($_.ID)) to the group" $body = $body + "$a Adding $($_.DisplayName) ($($_.ID)) to the group with ObjectID $GroupID.`n" $ComputerName = $($_.DisplayName) $Status = "ADDED" $BodyContent = @{ "@odata.id"="https://graph.microsoft.com/v1.0/devices/$($_.id)" } | ConvertTo-Json # code to add it here... # the $ref variable is explained here... kinda # https://docs.microsoft.com/en-us/graph/api/group-post-members?view=graph-rest-1.0&tabs=http try {Invoke-RestMethod -Method POST -uri "https://graph.microsoft.com/v1.0/groups/$GroupID/members/`$ref" -Headers @{Authorization = "Bearer $token"; 'Content-Type' = 'application/json'} -Body $BodyContent # pause some seconds to allow time for the object to be populated if recently added... sleep 30 } catch { $body = $body + "$a ERROR ADDING THE DEVICE`n" $body = $body + "Here is the error message: '$_.ErrorMessage'" $Status = "ERROR ADDING THE DEVICE" } } } } #END $FindDevice $a = Get-Date $body = $body + "$a Exiting Azure function." # Associate values to output bindings by calling 'Push-OutputBinding'. Push-OutputBinding -Name Response -Value ([HttpResponseContext]@{ StatusCode = [HttpStatusCode]::OK Body = $body }) In the code above, fill in the following values that correspond to your environment: ApplicationID TenantDomainName AccessSecret Don't forget to Save your changes in the Http trigger. Take note of the function URL by clicking on Get Function URL, it'll look something like this Step 6. edit the variables Next, open Powershell ISE and locate the win.ap.sweepback_part1.ps1 powershell script. Fill in or change the missing values for the variables listed below: Note: DjoinPwd and DjoinAcct must use valid credentials for a user in your domain. The values below are examples from my lab. So it looks more like this (the values from my tenant are blurred): Note: The APIKey value is for sending emails using sendgrid, if you'd like info about setting that up see this guide (point 4) Next, open the encode.ps1 script and run it, once completed, browse to the Encoded files folder and locate the After running the script, locate the encoded_ServiceUI.txt file and open it in notepad. Copy the contents of that file using CTRL+A followed by CTRL+C Paste that code into the following line in between the quotation marks Save the changes to the win.ap.sweepback_part1.ps1 code. Step 7. create and deploy the app in ConfigMgr In my example, I simply created a package/program in ConfigMgr to deploy this app, use whatever application model you wish. To do this simply copy two files to a folder called Autopilot_Sweepback and use that as your package source. ServiceUI.exe win.ap.sweepback_part1.ps1 the program for the package uses the following line ServiceUI.exe -process:explorer.exe %SYSTEMROOT%\System32\WindowsPowerShell\v1.0\powershell.exe -NoProfile -WindowStyle Hidden -ExecutionPolicy Bypass -File Win.AP.Sweepback_part1.ps1 as shown here Next, deploy the package to a collection containing some devices you want to migrate. Step 8. Test it Now the hard work is mostly done and you can start testing it, launch it from Software Center and start migrating to the cloud ! That's it, join me in the next parts where we'll go a little further! cheers niall Related reading https://techcommunity.microsoft.com/t5/core-infrastructure-and-security/to-aad-join-or-not-that-is-the-question/ba-p/3435768 https://www.windows-noob.com/forums/topic/15773-how-can-i-enable-mdm-auto-enrollment-for-microsoft-intune-in-azure/ https://docs.microsoft.com/en-us/windows/client-management/mdm/mdm-enrollment-of-windows-devices https://docs.microsoft.com/en-us/mem/intune/enrollment/enrollment-restrictions-set https://techcommunity.microsoft.com/t5/microsoft-endpoint-manager-blog/the-journey-to-cloud-based-device-management/ba-p/3264631 https://docs.microsoft.com/en-us/mem/cloud-native-endpoints-overview


-
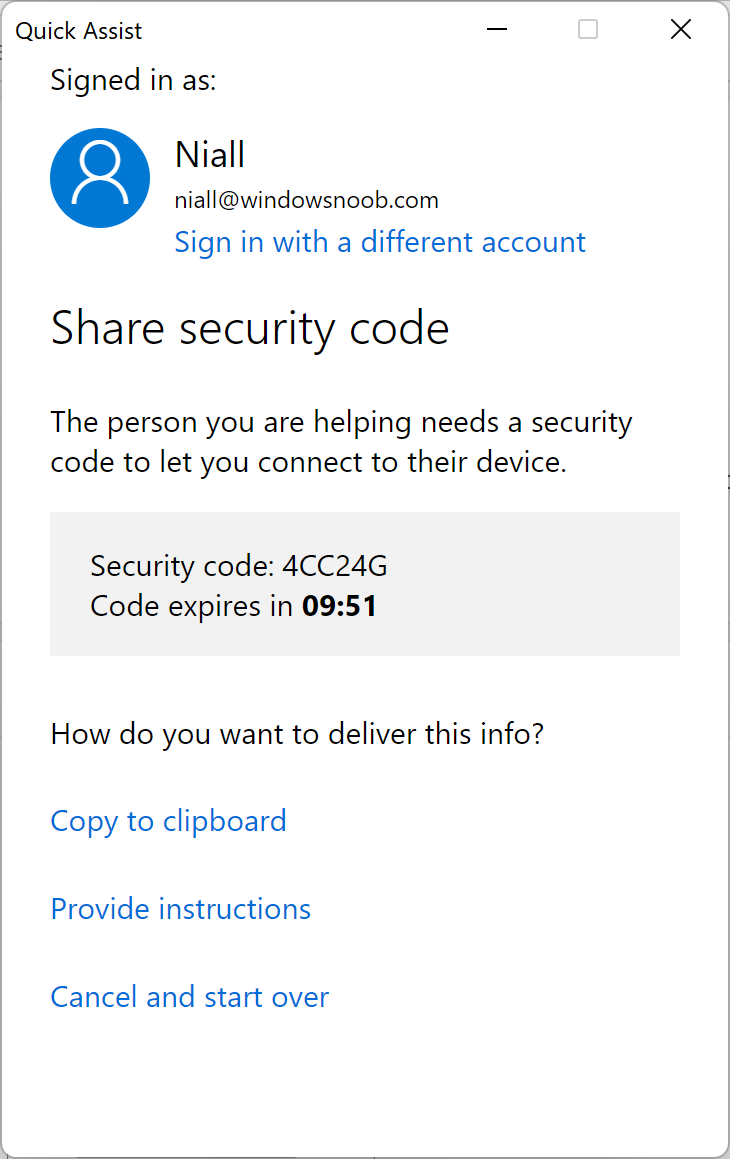
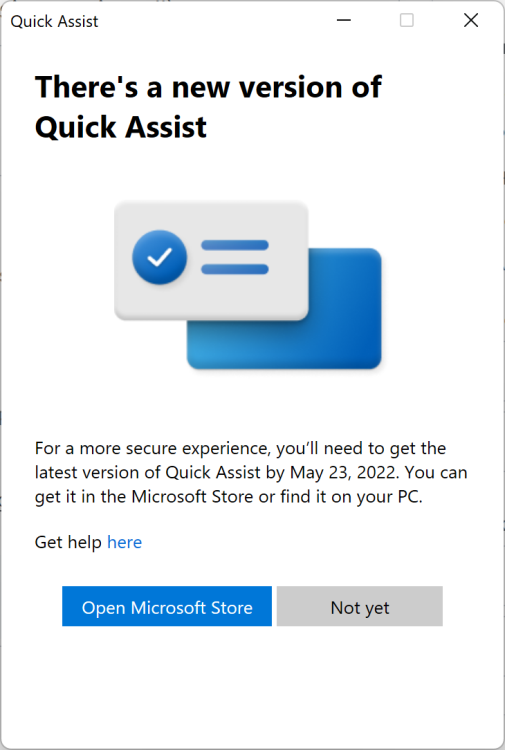
If you (like me) have used Quick Assist in the past you might be disappointed to know that the built in Windows 10/11 app is going to be killed off in the coming days and replaced with Quick Assist from the Microsoft Store. If you start the Quick Assist app today you'll see something like this (taken from my Windows 11 computer). the text below is taken from the official announcement. Why is this a big deal ? Well for a couple of reasons namely... If you were supporting users in Windows Autopilot using CTRL+Windows key + Q, then that built in ability will be gone. If your users are Standard Users (and they should be) then they won't be able to install the app from the Store as it requires local admin permissions. Below screenshot is from a Windows 10 vm running as a standard user. If the computer you are supporting has Store app issues (and that's a common problem, for example store apps not working after a Cumulative update was installed and waiting on a reboot). The new app uses characters as well as numbers, and that might confuse some people Ironically, the new Store apps provided instructions say nothing about the fact that the user has to download the Store app to get support. Some think this is a good thing as it means only admins can install the remote assistance app, but I think it'll just push people towards alternatives What are your thoughts on this ?


-
- 1
-

-
Introduction This video is a quick look at the Migrate to the cloud app. The Migrate to the cloud app is a Powershell based solution delivered via Software Center in Microsoft Configuration Manager, that takes your domain joined, ConfigMgr devices and migrates them to Intune management and converts them to Windows Autopilot devices in the process, all done without data-loss and minimal user interruption or downtime. You can check out the video here. I'll be posting a blog post or two covering how to implement this in your own environment, watch this space.
-
hi @rahill here's what I got from Microsoft ConfigMgr 2203 current branch Eval - https://aka.ms/MECM2203CB-Eval ConfigMgr 2202 technical preview baseline - https://aka.ms/MECM2202TP-Baseline
-
hi Robert, do you require 2103 eval for Current Branch or will another (later) version do ?
-
you are right it doesn't work currently, Microsoft has been made aware of this i\ll update this once i know more
-
i don't have a lab in your state to test this on as mine already has bitlocker management enabled, so please go ahead and create a test bitlocker management policy, doing so will put in place things like bitlocker management services in IIS, back when this was first released in 1910 we had to run powershell scripts to get reports, but it's all integrated now
-
first things first, have you created any bitlocker management policy yet ? when you create your first policy it starts installing things, and maybe that's what you are missing
-
SCCM Client Issue
anyweb replied to asad's topic in System Center Configuration Manager (Current Branch)
if DNS doesn't work then nothing will work, you need to fix DNS first and then deal with all the other issues. -
here's a video and blog post i did which covers Bitlocker reporting in ConfigMgr https://www.niallbrady.com/2020/01/08/learn-about-mbam-in-microsoft-endpoint-configuration-manager-version-1910-part-7-reporting-and-compliance/ https://www.niallbrady.com/2019/11/12/a-quick-look-at-reporting-in-mbam-integrated-with-microsoft-endpoint-manager-configuration-manager/ if these don't help you see your bitlocker reports then let us know
-
how are you deploying the batch file ? have you checked the execmgr.log ?
-
this method guides you through setting up a pki infrastructure as described, it does not cover what you are looking for however i'm sure once you are done setting this up, that setting up the remaining disaster recovery options will be doable, ask a PKI expert before you take on the task.
- 2 replies
-
- 1
-

-
- co-mangement
- ca
- (and 12 more)
-
Is it possible to reload existing Hyper-V VM's after OS reload?
anyweb replied to learningmode's question in Hyper V
ok great, now i'd recommend you export the virtual machines to a backup USB drive or another external drive regularly -
yes of course i have another trigger that does that, i'll share the code tomorrow
-
aha ! i'm glad you found it !
-
what does your smsts.log file tell you, it should explain why it's pulling content from each dp...
-
Cybercrime remains one of the biggest threats worldwide, according to a new report from email cloud security and backup provider Hornetsecurity. The Cyber Threat Report Edition 2021/2022 details the latest insights and data on the current threat situation with a focus on email communication. The report examines the development of spam and advanced threats, shows which industries are most under threat, and identifies the most frequently used cyberattack methods. It also reviews the most crucial cybercrime-related events of the past year. 40% of all incoming emails pose a potential threat As the primary means of communication for business, email is one of the main gateways for cybercrime and remains a prime attack vector. Threat researchers at the Hornetsecurity Security Lab found that 40% of all inbound emails out of the total email traffic during the research period posed a potential threat. This includes spam, phishing emails, and advanced threats such as CEO fraud and any type of malware. Phishing, malicious links, and ransomware are among the most popular attack tactics used by hackers. “Brand impersonation” is especially popular. For this, cyber criminals copy a company‘s corporate design and mimic the sender address in such a way that it can hardly be distinguished from the original, genuine email address. The main aim is to obtain the user’s access data or to spread malware via hidden links. At 16.5%, Deutsche Post and DHL are among the top five most frequently imitated brands. In addition to this and other insights about the current state of global cybercrime, the Cyber Threat Report Edition 2021/2022 also provides an outlook on further possible developments. Get your free copy of the Cyber Threat Report today, and access all data, figures, and visuals!

-
take a look at this it might give you some ideas
-
Is it possible to reload existing Hyper-V VM's after OS reload?
anyweb replied to learningmode's question in Hyper V
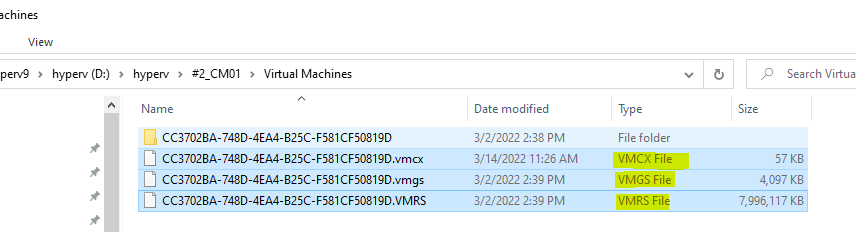
nope you don't need to export, it's all down to what is in C:\ProgramData\Microsoft\Windows\Hyper-V which is where by default hyper-v stores it's configuration info about virtual machines, now is the time for you to change how you create virtual machines and modify that path to store the configuration in the same folder as each vm.. like this... otherwise that info will be stored in the default path on C:\ and if you lose that partition all that info will be lost at least that's my guess (in your case) can you check your vm's and see do you see any files like this ?>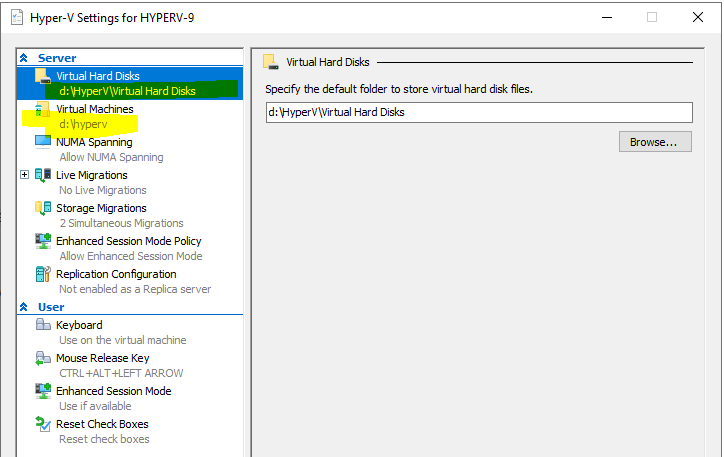
-
well if you'd like to zip up all the logs on a client that switched in C:\Windows\CCM\logs and make them available for me in onedrive (pm me a link) I can take a look
-
Is it possible to reload existing Hyper-V VM's after OS reload?
anyweb replied to learningmode's question in Hyper V
have you tried using the import option in hyperv, point it to the folder where you have the original vms and let it do the magic, this will only work if you had ALL the files in that location, for example D:\Hyperv\vm1 and so on, by default, unless you change it hyper-v usually tries to store some snapshot and other configuration info in C:\ProgramData\Microsoft\Windows\Hyper-V if i'm not mistaken... so if you haven't got a backup of that it might be difficult