anyweb
-
Posts
9277 -
Joined
-
Last visited
-
Days Won
371
Everything posted by anyweb
-
ok have you updated Server 2016 with the latest patches from windows update ?
-
is WSUS separate from Configuration Manager ? what version of Windows Server is it running on ?
-
 Introduction I saw an interesting tweet from @brucesaaaa where he talked about issues observed in multiple tenants during Windows Autopilot enrollment with required Win32 apps. The following was seen for required deployments of Win32 apps during Windows Autopilot enrollment: ESP did not flag these apps as required Required apps took hours and hours to install App install output codes (like for reboots) were not working Problem The problem was investigated and narrowed down to the version of Microsoft Win32 Content Prep Tool that the technicians were using to create the Win32 apps. The is very easy to understand as many admins simply download the tool and re-use it over and over. I’m guilty of that too !, the app I created below was created with 1.8.2.0 and the current version is 1.8.3. I’m not sure what version of the app that caused their issues but as soon as they downloaded the latest version and repackaged their apps the problems went away. Analysis I did some checking with a Win32 app I recently created. If you rename the app from it’s original filename.intunewin extension to filename.zip you can extract the contents. Open the detection.xml file in the metadata folder. If you open the XML file in a suitable reader, you can see the version of the tool that it was made with by reviewing the ToolVersion property highlighted below in yellow. If you start the Microsoft Win32 Content Prep Tool (IntuneWinAppUtil.exe) and use a -v it’ll show the version info. IntuneWinAppUtil -v I guess that Microsoft could force that people use the latest and greatest version of their tool by scanning that detection.xml file prior to accepting the file. Or at the very least inform the user of possible problems if they choose to ignore the fact. This should bypass any issues caused by using older versions of the tool to package the Win32 App. Interesting problem, let’s see where it goes ! cheers niall
 -
i'm using the most up to date windows 11 and my taskbar doesn't autohide, i'd imagine lots of people would complain if that did happen without their involvement
-
i've never noticed that, are you sure you are not setting some policy/registry key for that ?
-
that's not how I read it, I interpret the docs mentioned above as you need to install the DP role on a computer in the untrusted forest, and open ports to allow for communication back to the trusted forest
-
I think this covers it.. Primary sites support the installation of site system roles on computers in remote forests. When a site system role accepts connections from the internet, as a security best practice, install the site system roles in a location where the forest boundary provides protection for the site server (for example, in a perimeter network). To install a site system role on a computer in an untrusted forest: Specify a Site System Installation Account, which the site uses to install the site system role. (This account must have local administrative credentials to connect to.) Then install site system roles on the specified computer. Select the site system option Require the site server to initiate connections to this site system. This setting requires the site server to establish connections to the site system server to transfer data. This configuration prevents the computer in the untrusted location from initiating contact with the site server that's inside your trusted network. These connections use the Site System Installation Account. To use a site system role that was installed in an untrusted forest, firewalls must allow the network traffic even when the site server initiates the transfer of data. Additionally, the following site system roles require direct access to the site database. Therefore, firewalls must allow applicable traffic from the untrusted forest to the site's SQL Server: Asset Intelligence synchronization point Endpoint Protection point Enrollment point Management point Reporting service point State migration point For more information, see Ports used in Configuration Manager.
-
if the other forest is untrusted: Install site system roles in that untrusted forest, with the option to publish site information to that Active Directory forest To use a site system role that was installed in an untrusted forest, firewalls must allow the network traffic even when the site server initiates the transfer of data. When a two-way forest trust exists, Configuration Manager doesn't require any additional configuration steps.
-
start here https://docs.microsoft.com/en-us/mem/configmgr/core/plan-design/hierarchy/communications-between-endpoints#bkmk_noforesttrust if you can't find what you need please explain what is missing
-
With the shift in the computing paradigm to the cloud, the Azure ecosystem is quickly becoming a critical platform for IT pros to grasp and adopt. But how do you make the leap while maintaining security, manageability, and cost-control? Whether you’re making new VMs directly in the cloud, have VMs in your own datacenter and are looking to migrate to Azure, or you’re looking to manage VMs with cloud-based tools regardless of where they live, The SysAdmin Guide to Azure Infrastructure as a Service (Iaas) will teach you to set up and maintain a high-performing Azure IaaS environment. Written by veteran IT consultant and trainer Paul Schnackenburg, Altaro’s free 100+ page second edition eBook covers how to create VMs, size them correctly, and manage storage, networking, and security, along with backup. You’ll also learn how to operate groups of VMs, deploy resources based on templates, manage security, and automate your infrastructure. There are also two new chapters on Automanage and Azure Arc to help you bring a lot of automation to IaaS, all lessening the burden on your time. One thing that has changed significantly over the past couple of years is the shift towards making IaaS VMs more like PaaS services. VMs are great but they require a lot of maintenance and care, whereas all the business is really interested in are the applications and data that run inside of them. This explains the popularity of PaaS services such as managed Kubernetes (AKS) and Azure Functions (serverless). If you’re new to the cloud (or have experience with Amazon Web Services and/or Google Cloud Platform but not Azure) this eBook will cover the basics as well as advanced skills. And given how fast things change in the cloud, it covers the why (as well as the how) so that as features and interfaces are updated, you’ll know how to proceed. Make the cloud work for you - download your free copy today!
-
Azure AD joined device is not enrolling into Intune
anyweb replied to learningmode's topic in Microsoft Intune
did the event logs reveal anything about the problem ? -
How can I renew an expired secret in an Azure Function app
anyweb posted a topic in Microsoft Intune
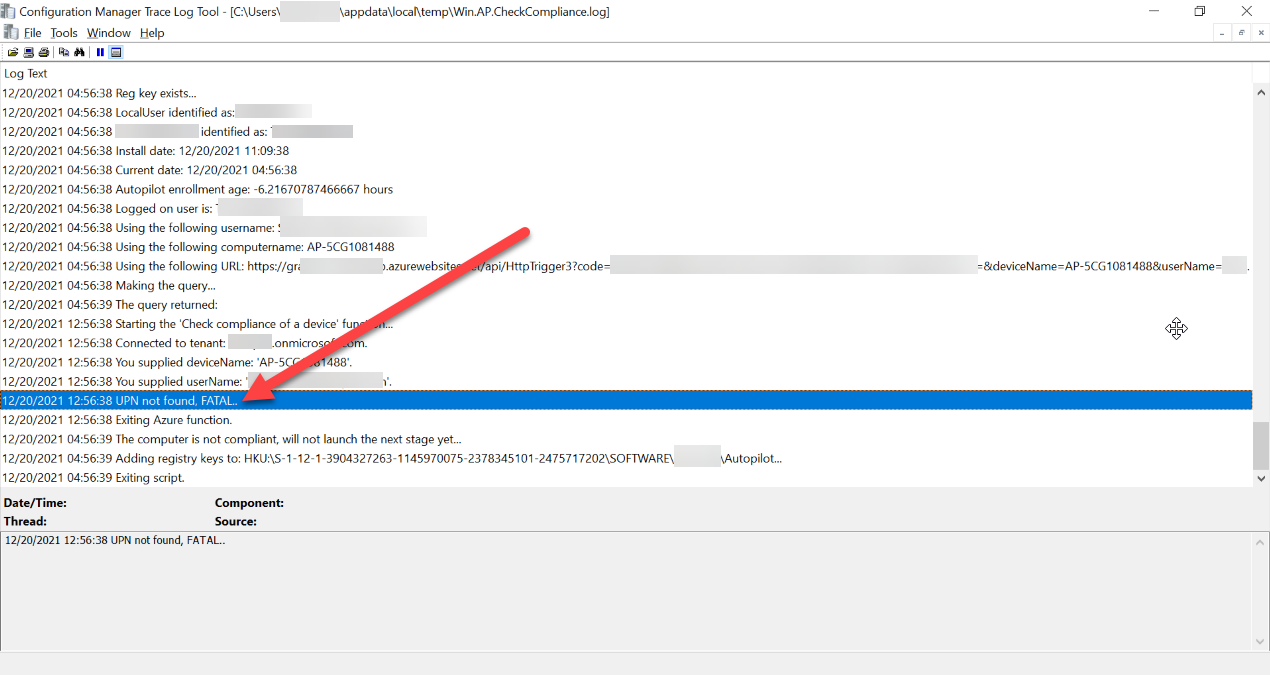
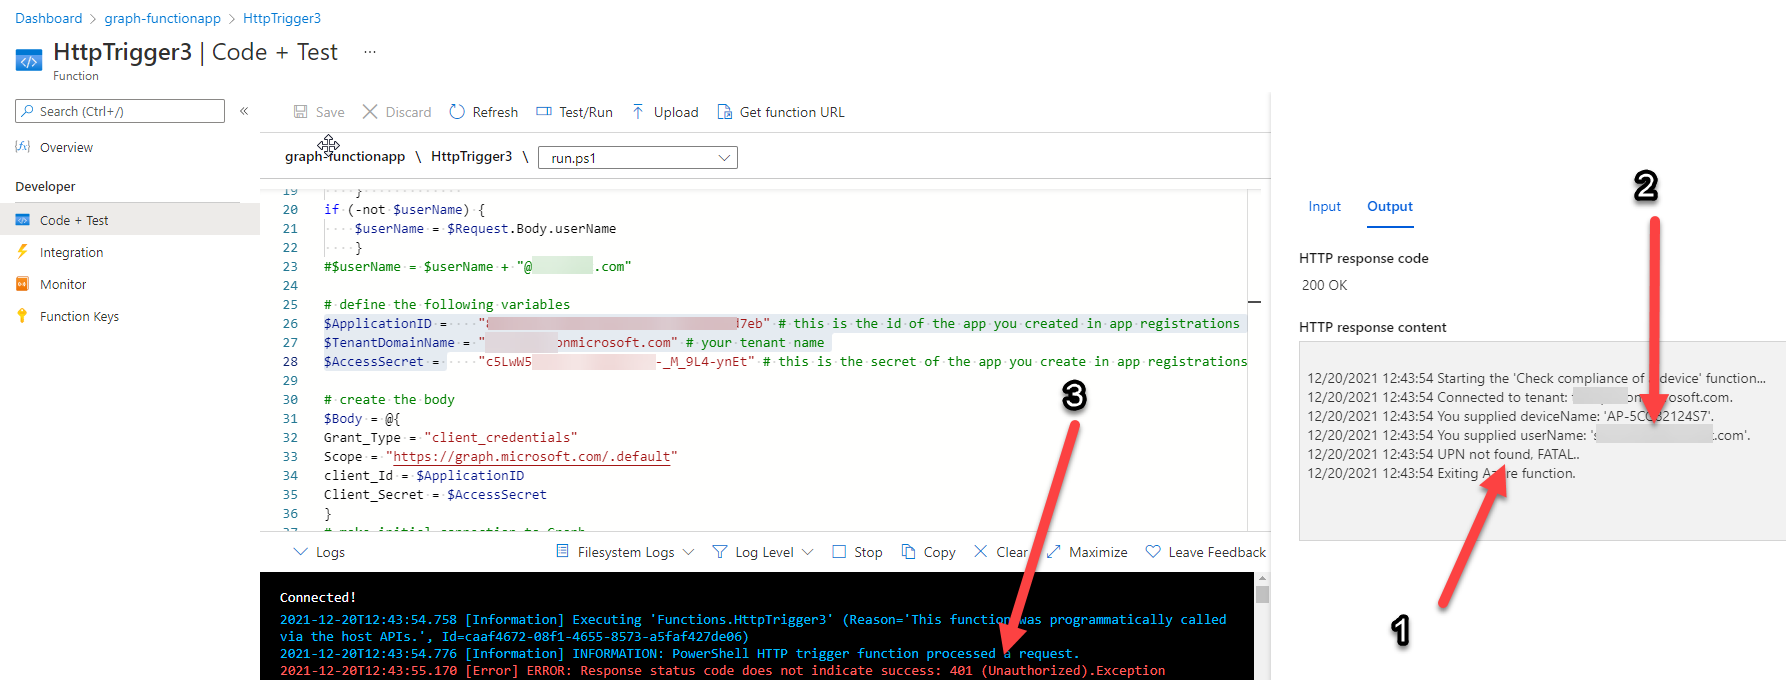
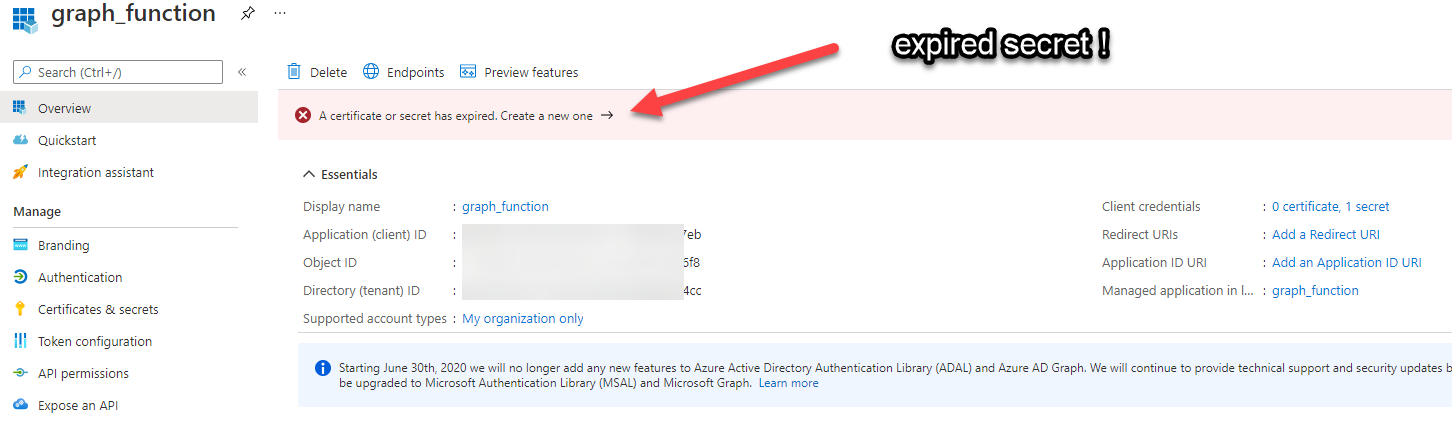
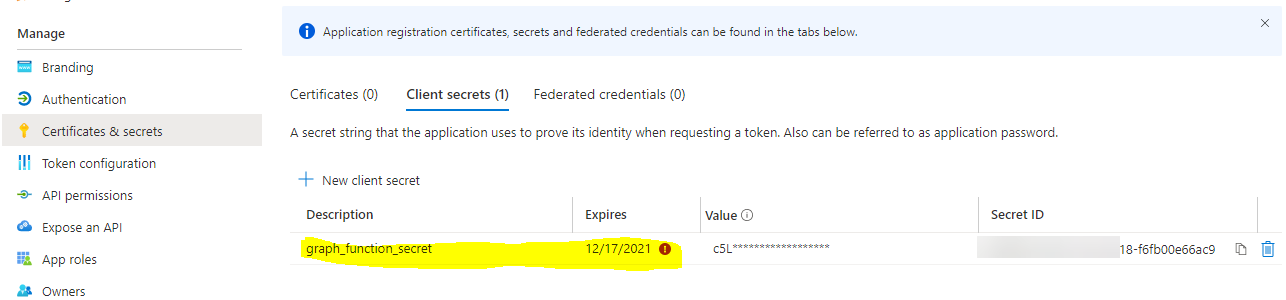
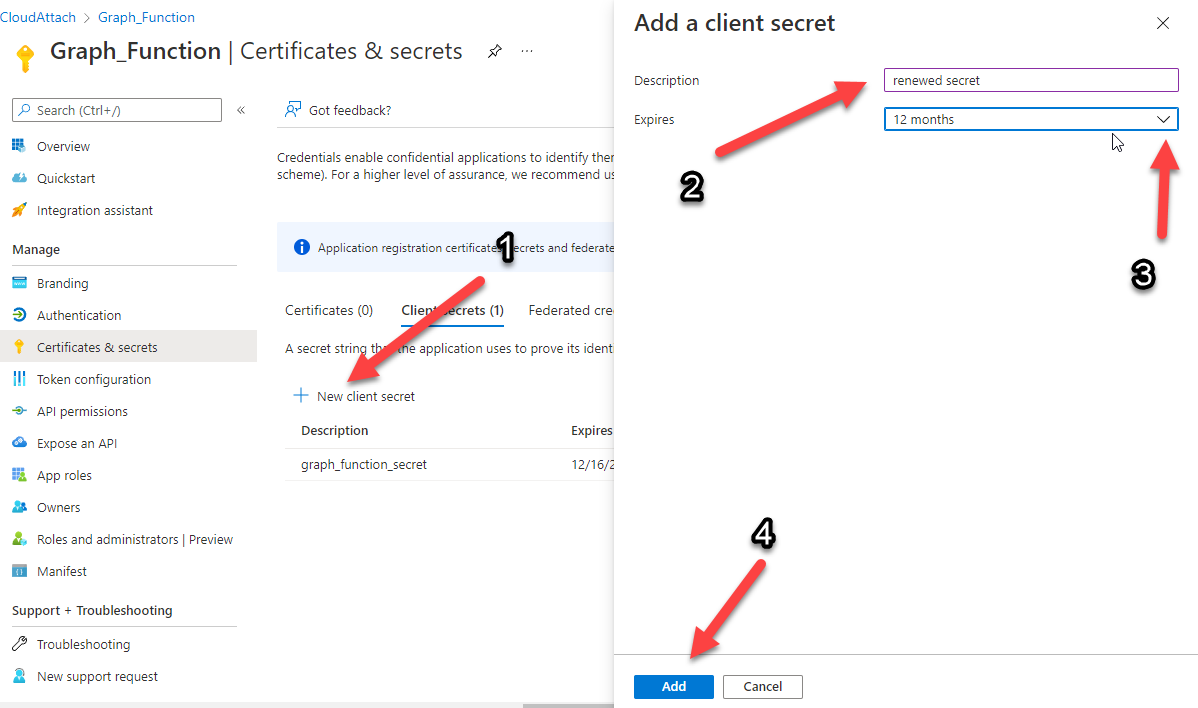
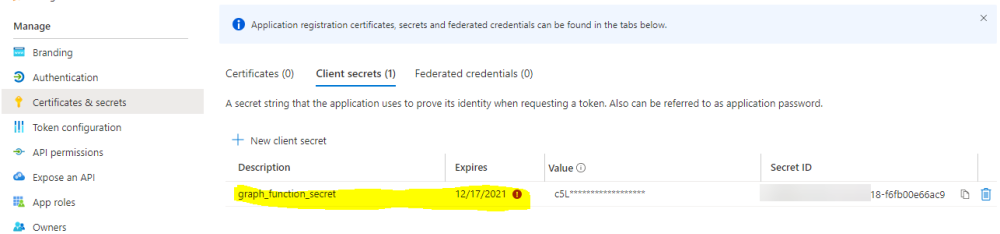
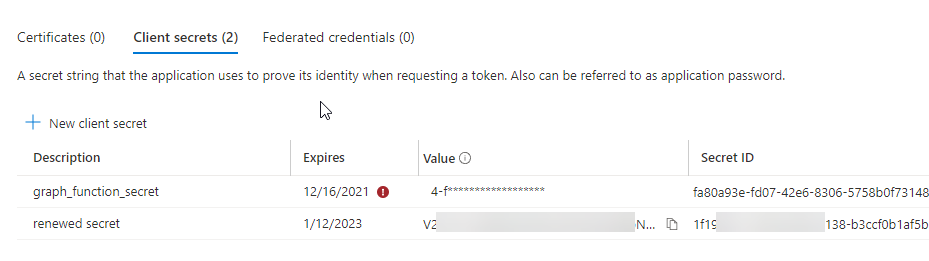
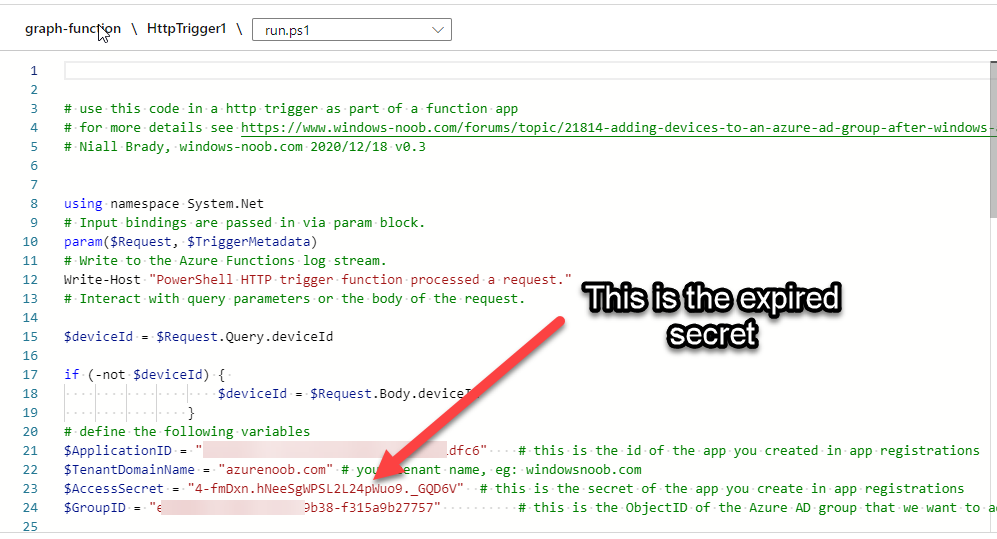
Introduction If you've been looking at my guides, you'll know that I've used httptriggers in functionapps to add functionality to Windows Autopilot, below are some examples of that. Adding devices to an Azure AD group after Windows Autopilot is complete - part 1 Adding devices to an Azure AD group after Windows Autopilot is complete - part 2 Gathering logs and sending an email when resetting Windows Autopilot - part 1 Gathering logs and sending an email when you need to reset Windows Autopilot - part 2 Gathering logs and sending an email when you need to reset Windows Autopilot - part 3 Adding devices or users to an Azure AD group after Windows Autopilot is complete but only when the device is marked as Compliant Using the updated & secure Retire My PC app via Company Portal These work great, but for security reasons the secret attached to the function app itself will expire (after 6 months by default) and should be renewed before that time. Trust me, I learned the hard way. Discovering the problem You might forget to renew the secret and that's when you'll notice things not behaving the way they should. I first became aware of the problem before Christmas, I came into work on the Monday, and kicked off some Windows Autopilot installs but they didn't work correctly. I noticed that the triggers responsible for adding devices to Azure AD groups after Windows Autopilot is complete, but only when the device is marked as compliant were no longer working. I started my investigation on a client with the issue, and the following was reported in the log file. One line jumped out at me, UPN not found, FATAL. Yeah, that doesn't sound good. I then logged into Azure and found the trigger responsible. I fed it with some known good values and looked at the output. The first thing to note is it output the same error (1), even though I supplied a known good UPN (2). Therefore, I knew the error UPN not found, FATAL was a red-herring. I also noticed that there were error code 401 (unauthorized) in the console output (3). That was my first clue ! Next, I select App Registrations in Azure Active Directory, selected the Graph_function app and was greeted with a red error on top showing me that a certificate or secret had expired. Clicking on Certificates and secrets, showed the expired secret. Fixing expired secrets Now that I identified the problem, it was time to fix it. In the Certificates & secrets section, click on + New client secret (1), give it a suitable name (2), select when it expires from the drop down menu (3) and finally Add it (4). The new secret will appear. Notice the expiry date. Now, copy the new secret value. Next, locate the trigger(s) that use the previous secret. It's stored as $AccessSecret in my httptrigger examples. Replace that expired value with the value you copied from the newly created secret and then save your changes. Job done ! Repeat the above exercise for each trigger that uses the expired secret. Conclusion Nothing lasts forever, especially secrets. Now that you know how to renew your expired secrets, maybe it's a good idea to look at your app registrations and take note of when they expire, and pro-actively renew them before they expire next time ! If you'd like to automate that take a look at Peter Klapwijk's post here.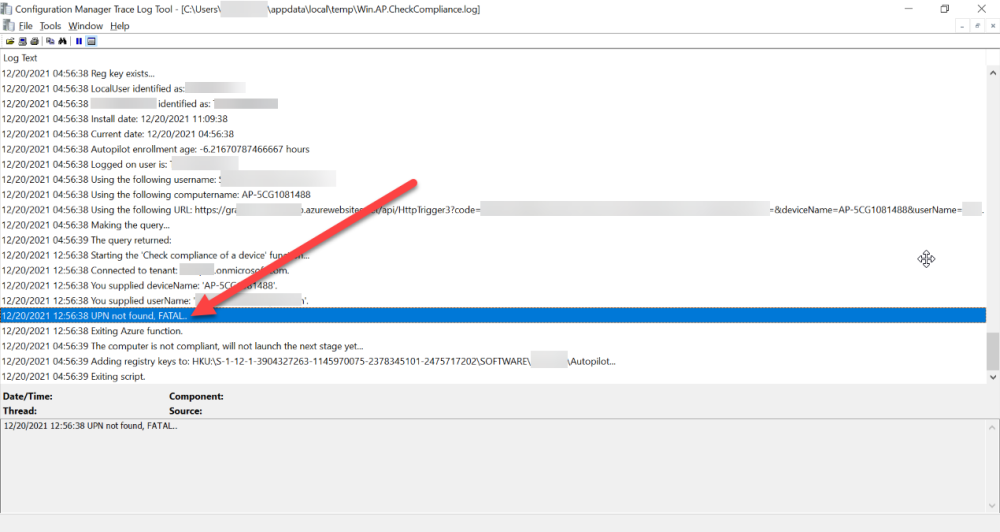


-
interesting, did you raise a microsoft case to determine this ?
-
Windows 10 20H2 RSAT tools are failing to install from FOD
anyweb replied to lalajee's question in Windows 10
here's the error, verify that the source files are in the locations specified in your -source path, Add-WindowsCapability : The source files could not be found. -
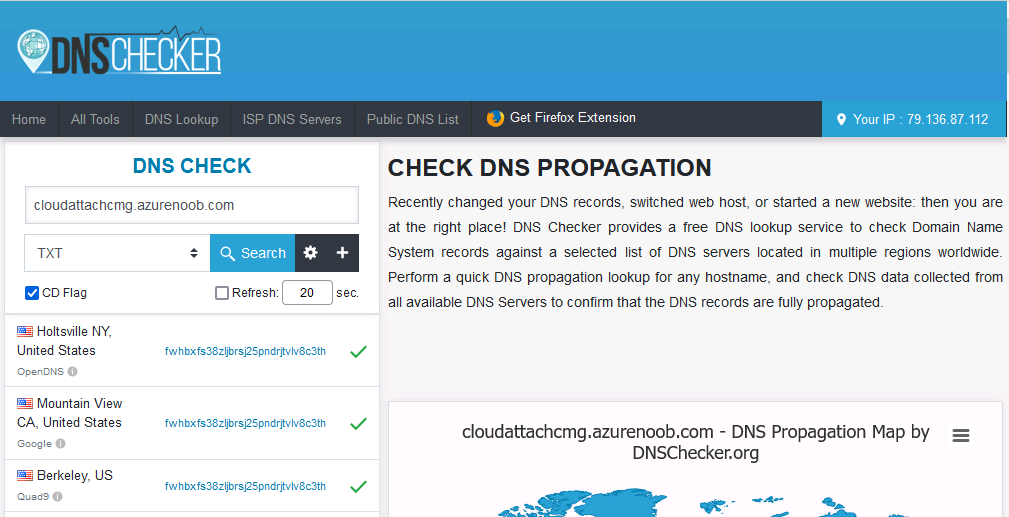
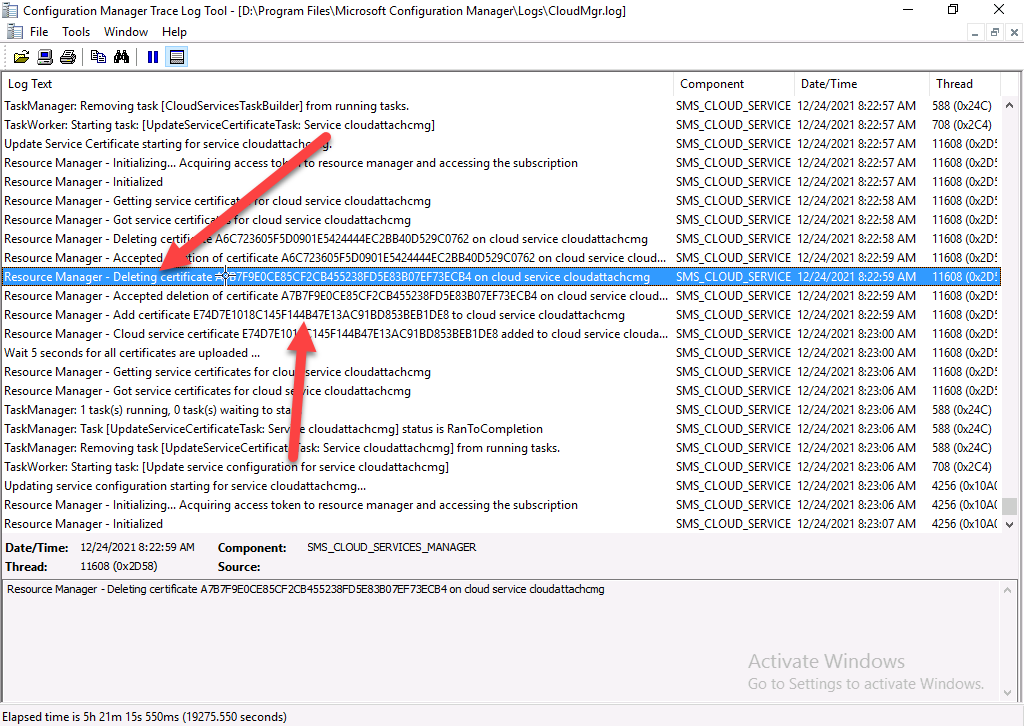
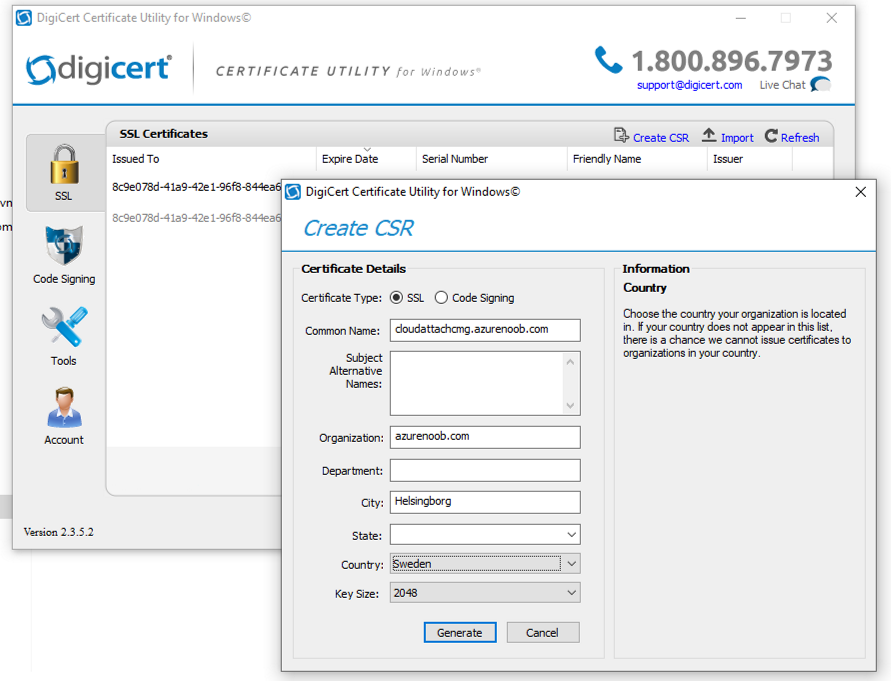
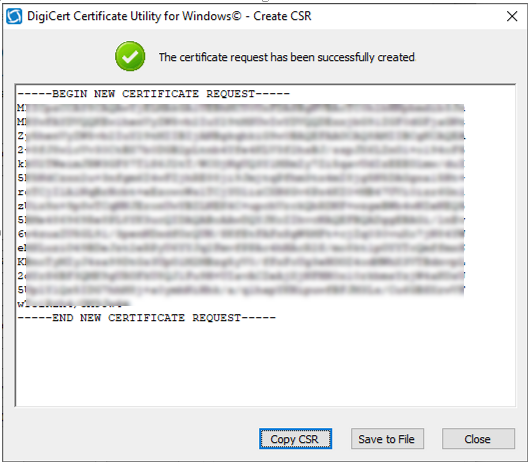
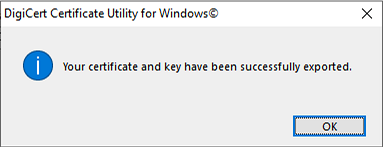
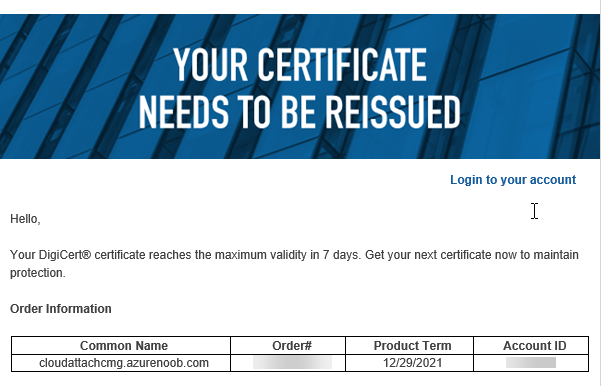
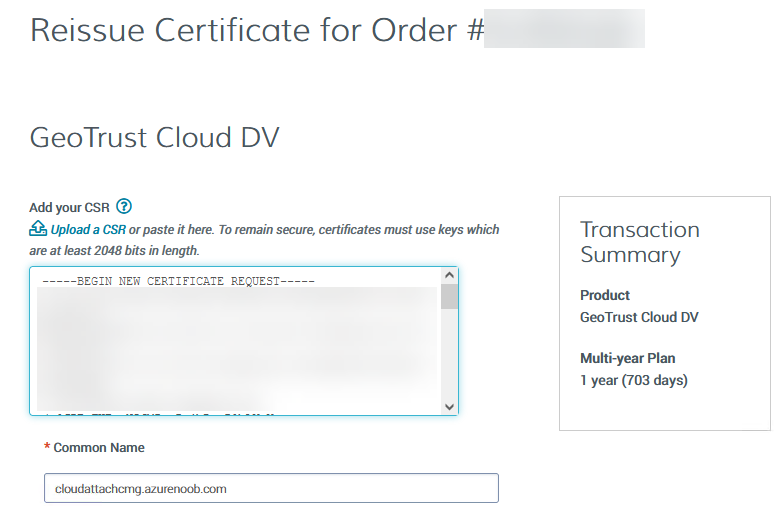
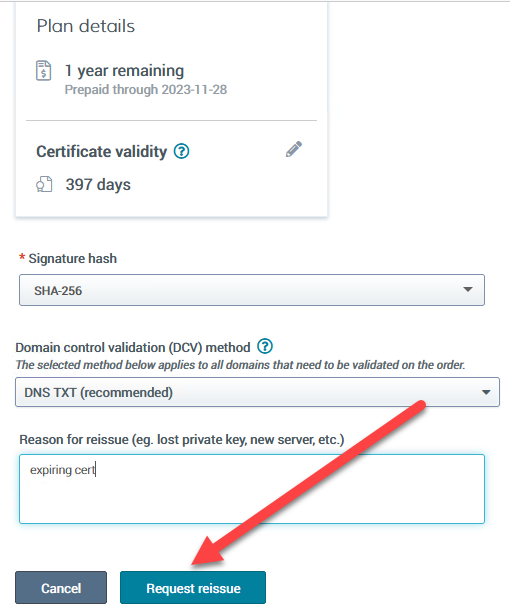
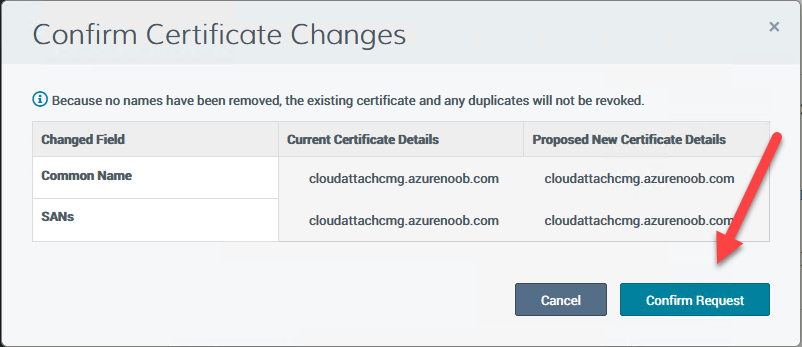
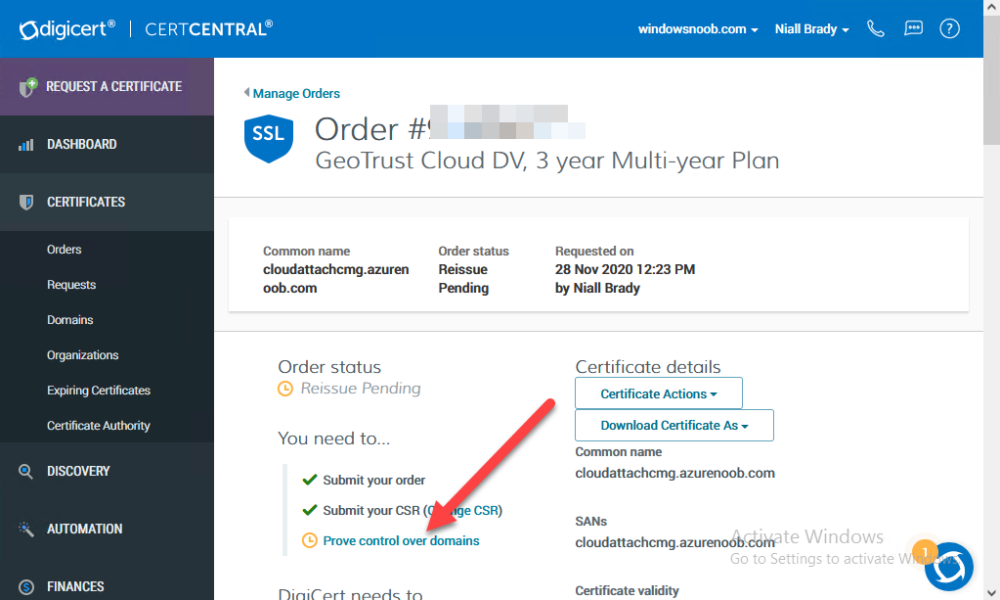
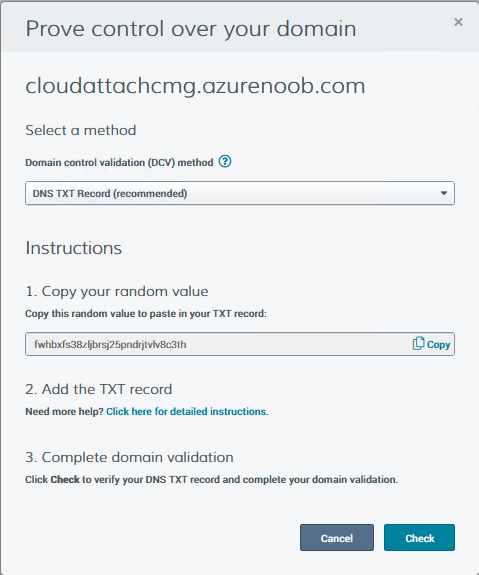
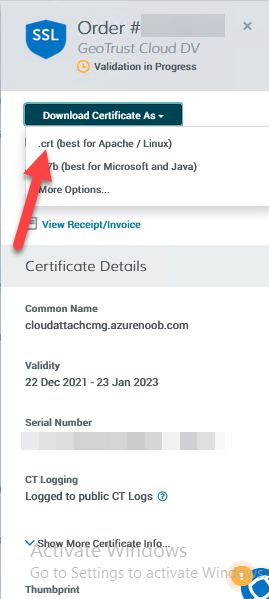
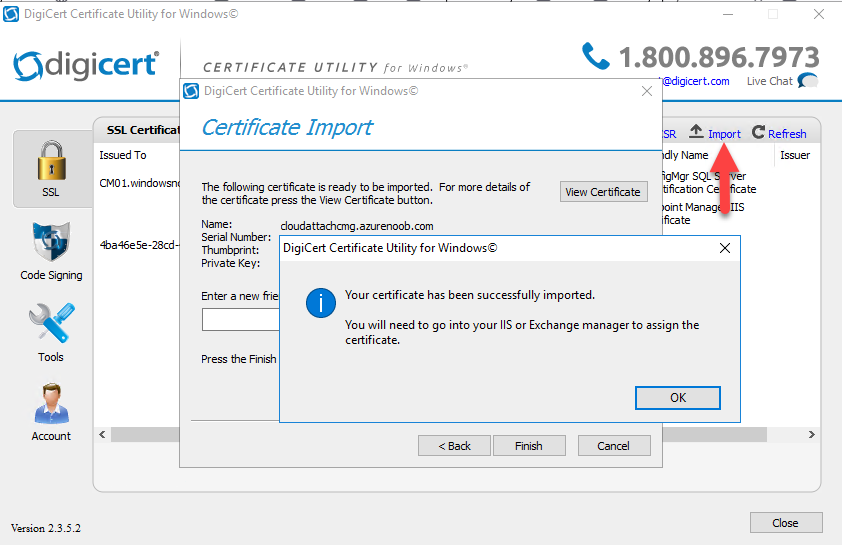
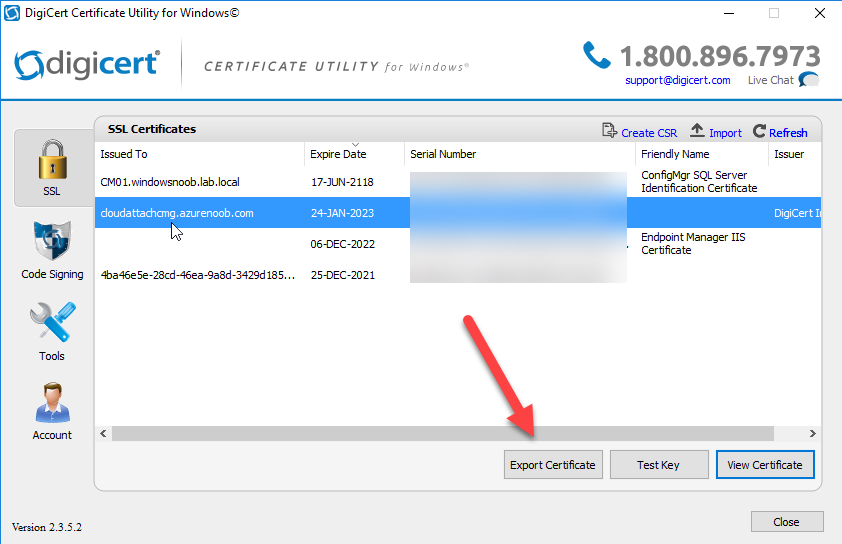
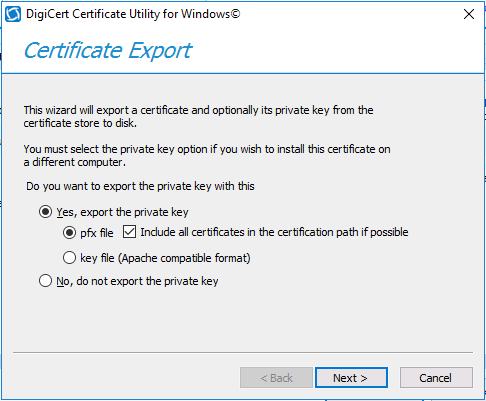
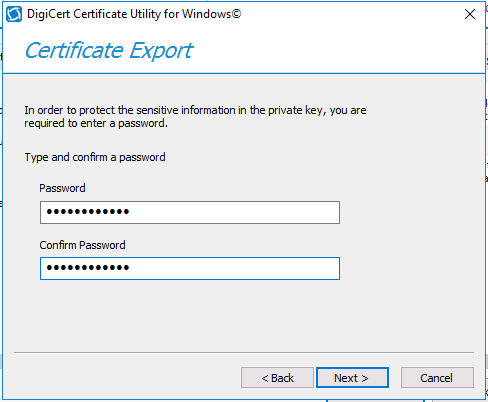
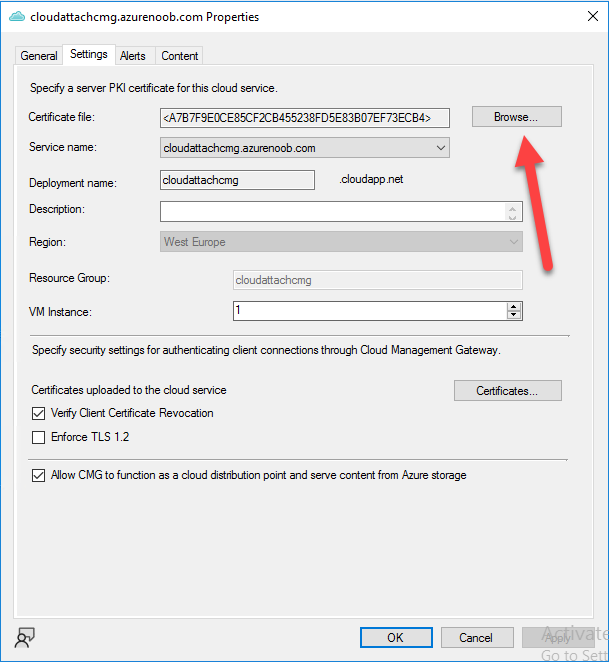
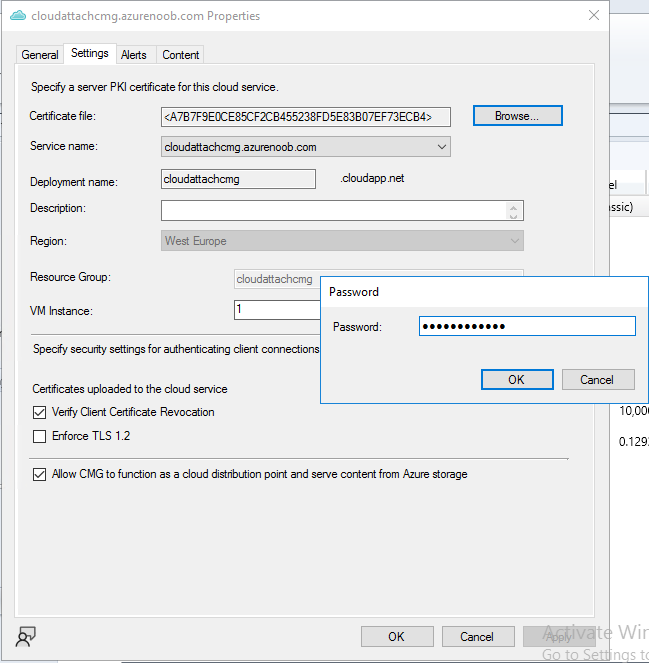
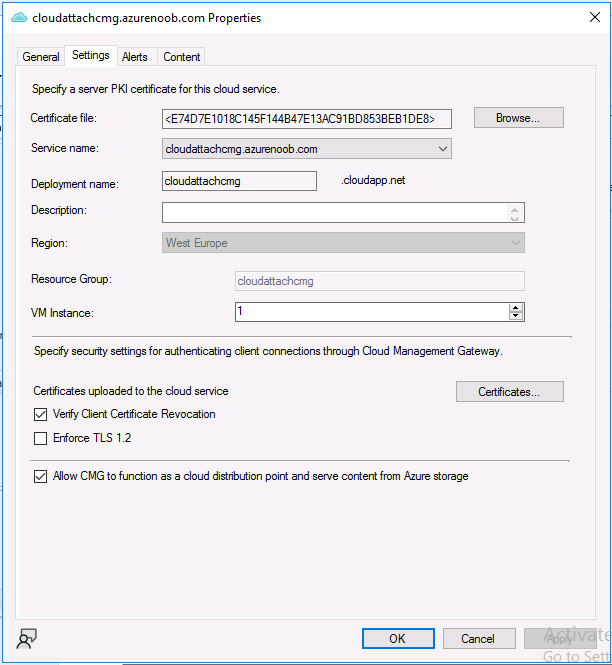
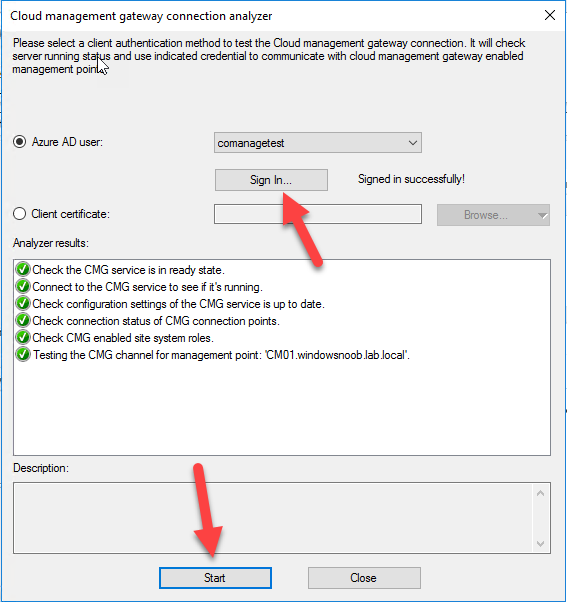
Introduction This is part 9 in a series of guides about cloud attach in Microsoft Endpoint Manager, with the aim of getting you up and running with all things cloud attach. This part will focus on renewing expiring certificates. This series is co-written by Niall & Paul, both of whom are Enterprise Mobility MVP’s with broad experience in the area of modern management. Paul is 5 times Enterprise Mobility MVP based in the UK and Niall is 11 times Enterprise Mobility MVP based in Sweden. In part 1 we configured Azure AD connect to sync accounts from the on premise infrastructure to the cloud. In part 2, we prepared Azure resources for the Cloud Management Gateway, in part 3 we created the cloud management gateway and verified that everything was running smoothly. In part 4 we enabled co-management. With co-management, you retain your existing processes for using Configuration Manager to manage PCs in your organization and you gain the additional advantage of being able to transfer workloads to the cloud via Endpoint Manager (Intune). In part 5 we enabled the compliance policies workload and reviewed how that affected a co-managed computer. In this part we will enable conditional access and see how that can be used to deny access to company resources. In part 6 we configured conditional access and used it to deny access to company resources unless the device was encrypted with BitLocker. In part 7 we showed you how to co-manage Azure AD devices. In part 8 we enabled Tenant Attach and looked briefly at it's features. In this part we'll renew a soon to be expired certificate which we created about a year ago in part 2. Below you can find all parts in this series. Cloud attach - Endpoint Managers silver lining - part 1 Configuring Azure AD connect Cloud attach - Endpoint Managers silver lining - part 2 Prepare for a Cloud Management Gateway Cloud attach - Endpoint Managers silver lining - part 3 Creating a Cloud Management Gateway Cloud attach - Endpoint Managers silver lining - part 4 Enabling co-management Cloud attach - Endpoint Managers silver lining - part 5 Enabling compliance policies workload Cloud attach - Endpoint Managers silver lining - part 6 Enabling conditional access Cloud attach - Endpoint Managers silver lining - part 7 Co-managing Azure AD devices Cloud attach - Endpoint Managers silver lining - part 8 Enabling tenant attach Cloud attach - Endpoint Managers silver lining - part 9 Renewing expiring certificates <- you are here Cloud attach - Endpoint Managers silver lining - part 10 Using apps with tenant attach A certificates validity is set in stone when it's created, and as time passes the certificates validity will eventually expire. When a certificate expires, anything that relied on it to approve communication will no longer work, so keeping a close eye on your certificates validity and noting when they expire is a good practice to avoid any disruption to services within your organization. Note: The Configuration Manager console (as of ConfigMgr version 2111) does NOT keep you alerted of the expiring certificate, so you'll have to keep track of it yourself by paying attention to those emails from your certificate provider. Digicert does however notify you by email about the coming expiration, at 90 days, 30 days and 7 day intervals. Step 1. Create a new CSR Note: You should avoid using the CSR generated during the initial certificate creation, as this is not secure and can compromise your SSL certificate usage. In Part 2 of this series, we downloaded a digital certificate utility from DigiCert for creating a Certificate Signing Request (CSR) but you can do this process on an IIS server see here. A CSR is a block of encoded text that is given to a Certificate Authority when applying for an SSL Certificate. It is usually generated on the server where the certificate will be installed and contains information that will be included in the certificate such as the organization name, common name (domain name), locality, and country. Source Using the tool above (from Digicert, our external SSL certificate provider, there are many to choose from), click on Generate to create the CSR. After generating the CSR, save it to a file. Step 2. Reissue the expiring certificate Next, login to your certificate provider (in this case Digicert) and locate the soon to be expired certificate. To the right click on Reissue Now. In the window that appears paste in the newly generated CSR from step 1. Enter a reason why you want the certificate reissued and then click on Request reissue. Finally, click on Confirm request. At this point, you will see a summary screen like this, take note that to complete the process you'll have to prove ownership of the domain by clicking on Prove control over domains. We chose the option to use a DNS TXT Record (recommended). Copy the TXT record and then login to your Domain Name registrar (eg: godaddy) and select the domain name, then paste in the DNS txt record value, below is the record created from above. Note: If your domain name registrar is GoDaddy or uses the same UI as GoDaddy, you may need to temporarily delete any CNAME that matches the hostname prior to adding the TXT record. After validating the TXT record, you can delete the TXT record and add the CNAME back. This seems to be a bug in their UI. After creating the TXT record you can verify it with dnschecker.org, as shown here, this is helpful in troubleshooting whether your DNS record (TXT, CNAME etc...) is valid or not. Be sure to enter the cloudattachcmg prefix (yours will be different obviously) into the record for the TXT DNS validation otherwise it might have problems finding the TXT record. Step 3. Download the CRT After verifying that you own the domain, you'll be able to download the reissued CRT (certificate) from the certificate provider (eg: DigiTrust). Step 4. Import the CRT Next, import the downloaded CRT back into the Digicert tool by clicking on Import and pointing it to the extracted CRT file in the zip you downloaded. Step 5. Export the pfx Select the Imported certificate, click on Export Certificate choose the option to export pfx You'll be prompted for a password and you'll be informed of the successful export. Step 6. Reconfigure the Cloud Management Gateway In the ConfigMgr console, select Cloud Services and select Cloud Management Gateway. In the CMG properties, choose the Settings tab and click Browse beside the currently expiring PKI certificate Point it to the previously exported PFX file and enter the password when prompted Click Apply, notice that the Certificate File will have changed The CloudMgr.log will record this old certificate deletion and the addition of the reissued certificate. At this point, the hard work is done and your certificate is reissued, and your CMG is reconfigured to use the new certificate. You can verify the CMG is working properly by running the Connection Analyzer. Job done, please join us in the next Cloud Attach blog post, early next year !


-
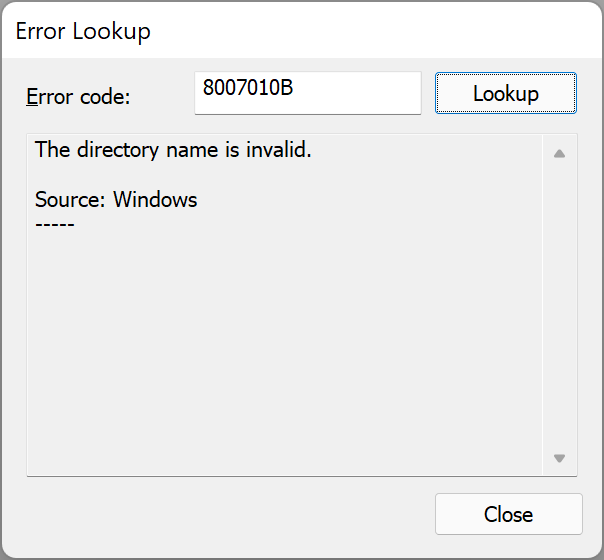
the first problem seems to be this CreateProcessAsUser failed. Code(0x8007010B) which translates to... you could try pressing F8 when the HTA is on screen, and running your powershell script manually to see if that gives any clues, or modify the original script to include logging to capture the exception message to a log file so we see what's actually wrong, that's what i'd do...
-
incorrect function means the script is failing, is the script itself logging to anywhere ? if not, what does smsts.log reveal for this step in the task sequence
-
have you looked at the advice here ? https://social.technet.microsoft.com/Forums/en-US/d8753255-6b98-478c-875e-117358f972f1/mpstatusreceiver-directory-on-wsus-is-80-gb
-
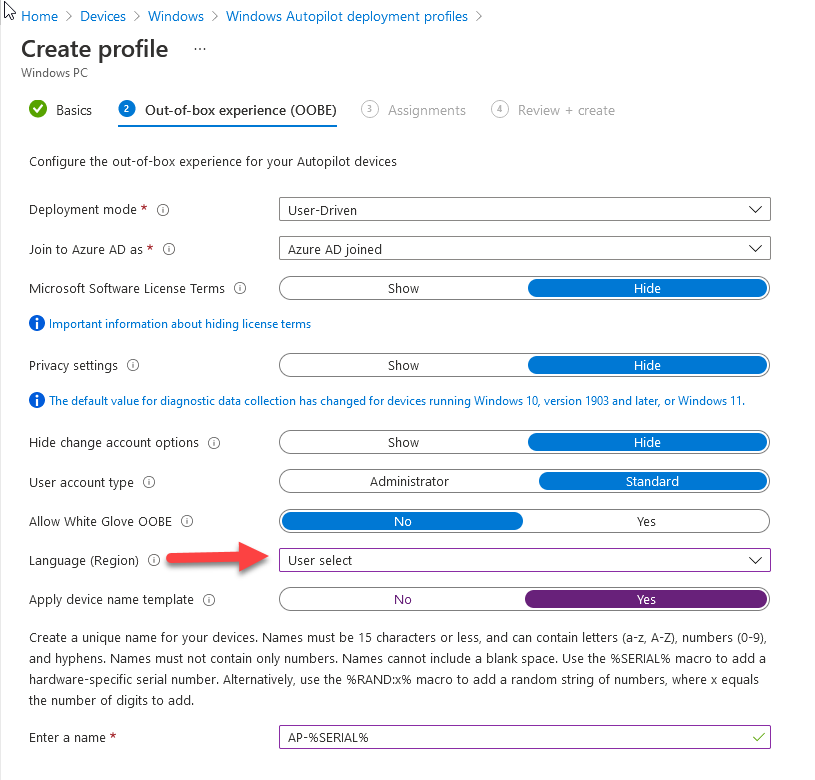
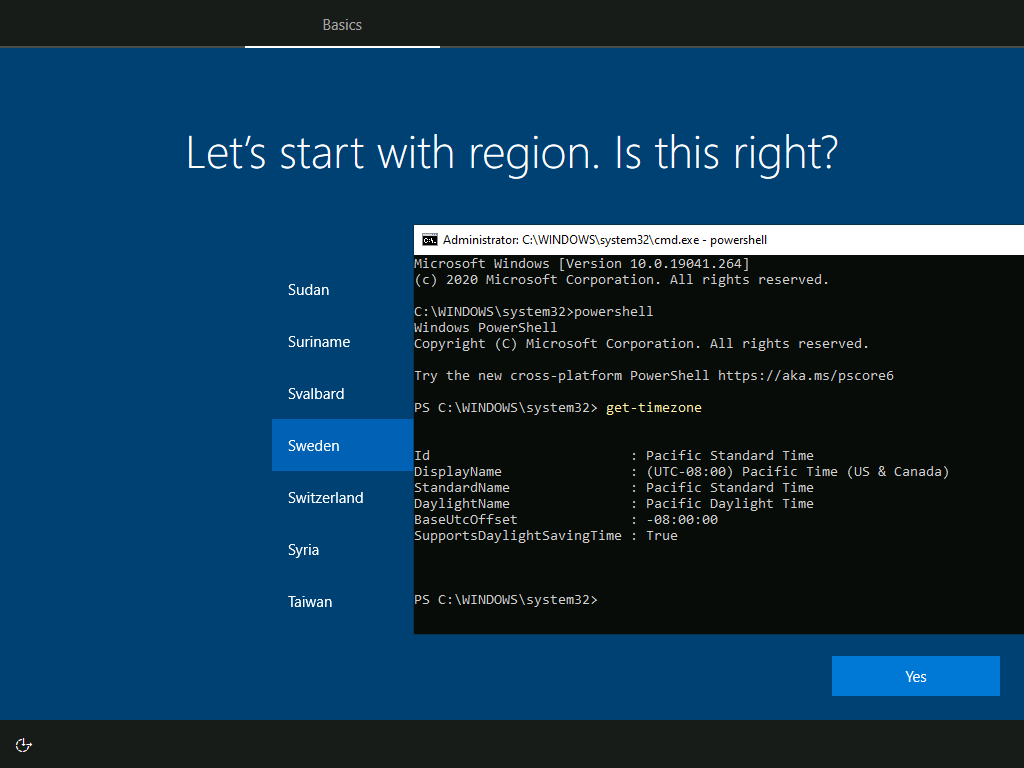
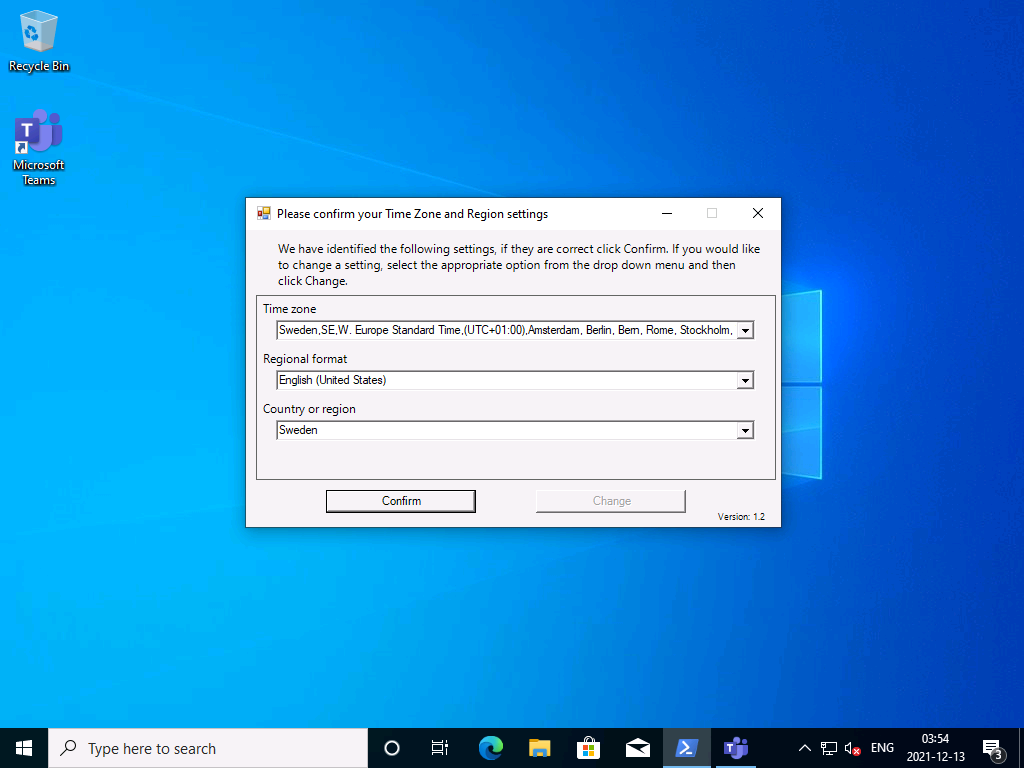
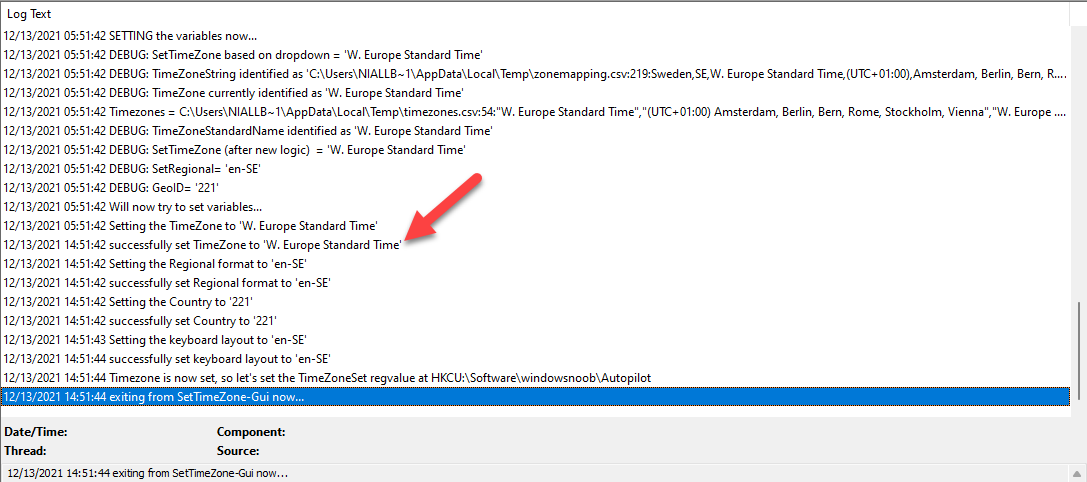
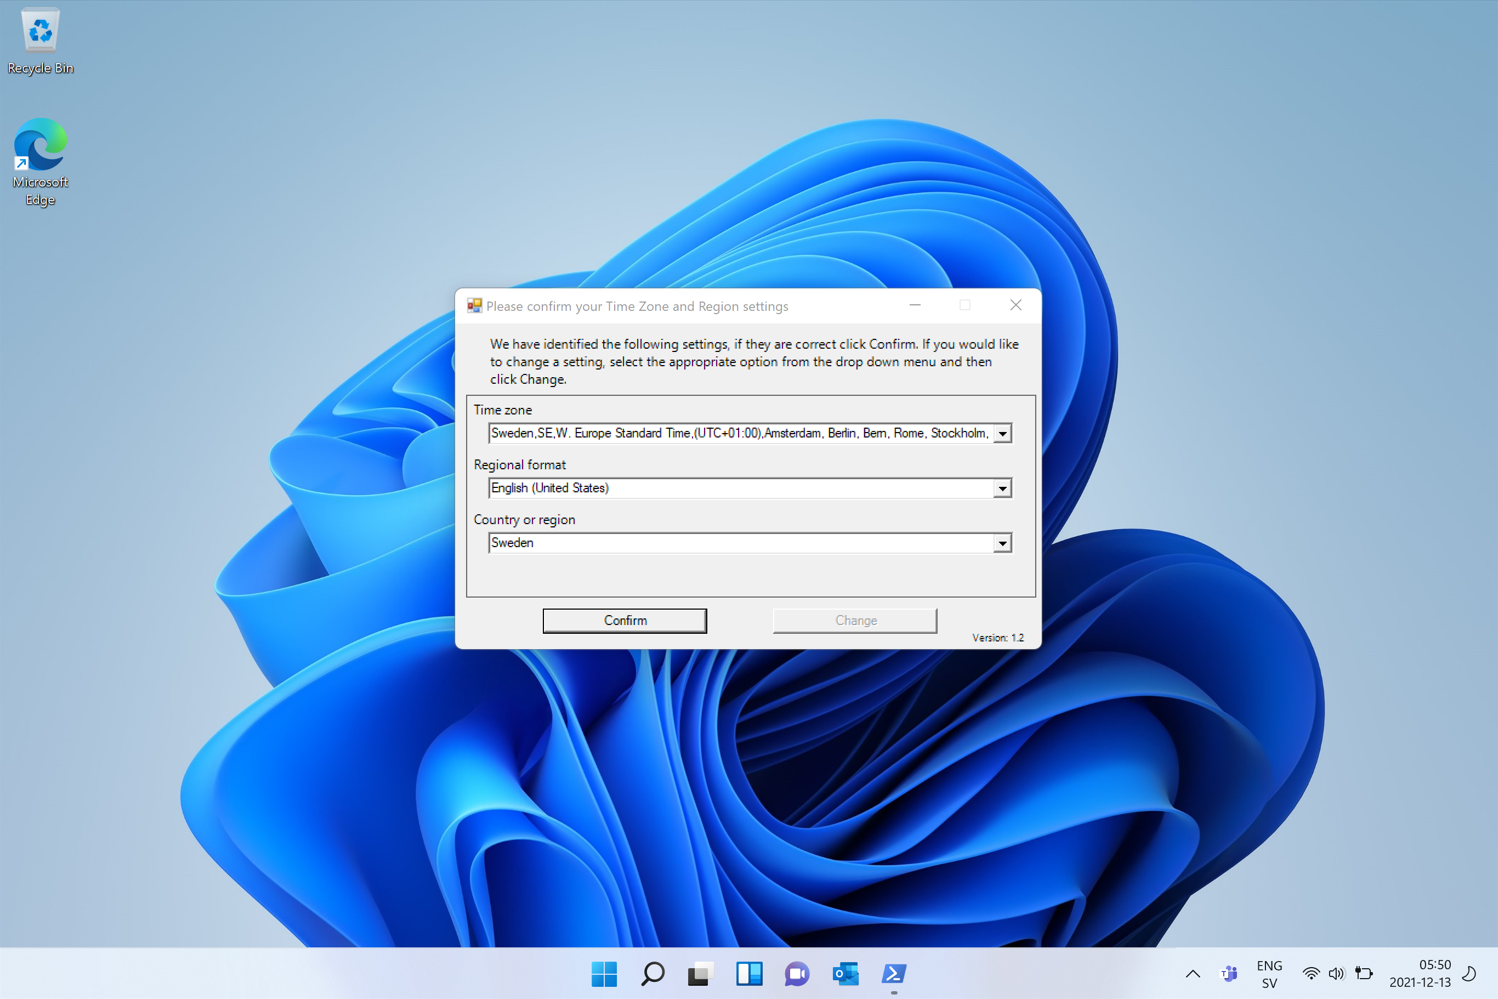
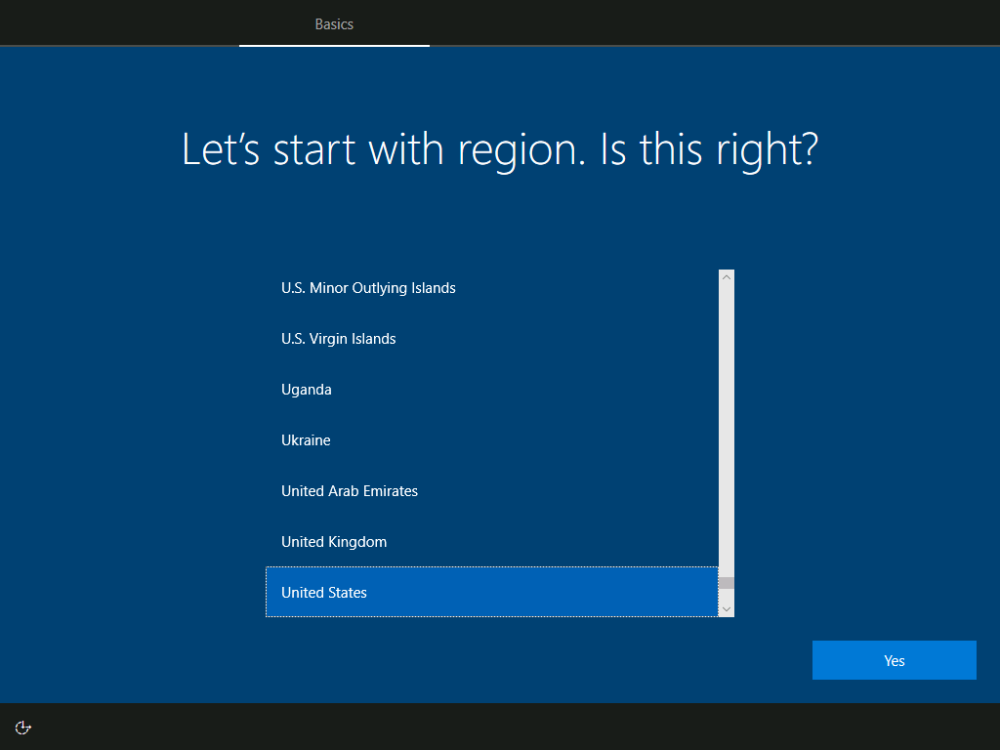
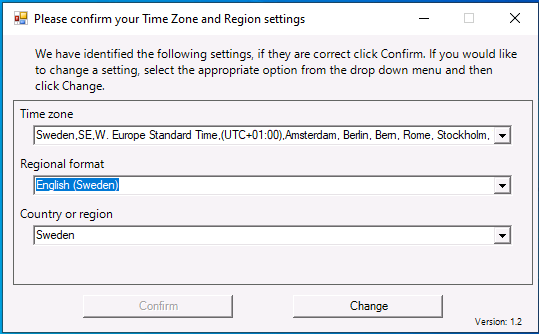
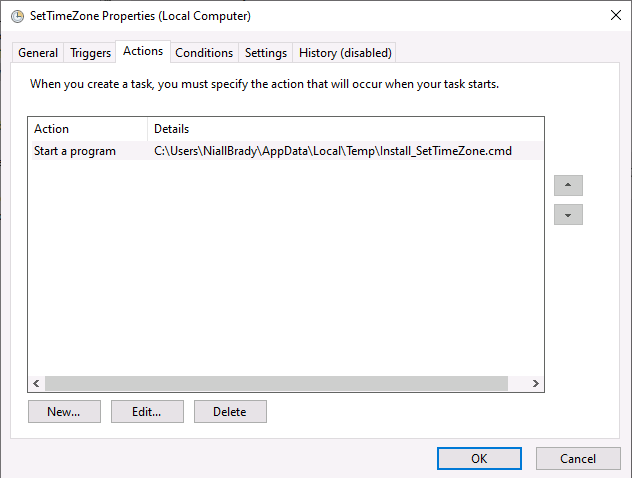
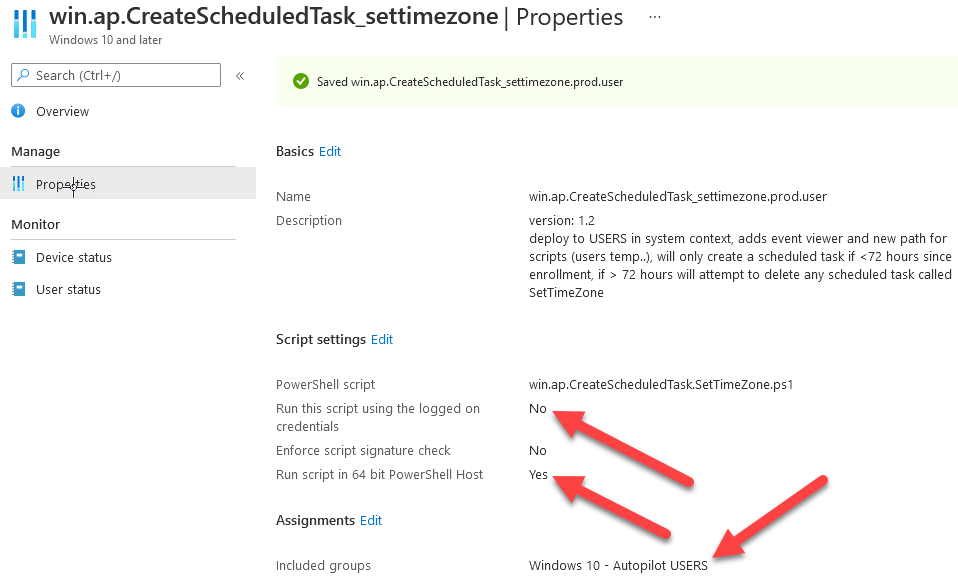
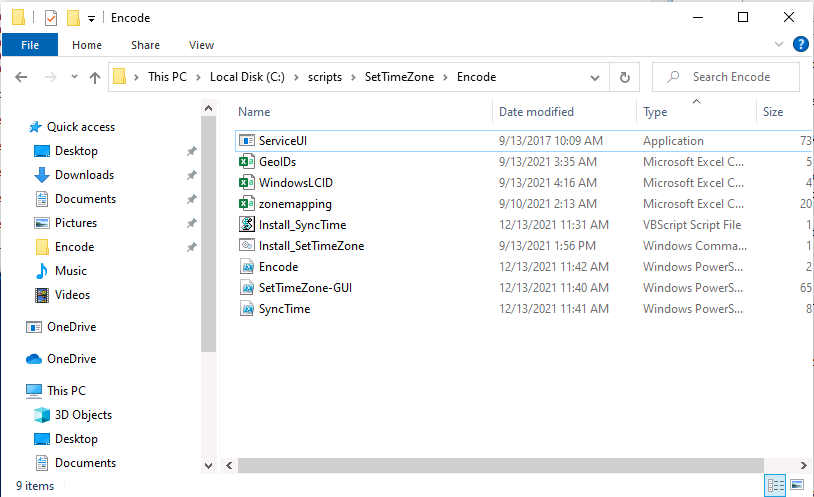
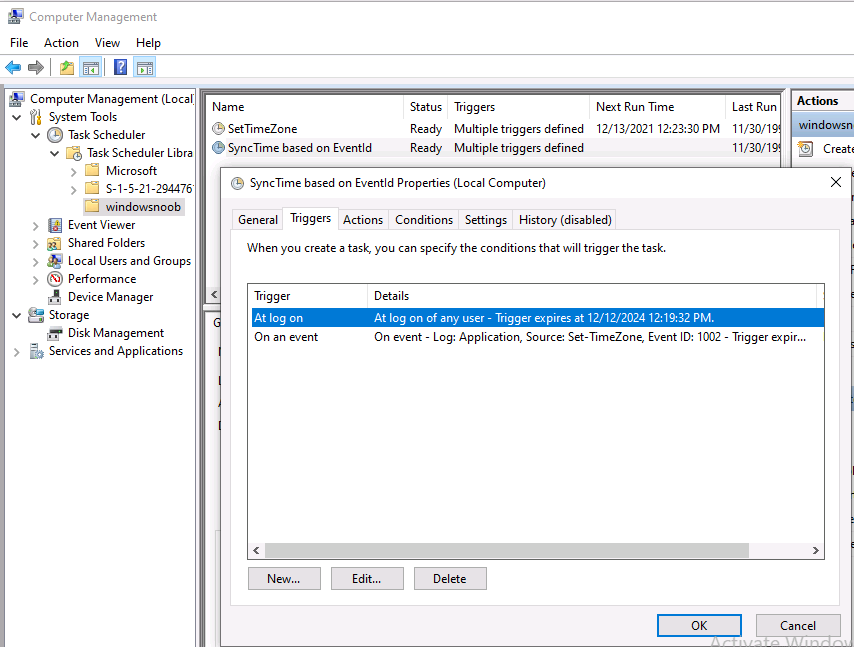
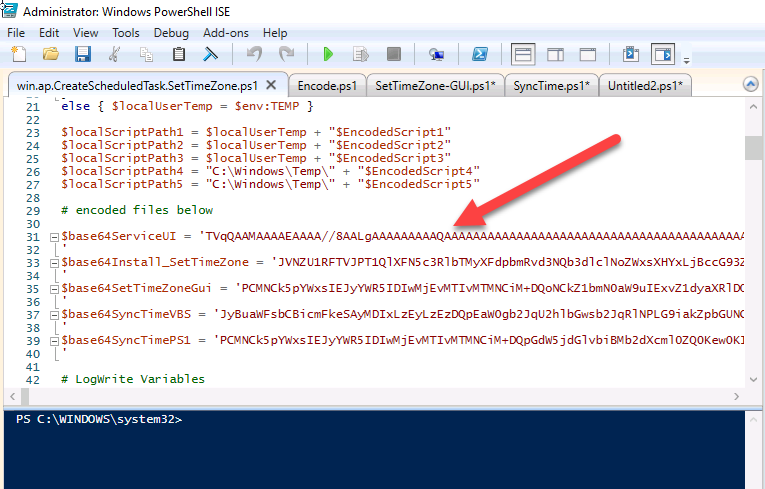
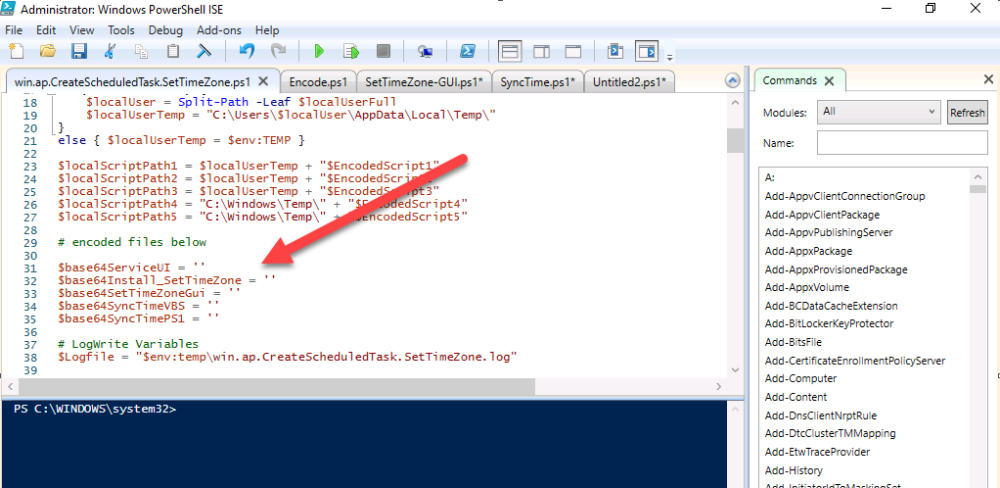
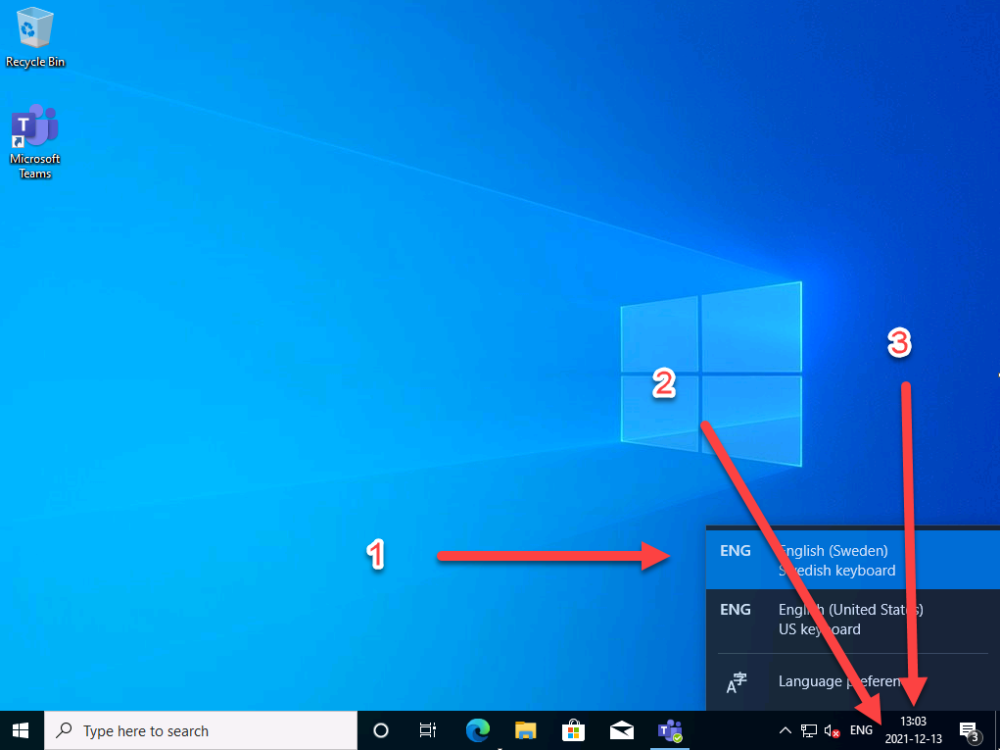
Introduction When users complete Windows Autopilot Out of Box Experience (OOBE), they can be asked to confirm Country and Keyboard settings, based on what is configured in the following Windows Autopilot Deployment Profile settings. Below is the Windows Autopilot deployment profile settings used for this blog post, notice how the User account type is set to Standard. Notice also that the Privacy settings setting is set to Hide. Your users will most likely be used to seeing the region related screens during OOBE, for example: However if you disable Privacy Settings in the Windows Autopilot Deployment profile, even though you might allow users to select Country and Keyboard settings, Windows Autopilot still sets the Time Zone to Pacific Standard Time. You can confirm this behavior by pressing left shift+F10 and typing PowerShell then Get-TimeZone. This Time Zone will apply regardless of what country the user selects. Even if your users are tech-savvy enough to find out where in Windows Settings they need to change these region based settings, if they are a standard user (which they should be in today's security conscious world), changing the timezone may leave them with incorrect time and incorrect regional format settings in the operating system. To fix this you could use Geo location and Azure services as per Nickolaj's post here, provided of course that: Your company allows Geo location Your company is not using any proxies or VPN's that mask the users actual location. This solution is not affected by either of these things, doesn't need local administrative permissions and does not require enabling privacy settings. This solution prompts the end user to confirm (or change) the detected settings, and then uses some back end magic to set everything in place including triggering a time sync. This method works even for standard (non administrator) users. Requirements The method requires that you use the English (En-US) version of Windows 10 as delivered from your OEM. If any other language is applied from the factory then it might cause some of the logic to fail. If you do go down that route, then you'll need to prepare language specific versions of the zonemapping.csv and other files as necessary. So let's get started. You can always install language packs later. Step 1. Get the scripts Note: You can only download these files when logged on as a member of https://www.windows-noob.com Note: Intune has a hard block of 200,000 bytes per PowerShell script. To get around this limit, I've removed most of the original comments from the Powershell scripts. The resulting script can be uploaded to Intune as it's less than the 200,000 bytes limit even with all the files encoded. If you'd like a copy of the version with comments included to help with troubleshooting, scroll to the very bottom of this blog post. Download the condensed ZIP: win.ap.CreateScheduledTask.SetTimeZone_CONDENSED_VERSION.zip Extract the condensed ZIP file to C:\Scripts\SetTimeZone Step 2. Get ServiceUI.exe from MDT You'll need the ServiceUI.exe executable file to display user interfaces (UI) to end users when operating in SYSTEM context. To get the file, download and install MDT somewhere and navigate to C:\Program Files\Microsoft Deployment Toolkit\Templates\Distribution\Tools\x64. To download MDT click here. Copy the ServiceUI.exe file to your extracted SetTimeZone\Encode folder so it looks like this. Step 3. Modify the scripts Open SetTimeZone-GUI.ps1 and SyncTime.ps1 in PowerShell ISE and make changes as appropriate. Once done editing those scripts to suit your needs save the changes. Then run the Encode script to generate the encoded txt files which you will paste into the variables highlighted below. you can do that by locating the appropriate TXT file for each encoded file, for example for ServiceUI.exe it'll be the ServiceUI.txt file, open it in notepad, copy the contents of that file using CTRL+A and CTRL+C and paste the results using CTRL+V into the associated variable, once you've done all 5 encoded files it'll look something like this If you are happy with all the changes in win.ap.CreateScheduledTask.SetTimeZone.ps1, save the changes. Step 4. Deploy it from Intune In Microsoft Endpoint Manager, select devices, scripts and add a new PowerShell script. Fill in some details like so. Deploy it to your Windows Autopilot users (start with a small group of users to test...), note that if you deploy this script to users that have already enrolled, the script checks if the enrollment was within the last 72 hours and if it was it will run, but if the enrollment was more than 72 hours ago, it'll do nothing. Step 5. Test it out First off, let's see what the expected outcome is. After Windows Autopilot enrollment is complete, and the user has logged on to the desktop, shortly after they login they will see a popup window asking them to Confirm or Change their Time Zone and Region settings. Below is an example of that. The user can confirm the settings by simply clicking Confirm, or if they want to change any of the options they can do so by clicking the relevant drop down menu. In this example the user changed the Regional format to English (Sweden), from English (United States) and after clicking Change the settings are applied. The following will occur when Confirm or Change is clicked. The keyboard layout is set (1), the regional format is in the chosen format (2) and the time will change to the selected timezone within one minute (3). The time sync takes place via an event generated in event viewer by the SetTimeZone-Gui script. Windows 11 support Does it work with Windows 11 ? absolutely ! see here: Job done ! Troubleshooting Note: If you are testing this on a hyper-v virtual machine, please disable enhanced mode. There are three log files generated by this solution win.ap.CreateScheduledTask.SetTimeZone.log located in C:\Windows\Temp win.ap.SetTimeZone-GUI.log located in C:\Users\<username>\appdata\local\Temp win.ap.synctime.log located in C:\Windows\Temp Here you can see it changing the time zone as revealed in the log file time change... the following scheduled tasks are created. The SetTimeZone scheduled task will run within a few minutes of the user logging in, it runs the following script. which in turn launches Powershell and our SetTimeZone-Gui.ps1 script %SYSTEMROOT%\System32\WindowsPowerShell\v1.0\powershell.exe -NoProfile -WindowStyle Hidden -ExecutionPolicy Bypass -File %temp%\SetTimeZone-Gui.ps1 That will launch the UI shown previously, allowing the end user to confirm or change the detected settings. Once the user confirms or changes the timezone settings an event ID will be generated which will in turn launch the Synctime Based on EventId task. Magic ? If the user ignores the popup and restarts the computer, it will appear again after logging on every time they logon for 7 days. You can change that behavior via the scripts settings.Ok that's it for this blog post, see you next time, cheers niall Related: https://smsagent.blog/2022/05/13/beware-of-changing-regional-format-after-intune-enrolment/ Footnote: Here is the commented version of ZIP. This version of the scripts cannot be uploaded to Intune as it's too big, use for troubleshooting purposes only.win.ap.CreateScheduledTask.SetTimeZone_COMMENTED_VERSION.zip


-
Introduction I’m no stranger to Tachyon, I’m currently blogging about it in this series. When I heard that a new version was about to be released I was definitely interested. I signed up and watched the 1E Tachyon 8 Launch Webinar which showcased a preview of Tachyon 8, hosted by Michael Wright (Director of Product Marketing, 1E) and Bogdan Udrea (Chief Technologist Product, 1E). The webinar showcased what is new and exciting about the latest version of Tachyon and why you should be excited about it and it’s host of new features. If you do watch the webinar (and I encourage you to do so) take note that there is a huge amount of information to digest. Why release a new version now ? The first question to ask yourself would be why should Digital Workplace Leaders like you be interested in another release of Tachyon from 1E ? This blog post will hopefully clarify and simplify points about why there is a new version of Tachyon. “Software constantly evolves to adapt to new problems and the scenarios they present.” One of the first reasons is challenges from within the workplace, including something referred to as The Great Resignation. You only have to take a look online at Tik-Tok and you’ll see multiple videos of people resigning from their current workplace. The quit rate in the United States just hit an all time high, and now more than ever, we live in an employee centric world. Ask yourself these questions: Is your organization a contributor to the global challenges that many companies are facing ? Is your organization IT Infrastructure a contributor to why your employees are switching jobs ? The Great Resignation. It’s clear that the hybrid workplace (which came into its own niche during the never ending Covid 19 pandemic) increased employee-IT friction because workers were forced to work from home, sometimes without adequate tools and having to figure out why they couldn’t access on-premise resources or do their job as they used to when in the office. Tickets were raised, users were not happy. Users that cannot work for a couple of hours because an application is crashing reduces productivity and increases frustration. To add to the users frustration the ability of the IT Help Desk to help them with their problems by visiting the users desk is out of the question as their desk is more than likely at home. “Everything is dependent on experience.” What forward looking companies have realized is that employee’s engagement and productivity (regardless of whether they are working from home or in the office) is dependent on experience. This has led 1E to create something called the Experience Economy for the workplace and that is one of the building blocks of Tachyon 8. Experience Economy As a home consumer you expect certain performance from your Internet Providers, you expect high performance and the speed that was advertised when you purchased it. You also expect things like Siri, Alexa or Google to understand what you said when you summoned them. The same needs to be true for employees in the workplace, those employees should get the type of experience they expect from the business, and they should not be negatively impacted changes in the workplace carried out by IT and they should definitely not be treated like second class citizens. Focusing on what matters When a problem invariably happens it’s not enough to simply observe the problem. We know through monitoring or user complaints that there is a problem, and just acknowledging it doesn’t help. As an IT Admin you can acknowledge a problem but if you cannot do anything about it then the user will suffer and that doesn’t necessarily help improve the situation. What can Tachyon 8 do to relieve this friction factor? Tachyon 8 focuses on what matters, it’s not enough to simply focus on a problem. 1E navigated through the following four areas when creating Tachyon 8 to drive insights to action acceleration. Analytics and Insights Resolution Acceleration Action and Prevention Engagement and Empowerment Insights to Action Acceleration. Tachyon 8 enhanced the capabilities across these 4 key areas to: Expand and improve upon what is collected and provide insights into analytics Cool capabilities built into the RCA toolkit Prevent issues at scale Engage with employees using the toolset in Tachyon 8 to facilitate self-service Tachyon 8 has increased the level of insights into key problematic areas namely networking, boot and login, applications and software to provide better visibility from a networking perspective, to investigate why devices are slow to boot or login, and to assist with determining if applications are affecting the overall productivity of the device. Resolution acceleration provides a quadrant view to give a device a unique placement on horizontal and vertical axis compared to other devices in the enterprise but also to be able to show the correlation between a certain metric (or event) and the impact that has had on the overall experience or whatever you are concerned about on that device. In addition, you can do a side by side comparison between affected and ‘good’ devices to determine what is causing the problem. From the Action & Prevention space, Tachyon has continued to publish management packs. These are sets of instructions to address a problem statement in real time on a problem device. Tachyon 8 has added a new user engagement ability which allows admins to engage with their users, not necessarily a survey. It also adds enhancements around interactions with those users to let them know about something or to enhance self-service capabilities. Use cases There are actually hundreds of use cases and scenarios that can be run in Tachyon 8, if you’d like more info about them then do join 1E’s Tachyon Tuesdays where they’ll start unpacking these use cases and how you can benefit from them. To summarize though, they can be broken down into the following four categories. Use cases that address Employee Engagement and Empowerment for example are announcements, this is a one way communication to the end user. Announcements can be used to announce IT or non-IT changes. Interactions compliment announcements by using the User Engagement module in Tachyon where the 1E client can automatically engage with a user based on how they react to whatever has occurred. These four elements are built into a persistent user interface within the 1E client, which allows users to revisit certain elements and go back and open tickets if that’s what the user wanted to do. Updated UI With Tachyon 8, the UI has been expanded in several areas. For example, previously the Tachyon Experience module looked like this: With Tachyon 8, focus areas have been added including Advanced Analytics, Inventory Management and User Engagement as you can see here: What do the users see ? The users get to see an updated 1E client agent when it’s appropriate. They also get access to the new persistent user-interface so that they can revisit previous problems if and when necessary. Announcements can be customized to make them look more like they are coming from an individual rather than an organization to make them feel more personal. When will the release be available ? Early adopters of Tachyon 8 are actively using this in their environments today. If you’d like to try it now, please reach out to your 1E Account Manager and they will make it available. Conclusion The development team behind Tachyon 8 have learnt valuable lessons from customers, business needs and partners to focus on what really matters. They’ve used this knowledge gained to add additional functionality to assist with the challenges posed by hybrid workplaces. DISCLAIMER: The contents of this article are the opinion of the author and have been written from an impartial standpoint; however, 1E may have reimbursed the author for time and expenses for undertaking the findings and conclusions detailed in the article.
-
‘Tis the season to be caring – for your loved ones, for each other, and yes, even for your data and mailboxes. If you’re a Microsoft 365 administrator, celebrate with us. All you have to do is sign up for free to 365 Threat Monitor and set up your account! How does it work? - Sign up to 365 Threat Monitor - Receive a guaranteed $10 Amazon voucher and a chance to win one of the Grand Prizes! - For every valid entry, we’ll make a $10 donation to One Laptop per Child What are you waiting for? Sign up now!

-
this shouldn't cause the devices to 'not' get task sequence policy, which is essentially what is happening, i don't know enough about how your environment is setup to give conclusive proof, you could for example have some pre-start command that is running to add the computer into the collection(s) needed for UI++,. that would require further investigation from you, and maybe that pre-start (if there is one) is getting confused on these Dell computers.
-
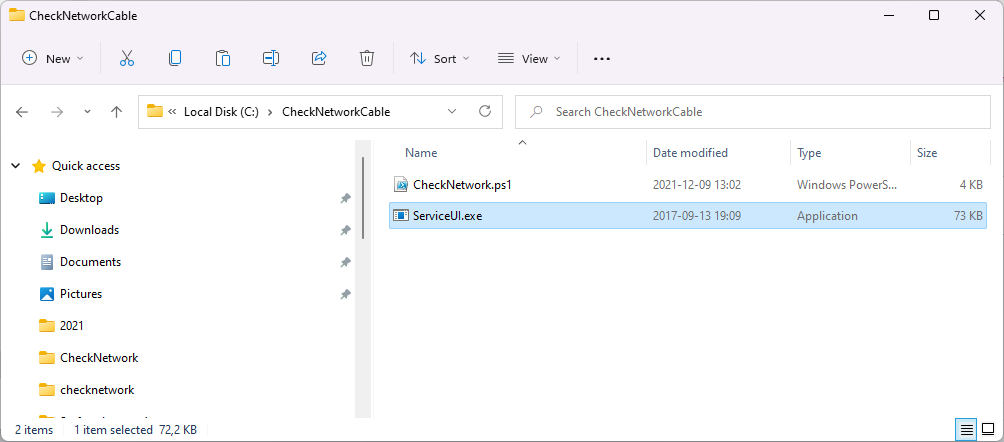
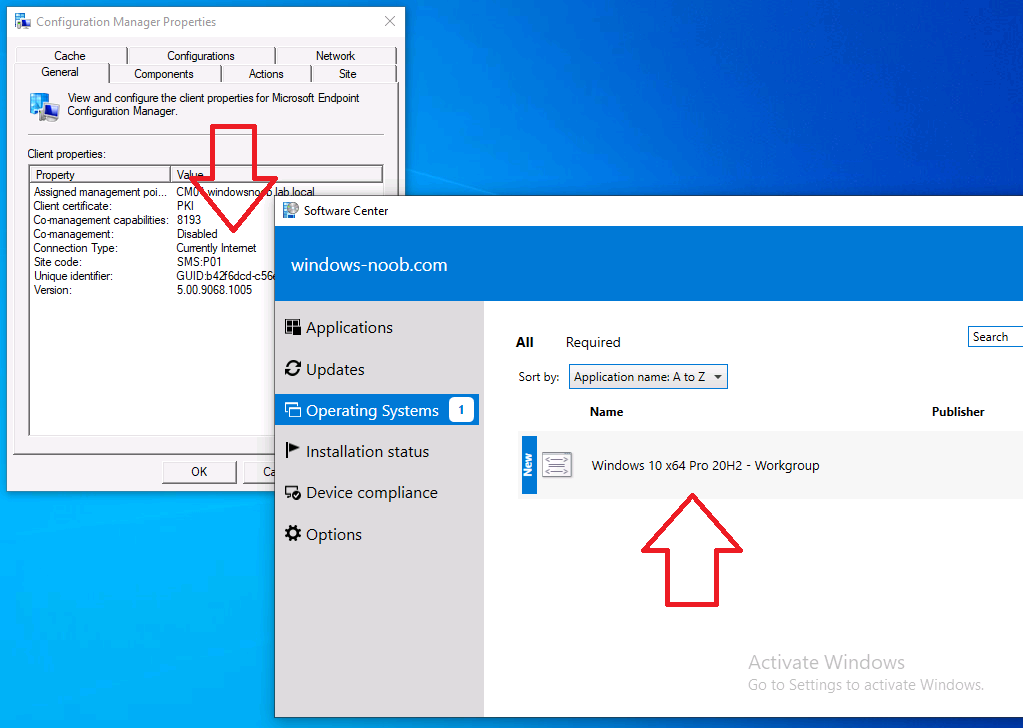
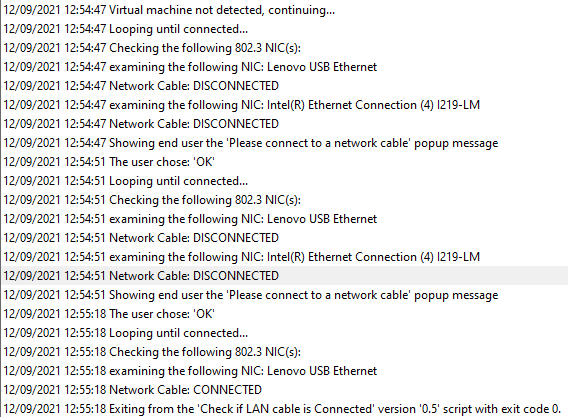
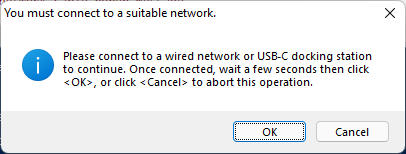
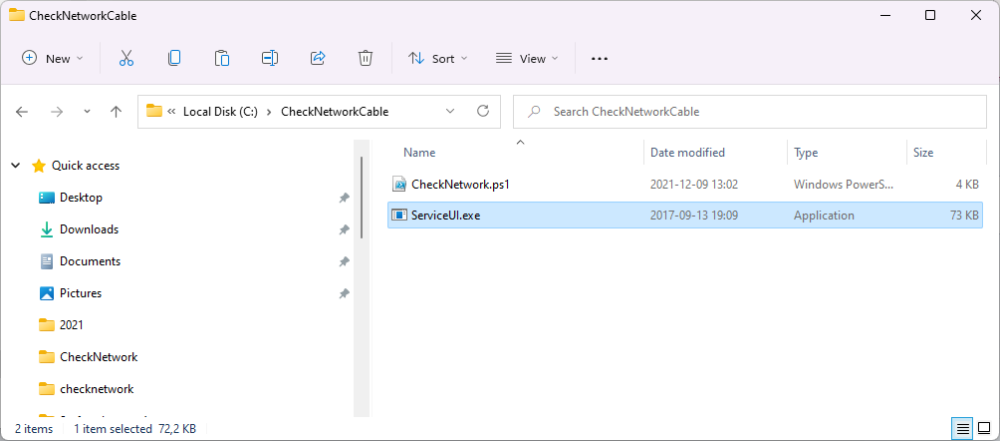
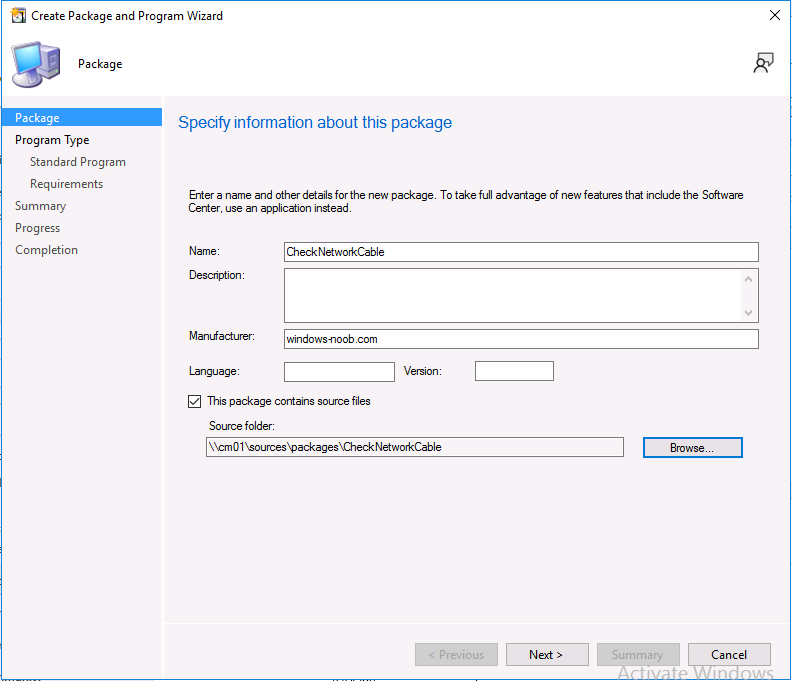
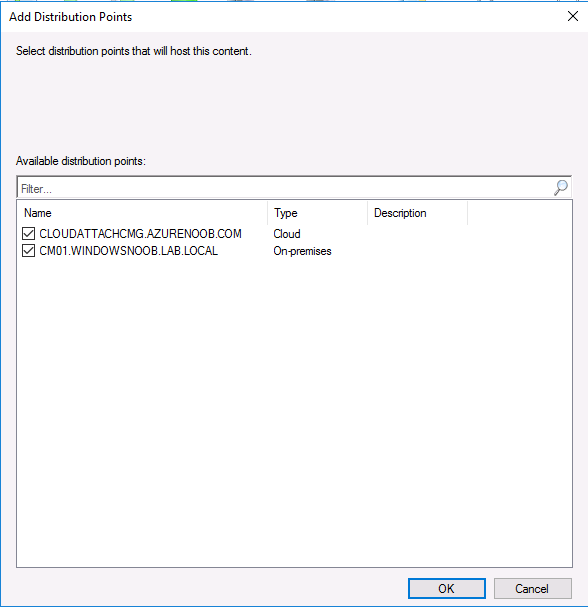
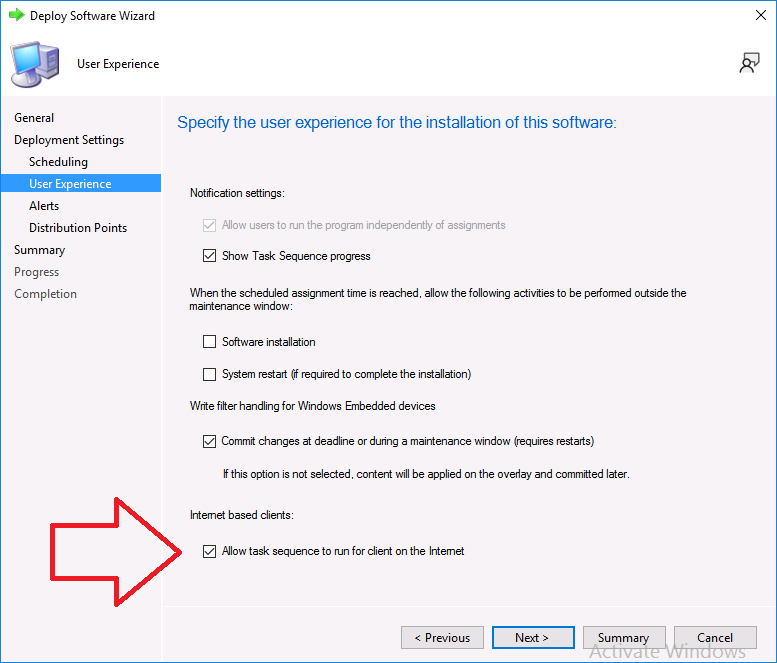
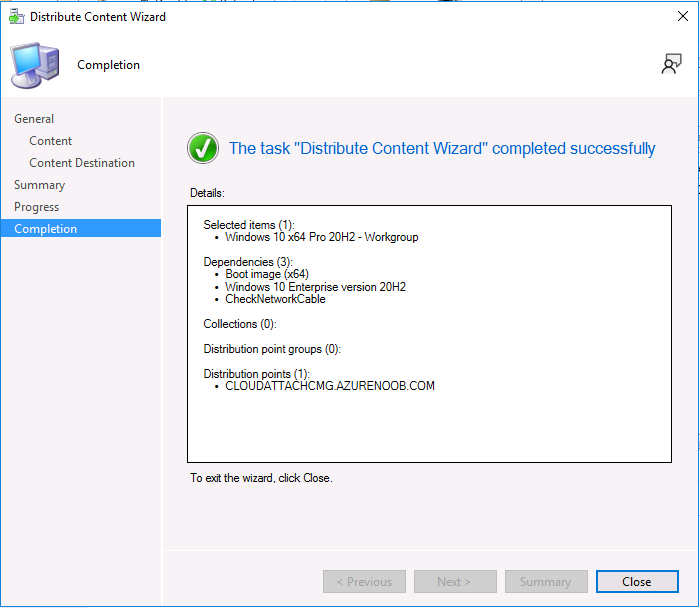
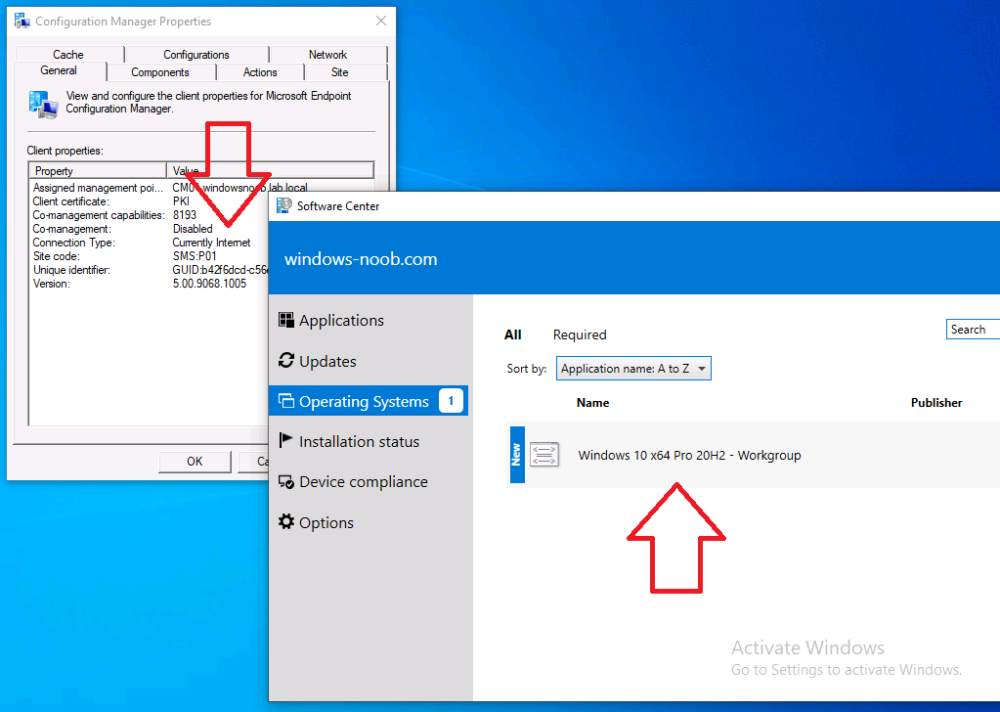
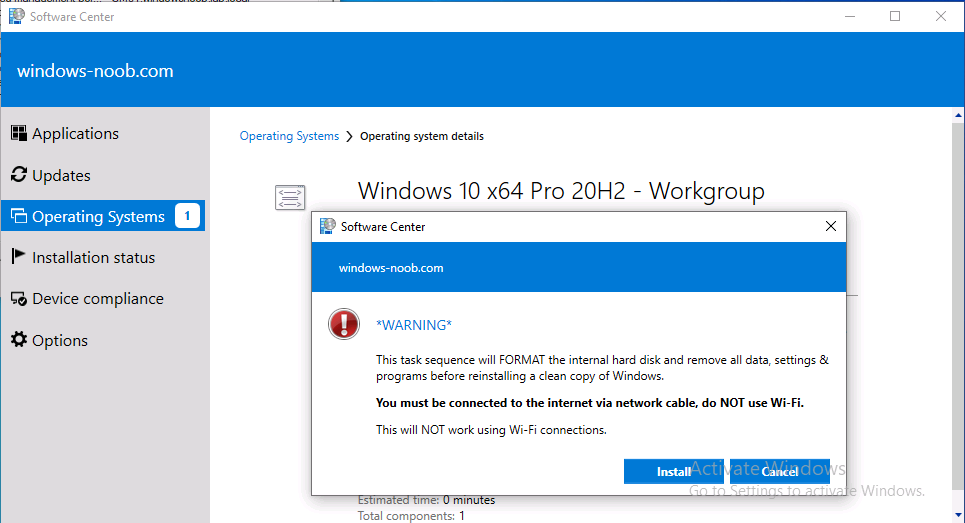
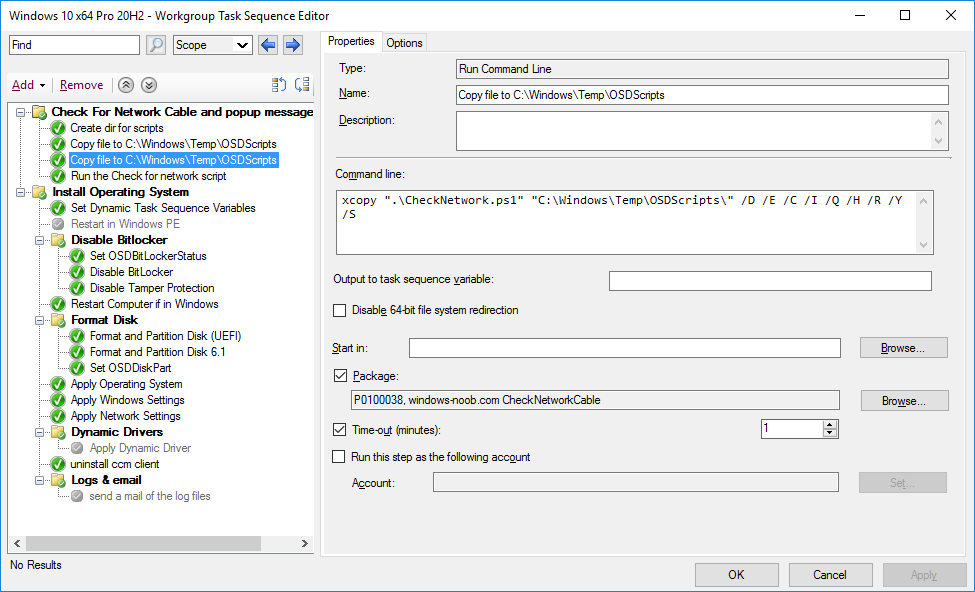
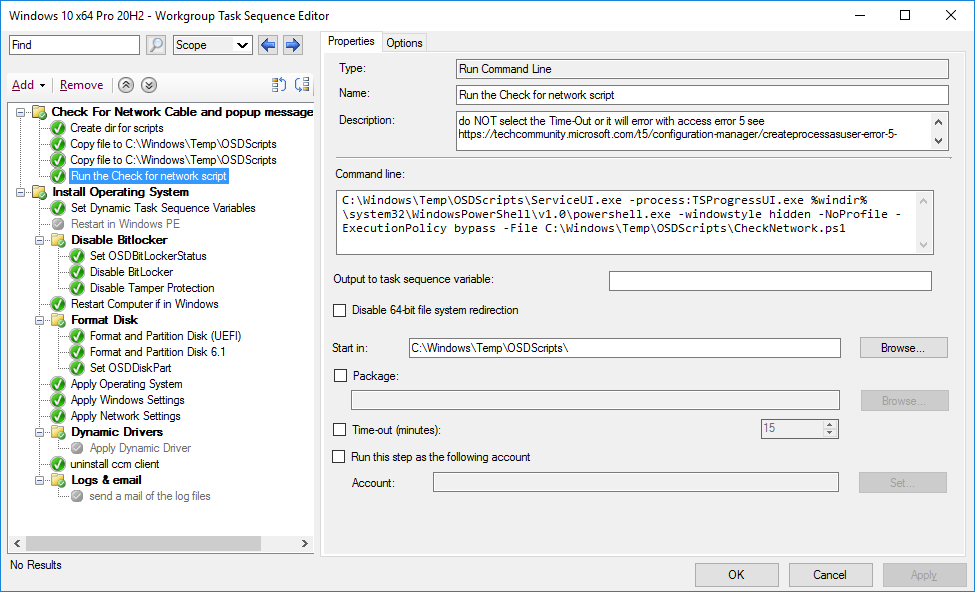
Introduction Note: In a previous blog post I showed you how you can deploy an Operating System from a Cloud Management Gateway (CMG) using bootable media. That blog post assumed you had a working network connection (wired) and also required the use of bootable media. Please review that blog post and associated video before starting this one. This new ability to deploy OS via the CMG was added to Configuration Manager version 2010, screenshots in this blog post come from Configuration Manager version 2111. In this blog post, I'll show you how to allow your users to self-service deploy an operating system from Software Center. That task sequence will run some steps to ensure that they are connected to a LAN cable or USB-C docking station prior to starting. But why is this important ? Well, if the user is connected to Wi-Fi, then as soon as the task sequence reboots, the boot image will load and unless it knows exactly what Wi-Fi hotspot the user was connected to and unless it has Wi-Fi support and necessary certificates built in (unlikely) it will fail to pull down any content as there will be no network. Their are 3rd party custom solutions that can allow you to connect to Wi-Fi via the boot image, I haven't tested them yet due to complexities with our own Enterprise Wi-Fi, but here's a comprehensive example. So assuming that you don't want to use Wi-Fi, read on. In this blog post I'll show you how to automatically check the type of network connection, and to popup a message to the end user if no wired connection (802.3) is detected. this is done using the PhysicalMediaType and Status properties from Get-NetAdapter. In the sample below I check for all network adapters on a computer. It lists both wired and wireless (as well as virtual (non-physical)) network adapters. The red box shows the output from a laptop that is docked, as you can see multiple network cards/types are listed. Get-NetAdapter The green output shows the same command but filters on 802.3 physicalmedia type. Get-NetAdapter | Where-Object PhysicalMediaType -EQ 802.3 Taking it one step further, you can add the -physical attribute to only show physical network adapters. Get-NetAdapter -physical | Where-Object PhysicalMediaType -EQ 802.3 and from the two network adapters listed here, we can see that only one of them has a status of Up, meaning that is it connected. We could even filter for that as shown here. Get-NetAdapter -physical | Where-Object {$_.PhysicalMediaType -EQ 802.3 -and $_.Status -EQ "Up"} Using this logic we can build a script to detect the desired type of network and to popup a message to the end user if it's not connected. Step 1. Get the script The following script does the checking, save it to a folder called CheckNetworkCable. <# .SYNOPSIS This script checks if a network cable is connected or not, if not, pops up message to connect .DESCRIPTION For more info see https://www.windows-noob.com/forums/topic/22678-checking-for-network-cable-connections-before-deploying-an-os-from-the-cmg-via-software-center/ .PARAMETER [none] This script does not take any parameters. .EXAMPLE .NOTES Version: 0.1 2021/12/5 Version: 0.2 2021/12/6 lan cable re-check Version: 0.3 2021/12/7 hide tsprogressui Version: 0.4 2021/12/8 loop through multiple 802.3 NIC types if present and check status, added Cancel ability to the popup message Version: 0.5 2021/12/9 check for VM and exit if so, added ExitValue .LINK .Author Niall Brady 2021/12/5 #> Function LogWrite { Param ([string]$logstring) $a = Get-Date $logstring = $a,$logstring Try { Add-content $Logfile -value $logstring -ErrorAction silentlycontinue } Catch { $logstring="Invalid data encountered" Add-content $Logfile -value $logstring } write-host $logstring } function CheckCable{ # checks 802.3 LAN connections for a status of Up, loops through all 802.3 nics found before popping up message if none are connected $global:connected = $null $networkcards = Get-NetAdapter -Physical | select Name, PhysicalMediaType, InterfaceDescription, Status LogWrite "Checking the following 802.3 NIC(s): " $networkcards foreach ($networkcard in $networkcards) { # only interested in 802.3 nics... if ($networkcard.PhysicalMediaType -eq '802.3'){ $description = $networkcard.InterfaceDescription LogWrite "examining the following NIC: $description" if ($networkcard.status -eq 'Up') { LogWrite "Network Cable: CONNECTED" $global:connected = $true $ExitValue = 0 ExitScript ($ExitValue) } else { LogWrite "Network Cable: DISCONNECTED" $global:connected = $false } } } LogWrite "Showing end user the 'Please connect to a network cable' popup message" Add-Type -AssemblyName PresentationCore,PresentationFramework $msgBody = "Please connect to a wired network or USB-C docking station to continue. Once connected, wait a few seconds then click <OK>, or click <Cancel> to abort this operation." $msgTitle = "You must connect to suitable network." $msgButton = 'OKCANCEL' $msgImage = 'info' $Result = [System.Windows.MessageBox]::Show($msgBody,$msgTitle,$msgButton,$msgImage) LogWrite "The user chose: '$result'" $global:connected = $false if ($Result -eq 'Cancel') { LogWrite "The user chose cancel to insert network cable popup message" $ExitValue = 1 ExitScript ($ExitValue) } } Function ExitScript ($ExitValue) { LogWrite "Exiting from the '$scriptname' version '$version' script with exit code $ExitValue." Exit $ExitValue } ########################################################################################### # script body starts here... $scriptname = "Check if LAN cable is Connected" $version = "0.5" $logfile = "$env:temp\CheckNetworkCableConnected.log" LogWrite "Starting the '$scriptname' version '$version' script..." #Hide the progress dialog try { LogWrite "hiding the task sequence progress user interface" $TSProgressUI = new-object -comobject Microsoft.SMS.TSProgressUI $TSProgressUI.CloseProgressDialog()} catch {LogWrite "failed to hide the Task Sequence UI, are we really in a task sequence ?"} # check is this a vm, exit if so... $IsVirtual=((Get-WmiObject win32_computersystem).model -eq 'VMware Virtual Platform' -or ((Get-WmiObject win32_computersystem).model -eq 'Virtual Machine')) if ($IsVirtual) {LogWrite "virtual machine detected, will exit now." $ExitValue = 0 ExitScript ($ExitValue) } else {LogWrite "Virtual machine not detected, continuing..."} do{ LogWrite "Looping until connected..." CheckCable } until($connected -eq $true) $ExitValue = 0 ExitScript ($ExitValue) Step 2. Get ServiceUI.exe from MDT You'll need the ServiceUI.exe executable file to display user interfaces (UI) to end users when operating in SYSTEM context. To get the file, download and install MDT somewhere and navigate to C:\Program Files\Microsoft Deployment Toolkit\Templates\Distribution\Tools\x64. To download MDT click here. Copy the ServiceUI.exe file to your extracted CheckNetworkCable folder so it looks like this. Next, copy this folder to your package source on your Configuration Manager server. Step 3. Create a package (with no program) In ConfigMgr create a new package *with no program* using the files in the CheckNetworkCable folder you created above. Step 4. Distribute the package After creating the package, right click it and choose Distribute Content. Distribute the content to all of your CMG's and any other on-premise distribution points. Step 5. Edit the task sequence and point to the package In your task sequence, add the following lines at the start of the task sequence. cmd.exe /c mkdir C:\Windows\Temp\OSDScripts\ Then copy files to the C:\Windows\Temp\OSDScripts folder.. xcopy ".\ServiceUI.exe" "C:\Windows\Temp\OSDScripts\" /D /E /C /I /Q /H /R /Y /S copy another file... xcopy ".\CheckNetwork.ps1" "C:\Windows\Temp\OSDScripts\" /D /E /C /I /Q /H /R /Y /S Run the script, note: do NOT select the timeout value in this step otherwise it will fail. C:\Windows\Temp\OSDScripts\ServiceUI.exe -process:TSProgressUI.exe %windir%\system32\WindowsPowerShell\v1.0\powershell.exe -windowstyle hidden -NoProfile -ExecutionPolicy bypass -File C:\Windows\Temp\OSDScripts\CheckNetwork.ps1 Apply the changes. Don't forget to distribute the content contained in your task sequence to your CMG. Step 6. deploy the Task sequence Deploy your task sequence as Available to a collection containing client computers that you intend to test with, make sure that the following option is selected. Step 7. Test the solution On a client computer with real network cards (or with a connection to a USB-C hub or Thunderbolt 3 dock that is in turn connected to a wired LAN), verify that the Configuration Manager client detects that it is connected to the Internet and that you can see the task sequence in Software Center. For the purposes of the test, unplug the dock and/or network cable and use Wi-Fi to test. Note: The script detects virtual machines and assumes they have network connectivity and therefore skips the popup. This particular task sequence also informs the user about the type of network they need to use, but we'll still run our detection script. If the user is not connected to a wired LAN cable or USB-C docking station, they'll get this popup. After connecting to the required network type and clicking OK the task sequence will continue. Job done. Troubleshooting The script logs to C:\Windows\Temp\CheckForNetworkCable.log. Below we can see that at first the cable was disconnected, and then the user connected the cable and it allowed the script to continue. Related reading https://docs.microsoft.com/en-us/mem/configmgr/osd/deploy-use/deploy-task-sequence-over-internet


-
if you look at your task sequence and click on the deployments tab, check what collections is it deployed to, if your computer isn't in one of those collections then it won't see the task sequence, if your computer is in a collection targeted by the task sequence them and has been imaged before it won't re run the task sequence unless it's re-deployed to that device or the device deleted regarding the front end you are using, it's probably trying to run a deployment using direct membership (adding a device record to a collection that the task sequence is deployed to), can you confirm that ? if so, verify if your computers record is in that collection (or not...)
-
it's protection, if you want to re-image the same device just re-deploy the same task sequence to it (in another collection for example), <OR> if you don't care about the history of the device, delete the device record in ConfigMgr Assets and Compliance and try again