anyweb
-
Posts
9259 -
Joined
-
Last visited
-
Days Won
371
Everything posted by anyweb
-

Secondary Site Clients Site Code
anyweb replied to gokhan76's topic in System Center Configuration Manager (Current Branch)
1. that's normal see https://docs.microsoft.com/en-us/mem/configmgr/core/clients/deploy/assign-clients-to-a-site 2. I wouldn't setup boundaries using subnet, that's probably going to cause you issues, use IP ranges instead for your boundary definitions. Clients should download content from the distribution point closest to them (based on boundaries) or from fallback dp's if you have configured that. -
what have you tried and did it fail ? why not raise your own topic and explain what you've tried and what you want to achieve...
-
if you add a restart computer step before this one, does it make any difference ? did it ever work for you ? during OSD is the computer in a collection targeted with these updates ?
-
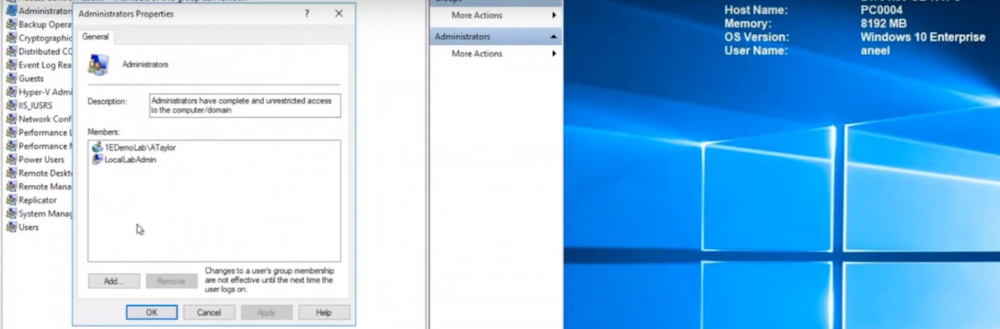
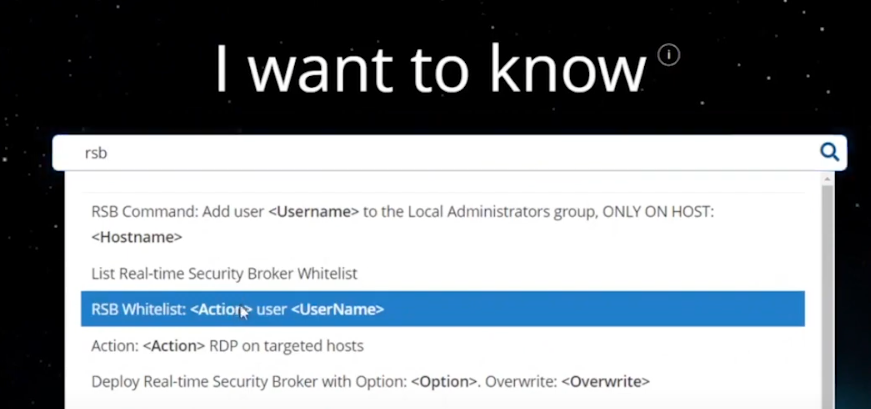
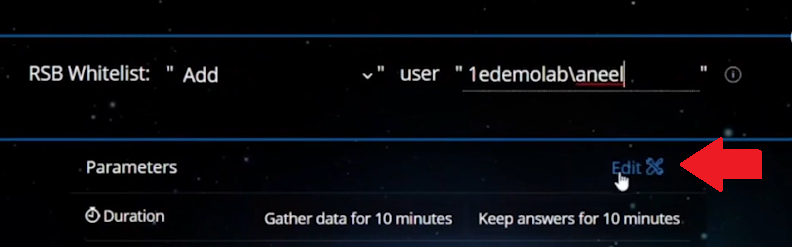
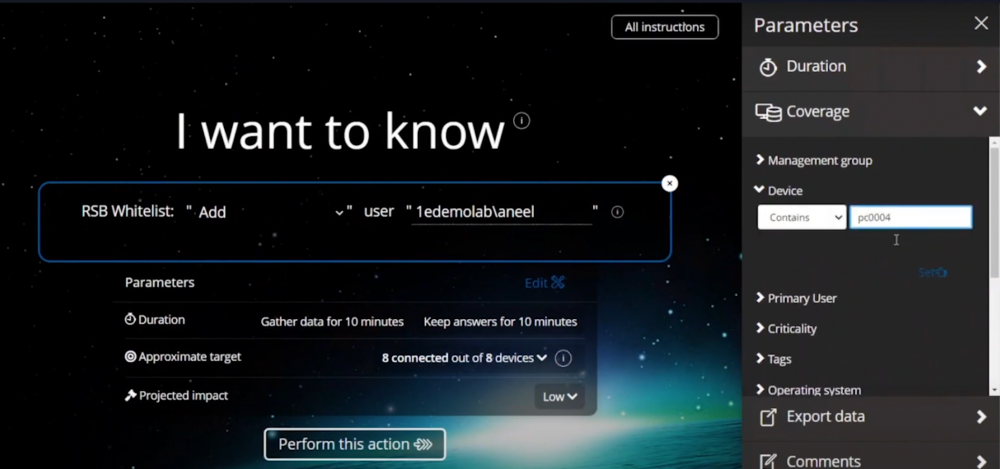
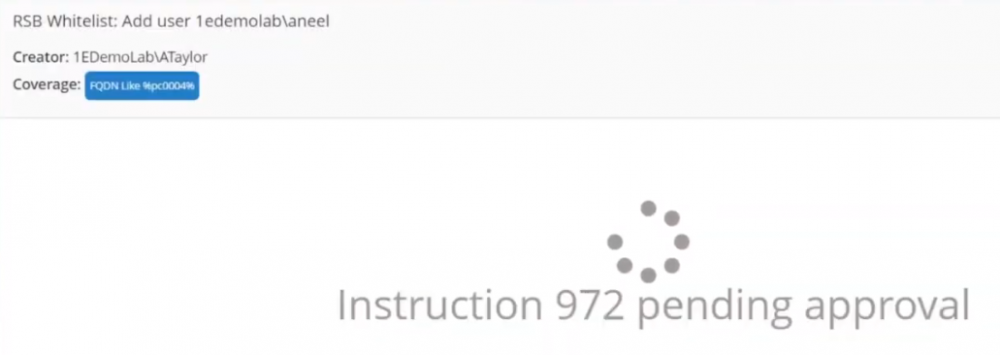
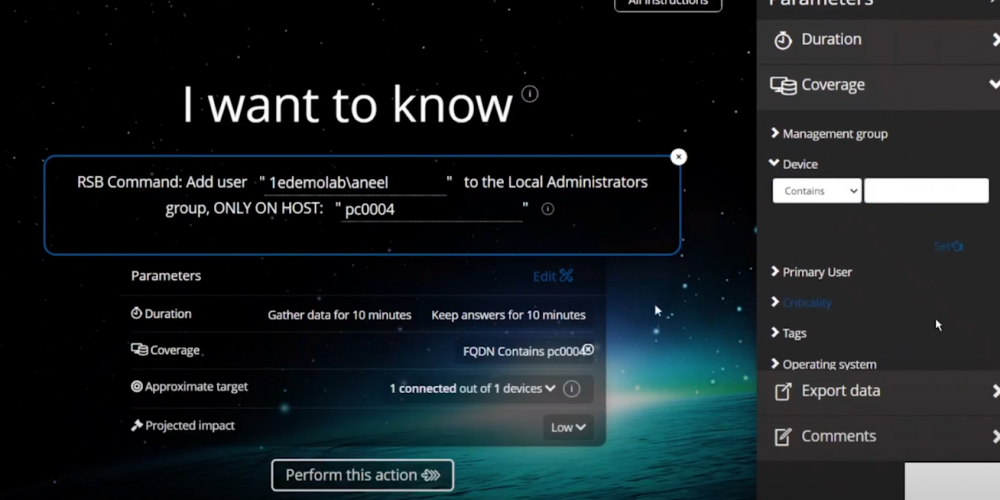
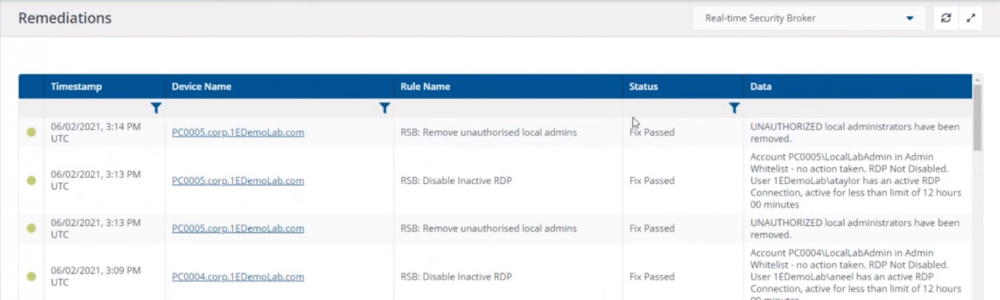
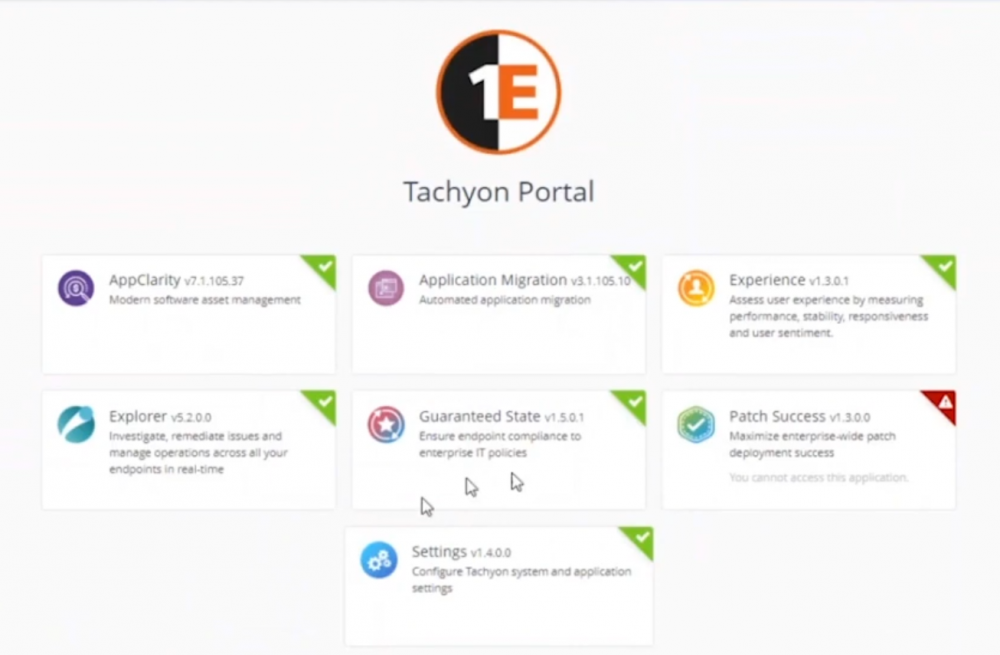
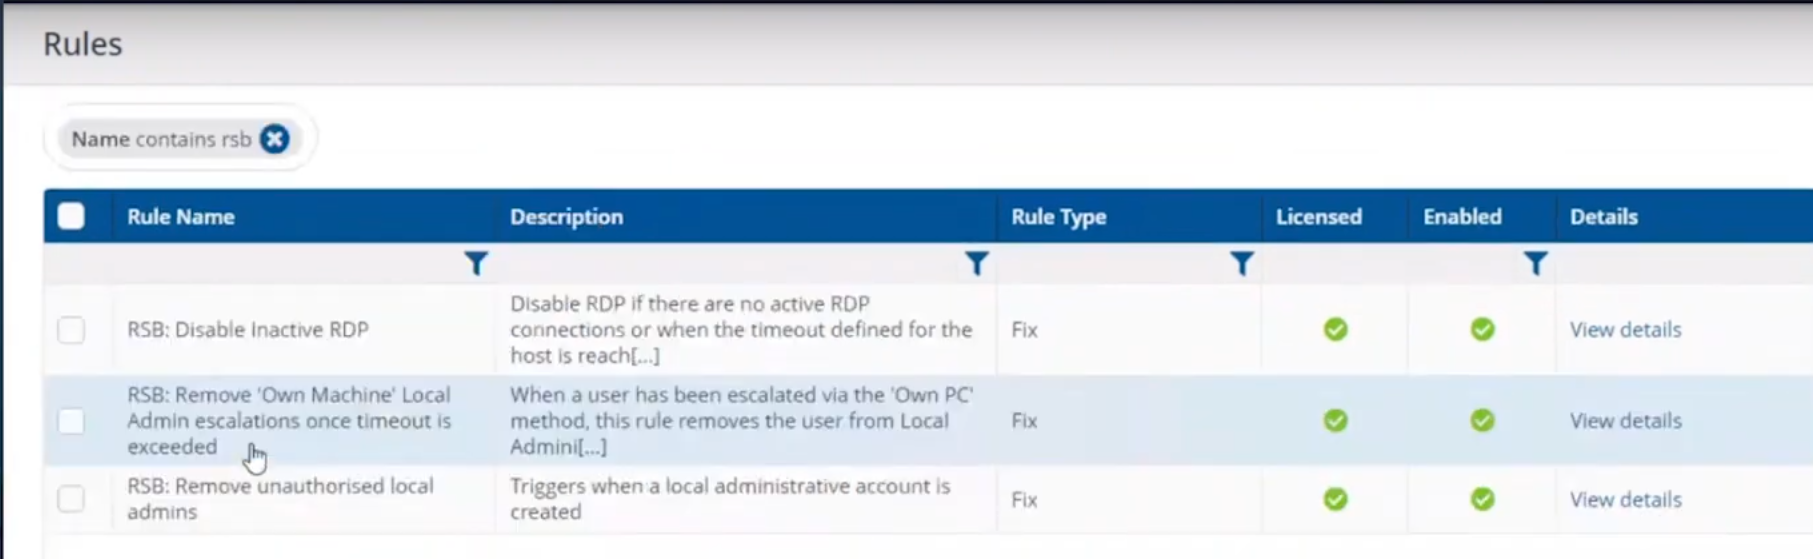
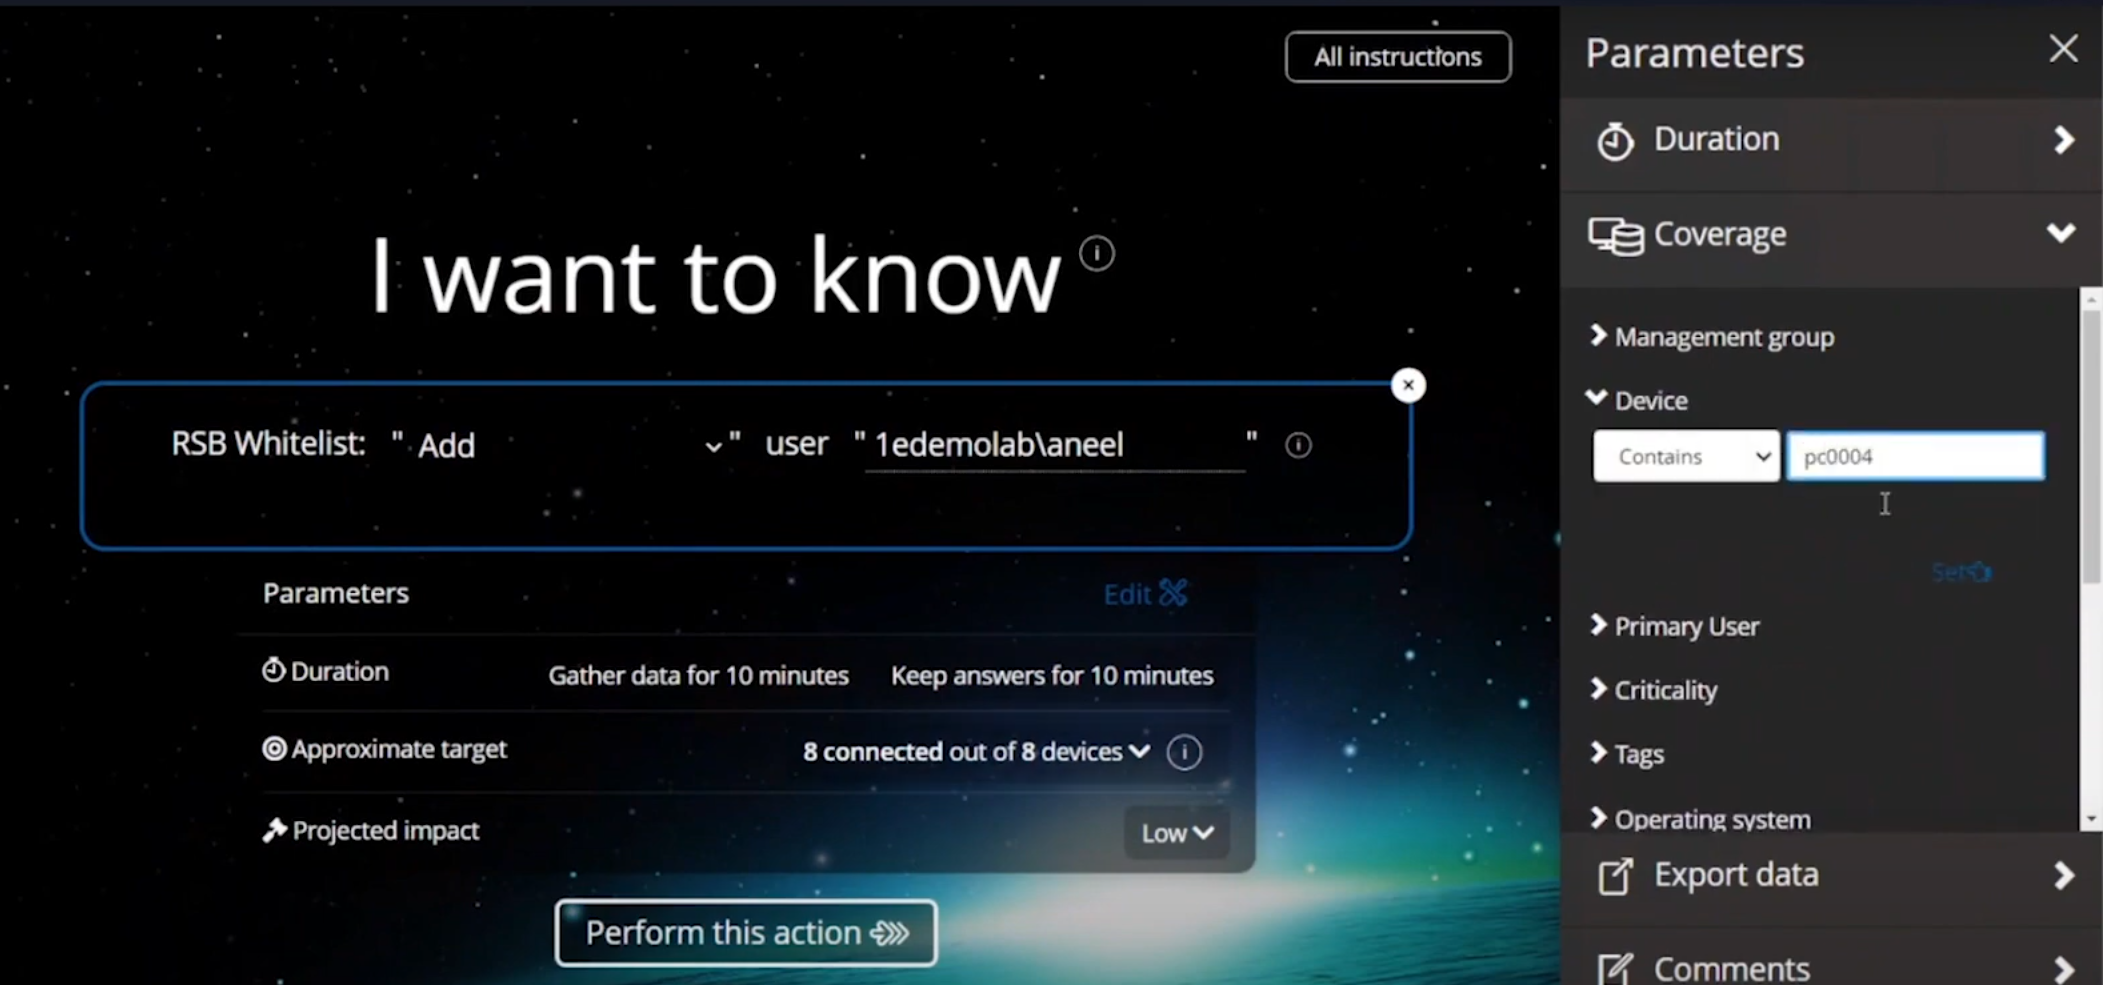
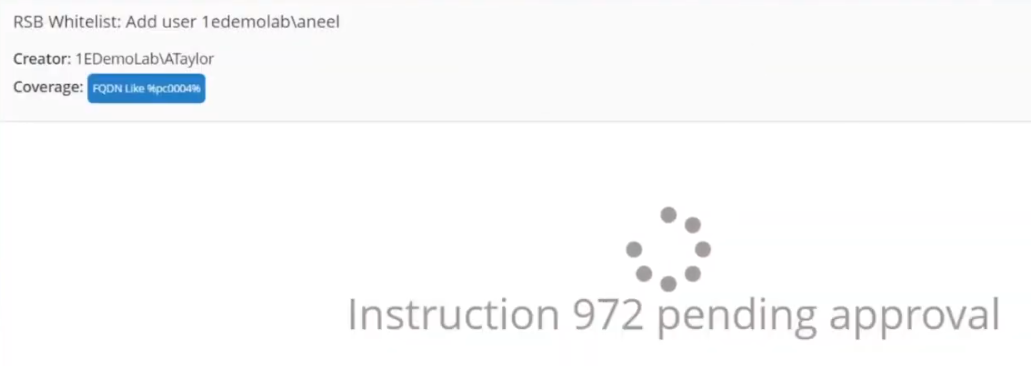
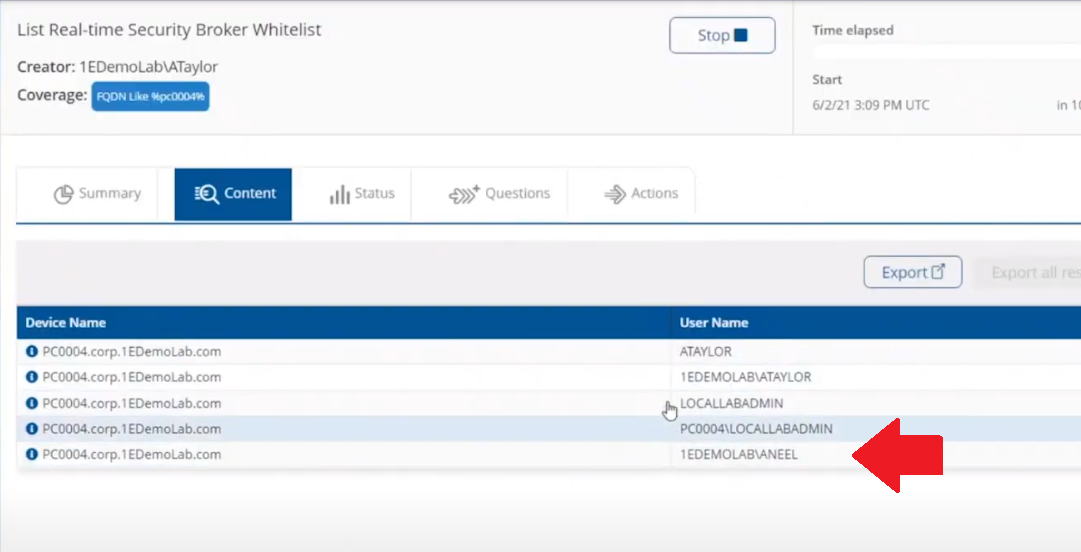
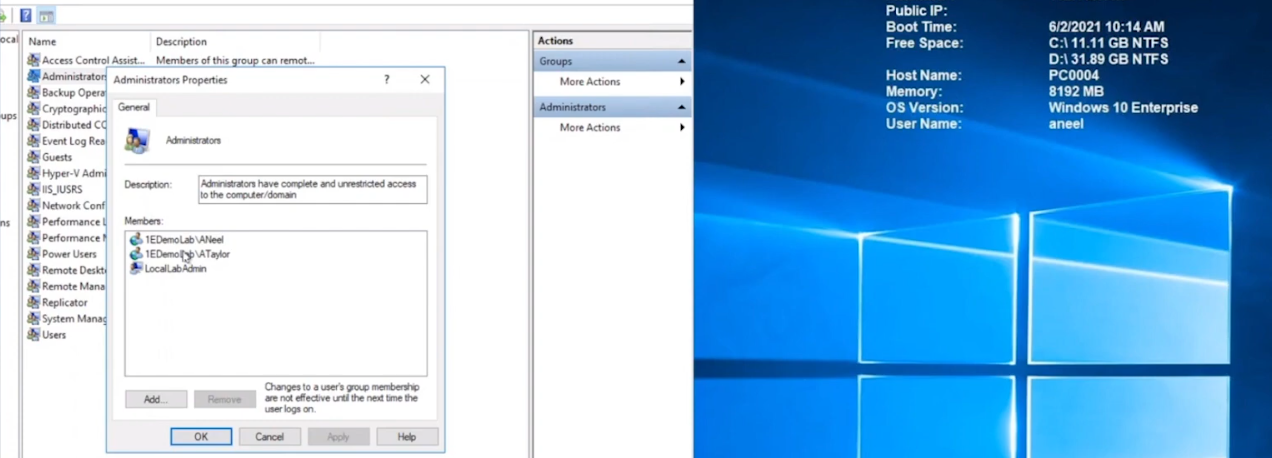
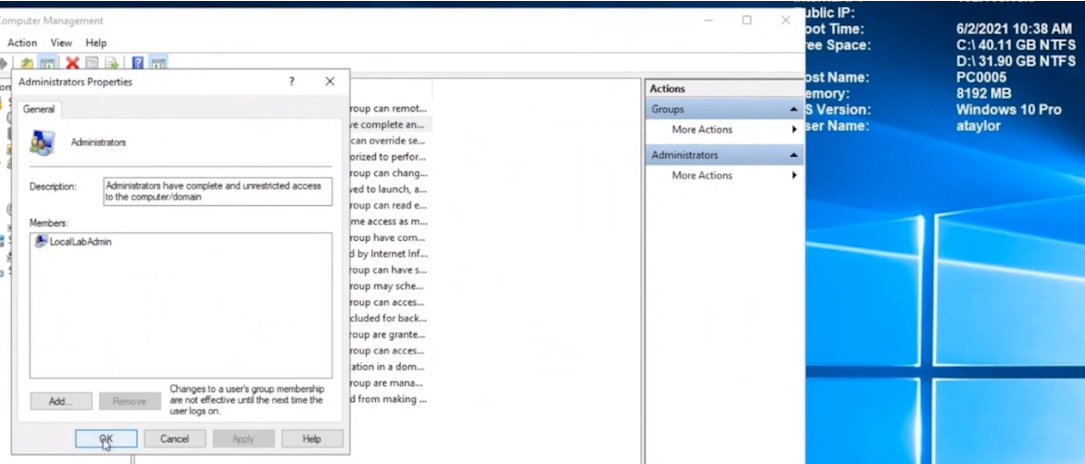
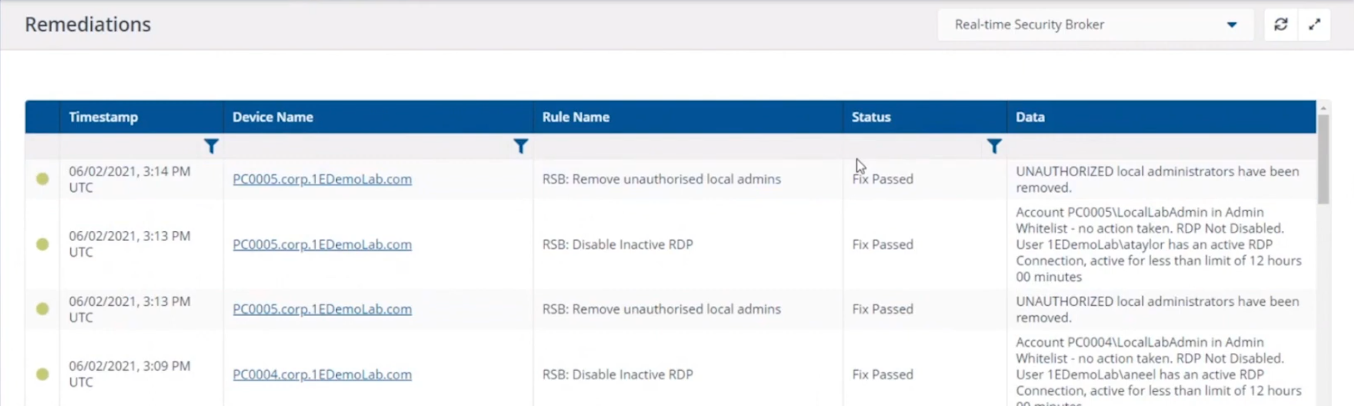
Introduction In a previous blog post I explained how to sign up for a webinar series and by doing so, learn from industry experts and Microsoft MVP’s about how and why they use tools like Tachyon from 1E to make things work better for your users, including how to deal with slow endpoints, or how to deal with apps that crash or for todays blog post, how to deal with those annoying admin requests. I will blog about each episode in the webinar series and link them here for your perusal. Episode 1. How to find and fix Slow Endpoints Episode 2. That crashy app Episode 3. Dealing with annoying admin requests Security. Love it or hate it, without it we’d all be in a worse situation. However security mandates as a best practice that the user logged on to Windows should be a standard user and not a local administrator. Why ? because that helps thwart the spread of damage to the operating system from running files that could overwrite operating system kernel files for example, or simply to keep root kits or viruses in check. Bad software can do bad things especially if you are a local administrator. That said, most users will need to be able to install legitimate software or configure things that require local administrator permissions on their computer, so how can we deal with that in a seamless, automated way with Tachyon. “Maybe you need an application for a demo, in 30 minutes.” Software Installation Requests are the probably the most common reason why people request admin elevation. Here are some ways that people typically deal with local admin rights requests. Group Policy – It’s a bit of a legacy dinosaur. Not that granular. The downside is knowing did it apply to the right group, did you clean it up after wards. Local Admin Password solution – LAPS, giving out a password for the local admin account and risks associated with it, able to add others to the local admin group, security team not so happy about that. How does Tachyon deal with this problem ? Tachyon deals with this seamlessly and fast, but it doesn’t sacrifice security to enable this ability. It’s part of the Guaranteed state module, specifically the real time security broker (RSB) shown below. This is made up of three rules listed here. RSB: Disable Inactive RDP RSB: Remove ‘Own Machine’ Local Admin escalations once timeout is exceeded. RSB: Remove unauthorised local admins. Here’s an example of it how Tachyon deals with this from start to finish. This is broken down into a couple of actions which are security focused, in that the user must be whitelisted in order to be allowed local administrative privileges. Whitelisting an account/Verifying whitelisted account Adding that whitelisted account to the local admins group Whitelisting an account Below we can see a user (aneel) is logged on to PC0004 and we can clearly see that the user is not a member of the Local Admins group on that PC. In the Tachyon Explorer console, you can search for RSB and then select RSB Whitelist: <Action> user <UserName> to add (or remove) a user. Next, click on Edit (shown below with the red arrow) to add Parameters to your action. In the parameters section on the right side of the console, select the device name that you want that user to have local admin permissions on. Adding a user to local admin on PC0004 in Tachyon After clicking Perform this action the request is then validated and any alternative accounts needed to approve the request will be informed to approve it. After the instruction was approved you can see that the user has been whitelisted and all of this is in real time. Verifying whitelisted account To verify that the whitelist request has succeeded you can use the List Real-time Security Broker Whitelist action in Tachyon Explorer. and in an instant you can see that the user has been added to the whitelist. Adding the user to the Local Admins group Next, you actually add the user (aneel) to the Local Admins Group. In Tachyon Explorer use the RSB Command: Add user <UserName> to the Local Administrators group, ONLY ON HOST: <hostname>. After performing the action you can see that the user is added to the Local Admins group. The entire process took less than a minute to whitelist and then add the user to the local admins group including the secondary approvals. You can also set the amount of time needed, for example give the user 30 minutes of Local Admin time. What about Self service for the end user ? If you want to allow your users to do this on their own, to elevate on demand using self-service, it’s possible as long as they’ve been given the correct permissions/ability. We can deploy an app called “Escalate to local admin” via Tacyhon to a small subset of users whom we trust to use appropriately. Below we can see another user (Ataylor) is logged on to PC0005 and this user is not a member of the Local admins group. This user launches the “Escalate to local admin” app so that they can self-service (with 2FA) the action themselves. and after clicking Go and satisfying the security prompts, the user is now added to the local admins group. Users behaving badly What about users adding other accounts without permission, below we can see a user that was granted local admin permissions has decided to add another user (sneakyadmin) to the local admins group. But no sooner than they click Apply, they are informed that the unauthorized action was denied. This is because the user added was not authorized via the Tachyon platform, and was instantly denied, not only that but the action has been logged and undone. going back into the Local Admins group you can see that the sneakyadmin account is not listed any more. Reporting on actions If you look in the Guaranteed State rules which drive this you can see that the action has been remediated, this is revealed under Report, Remediations. Conclusion Using Tachyon to provide admin credentials using security focused methods is easy and painless, yet retains useful features such as auditing, whitelisting and the ability to deny unapproved users. That’s it for this blog post, I hope to see you in the next one. In the meantime, I’d suggest that you sign up for the next DEM webinar, it’s free, tell them Niall sent you . And for those of you who want to see previously published episodes on youtube please click here. DISCLAIMER: The contents of this article are the opinion of the author and have been written from an impartial standpoint; however, 1E may have reimbursed the author for time and expenses for undertaking the findings and conclusions detailed in the article.


-
this sounds like the same problem (random) reported by various customers with ConfigrMgr 2010, I didn't see any fix for that, so you could try raising a ticket with Microsoft and see what they say, they claimed then that they couldn't reproduce it
-
thanks a bunch for the info, i'll include a note linking to this at the top of the blog post ! I've also tweeted the info and posted it on my linked-in page
-
do you have lots of lines in red in your SMS_Cloud_ProxyConnector.log ? did you review the link i included above to verify that you have not missed a step? have you ever had this working ? you don't need to configure any ports in Azure.
-
Text=ERROR_WINHTTP_NAME_NOT_RESOLVED dns or network issues ? have you reviewed the required ports and other configuration that we've blogged about here ?
-
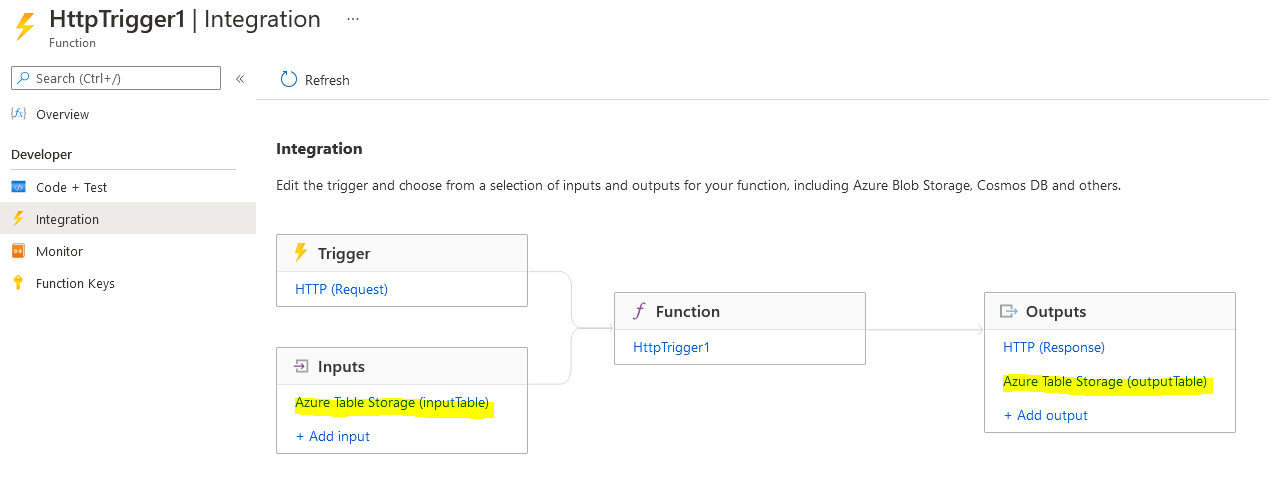
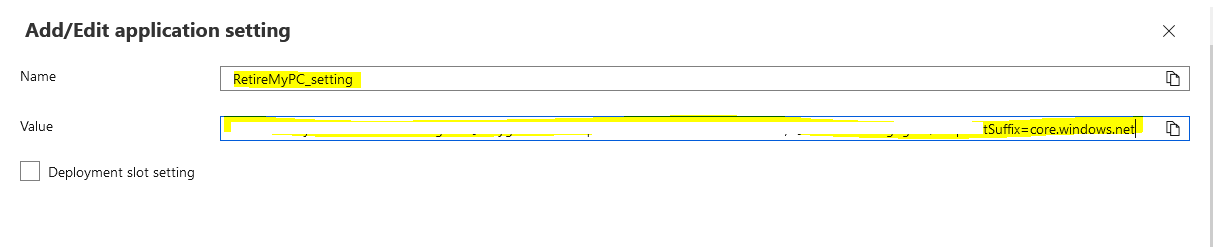
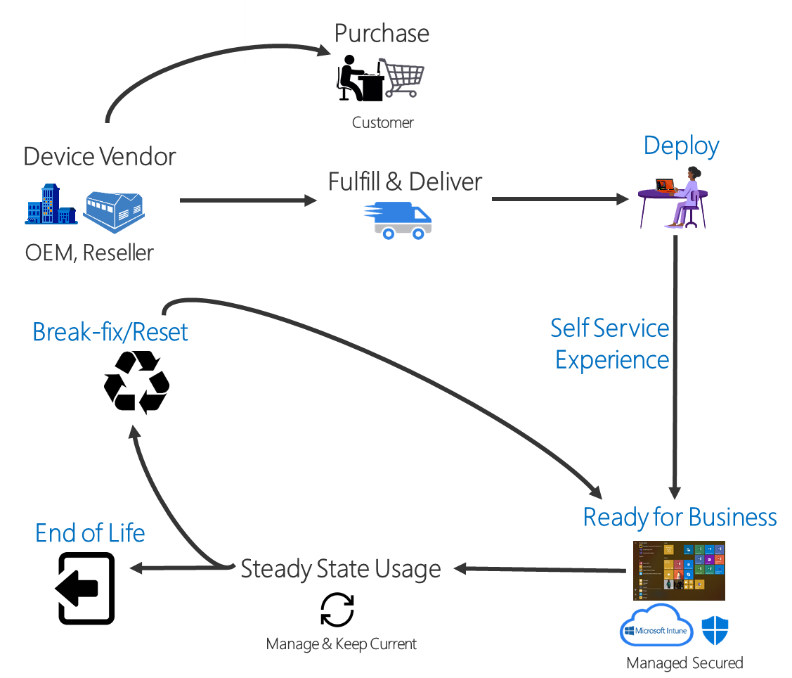
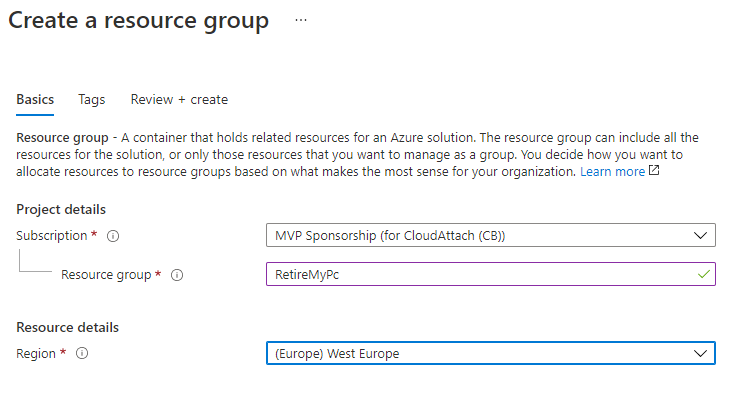
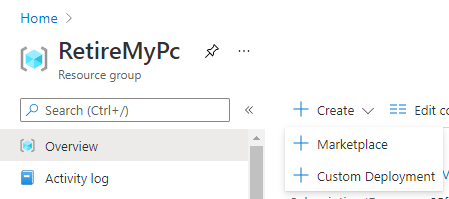
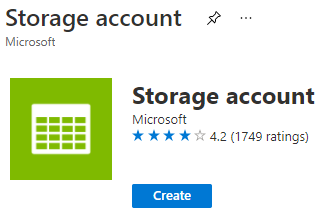
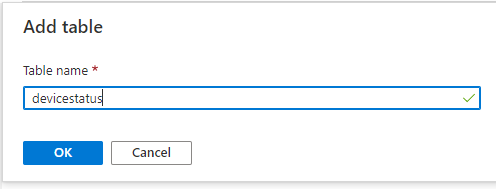
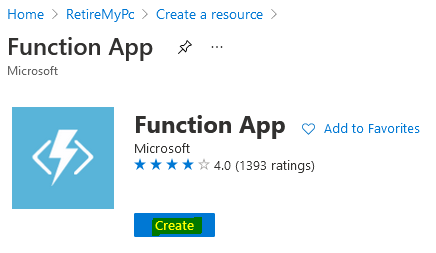
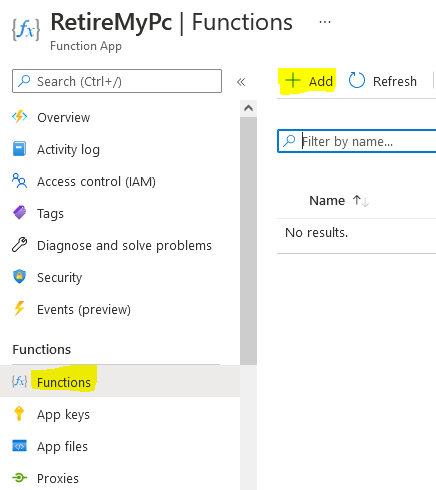
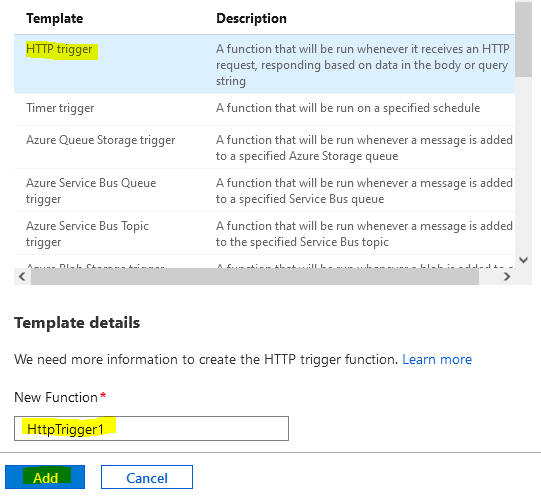
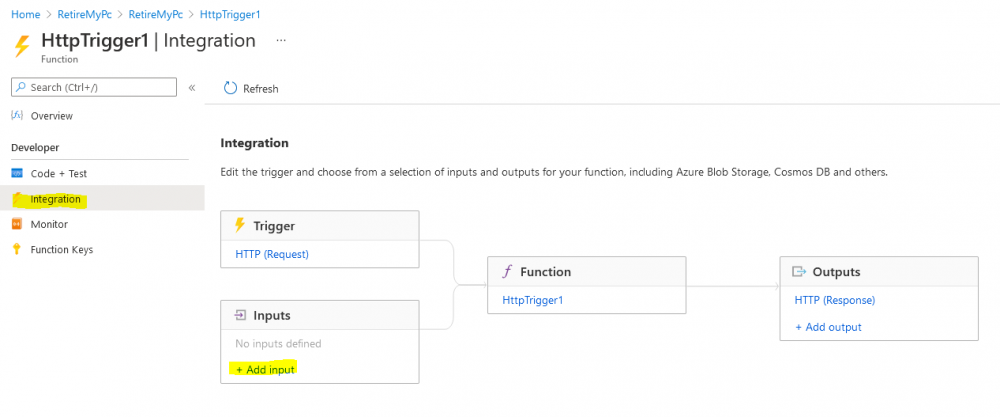
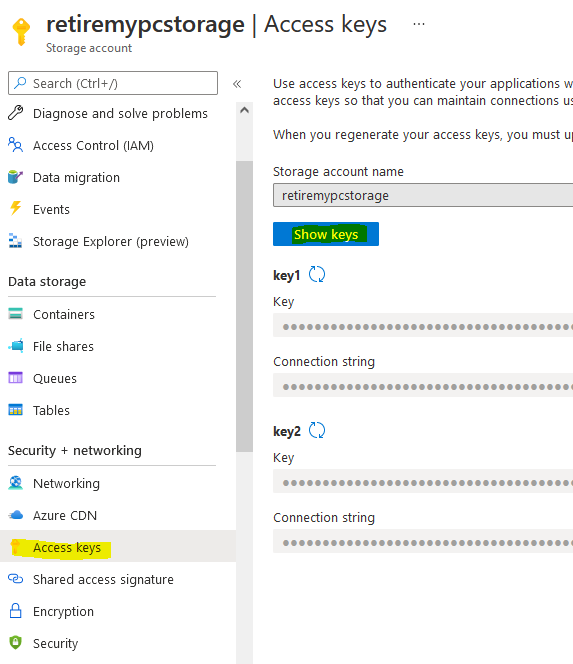
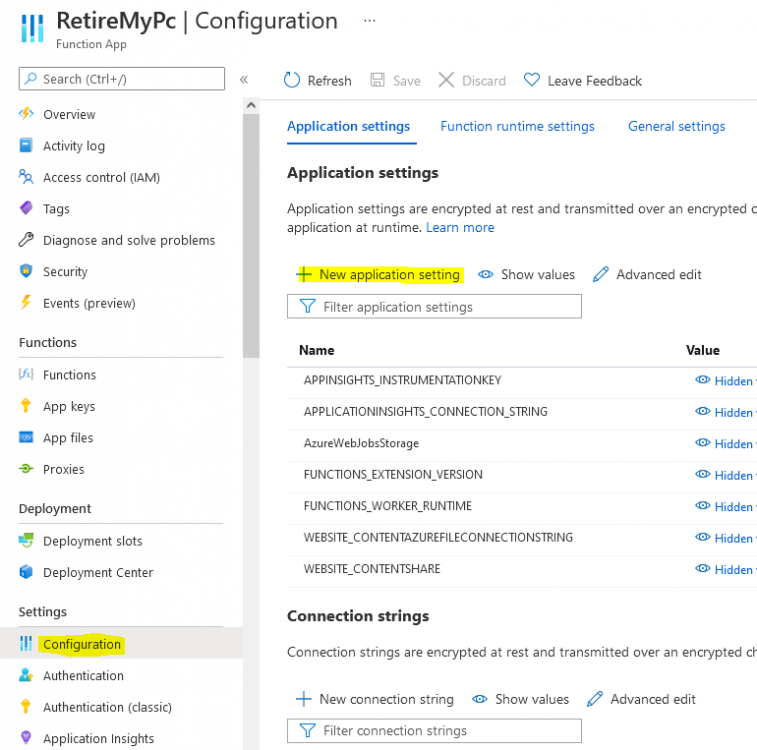
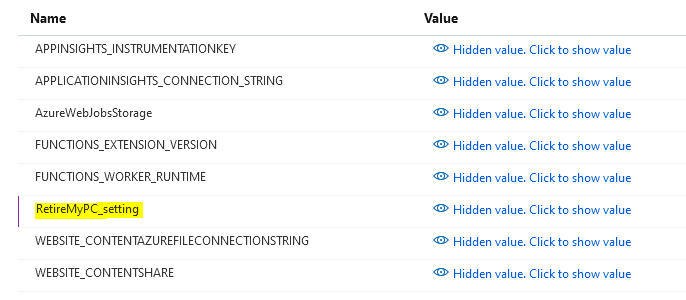
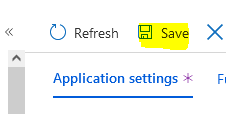
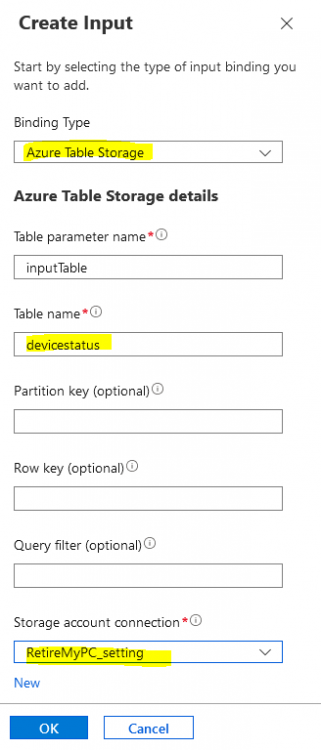
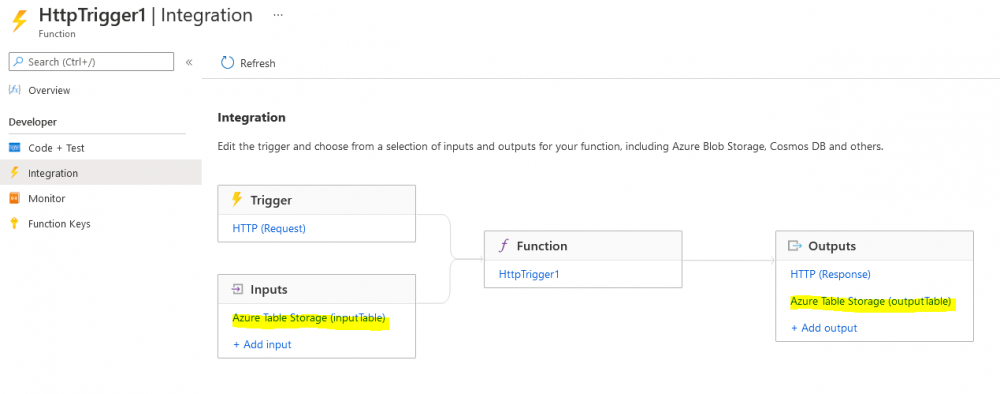
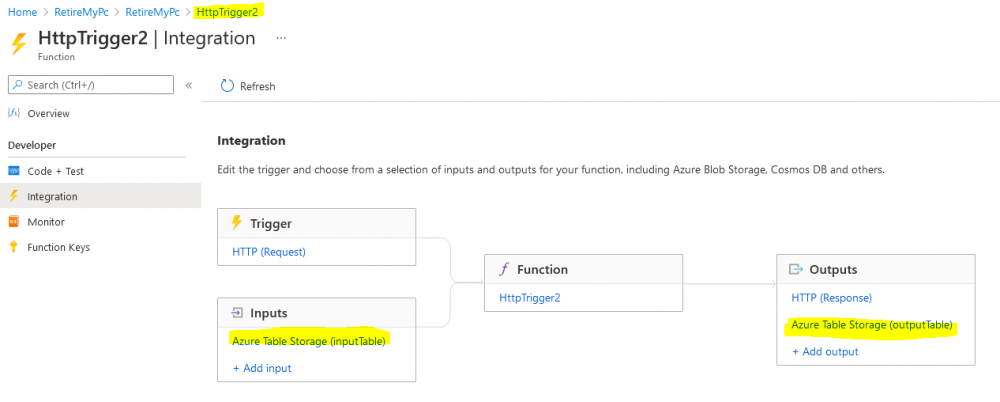
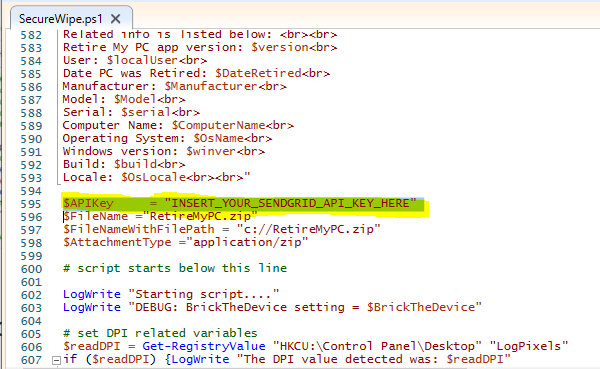
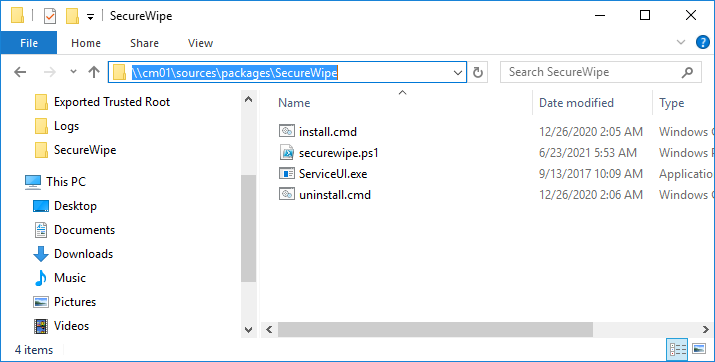
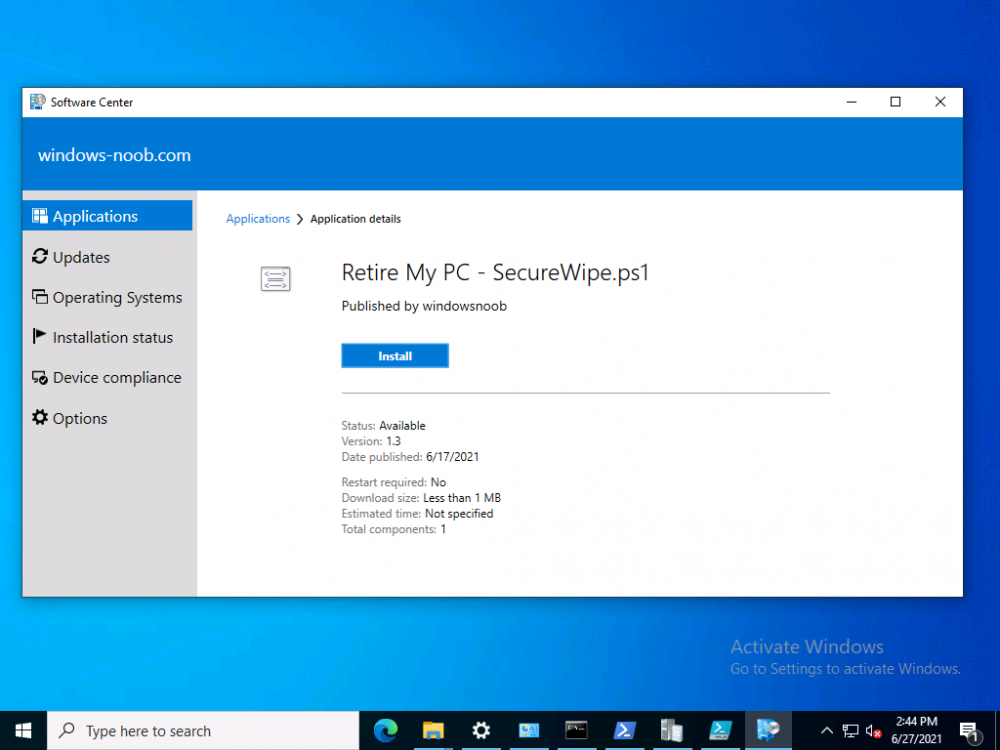
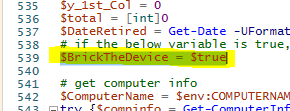
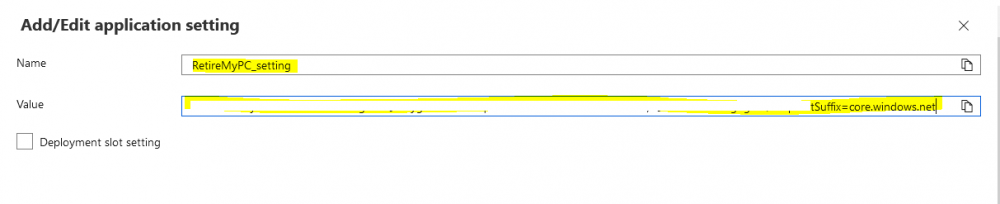
Introduction By now we should all be familiar with Windows Autopilot and how it is used to provision new computers, as explained below in Microsoft's diagram. For every new computer delivered via the Windows Autopilot process there's usually an old or obsolete computer waiting to be retired or re-sold. Those old computers still have life left in them and are frequently sold back to the vendor who sold them as new 3 years previously, either to be re-used or re-sold around the world. However those old devices may still contain sensitive company data on them and you want to protect that from prying eyes. Today your company may have an existing process where on site support staff clear the BitLocker protectors from the TPM chip to make extraction of that data as difficult as possible. The Retire My PC app aims to provide self-service ability to the end-user to retire their old PC quickly, easily and with minimum fuss and of course, to do so in a secure manner thereby protecting your companies data. In this blog post I'll guide you through setting it up in your own environment. The Retire My PC app. This app has the following features: stops the ConfigMgr client agent service stops the MBAM agent service rotates the BitLocker key (optional) WIPEs the BCD registry entries (optional) joins a workgroup clears the TPM protectors adds a record of all this to Azure Tables emails the log to a support inbox Requirements: Before you get started please ensure that you've already setup a Sendgrid account (for sending emails) as I've explained in Step 4 of this blog post. In this blog post you'll do the following actions: Create an Azure Resource Group Create a storage account Copy access key connection string Create an Azure table Create a function app] Configure the function app settings Create some httptriggers deploy the app via ConfigMgr test and verify on a computer Step 1. Create a Resource Group login to https://portal.azure.com and click on Create a resource, in the search field type in Resource group and select Create Resource Group. Give it a suitable name like RetireMyPc and select a suitable region. Step 2. Create a storage account In the newly created resource group, click on the Create button, select Marketplace and search for Storage Account using the text field provided. when you find Storage account, select it and then click Create. In the Create a storage account wizard, give it a unique name, select the resource group you previously created and finally, select your applicable region as shown below (highlighted in yellow). When done, click on Review + create followed by Create. Step 3. Copy access key connection string After creating the storage account, select it and then click on Access keys in the Security + Networking section and then click on Show keys and copy the Connection string of key1 as we'll need it later. Step 4. Create a table In the Storage account you created in Step 2, click on the Tables under the Data storage heading in the left pane. Next, click on + Table to add a new table. give the table a name like devicestatus and then click OK to add the table. Next click on Storage Explorer (preview) and select the newly created devicestatus table. If it appears blank (appeared blank for me with Google Chrome) try using Mozilla Firefox or another web browser. As you can see there is no data in the table yet. Step 5. Create a function app In the RetireMyPc resource group, click on + Create to create a new resource, search for Function App and go ahead and Create a function app. In the Create Function App wizard, make sure to select the RetireMyPc resource group in the resource group drop down menu, then make sure to name the Function App Name, next select PowerShell core as the Runtime stack and finally select an applicable region. and then click through the wizard, don't forget to point to the Storage Account you created previously before clicking on Create to complete this wizard. After the Function app deployment is complete your Resource group should look something like this. Step 6. Configure function app After creating the RetireMyPc Function App, select Configuration from the Settings menu on the left. Click on + New application setting. Give the new setting a suitable name like RetireMyPc_setting and paste in the Connection string you copied in step 3. click OK to the add/Edit application setting wizard, it should now appear in the list of application settings. finally, click on Save application setting and then click on Continue when prompted. Step 7. create some HttpTriggers In this step you will create 2 Http Triggers for use by the RetireMyPc app. Select the RetireMyPc Function App you created above, and select Functions in the Functions menu, then click on + Add. Create a new Http Trigger from the template provided and click on Add when done. After the http trigger is created, click on Code + Test and paste in the following Powershell code to replace what was there previously. ####################################################################################################################################### # use this code in a http trigger as part of a function app # for more details see https://www.windows-noob.com/forums/topic/22489-retire-my-pc-a-self-service-app-to-secure-company-data-on-old-computers/ # Niall Brady,2021/06/27 ####################################################################################################################################### using namespace System.Net # Input bindings are passed in via param block. param($Request, $TriggerMetadata, $inputTable) $Tenant = "windowsnoob.com" $triggerName = "ADD data TO Azure Table" # Write to the Azure Functions log stream. Write-Host "PowerShell HTTP trigger function processed a request." # Interact with query parameters or the body of the request. $ComputerName = $Request.Query.ComputerName if (-not $ComputerName) { $ComputerName = $Request.Body.ComputerName } $UserName = $Request.Query.UserName if (-not $UserName) { $UserName = $Request.Body.UserName } $Model = $Request.Query.Model if (-not $Model) { $Model = $Request.Body.Model } $Manufacturer = $Request.Query.Manufacturer if (-not $Manufacturer) { $Manufacturer = $Request.Body.Manufacturer } $Serial = $Request.Query.Serial if (-not $Serial) { $Serial = $Request.Body.Serial } $DateRetired = $Request.Query.DateRetired if (-not $DateRetired) { $DateRetired = $Request.Body.DateRetired } $Status = $Request.Query.Status if (-not $Status) { $Status = $Request.Body.Status } $a = Get-Date $body = $body + "$a ------------------------------------`n" $a = Get-Date $body = $body + "$a Starting the following trigger: '$triggerName'.`n" $a = Get-Date $body = $body + "$a Connected to tenant: '$Tenant'.`n" if ($ComputerName) { $a = Get-Date $body = $body + "$a Adding this computer to Azure Tables: '$ComputerName'.`n" #} #fix the date $NewDate = $(get-date($DateRetired) -UFormat '+%Y-%m-%dT%H:%M:%S.000Z') $a = Get-Date $body = $body + "$a Get next row key based on the last entry in the Storage Table....`n" $nextRowKey=$([int]$(($inputTable.RowKey|measure -Maximum).Maximum)+1) $a = Get-Date $body = $body + "$a nextRowKey = '$nextRowKey'.`n" # this will be the row key that we insert in this operation # Input row into DB $tableStorageItems = @() #insert the NEW data $tableStorageItems += [PSObject]@{ PartitionKey = "1" RowKey = $nextRowKey.ToString() ComputerName = $ComputerName UserName = $UserName Model = $Model Manufacturer = $Manufacturer Serial = $Serial DateRetired = $NewDate Status = $Status } # insert the data $Result = Push-OutputBinding -Name outputTable -Value $tableStorageItems $body = $body + " Adding the data returned (usually blank...): $Result `n" } $a = get-date $body = $body + "$a Exiting Azure function.`n" $a = Get-Date $body = $body + "$a ------------------------------------`n" # Associate values to output bindings by calling 'Push-OutputBinding'. Push-OutputBinding -Name Response -Value ([HttpResponseContext]@{ StatusCode = [HttpStatusCode]::OK Body = $body }) Note: In the code above, replace $Tenant = "windows-noob.com" with your tenant name and then click on Save. Step 8. Integrate the HttpTrigger Select the HttpTrigger and click on Integration and then click on + Add input under Inputs. In the window that appears on the right of your console, for Binding Type select Azure Table Storage. For the Table name enter the name of the table created earlier which was devicestatus. For the storage account connection select the RetireMyPc_setting from the drop down menu as shown below. click on OK. Repeat the above process for the HttpTrigger Output. Once done, your HttpTrigger1 integration should look like this with both Azure Table Storage (inputTable) and Azure Table Storage (outputTable) configured. Step 9. Test HttpTrigger In the Code + Test section, click on Test/Run and paste in the following Input. { "ComputerName": "MYCOMPUTER", "UserName": "niall", "Model": "Surface Book 2", "Manufacturer": "Microsoft", "Serial": "1234567890", "DateRetired": "2021-06-27T14:20:06.000Z", "Status": "OK" } If you did everything correctly you should see the following type of output in the right pane. Notice how it states your tenant name and "Adding this computer to Azure Tables:" Finally, check the Azure Tables in your storage account and you should see the data you just added. Success ! Step 10. Add/Configure second HttpTrigger Now that you know how this works, please add an additional Http Trigger called HttpTrigger2 with the following code: ####################################################################################################################################### # use this code in a http trigger as part of a function app # for more details see https://www.windows-noob.com/forums/topic/22489-retire-my-pc-a-self-service-app-to-secure-company-data-on-old-computers/ # Niall Brady,2021/06/27 ####################################################################################################################################### using namespace System.Net # Input bindings are passed in via param block. param($Request, $TriggerMetadata, $inputTable) $Tenant = "windowsnoob.com" $triggerName = "READ data FROM Azure Table" # Write to the Azure Functions log stream. Write-Host "PowerShell HTTP trigger function processed a request." # Interact with query parameters or the body of the request. $nextRowKey = $Request.Query.nextRowKey if (-not $nextRowKey) { $nextRowKey = $Request.Body.nextRowKey } $CheckComputerName = $Request.Query.CheckComputerName if (-not $CheckComputerName) { $CheckComputerName = $Request.Body.CheckComputerName } $a = Get-Date $body = $body + "$a ------------------------------------`n" $a = Get-Date $body = $body + "$a Starting the following trigger: '$triggerName'.`n" $a = Get-Date $body = $body + "$a Connected to tenant: '$Tenant'.`n" if ($nextRowKey -and $CheckComputerName) { $a = Get-Date $body = $body + "$a Checking the following row: '$nextRowKey'.`n" $body = $body + "$a Looking for this computername: '$CheckComputerName'.`n" #} #Put all table rows into $table $table="" foreach($row in $inputTable){ $table+="$($row.PartitionKey) - $($row.RowKey) - $($row.ComputerName) - $($row.UserName) - $($row.Model) - $($row.Manufacturer) - $($row.Serial) - $($row.DateRetired)- $($row.Status) " } # print out the results... # $body = $body + $table #validate section #$body = $body + "Validate: $($($inputTable|Where-Object -Property RowKey -EQ 12).ComputerName)" $a = Get-Date $found = $($($inputTable|Where-Object -Property RowKey -EQ $nextRowKey).ComputerName) $body = $body + "$a ComputerName found: $found`n" if ($found -match $CheckComputerName) { $a = Get-Date $body = $body + "$a FOUND a MATCH :-)`n" } else { $a = Get-Date $body = $body + "$a sorry, did not find a match :-(`n" } } $a = get-date $body = $body + "$a Exiting Azure function.`n" $a = Get-Date $body = $body + "$a ------------------------------------`n" # show the output to the browser...Associate values to output bindings by calling 'Push-OutputBinding'. Push-OutputBinding -Name Response -Value ([HttpResponseContext]@{ StatusCode = [HttpStatusCode]::OK Body = $body }) and configure the integration the same way as you did with the first trigger. The second trigger can be tested with a different input, pasted here. { "nextRowKey": "1", "CheckComputerName": "MYCOMPUTER" } Confirm that it finds the previously added data before moving on, notice how it states "FOUND A MATCH", this proves it is working. Step 11. Download the script Note: The SecureWipe.ps1 script used in this guide can only be downloaded by logged-on members of windows-noob.com, so if you haven't already done so, create an account and login. Download the RetireMyPC Powershell script (txt file) and save it as SecureWipe.ps1 SecureWipe.txt Step 12. edit the script The script won't work until you've made some edits. In Azure, locate HttpTrigger1 and click on Get Function URL, copy it. Edit line 428 of SecureWipe.ps1 and insert the copied URL of httptrigger1 Edit line 463 for the copied url of httptrigger2 Edit line 595 and insert your sendgrid API key Modify the following lines otherwise i'll be getting your emails... Step 12. Deploy the app via ConfigMgr Locate ServiceUI.exe from the C:\Program Files\Microsoft Deployment Toolkit\Templates\Distribution\Tools\x64 folder in MDT files as explained in Step 2 here. For licensing reasons I cannot include it here. Create a package/program with the following text ServiceUI.exe -process:explorer.exe %SYSTEMROOT%\System32\WindowsPowerShell\v1.0\powershell.exe -NoProfile -WindowStyle Hidden -ExecutionPolicy Bypass -File securewipe.ps1 Your finished package (or app, it's up to you to decide which...) should contain at least securewipe.ps1 and ServiceUI.exe (the install.cmd and uninstall.cmd are not needed here). Deploy the package with a purpose of AVAILABLE so that it shows up in your users Software Center Job done, go ahead and start testing it, to see the app in action please review my video here. Troubleshooting If you want to test this in a non-destructive way locate the following variable $BrickTheDevice and set it to $false The app logs to C:\Users\<USERNAME>\AppData\Local\Temp\win.ap.securewipe.log Next Steps A quick look at the Retire My PC app The verification app Using the updated version via Company Portal


.thumb.png.ec91f70e63a99dd572889b1334e1ef56.png)


-
MBAM portals cannot access
anyweb replied to hannah's topic in System Center Configuration Manager (Current Branch)
i'd just run it and then attempt to install the portal again -
good info, thanks for sharing, i'll ask Microsoft for comment
-
MBAM portals cannot access
anyweb replied to hannah's topic in System Center Configuration Manager (Current Branch)
did you run winrm quickconfig on the server ? -
PXE working but from wrong network
anyweb replied to jkjk12's topic in System Center Configuration Manager (Current Branch)
i think you answered your own question, have you tried hyper-v ? why have 2 nics connected to the ConfigMgr server ? -
i notice in your first screenshot that it is warning you about the sheer number of SUG's you have, do you have any idea how many there are ? any reason why you are not cleaning them up ?
-
MBAM to SCCM issue
anyweb replied to Prip's topic in System Center Configuration Manager (Current Branch)
PKI is not needed for BitLocker Management, but it's recommended, you can still use e-http, however be aware that come October 2022, http will be deprecated so the move to HTTPS should start now https://www.niallbrady.com/2021/03/12/prepare-for-http-only-client-communication-depreciation-in-configmgr-31-10-2022/ I'd recommend you fix your PKI issues and continue down that road, hire a pki consultant to assist -
ok and all your component status are ok ? or are there issues reported there ?
-
MBAM to SCCM issue
anyweb replied to Prip's topic in System Center Configuration Manager (Current Branch)
first things first, converting ConfigMgr to HTTPS shouldn't break things unless it's not done right, so were you sure that the clients had the right certs in place before making the switch? -
what happens if you click OK or type the name of the software update group ?
-
PXE not working
anyweb replied to jkjk12's topic in System Center Configuration Manager (Current Branch)
are you pxe booting a vm or a real computer ? what does the smspxe.log reveal when you are pxe booting, if you don't see the mac address of the device listed then something is mis-configured on the osd side, for example, did you deployed anything to the unknown collection(s), did you make the task sequence available to media&pxe ? -
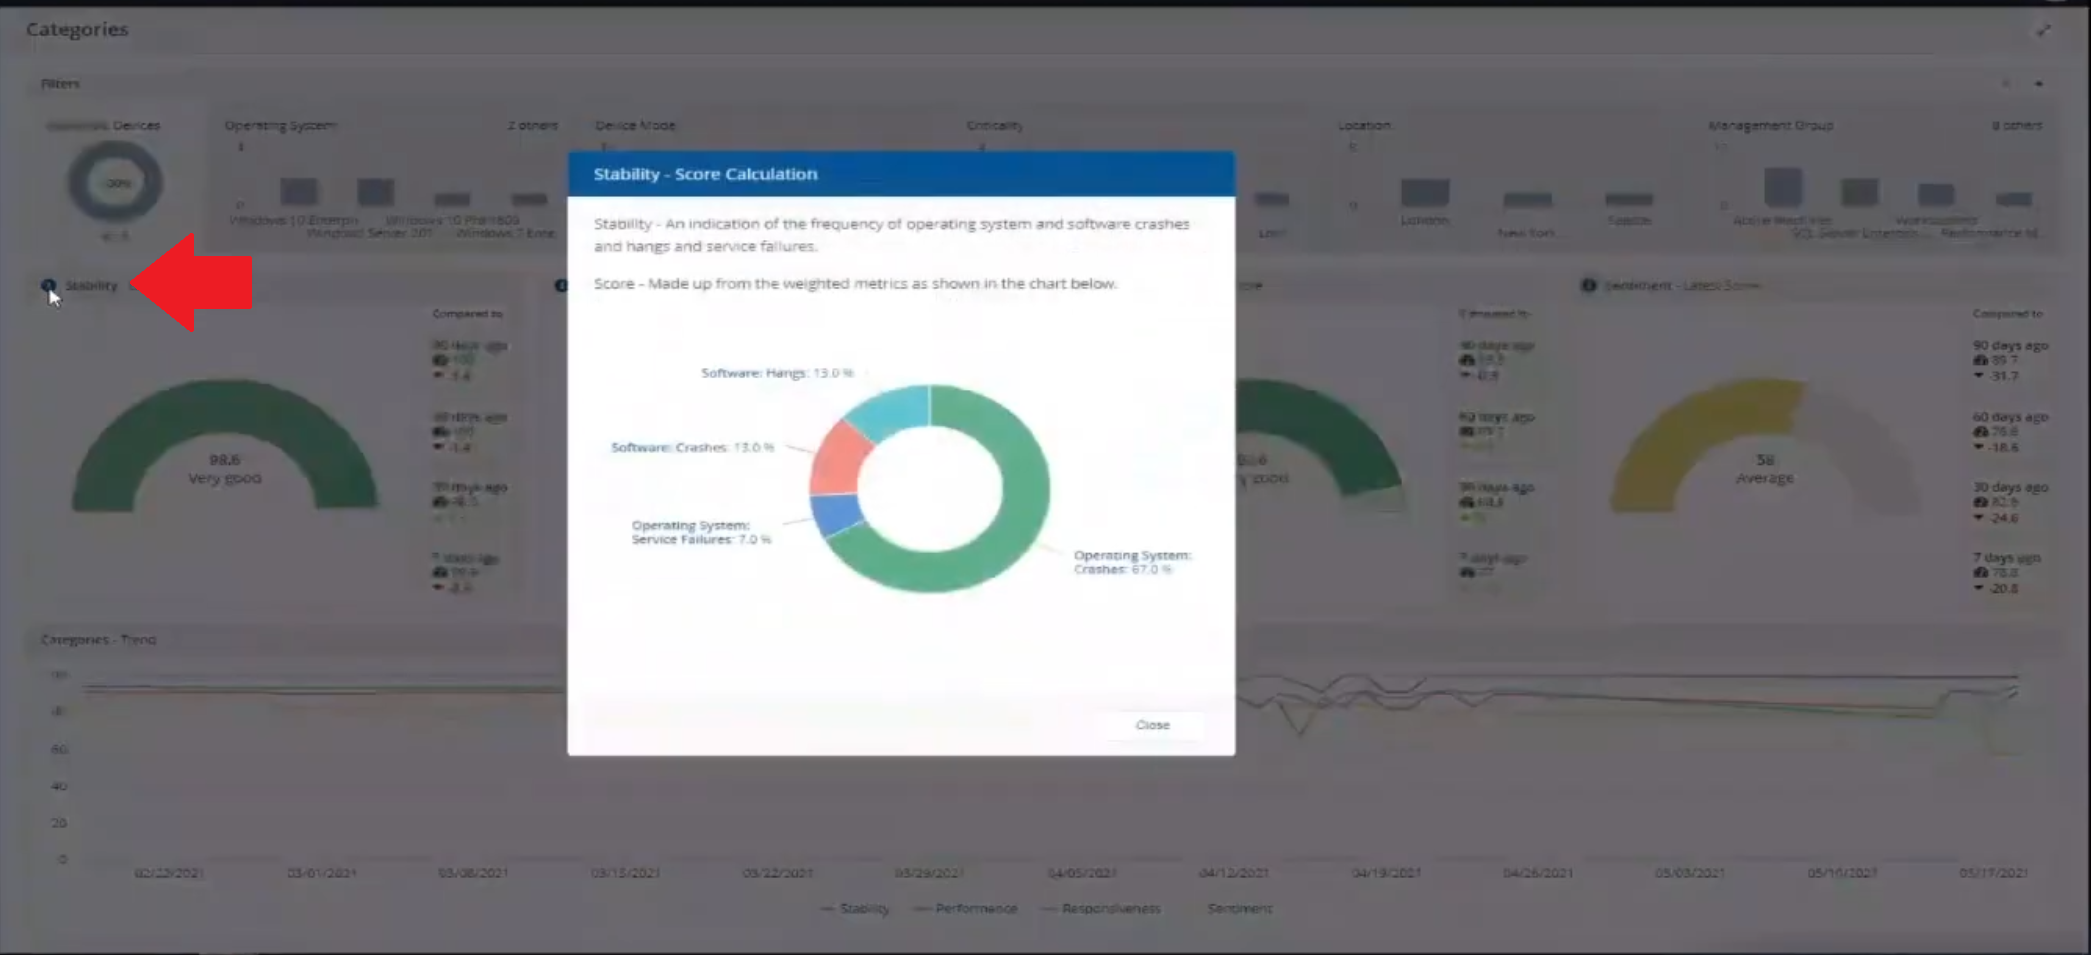
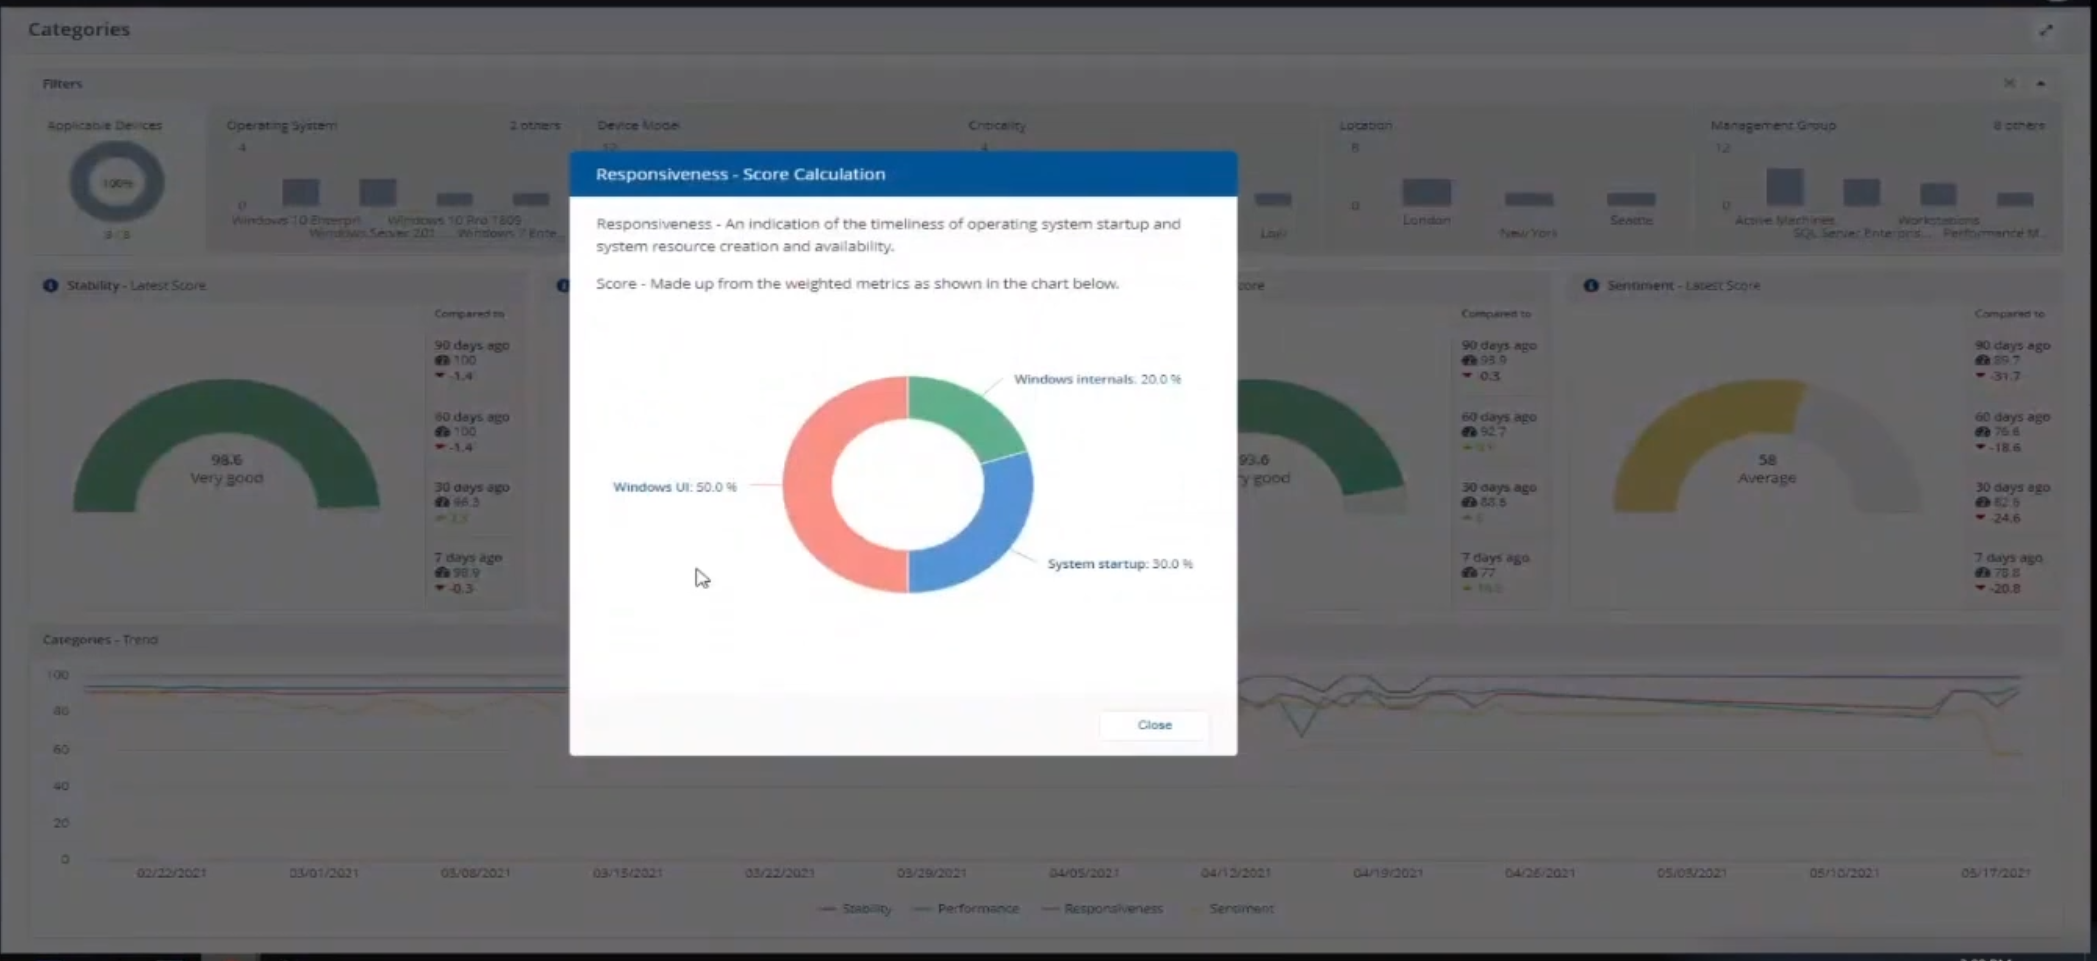
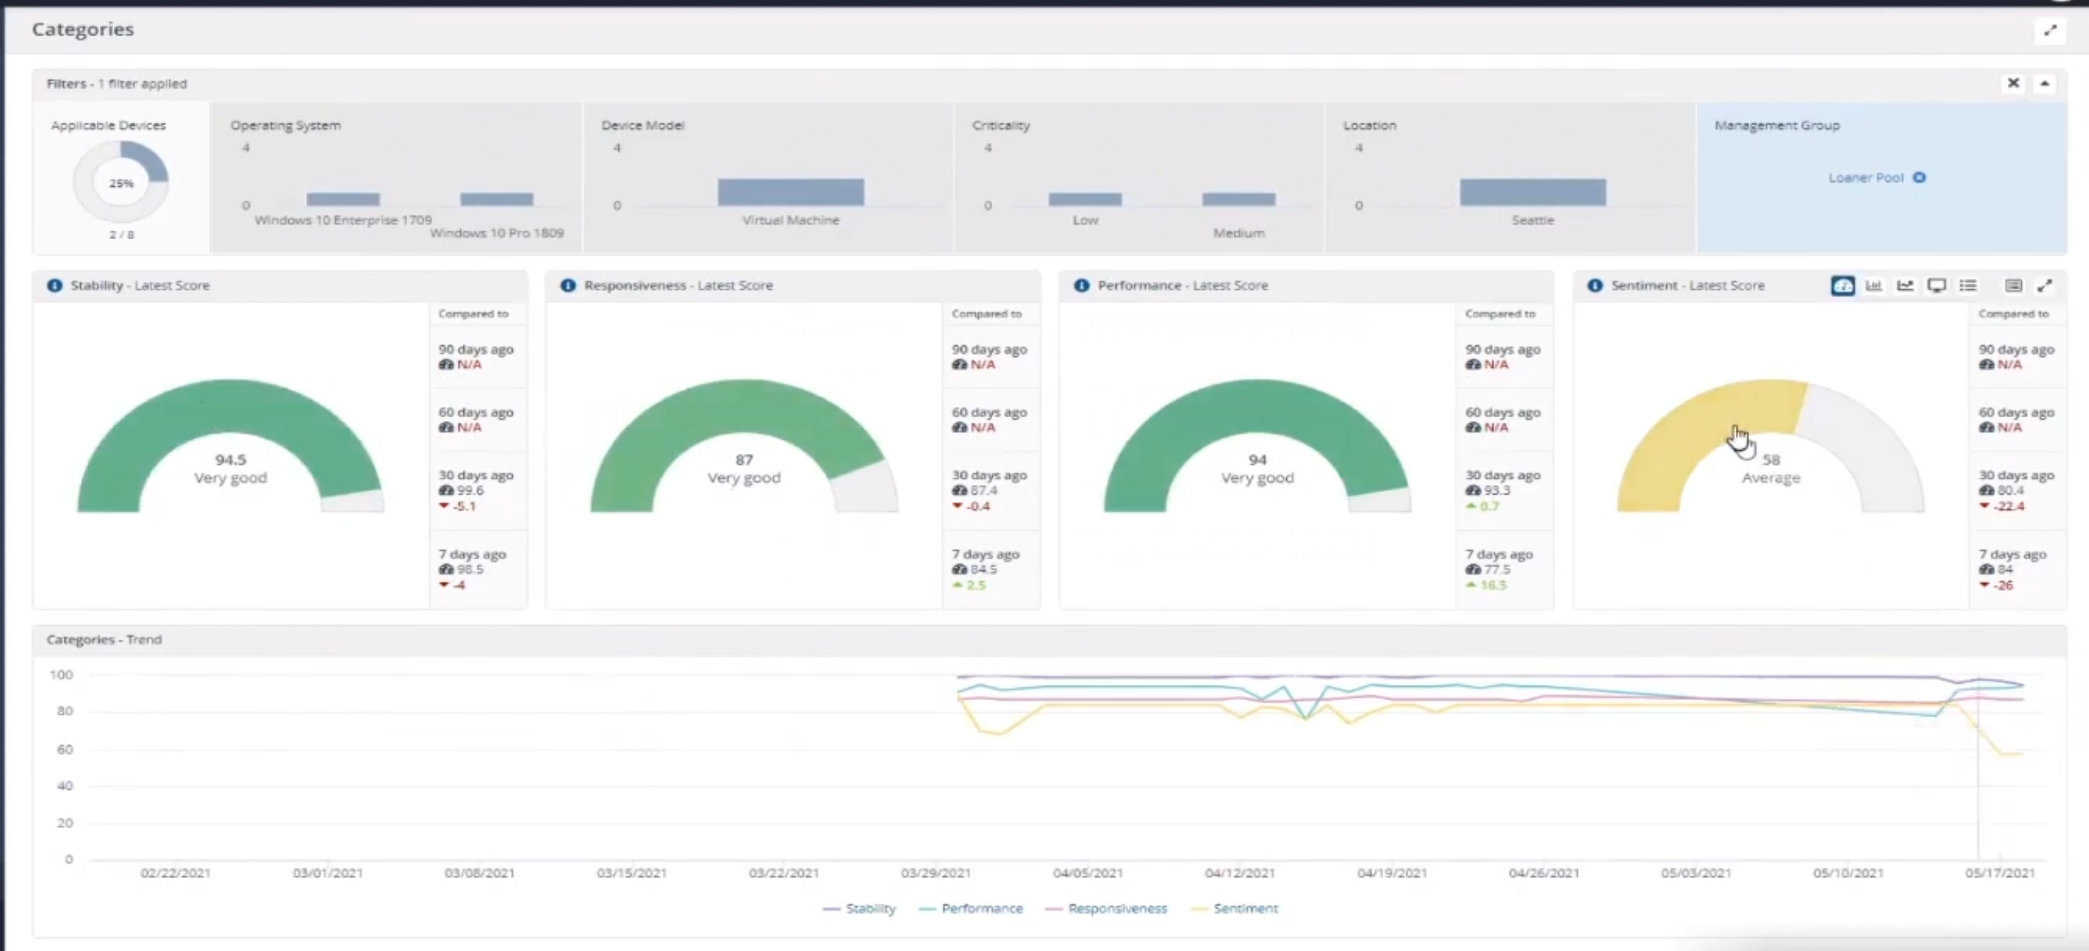
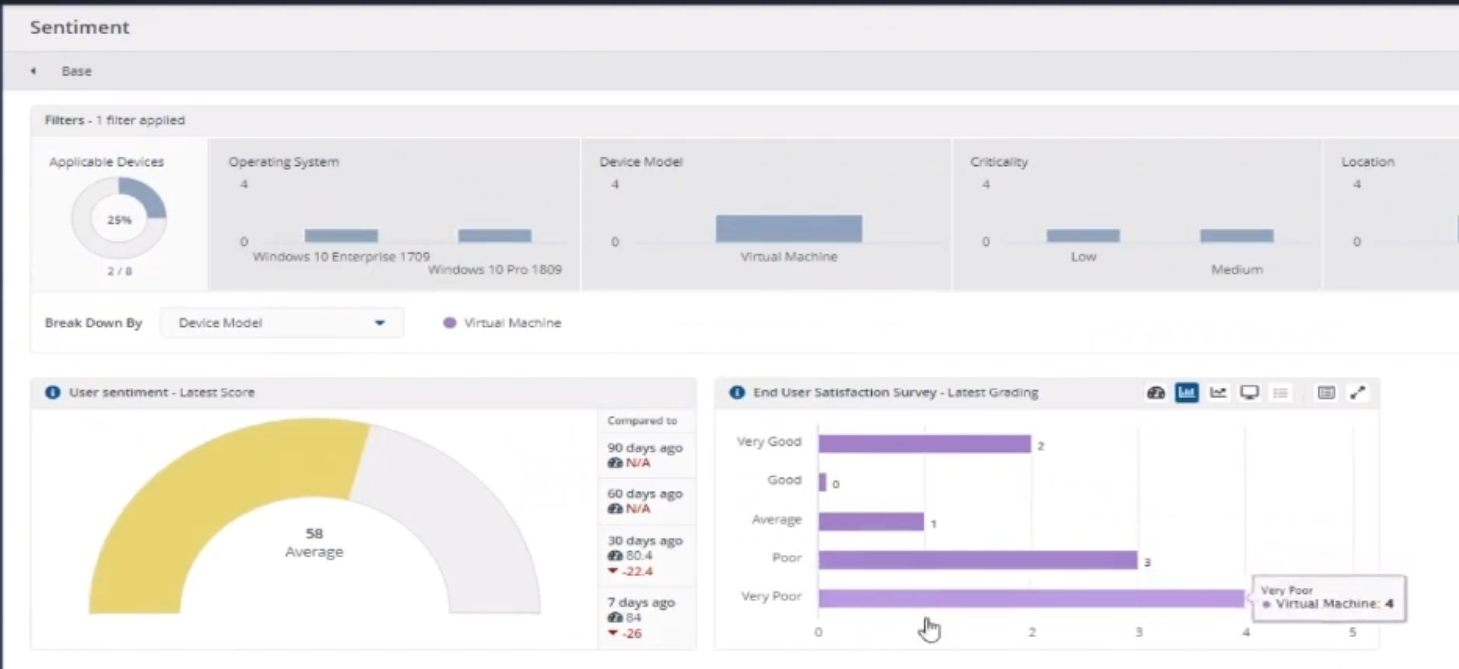
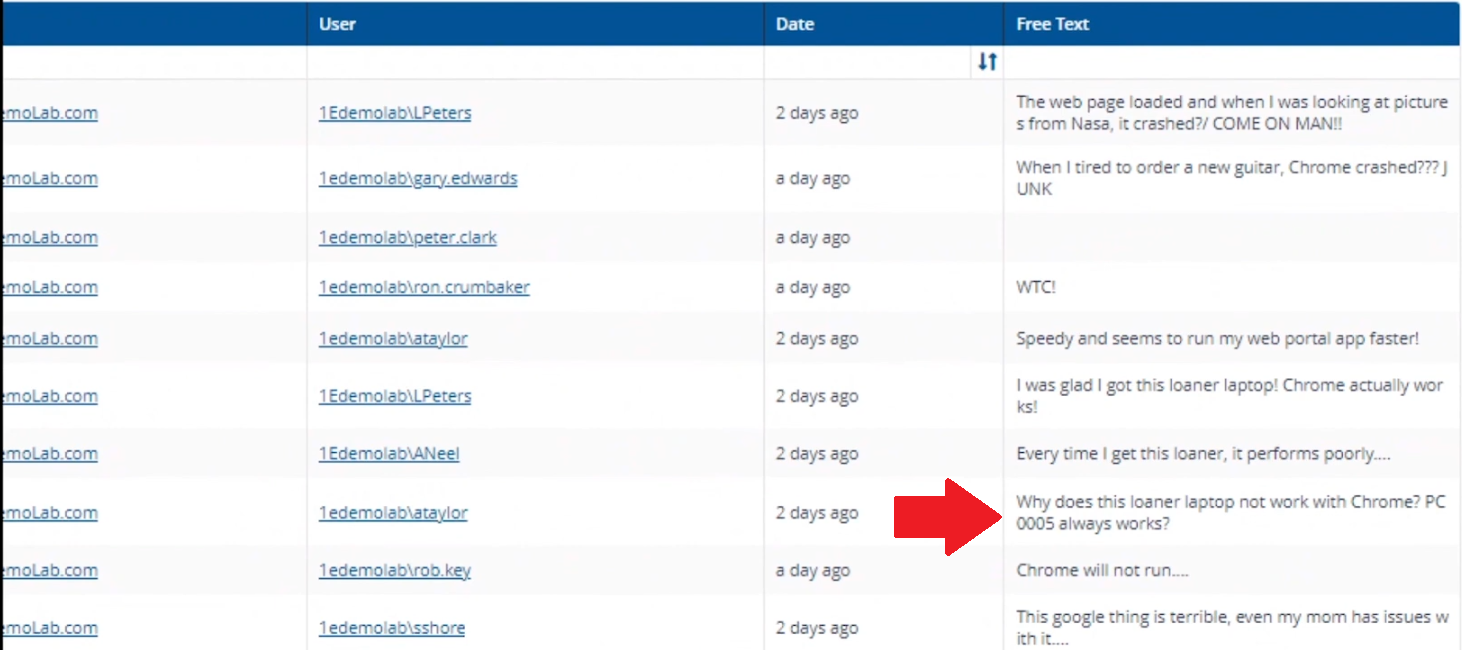
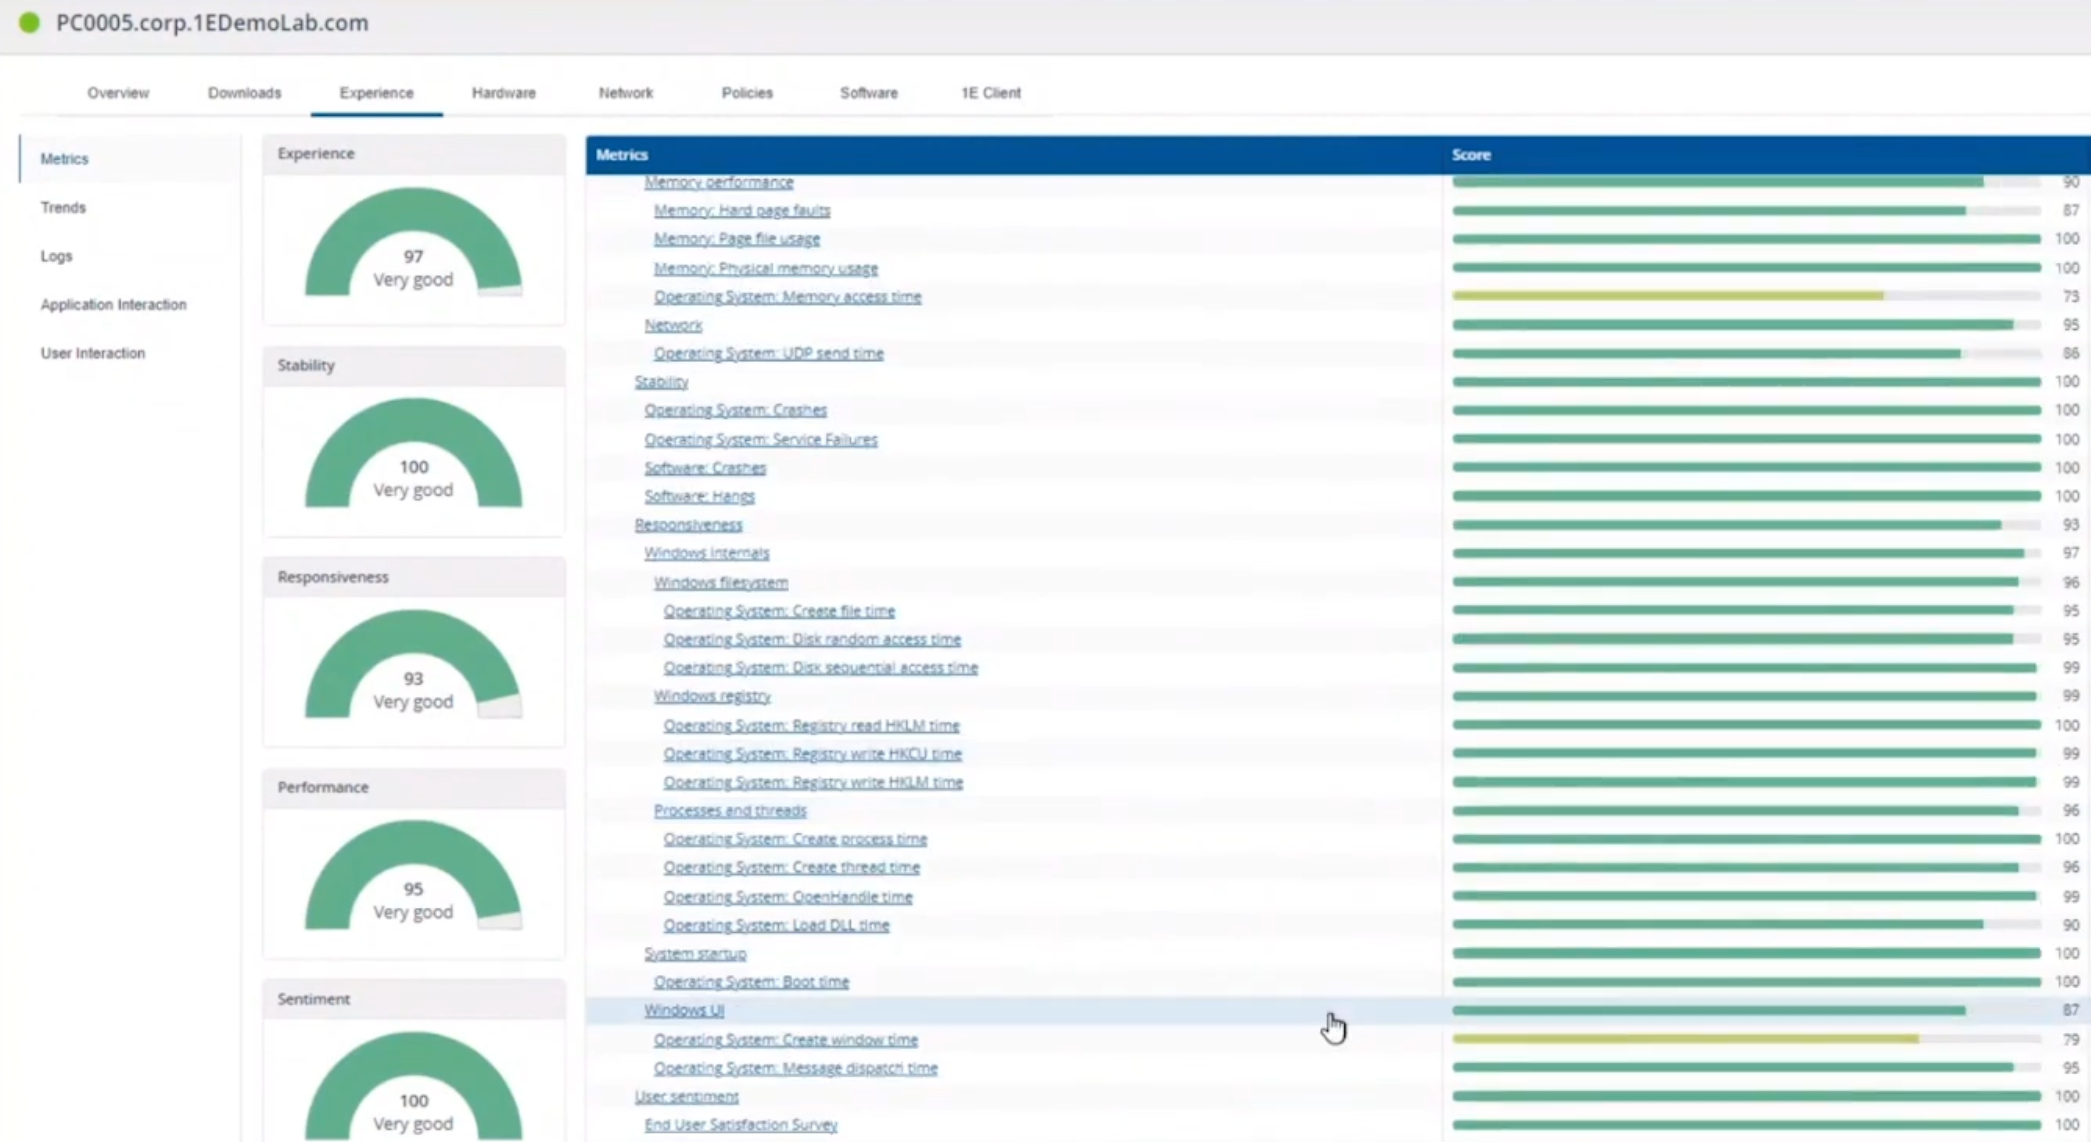
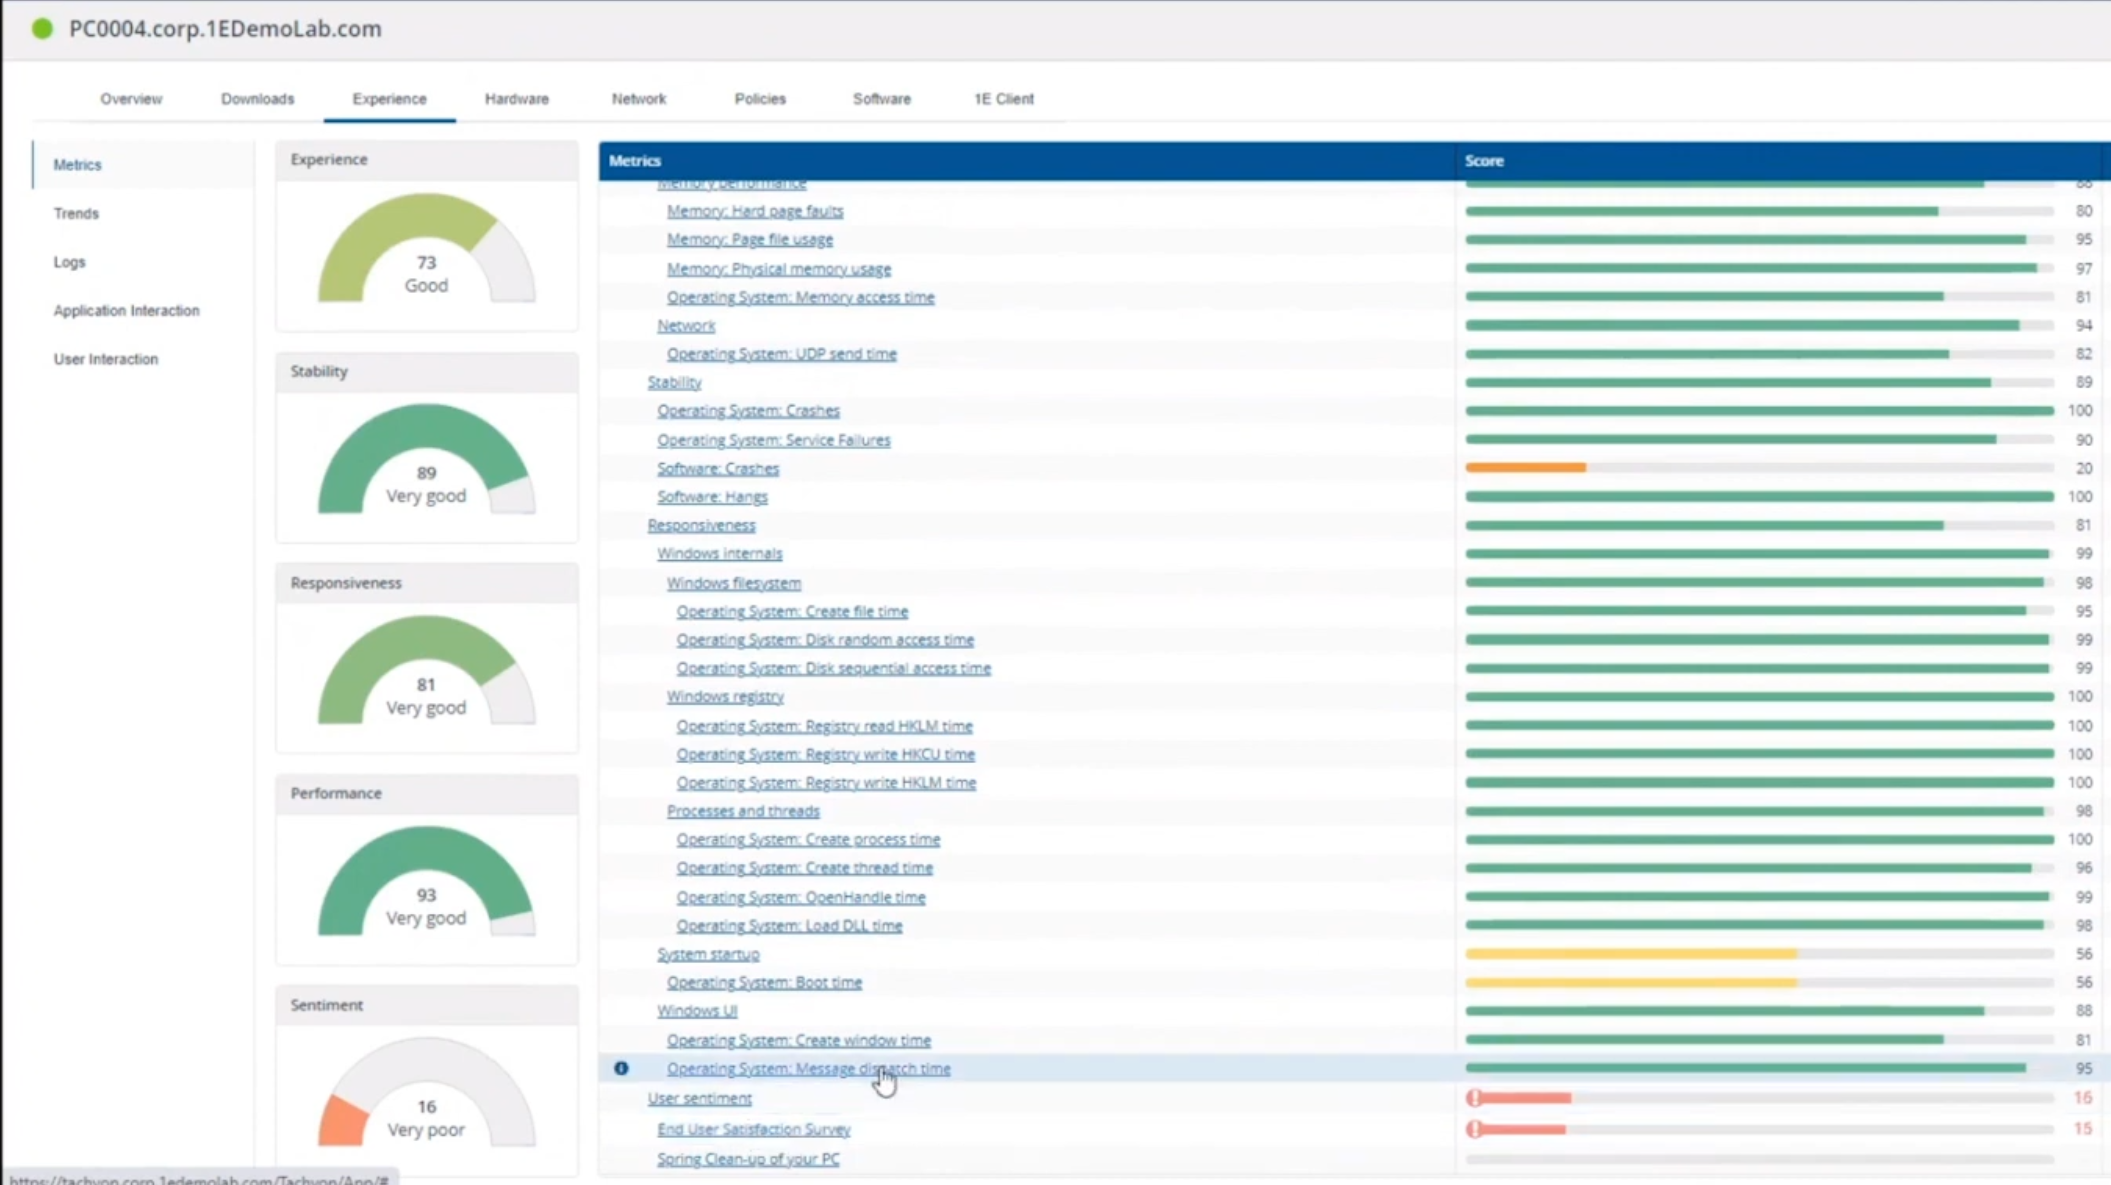
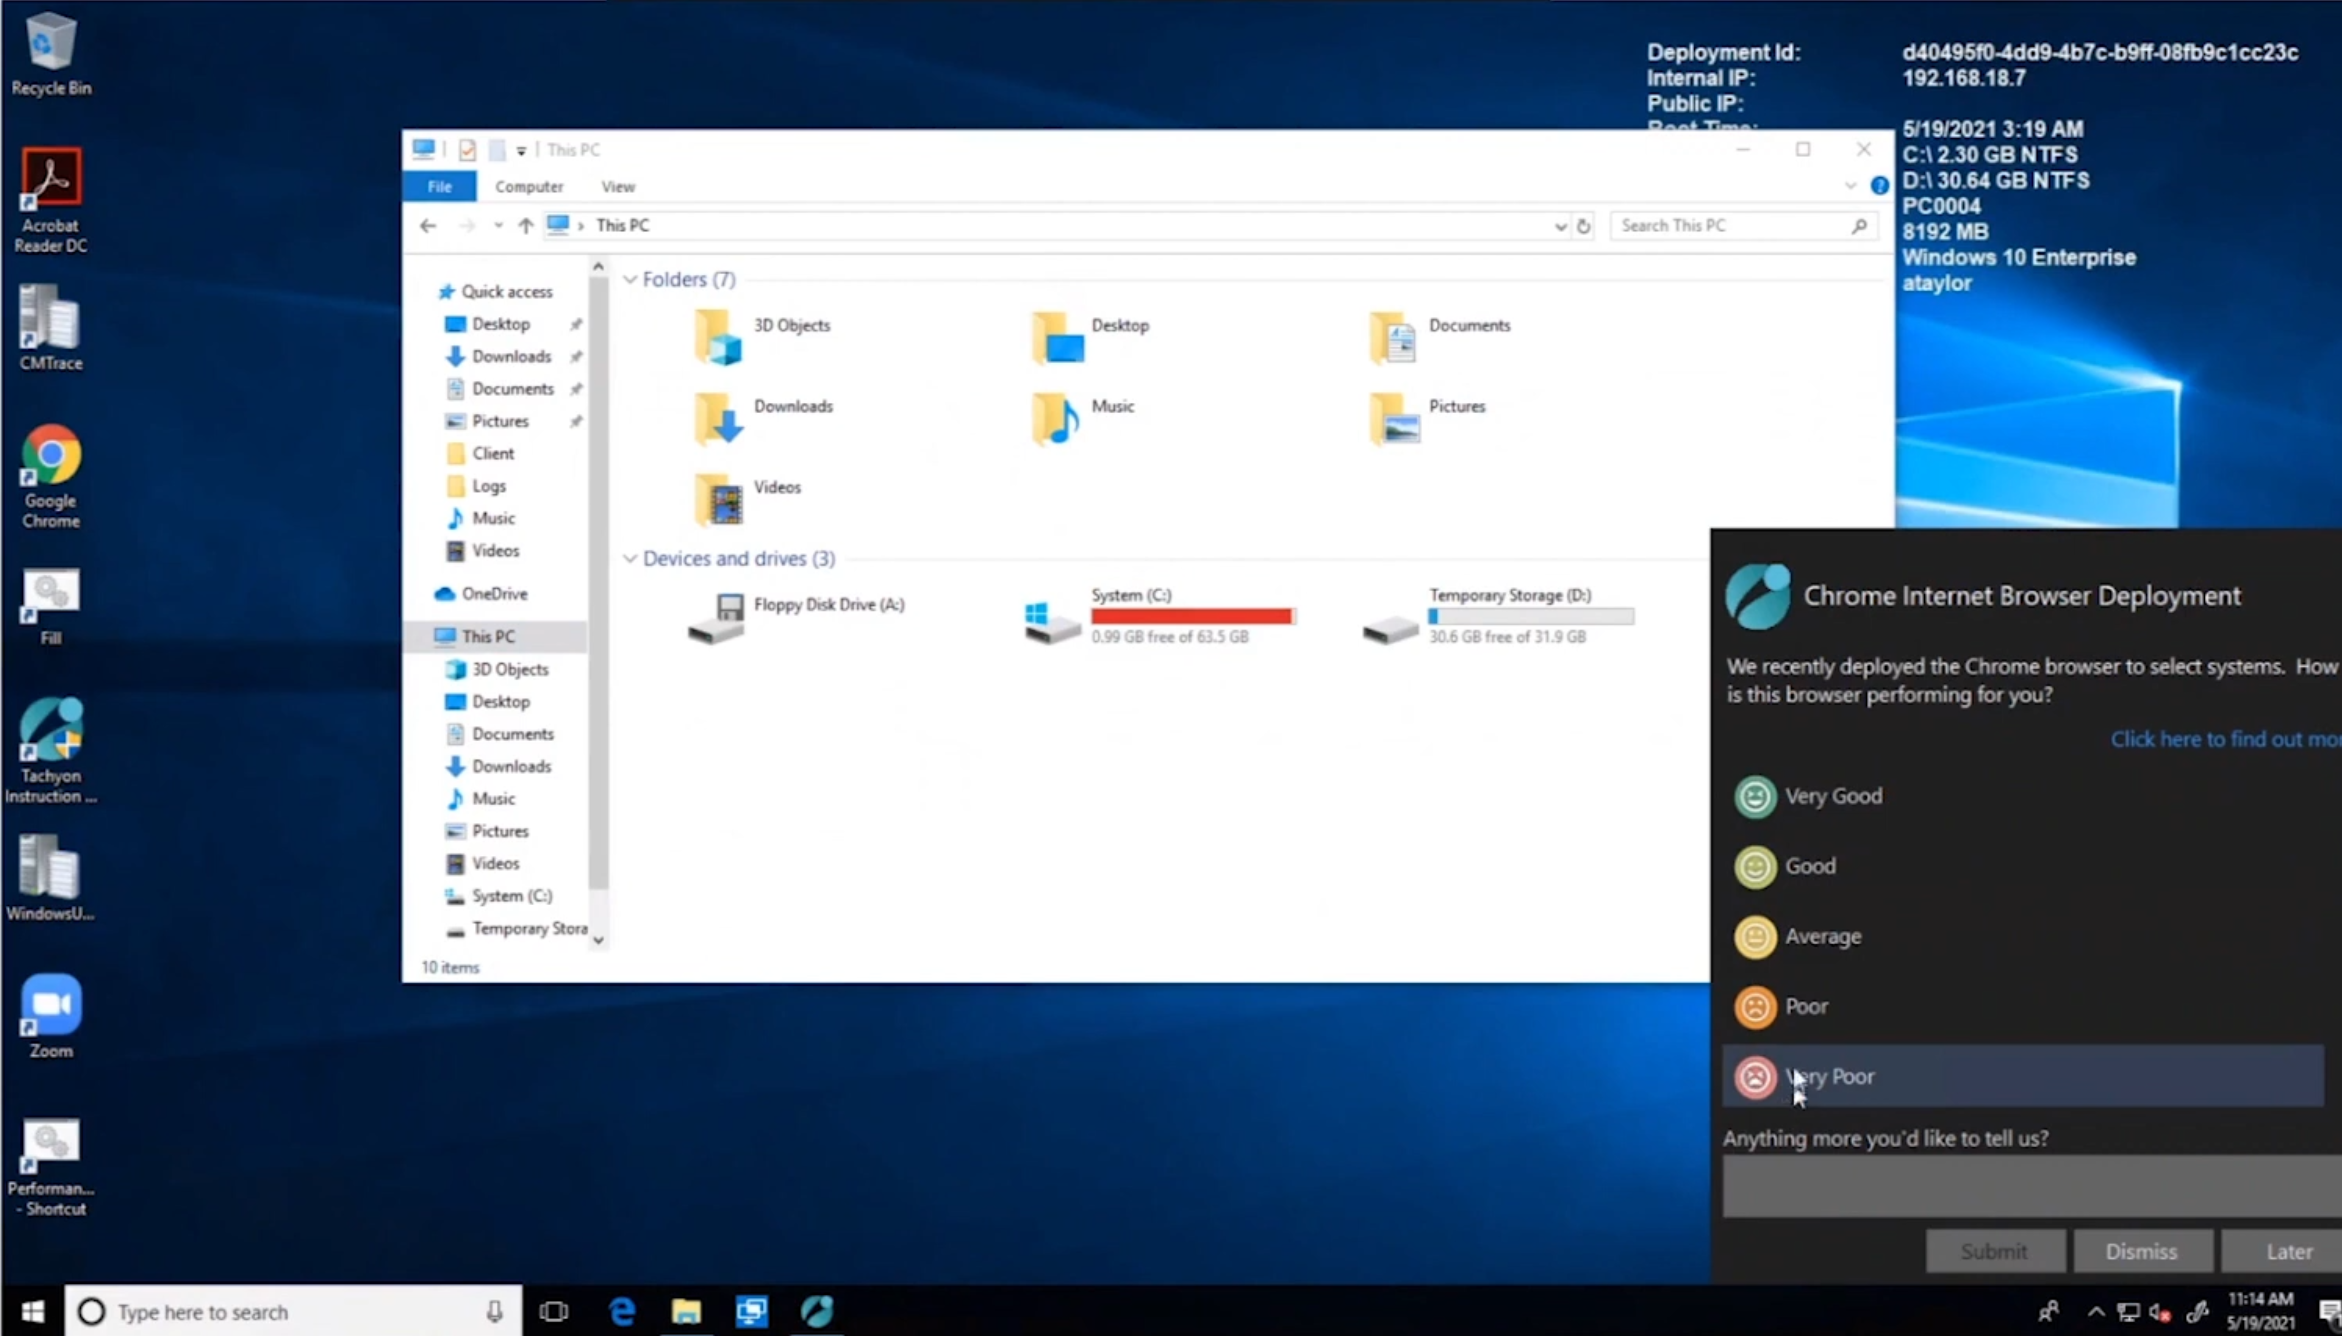
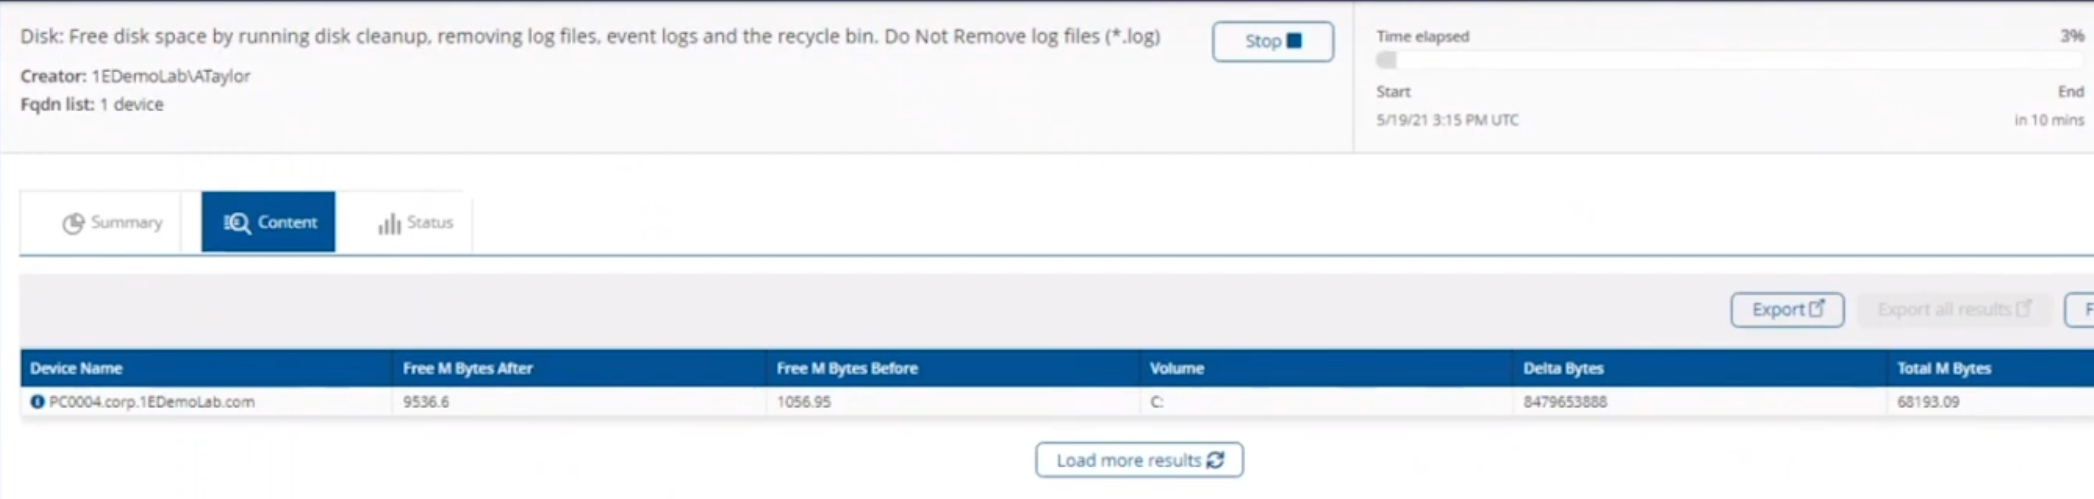
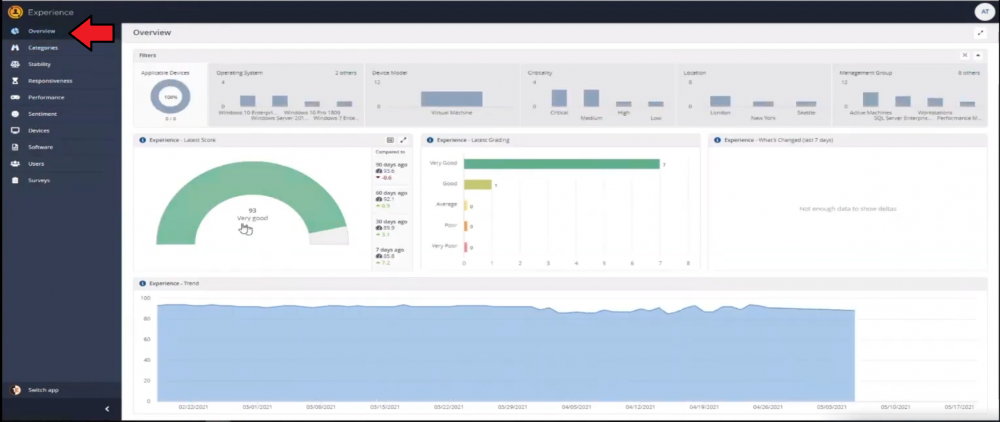
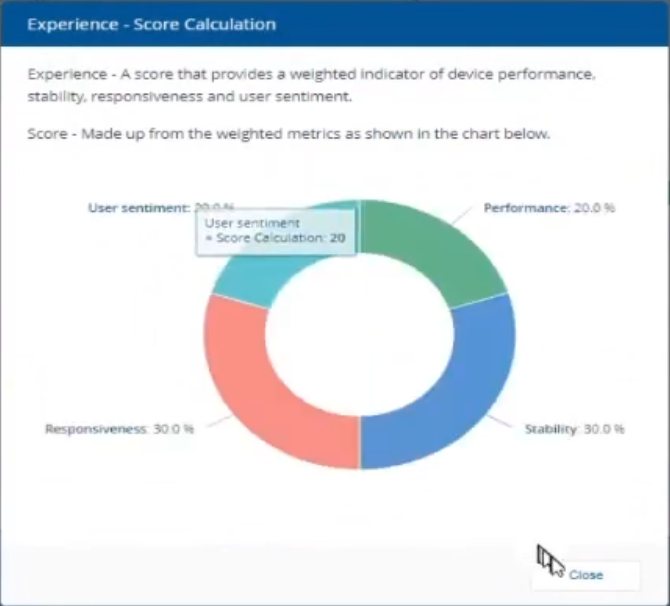
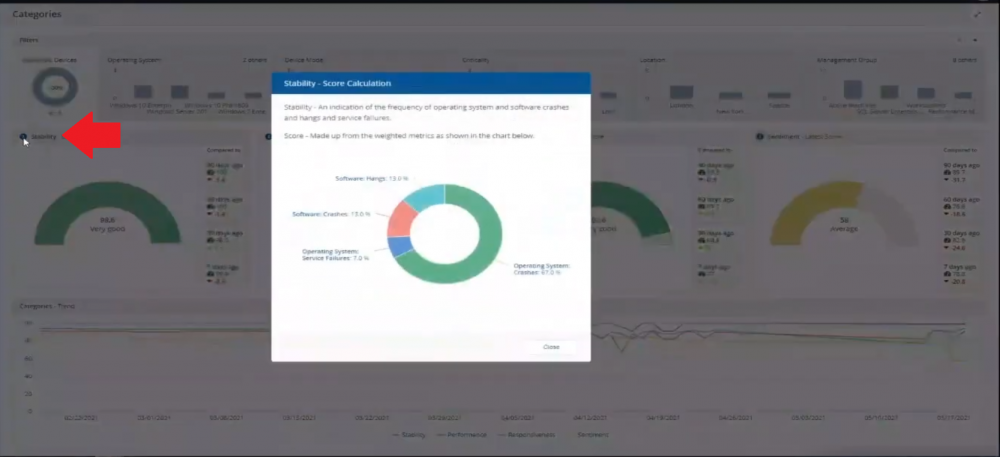
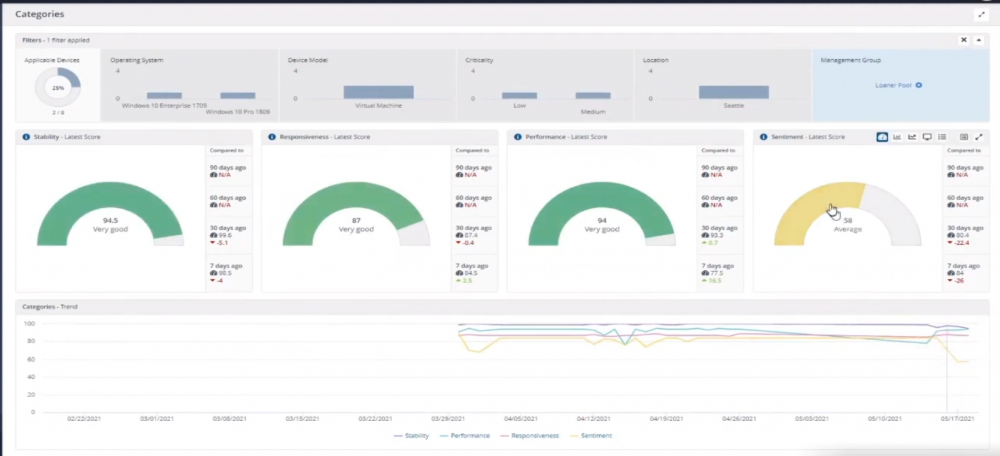
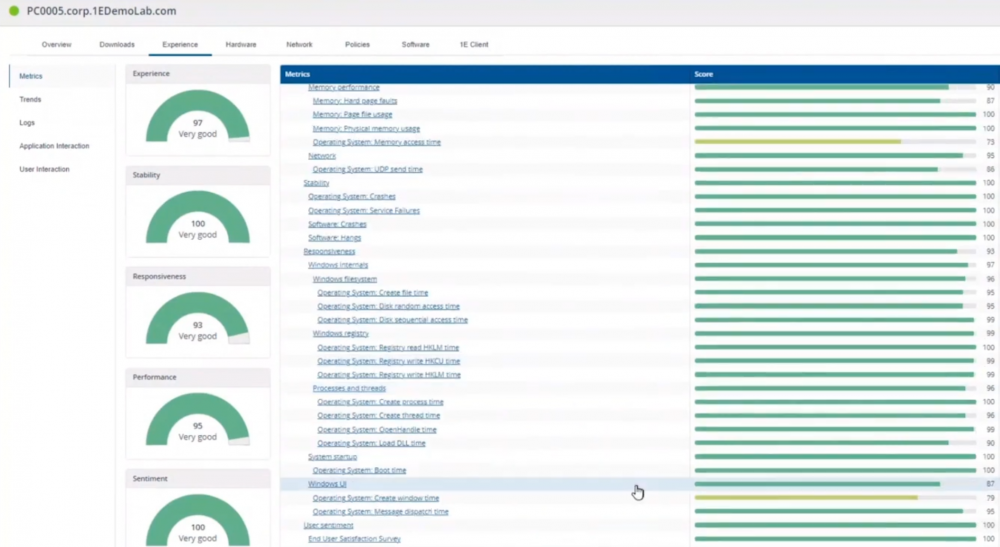
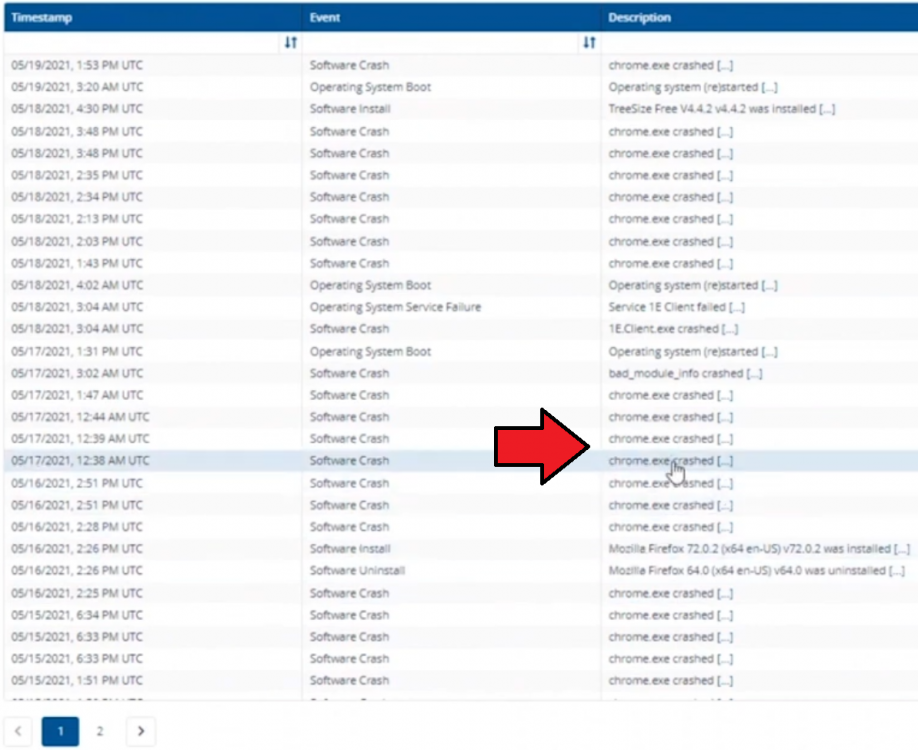
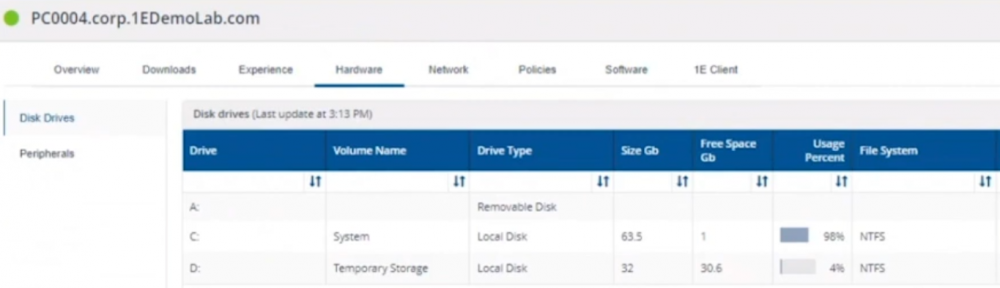
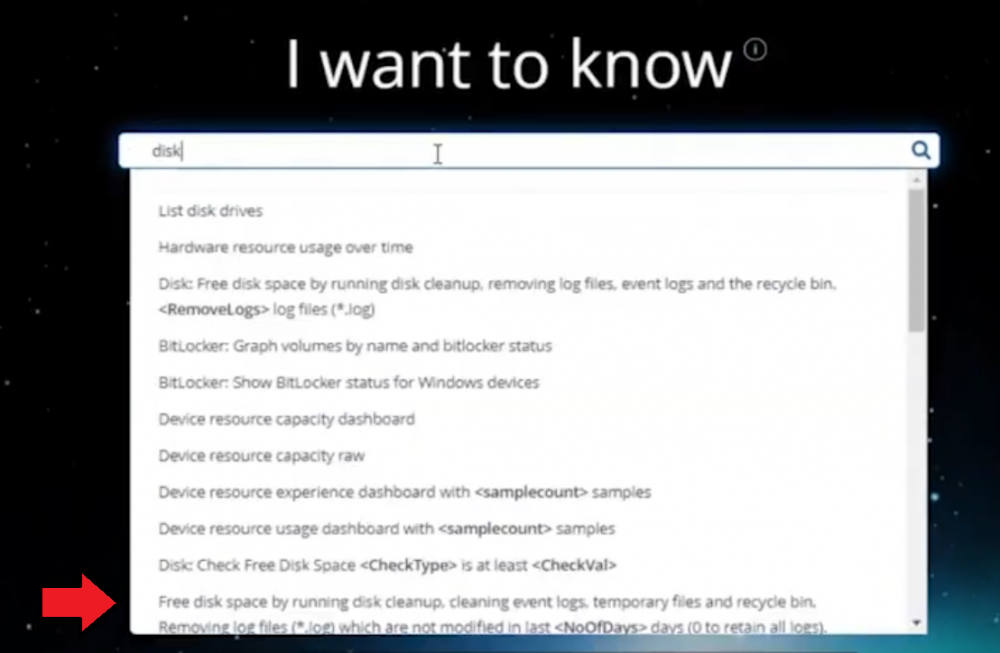
Introduction In a previous blog post I explained how to sign up for a webinar series and by doing so, learn from industry experts and Microsoft MVP’s about how and why they use tools like Tachyon from 1E to make things work better for your users, including how to deal with slow endpoints or in today’s case, how to deal with apps that crash. I’ll blog about each episode in the webinar series and link them here for your perusal. Episode 1. How to find and fix Slow Endpoints Episode 2. That crashy app This blog post relates to the apps that crash and how you can deal with them. I’m sure we’ve all experienced app crashes, I know I have. They go hand in hand with computer usage. For example, you download and install an app and before long either the operating system, some missing .DLL file or some other application or driver cause an incompatibility and the end-result is a crash. Google Chrome after crashing. Apps that crash can be caused by all sorts of things, software causing the hardware to crash or vice versa. If you purchase software that costs a lot of money and it crashes, then that leaves you with a bad experience. Michael Mott (guest speaker, on the right) talks about the approach of someone using Tachyon experience as a new user, to query the endpoints in real time and to figure out how the end users are feeling, particularly with all this working from home going on right now. But what is Tachyon exactly ? I briefly touched upon it in the first blog post in this series. Tachyon enables you to query endpoints in real time to figure out what is happening or what is installed on that machine, and execute commands in real time to fix issues at scale. The benefit to the end user is that the IT admin can use Tachyon to observe what is happening on the endpoint in real-time and potentially avoid having to call the end user about their problem, be it a crashy app or slow endpoint. “A lot of the time users don’t complain until it gets really bad.” Tachyon itself is made up of different modules (shown below) and today we’ll be looking mostly at the Experience module. Using the Experience module (made up of a couple of different scores) in Tachyon gives you an overview of everything, you can see how apps experience for the end user and this gives you the power to stop problems in advance or see them happening in real time. Here we can see the Overview selected. The overview is made up of 4 main components to generate an experience score. User sentiment Performance Responsiveness Stability A breakdown of the experience score calculation. By drilling down into each of those weighted metrics we can see that Stability is the one which directly relates to apps that crash or an operating system with problems. Responsiveness relates to the Windows UI, system internals and system startup so for example if an app such as Outlook is slow to launch and shows a blank screen while loading, this can be captured here and reported on. Performance is based on System disk performance, memory throughput, network performance and CPU performance. In the categories overview for these loaner machines (in the example) they are performing well for the first three metrics, however Sentiment is not doing so well in the dashboard below. Sentiment showing an average score. But what is the Sentiment component, well it’s based on user feedback gathered from surveys sent out. If you click on the Sentiment category to drill down further we get more details of that. Some user rated their virtual machine as very poor. Surveys help to generate the Sentiment score and these surveys are sent out using the 1E client. Digital Experience Management (DEM) is all about assisting the user to do the best work they can… Sentiment is a great addition here. These surveys are only sent out to the end-user when the client detects that mouse movement is low, or for example processor usage is calm or for example it verifies that the user is not busy having a conversation in a Teams chat. In other words, the surveys are built in such as a way as to not disturb the user. Using the data and drilling down to find out more Looking at the data we can see that PC0005 is responding well and getting good scores, but not so for PC0004. Drilling down further we can see responses from the end users about problems on individual clients and these give clues as to what the problem is. A quick look at the good machine (PC0005) in real-time shows how it’s performing and all looks good (as expected), including the Surveys. You can also look at the logs and see how it booted, you can search for events that have keywords like Crash for example. But that was the good machine, so all looked OK. PC0004 however had a bad score for Sentiment, so let’s take a look at that. As you can see, the Sentiment score is very poor. Digging deeper we can see that Chrome was crashing over and over, no wonder the user was unhappy. They even installed Mozilla Firefox to try and resolve things. More investigation reveals that the system disk is nearly full, perhaps that’s the cause of the crashing app. If we then go directly to the device in question you can indeed see it’s low on disk space and (as it was not being used) the Survey was showing. Surveys help to pinpoint where the issues lie. Taking action Now that the IT admin has some clues to the problem, they can take action using Tachyon Explorer. The actions available to IT admins can be scoped with permissions via role based access control (RBAC) so that for example they can only run Survey Administration and the actions applicable to that role. In there, you can type free text search fields or even connect to it using an IT ticketing system such as ServiceNow. In this example however, the admin searches for disk and that brings up several examples of actions, including how to free up disk space. This free disk action empties the recycle bin, runs a disk cleanup and removes temporary files. But, even though the admin wants to do this action they can be required to need approval to do it to add an extra layer of (2FA based) security. After the approval is received the free disk action runs automatically, and Chrome stops crashing for the end user on PC0004. Another happy user ! That’s it for this blog post, I hope to see you in the next one. In the meantime, I’d suggest that you sign up for the next DEM webinar, it’s free, tell them Niall sent you . And for those of you who want to see previously published episodes please click here. DISCLAIMER: The contents of this article are the opinion of the author and have been written from an impartial standpoint; however, 1E may have reimbursed the author for time and expenses for undertaking the findings and conclusions detailed in the article.


-
PXE not working
anyweb replied to jkjk12's topic in System Center Configuration Manager (Current Branch)
did you enable the boot image for PXE ? -
High CPU Usage Cause by Windows Management Instrumentation
anyweb replied to NunovUrbizniz's question in Windows 10
to prove it's not the ConfigMgr client agent, simply uninstall it on one or more of those systems and monitor to see if the problem re-occurs, if it doesn't then you've got a clue, start there -
Client Health Status sccm 2103
anyweb replied to Cliff's topic in System Center Configuration Manager (Current Branch)
first things first, before trying to fix your clients are you sure that the component status on the site server is all ok ? any problems there ? if it's all good then start looking at clients individually to determine the issues, it could be anything, corrupt wmi, invalid data or other reasons, Anoop has a good post here which should give you some pointers -
also the 0x8031005b translates to " The Group Policy settings for BitLocker startup options are in conflict and cannot be applied. Contact your system administrator for more information. Source: Windows ----- "
-
have you enabled the client management tab settings at all when you configured BitLocker Management ?


.png.6fef9ba493139d02307ecab2c954b60b.png)