


anyweb
-
Posts
9277 -
Joined
-
Last visited
-
Days Won
371
Everything posted by anyweb
-

3rd party updates
anyweb replied to jkjk12's topic in System Center Configuration Manager (Current Branch)
did you setup a schedule ? did you monitor the wsus logs generated when it synced ? do the status messages give any clues -
is WSUS configured in https mode ?
-
Failed to run Task Sequence 0x80004005
anyweb replied to CindyP750's topic in Configuration Manager 2012
ok so based on this, can you check the IIS services on your mp, and verify it is started (or not), if not, try starting it. IIS=Internet Information Services (IIS), such as here...the actions in the right pane govern start/stop etc...
-
Failed to run Task Sequence 0x80004005
anyweb replied to CindyP750's topic in Configuration Manager 2012
I'm happy to help but this is just the ccmsetup log from a client, it's nothing to do with attempting to image a computer, you need to first review the management point status on your site server, if and only if that is ok then move on to troubleshooting the clients -
- In Tune, Surface hubs not registering in MDM
anyweb replied to RobbieJ's topic in Microsoft Intune
that makes sense, give it a go and report back with your success or lack of -
- In Tune, Surface hubs not registering in MDM
anyweb replied to RobbieJ's topic in Microsoft Intune
I checked with a Hub user and this was his response 1) autoenrollment is not enrolling in to intune, only Azure AD 2) all policy and apps need to be assigned to a device group, as there is no "concept" of a user on the device -
- In Tune, Surface hubs not registering in MDM
anyweb replied to RobbieJ's topic in Microsoft Intune
I'd like to help but I don't have a surface hub lying around, I'll ask someone who does... -
Failed to run Task Sequence 0x80004005
anyweb replied to CindyP750's topic in Configuration Manager 2012
ok well one step at a time then, if you cannot get policy then either its a client issue, a network issue or a server issue, to rule out the server having an issue, check your component status logs in the Monitoring node of ConfigMgr for anything MP related -
Failed to run Task Sequence 0x80004005
anyweb replied to CindyP750's topic in Configuration Manager 2012
ok so to summarise when you pxe boot you cannot get policy is that your problem ? if not please add more details -
Failed to run Task Sequence 0x80004005
anyweb replied to CindyP750's topic in Configuration Manager 2012
check date time on the client computer, today is the 19th but your log is from the 16th, so which is correct ? the client must have the same date/time as the MP, and it's not able to get policy from the MP as you can see here <![LOG[SyncTimeWithMP() failed. 80004005.]LOG]!><time="17:00:38.460+480" date="04-16-2021" component="TSMBootstrap" context="" type="3" thread="1572" file="tsmbootstraputil.cpp:1516"> <![LOG[Failed to get time information from MP: http://xxx.yyy.com.]LOG]!><time="17:00:38.460+480" date="04-16-2021" component="TSMBootstrap" context="" type="3" thread="1572" file="tsmbootstraputil.cpp:1976"> <![LOG[MpCnt > 0, HRESULT=80004005 (tsmbootstraputil.cpp,2058)]LOG]!><time="17:00:38.460+480" date="04-16-2021" component="TSMBootstrap" context="" type="0" thread="1572" file="tsmbootstraputil.cpp:2058"> <![LOG[QueryMPLocator: no valid MP locations are received]LOG]!><time="17:00:38.460+480" date="04-16-2021" component="TSMBootstrap" context="" type="3" thread="1572" file="tsmbootstraputil.cpp:2058"> <![LOG[TSMBootstrapUtil::QueryMPLocator ( true, sSMSTSLocationMPs.c_str(), sMediaPfx.c_str(), sMediaGuid.c_str(), sAuthenticator.c_str(), sEnterpriseCert.c_str(), sServerCerts.c_str(), nHttpPort, nHttpsPort, bUseCRL, m_bWinPE, httpS, http, accessibleMpCnt), HRESULT=80004005 (tsmediawizardcontrol.cpp,1039)]LOG]!><time="17:00:38.460+480" date="04-16-2021" component="TSMBootstrap" context="" type="0" thread="1572" file="tsmediawizardcontrol.cpp:1039"> <![LOG[Failed to query Management Point locator]LOG]!><time="17:00:38.460+480" date="04-16-2021" component="TSMBootstrap" context="" type="3" thread="1572" file="tsmediawizardcontrol.cpp:1039"> <![LOG[Exiting TSMediaWizardControl::GetPolicy.]LOG]!><time="17:00:38.460+480" date="04-16-2021" component="TSMBootstrap" context="" type="0" thread="1572" file="tsmediawizardcontrol.cpp:1482"> <![LOG[pWelcomePage->m_pTSMediaWizardControl->GetPolicy(), HRESULT=80004005 (tsmediawelcomepage.cpp,304)]LOG]!><time="17:00:38.460+480" date="04-16-2021" component="TSMBootstrap" context="" type="0" thread="1572" file="tsmediawelcomepage.cpp:304"> <![LOG[Setting wizard error: An error occurred while retrieving policy for this computer (0x80004005). For more information, contact your system administrator or helpdesk operator.]LOG]!><time="17:00:38.460+480" date="04-16-2021" component="TSMBootstrap" context="" type="0" thread="1476" file="tsmediawizardcontrol.cpp:1673"> <
-
PXE Boot on current branch 2010
anyweb replied to Quinten's topic in System Center Configuration Manager (Current Branch)
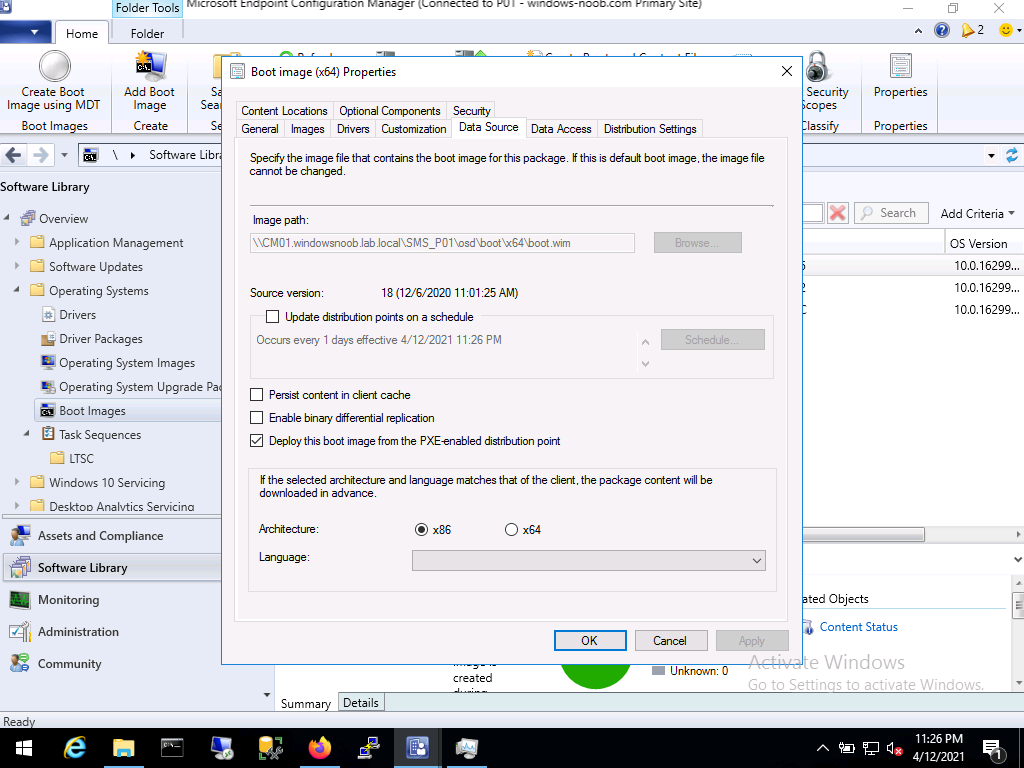
did you distribute boot images to the pxe enabled dp ? -
the application returned an unexpected code 2
anyweb replied to hanen's question in Microsoft Deployment Toolkit (MDT)
what log file are you generating when deploying this application ? that's what you need to examine to verify why the application is failing, if you don't know then find out what switch needs to be passed to the application EXE file to generate a log at install time -
PXE Boot on current branch 2010
anyweb replied to Quinten's topic in System Center Configuration Manager (Current Branch)
check the boot images, did you select the option to deploy this boot image from a pxe enabled distribution point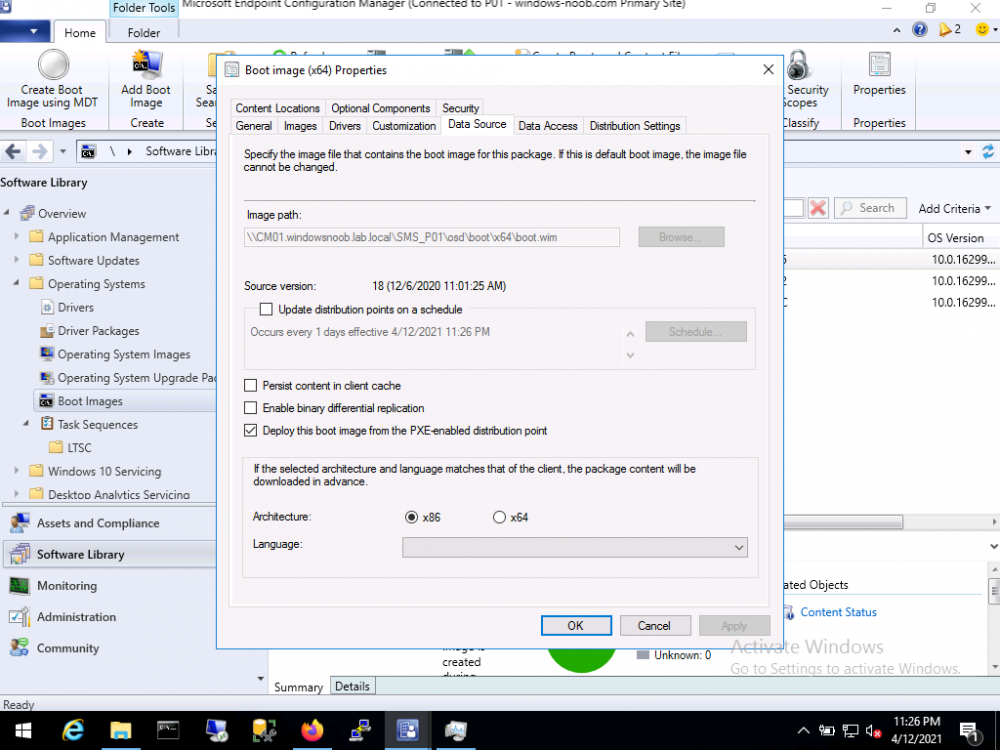
-
it's available to logged on members of windows-noob.com, which you now are, so try again and you'll see it's available.
-
Partition Disk 0 - UEFI
anyweb replied to Quinten's topic in System Center Configuration Manager (Current Branch)
if you examine the smsts.log generated in x:\Windows\Temp\SMSTSLOG you can review exactly what takes place during partitioning -
see part 4 and part 6 here https://www.niallbrady.com/2019/11/13/want-to-learn-about-the-new-bitlocker-management-in-microsoft-endpoint-manager-configuration-manager/
-
you will have to decrypt the device, then re-encrypt with the desired encryption
-
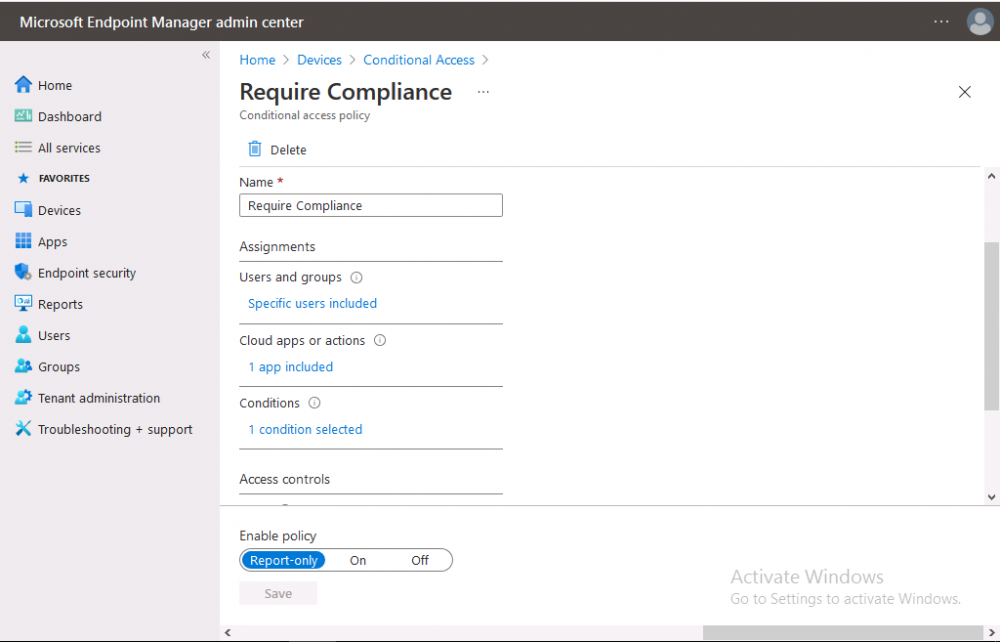
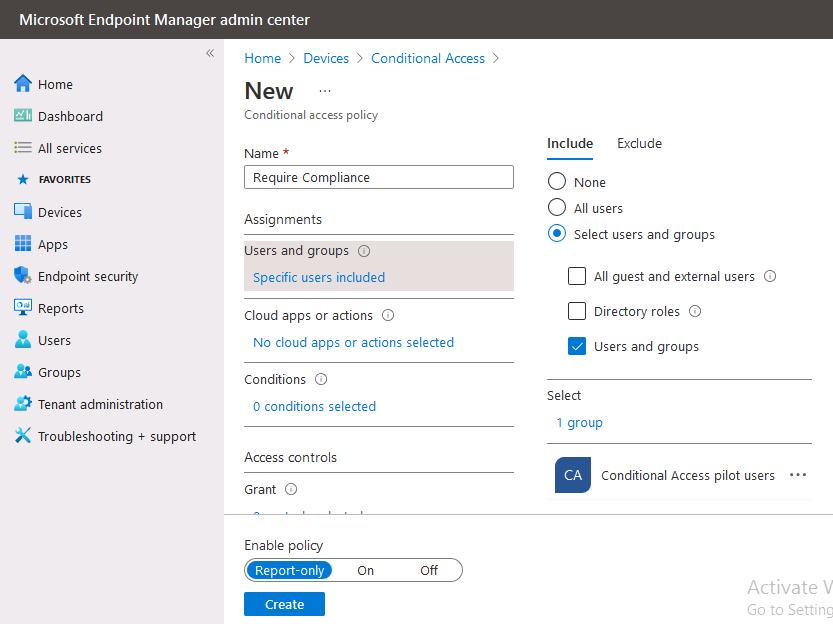
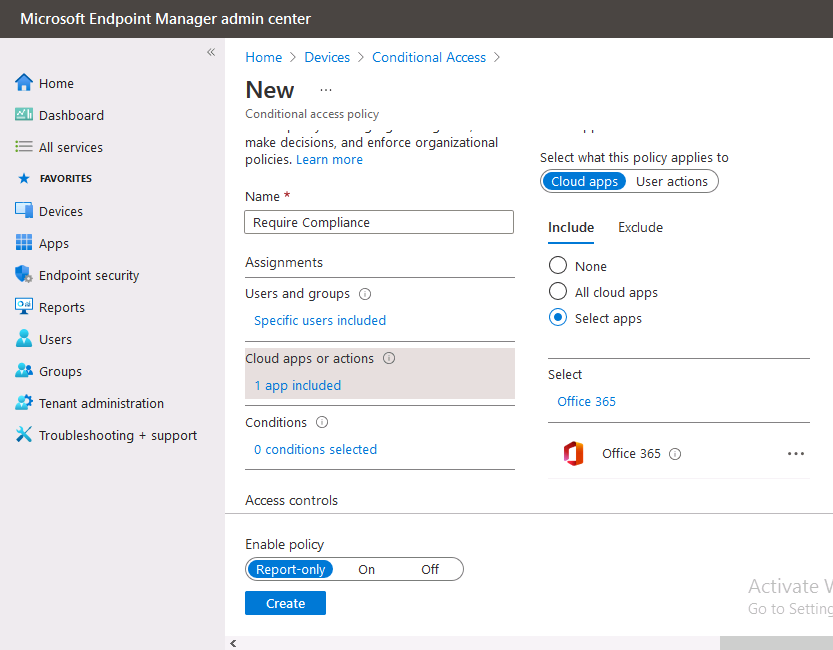
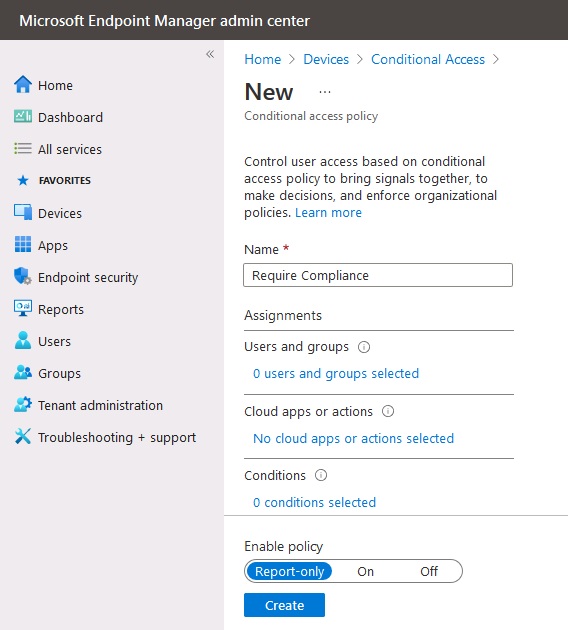
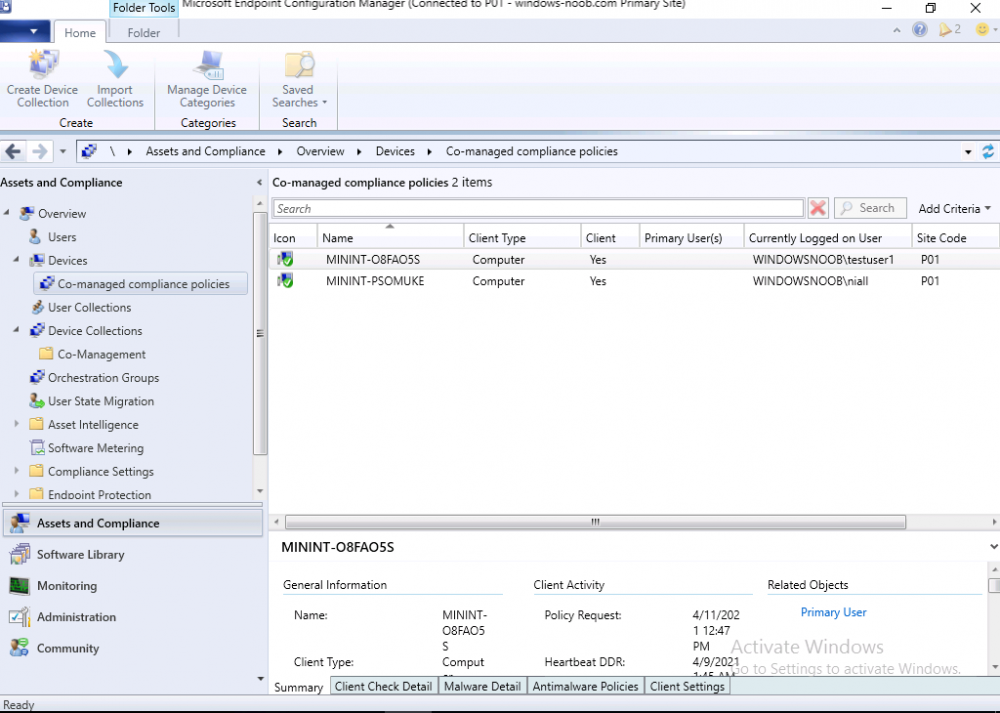
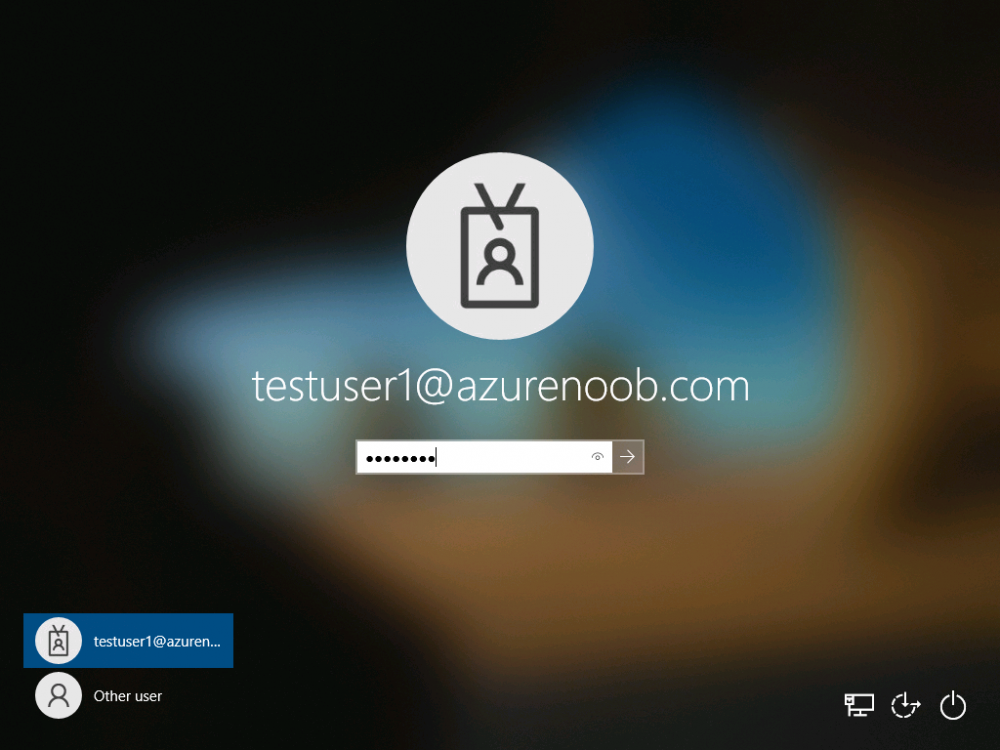
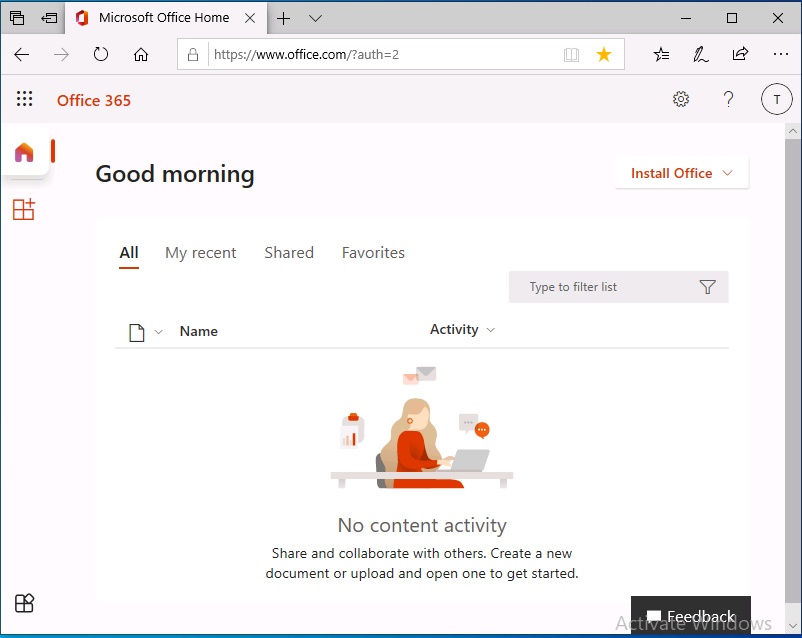
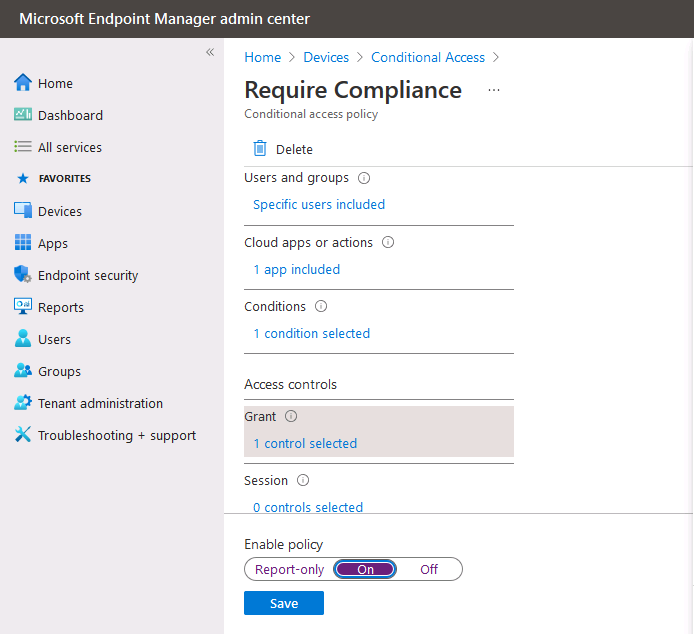
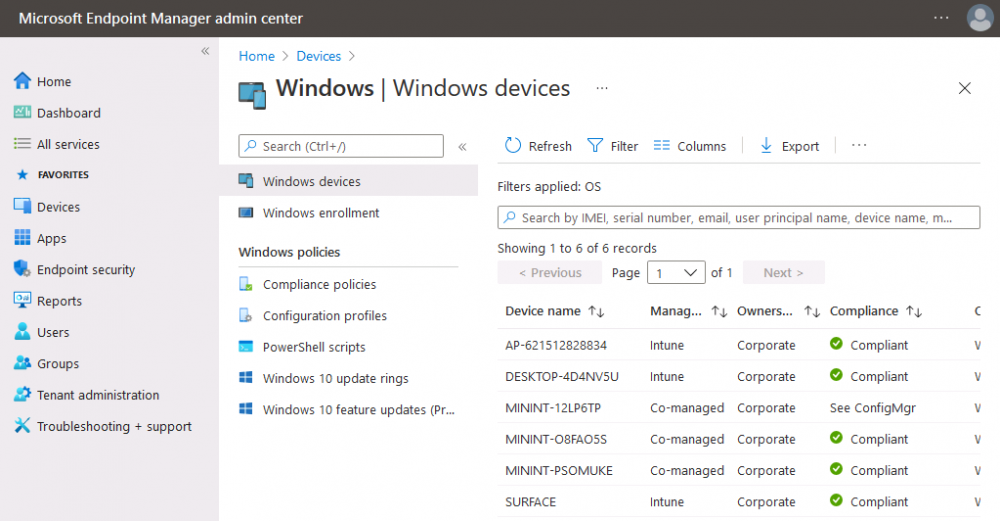
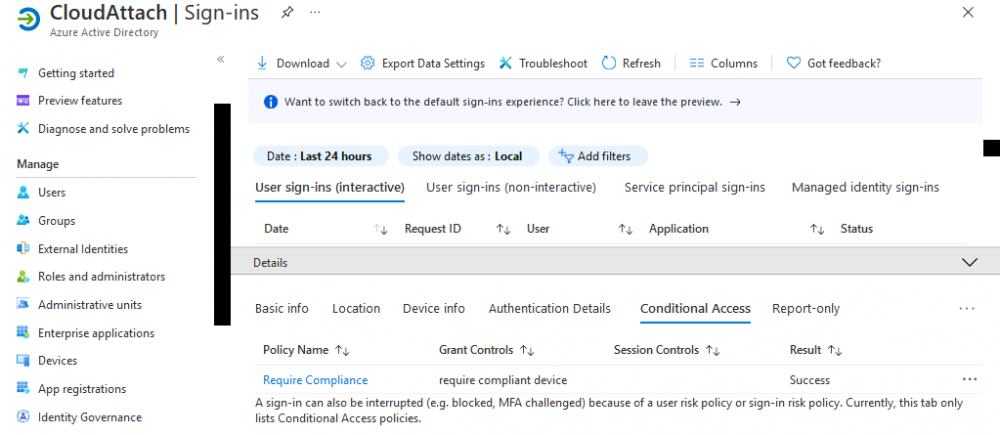
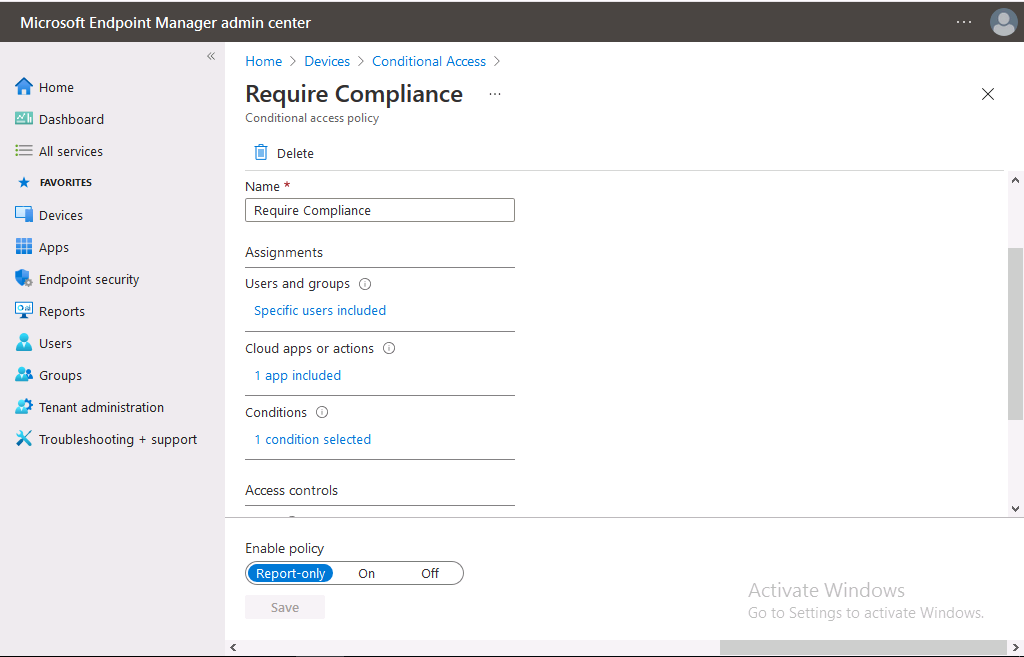
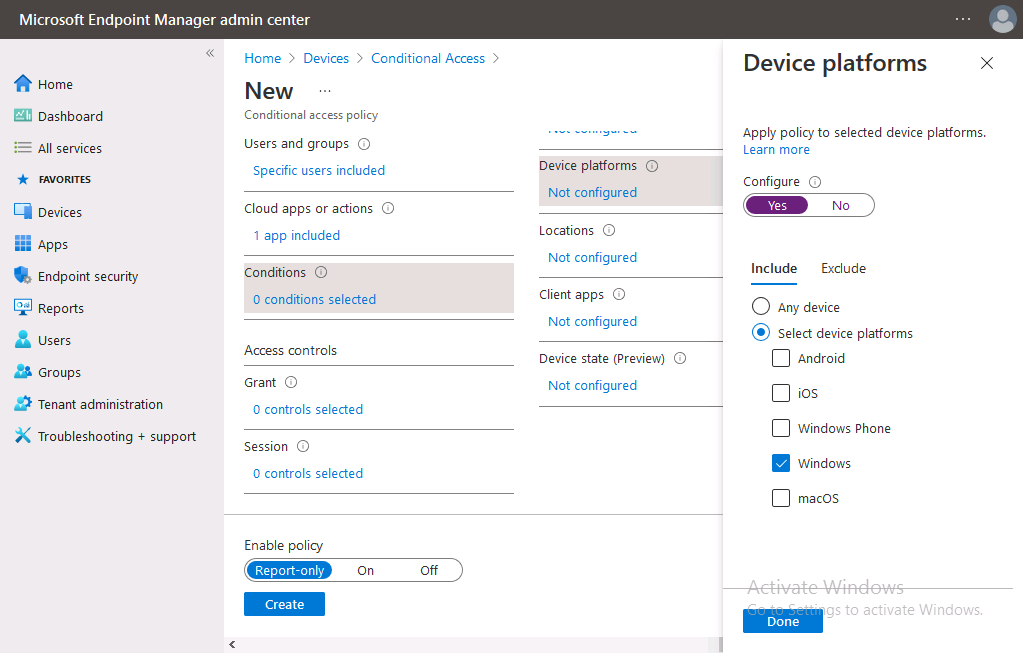
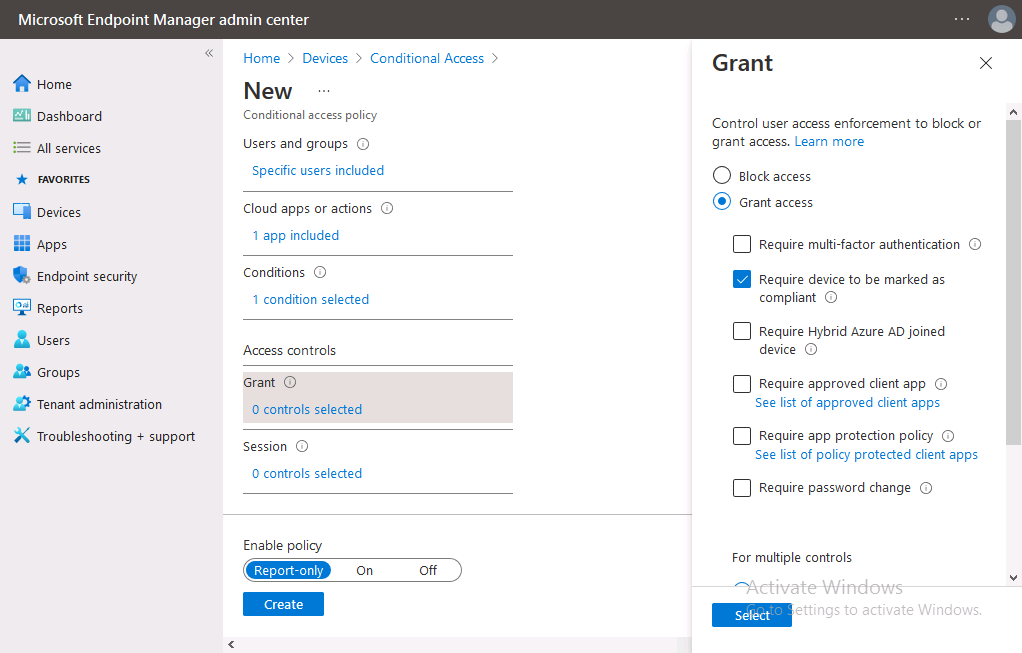
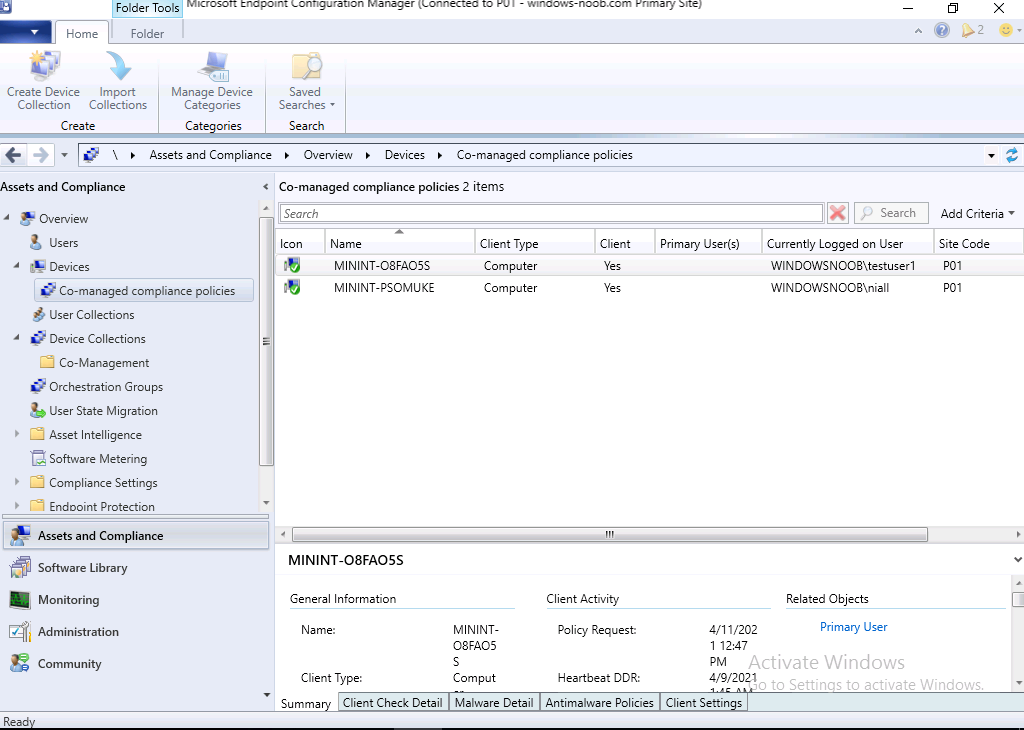
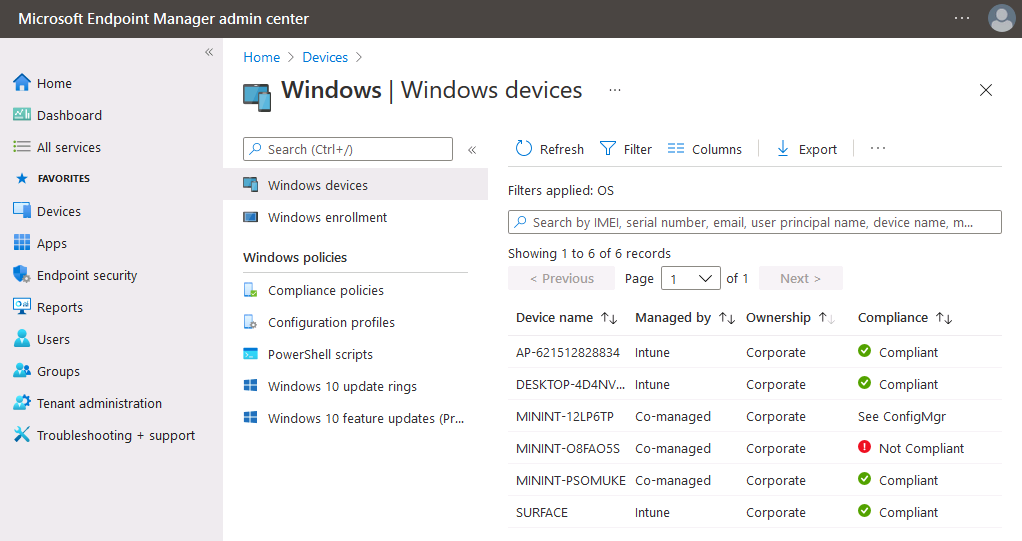
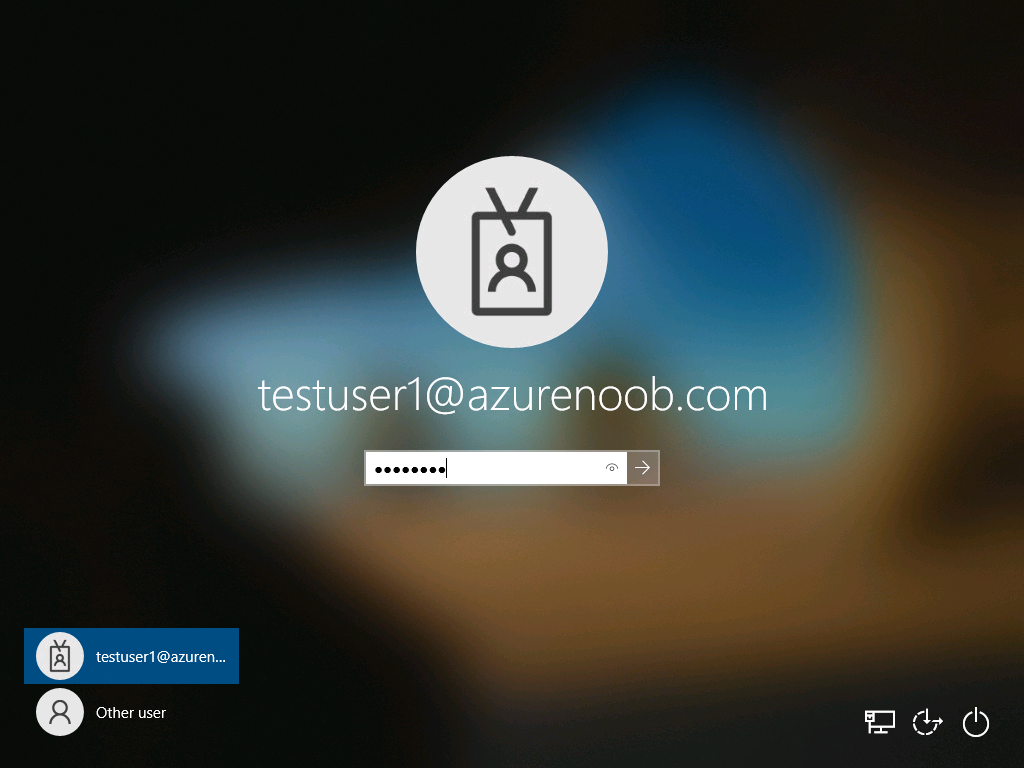
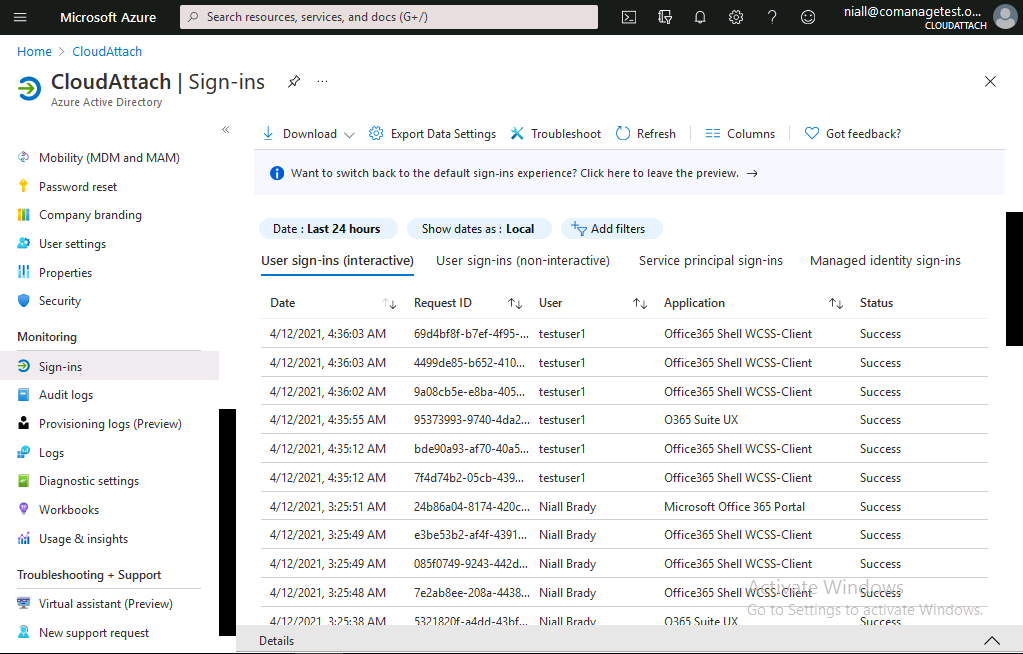
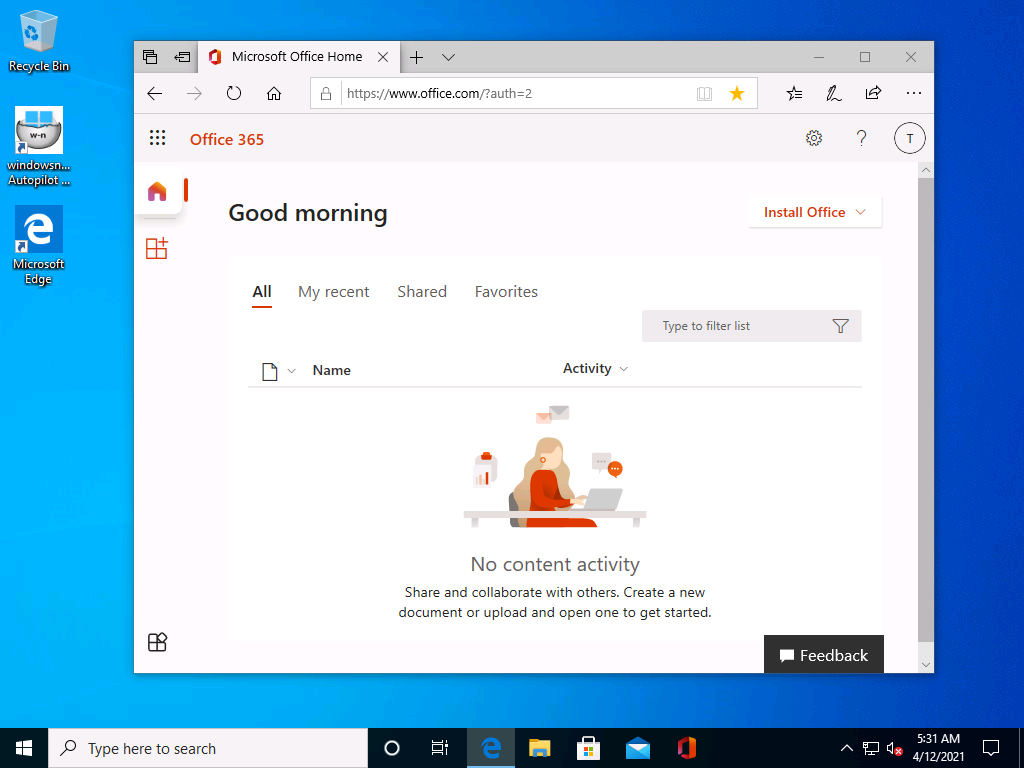
Introduction This is part 6 in a series of guides about cloud attach in Microsoft Endpoint Manager, with the aim of getting you up and running with all things cloud attach. This part will focus on enabling the compliance policies workload. This series is co-written by Niall & Paul, both of whom are Enterprise Mobility MVP’s with broad experience in the area of modern management. Paul is 4 times Enterprise Mobility MVP based in the UK and Niall is 10 times Enterprise Mobility MVP based in Sweden. In part 1 we configured Azure AD connect to sync accounts from the on premise infrastructure to the cloud. In part 2, we prepared Azure resources for the Cloud Management Gateway, in part 3 we created the cloud management gateway and verified that everything was running smoothly. In part 4 we enabled co-management. With co-management, you retain your existing processes for using Configuration Manager to manage PCs in your organization and you gain the additional advantage of being able to transfer workloads to the cloud via Endpoint Manager (Intune). In part 5 we enabled the compliance policies workload and reviewed how that affected a co-managed computer. In this part we will enable conditional access and see how that can be used to deny access to company resources. Conditional access is easy to use when you enable co-management. It requires moving the Compliance Policies workload to Intune. We've already completed both of those activities in the previous 2 parts. Now we will configure conditional access and we'll use it to deny access to company resources unless the device is encrypted with BitLocker. Conditional Access makes sure that only trusted users can access organizational resources on trusted devices using trusted apps. It's built from scratch in the cloud. Whether you're managing devices with Intune or extending your Configuration Manager deployment with co-management, it works the same way. Source: https://docs.microsoft.com/en-us/mem/configmgr/comanage/quickstart-conditional-access Below you can find all parts in this series. Cloud attach - Endpoint Managers silver lining - part 1 Configuring Azure AD connect Cloud attach - Endpoint Managers silver lining - part 2 Prepare for a Cloud Management Gateway Cloud attach - Endpoint Managers silver lining - part 3 Creating a Cloud Management Gateway Cloud attach - Endpoint Managers silver lining - part 4 Enabling co-management Cloud attach - Endpoint Managers silver lining - part 5 Enabling compliance policies workload Cloud attach - Endpoint Managers silver lining - part 6 Enabling conditional access <- you are here Cloud attach - Endpoint Managers silver lining - part 7 Co-managing Azure AD devices Cloud attach - Endpoint Managers silver lining - part 8 Enabling tenant attach Cloud attach - Endpoint Managers silver lining - part 9 Renewing expiring certificates Cloud attach - Endpoint Managers silver lining - part 10 Using apps with tenant attach License requirements Using this feature requires an Azure AD Premium P1 license. To find the right license for your requirements, see Comparing generally available features of the Free, Basic, and Premium editions. Customers with Microsoft 365 Business Premium licenses also have access to Conditional Access features. Sign-in Risk requires access to Identity Protection Step 1. Add some users to an Azure AD group To test conditional access we'll first create an Azure AD group and populate it with some test users. In Microsoft Endpoint Manager, select Groups, then select + New Group, give it a suitable name such as Conditional Access pilot users. Add some test users by clicking on No members selected, select the users you want to test conditional access with and then click on Create. Step 2. Configure conditional access Now you'll create your first conditional access policy, to do so in Microsoft Endpoint Manager, select devices and then select Conditional Access from the Policy node (shown below). In the Conditional Access pane, click on + New Policy, give it a suitable name such as Require Compliance In the Assignments section click on 0 users and groups selected, in the pane that appears select Include, and select select users and groups and add the Azure ad group created in step 1. For the Cloud apps or actions selection, select No cloud apps or actions selected and then choose select apps and select a suitable app such as Office 365. For the Conditions selection, select 0 conditions selected and select the following conditions, Device platforms, select select device platforms and select Windows as shown here and then select Done. Note: You could use other conditions to fine grain the conditional access rules such as trusted locations, use modern authentication only etc but this is just an example. Next, select the Access controls you wish to apply to this policy. For Grant select that the device is marked as Require device to be marked as compliant. Click Select when done. Finally, we will set the policy to Report-only for now so we can test the rule in case we have negative impact on the targeted users which can later be remedied before switching the policy On. Finally, click on Create. For more details on the Report-only setting see https://docs.microsoft.com/en-us/azure/active-directory/conditional-access/concept-conditional-access-report-only Step 3. Testing conditional access Note: Make sure that the devices you use for testing are targeted with the compliance policy created in Part 5 before continuing by adding them to that Configuration Manager collection which we enabled for sync to the cloud (co-managed compliance policy devices) or targeting the assignment to those devices. Below you can see our test devices. And here you can see that the device in question MININT-08FAO5S is Co-managed and with a compliance state of not compliant. On a computer that is not encrypted with BitLocker encryption and therefore not compliant, login as a user that is in the group created in step 1. Once done, open a web browser and browse to https://www.office.com In portal.azure.com select Azure Active directory and scroll down to Sign-ins. This will list all sign-ins for that tenant. Select the latest sign-in for the test user testuser1 (which is added to the azure ad group we created in step 1). As this conditional access policy is in report-only mode, select the Report-only tab and you'll see a report of what happened and it's status as shown here: Now that we've verified it works, let's flip the compliance policy to On and click Save. On the test computer, sign out of office and once again try and browse to https://www.office.com you should see that conditional access blocks access to that resource ! And back in Azure AD, if you check the sign-ins and this time select the Conditional Access tab... you can see that it's correctly reported as a failure. At this point, you can go ahead and encrypt the device with BitLocker, so that it becomes Compliant in Intune. Here we can see the device is listed now as Compliant. Now that it is compliant, verify that it can access Office while using Conditional Access. It should work just fine. And you can verify that too, in the Azure AD sign-ins, using the Conditional Access tab, here you can see that for the policy named Require compliance, with a grant controls of require compliant device it has a result of Success. Job done, you've successfully enabled your first Conditional Access policy and reviewed how it functions on a co-managed device. Please join us in the part 7 where we'll take an Azure AD joined device and add make it co-managed. Related reading Quick start conditional access - https://docs.microsoft.com/en-us/mem/configmgr/comanage/quickstart-conditional-access What is Conditional Access in Azure Active Directory - https://docs.microsoft.com/en-us/azure/active-directory/conditional-access/overview


-
I think you've answered your own question, the Enterprise Eval editions cannot be upgraded as they are evaluation editions try with a licensed iso and you'll see the results you desire
-
No Site System Listed in Boundary
anyweb replied to wudevr's topic in System Center Configuration Manager (Current Branch)
great stuff, you should definitely check out the posts here, there are plenty to get you up and running again -
As World Backup Day approaches, we're reminded of all the mishaps, backup scares, and near- catastrophes that we've experienced over the years – and how grateful we were to have backup during those times! If you use Microsoft 365/Office 365, Hyper-V or VMware, celebrate with us. All you have to do is sign up for a 30-day free trial of either Altaro VM Backup or Altaro Office 365 Backup – it's your choice! What can you win? Receive a guaranteed €20 Amazon voucher when you sign up for and use the trial of Altaro Office 365 Backup or Altaro VM Backup Get a chance to WIN one of our Grand Prizes when you tell us about your funniest IT catastrophe! Grand Prizes include: What are you waiting for? Sign up now!
.thumb.png.36643d9e609e42af58a97897bb695d5b.png)


.png.5079cb4294ddaef08d01074d4c7900d0.png)