anyweb
-
Posts
9273 -
Joined
-
Last visited
-
Days Won
371
Everything posted by anyweb
-

MBAM portals cannot access
anyweb replied to hannah's topic in System Center Configuration Manager (Current Branch)
did you run winrm quickconfig on the server ? -
PXE working but from wrong network
anyweb replied to jkjk12's topic in System Center Configuration Manager (Current Branch)
i think you answered your own question, have you tried hyper-v ? why have 2 nics connected to the ConfigMgr server ? -
i notice in your first screenshot that it is warning you about the sheer number of SUG's you have, do you have any idea how many there are ? any reason why you are not cleaning them up ?
-
MBAM to SCCM issue
anyweb replied to Prip's topic in System Center Configuration Manager (Current Branch)
PKI is not needed for BitLocker Management, but it's recommended, you can still use e-http, however be aware that come October 2022, http will be deprecated so the move to HTTPS should start now https://www.niallbrady.com/2021/03/12/prepare-for-http-only-client-communication-depreciation-in-configmgr-31-10-2022/ I'd recommend you fix your PKI issues and continue down that road, hire a pki consultant to assist -
ok and all your component status are ok ? or are there issues reported there ?
-
MBAM to SCCM issue
anyweb replied to Prip's topic in System Center Configuration Manager (Current Branch)
first things first, converting ConfigMgr to HTTPS shouldn't break things unless it's not done right, so were you sure that the clients had the right certs in place before making the switch? -
what happens if you click OK or type the name of the software update group ?
-
PXE not working
anyweb replied to jkjk12's topic in System Center Configuration Manager (Current Branch)
are you pxe booting a vm or a real computer ? what does the smspxe.log reveal when you are pxe booting, if you don't see the mac address of the device listed then something is mis-configured on the osd side, for example, did you deployed anything to the unknown collection(s), did you make the task sequence available to media&pxe ? -
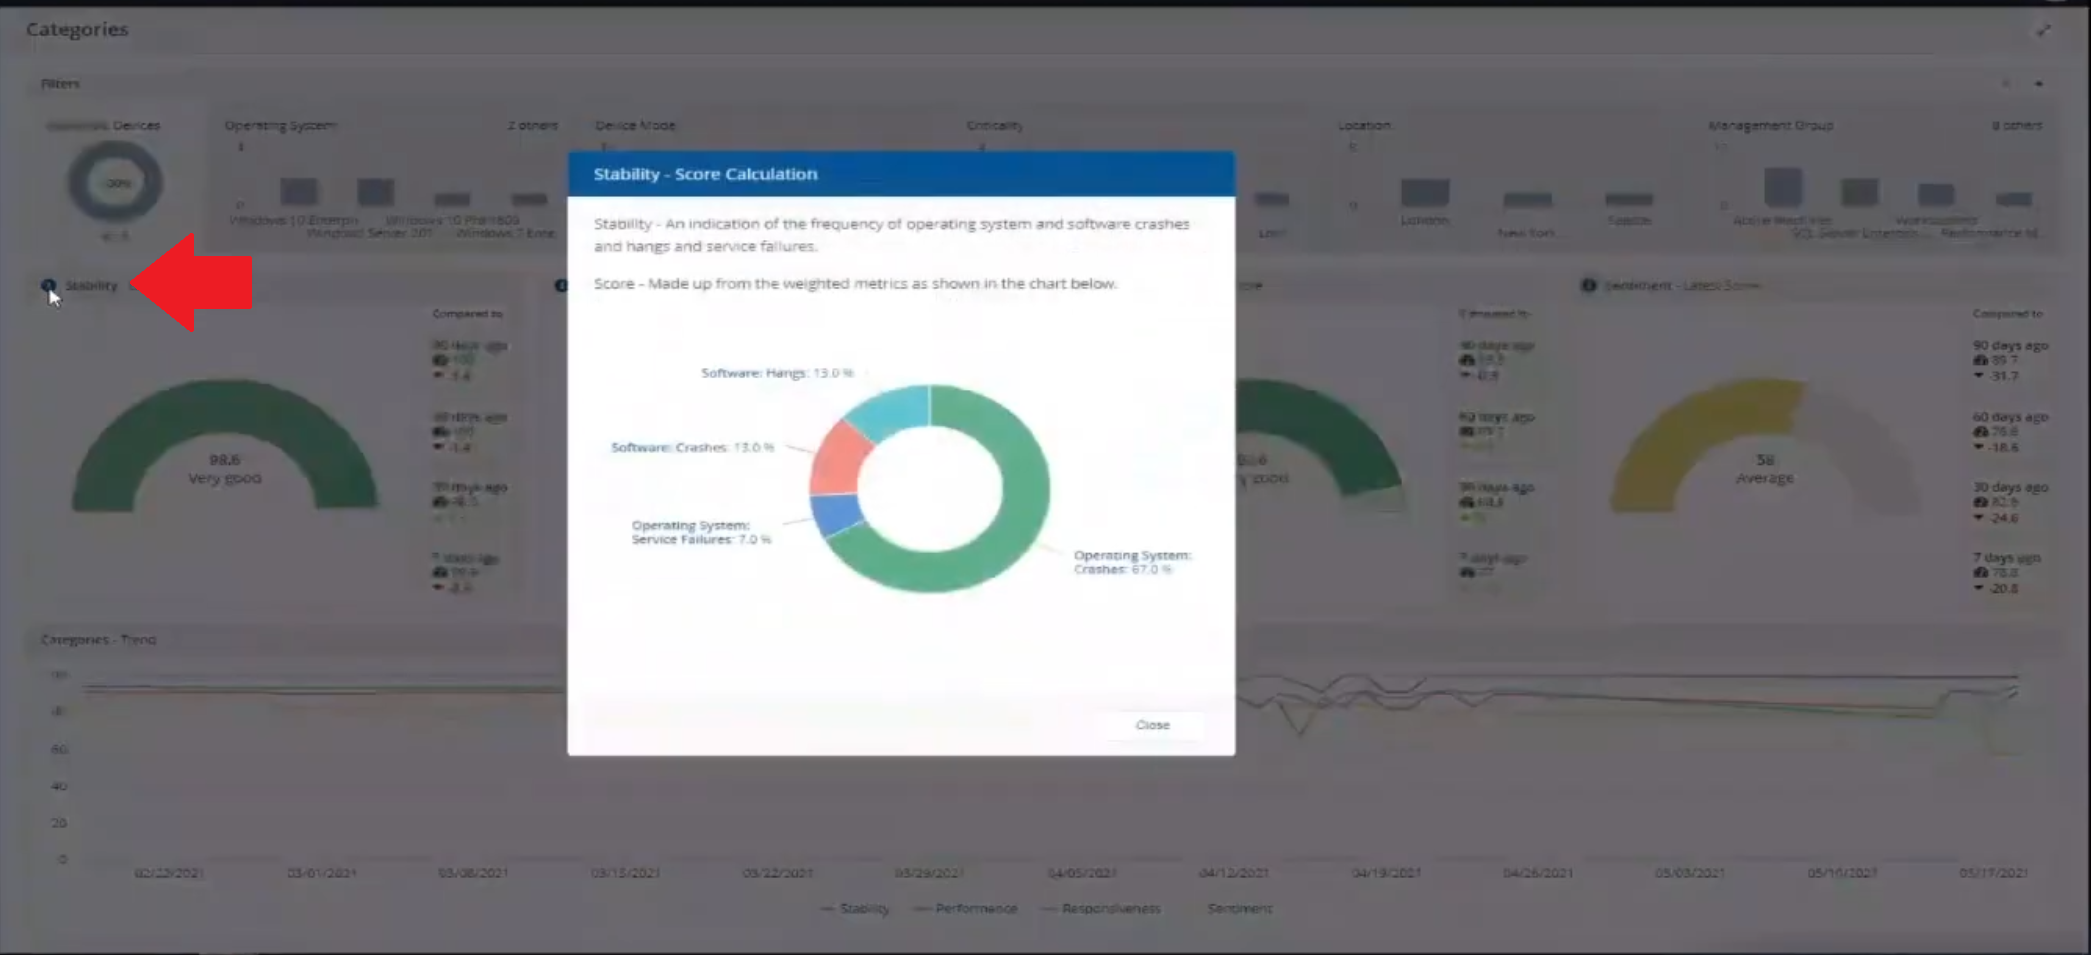
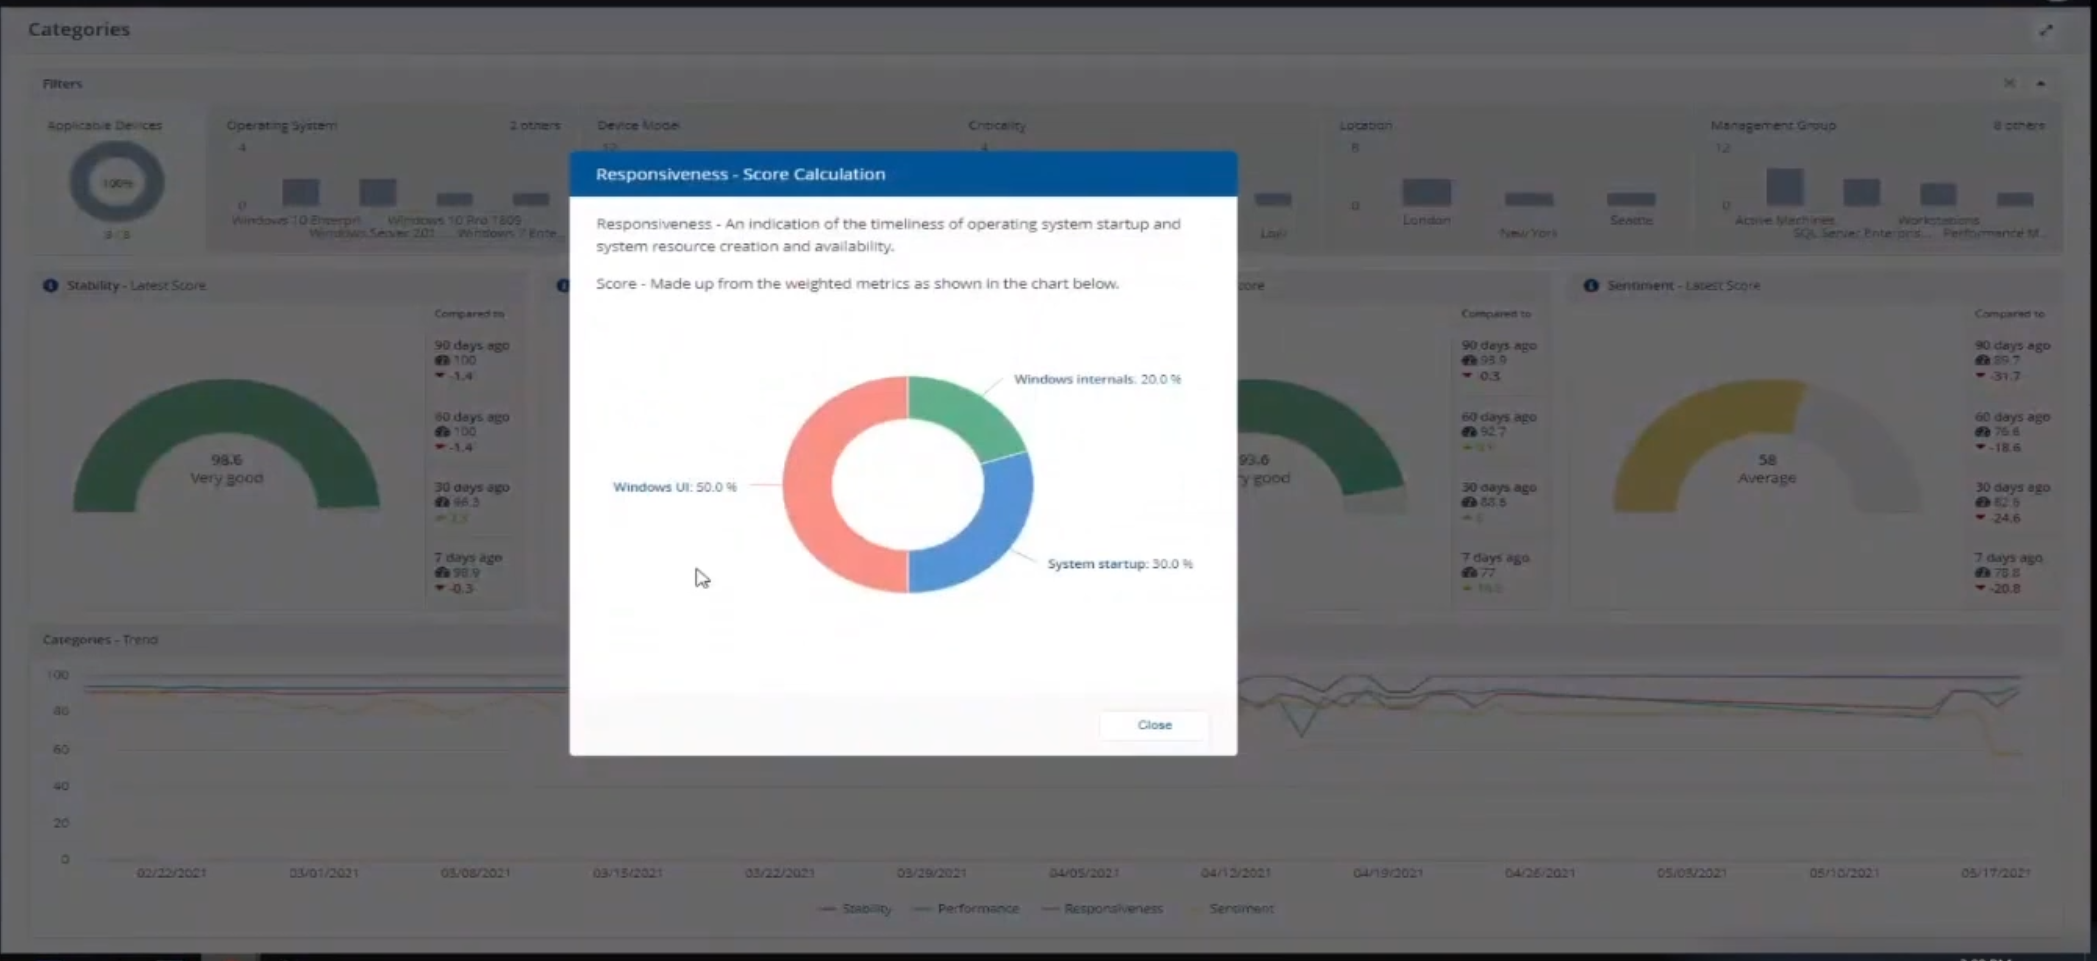
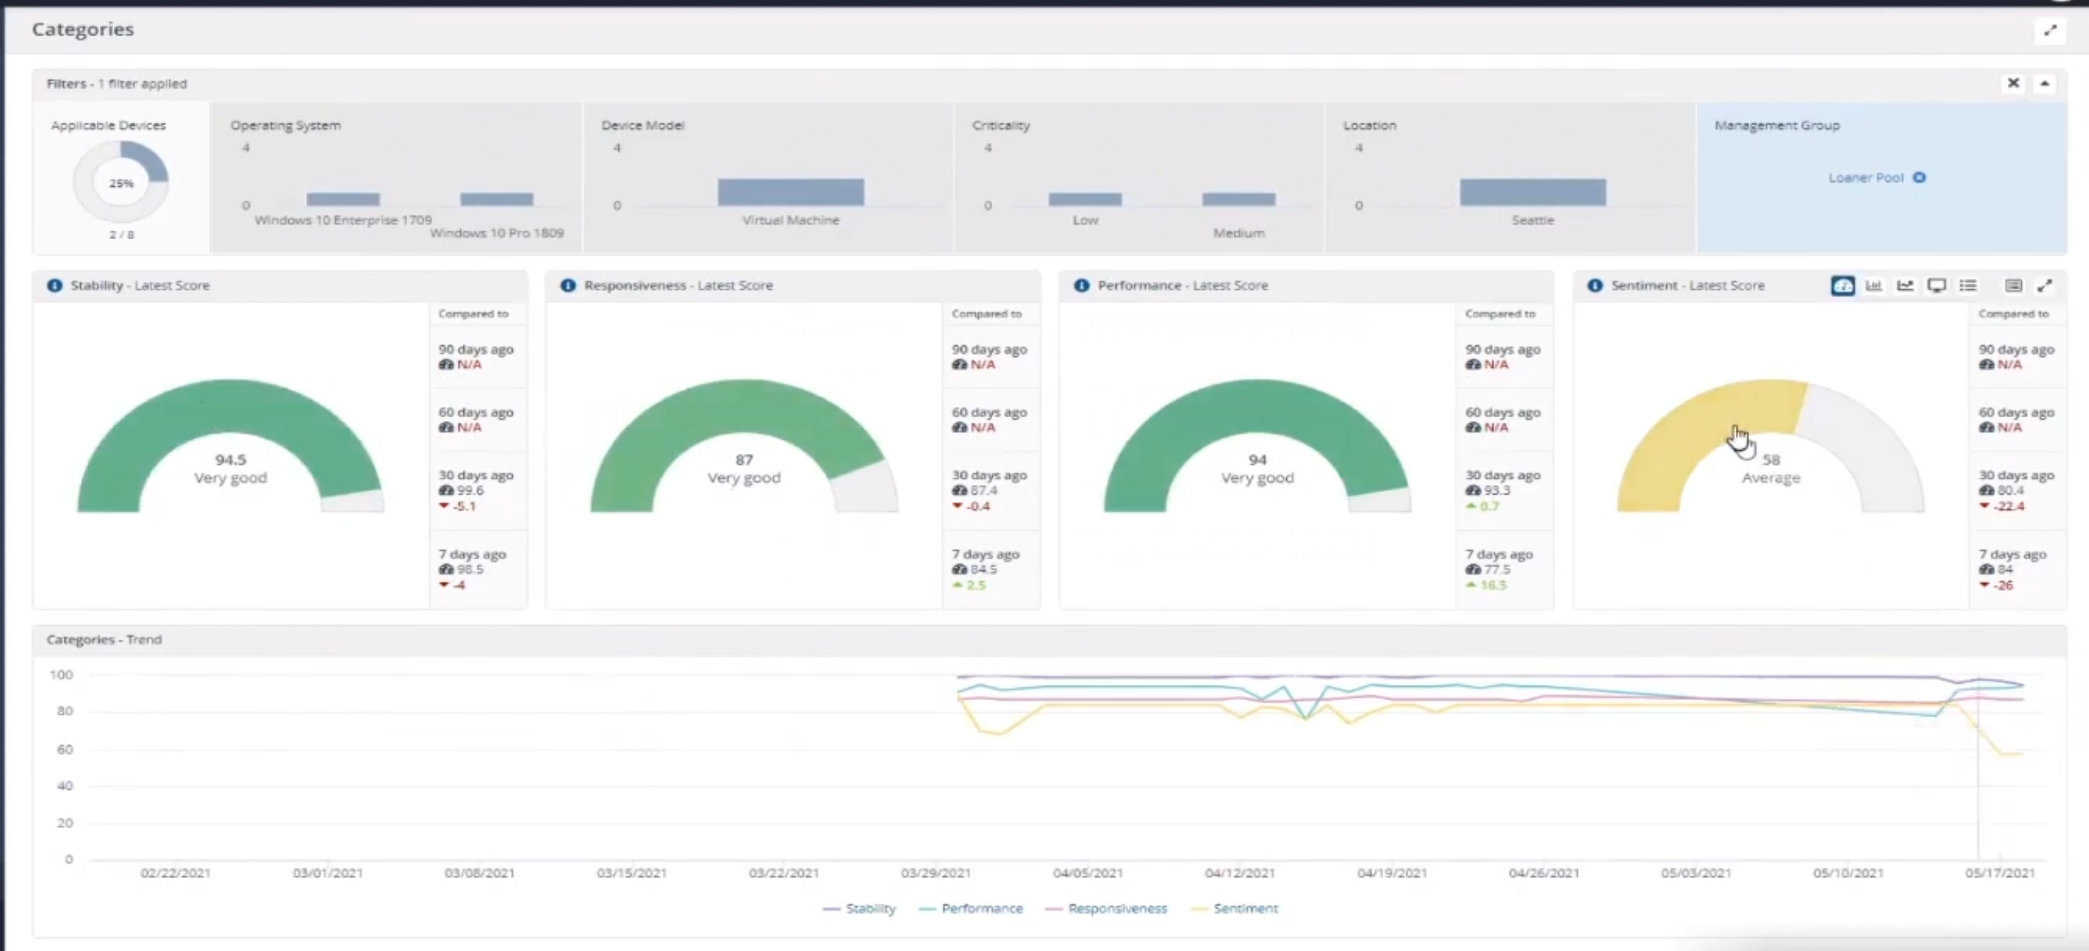
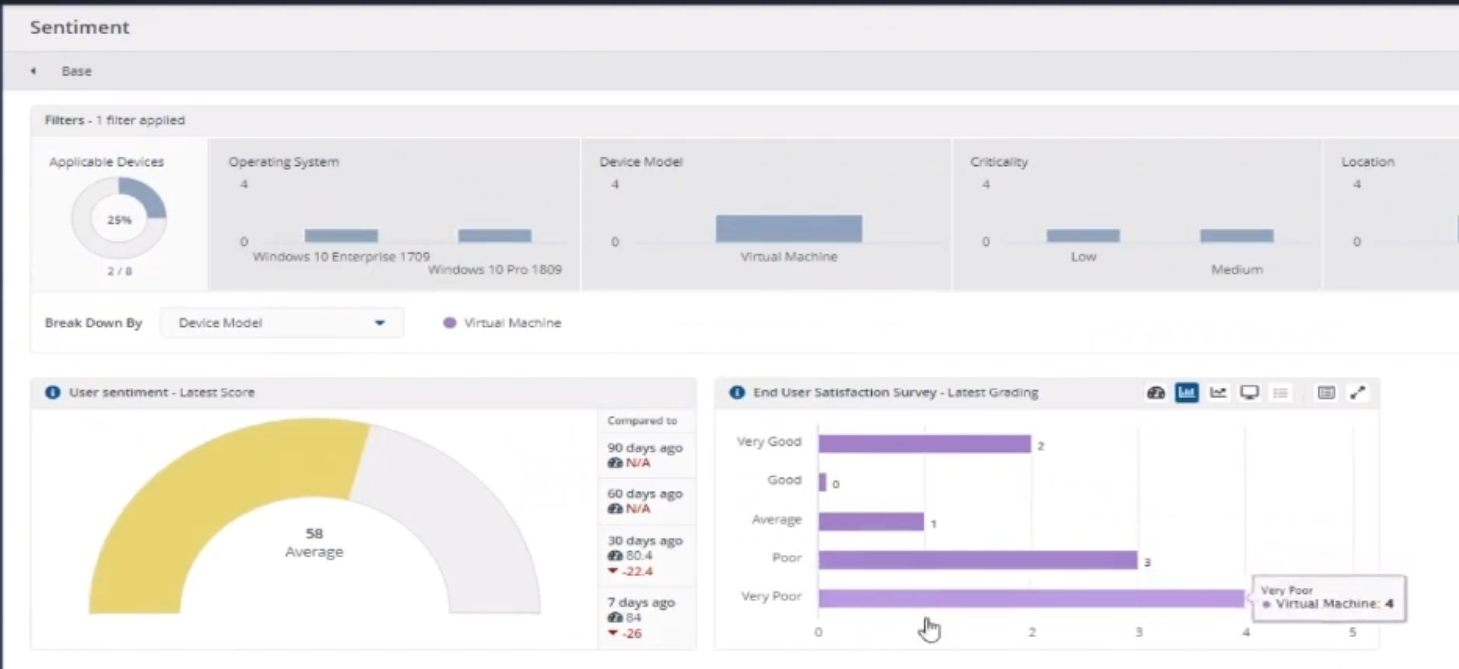
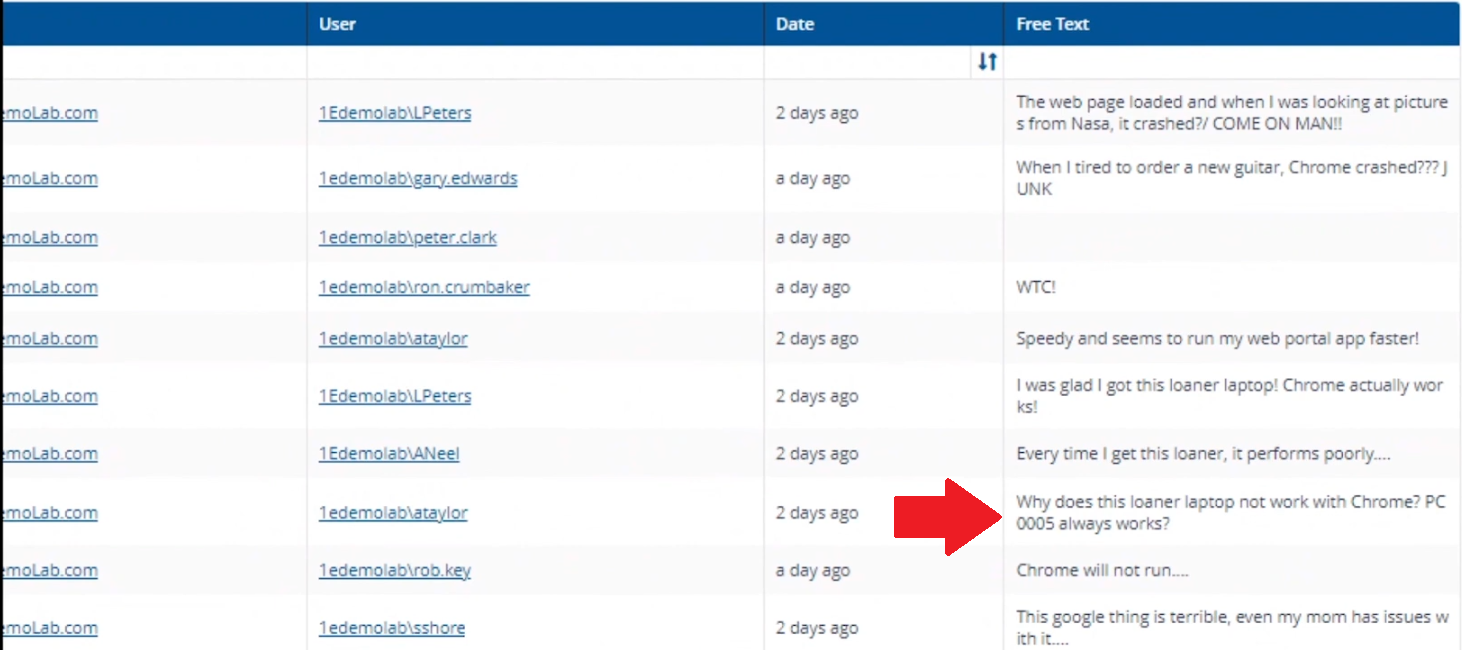
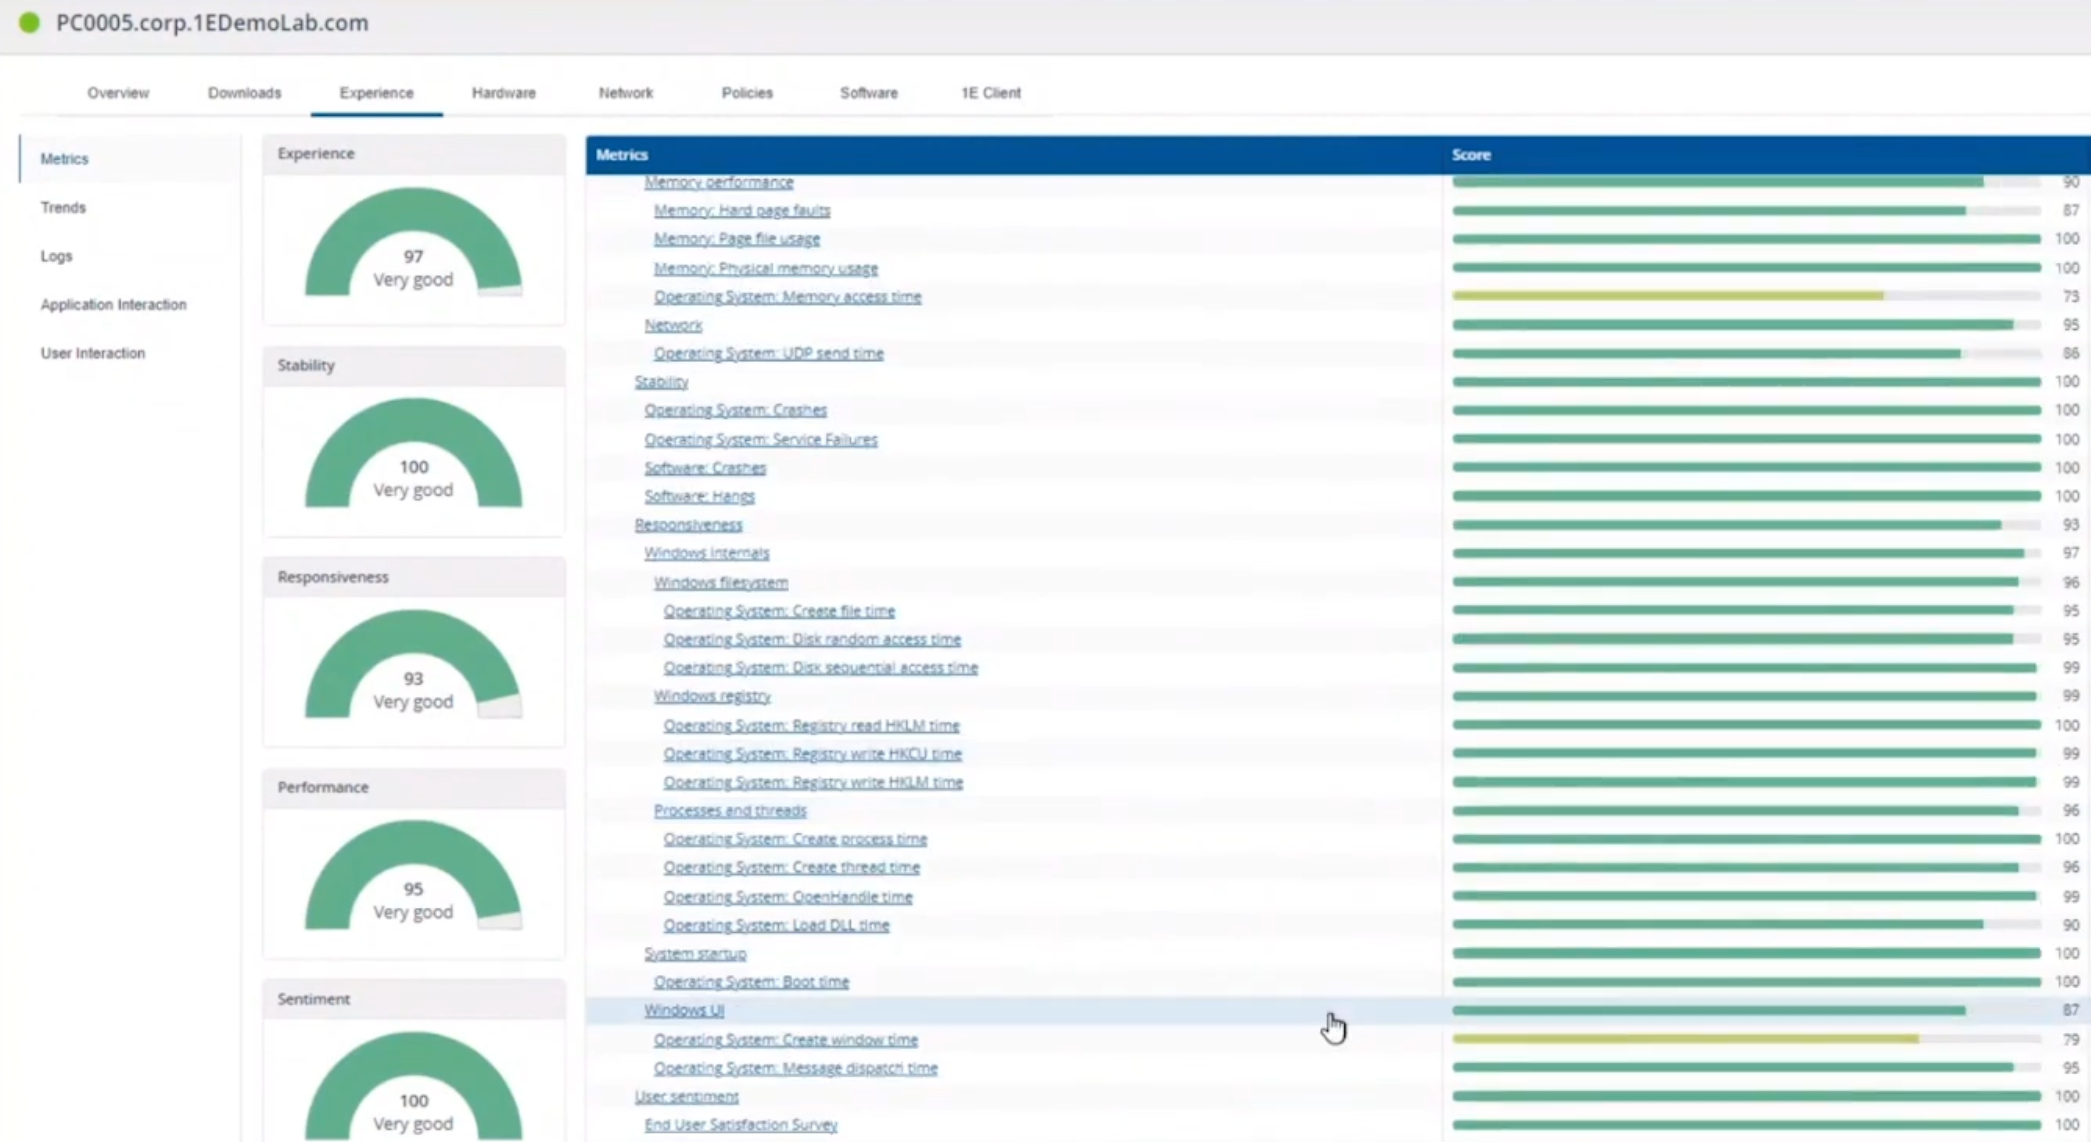
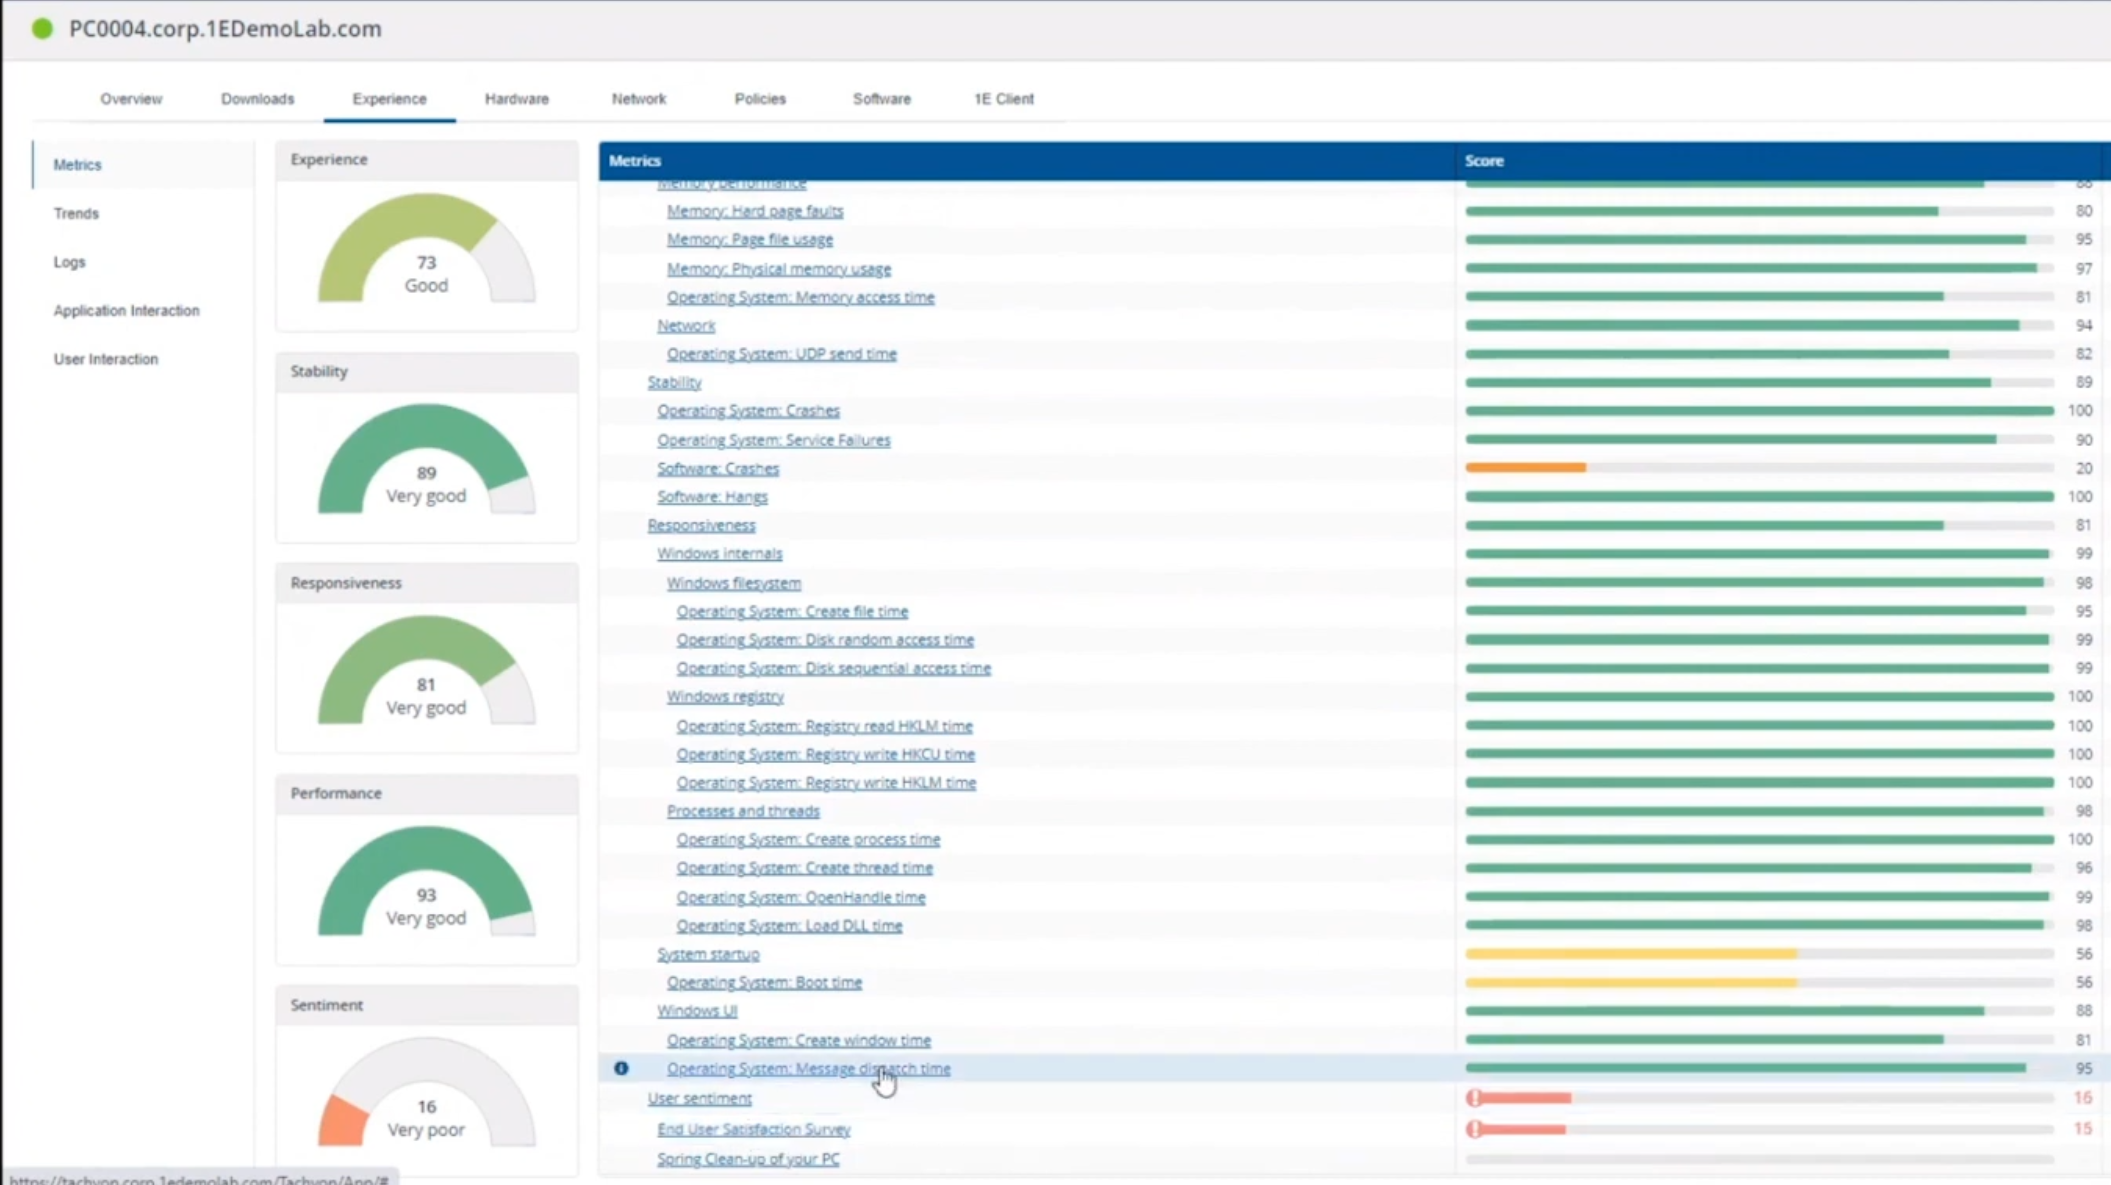
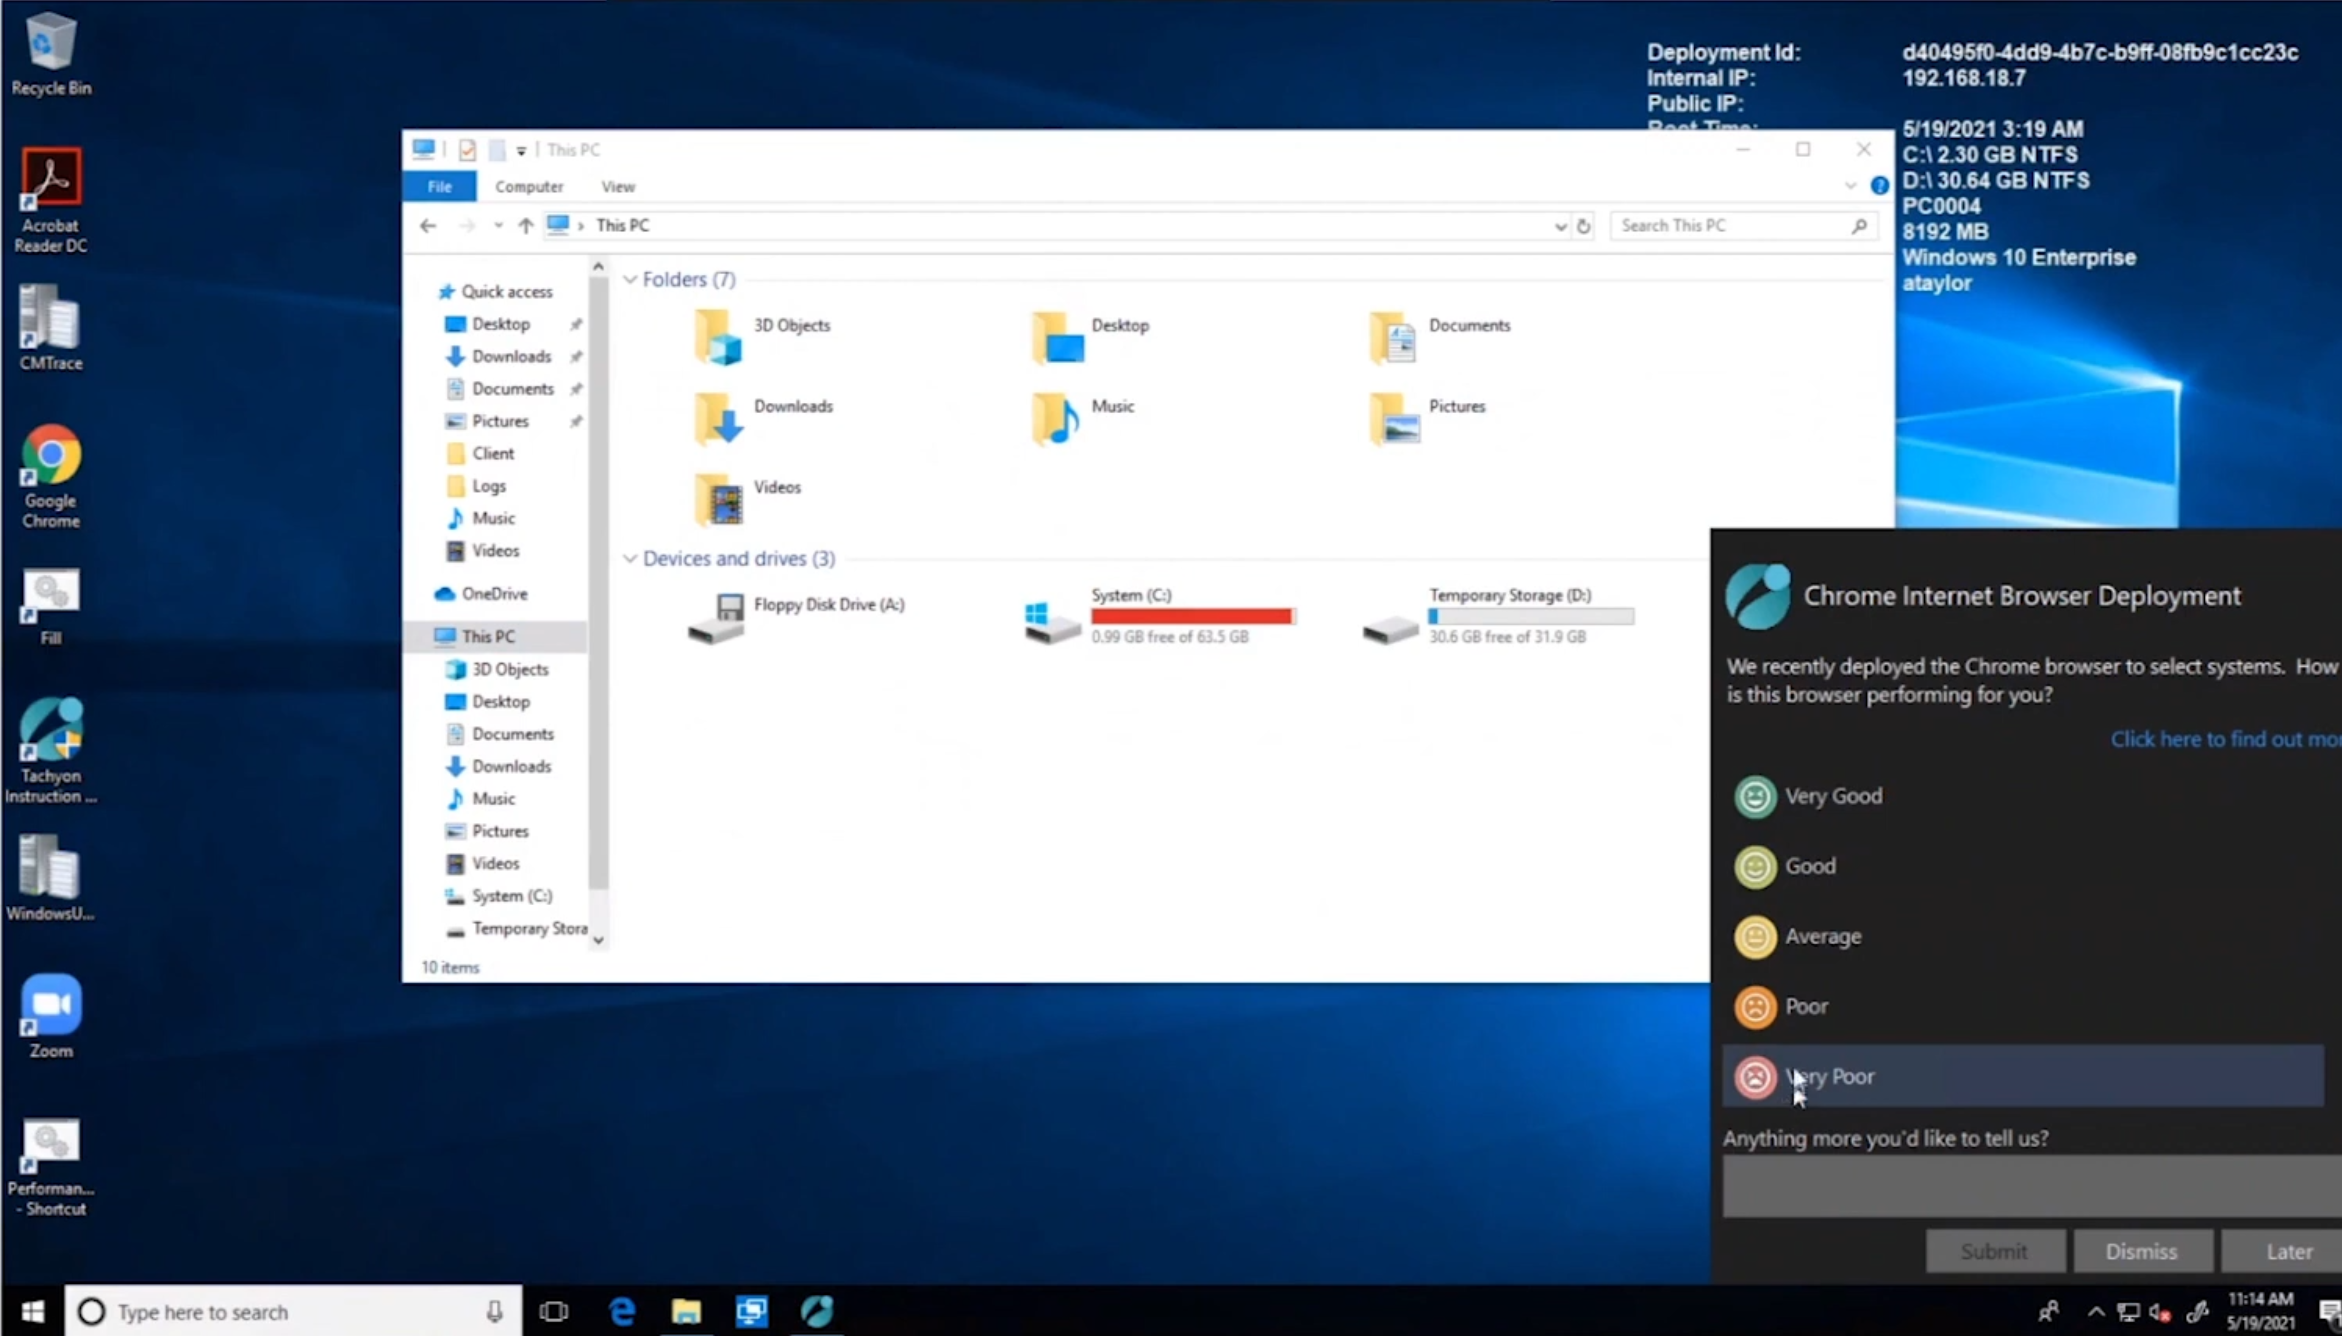
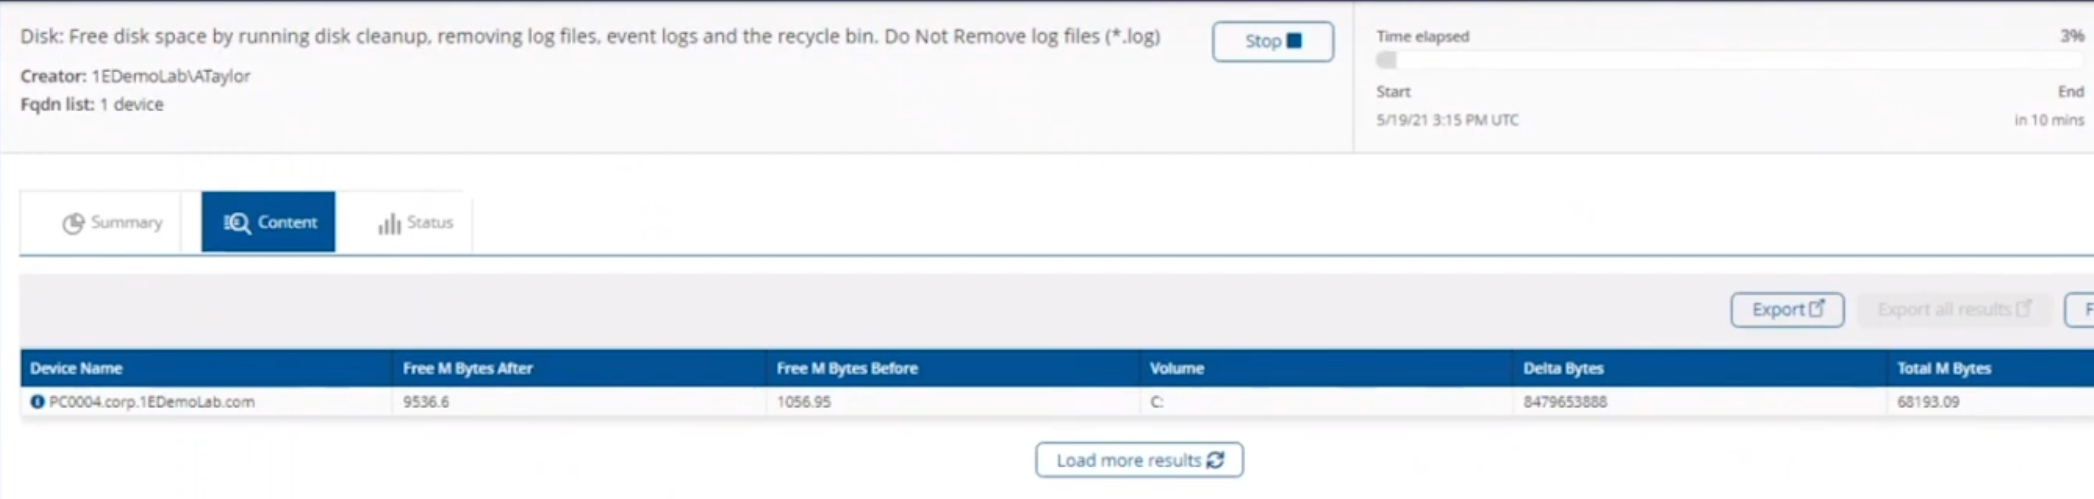
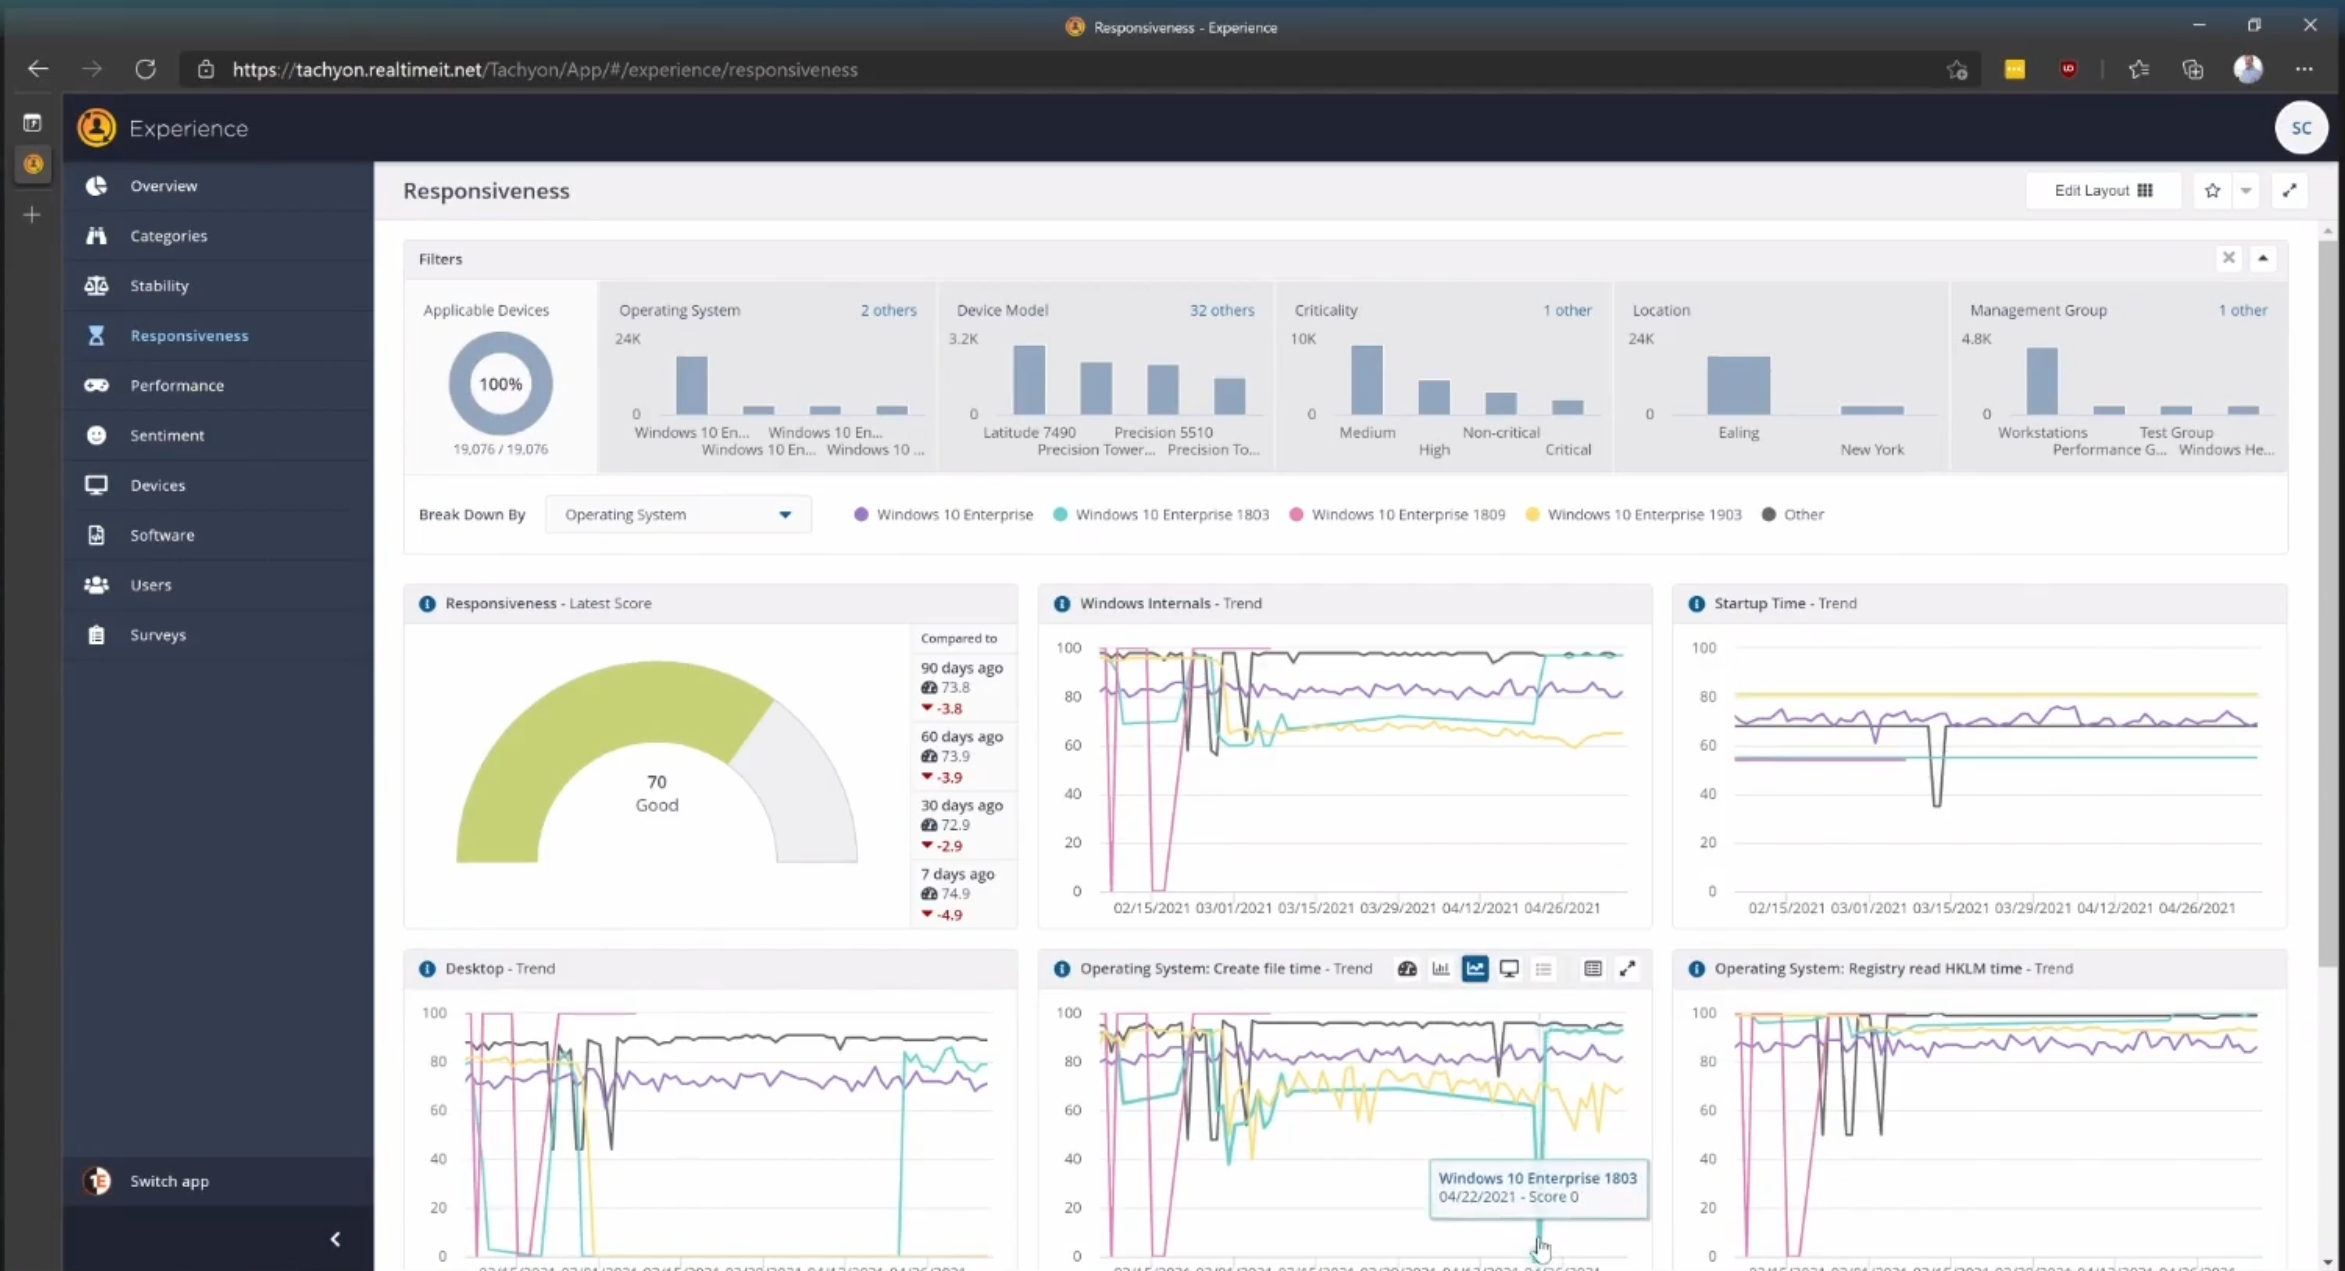
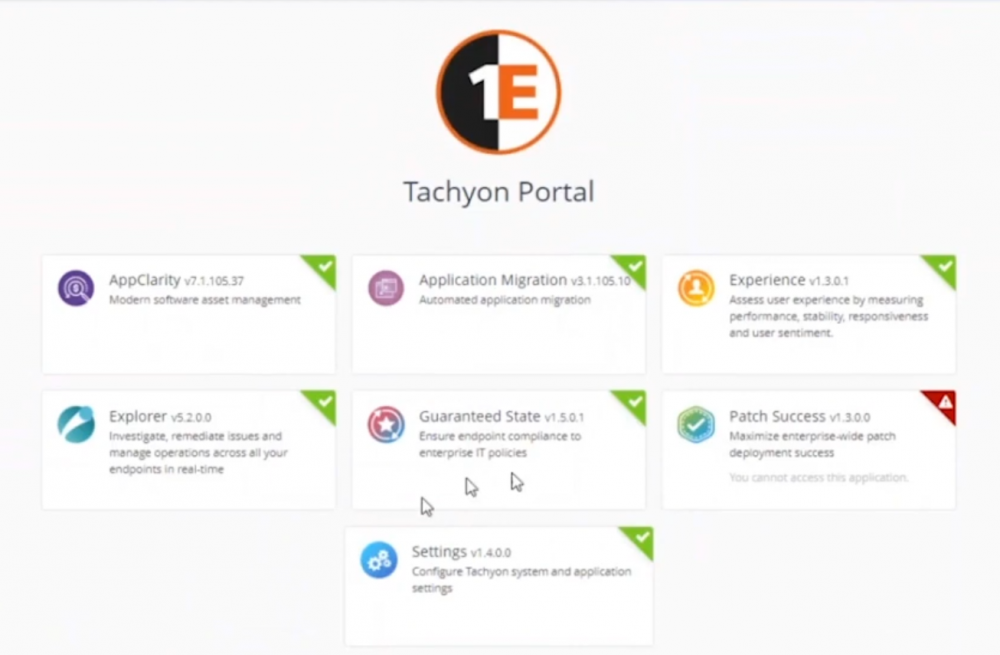
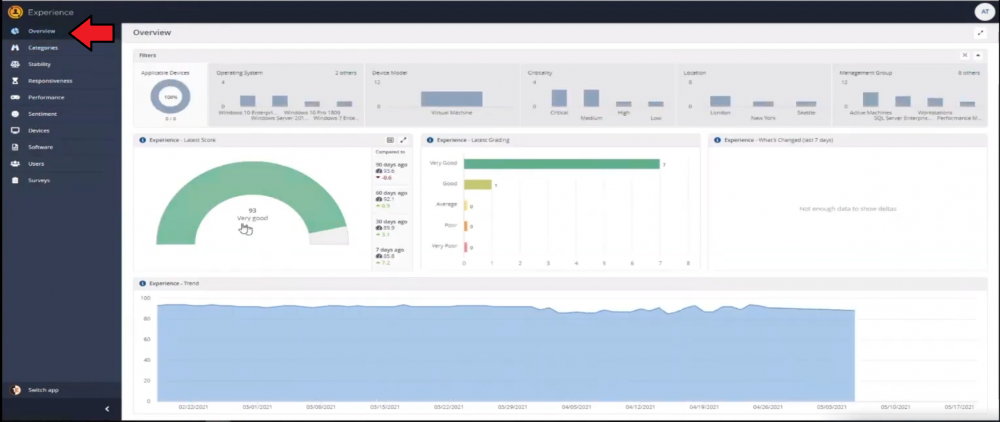
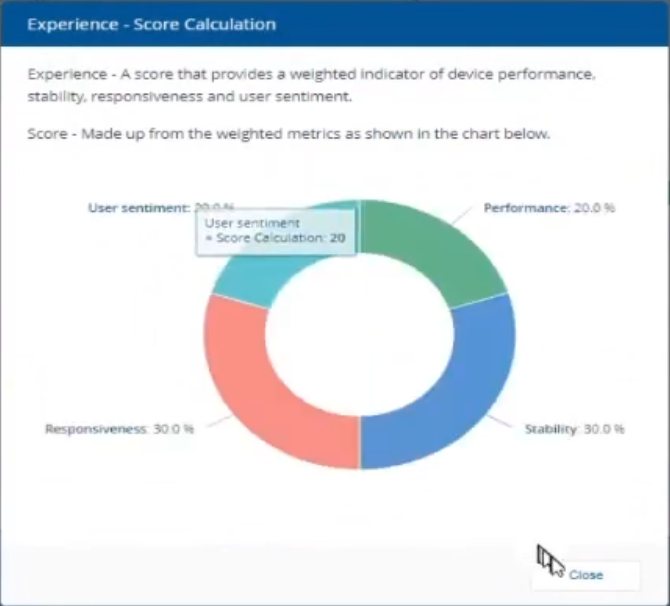
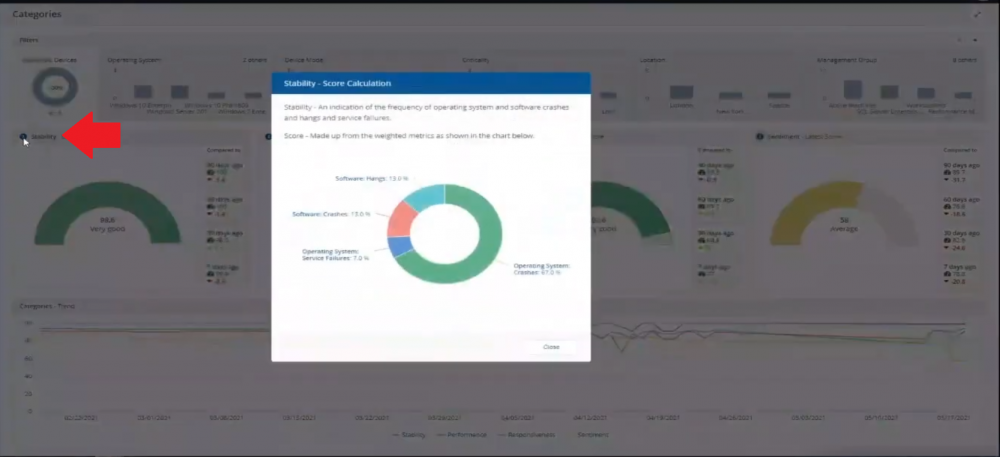
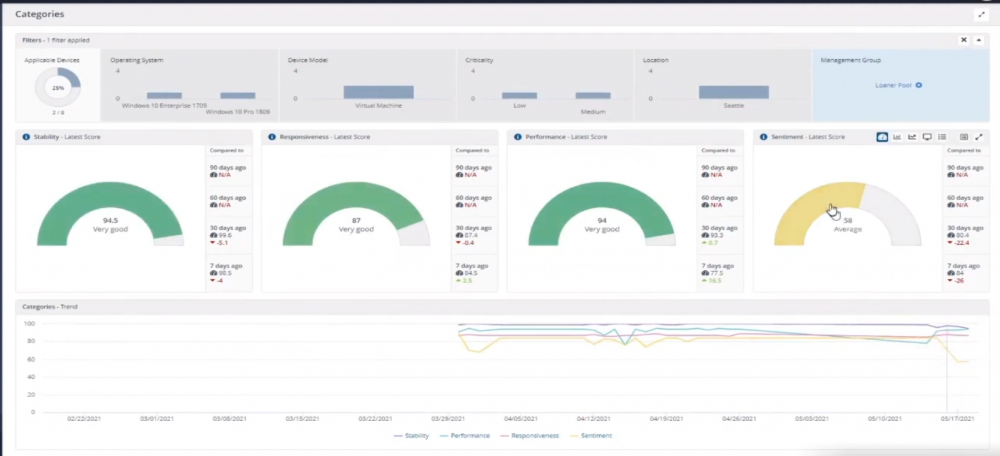
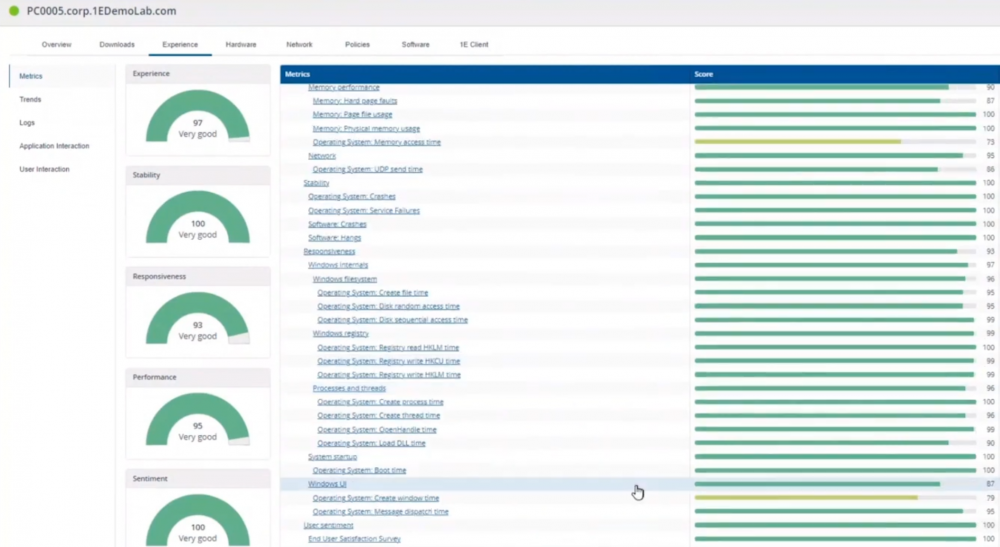
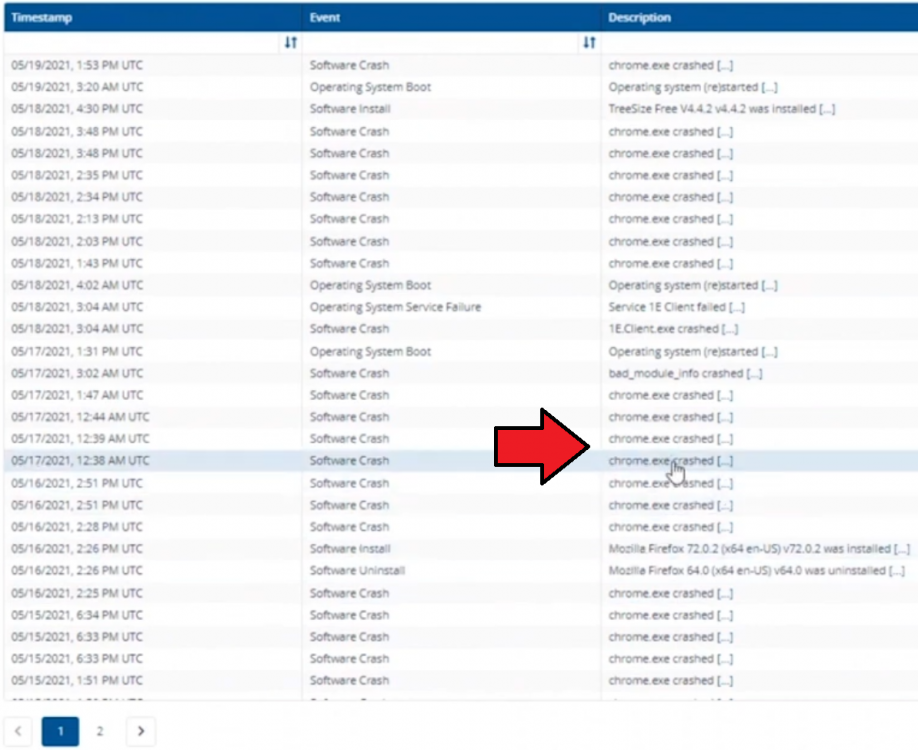
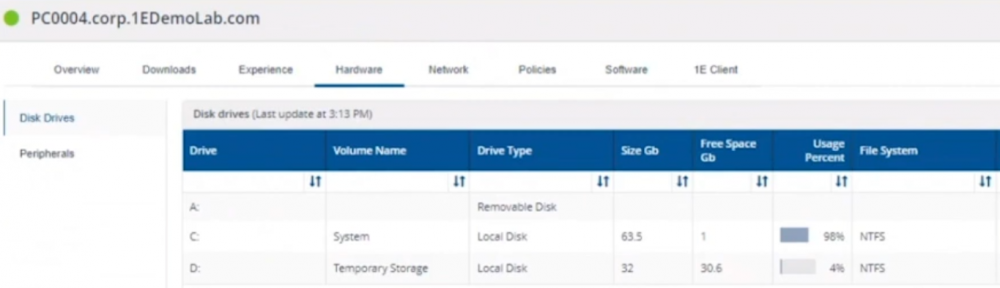
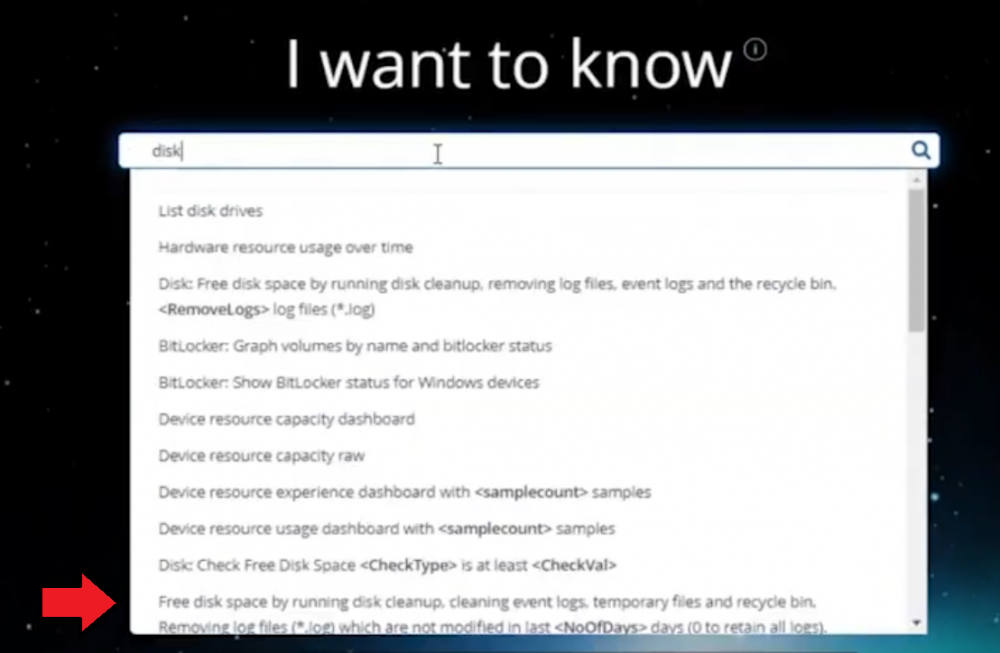
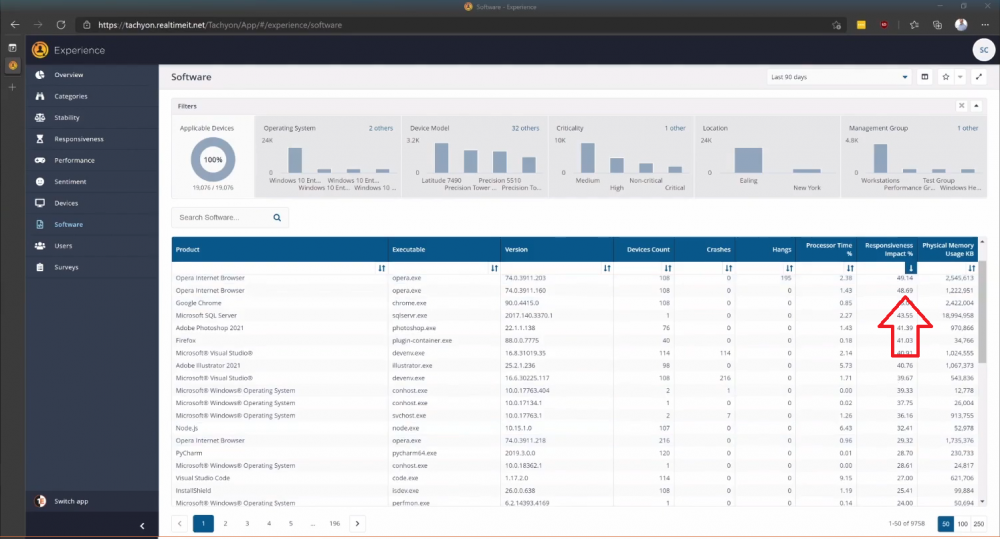
Introduction In a previous blog post I explained how to sign up for a webinar series and by doing so, learn from industry experts and Microsoft MVP’s about how and why they use tools like Tachyon from 1E to make things work better for your users, including how to deal with slow endpoints or in today’s case, how to deal with apps that crash. I’ll blog about each episode in the webinar series and link them here for your perusal. Episode 1. How to find and fix Slow Endpoints Episode 2. That crashy app This blog post relates to the apps that crash and how you can deal with them. I’m sure we’ve all experienced app crashes, I know I have. They go hand in hand with computer usage. For example, you download and install an app and before long either the operating system, some missing .DLL file or some other application or driver cause an incompatibility and the end-result is a crash. Google Chrome after crashing. Apps that crash can be caused by all sorts of things, software causing the hardware to crash or vice versa. If you purchase software that costs a lot of money and it crashes, then that leaves you with a bad experience. Michael Mott (guest speaker, on the right) talks about the approach of someone using Tachyon experience as a new user, to query the endpoints in real time and to figure out how the end users are feeling, particularly with all this working from home going on right now. But what is Tachyon exactly ? I briefly touched upon it in the first blog post in this series. Tachyon enables you to query endpoints in real time to figure out what is happening or what is installed on that machine, and execute commands in real time to fix issues at scale. The benefit to the end user is that the IT admin can use Tachyon to observe what is happening on the endpoint in real-time and potentially avoid having to call the end user about their problem, be it a crashy app or slow endpoint. “A lot of the time users don’t complain until it gets really bad.” Tachyon itself is made up of different modules (shown below) and today we’ll be looking mostly at the Experience module. Using the Experience module (made up of a couple of different scores) in Tachyon gives you an overview of everything, you can see how apps experience for the end user and this gives you the power to stop problems in advance or see them happening in real time. Here we can see the Overview selected. The overview is made up of 4 main components to generate an experience score. User sentiment Performance Responsiveness Stability A breakdown of the experience score calculation. By drilling down into each of those weighted metrics we can see that Stability is the one which directly relates to apps that crash or an operating system with problems. Responsiveness relates to the Windows UI, system internals and system startup so for example if an app such as Outlook is slow to launch and shows a blank screen while loading, this can be captured here and reported on. Performance is based on System disk performance, memory throughput, network performance and CPU performance. In the categories overview for these loaner machines (in the example) they are performing well for the first three metrics, however Sentiment is not doing so well in the dashboard below. Sentiment showing an average score. But what is the Sentiment component, well it’s based on user feedback gathered from surveys sent out. If you click on the Sentiment category to drill down further we get more details of that. Some user rated their virtual machine as very poor. Surveys help to generate the Sentiment score and these surveys are sent out using the 1E client. Digital Experience Management (DEM) is all about assisting the user to do the best work they can… Sentiment is a great addition here. These surveys are only sent out to the end-user when the client detects that mouse movement is low, or for example processor usage is calm or for example it verifies that the user is not busy having a conversation in a Teams chat. In other words, the surveys are built in such as a way as to not disturb the user. Using the data and drilling down to find out more Looking at the data we can see that PC0005 is responding well and getting good scores, but not so for PC0004. Drilling down further we can see responses from the end users about problems on individual clients and these give clues as to what the problem is. A quick look at the good machine (PC0005) in real-time shows how it’s performing and all looks good (as expected), including the Surveys. You can also look at the logs and see how it booted, you can search for events that have keywords like Crash for example. But that was the good machine, so all looked OK. PC0004 however had a bad score for Sentiment, so let’s take a look at that. As you can see, the Sentiment score is very poor. Digging deeper we can see that Chrome was crashing over and over, no wonder the user was unhappy. They even installed Mozilla Firefox to try and resolve things. More investigation reveals that the system disk is nearly full, perhaps that’s the cause of the crashing app. If we then go directly to the device in question you can indeed see it’s low on disk space and (as it was not being used) the Survey was showing. Surveys help to pinpoint where the issues lie. Taking action Now that the IT admin has some clues to the problem, they can take action using Tachyon Explorer. The actions available to IT admins can be scoped with permissions via role based access control (RBAC) so that for example they can only run Survey Administration and the actions applicable to that role. In there, you can type free text search fields or even connect to it using an IT ticketing system such as ServiceNow. In this example however, the admin searches for disk and that brings up several examples of actions, including how to free up disk space. This free disk action empties the recycle bin, runs a disk cleanup and removes temporary files. But, even though the admin wants to do this action they can be required to need approval to do it to add an extra layer of (2FA based) security. After the approval is received the free disk action runs automatically, and Chrome stops crashing for the end user on PC0004. Another happy user ! That’s it for this blog post, I hope to see you in the next one. In the meantime, I’d suggest that you sign up for the next DEM webinar, it’s free, tell them Niall sent you . And for those of you who want to see previously published episodes please click here. DISCLAIMER: The contents of this article are the opinion of the author and have been written from an impartial standpoint; however, 1E may have reimbursed the author for time and expenses for undertaking the findings and conclusions detailed in the article.


-
PXE not working
anyweb replied to jkjk12's topic in System Center Configuration Manager (Current Branch)
did you enable the boot image for PXE ? -
High CPU Usage Cause by Windows Management Instrumentation
anyweb replied to NunovUrbizniz's question in Windows 10
to prove it's not the ConfigMgr client agent, simply uninstall it on one or more of those systems and monitor to see if the problem re-occurs, if it doesn't then you've got a clue, start there -
Client Health Status sccm 2103
anyweb replied to Cliff's topic in System Center Configuration Manager (Current Branch)
first things first, before trying to fix your clients are you sure that the component status on the site server is all ok ? any problems there ? if it's all good then start looking at clients individually to determine the issues, it could be anything, corrupt wmi, invalid data or other reasons, Anoop has a good post here which should give you some pointers -
also the 0x8031005b translates to " The Group Policy settings for BitLocker startup options are in conflict and cannot be applied. Contact your system administrator for more information. Source: Windows ----- "
-
have you enabled the client management tab settings at all when you configured BitLocker Management ?
-
What is a /ProhibitedApplication ?
anyweb replied to josecastillo2021's topic in Configuration Manager 2012
are you deploying apps as required or available ? what version of configmgr ? have you seen https://docs.microsoft.com/en-us/mem/configmgr/apps/deploy-use/install-app-for-device -
if you undock from the thunderbolt 3 dock and connect the computer directly to one of the displays do you see the same problem
-
it's a good question, and i'd recommend you read this guide (from Microsoft) which goes into details about that https://social.technet.microsoft.com/wiki/contents/articles/485.how-to-publish-the-crl-on-a-separate-web-server.aspx
-
Microsoft 365 is an incredibly powerful software suite for businesses, but it is becoming increasingly targeted by people trying to steal your data. The good news is that there are plenty of ways admins can fight back and safeguard their Microsoft 365 infrastructure against attack. This free upcoming webinar, on June 23 and produced by Hornetsecurity/Altaro, features two enterprise security experts from the leading security consultancy Treusec - Security Team Leader Fabio Viggiani and Principal Cyber Security Advisor Hasain Alshakarti. They will explain the 5 most critical vulnerabilities in your M365 environment and what you can do to mitigate the risks they pose. To help attendees fully understand the situation, a series of live demonstrations will be performed to reveal the threats and their solutions covering: O365 Credential Phishing Insufficient or Incorrectly Configured MFA Settings Malicious Application Registrations External Forwarding and Business Email Compromise Attacks Insecure AD Synchronization in Hybrid Environments This is truly an unmissable event for all Microsoft 365 admins! The webinar will be presented live twice on June 23 to enable as many people as possible to join the event live and ask questions directly to the expert panel of presenters. It will be presented at 2pm CEST/8am EDT/5am PDT and 7pm CEST/1pm EDT/10am PDT. Don’t miss out - Save your seat now!

-
what about the edge_installer.log on the client what does that reveal
-
normally what I do is uninstall the existing ADK, restart the server, then install the latest applicable ADK, but it all depends on what version of ADK you have installed, and whether it's compatible with 2103 or not here's the list of supported ADK's https://docs.microsoft.com/en-us/mem/configmgr/core/plan-design/configs/support-for-windows-10#windows-10-adk
-
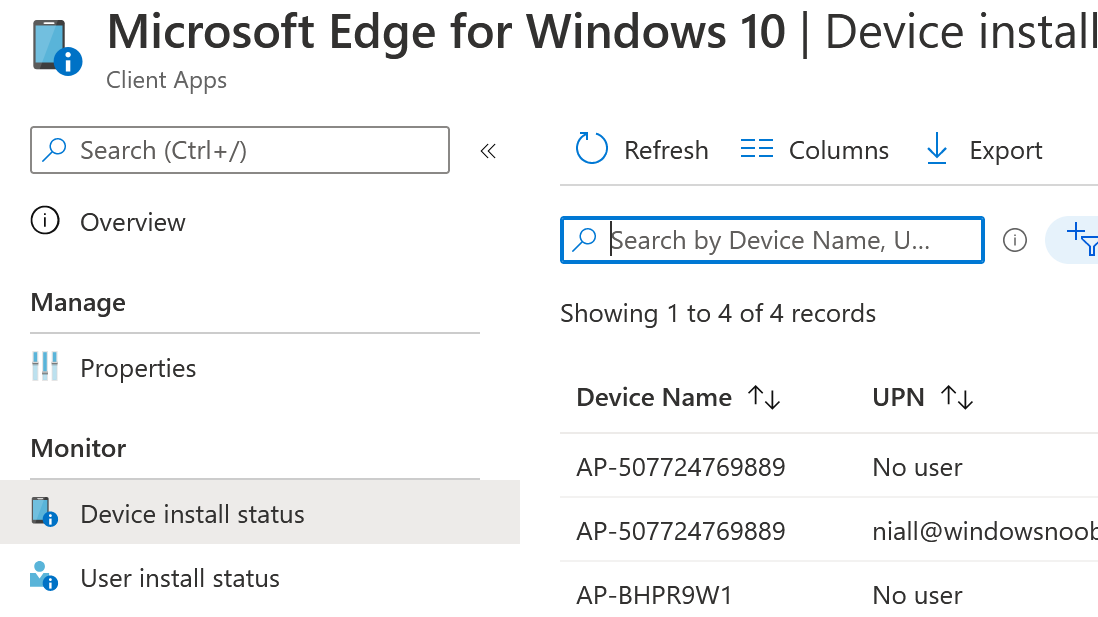
and are you sure it's not getting policy from Intune ? are any of the devices you are investigating showing up in your Edge deployments ? are your Edge logs on the client telling you anything ?

-
is it co-managed ?
-
Client Health Status sccm 2103
anyweb replied to Cliff's topic in System Center Configuration Manager (Current Branch)
hi and welcome, if you are new to ConfigMgr then please don't try deleting tables in SQL, that's a big no no even for those that are used to using it and it's not supported by Microsoft. Now that that's out of the way, you need to understand deeper why the clients are reporting the way they are, first things first, if your Primary is running version 2103 then are all your clients upgraded to the new client version ? do you know that yet ? -
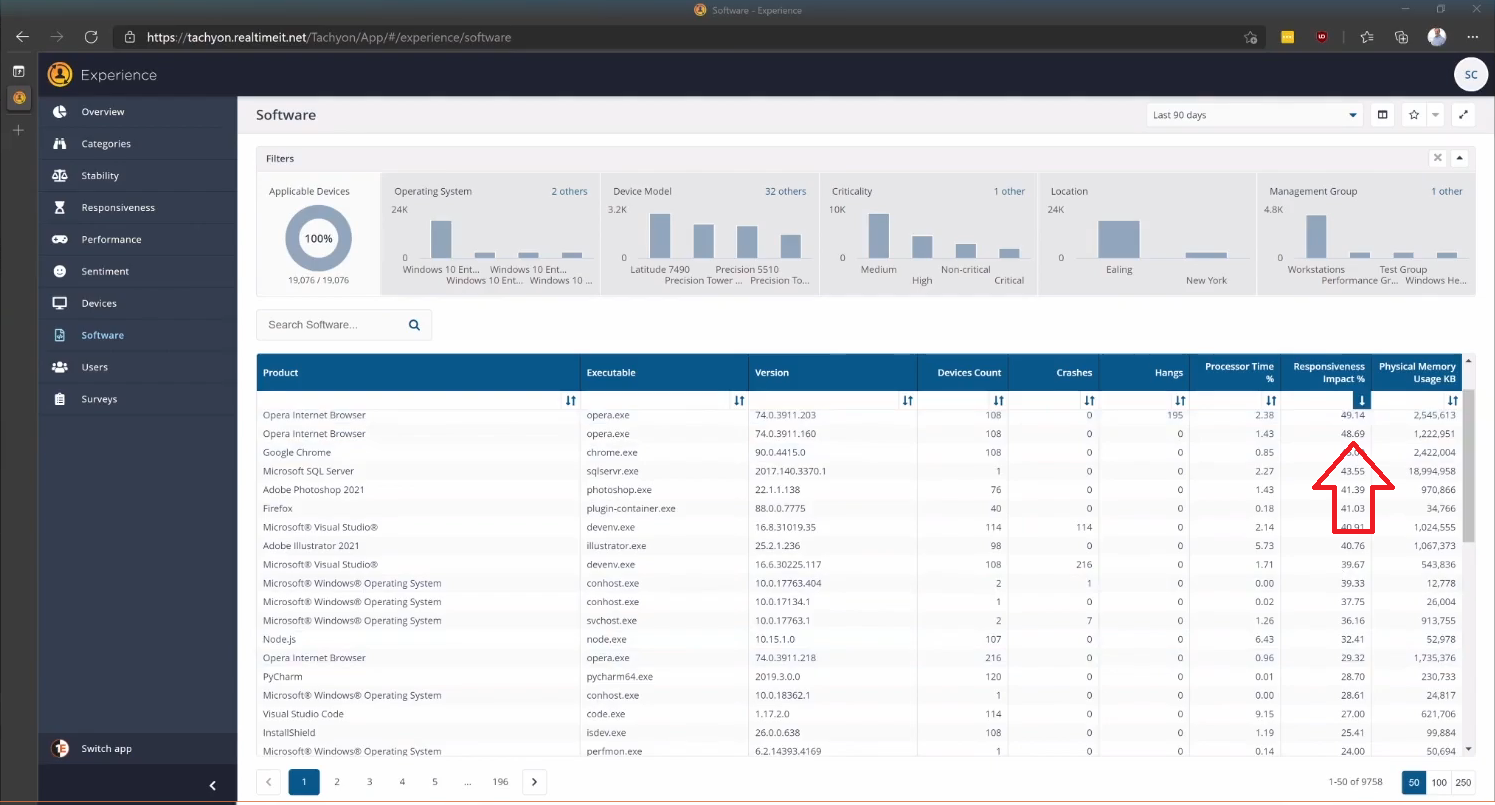
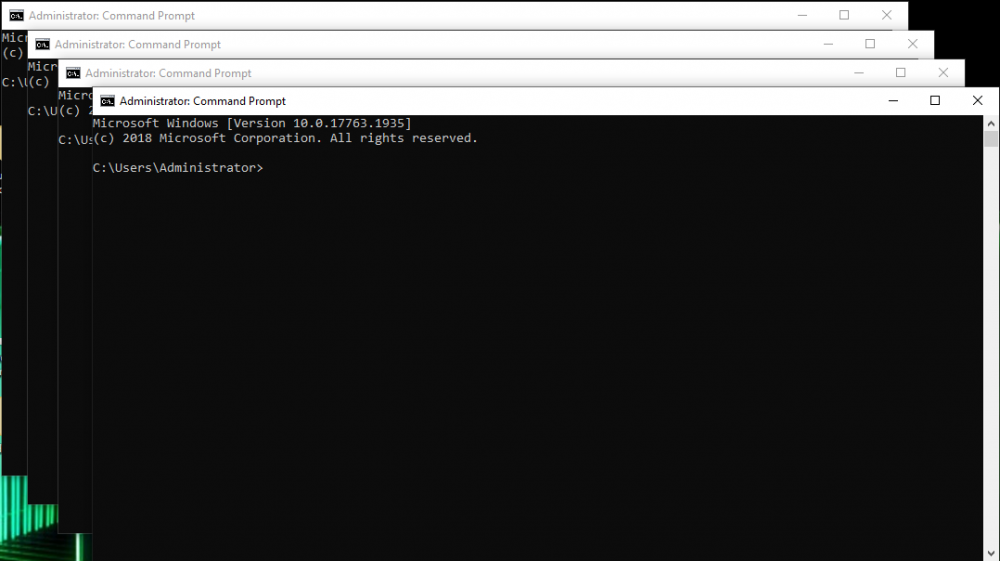
Introduction I’m sure we are all familiar with a slow running machine, it can happen at that exact moment when you least want it to occur, for example just before a meeting is about to start or on first power up after the weekend on a Monday morning. When it happens, everything seems to crawl, or is non-responsive. In desperation you click on an icon to spring it to life but nothing happens, so you click it again, and again…but the computer seemingly just ignores your actions as it is overloaded, slow and clearly busy doing something. To add insult to injury, after a few moments of non-responsiveness, those icons you clicked on earlier suddenly spring to life, and open all at the same time. Ever experienced that ? Multiple copies of the same program opening one after the other… I know I have experienced it and sadly a little bit too often during my working week. If this also sounds familiar to you then you are not alone, this is a very common problem as you can see based on google search results. Non tech-savvy people might trust a bunch of the first hits generated by that search, and think that cleaning their registry or installing X software will solve all their problems, if it sounds too good to be true, chances are, it won’t help at all, or worse can cause additional issues. Some common advice given to resolve slow running computers are: Windows update Reboot computer Install X program So what do you do, take the advice of random hits on google, or find another way. How you or your users deal with slow computers is something that a lot of us want more control over. 20 minutes, more or less Rather than searching for more advice I’d recommend you spend 20 minutes watching this on-demand webinar series where you’ll get to learn from industry experts and Microsoft MVP’s about how and why they use tools to make things work better for your users, including how to deal with slow endpoints (computers) which is touched on in part 1. 1E has started a new webinar series about Digital Experience Monitoring (DEM) in 10 parts, which you can sign up for free here. This particular webinar ties in nicely with their recent announcement about unified experience management (UXM). “1E Challenges DEM Market to Deliver More, Launching New Unified eXperience Management Category.” One of the great things about these webinars is they cover just enough information about the topic to keep you interested and are limited to 20 minutes in length which gives you plenty of time to get on with your other daily tasks. The first webinar is all about the subject of slow running endpoints, how to identify them and more importantly how to fix them in a proactive way. Think about this, if a user creates a ticket about their slow PC performance they are already unhappy. And you want to avoid that. As an admin, you could take steps to proactively avoid these problems for your users by co-relating all the data available to you looking at the responsiveness impact of software installed in your estate using 1E’s very own Tachyon. “Tachyon experience …is a dashboard that gives you visibility across your entire digital landscape.” Using the dashboard you can easily visualize how recent changes made have impacted negatively, and use that info to dig deeper. If you haven’t heard of Tachyon, google it. You’ll probably get a bunch of posts about high speed particles, and that’s because Tachyon is fast, at least that’s what the 1E marketing blurb says. How fast is Tachyon ? Later on in this series of blog posts I will experiment with Tachyon and give you a brief tour. I’ll also give you my honest feedback about how well it performs (or doesn’t) for me. So stay tuned. In the meantime, sign up for the next DEM webinar (June 2nd, 2021), it’s free, and tell them Niall sent you. And for those of you who want to see previously published episodes please click here. DISCLAIMER: The contents of this article are the opinion of the author and have been written from an impartial standpoint; however, 1E may have reimbursed the author for time and expenses for undertaking the findings and conclusions detailed in the article.


-
so what errors are you seeing now, to be clear