anyweb
-
Posts
9278 -
Joined
-
Last visited
-
Days Won
371
Everything posted by anyweb
-

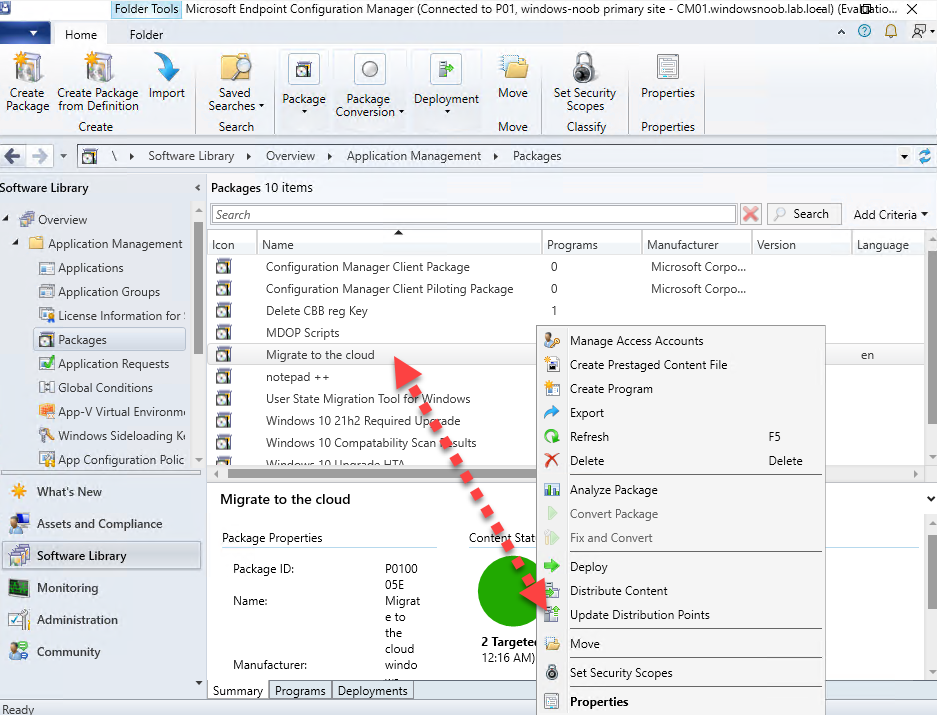
Migrate to the cloud - Part 1. Setup
anyweb replied to anyweb's topic in System Center Configuration Manager (Current Branch)
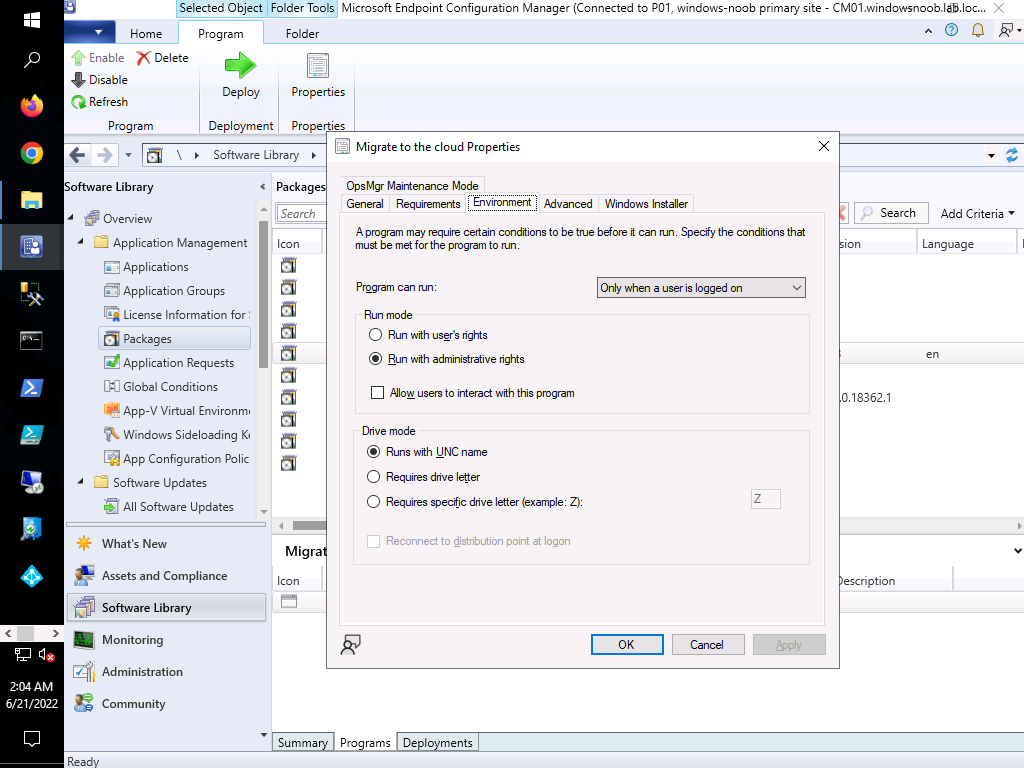
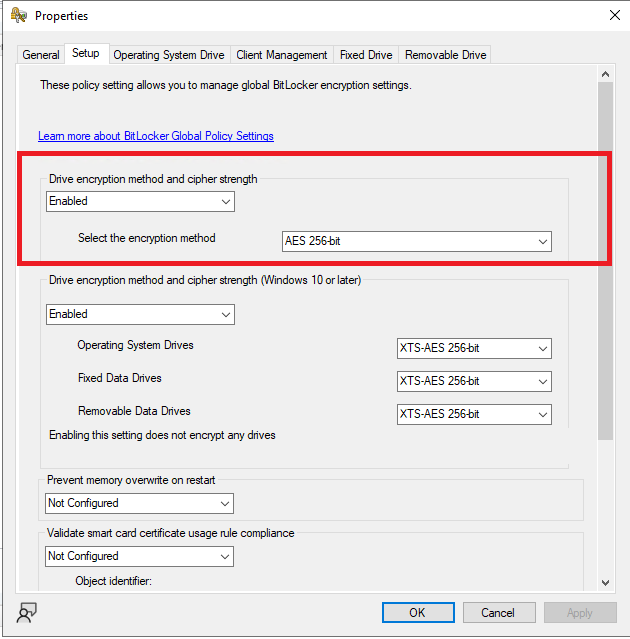
it must run under system context, so set it like i show in the picture below
-
Migrate to the cloud - Part 1. Setup
anyweb replied to anyweb's topic in System Center Configuration Manager (Current Branch)
hi @ryand274 did you modify the step to create the scheduled task in any way, it's very sensitive to any changes secondly, how are you testing this, i'd recommend you take a look at part 3 where I explain how to troubleshoot things -
if you want the device bitlockered BEFORE a user logs on then do it via OSD as I explain here https://www.niallbrady.com/2022/03/06/new-video-escrow-bitlocker-recovery-password-to-the-site-during-a-task-sequence-in-configuration-manager-2203/
-
yes a user must be logged on, i've got my new lab at 2203 now in e-http mode, i haven't enabled Bitlocker Management yet for reports check my posts on that here
-
it takes time to get my lab up and running, and i have a day job, but i'm working on it... i'll let you know when i'm done
-
i'll get one of my labs up to 2203 without bitlocker management, and try testing this...
-
and this is using e-http instead of PKI ? is everything else working fine in this environment eg: deployment of applications to the client ?
-
there must be something missing, how are you connecting to the VM exactly ? are you RDP'ing to it (don't do that) or connecting to it from within the hyperv host secondly, have you tried creating a brand new vm with a virtual TPM (and no iso mounted) to see does it behave differently and lastly, don't use the section highlighted here (set it to disabled), this is for pre-Windows 10 operating systems...
-
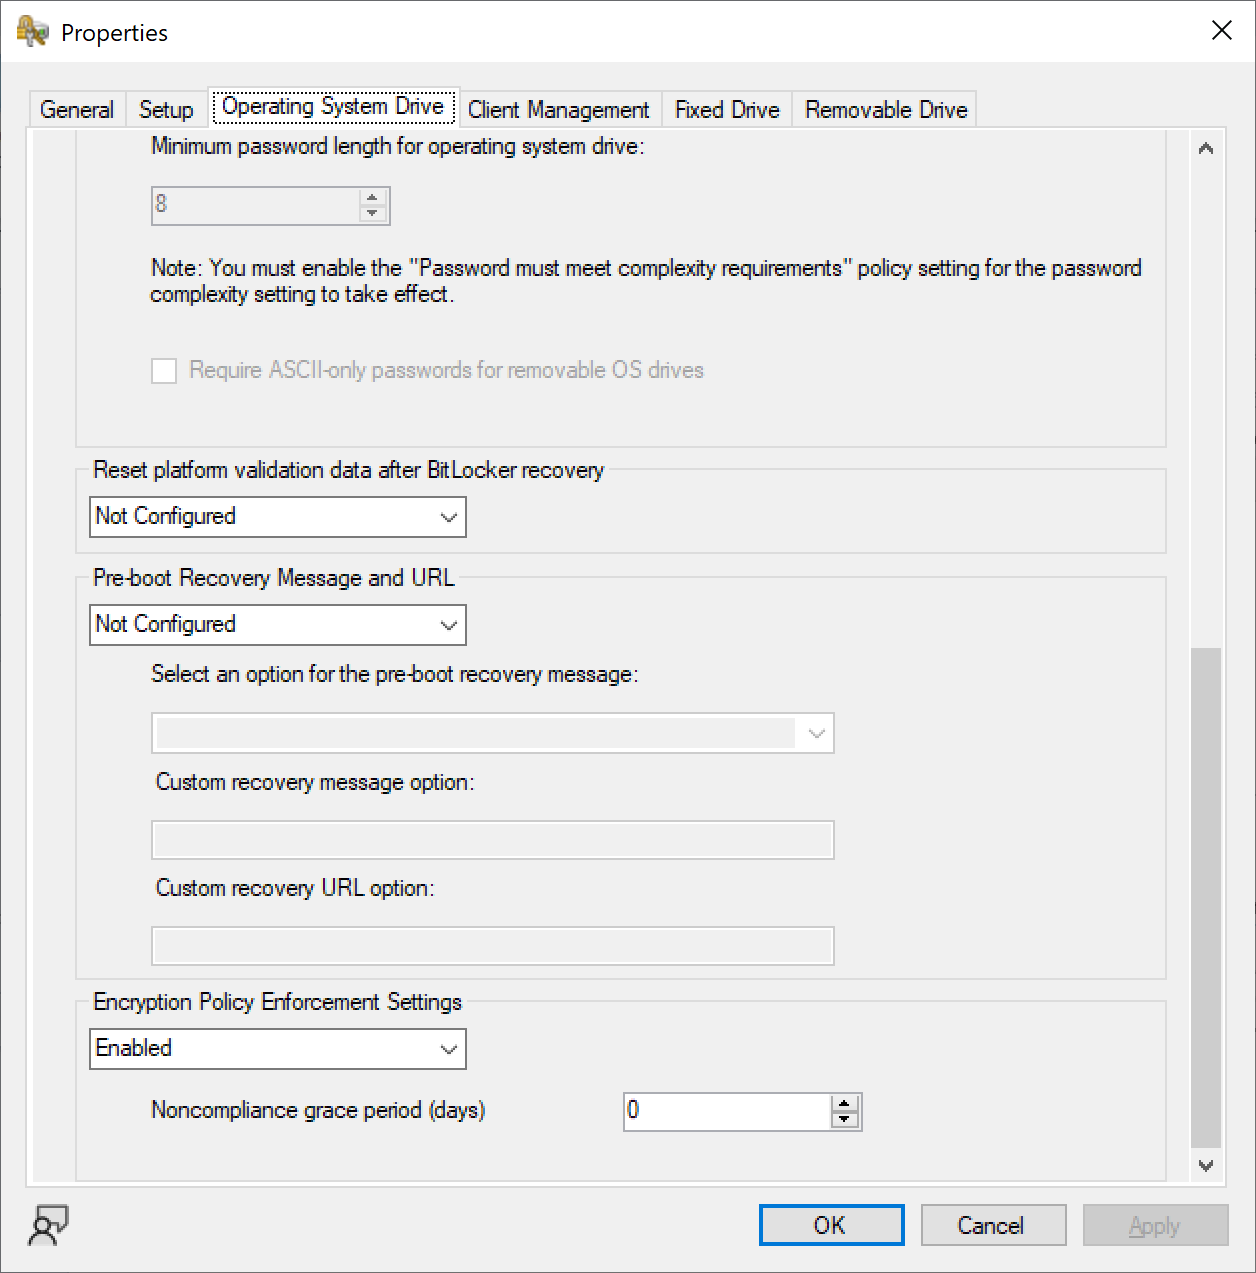
well you didn't get that prompt before so i think that's a step forward, how have you configured this ? To force encryption without intervention you must set the Encryption Policy Enforcement Settings to Enabled and set the non compliance grace period (days) to 0 if you want it to start as soon as possible

-
eject the ISO in the drive. and see what happens bitlocker won't encrypt if there is a CD present...
-
ok does the client have a virtual TPM, and is it enabled ? what encryption settings have you set in your bitlocker management policy ?
-
the thing is, i don't think they are needed any more as the recovery is handled by the management point and not by any mbam recovery service (like it used to be) that would explain why you get an 'warning' in the logs and not an 'error'
-
the following article has some good tips for setting it up http://woshub.com/password-policy-active-directory/
-
well things changed after 2103 i think, and instead of the mdop agent handling communication to the recovery point the cmagent took over, so it could be related to that,
-
sorry i had a long day, can we do a remote session tomorrow, i'm in Sweden so GMT+1
-
you can install the portals as mentioned here (scroll down) and for troubleshooting see this post
-
are you doing as follows, enabling the feature creating bitlocker management policy testing it or are you doing something differently ?
-
yeah we can try that tomorrow evening if you want (teams to talk, quickassist to view) ping me @ niall AT windowsnoob.com
-
is the client version on the clients the same as the site version ?
-
did you enable the feature ?
-
SCCM Update from 2111
anyweb replied to Joe13's topic in System Center Configuration Manager (Current Branch)
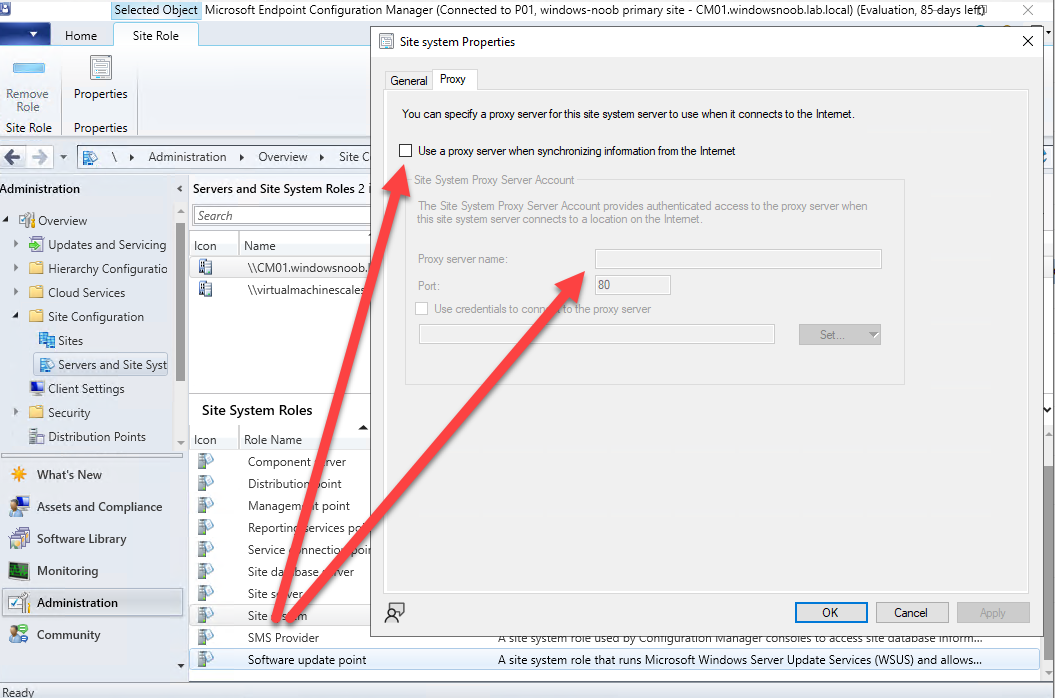
check your proxy settings
-
if you check in your SCCM DB, they are there, the issue is with the Console showing them... also, if you remember the ADR name and search for it by name it should show up
-
yes i've seen it, I assume you are talking about the Technical Preview releases ? I have the exact same problem in my Technical Preview lab and reported it already to Microsoft
-
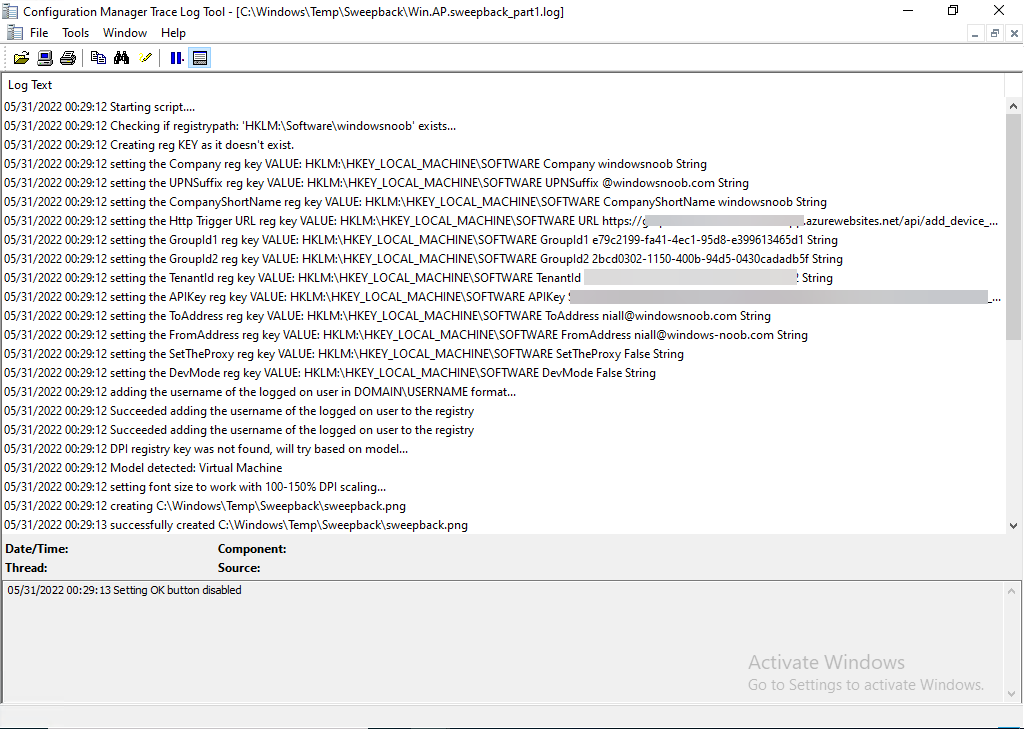
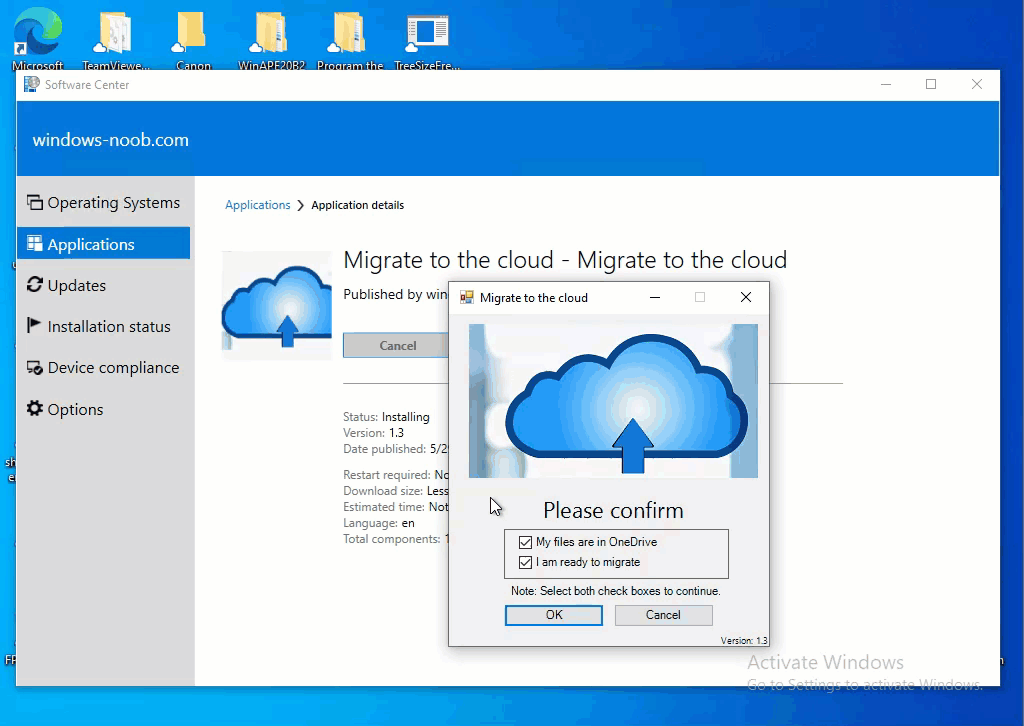
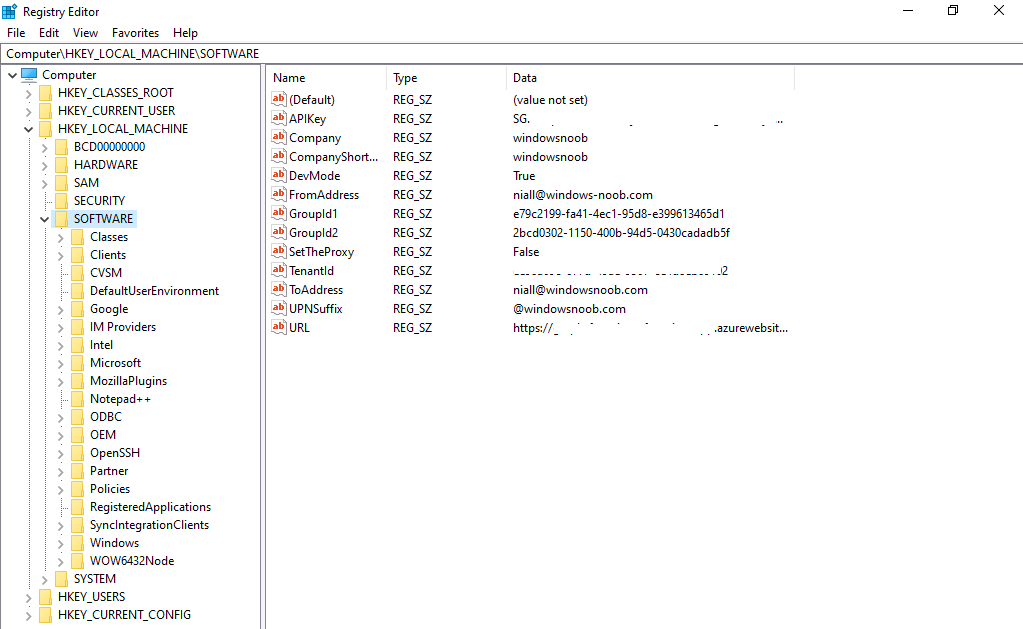
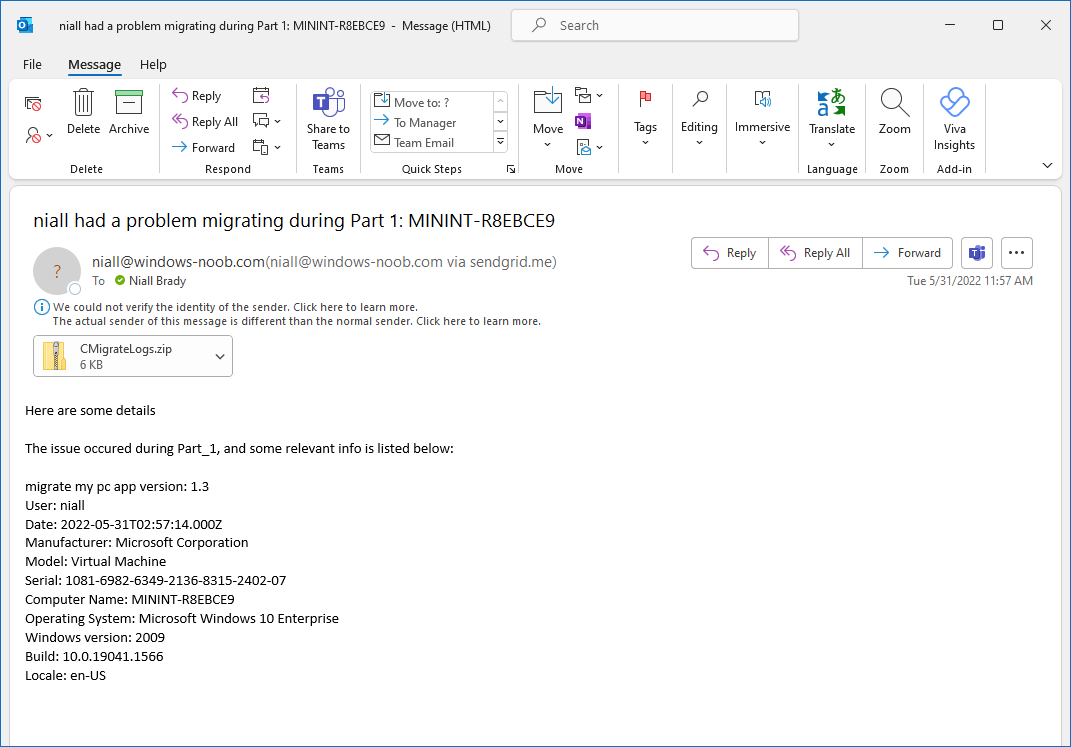
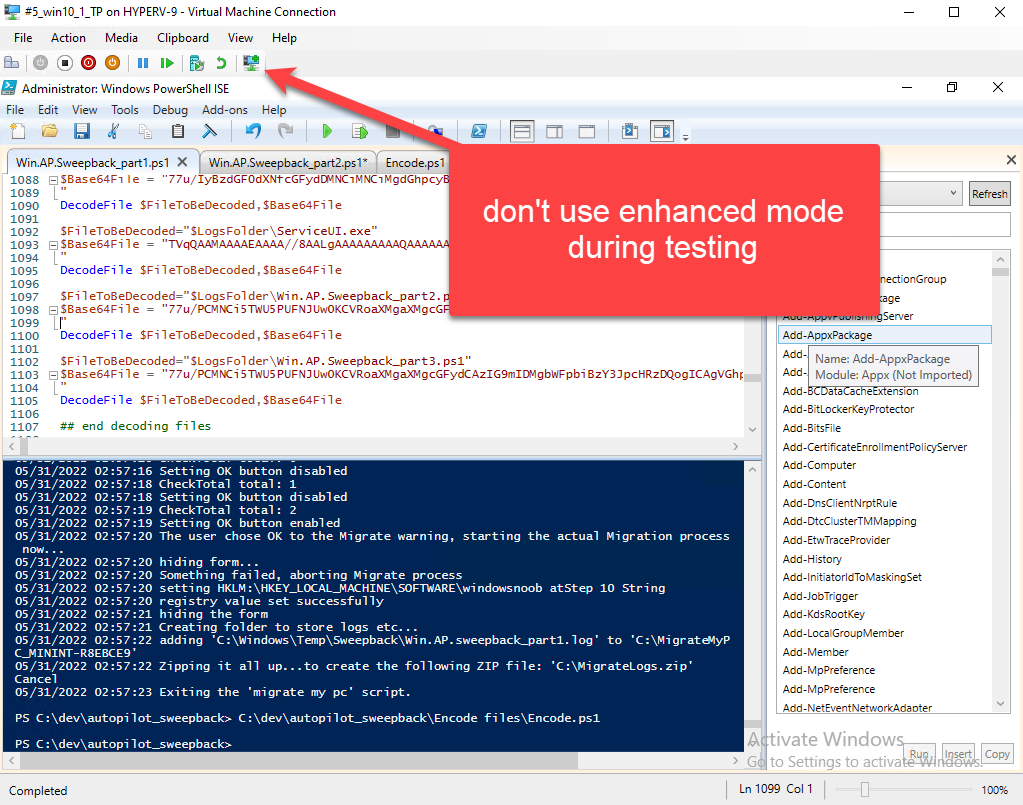
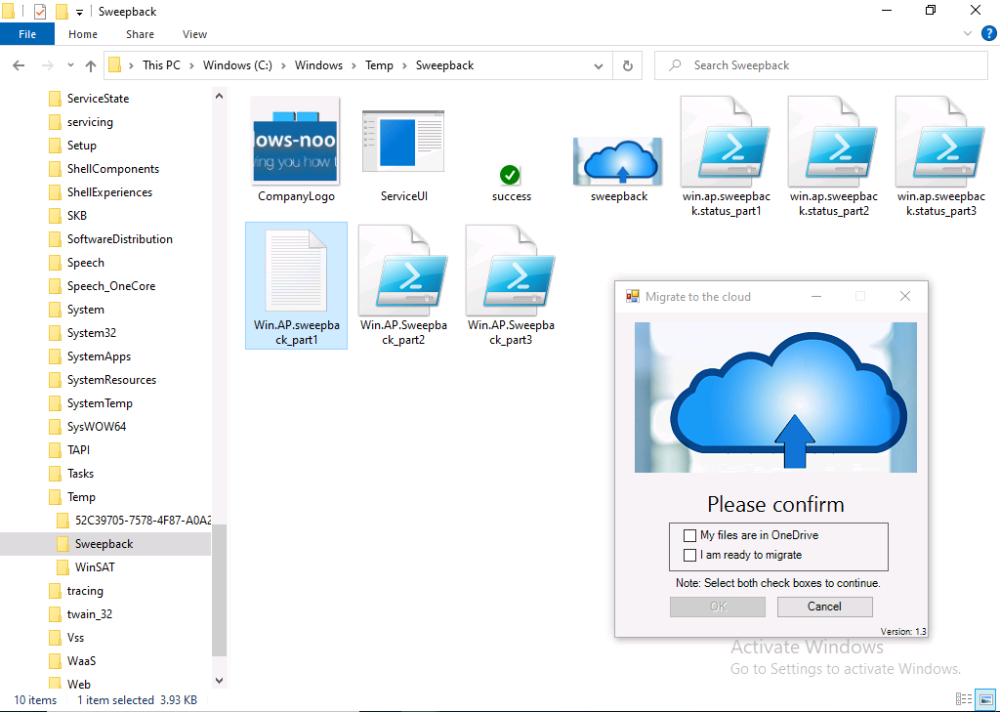
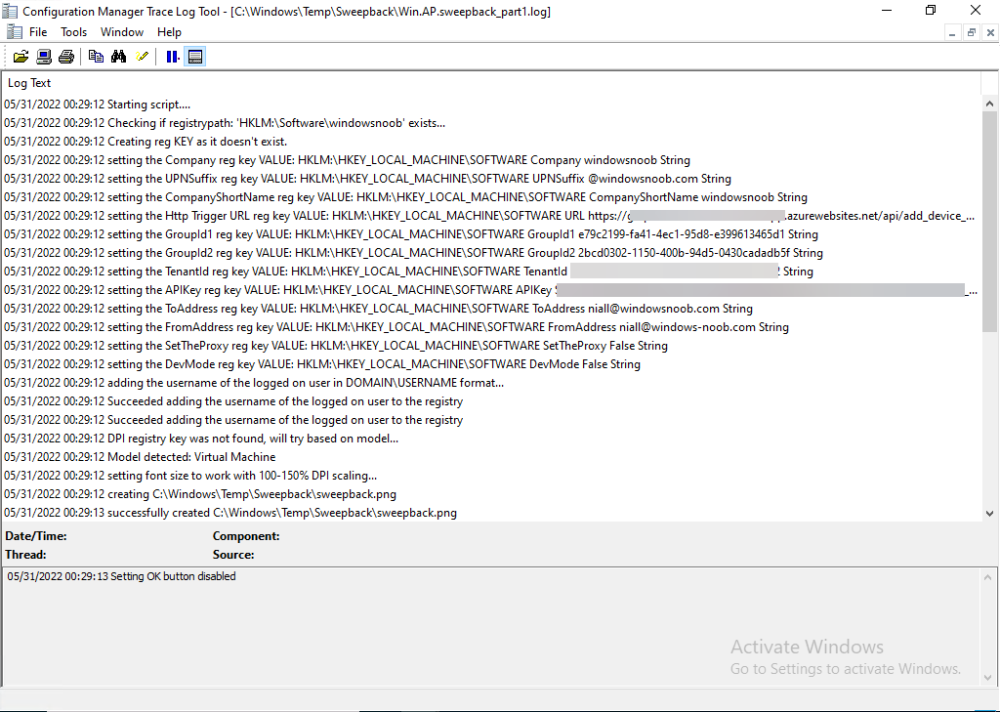
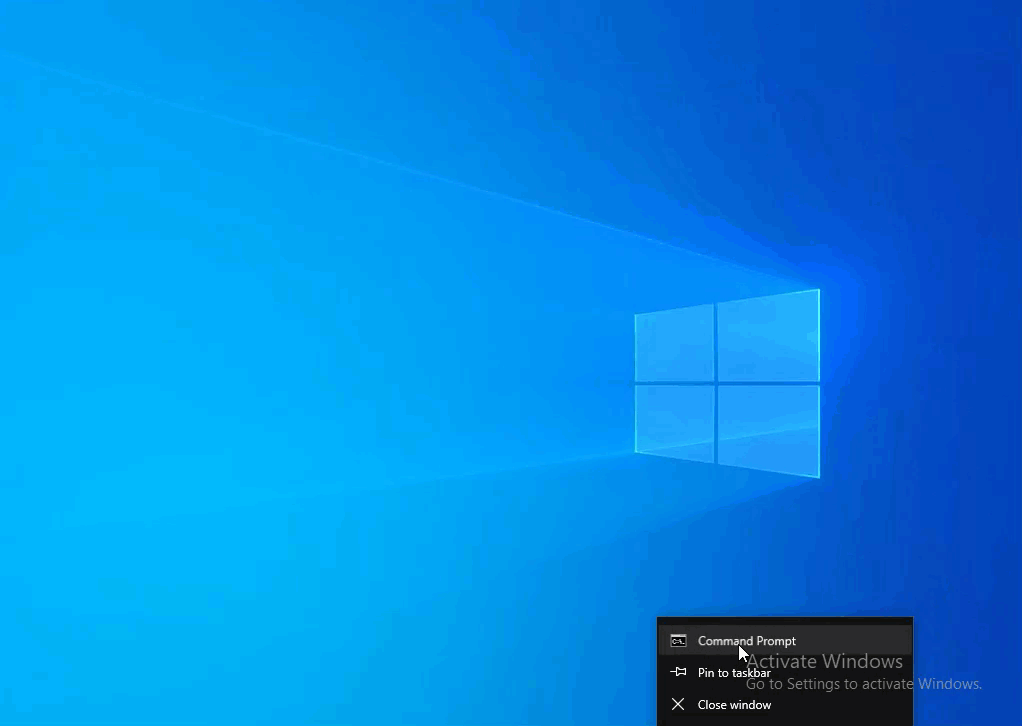
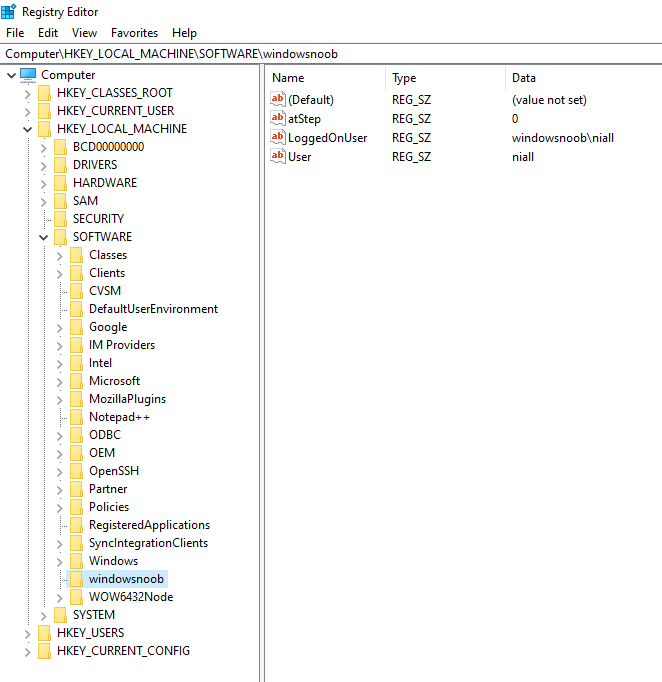
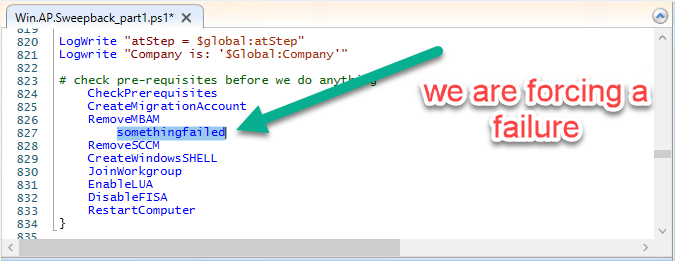
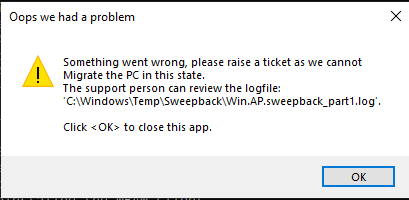
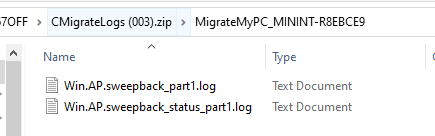
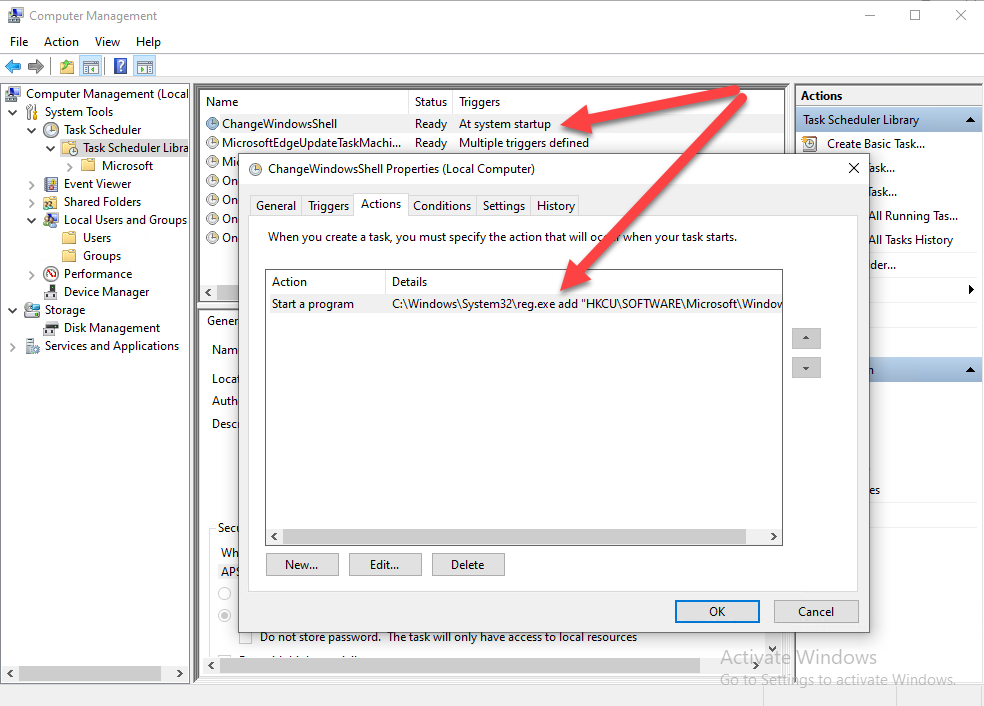
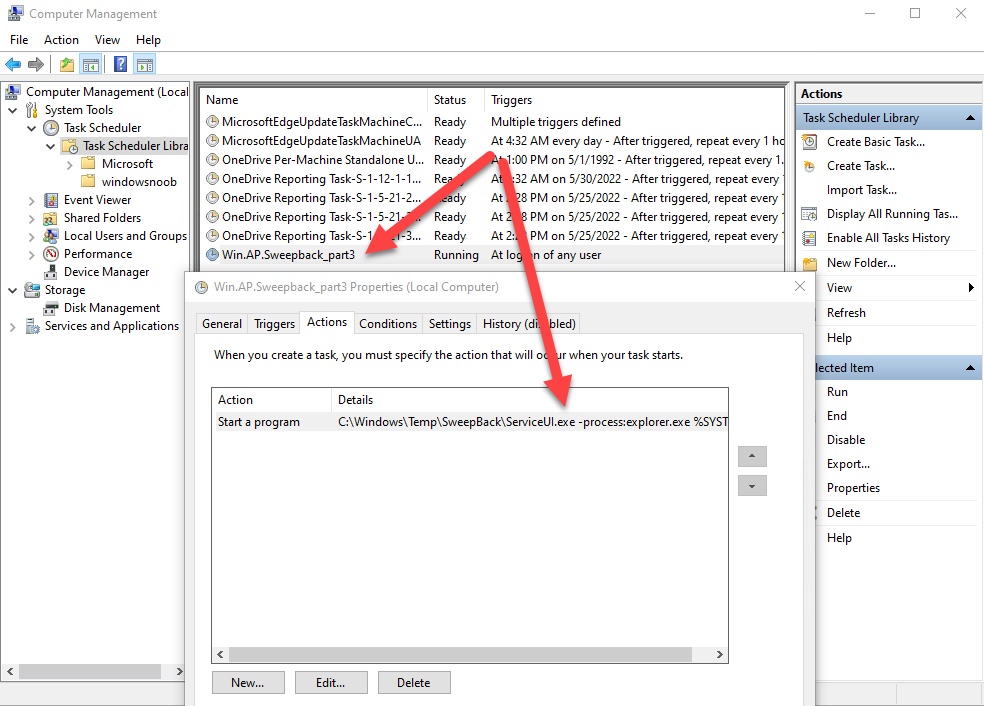
Introduction This blog series is comprised of 3 parts. In part 1 you reviewed a video of the solution and then carried out the initial steps to set everything up. In part 2 you saw how you could modify files, text and graphics to customize the app so that it matched with your company look and feel. In this part you'll look at troubleshooting to assist you with a deeper understanding of the solution and using that knowledge to make it work in your environment as quickly as possible. Migrate to the cloud - Part 1. Setup Migrate to the cloud - Part 2. Customization Migrate to the cloud - Part 3. Troubleshooting <- you are here Step 1. Test the app using SYSTEM context During the testing phase, use SYSTEM context to test the scripts. This verifies that everything you do will work correctly when it's eventually converted into a package/application in ConfigMgr. PSExec allows you to launch processes in SYSTEM context and as this app will run in SYSTEM context you should test and verify that it behaves correctly. To do that download PSExec from here and then launch an Administrative Command prompt. To launch a new command prompt in SYSTEM context issue the following command. psexec /i /s cmd.exe After launching the cmd prompt you can start Powershell to test the solution. Step 2. Familiarize yourself with the log files The app writes logs for each component that is running to the default log location which is C:\Windows\Temp\Sweepback as shown here. There are two main components for each part, the main script itself, and it's corresponding status script, each have their own separate log files. You can open the log files with CMTrace and monitor them live or when debugging issues. If you let the solution run to completion the following log files are generated in the default log file location of C:\Windows\Temp\Sweepback Win.AP.sweepback_part1.log Win.AP.sweepback_part2.log Win.AP.sweepback_part3.log Win.AP.sweepback_status_part1.log Win.AP.sweepback_status_part2.log Win.AP.sweepback_status_part3.log Step 3. Use devmode during development While you are testing the solution in your environment and tweaking it, you should enable the devmode variable. This allows you to include an Abort button on the 3 status screens, this will aid in troubleshooting as you can close the status screen and monitor logs live in CMTrace. Note: The Abort button does not stop the progress it just closes the currently open status screen. To enable devmode find the devmode variable in the main script and set it to $true, like so... after setting the variable to $true, save the script and then update your package to your distribution points. After doing so, you'll find the handy Abort button on all three of the status screens allowing you to easily close the status screen and check logs/registry settings/event viewer. When you've solved all your issues with the script, don't forget to flip devmode back to $false. Step 4. Familiarize yourself with the registry settings The app writes several regkeys to the following locations, you can review them to verify that it's writing the correct data. Below are the 2 locations that it will write to. The registry keys are used in the remaining parts so if not correctly written things will fail. It writes to the root of HKLM\Software and after the app is launched it writes to HKLM\SOFTWARE\Company where Company is your company name. The atStep registry key records the step which is currently shown in the status screen (usually from 0 to 7 depending on which part you are in). Step 5. Use the email ability If and when the app fails, it should send an email to your configured email inbox via the Azure Sendgrid ability. You'll need to configure Sendgrid as per the first part of this series and add your APIKey to the main script. Tip: You can manually force a failure (to capture logs etc) by calling the somethingfailed function during script execution as shown here. When running the script with that forced failure, the following will appear Here's an example of an email sent to your inbox when something fails. and the zip itself contains all logs generated at that point Step 6. Scheduled tasks The solution uses scheduled tasks to auto start parts, such as part 2 and part 3. During part 1 it will create a scheduled task to change the Windows Shell used during part 2, you can see that scheduled task here (sometime during part 1) before starting part 2. this scheduled task will be deleted upon successful completion so if something goes wrong, you can always ask the end user to restart the computer and if you are lucky it'll launch the scheduled task for that part and continue... Below you can see the scheduled task used to launch part 3 (which is created during part 2). Step 7. Test virtually When testing this solution, use virtual machines such as Microsoft Hyper-v (Generation 2) or VMware Workstation and take snapshots before running the script. If you do test it using hyper-v, run the scripts with enhanced mode OFF otherwise it'll fail to detect the logged on user. Once you've ironed out all the bugs, copy the scripts to your package source and test them via Software Center ! Well that's it, I hope this information has motivated you enough to start migrating your computers to cloud management ! until the next time, adios ! cheers niall.


-
update: this is now resolved natively without the need for a Powershell script in ConfigrMgr 2203, read more here > https://www.niallbrady.com/2022/03/06/new-video-escrow-bitlocker-recovery-password-to-the-site-during-a-task-sequence-in-configuration-manager-2203/