anyweb
-
Posts
9271 -
Joined
-
Last visited
-
Days Won
371
Everything posted by anyweb
-

Problems adding new Operating system
anyweb replied to jheideman's topic in Configuration Manager 2012
can you post the smsts.log ? -
you can install the MBAM client and any associated registry keys at the end of the task sequence and once installed MBAM will take control of your bitlocker environment, in the CM12 HTA I do just that here. CM12 in a Lab -The CM12 BitLocker FrontEnd HTA - video CM12 in a Lab - The CM12 BitLocker FrontEnd HTA
-
Yesterday Microsoft released 11 security bulletins fixing 24 vulnerabilities in Windows, Windows Server, Exchange Server, Microsoft SharePoint Server, Office Web Apps, Lync, ASP.NET SignalR, and Visual Studio Team Foundation Server 2013. Five of the bulletins address at least one vulnerability rated Critical. Another recently-reported zero-day was not fixed. Microsoft says that four of the bulletins (MS13-096, MS13-098, MS13-104 and MS13-106) contain a vulnerability which is being exploited in the wild. Of particular concern is MS13-098 which could undermine code signing, one of the more important fundamental protections available today. MS13-096: Vulnerability in Microsoft Graphics Component Could Allow Remote Code Execution (2908005) — This update fixes a vulnerability that was being exploited in the wild. The bug was in TIFF parsing and and affected an odd assortment of Windows and Office versions. MS13-097: Cumulative Security Update for Internet Explorer (2898785) — Seven vulnerabilities, five of them rated critical, are fixed in the latest cumulative update. MS13-098: Vulnerability in Windows Could Allow Remote Code Execution (2893294) — The WinVerifyTrust function, which is involved in verification of code signatures, has a critical vulnerability which could allow a malicious actor to inject malicious code into a signed executable. Microsoft says that this vulnerability is being exploited in the wild. MS13-099: Vulnerability in Microsoft Scripting Runtime Object Library Could Allow Remote Code Execution (2909158) — A critical vulnerability in Windows Script 5.6, Windows Script 5.7, and Windows Script 5.8 could allow a malicious web site to take control of a user's computer. MS13-100: Vulnerabilities in Microsoft SharePoint Server Could Allow Remote Code Execution (2904244) — Multiple SharePoint page content vulnerabilities, collected as CVE-2013-5059, could run arbitrary code in the security context of the W3WP service account. SharePoint Server 2010, 2013, and Office Web Apps 2013 are affected. MS13-101: Vulnerabilities in Windows Kernel-Mode Drivers Could Allow Elevation of Privilege (2880430) — Five vulnerabilities could allow elevation of privilege. An attacker must have valid logon credentials and be able to log on locally and would have to run a malicious program to exploit this vulnerability. MS13-102: Vulnerability in LRPC Client Could Allow Elevation of Privilege (2898715) — Malicious code could elevate privilege by spoofing an LRPC server and sending a specially crafted LPC port message to any LRPC client. MS13-103: Vulnerability in ASP.NET SignalR Could Allow Elevation of Privilege (2905244) — By reflecting specially-crafted JavaScript back to the user, an attacker could elevate privilege at the user in the context of Visual Studio Team Foundation Server 2013. MS13-104: Vulnerability in Microsoft Office Could Allow Information Disclosure (2909976) — By getting a user to open an Office document on a malicious web site, the attacker could ascertain access tokens used to authenticate the current user on a targeted SharePoint or other Microsoft Office server site. Strangely, Microsoft says both that functional exploit code for this vulnerability is unlikely, and that they are aware of limited, targeted attempts to exploit it. MS13-105: Vulnerabilities in Microsoft Exchange Server Could Allow Remote Code Execution (2915705) — This describes four vulnerabilities in Exchange Server, 2 of them in a bundled component from Oracle. MS13-106: Vulnerability in a Microsoft Office Shared Component Could Allow Security Feature Bypass (2905238) — Loading a shared Office component as an ActiveX control in IE could allow it to bypass ASLR. The vulnerability has been publicly disclosed and Microsoft is aware of attempts to exploit it. Microsoft also released many non-security updates today.] via Zdnet - http://www.zdnet.com/microsoft-patches-4-zero-day-vulnerabilities-in-major-patch-tuesday-event-7000024145/

-
Unable to add Roles with MDT integration to OSD TS
anyweb replied to Yan's topic in Configuration Manager 2012
the smsts.log file will reveal the success or failure of any step, and that's the place to look when things are not working as you expect -
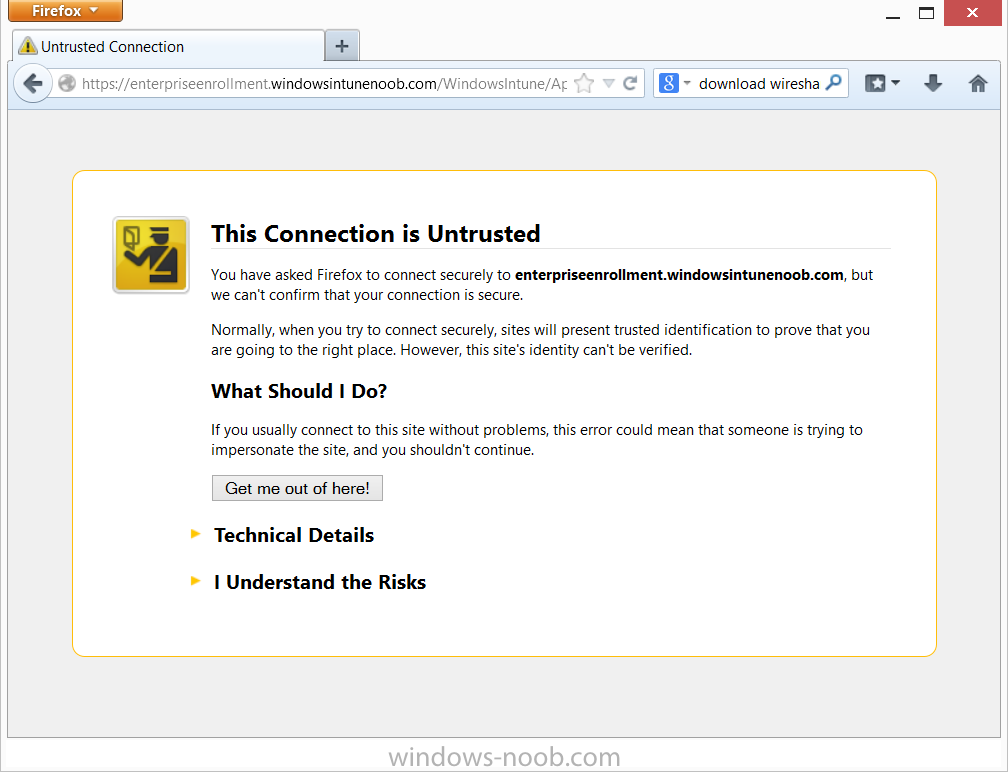
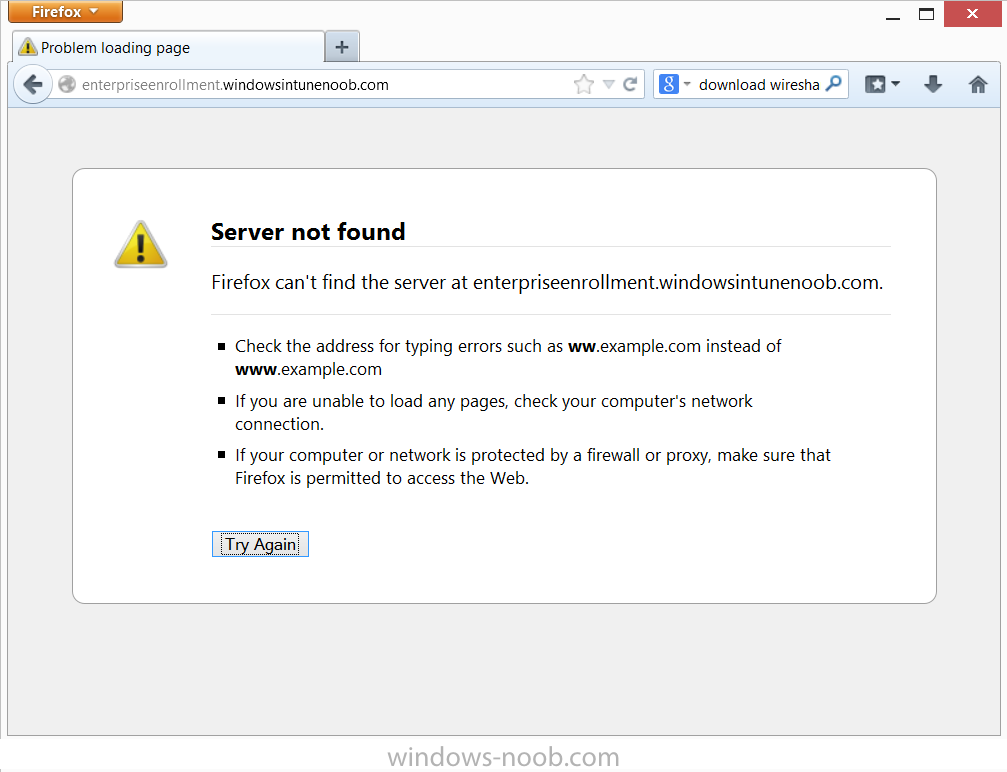
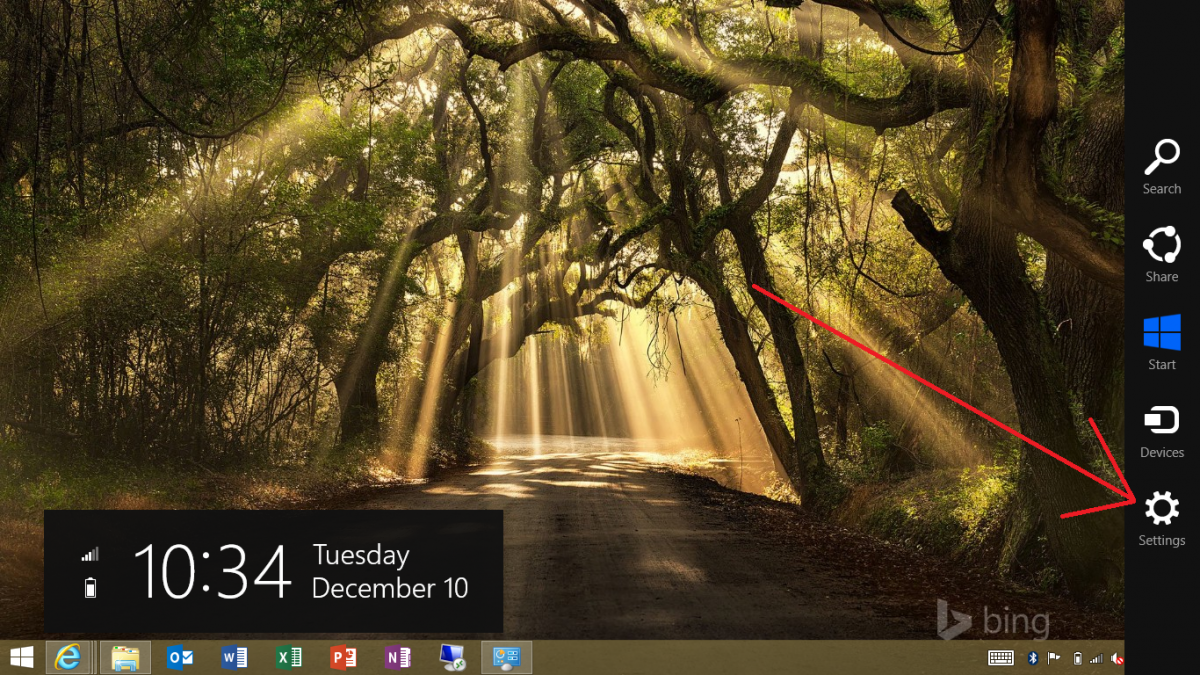
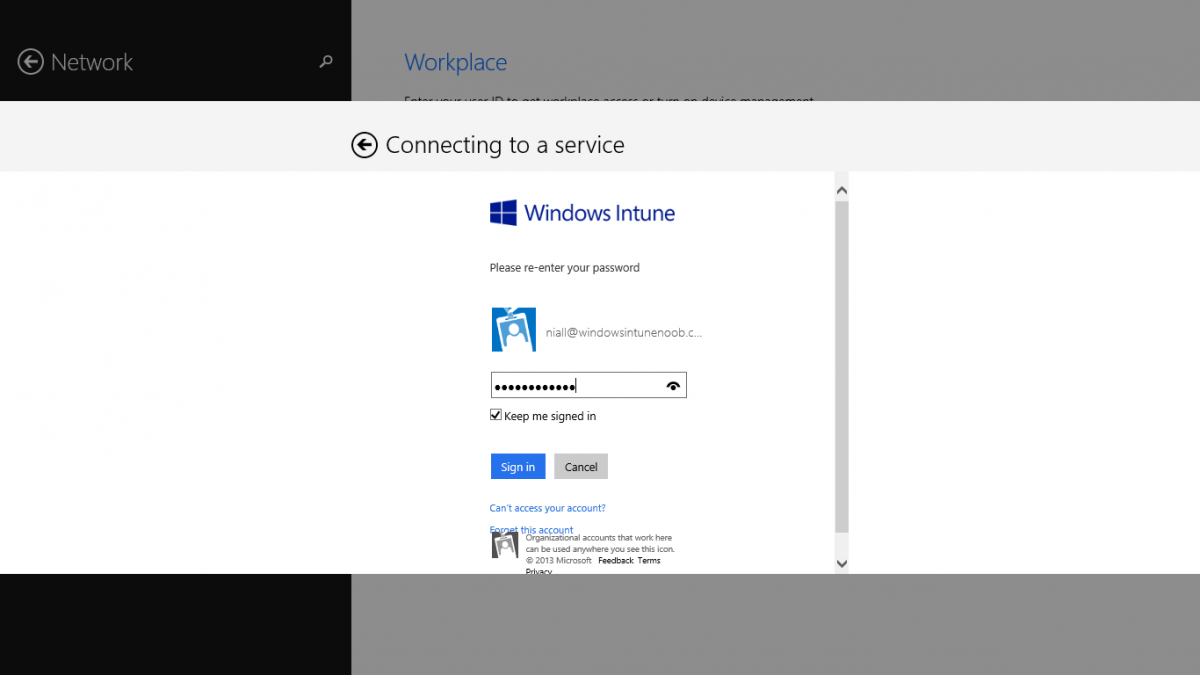
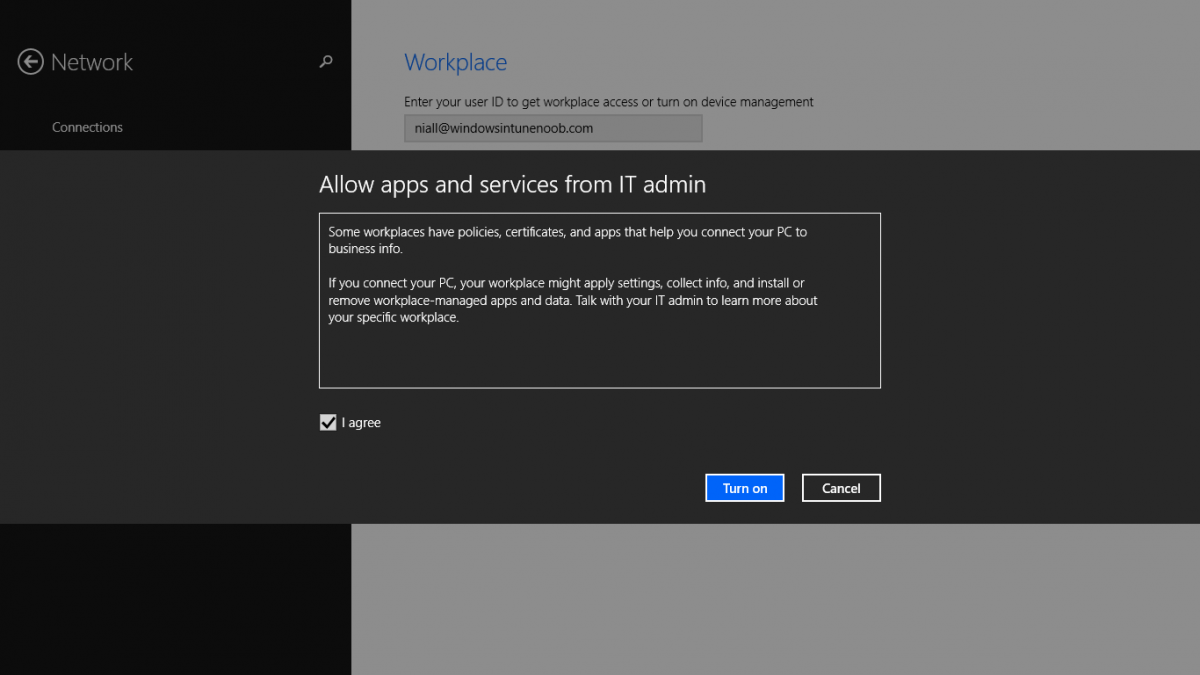
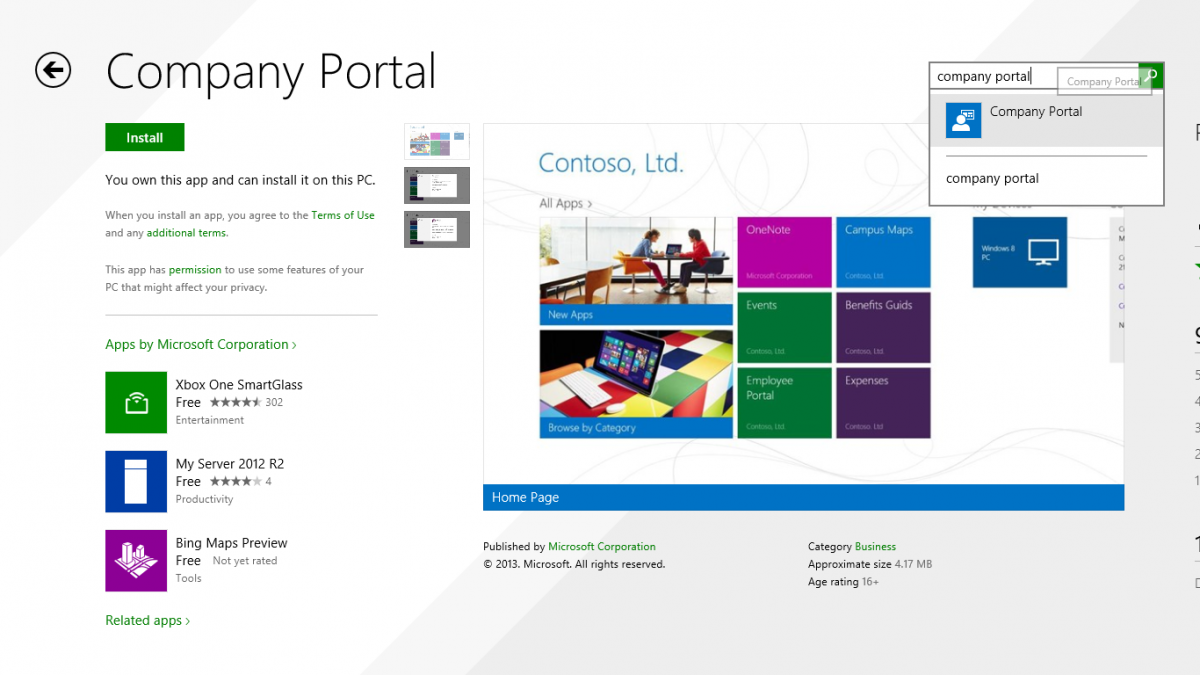
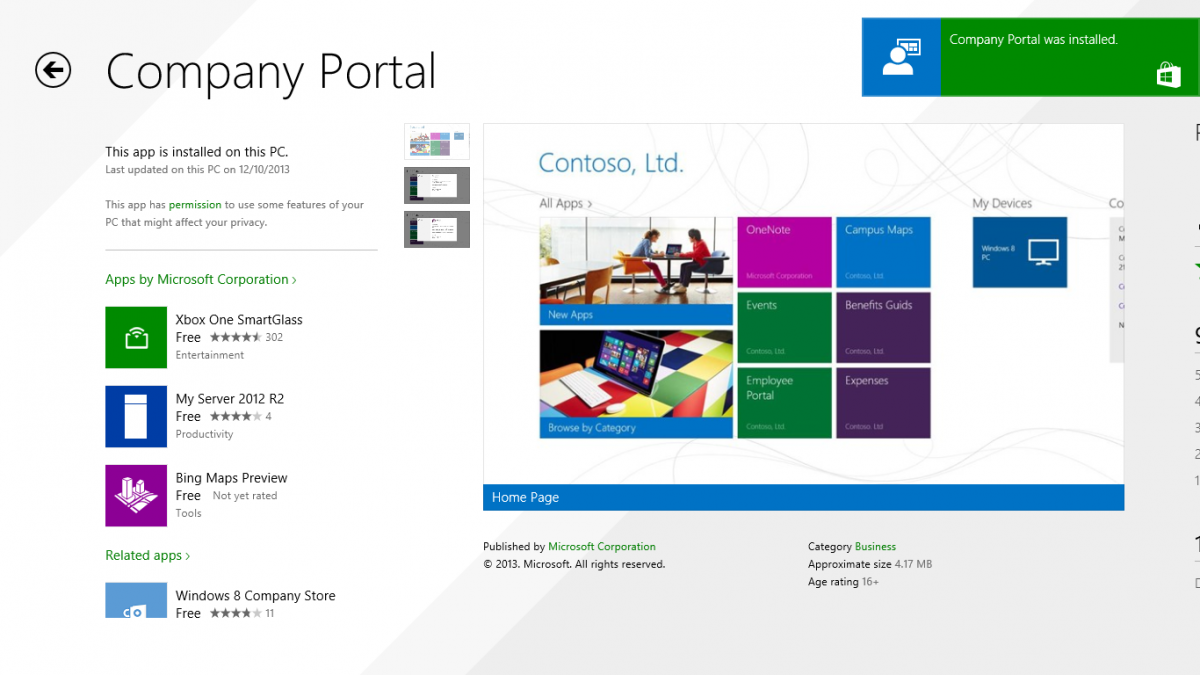
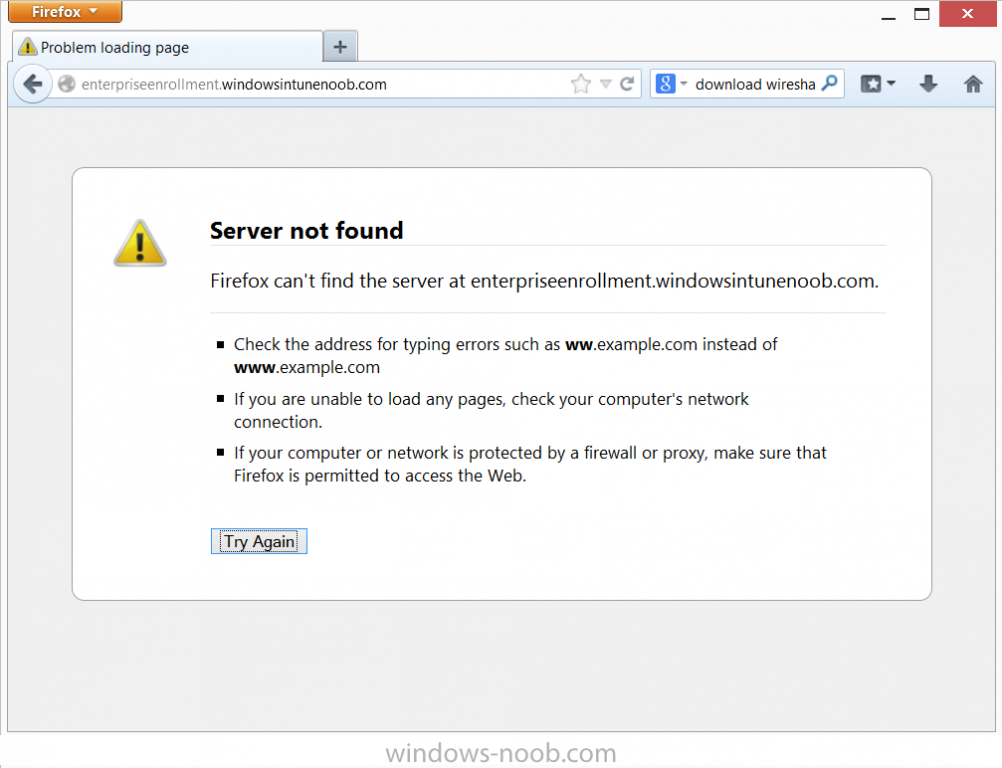
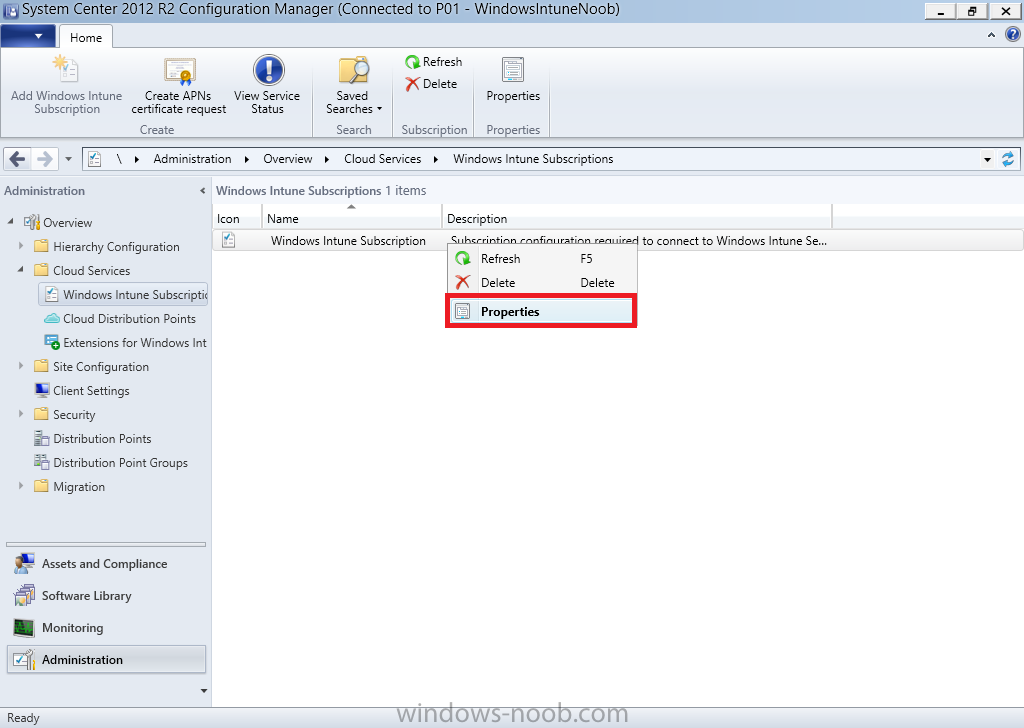
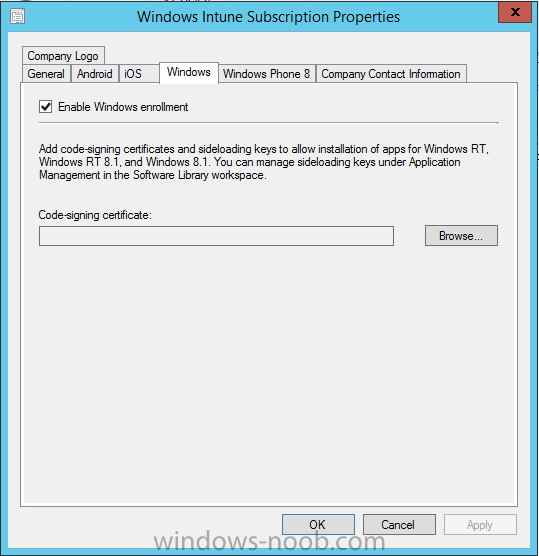
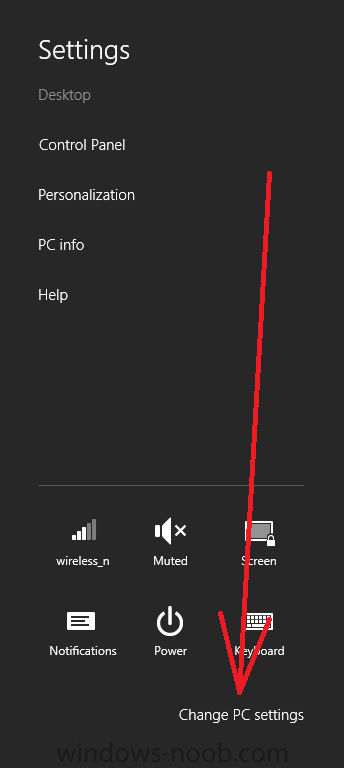
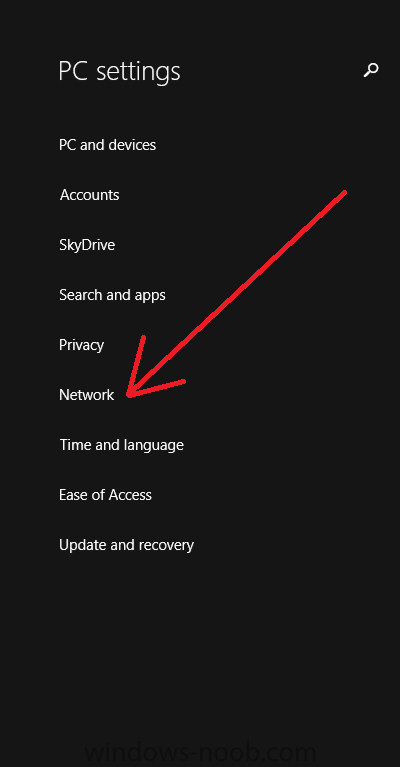
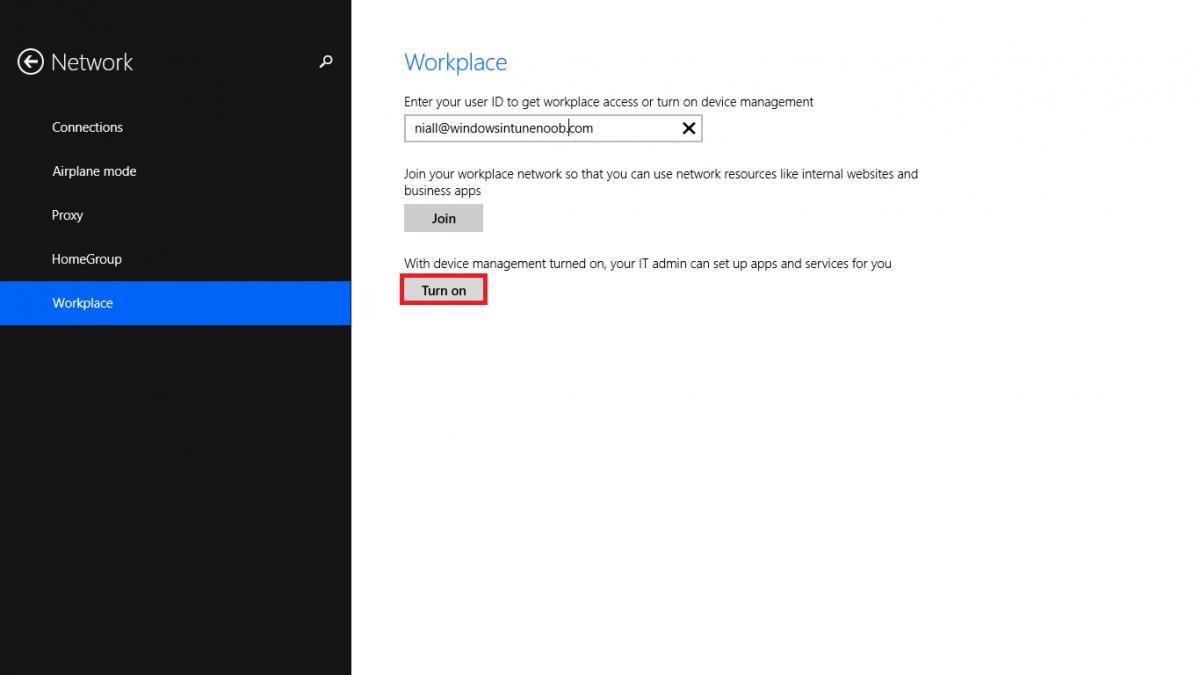
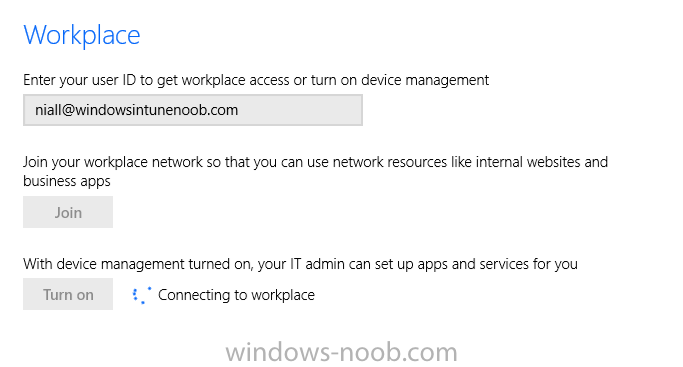
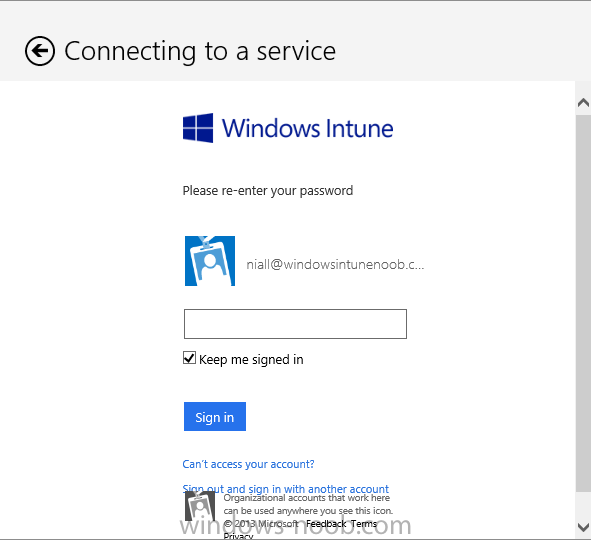
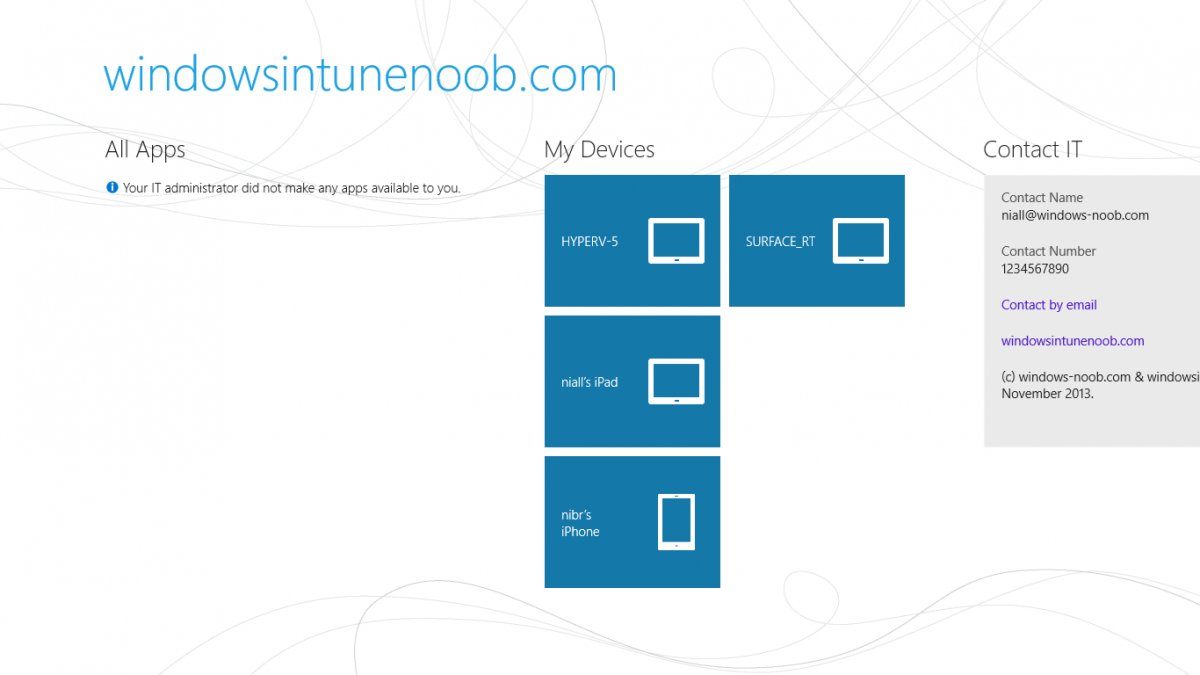
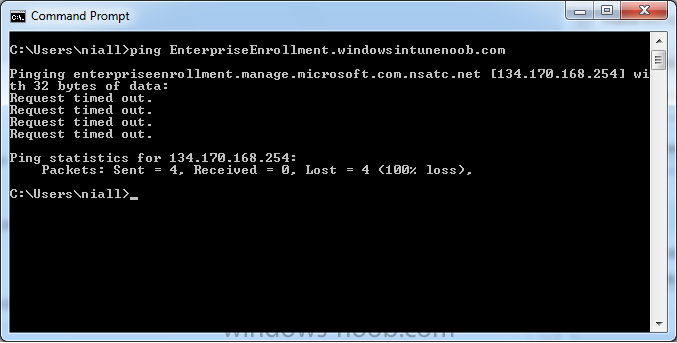
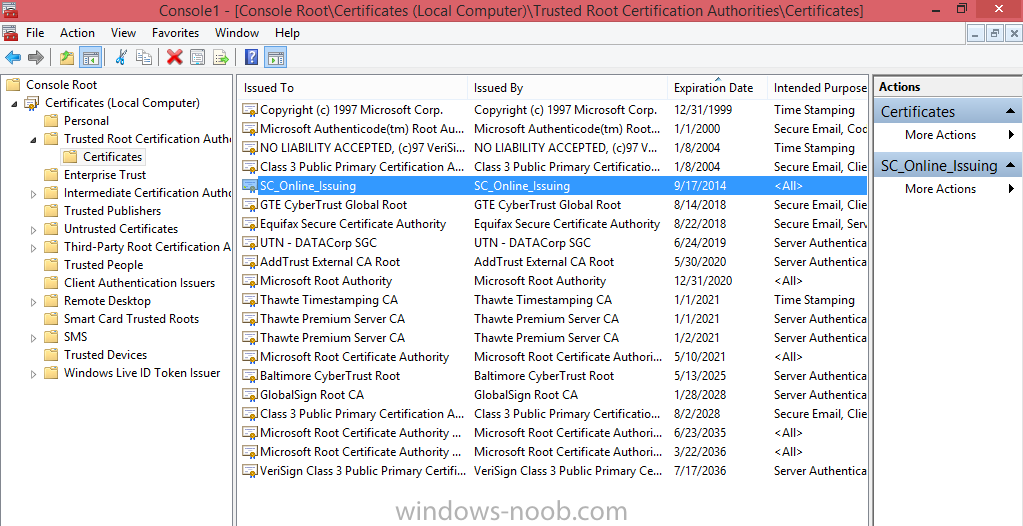
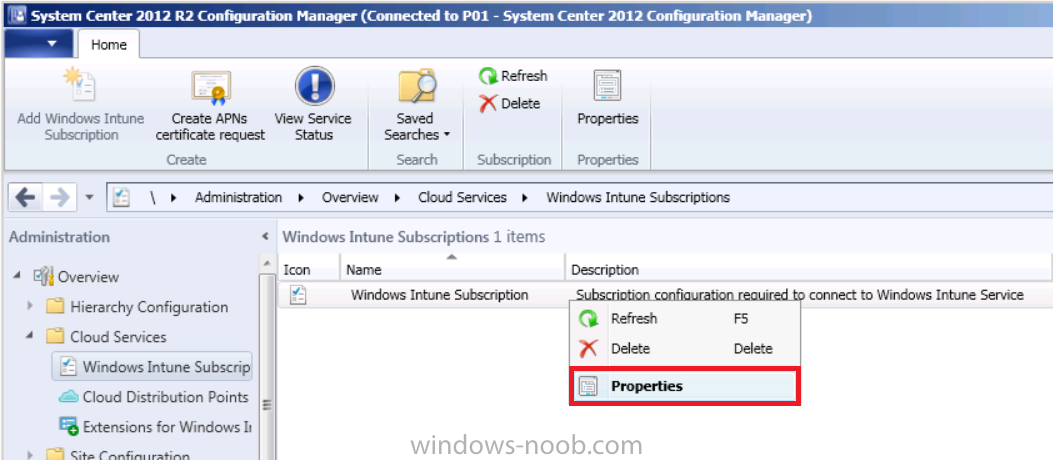
Introduction In Part 1 of this mini series we integrated Windows Intune with System Center 2012 R2 Configuration Manager. In Part 2 we added Support for iOS devices (Iphone, iPad). In Part 3 we learned the difference between App Package for iOS (*.ipa file) and applications from the Apple App Store. We learned how to deploy them to iOS devices and configured the deployment type so that the applications were made available to the user based on the iPhone or Ipad operating system version, in addition we also checked device Ownership information and deployed the application based on those requirements. In Part 4 we learned how to use and configure compliance settings in order to enable or disable certain configurable features on iOS devices. We enforced a Password requirement and enforced a minimum password length as this is a common requirement for organizations. Now we will enable support for Windows 8.1 devices (both Windows RT 8.1 and Windows 8.1 Enterprise) to be managed via System Center 2012 R2 Configuration Manager integrated with Windows Intune. Configuration Manager adds to the application experience with Windows 8.1 modern UI apps by adding some new features listed below:- Windows 8.1 introduces the app bundle (or .appxbundle package) to help optimize the packaging and distribution of Windows Store apps and resource packages. Configuration Manager extends the existing Windows app package deployment type to recognize .appxbundle package files. The create application wizard includes a new option that allows you to configure featured applications. These applications are displayed prominently in the company portal. You can specify a privacy link for each application that users can review before they install the application. You can configure an application to automatically open a VPN connection if a VPN profile has been configured. For more information, see VPN Profiles in Configuration Manager. Step 1. Verify your CNAME DNS settings are working In Step 3 of Part 1 you should have created a CNAME DNS entry for your public domain name that redirects EnterpriseEnrollment.yourpublicdomainname.com to manage.microsoft.com. The CNAME record is used as part of the enrollment process. We will now do a couple of quick tests to verify that the redirection is working. In a web browser, type in the following URL. http://EnterpriseEnrollment.yourpublicdomainname.com Replace yourpublicdomain.com with your own public domain name, so for example if your public domainname is windowsintunenoob.com then for the url above use http://EnterpriseEnrollment.windowsintunenoob.com If your CNAME DNS entry is working then the redirection will show something like the following:- If the CNAME DNS entry hasn't taken yet or hasn't been done at all, or was done incorrectly you'll see something like the below:- If you don't have access to a Web Browser you can open a command prompt and ping EnterpriseEnrollment.yourdomainname.com and it should return a result like below (note the redirection to manage.microsoft.com... it IS ok that it doesn't return the ping and that that address may have nsatc.net attached to the end, that's a load balancing server) If you are testing and cannot change the CNAME settings you can install a Registry key on your Windows 8.1 client to help with the above redirection. The registry key is shown below Windows Registry Editor Version 5.00 [HKEY_LOCAL_MACHINE\SOFTWARE\Policies\Microsoft\Windows\CurrentVersion\MDM] "DiscoveryService"="manage.microsoft.com" Step 2. Enable Windows RT, Windows RT 8.1, and Windows 8.1 Enrollment In the Configuration Manager console browse to Cloud Services, select Windows Intune Subscriptions and right click on the previously created subscription, choose Properties. Select the Windows tab and place a check mark in the box provided to Enable Windows Enrollment. At this point if you wish you can click on Apply and Ok and you'll be able to enroll Windows 8.1 devices and move to the next step. If however you want to deploy Windows Modern UI type applications (appx Metro apps...) then you'll need to install an appropriate code-signing certificate by clicking on the browse button and selecting your code-signing certificate. Note: To distribute line-of-business apps to Windows RT users, you must also ensure that the apps are signed with a certification authority that is trusted by the users’ devices. You can either obtain a non-Microsoft public certificate, or use a code-signing certificate from your organization’s certification authority. For information, see Acquire a Code Signing Certificate. For Windows RT or Windows 8.1 devices, you can deploy line-of-business apps using a process known as sideloading, or you can deploy links to apps in the Windows Store (deeplinking). Note: Although sideloaded applications do not have to be certified by the Windows Store or installed through the Windows Store, they can only be installed on sideloading-enabled devices. To enable a Windows RT device for sideloading, you must first obtain sideloading product activation keys. For information about how to obtain sideloading product activation keys, see Microsoft Volume Licensing. Step 3. Enroll the device Check the Pre-requirements of your Windows 8.x device here before continuing. In this step we will actually enroll the device with Windows Intune and this involves turning on mobile device management capability in Windows 8.1. Tip: To enable management, you do need to be a local administrator. Logon as a user that is a local administrator of the Windows 8.1 device (do not use the built-in Administrator account). The method used to enroll the devices depends on which version of Windows you are using. If you are using Windows RT 8Select Start, and type “System Configuration”, and click the dialog box to open the Company Apps. Enter your company credentials and the device will be enrolled. Note: I don't have a Windows 8 RT device so cannot show that process, I hope everyone has upgraded to Windows RT 8.1 at this point and that process is shown below. Windows RT 8.1, Windows 8.1 (workgroup joined, no Configuration Manager client installed)Note: If you are trying to enroll a Windows 8.1 device then make sure it is Workgroup Joined (not joined to a domain, otherwise you won't see the MDM Turn On button.) and that there is no Configuration Manager client installed. Swipe in from the right and choose Settings Click on Change PC Settings Select Network Select Workplace and enter your company credentials, then click on Turn On (do not select Join.) it should say connecting to workplace.... if it doesn't and you get an error such as then review the following and more importantly Step 1 above. Also verify that you are not logged on as the local administrator but as another account that has administrative permissions on this device. And in case you have not checked, double check that you actually have enabled Windows Enrollment in the Windows Intune Subscription in the Configuration Manager console. Assuming all went ok, a Connecting to a service screen appears, enter your password when prompted to do so and click on Sign In you'll be prompted to accept an agreement, place a checkmark in the I agree box and click on Turn On. At this point your device is enrolled and the only option shown should be Turn Off (don't select that). Tip: You can confirm a successful enrollment by checking Event Viewer and looking at the SystemSettings log (event ID 510 - should say "Attempted to turn on workplace device management. Result is 0x0 ending at phase 3."). You can also check what certificates are installed, and look at the Trusted Root Certificates Authority, if all went well you should see a SC_Online_Issuing certificate with an Intended Purpose of <All> in your Certificates store such as the one in the screenshot below: Step 4. Install the Company Portal Start the Windows Store and search for Company Portal choose Install once installed, start the application, you'll be prompted for your password, enter it and click on sign in. The Company Portal should appear and any devices you have previously enrolled should be listed. In the screenshot below you can see both a Windows 8.1 device (workgroup joined, no Configuration Manager Client installed) called Hyperv-5 and a Windows RT 8.1 device. Job done ! until next time, adios. Recommended Reading Prepare and set up to manage mobile devices by using Windows Intune - http://technet.microsoft.com/en-us/library/dn408185.aspx#BKMKPrereqs What's New in Windows 8.1 - http://technet.microsoft.com/en-us/windows/dn140266.aspx How can I manage modern devices using System Center 2012 R2 Configuration Manager ? - Part 1 How can I manage modern devices using System Center 2012 R2 Configuration Manager ? - Part 2 How can I manage modern devices using System Center 2012 R2 Configuration Manager ? - Part 3 How can I manage modern devices using System Center 2012 R2 Configuration Manager ? - Part 4 Summary In this post we've enabled support for Windows 8 RT, Windows RT 8.1 and Windows 8.1 devices by enabling the option in our Windows Intune Subscription within Configuration Manager 2012 R2. We've learned how to easily check if our CNAME DNS entry is working and seen the enrollment process in detail. In our next post we'll look at deploying applications to the company portal for users of Windows 8.x devices. Continue on to Part 6. Downloads You can download a Microsoft word copy of this guide here: How can I manage modern devices in System Center 2012 R2 Configuration Manager Part 5 enabling support for Windows 8.1.zip


-
Unable to add Roles with MDT integration to OSD TS
anyweb replied to Yan's topic in Configuration Manager 2012
verify your setup windows and configmgr step is really working as if the error is to be believed you are still in WinPE -
where are your sql logs being stored, that could likely be a cause of your problems..
-
Sccm 2012 R2 - Window 7 installs on D, broken client etc
anyweb replied to smspxe's topic in Configuration Manager 2012
when you captured the image did you specify OSDPreserveDriveLetter or not ? I do when capturing and then there's NO NEED to specify that variable in the deploy task sequence. -
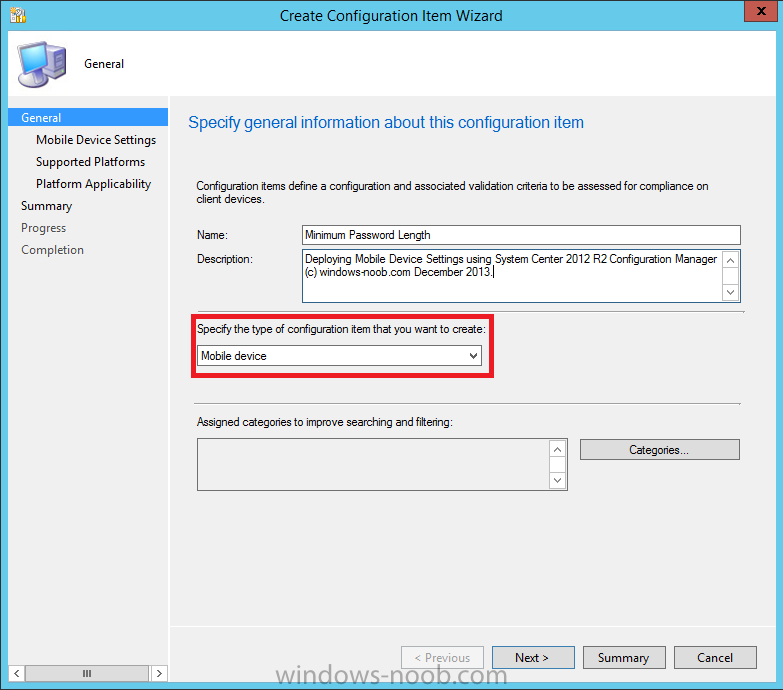
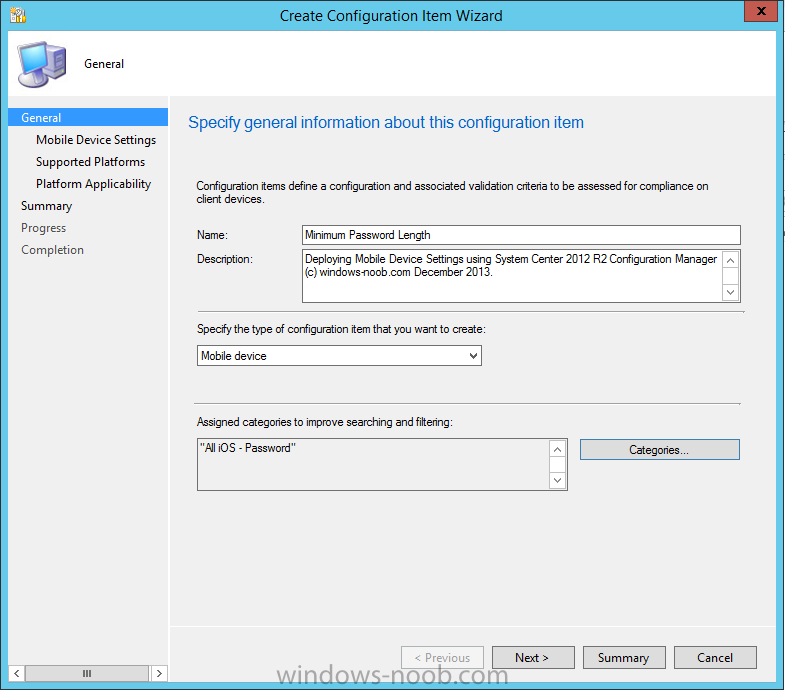
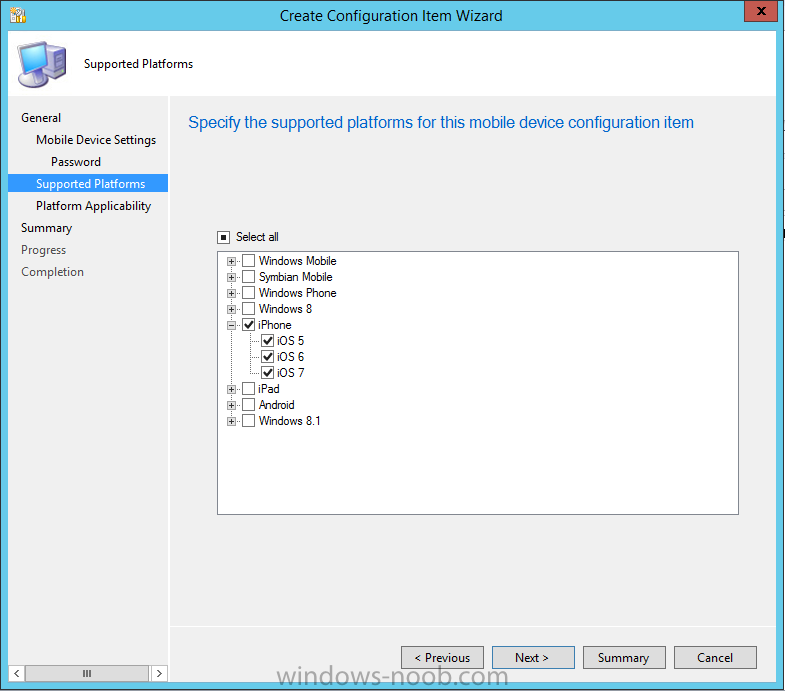
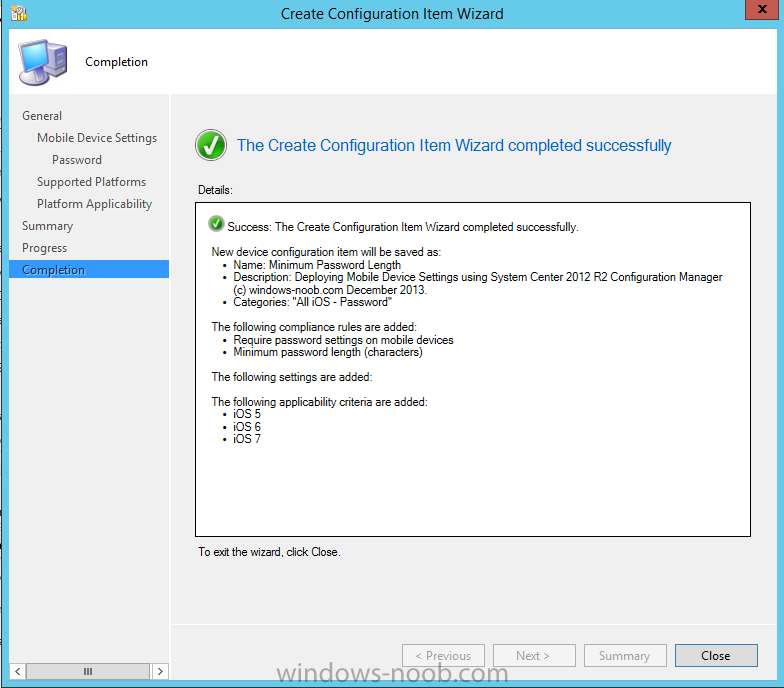
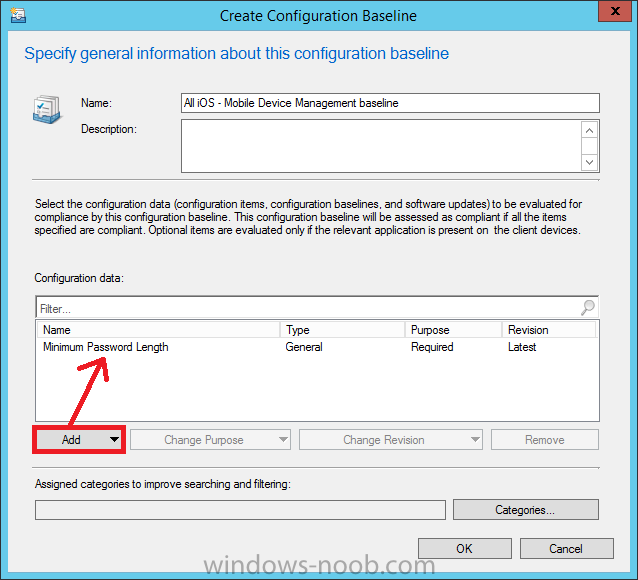
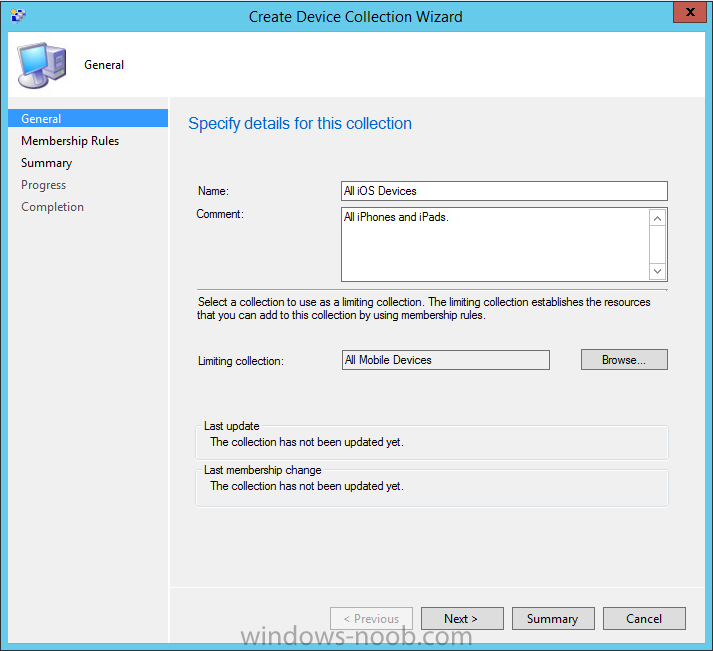
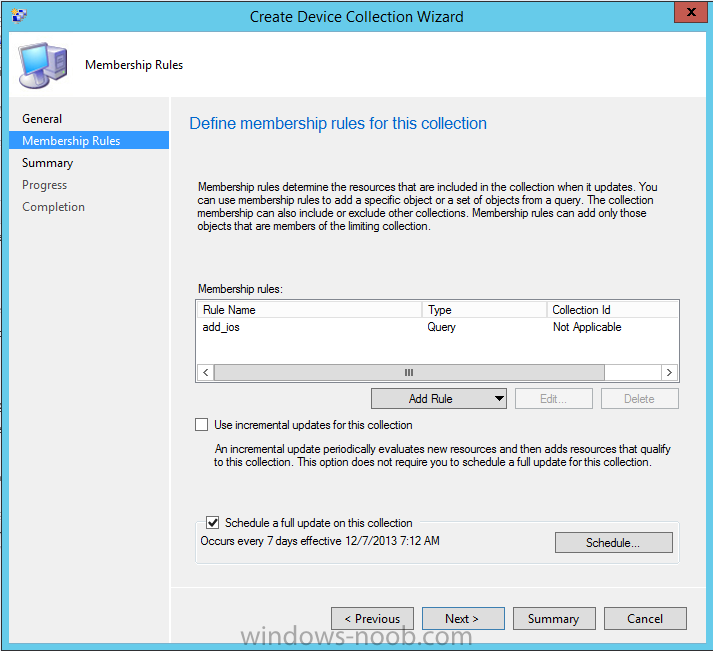
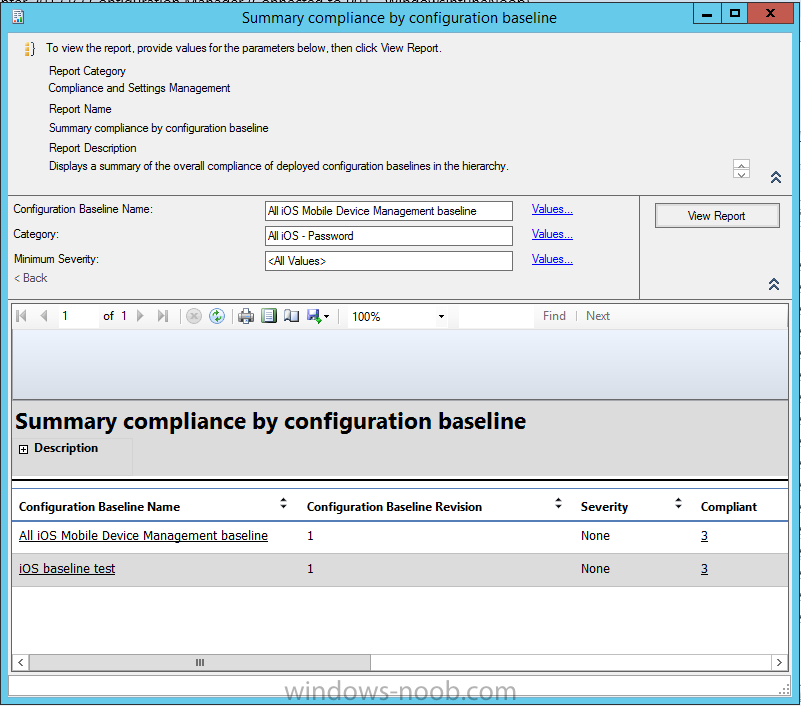
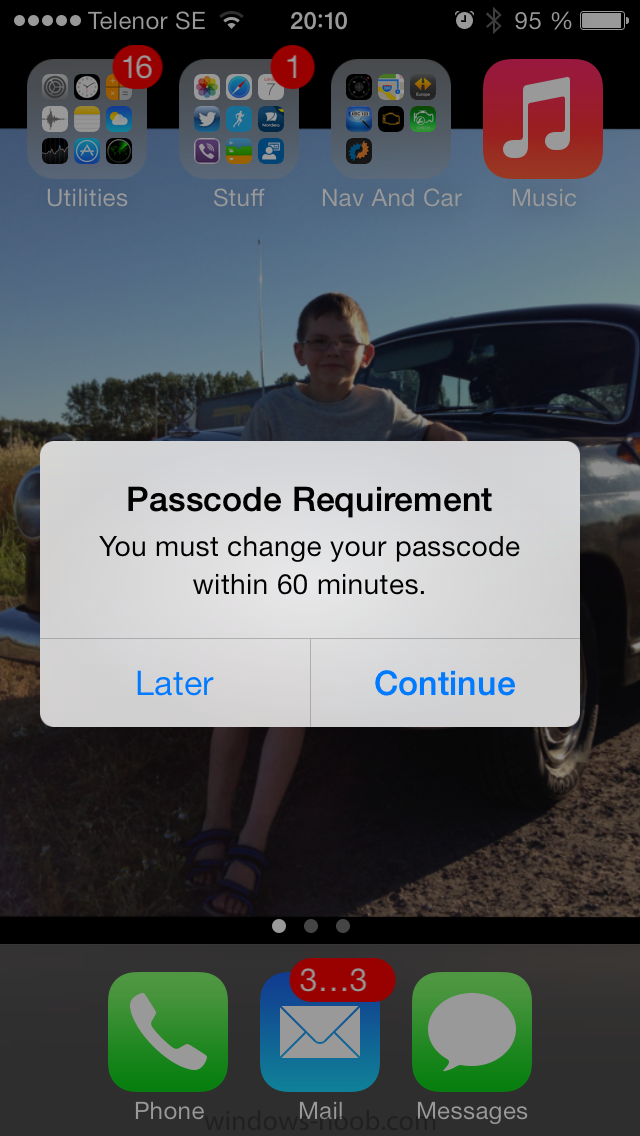
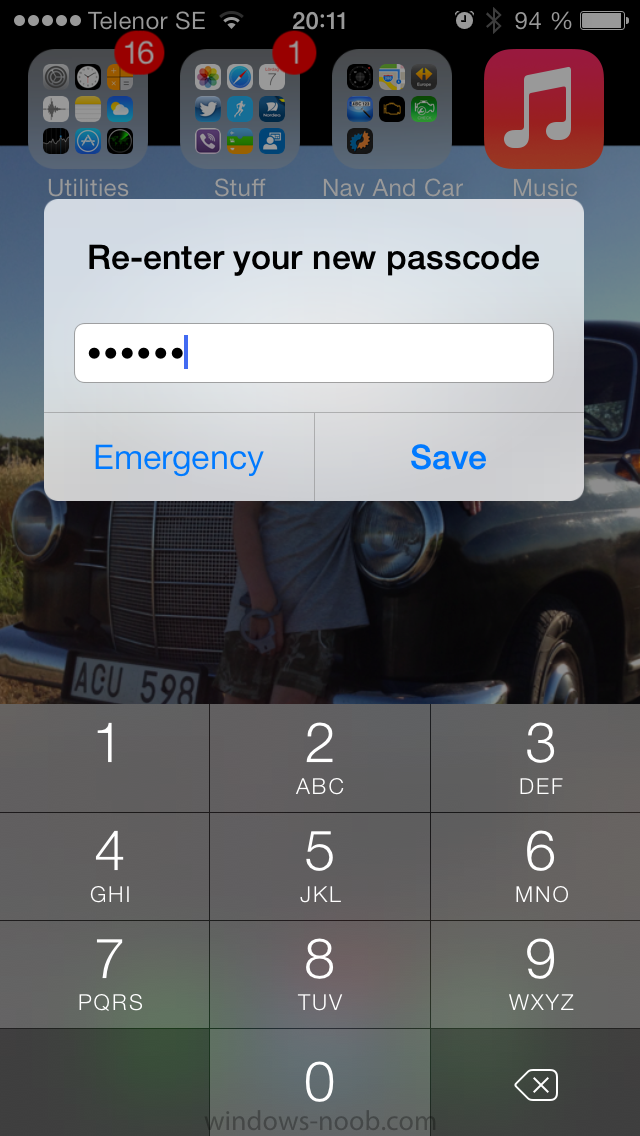
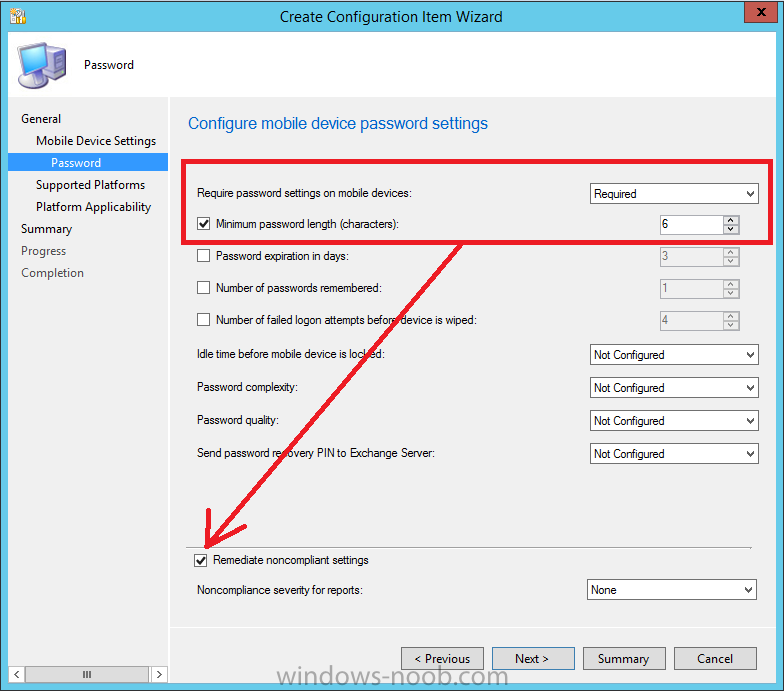
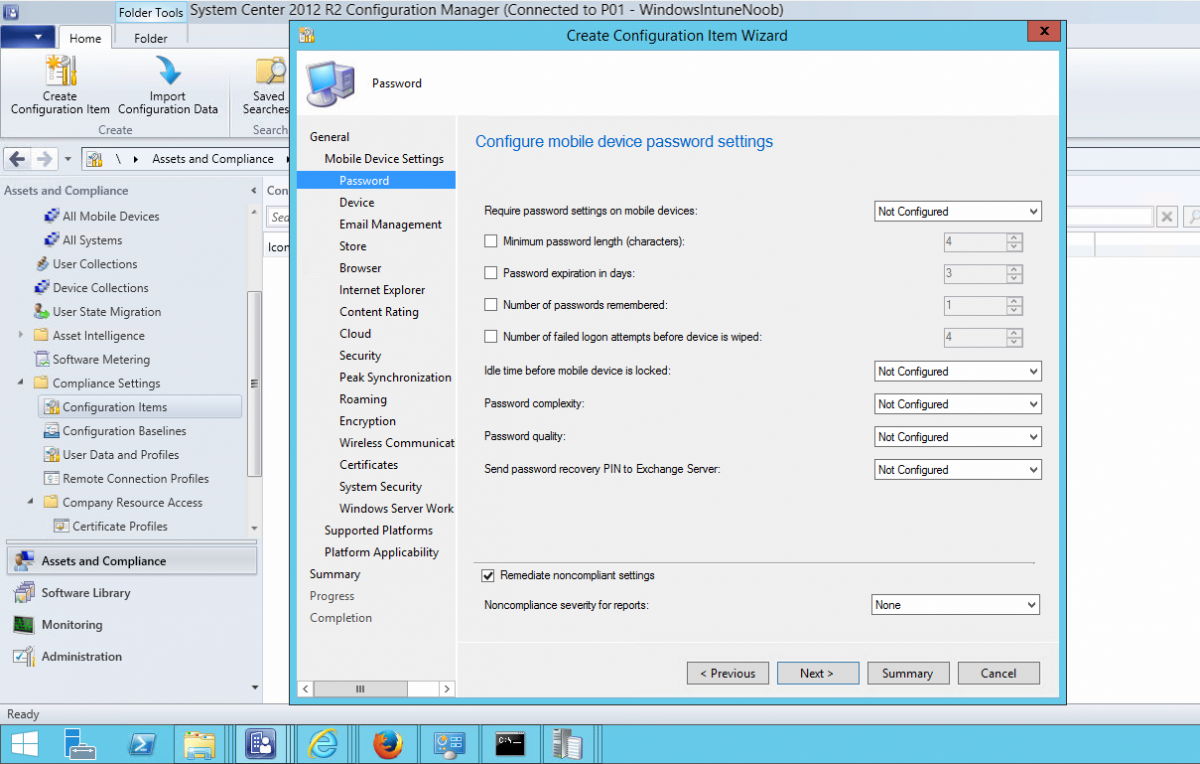
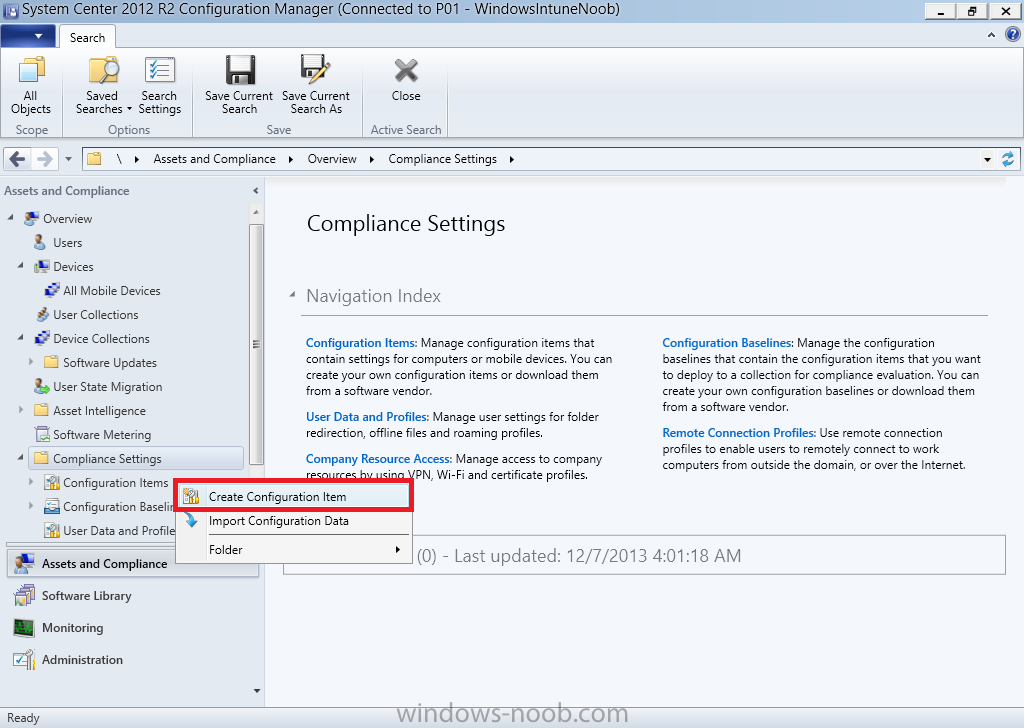
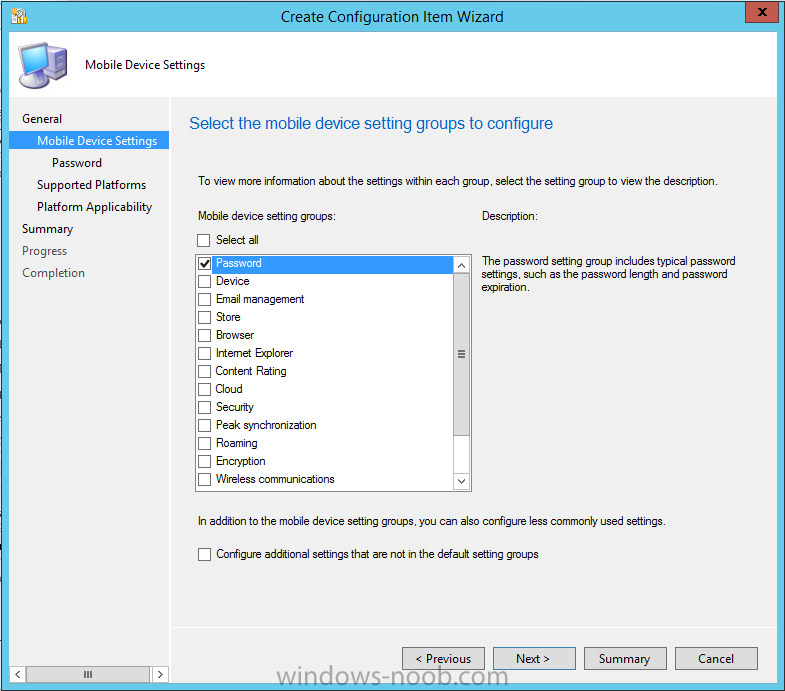
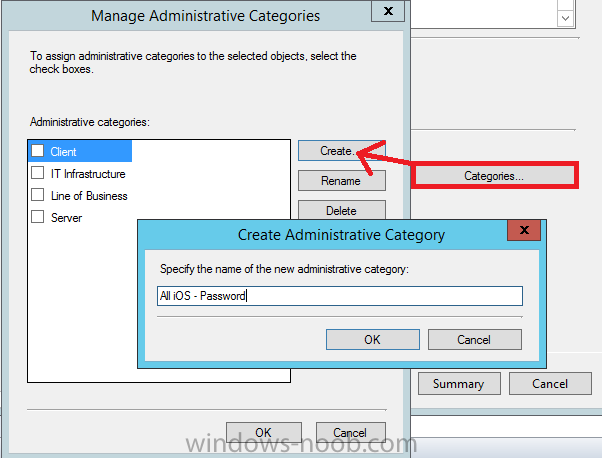
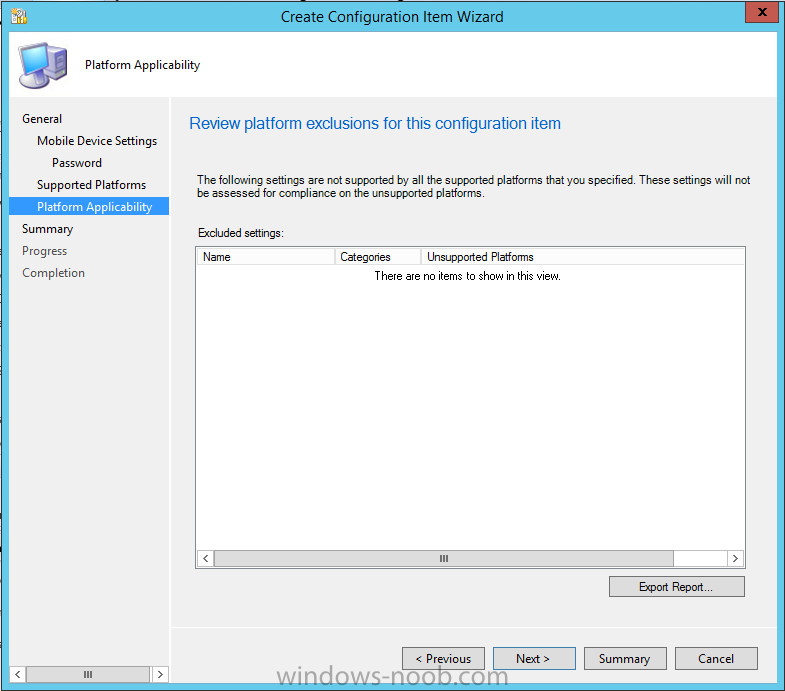
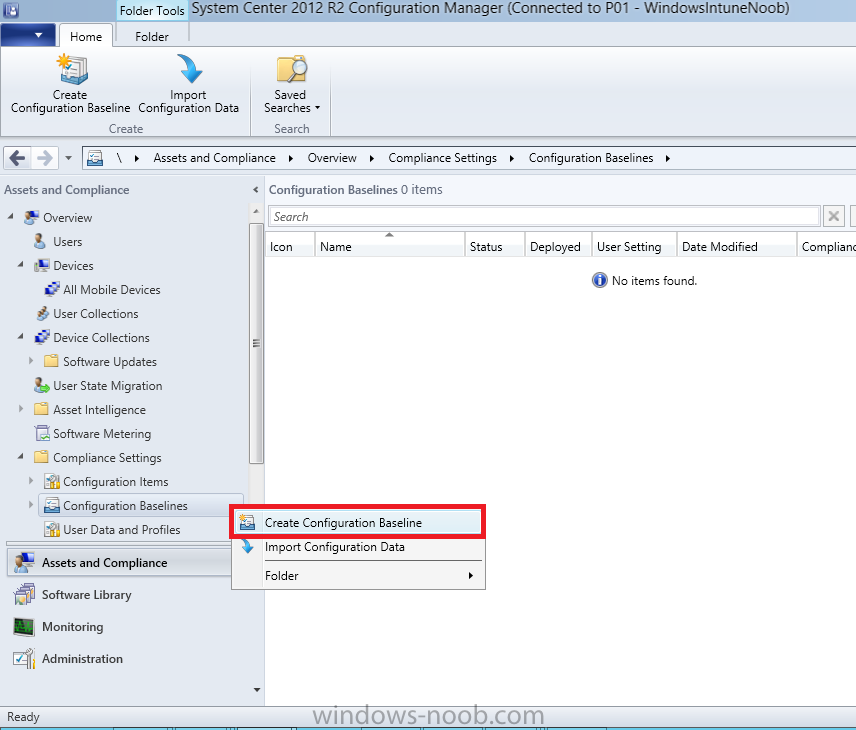
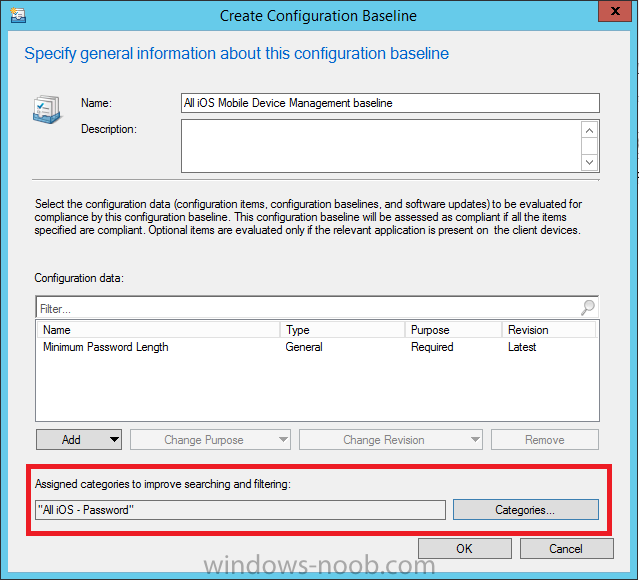
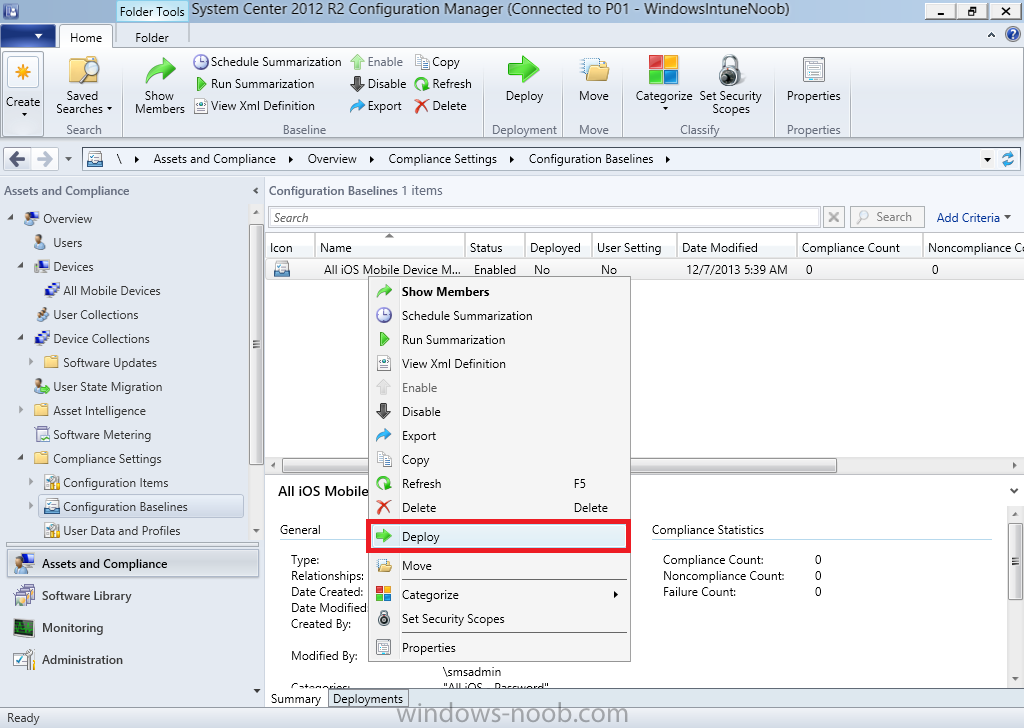
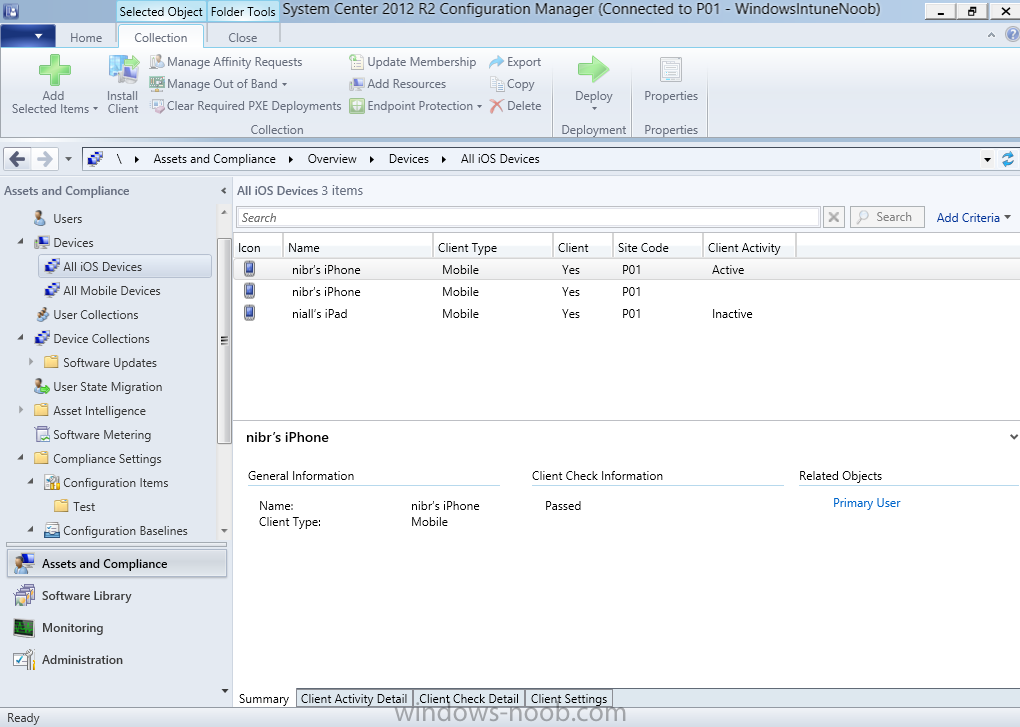
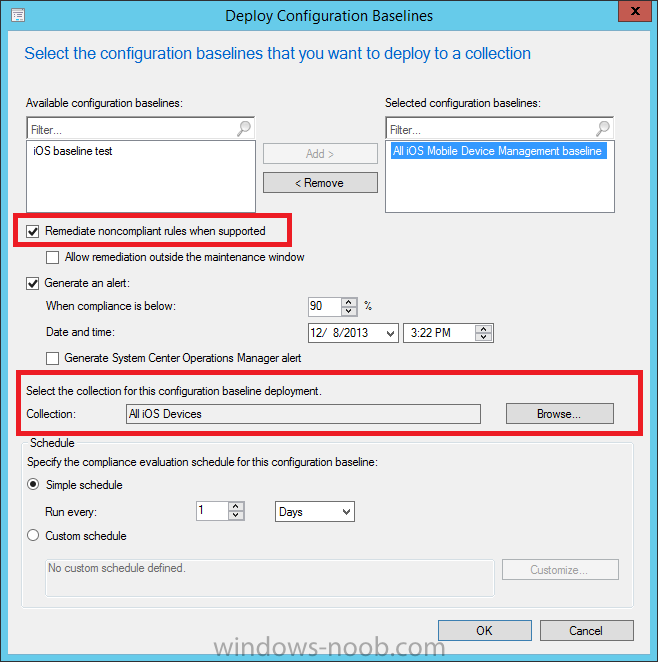
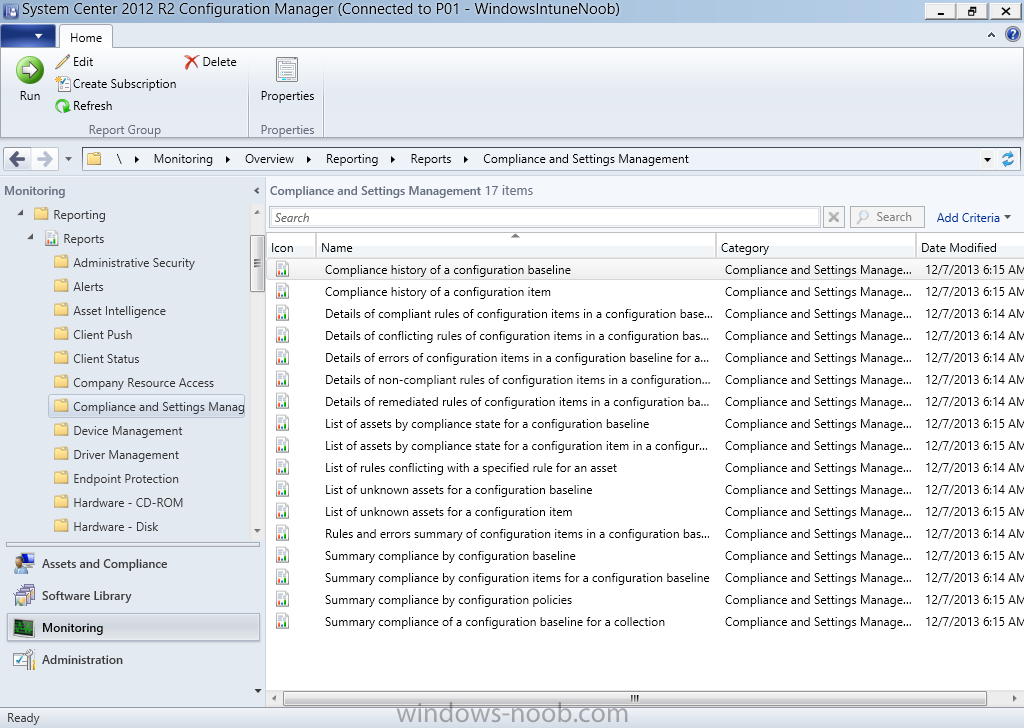
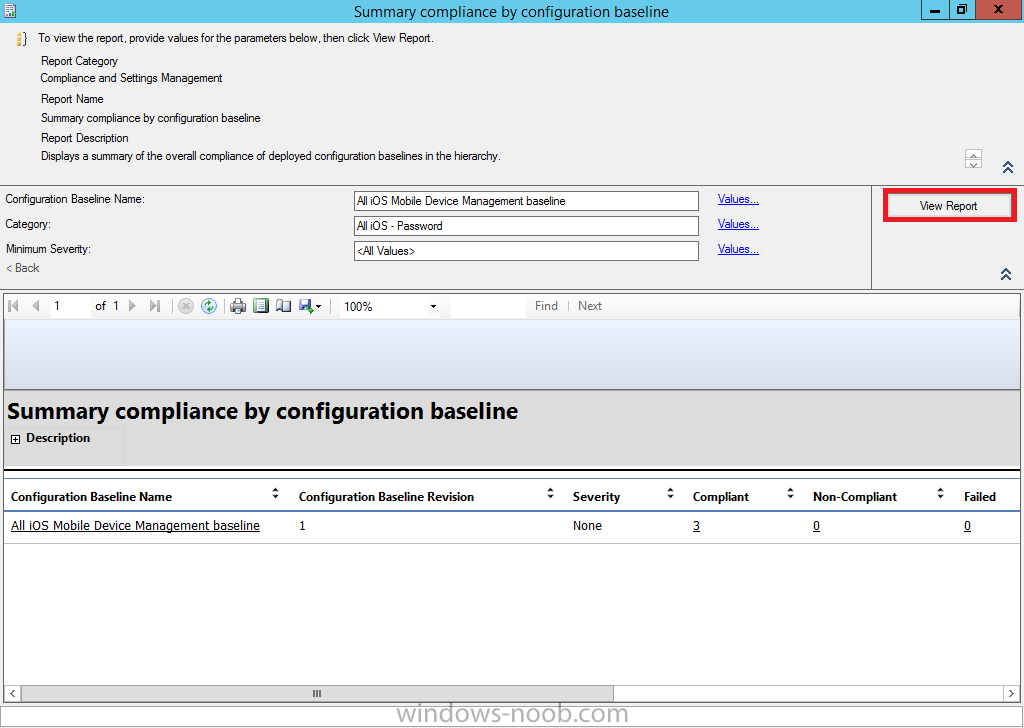
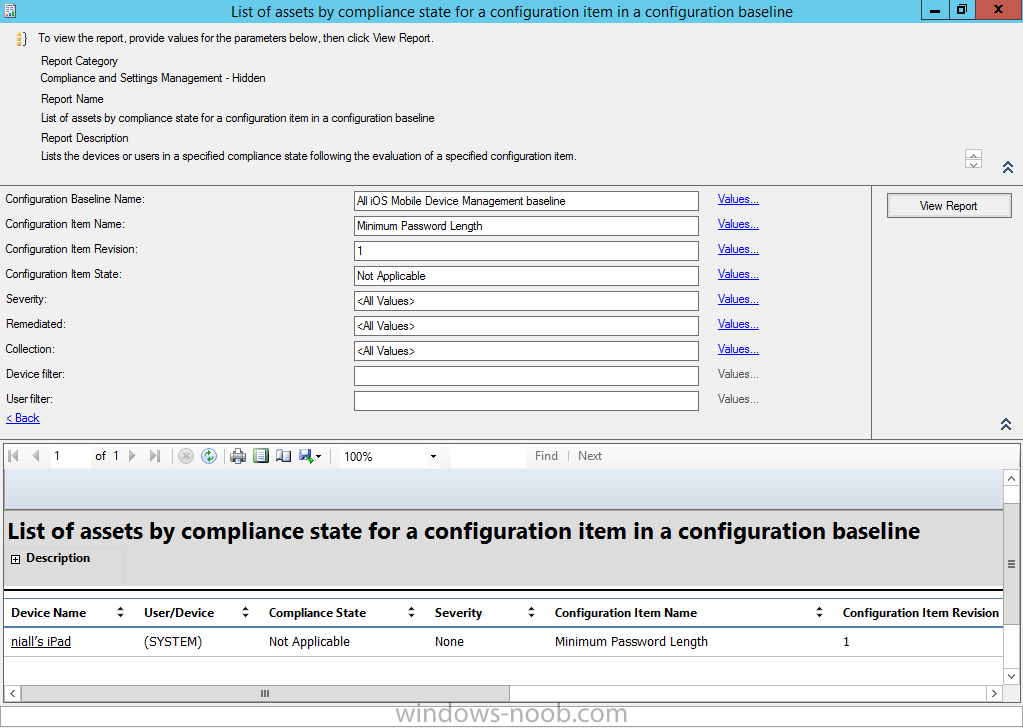
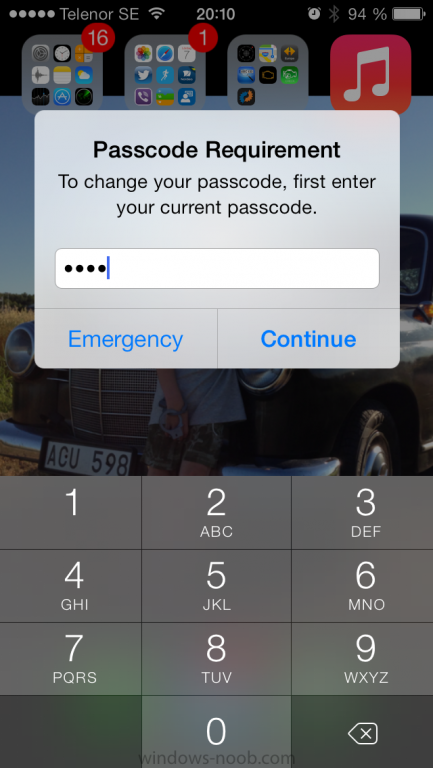
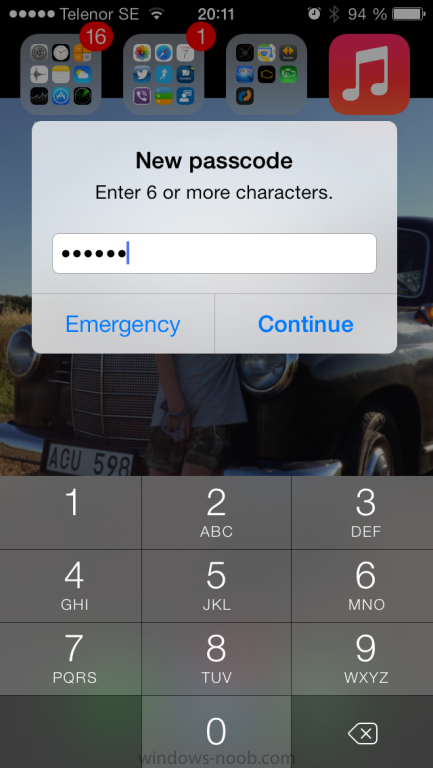
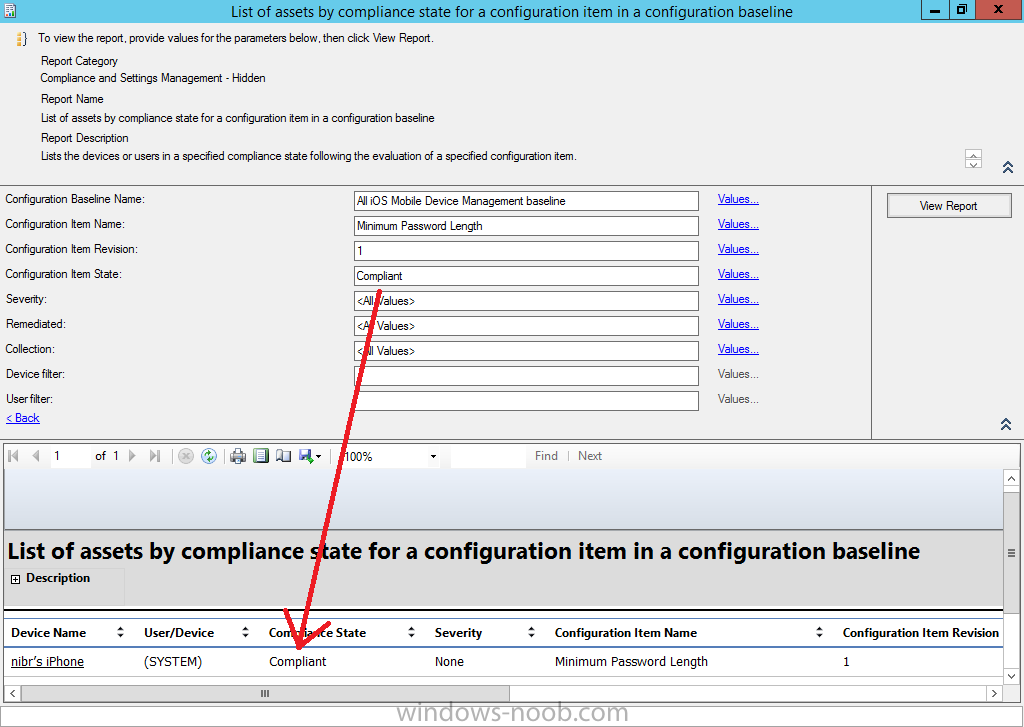
Introduction In Part 1 of this mini series we integrated Windows Intune with System Center 2012 R2 Configuration Manager. In Part 2 we added Support for iOS devices (Iphone, iPad). In Part 3 we learned the difference between App Package for iOS (*.ipa file) and applications from the Apple App Store. We learned how to deploy them to iOS devices and configured the deployment type so that the applications were made available to the user based on the iPhone or Ipad operating system version, in addition we also checked device Ownership information and deployed the application based on those requirements. System Center 2012 R2 Configuration Manager with Windows Intune integration provides new abilities (double the default settings groups that were offered in Configuration Manager 2012 Service Pack 1) for configuring settings for mobile device management. In this part we will learn how to use and configure compliance settings in order to enable or disable certain configurable features on iOS devices. We will enforce a Password requirement and make it a minimum password length, this is a common requirement for organizations. The following lists the default settings groups (or headings) of the mobile device settings which are now available, each default settings group contains many configurable settings: Password Device Email Management Store Browser Internet Explorer Content Rating Cloud Security Peak synchronization Roaming Encryption Wireless communications Certificates System Security Windows Server Work folders Note: In addition to the above, you can configure additional settings that are not listed by clicking on configure additional settings that are not listed in the default settings groups when creating your configuration item. There are many additional settings available so do take a look at them. The following page on Technet explains the above settings in more detail and shows which settings are applicable by platform type. Note: Although the list above is quite extensive and contains several configurable settings per heading, not all default settings groups apply to any one device type, the applicability of a setting is listed during Configuration Item creation. Step 1. Create a new Mobile Device configuration item Compliance Settings within Configuration Manager are used to control the settings on your mobile devices. In the Configuration Manager console, click on Assets and Compliance, and expand Compliance Settings. Locate Configuration Items, right click and choose Create Configuration Item. In the wizard that appears, give your configuration Item a suitable name which desribes the functionality of the Configuration Item such as Minimum Password Length, then from the drop down menu select Mobile Device as the type of Configuration Item you are going to create like in the example below and then click on Categories, then Create to create a new category, enter All iOS - Password. This will make it easier later to filter our configuration items for each platform and heading group. so that it looks look the following example Place a checkmark in the Password default settings group. click on next and the Password default settings group settings are revealed, we will configure the minimum password length here, set it to a value that works in your organization and change the Require password settings on mobile devices dop down menu to Required and make sure that Remediate noncompliant settings checkbox is checked as shown in the screenshot below. Tip: Although there are many settings in each default settings group, to make it easier to track compliance for each setting you configure, consider creating one Configuration Item per setting. On the Supported Platforms screen you can select the devices you want to support, for example iPhone as shown in the screenshot below, if you choose to select All Systems (default) then the next screen will be populated with those platforms that are not supported by the setting you have chosen. In the Platform Applicability screen any platforms that are NOT supported by the settings you chose will be listed, complete the wizard Step 2. Create a Configuration Baseline Now that we've created our Configuration Item, we will add it to a Configuration Baseline. To do that we need to create the baseline. In Configuration Baselines, right click and choose Create Configuration Baseline Give it a suitable name like All iOS Mobile Device Management baseline and click on Add, then add our previously created Configuration Item from Step 1. and don't forget to add any assigned Categories to improve search filtering Step 3. Create a new device collection Create a new device collection called All iOS devices, limit it to All Mobile devices and setup a membership query to look for Operating Systems like iOS. select SMS_R_SYSTEM.ResourceID,SMS_R_SYSTEM.ResourceType,SMS_R_SYSTEM.Name,SMS_R_SYSTEM.SMSUniqueIdentifier,SMS_R_SYSTEM.ResourceDomainORWorkgroup,SMS_R_SYSTEM.Client from SMS_R_System where SMS_R_System.OperatingSystemNameandVersion like "iOS%" And below is our collection populated with iOS devices after creation Step 4. Deploy the Configuration Baseline Now that we have created our configuration item which has compliance rules defined for Password minimum length, and added it to a configuration baseline we are ready to deploy it to a collection. Note: You can deploy compliance settings for Mobile Devices to a user or device collection. If you deploy the baseline to a user collection, the compliance settings are applied to all the enrolled devices for those users. In this example, we will deploy it to our previously created collection called All iOS Devices. Right click on the All iOS Mobile Device Management baseline configuration baseline created above and choose Deploy. Place a checkmark in Remediate noncompliant rules when supported and Generate an alert. Next select the browse button beside collection and specify the All iOS Devices collection, select the Schedule to Simple Schedule and set it to run every 1 days. Step 5. Monitor Compliance using Reports. Configuration Manager has several built-in reports including of course reports for Compliance. In the Monitoring node click on Reports, and expand to Compliance Settings Management. Select the following report, Summary Compliance by a configuration baseline and fill in the values requested Click on View Report to get details of compliance and you can drill your way through the compliance reports to see how your Compliance Settings are taking shape ! In the screenshot below for example we can see that the compliance state was not applicable as we targeted our configuration item to iPhone IOS only (and excluded iPads). and below we can see a compliant device Step 6. Verify the settings change on a targeted mobile device You will of course want to verify the settings change on a mobile device that you have targeted with these compliance settings. Tip: It can take up to 24 hours for the policy to arrive so patience is important. Note: The screenshots below are only related to the change we enforced above (minimum password length) so obviously whatever setting you target to your modern devices will have to be verified accordingly. In the first screenshot we can see that the device has received the policy and alerts the user, clicking on continue allows the user to make the change, or the user can delay it (within the deadline of 60 minutes) by clicking later. the user is prompted to enter the old password (4 chars in this case) and then the user must enter the new password with 6 characters (from our configured compliance settings) and re-enter it and click on save to confirm congratulations ! All done. Recommended Reading How to Create Configuration Items for Devices enrolled by Windows Intune and Configuration Manager - http://technet.microsoft.com/en-us/library/dn376523.aspx Adding the Reporting Services Point role - http://www.windows-noob.com/forums/index.php?/topic/4550-using-sccm-2012-rc-in-a-lab-part-11-adding-the-reporting-services-point-role/ How can I manage modern devices using System Center 2012 R2 Configuration Manager ? - Part 1 How can I manage modern devices using System Center 2012 R2 Configuration Manager ? - Part 2 How can I manage modern devices using System Center 2012 R2 Configuration Manager ? - Part 3 Summary In this part we've looked at how we can configure settings on mobile devices using Compliance Settings within Configuration Manager. We then saw how to report on the compliance and finally how to verify those settings were applied on targeted devices. Until next time, adios ! Continue on to Part 5. Downloads You can download a Microsoft Word copy of this guide here: How can I manage modern devices in System Center 2012 R2 Configuration Manager Part 4 configuring compliance on iOS devices.zip


-
hi Luke page 5 of the following Powerpoint should give you the info you need, review the notes in the slides. cheers niall
-
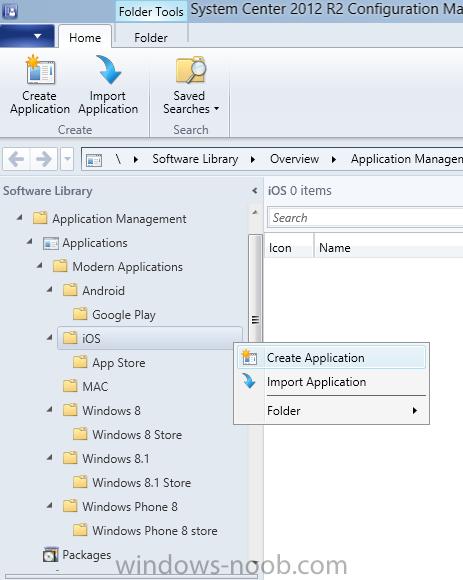
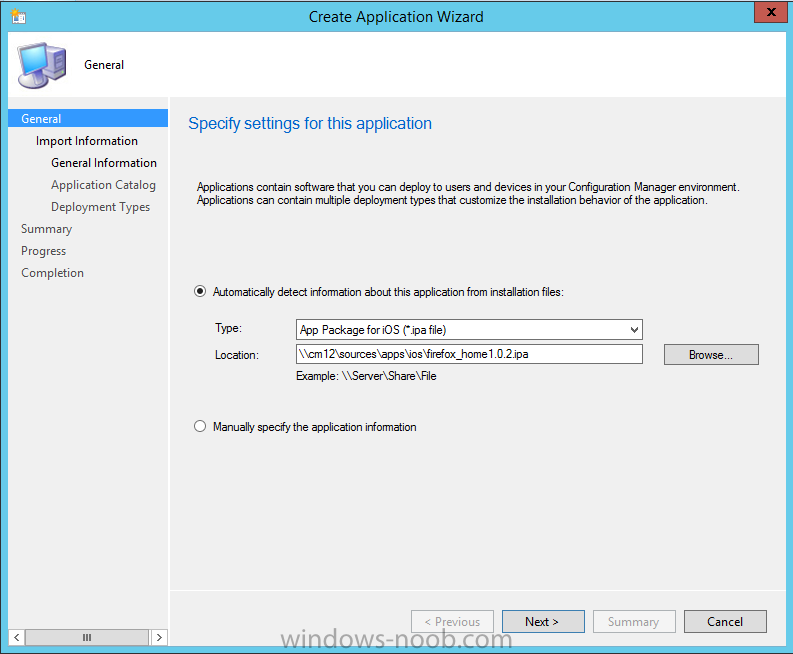
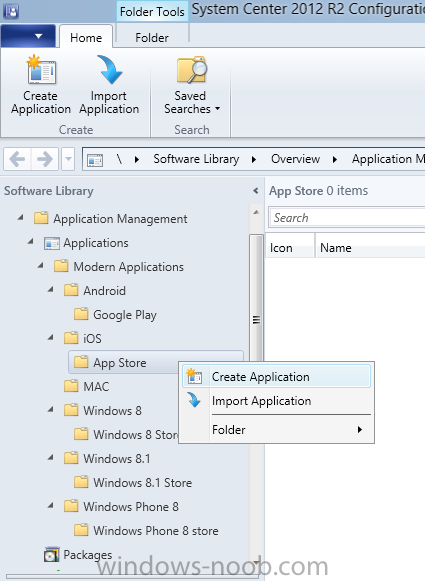
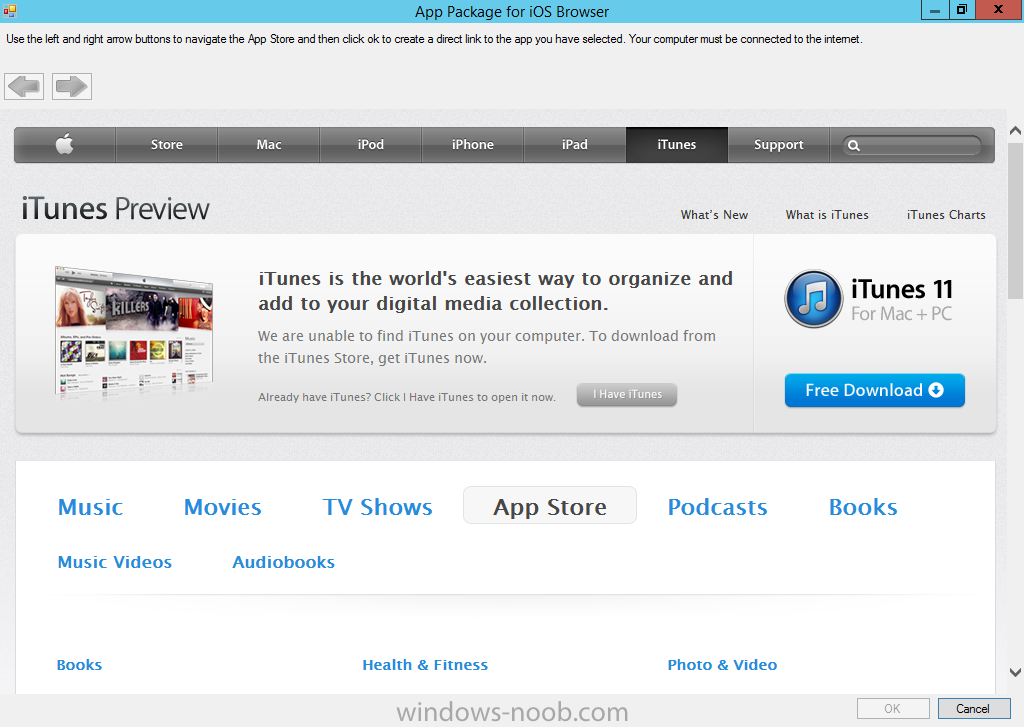
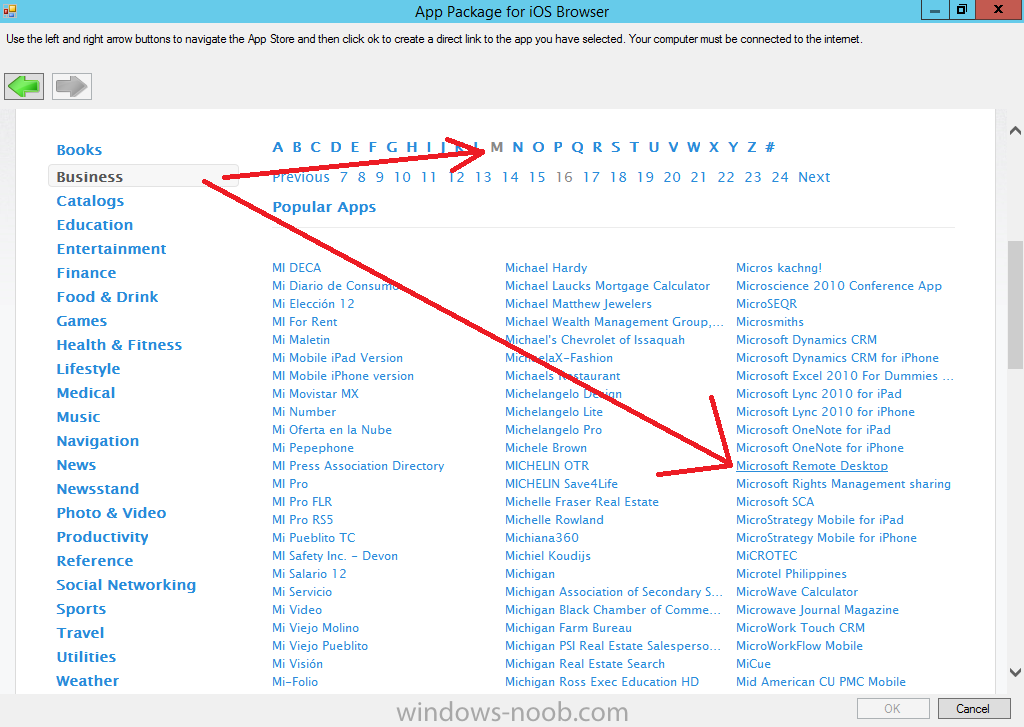
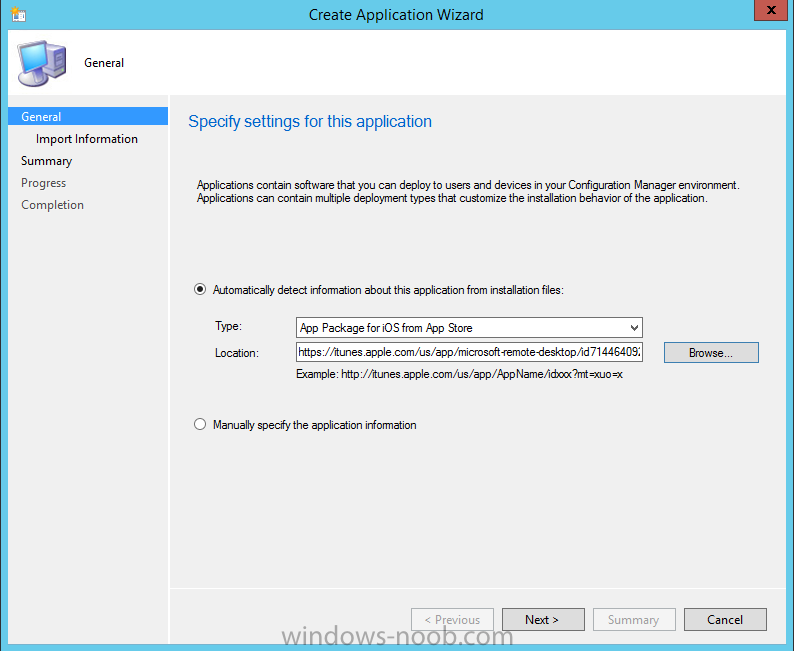
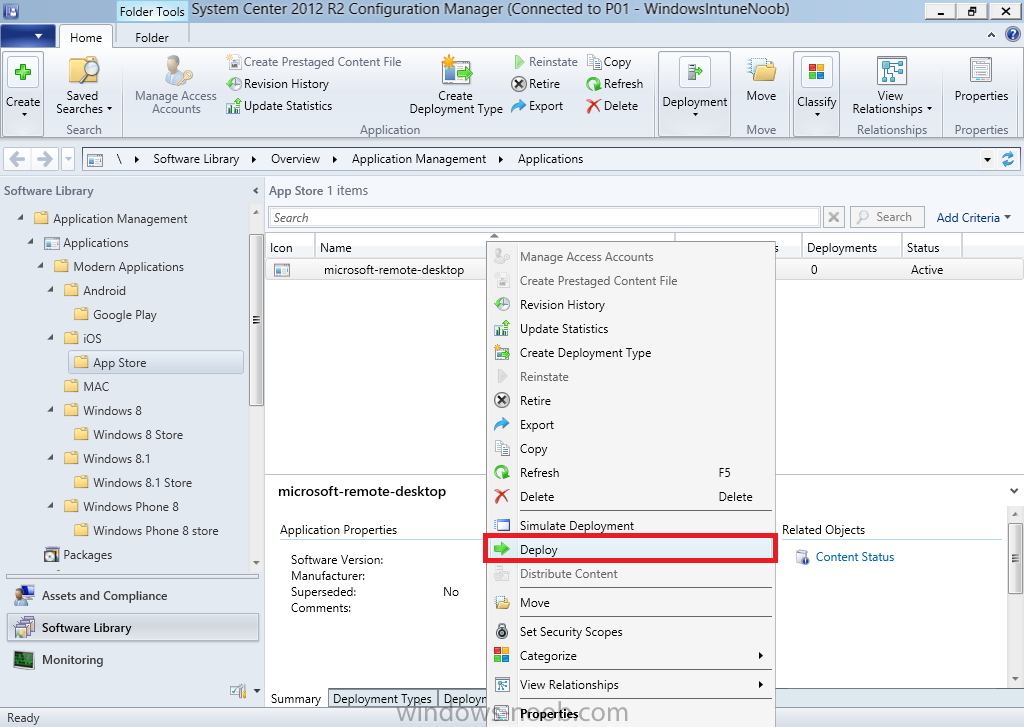
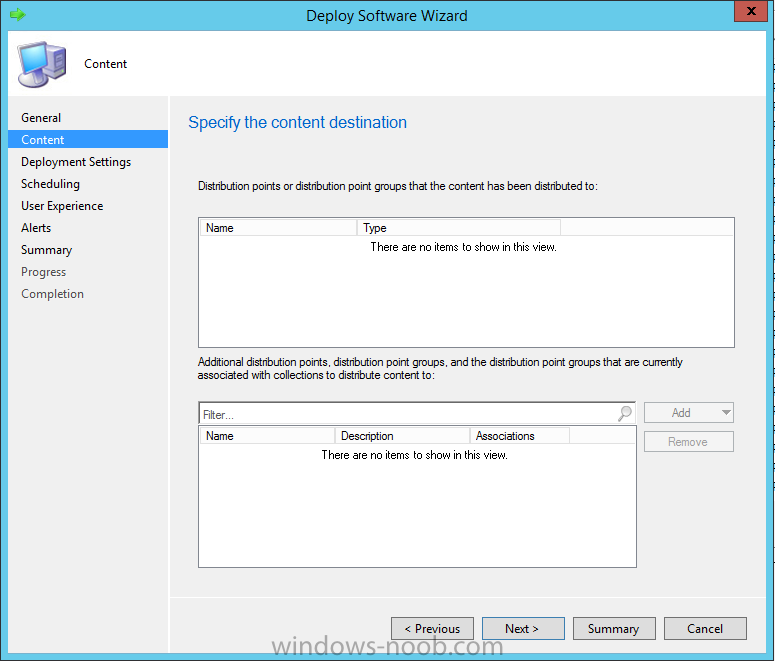
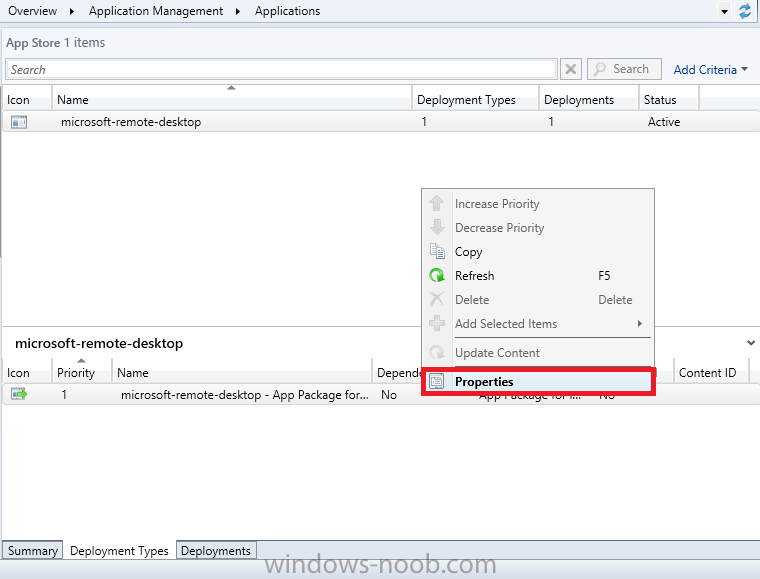
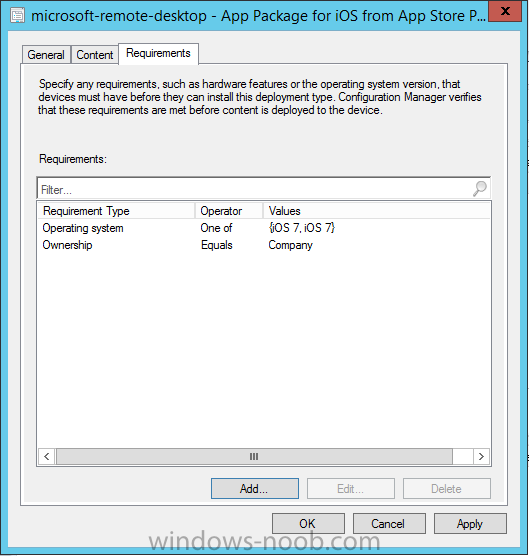
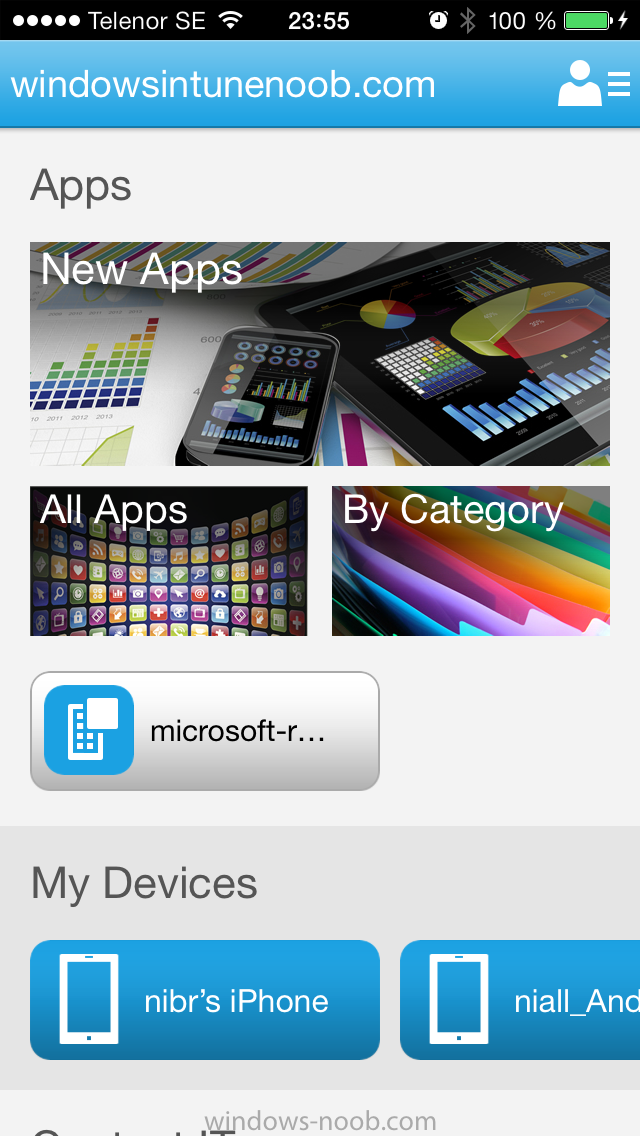
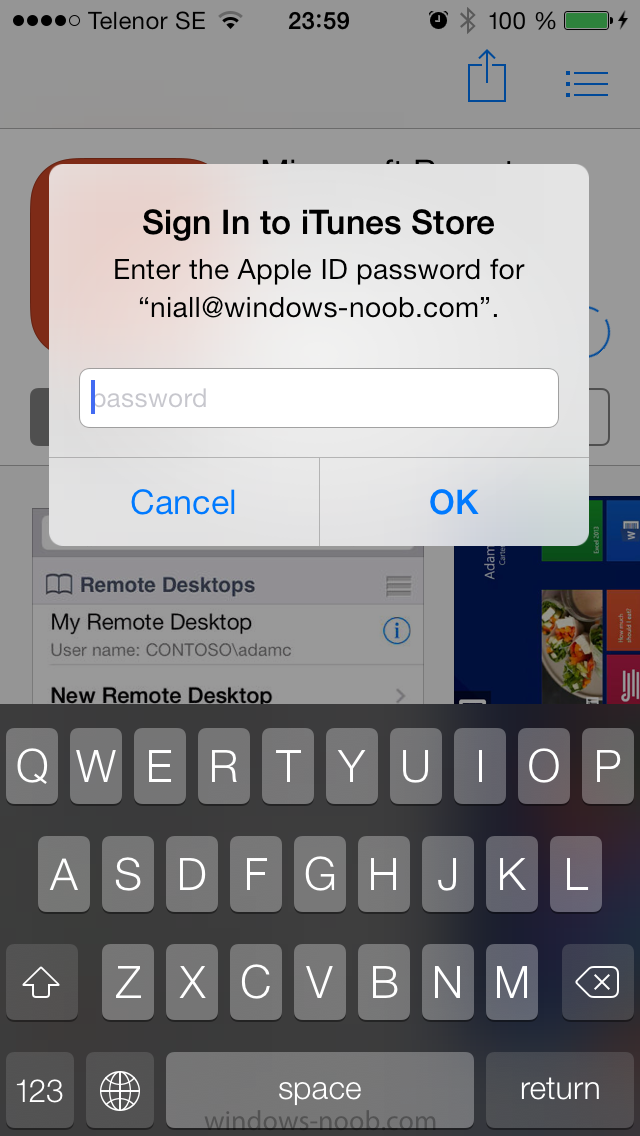
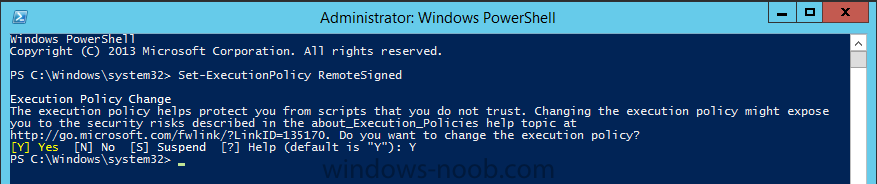
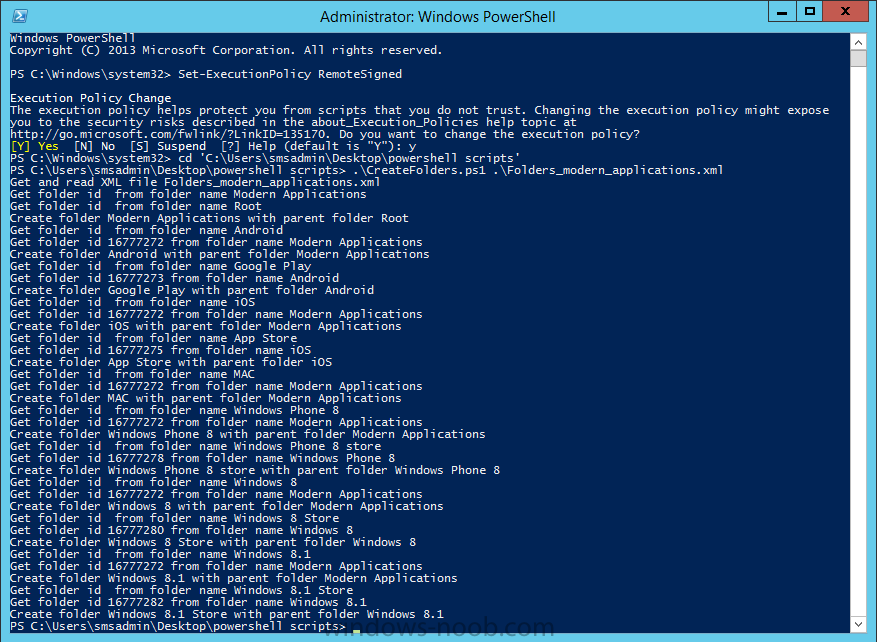
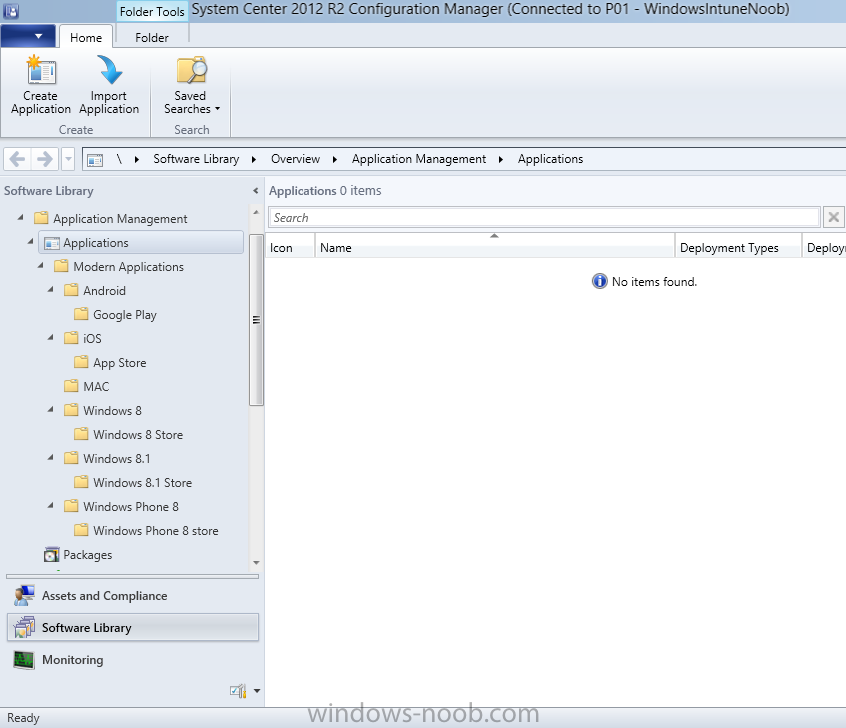
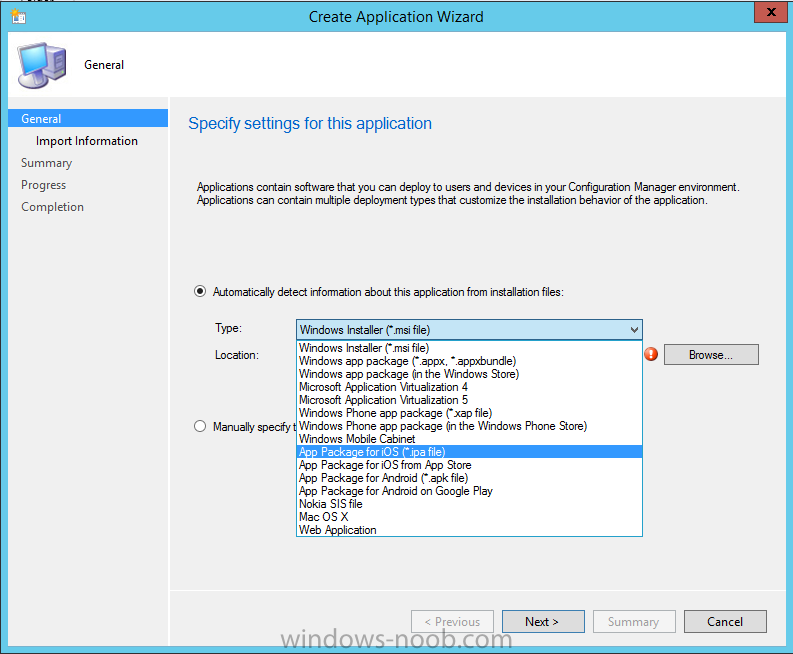
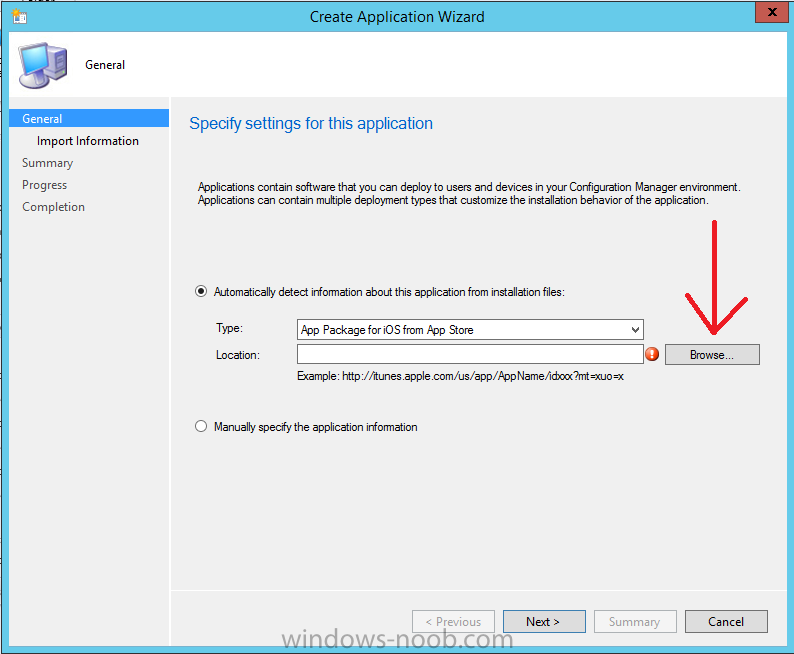
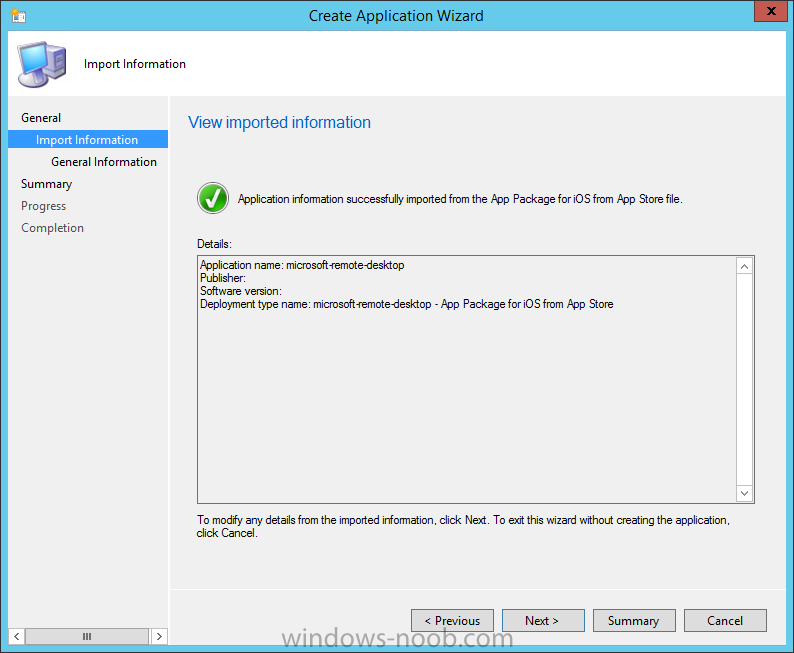
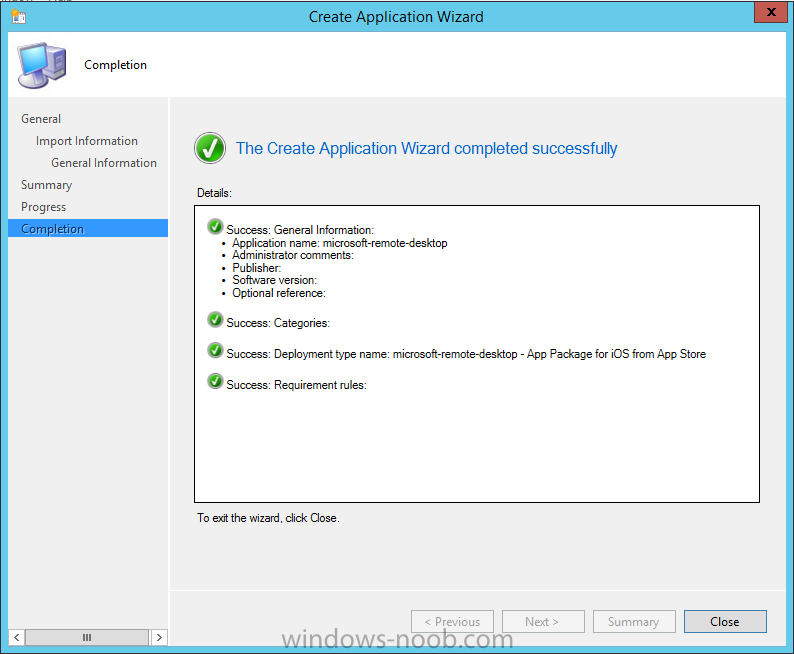
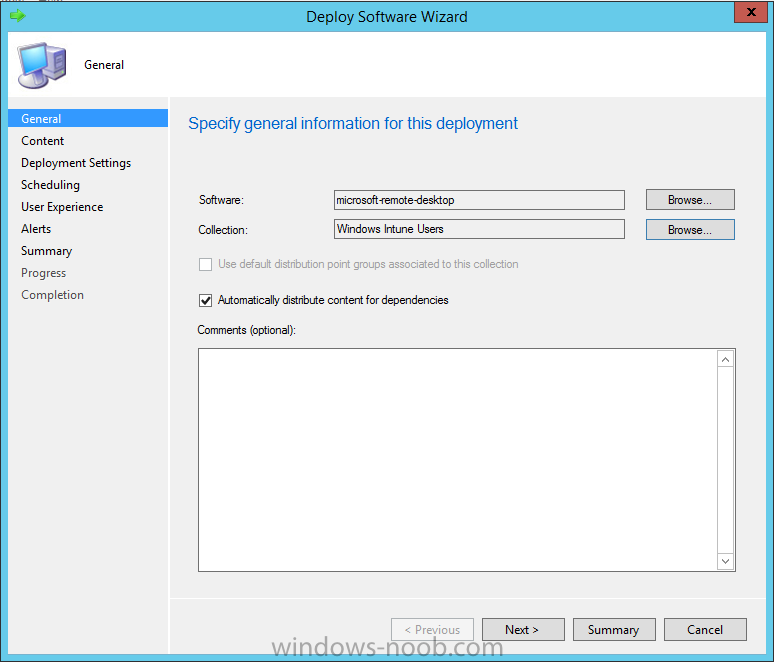
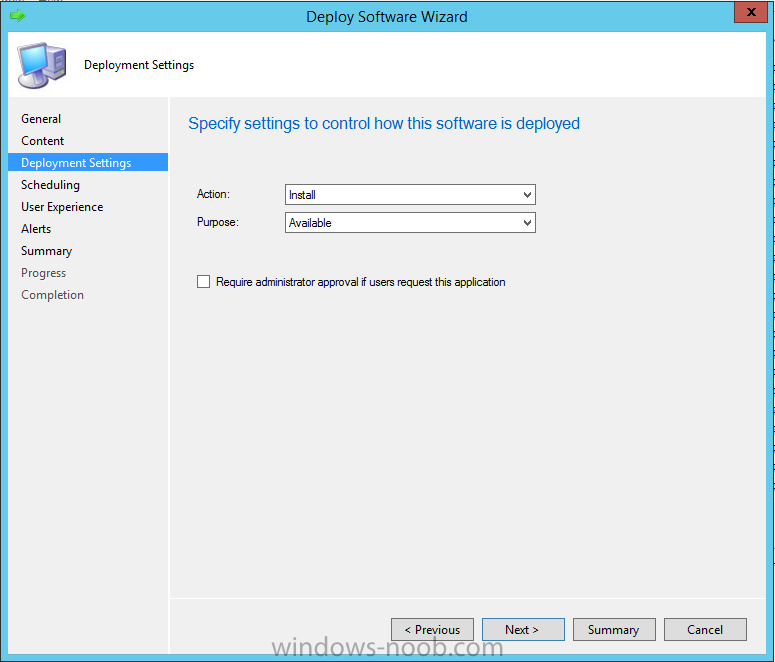
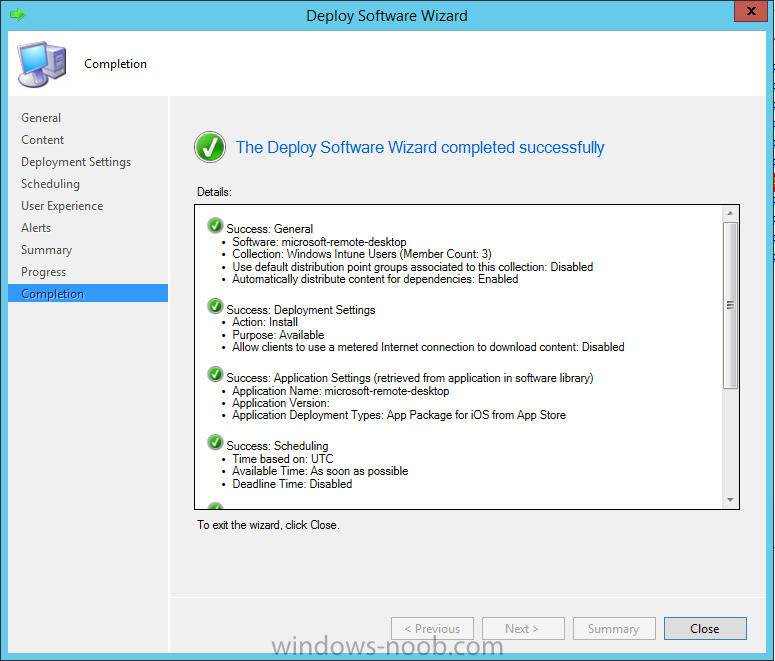
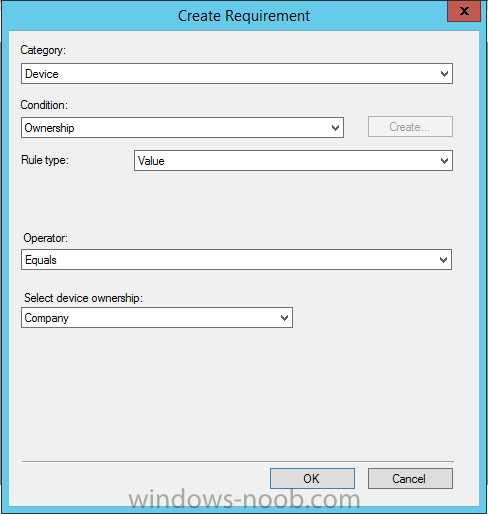
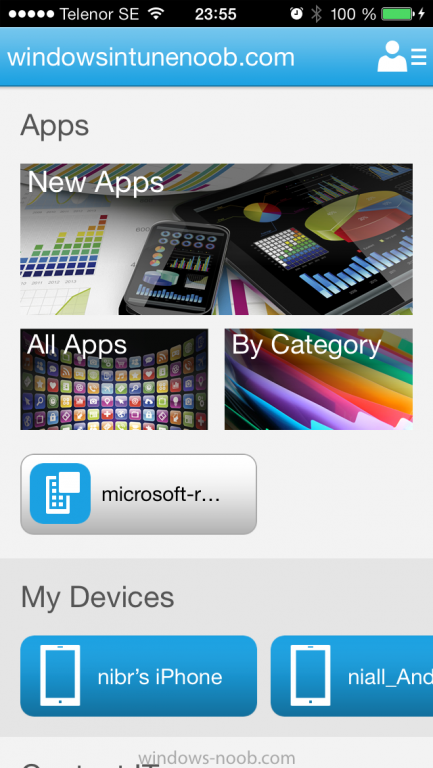
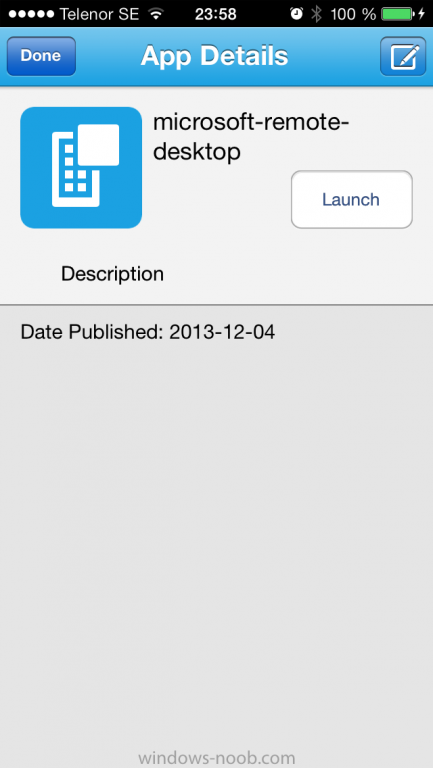
Introduction In Part 1 of this mini series we integrated Windows Intune with System Center 2012 R2 Configuration Manager. In Part 2 we added Support for iOS devices (Iphone, iPad). In this part we learn the difference between App Package for iOS (*.ipa file) and applications from the Apple App Store. We learn how to deploy them to iOS devices and use compliance settings to set requirements so that the applications are available to the user based on the iPhone or Ipad operating system version, in addition we also check device Ownership information and can deploy the application based on those requirements. Step 1. Create some Folders for our modern applications This step is optional but recommended, download the following powershell scripts and exctract them, we will use them to create some folders to organise where you create your modern apps. If you don't like the layout i've chosen for you then edit the Folders_modern_applications.xml to your liking in notepad. This script (CreateFolders.ps1) will create folders under the Applications node (folder type=6000) in Software Library . powershell scripts.zip Open a powershell cmd prompt as administrator change the execution policy to run this script, answer yes when prompted Set-ExecutionPolicy RemoteSigned change to the directory you extracted the scripts and then run the command below to automatically create our folder structure .\CreateFolders.ps1 .\Folders_modern_applications.xml the output should like like the following screenshot and in the Configuration Manager console, you should now see the following (refresh the console) Step 2. Adding IPA applications. You'll need to have an Apple developer license to develope proprietary, in-house iOS apps that you can distribute using Configuration Manager. Assuming you do, right click on the iOS folder shown below and choose Create Application select App Package for iOS (*.ipa file) and browse to your in-house iOS app that you've created and continue through the wizard. Note: I cannot show the rest of the wizard as I get plist errors because I do not have an Apple Developer License and do not have access to an in-house IPA file due to licensing restrictions. Assuming you have a developers license and have IPA apps, you'll be able to deploy them to your Windows Intune Users collection created in Part 1 of this series. Step 3. Adding iOS app packages from the Apple App Store. In the Configuration Manager console, right click on the App Store folder shown below and choose Create Application You'll need an internet connection for this step, in the drop down menu choose App Package for iOS from App Store and click on Browse the Apple App Store appears, Select Business from the index on the left, then click on the letter M in the alphabet and select Microsoft Remote Desktop on page 16 or so. finally click on OK when ready The application url appears in our wizard in the location field after clicking on next the app package is added Continue through the wizard until completion. Step 4. Deploy the application Right click the newly added application and choose Deploy when the Deploy Software Wizard appears select the Windows Intune Users collection by clicking on browse for the specifiy the content destination step , there is no content (as it's in the App Store) so click next Select Available as the purpost (we want to give the users a choice) Note: Devices that run Windows RT, iOS and Android now support a deployment purpose of Required. This allows you to deploy apps to devices according to a configured schedule - see Technet. continue through the wizard until completion Step 5. Edit the Deployment Type click on the Deployment Types tab as shown below, select the app and right click, choose Properties Click on the Requirements tab and click on Add if required select your chosen iOS operation system (iPhone or iPad), then click on ok, next click on Add again and in the Condition drop down select Ownership, set the value to Company (the default setting of mobile devices is Personal). click on Apply then OK. Step 6. Verify the end user experience on an iOS device Login to the Company Portal (which we installed in Part 2) on a iOS device that has already had it's Ownership set to Company and which iOS version matches what you set in the requirements above. Click on the Microsoft Remote Desktop app that appears in the Company Portal and click on Launch The application shows in the Apple App Store, install it as you would any app from the app store, you'll be prompted for your Apple ID at this point. After logging in and installing the app it is now installed on your iOS device, success ! and there's a shortcut to it on your device Recommended reading CM12 in a Lab - How can I manage modern devices using System Center 2012 R2 Configuration Manager ? - Part 1 CM12 in a Lab - How can I manage modern devices using System Center 2012 R2 Configuration Manager ? - Part 2 Summary In this part we've seen how to target iOS applications to company owned iOS devices such as iPads and iPhones with a specific version of the iOS operating system all through System Center 2012 R2 Configuration Manager. Continue on to Part 4. Downloads You can download a Microsoft Word copy of this guide here: How can I manage modern devices in System Center 2012 R2 Configuration Manager Part 3 deploying apps to iOS devices.zip


-
How to manage the growing updates packages with SCCM
anyweb replied to yanglu_jn's topic in Configuration Manager 2007
I would use the build and capture process on virtual hardware -
How to manage the growing updates packages with SCCM
anyweb replied to yanglu_jn's topic in Configuration Manager 2007
re-capture the image once a quarter with the new updates or use offline patching (built into CM12 and decribed here.) -
you manage your mobile settings (policies) in CM12 using Compliance Settings, I will post this shortly when and if i get time, but here's a screenshot to give you an idea.

-
thanks David ! I will be covering Android devices shortly, just need time to write the guides... but basically you enable Android support (like we did with iOS support in part 2) and then download and install the SSP from Google Play, once done enroll the device and you'll be able to manage it via Configuration Manager - not Intune, once you set the management authority to Configuration Manager then all management of these devices is done via Configuration Manager, so yes what you are seeing is correct, I assume the collection you are referring to is the Windows Intune Users collection we created above in Configuration Manager and not in Intune...?
-
you should be able to deploy he R2 version of the client without having the SP1 client installed first, no problem
-
When I blogged recently about Microsoft's plans on the operating-systems front following Windows 8.1, I mentioned a couple of "spring 2015" releases. It turns out the Microsoft codename for that wave of deliverables is Threshold. A couple of my contacts have confirmed that Microsoft Executive Vice President Terry Myerson recently mentioned the Threshold codename in an internal email about plans for his unified operating-system engineering group. If all goes according to early plans, Threshold will include updates to all three OS platforms (Xbox One, Windows and Windows Phone) that will advance them in a way to share even more common elements. (The codename Threshold, for those wondering, derives from the planet around which the first halo ring orbited in the original Halo game launched back in 2001. Threshold joins "Cortana," Microsoft's answer to Siri, as yet another codename with its origins in the Xbox franchise.) From what I've heard, Threshold doesn't refer to a single Windows OS -- not even the expected, converged hybrid comprised of the Windows Phone OS and Windows RT. Instead, the codename refers to the wave of operating systems across Windows-based phones, devices and gaming consoles. The Xbox One OS, Windows 8.x OS and Windows Phone 8 OS already share a common Windows NT core. As we've heard before, Microsoft is working to deliver a single app store across its myriad Windows platforms. Company officials also are laboring to make the developer toolset for all three of these platforms more similar. But Threshold will add another level of commonality across Microsoft's various Windows-based platforms, sources said. With the Threshold wave, Microsoft plans to support the same core set of "high value activities" across platforms. These high-value activities include expression/documents (Office, and the coming "Remix" digital storytelling app, I'd think); decision making/task completion (Bing, I'd assume); IT management (Intune and Workplace Join, perhaps?) and "serious fun." CEO Steve Ballmer mentioned this concept of high-value activities at back in July when he announced Microsoft's cross-company reorg to make the company more focused around its new "One Microsoft" mission. Before Microsoft gets to Threshold, the company is on track to deliver an update to Windows 8.1 (known as Windows 8.1 Update 1) around the same time that it delivers Windows Phone "Blue" (Windows Phone 8.1). That's supposedly happening in the spring 2014/Q2 2014 timeframe, from what my sources have said. I've asked Microsoft officials if they'd confirm any of this information about Threshold. No word back so far. By Mary Jo Foley via Zdnet - http://www.zdnet.com/microsoft-codename-threshold-the-next-major-windows-wave-takes-shape-7000023832/
-
hi Malik4u 1. i've added the url and here it is again 2. yep should be fine, but verify it as listed above.
-
hi all, here are my slides from the presentation I gave at TechCamp 2013 in Ireland, the observant amongst you will figure out that my current mini-series on 'modern device management' is closely related to this content. CM12 in a Lab - How can I manage modern devices using System Center 2012 R2 Configuration Manager ? - Part 1 CM12 in a Lab - How can I manage modern devices using System Center 2012 R2 Configuration Manager ? - Part 2 Download the slides here - Niall Brady - TechCamp2013.pptx there are ample notes describing the content in the slides themselves. cheers niall

-
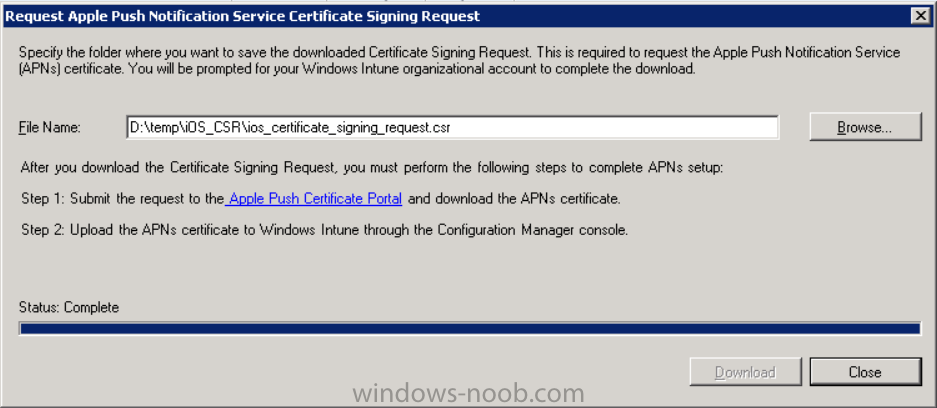
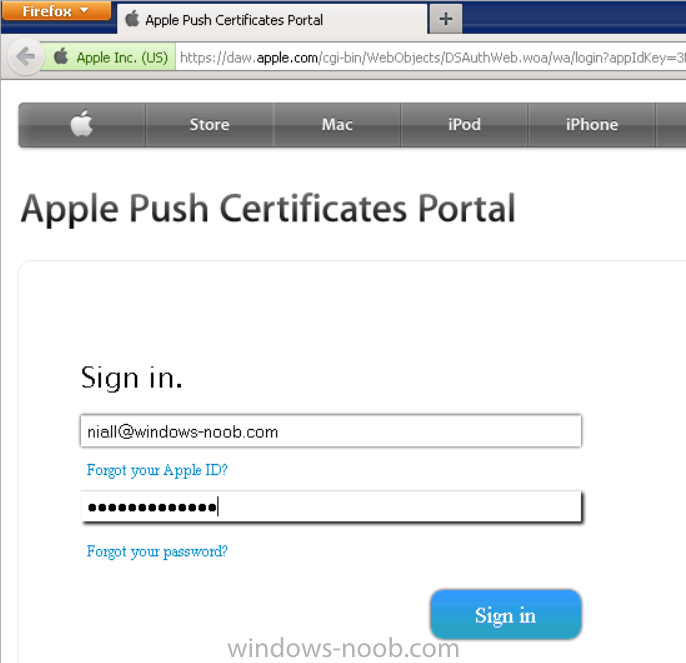
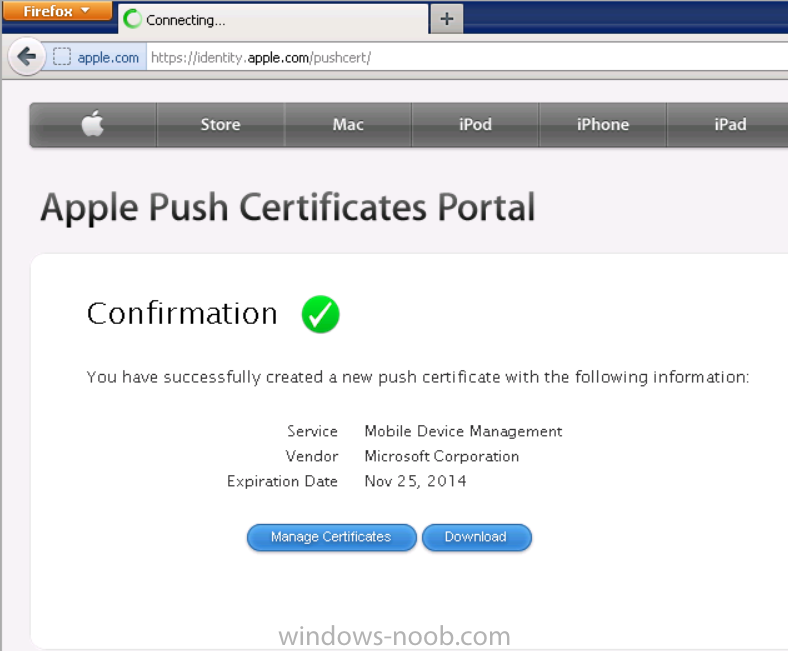
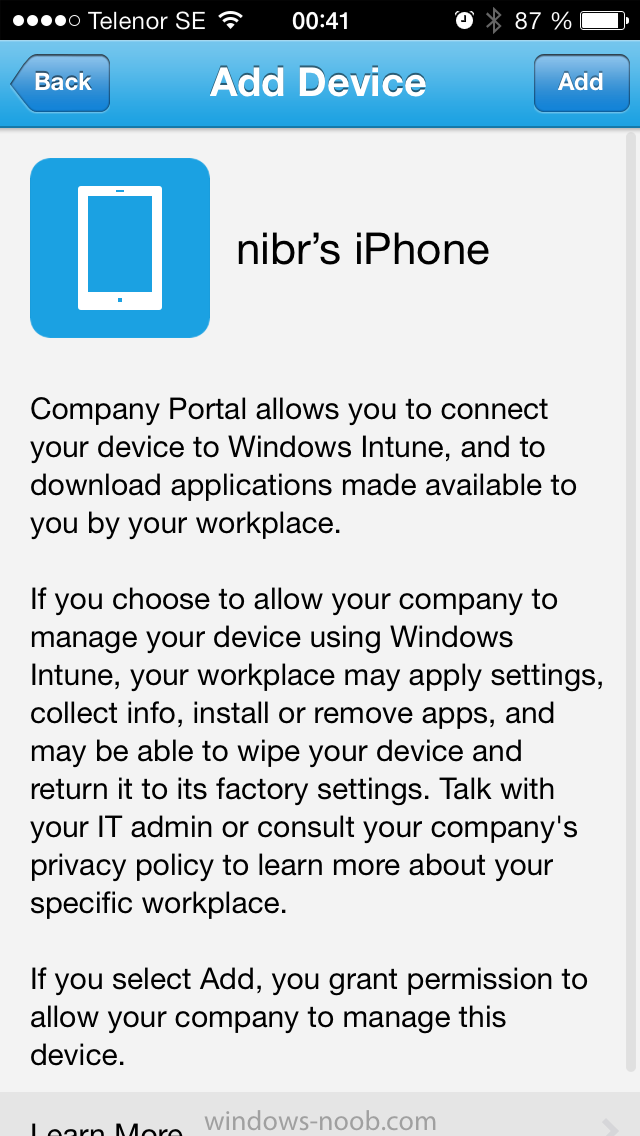
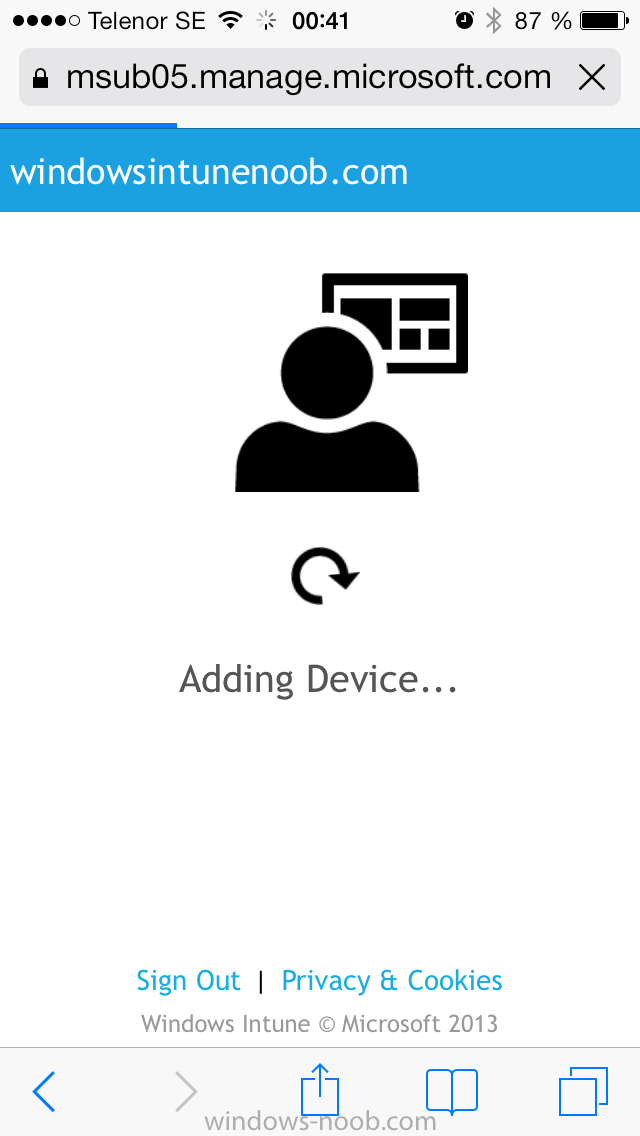
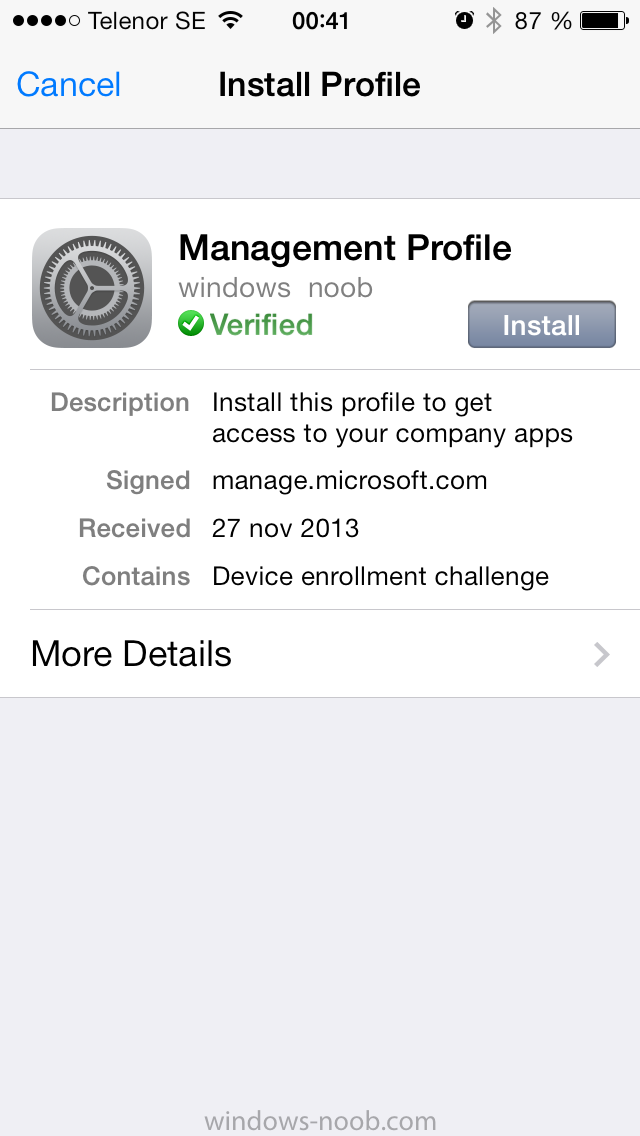
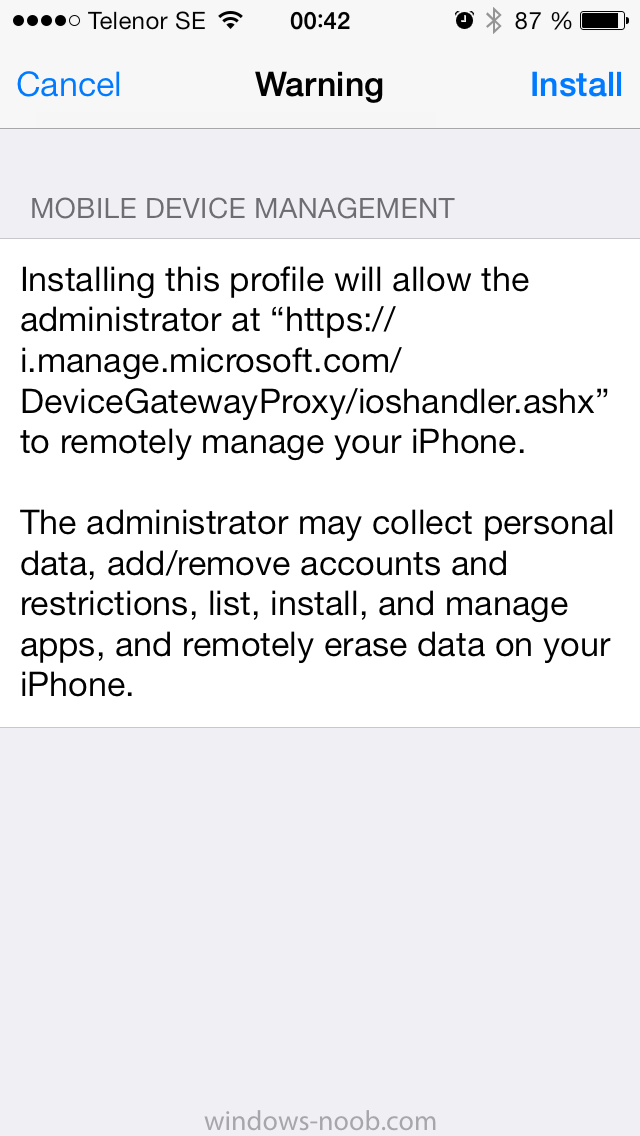
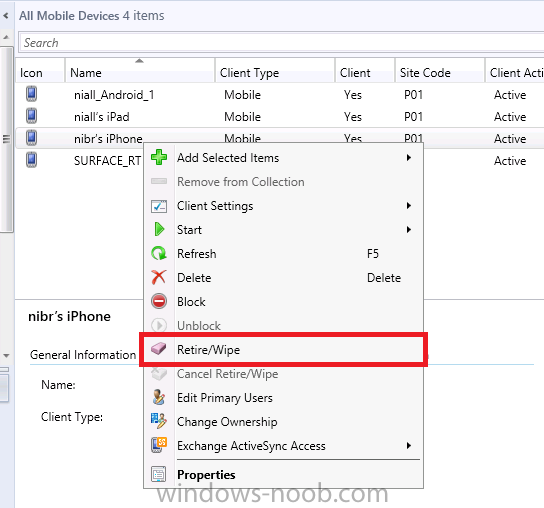
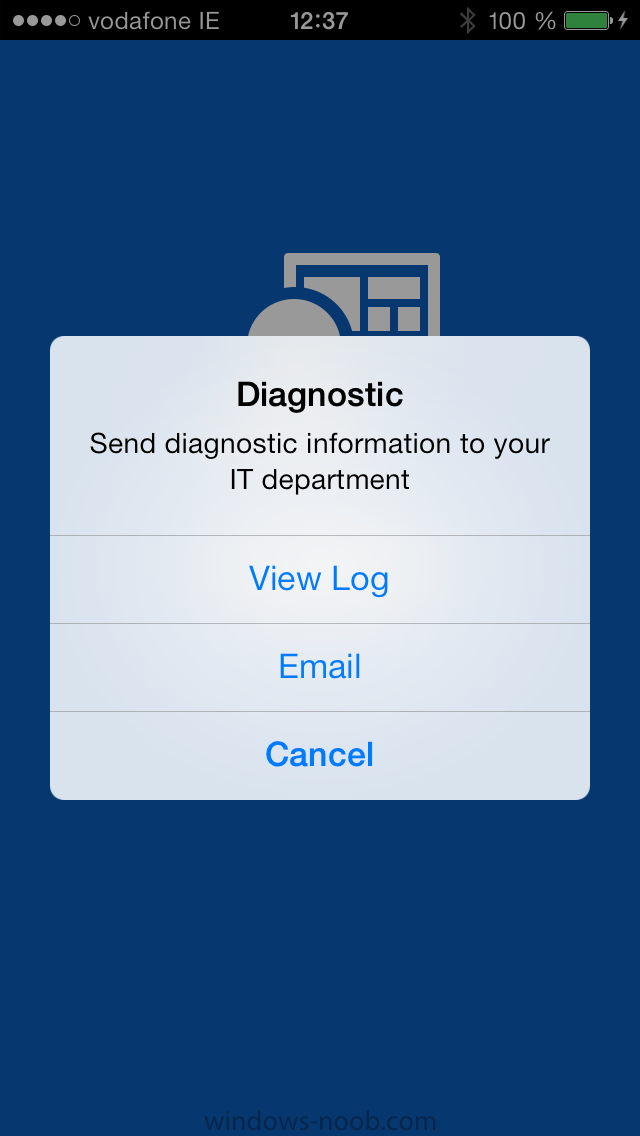
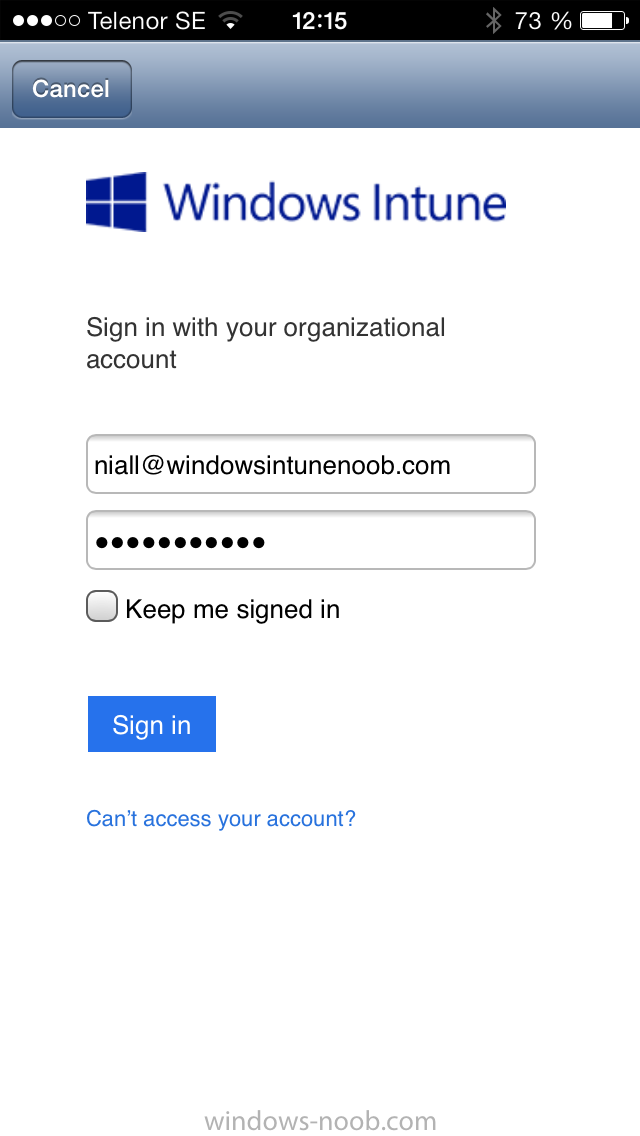
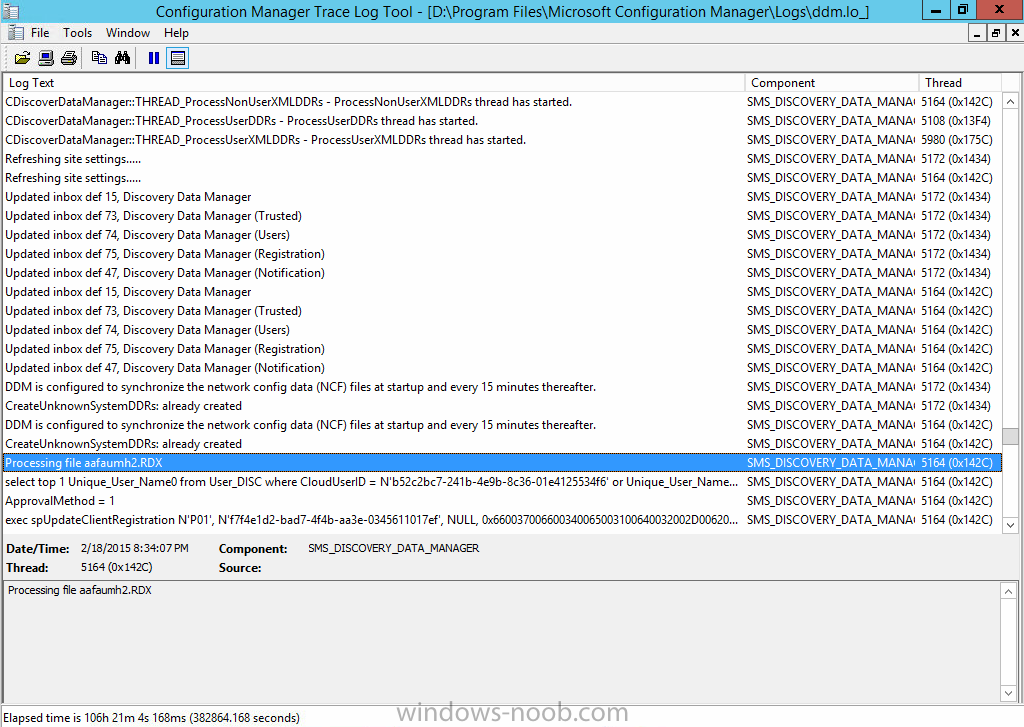
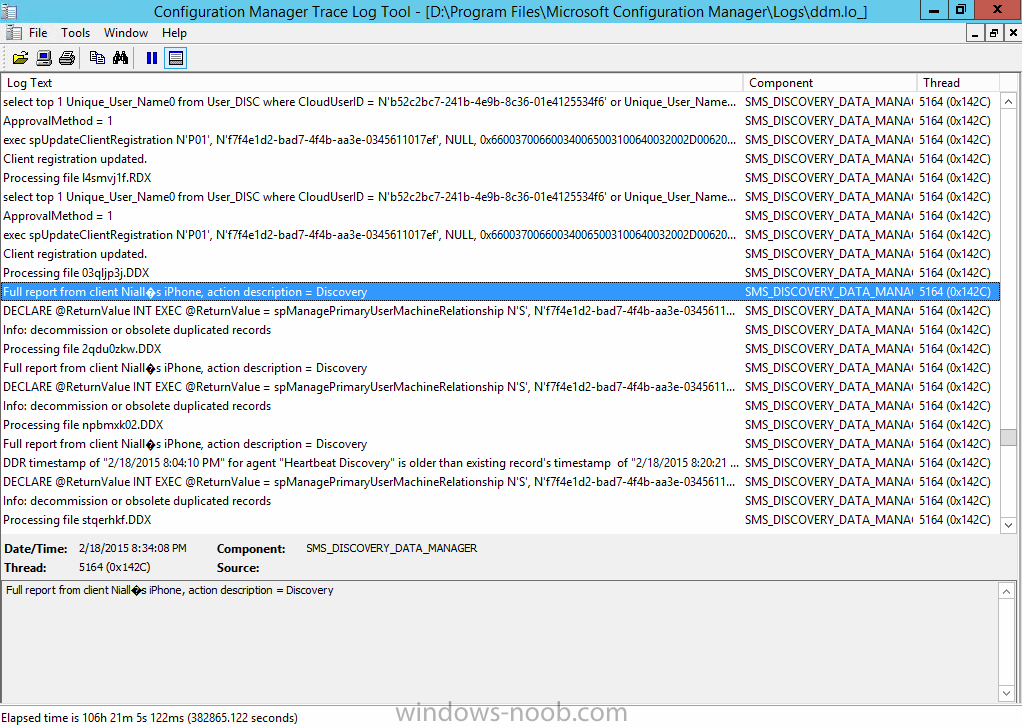
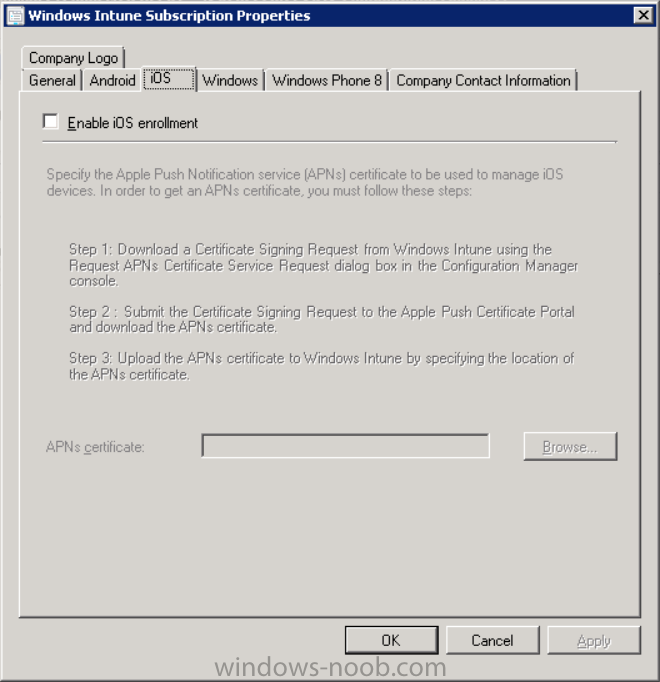
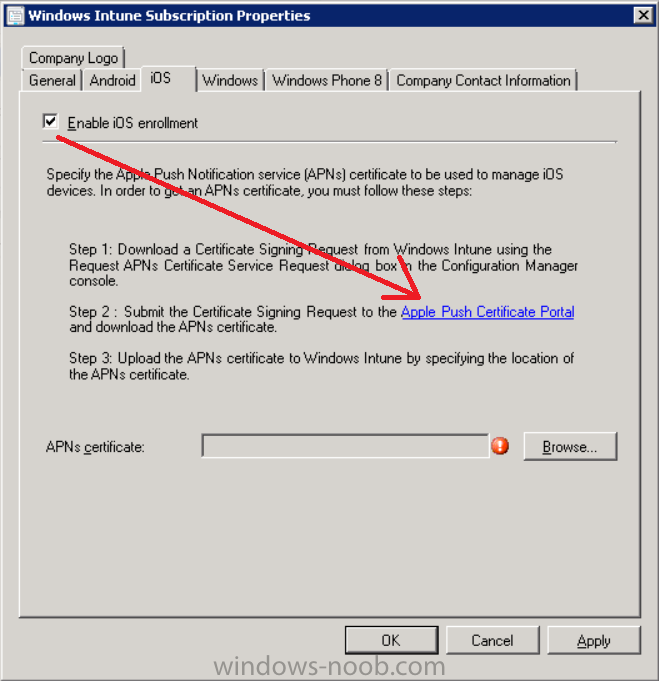
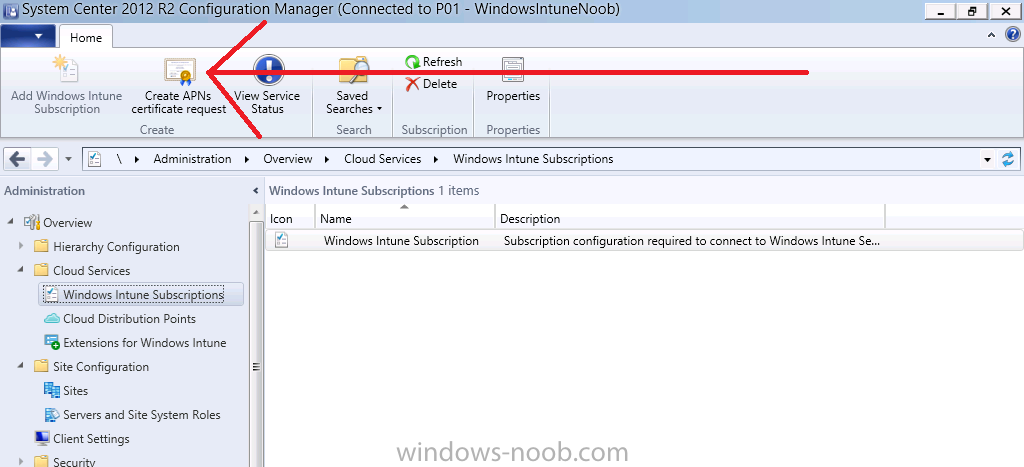
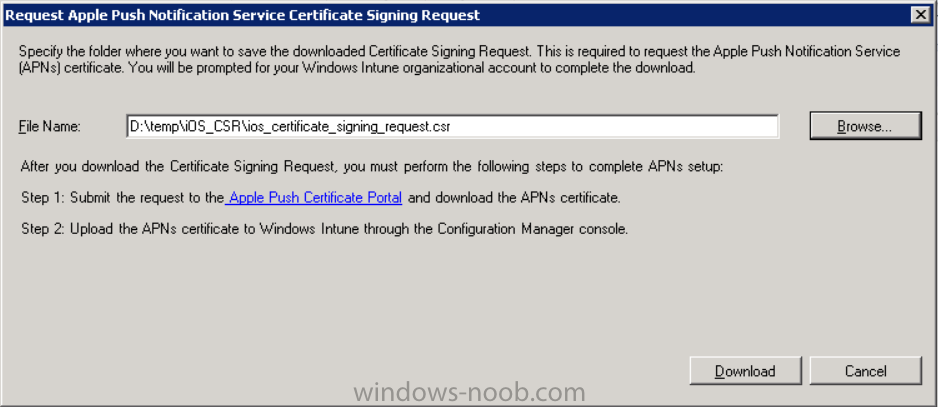
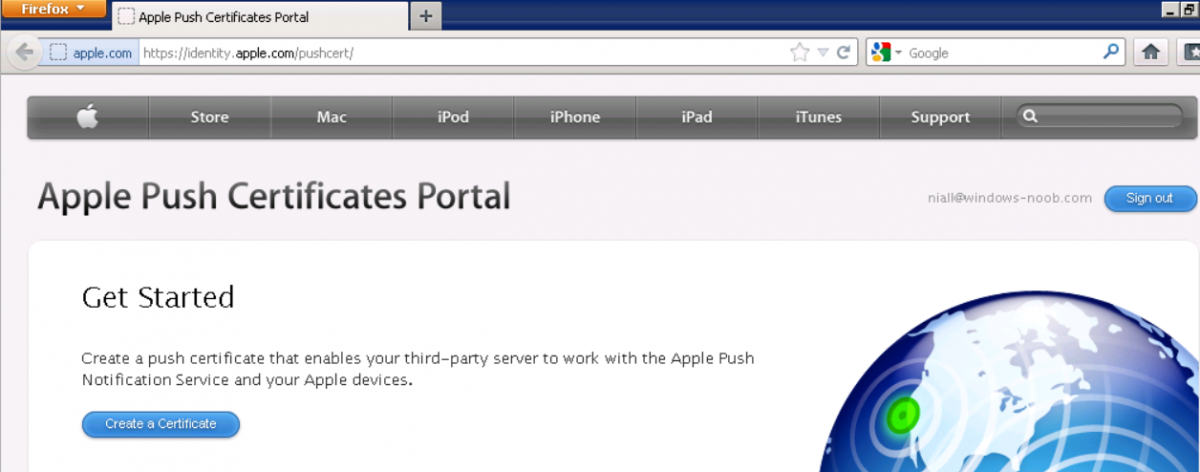
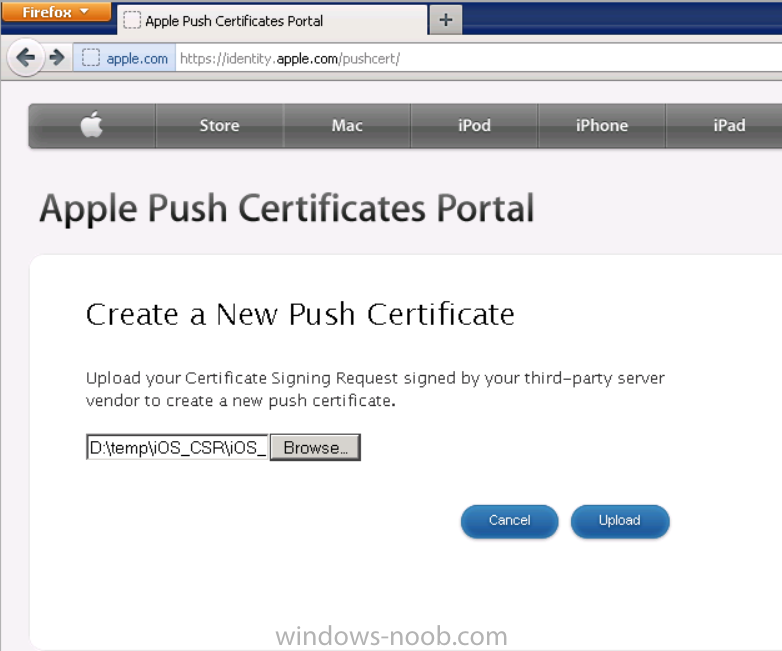
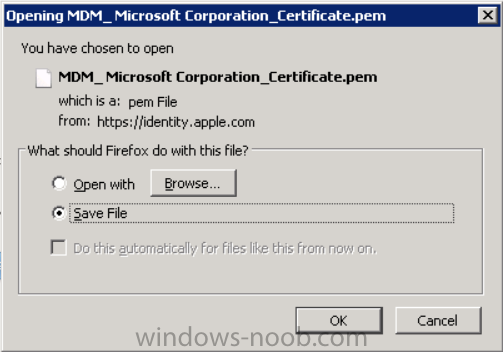
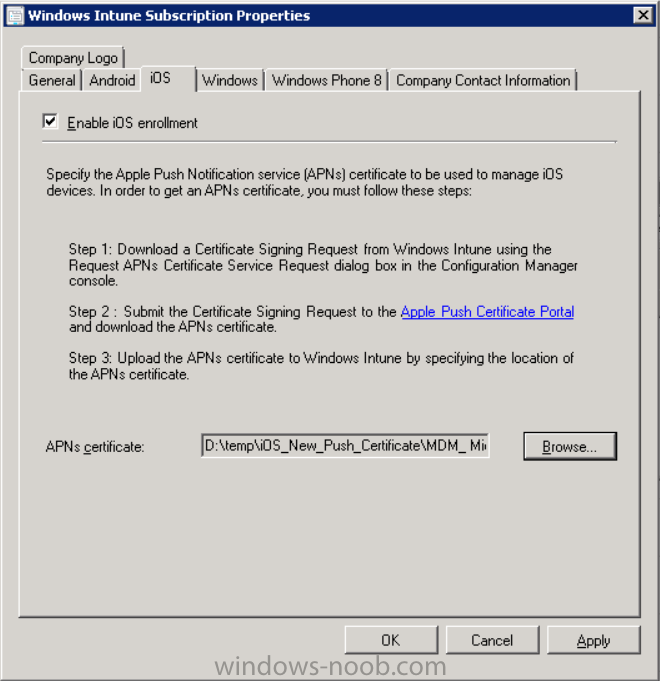
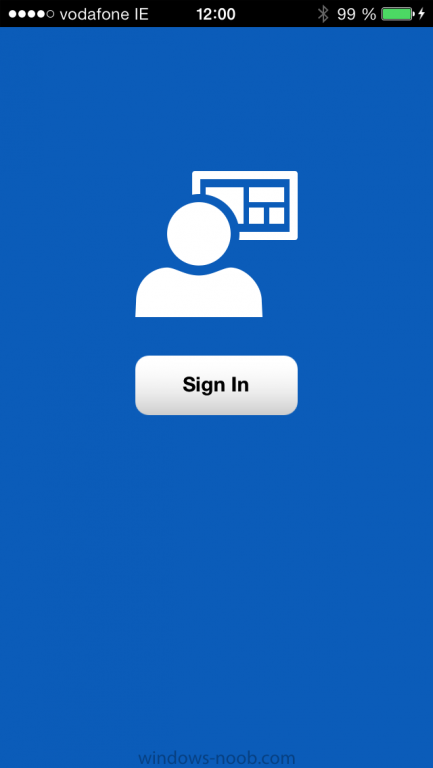
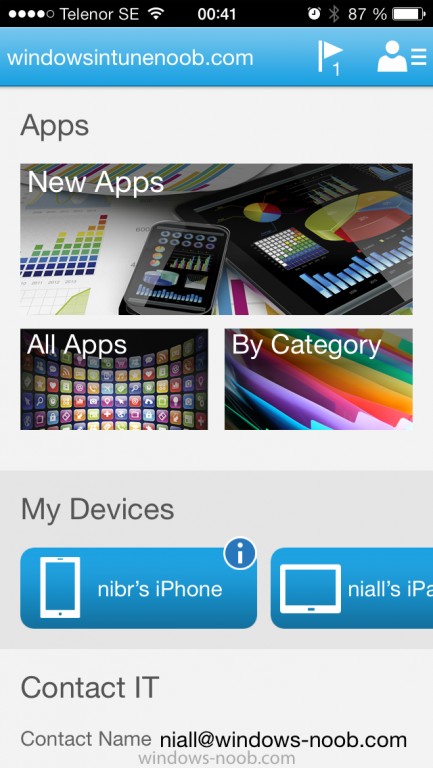
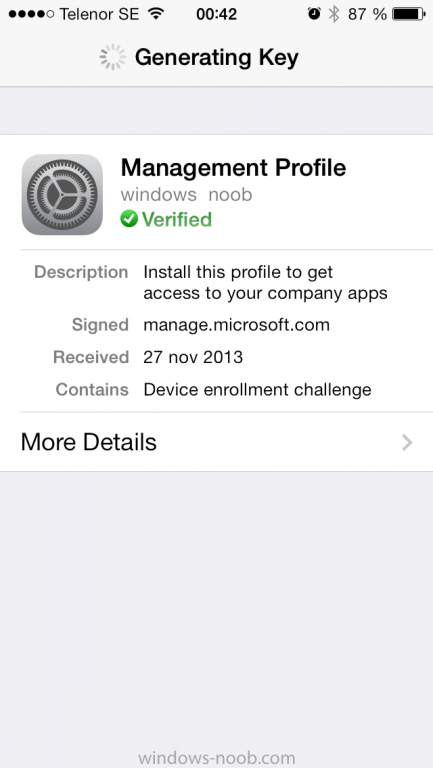
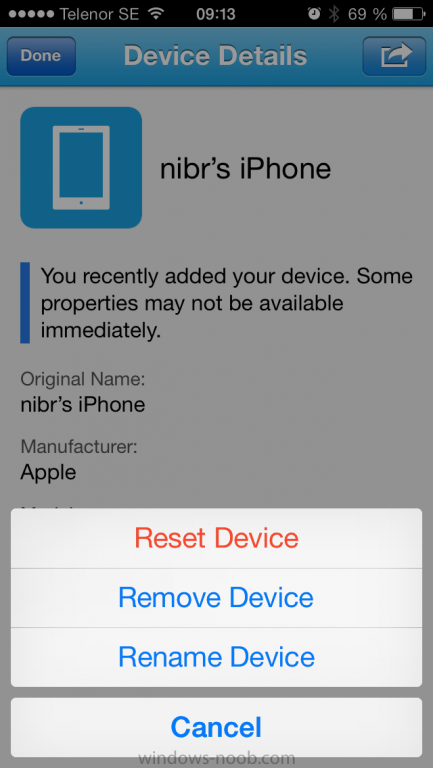
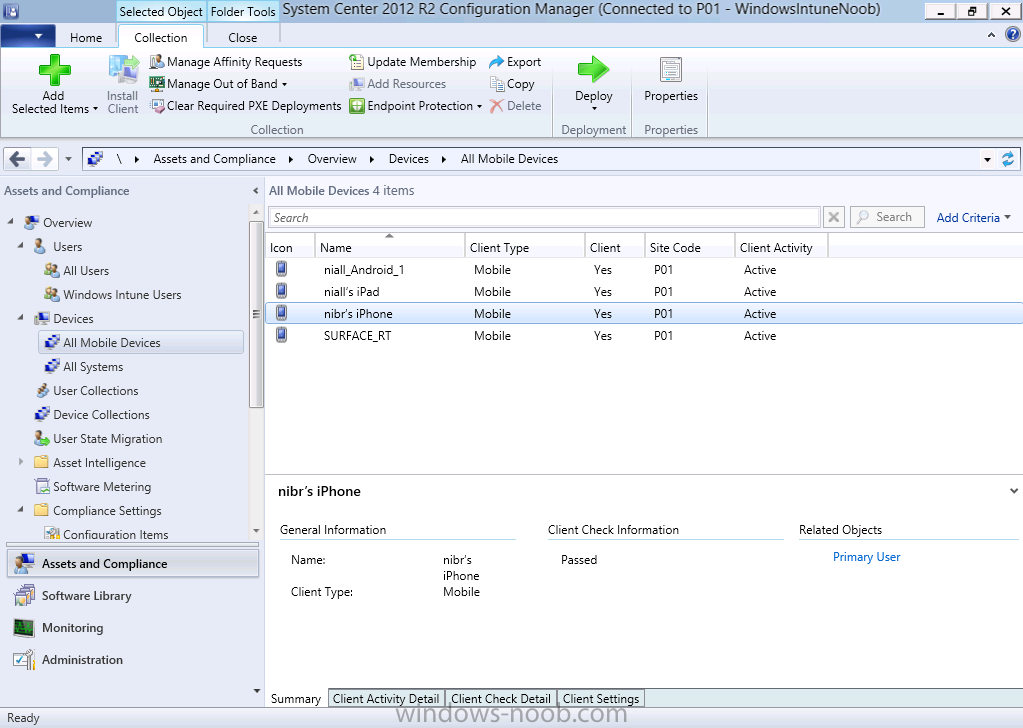
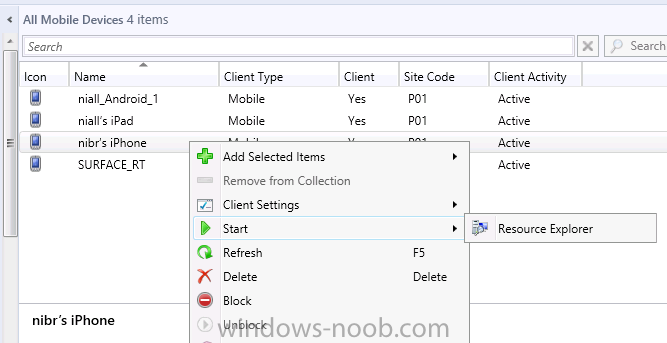
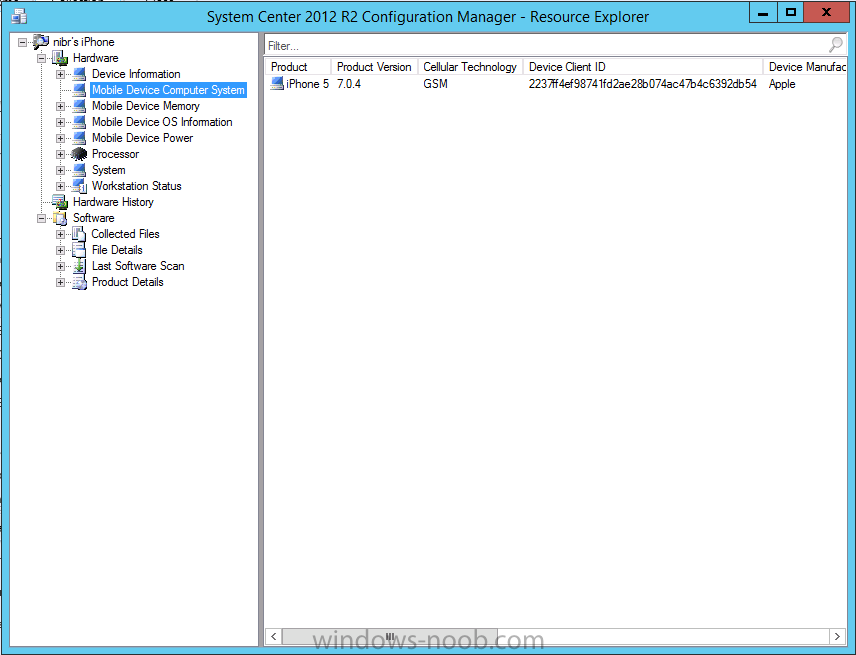
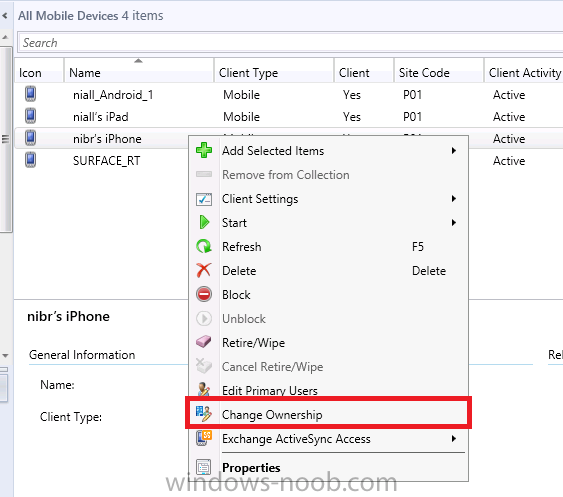
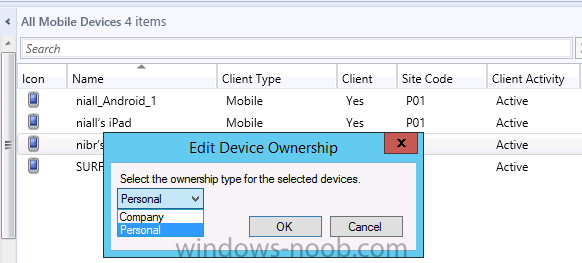
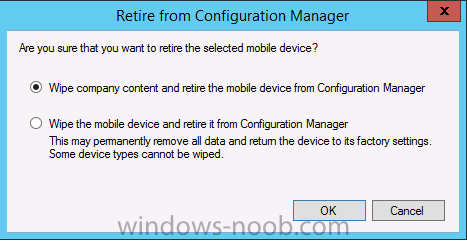
Introduction In Part 1 of this mini series we integrated Windows Intune with System Center 2012 R2 Configuration Manager. In this part we will add Support for iOS devices (Iphone, iPad). Many companies today have users with company or personal owned iPhones with one or more iPads so being able to manage these devices and offer them application choice via a Company Portal is a good thing. In order for iOS devices to check for policy, they need to be contacted by the Apple Push Notification service (APNs). Each company needs an APNs certificate to allow Windows Intune to contact Apple to make this request. When a new policy is created, Intune then contacts Apple for those devices, the devices then check the Intune service for new policy. Users can enroll iOS devices by using the iOS company portal app which was made available in the App store on November 19th 2013. The Windows Intune company portal app can be installed on iOS devices as of iOS 6. The company portal app will allow users to perform the following actions: Change or reset passwords. Download and install company apps. Enroll, unenroll, or wipe company content from their devices. Step 1. Create an APNs Certificate Request Before adding iOS enrollment support we first need to complete a few steps to enable our iOS devices to talk to Windows Intune. In the console click on Create APNs certificate request. You’ll be prompted where to store the Certificate Signing Request, give it an appropriate path and file name such as in the example below, then click on Download and enter your Windows Intune credentials when prompted. Once the download is complete click on close. Step 2. Submit the request to the Apple Push Notification service portal. In the Configuration Manager console, browse to Cloud services in Administration, select your Windows Intune Subscription and right click it, choose properties. the brings up the Windows Intune Subscription properties, click on the iOS tab. Place a checkmark in Enable iOS enrollment and then click on the Apple Push Certificate Portal link as shown in the example below: Note: Please use something other than Internet Explorer for the steps below otherwise you may have issues with the certificate PEM files from Apple. Instead use FireFox or Chrome for these steps. You have been warned ! sign in with your (previously created) Apple ID to the Apple Push Certificates Portal, once logged in to the Apple site, click on Create a Certificate Agree to the terms and conditions if you want to continue and click on Accept Browse to the certificate signing request file you saved in the steps above and click on Upload Once it’s done creating your certificate you should receive a confirmation like the example below, however if you did not – make sure to read my note above about Internet Explorer. Tip: Notice the expiration date, it is one year from the day you created the certificate. You’ll have to repeat the process of creating a new certificate one year from now to continue managing iOS devices. Click on Download to download the PEM file (if it’s not a PEM file read my NOTE above) and then save the PEM file Copy the newly downloaded PEM file to somewhere useful like D:\temp\iOS_New_Push_Certificate\. Step 3. Add the APNs Certificate Back in the Enable iOS Enrollment Wizard, browse to the PEM file above and click on Apply then OK. Close the wizard. Step 4. Enroll an iOS device On an iOS device open the Apple App Store., search for Company Portal, select the Windows Intune Company Portal from the list of available apps Install it by clicking on Open/Install. Once installed locate the app on your device and click on it. Enter your public domain Intune credentials (or Active Directory credentials if you setup ADFS) Click on sign in and you will be presented with the company portal. Notice the 'i' beside my phone device, that means it is not enrolled yet. Click on the device to start the enrollment procedure Click on Add Device, You will be presented with information about the portal, click on Add in the top right corner. the device get's enrolled to Windows Intune. You'll get prompted to install the MDM Profile, click on Install then click on Install Now... and off it goes... you'll again get prompted to click on Install (with a warning about what the administrator can do with your phone) and if all goes well your device will be successfully enrolled. Tip: If you have any problems with the enrollment, shake the phone/ipad while the company portal is open and you'll see the following screen, this allows you to troubleshoot via viewing the log file or you can email the log file. Note: if you shake the device during enrollment (while safari is open) nothing will happen, simply click on the link at the bottom of the enrollment screen to go back to the company portal and Shake the device then, the troubleshooting ability should then appear. Once your iOS device has enrolled you can verify things on the server side, for example open the DDM.Log to review details of the device DDR being created (see below), a file is spotted in the inbox and shortly after some discovery information is sent including the device name and the username used to enroll the device and discovery info being processed Step 5. A quick look at the features. In the company portal you can now review what features are available on this device by clicking on the device name , on the phone itself you can do the following from the portal reset rename remove as shown below and of course you can select to install apps from the app store (we havn't added any yet, that is coming in the next part of this series). In the Configuration Manager console browse to Assets and Compliance, your device should be listed there in the All Mobile Devices collection. right click the device and choose Start, Resource Explorer and you'll get to see what details have been captured from your iOS device, cool ! you can also define the ownership of the device as there are new Global Conditions set up to allow you to target software/settings to devices based on ownership. Note: All devices enrolled via Intune into Configuration Manager will have the device ownership set to Personal by default. Right click the device and choose Device Ownership choose Personal or Company from the options available. And we can also do selective wipe/retire via the Retire/Wipe menu This pops up a new menu describing the two choices available to you. Related reading How can I manage modern devices using System Center 2012 R2 Configuration Manager ? - Part 1 James Bannan, an awesome Configuration Manager MVP - http://www.jamesbannanit.com/ James and Peter demoing BYOD - Unifying BYOD Management with Windows Intune and Configuration Manager 2012 - http://channel9.msdn...and/2013/WCL309 What’s New in System Center 2012 R2 Configuration Manager - http://technet.micro...y/dn236351.aspx How to Manage Mobile Devices by Using Configuration Manager and Windows Intune http://technet.micro...e10#BKMK_RTcert Support Tool for Windows Intune Trial Management of Window Phone 8 - http://www.microsoft...s.aspx?id=39079 Set up Windows Intune Direct Management for Windows Phone 8 Mobile Devices - http://technet.micro...y/jj733640.aspx How to: Edit DNS records - A, CNAME, MX, TXT, and SRV https://help.hover.c...-MX-TXT-and-SRV Configuring Configuration Manager SP1 to manage mobile devices using Windows Intune- http://blogs.technet...ows-intune.aspx Deploying and Configuring Mobile Device Management Infrastructure - http://channel9.msdn...MS/2013/UD-B309 Windows Intune Company Portal App - http://blogs.technet...-available.aspx Summary We've learned how to successfully enroll iOS devices using the Windows Intune Company Portal available from the Apple App Store. Once enrolled the devices appear in Configuration Manager and can be managed. That's all for now, In our next part we will learn how to add applications for iOS devices in our Company Portal. Until next time, adios! Downloads You can download a Microsoft Word copy of this guide here: How can I manage modern devices in System Center 2012 R2 Configuration Manager Part 2 - Adding support for IOS devices.zip cheers niall


-
sure thing
-
to be clear, you need to install ADK 8.0 to install SP1 and you then need to uninstall ADK 8.0 and install ADK 8.1 to upgrade to R2.
-
if the task sequence is failing for whatever reason then the client WILL be stuck in provisioning mode, this is NORMAL and a symptom of the failed installation. what you need to find out is why the installations are faliing, and fix that problem cheers niall
-
I have the same problem and have raised a ticket on connect with Microsoft
-
are any updates being installed as part of the task sequence (for windows silverlight or .NET)