anyweb
-
Posts
9271 -
Joined
-
Last visited
-
Days Won
371
Everything posted by anyweb
-
that can't be right, can you post the correct error message please ? and the number is the package id of the package in question, add it to your dp and you'll be ok
-

Error when installing SCCM 2012 even when following guides!!
anyweb replied to amitpatel08's question in How do I ?
thanks for posting the resolution ! and good luck with the rest of it -
using SCCM 2012 in a LAB - Part 1. Installation
anyweb replied to anyweb's topic in Configuration Manager 2012
no, SQL Server 2012 is not yet supported so don't use it until it is. The supported versions of SQL Server are listed in my Configuration Manager 2012 RTM guide here. -
Configuration Manager client computers can be domain members, or workgroup members however if they are workgroup members you'll need to manage them differently, for example you can't install the client using client push to workgroup computers.
-
Error when installing SCCM 2012 even when following guides!!
anyweb replied to amitpatel08's question in How do I ?
where are you seeing that error ? in the logs or in the setup installation console, can you post the ConfigMgrSetup.log file here please ? did you add the installation account (SMSadmin) as a sysadmin on your sql server as described below ? -
is your wds server on the same lan/vlan as the client ?
-
Manage Windows Updates in work environment whith SCCM 2012
anyweb replied to volk1234's topic in Configuration Manager 2012
it's different for every company, however there are scripts for deleting unused updates from packages such as this one here. -
OSD: All Unknown Computers collect is empty
anyweb replied to nhutminh008's topic in Configuration Manager 2012
is Enable support for unknown computers selected on the PXE tab in your Distribution Point properties ? -
what updates were they ?
-
What are you guys running in your lab environments?
anyweb replied to wmmayms's topic in General Chat
how do you find the performance of that Dell., is it ok ? -
are you saying that the computers are only WORKGROUP joined ?
-
you can install everything on the one server (Standalone Primary) for that number of clients, no problem, just think about lots of storage, fast discs (for SQL) and lots of RAM. When you say the clients aren't in AD can you elaborate please
-
it gets the name from the Computer Agent part of the Default Client Settings defined for the hierarchy,
- 10 replies
-
- 1
-

-
- IT Organization
- WinPE
- (and 2 more)
-
you must install Cu6, your version is Cu4 (you made a typo with 10.51.2796.0 ?) 10.50.2796 SQL Server 2008 R2 SP1 CU4 are you attempting to install CU6 for SQL Server 2008 R2 or CU6 for the regular version of SQL Server 2008 below is the link to download the correct version of CU6, please try again...
-
HP Proliant Deployment Task Sequence and RebootStep Variable
anyweb replied to djcampbell's question in Deploy Server 2008 R2
it says this in the log " ConnectToProvider: Couldn't connect to the mgmt point (Siteserver.domain.COM): The RPC server is unavailable. " " ### DESCRIPTION: ERROR : Could not connect to WMI on the Management point after 3 attempts " have you set a user/pass in the hp wizard ? have you followed all the advice given in that pdf ? -
yup see here using Multiple Task Sequences via PXE, PXE boot to a task sequence menu choice is sometimes a good thing
-
no you don't, however if you want to be SURE That you are executing the latest changes when pxe booting for example, you can add a version number to the name of the task sequence, that way, if you made changes to Deploy Windows 7 X64 v1.0, increment the version number by one and you should see Deploy Windows 7 X64 v1.1 when you pxe boot. This ensures that your clients have the latests policies for this deployment (sometimes theres a delay depending on hierarchy..) i use versioning a lot when i'm testing task sequences as i want to be sure i'm testing my changes and not the old task sequence
-
your first and most glaring issue is this if wsus can't sync then you can't get any updates, so... do you have internet on the server that WSUS/SUP are installed on ?
-
Summary: There are more than 300 new features coming in Windows Server 2012. One worth noting is Hyper-V Replica. Here’s why. I’m taking a couple weeks off before the busiest part of Microsoft’s 2012 kicks into full gear. But never fear: The Microsoft watching will go on while I’m gone. I’ve asked a few illustrious members of the worldwide Microsoft community to share their insights via guest posts on a variety of topics — from Windows Phone, to Hyper-V. Today’s entry is all about Hyper-V Replica and is authored by Aidan Finn. Think back to disasters such as the hurricane in New Orleans and the floods in Eastern Australia, where there were business and technology impacts of those disasters. Large datacenters probably had made significant investments to protect against such emergencies. But what about the small/medium enterprise (SME) or the corporate branch office that couldn’t afford these expensive solutions? Did they have somewhere to go? Did those businesses survive? What was the long term cost to their owners and shareholders? The list of new features in Windows Server 2012 Hyper-V is staggering but the new one that stands out to me is Hyper-V Replica (HVR). HVR is built into Hyper-V at no extra cost and is designed specifically for those branch offices and small/mid-size enterprises that cannot afford an expensive SAN-based or host-based replication solution with their required expensive bandwidth. In fact, HVR has been designed to work on commercial broadband with no special hardware. HVR can be configured via PowerShell (there are a lot of native PowerShell cmdlets for Hyper-V in Windows Server 2012) or in the GUI. Users configure each virtual machine (VM) that they want to replicate. VMs are usually just a few files and that makes them easy to replicate. No, you will not be able to use HVR with Passthrough disks, and this is another reason to be excited about 64 TB VHDX files with near physical disk performance. Once enabled, HVR will do light weight logging of changes to the VM’s virtual hard disks. Every five minutes, Hyper-V Replica will attempt to replay that log file, containing the changes only, with compression enabled from the source host to the destination host to reduce bandwidth utilization. If the network connection is not available then HVR will reattempt to replicate for up to 30 minutes before it goes into a state that requires attention. This asynchronous method assumes that the Internet connection to the DR site is unreliable, as commercial broadband usually is. The combination of compression and change only replication is perfect for low cost connections that are the norm for branch offices and SMEs. Microsoft remembered that users might have possibly terabytes of data to replicate during the initial synchronization and gave them a few options. If they have a small amount of data, they can do the first synchronization over the wire, with an additional option to schedule this for out-of-business hours. They can export the data to removable storage, preferably with BitLocker encryption to protect the data during transit. And they can restore the VMs from backup in the DR site, and fix up the differences over the wire. Customers have some additional options when you configure HVR. They can choose to keep multiple snapshots of a VM on the replica host, allowing them to choose a past version of a VM when they start it up in the DR site. (This would be useful if a VM is corrupted and that was the reason for invoking the business continuity plan.) Users can also choose to configure an isolated network for testing the DR replicas. With this enabled, they can start up test copies of the replica VMs in the DR site, and verify that their plans will work during an emergency without impacting on systems on the production network. HVR does not have a heartbeat and does not start up DR VMs automatically. This makes sense because it is designed to replicate across unreliable links and users don’t want accidental invocation of the DR site because the ISP has one of those all-too-frequent brief outages. VMs are manually started, a process which can be sped up by using PowerShell or a System Center 2012 Orchestrator runbook. HVR allows replication of VMs from standalone host to standalone host, from Hyper-V cluster to Hyper-V cluster, and from standalone host to Hyper-V cluster and vice versa. This opens up a lot of options. SMEs are more likely to have standalone virtualization hosts. Many hosting companies choose this option, too, because it allows them to offer very low cost hosting plans. There are a few scenarios where HVR will be used. The SME will find HVR very appealing because it is free and can avail of low cost bandwidth. Those SMEs with two offices might choose to configure each one as the DR site for the other. Managed services partners or public cloud companies can choose to offer hosted DR services, availing of the optional HTTPS authentication and policy mechanisms in HVR, and building on additional add-ons such as remote access and remote backup. Corporations can also look at HVR as a way to provide economic DR replication either to a local DR site or to a central data center. HVR is asynchronous replication. Therefore it won’t be suitable for those organizations that need zero data loss. HVR is also not intended for replicating from massive environments such as a public cloud. In this case, users can expect to find high end storage with built-in replication and plentiful low latency bandwidth that can replicate at the hardware level, which is more suitable for large amounts of data and constant VM change. Hyper-V Replica is a built-in, free, asynchronous virtual machine replication mechanism that can offer something to SMEs, managed service partners, hosting companies, and corporations with branch offices. I think it is a killer feature because it is designed to work well in these environments and can solve problems for SMEs and complex environments, while offering service opportunities for Microsoft partners. Aidan Finn is a Microsoft Valuable Professional (MVP) with an expertise in Virtual Machine. He works for MicroWarehouse Ltd, an Irish Value Added Distributor, as a Technical Sales Lead, working closely with Microsoft and VARs in Ireland. He blogs on aidanfinn.com, tweets as @joe_elway, and has written or contributed to books such as Mastering Hyper-V Deployment (Sybex, 2010) and Microsoft Private Cloud Computing (Sybex, 2012). via > http://www.zdnet.com/blog/microsoft/one-of-windows-server-2012s-secret-weapons-hyper-v-replica/12707?tag=mantle_skin;content
-
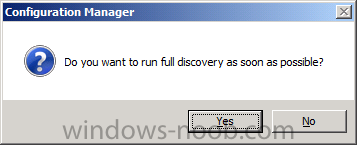
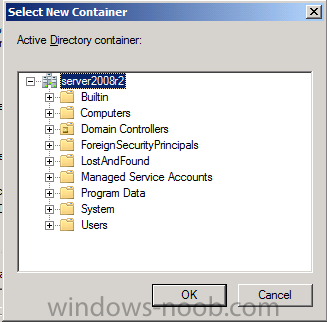
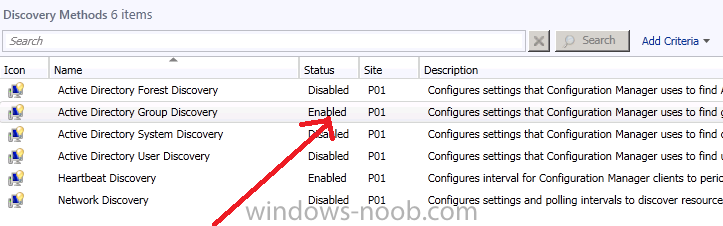
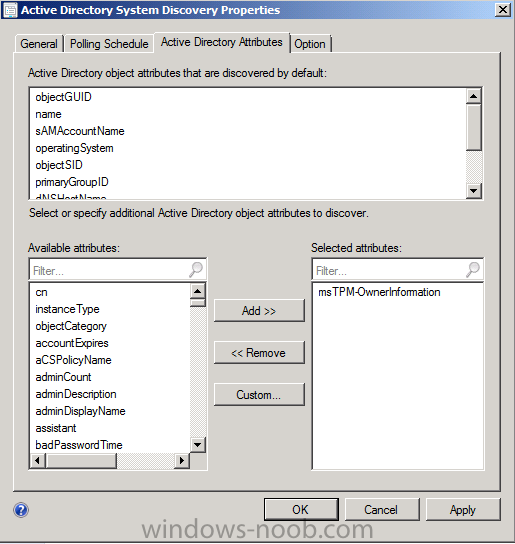
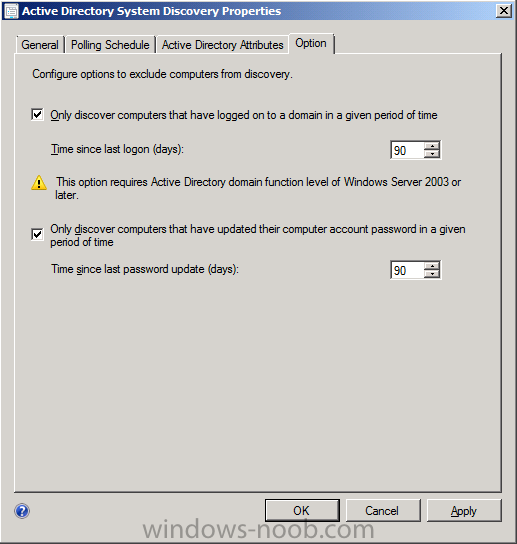
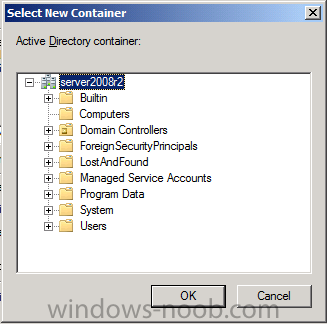
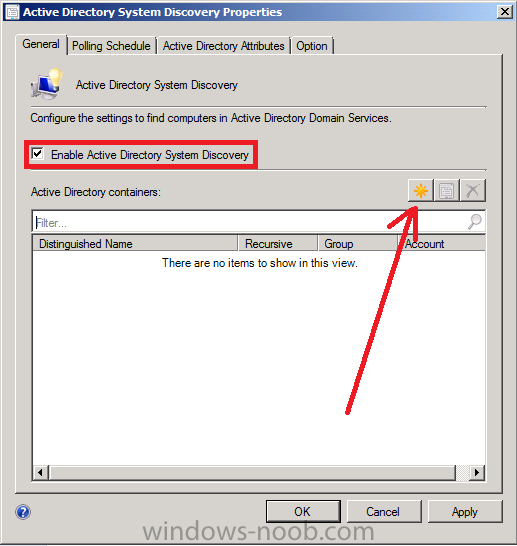
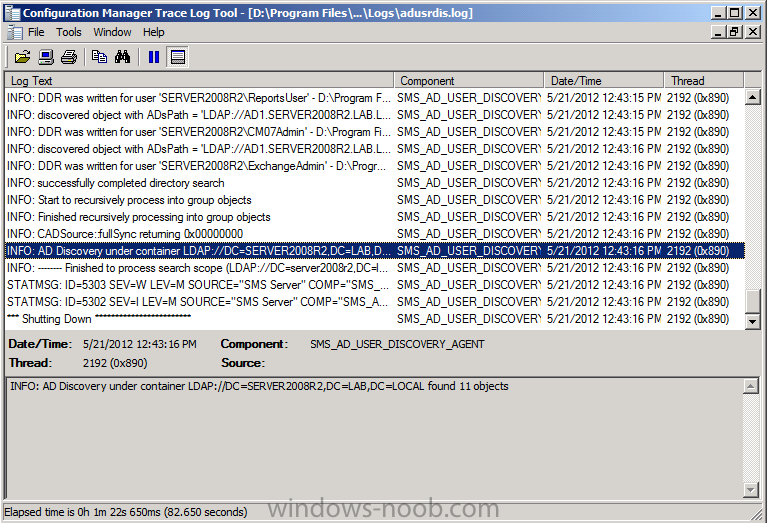
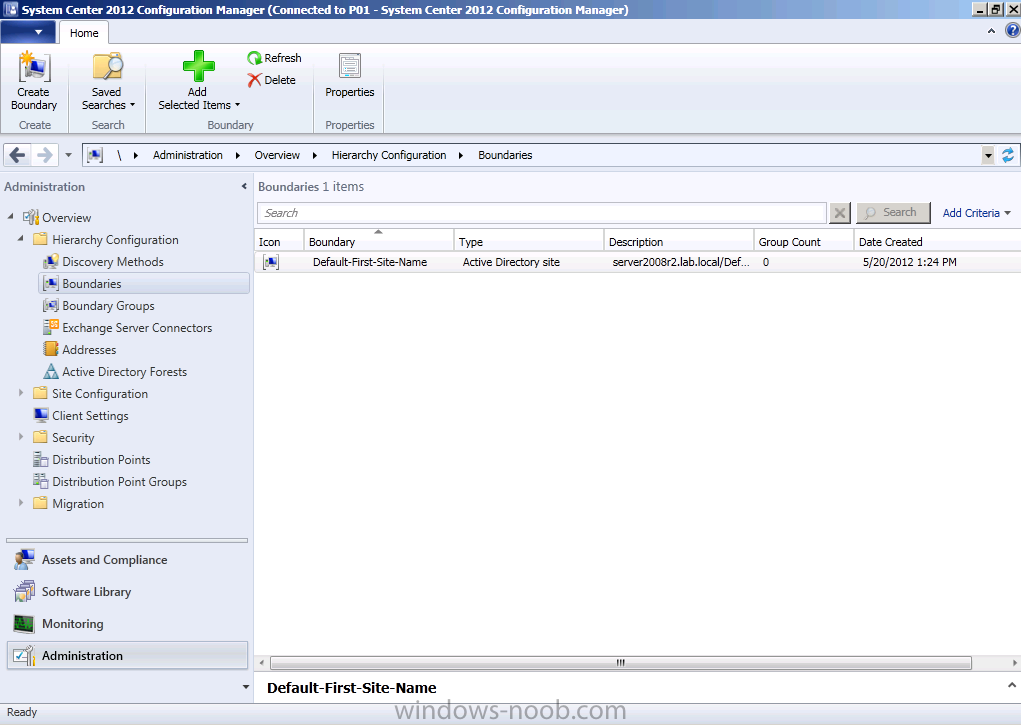
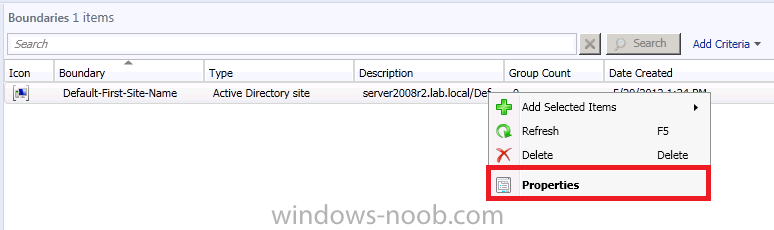
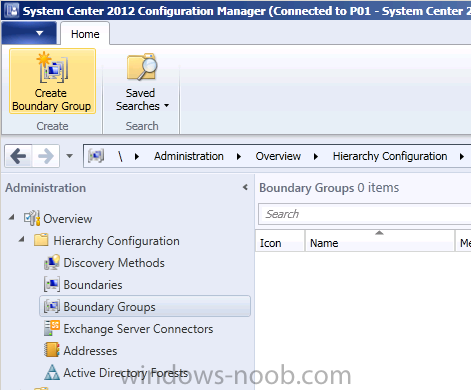
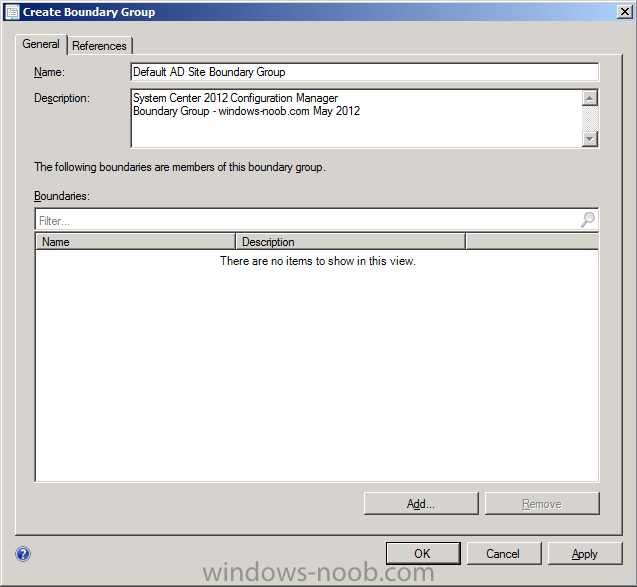
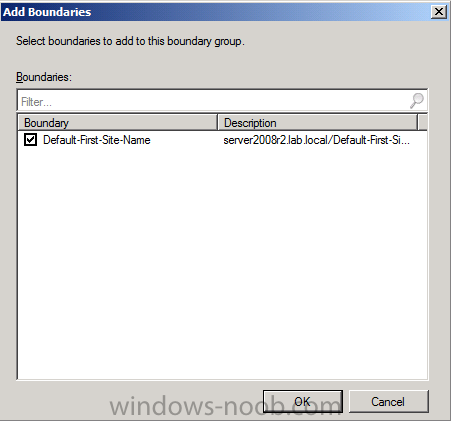
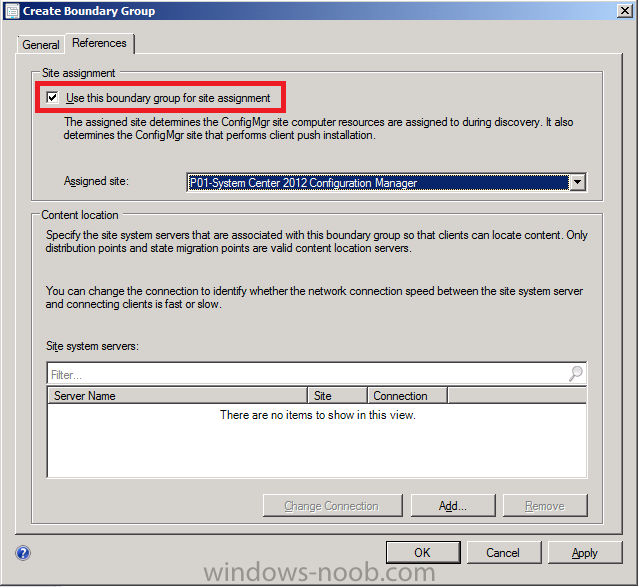
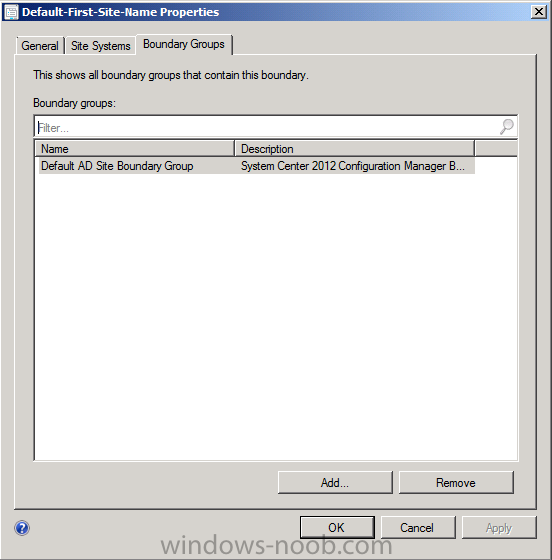
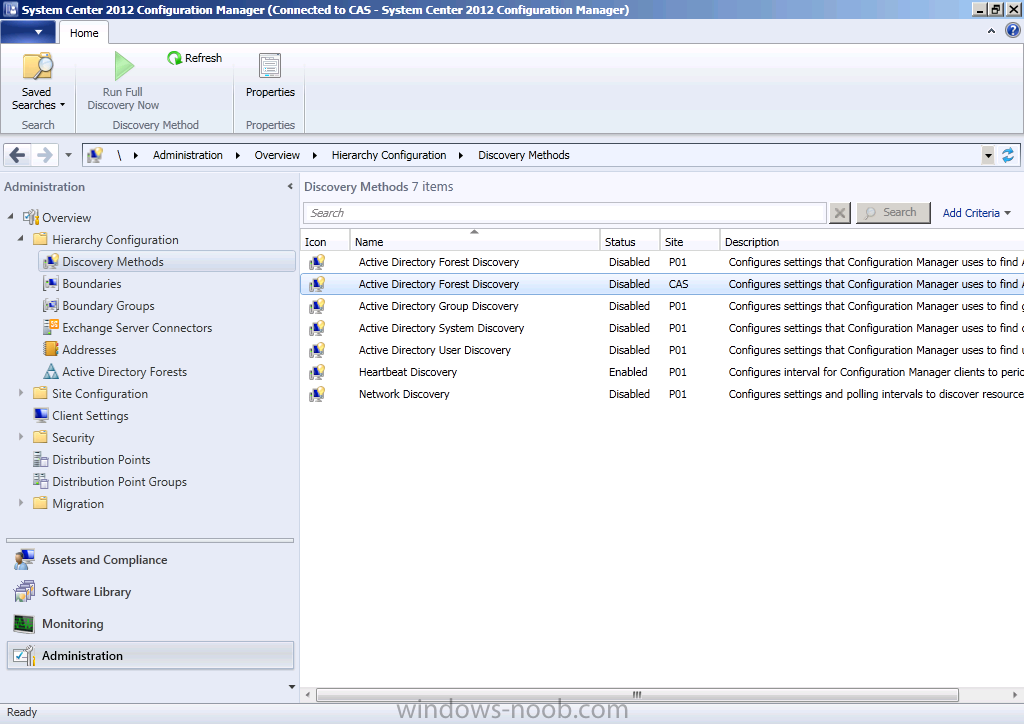
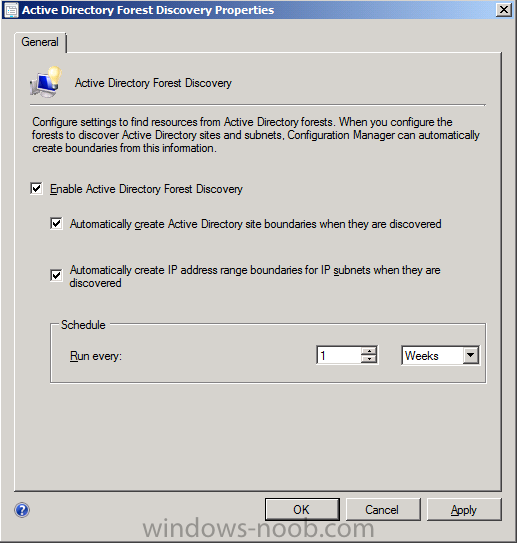
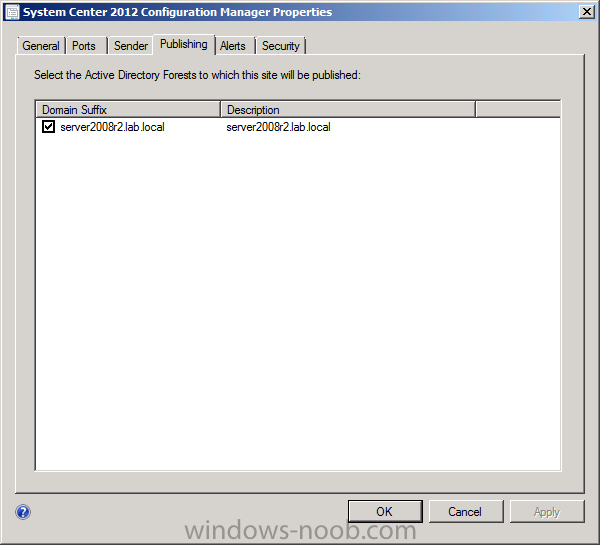
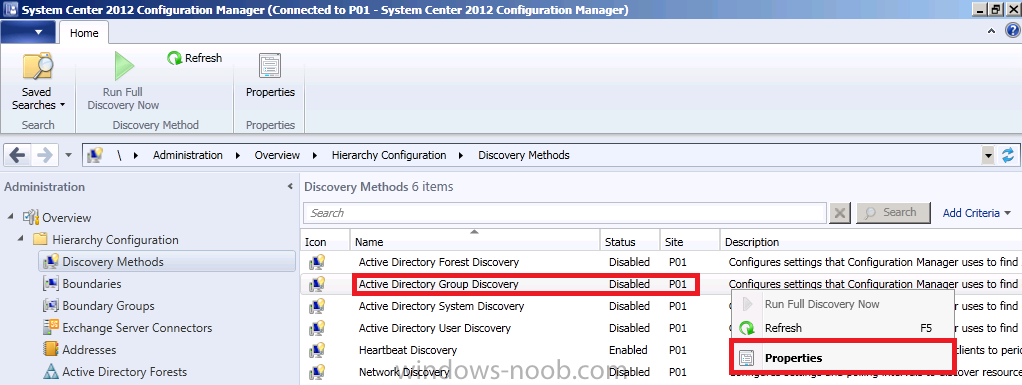
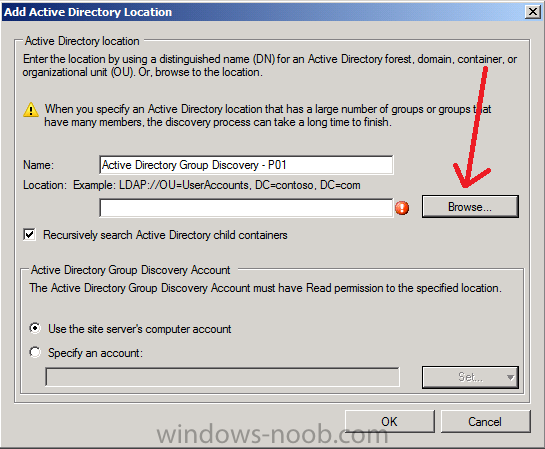
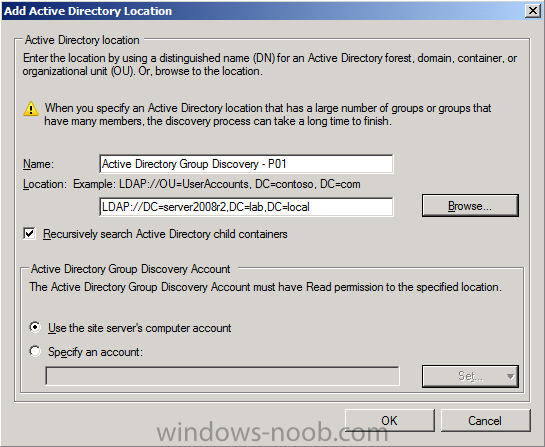
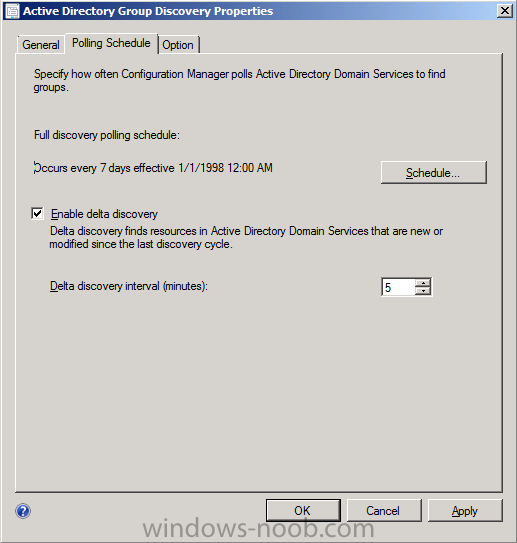
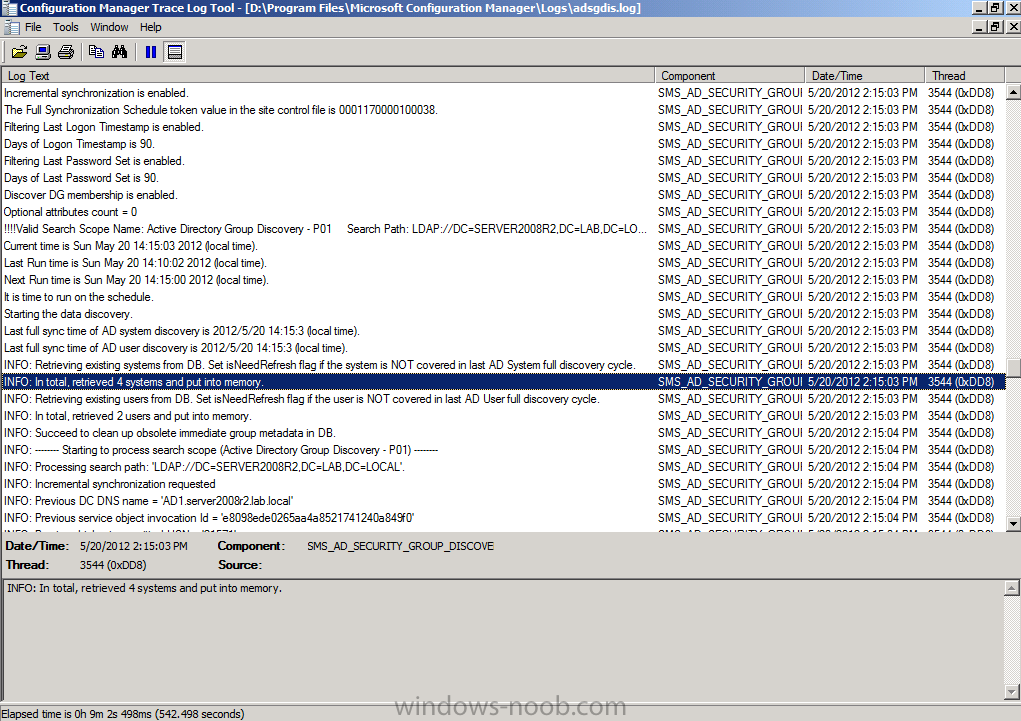
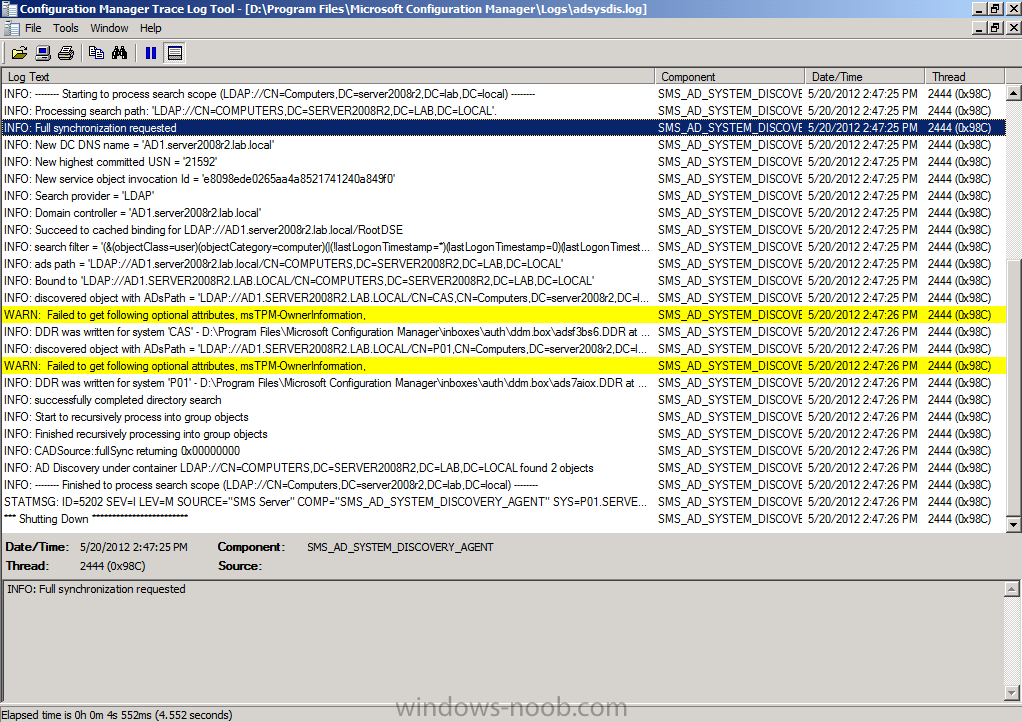
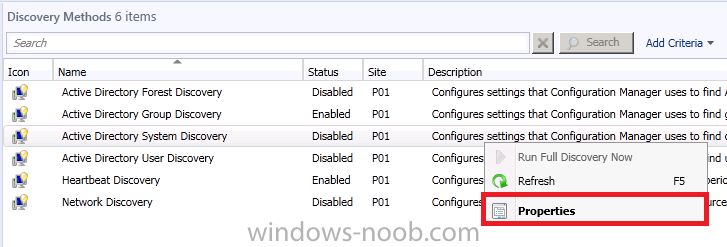
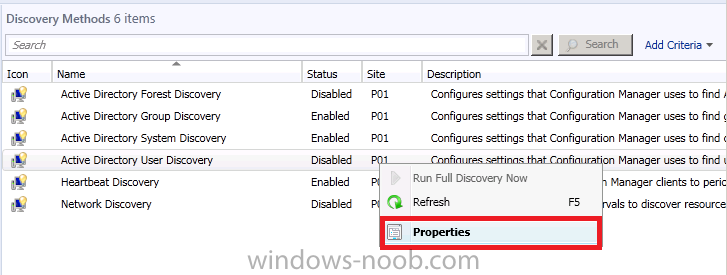
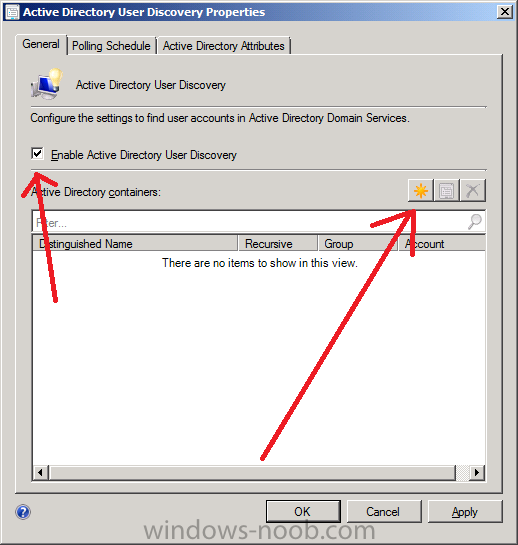
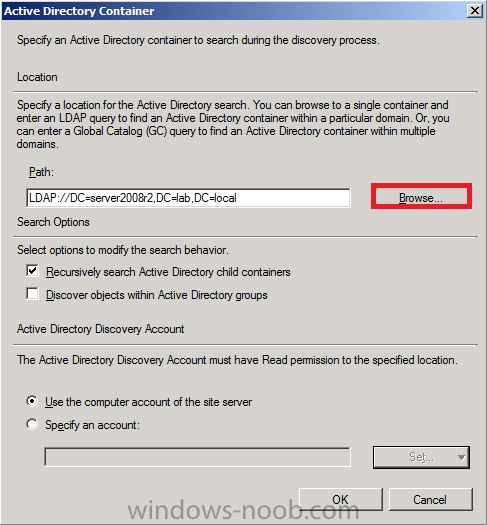
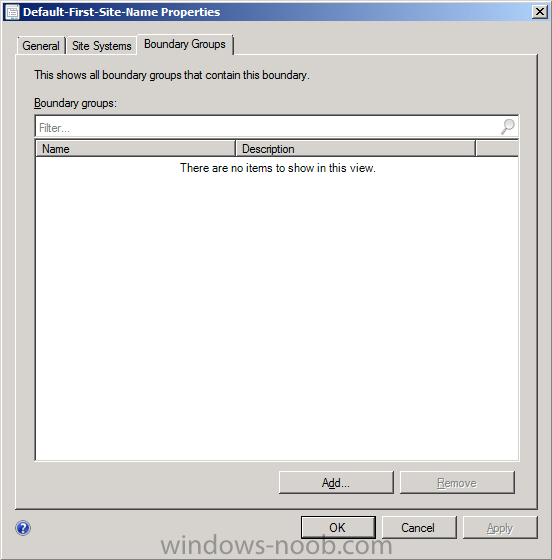
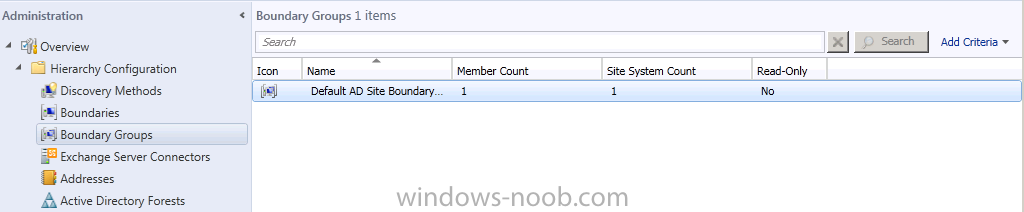
In Part 1 of this series we created our new LAB, we got the System Center 2012 Configuration Manager ISO and extracted it, then copied it to our Active Directory server. We then created the System Management container in AD, delegated permissions to the container, extended the Schema for Configuration Manager. We then opened TCP ports 1433 and 4022 for SQL replication between sites, installed some prerequisites like .NET Framework 4.0, added some features and then downloaded and installed SQL Server 2008 R2 SP1 CU6. We then configured SQL Server using SQL Server Management Studio for security and memory configurations prior to running the Configuration Manager 2012 setup to assess server readiness. Finally we installed a central administration site (CAS). In Part 2 we setup our Primary server with SQL Server 2008 R2 SP1 CU6. We then installed Configuration Manager 2012 on our primary server (P01) and verified that it was replicating to our central administration site (CAS) server. Now we will configure Discovery methods for our Hierarchy and then configure Boundaries and Boundary Groups. Planning for discovery in Configuration Manager Note: Planning for discovery in Configuration Manager is an important step, you need to discover objects that you want to manage (computers/users) so that you can target them with software and/or use client push. Please review the following information on Technet which is summarised below. The discovery types that we will use are listed below:- Active Directory Forest Discovery Active Directory Group Discovery Active Directory System Discovery Active Directory User Discovery System Center 2012 Configuration Manager discovery identifies computer and user resources that you can manage by using Configuration Manager. It can also discover the network infrastructure in your environment. Discovery creates a discovery data record (DDR) for each discovered object and stores this information in the Configuration Manager database. When discovery of a resource is successful, discovery puts information about the resource in a file that is referred to as a discovery data record (DDR). DDRs are in turn processed by site servers and entered into the Configuration Manager database where they are then replicated by database-replication with all sites. The replication makes discovery data available at each site in the hierarchy, regardless of where it was discovered or processed. You can use discovery information to create custom queries and collections that logically group resources for management tasks such as the assignment of custom client settings and software deployments. Computers must be discovered before you can use client push installation to install the Configuration Manager client on devices. Decide Where to Run Discovery When you plan to use discovery in Configuration Manager, you must consider where to run each discovery method. After Configuration Manager adds discovery data to a database, it is quickly shared between all sites in the hierarchy. Because there is no benefit to discovering the same information at multiple sites in your hierarchy, consider configuring a single instance of each discovery method that you use to run at a single site instead of running multiple instances of a single method at different sites. However, periodically it might help assign the same discovery method to run at multiple sites, each with a separate configuration and schedule. This is because at each site, all configurations for a single discovery method are evaluated every time that discovery method runs. If you do configure multiple instances of a single discovery method to run at different sites, plan the configuration of each carefully to avoid having two or more discovery processes discover the same resources. Discovering the same locations and resources at multiple sites can consume additional network bandwidth and create duplicate DDRs for resources that add no value and must still be processed by your site servers. Consider the following when you plan where to run discovery. When you use an Active Directory Discovery method for systems, users, or groups: Run discovery at a site that has a fast network connection to your domain controllers. Consider the Active Directory replication topology to ensure discovery can access the latest information. Consider the scope of the discovery configuration and limit discovery to only those Active Directory locations and groups that you have to discover. Step 1. Enable Active Directory Forest Discovery Note: Perform the following on the Central Administration Site server (CAS) as SMSadmin In the Configuration Manager console, click on Administration and select Hierarchy Configuration, click on Discovery Methods. The first discovery method listed is Active Directory Forest Discovery and this can be enabled on the CAS or Primary site(s), however we want to limit the discovery instances to one, and we also want this discovery method to occur at the top site in our hierarchy so we will enable this discovery method on our Central Administration Site (CAS). Unlike other discovery methods, Active Directory Forest Discovery does not discover resources that you can manage. Instead, this method discovers Active Directory network locations and can convert those locations into boundaries for use throughout your hierarchy. This is a cool new benefit of Configuration Manager 2012. You can use Active Directory Forest Discovery to do the following: Discover IP subnets in an Active Directory forest Discover Active Directory sites in an Active Directory forest Add the IP subnets and Active Directory sites that are discovered as boundaries in Configuration Manager Publish to the Active Directory Domain Services of a forest when publishing to that forest is enabled, and the specified Active Directory Forest Account has permissions to that forest Select Active Directory Forest Discovery for the Site CAS and right click, choose Properties. The General window appears with one option, Enable Active Directory Forest Discovery. Select it and two more choices are revealed: Automatically create active directory site boundaries when they are discovered Automatically create IP address range boundaries for IP subnets when they are discovered. Select both options and leave the default schedule for every 1 weeks. Tip: Selecting both options above is fine in a LAB. In Production however, you should strongly consider only selecting the second option which is IP Address range boundaries.For clarification about this point please review this post from Jason Sandys (Configuration Manager MVP) about why IP Subnet Boundaries are EVIL click Apply and answer yes when prompted to Run a discovery as soon as possible. Click ok to exit that discovery method. You can now see that the Active Directory Forest Discovery method is enabled on our CAS site server. Remember that we mentioned that this discovery method can enable publishing of information to AD ? When publishing is enabled for a forest and that forests schema is extended for Configuration Manager, the following information is published for each site that is enabled to publish to that Active Directory forest: SMS-Site-<site code> SMS-MP-<site code>-<site system server name> SMS-SLP-<site code>-<site system server name> SMS-<site code>-<Active Directory site name or subnet> To verify that you've enabled publishing browse to Administration, Site Configuration, Sites, and check the properties of your CAS site server. Click on the Publishing tab. Step 2. Enable Active Directory Group Discovery Note: Perform the following on the Primary Site server (P01) as SMSadmin Use Configuration Manager Active Directory Group Discovery to search Active Directory Domain Services (AD DS) to identify the group memberships of computers and users. This discovery method searches a discovery scope that you configure, and then identifies the group memberships of resources in that discovery scope. By default, only security groups are discovered. However, you can discover the membership of distribution groups when you select the checkbox for the option Discover the membership of distribution groups on the Option tab in the Active Directory Group Discovery Properties dialog box. When you discover a group, you can also discover limited information about its members. This does not replace Active Directory System or User Discovery and is usually insufficient to build complex queries and collections or serve as the bases of a client push installation. Use Active Directory Group Discovery to discover the following information: Groups Membership of Groups Limited information about a groups member computers and users, even when those computers and users have not previously been discovered by another discovery method On our Primary server (P01) right click on Active Directory Group Discovery and choose properties. Select the option to Enable Active Directory Group Discovery and click on Add to see two more choices, Groups and Location. Location: Use a location if you want to search one or more Active Directory containers. This scope option supports a recursive search of the specified Active Directory containers that also searches each child container under the container you specify. This process continues until no more child containers are found. Groups: Use groups if you want to search one or more specific Active Directory groups. You can configure the Active Directory Domain to use the default domain and forest, or limit the search to an individual domain controller. Additionally, you can specify one or more groups to search. If you do not specify at least one group, all groups found in the specified Active Directory Domain location are searched. Note: When you configure a discovery scope, select only the groups that you must discover. This is because Active Directory Group Discovery attempts to discover each member of each group in the discovery scope. Discovery of large groups can require extensive use of bandwidth and Active Directory resources. Select Location from the drop down menu. Give it a name like Active Directory Group Discovery - P01 and select browse to decide where to recurisively search. Now you get to select a container, in our LAB we have nothing interesting to select, but in production you probably have your Active Directory Security Groups neatly organised in specific containers, in that case select the top most container that contains your Active Directory Security Groups to narrow your search criteria. review your choices and click ok when you ready. Click on the Polling schedule tab and decide what is appropriate for your setup, the default is 7 days for a full Active Directory Group Discovery and you can enable Delta Discovery (enabled by default). This discovery method finds resources in Active Directory Domain services that are new or modified since the last discovery cycle in the time interval specified (default is 5 minutes). and select the Option tab, select all three options if appropriate. click Apply and when asked about running a full discovery as soon as possible click yes. The Active Directory Group Discovery method is now enabled on site P01. Tip: If you want to review what is happening in realtime in relation to this discovery method, you can review the adsgdis.log file on D:\Program Files\Microsoft Configuration Manager\Logs folder. Step 3. Enable Active Directory System Discovery Note: Perform the following on the Primary Site server (P01) as SMSadmin Use Configuration Manager Active Directory System Discovery to search the specified Active Directory Domain Services (AD DS) locations for computer resources that can be used to create collections and queries. You can then install the client to discovered computers by using client push installation. To successfully create a discovery data record (DDR) for a computer, Active Directory System Discovery must be able to identify the computer account and then successfully resolve the computer name to an IP address. By default, Active Directory System Discovery discovers basic information about the computer including the following: Computer name Operating system and version Active Directory container name IP address Active Directory site Last Logon Timestamp Right click Actve Directory System Discovery and choose Properties Place a checkmark in Enable Active Directory System Discovery and click on the yellow starburst to add some Active Directory containers. For path click on browse and browse to the container you want to discover systems in, in production you'd probably have your computers moved from the default Computers container to a custom container. Tip: You can add several containers by repeating this process and selecting different containers, but only add the containers you need to add as you don't want to generate un-needed network and cpu bandwidth. On the Polling schedule tab, stick to the defaults and then select the Active Directory Attributes tab, if you want to add an attribute to discover select one from the list and choose Add >> in the example below i'm adding an Active Directory attribute called msTPM-ownerinformation. There are many attributes to choose from, use only the ones you need to get your job done. click on the Option tab and select the options listed and click Apply and Ok and answer Yes to run a full discovery as soon as possible. Tip: At this point you can monitor the Active Directory System Discovery in the adsysdis.log file in D:\Program Files\Microsoft Configuration Manager\Logs folder. You can see when it writes DDR's by looking for the following line where XXX is some computername. Step 4. Enable Active Directory User Discovery Note: Perform the following on the Primary Site server (P01) as SMSadmin Use Configuration Manager Active Directory User Discovery to search Active Directory Domain Services (AD DS) to identify user accounts and associated attributes. You can view the default list of object attributes returned by Active Directory User Discovery, and configure additional attributes to be discovered in the Active Directory User Discovery Properties dialog box on the Active Directory Attributes tab. By default, Active Directory User Discovery discovers basic information about the user account including the following: User name Unique user name (includes domain name) Domain Active Directory container names Right click Actve Directory User Discovery and choose Properties select the Enable Active Directory User Discovery box and click on the yellow starburst to add some active directory containers to search for users browse to the location in AD where you want to discover users, you can repeat this process to add several containers if you wish You can configure the Polling tab and Active Directory Attributes tab settings if you wish, then click apply and answer yes to Run a Full Discovery now. Tip: At this point you can monitor the Active Directory System Discovery in the adusrdis.log file in D:\Program Files\Microsoft Configuration Manager\Logs folder. Step 5. Configure Boundaries and Boundary Groups Note: Perform the following on the Primary Site server (P01) as SMSadmin In System Center 2012 Configuration Manager, a boundary is a network location on the intranet that can contain one or more devices that you want to manage. Boundaries can be an IP subnet, Active Directory site name, IPv6 Prefix, or an IP address range, and the hierarchy can include any combination of these boundary types. To use a boundary, you must add the boundary to one or more boundary groups. Boundary groups are collections of boundaries. By using boundary groups, clients on the intranet can find an assigned site and locate content when they have to install software, such as applications, software updates, and operating system images When clients are on the Internet, or they are configured as Internet-only clients, they do not use boundary information. These clients cannot use automatic site assignment and always download content from any distribution point in their assigned site when the distribution point is configured to allow client connections from the Internet. Boundaries are no longer site specific, but defined once for the hierarchy, and they are available at all sites in the hierarchy. Each boundary must be a member of a boundary group before a device on that boundary can identify an assigned site, or a content server such as a distribution point. You no longer configure the network connection speed of each boundary. Instead, in a boundary group you specify the network connection speed for each site system server associated to the boundary group as a content location server. As we want our resources to use Automatic Site Assignment and Content Location we will configure our boundaries. This is quite easy for us as Active Directory Forest Discovery has already created a boundary for us to use, our Active Directory Site. In production you'll probably have several subnets and ip ranges listed in here, and that's a good thing as you didn't have to enter them manually. right click on our Default-First-Site-Name (active directory default name..) and choose properties, This boundary was added automatically via Forest discovery so we don't need to change it, however we do want to add it to a Boundary Group so that we can use it. Click on the Boundary Groups tab, it will appear empty and clicking on the Add button will show you an empty list, that tells you that you need to create a boundary group, so close the Boundary Properties window. Click on Boundary Groups and select Create Boundary Group in the ribbon. when the Create Boundary Group wizard appears, fill in some useful details and click on Add to add our boundary to our boundary group Tip: To make it easier to visualize where boundary groups are (for later exercises) you could make the name descriptive of the Geographical location, eg: change the name of the boundary group to Skane, Sweden, Europe, another boundary group could be Paris, France, Europe and so on. the Add Boundaries window appears, select our AD site name and click ok next click on the References tab, in here you have two main options, Automatic Site Assignment Content Location Note: When you plan for boundary groups, consider creating one set of boundary groups for content location and a second set of boundary groups for automatic site assignment. This separation can help you avoid overlapping boundaries for site assignment. When you have overlapping boundaries and use automatic site assignment, the site to which a client is assigned, might be to is nondeterministic. As we only have a LAB we will use both Automatic Site Assignment and Content Location in our boundary group, select the checkbox beside Use this boundary group for site assignment and you can pick an assigned site from the drop down menu. (we only have one primary so it's the only one listed, if you have more than one primary they will be listed in the drop down menu). Next we will configure Content Location for this Boundary Group, click on Add and place a checkmark in our site system that is listed. This will associate this site system with our boundary group. Click ok, apply and ok. All Done. Our boundary group is defined and our boundary has been added to it to verify this double click on our boundary and review it's properties, then click on the Boundary Groups Tab, this time you'll see our Boundary Group is listed. By doing the above we have defined which site our clients get assigned to via Automatic client assignment and we have defined their content location. In the next part of this series, we will add the Application Catalog roles and configure and then deploy Custom Client Device settings and Custom Client User Settings.


-
HP Proliant Deployment Task Sequence and RebootStep Variable
anyweb replied to djcampbell's question in Deploy Server 2008 R2
hi Doug can you please post a screenshot or two of the steps in your task sequence that you are referring to, plus post the smsts.log file as an attachment -
it's best practise to apply drivers as part of the Deploy Task Sequence, you can use WMI queries to detect hardware and apply driver package steps to apply the correct drivers to the correct hardware. Having drivers in your captured image is not a good idea.
-
SCCM 2012 Sporadic Client Installation
anyweb replied to afilla's topic in Configuration Manager 2012
that's not a good sign indeed, do you have more from the log where it actually tries to copy these files ? -
Compatible Frontends / HTAs for SCCM 2012
anyweb replied to BzowK's topic in Configuration Manager 2012
i would image that any of the current HTA's would work with minor modifications for ConfigMgr 2012, and MDT 2012 integrated, have you tried any yet Ben apart from Rons tools (which I havn't tried) ? -
yes, if you want to capture a 64 bit OS you need a 64 bit boot image, it will complain otherwise. however, you can then deploy that captured image using a 32 bit boot image (x86)