


anyweb
-
Posts
9259 -
Joined
-
Last visited
-
Days Won
371
Everything posted by anyweb
-

Windows 10 deployment via WDS in VM
anyweb replied to ONeill's question in Deploying Windows 10, Windows 8.1, Windows 7 and more...
thanks for updating the post with the solution. -
Multiple issues related to XML processing: Application bundles returning error 87 Selecting a keyboard locale in the Deployment Wizard Deployments failing due to Unattend.xml errors ZTIPatches returning error "Object required (424)" Cleanup after image capture doesn't remove LTIBootstrap entry which should cover the error above (which i've removed from the post), so, make sure that after you've updated the version that you also update the new packages to your distribution points otherwise they'll still be using the old source.
-
it shouldn't be needed anymore, please verify.
-
first line shows that it's complaining about your xml file, have you tried importing the same XML file on that computer using the powershell cmd, if so what happens ?
-
what does your smsts.log file tell you about the step ?
-
do you have any other distribution points enabled for PXE ?
-
have you seen this yet ? http://www.windows-noob.com/forums/index.php?/topic/4683-using-sccm-2012-rc-in-a-lab-part-12-updating-an-operating-system-image-using-offline-servicing/
-
Windows 10 OSD & mouse/keyboard/F8 issues
anyweb replied to TimLancer's topic in Configuration Manager 2012
you didn't say what version of ConfigMgr you are using, and/or when exactly you are pressing F8, does the SMSTS.log file reveal the keypress (it should) -
I just reused a previous serviceUI.exe step so yes if you want to call it overly complex, you can, and yes it can be simplified, however, it does work and that's the point :-) I'll take a look at the IE shortcut suggestions, cheers
-
hi yes it just copies the file, however the script does use the 'proper' powershell cmdlet for doing so, so in that respect you could say it's supported, but it's entirely up to you which way to use
-
hi Con I havn't tried it using the ICD yet, if i do and if i see a need i'll post an update here cheers niall
-
two suggestions for you, use offline servicing to patch the wim instead or build the reference image using MDT 2013 which shouldn't suffer from the same issues.
-
PXE time issue after r2 sp1 upgrade
anyweb replied to joeman1881's topic in Configuration Manager 2012
it is NOT resolved in Cu1, maybe CU2. -
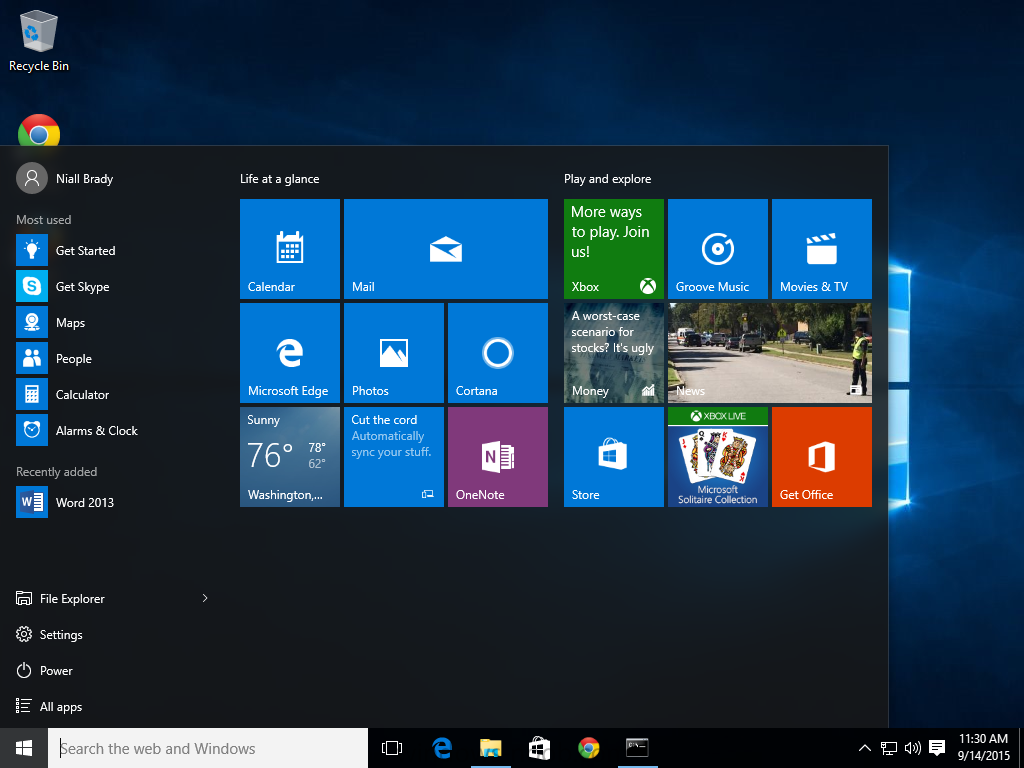
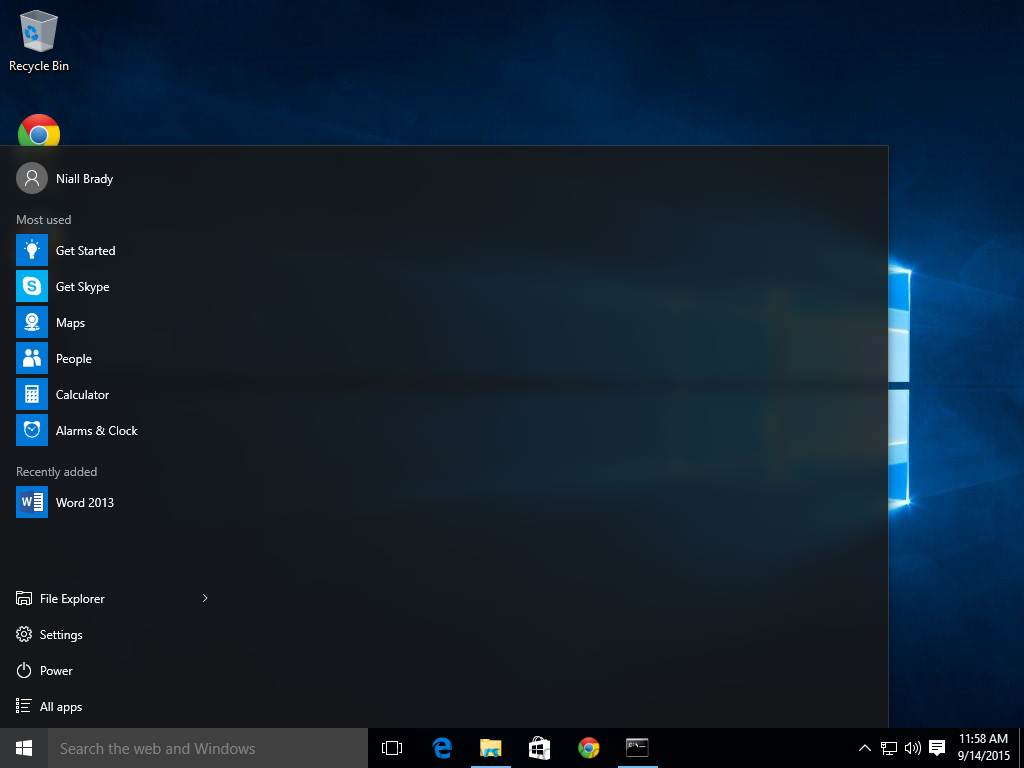
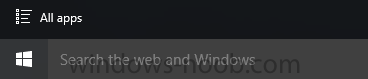
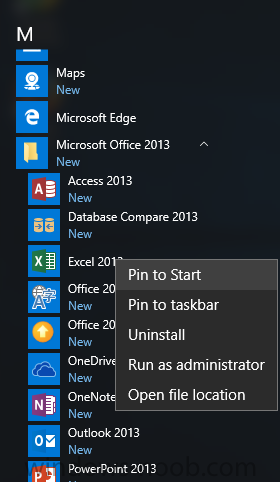
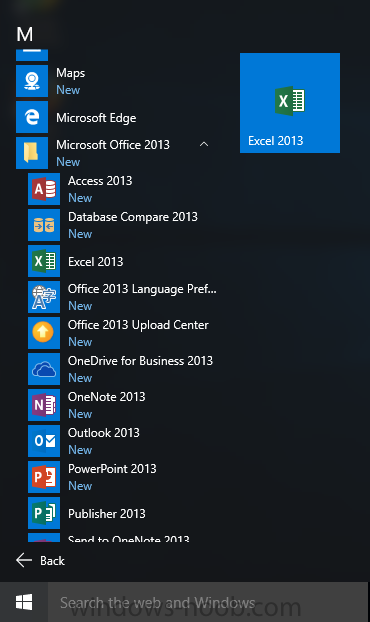
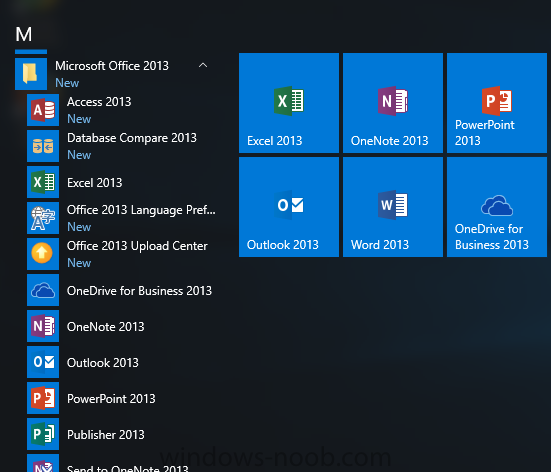
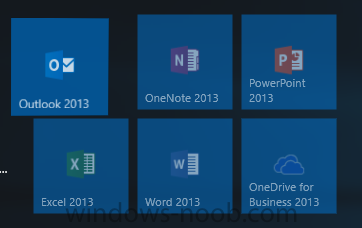
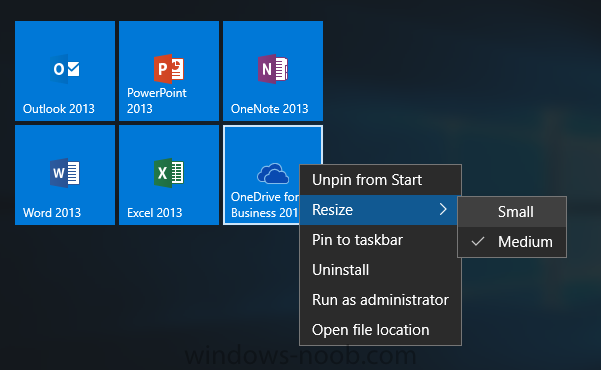
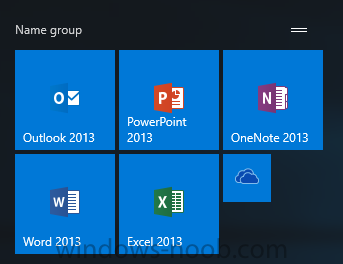
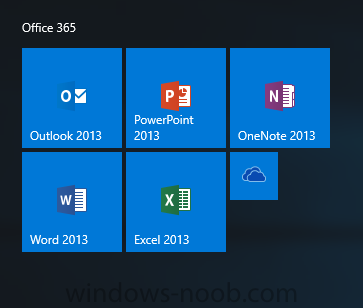
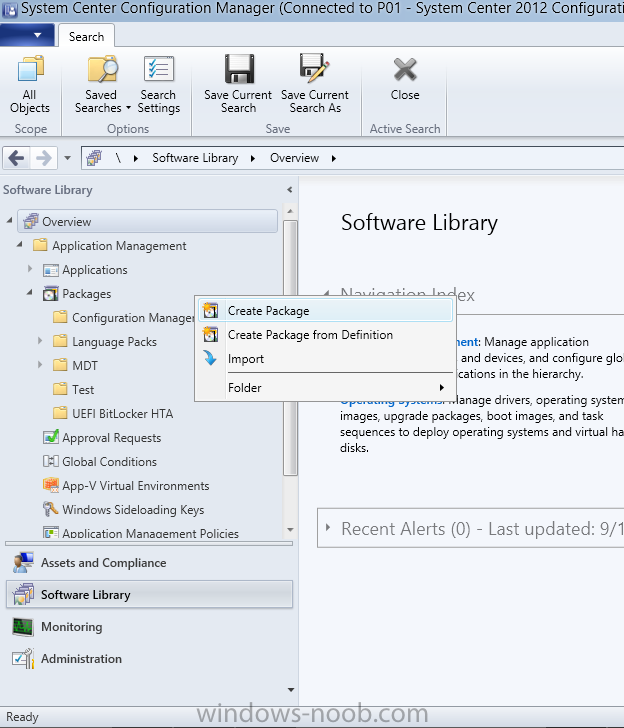
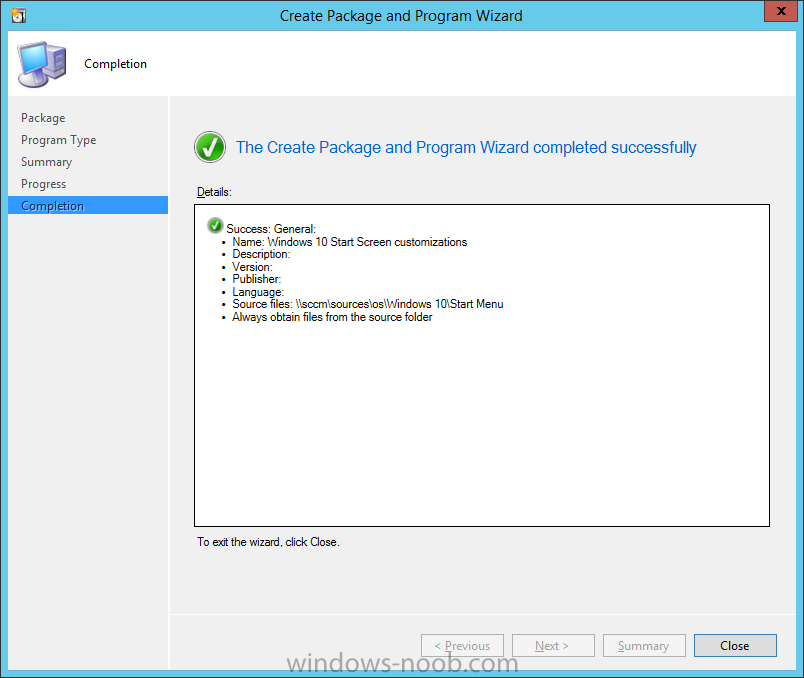
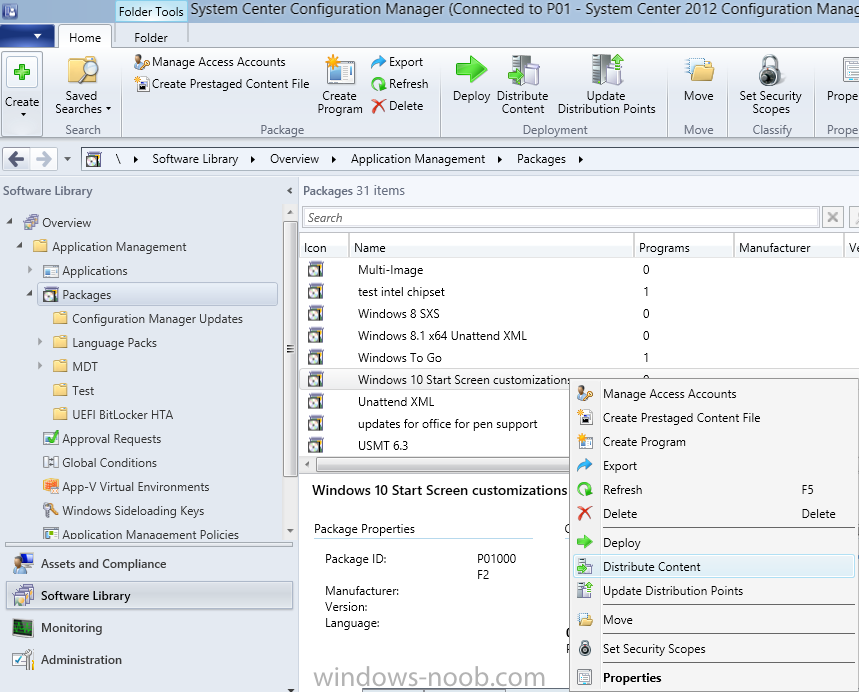
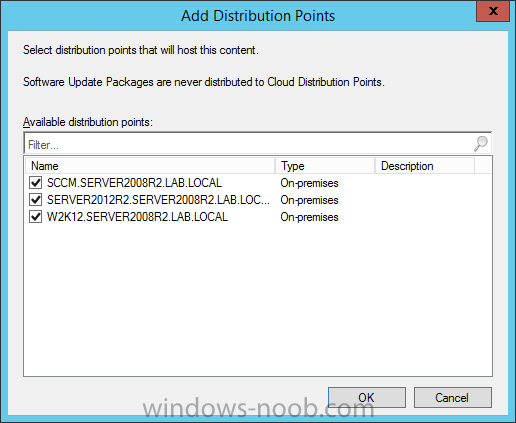
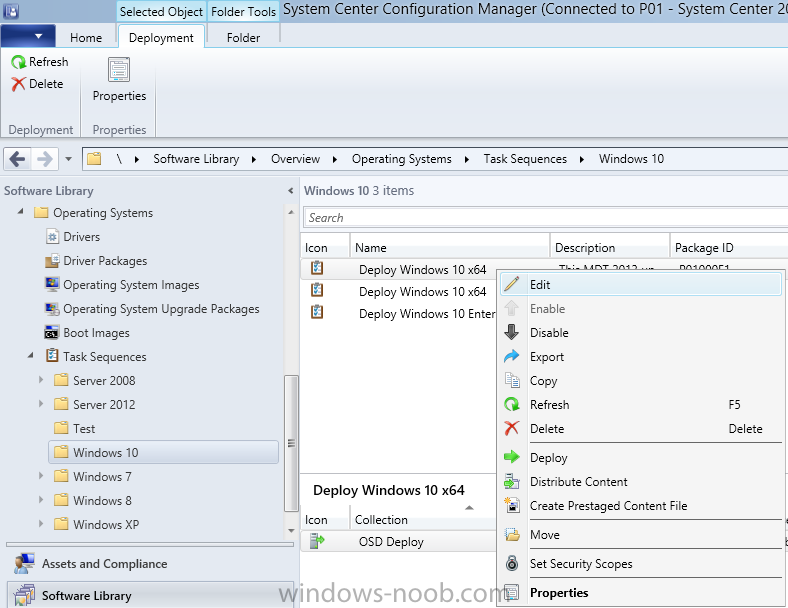
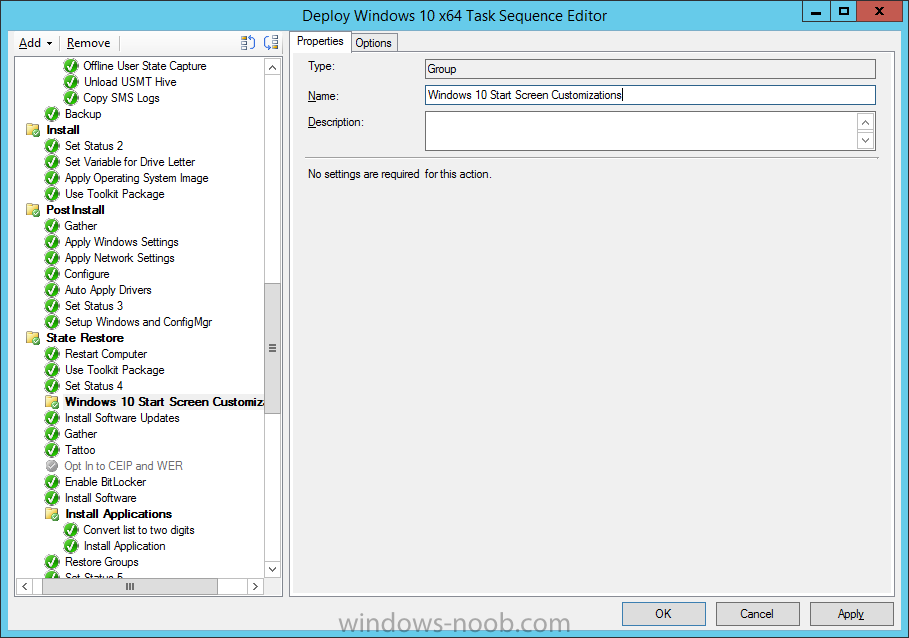
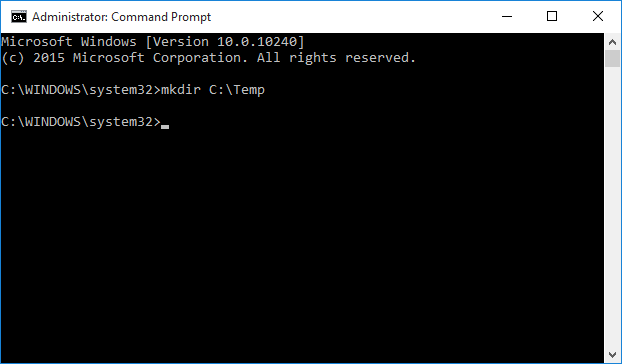
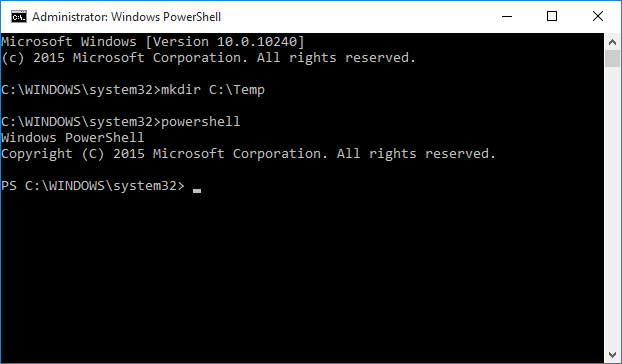
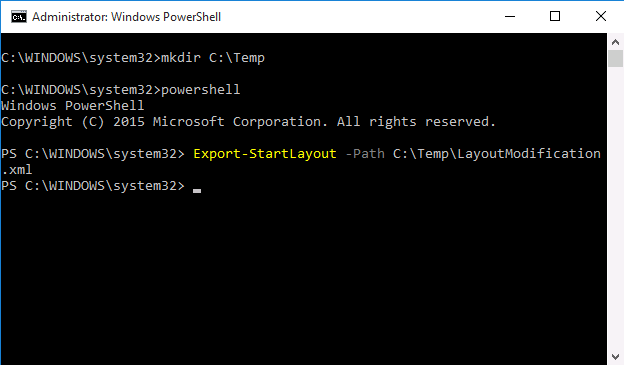
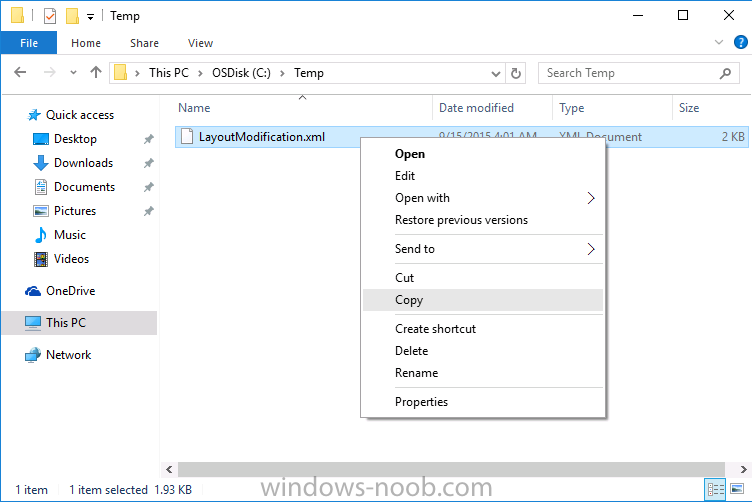
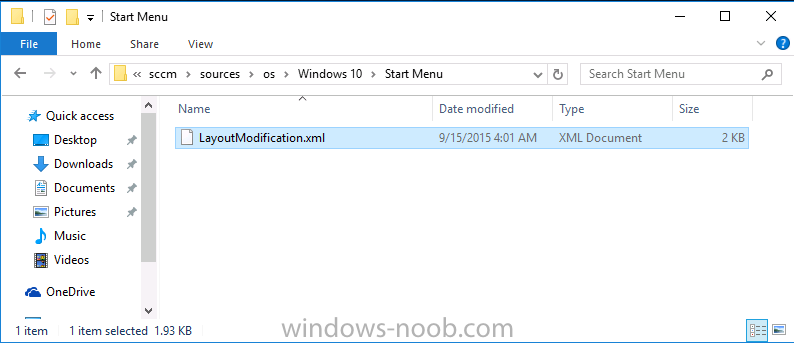
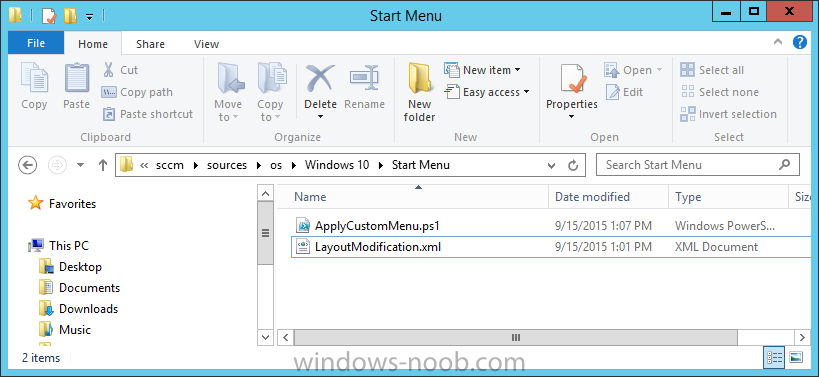
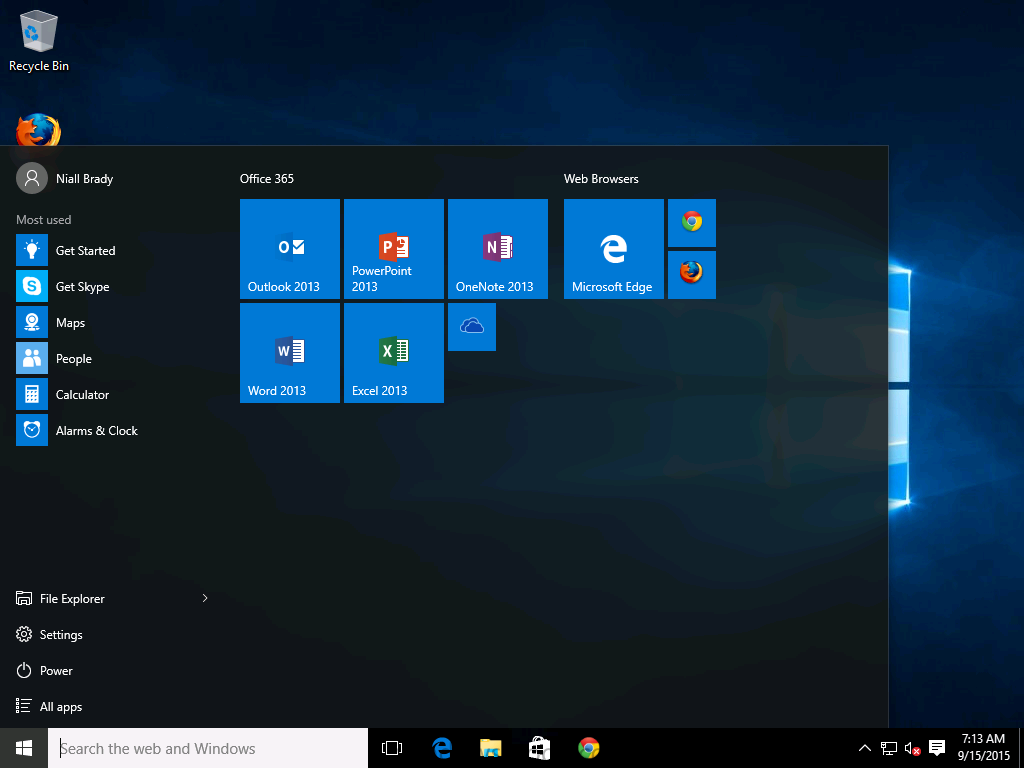
Introduction In previous posts I showed you how you can upgrade to System Center 2012 R2 SP1 Configuration Manager and how to Deploy Windows 10 x64 Enterprise. In this post I'll explain how you can customize the Windows 10 start menu for use during a task sequence deployment using an MDT 2013 update 1 integrated task sequence. You could use active directory Group Policy (Administrative Templates\Start Menu and Taskbar\Start Menu Layout) or other methods to do this however this method works very nicely and is easy to implement. I'll cover customizing the taskbar in a separate post. Note: I've noticed that Internet Explorer doesn't show up even though pinned to start. Perhaps it's a way of discouraging usage of same in favor of Microsoft Edge. Step 1. Review a standard Windows 10 start menu Using a Windows 10 virtual machine that was previously built (with apps you intend to use in your organization), log in and review the start menu before any customization's are performed. In the screenshot below there are three columns in the start menu. The left column is where Windows informs you about things it thinks you should know such as recently installed applications or most used apps. In addition you have some standard actions available. The second and third columns contain tiles (boxes) which can be live or not. Live tiles update themselves with (for example) photos, or news snippets depending on the application. Tiles can be resized as small medium wide large but those resize options can vary depending on what type of tile it is. In addition to the columns there group names so that you can group tiles of similar nature together (for example Microsoft Office) and give them an appropriate group name (Office 365). Step 2. Customize the Windows 10 start menu Now that you have familiarized yourself with the Windows 10 start menu it's time to make it look the way you want but before you do understand what is allowed or not. On Windows 10 for desktop editions, the customized Start works by: The OS performs level checks to determine the chosen base default layout, such as the desktop edition and whether Cortana is supported for the country/region. The OS reads the LayoutModification.xml file and only allows groups to be appended to Start. The groups have the following constraints: 2 groups that are 6 columns wide, or equivalent to the width of 3 medium tiles. 2 medium-sized tile rows in height. The OS ignores any tiles that are pinned beyond the second row. No limit to the number of apps that can be pinned. There is a theoretical limit of 24 tiles per group (4 small tiles per medium square x 3 columns x 2 rows). Remove some tiles To customize the start menu, logon as a user with administrative credentials on that machine. You can begin by removing any tiles that you do not want appearing in the finished menu. To do that, right click on a tile you want to remove and choose Unpin from Start. Repeat as necessary until you've removed all the tiles you do not want to appear in your finished start menu. After removing a bunch of tiles your start menu can look totally empty or at least different to the way it looked in the beginning. In my screenshot below I've removed all tiles from the start menu so it is effectively a blank slate. Add some Tiles Next, it's time to add back some colour to your start menu, start with a bunch of apps you'll be using in your organization and try and group the tiles in a way that you think your users will use often. To add a tile, click on All Apps in the bottom left corner to see all the applications installed on this computer. Keep in mind that you need to install whatever apps you intend to offer in your organization prior to this customization. In the list of applications browse to the group that interests you and select an app, right click the app and choose Pin to Start. Once done, the application will appear in it's own tile in the first available column. Repeat as necessary adding a bunch of apps that you want made into a group. Reposition tiles Next grab a tile (by selecting a tile, left clicking and holding the mouse button down) that you want to move and move it to the location you want it to appear, when happy, release the mouse button. Resize tiles Once you are happy with the order you might want to resize one or more tiles, to do so, right click a tile and choose from the sizes available. Repeat as necessary. Name groups of tiles Now that you've created a group of tiles, give the group a name. To name a group simply point the mouse cursor to the top of a group of tiles and Name Group (or a previous group name) will appear, click anywhere in the text to enter in a new group name. After naming a group, you can see the results immediately. And after you are done customizing the start menu you can review your work. Awesome. Step 3. Export the custom menu using PowerShell Now you are ready to capture the customizations using PowerShell. To do so fire up an Administrative cmd prompt and type the following command to store our custom xml files. mkdir C:\Temp Next we need to start PowerShell, do so by typing the following command powershell At the PowerShell cmd prompt, type the following Export-StartLayout -Path C:\Temp\LayoutModification.xml Tip: If you get access denied errors, make sure you are logged in as a user with Administrative permissions on the computer (not just an administrative command prompt), or specify a folder that you have appropriate access to. Step 4. Copy the XML file to ConfigMgr sources Using an account that has permissions adequate to write a file to your Configmgr sources structure, on the Windows 10 machine with the custom start menu browse to the C:\Temp folder, select the LayoutModification.xml file and choose copy. Paste the file into your ConfigMgr sources into a suitably named folder structure (eg: \\sccm\sources\os\Windows 10\Start Menu) such as below Step 5. Download a PowerShell script Download the following PowerShell script (in a ZIP archive) ApplyCustomMenu.zip extract it and copy the extracted script into the folder structure created above. Step 6. Create a Package To deploy the changes to new Windows 10 machines during OSD, you need to make the file above available via a package. In the Configuration Manager console, select software library then applications and right click on Packages. Choose Create Package. give the package a suitable name such as Windows 10 start screen customizations and point the data source to the folder where you copied the xml file above Choose Do not create a program and continue through the rest of the wizard until completion. Step 7. Distribute the package To distribute this package right click and choose Distribute Content this will make the content available to computers being imaged from selected distribution points. On the content destination screen, click add then select any distribution points you want to make this available to. continue through the wizard until completion. Step 8. Edit a Deploy Windows 10 task sequence In a previous post you learned how to deploy Windows 10, in this guide you will edit that task sequence to include the custom start menu. In the Configuration Manager console browse to Software Library, Operating Systems and select Task Sequences, locate your Windows 10 task sequence, right click it and choose edit. Scroll down to a section that occurs after Set Status 4, select Add, select New Group and give it a name like Windows 10 Start Screen Customizations. Next select the Add dropdown, select General and choose Run Command Line, paste in the following command. cmd.exe /c copy LayoutModification.xml C:\Windows\Temp & %deployroot%\tools\x64\ServiceUI.exe -process:TSProgressUI.exe %SYSTEMROOT%\System32\WindowsPowerShell\v1.0\powershell.exe -NoProfile -ExecutionPolicy bypass -File "ApplyCustomMenu.ps1" give the step a suitable name like Import Customized start menu and make sure to select the previously created Windows 10 Start Screen customizations package so that it can reference the content correctly as shown here Apply the changes and close the task sequence editor. Step 9. Deploy a new Windows 10 machine To review the changes, deploy a new Windows 10 computer Once it is complete, logon and you'll see the customized start menu in action. Job done ! Yes I know the Internet Explorer icon is missing, see the note at the top of the page. Note that the customized xml file above is copied to the default profile path listed below: C:\Users\Default\AppData\Local\Microsoft\Windows\Shell Remember that your newly deployed Windows 10 machines start menu will only show pinned tiles that are installed. Recommended Reading How can I deploy Windows 10 Enterprise x64 with MDT 2013 Update 1 integrated with System Center 2012 R2 SP1 Configuration Manager ? How can I upgrade to System Center 2012 R2 SP1 with MDT 2013 update 1 integrated ? Start layout for Windows 10 desktop editions Well that's all, until next time, cheers niall


-
OSD & PXE: BIOS/UEFI and SecureBoot
anyweb replied to surfincow's topic in Configuration Manager 2012
and you are absolutely sure the boot image (x64) is enabled for PXE boot ? -
OSD & PXE: BIOS/UEFI and SecureBoot
anyweb replied to surfincow's topic in Configuration Manager 2012
do you have both x64 and x86 boot images on the dp and enabled for PXE ? -
getting an error when trying to import Windows 10 in to MDT
anyweb replied to jonald0709's question in Microsoft Deployment Toolkit (MDT)
are you using Windows ADK 10 and MDT 2013 Update 1? -
Can't add boot image (2012 R2 SP1 with ADK10)
anyweb replied to tps10's topic in Configuration Manager 2012
do you have any antivirus exclusions on the folders been used by dism ? -
no I would upgrade it this way, run all steps on the CAS and once you've verified all is good, start on PRI1, PRI2 and so on. Do make sure to run the testdbupgrade on a COPY of the database backup. good luck and let us know how it goes for you
-
Already well known and respected for their simple, powerful, and reliable backup software, Altaro Software, has released the next major version of their backup application. In today’s changing IT landscape, multi-hypervisor deployments are becoming more and more common. With changing capabilities and ever different pricing structures, IT administrators are always on the lookout for technologies that provide new improved functionality and also provide cost savings measures. As a result many administrators are finding themselves in environments that contain both Hyper-V and VMware based workloads. As is the case with any production workload, the data associated with that service or business needs to be protected, and that can become difficult in multi- hypervisor deployments in the event that the current backup solution in place is targeted at one platform or the other. Historically Altaro Software’s backup application was targeted primarily at Hyper- V based workloads, but with the version 6 release of their software, support for VMware’s vSphere platform has been added as well. So, in those situations where you have a multi-hypervisor deployment, Altaro VM Backup has you protected. If you’ve used Altaro’s backup products in the past, you’ll notice that the name has changed to reflect the expanded platform support. The product is no longer known as “Altaro Hyper-V Backup”. It is now just simply, “Altaro VM Backup”. It’s not just a name change and a couple of software bits that are different though. Altaro has really pulled out all the stops when it comes to providing backup services to VMware customers. There is complete feature parity in providing backups between each platform. Regardless of target hypervisor you get all the same great benefits of Altaro VM Backup. That includes things like full VM and granular recovery. It provides full cluster support and offsite backup with WAN acceleration. Also included are some truly great advanced features such as in-application chat support and sandbox verification features to make sure those protected workloads are actually valid. Many administrators are so focused on getting successful backups of their workloads that they often forget about the other major part of a backup plan: RECOVERY! If you can’t recover from a backup, it doesn’t do much good does it? Altaro VM Backup provides a testing mechanism in which the application will actually conduct a test restore in an isolated state, verify that the workload is bootable, and then notify you if any issues are encountered. It’s this type of reliable, simplistic approach that makes Altaro VM Backup so Great. The application was designed to be simple to use, yet still powerful, reliable and feature-rich. Backups can quite literally be setup in just a couple of clicks, and the installation of the application is extremely simple as well. Additionally if you do manage to run into issues of some kind, Altaro’s world-class tech support is only a couple of clicks away. The application features in-app chat support to provide one additional avenue for getting your issues resolved in a timely manner by a support team that has made it their mission to provide the best customer service possible in the backup and recovery space. Pricing and licensing is also a large differentiator between Altaro Software and its competition. Most of Altaro’s competitors license their products based on the number of CPU sockets in the target host(s). Altaro doesn’t believe in hindering businesses for having more CPUs in their hypervisors. So, this is why Altaro VM backup is licensed per physical host that is being protected and not per socket. You don’t have to worry about the number of sockets in your host when placing an order. In addition to the paid version, a full-featured, 30-day trial is available for download here , in the event that you want to test it inside of your organization. On top of that, once the 30 day trial ends, the product is still able to protect up to two virtual machines for free on that host! This provides great value and gives you a chance to meaningfully test the product before committing to a purchase. If you’d like to learn more, be sure to check out the webpage at http://www.altaro.com and the Hyper-V Hub for great tips and howtos in the world of Microsoft virtualization. Disclaimer: The article is from a windows-noob recommends partner.
-
ok good point, i'll add a note about it, although i'd also say i'd recommend not separating the SQL server.
-
do you mean your DB is remote to the primary ?
-
i'd go with windows 8.1 with update which can support hyperv Gen 2 vm's, or if you are adventurous use Windows 10 which can do the same thing, also consider upgrading to 16gb of ram. cheers niall
-
yes, it's even mentioned in the official FAQ. Are the files on the Microsoft Evaluation Center suitable for use in production? Yes. You can transition from a product evaluation to a full version of the product by using Site Maintenance and entering your existing product key.
-
while it's not needed, it's always a good idea to consider it, here's my upgrade guide for your information in case you missed it. http://www.windows-noob.com/forums/index.php?/topic/12852-how-can-i-upgrade-to-system-center-2012-r2-sp1-with-mdt-2013-update-1-integrated/
