anyweb
-
Posts
9255 -
Joined
-
Last visited
-
Days Won
371
Everything posted by anyweb
-
if you have 300 servers to setup then why are you not using MDT 2012 or System Center 2012 Configuration Manager ? there may be some tftpd registry settings that you can configure have you checked..
-
if you mean to upgrade the os from Windows 7 to Windows 8 then no upgrade is not supported, but you can migrate from Windows 7 to Windows 8 using Configuration Manager 2012 Service Pack 1 with User State Migration Tool for Windows 8 which is included in the Windows ADK
-
sounds like the systems are processing other policies (windows updates perhaps ?) before getting the fep policy.. does that sound right ?
-

Windows 7 with Bitlocker deployment
anyweb replied to P@docIT's question in Deploying Operating Systems
here you go... http://www.windows-noob.com/forums/index.php?/topic/6451-how-can-i-pre-provision-bitlocker-in-winpe-for-windows-8-deployments-using-configuration-manager-2012-sp1/ -
good point it's not for every client, it's just for the Configuration Manager servers to replicate data between each other - I've edited the post to clear that up and suggested that you target the GPO to an OU where you've placed your Configuration Manager servers.
-
are you referring to Wake Up on Lan ? if so are you using any OOB features ?
-
using SCCM 2012 in a LAB - Part 6. Deploying Software Updates
anyweb replied to anyweb's topic in Configuration Manager 2012
as it's a build and capture collection it can be empty (no membership rules) you can add computers to that collection using a direct membership rule later or by using computer association. the limiting collection can be All systems or all windows 7 computers, it's up to you. -
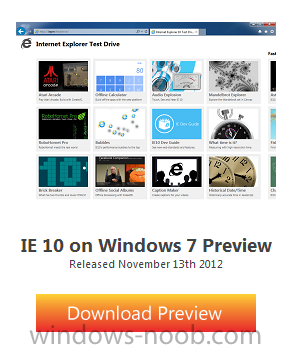
As I've noted in this blog several times over the past couple years, I have become a devoted Google Chrome user because Internet Explorer 9 on my Windows 7 PC is not up to snuff. Yes, I have tried just about everything imaginable to fix this. I've disabled all add-ons. I've reinstalled the browser. I've called in the big guns from Microsoft, ZDNet and other shops to try to provide help. Nothing made IE9 running on Windows 7 on my UL30A laptop from ASUS run acceptably. In spite of all of Microsoft's benchmarks and claims to the contrary, Chrome starts up, opens sites faster and hangs less than IE9 on my current PC. I am willing to see if IE10 will work any better on my current Windows 7 laptop. So I am downloading the new preview build -- the first Microsoft has released for IE10 for Windows 7 in over a year. Here's the download link for the latest IE10 for Windows 7 test build. There's no word from the IE team as to why they went months and months with no new preview builds for this. (My guess would be the team was busy finalizing IE10 for Windows 8 and Windows RT and there are only so many resources to go around.) In mid-October this year, the team broke its silence and said another test build was on its way. Unlike the other test builds, the new IE10 on Windows 7 preview build is meant for consumers, and not just developers, meaning it includes the new IE10 user interface. It also is optimized for touch first and includes improved security, performance and HTML5/CSS3 standards compliance, according to the Softies. Microsoft is not providing a date as to when it expects to release the final version of IE10 for Windows 7. It's also not known if there will be additional preview builds before the final is out. Company officials say all of this will be determined by customer feedback. Microsoft's IE marketshare on Windows has been either holding roughly steady or dropping, depending on which analysts you believe. Will IE10 on Windows 7 help Redmond grab a few more points? Time will tell.... via Zdnet > http://www.zdnet.com/microsofts-ie10-for-windows-7-worth-another-try-7000007338/

-
the only role you can install on an X86 server is the Distribution Point role - see http://technet.microsoft.com/en-us/library/gg682077.aspx#BKMK_SiteAndRoleScale
-
which version of MDT are you testing with ?
-
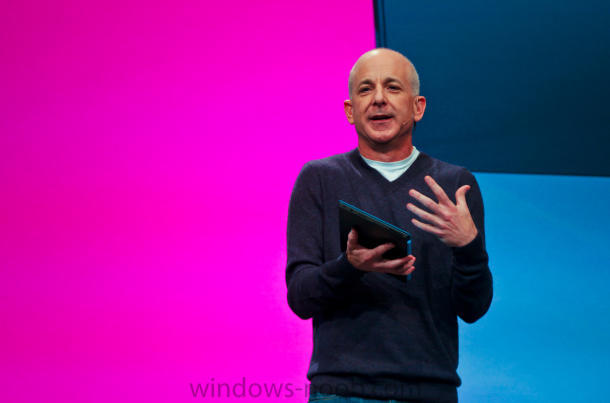
Who is Julie Larson-Green? Meet the new head of Windows I don't know the back story here, but here's what I do know: Microsoft President Steven Sinofsky is leaving Microsoft, effective immediately -- just days after launching his babies, Windows 8 and the Microsoft Surface. And the new head of Windows is Julie Larson-Green. As my CNET colleague Jay Greene reported, Microsoft is saying Sinofsky's departure was mutually agreed upon. Sinofsky is leaving to pursue other unspecified interests. In the shake-up, announced on November 12, Microsoft announced that Larson-Green will be promoted to lead all Windows software and hardware engineering. Tami Reller will continue on as chief financial officer and chief marketing officer and will assume responsibility for the business of Windows. Both executives will report directly to Microsoft CEO Steve Ballmer, according to Microsoft's press release. Julie Larson-Green has been Corporate Vice President, Program Management, Windows Client. Larson-Green is no stranger to Windows: She has had between 1,200 and 1,400 program managers, researchers, content managers and other members of the Windows team reporting to her. Last time I got to interview her (March 2010), Larson-Green was in charge of Windows planning. Her colleagues Jon DeVaan and Grant George led Windows development and test, respectively. This core team of three reported directly to Sinofsky. This was a new structure for the Windows team since Windows 7 shipped. Rather than organizing Windows Client around smaller product units, the team operates more like the Microsoft Office team does -- not too surprising, given the leaders of the Windows team all came from Office. Larson-Green applied to Microsoft right after she got her business management degree from Western Washington University, only to be told no. But she did land a job at desktop-publishing-software maker Aldus working on the product support call lines. Microsoft "discovered" Larson-Green after a few Softies attended a talk she gave comparing Microsoft compilers to Borland compilers and asked her to run a Visual C++ focus group for the company. In 1993, she ended up landing a job on the Visual C++ team, where focused on the integrated development environment. She moved to the Internet Explorer team (where she worked on the user experience for IE 3.0 and 4.0) and then, in 1997, to the Office team to work on FrontPage, where she got her first group program manager job. She also did a stint on the SharePoint Team Services team, back when SharePoint was known as "Office.Net." Larson-Green subsequently led user interface design for Office XP, Office 2003 and Office 2007. I cannot pretend I am sad about the passing of the torch. I have been persona non grata with the Windows division for the entire time that Sinofsky ran it. Many long-time Microsoft employees, managers and testers have expressed similar sentiments, mostly in private. Here's hoping to better days, in terms of how the Windows client team interacts with all of its constituents: Its customers, partners and us Microsoft watchers. via ZDnet > http://www.zdnet.com...ows-7000007292/
-
The company says the decision was mutual. But reported disputes between Sinofsky and Microsoft Chief Executive Steve Ballmer may have strained the relationship. Former Windows President Steven Sinofsky (Credit: Microsoft) Steven Sinofsky, the Microsoft executive who turned its Windows franchise around and just led the effort to release Windows 8, is leaving the company, effective immediately. Sinofsky, a controversial figure at the company, was the subject of a recent CNET profile that explored his polarizing ways. Insiders said he was warring with Microsoft Chief Executive Steve Ballmer. The company said the decision behind Sinofsky's departure was mutual, thought the abruptness of the announcement might suggest otherwise. "I am grateful for the many years of work that Steven has contributed to the company," Ballmer said. Steven Sinofsky talks up Microsoft's Surface tablet at the company's unveiling event in New York. (Credit: Seth Rosenblatt/CNET) Sinofsky was equally gracious in his comments. "It is impossible to count the blessings I have received over my years at Microsoft. I am humbled by the professionalism and generosity of everyone I have had the good fortune to work with at this awesome company," Sinofsky said in a statement. Microsoft promoted Sinofsky's longtime lieutenant, Julie Larson-Green, to lead all Windows software and hardware engineering. Tami Reller, the chief financial officer and chief marketing officer in the Windows group, will take over responsibility for the business of Windows. Both executives will report directly to Ballmer. Some Microsoft watchers had pegged Sinofsky as a CEO-in-waiting, but he developed a reputation for being divisive and not working well with executives in other divisions. "Steven is a rare talent," a Microsoft executive told CNET in last month's profile of him. But "as you think about future leadership, collaboration will be critical in a way it has never has before." Sinofsky joined Microsoft in July 1989 as a software design engineer, fresh from earning a master's degree in computer science from the University of Massachusetts, Amherst. Within three years, he was elevated to technical assistant for Microsoft co-founder Bill Gates, a top job for an aspiring young Microsoftie. In 1999, he became senior vice president of Office, responsible for leading the effort to release productivity software suite. His success with shipping a quality version of Office regularly and on time, led Microsoft's brass to tap him to run the Windows division. In 2006, Sinofsky became senior vice president of the Windows and Windows Live group. Three years later, Sinofsky was promoted to president of the Windows division. He helped restore Windows from the debacle that was Windows Vista, a widely panned and dramatically late version of the company's flagship product. Windows 7 was his first effort, a solid product that cleaned up much of the mess that Vista left behind. Windows 8 debuted last month. While it's too early to tell how well it's doing, the product has won kudos and raised some concern for its bold user interface design, a striking departure from previous versions. With Sinofsky out the door, the list of possible successors to Ballmer shrinks by one. Internally, some have speculated that Kevin Turner, the voluble chief operating officer, might be next in line. But Turner, who joined Microsoft from Wal-Mart Stores, doesn't have the technical chops that might be a requirement for the post. Potential outside candidates could include Netflix Chief Executive Reed Hastings, who said last month that he wouldn't stand for re-election to Microsoft's board in order to focus on Netflix. But some have speculated that Microsoft might be interested in buying the video service, which could put him in position to succeed Ballmer. via Cnet > http://news.cnet.com/8301-10805_3-57548751-75/controversial-windows-boss-steven-sinofsky-leaves-microsoft/

-
help with remote SUP/WSUS - SCCM 2012
anyweb replied to towilson's topic in Configuration Manager 2012
this post was written for CM07 but it should give you the idea http://www.windows-noob.com/forums/index.php?/topic/812-install-a-sup-on-remote-server/ -
it's all covered in the guides, start with Deploying Windows 7 Enterprise Part 1 and continue through to part 4. Using SCCM 2007 Sp2 to deploy Windows 7 Deploy 7 (4 parts)
-
yes pretty much, you'd keep FAT applications in the build and capture image and everything else (customizations etc) in your deployment image - more info in the speaker notes of this presentation i did http://www.windows-noob.com/forums/index.php?/topic/3585-tips-tricks-ppt-content-deploying-windows-7-with-configuration-manager-2007-live-meeting/
-
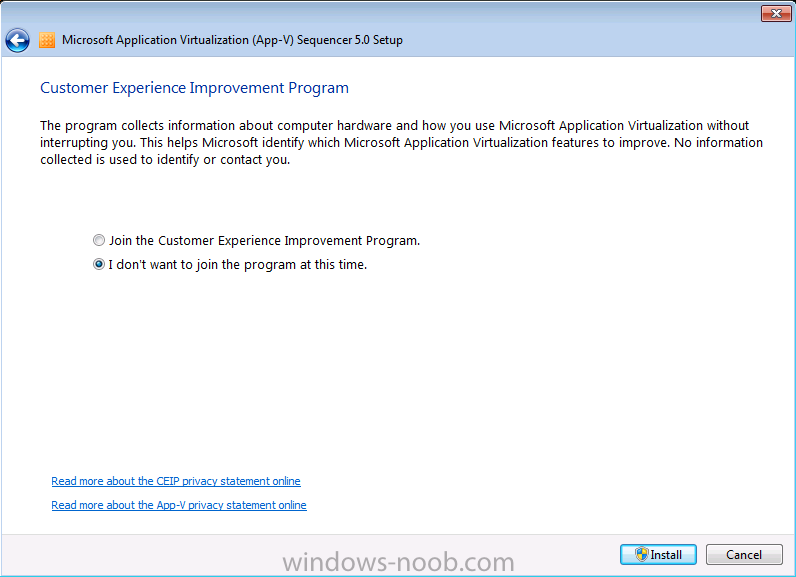
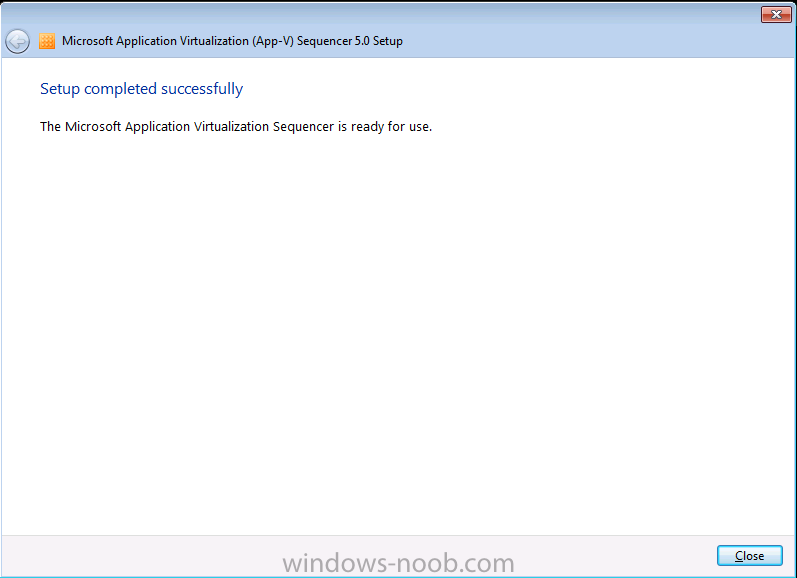
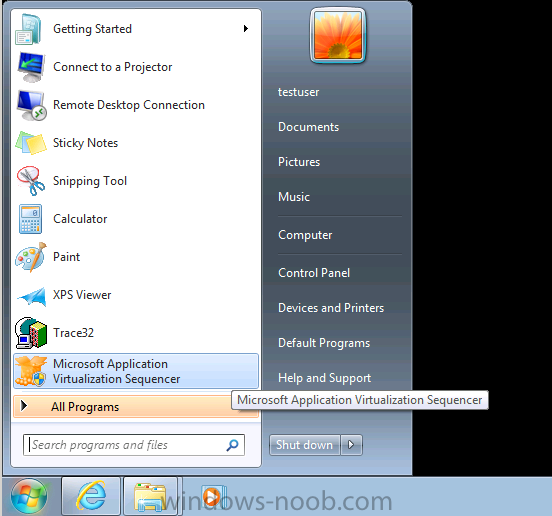
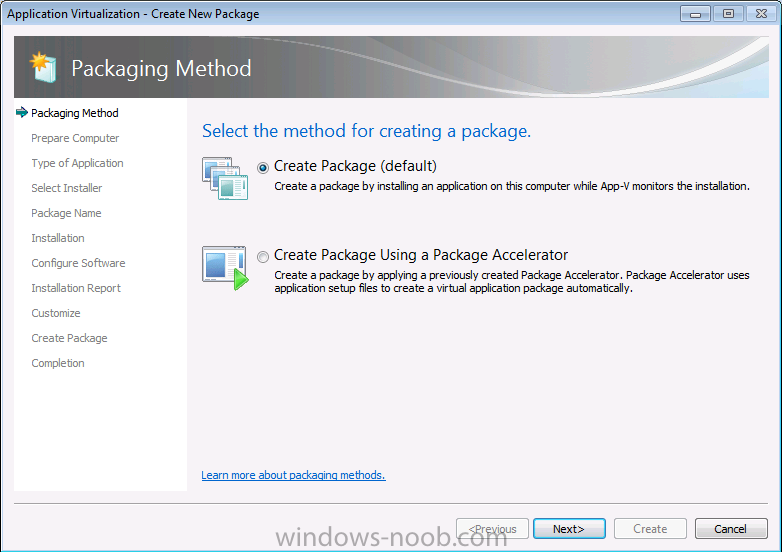
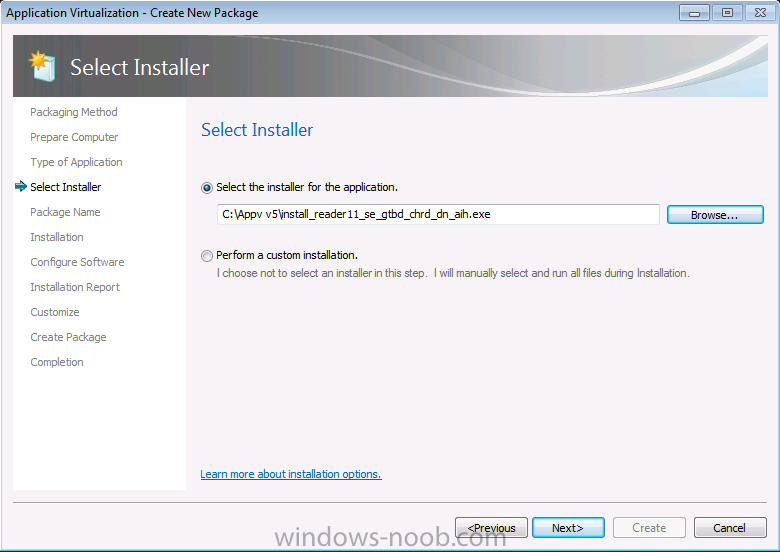
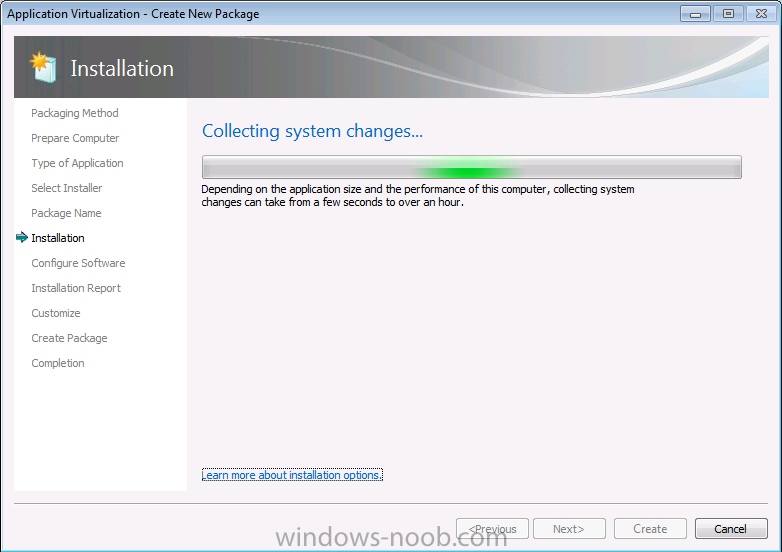
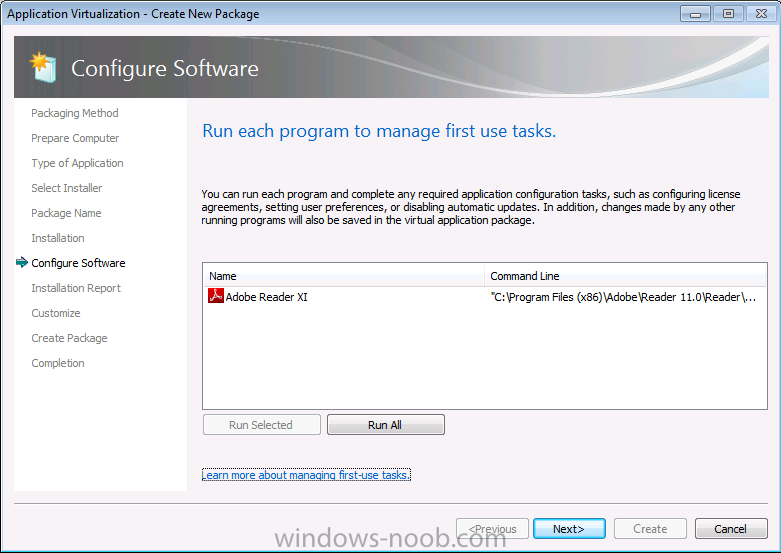
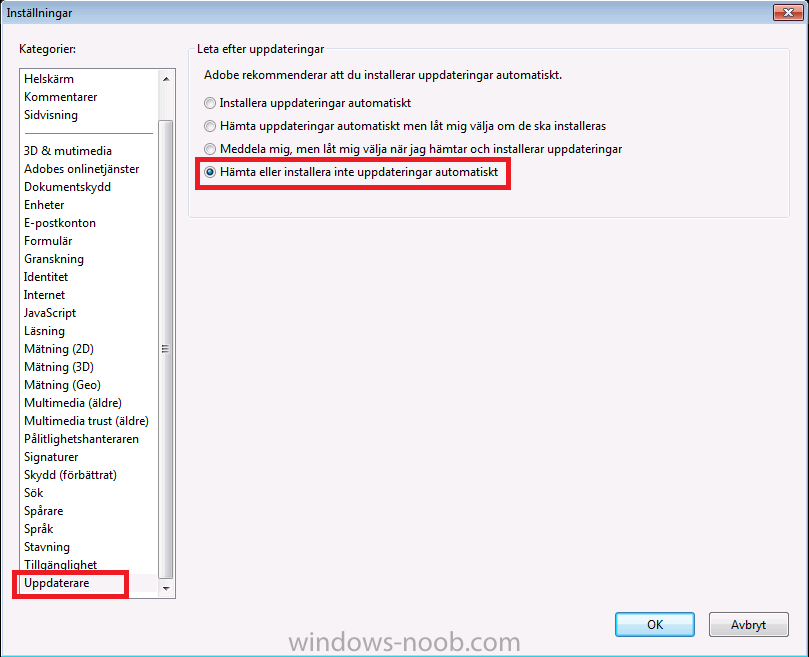
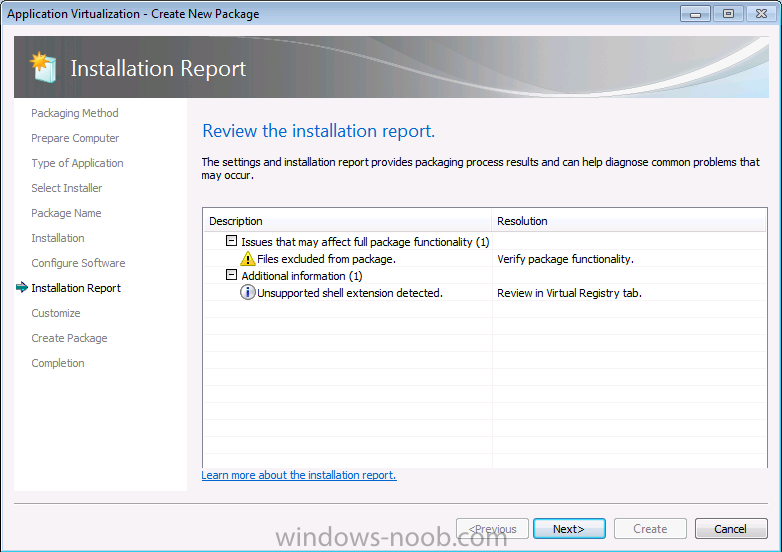
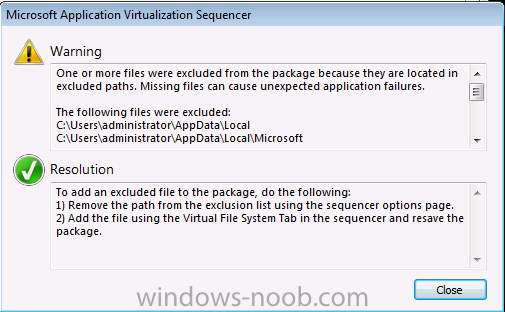
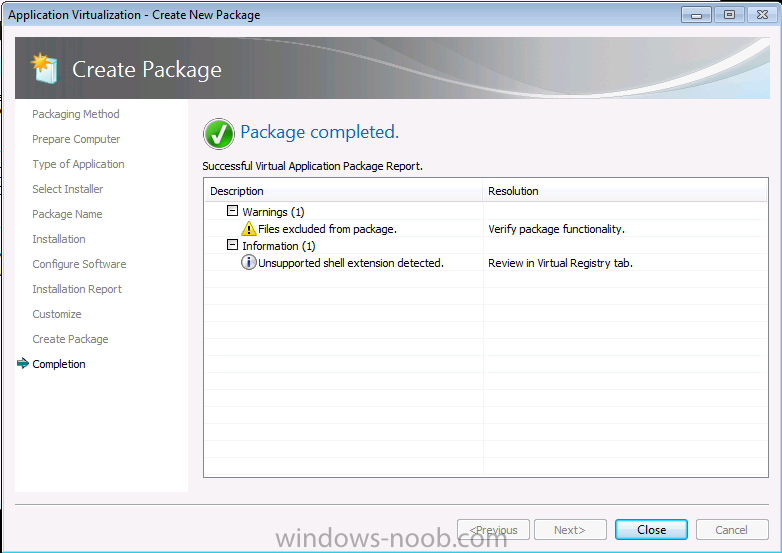
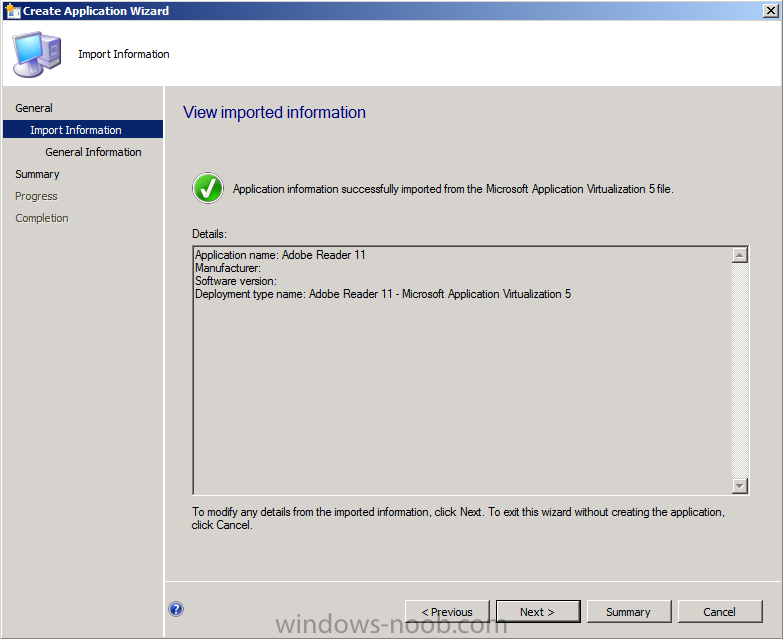
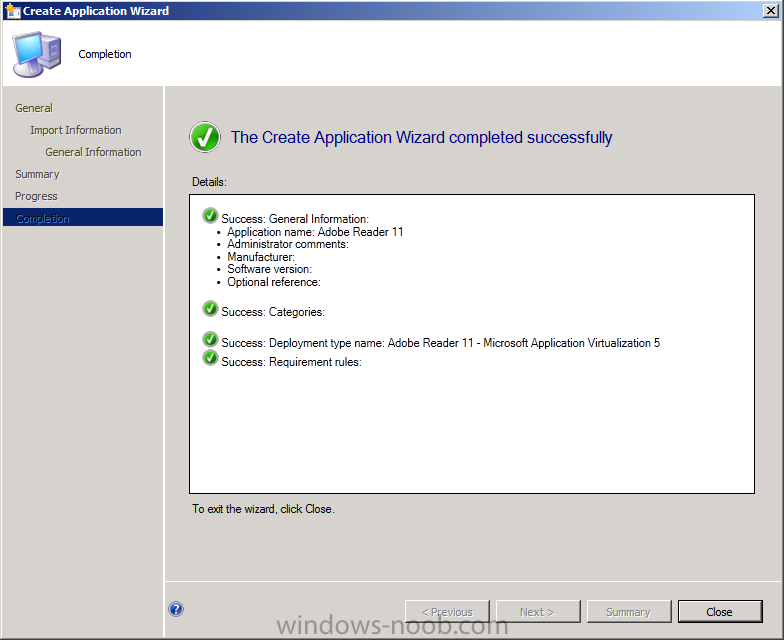
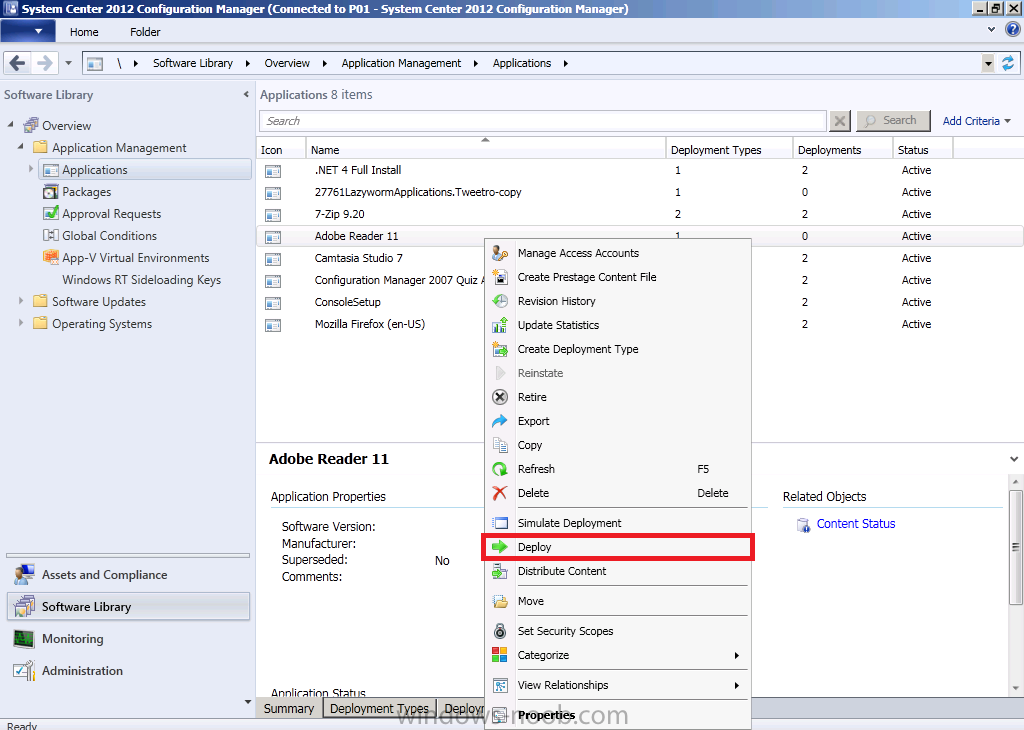
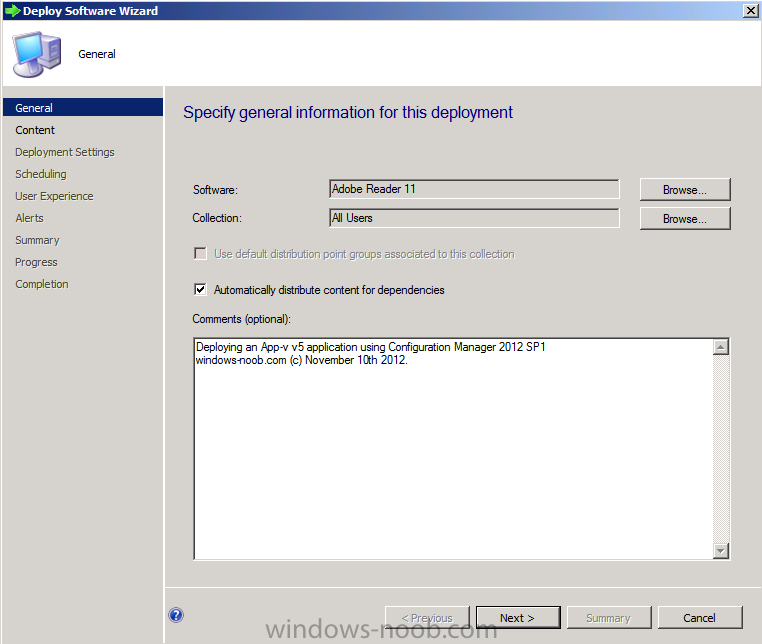
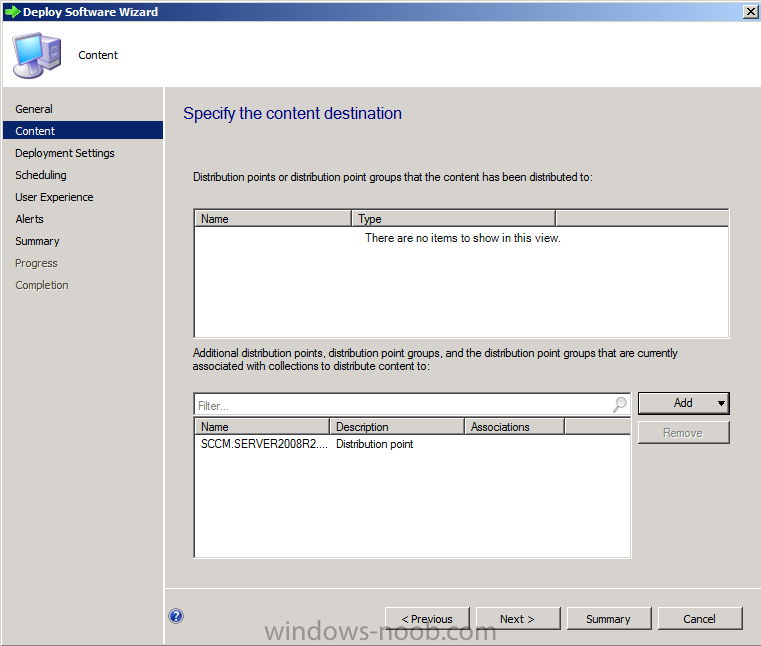
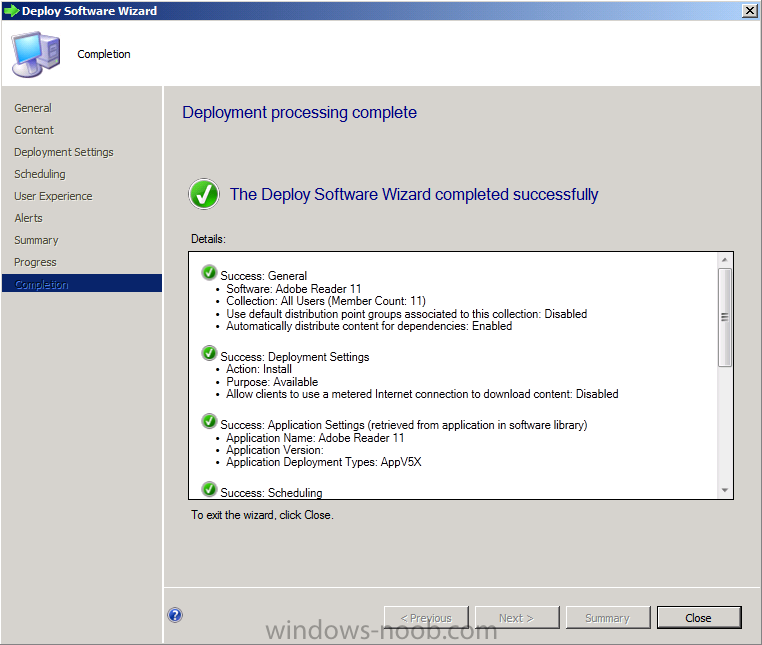
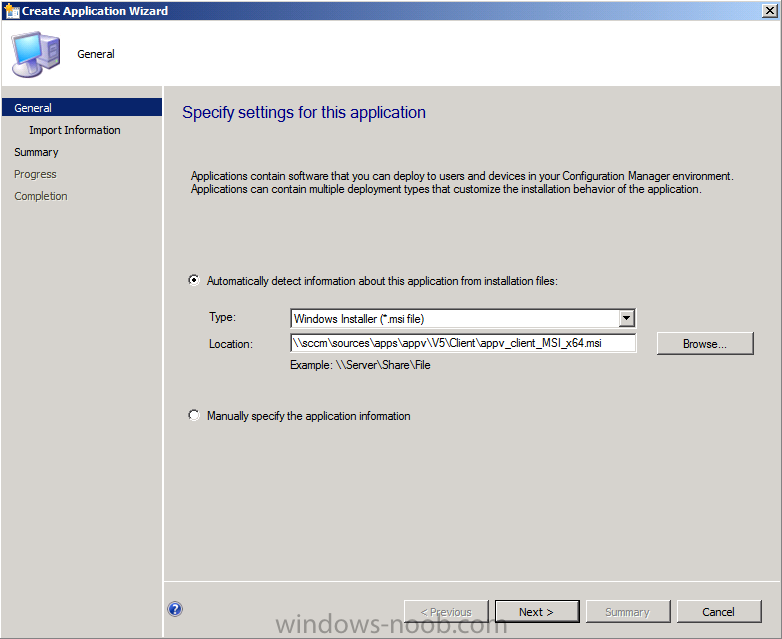
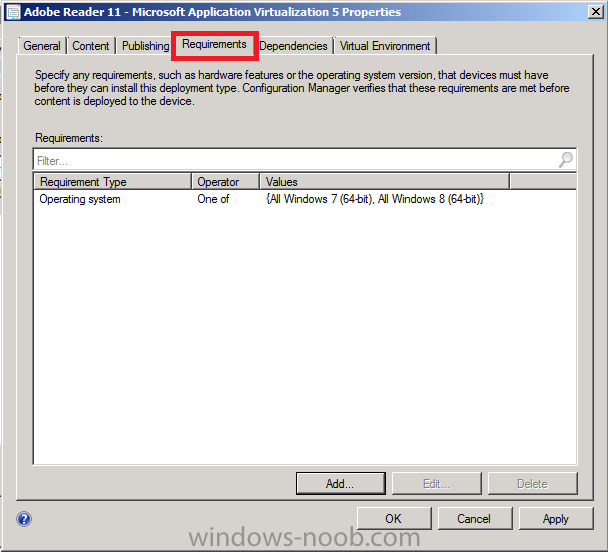
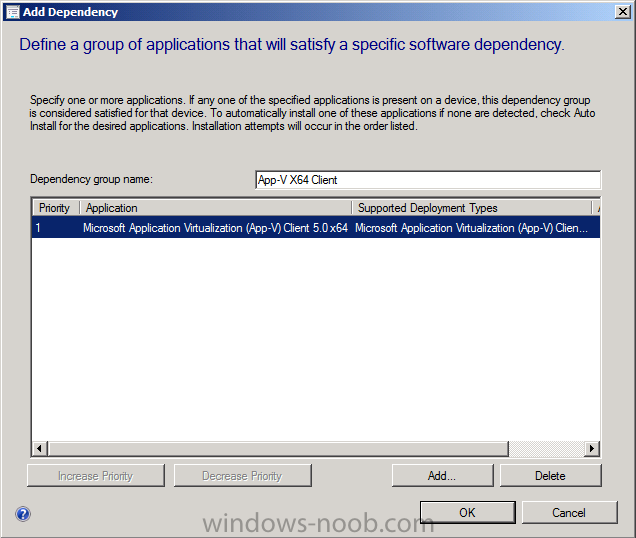
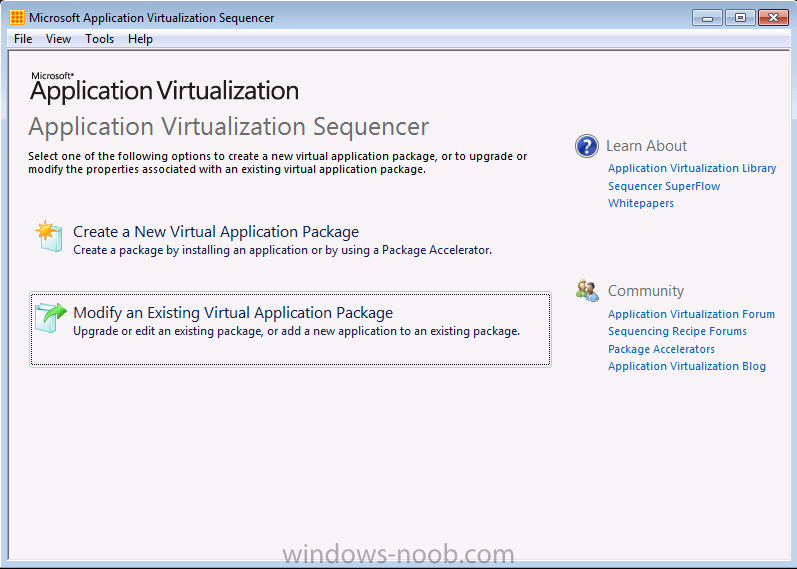
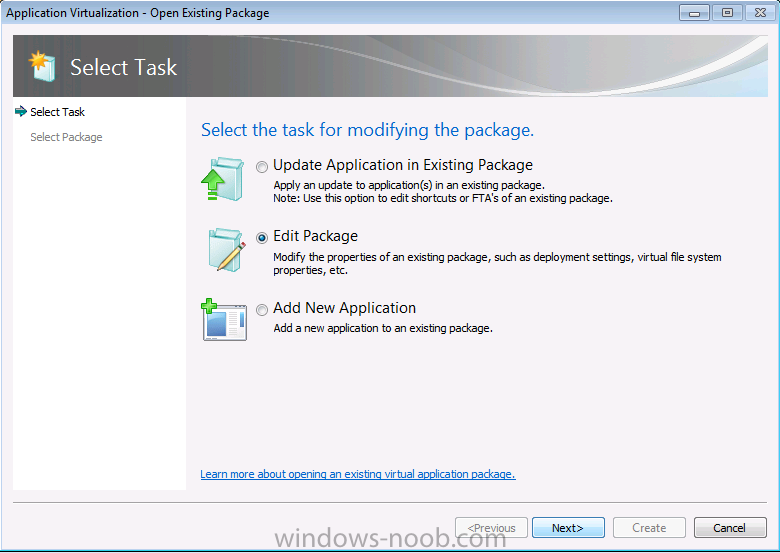
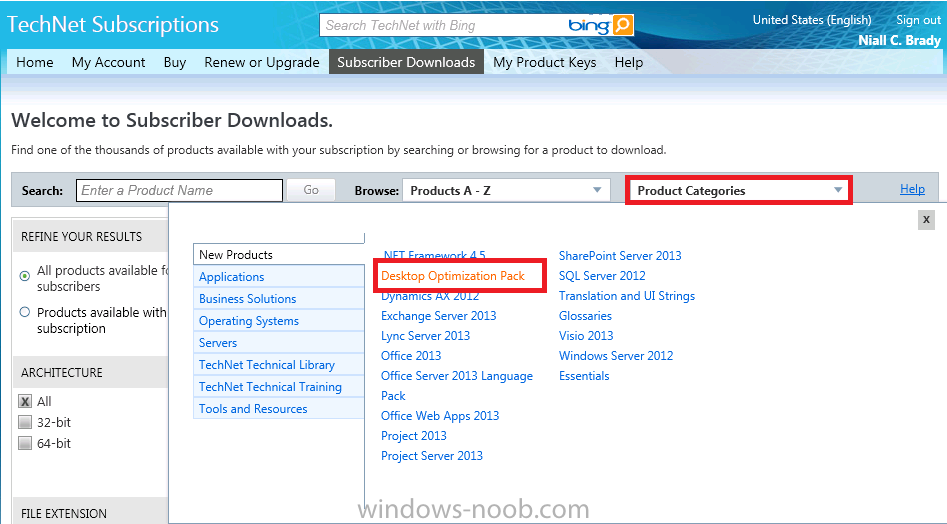
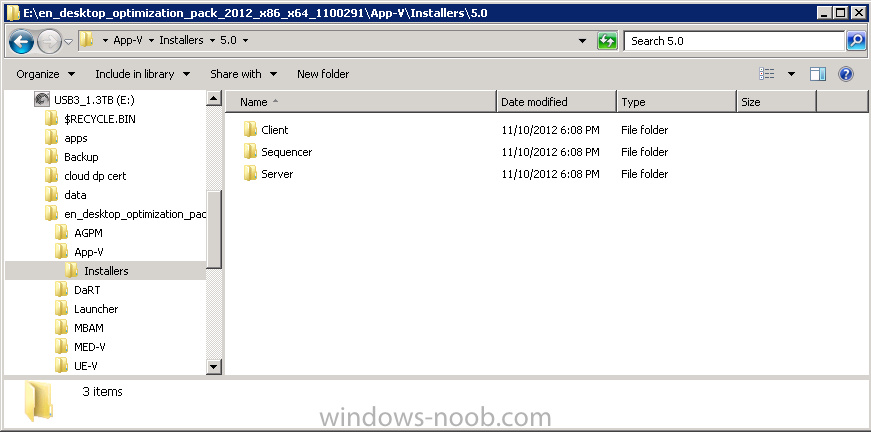
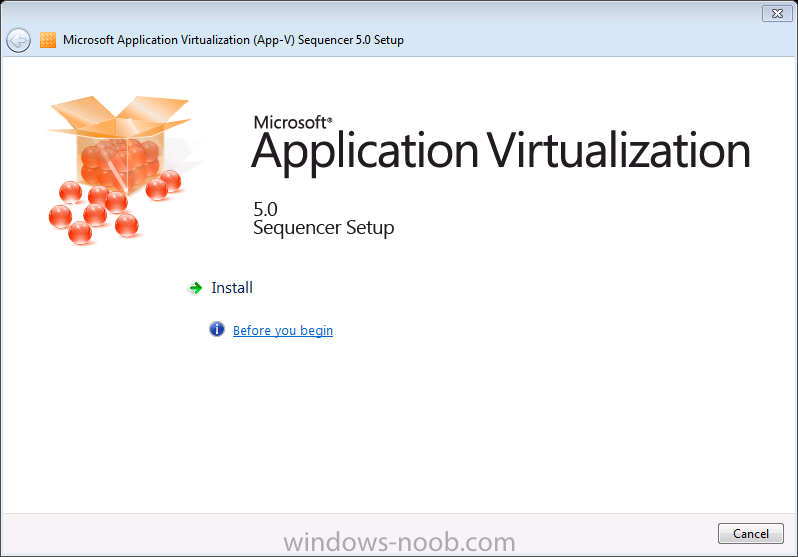
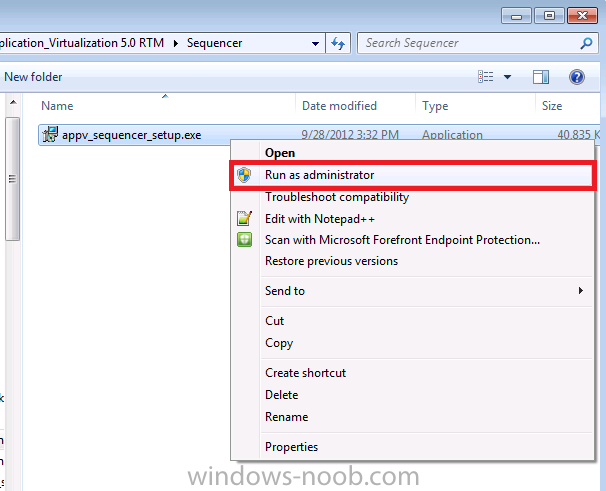
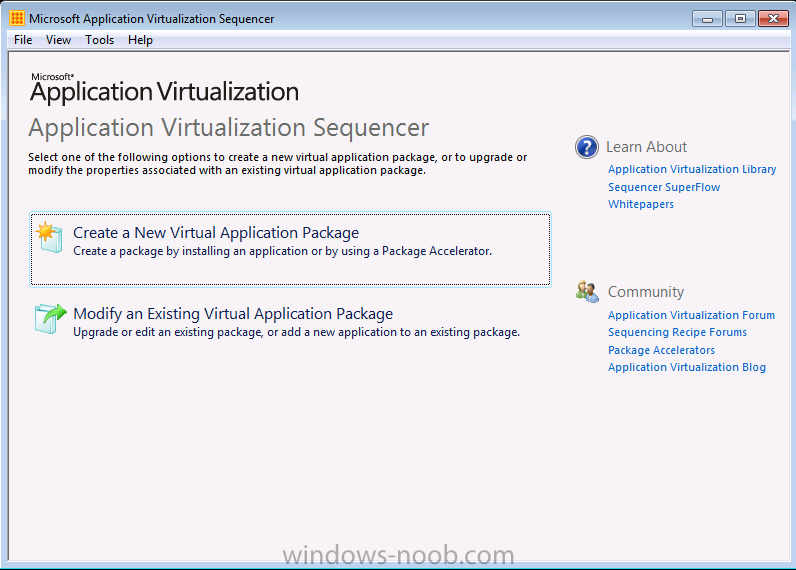
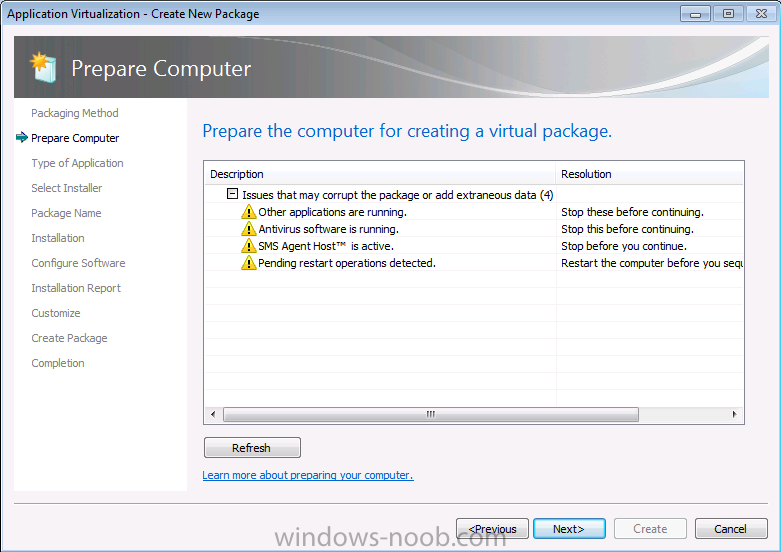
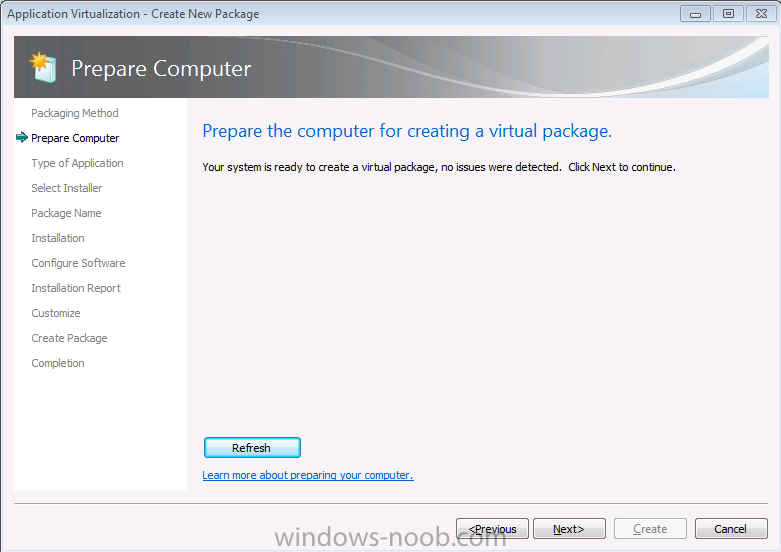
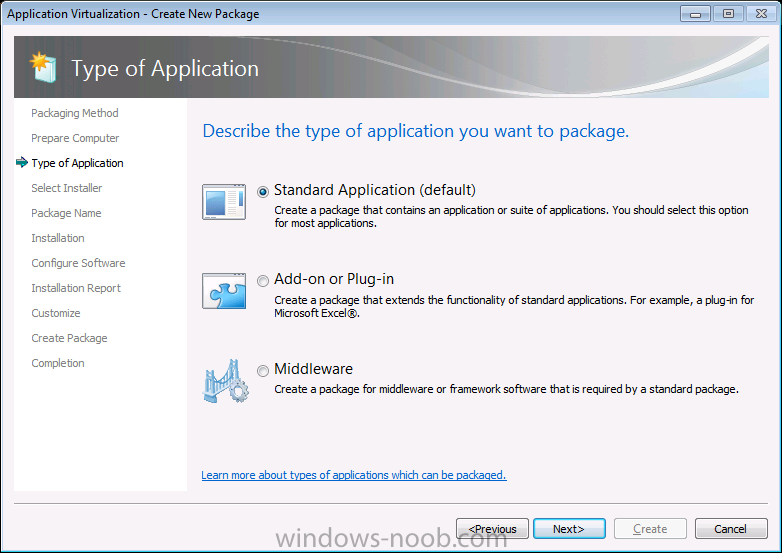
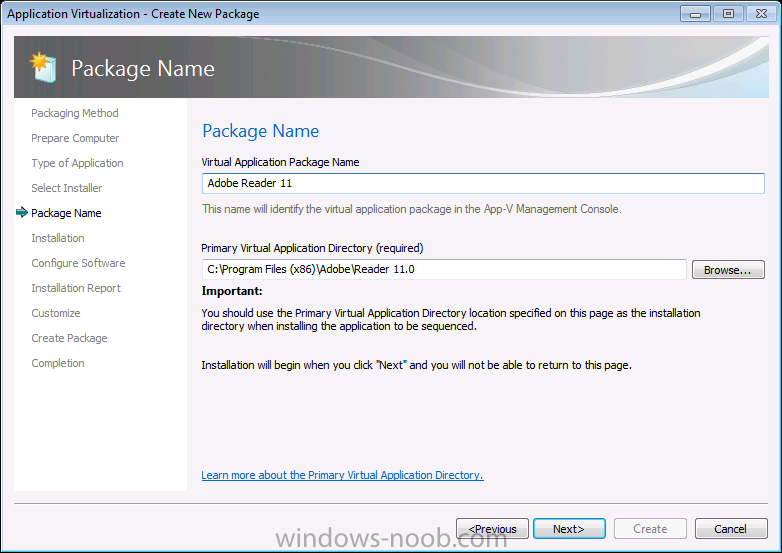
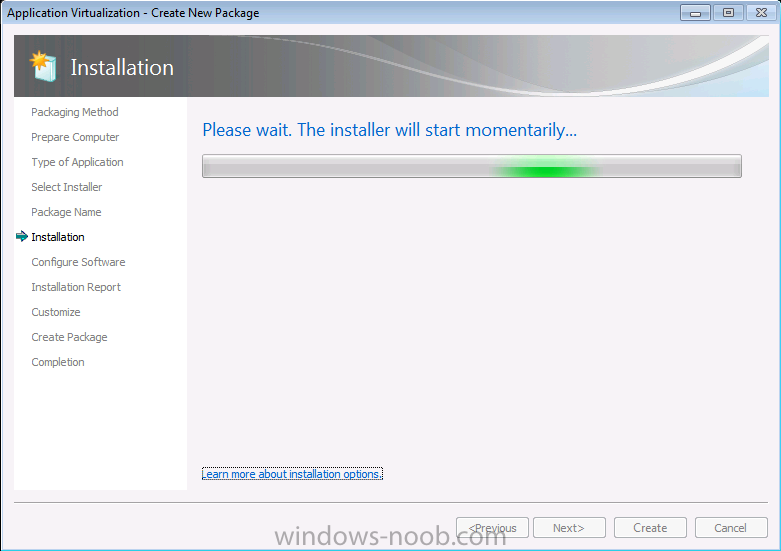
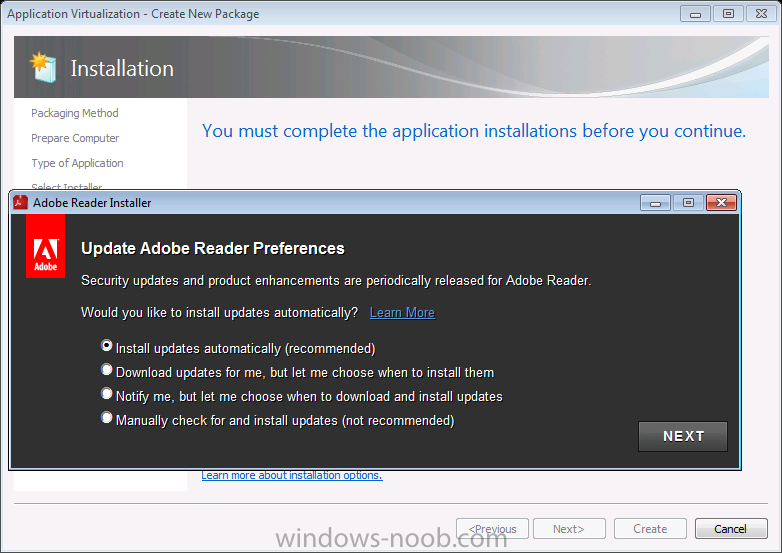
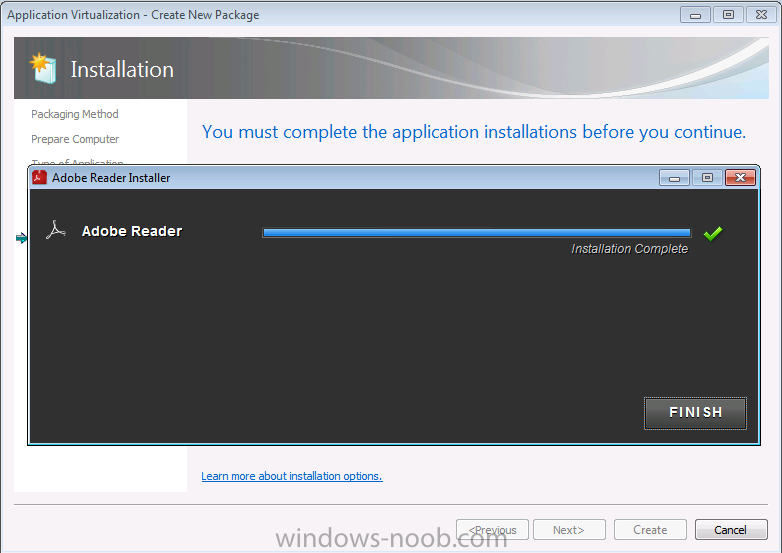
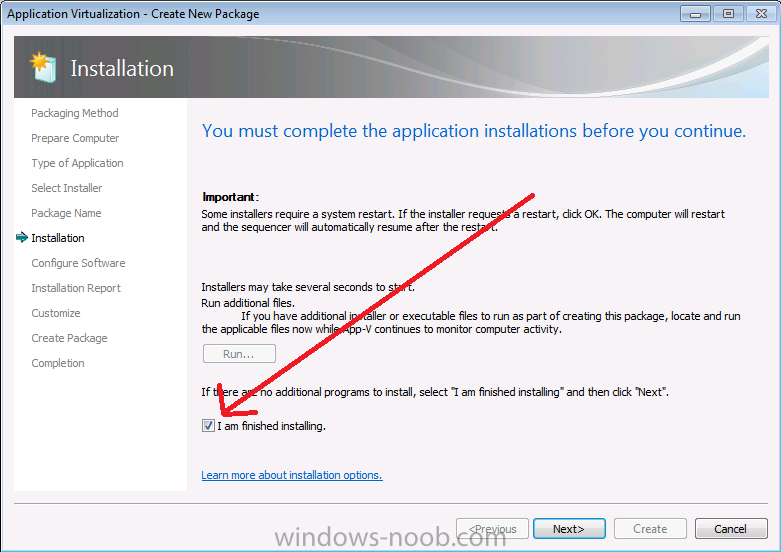
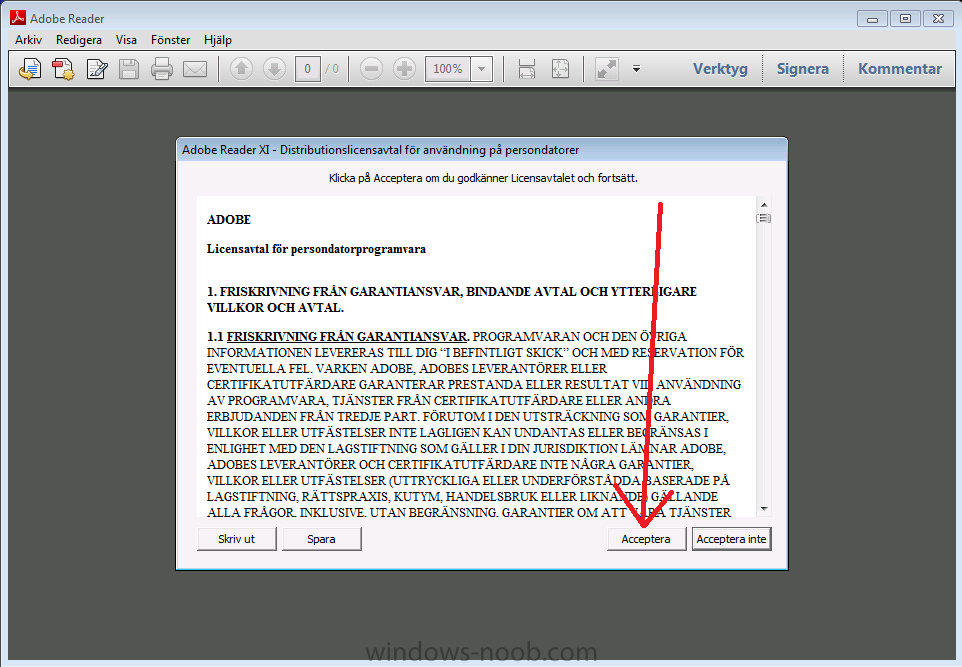
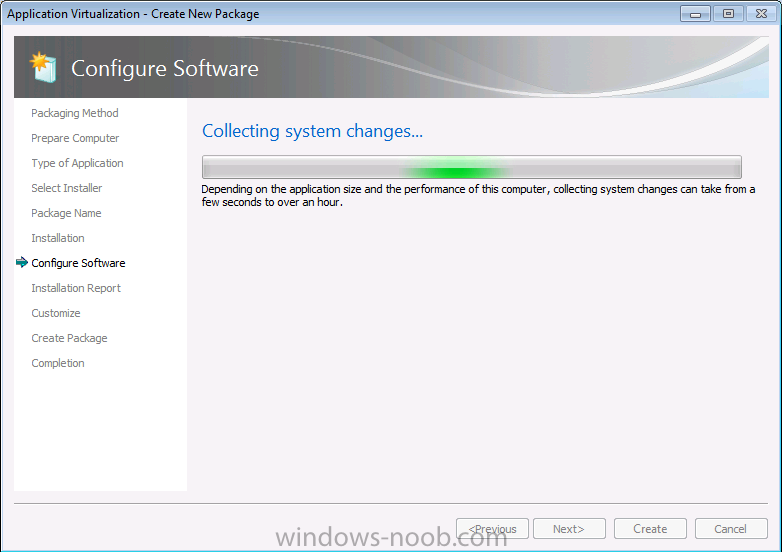
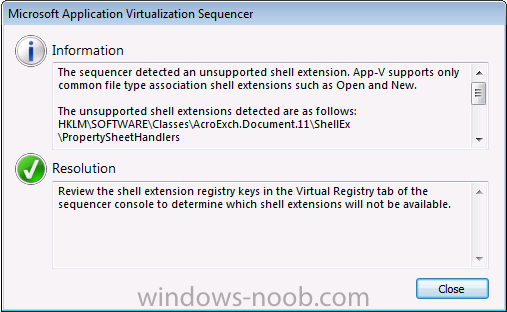
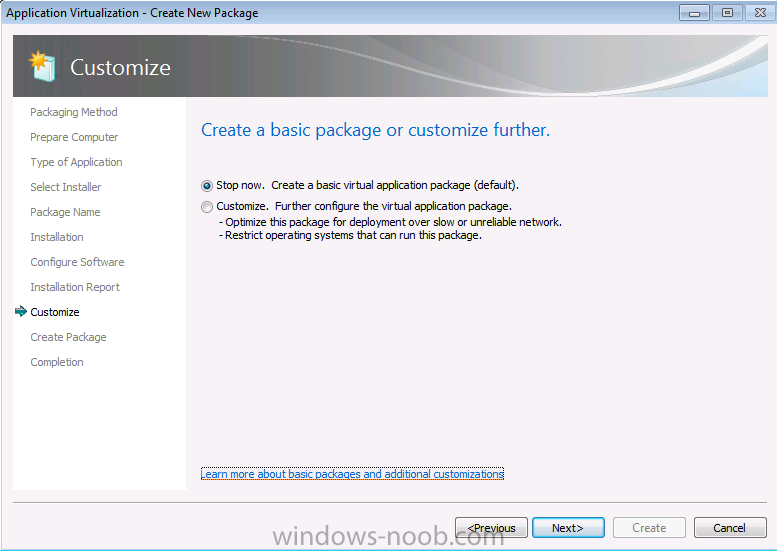
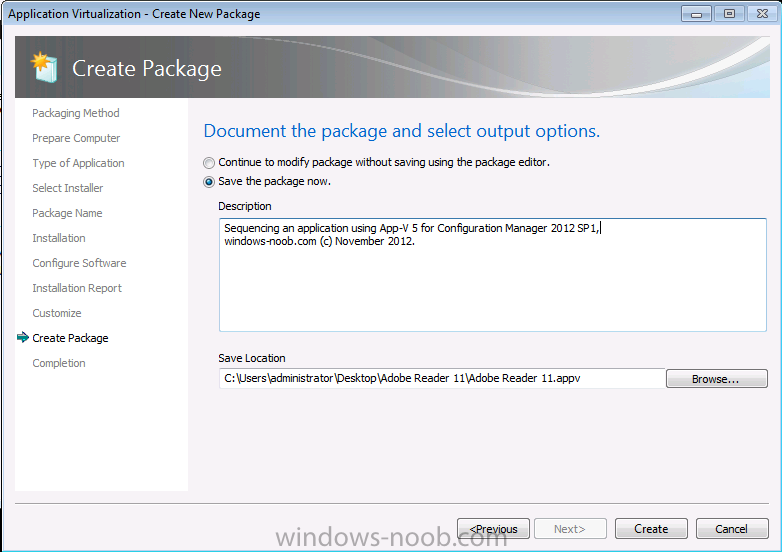
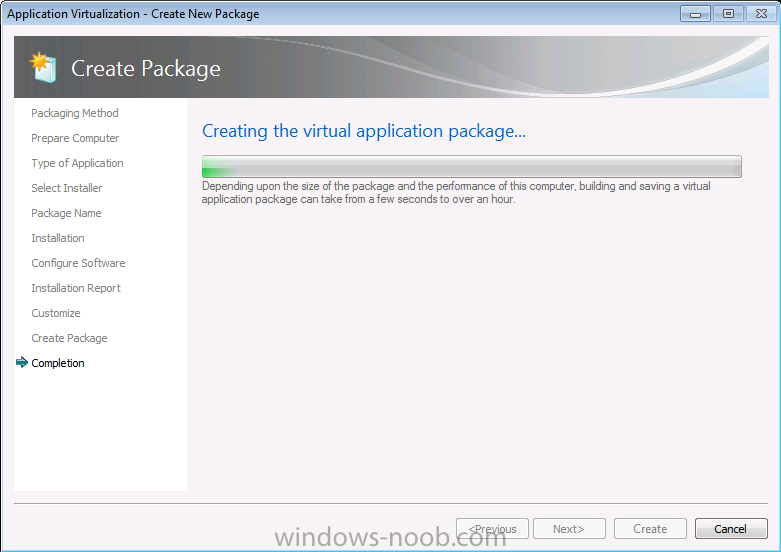
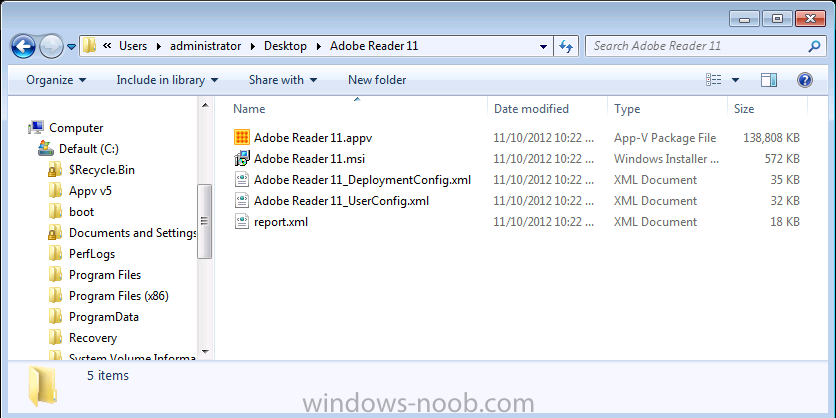
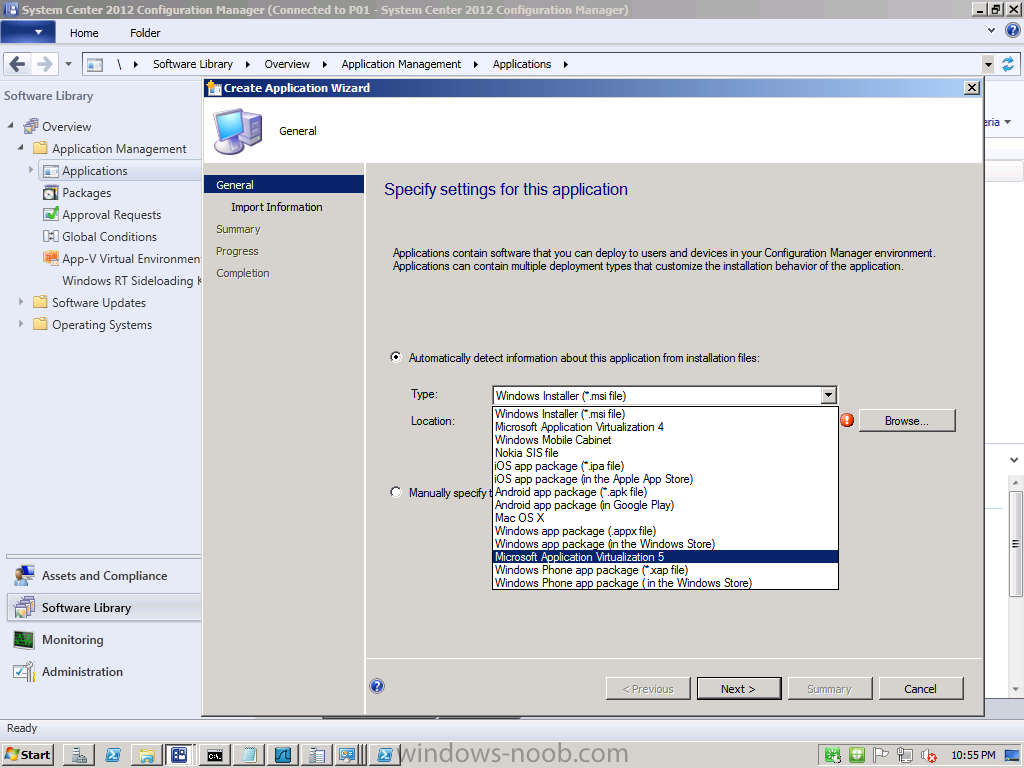
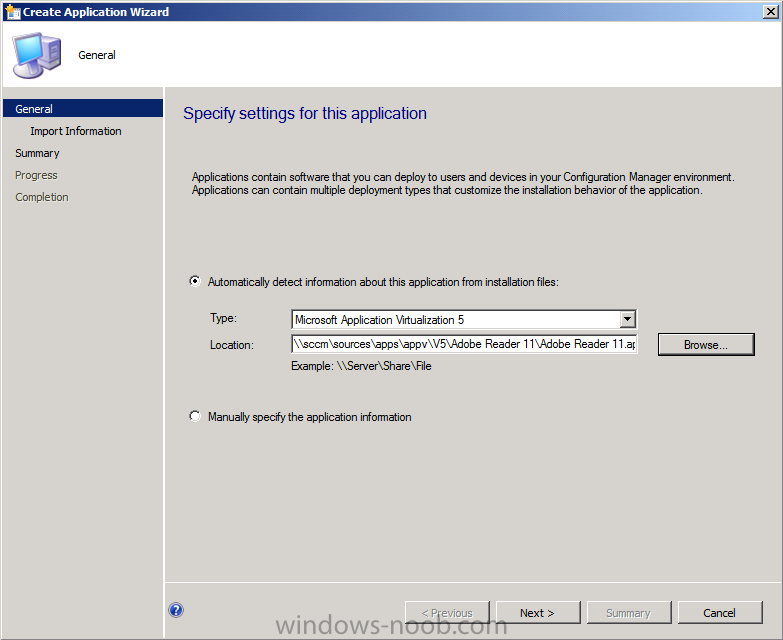
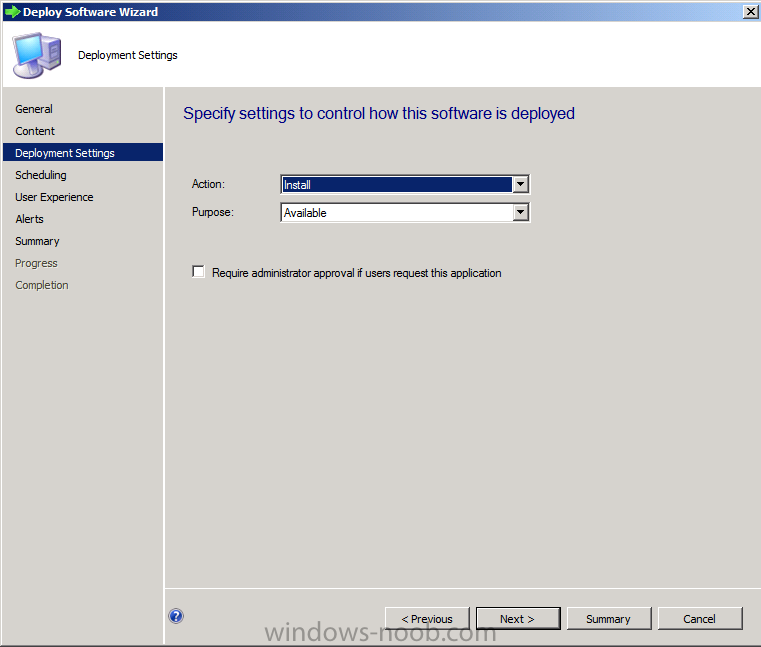
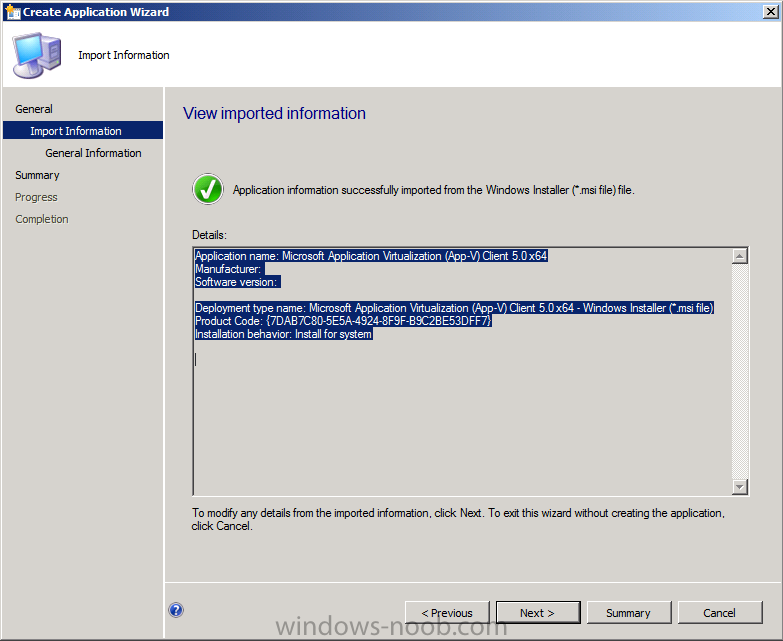
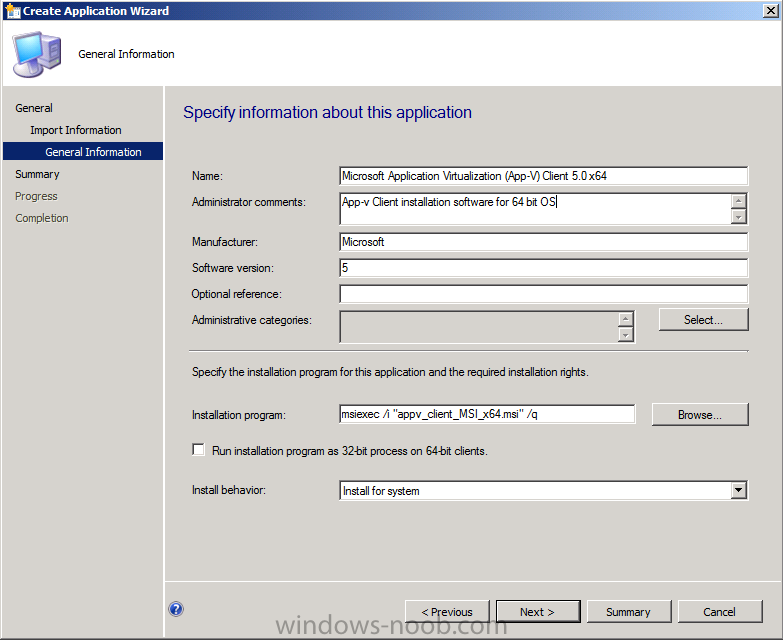
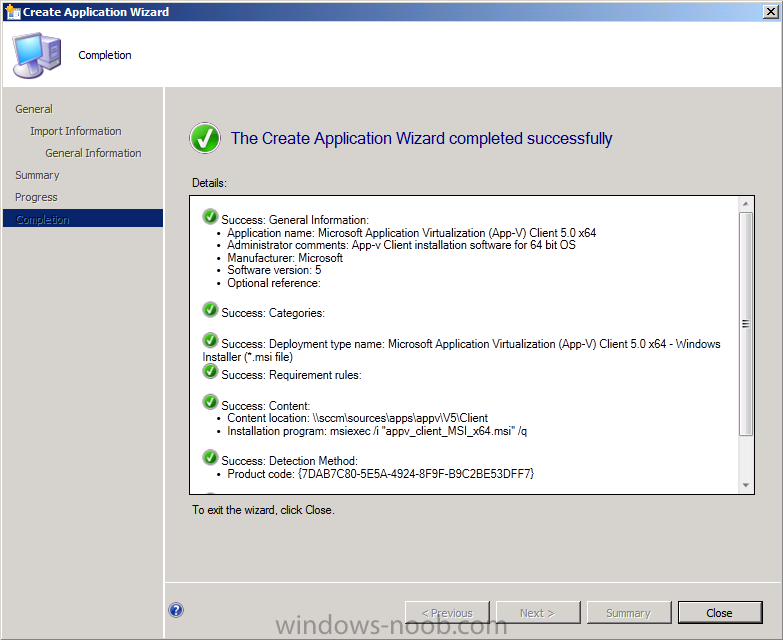
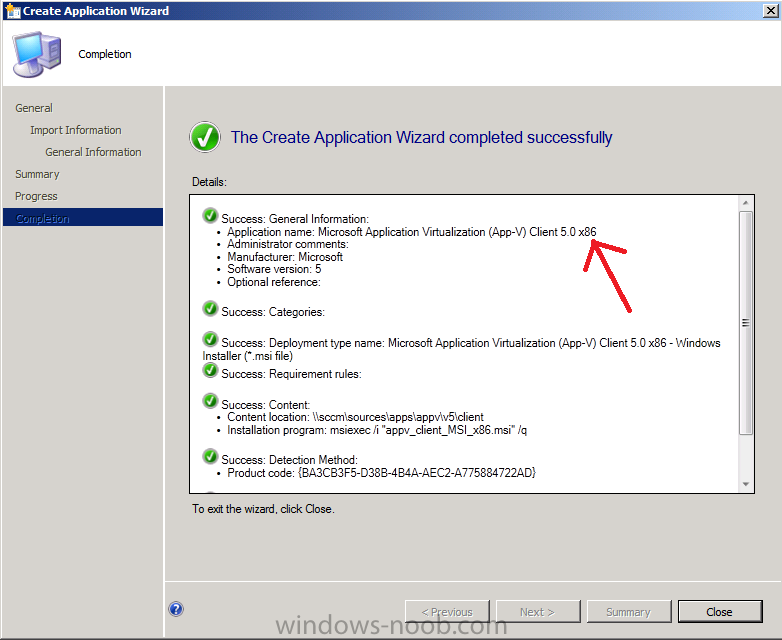
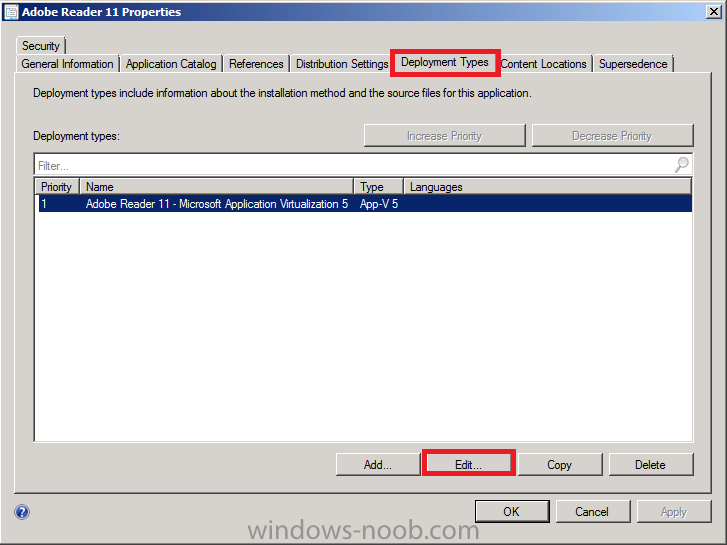
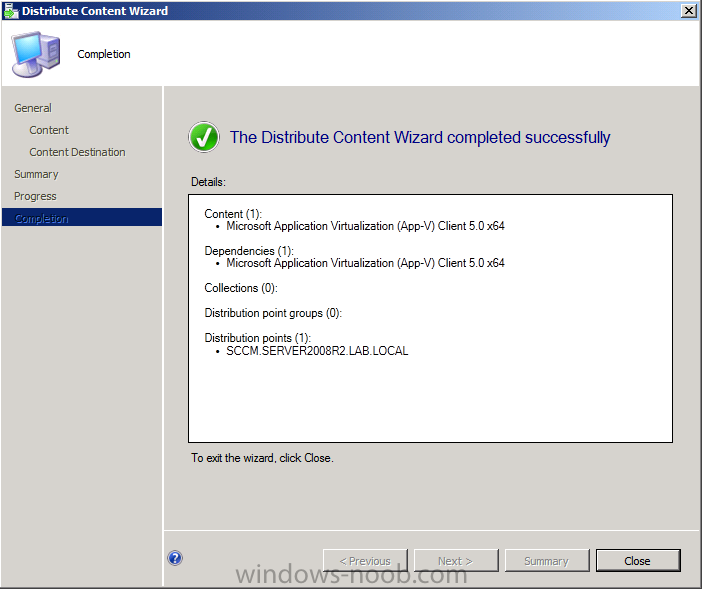
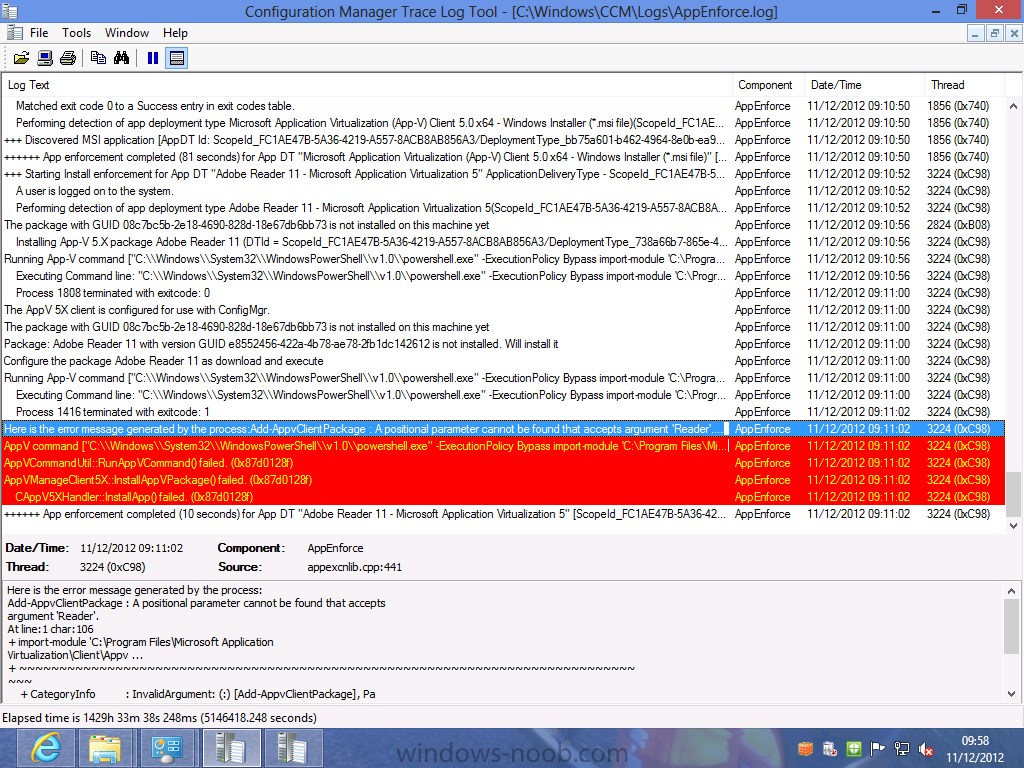
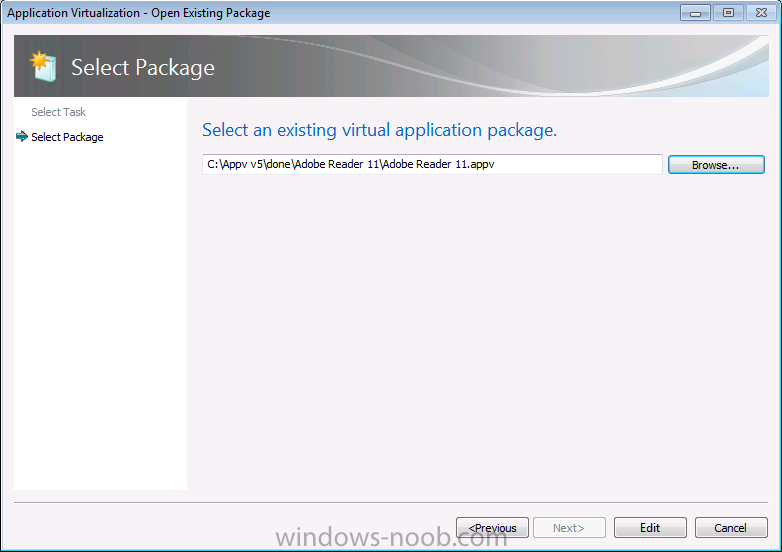
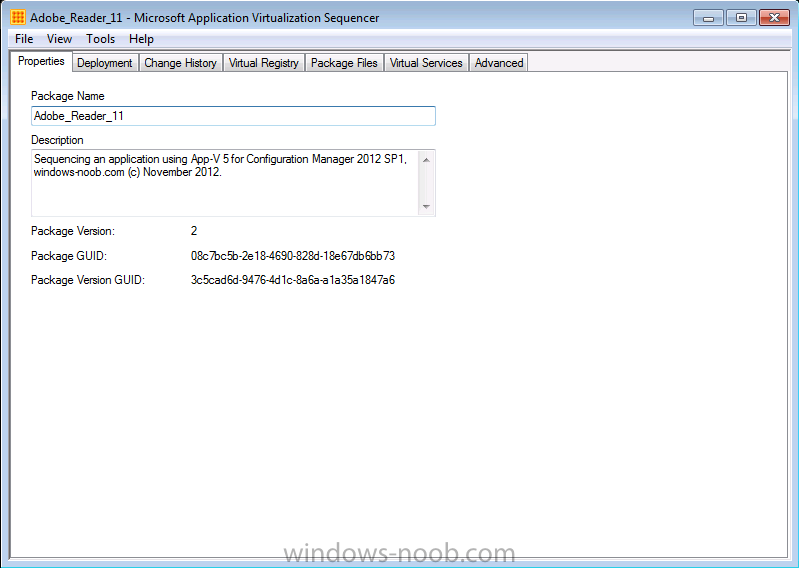
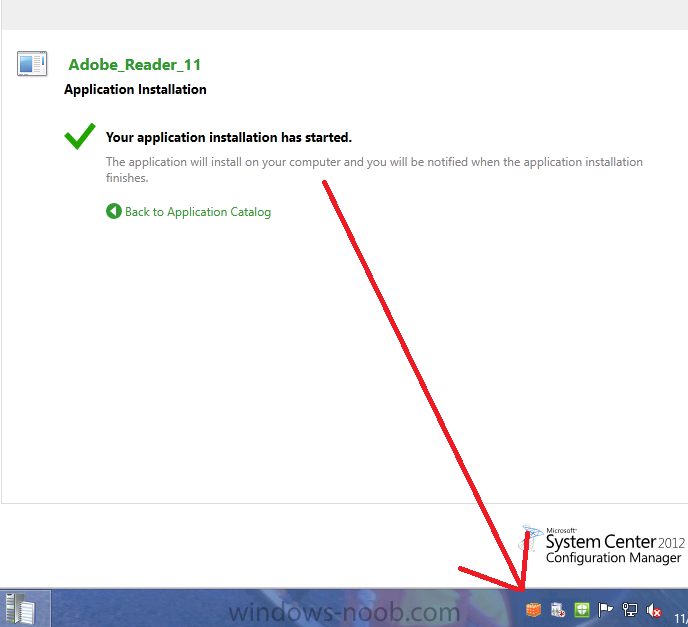
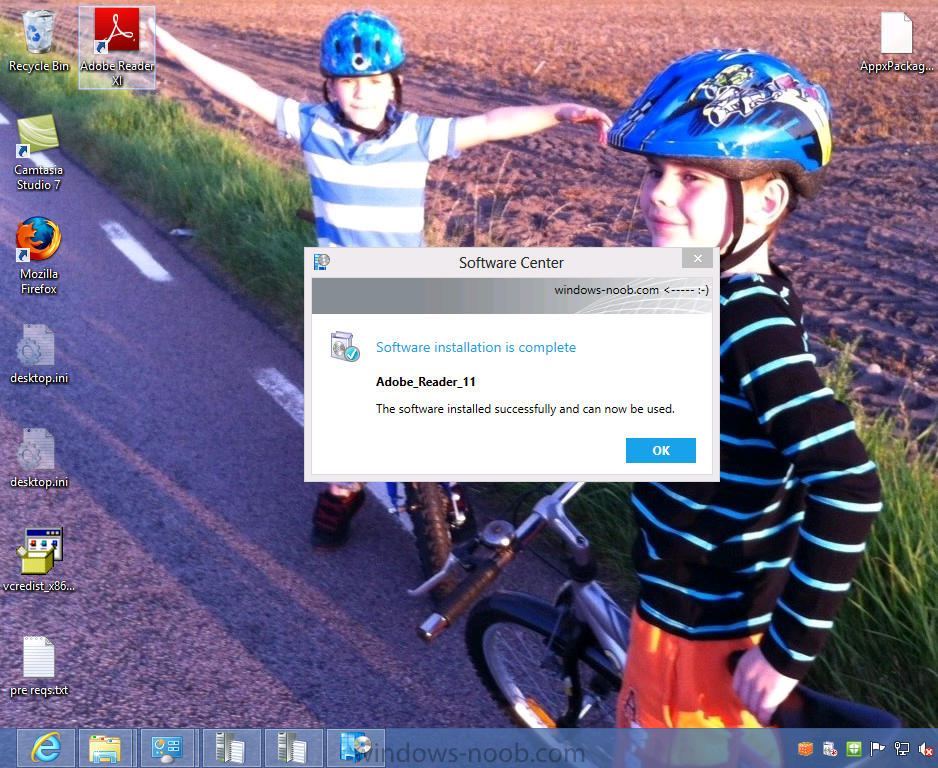
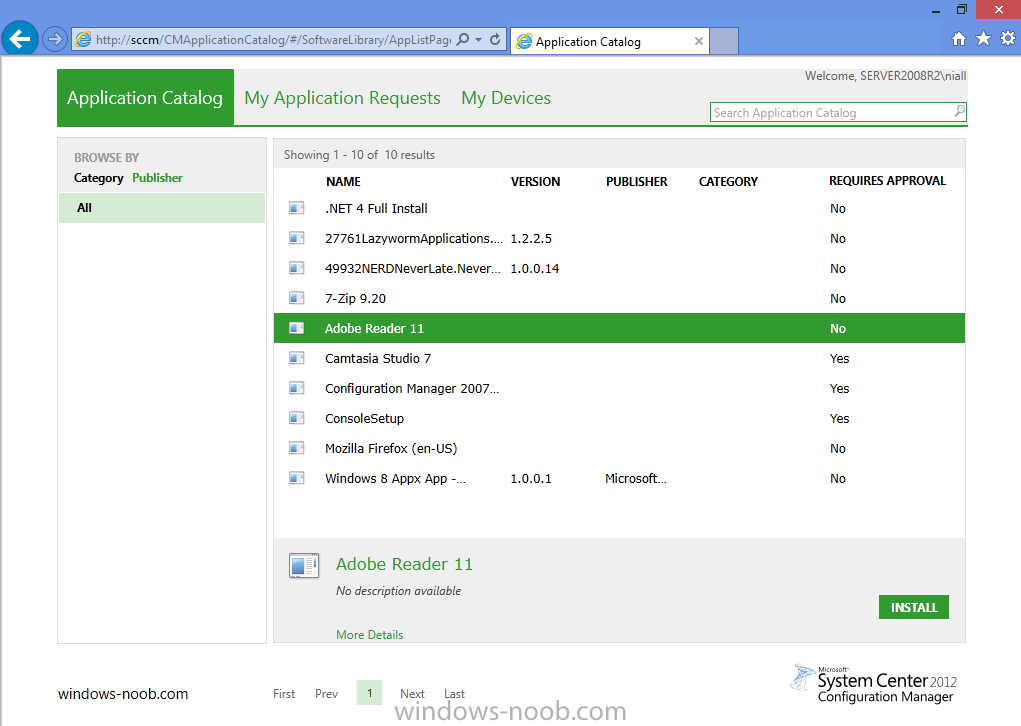
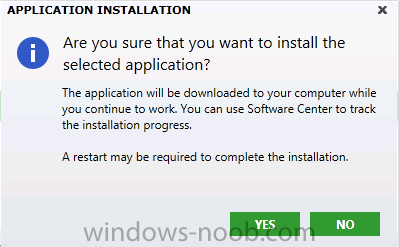
Now that App-V version 5 is available and Configuration Manager 2012 Service Pack 1 beta is out there's more reason then ever to learn how to sequence applications with App-V and then deploy them with Configuration Manager 2012 Service Pack 1.It's cool, it's fun and it's about time you got started ! Tip: This guide is long and detailed, make sure to give yourself plenty of time to go through it all. Step 1. Fulfill the requirements for Sequencing applications Before starting this, you'll need to setup your lab, and for that you'll need a good environment to sequence apps, I'd recommend using a virtual machine (that way you can take snapshots before adding an application, highly recommended) and in my guide I'm using a Windows 7 X64 Service Pack 1 virtual machine running in HyperV. Tip: Windows 8 also works fine for sequencing apps however as some applications don't yet support that Operating System it might be a better idea to sequence your apps in Windows 7 until Windows 8 gains more traction. The following requirements must be met otherwise you'll get an error as soon as you attempt to install the Sequencer. Windows 7 Service Pack 1 or later .NET 4 Framework Full Version PowerShell 3.0 Download the requirements from here.NET 4 Framework Full Version from here. PowerShell 3.0 (contained in Windows6.1-KB2506143-x64.msu) from here. Step 2. Download the MDOP ISO To sequence applications you'll need to download App-V version 5 and it's included in the newly released Microsoft Desktop Optimization Pack (MDOP) which is available for download to Microsoft Volume License customers and on Technet.To find it on Technet choose Desktop Optimization Pack under Product categories. Download the 2012 MDOP iso, the one I downloaded was called en_desktop_optimization_pack_2012_x86_x64_1100291.iso (1.29GB). Extract the ISO and locate the App-V content, it is located in \App-V\Installers\5.0 Step 3. Install the Sequencer On your Windows 7 (or Windows 8) client computer, browse to \App-V\Installers\5.0\Sequencer and right-click on the appv_sequencer_setup.exe file and choose Run as Administrator. The App-V Sequencer setup appears, you can click on the Before you begin link to bring you to an App-V website (which still refers to App-V 4 strangely enough) or you can click on Install to start the installer. accept the license aggreement decide if you want to join the CEIP or not click install and it will begin the installation and after some installing it's all done. Step 4. Sequence an Application In the start menu locate the Microsoft Application Virtualization Sequencer and it will start, if you are not a local administrator it will prompt you for administrative credentials. The Sequencer wizard appears, select the first option, Create a New Virtualization Package select Create Package (default) the other option is for Packages that have already been created using a Package Accelerator. at this point you'll probably see something like this (I do indeed have Forefront Endpoint Protection Antivirus software and the Configuration Manager client is installed). Take note of the warnings and restart the computer, after the restart you can stop those services when the computer has restarted (run services.msc as administrator). Tip: If after the restart you still see restart operations pending then you can try restarting again or use a tool such as Why Reboot (download it here) to see what is requiring the reboot. Run that application as administrator otherwise it won't be able to view all parts of the Registry. If you are still seeing Pending Resetart Operations detected, then check the following registry keys, export them if present and remove any entries listed in them, you can restore the keys later by simply double-clicking on the exported registry key *.REG files. HKEY_LOCAL_MACHINE\System\CurrentControlSet\Control\Session Manager\PendingFileRenameOperations HKEY_LOCAL_MACHINE\Software\Microsoft\Windows\CurrentVersion\RunOnce HKEY_LOCAL_MACHINE\Software\Microsoft\Windows\CurrentVersion\RunOnceEx HKEY_LOCAL_MACHINE\Software\Microsoft\Windows\CurrentVersion\RunServicesOnce HKEY_CURRENT_USER\Software\Microsoft\Windows\CurrentVersion\RunOnce Note: Please make sure that all problems found are cleared before continuing otherwise you'll end up risking problems with your Application Virtualization process. When your system is ready to create a virtual package is displayed click next select standard application (default) when the Select the installer for the application appears click on browse and select an application you want to virtualize, in this example I will use Adobe Reader. Next you input the Package Name and Primary Virtual Application directory Note: The Primary Virtual Application Directory is the directory that will contain all files for the sequence. It is recommended to define the application’s default installation directory (example C:\Program Files\directory) as the Primary Virtual Application Directory. Next you will see a Please wait... before the application itself starts once the application starts you'll need to complete the installation actions so click next on the Adobe Reader wizard (your chosen app will obviously have different steps for its installation which you must deal with, this guide is only for Adobe Reader) after a while you should see your application complete its Installation, click on Finish. when you are done with your application, place a checkmark in I am finished installing. once you click next the App-V sequencer will gather the changes made by the application installation before being presented with a Configure software step which allows you to run the app in order to configure it for any update requirements or license agreements etc. You can select the application and click Run, the application starts and in this example a License screen is presented (in Swedish), accept it so that your users won't be prompted with the License Agreement when they run the application. Next configure the application settings to not automatically check for updates, you don't want your App-V application annoying your users by prompting them to update it once they run it... again this screenshot is in Swedish but you'll figure it out won't you ? once you are done making your configuration changes click on next and the sequencer will gather your changes again... and then you get to review the installation report in the screenshot above it mentions some files were excluded that may be required, if you double click on this it will tell you why they were excluded and how to resolve it in addition it referred to some unsupported shell extension, again double-clicking the warning will give you tips to resolve it let's assume all is OK and continue by clicking Next, once you do you have the option to Stop now or Customize. In this example we'll stop now as we don't want to restrict the package on any operating systems and we are not concerned with network latency. next you get to save the package somewhere useful, give the package some description as well, fill in the info and click on create your virtual application package is created and your package is completed, any warnings are listed, you can double click on them for more info, once done click close You can now browse to the path where you saved the App-V package and you'll see the files are all there waiting for you, congratulations you've just sequenced your first App-V 5 package ! Step 5. Add your App-V5 application to Configuration Manager 2012 SP1 Now that we've sequenced our first app, we want to deploy it, but before doing so we need to add it to Configuration Manager 2012 Service Pack 1.In the Software Library workspace right click on Applications and choose Create Application, when the menu appears select Microsoft Application Virtualization 5 and select the location of the App-V package by pointing to the .appv file in your App-V package if all goes well you will be displayed with the View Imported Information screen click your way through that wizard until completion. Step 6. Add the App-v client In order to deploy App-V applications we need to have the App-v client installed on our target computers, the client installation files are located on the extracted ISO in \App-V\Installers\5.0\Client, copy them to your sources folder (\\server\sources\apps\appv\v5\client) on the Configuration Manager server. Note: In this guide I will not go into details of fulfilling the prerequisites for the App-V client package (that'll come in a later blog). However you must ensure that your client computers meet the prerequisites or the app-v client will fail to install. If you want to keep it easy then test with Windows 8 as that has most of the prerequisites built in (you may still need to install the Microsoft Visual C++ 2005 SP1 Redistributable and the Microsoft Visual C++ 2010 Redistributable) as described below... Below are the prerequisites for the App-V Client: Microsoft Windows .NET Framework 4 (Full Package) (http://www.microsoft...s.aspx?id=17718) Windows PowerShell 3.0 (http://www.microsoft...s.aspx?id=29939) Download and install KB2533623 (http://www.microsoft...s.aspx?id=26746) The client installer will detect if it is necessary to install the following prerequisites, and it will do so accordingly: The Microsoft Visual C++ 2010 Redistributable(http://go.microsoft..../?LinkId=268896) The Microsoft Visual C++ 2005 SP1 Redistributable Create a new application and point it to your App-v Client folder it gets imported add some info, take note that this is the 64 bit MSI for 64 bit operating systems, you'll have to repeat this process for the other 32bit msi. continue the wizard until completion and then repeat the above for the 32bit client msi. once done, don't forget to add the client applications to your Distribution Points Step 7. Edit your Application to add a dependency for the App-v Client Locate your previously added application (Adobe Reader) and right click it, select properties and navigate to the Deployment Types tab, select the listed Deployment Type and click Edit On the requirements tab select both Windows 7 X64 and Windows 8 X64 as per the screenshot below Next select the Dependancies tab of our Deployment Type and give it the name App-V X64 Client, click on Add and point it to our previously created App-V X64 Client, select that deployment type so that it's like the screenshot below and click ok then apply to apply the changes to our Deployment Type and ok + apply...Once done you can create a new Deployment type with a requirement for the X86 Operating systems and a dependency for the 32bit client. so now we have two deployment types for our Adobe Reader application to deal with both 32bit and 64 bit operating systems. Step 8. Deploy your app-v application Right click on your newly added application and choose Deploy. point it to your desired collection next you can add your distribution points by clicking on Add and selecting the distribution points you want to have the content available on in this guide we are not forcing the installation therefore we'll set the purpose to available (optional) click your way through the rest of the wizard until completion Step 9. Review the App-V application installation Now that you've done the hard work, logon to a client computer and wait until it retrieves policy or trigger a policy update to speed things along.Open the Application Catalog and you'll see your new App-V application listed there, select it and click on Install you might be asked if you are sure you want to install the application, answer yes.. and off it goes installing...if you get any failures then it's most likely due to missing prerequisites for the App-V client software, refer to a MSI*****.log file present in C:\Windows\Temp for details of the missing prerequisites. fix the missing prerequisite problems before continuing.. Note: at this point if you get any errors about the installation of Adobe Reader (or your virtual application) it may be due to a feature in this version, unfortunately this is due to having spaces in the App V application name. To resolve this please edit the Appv package using the sequencer and remove the spaces or replace them with underscores like in the screenshots below. I'll update this post once I know more about that feature... Simply start the sequencer and choose Modify an existing virtual package followed by Edit, then change the name and save the result.Here's what that problem looks like, notice how it's trying to determine what arguments 'reader' are... to resolve it, go back to your sequencer and modify your App-V package then choose Edit select your existing virtual application package change the name and click on File then Save As (without spaces...) Once done, create a new app exactly as before in Configuration Manager as described above, except this time use the Adobe_Reader_11 application instead.Once done don't forget to Deploy it, then logon back on to your client and select the new application in the Application Catalog. and you should see the App-V client gets installed happily and pops up in the system tray and our Virtual Application is installed! success, finally... :-) Further Reading I'd highly recommend you checkout the following websites for great information about App-V and beyond. http://www.applepie....s-behind-it-all http://www.applepie....nnection-groups http://www.stealthpuppy.com/ until next time,adios niall.


-
it's Beta therefore not supported in Production. You can install it in your LAB though, no problems there.
-
TSMBootstrap.exe-system error(Deploy win7 ent with UDI-wizard)
anyweb replied to sxleilong's question in How do I ?
well it could be something to do with the language(s), but it's hard to tell, can you attach the full smsts.log file here please ? -
yup and here's how to do it (Windows Assessment and Deployment Kit or Windows ADK) http://www.niallbrady.com/2012/06/20/how-can-i-upgrade-system-center-2012-configuration-manager/ remember that SP1 is in beta and therefore not supported in production unless you are a TAP customer, cheers niall
-
I think creating a Software Update Group with a corresponding deployment would be more suitable for that scenario
-
hold on. stop right there, if you are deploying Windows 8 Enterprise then the only supported version of ConfigMgr for that is Configuration Manager 2012 Service Pack 1 which is still in beta, so are you using that in your lab as it's not supported in production unless you are a TAP customer as regards your questions, 1 and 2 are part of the build and capture task sequence, 3,4,5 never happen, instead you deploy the image captured in your BAC task sequence and use separate steps/groups based on WMI to detect hardware and install the best drivers using just one task sequence and one image. in case you havnt already seen them review my index of guides here CM07 - http://www.windows-noob.com/forums/index.php?/topic/1064-sccm-2007-guides/ and CM12 - http://www.windows-noob.com/forums/index.php?/topic/4045-system-center-2012-configuration-manager-guides/
-
oh, and to answer your question, yes it's worth going, do it, go ! cheers niall
-
I wish I was but I live in Sweden, so I'll be going to the nearest one to me which is in Copenhagen, if you are wondering, that's in Denmark, but it's nearer than Stockholm so I can drive there quite easily the event with Wally is Next friday actually - Scug.dk if you go to the event in Reading then please say hi to Wally from me ! you'll probably meet Rob, Raphael and Cliff there also (ConfigMgr MVP's) cheers niall
-
TSMBootstrap.exe-system error(Deploy win7 ent with UDI-wizard)
anyweb replied to sxleilong's question in How do I ?
which version of MDT are you using and which version of Configuration Manager 2012 ? -
hi Greg if you are really new to this then the first thing i'd suggest you tackle is getting used to using Virtual machines for image building, particularly for build and capture where you want to keep the image clean and driver free. have you decided what OS you want to deploy ? the error you are getting is probably because you are doing an action that needs to be done in windows when you are in winpe (or vice versa), 0x00000032=unsupported