anyweb
-
Posts
9277 -
Joined
-
Last visited
-
Days Won
371
Everything posted by anyweb
-

how can I target applications to specific hardware
anyweb replied to anyweb's question in Deploy software, applications and drivers
if you follow the guide above it will work so......... open a command prompt as it says and type wmic To find out the model name type this CSProduct Get Name The result is what we need once you have the result you can do this obviously replace result in the above with the answer you got back from the CSProduct Get Name test -
post the smsts.log file here and we'll take a look
-
you need the windows vista management tools then more about that here http://support.microsoft.com/kb/952627
-
yup you need it, and remember it\s in Release candidate phase right now, so not supported but it works...
-
can you verify via the logs left in the minint folder that your actual zti task sequence has completed successfully ?
-
delete that minint folder and try again
-
SCCM 2007 R2 and Windows Server 2008 R2
anyweb replied to jeaostro's topic in Configuration Manager 2007
not supported yet but it works -
OS deployment and Lenovo computers
anyweb replied to jeaostro's question in Deploy software, applications and drivers
also look at this post on technet... -
ok good info, i've posted the question on the invision forums (i pay for this license) so let's see if i get a reply if i don't then we'll look at the code itself i've downloaded the developers guide it may help, this is ipboard version 3.02 now i think cheers niall
-
it's a great idea but i guess it would involve hacking or changing the php that this board is made from.......... can you show me a link to the forum in your screenshot, i want to see what forum software they are using cheers
-
if you are trying to deploy server 2008 R2 then sccm needs sp2 release candidate installed, so is the sp2 rc installed ? I have deployed server 2008 R2 using the very same steps in my deploy windows 7 guide, works just fine... if you want roles and features working via the task sequence then simply integrate MDT 2010 which is now final
-
and don't forget if you are testing windows 7 then you'll need the SP2 release candidate installed on sccm
-
i'm looking forward to what you produce Jamit, please raise it as a new topic and i'll pin it cheers niall
-
Disbale USB storage in XP workstations through Windows 2008 Group policy
anyweb replied to sun's question in Group Policy
yup, have a read of this -
sorry but its closed for now.
-
Released: Configuration Manager 2007 Service Pack 2 Release Candidate
anyweb replied to anyweb's topic in Windows News
you can get it from Microsoft Connect cheers niall -
post the entire log here please
-
hi, please read this thread on myitforum and tell me does it help
-
no don't skip it, can you please post the entire smsts.log file please
-
Need guidence to migrate standlone WDS to SCCM..
anyweb replied to Samtiger's question in How do I ?
i'll try and answer your qeustions you can do that using multiple non-mandatory task sequences yes i think so, but it's far better to build and capture the images from SCCM in the first place (think, total control of the whole process) not if wds is already in place -
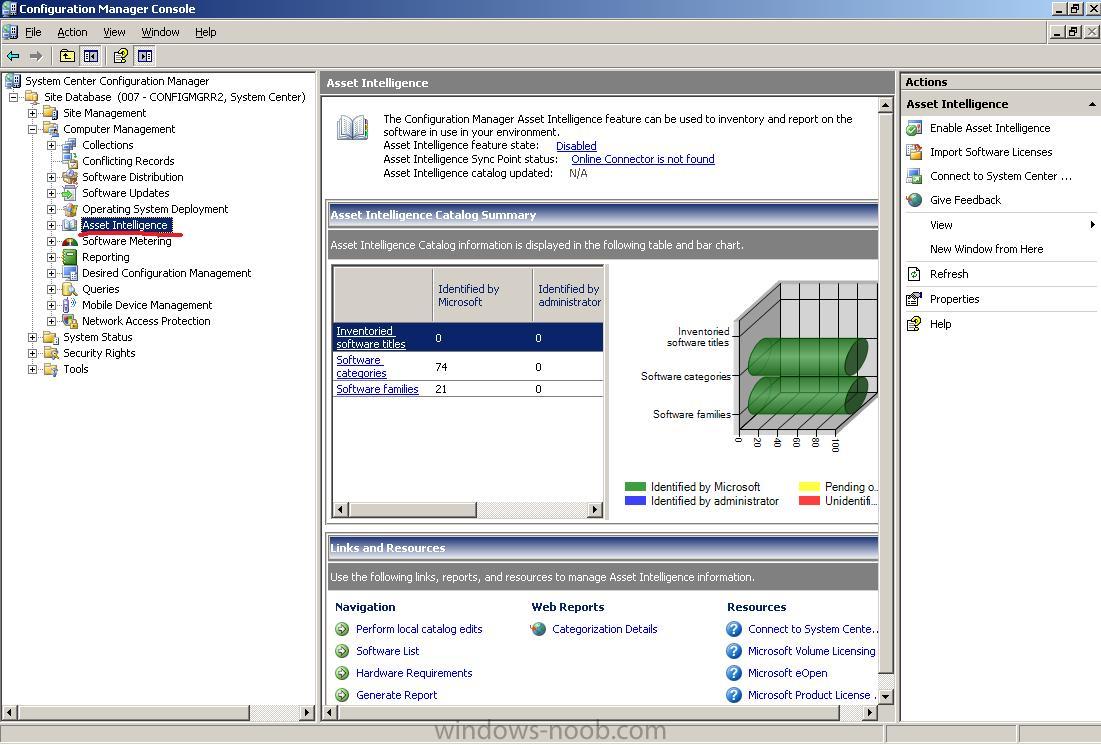
What is Asset Intelligence and how can I use it in SCCM
anyweb posted a question in Asset Management
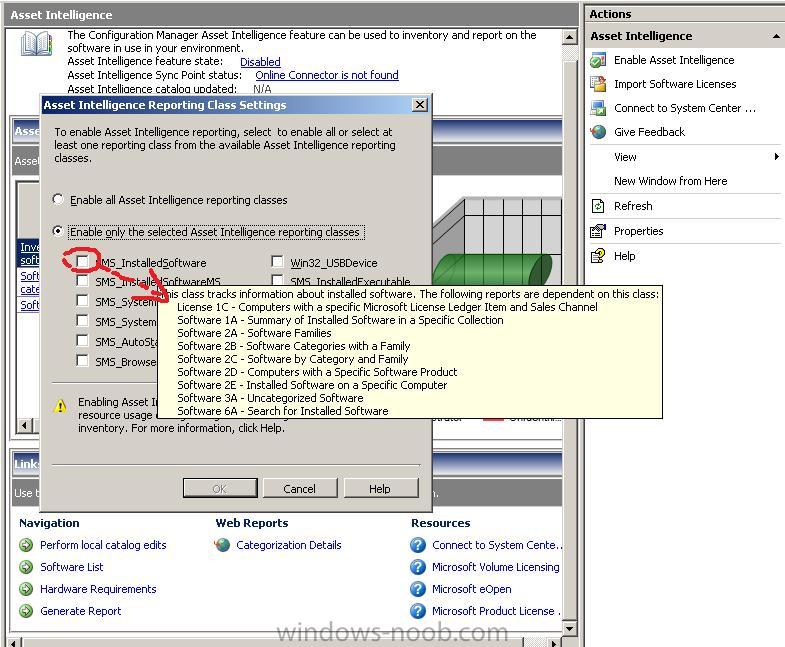
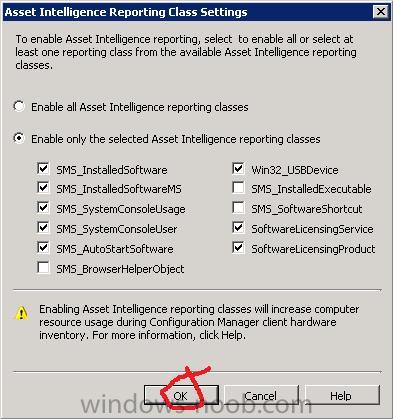
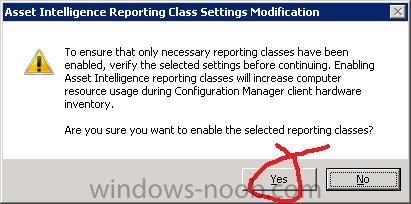
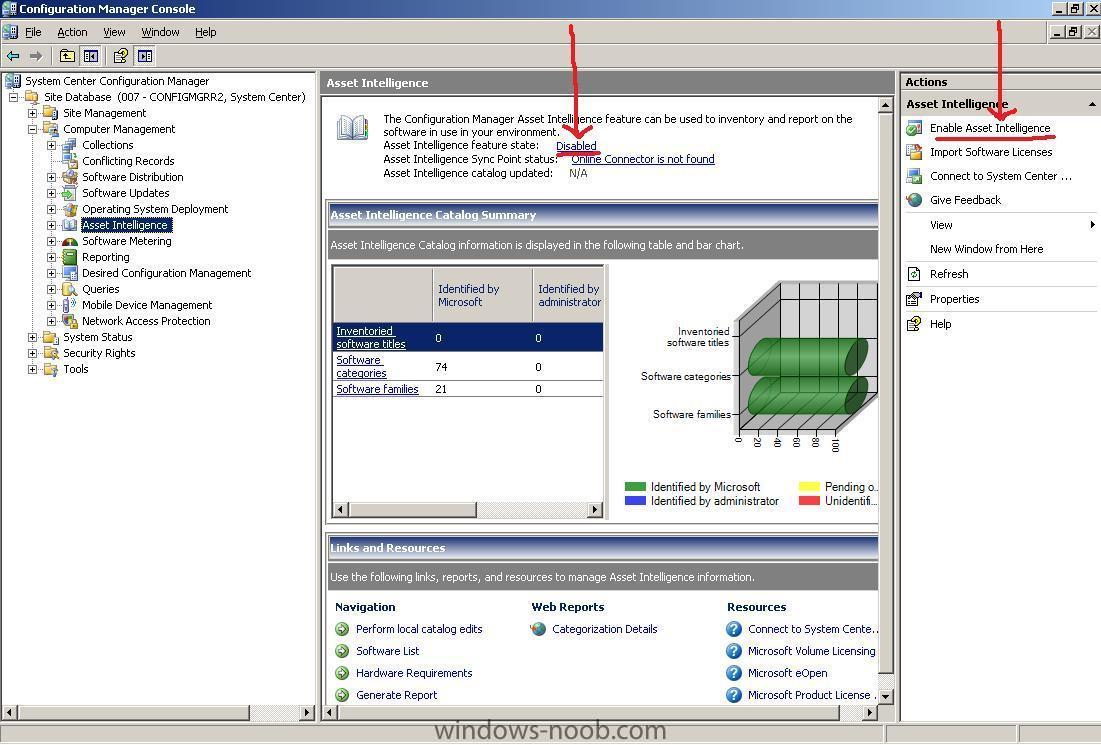
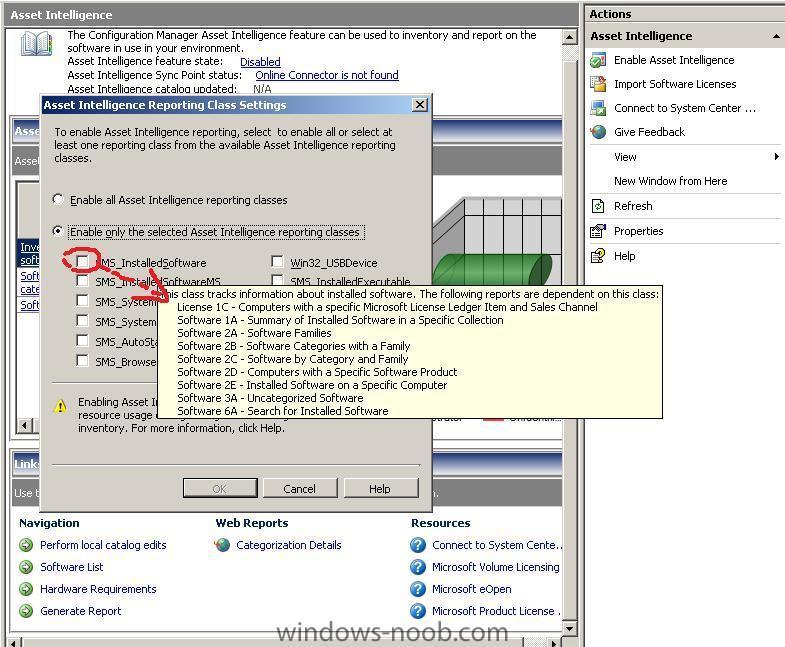
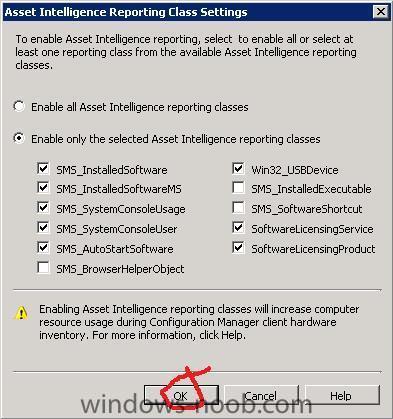
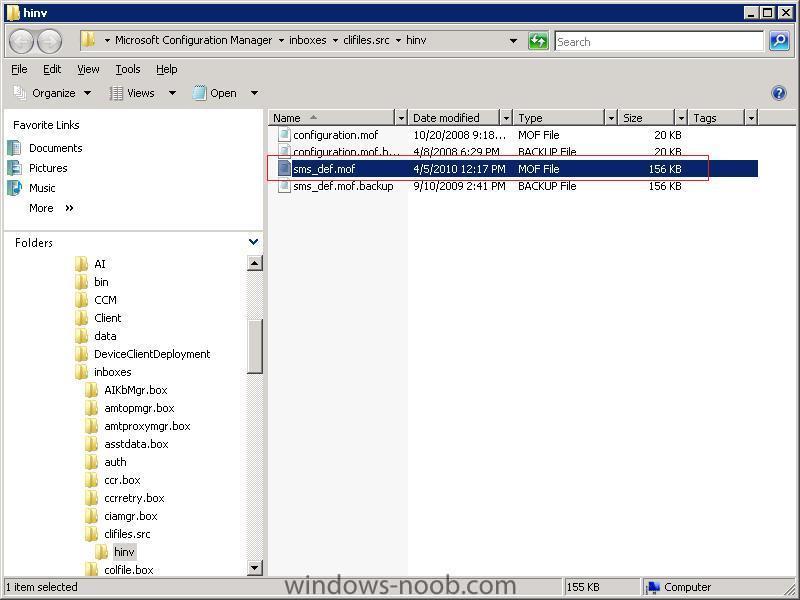
The Asset Intelligence feature in SCCM can be used to inventory and report on software in use in your environment. Where do I find the Asset Intelligence feature in SCCM ? Expand the Computer Management node and click on Asset Intelligence. How can I use Asset Intelligence ? to start off you'll want to enable the feature, to do this you can expand the Asset Intelligence node and click on the disabled state (or click on Enable Asset Intelligence in the Actions Pane). This will bring up a new window from which you can decide what Asset Intelligence reporting classes you want to enable. You must select at least one otherwise your reports based on those classes will contain no data. The more you enable the greater the hardware resource usage during the inventory. hover your mouse over a selection box and you'll be given information about what reports depend on the class. select the classes that you will need and click ok you will be prompted to verify the selected classes, if you are sure that they are ok (remember the more classes you enable the greater the increase in computer resource usage during the client hardware inventory) click Yes. We can always return here later and de-select classes if you don't require the info they gather. If you are a Microsoft Software Assurance (SA) licensed customer you can use the Asset Intelligence synchronization point site role in Configuration Manager 2007 SP1 to schedule automatic catalog information updates. What about my MOF file ? Browse to C:\Program Files (x86)\Microsoft Configuration Manager\inboxes\clifiles.src\hinv (change to the drive letter that you installed ConfigMgr on) You will see that the SMS_DEF.MOF has now changed to today's date/time. This file represents the changes you have just made (open it, scroll to the bottom and you'll see all the Asset Intelligence classes listed). Here's a snippet from there:- //************************************************************************** //* Class: SMS_SystemConsoleUsage //* Derived from: (nothing) //* //* Key = SecurityLogStartDate //* //* This Asset Intelligence class provides System Console Usage information. //* //************************************************************************** [ dynamic, provider("AAInstProv"), SMS_Report(TRUE), SMS_Group_Name ("System Console Usage"), SMS_Namespace (TRUE), SMS_Class_ID ("MICROSOFT|SYSTEM_CONSOLE_USAGE|1.0") ] class SMS_SystemConsoleUsage : SMS_Class_Template { [sMS_Report (TRUE)] uint32 TotalSecurityLogTime; [sMS_Report (TRUE), key] datetime SecurityLogStartDate; [sMS_Report (TRUE)] uint32 TotalConsoleTime; [sMS_Report (TRUE)] uint32 TotalConsoleUsers; [sMS_Report (TRUE)]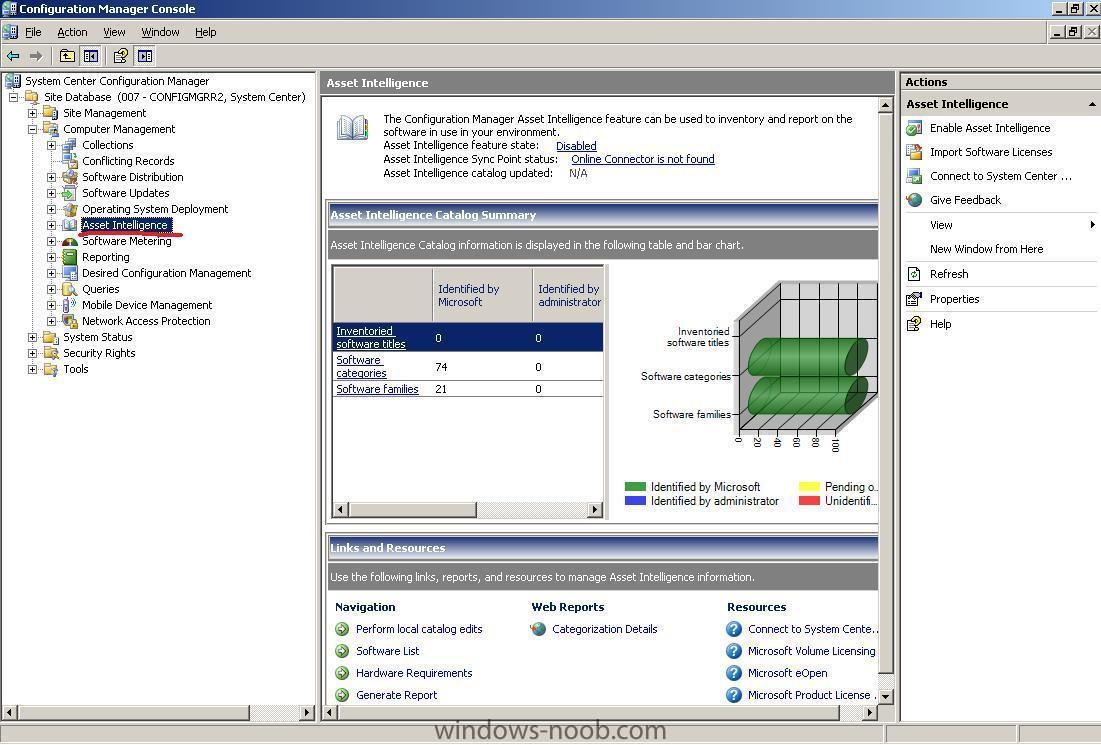

-
good question i think you'll need to change the multicast range that is defined by default in sccm as that doesn't work well with cisco, so i have read... i'm not a cisco person so that's all I can say
-
Microsoft Deployment Toolkit 2010 Now Released
anyweb posted a question in Microsoft Deployment Toolkit (MDT)
Get ready to deploy Windows 7 and Windows Server 2008 R2 with the final release of Microsoft Deployment Toolkit 2010 Click here to download MDT now. (http://go.microsoft.com/fwlink/?LinkId=159061) As you prepare to deploy Windows® 7 and Windows Server® 2008 R2, get a jump start with Microsoft® Deployment Toolkit (MDT) 2010. Leverage this Solution Accelerator to achieve efficient, cost-effective deployment of Windows 7 and Windows Server 2008 R2. MDT is the recommended process and toolset to automate desktop and server deployment. MDT provides you with the following benefits: * Unified tools and processes required for desktop and server deployment in a common deployment console and collection of guidance. * Reduced deployment time and standardized desktop and server images, along with improved security and ongoing configuration management. * Fully automated Zero Touch Installation deployments by leveraging System Center Configuration Manager 2007 Service Pack 2 Release Candidate and Windows deployment tools. For those without a System Center Configuration Manager 2007 infrastructure, MDT leverages Windows deployment tools for Lite Touch Installation deployments. MDT 2010 includes new features such as flexible driver management, optimized user interface workflow, and Windows PowerShellTM command line interface to help simplify deployment and make your job easier. Deploy faster and more easily with MDT 2010. New in MDT 2010 Improvements in MDT 2010 allow you to: * Access deployment shares from anywhere on the network and replicate files and settings across organizational boundaries or sites. * Organize and manage drivers, operating systems, applications, packages, and task sequences with an improved UI. * Automate UI functionality using the new Windows PowerShell command line interface. Next steps * Download Microsoft Deployment Toolkit 2010. (http://go.microsoft.com/fwlink/?LinkId=159061) * Learn more about MDT by visiting the MDT site on TechNet. (www.microsoft.com/mdt) * Get the latest news by visiting Microsoft Deployment Toolkit Team blog. (http://blogs.technet.com/msdeployment/default.aspx ) * Provide us with feedback at satfdbk@microsoft.com. If you have used a Solution Accelerator within your organization, please share your experience with us by completing this short survey (http://go.microsoft.com/fwlink/?LinkID=132579). Sincerely, Microsoft Deployment Toolkit Team Solution Accelerators | Microsoft Corporation |