anyweb
-
Posts
9260 -
Joined
-
Last visited
-
Days Won
371
Everything posted by anyweb
-
ok interesting, after you do a sync, can you verify from the system Status component logs that the sync was successful and see does it appear then ?
-
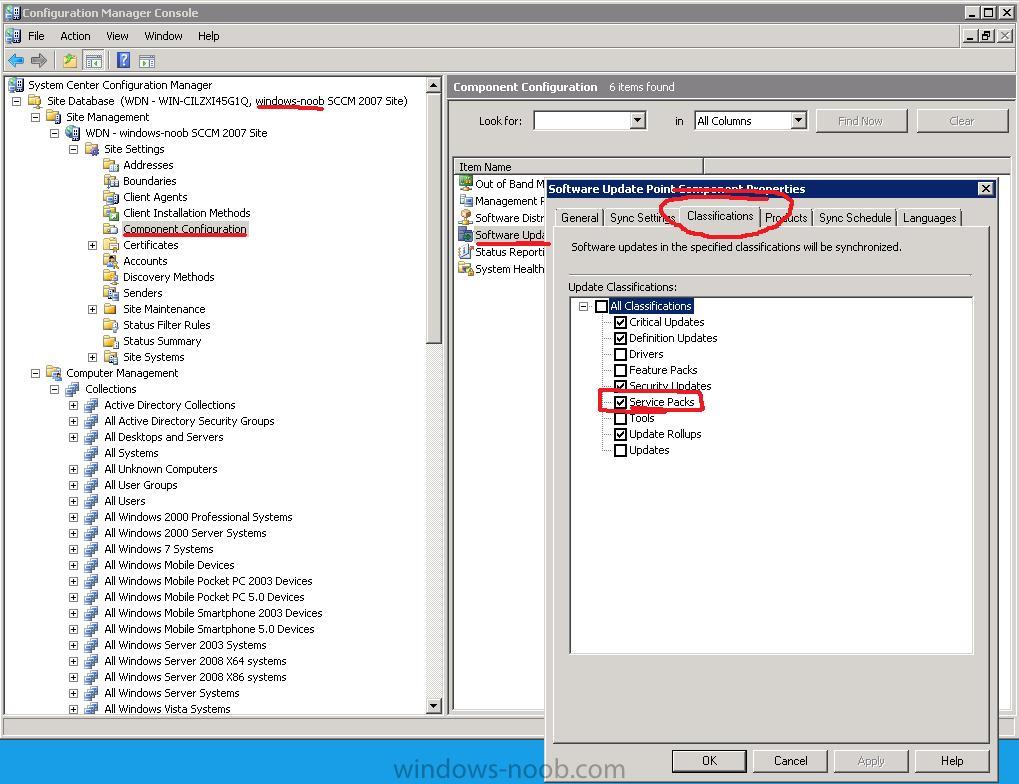
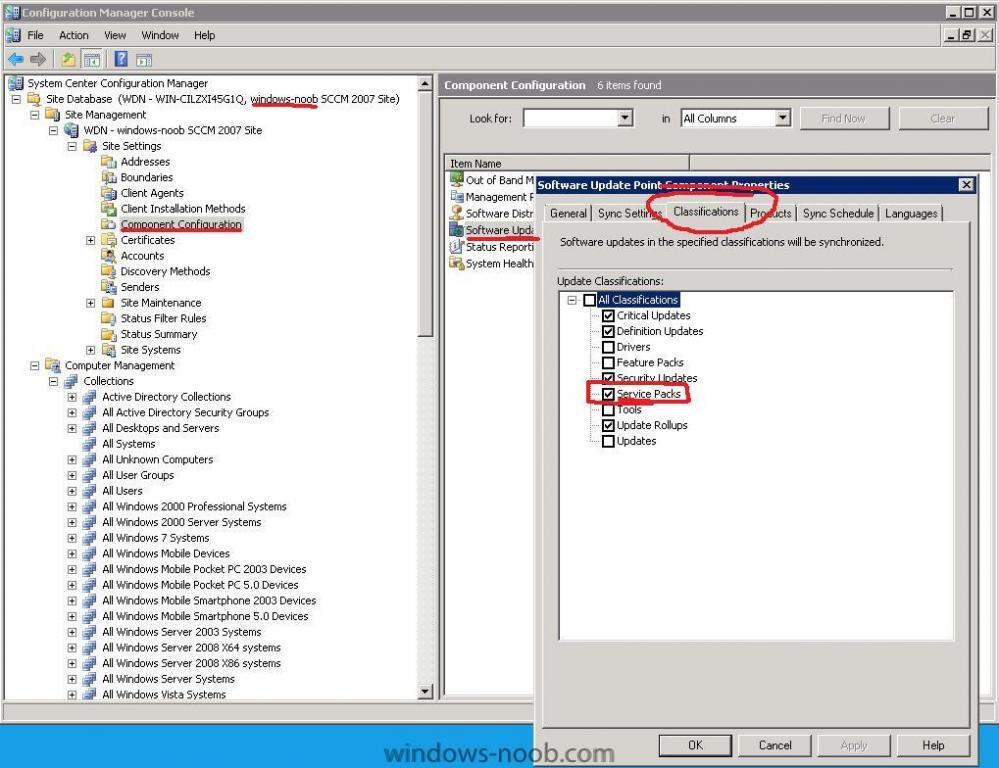
check your classifications in the software update point components, are service packs selected ?
-
if it is marked as obsolete then it is still known.
-
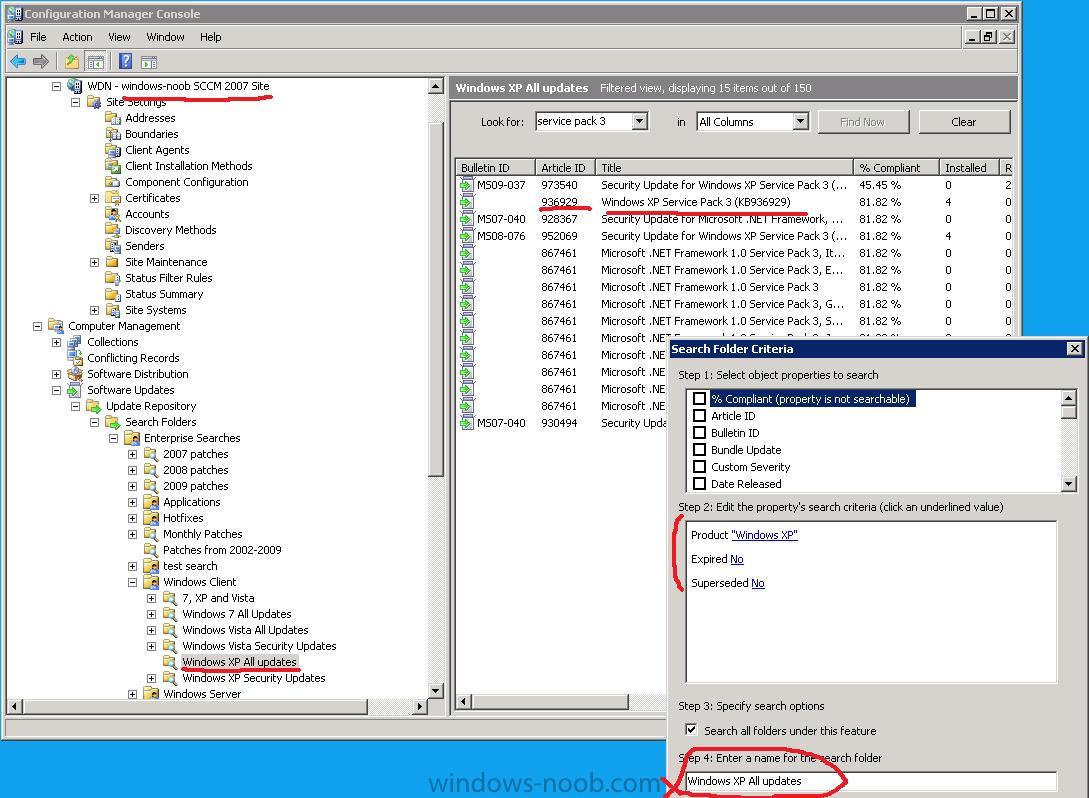
is your All Windows XP updates search folder criteria setup like this ?

-
a machine that is unknown to sccm is one that isnt in sccm's database the machines mac address, guid or computername can be present in the sccm database, and you need at least two of those components to (for example) import a computer into sccms database and make it known
-
InfoWorld's J. Peter Bruzzese takes an admin look the key decisions and options you'll have to address to ensure a successful migration to Windows 7. Bruzzese's guide -- which includes a hands-on video tour of Windows 7 and a deep-dive PDF report that provides Windows 7 benchmarks -- examines hardware and software compatibility issues, addresses the licensing question, and lends insight for those Windows shops considering the virtualized desktop route. via > http://www.osnews.com/story/22286/Admin_s_Guide_to_Deploying_Windows_7
-

how can I install SCCM 2007 in Windows Server 2008
anyweb replied to anyweb's topic in Configuration Manager 2007
please raise a new topic in the correct section, this topic is for how to install SCCM 2007 SP1 in Windows Server 2008.. -
its not that hard to do when you think about it, all unknown computers (unknown to sccm) can be deployed via a task sequence advertised to the unknown computers collection... (windows 7 for example) whereas all known computers can be added to deploy XP.... does that make sense, or not ?
-
its easy i use collections and drop computers into collections based on what I want to do with them so if I want to deploy Windows 7 to a new computer I drop the computer into a collection called Deploy windows 7 if I want to deploy XP I can do the same for the XP computers, I have my task sequences advertised to the respective collections and they are mandatory unless of course I want a list of task sequences does that make sense ?
-
find out what this package is and distribute it to the DP and try again (GEO00009)
-
i believe ghost does multicasting which by the sounds of things is what you want to do is it ?
-
"Thanks to everyone's feedback, we're happy to announce that Windows XP Mode has RTM'd today. We expect to make the final release of Windows XP Mode available via the Microsoft Download Center on October 22nd. OEMs will be able to offer Windows XP Mode on their PCs based on their manufacturing schedules." via http://www.osnews.com/story/22272/XP_Mode_Hits_RTM_Status
-
SCCM client doesn't show site code or mode
anyweb replied to Tom5674's question in Troubleshooting, Tools, Hints and Tips
can you elaborate ? -
Join domain depending on computername
anyweb replied to ::_Christian_::'s question in Troubleshooting, Tools, Hints and Tips
the regional and language settings are used as follows create a blank (or edit existing) sysprep.inf file with the following lines in it then create a sysprep package of the above file and add it to your task sequence, if you use MDT integration in SCCm you can use ztigather and zticonfigure scripts in the TS and they will poke the correct values you set on the collection variables into your sysprep.inf during deployment try it and post your results here -
wait time for Client to show up as YES in your collections
anyweb replied to lark2056's topic in Configuration Manager 2007
initiate a Data Discovery Cycle on the client and then refresh the collection in configmgr 10 minutes later any change ? -
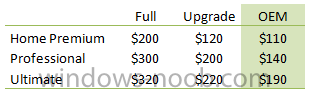
Windows 7 will be released October 22, and the pricing information for both the full and upgrade versions have been known for a while. However, as most of us geeks will know, there's a third variant you can buy, apart from upgrades and full versions: OEM or system builder releases. NewEgg has leaked the pricing information for these releases too. In stores in the western world, you'll be confronted with three Windows versions: Home Premium, Professional, and Ultimate (although that last version might be hard to come by). NewEgg has published the pricing information for all OEM variants of those three versions. Putting all the three price variants together for the three versions (get it?), results in the following table (as far as I can tell, these prices go for both the 32bit and 64bit versions): more > http://www.osnews.com/story/22265/Windows_7_OEM_Prices_Revealed

-
in an enterprise that would'nt be an option, but feel free to create a guide for doing it, and share it with us here
-
don't delete it, who installed this SCCM server ? was it someone else ? do you have any documentation for this server ?
-
you say it shows under site system status, is that the status of the parent site and perhaps that site has the psp role installed >?
-
under site systems,click on your servername you will see the roles listed on the right side, do you see ConfigMgr PXE Service Point listed ? if so the PSP role is installed (it is required for OSD) to remove the role, right click on it and choose Delete.
-
Join domain depending on computername
anyweb replied to ::_Christian_::'s question in Troubleshooting, Tools, Hints and Tips
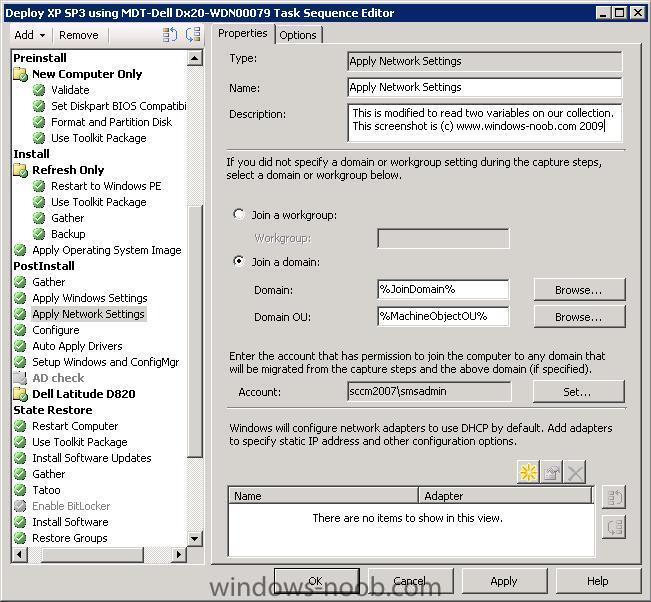
good question, in my suggestion below I am not using the computername to decide where the computer shall be placed but by using collection variables, perhaps someone with a VBS script that does domain OU joining based on computername can chirp in, you could use computer variables (right click on the computer in the collection and set a variable called JoinDomain=DOMAIN or similar or you could use collection variables to apply to all computers in that collection, to do this, simply right click on your deploy collection and choose Modify collection settings, here is an example of two variables on a collection Set the following Collection variables to something like this... then edit your Task Sequence to use the variables like so does this help ? TIP: to verify that your Collection Variables are indeed being passed through to your task sequence bring up a command prompt in WinPE and use TSENV2 to list the variables eg: tsenv2 list > variables.txt you can then review the variables.txt file to find your collection variables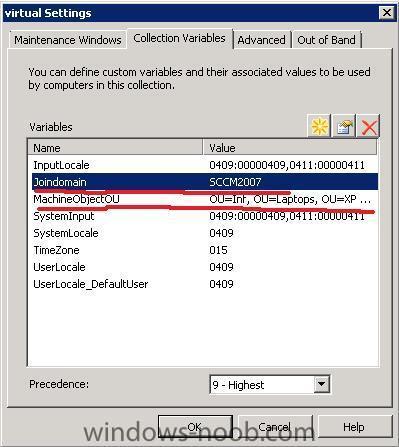
-
what is your goal ?
-
how can I configure SCCM 2007 in Windows Server 2008 - Part 2
anyweb replied to anyweb's topic in Configuration Manager 2007
have a read of this and see does it help -
on 64bit systems in the control panel, click on the View 32 bit items icon to see the configmgr client icons cheers niall
-
Microsoft have released their free anti-virus and anti-malware software (codenamed 'Morro') to the public, under the name of 'Microsoft Security Essentials'. Microsoft's intent to release free anti-virus software has been known for as long ago as 2004 when Microsoft bought out GeCad and Pelican Software. Microsoft also purchased Giant Antispyware (which was generally considered to be a good product at the time) and later became Windows Defender, as well as being built into Windows Vista by default. Microsoft previously had Windows Live OneCare, a paid subscription security suite including extras like parental controls and photo backup, but discontinued the product possibly due to user and industry-wide criticism of the product, and that Morro was already on the horizon. more > http://www.osnews.com/story/22255/Microsoft_Security_Essentials_Released you can download the files here: Windows XP 32‐bit: mssefullinstall-x86fre-en-us-xp.exe Windows Vista/WIN7 32‐bit: mssefullinstall-x86fre-en-us-vista-win7.exe Windows Vista/WIN7 64‐bit: mssefullinstall-amd64fre-en-us-vista-win7.exe