anyweb
-
Posts
9271 -
Joined
-
Last visited
-
Days Won
371
Everything posted by anyweb
-
 i mean are the users you are using to login to the helpdesk in the appropriate active directory groups specified in the powershell arguments
 -
did you get any errors when you installed the helpdesk using the powershell script ? are your helpdesk users that you use to retrieve keys correctly setup ?
-
thanks ! as regards your problem I'm not using TPM+PIN, have you tried with just TPM only ? does it work there or same issue ?
-
have you tried to reinstall the helpdesk webportal as it's more than likely still tied to your original SQL server setup, here's the command line I used in my labs .\MBAMWebSiteInstaller.ps1 -SqlServerName cm01.windowsnoob.lab.local -SqlInstanceName MSSQLSERVER -SqlDatabaseName CM_P01 -ReportWebServiceUrl http://cm01.windowsnoob.lab.local/Reportserver -HelpdeskUsersGroupName "windowsnoob\MBAM_HD" -HelpdeskAdminsGroupName "windowsnoob\MBAM_HD_Adv" -MbamReportUsersGroupName "windowsnoob\MBAM_HD_Report" -SiteInstall Both that would be the first thing i'd do, uninstall your current help desk (as you've moved SQL) and then reinstall the helpdesk portal pointing to the new SQL server
-
Interesting, I haven't tested it yet with a CMG scenario, but now that you've mentioned it I guess I should so i'll try and replicate this in my lab and see what happens, time willing, i'll report back after that cheers niall
-
Altaro FREE ebook - SysAdmin Horror Stories Vol.2
anyweb posted a topic in Official Forum Supporters
Last year’s ebook, SysAdmin Horror Stories Vol1 by Altaro, highlighted some of SysAdmins’ funniest and most horrifying stories. It proved so successful, that Altaro decided to produce a second edition this year: they’ve gathered some more real-life stories to share with you, that are both funny and horrific! We all know that a SysAdmin’s job is no easy task, and apart from constantly having systems to update, bugs to fix and users to please, SysAdmins encounter all sorts of situations throughout their careers. From tech situations to funny anecdotes, terrible mishaps or incidents with colleagues, this eBook includes real stories of what SysAdmins go through on a daily basis. It’s very easy to download as no registration is required. Click on Download and it’s yours. It includes more than 20 short stories but this one is my personal favorite. Download your FREE copy today & Happy Halloween!


-
Dont Have Application Website Catalog
anyweb replied to honestvip's topic in Configuration Manager 2012
they are not there because they have been removed, see https://docs.microsoft.com/en-us/mem/configmgr/core/plan-design/changes/deprecated/removed-and-deprecated-cmfeatures- 1 reply
-
- 1
-

-
ADR not downloading updates
anyweb replied to kesh's topic in System Center Configuration Manager (Current Branch)
which version of configmgr ? -
i've no idea sorry, and i wouldn't do it that way, just restore your back up to another vm server and export the ts from there
-
sure it was, until you deleted it ?
-
if you've deleted the task sequence then it's gone i'm afraid, you could restore the backup of your server to a vm and export the task sequence from that vm to your online server, that's what i'd do cheers niall
-
what type of headphones are they and are you using bluetooth or wired to use them ?
-
thanks ! if you look at the apps included on the FOD discs, chances are they are there, and you need to add them (if that's what you want), you can modify the steps i've added and add additional steps to include the apps you want localised
-
Awesome, I'm glad to hear it ! now make sure you check out the rest of my guides ? There is plenty to learn (such as PKI, Tenant Attach, Bitlocker Management and more)
-
hi Mike used space only in a task sequence occurs when you have enabled the Pre-Provision BitLocker step and have not configured it (or the enable bitlocker step) to use Full disk encryption I blogged about that in the following posts, please take a look: How can we utilize the Bitlocker Management feature during OSD with Endpoint Manager Full disk encryption (in ConfigMgr 1910) – a closer look using real hardware Enabling Full Disk Encryption in Microsoft Endpoint Configuration Manager 1910 in a task sequence if none of this helps then let me know and i'll investigate in my lab
-
Autologon.exe task sequence SCCM2012r2
anyweb replied to Xavier62's topic in Configuration Manager 2012
hi and welcome, first i'd recommend you use the Current Branch release of ConfiMgr, today that would be anything from version 2006 and later (you install the baseline version first CM2002) then upgrade. next, your error 0x8007052e translates to " The user name or password is incorrect. Source: Windows ----- so you should verify you are settings the username/password correctly cheers niall " -
thanks ! warnings can be ignored but anything that is Failed can not. Can you share the logs generated on the root of C:\ on your ConfigMgr server please and i'll take a look (zip them up)
-
due to the complexity of this solution you'll probably want to use an inplace upgrade task sequence from configmgr, is that an option for you ?
-
@lalajee yup, that's why I had a Note: in step 5, shown again below ? Note: This is an MDT integrated task sequence so if you want to use it please integrate MDT with ConfigMgr. You will get messages about missing content during the import, choose 'ignore dependancies' and it will import the task sequence steps anyway. However, you must then step through each step in the task sequence that references a package, and point it to the equivalent package on your ConfigMgr environment.
-
anything is possible you just need to think and then come up with a solution. this solution will detect the installed language pack, and you could use that detection method and expand it to work in your environment https://www.niallbrady.com/2016/05/17/introducing-the-windows-10-uefi-bitlocker-frontend-for-system-center-configuration-manager-current-branch
-
I'm not infront of my computer but this can be inverted so that you can get or set $OSDComputerName $tsenv = New-Object -COMObject Microsoft.SMS.TSEnvironment $tsenv.Value("OSDComputerName") = $OSDComputerName I'll fire up my lab and show some examples shortly... $tsenv = New-Object -COMObject Microsoft.SMS.TSEnvironment $OSDComputerName = $tsenv.Value("OSDComputerName")
-
how about something simple like this... $tsenv = New-Object -COMObject Microsoft.SMS.TSEnvironment $tsenv.Value("OSDComputerName") = $OSDComputerName
-
Trouble deploying Windows 8 using UEFI to HP Laptop
anyweb replied to DavidK's topic in Configuration Manager 2012
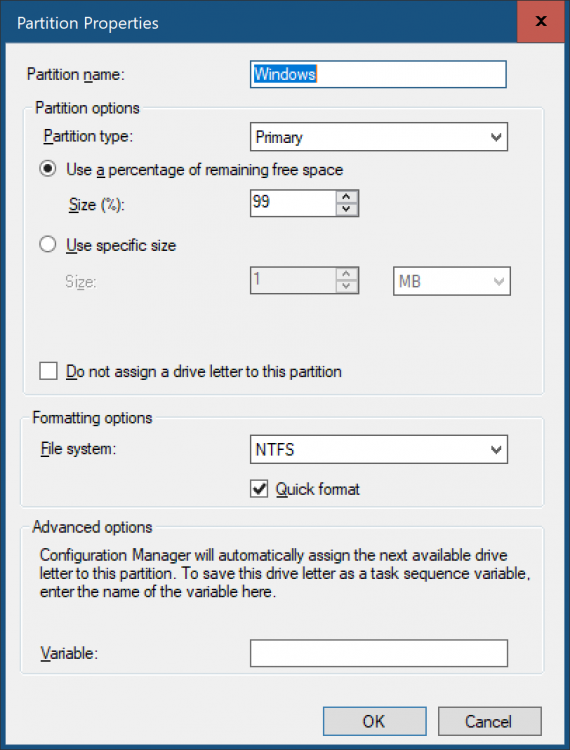
ok well then perhaps it would have been better to create a separate thread for this, seeing as it's got nothing to do with deploying Windows 8 to a HP computer... anyway, you are testing a very default scenario, i'll compare my log to yours... does your partition step look like this ? if not, show me a screenshot of your settings. in the Windows partition, have you verified that it does a Quick format ? secondly, your vm has an A:\ drive, have you tried without that ?
-
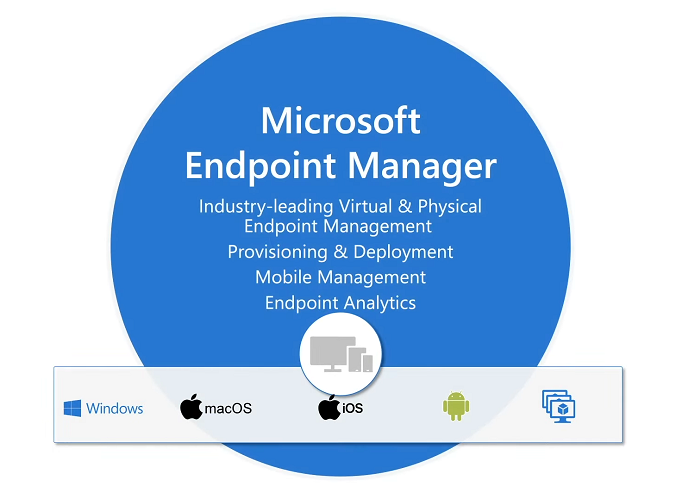
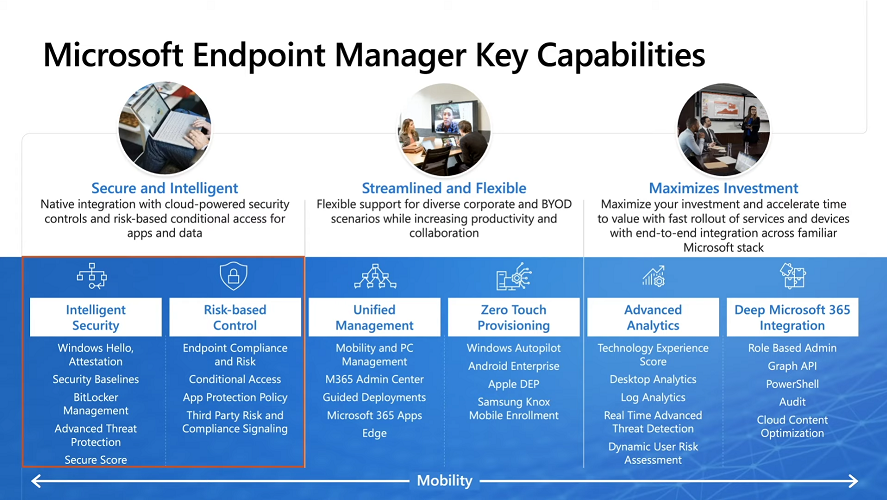
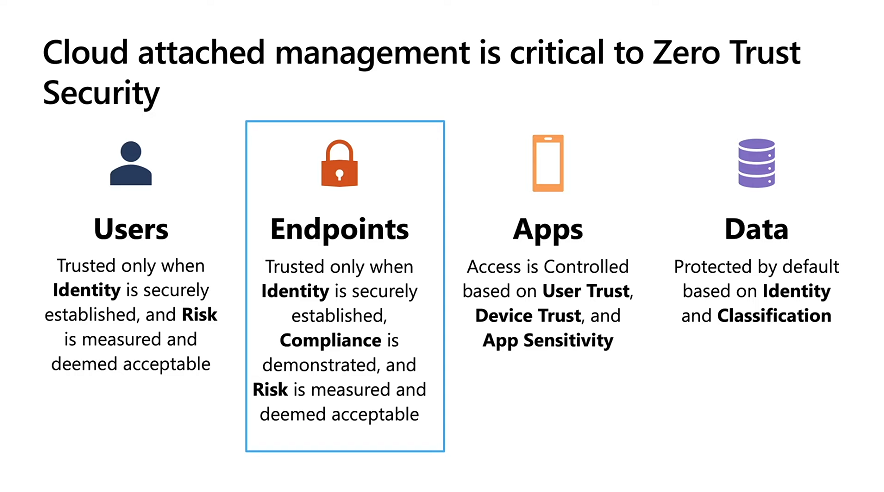
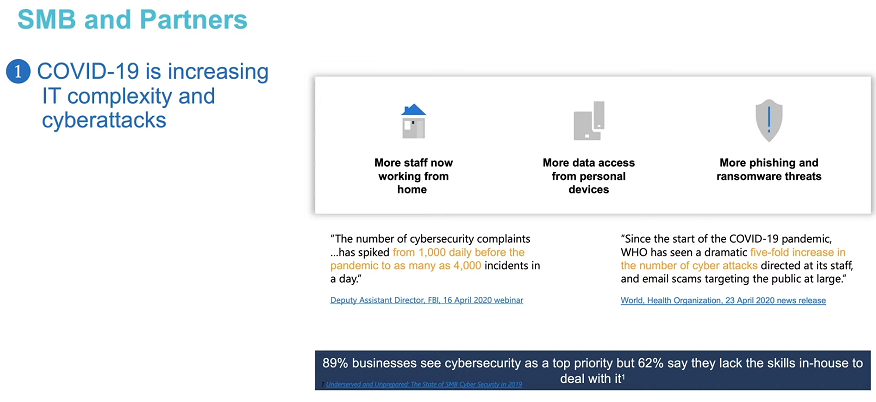
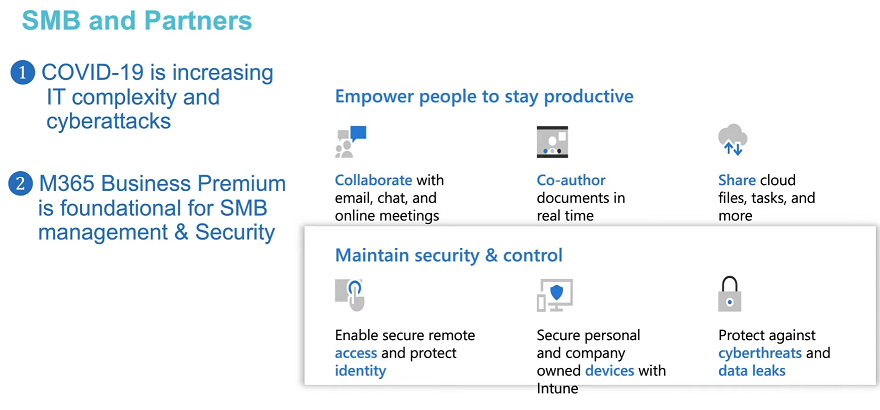
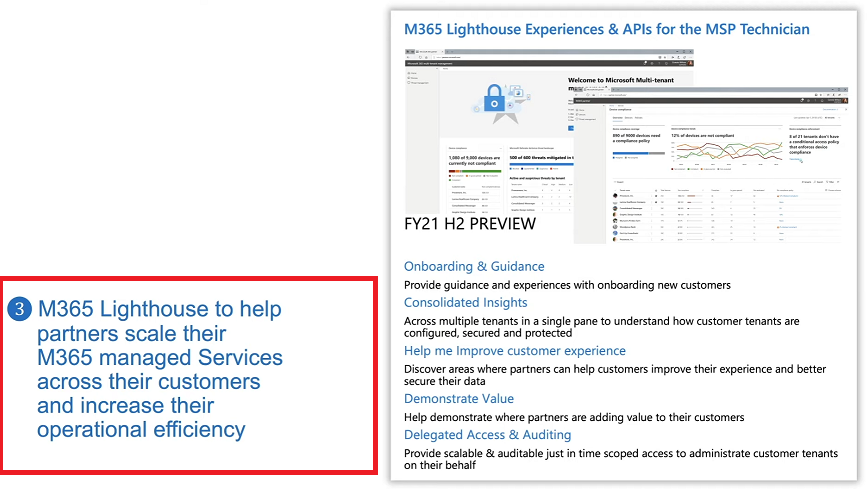
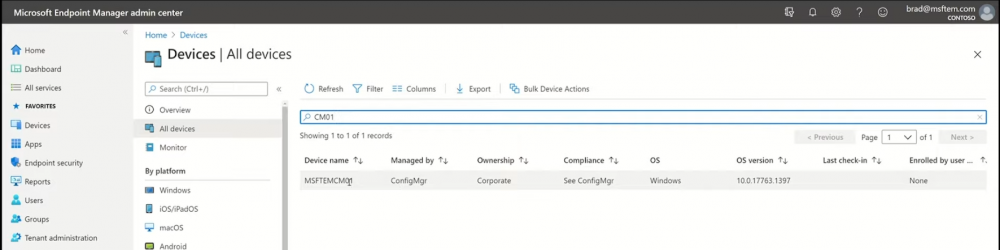
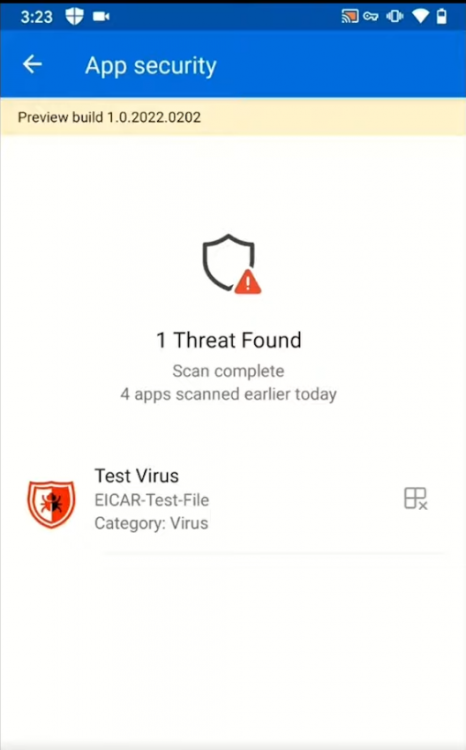
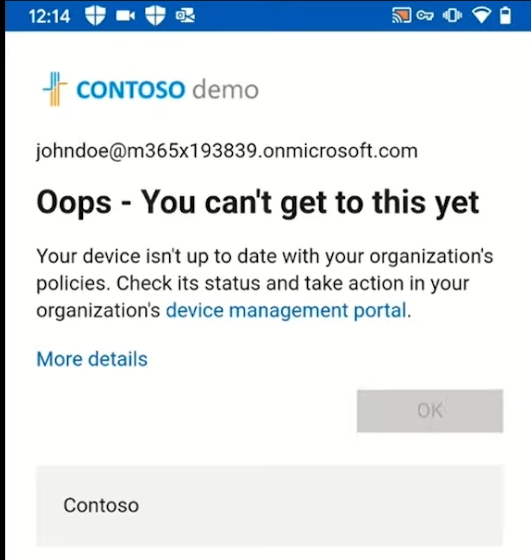
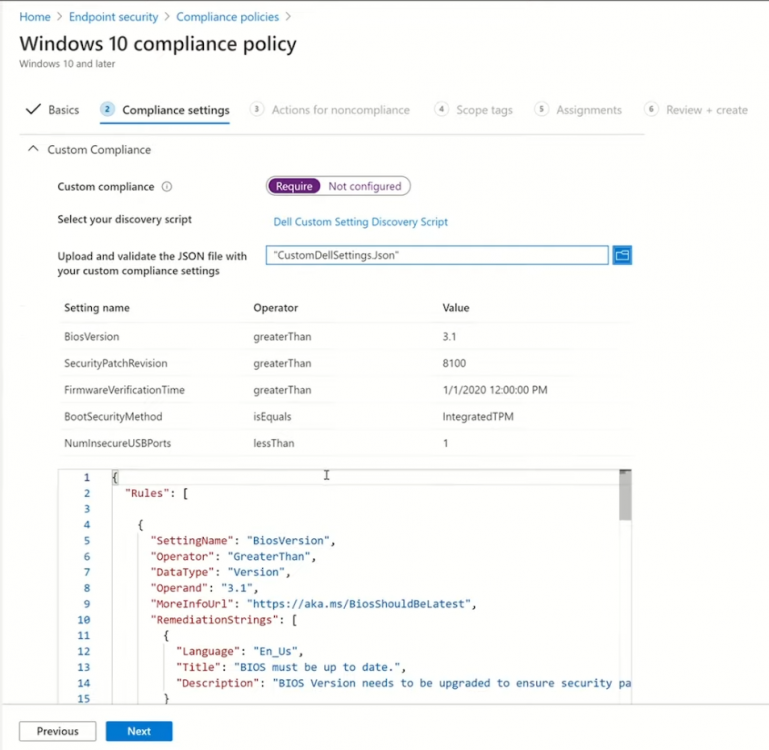
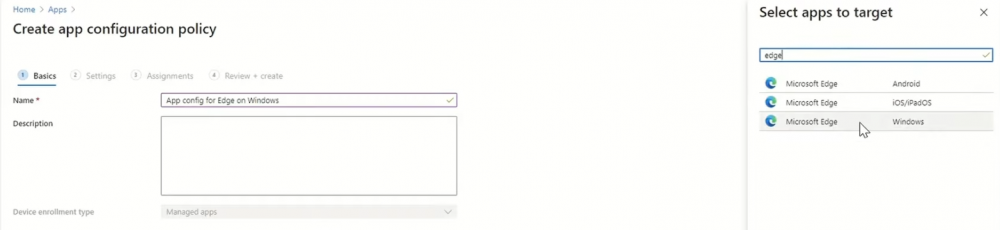
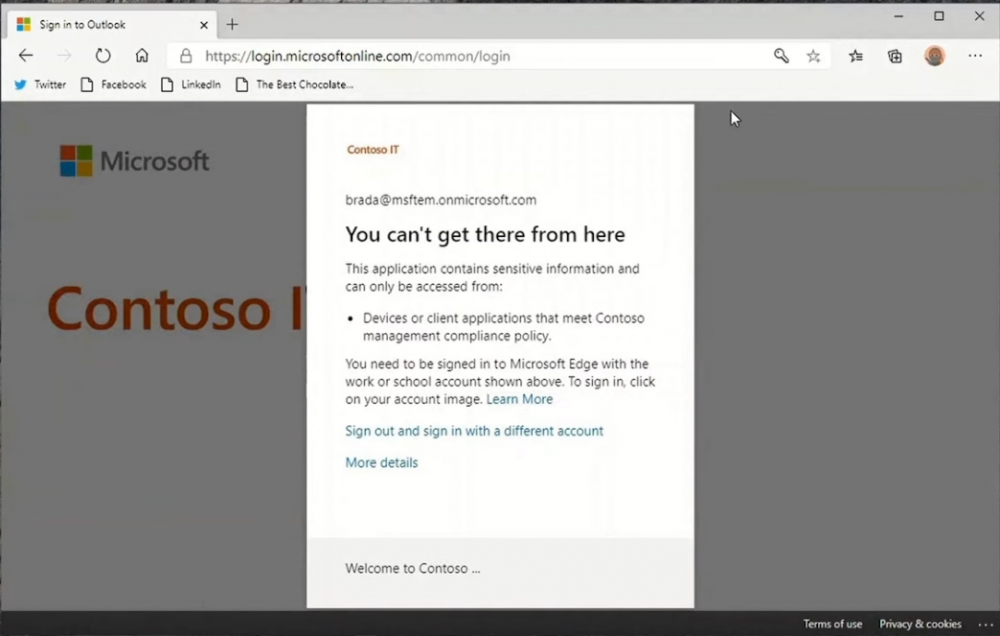
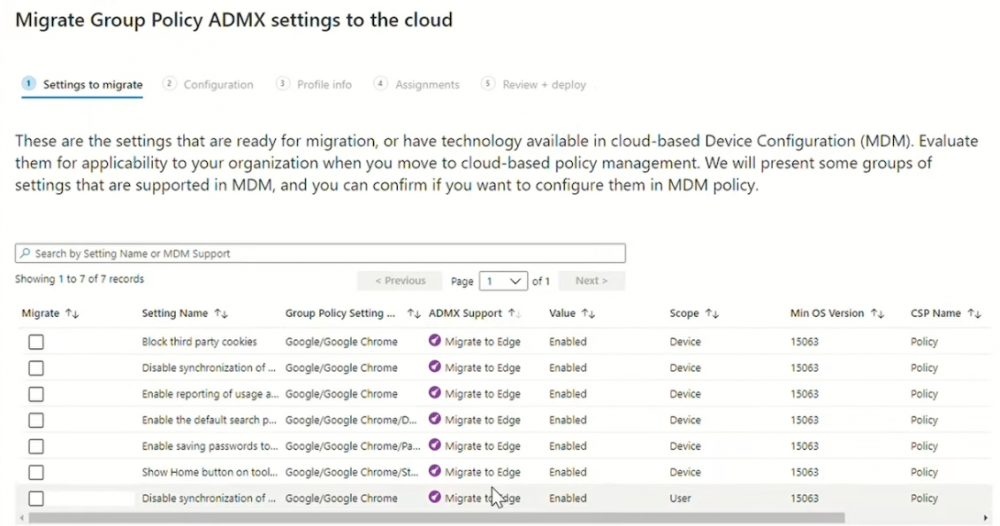
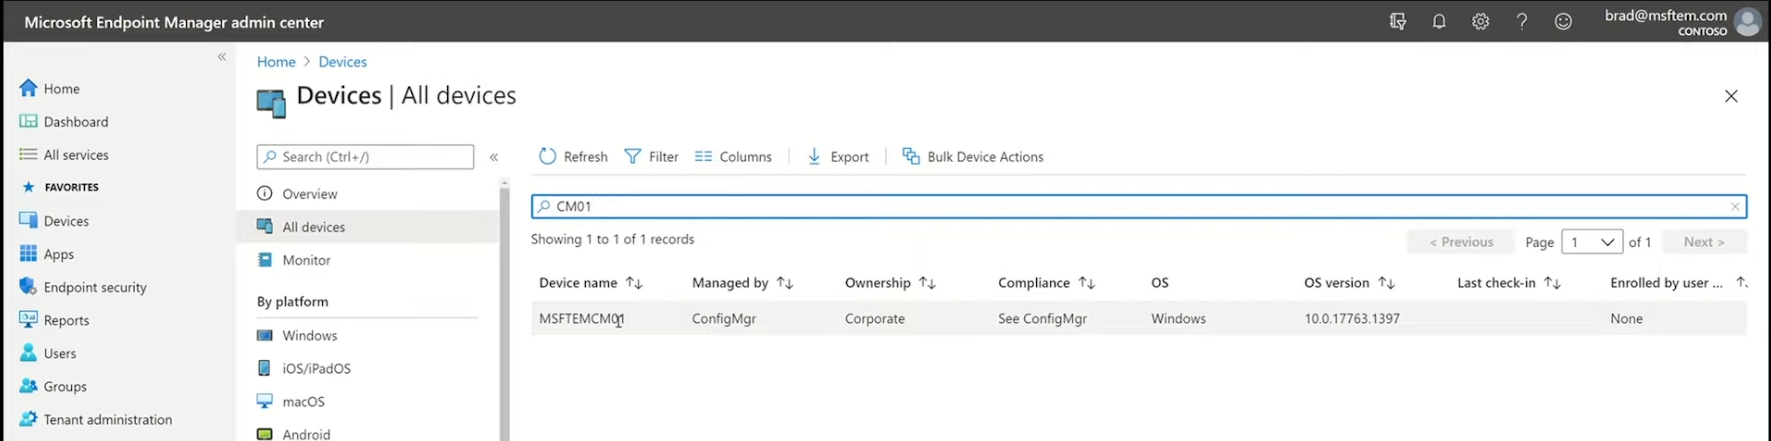
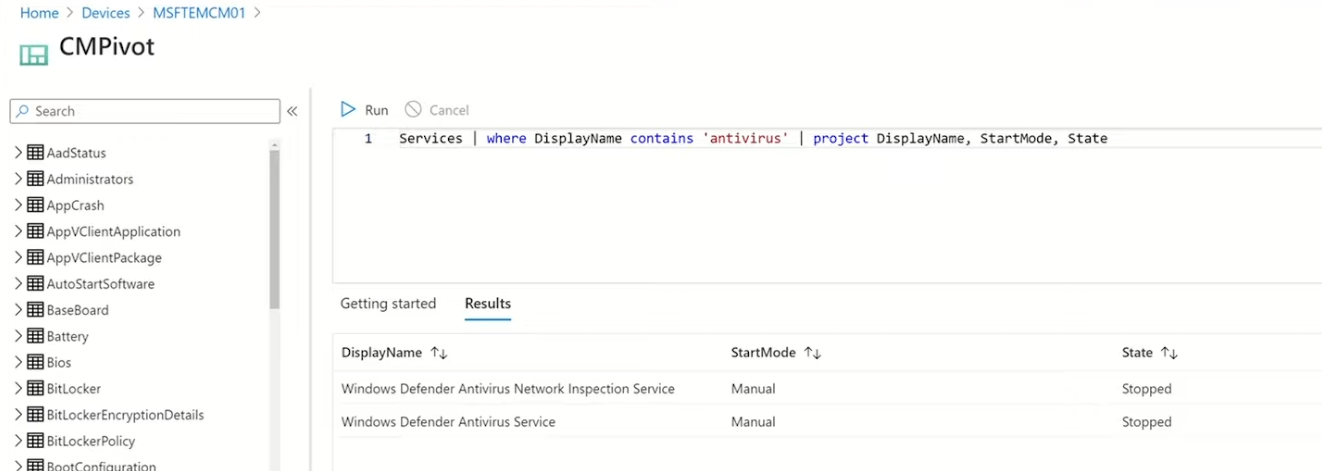
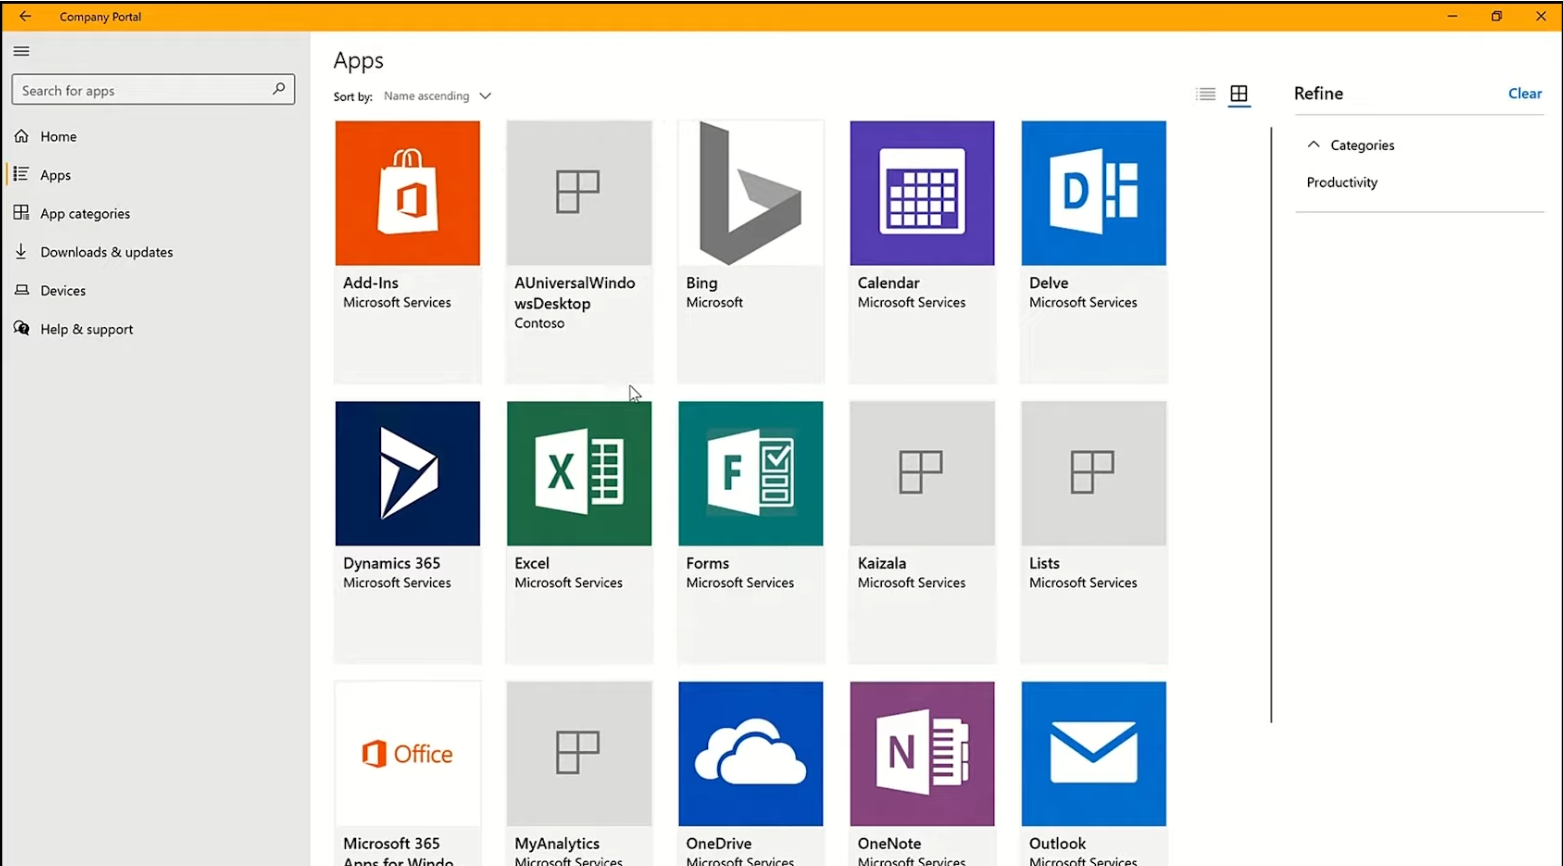
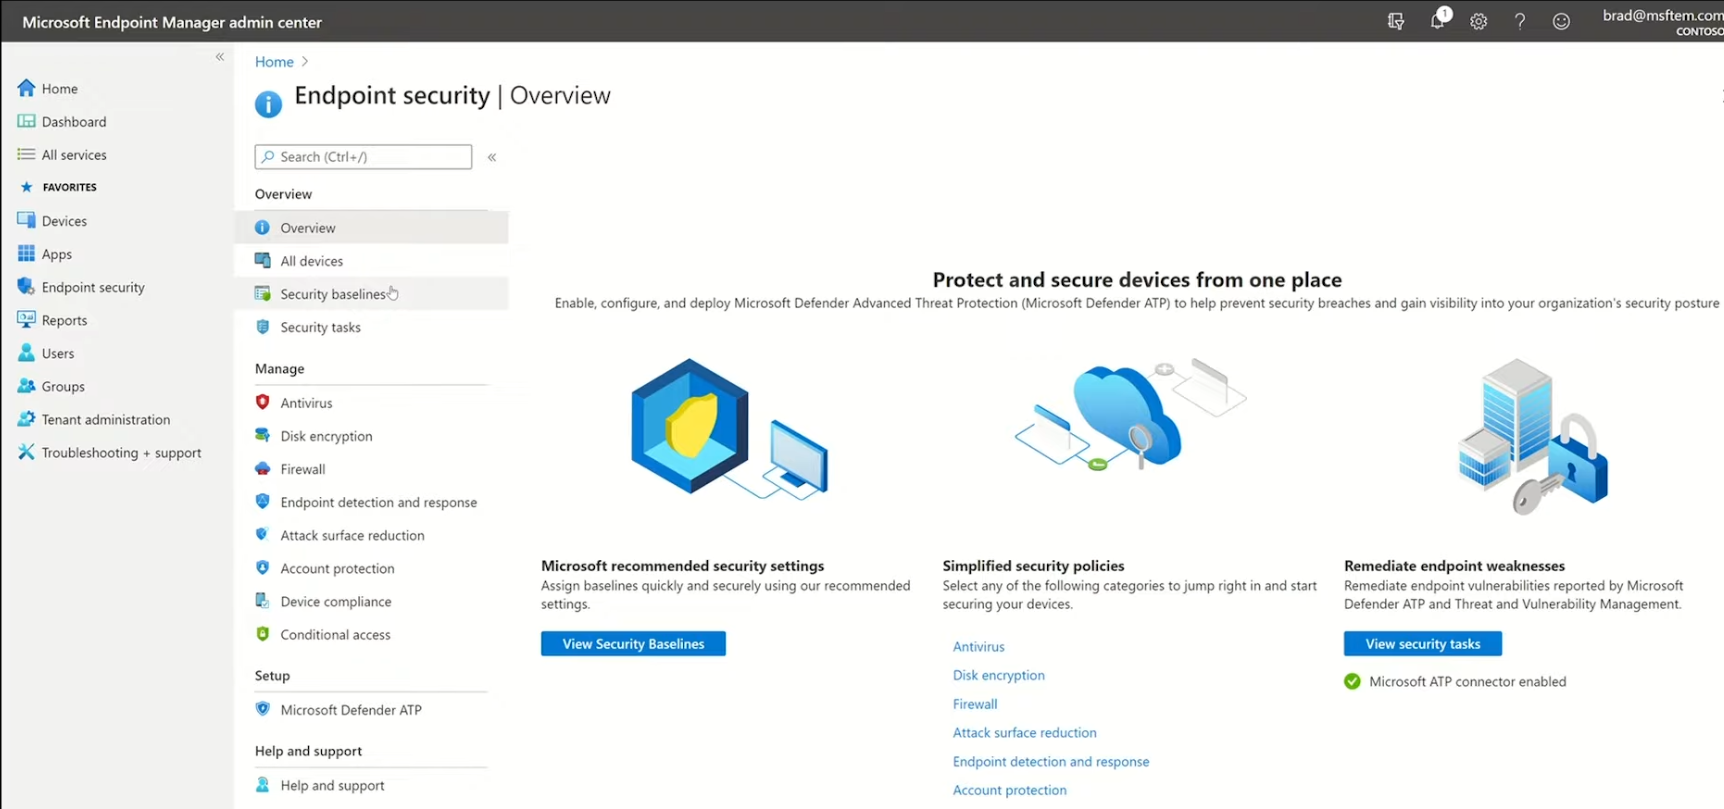
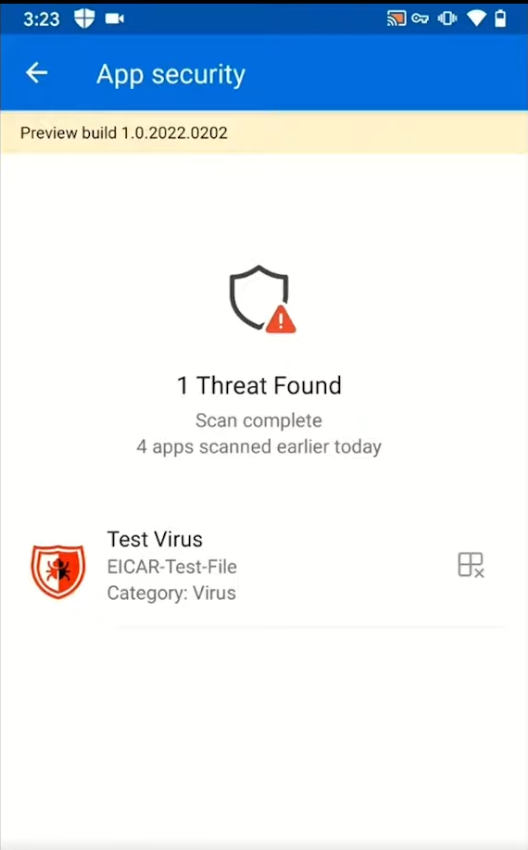
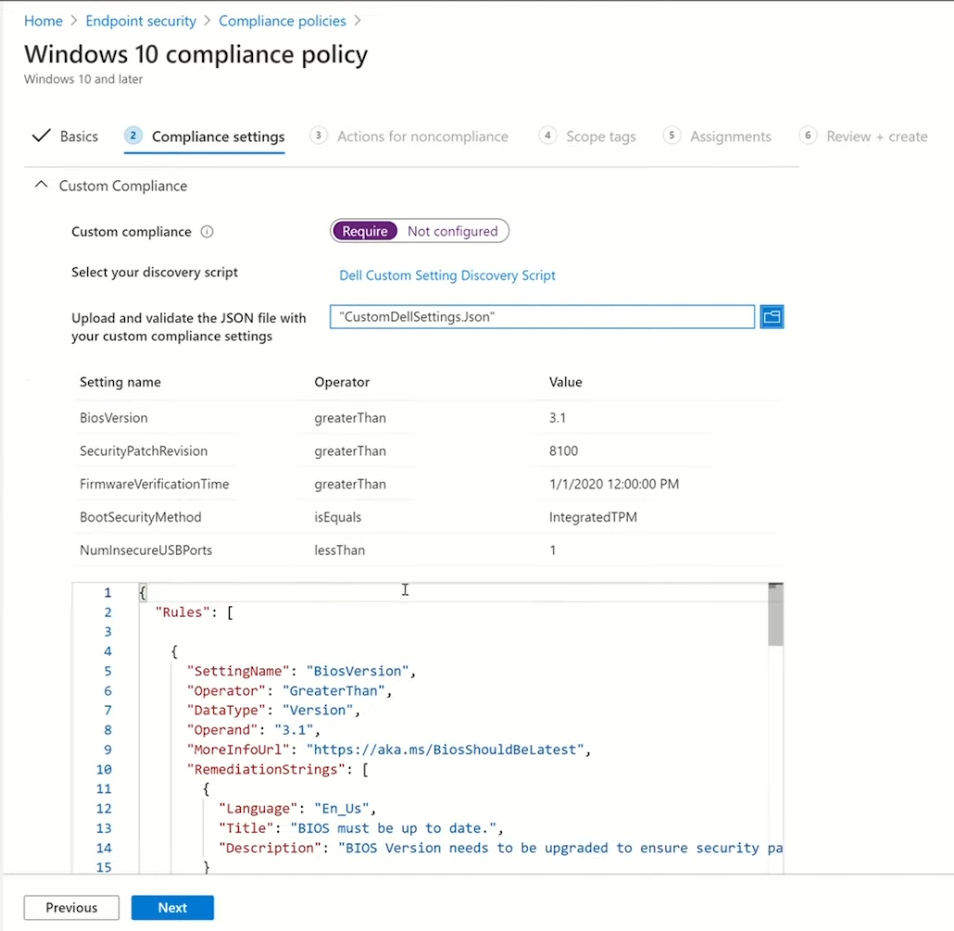
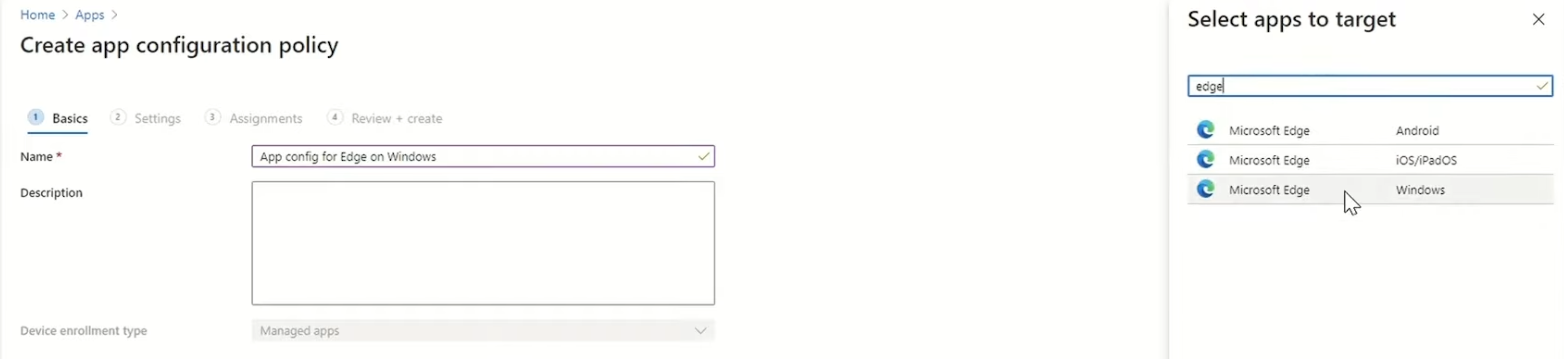
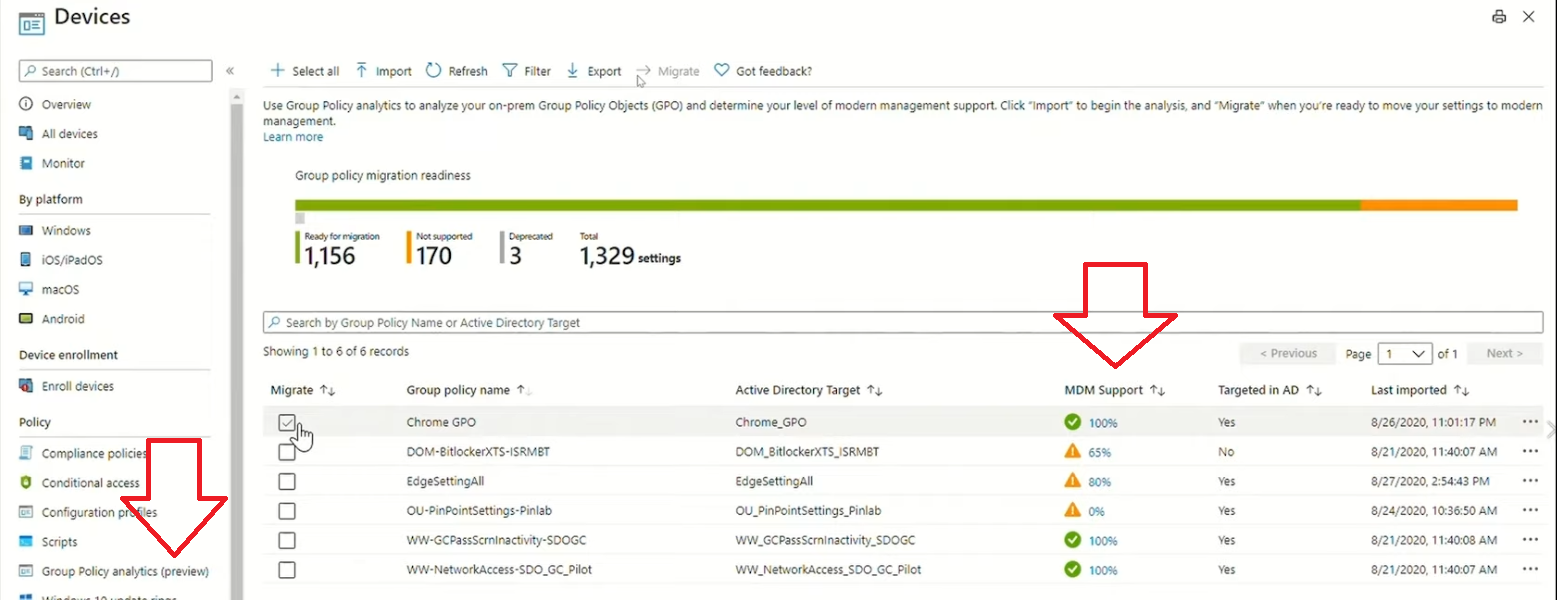
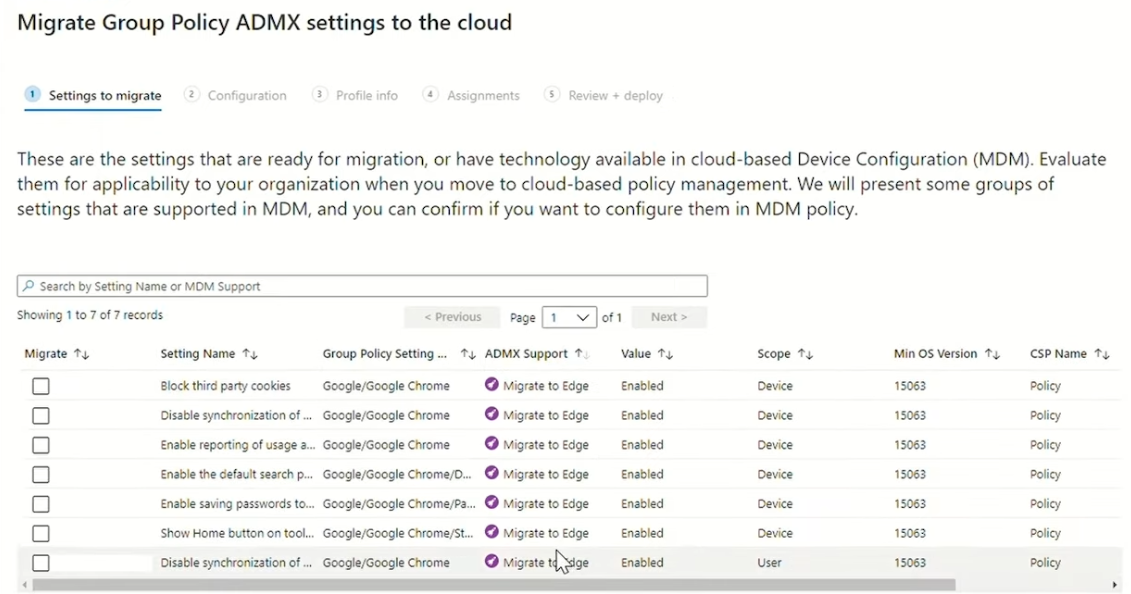
Introduction These are my notes from a session @ Microsoft Ignite 2020, the session was hosted by Steve Dispensa (Director of Program Management at Microsoft Endpoint Manager) and Ramya Chitrakar (Director of Engineering at Microsoft Endpoint Manager). For the last couple of years at Ignite I blog my notes for sessions I'm interested in as I always find it nice to later refer to this reading material and punctuate it with content I've covered, and sometimes the videos just flow by too fast and you miss out on important points. Where appropriate I'll link to content that I've covered that is referred to in the video. This is part 2 of a two part series: What's new in Microsoft Endpoint Manager - part 1 What's new in Microsoft Endpoint Manager - part 2 (this part) As a reminder, Microsoft Endpoint Manager let's you manage your entire endpoint estate whether cloud native or on premise. On your cloud management journey if you've just started out or you've deployed co-management or you are completely in the cloud Microsoft Endpoint Manager is truly your hub to unify security, apps, access,compliance and end user experience across your entire technology estate. MEM delivers analytics and data to keep you ahead of change so you can keep your cost down, no matter what change brings. Focus on Security With Covid, almost all businesses in the world are dealing with remote productivity, where users are working from home and other remote locations and that means it's never been more important to ensure uniform security policy. MEM provides a rich portfolio of capabilities to assist you with keeping your organization safe and sound. "Start with Security Baselines to ensure your organization is following best practices and to ensure you have uniform application policy across your organization." You can start with Security Baselines to ensure your organization is following best practices and to ensure you have uniform application policy across your organization. You can manage a host of security specific policies across devices including platform specific capabilities like encryption and firewall rules and advanced threat protection from Microsoft Defender ATP. Then you can move on to risk-based access control where MEM can monitor the compliance of devices real time and that can be fed into Azure AD Conditional Access (powerful access control system). Additional you can deploy app control policies to provide compliance without fully managing a device, for example with BYOD devices. With users working from so many locations organizations need to deploy consistent policy either inside or outside corporate firewalls, is the foundation of Zero Trust. MEM can ensure that your Zero Trust policy is deployed to all your devices. Cyber threats and phising attacks are increasing between 3 and 5 times and in a recent survey 89% of businesses see cyber security as a top priority yet 62% say they lack the in-house skills to deal with it. "In a recent survey 89% of businesses see cyber security as a top priority yet 62% say they lack the in-house skills to deal with it." The rapid shift to secure remote work presents a huge opportunity for partners and SMB's. Covid19 is increasing IT Complexity and cyberattacks. Microsoft 365 Business Premium is a foundation for SMB management and security and contains everything from Teams, Conditional Access, to Azure AD to Intune and it can provide you a roadmap to maintain managed services for your customers as you light up new services for them every 6 months. Microsoft 365 Lighthouse will provide guidance and experiences with onboarding new customers, offer consolidated insights across multiple tenants in a single pane to understand how customer tenants are configured and secured, and help improve customer experience and demonstrate value. Demo Configuring Microsoft Defender policy on servers managed by Configuration Manager Below is a server managed by Config Manager, and using Tenant Attach it shows up in Microsoft Endpoint Manager. Using CMPivot, you can run queries on devices in MEM, in this example Ramya queries to see what antivirus service(s) are running on this server. Notice how the two instances found are both in a stopped state. Note: I showed you how you can run CMPivot queries in MEM here. You can now deploy Defender AV policies for devices managed by ConfigMgr in the MEM console. To do that go to the Endpoint Security node and select Antivirus, then Create Policy. Windows Autopilot Autopilot provides cloud value by simplifying the provisioning and management of Windows 10 devices. There is now a new ability in Windows Autopilot to work with co-managed devices that have the ConfigMgr client agent installed during the enrollment status page (ESP) and invoke a provisioning task sequence created in ConfigMgr. In the example the task sequence was a non-osd task sequence, it was responsible for restoring files and settings for the user. Company Portal changes Company Portal is going to be the one place IT users go for everything related to enterprise IT services. Company Portal now supports Apps from Configuration Manager, web apps from Azure ad and office.com. When you install and application you can monitor it's progress in the Downloads & Updates tab. The PowerBI app here can be opened in a Browser as it is a SAAS Azure AD app. "This shows you how Microsoft Endpoint Manager is providing you with unified experiences across the spectrum from IT Pros to End Users." Microsoft 365 is uniquely positioned to bring together the power of management and security. The Endpoint Security node in Microsoft Endpoint Manager is your one stop shop for managing security across your enterprise. In there you can configure Antivirus, Firewall, Disk Encryption (BitLocker) policies and settings, but you can also configure Security Baselines. When Defender ATP is connected to MEM you'll see additional tasks listed such as Security tasks as well as device risk based compliance. As Defender ATP was released recently for Android, you can now take actions on that in MEM. In this example, you can create a compliance policy in Endpoint Security to enable conditional access based on the Android risk score detected by Defender ATP. You can see this in action using the Eicar test virus on an Android device with Defender ATP enabled. After this happens when the user launches Outlook, you can see Conditional Access kicking in. After the user uninstalls the test virus from their phone they are once again able to access email successfully. Custom Compliance Policy In this demo you can see how to create a custom compliance policy using a Powershell script and a JSON file to manage Dell computers. "BIOS must be up to date" And using this new custom compliance policy you can use it to block access using conditional access if for example the BIOS is not up to date. Those settings are configurable in the JSON file. Security Settings for Micorsoft Edge Now you can use the Managed App settings in MEM to configure policy for Microsoft Edge on Windows devices. You can configure the home page and other settings for Edge. And on a remote users device you can see conditional access informing the user in Edge that they cannot access corporate email while signed in with their private credentials, they must use their office account. Using GPO Analytics to seamlessly migrate GPO's to the cloud. For more info see > https://docs.microsoft.com/en-us/mem/intune/configuration/group-policy-analytics Once you've selected your GPO, click on Migrate to migrate group policy admx to the cloud There will also be a possibility of doing this via Powershell and this is will all be released as part of overall GPO to MDM capability. Key Takeaways Recommended reading Working from home - the new reality Introducing Microsoft Tunnel Microsoft Productivity Score https://adoption.microsoft.com/productivity-score/ Endpoint Analytics https://docs.microsoft.com/en-us/mem/analytics/overview Microsoft Endpoint Manager https://endpoint.microsoft.com