anyweb
-
Posts
9275 -
Joined
-
Last visited
-
Days Won
371
Everything posted by anyweb
-
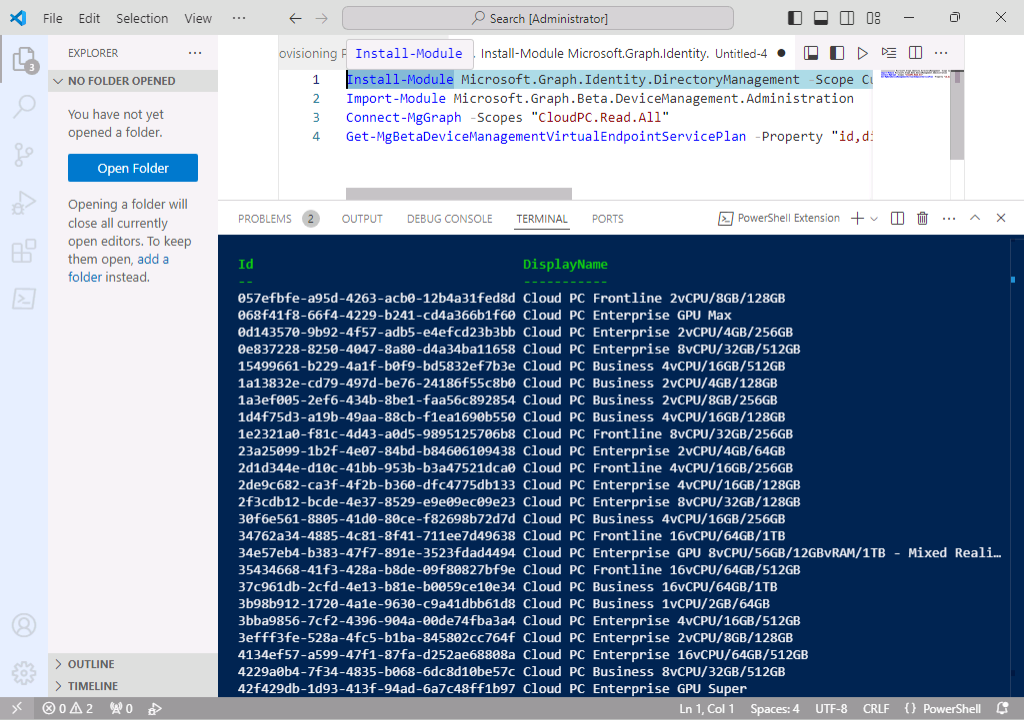
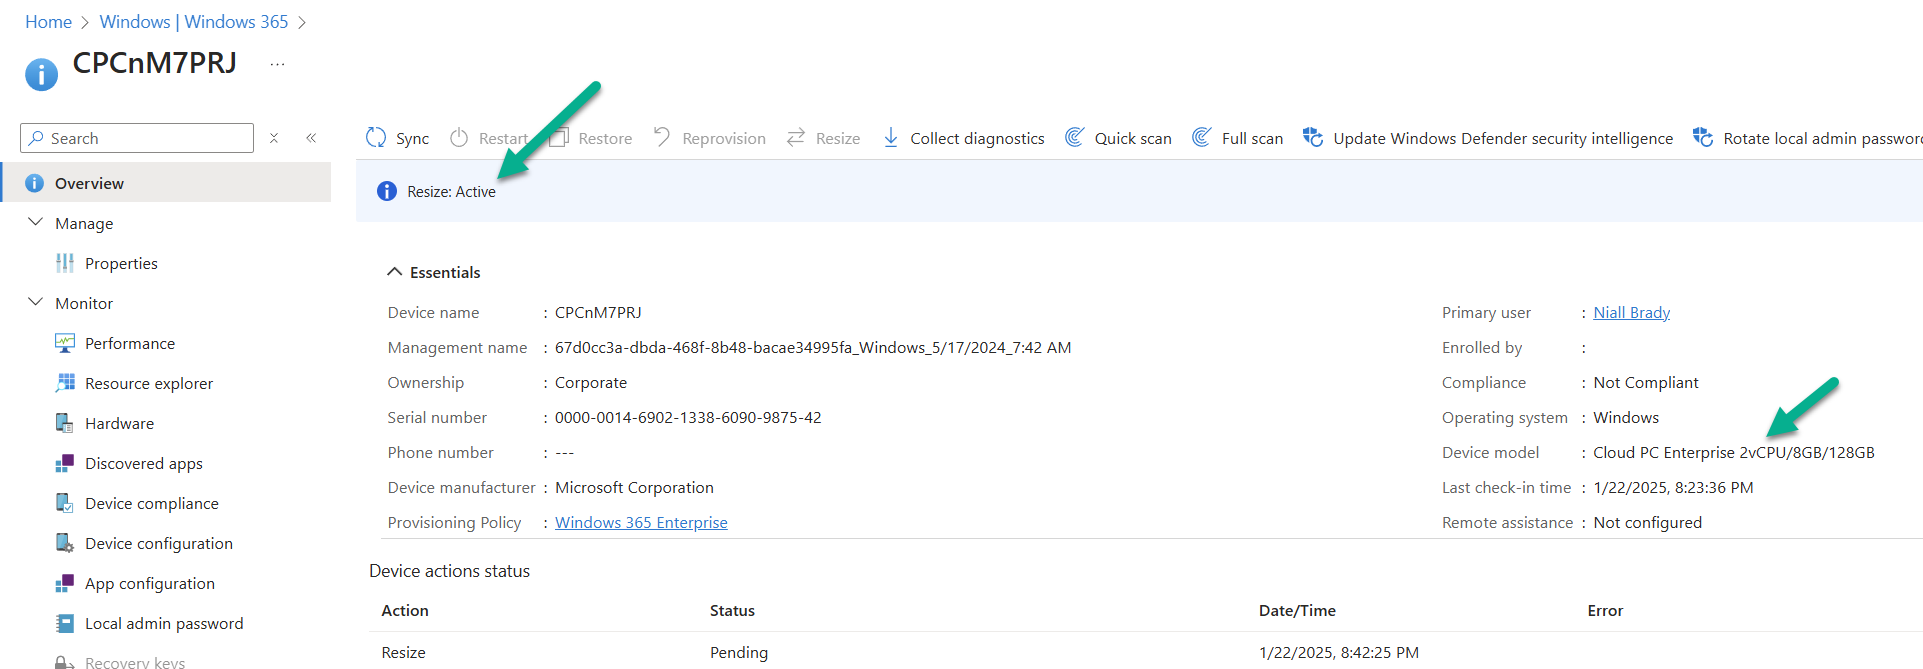
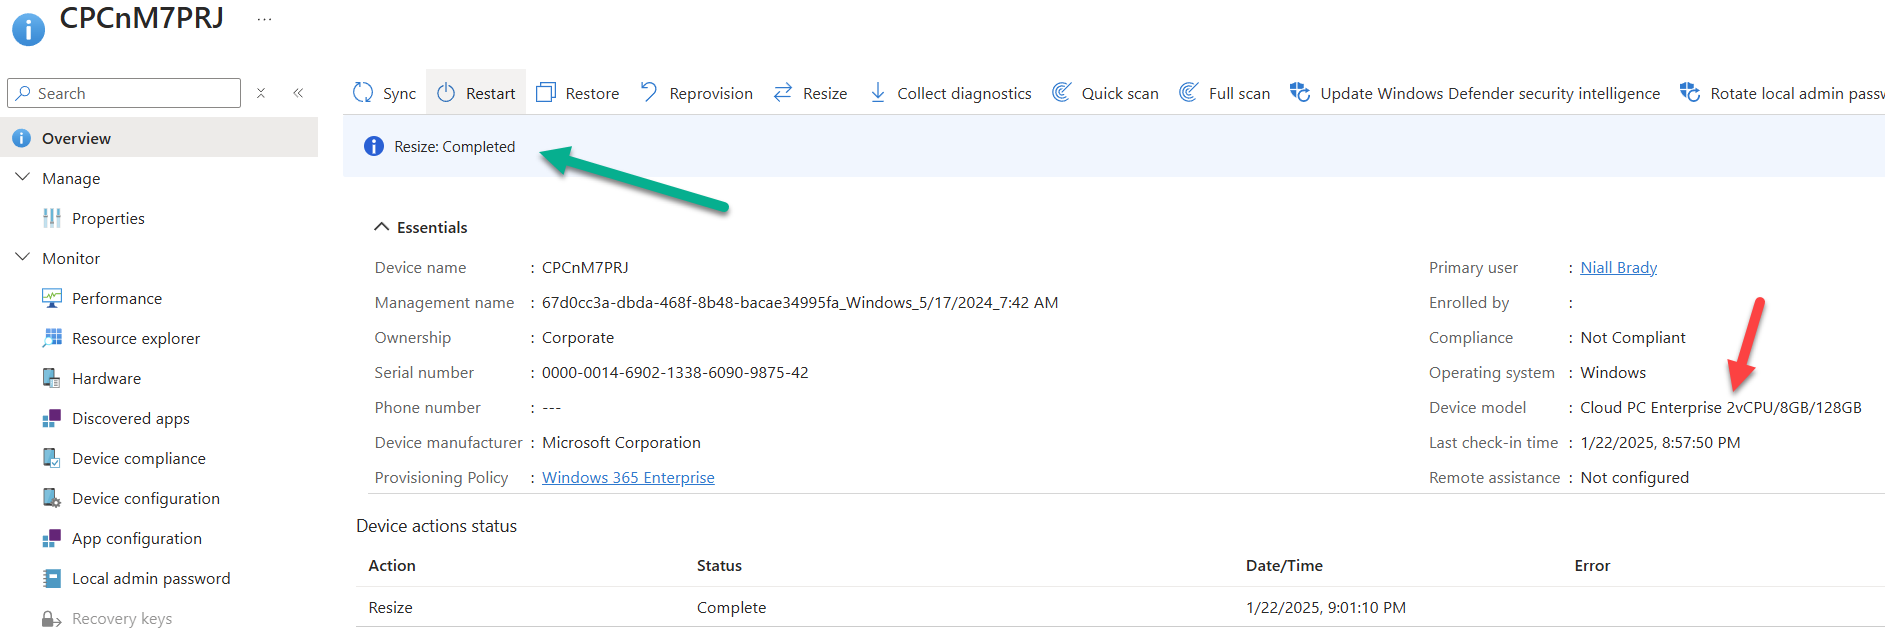
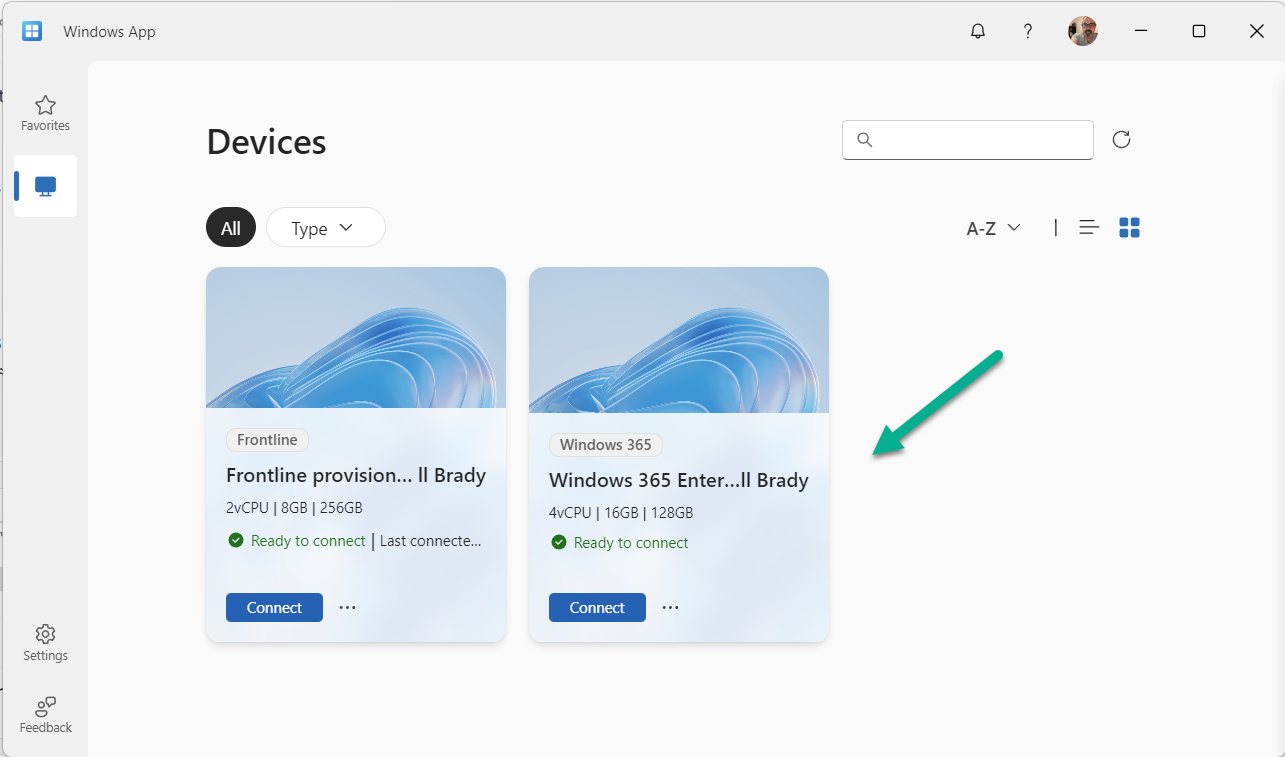
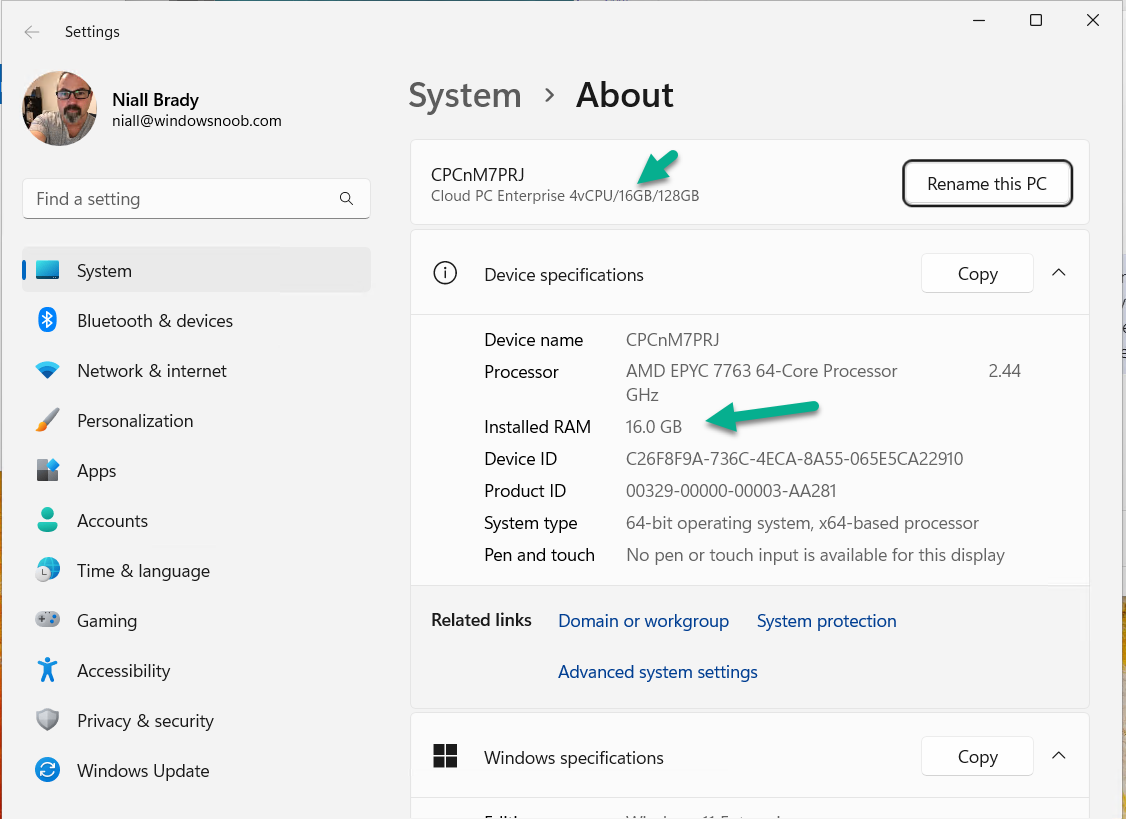
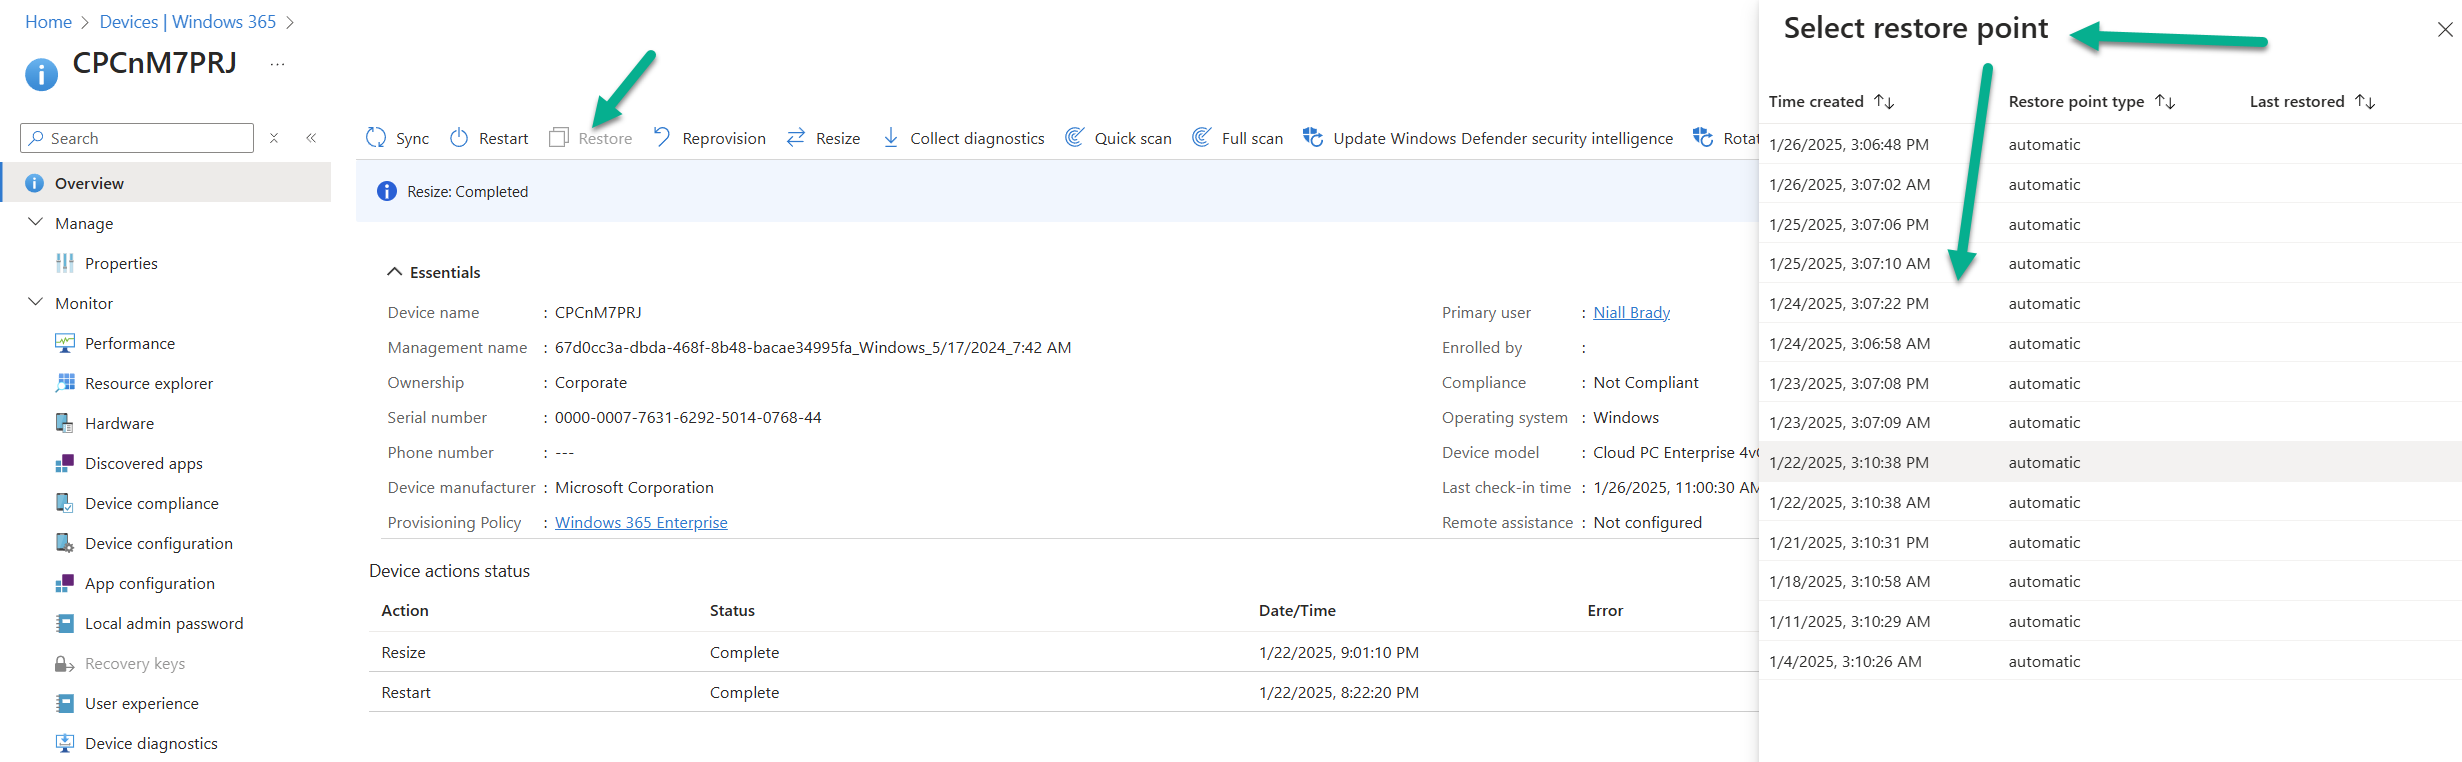
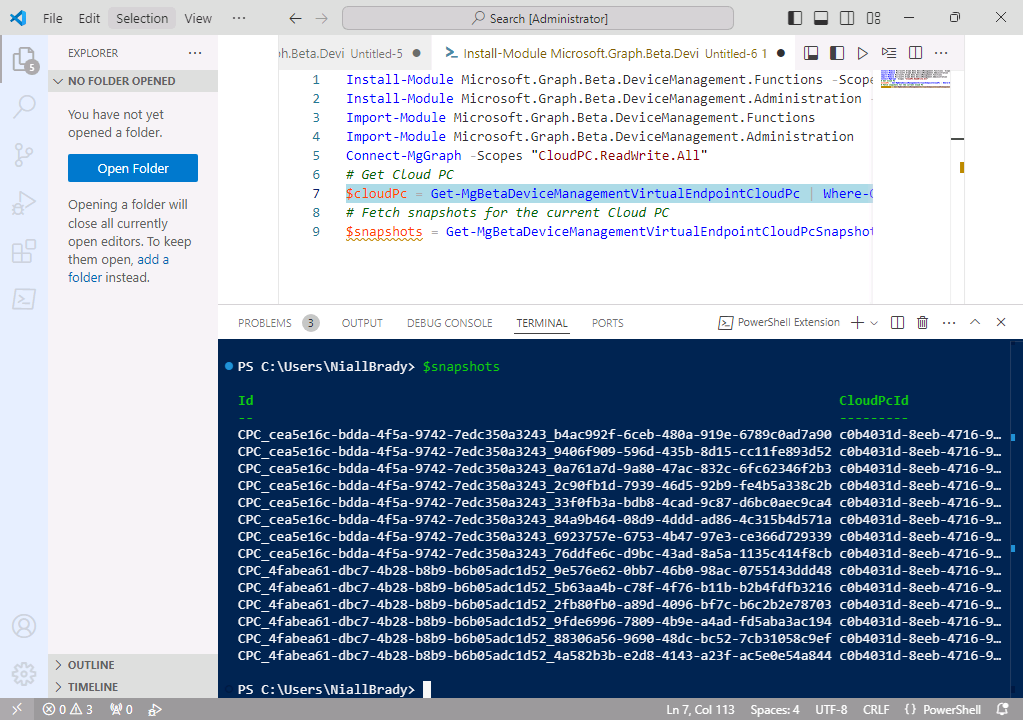
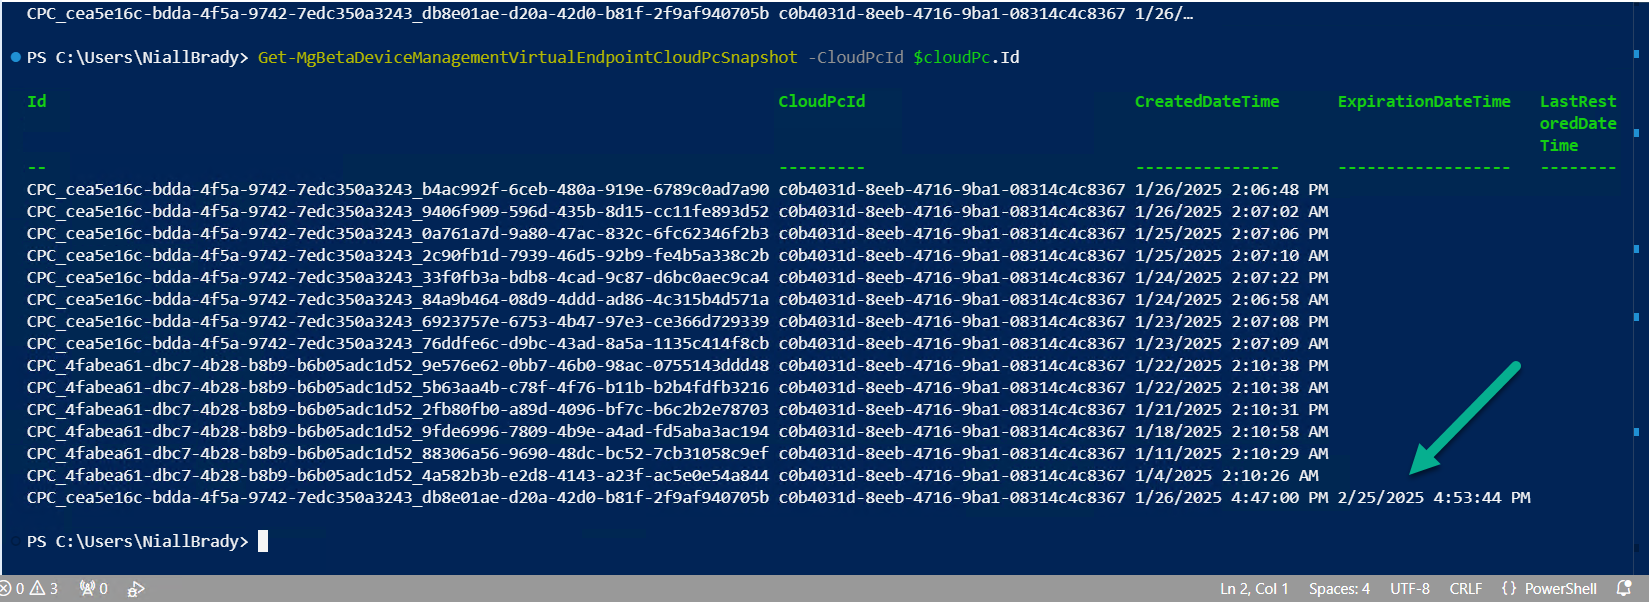
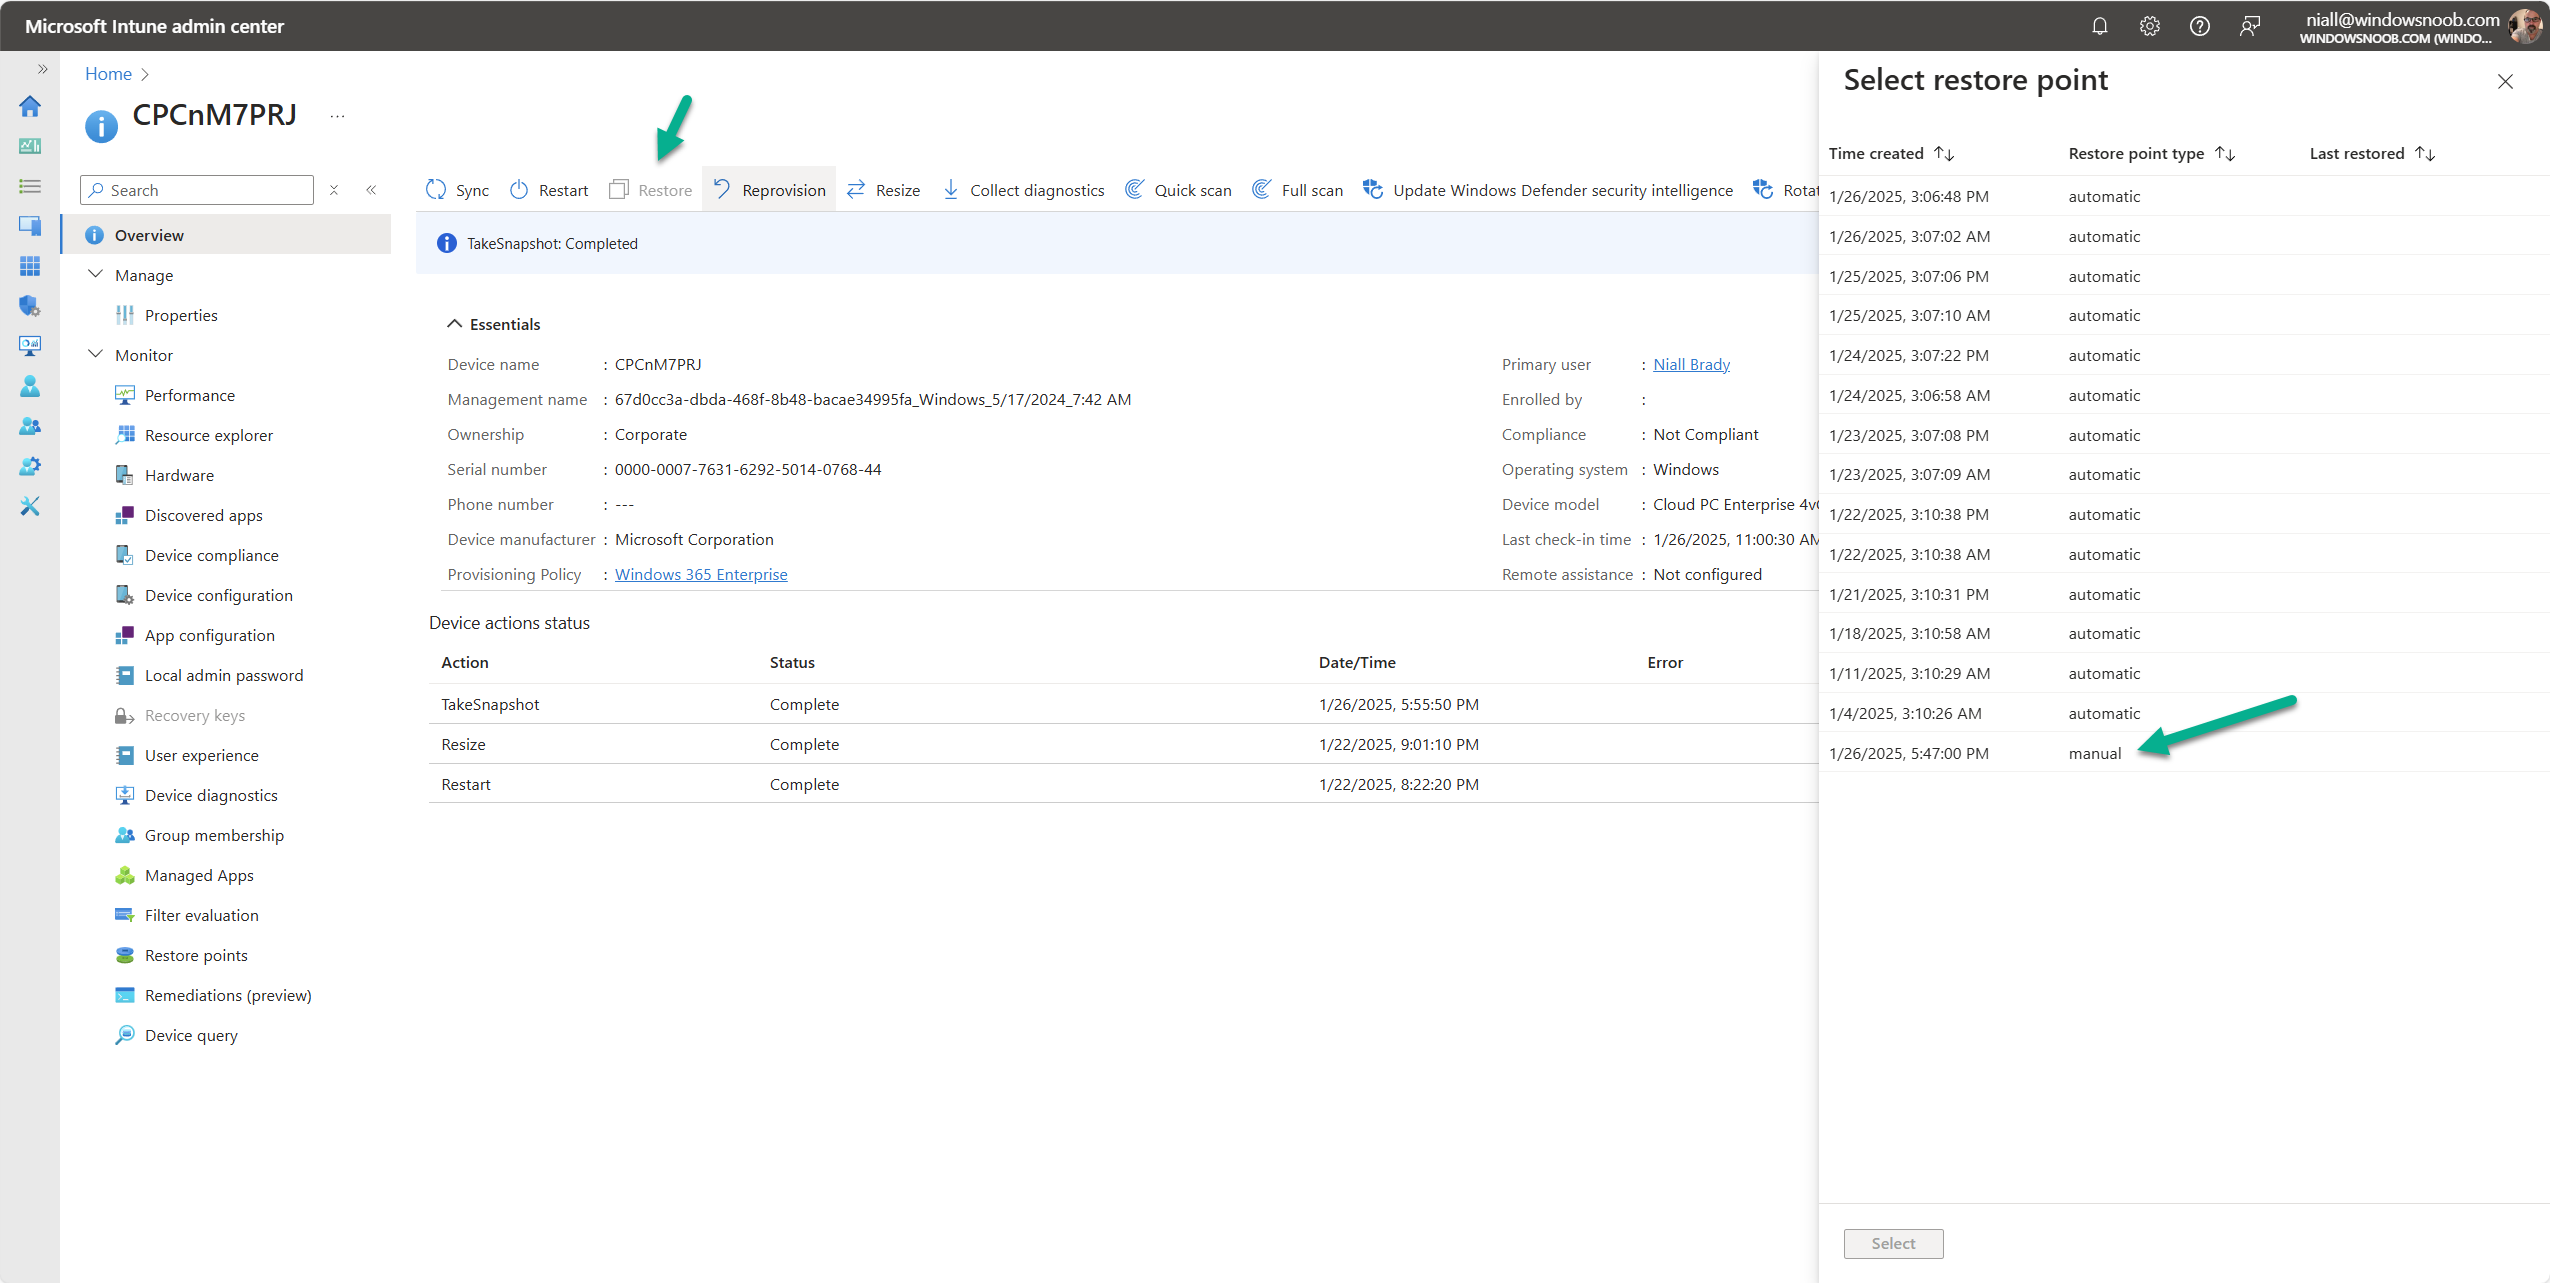
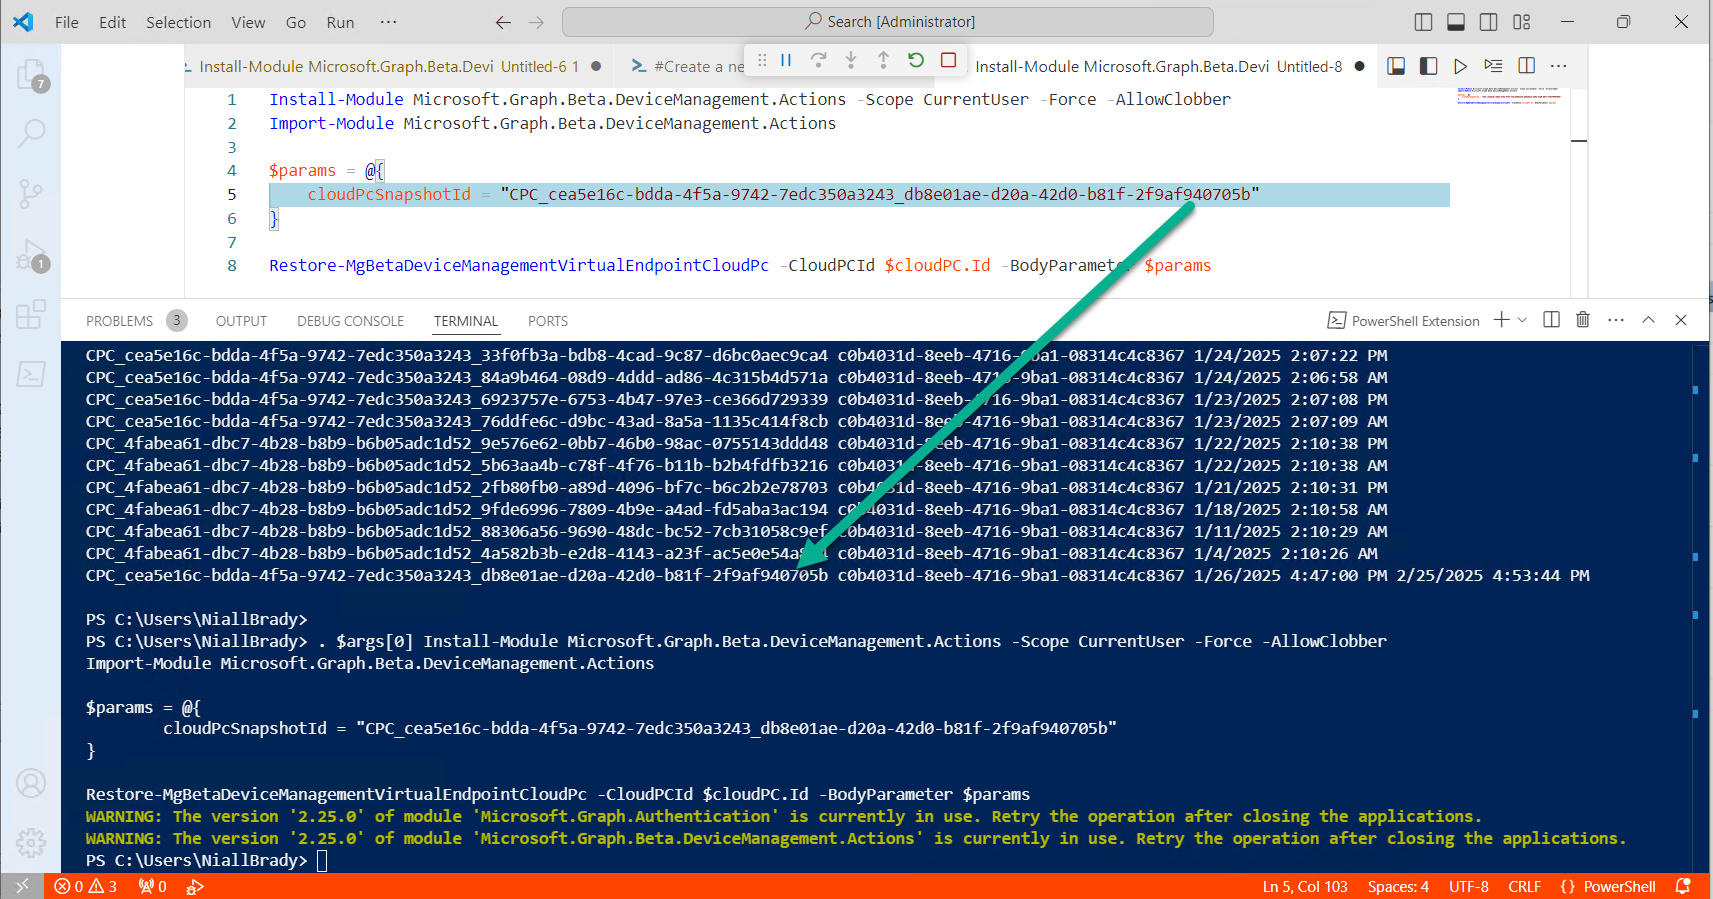
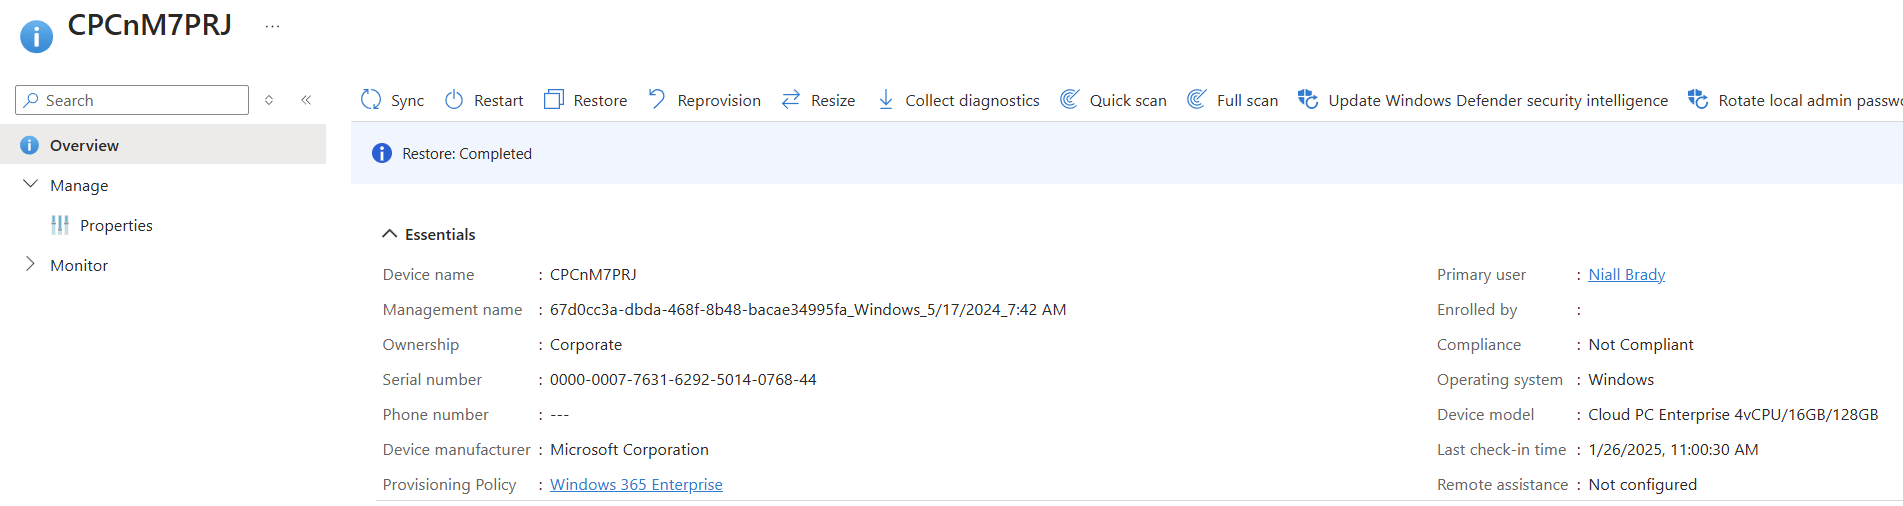
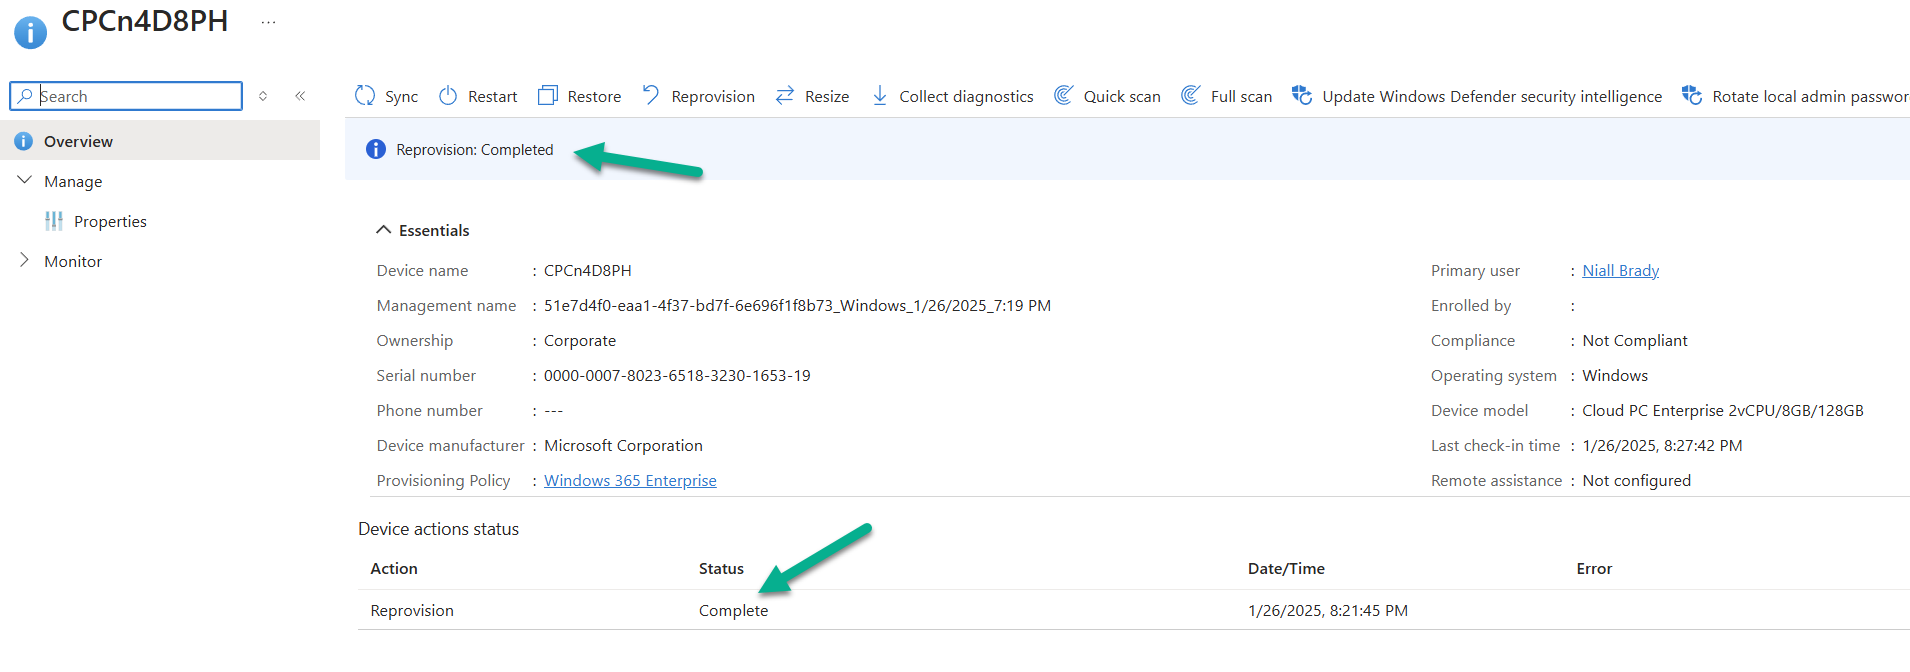
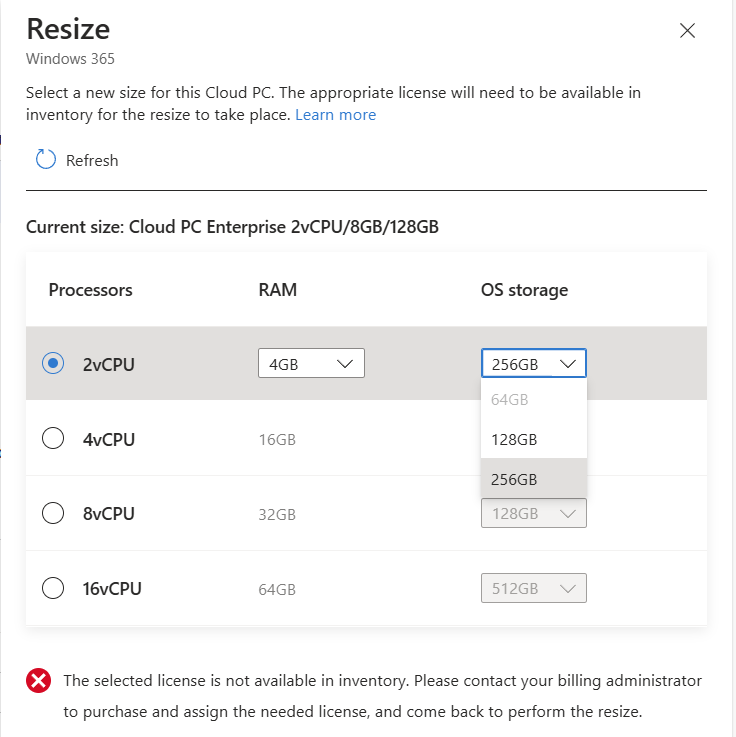
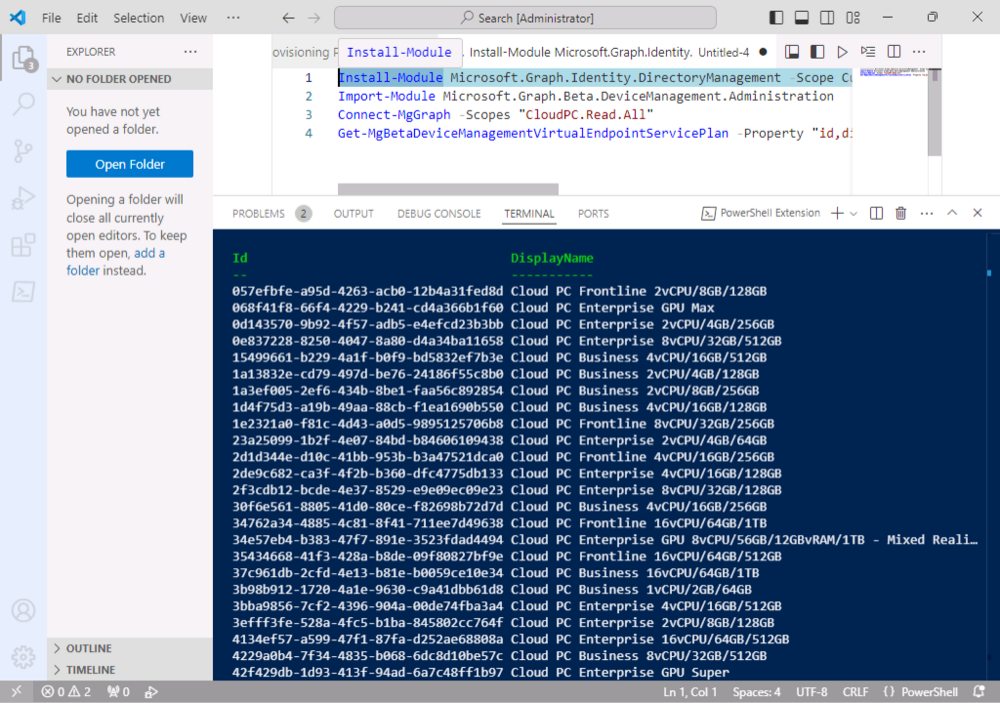
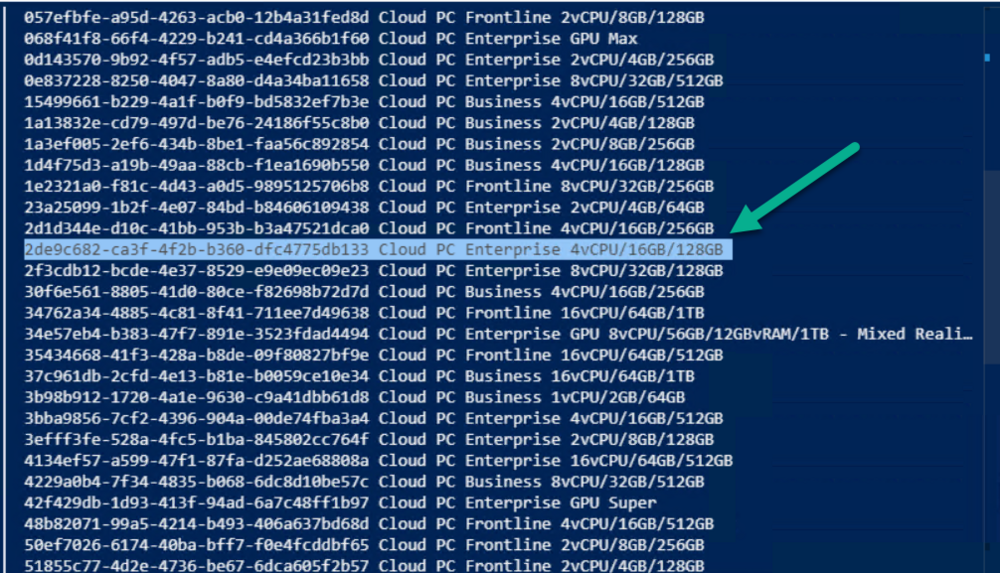
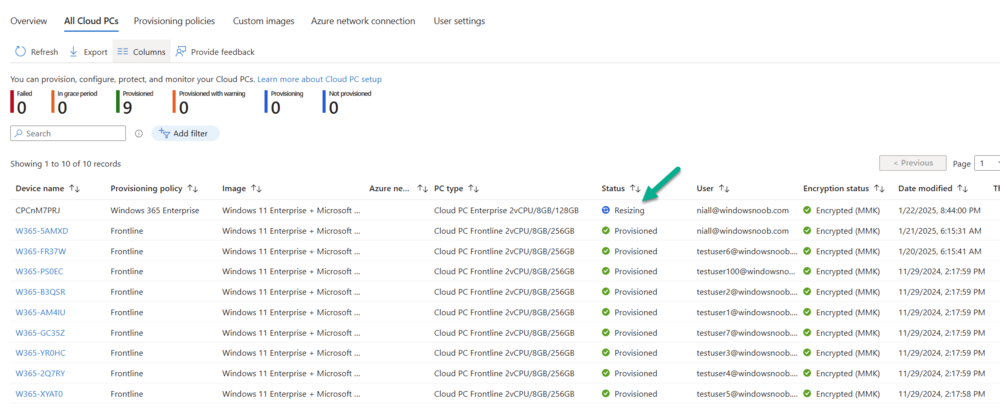
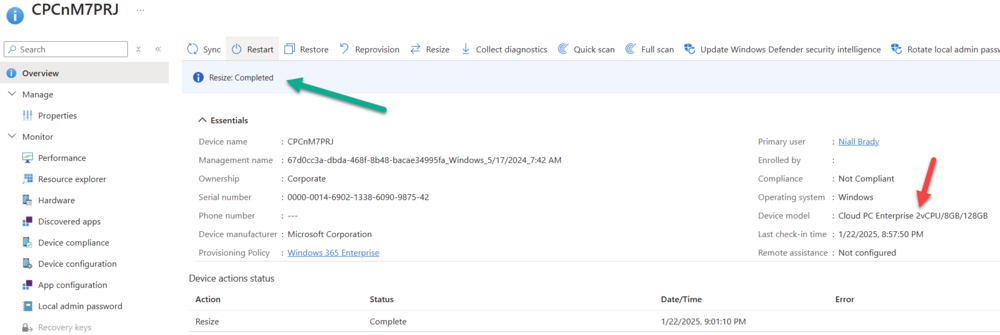
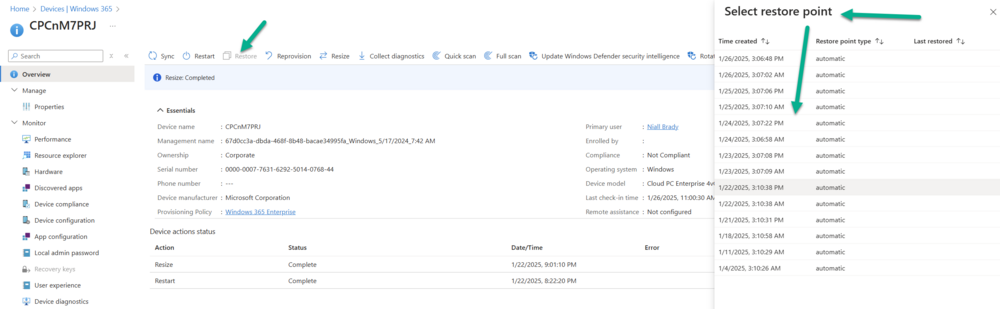
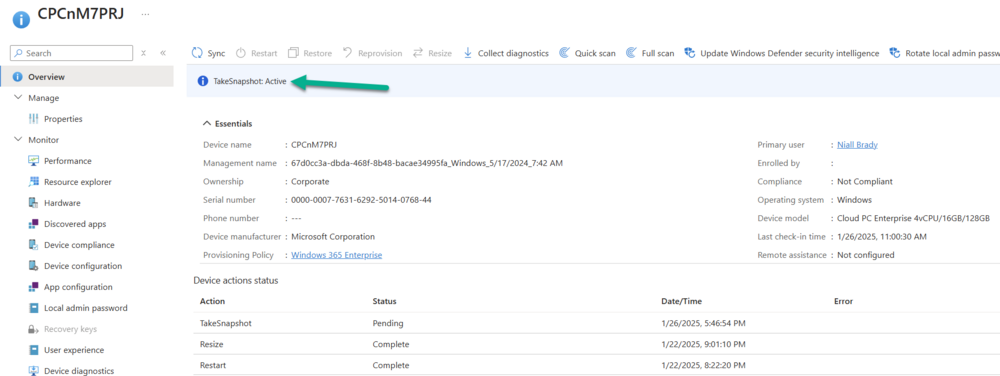
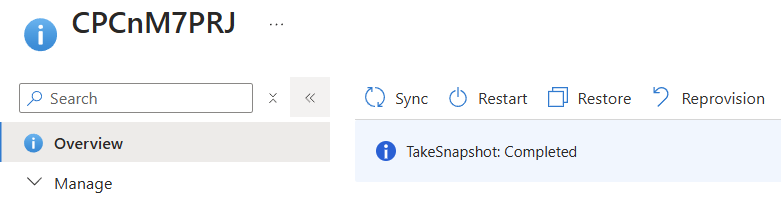
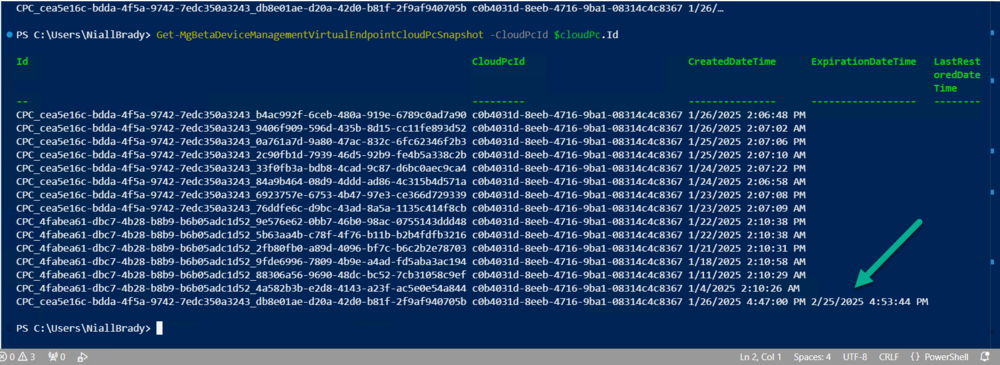
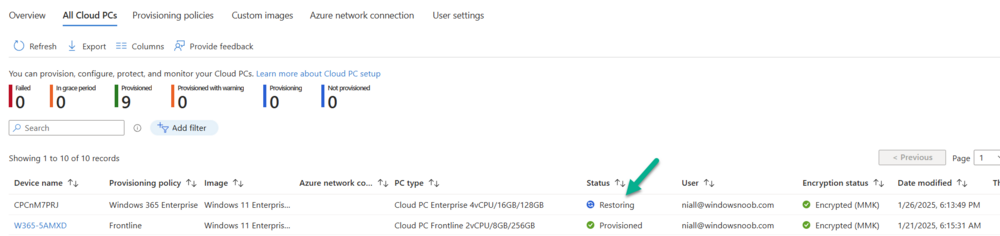
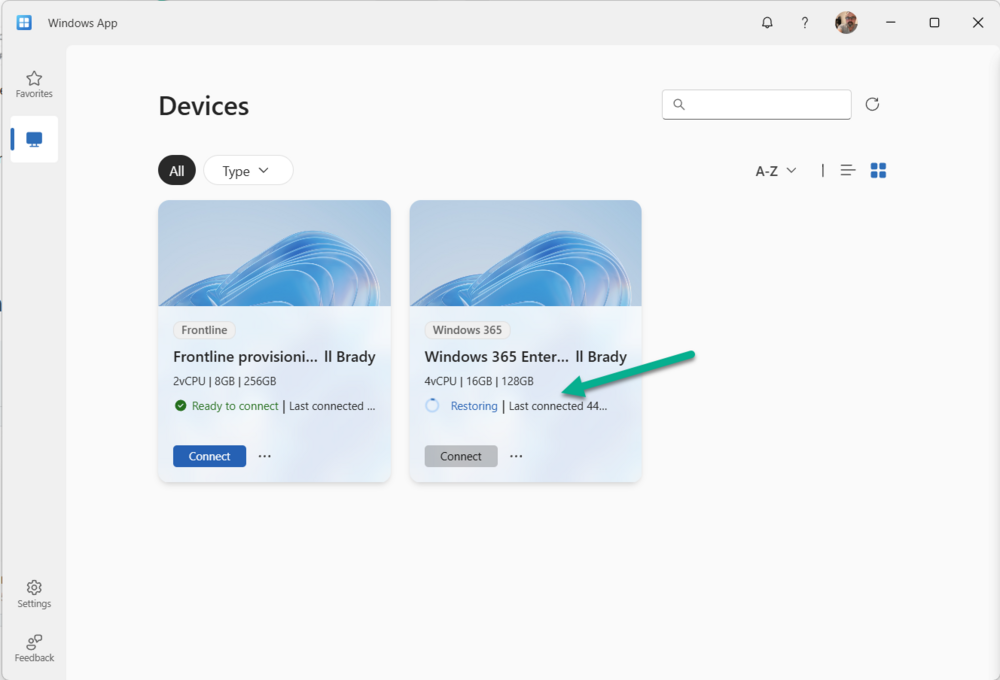
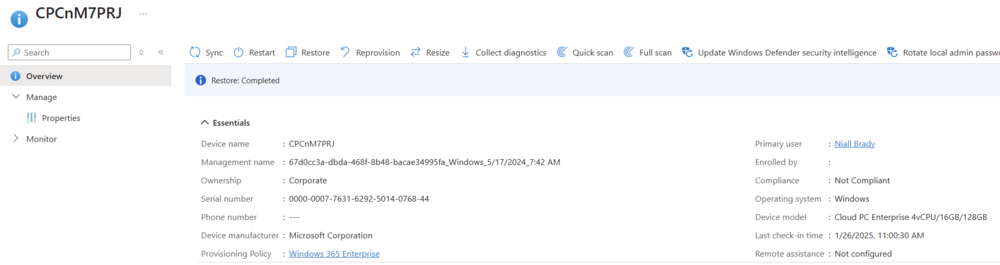
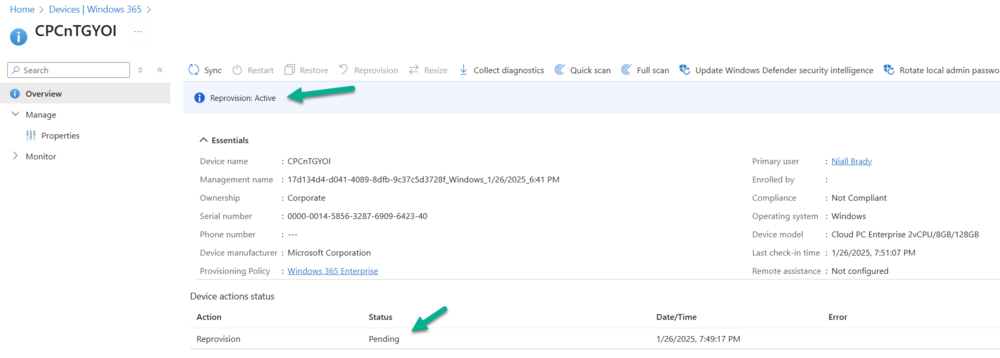
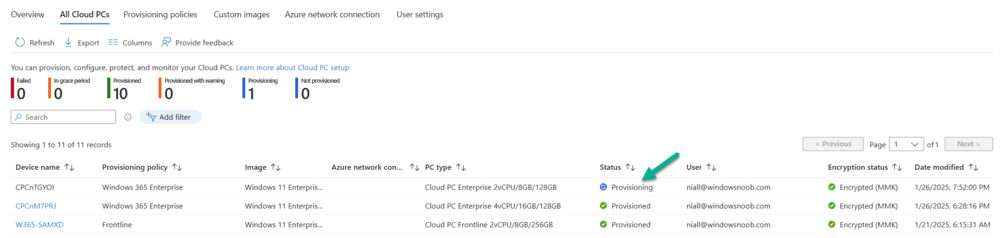
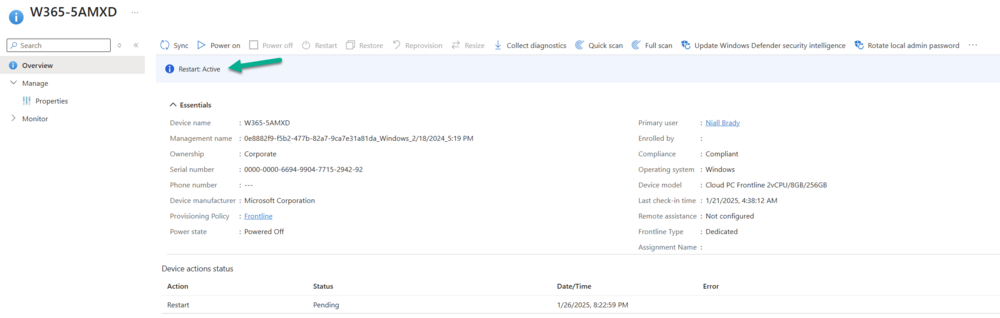
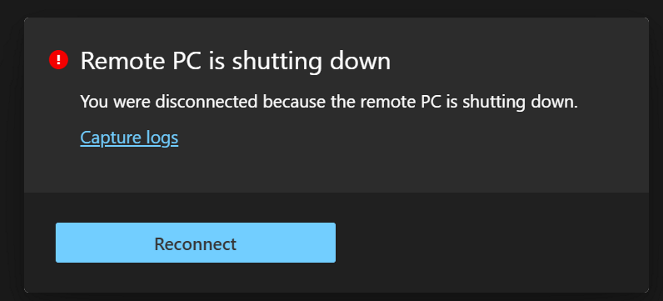
Introduction This is Part 4 of a new series of guides which will cover managing Windows 365 Cloud PCs using PowerShell and Microsoft Graph. This mini series should help you get started with automating and managing your Cloud PCs using PowerShell via Microsoft Graph. If you are new to Windows 365 Cloud PCs then please read our previous series called Getting started with Windows 365 available here. At the time of writing, Paul is a 8 times Enterprise Mobility MVP based in the UK and Niall is a 14 times Enterprise Mobility & Windows and Devices MVP based in Sweden. Below you can find all parts in this series: Automating Windows 365 part 1 - Introducing Graph and setting up Visual Studio code Automating Windows 365 part 2 - Using Graph X-Ray Automating Windows 365 part 3 - Provisioning Cloud PC's Automating Windows 365 part 4 - Managing your Cloud PC <- you are here Automating Windows 365 part 5 - TBD In this part of our guide to managing Windows 365 Cloud PCs via PowerShell and Microsoft Graph, we'll cover the following management actions: Resize Restore Reprovision Restart Resizing your Windows 365 Cloud PCs The Resize remote action for Windows 365 Cloud PCs retains user and disk data which is very cool, and allows you the IT Admin to resize the users device as required based on usage or requests. The resize action allows you to: Upgrade the RAM, CPU, and storage capacity of a Cloud PC. Downgrade the RAM and CPU of a Cloud PC. Note: The resize option does not support reducing disk space. Also worth mentioning, you cannot resize a Frontline provisioned Cloud PC. The available options when attempting to resize your Cloud PCs are also based on the Windows 365 licenses you have in your tenant. For example, in our tenant we have the following licenses available: Windows 365 Enterprise 2 vCPU, 8 GB, 128 GB Windows 365 Enterprise 4 vCPU, 16 GB, 128 GB Windows 365 Enterprise 16 vCPU, 64 GB, 512 GB There are various resize options available but for this guide we'll upgrade from 2vCPU to 4vCPU, we cannot downgrade the disk space from 128GB to something smaller as this is not supported and we don't have the licenses available anyway. With that in mind in the Microsoft Intune admin under Devices > Device onboarding > Windows 365 > All Cloud PCs, if you select a device and choose Resize, you are presented with the options to Resize. Selecting an inappropriate option results in you being informed that the selected license is not available in your inventory as shown below in the screenshot. Keep this in mind when you attempt to resize your Cloud PCs via Graph. To get started with Resize via Graph and PowerShell, we need to list all the service plans available. Remember, these are not all the sizes available, just a list of them all. Using the following code, we can list all of those service plans, this uses the following cmdlet Get-MgBetaDeviceManagementVirtualEndpointServicePlan documented here. Install-Module Microsoft.Graph.Identity.DirectoryManagement -Scope CurrentUser -Force -AllowClobber Import-Module Microsoft.Graph.Beta.DeviceManagement.Administration Connect-MgGraph -Scopes "CloudPC.Read.All" Get-MgBetaDeviceManagementVirtualEndpointServicePlan -Property "id,displayName,type,vCpuCount,ramInGB,storageInGB,category,provisioningType,supportedSolution" Launch Visual Studio Code give it a go. The results will be displayed similar to the below output. To demonstrate the Resize action, we will upgrade one of our Cloud PCs, you can try this out on one of your own Windows 365 Cloud PCs by substituting the relevant service plan information. Currently, our Cloud PC is 2 vCPU, 8 GB, 128 GB as you can see below. Looking at the output from Graph for our service plans, we can see that we need service plan with the ID 2de9c682-ca3f-4f2b-b360-dfc4775db133 as this matches the subscription we have available. In the code below, we use the Get-MgBetaDeviceManagementVirtualEndpointCloudPc cmdlet, documented here, to retrieve the details of the device we are going to resize. Remember, you will need to change the ManagedDeviceName from CPCnM7PRJ to one of your own Cloud PC device names and select an available target service plan Id. We store the service plan information in the variable targetServicePlanId in the $params array. You will also need to change this to your target service plan ID. Finally, we issue the Resize-MgBetaDeviceManagementVirtualEndpointCloudPc cmdlet to kick start the resize process. Read about that cmdlet here. Install-Module Microsoft.Graph.Beta.DeviceManagement.Administration -Scope CurrentUser -Force -AllowClobber Import-Module Microsoft.Graph.Beta.DeviceManagement.Administration Connect-Graph -Scopes "CloudPC.ReadWrite.All" $cloudPc = Get-MgBetaDeviceManagementVirtualEndpointCloudPc | Where-Object { $_.ManagedDeviceName -eq "CPCnM7PRJ" } $params = @{ targetServicePlanId = "2de9c682-ca3f-4f2b-b360-dfc4775db133" } Resize-MgBetaDeviceManagementVirtualEndpointCloudPc -CloudPCId $cloudPC.Id -BodyParameter $params If you have picked a service plan which is not applicable, based on the criteria we have mentioned previously, you will receive a failure to resize when you view the device in the Intune admin center. If however you have executed the code against a valid target service plan, you will see the Resize action taking place in Intune. Return to the All Cloud PCs view under Devices > Device onboarding > Windows 365 > All Cloud PCs you will notice that the device will be listed with its Status as Resizing. After some time, the resizing operation will complete and this will be reflected under Device actions status when viewing the targeted device. In the screenshot below however you can also see that the old device model is listed. Triggering a Sync of the device or just waiting will update the model to the correct specs. In the All Cloud PCs view, the Status will now report as Provisioned and the PC type should reflect the new service plan. We can see below that the device does indeed have the new changes (CPU/RAM). Also, if the user attempts to access the Cloud PC from the Windows app or Windows 365 website, the size details of the Cloud PC will be reflected with the new resized information. Finally, the quick check on the Cloud PC itself confirms the change in CPU/RAM. The resize via Graph was a success! The Restore action via Graph In our previous Windows 365 series about Windows 365 we covered the Restore action, a feature specifically available to Cloud PCs. These restore points allow you, as the admin, to choose from a series of long or short term restore points. Long term restore points are saved every 7 days and there are a maximum of 4 long term restore points. Short term restore points are saved based on the user settings interval, so can be every 4, 6, 12, 16 or 24 hours. Read more about restore points at our blog post, here. You can view the available restore points for a device by navigating to Devices > Device onboarding > Windows 365 > All Cloud PCs in Intune. You then select a device and choose Restore from the menu. You are presented with a list of the available restore points which can be selected to revert the Cloud PC to. When managing our Cloud PCs for Restore via Graph, we need to begin by querying those restore points for our device. Start off by running the relevant modules and connecting to Graph. Next, you need to obtain the details of the Cloud PC you want to run the Restore action on. We are reusing our code from previous to do this by running the Get-MgBetaDeviceManagementVirtualEndpointCloudPc cmdlet and filtering on a specific hostname. Then we utilise the Get-MgBetaDeviceManagementVirtualEndpointCloudPcSnapshot cmdlet to gather all the snapshots for this Cloud PC. Read more about that cmdlet here. Install-Module Microsoft.Graph.Beta.DeviceManagement.Functions -Scope CurrentUser -Force -AllowClobber Install-Module Microsoft.Graph.Beta.DeviceManagement.Administration -Scope CurrentUser -Force -AllowClobber Import-Module Microsoft.Graph.Beta.DeviceManagement.Functions Import-Module Microsoft.Graph.Beta.DeviceManagement.Administration Connect-MgGraph -Scopes "CloudPC.ReadWrite.All" # Get Cloud PC $cloudPc = Get-MgBetaDeviceManagementVirtualEndpointCloudPc | Where-Object { $_.ManagedDeviceName -eq "CPCnM7PRJ" } # Fetch snapshots for the current Cloud PC $snapshots = Get-MgBetaDeviceManagementVirtualEndpointCloudPcSnapshot -CloudPcId $cloudPc.Id After executing, all the snapshots will be stored in the $snapshots variable. Let's say that we want to create a new snapshot for this Cloud PC. We can execute the New-MgBetaDeviceManagementVirtualEndpointCloudPcSnapshot cmdlet to achieve this. Details of this cmdlet are here. #Create a new snapshot New-MgBetaDeviceManagementVirtualEndpointCloudPcSnapshot -CloudPcId $cloudPc.Id In the Intune console, if you take a look at the targeted device you will see that Take Snapshot: Active is reported and initially in a Pending state before becoming Active. Once the Restore action of taking the snapshot is compete, the Device action status will be updated to reflect this. You can now re-run the Get-MgBetaDeviceManagementVirtualEndpointCloudPcSnapshot -CloudPcId $cloudPc.Id command to see the newly created, manual, snapshot listed. Likewise, in the Intune console, the snapshot will be listed. Note that the Restore point type will be listed as manual. OK, let's look at how you can restore to a specific restore point. You previously collected all the snapshots for a device and stored them in the $snapshots variable. You can use the ID from that data to run the restore. These are the ID's starting with CPC. Find the ID you want to use for your restore point and use the code below, changing the cloudPcSnapshotId details to match the ID of your snapshot. The code runs the Restore-MgBetaDeviceManagementVirtualEndpointCloudPc cmdlet to restore the Cloud PC. You can read about this cmdlet here. Install-Module Microsoft.Graph.Beta.DeviceManagement.Actions -Scope CurrentUser -Force -AllowClobber Import-Module Microsoft.Graph.Beta.DeviceManagement.Actions $params = @{ cloudPcSnapshotId = "CPC_cea5e16c-bdda-4f5a-9742-7edc350a3243_db8e01ae-d20a-42d0-b81f-2f9af940705b" } Restore-MgBetaDeviceManagementVirtualEndpointCloudPc -CloudPCId $cloudPC.Id -BodyParameter $params Once again, check the device in the Intune console to observe the status of the action. Here you can see from the All Cloud PCs view that the device is Restoring. and the Device action status will show when that Restore action is complete. Whilst a restore takes place, the user is unable to access the Cloud PC. In the Windows app, or the Windows 365 website, the status of the device will report Restoring Cloud PC. How to Reprovision a Cloud PC with Graph Another action, which is unique to Windows 365 Cloud PCs, is Reprovision. This action effectively deletes a user's current Cloud PC and creates a brand new one for the same user. Note that all the user's data, applications, customisations, etc, are also removed as part of this process. The code, once again, utilize the Get-MgBetaDeviceManagementVirtualEndpointCloudPc cmdlet and, as before, remember to change the name of the Cloud PC to match your device. To reprovision the device you simply need to run the Invoke-MgBetaReprovisionDeviceManagementVirtualEndpointCloudPc cmdlet against that Cloud PC. Read about that cmdlet here. Install-Module Microsoft.Graph.Beta.DeviceManagement.Actions -Scope CurrentUser -Force -AllowClobber Import-Module Microsoft.Graph.Beta.DeviceManagement.Actions Install-Module Microsoft.Graph.Beta.DeviceManagement.Administration -Scope CurrentUser -Force -AllowClobber Import-Module Microsoft.Graph.Beta.DeviceManagement.Administration Connect-MgGraph -Scopes "CloudPC.ReadWrite.All" # Get Cloud PC $cloudPc = Get-MgBetaDeviceManagementVirtualEndpointCloudPc | Where-Object { $_.ManagedDeviceName -eq "CPCnTGYOI" } # Reprovison the device Invoke-MgBetaReprovisionDeviceManagementVirtualEndpointCloudPc -CloudPCId $cloudPC.Id Let's check the Intune console once again for the status of the Reprovision action. You will see it reporting as Active in the device view. In the All Cloud PCs view it will state Provisioning in the Status column. Since our Cloud PCs using a random naming template, the device will be created with a new name. In our case the device is now called CPCn4D8PH. Finally, in the device view, the reprovisioning will be marked as Completed. Restarting a Cloud PC As with the reprovisioning via Graph, the Restart action is fairly simple to implement. The Restart device action initiates a reboot of the selected device within five minutes. Keep in mind that the device owner won't receive an automatic notification, which could result in unsaved work being lost. Since we provisioned the Cloud PC previously, we have updated the hostname in our command to get the Cloud PC via the Get-MgBetaDeviceManagementVirtualEndpointCloudPc cmdlet. Be aware of that if you have followed along and also reprovisioned prior to running this action. As mentioned, the reprovision action may have changed the device name. With details of the Cloud PC gathered, you can execute the Restart-MgBetaDeviceManagementVirtualEndpointCloudPc cmdlet. Details here. Install-Module Microsoft.Graph.Beta.DeviceManagement.Actions -Scope CurrentUser -Force -AllowClobber Import-Module Microsoft.Graph.Beta.DeviceManagement.Actions Install-Module Microsoft.Graph.Beta.DeviceManagement.Administration -Scope CurrentUser -Force -AllowClobber Import-Module Microsoft.Graph.Beta.DeviceManagement.Administration Connect-MgGraph -Scopes "CloudPC.ReadWrite.All" # Get Cloud PC $cloudPc = Get-MgBetaDeviceManagementVirtualEndpointCloudPc | Where-Object { $_.ManagedDeviceName -eq "W365-5AMXD" } # Restart the device Restart-MgBetaDeviceManagementVirtualEndpointCloudPc -CloudPCId $cloudPC.Id The device will report as Restart: Active in the device view in the Intune console. As mentioned, the user will get disconnected from their Cloud PC. and when the action is complete, it will be reported as such in the Intune console and the user will be able to log back into their device. Summary Managing your Cloud PCs via Microsoft Graph is super simple and we have showed you how you can run effective code to execute the resize, restore, reprovision and restart actions against a specific device. You can take the code provided and expand this to create scripts which could run these actions against a collection of devices, similar to the Bulk actions options available in the Microsoft Intune admin center.


-
 if they click cancel then the required task sequence will not run and it will want to reboot the computer
 -
Prerequsites for SCCM 2012 R2 and SCCM 1606
anyweb replied to charris211's topic in Configuration Manager 2012
check your messenger -
A quick look at using Windows 365 Cloud PC’s via Motorola Thinkphone
anyweb replied to anyweb's topic in Windows 365
thanks for sharing ! -
Prerequsites for SCCM 2012 R2 and SCCM 1606
anyweb replied to charris211's topic in Configuration Manager 2012
I have the following prerequisites, take your pick
-
Introduction Shortly after Technical Preview 2411 was released I predicted that Configuration Manager 2409 would be released within a couple of days, and it was more or less, well… 4 days later. This production release was late and people were waiting to see what the new release offered/fixed. To clarify what i mean by late, if we are going by the release name, it should have technically been released in September 2024 (Configuration Manager 2409) and yet was released in December 2024. Oh well, at least it’s out. 2409 Release dates Fast Ring: December 03, 2024 Slow Ring: December 16, 2024 I upgraded my lab to 2409 using the fast ring script as soon as it was available and I had no issues at all with the upgrade. Here are the update notes from Microsoft. What’s new ? Now that we have 2409 installed, what is new/changed/broken/depreciated. I’ll highlight the important ones, you can get the entire list here. SQL related Configuration Manager now supports SQL extended protection for authentication. It’s a security feature that enhances protection against MITM attacks, making SQL server more secure when connections are made using extended protection. Starting with version 2409, Configuration Manager no longer supports SQL Server 2012 and 2014. Upgrade to the latest SQL Server version or at least SQL Server 2016. If you don’t upgrade, CM upgrades are blocked, and you see an error during the prereq check. For more information, see Supported SQL Server versions for Configuration Manager. OSD related MDT is depreciated so it’s time to remove all MDT integration from your task sequences before October 2025. Windows 11 24H2 & Windows Server 2025 are added to the Product lifecycle dashboard and supported platform. Windows 11 24H2 & Windows Server 2025 client support is added. Boot image creation in CM on Windows Server 2025 now supports the latest Windows ADK. The Windows upgrade readiness dashboard now supports Windows 11 24H2 for upgrading clients. Configuration Manager now supports BitLocker task sequence steps for Arm64 devices. Cloud related The ‘Renew Secret Key‘ feature now opens a dialog with four options for the validity period. This update also prevents applications older than 800 days (approximately two years) from renewing their secret keys. The same options are available when creating a new app. CMG Setup now uses managed Identities and third-party Server App to interact with CMG’s Azure Storage account, instead of storage account keys. Other In BitLocker Management, policies that include OS drive encryption with a TPM protector and fixed drive encryption with the Auto-Unlock option are supported on Arm64 devices. Issues I observed (post upgrade) Upgrading to 2409 twice As I had originally upgraded to 2409 using the fast ring script, I went back to see if any HFRU was released to address any issues, and there wasn’t however there was a new version of Configuration Manager 2409 … not confusing at all. So before continuing I decided to upgrade my site to 2409 again :-). After some time (the next day) my site was upgraded again and looking good, this time with version 5.00.9132.1011. Enabling CMG Enhanced Security When enabling the CMG enhanced security, using an account that was a Global Admin in Azure, I got the following error: Subscription Configuration Error occurred when granting Contributor permission to the Microsoft Entra ID app for resource group cloudattachcmg. For more information, see SmsAdminUI.log. which pointed me to the SMSAdminUI.log. Here’s a snippet from that log: [1, PID:3620][12/18/2024 11:21:17] :Hyak.Common.CloudException\r\nFailed to complete the role assignment with status code Forbidden.\r\n at Microsoft.ConfigurationManagement.AdminConsole.AzureServices.EnhanceSecurityDialog.GrantRoleBasedAccessControlToAadAppOnResourceGroup(String subscriptionId, String servicePrincipalId, String resourceGroupName)\r\n I looked at the user I was logged in as and it was indeed a Global Admin and the role enabled using PIM, however it wasn’t a subscription owner as the following indicates you need to be. When I originally setup this CMG I used a different Global Admin account which was also the subscription owner. So I assigned the subscription owner Azure resource role to my new Global Admin user, PIM’d the role and tried again. This time, it went through the upgrade wizard without a hitch! I hope this helps someone ! New abilities Below you can see the new maintenance windows feature which is part of the CMG enhanced security The renew secret key option for your Cloud Management Server App opens the following wizard with new options for secret key expiry Centralized search means you can now decide which node to search in, or choose All Workspaces to search everywhere. Until the next time, cheers niall
-
Introduction Windows 365 Cloud PC’s have evolved a lot in the last couple of years, and with the Windows app you can access them from practically any device. The Android based Motorola ThinkPhone is not new however, but I’ve been using it to access my Cloud PC’s from various locations (Sweden, Texas, Florida) over the last several months to get a good idea of it’s capabilities. To assist with that I’ve connected it to the following for ease of use: External monitor (Lenovo ThinkVision portable monitor) Phone stand (cheap eBay stand) USB C port extender Wireless keyboard and mouse This combination might mean that you need to pack less computing power as the Cloud PC does the heavy lifting. You could even skip the portable monitor and use the ThinkPhone’s built in screen but that might be a stretch if your eyesight isn’t up to it. ThinkPhone & Windows 365 So what does this phone offer exactly in relation to Windows 365 Cloud PC’s ? Well if has built in integration with Windows 365 allowing you to quickly access your Cloud PC’s with a rich experience over the native Android experience via the Window app. When you connect an external monitor you’ll see the Windows 365 integration first hand and it’s conveniently the first icon shown. Clicking it shows you what looks like a connection to a Cloud PC but the text at the bottom of the screen informs you to: Select a Cloud PC on your phone to connect. I don’t quite get why this is necessary, or why you are not shown the Cloud PC’s on your display to choose from, but this is how it works with this solution currently. It’s a step I’d like to see improved in a later release of this solution. Returning to your phone, you select the Cloud PC you want to connect to. and after doing so you are prompted to confirm your preferences in relation to what the remote PC can access on your device. your Cloud PC magically launches, how cool is that? You can do your work as normal, browse websites, use Teams for meetings and so on. It actually works very well for general office tasks. This entire blog post, from start to finish was composed on my Cloud PC using the ThinkPhone while away from my normal office environment. What needs improvement As I’ve said already I’ve used this combination (ThinkPhone + External portable monitor + wireless keyboard + mouse) in various locations around the world and for most scenarios it works really well. However there is room for improvement. Multiple monitor support Most people that dock anything to a USB-C or Thunderbolt dock do so with multiple monitors, and straight away, this scenario fails, as it can only utilize one monitor. This is probably why the online demos are always with one monitor. I’ve 3 monitors in my home office and that’s how I like to work with my Cloud PC’s. Cloud PC license support Currently it doesn’t support Frontline licensing, why ? I did notice for a brief few weeks that my Frontline Cloud PC showed up on the ThinkPhone, but it has once again disappeared. Text markup I’m not sure if this is an Android thing or a Cloud PC + ThinkPhone thing, but when I mark text (for example an entire paragraph) and want to do an action such as delete that selected text, it doesn’t let me complete that action so I have to delete the text letter by letter instead. Locking the screen When using the shortcut (windows key + L) to lock the screen, or when choosing the option to lock screen from the start menu, it completely disconnects the ThinkPhone from the session even though all I wanted was a lock screen, why is this the default behaviour ? Docking behaviour When docked, the external web camera connected to the docking station is ignored, only the phones cameras are available, why ? Watching videos When watching videos on your Cloud PC via the ThinkPhone, audio lags, you can watch a video but when you focus on what people are saying there lips don’t sync up to the actual audio. Summary The Motorola ThinkPhone is a brilliant phone in it’s own right and offers cool features that any phone efficiando would appreciate. But when it comes to Windows 365 connectivity, this is the icing on the cake. It really does offer you the ability to work remotely using just a phone, by docking to an existing USB-C docking station or by connecting external peripherals. This phone and this solution gets two big thumbs up from me and I’m definitely excited to test the next generation of this release from Motorola and Microsoft.
-
you can use one boot image, if you check my devmode follow up blog post it shows up it all fits together and yes you can use an x64 boot image, I was simply using x86 at the time for this example
-
you can deploy multiple task sequences to the same collection with a purpose of Available, some hidden, some not, the hidden ones just 'won't appear' unless acted upon using my script or a modern version of it (Powershell), the thing that matters here (for hidden task sequences) is the deploymentID
-
SCCM 2007 SP2 prerequisites download
anyweb replied to EngiNerd's topic in Configuration Manager 2007
i've shared them with you, and yes i'm still here, this is my forum 🙂 -
Surface Laptop 7 (ARM)
anyweb replied to RobDrizz's topic in System Center Configuration Manager (Current Branch)
here's some info to assist you https://www.niallbrady.com/2023/12/03/arm64-support-for-osd-added-to-configuration-manager/ -
Surface Laptop 7 (ARM)
anyweb replied to RobDrizz's topic in System Center Configuration Manager (Current Branch)
did you add support for ARM pxe ? -
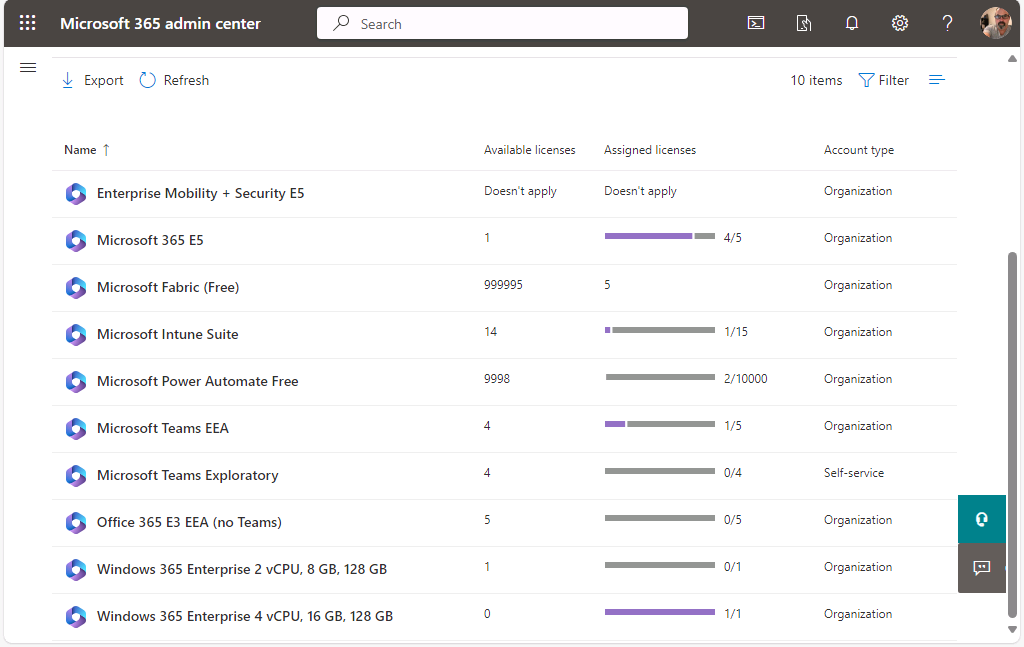
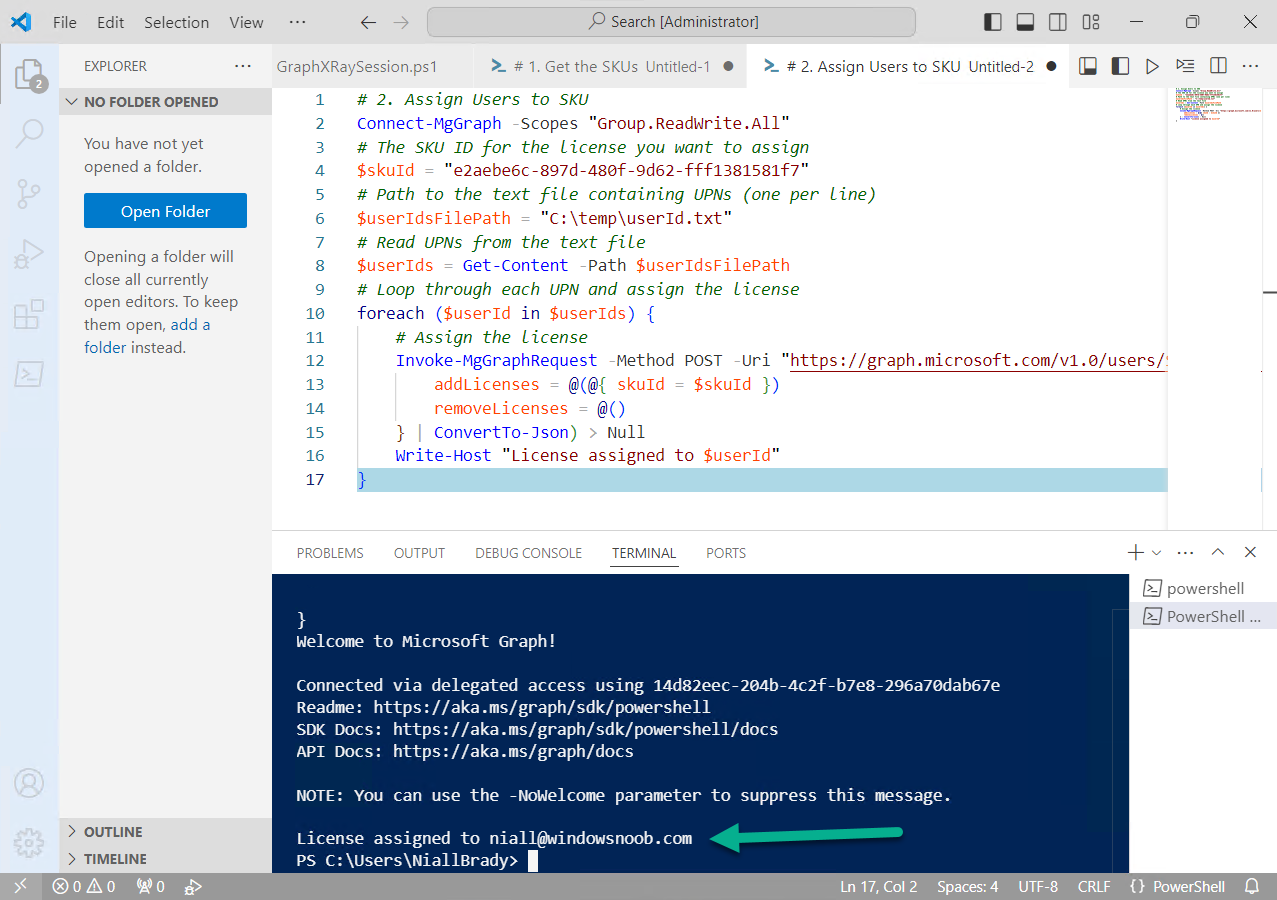
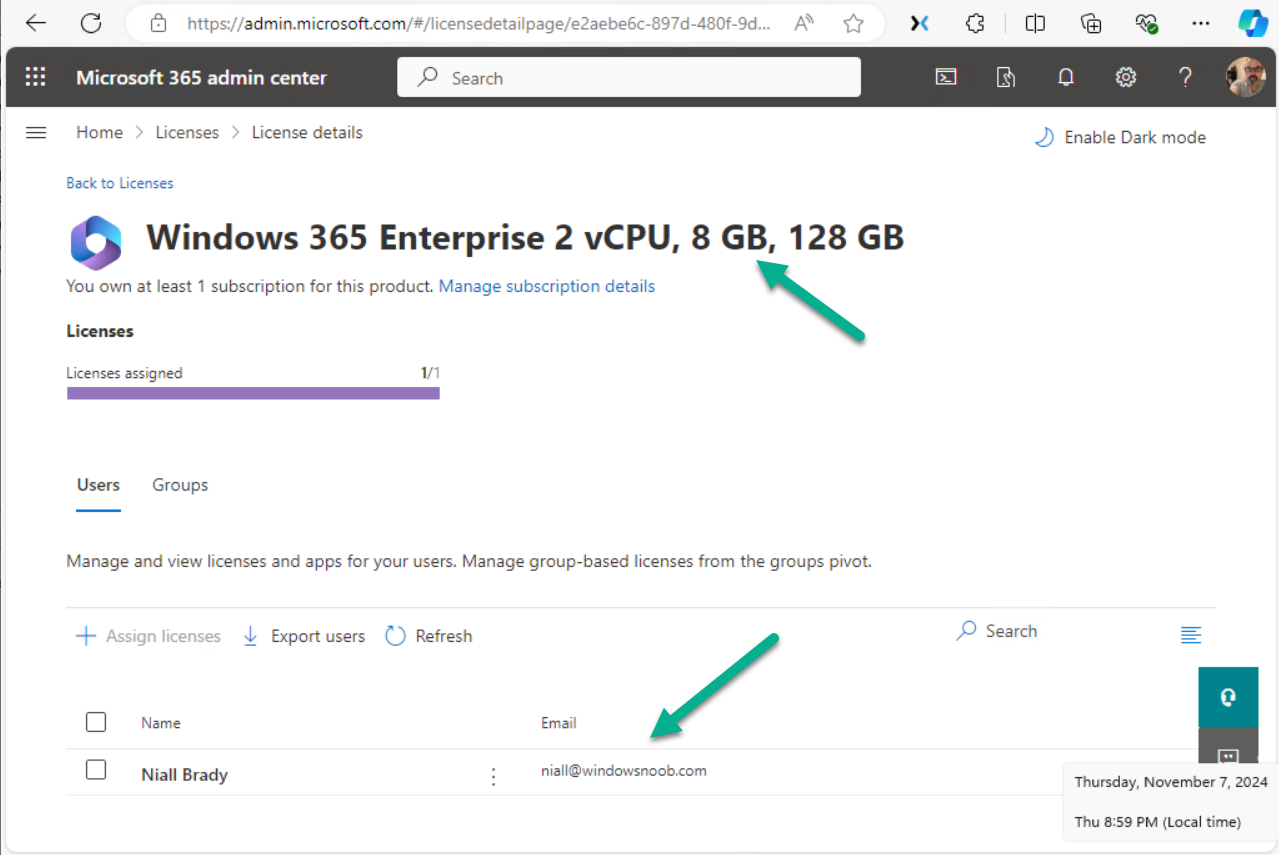
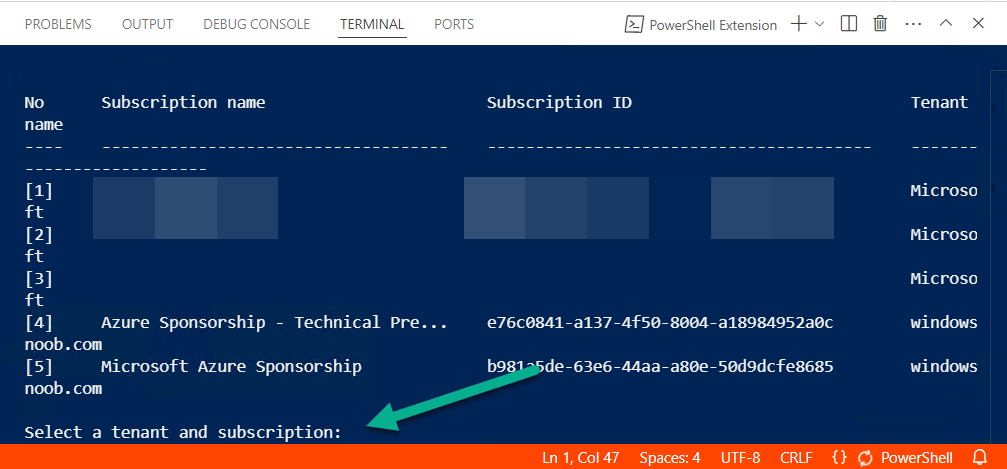
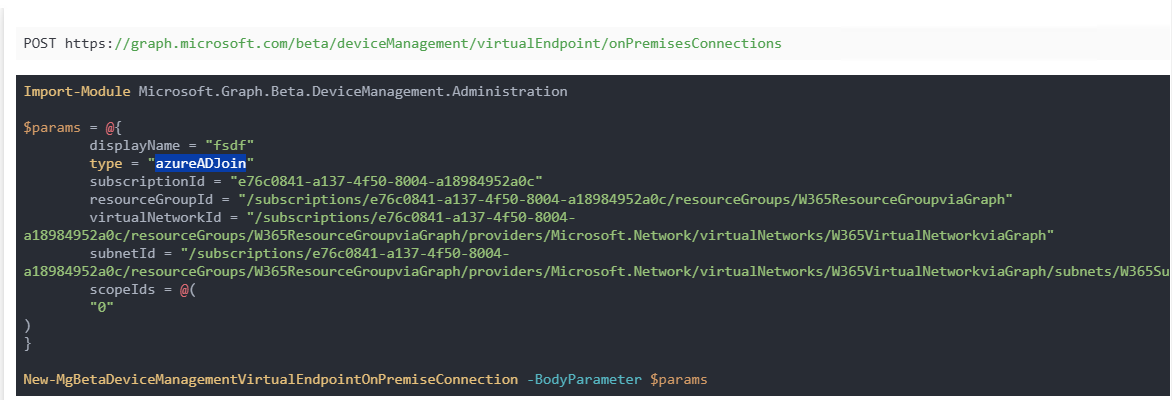
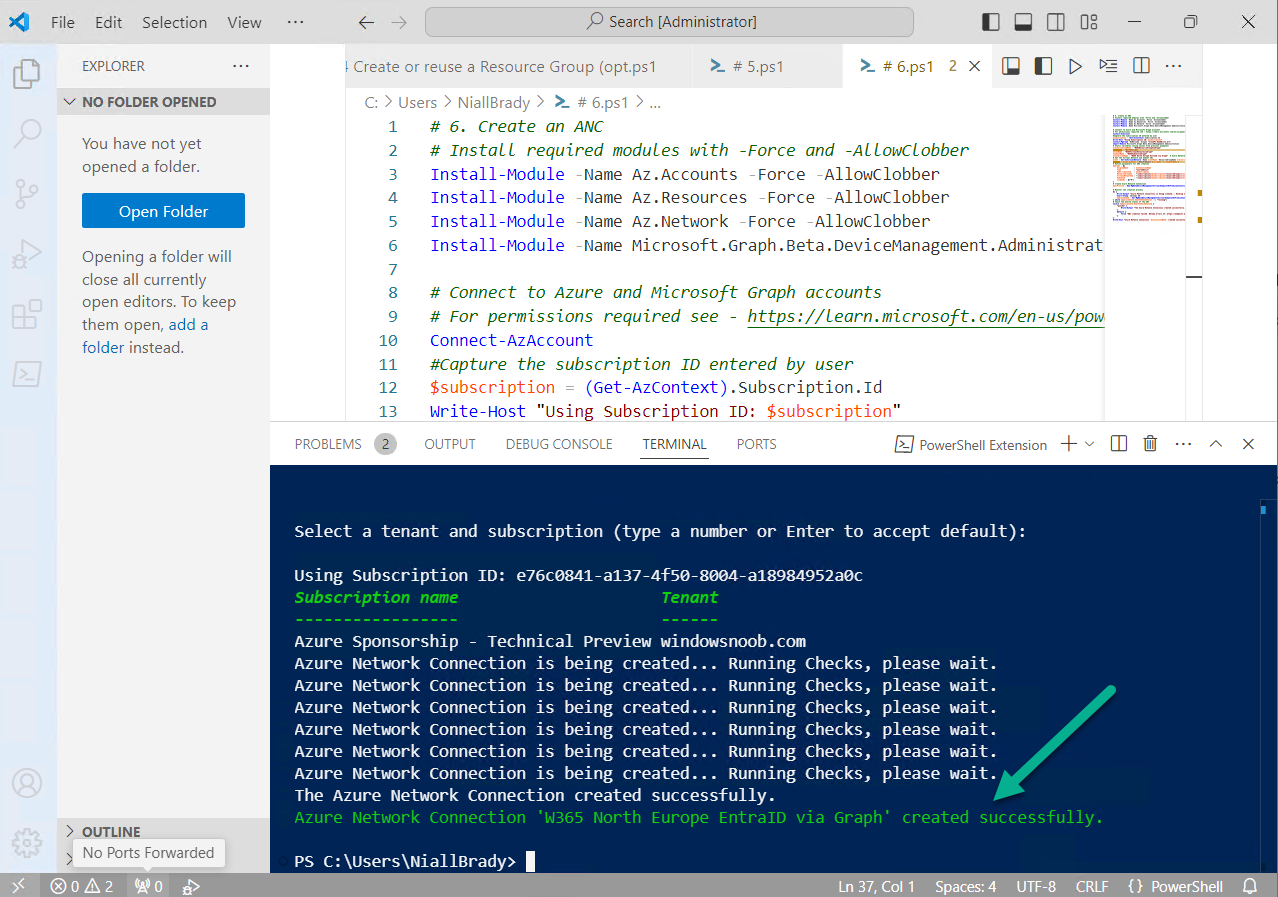
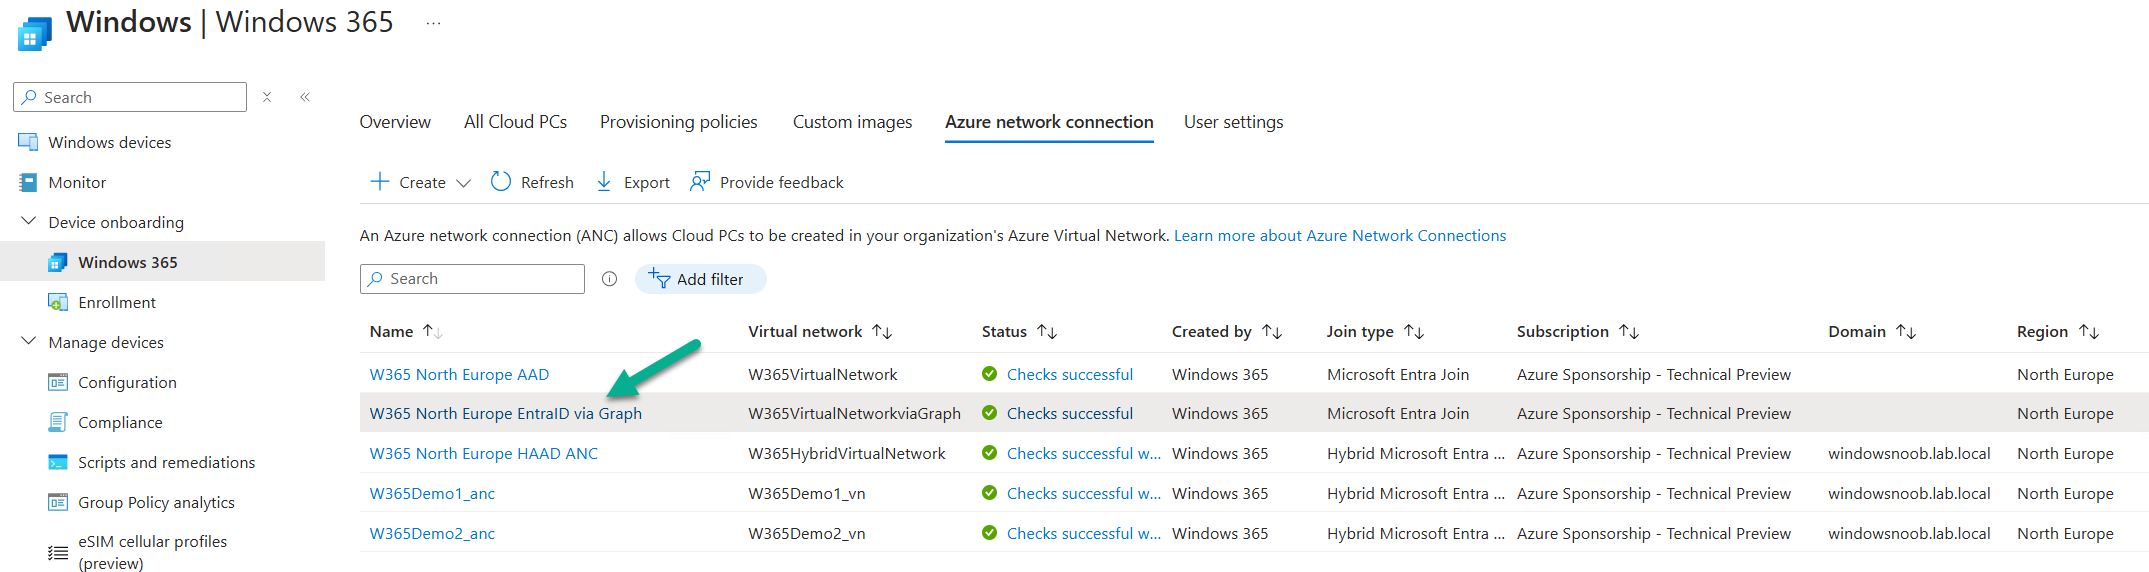
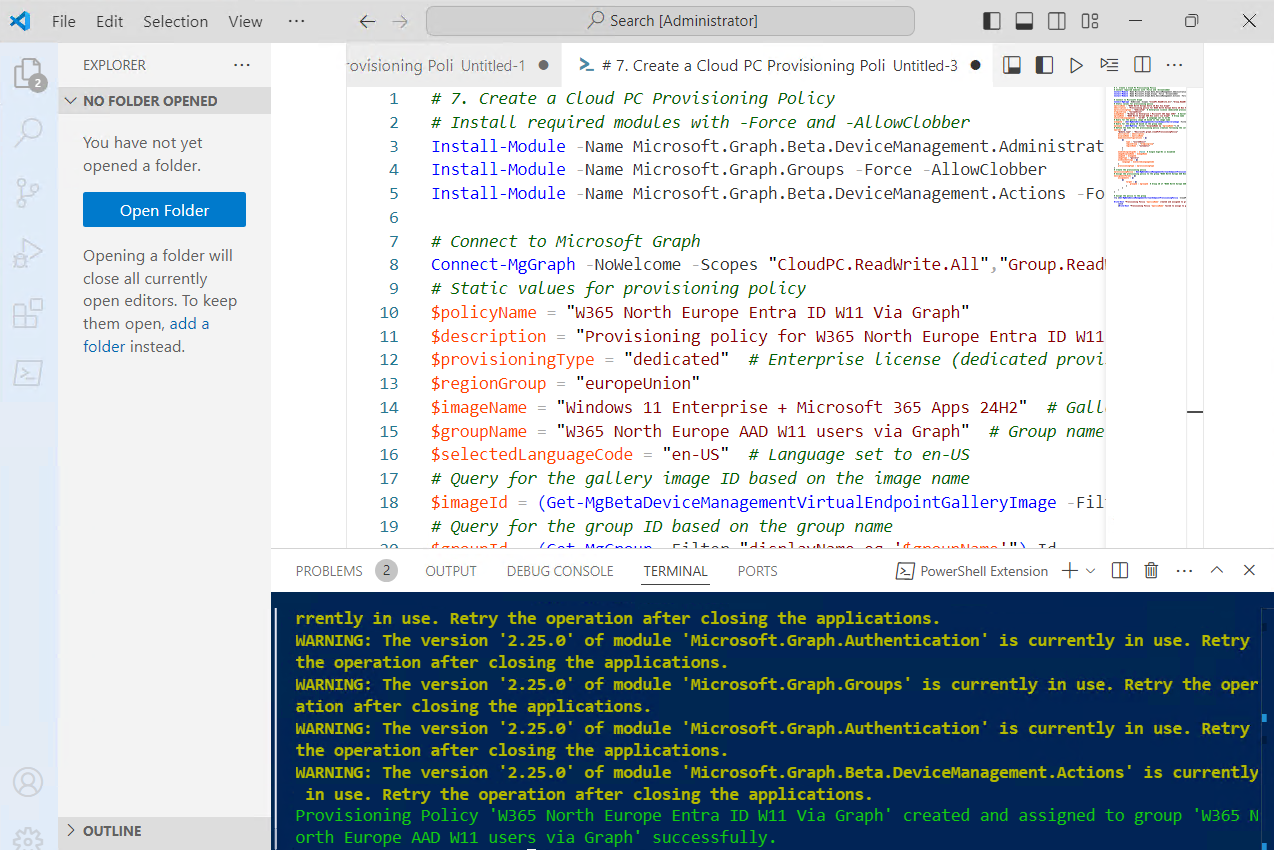
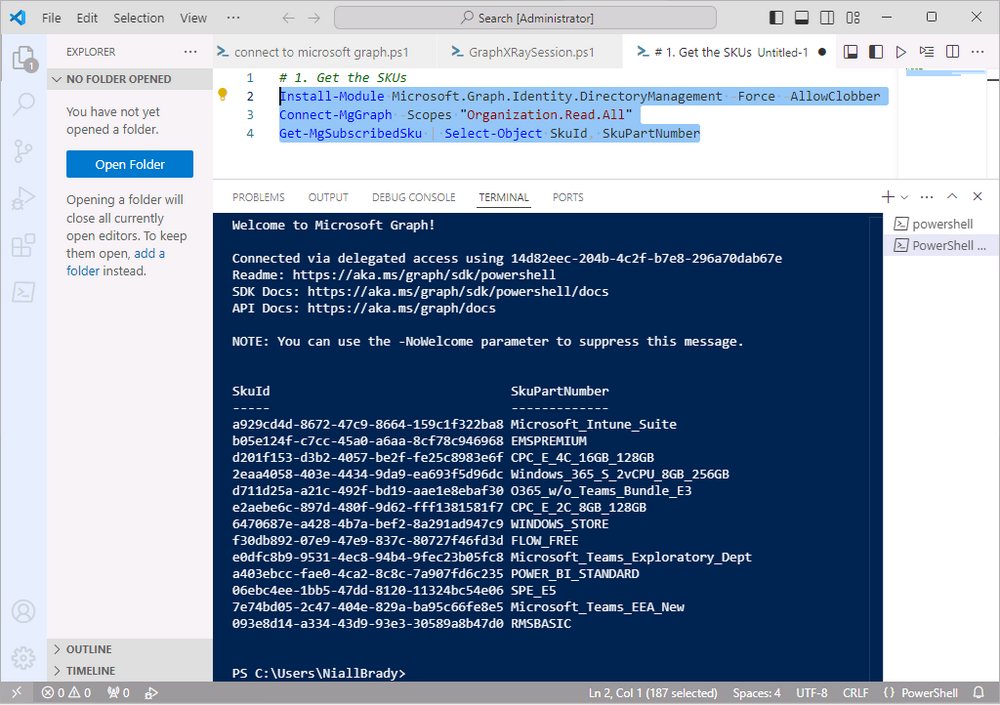
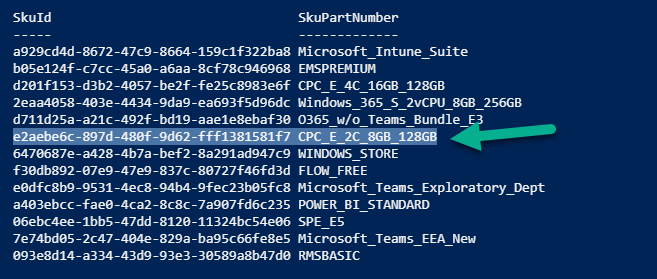
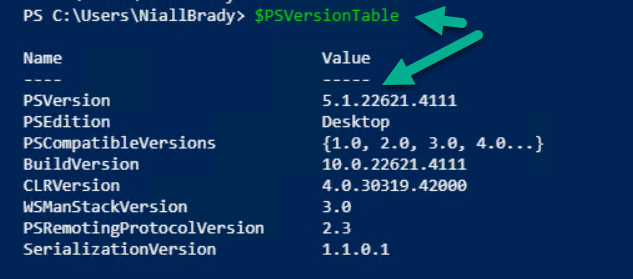
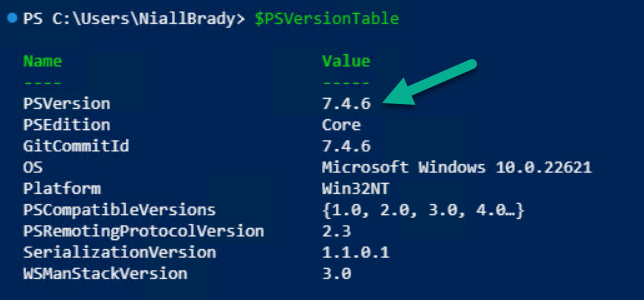
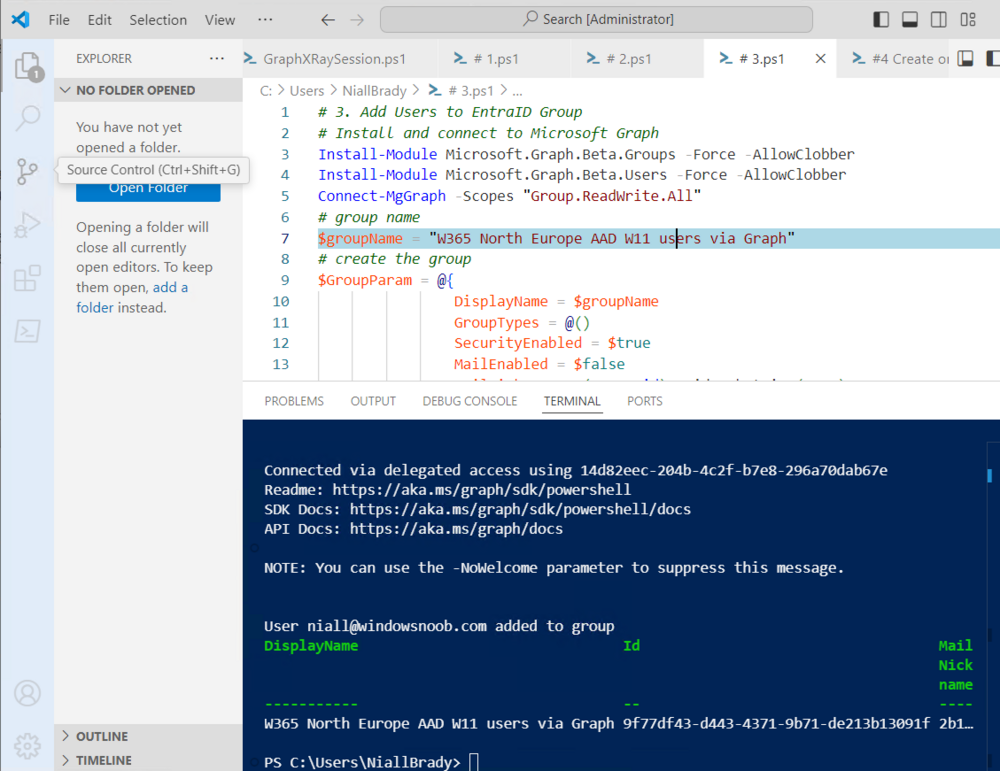
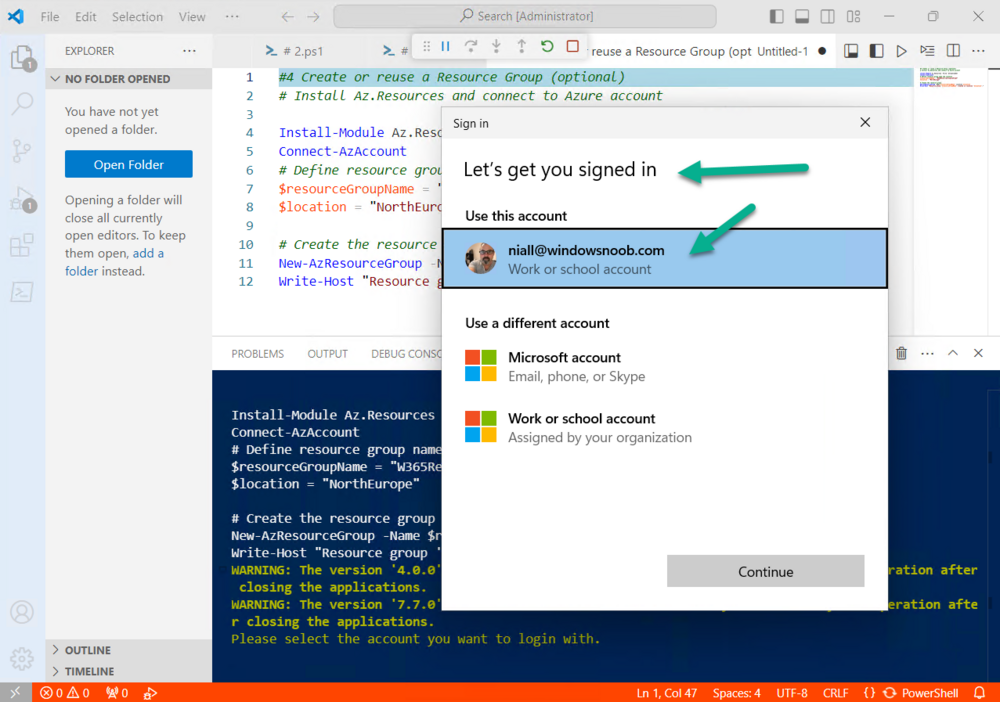
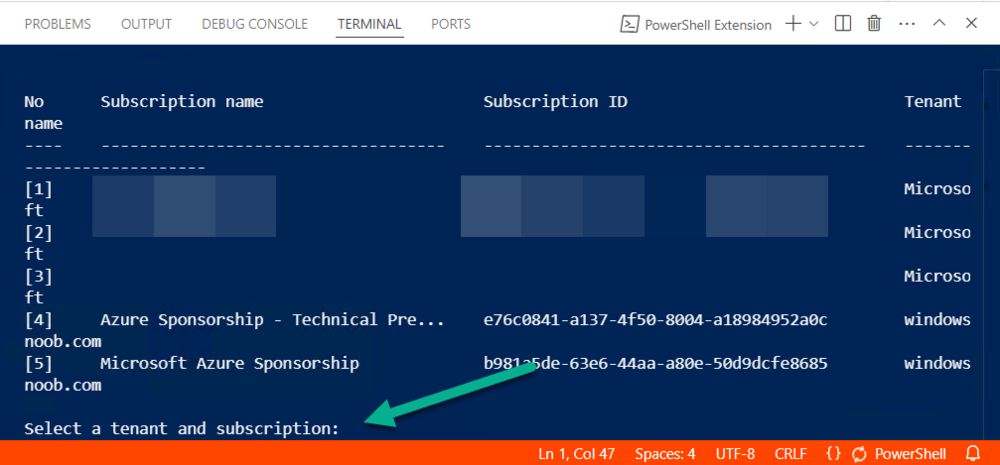
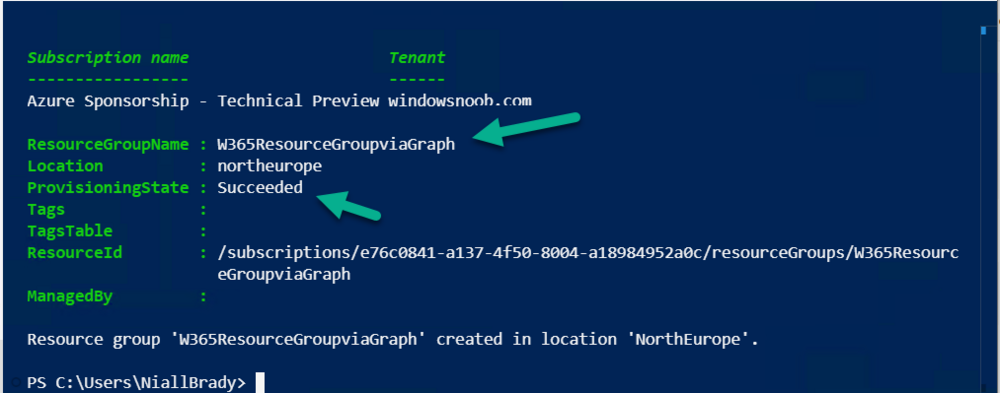
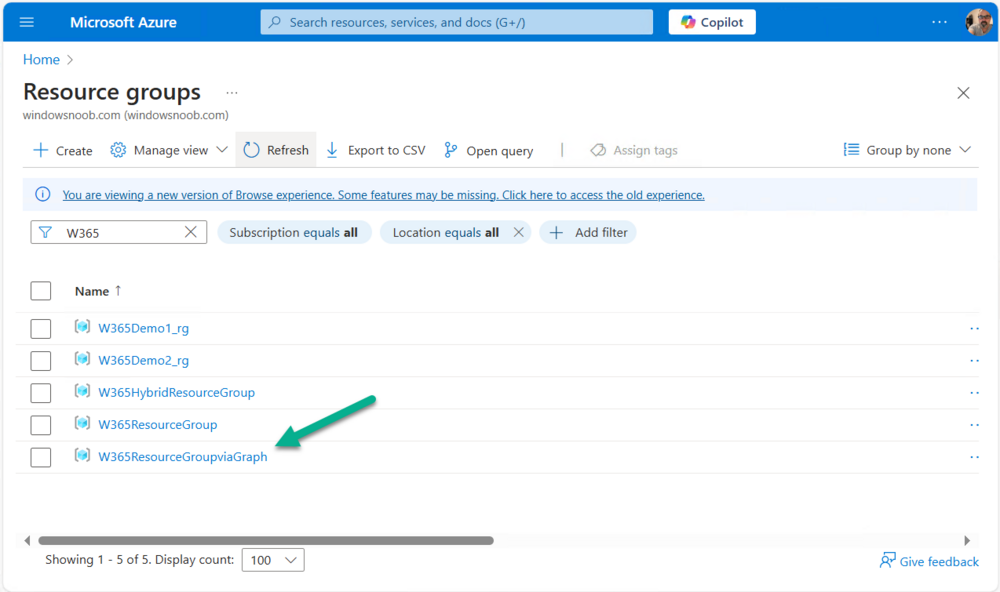
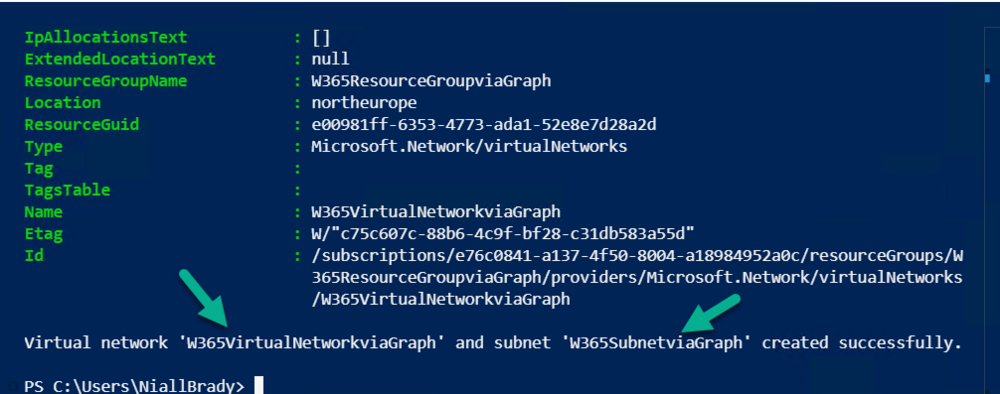
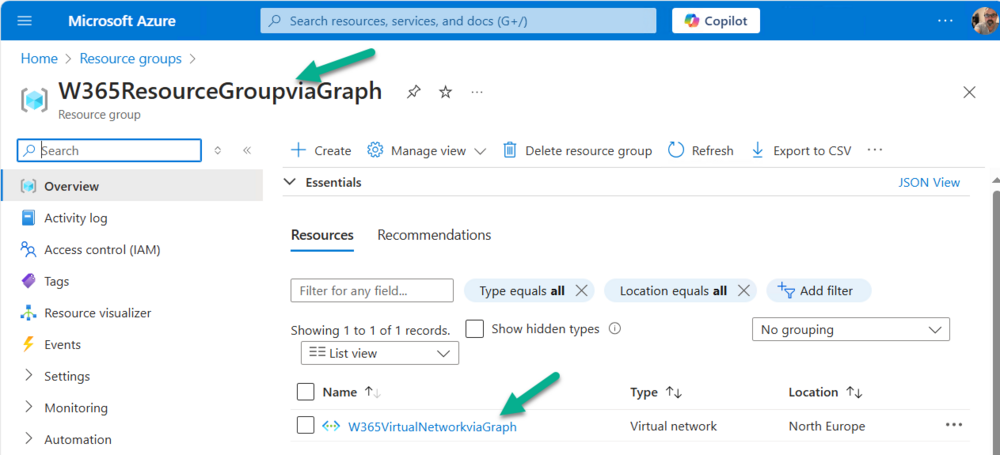
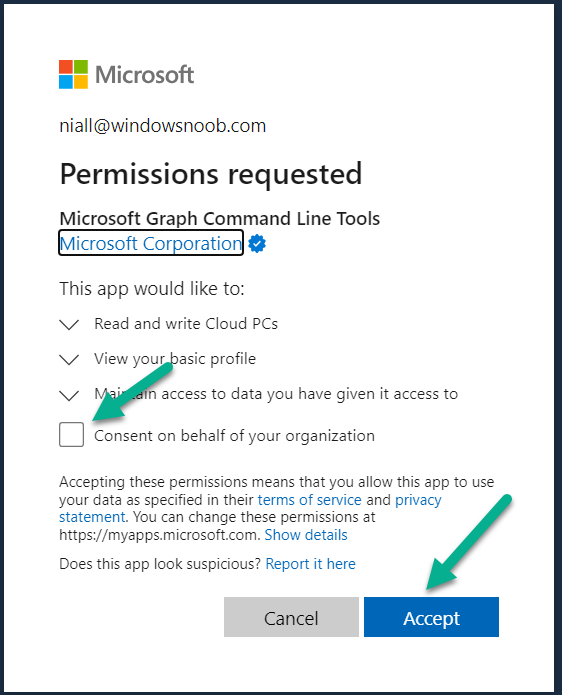
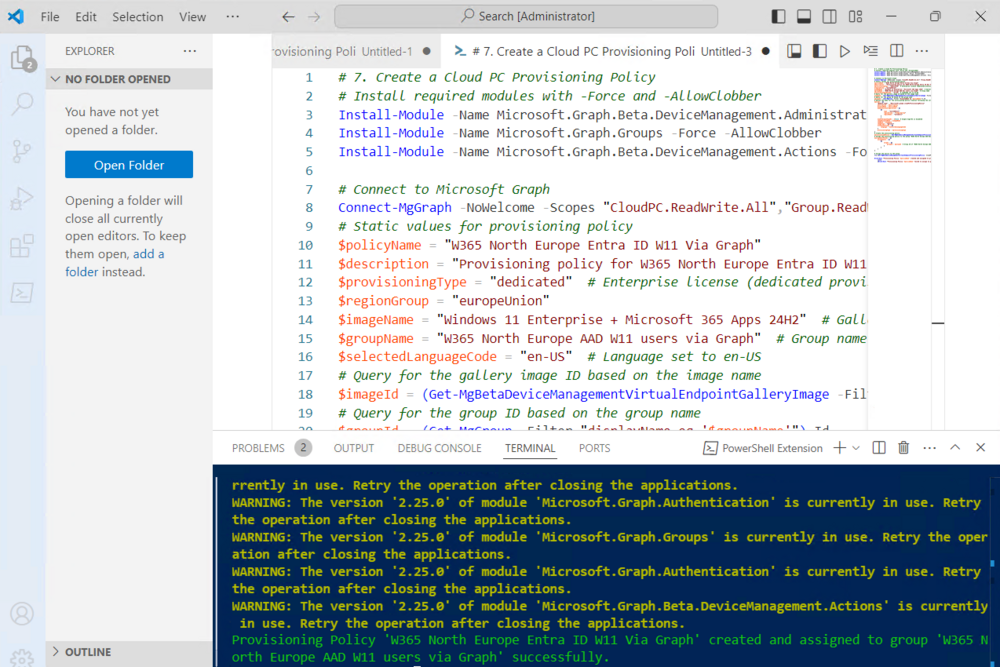
Introduction This is Part 3 of a new series of guides which will cover managing Windows 365 Cloud PC's using PowerShell and Microsoft Graph. This mini series should help you get started with automating and managing your Cloud PC's using PowerShell via Microsoft Graph. If you are new to Windows 365 Cloud PC's then please read our previous series called Getting started with Windows 365 available here. At the time of writing, Paul is a 8 times Enterprise Mobility MVP based in the UK and Niall is a 14 times Enterprise Mobility & Windows and Devices MVP based in Sweden. Below you can find all parts in this series: Automating Windows 365 part 1 - Introducing Graph and setting up Visual Studio code Automating Windows 365 part 2 - Using Graph X-Ray Automating Windows 365 part 3 - Provisioning Cloud PC's <- you are here Automating Windows 365 part 4 - Managing your Cloud PC Automating Windows 365 part 5 - TBD The automation used in this part is based upon the manual actions we took in a previous series on Windows 365 here. In this part we'll cover the following: Install Powershell 7 Assigning Licenses to Users Adding licensed users to an Entra Id Group Decide which network your Azure AD Joined Cloud PC's will use Create or reuse a Virtual Network (optional) Create an Azure Network Connection (optional) Create a Provisioning Policy Summary Install Powershell 7 To avoid errors later on, and in order to get the full benefit of Powershell, we'll install Powershell version 7, you can determine your Powershell version using the following code, in Visual Studio Code. $PSVersionTable As you can see here, our PC is running an older version of Powershell so it's time to update it. You can download Powershell 7 from here. Once installed, restart Visual Studio Code and check the version again and it should reflect PowerShell version 7.4.6 as below. Assigning Licenses to Users You need to assign a Windows 365 license to your users in order for them to use the service, much as you would with any Microsoft 365 product. To do this, open the Microsoft 365 admin center and expand the Billing node, select Licenses, and choose the appropriate Windows 365 product from those you've purchased. When it comes to automation however, we first need to know what SKUS are available in our tenant. Using the following code, we can list all of those SKUS, this uses the following cmdlet Get-MgSubscribedSku documented here. # 1. Get the SKUs Install-Module Microsoft.Graph.Identity.DirectoryManagement -Force -AllowClobber Connect-MgGraph -Scopes "Organization.Read.All" Get-MgSubscribedSku | Select-Object SkuId, SkuPartNumber Launch Visual Studio Code as Administrator and give it a whirl. The results will be displayed similar to the below output. and here are the corresponding licenses in admin.microsoft.com Now that we know the SKU id of our available licenses, we will assign users to the Windows 365 Enterprise 2 vCPU, 8 GB, 128 GB license shown as e2aebe6c-897d-480f-9d62-fff1381581f7 CPC_E_2C_8GB_128GB in the Powershell output. In order to do so, drop a file called userId.txt in C:\temp containing the UPN of the users you wish to assign licenses to: # 2. Assign Users to SKU Connect-MgGraph -Scopes "Group.ReadWrite.All" # The SKU ID for the license you want to assign $skuId = "e2aebe6c-897d-480f-9d62-fff1381581f7" # Path to the text file containing UPNs (one per line) $userIdsFilePath = "C:\temp\userId.txt" # Read UPNs from the text file $userIds = Get-Content -Path $userIdsFilePath # Loop through each UPN and assign the license foreach ($userId in $userIds) { # Assign the license Invoke-MgGraphRequest -Method POST -Uri "https://graph.microsoft.com/v1.0/users/$userId/assignLicense" -Body (@{ addLicenses = @(@{ skuId = $skuId }) removeLicenses = @() } | ConvertTo-Json) > Null Write-Host "License assigned to $userId" } After running the code above, the result is revealed: which can be confirmed in the admin portal Ok, now that we know how to assign licenses to users, let's automate the creation of an Entra Id group and populate it with users. Adding licensed users to an Entra Id group Next, you need to add the licensed user(s) to an Entra Id group, you can name the group whatever you want but it would be a good idea to match the name of your Entra Id group to the Provisioning policy that we will create later in this guide by using a naming convention. In this example, the script will create an Entra Id group called W365 North Europe AAD W11 users via Graph and it will add the licensed user(s) to that group. By using this naming convention we can quickly determine that members of this group will get a Windows 365 Cloud PC configured for Northern Europe, using Azure AD Join and running Windows 11. To accomplish this we'll use the following code: # 3. Add Users to EntraID Group # Install and connect to Microsoft Graph Install-Module Microsoft.Graph.Beta.Groups -Force -AllowClobber Install-Module Microsoft.Graph.Beta.Users -Force -AllowClobber Connect-MgGraph -Scopes "Group.ReadWrite.All" # group name $groupName = "W365 North Europe AAD W11 users via Graph" # create the group $GroupParam = @{ DisplayName = $groupName GroupTypes = @() SecurityEnabled = $true MailEnabled = $false MailNickname = (New-Guid).Guid.Substring(0,10) } New-MgBetaGroup -BodyParameter $GroupParam # Retrieve the group by name $group = Get-MgBetaGroup -Filter "displayName eq '$groupName'" # Path to the text file containing UPNs (one per line) $userIdsFilePath = "C:\temp\userId.txt" # Read UPNs from the text file $userUPNs = Get-Content -Path $userIdsFilePath # Loop through each UPN and add the user to the group foreach ($upn in $userUPNs) { # Add the user to the group using their object ID $user = Get-MgBetaUser -UserId $upn New-MgBetaGroupMember -GroupId $group.Id -DirectoryObjectId $user.Id Write-Host "User $upn added to group" } The code above not only creates the Entra Id group but then populates it with all users found in the text file. Note: If you run the script more than once it will error out, as currently there is no error checking to verify if the group was already created. Decide which network your Azure AD joined Cloud PCs will use You need to decide which network type your Cloud PC's will use for the Azure AD Join scenario. There are 2 choices listed below. • A Microsoft-hosted network • Your own network (using an Azure network connection) Tip: If you want your Azure AD Joined Windows 365 Cloud PCs to be 100% Cloud Only then select the built-in Microsoft-hosted network. If you select that choice then you can skip the next three optional steps. If however you want to control the region where your network is located (in relation to your users) and which DNS settings your Cloud PC's will use plus many other additional network settings, then you should configure the next three steps. Create or reuse a Resource Group (optional) Windows 365 uses Resource Groups in Azure to store certain resources, such as Virtual networking. When creating a provisioning policy for a Cloud PC you can select to use the Microsoft hosted network (cloud only) or use a previously created Azure network connection (ANC). If you choose the option to use your own network via an Azure network connection, that ANC needs to be in a Resource Group. To prepare for that, we'll create a new Resource Group in Azure. We need to run the following code #4 Create or reuse a Resource Group (optional) # Install Az.Resources and connect to Azure account Install-Module Az.Resources -Force -AllowClobber Connect-AzAccount # Define resource group name and location $resourceGroupName = "W365ResourceGroupviaGraph" $location = "NorthEurope" # Create the resource group New-AzResourceGroup -Name $resourceGroupName -Location $location Write-Host "Resource group '$resourceGroupName' created in location '$location'." After running, it should prompt you for an account to use and next it'll prompt you for which tenant and subscription to use: and after that, it should create the resource group. which can be confirmed in Azure, Resource Groups. Create or reuse a Virtual Network (optional) Windows 365 in an Azure AD Join scenario can use a Microsoft Hosted Network to be completely cloud only, or can use Virtual Networks to allow your Cloud PC's to use specific network settings that you define. Note: If you want your Azure AD Join based Windows 365 Cloud PC's to be cloud only you can skip this step. To use your own network and provision Azure AD joined Cloud PCs, you must meet the following requirements: • Azure virtual network: You must have a virtual network (vNET) in your Azure subscription in the same region as where the Windows 365 desktops are created. • Network bandwidth: See Azure’s Network guidelines. • A subnet within the vNet and available IP address space. In your newly created Resource Group, click on Create and select Virtual Network. Here you can define the ip addresses to use if that's your preference. # 5. Create or reuse a Virtual Network (optional) # Install Az.Network and connect to Azure account Install-Module Az.Network -Force -AllowClobber Connect-AzAccount # Define hardcoded values for resource group, location, virtual network, and subnet $resourceGroupName = "W365ResourceGroupviaGraph" $location = "NorthEurope" $vnetName = "W365VirtualNetworkviaGraph" $addressPrefix = "10.0.0.0/16" $subnetName = "W365SubnetviaGraph" $subnetPrefix = "10.0.1.0/24" # Create the virtual network and subnet $subnetConfig = New-AzVirtualNetworkSubnetConfig -Name $subnetName -AddressPrefix $subnetPrefix New-AzVirtualNetwork -ResourceGroupName $resourceGroupName -Location $location -Name $vnetName -AddressPrefix $addressPrefix -Subnet $subnetConfig Write-Host "Virtual network '$vnetName' and subnet '$subnetName' created successfully." After running, it will prompt you which account to use and once again prompt you which tenant and subscription to use, pressing enter will keep your previous choice. If everything went ok, your virtual network and subnet will be created successfully. And that virtual network will be in your chosen resource group in Azure. Create Azure network connection (optional) Windows 365 in an Azure AD Join scenario can use a Microsoft Hosted Network to be completely cloud only, or can use an Azure network connection to allow your Cloud PC's to access your on-premises network resources. Note: If you want your Azure AD Join based Windows 365 Cloud PC's to be cloud only you can skip this step. The following code will create the ANC for you, using the details of the Resource Group, virtual network and subnets which were created in the previous code. Keep in mind that each tenant has a limit of 10 Azure network connections, if you need more than that you must contact Microsoft support. # 6. Create an ANC # Install required modules with -Force and -AllowClobber Install-Module -Name Az.Accounts -Force -AllowClobber Install-Module -Name Az.Resources -Force -AllowClobber Install-Module -Name Az.Network -Force -AllowClobber Install-Module -Name Microsoft.Graph.Beta.DeviceManagement.Administration -Force -AllowClobber # Connect to Azure and Microsoft Graph accounts # For permissions required see - https://learn.microsoft.com/en-us/powershell/module/microsoft.graph.beta.devicemanagement.administration/new-mgbetadevicemanagementvirtualendpointonpremiseconnection?view=graph-powershell-beta Connect-AzAccount #Capture the subscription ID entered by user $subscription = (Get-AzContext).Subscription.Id Write-Host "Using Subscription ID: $subscription" Connect-MgGraph -NoWelcome -Scopes "CloudPC.ReadWrite.All" Import-Module Microsoft.Graph.Beta.DeviceManagement.Administration # Static variables (using values from previous examples) $resourceGroupName = "W365ResourceGroupViaGraph" $location = "NorthEurope" $vnetName = "W365VirtualNetworkviaGraph" $subnetName = "W365SubnetviaGraph" $connectionName = "W365 North Europe EntraID via Graph" # Azure Network Connection name # Get the Virtual Network and Subnet IDs $vnet = Get-AzVirtualNetwork -Name $vnetName -ResourceGroupName $resourceGroupName $subnet = $vnet.Subnets | Where-Object { $_.Name -eq $subnetName } # Define parameters for ANC creation $params = @{ DisplayName = $connectionName Type = "azureADJoin" SubscriptionId = $subscription ResourceGroupId = "/subscriptions/$subscription/resourceGroups/$resourceGroupName" VirtualNetworkId = "/subscriptions/$subscription/resourceGroups/$resourceGroupName/providers/Microsoft.Network/virtualNetworks/$vnetName" SubnetId = "/subscriptions/$subscription/resourceGroups/$resourceGroupName/providers/Microsoft.Network/virtualNetworks/$vnetName/subnets/$subnetName" scopeIds = @("0") } # Create Azure Network Connection $ancProfile = New-MgBetaDeviceManagementVirtualEndpointOnPremiseConnection -BodyParameter $params # Monitor the creation process do { Write-Output "Azure Network Connection is being created... Running Checks, please wait." Start-Sleep -Seconds 60 $policyState = Get-MgBetaDeviceManagementVirtualEndpointOnPremiseConnection -CloudPcOnPremisesConnectionId $ancProfile.Id } while ($policyState.HealthCheckStatus -eq "running") # Check the health status of the ANC switch ($policyState.HealthCheckStatus) { "passed" { Write-Output "The Azure Network Connection created successfully." } default { throw "ANC creation failed. Review errors at: https://endpoint.microsoft.com/#view/Microsoft_Azure_CloudPC/EditAzureConnectionWizardBlade/connectionId/$($policyState.id)/tabIndexToActive~/0" } } Write-Host "Azure Network Connection '$connectionName' created successfully." -ForegroundColor Green When executed, it'll once again prompt for username before asking you to confirm the subscription, next it'll probably launch a web browser asking you to login, and then once logged in, you'll have to confirm the scoped permissions. This permission request (shown below) will only happen as needed. After it's got the permissions needed, It will check the health status every 60 seconds to see if it has completed. Side note, while you are waiting for your ANC to be built, keep in mind that all of the Powershell examples we are using here are coming via help from Graph X-Ray, here's an example of the Graph X-Ray snippet used for this section. And after some time, the ANC should be created successfully as we can see here in Visual Studio Code. And it should appear in the Intune portal. Create provisioning policy Next you need to create a provisioning policy. To create the Provisioning Policy using Graph we'll use the following script. This code will create the Provisioning Policy with the optional Azure Network Connection details added. So if you have used all the optional steps when executing the previous code then we recommend using this code to create a provisioning policy with an ANC. # 7. Create a Cloud PC Provisioning Policy # Install required modules with -Force and -AllowClobber Install-Module -Name Microsoft.Graph.Beta.DeviceManagement.Administration -Force -AllowClobber Install-Module -Name Microsoft.Graph.Groups -Force -AllowClobber Install-Module Microsoft.Graph.Beta.DeviceManagement.Actions -Force -AllowClobber # Connect to Microsoft Graph Connect-MgGraph -NoWelcome -Scopes "CloudPC.ReadWrite.All","Group.ReadWrite.All" # Static values for provisioning policy $policyName = "W365 North Europe Entra ID W11 Via Graph" $description = "Provisioning policy for W365 North Europe Entra ID W11 Via Graph" $provisioningType = "dedicated" # Enterprise license (dedicated provisioning) $ancName = "W365 North Europe EntraID via Graph" # ANC name $imageName = "Windows 11 Enterprise + Microsoft 365 Apps 24H2" # Gallery image name $groupName = "W365 North Europe AAD W11 users via Graph" # Group name $selectedLanguageCode = "en-US" # Language set to en-US # Query for the ANC ID based on the ANC name $ancId = (Get-MgBetaDeviceManagementVirtualEndpointOnPremiseConnection -Filter "displayName eq '$ancName'").Id # Query for the gallery image ID based on the image name $imageId = (Get-MgBetaDeviceManagementVirtualEndpointGalleryImage -Filter "displayName eq '$imageName'").Id # Query for the group ID based on the group name $groupId = (Get-MgGroup -Filter "displayName eq '$groupName'").Id # Define the body for the provisioning policy creation following the correct formatting $params = @{ "@odata.type" = "#microsoft.graph.cloudPcProvisioningPolicy" description = $description displayName = $policyName domainJoinConfigurations = @( @{ onPremisesConnectionId = $ancId type = "azureADJoin" } ) enableSingleSignOn = $false # Single Sign-On is disabled imageDisplayName = $imageName imageId = $imageId imageType = "gallery" windowsSettings = @{ language = $selectedLanguageCode } provisioningType = $provisioningType } # Create the provisioning policy $provisioningPolicy = New-MgBetaDeviceManagementVirtualEndpointProvisioningPolicy -BodyParameter $params # Assign the provisioning policy to the group "W365 North Europe AAD W11 users via Graph" $assignmentParams = @{ assignments = @( @{ target = @{ groupId = $groupId # Group ID of "W365 North Europe AAD W11 users via Graph" } } ) } # Assign the policy to the group try { Set-MgBetaDeviceManagementVirtualEndpointProvisioningPolicy -CloudPcProvisioningPolicyId $provisioningPolicy.Id -BodyParameter $assignmentParams Write-Host "Provisioning Policy '$policyName' created and assigned to group '$groupName' successfully." -ForegroundColor Green} catch {Write-Host "Provisioning Policy '$policyName' failed to assign to group '$groupName'." -ForegroundColor Red} Here you can see the successful creation of the policy in Intune with the Azure network connection that we specified. If you are not doing the optional steps above and are going to use the Microsoft Hosted Network, then use the following code, don't forget to adjust the variables as appropriate for your environment, eg: $regionGroup # 7. Create a Cloud PC Provisioning Policy # Install required modules with -Force and -AllowClobber Install-Module -Name Microsoft.Graph.Beta.DeviceManagement.Administration -Force -AllowClobber Install-Module -Name Microsoft.Graph.Groups -Force -AllowClobber Install-Module -Name Microsoft.Graph.Beta.DeviceManagement.Actions -Force -AllowClobber # Connect to Microsoft Graph Connect-MgGraph -NoWelcome -Scopes "CloudPC.ReadWrite.All","Group.ReadWrite.All" # Static values for provisioning policy $policyName = "W365 North Europe Entra ID W11 Via Graph" $description = "Provisioning policy for W365 North Europe Entra ID W11 Via Graph" $provisioningType = "dedicated" # Enterprise license (dedicated provisioning) $regionGroup = "europeUnion" $imageName = "Windows 11 Enterprise + Microsoft 365 Apps 24H2" # Gallery image name $groupName = "W365 North Europe AAD W11 users via Graph" # Group name $selectedLanguageCode = "en-US" # Language set to en-US # Query for the gallery image ID based on the image name $imageId = (Get-MgBetaDeviceManagementVirtualEndpointGalleryImage -Filter "displayName eq '$imageName'").Id # Query for the group ID based on the group name $groupId = (Get-MgGroup -Filter "displayName eq '$groupName'").Id # Define the body for the provisioning policy creation following the correct formatting $params = @{ "@odata.type" = "#microsoft.graph.cloudPcProvisioningPolicy" description = $description displayName = $policyName domainJoinConfigurations = @( @{ type = "azureADJoin" regionGroup = "$regiongroup" regionName = "automatic" } ) enableSingleSignOn = $false # Single Sign-On is disabled imageDisplayName = $imageName imageId = $imageId imageType = "gallery" windowsSettings = @{ language = $selectedLanguageCode } provisioningType = $provisioningType } # Create the provisioning policy $provisioningPolicy = New-MgBetaDeviceManagementVirtualEndpointProvisioningPolicy -BodyParameter $params # Assign the provisioning policy to the group "W365 North Europe AAD W11 users via Graph" $assignmentParams = @{ assignments = @( @{ target = @{ groupId = $groupId # Group ID of "W365 North Europe AAD W11 users via Graph" } } ) } # Assign the policy to the group try {Set-MgBetaDeviceManagementVirtualEndpointProvisioningPolicy -CloudPcProvisioningPolicyId $provisioningPolicy.Id -BodyParameter $assignmentParams Write-Host "Provisioning Policy '$policyName' created and assigned to group '$groupName' successfully." -ForegroundColor Green} catch {Write-Host "Provisioning Policy '$policyName' failed to assign to group '$groupName'." -ForegroundColor Red} here's the output Job done! Your newly provisioned Cloud PC is now available to the targeted user(s). Summary Automating tasks for your Cloud PC users is doable with PowerShell and Microsoft Graph. Using the Graph X-Ray web browser extension and Copilot to assist with your scripts makes your job a whole lot easier as now you can automate repetitive tasks instead of manually doing them in the various portals.


-
Migrate to the cloud - Part 1. Setup
anyweb replied to anyweb's topic in System Center Configuration Manager (Current Branch)
hi @RobsonM, thanks ! this tool does not migrate any of the users data, but ... it also doesn't delete anything so the users data (files apps etc) is still stored and hidden in their old profile located in C:\Users\<username.old> if you really want to migrate their data then you'll need to customize the scripts and/or use a 3rd party tool for that cheers niall -
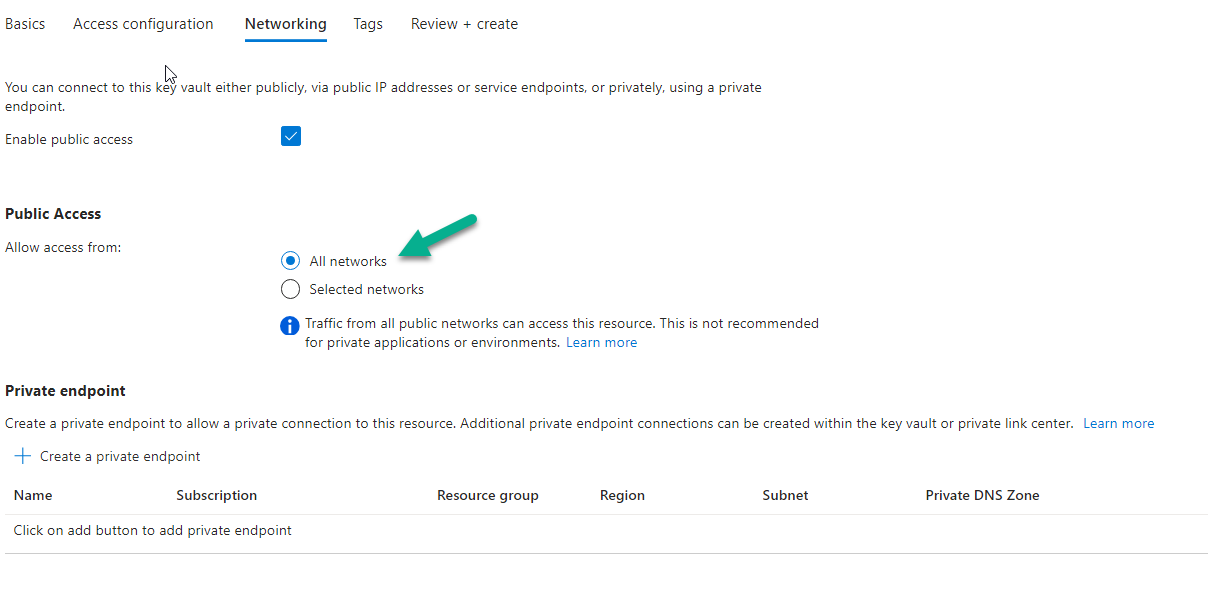
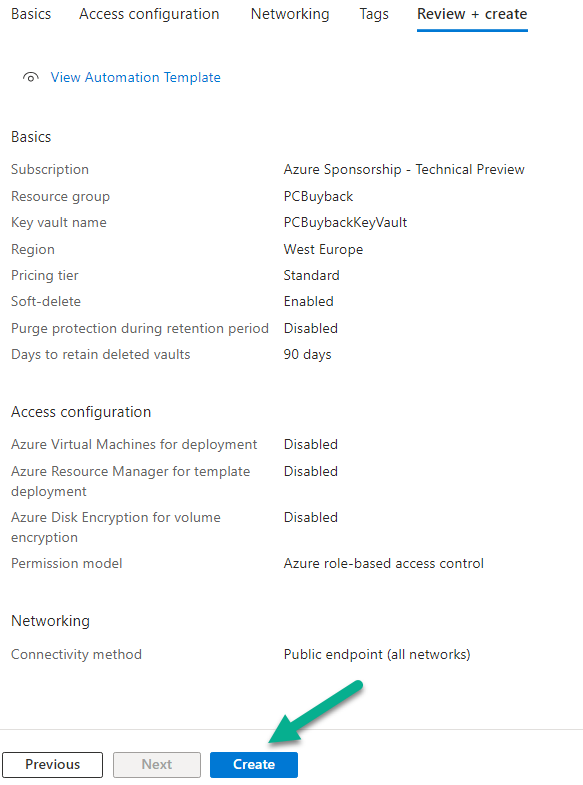
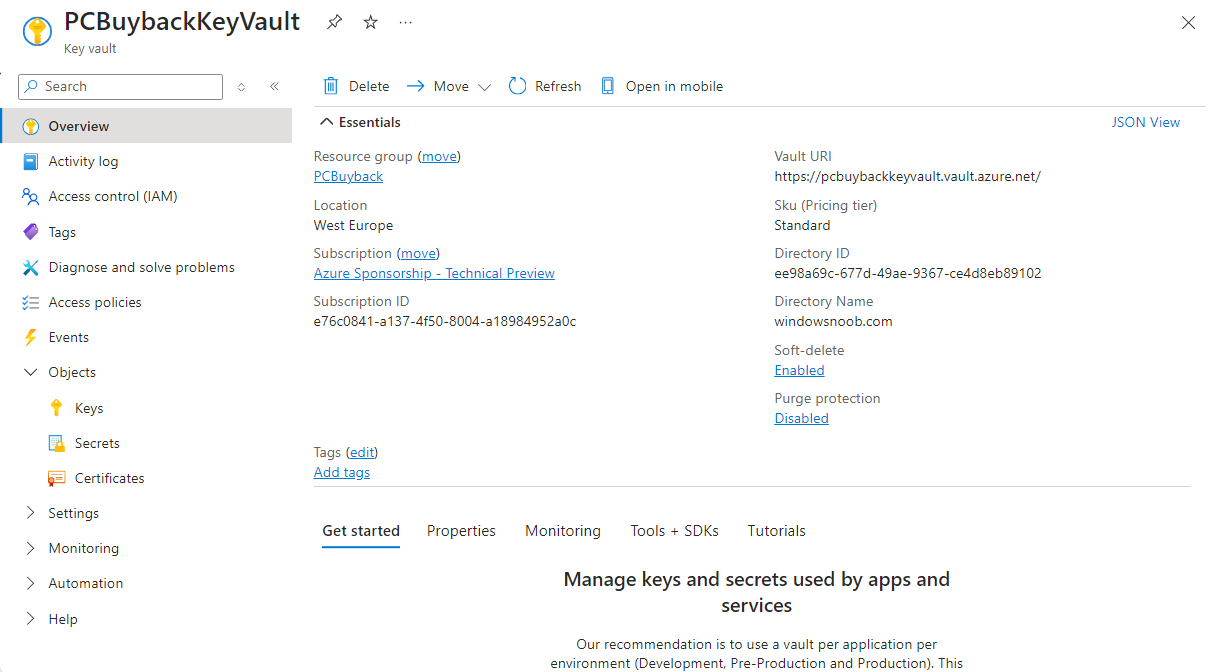
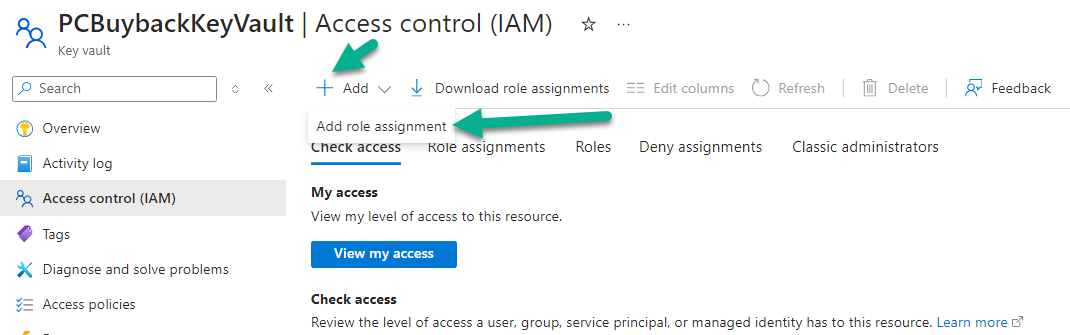
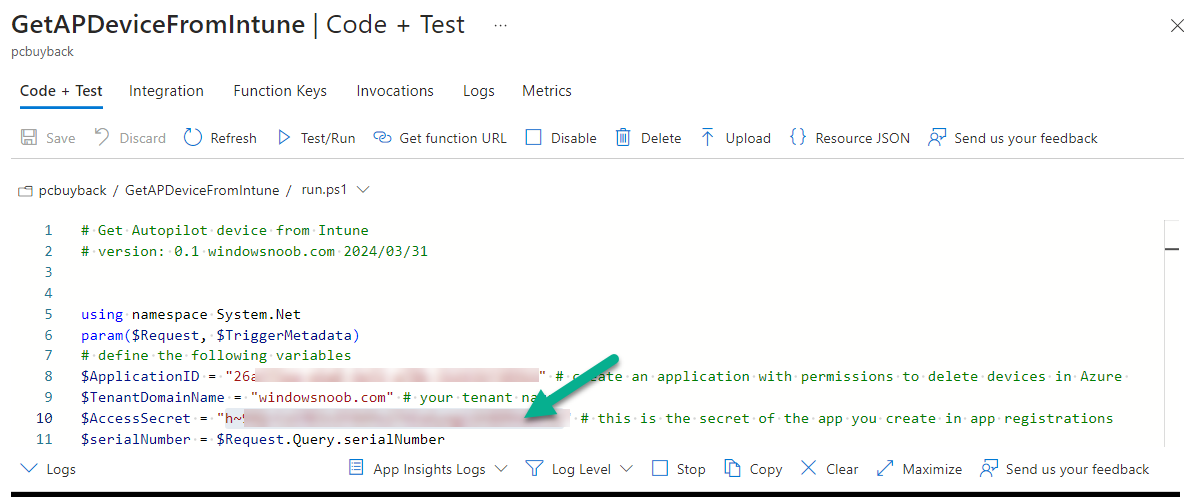
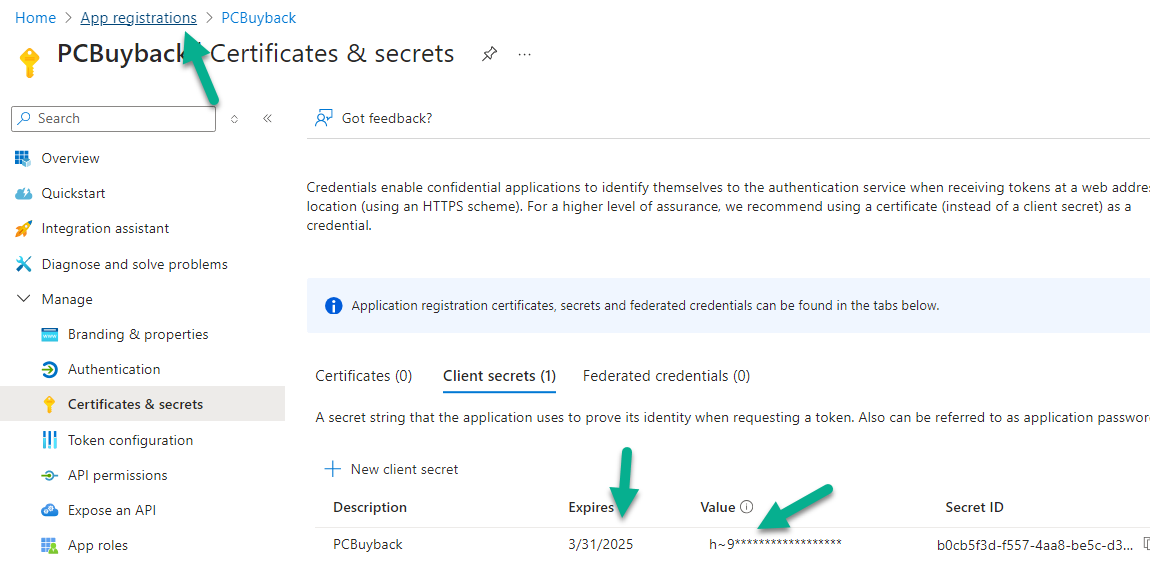
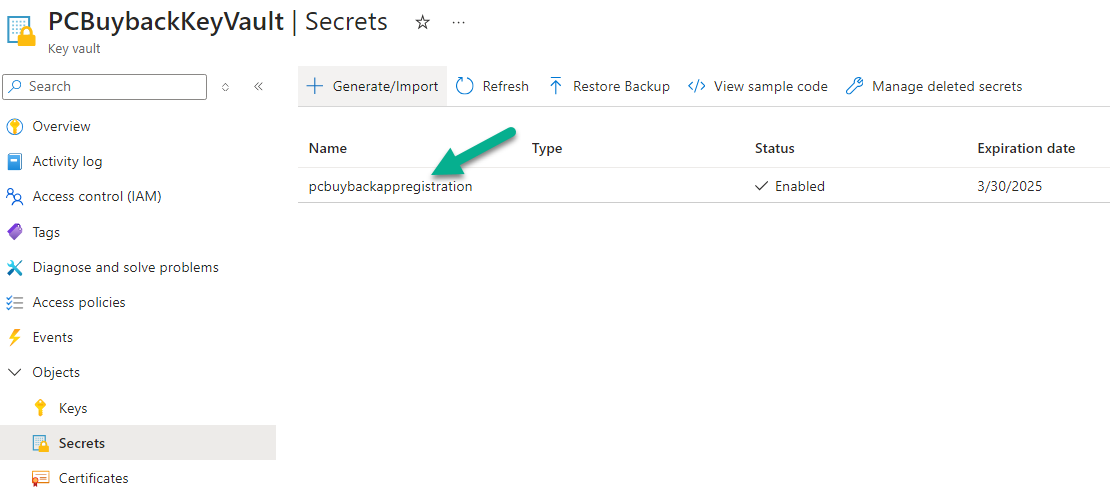
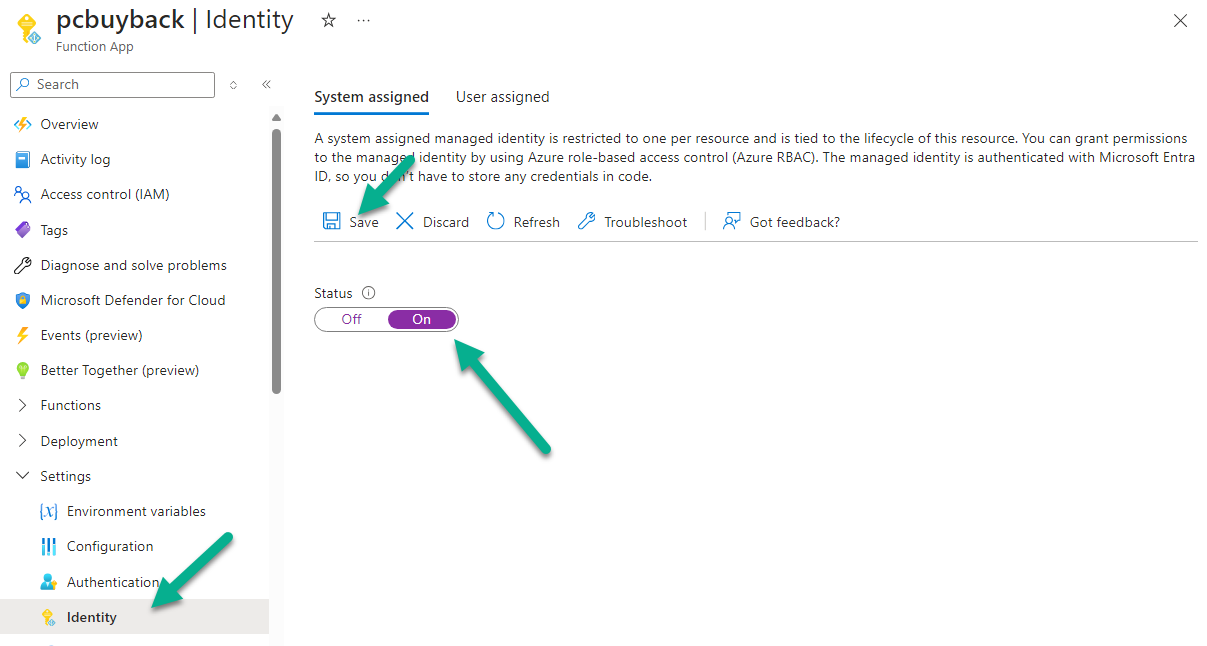
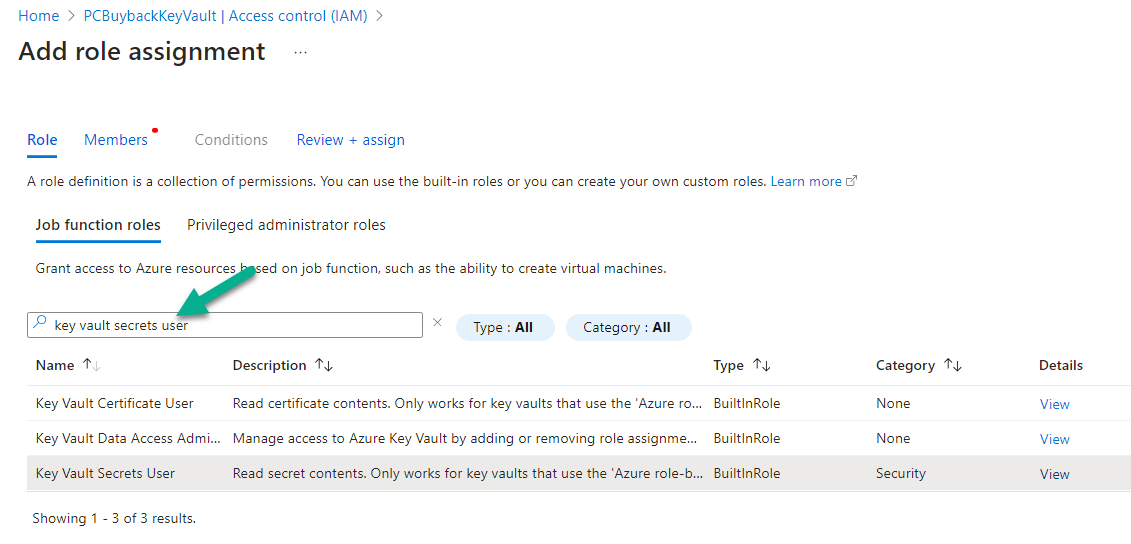
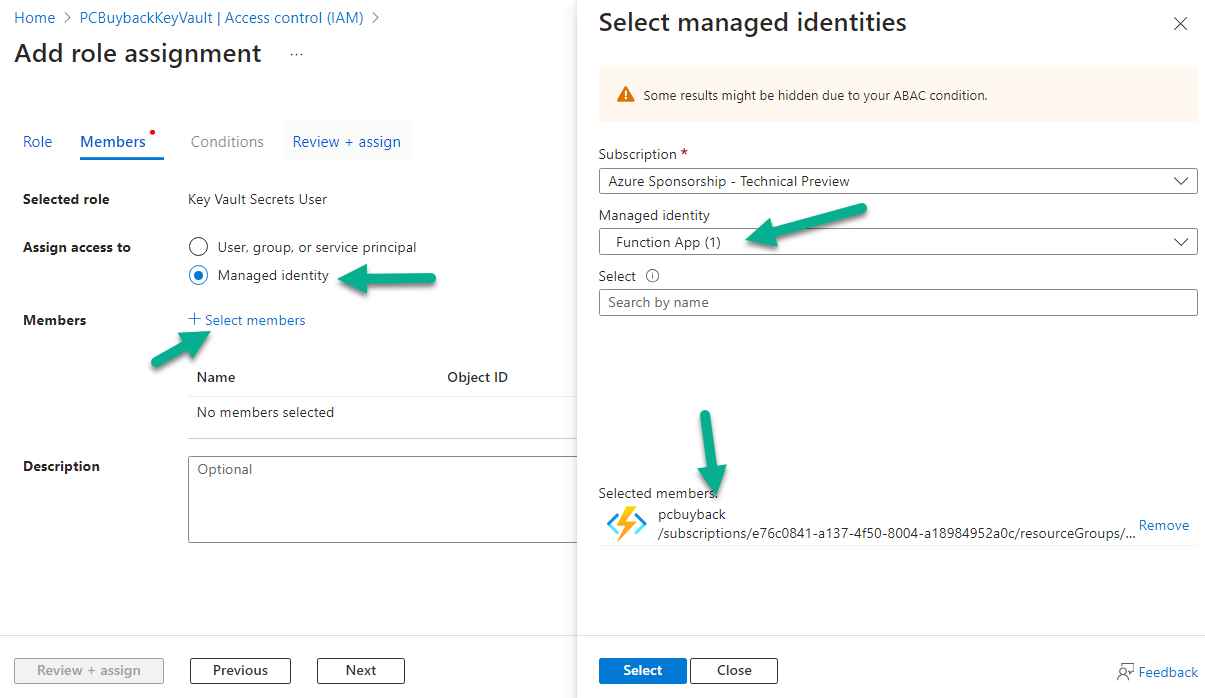
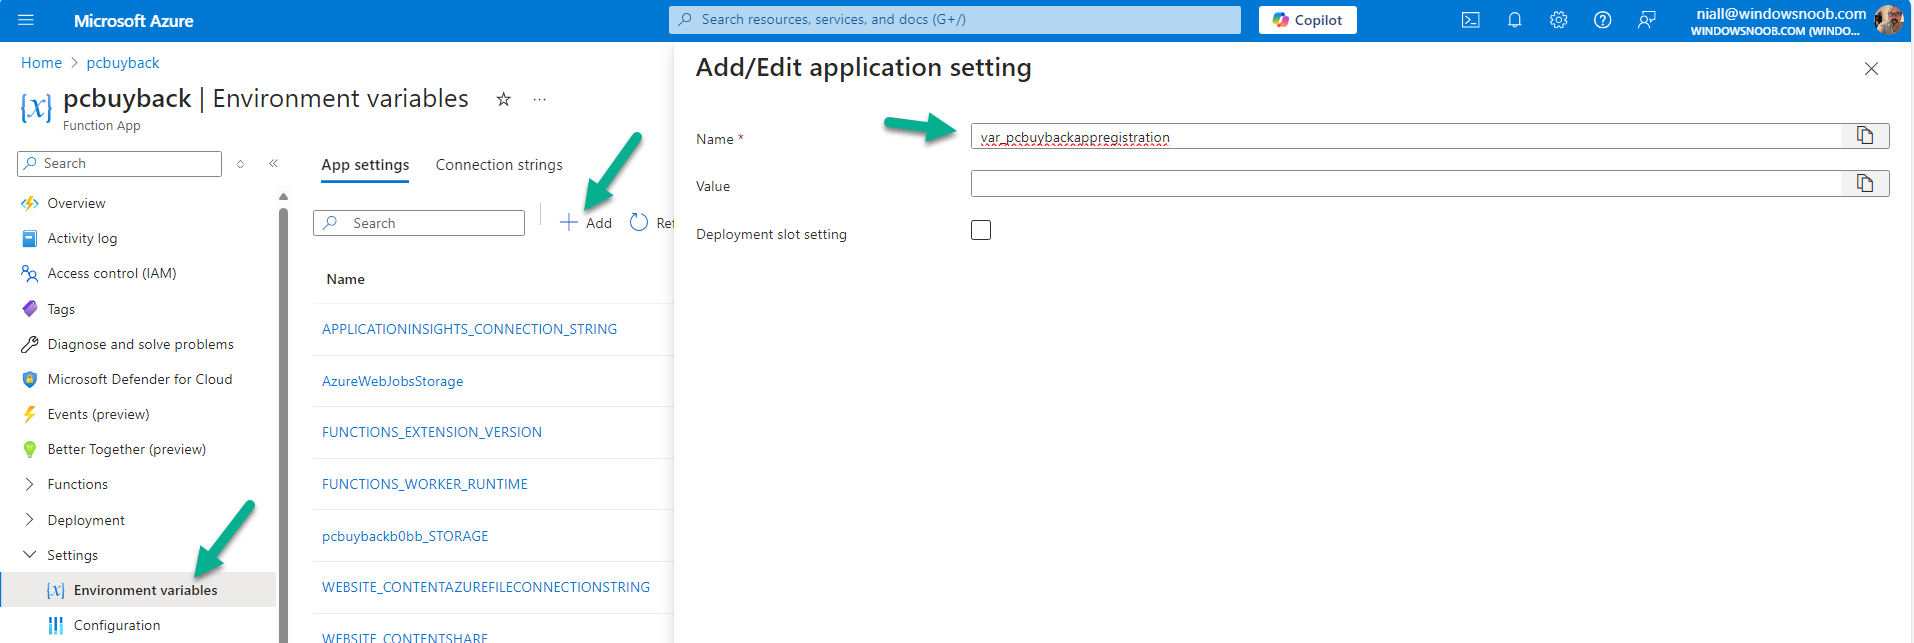
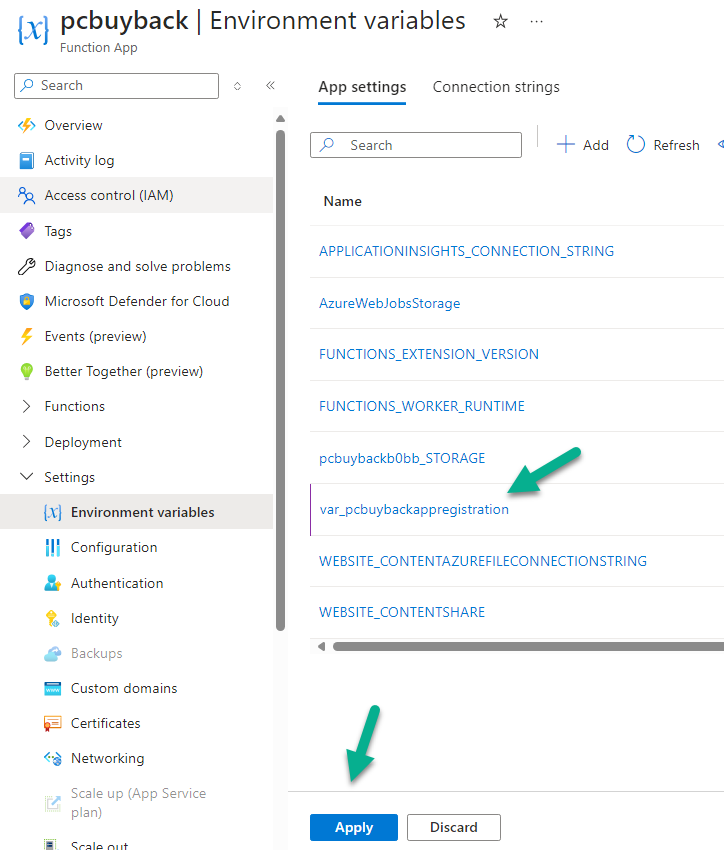
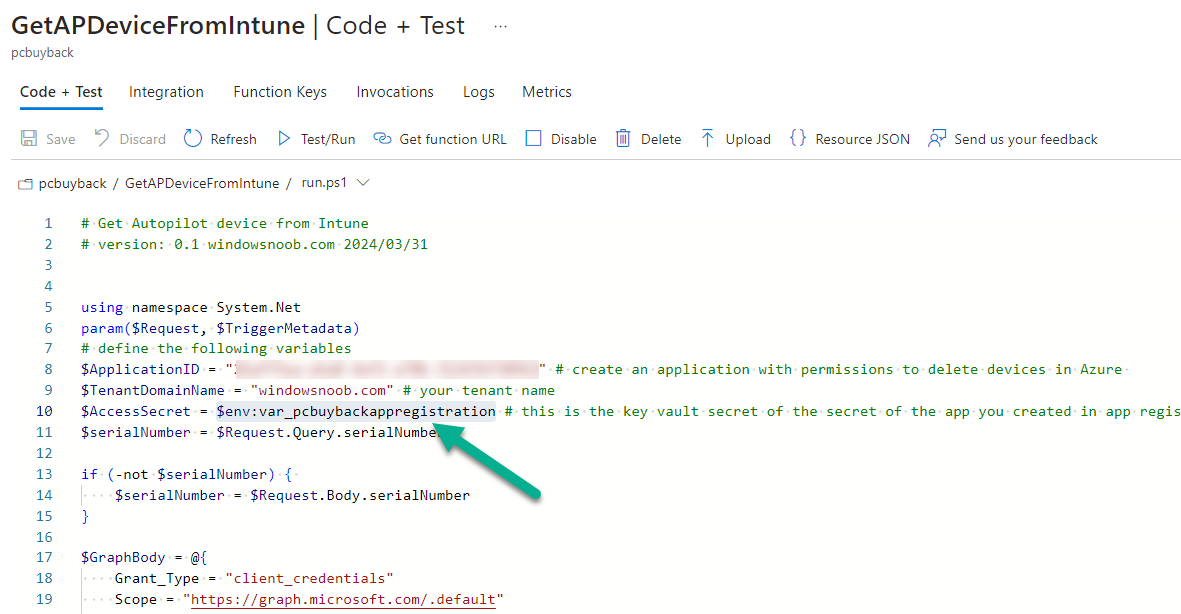
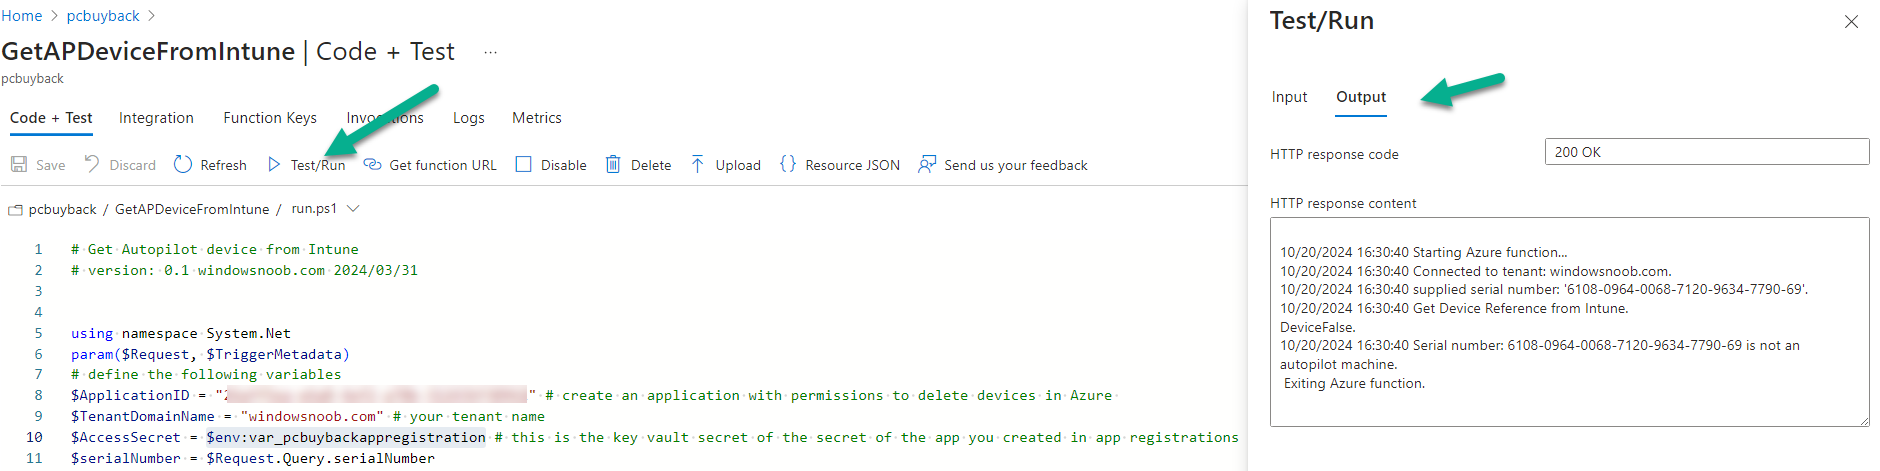
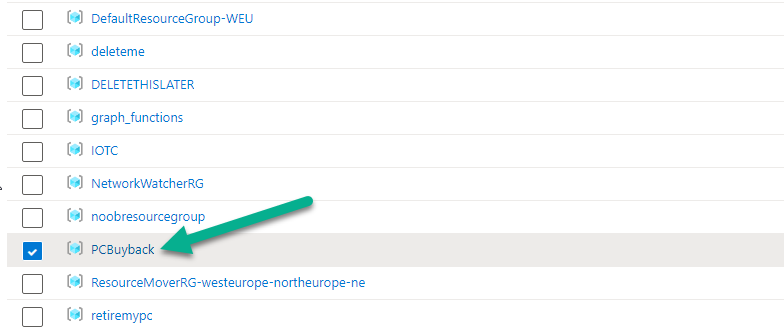
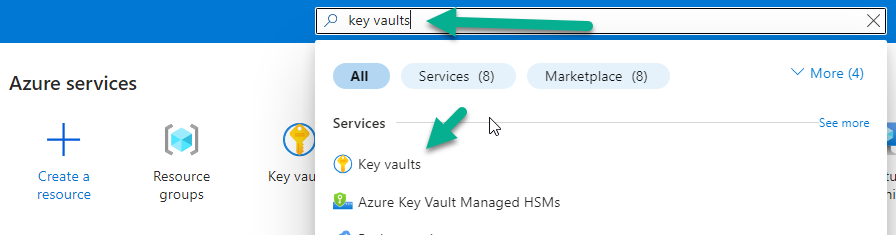
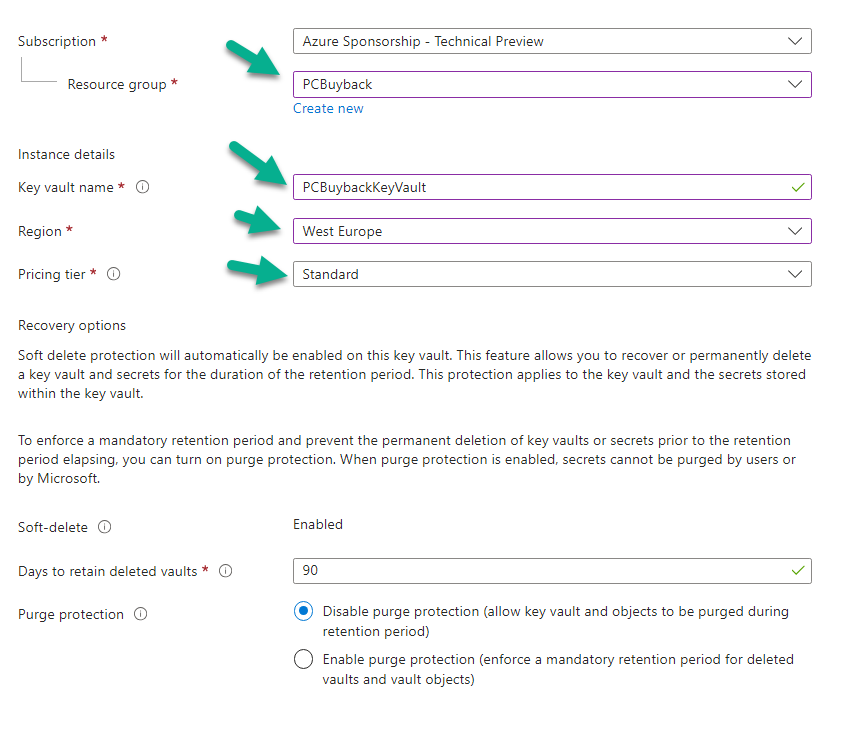
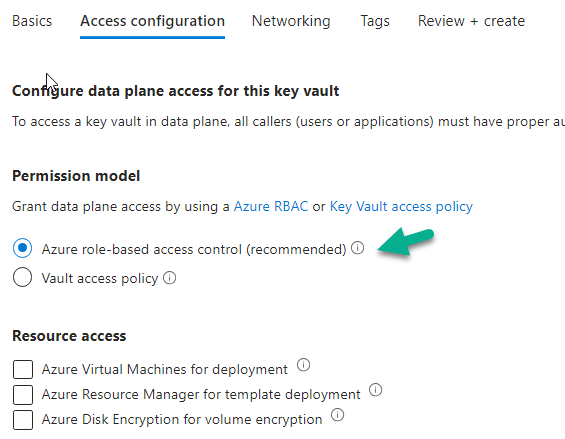
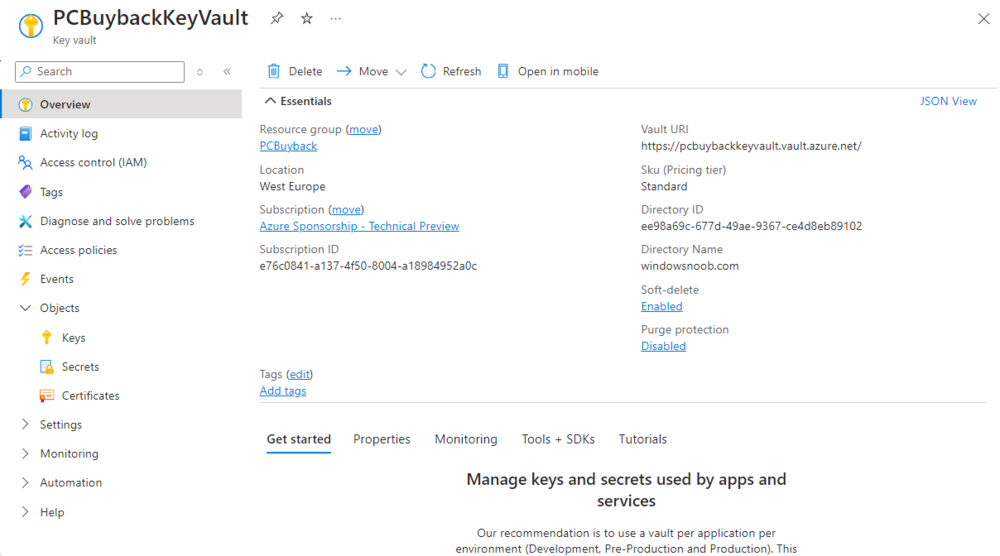
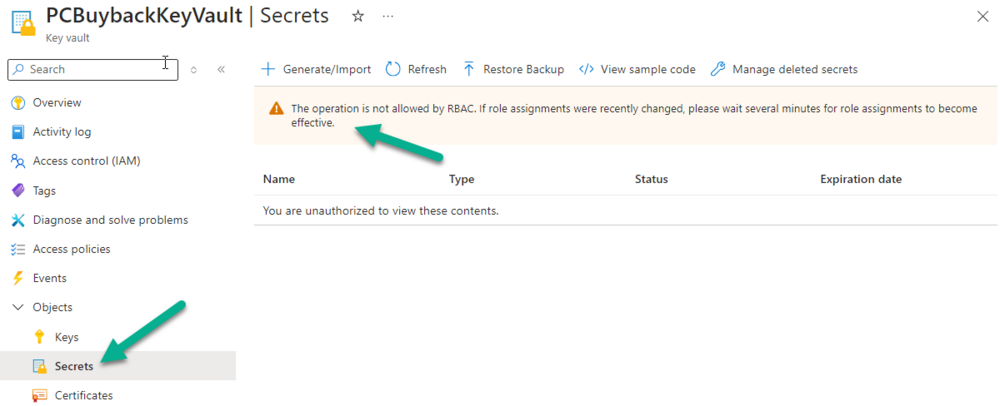
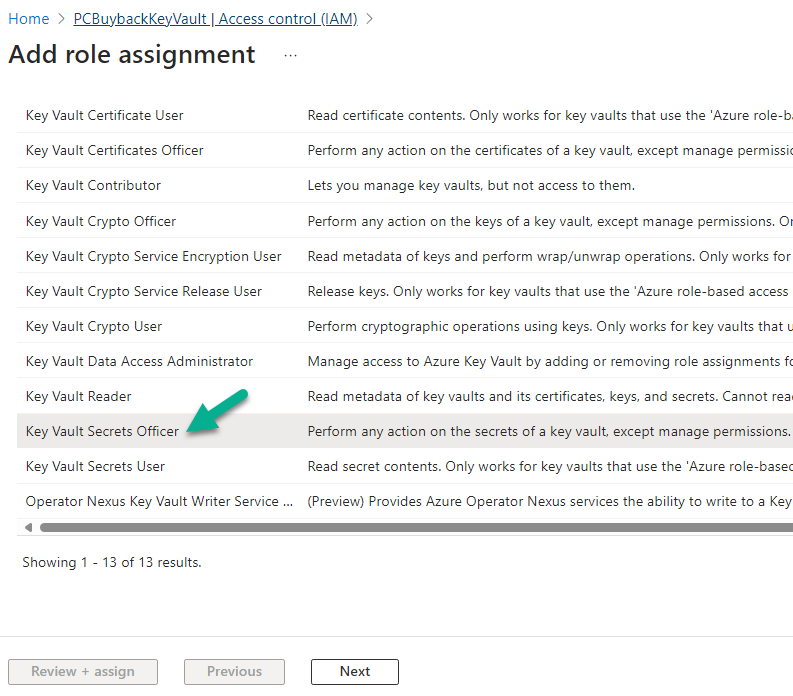
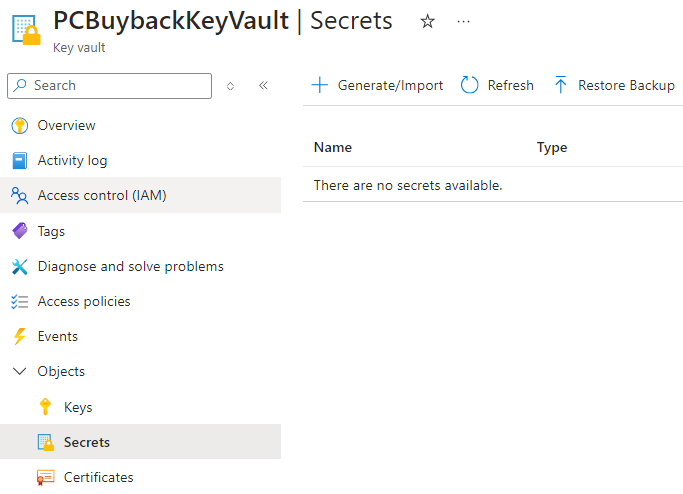
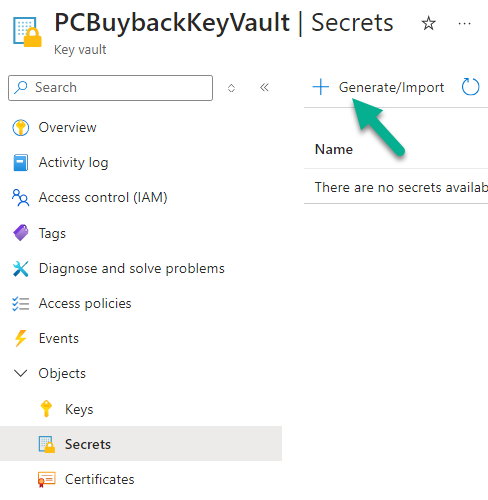
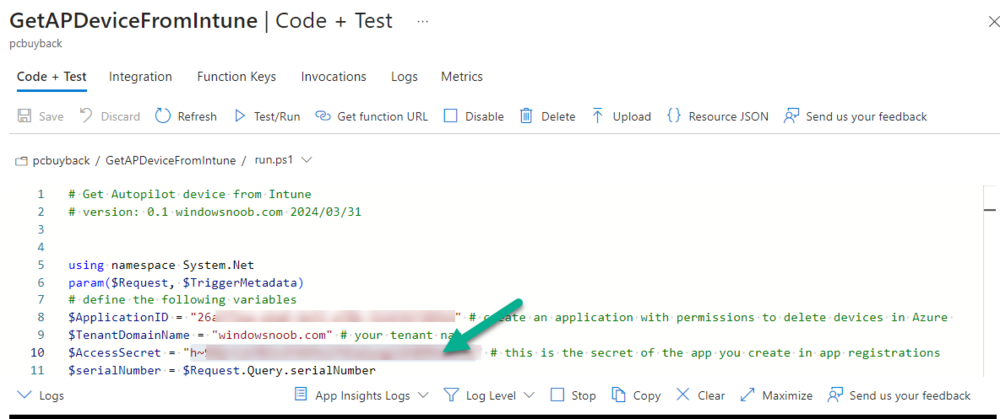
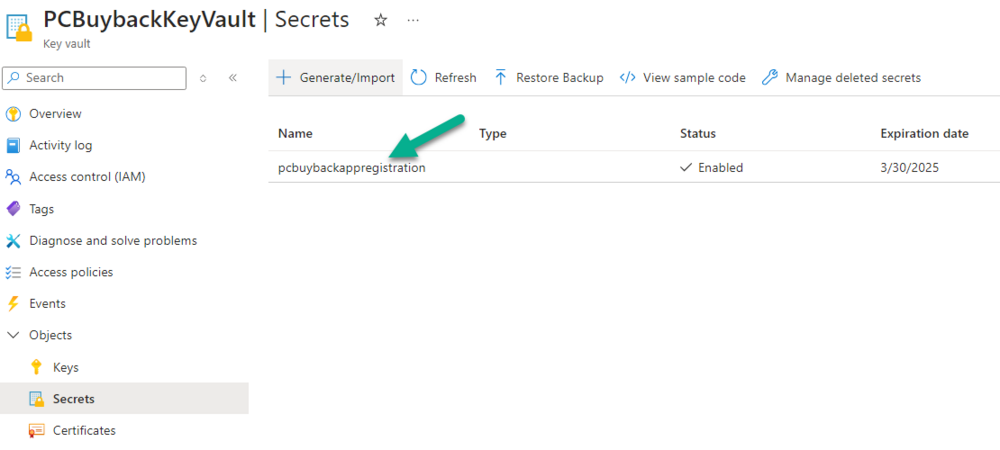
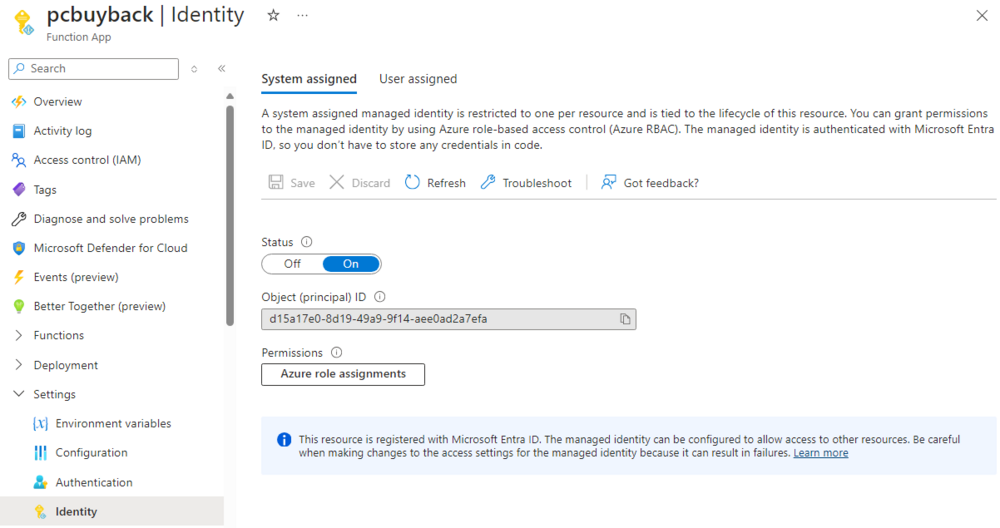
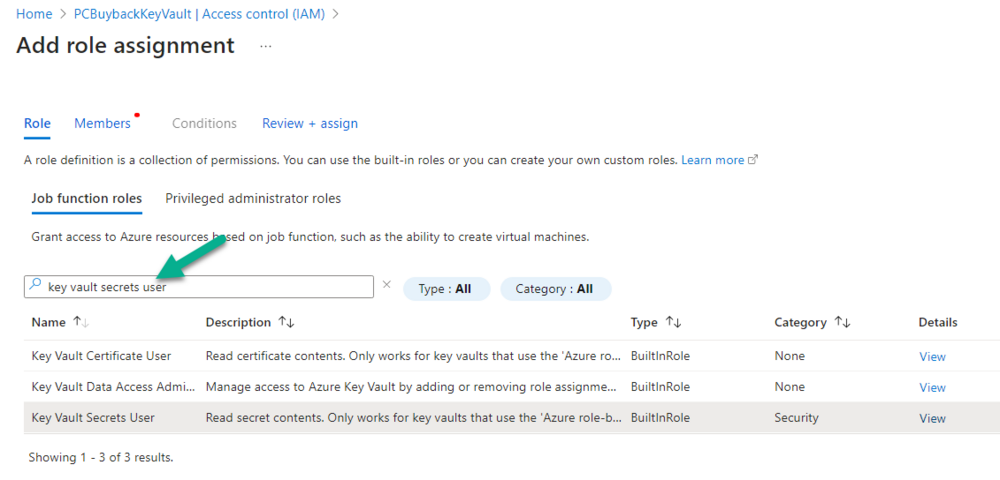
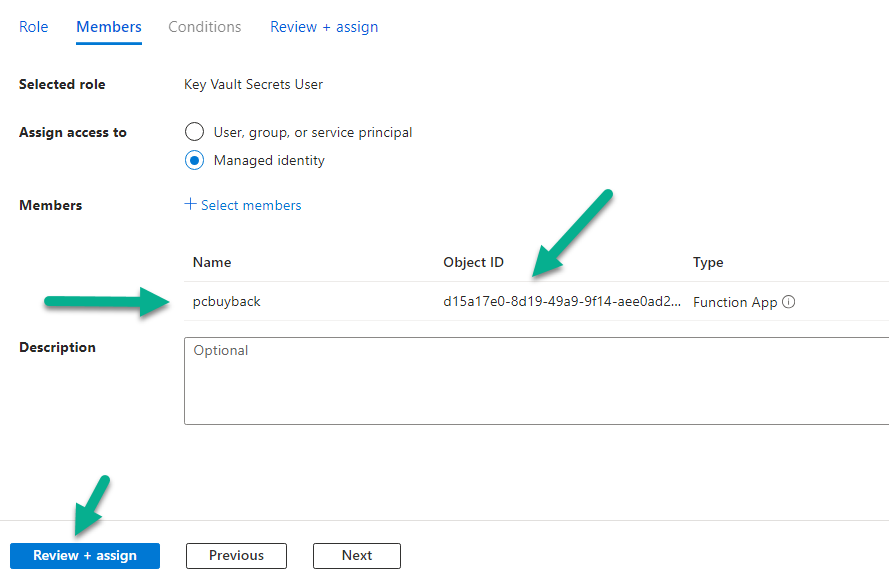
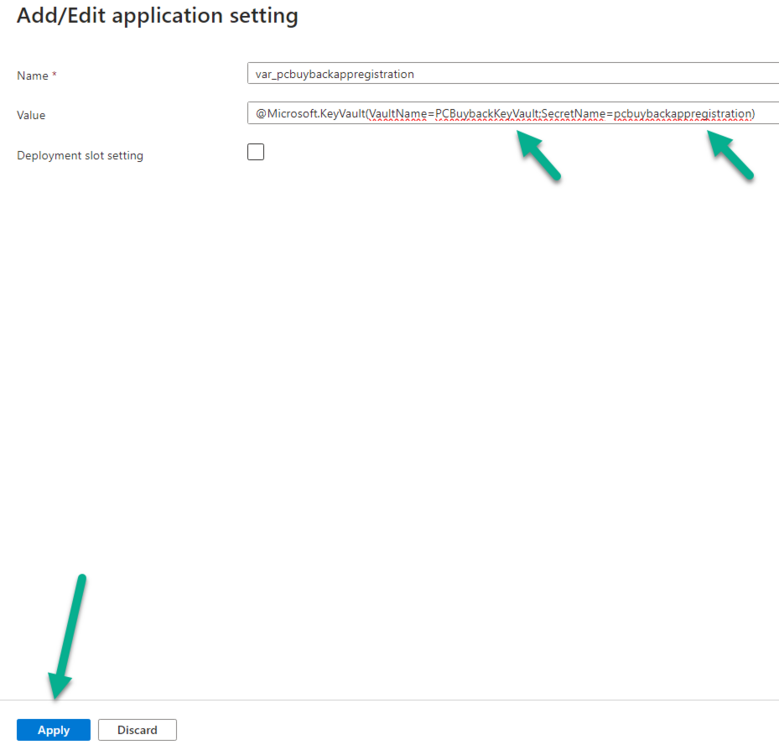
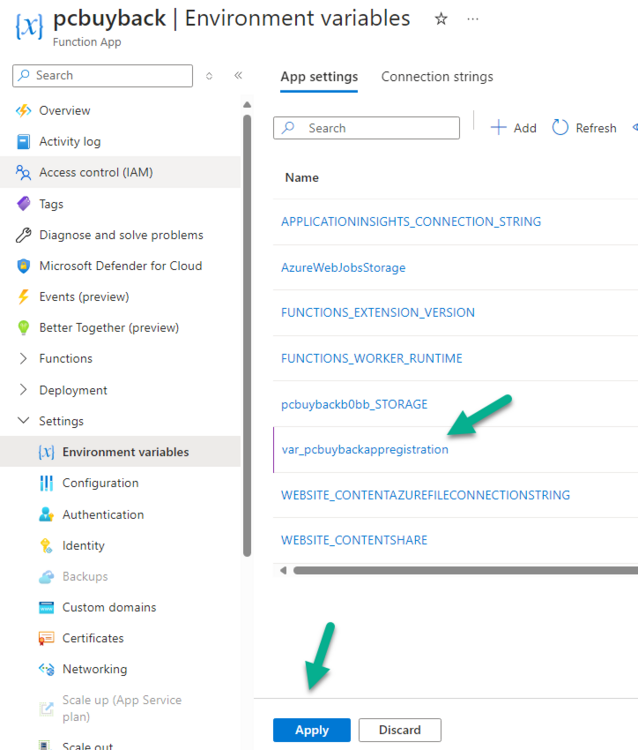
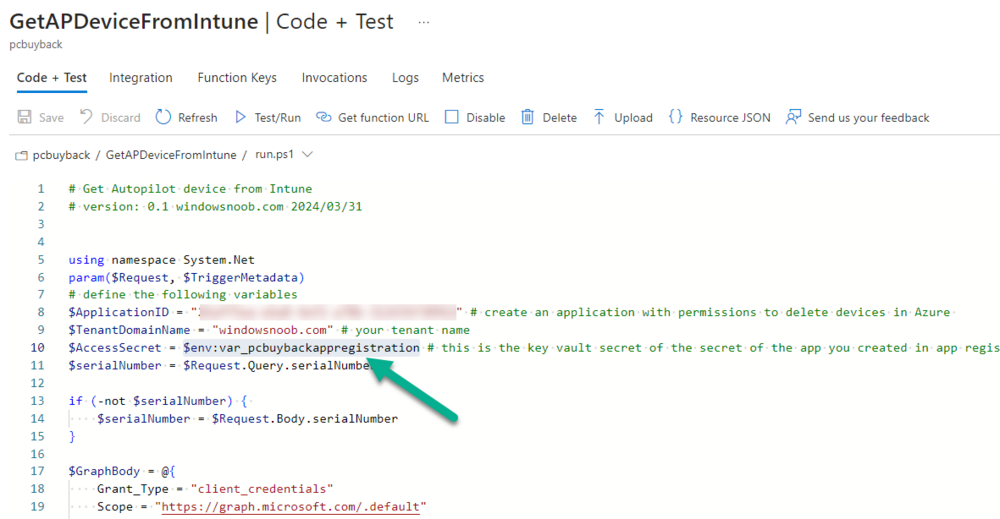
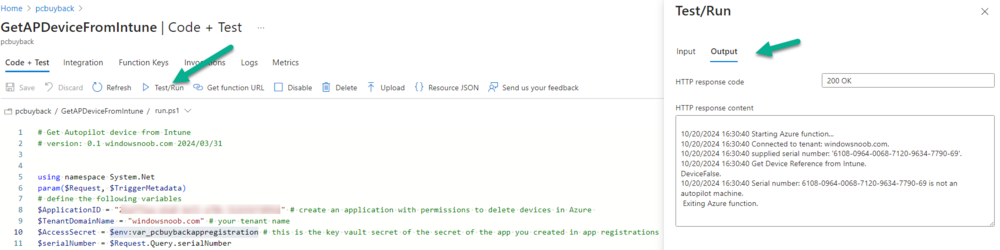
Introduction In previous blog posts such as this one, I've shown you how to create http triggers within Function apps in Azure to do magic with Intune managed devices, however in my examples for brevity I used secrets, and pointed out that the more secure method is to use Azure Key Vault. In this blog post I'll show you how to set that up so that your triggers are more secure. But first, let's see what Microsoft describes Azure key vault as and explains why it's important. In this blog post the scenario we are going to use is basically how to replace previously created app registration secrets used within your http triggers with Azure key vault secrets. Note: After spending a few days at MMS it was clear that there's an even better way of doing this and that is to use managed identities (step 5 onwards in this post) instead of app registrations to replace the need for expired secret renewals. Step 1. Create or reuse a resource group As we'll base this guide upon a previously created solution, we'll re-use our previously created resource group, but if you want you can go ahead and create a new one for this purpose. Resource groups are a way of grouping resources within Azure and to protect secrets within that resource group you'll use key vault. Below I'm highlighting the previously created PC Buyback resource group which we will reuse in the next step. Step 2. Create a key vault Now that we have a resource group, let's go ahead and create out Key Vault. In https://portal.azure.com search for key vaults, select the service from the list of services displayed. Next, click on + Create to create a key vault. In the UI that appears, the first screen is dedicated to the Basics or general information about your key vault. You'll need to select a valid Azure subscription and then select a previously created resource group (or create new). In this example we'll reuse the PC Buyback resource group. You also need to assign the key vault a name, so give it something descriptive (you cannot use spaces). Next select the region where this will be used, and that should match your Resource Group region. Finally select the pricing tier, in my example Standard is fine, you'll only need to use Premium if you need to avail of HSM capabilities (Hardware Security Module), for more info on the pricing plans see here. There are some additional options available relating to how long to key keep vaults after they are deleted and the default settings are good enough for us here. Click Next to see the Access Configuration screen. In here you can once again choose the defaults, as we'll be using RBAC (role based access control) in a later step. Click Next to proceed to the Networking screen. In the Networking screen you have the option to use All networks to allow access from your PowerShell scripts and more, or if in a locked down environment you can select Selected networks which may involve you setting up a virtual network with it's own private endpoint connection. In this example however we'll use the All networks setting. Note: These settings can be changed later in the Key Vaults Networking settings and some of the settings may be disallowed by your own internal policy if an initiative of Public network access should be disabled for PAAS services is enabled in your ARM policy. Click next through the Tags screen and review and create your key vault. After the deployment is complete, select it to see the properties. Step 3. Assign role permissions In your newly completed key vault, click on the secrets section highlighted below, and take note of the permissions error. So even though I'm a Global Admin in Azure I'm not authorized to review those secrets. To resolve this we need to click on Access control (IAM) and assign some roles. You could simplify things and assign the Key Vault Administrator role to your chosen user or group which would give you the access you need to create secrets, keys and certificates, but as we only care about secrets in this blog post we'll assign the following role. Key Vault Secrets Officer To assign these roles in Access control (IAM) clcik on + Add and select Add role assignment from the drop down. Next search for key vault in the search field, and select Key Vault Secrets Officer from the list. Click Next and then click on + Select Members and browse to your chosen user Finally click on Select and then select Review and Assign. At this point you can now select the Secrets option in your key vaults Objects node and no longer get permission errors. It will state that there are no secrets available but we'll get to that shortly. Next select Key Vault Security User from the list and repeat as above (add role assignment). Step 4. Create a key, secret or certificate Now that you've configured your key vault, it's time to create your first resource, this can be a key, secret or certificate. Note: As we are replacing previously created App registrations secrets with azure key vault secrets we'll select that option for this blog post. Therefore, you'll need to know your previously created secrets when you created them back in the PC Buyback tutorial, steps 7 and 8 here. In key vaults secrets, click on + Generate/Import to start that process. Give the secret a suitable name and paste in the value from the previously created app registration secret. We can see that secret taken from a http trigger within my PC Buyback functionapp. The contents are blurred. and paste in that value into your key vault secret creation. You should also configure the activation and expiration date and make the expiration date to one day before the actual secret expires to allow you time to recreate a new one. Below you can see the app registrations secret expiry details. and that is reflected (minus 1 day) in the key vault secret creation. after creation, your secret is listed in the key vault. Step 5. Grant functionapp permissions to consume the key vault Next we'll grant permissions to our previously create functionapp to allow it to consume the key vault. To do that, open up the PC Buyback functionapp and click on the Settings drop down, select Identity and change the Status to On. After clicking Save you'll get the following message. Click Yes to proceed. After clicking Yes the results are displayed. Step 6. Grant the key vault permission Next open your key vault and browse again to Access control (IAM). In the role assignments click on Add and add the Key Vault Secrets User role. Click Next and select Managed identity, then in the wizard that appears select function app from the managed identity field and select your PC Buyback function app. once done, click Select and your PC Buyback function app is added. Don't forget to click on Review + Assign. Step 7. Configure function app environment variables Open up the previously created PC Buyback function app and expand Settings, select Environment variables and click on + Add, give it a suitable name such as var_pcbuybackappregistration. paste in the following string in the value line @Microsoft.KeyVault(VaultName=mykeyvault;SecretName=mysecret) edit the VaultName and SecretName values to match your environment... click on Apply when done. and click Apply again once the environment variable is added. At this point you'll need to confirm the change as it needs to restart the function app. Step 8. edit the http triggers Now you are finally ready to apply the key vault secret variable to your previously created http triggers, so let's do that. Select a trigger and review the contents, find the line that pointed to the Access Secret and replace the with the new environment variable, like so: $env:var_pcbuybackappregistration when $env:var... is your environment variable created above. Below is the result, and after saving the code and doing a Test/Run we can see it's working just fine using Azure Key Vault, Summary Using app registration secrets in your httptriggers is a bad idea, use Azure key vault to protect those resources, this blog post helps you to do just that. See you in the next one !


-
what does the log file reveal ? can you attach it here
-
Old Software Center getting installed
anyweb replied to ETx13's topic in System Center Configuration Manager (Current Branch)
is there anything different OS wise with the 50 that have issues versus the rest that don't ? are they using the same client version ? -
you'd need to supply a lot more details about your issues to get some traction on this, thanks
-
SCCM 2007 SP2 prerequisites download
anyweb replied to EngiNerd's topic in Configuration Manager 2007
sure thing, done. -
use the first option, _master
-
did you read this yet ? >
-
personally I think those days are over and that it's better to deploy an up to date ISO/WIM of the latest OS version of Windows 11 available, how will you manage your clients ? how do you intend to get an 'image' on these clients ? will you use Windows Autopilot ? without knowing more it's hard to advise
-
Migrate to the cloud - Part 1. Setup
anyweb replied to anyweb's topic in System Center Configuration Manager (Current Branch)
hi @shintest, i'm working on it just now so plan on releasing yet another release soon, please stay tuned ! -
yes, it's in part 2, step 6 of the guide
-
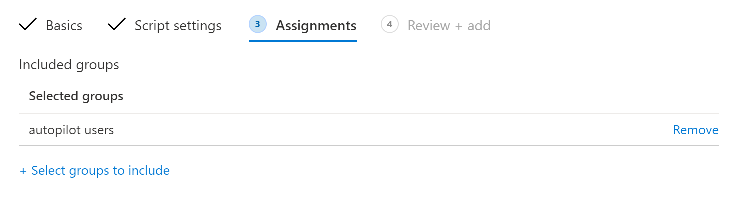
in the blog post you'll see it's deployed to 'autopilot users' that can be whatever users you want, it's up to you who get's this behaviour (or not)