Leaderboard


Popular Content
Showing content with the highest reputation since 08/04/09 in Posts
-
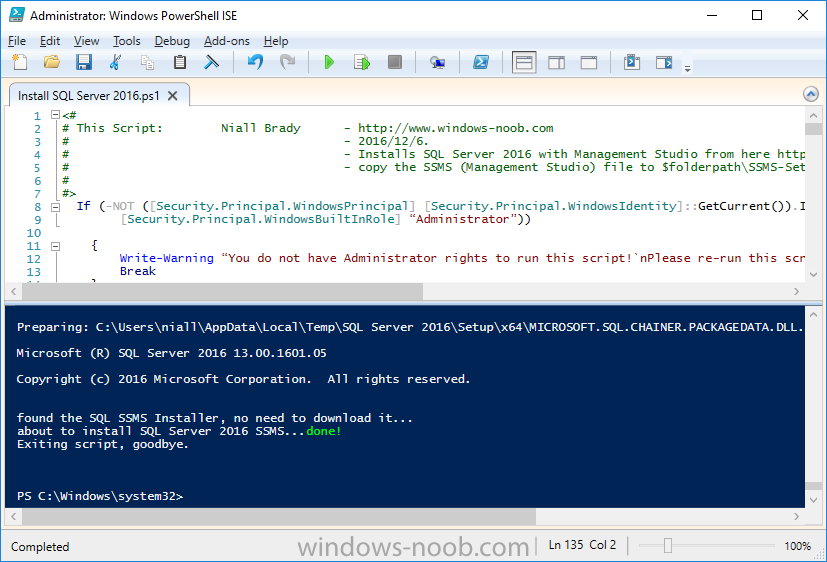
figure this out for anyone interested, found an article from 2012 that outlines some registry key changes you need to make on you cluster nodes. https://forum.red-gate.com/discussion/15396/error-monitoring-clustered-sql-server snippet taken from the article above. Of the tests we conducted above the root cause of the short file name error during the Pre-req checks was found to be the fact that we were not able to remotely access the registry using the SQL Virtual name which we should have been able to do. On contacting Microsoft Support we were informed that there are known issues around NoRemap registry key needing to be set if you are using Network Name resource that is dependent on a separate new IP Address resource – see http://support.microsoft.com/?id=306985 The final solution was to add a new REG_MULTI_SZ registry key to BOTH cluster nodes called:- NoRemapPipes to:- HKLM\SYSTEM\CurrentControlSet\Services\lanmanserver\parameters\ This key should contain the values of:- WINREG EVENTLOG svcctl After adding the above key and values we needed to reboot both cluster nodes and then we were able to connect to the SQL Virtual names (CLUSQL02 + CLUSQL01) using Regedit (Remote registry). Running the SCCM Pre –req checker now returns no errors. Hope this soluton helps someone else.3 points
-
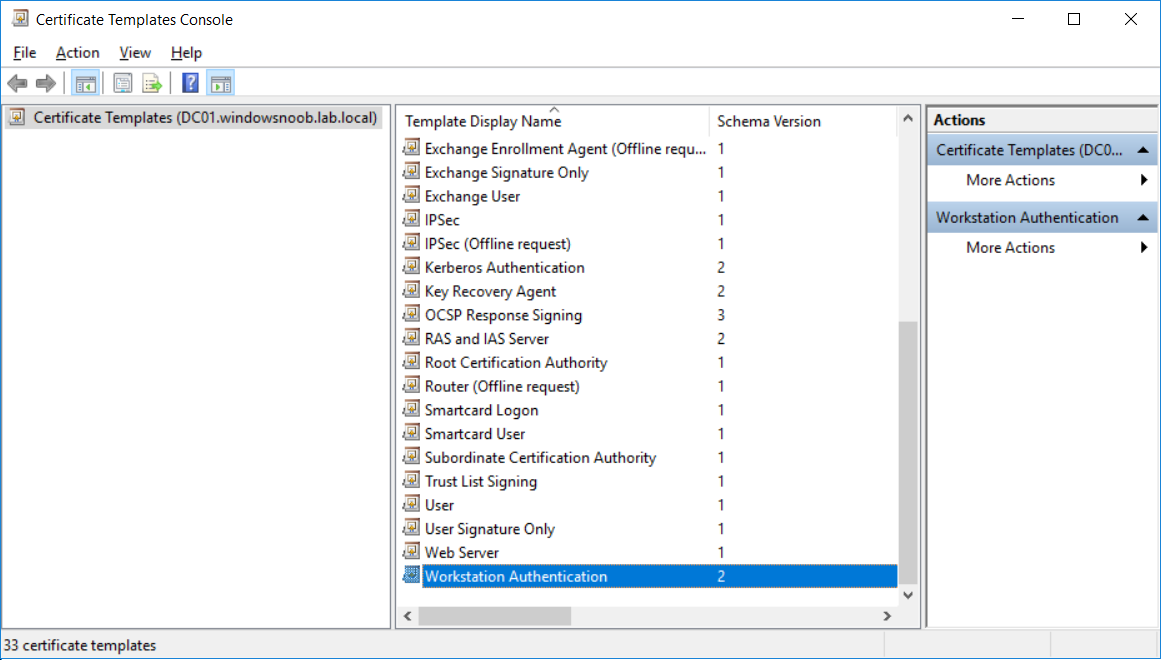
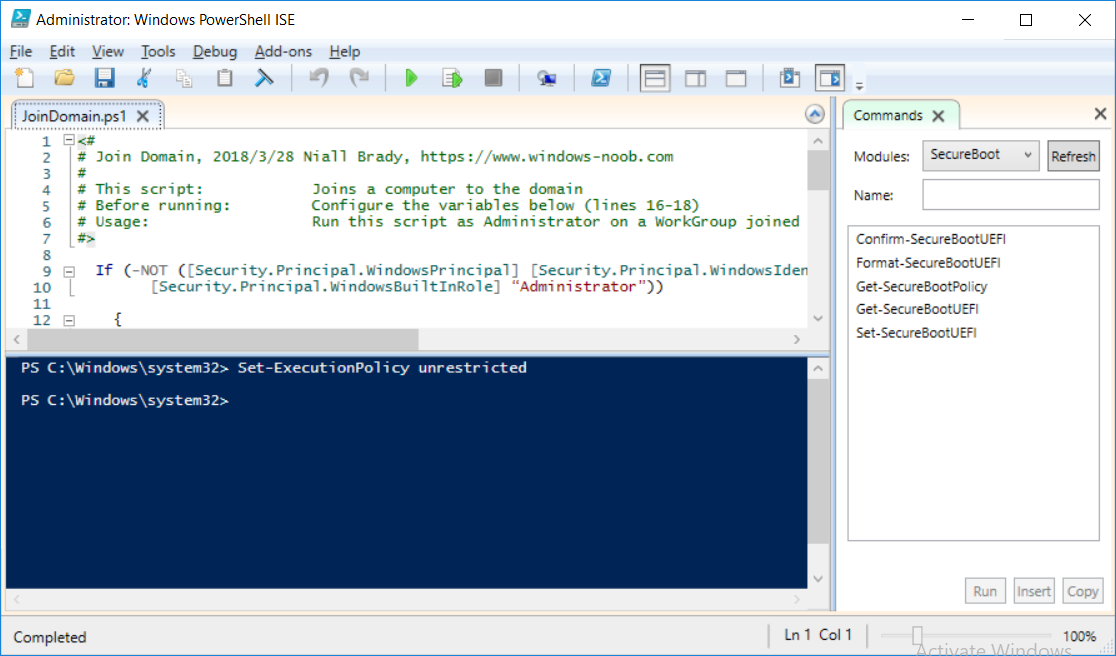
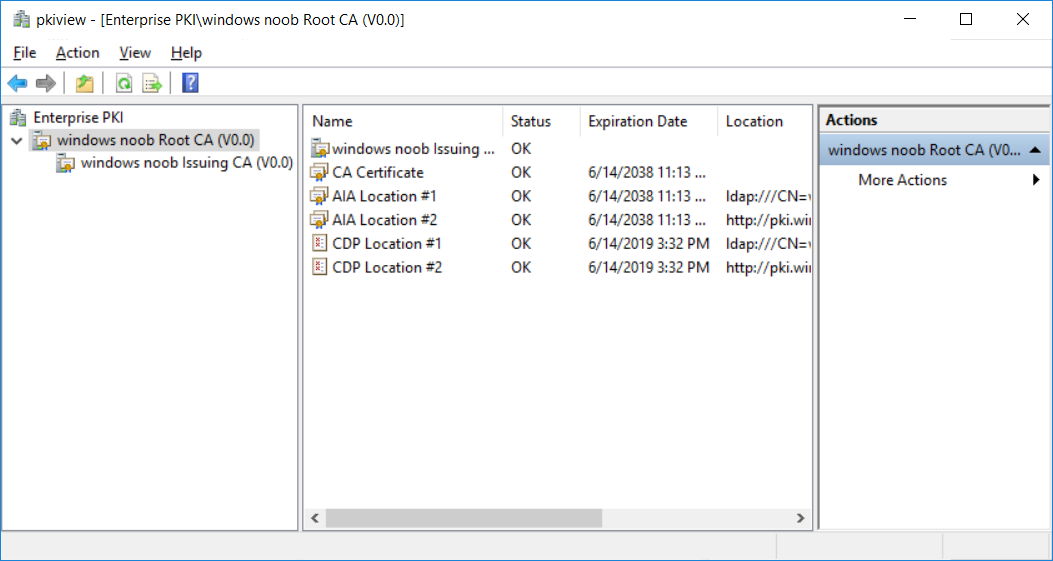
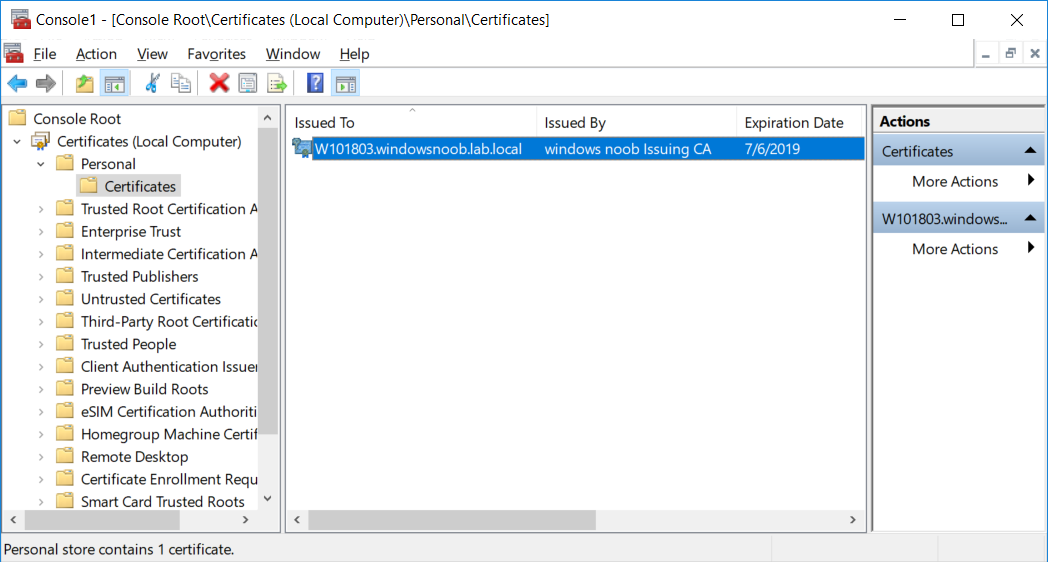
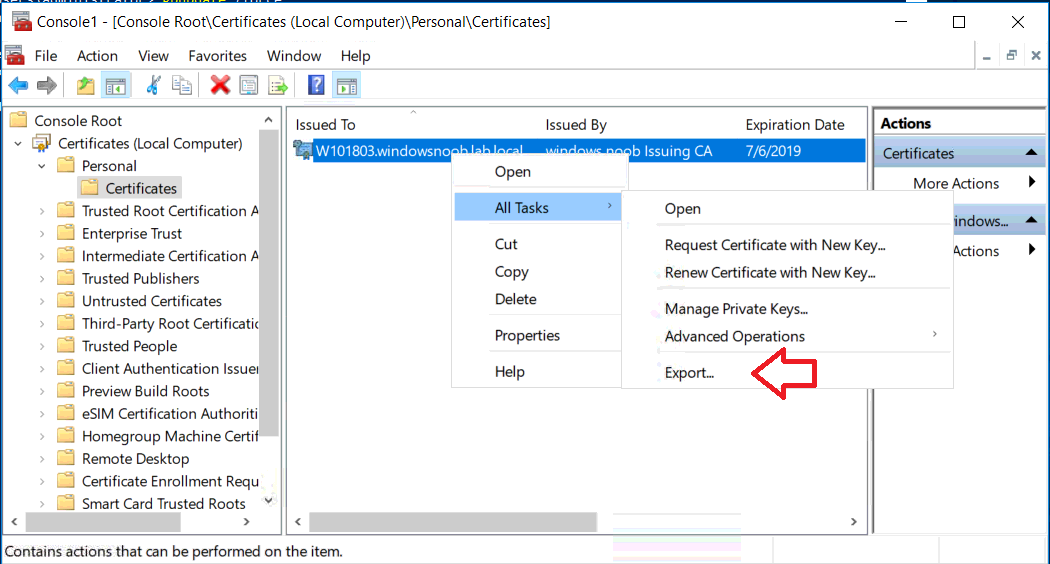
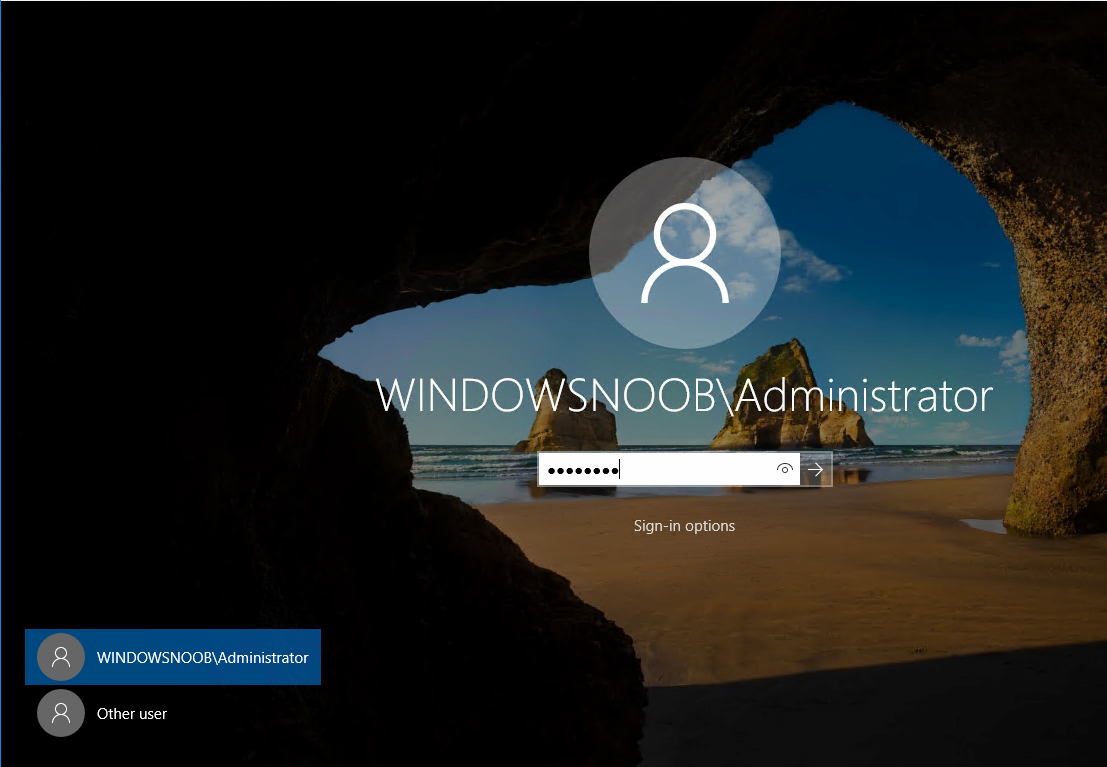
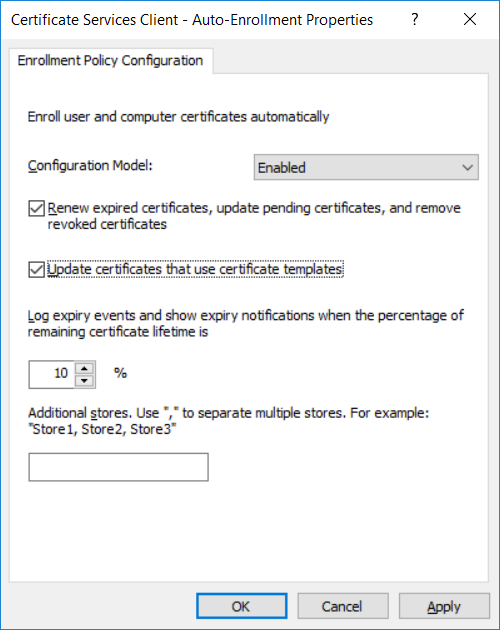
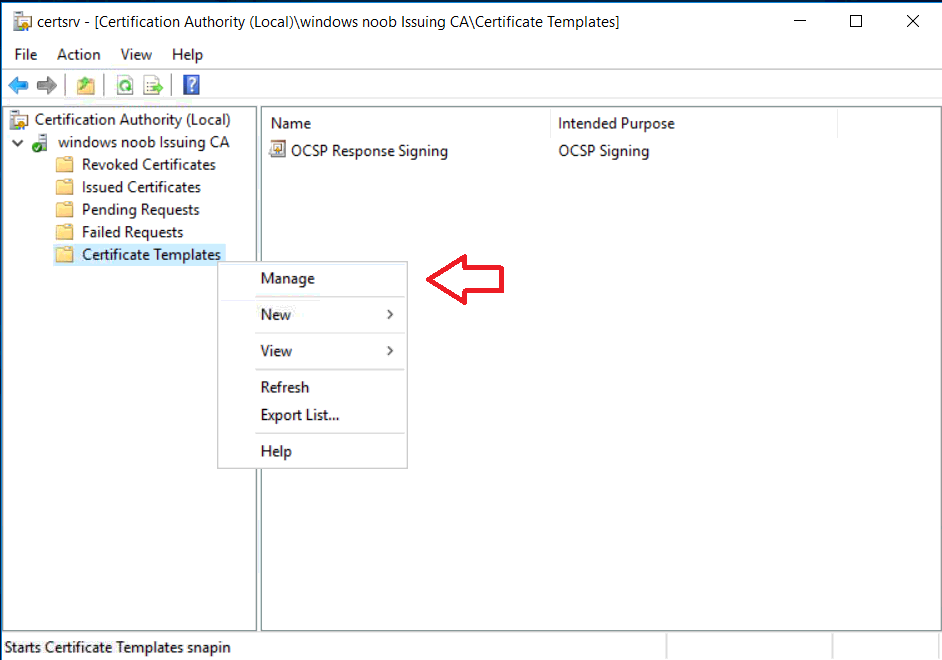
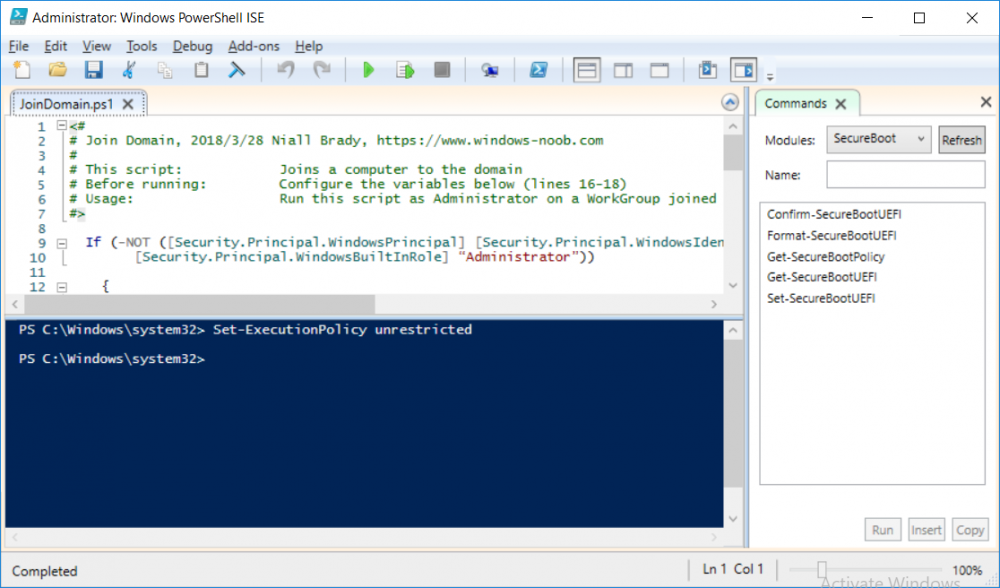
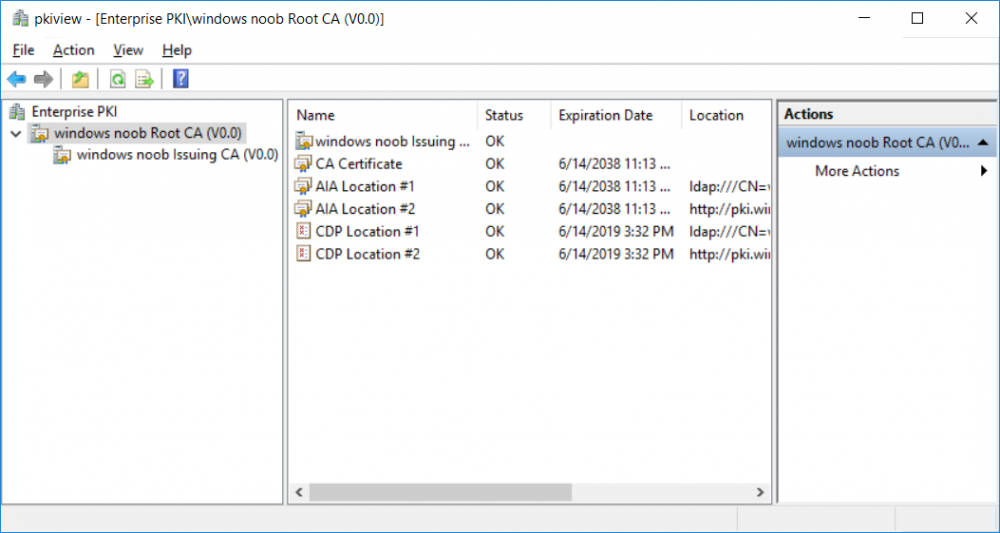
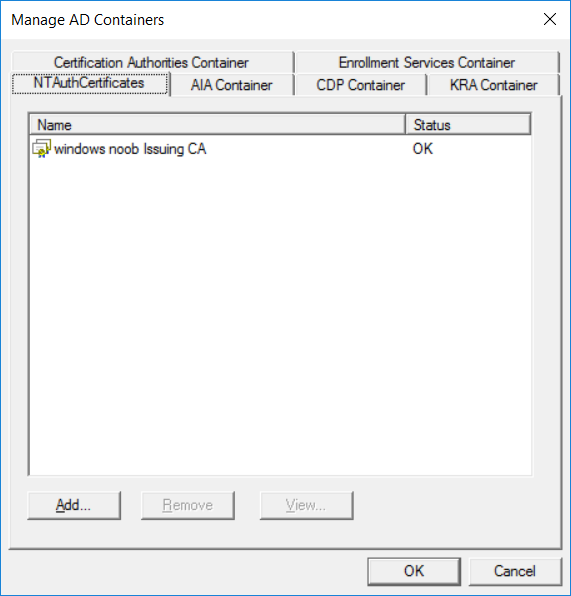
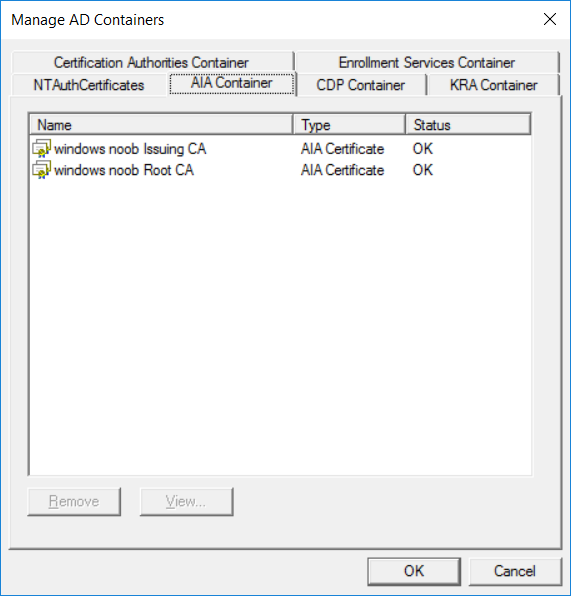
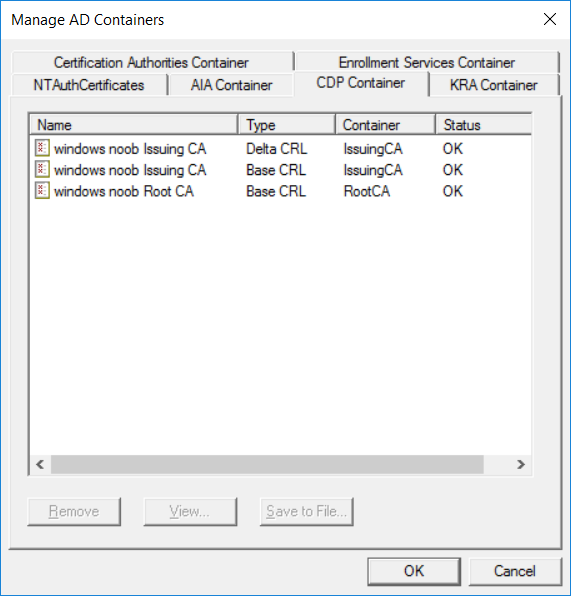
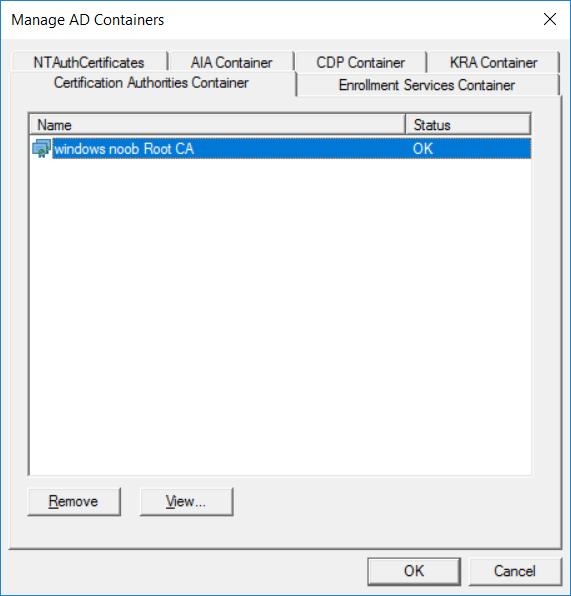
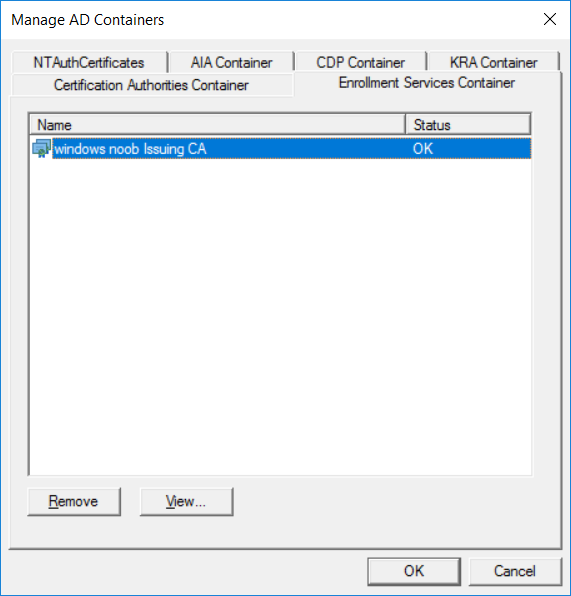
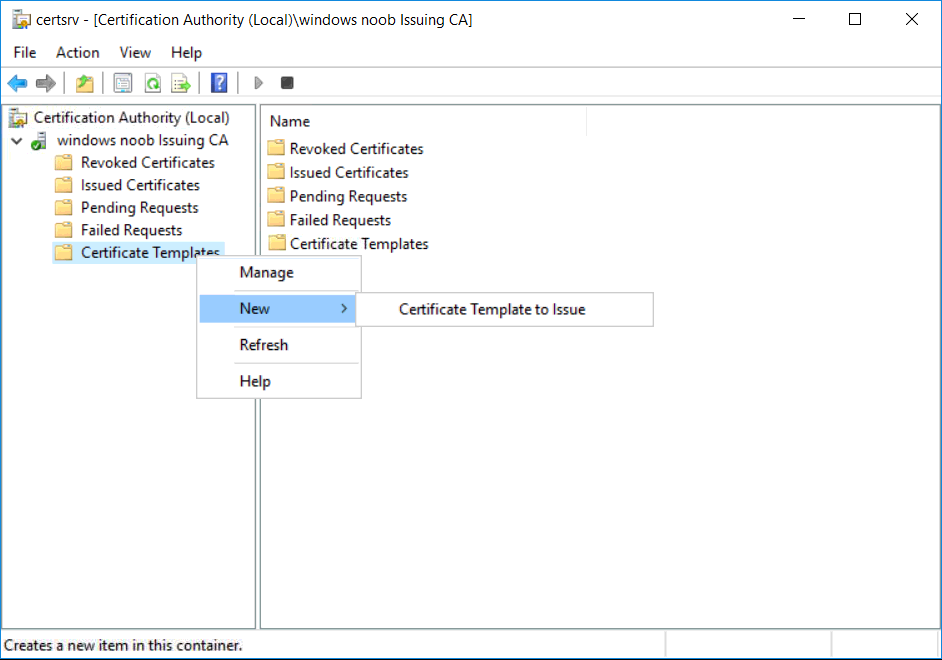
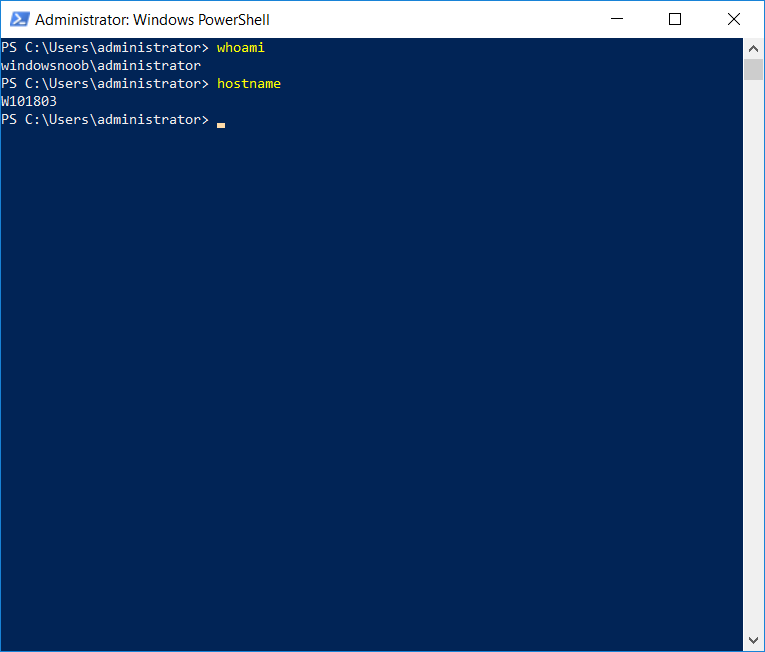
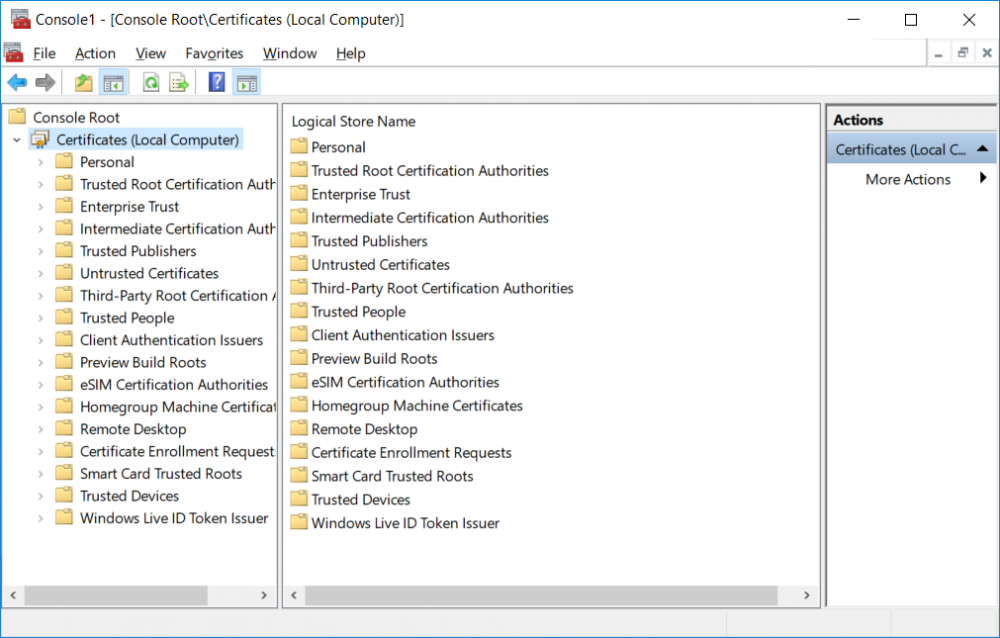
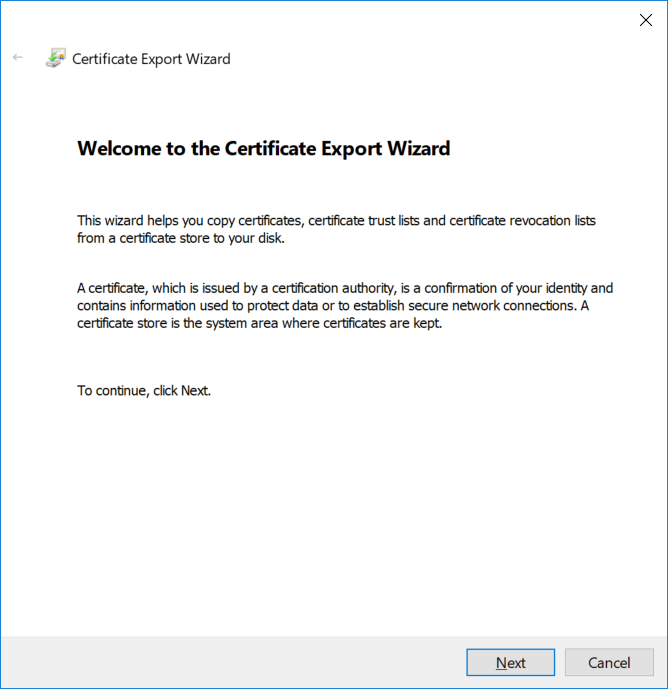
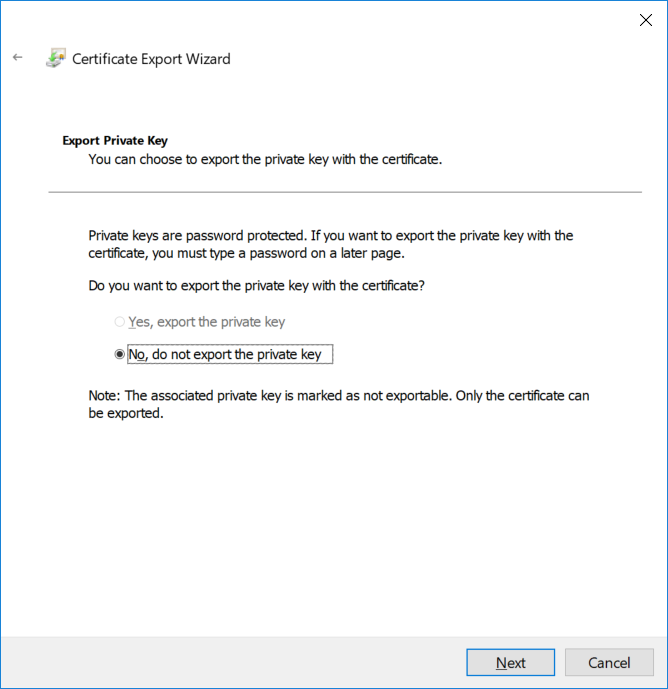
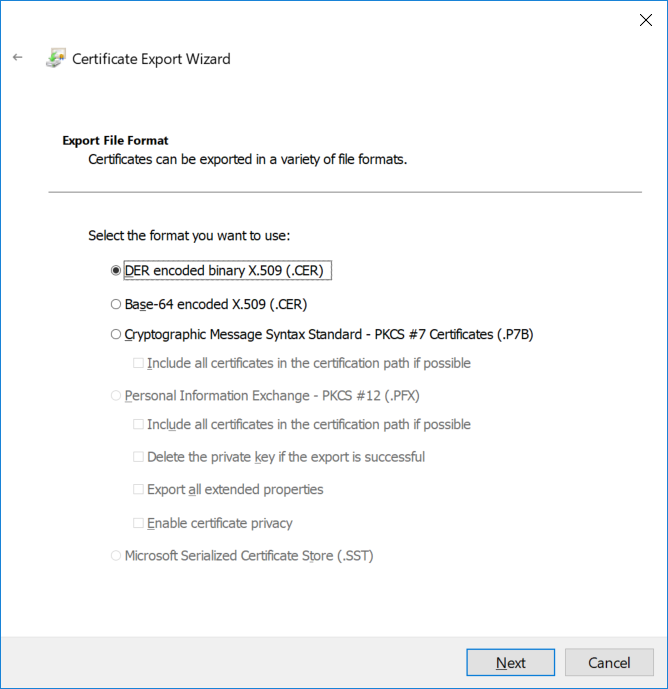
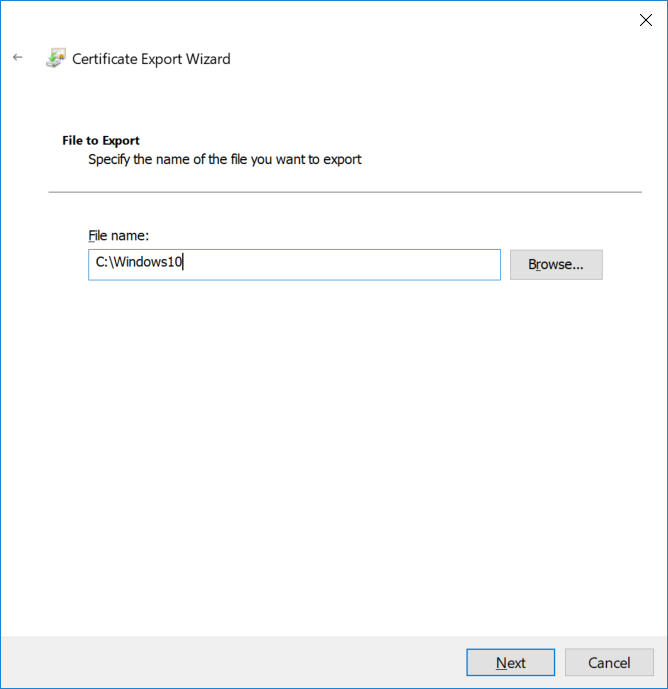
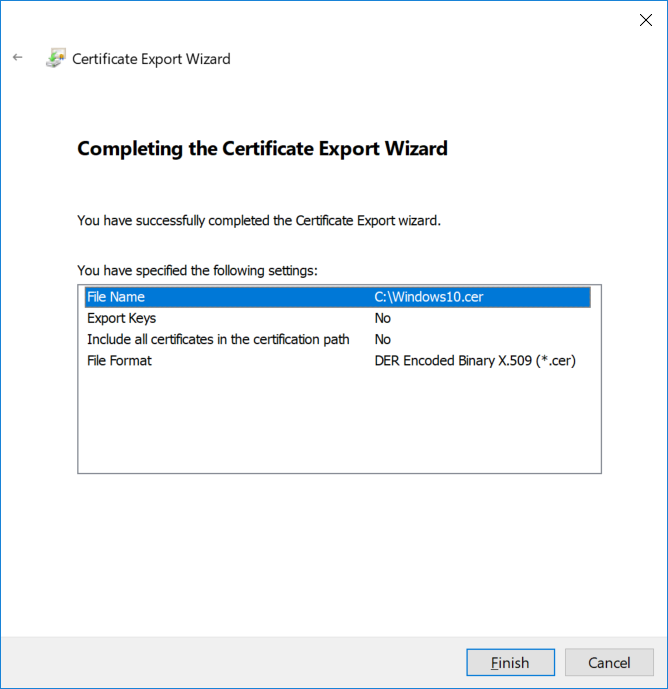
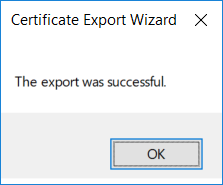
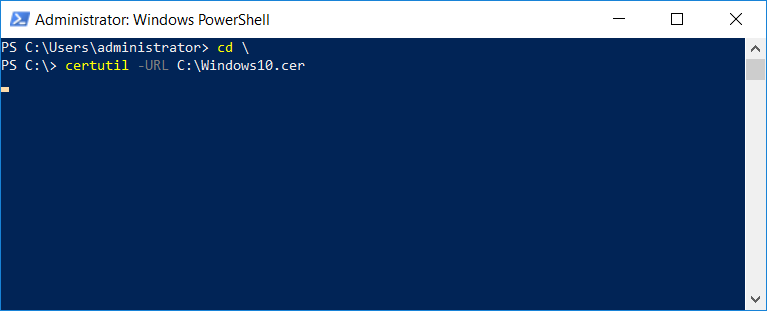
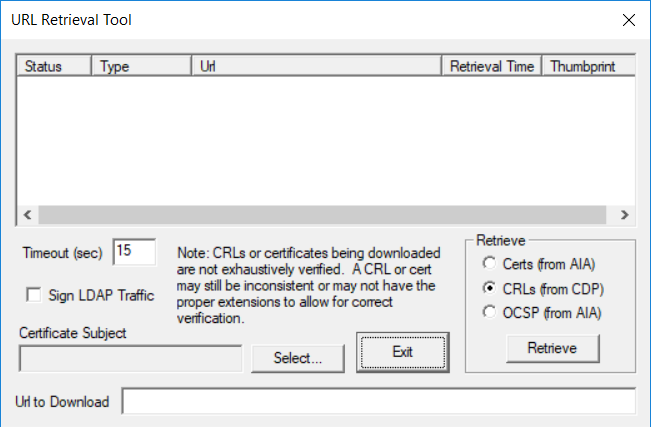
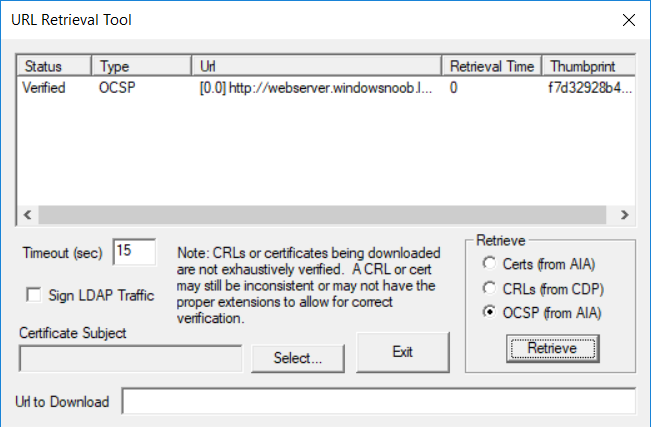
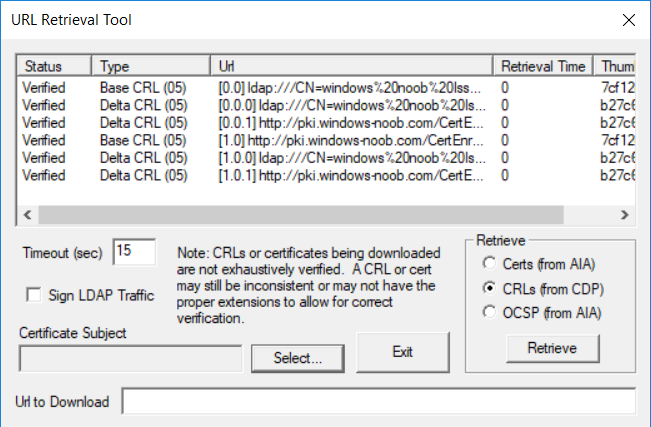
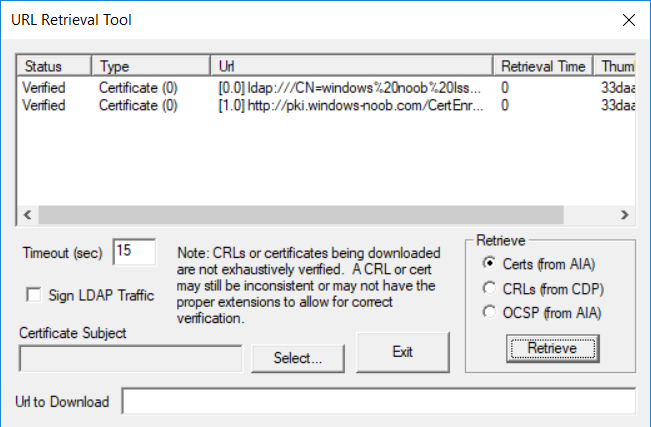
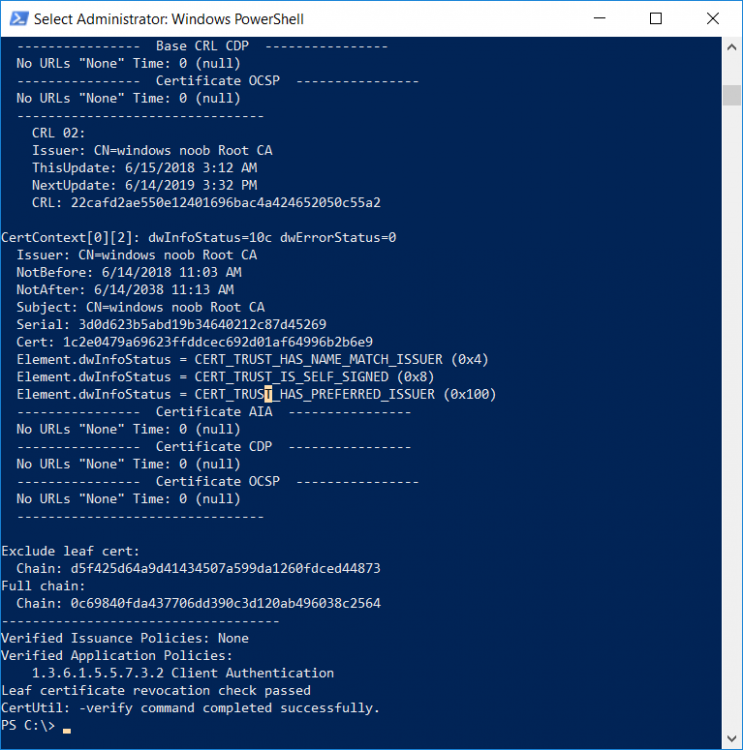
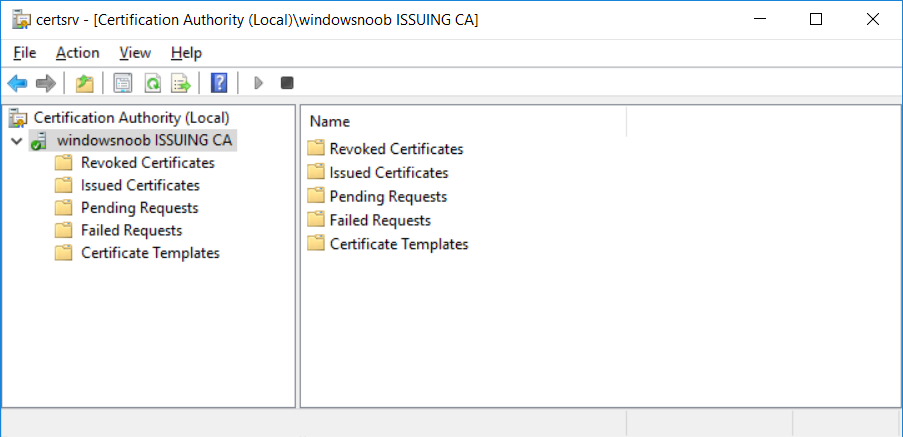
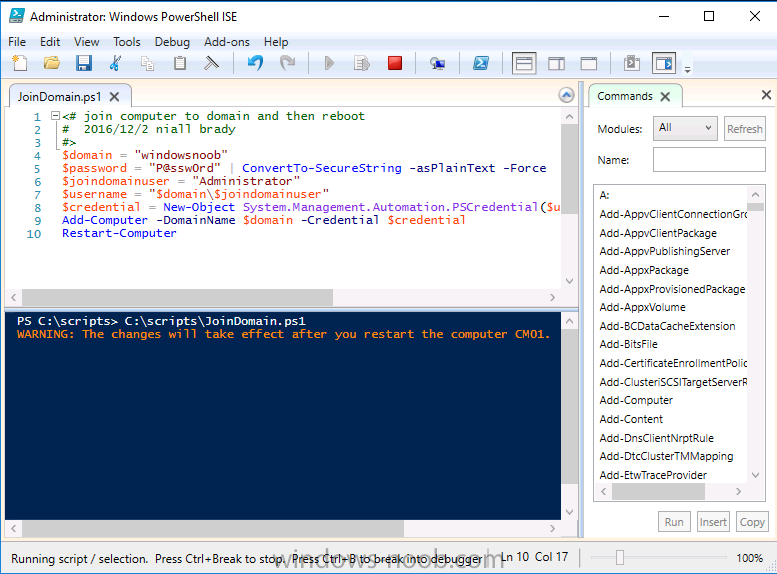
This series is comprised of different parts, listed below. Part 1 - Introduction and server setup Part 2 - Install and do initial configuration on the Standalone Offline Root CA Part 3 - Prepare the HTTP Web server for CDP and AIA Publication Part 4 - Post configuration on the Standalone Offline Root CA Part 5 - Installing the Enterprise Issuing CA Part 6 - Perform post installation tasks on the Issuing CA Part 7 - Install and configure the OCSP Responder role service Part 8 - Configure AutoEnroll and Verify PKI health (this part) In part 1 of this series, you configured your LAB for a 2 tier PKI hierarchy running on Windows Server 2016. You used PowerShell to create some virtual machines, and then installed Windows Server 2016, Windows 10 Enterprise version 1803 and optionally Smoothwall 3.1 before configuring the IP address scheme and Computer Names on the virtual machines. Finally you configured ADDS on DC01 so that you have a working Domain Controller for the rest of this LAB. In part 2 you installed and did the initial configuration on the Standalone Offline Root CA. In part 3 you prepared the HTTP Web Server for CDP and AIA Publication and you created a DNS record for the publicly available web server. In part 4 you performed post configuration on the Standalone Offline Root CA to set certificate revocation list (CRL) period registry settings using CertUtil, and then enabled object access Auditing and finally, you configured three locations for the Authority Information Access (AIA) and four locations for the Certificate revocation list Distribution Point (CDP), again using CertUtil. In part 5 you joined the IssuingCA computer to the windowsnoob domain before creating a new CAPolicy.inf file which was customized for the Issuing CA role. Next, you published the Root CA Certificate and CRL (both to Active Directory and the HTTP web server) and you installed the Enterprise Issuing CA before submitting a request to the StandAlone Offline Root CA. Next you installed the Issuing CA Certificate using the response files from the StandAlone Offline Root CA on the removable media. In part 6, you performed post installation and configuration of the IssuingCA server by configuring Certificate Revocation and CA Certificate Validity Periods, you then enabled auditing on the CA server, and configured the AIA and CDP. In part 7 you installed and configured the OCSP responder role service on the web server. Now you will configure Auto Enrollment and Verify PKI health. Step 1.Configure a GPO for Auto Enrollment Logon to to the Domain Controller (DC01) as windowsnoob\Administrator. Click Start, click Run, and then type gpmc.msc and press enter. Expand Forest, expand Domains, expand windowsnoob.lab.local, and then expand Group Policy Objects. Right click Default Domain Policy, then click Edit. Under Computer Configuration, expand Policies, expand Windows Settings, expand Security Settings, and then expand Public Key Policies. Select Certificate Services Client - Auto-Enrollment, right click and choose Properties. Change it from Not Configured to Enabled and enable the following 2 options. Renew expired certificates, update pending certificates, and remove revoked certificates Update certificate that use certificate templates As shown here. Click Apply when done, and close the Group Policy Management Editor and then close the Group Policy Management Console. Step 2. Configure AutoEnrollment for Workstation Authentication on the Issuing CA Ensure that you are logged on as windowsnoob\EntAdmin on the Issuing CA server (IssuingCA), start the Certification Authority console by entering certsrv.msc, ensure that windowsnoob Issuing CA is expanded. Right-click on Certificate Templates, then select Manage. In the Certificate Templates that appear, select Workstation Authentication. Right click it, and select Properties, click on the Security tab, select Domain Computers and ensure that AutoEnroll is selected, click Apply. Step 3. Join the Windows 10 computer to the domain Logon to Windows 10 version 1803 computer (Win101803) as Administrator, and copy the JoinDomain.ps1 script below to a folder called C:\Scripts. Open the script in PowerShell ISE as Administrator, then run Set-ExecutionPolicy to unrestricted before running the JoinDomain.ps1 PowerShell script by clicking on the Green Arrow in Windows PowerShell ISE. JoinDomain.ps1 Note: The computer will reboot by itself after joining the windowsnoob.lab.local domain. Step 4. Check PKI Health with Enterprise PKI To use the Enterprise PKI console to check PKI health, on the IssuingCA server, ensure that you are logged on as windowsnoob\entadmin. Run PKIView.msc from an administrative command prompt. Right click Enterprise PKI and then click Manage AD Containers. On the NTAuthCertificates tab, verify the windows noob Issuing CA certificate appears with a status of OK as shown below: On the AIA Container tab, verify both the windows noob Root CA and the windows noob Issuing CA certificates are present with a status of OK. On the CDP Container tab, verify that the windows noob Issuing CA has both Delta CRL and Base CRL, and that the windows noob Root CA has a Base CRL present and with a status of OK. On the Certification Authorities Container, verify that the windows noob Root CA certificate is present and with a status of OK. and finally on the Enrollment Services Container tab, verify that the windows noob Issuing CA certificate is present with a status of OK. Step 5. Configure Certificate Distribution on the Issuing CA To publish a certificate for computers in the enterprise do as follows. Logon to the IssuingCA computer as windowsnoob\EntAdmin. In the Certification Authority console (certsrv.msc), ensure that windows noob Issuing CA is expanded. Right-click Certificate Templates, select New and select Certificate Template to Issue. On the Enable Certificate Templates dialog box, select Workstation Authentication and then click OK. Step 6. verify certificate autoenrollment on the Windows 10 client To verify that autoenrollment of certificates on the Windows 10 compute do as follows. Log on to win101803.windowsnoob.lab.local as windowsnoob\Administrator. (Ensure that you switch user to log on as windowsnoob\Administrator) Click Start, type mmc and then press ENTER. Click File, and then click Add/Remove Snap-in. Click Certificates, then click Add, Select Computer Account, and then click Finish. Click OK. Expand Personal and select Certificates, if you do not see Certificates, in an Administrative Command prompt issue the following command gpupdate /force then refresh the view in the Certificates MMC. You should now see a Certificates folder and a certificate listed. This certificate was issued using AutoEnrollment which was configured above. Step 7. Verify PKI health on the issued certificate While logged on to W101803.windowsnoob.local.local as windowsnoob\Administrator, In the certificates console tree, expand Personal, click Certificates. In the details pane, right click the W101803.windowsnoob.lab.local certificate, click All Tasks, and then click Export. the Welcome to the certificate export wizard appears, click Next. Click Next at the No do not export the private key screen On the Export File Format page, click Next. [DER encoded binary X.509 (.CER) is the default selection]. in the File to Export, call it C:\Windows10 at the completing the certificate export wizard screen click Finish. you should be notified of the success of the export. Open an administrative command prompt and run the following commands: cd\ then certutil -URL C:\Windows10.cer The URL retrieval tool should appear. In the URL Retrieval Tool, select the OCSP (from AIA) option and then click Retrieve. Confirm that it shows status as Verified. In the URL Retrieval Tool, select the CRLs (from CDP) option and then click Retrieve. Confirm that it shows status as Verified. In the URL Retrieval Tool, select the Certs (from AIA) option and then click Retrieve. Confirm that it shows status as Verified. Click Exit to close URL Retrieval Tool. From the administrative command prompt run following command to thoroughly verify the certificate chain retrieval and revocation status. certutil -verify -urlfetch C:\Windows10.cer you'll see a lot of output similar to the following PS C:\> certutil -verify -urlfetch C:\Windows10.cer Issuer: CN=windows noob Issuing CA DC=windowsnoob DC=lab DC=local Name Hash(sha1): b500ca9b33a216fcc44492f25bb6e6b8bd6a5a78 Name Hash(md5): b0c8a9c15f77c9e2b7af24718ab3f3ec Subject: EMPTY (DNS Name=W101803.windowsnoob.lab.local) Name Hash(sha1): f944dcd635f9801f7ac90a407fbc479964dec024 Name Hash(md5): a46c3b54f2c9871cd81daf7a932499c0 Cert Serial Number: 1e000000057a5838e2727d5162000000000005 dwFlags = CA_VERIFY_FLAGS_CONSOLE_TRACE (0x20000000) dwFlags = CA_VERIFY_FLAGS_DUMP_CHAIN (0x40000000) ChainFlags = CERT_CHAIN_REVOCATION_CHECK_CHAIN_EXCLUDE_ROOT (0x40000000) HCCE_LOCAL_MACHINE CERT_CHAIN_POLICY_BASE -------- CERT_CHAIN_CONTEXT -------- ChainContext.dwInfoStatus = CERT_TRUST_HAS_PREFERRED_ISSUER (0x100) ChainContext.dwRevocationFreshnessTime: 3 Weeks, 1 Hours, 35 Minutes, 37 Seconds SimpleChain.dwInfoStatus = CERT_TRUST_HAS_PREFERRED_ISSUER (0x100) SimpleChain.dwRevocationFreshnessTime: 3 Weeks, 1 Hours, 35 Minutes, 37 Seconds CertContext[0][0]: dwInfoStatus=102 dwErrorStatus=0 Issuer: CN=windows noob Issuing CA, DC=windowsnoob, DC=lab, DC=local NotBefore: 7/6/2018 4:04 AM NotAfter: 7/6/2019 4:04 AM Subject: Serial: 1e000000057a5838e2727d5162000000000005 SubjectAltName: DNS Name=W101803.windowsnoob.lab.local Template: Workstation Authentication Cert: 9eae120ea27c064e609df51cacda77e286a223d6 Element.dwInfoStatus = CERT_TRUST_HAS_KEY_MATCH_ISSUER (0x2) Element.dwInfoStatus = CERT_TRUST_HAS_PREFERRED_ISSUER (0x100) ---------------- Certificate AIA ---------------- Verified "Certificate (0)" Time: 0 33daad0a6923fdbd02300d703264d13d70eedf42 [0.0] ldap:///CN=windows%20noob%20Issuing%20CA,CN=AIA,CN=Public%20Key%20Services,CN=Services,CN=Configuration,DC=windowsnoob,DC=lab,DC=local?cACertificate?base?objectClass=certificationAuthority Verified "Certificate (0)" Time: 0 33daad0a6923fdbd02300d703264d13d70eedf42 [1.0] http://pki.windows-noob.com/CertEnroll/IssuingCA.windowsnoob.lab.local_windows%20noob%20Issuing%20CA.crt ---------------- Certificate CDP ---------------- Verified "Base CRL (05)" Time: 0 7cf12cea65a271e322dcd148dafca9890381d68c [0.0] ldap:///CN=windows%20noob%20Issuing%20CA,CN=IssuingCA,CN=CDP,CN=Public%20Key%20Services,CN=Services,CN=Configuration,DC=windowsnoob,DC=lab,DC=local?certificateRevocationList?base?objectClass=cRLDistributionPoint Verified "Delta CRL (05)" Time: 0 b27c6e817abccb07e6d18c37c808013cc1377c1d [0.0.0] ldap:///CN=windows%20noob%20Issuing%20CA,CN=IssuingCA,CN=CDP,CN=Public%20Key%20Services,CN=Services,CN=Configuration,DC=windowsnoob,DC=lab,DC=local?deltaRevocationList?base?objectClass=cRLDistributionPoint Verified "Delta CRL (05)" Time: 0 b27c6e817abccb07e6d18c37c808013cc1377c1d [0.0.1] http://pki.windows-noob.com/CertEnroll/windows%20noob%20Issuing%20CA+.crl Verified "Base CRL (05)" Time: 0 7cf12cea65a271e322dcd148dafca9890381d68c [1.0] http://pki.windows-noob.com/CertEnroll/windows%20noob%20Issuing%20CA.crl Verified "Delta CRL (05)" Time: 0 b27c6e817abccb07e6d18c37c808013cc1377c1d [1.0.0] ldap:///CN=windows%20noob%20Issuing%20CA,CN=IssuingCA,CN=CDP,CN=Public%20Key%20Services,CN=Services,CN=Configuration,DC=windowsnoob,DC=lab,DC=local?deltaRevocationList?base?objectClass=cRLDistributionPoint Verified "Delta CRL (05)" Time: 0 b27c6e817abccb07e6d18c37c808013cc1377c1d [1.0.1] http://pki.windows-noob.com/CertEnroll/windows%20noob%20Issuing%20CA+.crl ---------------- Base CRL CDP ---------------- OK "Delta CRL (07)" Time: 0 b27c6e817abccb07e6d18c37c808013cc1377c1d [0.0] ldap:///CN=windows%20noob%20Issuing%20CA,CN=IssuingCA,CN=CDP,CN=Public%20Key%20Services,CN=Services,CN=Configuration,DC=windowsnoob,DC=lab,DC=local?deltaRevocationList?base?objectClass=cRLDistributionPoint OK "Delta CRL (07)" Time: 0 b27c6e817abccb07e6d18c37c808013cc1377c1d [1.0] http://pki.windows-noob.com/CertEnroll/windows%20noob%20Issuing%20CA+.crl ---------------- Certificate OCSP ---------------- Verified "OCSP" Time: 0 f7d32928b44de5b419a11bac19cc56fad7d4f9ee [0.0] http://webserver.windowsnoob.lab.local/ocsp -------------------------------- CRL 05: Issuer: CN=windows noob Issuing CA, DC=windowsnoob, DC=lab, DC=local ThisUpdate: 7/3/2018 7:02 AM NextUpdate: 7/10/2018 7:22 PM CRL: 7cf12cea65a271e322dcd148dafca9890381d68c Delta CRL 07: Issuer: CN=windows noob Issuing CA, DC=windowsnoob, DC=lab, DC=local ThisUpdate: 7/5/2018 7:02 AM NextUpdate: 7/6/2018 7:22 PM CRL: b27c6e817abccb07e6d18c37c808013cc1377c1d Application[0] = 1.3.6.1.5.5.7.3.2 Client Authentication CertContext[0][1]: dwInfoStatus=102 dwErrorStatus=0 Issuer: CN=windows noob Root CA NotBefore: 6/19/2018 4:34 AM NotAfter: 6/19/2028 4:44 AM Subject: CN=windows noob Issuing CA, DC=windowsnoob, DC=lab, DC=local Serial: 5600000002ff2362e624faf00a000000000002 Template: SubCA Cert: 33daad0a6923fdbd02300d703264d13d70eedf42 Element.dwInfoStatus = CERT_TRUST_HAS_KEY_MATCH_ISSUER (0x2) Element.dwInfoStatus = CERT_TRUST_HAS_PREFERRED_ISSUER (0x100) ---------------- Certificate AIA ---------------- Verified "Certificate (0)" Time: 0 1c2e0479a69623ffddcec692d01af64996b2b6e9 [0.0] ldap:///CN=windows%20noob%20Root%20CA,CN=AIA,CN=Public%20Key%20Services,CN=Services,CN=Configuration,DC=windowsnoob,DC=lab,DC=local?cACertificate?base?objectClass=certificationAuthority Verified "Certificate (0)" Time: 0 1c2e0479a69623ffddcec692d01af64996b2b6e9 [1.0] http://pki.windows-noob.com/CertEnroll/ROOTCA_windows%20noob%20Root%20CA.crt ---------------- Certificate CDP ---------------- Verified "Base CRL (02)" Time: 0 22cafd2ae550e12401696bac4a424652050c55a2 [0.0] ldap:///CN=windows%20noob%20Root%20CA,CN=ROOTCA,CN=CDP,CN=Public%20Key%20Services,CN=Services,CN=Configuration,DC=windowsnoob,DC=lab,DC=local?certificateRevocationList?base?objectClass=cRLDistributionPoint Verified "Base CRL (02)" Time: 0 22cafd2ae550e12401696bac4a424652050c55a2 [1.0] http://pki.windows-noob.com/CertEnroll/windows%20noob%20Root%20CA.crl ---------------- Base CRL CDP ---------------- No URLs "None" Time: 0 (null) ---------------- Certificate OCSP ---------------- No URLs "None" Time: 0 (null) -------------------------------- CRL 02: Issuer: CN=windows noob Root CA ThisUpdate: 6/15/2018 3:12 AM NextUpdate: 6/14/2019 3:32 PM CRL: 22cafd2ae550e12401696bac4a424652050c55a2 CertContext[0][2]: dwInfoStatus=10c dwErrorStatus=0 Issuer: CN=windows noob Root CA NotBefore: 6/14/2018 11:03 AM NotAfter: 6/14/2038 11:13 AM Subject: CN=windows noob Root CA Serial: 3d0d623b5abd19b34640212c87d45269 Cert: 1c2e0479a69623ffddcec692d01af64996b2b6e9 Element.dwInfoStatus = CERT_TRUST_HAS_NAME_MATCH_ISSUER (0x4) Element.dwInfoStatus = CERT_TRUST_IS_SELF_SIGNED (0x8) Element.dwInfoStatus = CERT_TRUST_HAS_PREFERRED_ISSUER (0x100) ---------------- Certificate AIA ---------------- No URLs "None" Time: 0 (null) ---------------- Certificate CDP ---------------- No URLs "None" Time: 0 (null) ---------------- Certificate OCSP ---------------- No URLs "None" Time: 0 (null) -------------------------------- Exclude leaf cert: Chain: d5f425d64a9d41434507a599da1260fdced44873 Full chain: Chain: 0c69840fda437706dd390c3d120ab496038c2564 ------------------------------------ Verified Issuance Policies: None Verified Application Policies: 1.3.6.1.5.5.7.3.2 Client Authentication Leaf certificate revocation check passed CertUtil: -verify command completed successfully. PS C:\> Review the output and make sure all the chain retrieval and revocation status are successfully verified. Job done ! That's it for this mini-series about setting up PKI in a lab, thanks for joining me, I hope you completed everything successfully and have a better understanding of how PKI works and how to set it up in a lab. Next steps If you'd like to see how SCCM works with HTTPS, see below:- How can I configure System Center Configuration Manager in HTTPS mode (PKI) - Part 1 How can I configure System Center Configuration Manager in HTTPS mode (PKI) - Part 2 cheers niall.


 3 points
 -
Thanks for your guidance, it is a very helpful! I did all the steps on my test infrastructure, though I had a reduced set of virtual machines. It seems to me that there is an error in section 5 (maybe my comment will help other people) You suggest to execute the command: certutil -f -dspublish "E: \ ROOTCA_windows noob Root CA.crt" RootCA Where RootCA , as you write, is the host name of offline Root CA, however certutil helps us: CertUtil [Options] -dsPublish CertFile [NTAuthCA | RootCA | SubCA | CrossCA | KRA | User | Machine] ... CertFile - certificate file to publish NTAuthCA - Publish cert to DS Enterprise store RootCA - Publish cert to DS Trusted Root store SubCA - Publish CA cert to DS CA object CrossCA - Publish cross cert to DS CA object ... So RootCA in this case is not the host name here, but the store name. Your host name matches the store name, and your command has been executed. My Root CA name was different, and when I will have tried to execute the command certutil -f -dspublish "C:\from_RCA\RCA01_My-CA.crt" RCA01 i got an error CertUtil: -dsPublish command FAILED: 0x80070057 (WIN32: 87 ERROR_INVALID_PARAMETER) CertUtil: The parameter is incorrect. however command certutil -f -dspublish "C:\from_RCA\RCA01_My-CA.crt" RootCA performed correctly. Next command in your manual certutil -f -dspublish "E: \ windows noob Root CA.crl" RootCA is correct, because to publish CRL you must specify the host name: CertUtil [Options] -dsPublish CRLFile [DSCDPContainer [DSCDPCN]] .... CRLFile - CRL file to publish DSCDPContainer - DS CDP container CN, usually the CA machine name3 points
-
glad to hear it, to summarize Microsoft is aware of the issue and has produced a fix3 points
-
To piggy back off this, talked to HP about this earlier today as well. Pre-release BIOS are available but they need to have it approved/signed off before providing it for testing purposes. I was told mid-April is their tentative release date for this. Anything with a kaby lake processor is having the UEFI PXE boot issues according to them or have had reports. They pointed to the G4 model laptops and the G3+ model desktop machines.3 points
-
This list of guides is a living index covering Windows 365 Cloud PC, Microsoft Intune or Configuration Manager. The Configuration Manager Current Branch releases are meant for your production deployments and the Technical Preview releases are for testing new upcoming features in the product, and are aimed at Lab use only. The PKI guides are added as https communication within ConfigMgr and Intune is desired. These guides are broken down into different sections: Windows 365 Microsoft Intune Configuration Manager - Current Branch Configuration Manager - Technical Preview Setting up PKI Note: The guides in each section are (mostly) sorted in the direction of oldest first. Windows 365 How can I delete a Windows 365 Cloud PC How can I use multiple monitors with Windows 365 Using Windows 365 with Linux Introducing the Windows 365 App How can I resize a Windows 365 Cloud PC USA Windows 365 User Group session – video available Windows 365 – Your connection failed – Error Code 0x3000047 How can I configure alerts for Windows 365 activity in Intune Getting started with Windows 365 - Part 1. Introduction Getting started with Windows 365 - Part 2. Provisioning an Azure Ad Joined Cloud PC Getting started with Windows 365 - Part 3. Provisioning a Hybrid Azure Ad Joined Cloud PC Getting started with Windows 365 - Part 4. Connecting to your Cloud PC Getting started with Windows 365 - Part 5. Managing your Cloud PC Getting started with Windows 365 - Part 6. Point in time restore Getting started with Windows 365 - Part 7. Patching your Cloud PCs with Windows Autopatch Getting started with Windows 365 - Part 8. Windows 365 boot Getting started with Windows 365 - Part 9. Windows 365 switch Getting started with Windows 365 - Part 10. Windows 365 offline Windows 365 app not connecting try this Using alternate ANCs in your Windows 365 provisioning policy Location redirection with Windows 365 Troubleshooting Windows 365 connection issues via the troubleshoot option in the Windows 365 app A quick look at some of the new features in the Windows 365 app An update about location redirection on Windows 365 Cloud PCs Windows 365 end user improvements - open in browser, open in desktop app Windows 365 web client can now use your camera New video: Windows 365 Switch in action Windows 365 boot and Windows 365 switch go GA! Automating Windows 365 part 1 - Introducing Graph and setting up Visual Studio code Automating Windows 365 part 2 - Using Graph X-Ray Automating Windows 365 part 3 - Provisioning Cloud PC's Automating Windows 365 part 4 - Managing your Cloud PC Automating Windows 365 part 5 - Cloud PC reports A quick look at Windows 365 Boot dedicated mode A quick look at Windows 365 Boot shared mode Getting more out of Windows 365 – Windows 365 Boot Getting more out of Windows 365 – Windows 365 GPU Getting more out of Windows 365 – Windows 365 Frontline Getting more out of Windows 365 – Windows 365 Switch Getting more out of Windows 365 – Securing your Windows 365 PC’s Updating the Windows app to the latest version A quick look at using Windows 365 Cloud PC’s via Motorola Thinkphone Automated Provisioning of Windows 365 Cloud PCs: Advanced Scripts Moving one or more Windows 365 Cloud PCs to another location Recovering a Windows 365 Cloud PC that was de-provisioned due to license expiration How healthy are your Windows 365 or Azure Virtual Desktop PC’s ? Using remediation scripts in Intune to grab Windows 365 health check logs Windows 365 and the External Identity preview – using a guest account to access Cloud PCs Cloudy With a Chance of Apps First looks at Windows 365 AI-enabled Cloud PCs First looks at the Windows 365 Cloud Input Protection Preview Feature January 2026 Cumulative Update breaks Windows app First looks at Frontline Shared UES First looks at the Remote Desktop Client app migration tool First looks at resizing Frontline Dedicated Cloud PC’s Microsoft Intune How can I find out version info about Intune Preview in Azure ? How can I unlock Windows Holographic for Business features in Intune Preview? How can I determine how long a blade loads in Intune Preview in Azure ? How can I check the status of my Intune service ? Intune Preview in Azure get’s a new look and Software Updates for Windows 10 ! What is Windows Information Protection and how can I use it to protect Enterprise data on Windows 10 devices using Intune Using Intune to enable WIP to protect Enterprise data on Windows 10 devices (MAM-WE) Getting started with Microsoft Graph and using PowerShell to automate things in Intune How can I integrate Microsoft Store for Business with Intune in Azure How can I create a dynamic group containing all Windows 10 version 1709 in Intune in Azure ? How can I enable MDM auto-enrollment in Azure How can I customize the start screen in Windows 10 using Intune How can I use Windows AutoPilot with a Proxy ? Troubleshooting “Something went wrong error 801c0003” during enrollment via Windows AutoPilot and Microsoft Intune Configuring BitLocker in Intune - Part 1. Configuring BitLocker Configuring BitLocker in Intune - Part 2. Automating Encryption Configuring BitLocker in Intune - Part 3. Testing the scripts How can I send notification messages using PowerShell in Microsoft Intune How can I deploy custom favorites in Microsoft Edge to Windows 10 devices using Microsoft Intune Managing devices with Microsoft Intune: What’s new and what’s next – my notes (Part 1 – new features) Managing devices with Microsoft Intune: What’s new and what’s next – my notes (Part 2 – iOS) Managing devices with Microsoft Intune: What’s new and what’s next – my notes (Part 3 – Android) Managing devices with Microsoft Intune: What’s new and what’s next – my notes (Part 4 – macOS) Managing devices with Microsoft Intune: What’s new and what’s next – my notes (Part 5 – Windows) Learn how to leverage Intune support for Microsoft Graph and PowerShell to enable powerful automation and IT security- my notes How Microsoft uses Intune internally to manage Windows devices Android device management with Microsoft Intune – Part 1. Partnerships Android device management with Microsoft Intune – Part 2. Deployment Scenarios Android device management with Microsoft Intune – Part 3. Dedicated device management Android device management with Microsoft Intune – Part 4. Coming soon and what’s new How can I create dynamic groups for different HoloLens devices in Microsoft Intune Troubleshooting app deployment in Windows Autopilot Configuring the Registered Owner and Organization in Windows Autopilot delivered PCs Removing company data from Endpoint Manager enrolled phones Office 365 issues after Windows Autopilot Displaying a welcome page after Windows Autopilot completes Adding devices to an Azure AD group after Windows Autopilot is complete - part 1 Adding devices to an Azure AD group after Windows Autopilot is complete - part 2 Gathering logs and sending an email when resetting Windows Autopilot - part 1 Gathering logs and sending an email when you need to reset Windows Autopilot - part 2 Gathering logs and sending an email when you need to reset Windows Autopilot - part 3 Adding devices or users to an Azure AD group after Windows Autopilot is complete but only when the device is marked as Compliant Using the updated & secure Retire My PC app via Company Portal Prompting standard users to confirm or change Regional, Time Zone and Country settings after Windows Autopilot enrollment is complete Encrypting devices during Windows Autopilot provisioning (WhiteGlove) - Part 1 Encrypting devices during Windows Autopilot provisioning (WhiteGlove) - Part 2 Encrypting devices during Windows Autopilot provisioning (WhiteGlove) - Part 3 https://www.niallbrady.com/2024/04/06/pc-buyback-for-windows-autopilot-devices-part-2/ PC Buyback for Windows Autopilot devices – part 1 PC Buyback for Windows Autopilot devices – part 2 PC Buyback for Windows Autopilot devices – part 3 Deploying KB5030310 to devices as a Win32 app for Copilot Using remediation scripts to automate a setting for Copilot How can I disable Copilot ? Getting started with Azure Key Vault Expediting updates using Windows Autopatch August Cumulative update causing Windows reset problems Configuration Manager Current Branch Installation - How can I install System Center Configuration Manager (Current Branch) Configuring Discovery - How can I configure discovery for System Center Configuration Manager (Current Branch) Configuring Boundaries - How can I configure boundaries in System Center Configuration Manager (Current Branch) Using Updates and Servicing in Offline mode - How can I use Updates and Servicing in Offline mode in System Center Configuration Manager (Current Branch) Using Updates and Servicing in Online mode - How can I use Updates and Servicing in Online mode in System Center Configuration Manager (Current Branch) Setting up the Software Update Point - How can I setup Software Updates in System Center Configuration Manager (Current Branch) Installing the Client agent - How can I configure client settings and install the ConfigMgr client agent in System Center Configuration Manager Current Branch Upgrading to System Center Configuration Manager (Current Branch) version 1602 from System Center Configuration Manager (Current Branch) version 1511 How can I use the Upgrade Task Sequence in System Center Configuration Manager (Current Branch) ? How can I use servicing plans in System Center Configuration Manager (Current Branch) to upgrade Windows 10 devices ? How can I deploy Windows 10 with MDT 2013 Update 2 integrated with System Center Configuration Manager (Current Branch) Setting up PKI Part 1 - Introduction and server setup Part 2 - Install and do initial configuration on the Standalone Offline Root CA Part 3 - Prepare the HTTP Web server for CDP and AIA Publication Part 4 - Post configuration on the Standalone Offline Root CA Part 5 - Installing the Enterprise Issuing CA Part 6 - Perform post installation tasks on the Issuing CA Part 7 - Install and configure the OCSP Responder role service Part 8 - Configure AutoEnroll and Verify PKI health How can I configure System Center Configuration Manager in HTTPS mode (PKI) - Part 1 How can I configure System Center Configuration Manager in HTTPS mode (PKI) - Part 2 New video: Fixing expired Root CA CDP and Crypt_E_REVOCATION_OFFLINE problems cheers niall3 points
-
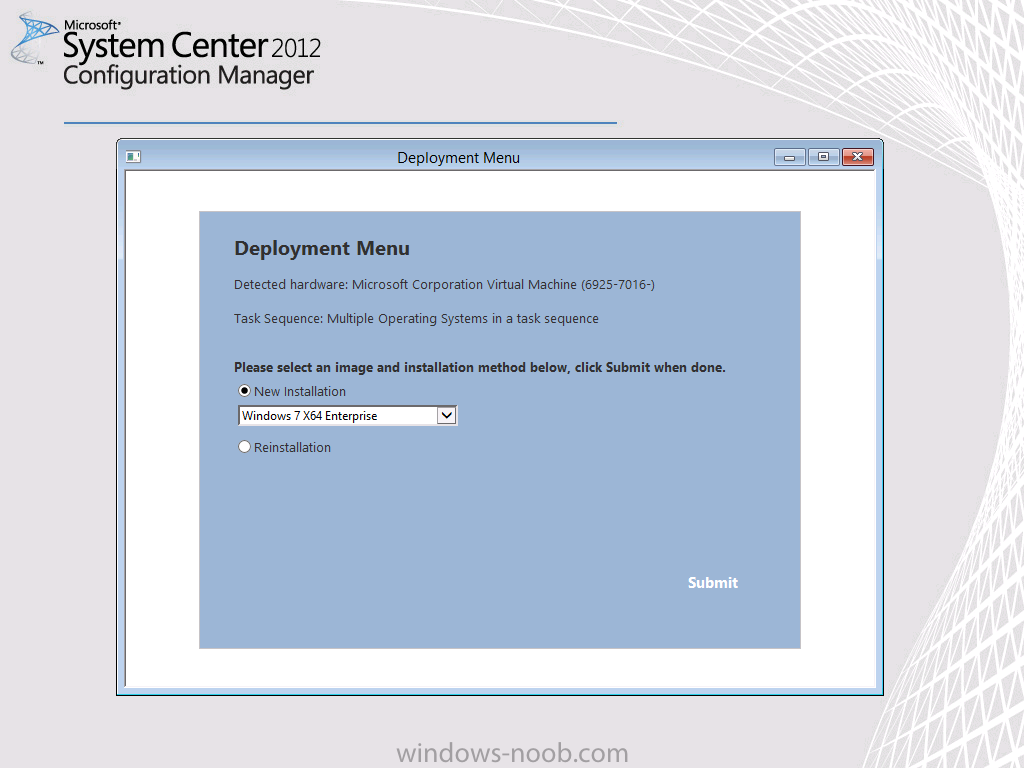
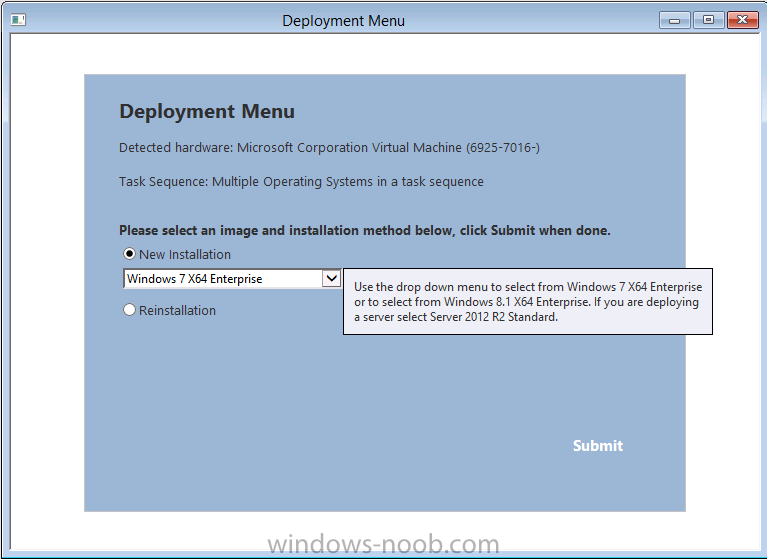
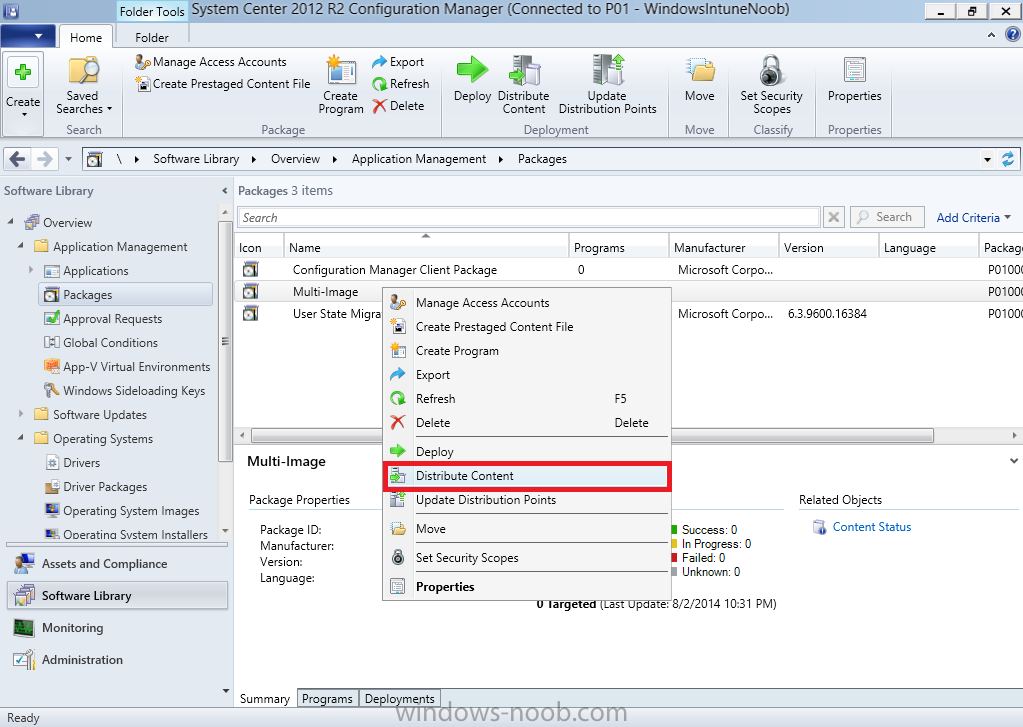
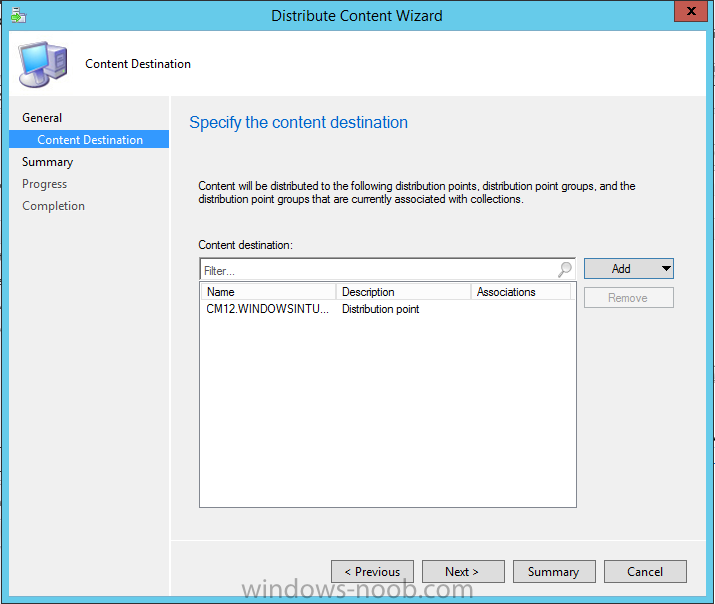
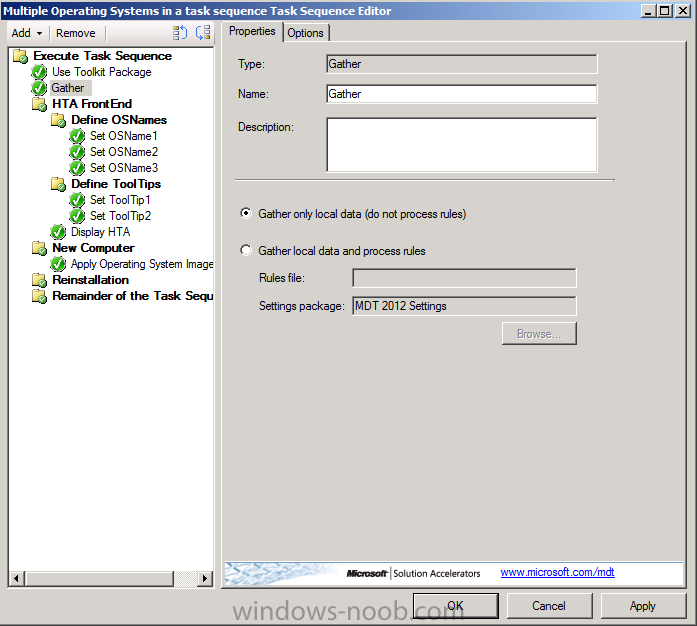
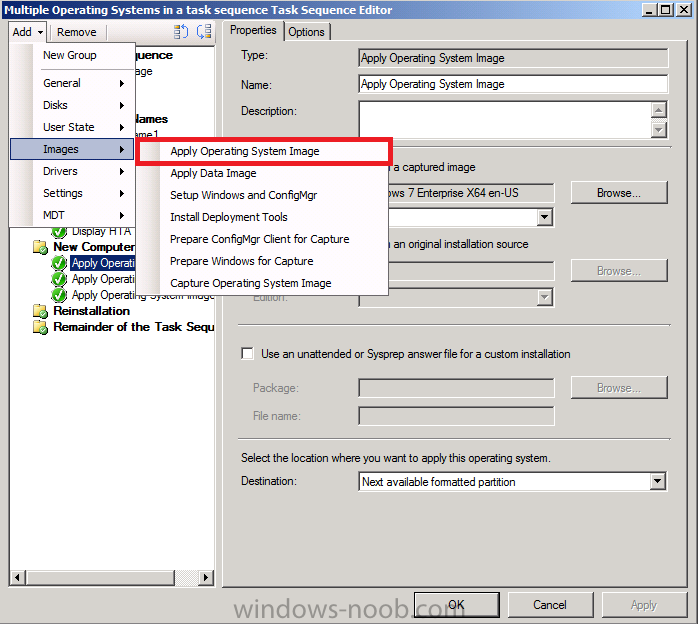
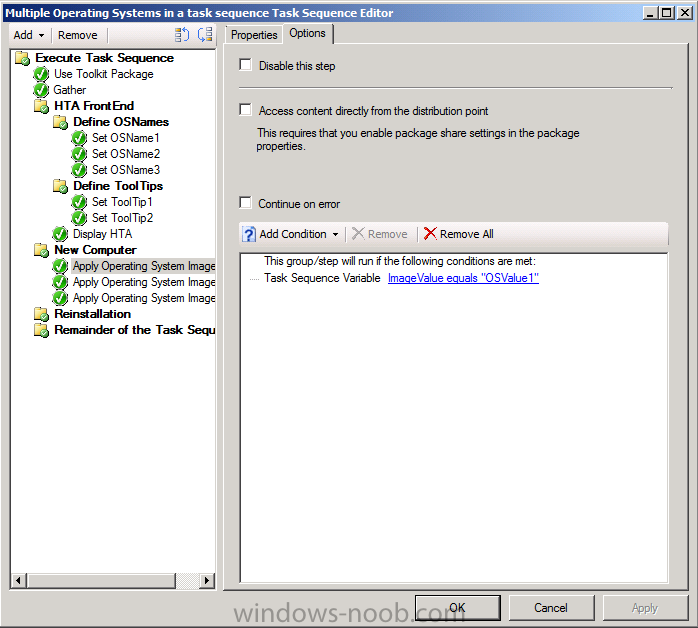
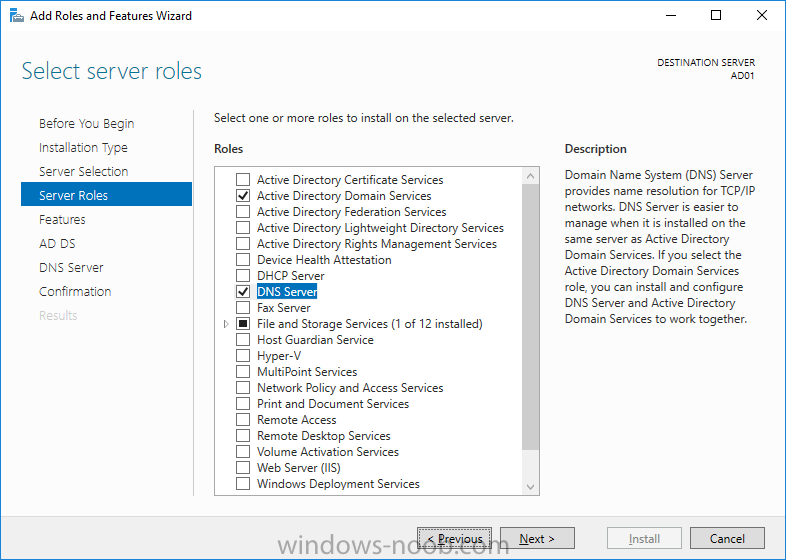
This list of guides is all about System Center 2012 R2 Configuration Manager. If you want to learn about SCCM 2012 this is how you can do it ! I've put together this list together to help people like you learn about Configuration Manager 2012 R2 and to help people learn about how they can integrate Microsoft Intune with Configuration Manager 2012 R2 to manage their iOS, Android and Windows Phone mobile devices. If you are looking for some of my other guides then please check below: Microsoft Intune (standalone) in Azure step by step guides are here Microsoft Intune (hybrid) guides look here (over 61,103 views as of July 2017) System Center Configuration Manager (Current Branch and Technical Preview) here (96,953 views, May 2018) Configuration Manager 2007 guides then look here (over 948388 views as of July 2017) Microsoft Deployment Toolkit guides are here SMS 2003 guides are here (over 10423 views as of July 2017) Note: Some of my guides are also available for download, please see below links download the Microsoft Intune Mobile Device Management guides here. download the Standalone Primary guides in PDF and WORD format here. Step-by-Step Guides CM12 in a Lab - PXE boot failure after upgrading to System Center 2012 Configuration Manager Service Pack 1 CM12 in a Lab - How can I deploy Windows 8 X64 to the Microsoft Surface Pro using Configuration Manager 2012 SP1 ? CM12 in a Lab - How can I deploy System Center 2012 Endpoint Protection Definition Updates from a UNC file share CM12 in a Lab - How can I determine what Antimalware Policy is applied to my SCEP 2012 SP1 client ? CM12 in a Lab - when running /testdbupgrade for System Center 2012 Configuration Manager SP1 you get an error: SQL Native client 11 is not installed CM12 in a Lab - How can I backup System Center 2012 Configuration Manager ? CM12 in a Lab - SQL Server 2012 SP1 support in System Center 2012 Configuration Manager SP1 CM12 in a Lab - The CM12 BitLocker FrontEnd HTA - video CM12 in a Lab - The CM12 BitLocker FrontEnd HTA CM12 in a Lab - Where can I download additional clients for System Center 2012 Configuration Manager SP1 ? CM12 in a Lab - How can I sequence applications using App-V version 5 for Configuration Manager 2012 SP1 CM12 in a Lab - How can I deploy a Hidden task sequence in Configuration Manager 2012 SP1 ? CM12 in a Lab - How can I pre-provision BitLocker in WinPE during Windows 8 deployments using Configuration Manager 2012 SP1 ? CM12 in a Lab - How can i disable “Connect to a wireless network” during Windows 8 OOBE ? CM12 in a Lab - How can I deploy Windows 8 in UEFI mode using Configuration Manager 2012 ? CM12 in a Lab - Why is my System Center 2012 Configuration Manager console in read-only mode ? CM12 in a Lab - How can I view hidden Endpoint Protection Reports in System Center 2012 Configuration Manager ? CM12 in a Lab - How can I upgrade System Center 2012 Configuration Manager ? CM12 in a Lab - How can I add a PXE enabled Distribution Point on Server 2008 X86 for System Center 2012 Configuration Manager ? CM12 in a Lab - How can I display my System Center 2012 Configuration Manager hierarchy in Bing Maps ? CM12 in a Lab - How can I enable Debug View in the Configuration Manager console? CM12 in a Lab - How can I easily prompt for a computer name in Configuration Manager 2012 CM12 in a Lab - Importing Computers using a file CM12 in a Lab - Two New Endpoint Protection Reports added, What are they and what do they look like CM12 in a Lab - How can I setup a Distribution Point on a Windows 7 PC in Configuration Manager 2012 ? CM12 in a Lab - How can I capture an image using Capture Media in Configuration Manager 2012 ? Hierarchy with CAS using System Center 2012 Configuration Manager - Part 1. Installation - CAS using System Center 2012 Configuration Manager - Part 2. Install the Primary server - P01 using System Center 2012 Configuration Manager - Part 3. Configuring Discovery and Boundaries using System Center 2012 Configuration Manager - Part 4. Adding roles and configuring custom Client Device Settings and custom Client User Settings using System Center 2012 Configuration Manager - Part 5. Adding WSUS, Adding the SUP role, deploying the Configuration Manager Client Agent using System Center 2012 Configuration Manager - Part 6. Adding the Endpoint Protection role, configure Alerts and custom Antimalware Policies using System Center 2012 Configuration Manager - Part 7. Build and Capture Windows 7 X64 SP1 using System Center 2012 Configuration Manager - Part 8. Deploying Applications using System Center 2012 Configuration Manager - Part 9. Deploying Monthly Updates using System Center 2012 Configuration Manager - Part 10. Monitoring our Monthly Updates Automatic Deployment Rule using System Center 2012 Configuration Manager - Part 11. Upgrading your hierarchy to Service Pack 1 using System Center 2012 Configuration Manager - Part 12. Connecting Powershell and building a reference image of Windows 8 with .NET 3.5 using System Center 2012 Configuration Manager - Part 13. Deploying Windows 8 X64 with custom Start screen using System Center 2012 Configuration Manager - Part 14. Using Compliance Settings3 points
-
if this is a lab i'd suggest you rebuild the lab (doesn't take long) and before converting the lab to PKI take snapshots of the virtual machines, so you have different states (http/https/e-http) if you cannot do that then you'll have to experiment with removing bindings in IIS for https, removing the certificates to the dp role and more, and removing certificate services, quite a mess, you could basically undo all the settings where you switched to HTTPS back to HTTP2 points
-
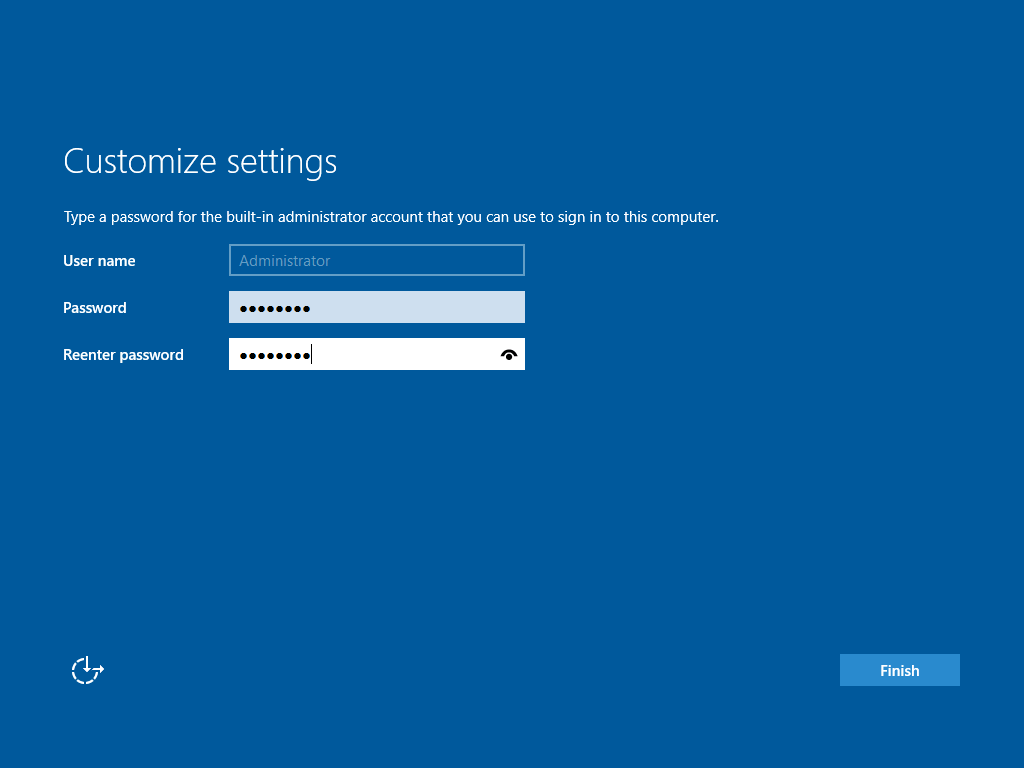
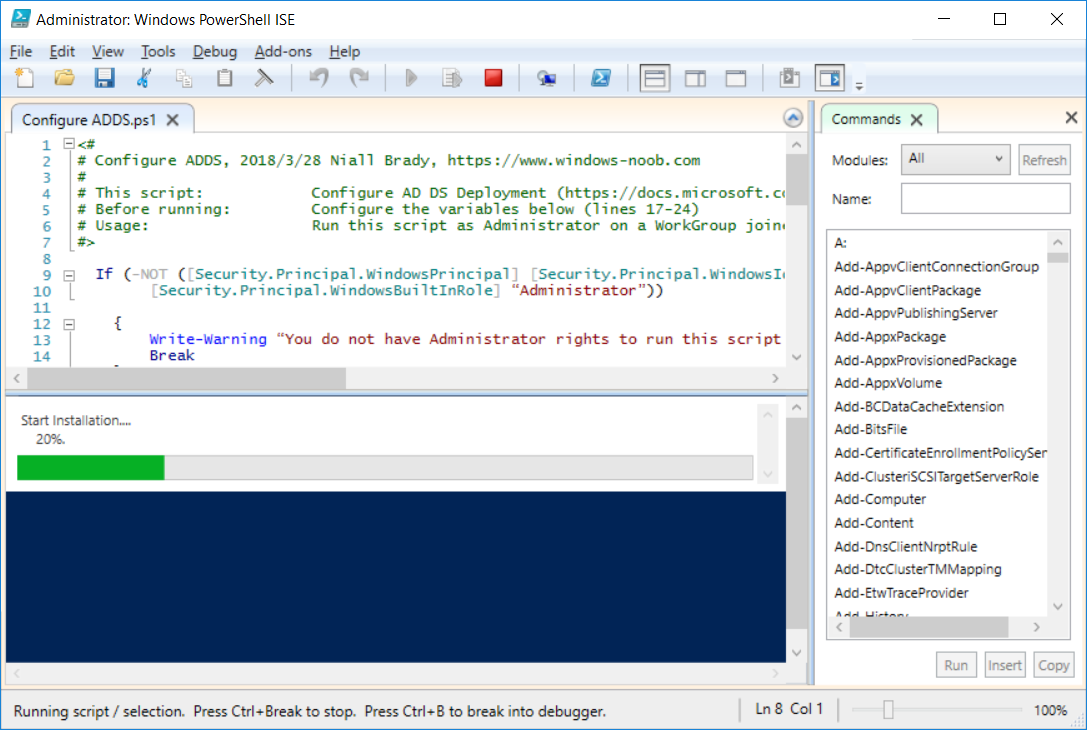
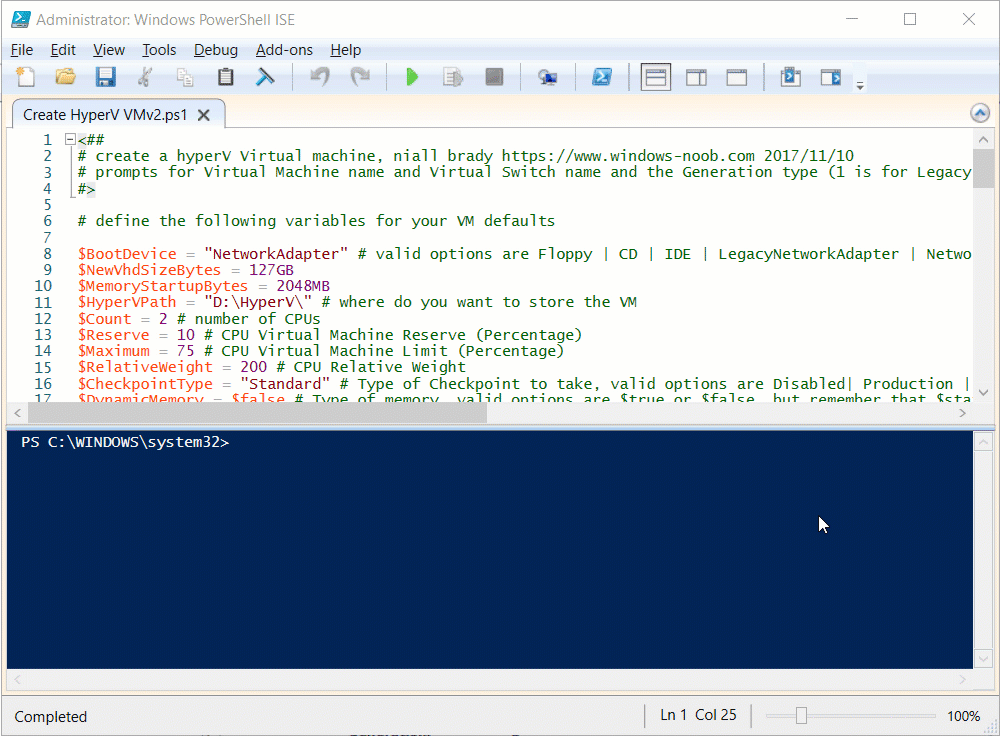
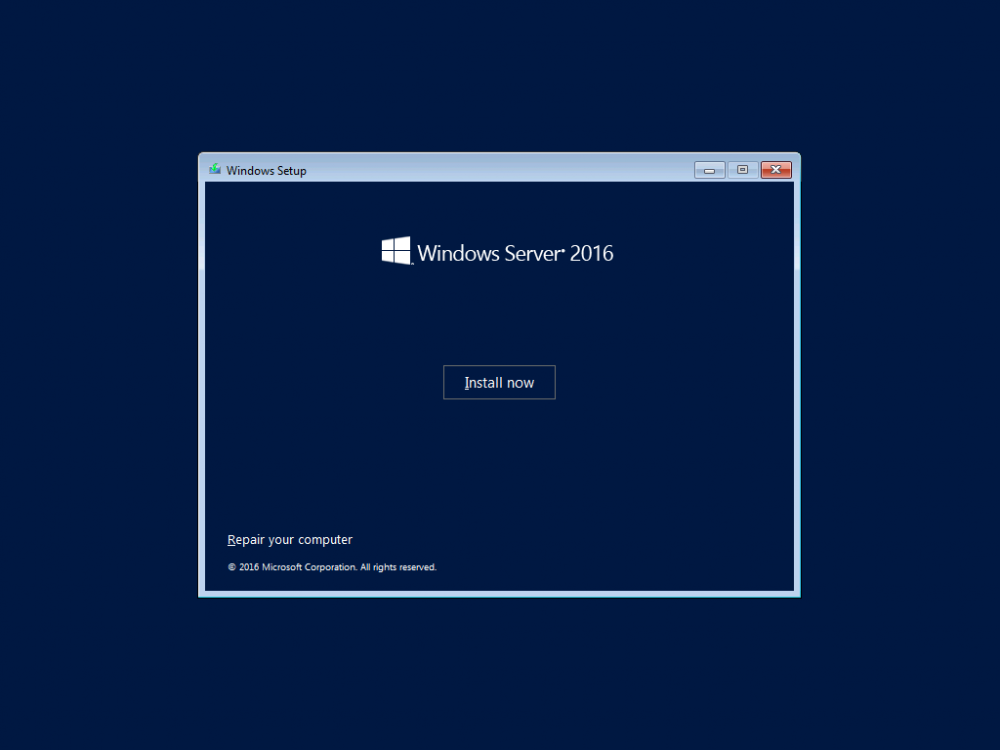
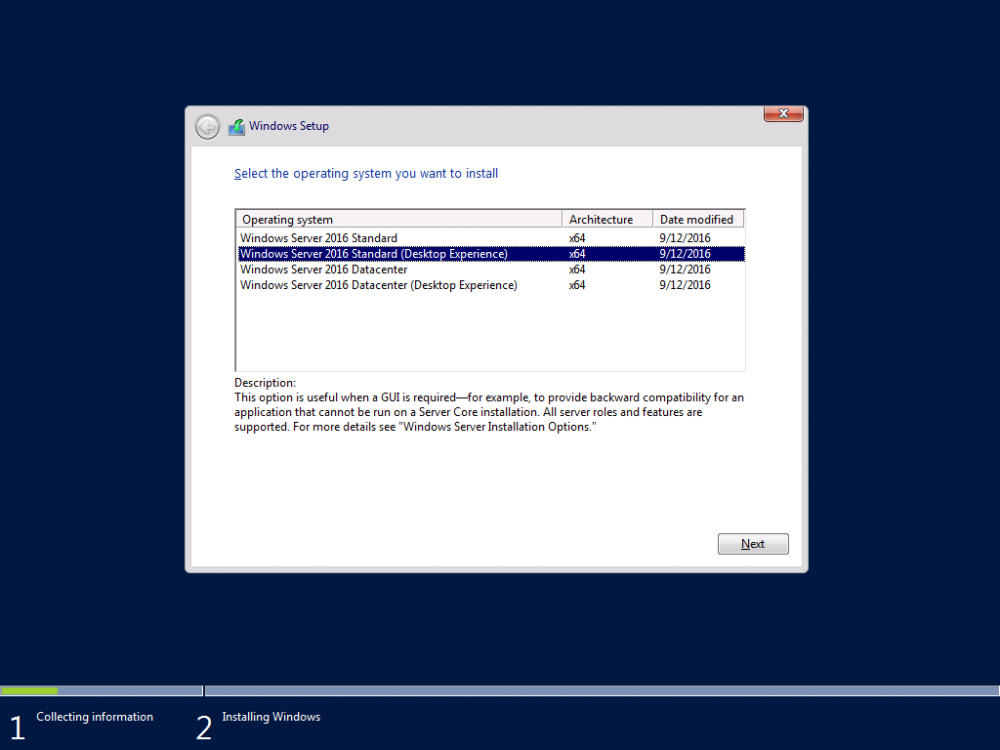
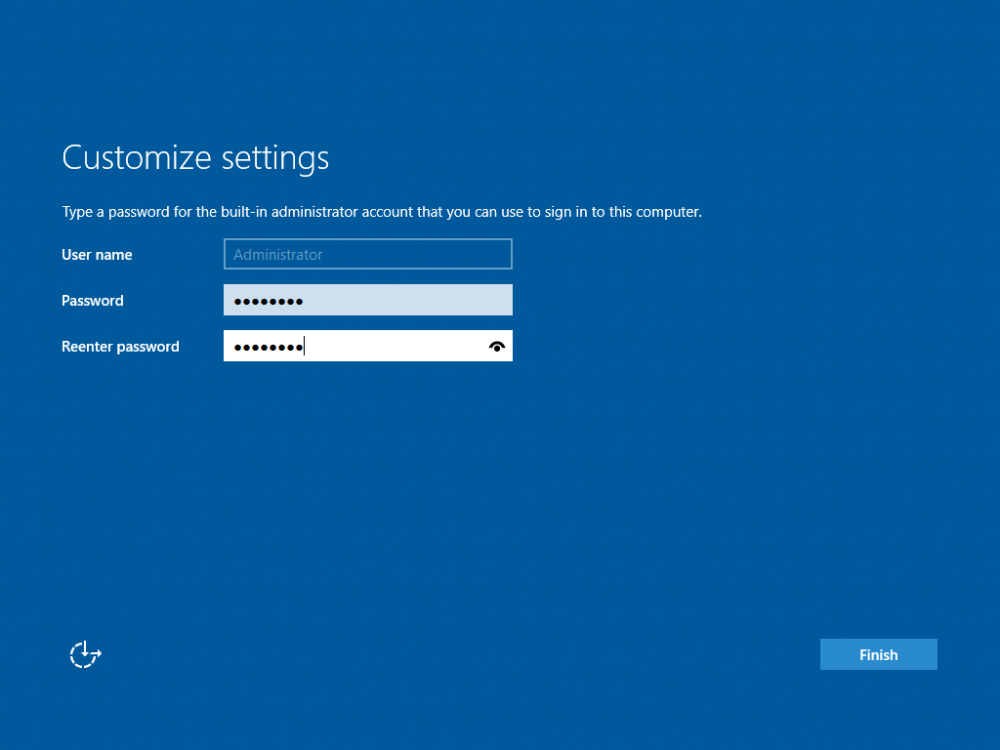
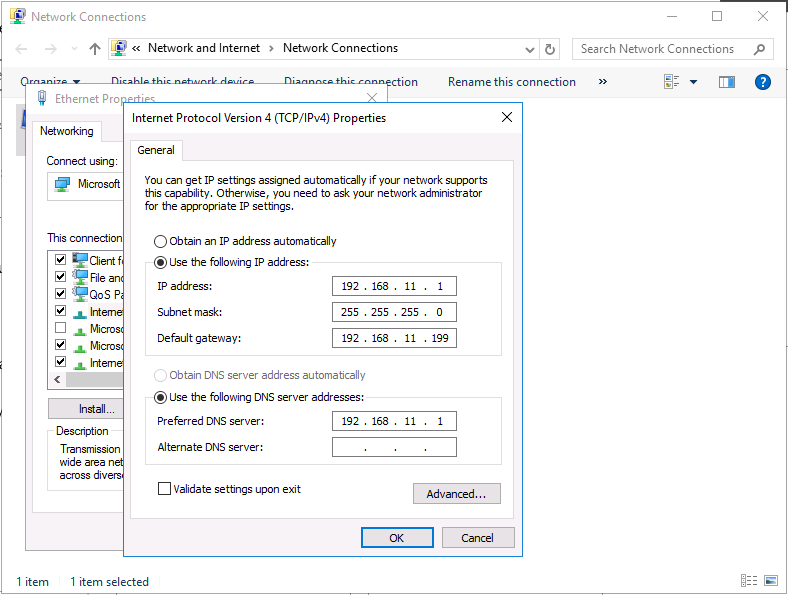
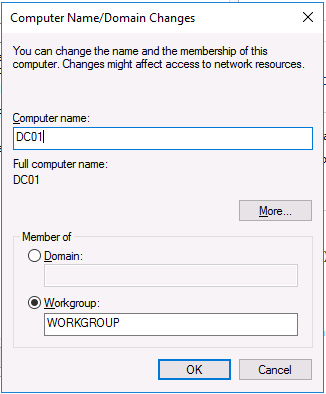
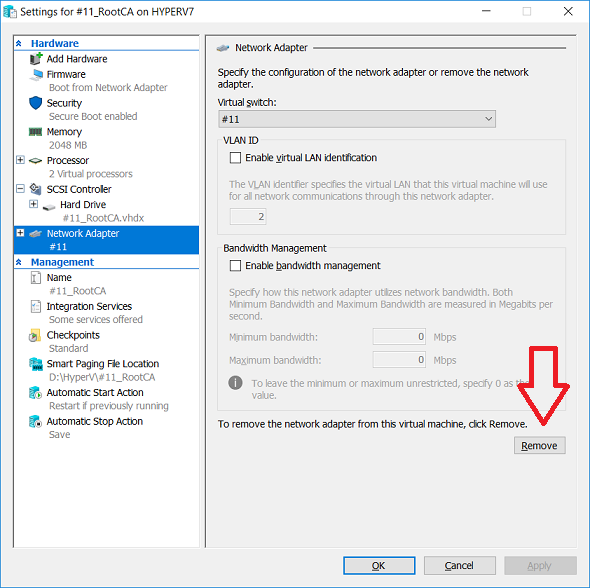
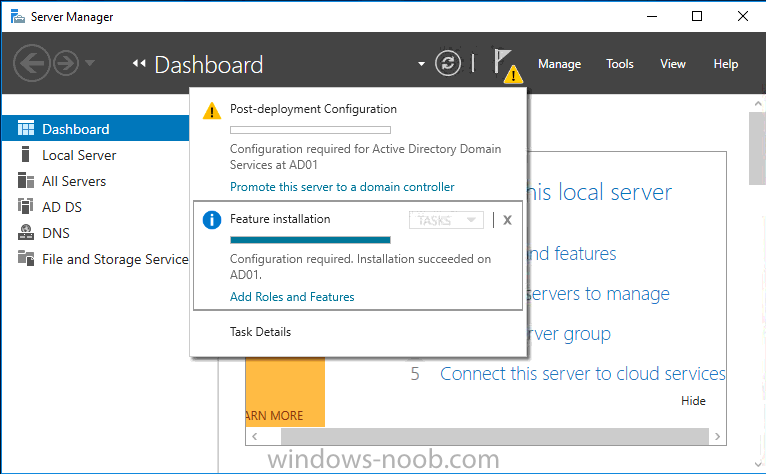
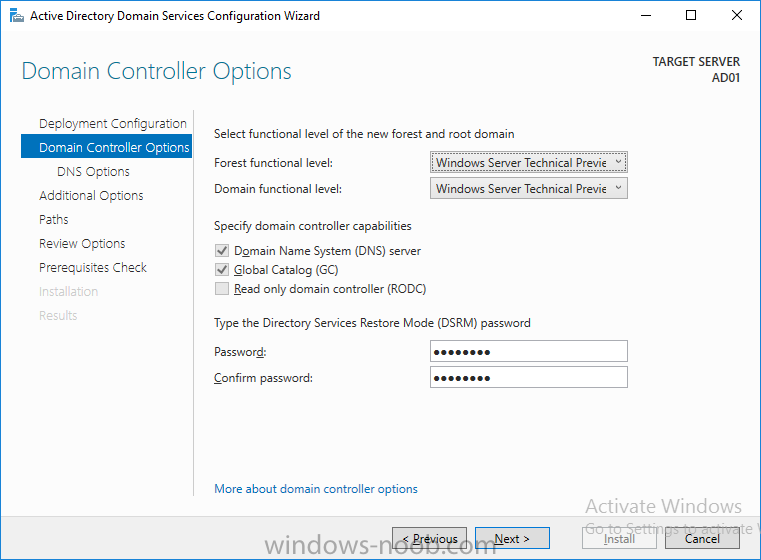
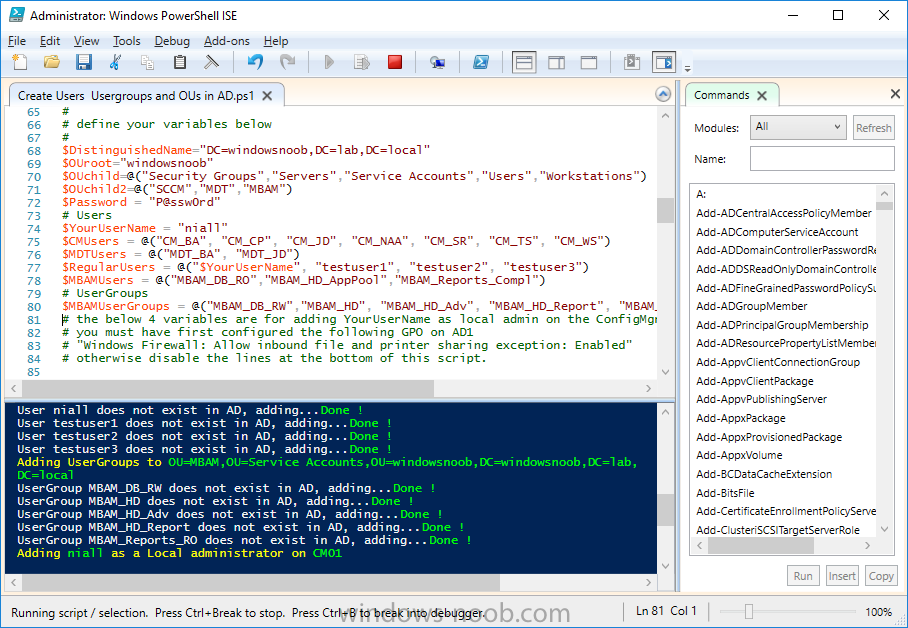
This series is comprised of different parts, listed below. Part 1 - Introduction and server setup (this part) Part 2 - Install and do initial configuration on the Standalone Offline Root CA Part 3 - Prepare the HTTP Web server for CDP and AIA Publication Part 4 - Post configuration on the Standalone Offline Root CA Part 5 - Installing the Enterprise Issuing CA Part 6 - Perform post installation tasks on the Issuing CA Part 7 - Install and configure the OCSP Responder role service Part 8 - Configure AutoEnroll and Verify PKI health Introduction Security is everywhere, and a core component of security is certificates. Public key infrastructure (PKI) is a set of roles, policies, and procedures needed to create, manage, distribute, use, store, and revoke digital certificates and manage public-key encryption (1). In this series of guides I will show you how to set up a 2 tier PKI hierarchy running on Windows Server 2016 and you can use this to set up your own LAB so that you can learn about PKI and later use it for related System Center Configuration Manager roles such as Co-Management (3). Note: I don't claim to be an expert on PKI and would absolutely advise you to consult with a PKI expert if you plan on setting up PKI in production. This guide is designed to help you setup your LAB, it's based on a Windows Server 2012 R2 PKI guide on Technet from here and kudos to those guys for writing it (2). The difference here is you'll be using Windows Server 2016 (or later) and you'll see more screenshots and hints to guide you through the experience. I'd highly recommend you go through this entire series at least twice, just to get a feel for how PKI works and to become familiar with the terms involved. The first time you complete this series will probably feel laborious, however the second time you do it things will start to make sense and you'll have a better understanding of why you are doing it. This series will be tough to wrap your head around especially if you are new to PKI, but take it one part at a time, one step at a time, methodically. If in any doubt, about any of the content then please ask your questions here by starting a new thread. Please note, Microsoft released a new updated PKI guide of their own, here June 2025. By the end of this series of guides you'll have the following setup and running in your windowsnoob.lab.local PKI LAB. Domain Controller (Windows Server 2016) - 192.168.11.1 Issuing CA (Windows Server 2016) - 192.168.11.2 Webserver (Windows Server 2016) - 192.168.11.3 Offline Root CA (Windows Server 2016) Windows 10 (Windows 10 Enterprise, version 1803) - 192.168.11.4 (Optional) Smoothwall NAT (linux) - 192.168.11.199 and MMC based applications like this screenshot from the Enterprise Issuing CA will become familiar to you Before we start the series let's list some of the terms you'll see popping up over and over. I will try to explain them as we move through the guide. PKI - Public Key Infrastructure AIA - Authority Information Access CDP - Certificate revocation list Distribution Point CRL - Certificate Revocation List OCSP - Online certificate status protocol CA - Certificate Authority Note: I'd recommend that you snapshot (checkpoint) the Virtual Machines at the end of each part of this series, so if you make a mistake, you can always back track to a known good state. Step 1. Create the Virtual Machines I use Hyper-V for my labs, as it's a role built into Windows Server 2016 (and even Windows 10), so as long as your computer is relatively new and the hardware supports virtualization, you can use it (simply enable the role, reboot, and start using it). You should have at least 16GB of ram and 500GB of SSD storage to set this lab up comfortably. To quickly create the virtual machines I use a PowerShell script which I wrote, you can download it here. Download the script - Create HyperV VMv2.ps1 Virtual Machine Names For this LAB, please use the following naming convention for your virtual machines (note this is not the computer name but the virtual machine name). #11_DC01 #11_IssuingCA #11_RootCA #11_W10_1803 #11_Webserver #11_Smoothwall Note: The #11 prefix is simply a method I use in Hyper-V to separate my labs visually in Hyper-v manager, so #11 is one lab, and #10 is another (and so on). You don't have to use the same convention as I do, but it would make it easier for you to follow the entire series. I use the Smoothwall linux based NAT to provide Port Forwarding capability and to share internet into my various LABs. Virtual Machine Roles The Virtual Machines created will have the following functions #11_DC01 Roles: DC, DNS, LDAP CDP,AIA #11_IssuingCA Roles: Enterprise Issuing CA #11_RootCA Roles: Standalone Offline Root CA #11_W10_1803 Roles: A Windows client #11_Webserver Roles: Webserver HTTP CDP, AIA #11_Smoothwall Roles: Port Forward, Internet sharing Note: When prompted for a network switch, create a unique one (#11) for the first VM created, and use the same one for each of the other vm's (we will remove the network from the Offline Root CA). For generation type, use Gen 2. Below is how I created the virtual machines listed above. Note: After creating the virtual machines and before installing Windows Server 2016 on the Offline Root CA, you must remove the Network Card for the Offline Root CA virtual machine as it should not be connected to any network. Step 2. Install the virtual machines Install Server 2016 On DC01, RootCA, IssuingCA and Webserver, install Windows Server 2016. It's up to you how to do this, you can use an Automated MDT PowerShell script, or install them manually. To install all Windows Server 2016 on all 4 servers as WorkGroup joined computers do as follows.. Choose Windows Server 2016 Standard (Desktop Experience) Continue through the installation wizard until prompted for a password, use P@ssw0rd as the Administrator password Click Finish. And then logon using the Administrator username and password configured above. Once Windows is installed, set the IP address for each virtual machine as shown below. Note: Below are the Computer Name and IP addresses used in this guide. For the Offline Root CA, you must remove the Network card in the Hyper-V virtual machine settings. Computer Name: DC01, IP address: 192.168.11.1, Subnet mask 255.255.255.0, Default gateway: 192.168.11.199, Preferred DNS server: 192.168.11.1 Computer Name: IssuingCA, IP address: 192.168.11.2, Subnet mask 255.255.255.0, Default gateway: 192.168.11.199, Preferred DNS server: 192.168.11.1 Computer Name: Webserver, IP address: 192.168.11.3, Subnet mask 255.255.255.0, Default gateway: 192.168.11.199, Preferred DNS server: 192.168.11.1 Computer Name: RootCA, IP: <NO NETWORK> Computer Name: W101803, IP address: 192.168.11.4, Subnet mask 255.255.255.0, Default gateway: 192.168.11.199, Preferred DNS server: 192.168.11.1 Computer Name: smoothwall11, IP address: (Green, static) 192.168.11.199 (Red, DHCP internet IP) x.x.x.x Here's how you can set the IP address for DC01. And configure the Computer Name as per the list (in this example it's for the Domain Controller) Reboot when prompted. Install Windows 10 Enterprise version 1803 Install Windows 10 Enterprise, version 1803 on the remaining virtual machine (#11_W10_1803). Configure the Computer Name and IP address as specified. Leave it WorkGroup joined. Optionally install Smoothwall To learn how to setup Smoothwall express as a firewall see this blog post. Step 3. Configure ADDS on DC01 Now that you've installed the servers, it's time to make DC01 a domain controller, to do that we'll install Active Directory Domain Services (ADDS) and to do that we'll use this PowerShell script, simply run the script as Administrator in Windows PowerShell ISE on DC01. Download the script -Configure ADDS.ps1 After running the script, DC01 is prompted to a Domain Controller and is ready for the next part of this series. Note: Please only run this script on the DC01 virtual machine. After running the script, the Domain Controller is ready for Part 2 (configured as dc01.windowsnoob.lab.local) and internet is working (via the Smoothwall) To continue with Part 2 of this series, click here. Recommended reading (1) - https://en.wikipedia.org/wiki/Public_key_infrastructure (2) - https://social.technet.microsoft.com/wiki/contents/articles/15037.ad-cs-step-by-step-guide-two-tier-pki-hierarchy-deployment.aspx (3) - https://docs.microsoft.com/en-us/sccm/core/clients/manage/co-management-overview


 2 points
 -
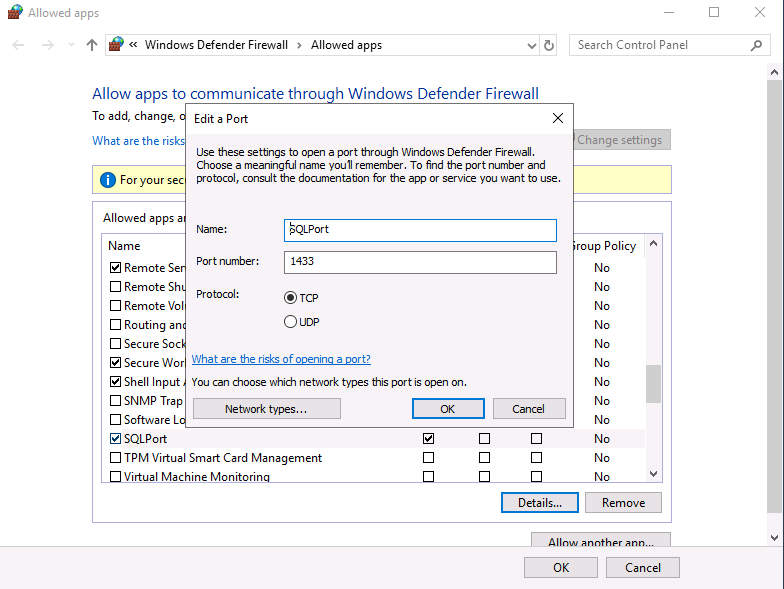
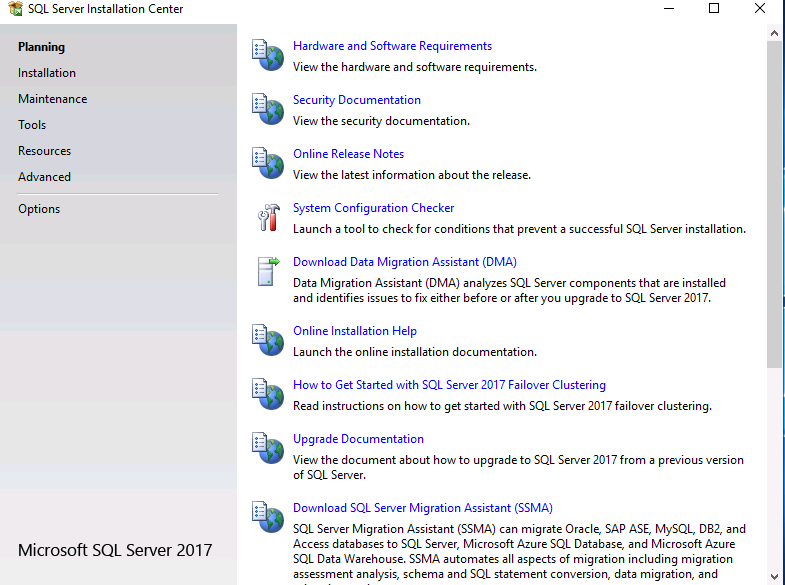
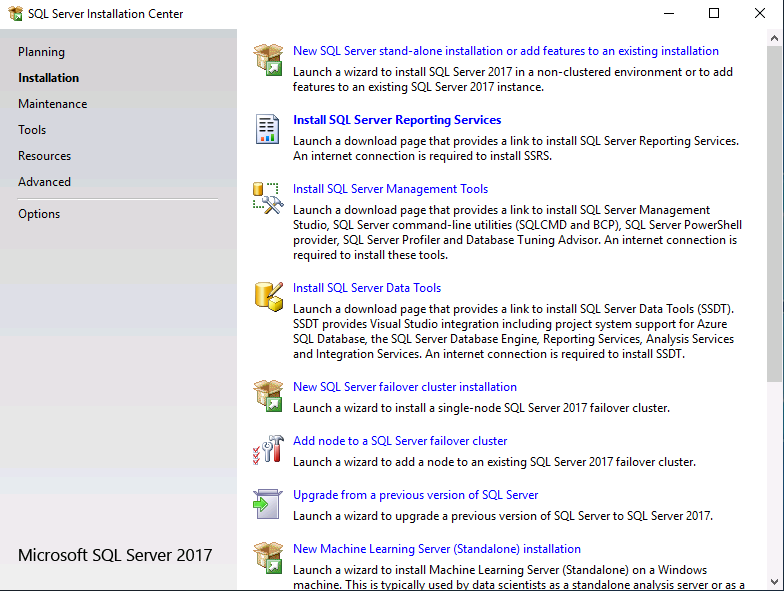
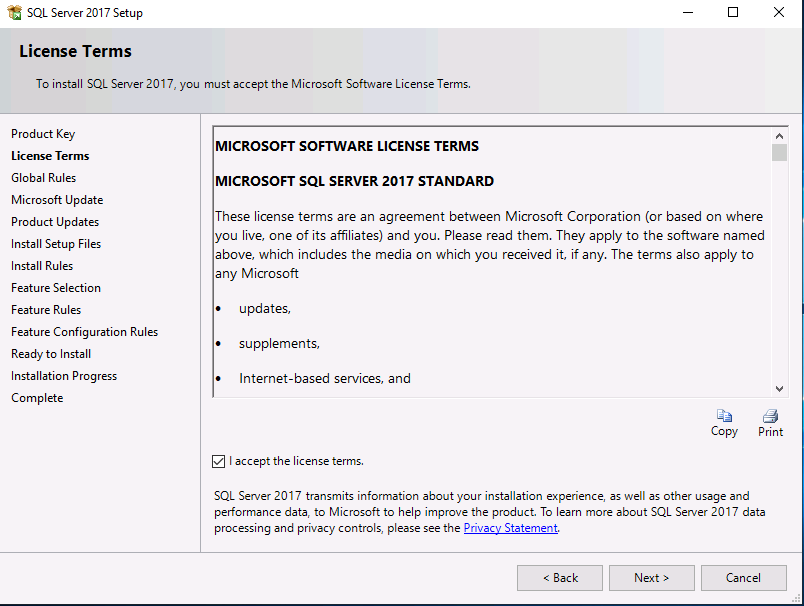
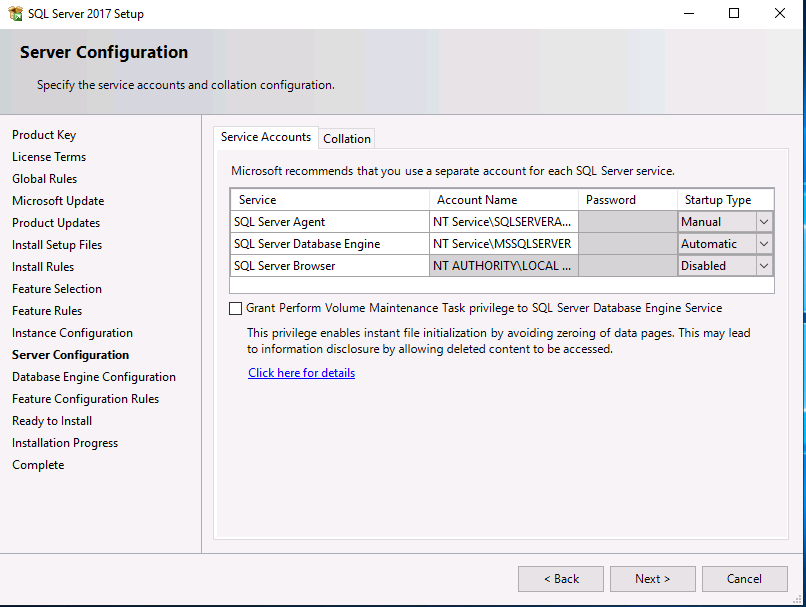
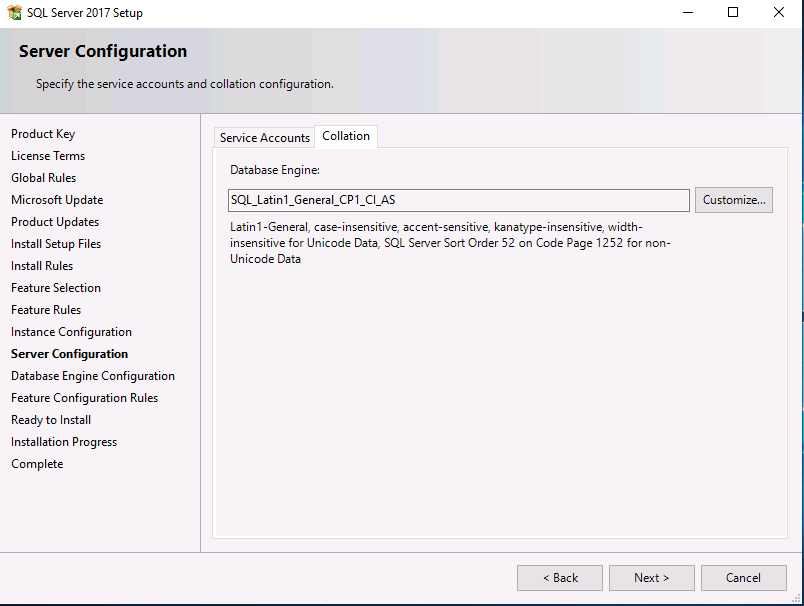
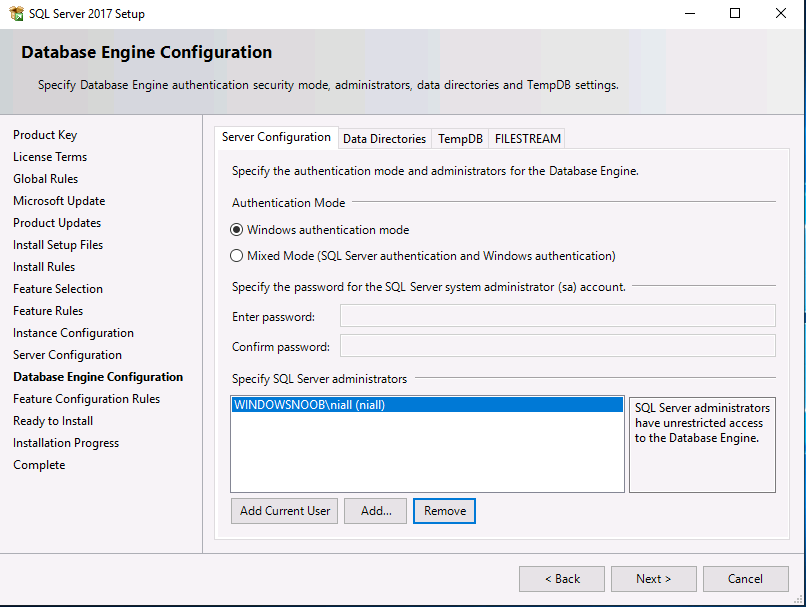
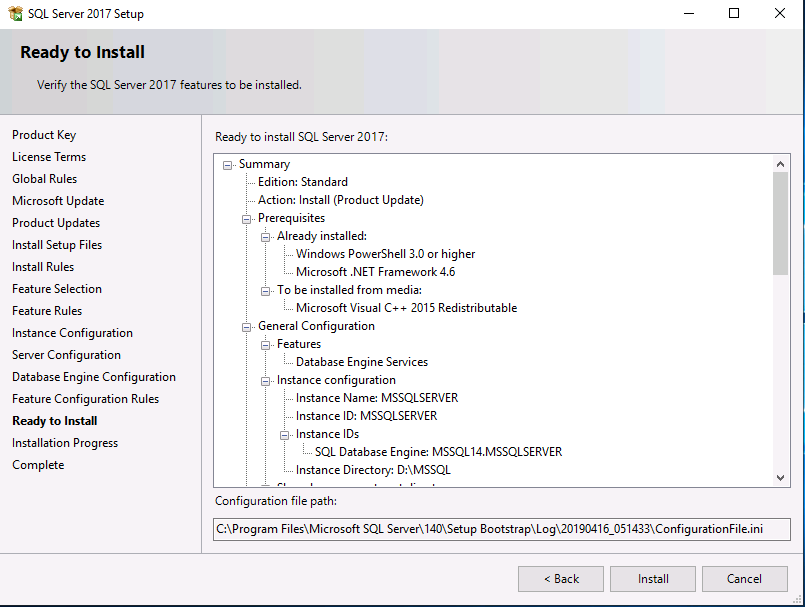
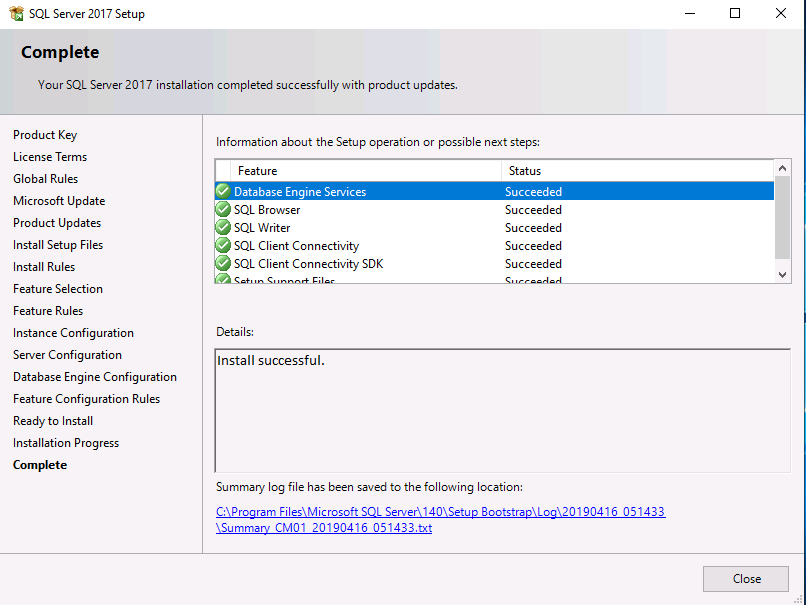
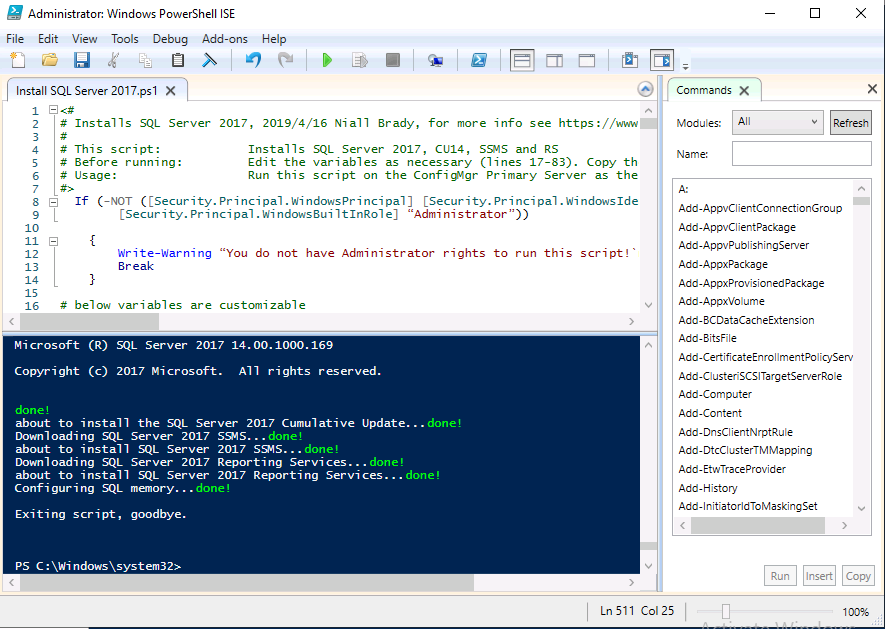
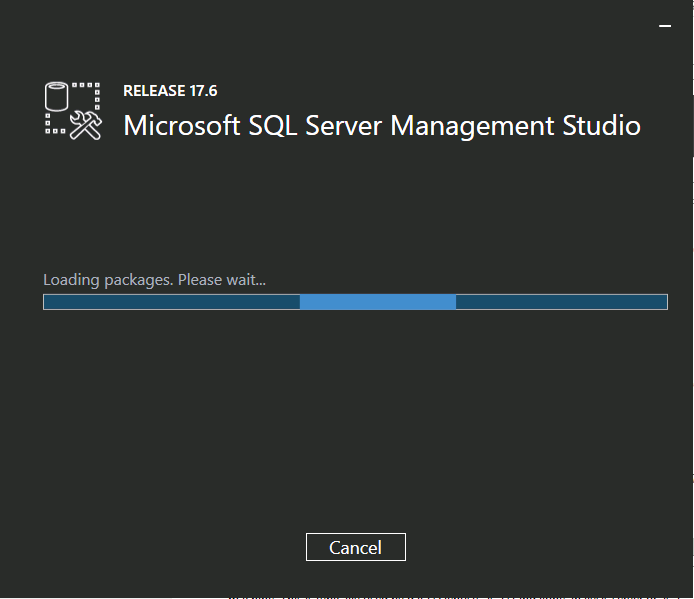
Introduction This multi-part guide will show you how to install the latest baseline version of Configuration Manager from Microsoft. The latest available baseline version is System Center Configuration Manager (Current Branch) version 1902 as of April the 10th 2019. I blogged how to upgrade to 1902 here. This guide is aimed a new installations of SCCM. Baseline media is used to install new ConfigMgr sites or to upgrade from supported versions, for more information about baseline media please see my blog post here. Note: The SCCM 1902 Current Branch media is not yet available on MSDN or VLSC. When the new baseline media is released I'll update this note. This series is broken down into the following parts:- Part 1 - Get the lab ready, configure ADDS Part 2 - Join CM01 to Domain, add users, create the Systems Management container, delegate permission Part 3 - Role and Feature installation, installation of WDS and ADK Part 4 - Configure and install SQL Server 2017 (This part) Part 5 - Configure and install SCCM 1902 Current Branch Part 6 - Post configuration You can use this multi-part guide to get a hierarchy up and running on Windows Server 2019 using SQL Server 2017. The concept behind this is to guide you through all the steps necessary to get a working Configuration Manager Primary site installed (for lab use) using manual methods or automated using PowerShell. This gives you the power to automate the bits that you want to automate, while allowing you to manually do other tasks when needed. You decide which path to take. PowerShell knowledge is desired and dare I say required if you are in any way serious about Configuration Manager. I will show you how to do most steps via two methods shown below, it's up to you to choose which method suits you best but I highly recommend automating everything that you can, using PowerShell. Method #1 - Do it manually Method #2 - Automate it with PowerShell Downloads The scripts used in this part of the guide are available for download here. Unzip to C:\Scripts. The scripts are placed in the corresponding folder (Part 1, Part 2 etc) and sorted into which server you should run the script on (DC01 or CM01). Scripts.zip Step 1. Install SQL Server 2017 Note: Perform the following on the Configuration Manager server (CM01) as a Local Administrator, I'd suggest you logon as the username matching your name. Method #1 - Do it manually In this section you will install SQL Server 2017 CU14 which is the latest supported version of SQL Server that is compatible with SCCM 1902 Current Branch as of 2019/4/16. For details about which versions of SQL Server are supported with different site systems in ConfigMgr, please see this page. Before starting, please configure the firewall as described in https://go.microsoft.com/fwlink/?linkid=94001 to allow access to SQL Server through the firewall. You can do this by executing the following command as local administrator on the CM01 (ConfigMgr) server. netsh advfirewall firewall add rule name = SQLPort dir = in protocol = tcp action = allow localport = 1433 remoteip = localsubnet profile = DOMAIN After configuring the firewall, browse to the drive where the SQL Server 2017 media is, and run setup.exe. The SQL Server Installation Center wizard will appear. Click on Installation and then choose New SQL Server standalone installation or add features to an existing installation. Enter the Product Key or use the evaluation version if that's what you want to use. Note: The product key will be automatically filled in for licensed media downloaded from Microsoft Volume Licensing Service Center. Accept the EULA Make your Microsoft Update choices and review your Install rules, as long as you've opened the correct port for SQL you'll be ok and can safely ignore the Warning about the Firewall. select the SQL server instance features you need (at least Database Engine Services) and if necessary change the drive letter where you intend to install it And configure the Instance Configuration or just leave it as default Verify the Service Accounts settings and for Collation (click on the Collation tab in Server Configuration), make sure the collation is set to SQL_Latin1_General_CP1_CI_AS For Database Engine Configuration, click on Add Current User After configuring Data Directories, TempDB and Filestream settings you are ready to install Click on Install to start the installation of SQL Server 2017, and once it's completed, click Close. Next download and install the following: SQL Server 2017 Cumulative Update 14. SQL Server 2017 SSMS here. SQL Server 2017 Reporting Services. Method #2 - Automate it with PowerShell Note: Make sure your SQL Server 2017 media is in the drive specified in the script or edit the script to point to the new location of the media. The script set's the installation path pointing at D:\MSSQL if you want to install SQL somewhere else please change the variables as appropriate. To install SQL Server 2017 use the Install SQL Server 2017.ps1 script. The script will create a ConfigurationFile.ini used to automate the installation of SQL Server 2017, and after it's installed the script will download the SSMS executable (Management Studio) and install it. Then it will download Reporting Services and install it. If either of the EXE's are in the download folder, it will skip the download and just install. SQL Server no longer comes with the Management Studio or Reporting Services built in, and they are offered as separate downloads, don't worry though, my PowerShell script takes care of that for you. 1. Extract the scripts to C:\Scripts on CM01 and load the Install SQL Server 2017.ps1 script located in C:\Scripts\Part 4\CM01 2. Edit the variables [lines 17-81] as desired before running. 3. Logon as the user specified in line 20. 4. Start Windows PowerShell ISE as Administrator and run the script by clicking on the green triangle. Done ! That's it for this part, please join me in Part 5 where we Configure and Install System Center Configuration Manager 1902.


 2 points
 -
Hi, I reviewed the Task Sequence (for which thanks a million!) and I believe the reason for 'error 87:parameter is not correct' in two of the steps you disabled for the time being is the wrong dism parameter: DISM.exe /image:%OSDisk%\ /Set-UILanguage:%OSDUILanguage% that should be-> DISM.exe /image:%OSDisk%\ /Set-UILang:%OSDUILanguage% Similarly Set-UILanguageFallback should be changed to Set-UILangFallback. I did not have enough time to test that one myself yet but according to DISM documentation Set-UILang is the parameter name that exists.2 points
-
I was able to Solve my authenticate issue. While running the site install Powershell script, I had to give the group names as the Pre-Windows 2000 as they differed slightly.2 points
-
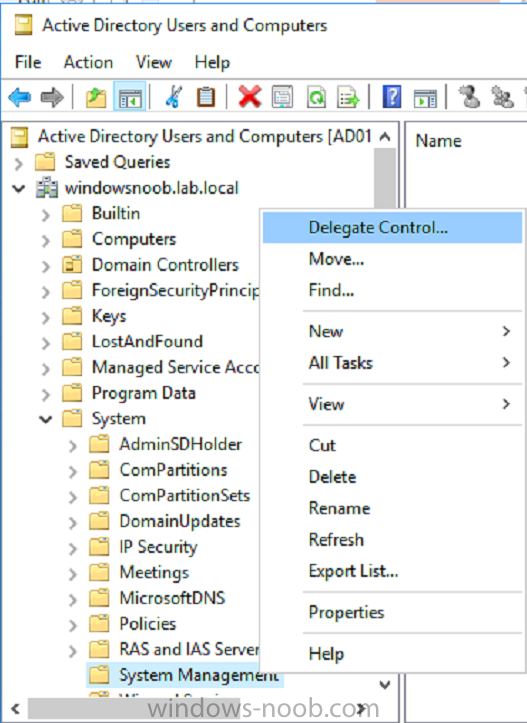
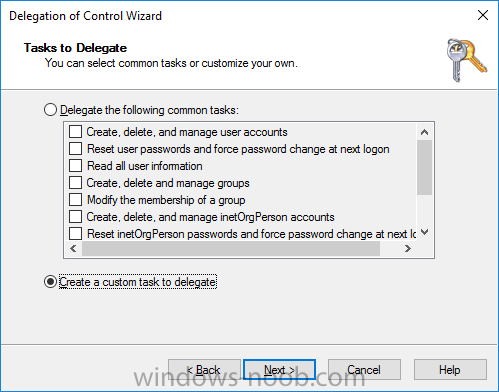
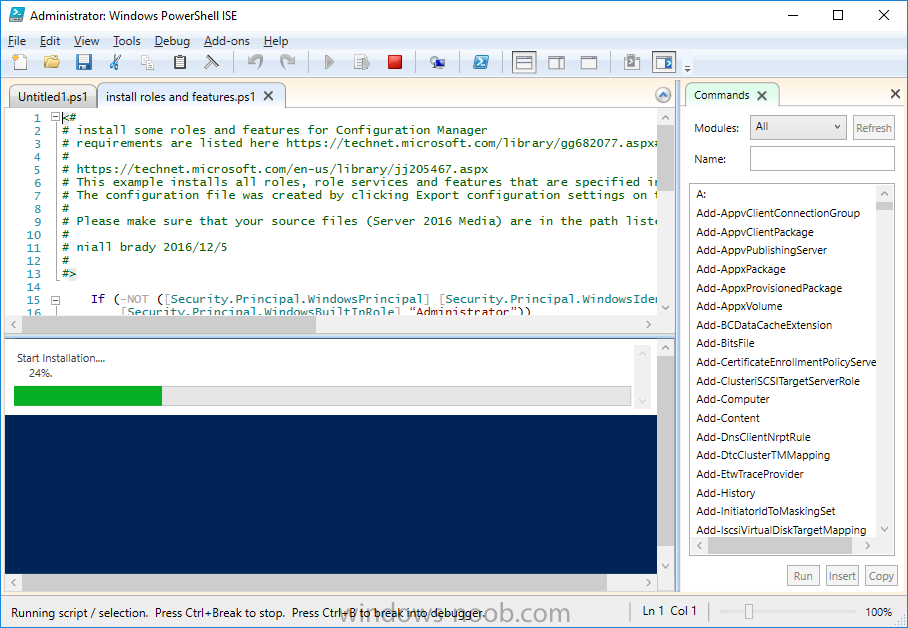
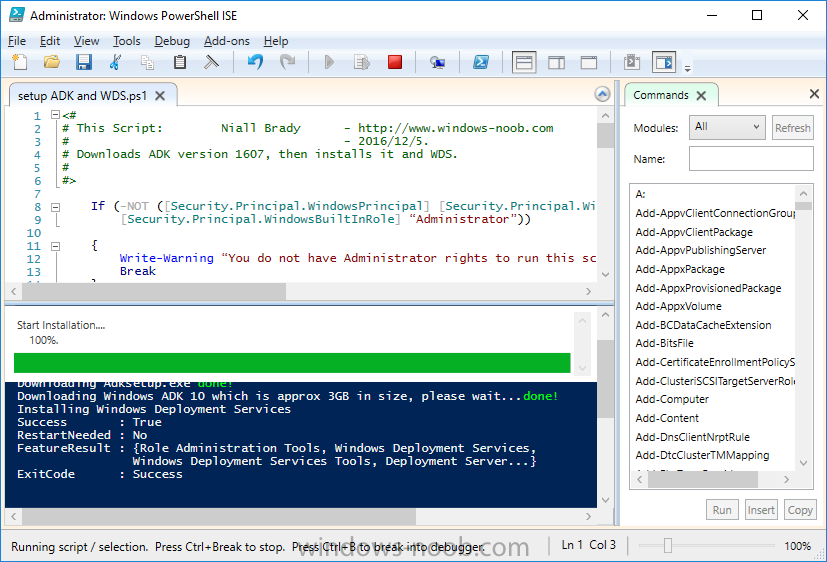
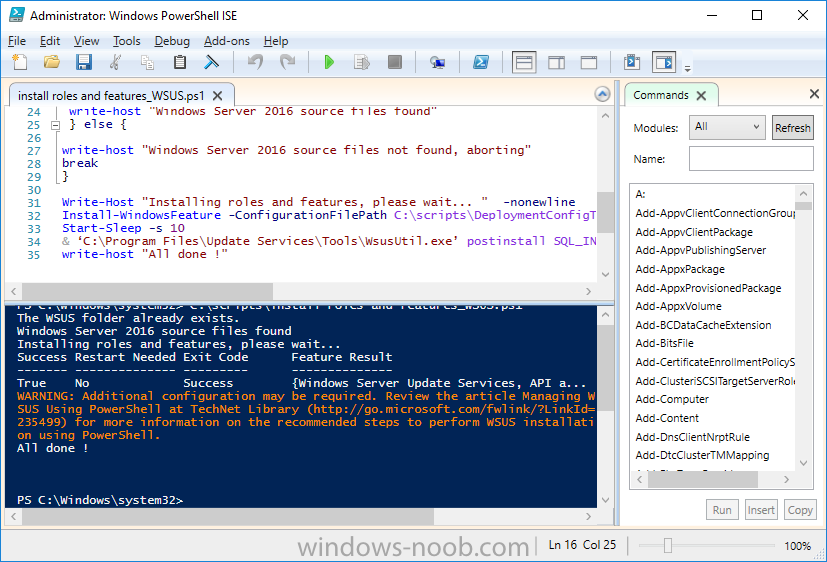
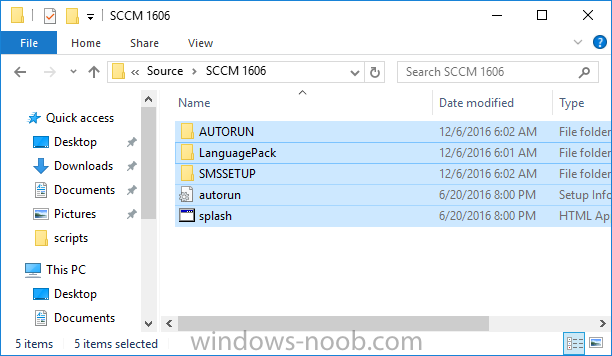
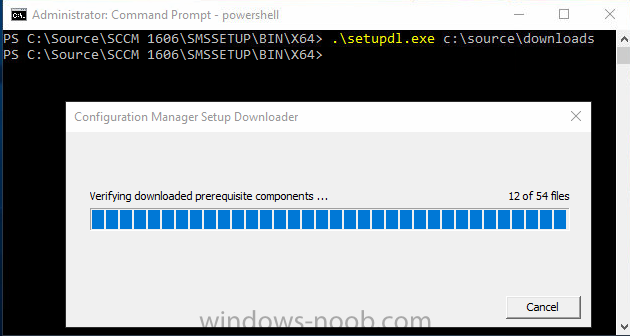
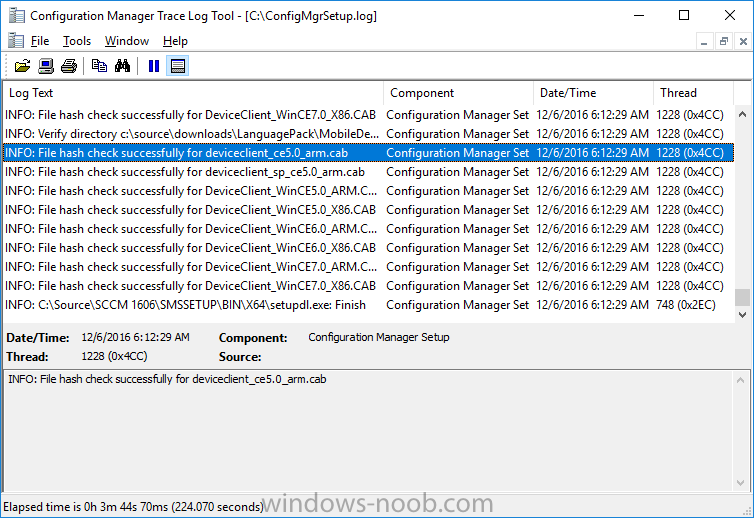
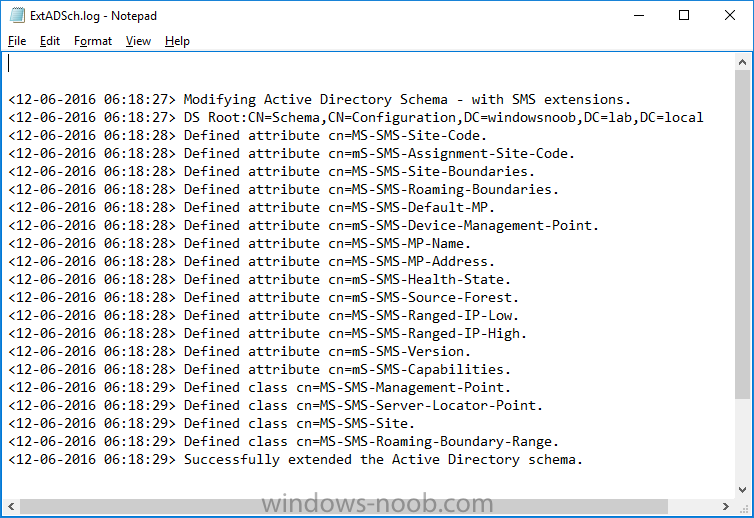
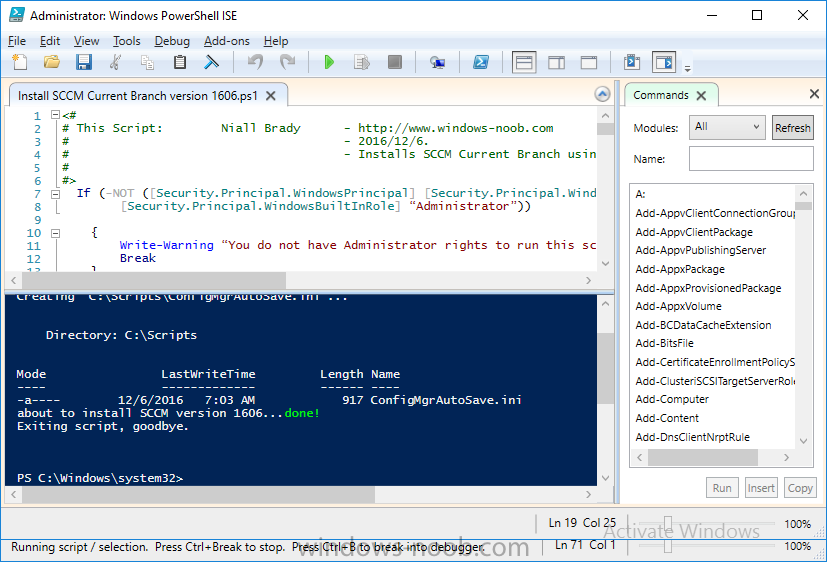
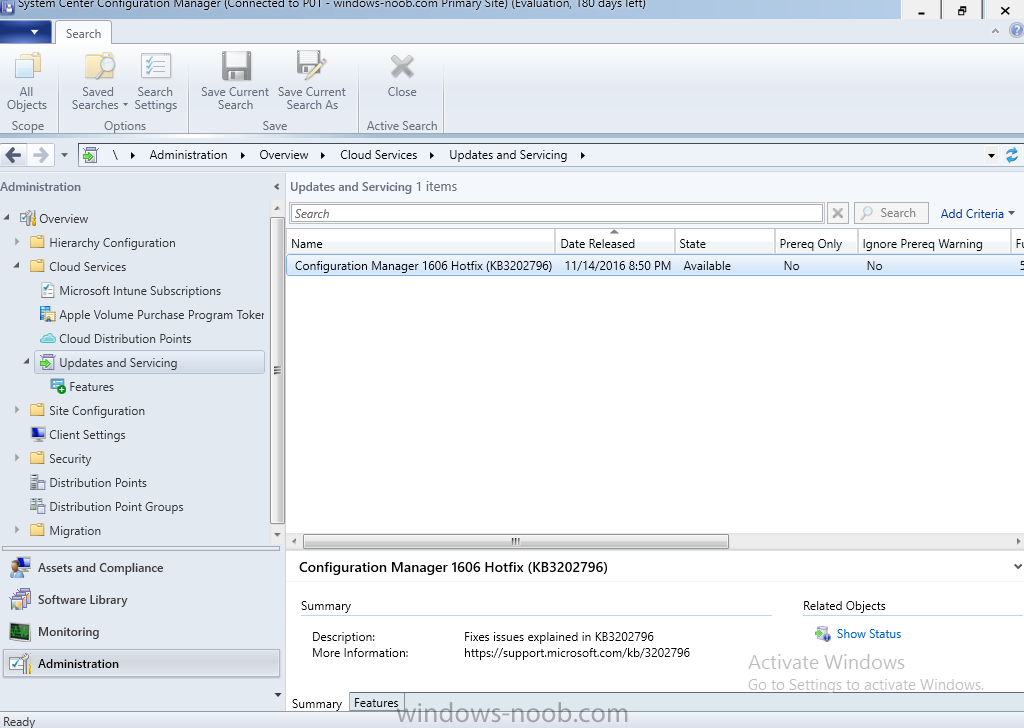
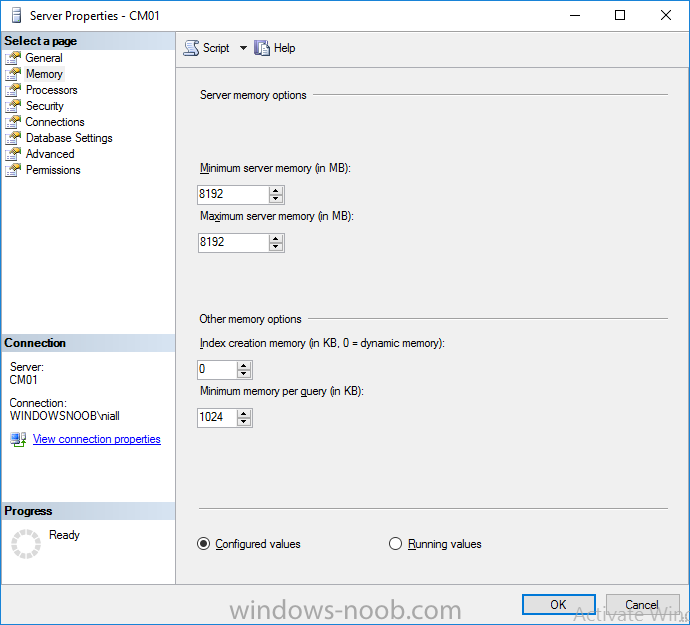
Update: please see this updated guide for SCCM 1802 CB, with SQL Server 2017. Introduction In a previous guide I showed you how to install System Center Configuration Manager version 1511 (Current Branch) on Windows Server 2012R2. Times are changing fast in this cloud-first mobile-first world, and as a result the System Center Configuration Manager (Current Branch) releases are being released rapidly. In addition to these releases are new Windows Server and SQL Server releases. Now that these new releases are all supported to run together, this guide will show you how to quickly install System Center Configuration Manager version 1606 (Current Branch) on Windows Server 2016 using SQL Server 2016, and then upgrade it to System Center Configuration Manager version 1610 (Current Branch). We use System Center Configuration Manager version 1606 (Current Branch) in this guide as it is the latest baseline version available on Microsoft's Volume License Service Center site (as of time of writing, December 2016). Some PowerShell knowledge is desired. I will show you how to do most actions manually as well as automated. Assumptions In this guide I assume you have already installed two workgroup joined servers running Windows Server 2016 (choose Windows Server 2016 Standard (Desktop Experience)) as listed below, and that you've configured the network settings. I also assume you have some knowledge of PowerShell, if you don't, start learning it now ! Server name: AD01 Server status: Workgroup joined IPv4 Address: 192.168.4.1 Subnet Mask: 255.255.255.0 Default Gateway: 192.168.4.199 DNS: 192.168.4.1 Server name: CM01 Server status: Domain joined IPv4 Address: 192.168.4.2 Subnet Mask: 255.255.255.0 Default Gateway: 192.168.4.199 DNS: 192.168.4.1 Server name: Smoothwall Server roles: A Linux firewall for sharing internet into these virtual machines, in hyperv you can add two legacy nics to achieve this. Scripts used in this guide The scripts used in this guide are available at the bottom of the guide in the Downloads section, download them before beginning and extract them to C:\scripts on your destination server(s). Step 1. Configure Active Directory Domain Services (ADDS) Note: Perform the following on the AD01 as Local Administrator on the workgroup joined server. To setup Active Directory Domain Services you could manually click your way through the appropriate wizard in Server Manager or automate it using PowerShell. For your benefit I'll show you both methods below, all you have to do is choose which one suits you. Method #1 - Do it manually 1. To manually setup ADDS, in the start screen search for Server Manager 2. Click on Add roles and features, for Installation Type choose Role-based or Feature-based installation 3. For Server Selection choose the local server (AD01) 4. For Server Roles select Active Directory Domain Services and DNS Server, answer yes to install any required components. 5. Continue the the wizard and click Install, then click Close to complete the wizard. 6. After it's finished, perform the Post Deployment Configuration by clicking on Promote this server to a domain controller select the Add a new forest option, give it a root domain name such as windowsnoob.lab.local and click through the wizard, when prompted for the password use P@ssw0rd. Method #2 - Automate it with PowerShell To configure ADDS automatically, use the ConfigureADDS.ps1 PowerShell script. 1. Copy the script to C:\scripts. 2. Edit the variables as desired before running. 3. Start Windows PowerShell ISE as Administrator and run the script by clicking on the green triangle. Step 2. Join CM01 to the domain Note: Perform the following on the CM01 as Local Administrator on the workgroup joined server. Method #1 - Do it manually To join the domain manually, bring up the computer properties. Click on Change settings beside the computer name, click Change and enter the appropriate domain join details, reboot when done. Method #2 - Automate it with PowerShell To join the domain automatically, use the joindomain.ps1 PowerShell script. 1. Copy the script to C:\scripts. 2. Edit the variables as desired before running. 3. Start Windows PowerShell ISE as Administrator and run the script by clicking on the green triangle. Step 3. Create users Note: Perform the following on the Active Directory Domain Controller server (AD01) as Local Administrator You can do this step manually or automated using the supplied PowerShell script. Method #1 - Do it manually To create users manually, add the following users in AD using Active Directory Users and Computers: * <your user name>, a domain user, this user will become a local administrator on CM01 * Testuser, a domain user * CM_BA, used for building ConfigMgr created images * CM_JD, used for joining computers to the domain * CM_SR used for reporting services. * CM_CP, a domain user used when installing the Configuration Manager Client for Client Push. * CM_NAA, a domain user, (Network Access Account) used during OSD Method #2 - Automate it with PowerShell To create users automatically, use the Create Users Usergroups and OUs in AD.ps1 PowerShell script. Tip: You need to edit the script and adjust the variables to your liking, for example if you want to change the default password. You may also want to rem out the MDT and MBAM user/groups that are created and change some of the user names within the script. To rem out a line place a # in front of it. 1. Copy the script to C:\scripts. 2. Edit the variables [lines 68-80] as desired before running. 3. Start Windows PowerShell ISE as Administrator and run the script by clicking on the green triangle. After running the PowerShell script in Windows PowerShell ISE you'll see something like the following. Step 4. Create the System Management Container Note: Perform the following on the Active Directory Domain Controller server (AD01) as Local Administrator For details of why you are doing this see https://technet.microsoft.com/en-us/library/gg712264.aspx. Method #1 - Do it manually Open ADSI Edit, click on Action, Connect To and click Ok, Double Click on Default Naming Context and the DC= that appears below it. Click on the + and scroll down to CN=System. Right Click on CN=System and choose New, Object, choose Container from the options, click Next and enter System Management as the value as shown below Method #2 - Automate it with PowerShell To create the System Management container automatically, use the Create System Management container.ps1 PowerShell script. Step 5. Delegate Permission Note: Perform the following on the Active Directory Domain Controller server (AD01) as Local Administrator Method #1 - Do it manually Open Active Directory Users and Computers. Click on view, select Advanced Features. Select the System Management Container, and right click it, choose All Tasks and Delegate Control. When the Welcome to Delegation of Control Wizard appears click next, then click Add. click on Object Types, select Computers. Type in your Configuration Manager server name (CM01) and click on Check Names, it should resolve. Click Ok, then Next. Choose Create a Custom Task to Delegate, click next, make sure This folder, existing objects in this folder and creation of new objects in this folder is selected. Click next, select the 3 permissions General, Property-Specific and Creation-deletion of specific child objects are selected then place a check mark in Full Control. Tip: Repeat the above process for each site server that you install in a Hierarchy. Method #2 - Automate it with PowerShell To delegate permissions to the System Management container automatically, use the Delegate Permissions.ps1 PowerShell script on CM01. That's right, on the ConfigMgr server. Step 6. Install Roles and Features on CM01 Note: Perform the following on the Configuration Manager server (CM01) as a Local Administrator To support various features in System Center Configuration Manager, the setup wizard requires some Server Roles and Features pre-installed. On CM01, login as the username you added to the Local Administrators group and navigate to C:\scripts. The XML files within the Scripts Used in This Guide.zip were created using the Export Configuration File option in Server Manager after manually installing roles and features and the accompanying PowerShell script simply installs it. Note: Make sure your Server 2016 media is in the drive specified in the script or edit the script to point to the location of the media. Method #2 - Automate it with PowerShell To install the roles and features needed, start Windows Powershell ISE as Administrator and run the install roles and features.ps1 script. Step 7. Download and install Windows ADK 10 version 1607 Note: Perform the following on the Configuration Manager server (CM01) as a Local Administrator The ConfigMgr prerequisite checker will check for various things, including ADK components such as USMT and Windows Preinstallation Environment (amongst others), therefore you need to install Windows ADK on your server. To do so, either download ADKsetup from here and manually install it or run the setup ADK and WDS.ps1 PowerShell script to download and install the correct components for you. This script not only downloads the components needed, it's also installs ADK 10 and then installs Windows Deployment Services. The setup ADK and WDS.ps1 PowerShell script is available in the Scripts Used in this Guide zip file. Method #2 - Automate it with PowerShell To download and then install Windows ADK 10 with the components needed, start Windows Powershell ISE as Administrator and run the setup ADK and WDS.ps1 script. Step 8. Install SQL Server 2016 Note: Perform the following on the Configuration Manager server (CM01) as a Local Administrator The following script will create a ConfigurationFile.ini used to automate the installation of SQL Server 2016, and after it's installed the script will download the SSMS exe (Management Studio) and install it. SQL Server no longer comes with the Management Studio and it's offered as a separate download, don't worry though, my PowerShell script takes care of that for you. Note: Make sure your SQL Server 2016 media is in the drive specified in the script or edit the script to point to the location of the media. Method #2 - Automate it with PowerShell To install SQL Server2016 use the Install SQL Server 2016.ps1 script. 1. Copy the script to C:\scripts. 2. Edit the variables [lines 17-75] as desired before running. 3. Start Windows PowerShell ISE as Administrator and run the script by clicking on the green triangle. Step 9. SQL Memory Configuration Note: Perform the following on the Configuration Manager server (CM01) as a Local Administrator Depending on your memory configuration and server setup, you may also want to configure SQL memory limits as per the following guidance prior to installing ConfigMgr otherwise you'll get warnings in the Prerequisite checker when it runs the Server Readiness checks. Configuration Manager requires SQL Server to reserve a minimum of 8 gigabytes (GB) of memory for the central administration site and primary site and a minimum of 4 gigabytes (GB) for the secondary site. This memory is reserved by using the Minimum server memory setting under Server Memory Options and is configured by using SQL Server Management Studio. For more information about how to set a fixed amount of memory, see here. If your SQL Server is configured for unlimited memory usage, you should configure SQL Server memory to have a maximum limit. Method #1 - Do it manually Open Management Studio, select CM01, right click, choose Properties, select memory and configure the values as appropriate for your environment. Method #2 - Automate it with PowerShell Use the following PowerShell in ISE on the server that you installed SQL Server 2016 on, thanks go to SkatterBrainz for the code snippet, you might want to adjust the $SqlMemMin and $SqlMemMax variables to suit your environment. $SqlMemMin = 8192 $SqlMemMax = 8192 [System.Reflection.Assembly]::LoadWithPartialName('Microsoft.VisualBasic') | Out-Null [System.Reflection.Assembly]::LoadWithPartialName('Microsoft.SqlServer.SMO') | Out-Null $SQLMemory = New-Object ('Microsoft.SqlServer.Management.Smo.Server') ("(local)") $SQLMemory.Configuration.MinServerMemory.ConfigValue = $SQLMemMin $SQLMemory.Configuration.MaxServerMemory.ConfigValue = $SQLMemMax $SQLMemory.Configuration.Alter() Step 10. Restart the Server Note: Perform the following on the Configuration Manager server (CM01) as a Local Administrator Open an administrative command prompt and issue the following command: shutdown /r Step 11. Install the WSUS role Note: Perform the following on the Configuration Manager server (CM01) as a Local Administrator Now that SQL server is installed, we can utilize that for the WSUS database. To install WSUS and configure it to use the SQL servers database instead of the Windows Internal Database, do as follows: Method #1 - Do it manually <Coming soon> Method #2 - Automate it with PowerShell Browse to the location where you extracted the scripts, C:\scripts. Start Windows PowerShell ISE as administrator, open the Install roles and features_WSUS.ps1 script, edit the $servername variable and replace CM01 with the ServerName your are installing ConfigMgr on (SQL server). Make sure to have your Windows Server 2016 SXS media in the path referred to by $Sourcefiles. Step 12. Download and extract the ConfigMgr content Note: Perform the following on the Configuration Manager server (CM01) as a Local Administrator To install System Center Configuration Manager version 1606 you'll need to download the content. You can download it from Microsoft's Volume license site for use in production or from MSDN for use in a lab. The VLSC download can be found be searching for Config and then selecting System Center Config Mgr (current branch and LTSB 1606) as shown below. Method #1 - Do it manually For the purposes of this guide I used the 1606 release from VLSC. This iso is named SW_DVD5_Sys_Ctr_ConfigMgrClt_ML_1606_MultiLang_ConfMgr_SCEP_MLF_X21-16461.ISO and is 1.20GB in size. Once downloaded, I mounted the ISO in Windows File Explorer and copied the contents to C:\Source\SCCM 1606 on CM01. Step 13. Download the ConfigMgr Prerequisites Note: Perform the following on the Configuration Manager server (CM01) as a Local Administrator You can download the prerequisites during ConfigMgr setup or in advance. As you'll probably want to install more than one copy of ConfigMgr (one lab, one production) it's nice to have the prerequisites downloaded in advance. To do that, open a PowerShell prompt with administrative permissions and navigate to the following folder: C:\Source\SCCM 1606\smssetup\bin\X64 Run the following line .\SetupDL.exe C:\Source\Downloads Tip: Browse to C:\source\SCCM 1606\SMSSETUP\TOOLS and double click on CMTrace.exe, answer Yes to the default logging question. Then, using Windows File Explorer, browse to C:\ and double click on ConfigMgrSetup.log which will open the log file in CMTrace. This will allow you to view any errors or problems with the download of the prerequisites in real time. Step 14. Extend the Schema Note: Perform the following on the Domain controller server (AD01) as Administrator. You do not have to extend the Active Directory schema if it was already extended for Configuration Manager previously. 1. Using Windows File Explorer on the Active Directory Domain Controller, browse to \\<server>\c$\Source\SCCM 1606\SMSSETUP\BIN\X64 where <server> is your ConfigMgr server 2. locate extadsch.exe, right click and choose Run As Administrator. 3. A command prompt window will appear briefly as the schema is extended, check in C:\ for a log file called ExtADSch.log it should look similar to this Step 15. Install SCCM Current Branch (version 1606) Note: Perform the following on the ConfigMgr server (CM01) as Administrator. If you are NOT using eval (as in my example) then you need to add this section to the configuration.ini file [SABranchOptions] SAActive=1 CurrentBranch=1 Method #1 - Do it manually <Coming soon> Method #2 - Automate it with PowerShell You will need to edit the Install SCCM Current Branch version 1606.ps1 script and replace the variables inside with those that work in your environment. For example, to change the ProductId open the script in Windows ISE, locate the line that reads $ProductID= and either enter your ConfigMgr Product Key or use the evaluation version of ConfigMgr by entering the word EVAL. 1. Copy the script to C:\scripts. 2. Edit the variables [lines 16-17 & lines 32-57] as desired before running. 3. Start Windows PowerShell ISE as Administrator and run the script by clicking on the green triangle. Once the script completes successfully, System Center Configuration Manager Current Branch (version 1606) is installed. Note: Currently there is a bug when using System Center Configuration Manager 1606 (Current Branch) and Windows ADK 1607 when used with Windows Server 2016 and SQL Server 2016, in that the boot images will not be created. The error shown in ConfigMgrSetup.log will be "ERROR: Failed to call method ExportDefaultBootImage. Error 0x80041013". If you experience this issue add your voice to Microsoft Connect ID 3116118. The solution at this point is to continue onto the next step and use Upgrades and Servicing to upgrade to System Center Configuration Manager 1610 (Current Branch). After completing that upgrade, the ADK 1607 boot images will be correctly added to ConfigMgr. Step 16. Upgrade to SCCM Current Branch (version 1610) Note: Perform the following on the ConfigMgr server (CM01) as Administrator. Method #1 - Do it manually As the upgrade process is a whole blog post by itself, please follow my guide here. Summary In this guide you used a lot of PowerShell to automate most of Installing System Center Configuration Manager Current Branch (version 1606), including installing and configuring SQL Server 2016 on Windows Server 2016. You then upgraded to version 1610 using Updates and Servicing. Related Reading Configuration Manager and the Windows ADK for Windows 10, version 1607 here. Documentation for System Center Configuration Manager here. What's new in version 1610 of System Center Configuration Manager here. Recommended hardware for System Center Configuration Manager here. Supported operating systems for sites and clients for System Center Configuration Manager here. Support for SQL Server versions for System Center Configuration Manager here. Use a command line to install System Center Configuration Manager sites here. Supported operating systems for System Center Configuration Manager site system servers here. Install-WindowsFeature here. Downloads You can download a Microsoft Word copy of this guide here dated 2016/12/6 How can I install System Center Configuration Manager version 1606 (Current Branch) on Windows Server 2016 with SQL 2016.zip You can download the PowerShell scripts used above here Scripts Used In This Guide.zip


 2 points
 -
If anyone gets an access denied error at the last step (certutil -crl), then please reboot your Issuing CA server once and then issue the command again. I had this issue and apparently several other users had this too per various forums.2 points
-
In March 2017 I blogged a method to allow you to forcefully upgrade your Windows 7 or Windows 10 computers to the latest version of Windows 10 using a popup (HTA) that gives the user some form of control (5 deferrals). Note: if you want to see how many days of support are left for Windows 7 extended support click here. This was very popular and spawned different versions of the same original concept by other MVP’s and the community at large. I always wanted to update mine, but never had time, however what I have done is incorporate bug-fixes and features, and rewritten the original VBS wrapper code to PowerShell. In the next version I’ll replace the HTA with a PowerShell gui. So how about listing the features of this solution. Designed to run as required Runs before the task sequence starts Shows the user a popup with options Can run on Windows 7 or Windows 10 Allows deferrals After deferrals run out, starts a 4 hour timer If the user ignores the popup, subtracts one deferral after 8 hours Checks for Power Checks for hard disc free space Checks for Supported Model Checks for VPN Is easy to Brand with your company details Has several checks to ensure it won’t run by accident So that’s enough of the features, here’s a look at what it will look like to the end user running either Windows 10 or Windows 7. Time to upgrade In the above screenshot, the user sees the popup daily at a time that you decide eg: 11am. The user has a number of choices: Upgrade now by clicking on the box ‘my files are backed up’, and then selecting Upgrade now Upgrade later by clicking on Defer Cancel, by clicking on the X in the top corner, this will remove one deferral. Note that this verifies how many deferrals are left and if there are none left, will start the task sequence Do nothing. The popup will auto close after 8 hours and remove one deferral. Kill it with Task Manager, this will remove one deferral. If the user runs out of deferrals the 4 hour timer will start. If the user still does nothing, when the 4 hours runs out the task sequence will begin. They can of course click the checkbox and select Upgrade now to start it at any time. Branding So how can you add your branding to it ? start with the banner.png. Open it in MSPaint and replace the windowsnoob logo with your own, try and keep it to 500×65 pixels otherwise you’ll need to edit the Upgrade.HTA code also. Next, open the wrapper.ps1 in PowerShell ISE. Edit CompanyName in line 15 to suit your Company Name. Save the changes, next, open upgrade.hta in Notepad ++. Edit CompanyName in line 50 to suit your company name. edit line 395, and put your company name in Troubleshooting The popup creates 3 log files in C:\ProgramData shown below Windows10RequiredUpgradeHTA.log Windows10RequiredUpgradeWrapper.log Windows10RequiredUpgradeStart-Upgrade.log The process creates registry keys (and deletes them upon successful closure of the HTA before starting the task sequence). For more details about how to set this up in your environment, please see the following blogpost. I’ve updated that blogpost to include the new files and the PowerShell wrapper.ps1. Note: To download the files included, you need to be a registered member of windows-noob.com cheers niall2 points
-
Do follow steps 1) delete c:\windows\system32\GroupPolicy\Machine\Registry.pol 2) Gpudate /force 3)initiate Machine policy , software update and evaluation.2 points
-
As a matter of interest are there any parts of the sccm install process you have not been able to powershell? I ask as around this time last year I was in a position of knowing I needed to rebuild my entire domain as we were going through a company rename but didnt yet have the new name. Ended up building a few dozen domain environments through powershell+powercli (vmware environment) including a lot of the sccm stuff so that once i did have the name+domain name i was ready to get going pretty quickly. I accept I am no powershell expert but as it took me a long time to put together if there are any smaller parts of interest I'm happy to share them, log of entire build attached. I made a lot of sacrifices in the scripts for the fact these scripts were all running remotely, e.g. i installed SQL as a scheduled task. Names/ip addresses tweaked for semi-anonymity. CleanedUpNames.Build.txt2 points
-
In the .HTA file I changed the following line: If DPI > 120 then DESIGN_DPI = 160 'dots per inch 'DESIGN_WIDTH = 450 'pixels 'DESIGN_HEIGHT = 365 'pixels DESIGN_WIDTH = dw 'pixels DESIGN_HEIGHT = dh 'pixels to If DPI > 120 then DESIGN_DPI = 96 'dots per inch <<--- 'DESIGN_WIDTH = 450 'pixels 'DESIGN_HEIGHT = 365 'pixels DESIGN_WIDTH = dw 'pixels DESIGN_HEIGHT = dh 'pixels This seems to have solved my scaling problems. You still need to adjust the Window size from above, reference: Call ReSizeWindow (425,335,500,535) in the code above the ReSizeWindow function. When the DPI is <120 the formula uses the design width and height 500,535 respectively. However when the DPI is >120 it will use the numbers 425,335 and then factor accordingly. To get mine to work I had to reduce those numbers somewhat but it now almost displaces the same as on a system with DPI set to 96.2 points
-
sorry just read the rest of your thread... as a work around, you can advertise the task to your desktop collection, but have the task respond ONLY to PXE and MEDIA, have it set to AVAILABLE and put a password on your boot media. MEDIA and PXE only, available setting and the password are all items to prevent current devices from getting reimaged by accident.2 points
-
Ok so finally figured this out. On the ScanAgent.log I was seeing a lot of "Sources are not current" messages. This led me to dig further and that the SUP MUST be in the default boundaries group, which I didn't know. It apparently is new to 1702?!?! Once I added the SUP to the default group clients started reporting in instantly! Hope this helps someone out there. Regards Kevin2 points
-
$location = Get-ItemProperty "HKLM:SOFTWARE\Microsoft\SMS\Setup" | Select-Object -ExpandProperty "UI Installation Directory" Resolves to C:\Program Files\Microsoft Configuration Manager\AdminConsole. That is the correct registry key. However AdminConsole folder is not in the C:\Program Files\Microsoft Configuration Manager The Module is only in x86 folder. I changed the registry 'UI Installation Directory' to point to: C:\Program Files (x86)\Microsoft Configuration Manager\AdminConsole and script is working after that change.2 points
-
I must say I like your tutorials. I am becoming your fan!2 points
-
Up and running again! Thanks to anyweb (and Microsoft) we are now running 1702 and so far everything looks good! A huuuge thank you for the help!2 points
-
Up and running again! Thanks to anyweb (and Microsoft) we are now running 1702 and so far everything looks good!2 points
-
glad to hear it, but do make sure to follow my advice and test thoroughly before releasing into production2 points
-
I have upgraded Windows-Noob.com today to the latest and greatest version of the IPS Community Suite. We are now on version 4. Among all the other features, this should significantly improve your experience when accessing the site on mobile devices thanks to the responsive theme. If there are any issues that you notice, please post in the Suggestion box.2 points
-
One thing i can't stand about forums is no one responding back to how they fixed their issue. I hope this helps someone down the road. I just got off the phone with support and this was their fix as well. They said it's a client side issue with certificates being corrupt. ERROR: Error. Status code 500 returned OSDSMPClient 7/25/2016 4:25:28 PM 5656 (0x1618) Received 1231 byte response. OSDSMPClient 7/25/2016 4:25:28 PM 5656 (0x1618) pReply != NULL, HRESULT=80004005 (e:\qfe\nts\sms\client\osdeployment\osdsmpclient\smpclient.cpp,2391) OSDSMPClient 7/25/2016 4:25:28 PM 5656 (0x1618) SMP Root share info response is empty OSDSMPClient 7/25/2016 4:25:28 PM 5656 (0x1618) ClientRequestToSMP::ClientRootShareRequestToSMP failed. error = (0x80004005). OSDSMPClient 7/25/2016 4:25:28 PM 5656 (0x1618) ExecuteRootShareInfoRequest(sRootShareList), HRESULT=80004005 (e:\qfe\nts\sms\client\osdeployment\osdsmpclient\smpclient.cpp,1717) OSDSMPClient 7/25/2016 4:25:28 PM 5656 (0x1618) ClientRequestToSMP::DoRequest failed. error = (0x80004005). OSDSMPClient 7/25/2016 4:25:28 PM 5656 (0x1618) Request to SMP 'http://myservername.domain.com'failed with error (Code 0x80004005). Trying next SMP. OSDSMPClient 7/25/2016 4:25:28 PM 5656 (0x1618) Sleeping for 60 seconds before next attempt to locate an SMP. OSDSMPClient 7/25/2016 4:25:28 PM 5656 (0x1618) Retry number 2 OSDSMPClient 7/25/2016 4:26:28 PM 5656 (0x1618) Microsoft's response ++ It looks like there is certificate issues while performing the restoration task. ++ Please run following command under PowerShell (As Admin ) · Remove-Item -Path ‘HKLM:\SOFTWARE\Microsoft\SystemCertificates\SMS\Certificates\*’ -force; · restart-service ccmexec Sunshine2 points
-
What has to be done if you change the external web services url in regards to the proxy server / edge server, and the internal and external certificates.2 points
-
@Savage thank you2 points
-
Any guides how to deploy Lync 2013 to one AD Domain/Forest with multiple sites? HA is in mind... What servers need to be deployed to sites and how to do the configuration?2 points
-
Hei sorry for not answering sooner. If you just install Lync 2010 standard then all u need is dc (as in domain) + 1 server to install Lync itself (standard). If u want high availability then Enterprise version is the way to go. With enterprise you can create pools of frontend servers for instance (with dns triks thouse pools work as load balancing). Also some spoilers from the next version: http://www.zdnet.com...ore-7000001415/ ---> Consolidation of roles; no separate server role needed for monitoring and archiving. Also if memory serves u cant select your own (remote) sql when using Standard (this could be lie as i dont remember no longer).2 points
-
i don't have a lab in your state to test this on as mine already has bitlocker management enabled, so please go ahead and create a test bitlocker management policy, doing so will put in place things like bitlocker management services in IIS, back when this was first released in 1910 we had to run powershell scripts to get reports, but it's all integrated now1 point
-
This first thing you are going to what to do is understand where the data that you want existing within CM. These two links will help you with that. https://docs.microsoft.com/en-us/mem/configmgr/develop/core/understand/sqlviews/software-updates-views-configuration-manager https://www.informit.com/store/system-center-configuration-manager-reporting-unleashed-9780134466811 .1 point
-
Introduction Microsoft released Windows Intune back in March 2011, this was their launch pad for the management of devices and users in the cloud. This was later renamed to Microsoft Intune and is now known as Microsoft Endpoint Manager. This cloud journey encompassed several new technologies and associated buzz words summarized below. Hybrid MDM – Depreciated, this was the first combination of ConfigMgr and Intune Co-management – The ability to manage devices via ConfigMgr and Intune Co-existence – Using a 3rd party MDM solution together with ConfigMgr Cloud Attach – Attaching cloud components to a ConfigMgr environment Tenant attach – Attaching ConfigMgr managed devices including servers to the cloud This part is the first part in a series of guides about cloud attach in Microsoft Endpoint Manager and the guides are co-written by Niall & Paul, both of whom are Enterprise Mobility MVP’s with broad experience in the area of modern management. Paul is 4 times Enterprise Mobility MVP based in the UK and Niall is 10 times Enterprise Mobility MVP based in Sweden. If you use Twitter and want to see content when we release it then please do follow us: @ncbrady @SCCMentor Why are we writing this? Both Paul and I have worked on multiple cloud-based lab scenarios together over the course of the last year keeping ourselves educated and involved during lock down. We focused on expanding our knowledge about these exciting new technologies that come with the enabling of cloud attach features. That includes advanced cloud capabilities offered via a Cloud Management Gateway (CMG), co-management and additional capabilities available via Tenant attach. This area of modern management is rapidly evolving, now more than ever as workers find themselves working remotely during COVID-19, therefore it’s important to keep up with what’s new and what is changing. Below you can find all parts in this series. Cloud attach - Endpoint Managers silver lining - part 1 Configuring Azure AD connect <- you are here Cloud attach - Endpoint Managers silver lining - part 2 Prepare for a Cloud Management Gateway Cloud attach - Endpoint Managers silver lining - part 3 Creating a Cloud Management Gateway Cloud attach - Endpoint Managers silver lining - part 4 Enabling co-management Cloud attach - Endpoint Managers silver lining - part 5 Enabling compliance policies workload Cloud attach - Endpoint Managers silver lining - part 6 Enabling conditional access Cloud attach - Endpoint Managers silver lining - part 7 Co-managing Azure AD devices Cloud attach - Endpoint Managers silver lining - part 8 Enabling tenant attach Cloud attach - Endpoint Managers silver lining - part 9 Renewing expiring certificates Cloud attach - Endpoint Managers silver lining - part 10 Using apps with tenant attach This multi part blog will focus on helping you get your organization cloud attached, and we will start by assuming that your environment has a few key aspects already setup: PKI enabled (guide) Intune Tenant created Azure Subscription (free trial) Licenses applied, you can grab a free trial of Enterprise Mobility plus Security which includes Intune and Azure AD Premium P2 here (free trial). In this part we will show you how to do the following: 1. Add a custom domain name to Azure 2. Set up a User Principal Name (UPN) for your on-premises Active Directory 3. Set up hybrid Azure AD Join using Azure AD Connect 4. Configure hybrid Azure AD join using Azure AD Connect So, let’s get started. Step 1. Add a Custom Domain Name to Azure Login to https://portal.azure.com select Azure Active Directory to add a custom domain name in Azure AD Directory. Select custom domain names in the left pane and then click the + Add custom domain link in the top ribbon. When presented with the Custom domain name window, enter the name of the domain you own and click the Add domain button. After adding the domain name, you’ll be shown a screen similar to the one below, you can choose to add a TXT or MX record on your DNS provider. In the example below we chose the TXT option. Enter the provided TXT record at your domain name provider. Below is example of the TXT record we entered at out providers DNS management portal. We’ve set the TTL to a low value to get this propagated quickly so that we can verify the domain. Tip: You can use a website such as dnschecker.org to see if the TXT record has propagated and can be queried, when this has happened go back to the Azure portal and click the Verify button to verify the domain. Once the domain is successfully verified, it will report as so in the Custom domain names blade. After the custom domain name is added, you can make it the Primary domain name. To do that do as follows. Select the custom domain name which you have verified above, and click on Make Primary. After doing that your custom domain name will be the new Primary domain name. Step 2. Set up a User Principal Name (UPN) for your on-premises Active Directory With the custom domain name added and set to primary we are going to add an alternative user principal name suffix into the on-premises Active Directory. This will match the domain name we have verified, so our example is azurenoob.com. This is fairly simple to set up, but once configured, we need to set this as the default for our users and we can use a PowerShell script to achieve this. Let us start off by setting the UPN, you will need to be a Domain Admin or Enterprise Admin to achieve this. Open Active Directory Domains and Trusts. Right click on Active Directory Domains and Trusts, and select Properties. Type in your new alternative name suffix into the Alternative UPN suffixes box, and click Add. Click OK. Below you can see we've added azurenoob.com. Now we need to set the alternative UPN as the default UPN for all our users. Thanks to the community we can use a PowerShell script which is already out there to achieve this, and we used a script from martinsblog.dk. You can be granular with this script, so that you only add in a specific OU for your users, or you could run it at the top level of the domain. Below is the properties of an user with the new UPN applied. Step 3. Set up hybrid Azure AD Join using Azure AD Connect You can use Azure AD Connect to integrate on-premises and online directories. It can synchronize computer, user and group objects and assist with single sign-on in both directories as well as password sync. When using the Azure AD Connect it’s recommended to download the latest release. You can obtain this from Microsoft Download Center. A minimum of version 1.1.819.0 is needed, but this is an old version, you would be better off downloading the latest and using the newer features available with that release. Download Azure AD Connect here. After downloading and installing the tool, launch it and Agree to the terms and conditions before clicking Continue. We have the choice of running an express installation or customizing the install. Microsoft recommends using the customize option if you have multiple forests or if you want to configure optional features, otherwise you can continue with the Use express settings option. In the steps below we run through the options you'll see when choosing Use Express Settings. Next, enter the Global Admin login details for your Azure Ad environment. Click Next and then enter the Enterprise Admin credentials for the on-prem Active Directory Domain Services. Note: The Azure AD sign-in configuration page only shows if you did not complete verify your domains in the prerequisites. If you see this page, then review every domain marked Not Added and Not Verified. Make sure those domains you use have been verified in Azure AD. Click the Refresh symbol when you have verified your domains. If you have domains marked as Not Added then see the next step. The azurenoob.com domain is Verified as we verified this domain in Azure AD. This also means we will be able to sign in with the same credentials in our on-premises Active Directory as we also added in the UPN. Select the checkbox to Continue without matching all UPN suffixes to verified domains if one of your UPN suffix values is not added, for example the windowsnoob.lab.local address is in the state Not Added. You will only have this checkbox available if you have a Not Added entry and you must check the box in order to continue. Click Install We have enabled the checkbox for Start the synchronization process when configuration completes as we want the synchronization process to start once we have completed the wizard. If you do not enable this, the sync will be configured but won’t run until you re-run the Azure AD Connect wizard. Click Install. After clicking Install the wizard will start configuring. And after a few minutes it’s complete. You can close the wizard by clicking on Exit. Step 4. Configure hybrid Azure AD join using Azure AD Connect With the express settings configured, we now need to configure Azure AD Connect for hybrid Azure AD join of our on-premises devices. Launch the Azure AD Connect wizard and click Configure to continue. On the Additional tasks page, select Configure device options, and then select Next. Select the option to Configure Device Options. On the next screenshot note that we are interested in Hybrid Azure Ad join and that Hybrid Azure AD join enables devices in your Active Directory forest to register with Azure AD for access management. Computers in your organization will automatically discover Azure AD using a service connection point (SCP) object that is created in your Active Directory forest. On the Overview page select Next. On the Connect to Azure ad page enter the credentials of your Global Admin. On the Device options screen, select Configure Hybrid Azure AD join to synchronize our on-premise devices and to configure them for Azure Ad join. The Service Connection Point (SCP) needs to be configured for each forest where you want to enable Hybrid Azure AD join. We only have the one forest. Click the Add button. Select Windows 10 or later domain-joined devices and then click Next. Select the check box beside your on premise domain and then click Add. Enter your Enterprise Admin Credentials when prompted. Click Next. And at the Ready to configure screen click Next. At the Configuration complete, click Exit. You can verify the success of the above by opening Adsiedit, selecting Services, expand Device Registration Configuration, as shown below in keywords and objectcategory. That's it for this part, join us in Part 2 where we will prepare your environment for a Cloud Management Gateway. Useful links Conditional Access mfa breaks azure ad connect synchronization - https://www.alitajran.com/conditional-access-mfa-breaks-azure-ad-connect-synchronization/ Cloud attach and Microsoft Endpoint Manager - https://techcommunity.microsoft.com/t5/business-continuity-and-disaster/cloud-attach-and-microsoft-endpoint-manager/m-p/1498577 Download Azure AD Connect - Download Microsoft Azure Active Directory Connect from Official Microsoft Download Center Azure AD connect prerequisites - https://docs.microsoft.com/en-us/azure/active-directory/hybrid/how-to-connect-install-prerequisites How to setup Azure AD Connect using express settings - https://docs.microsoft.com/en-us/azure/active-directory/hybrid/how-to-connect-install-express

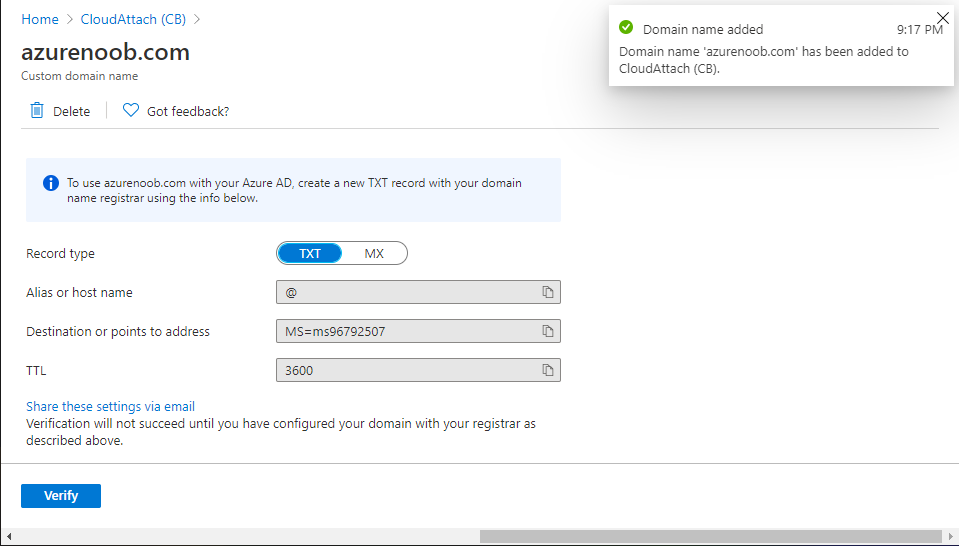
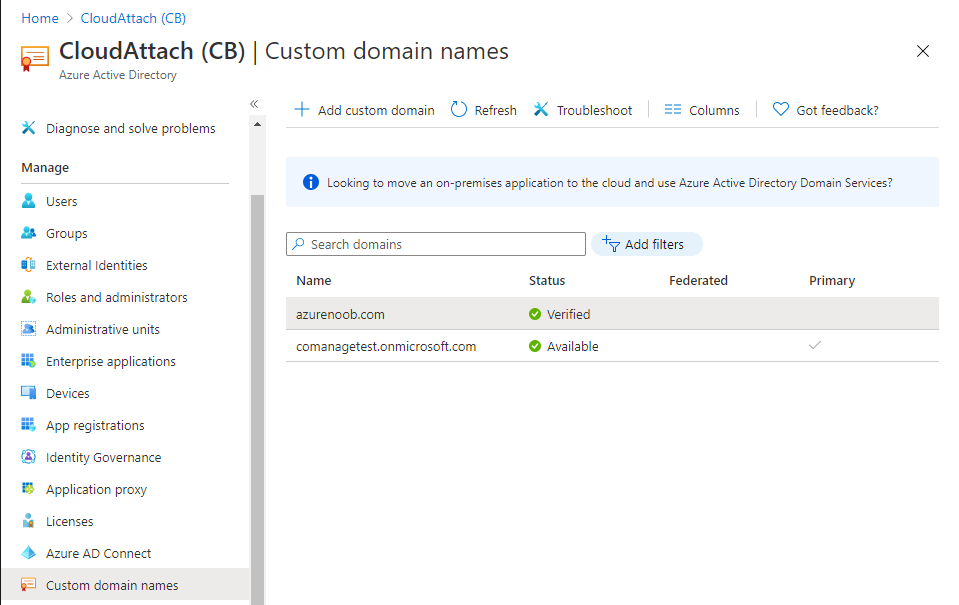
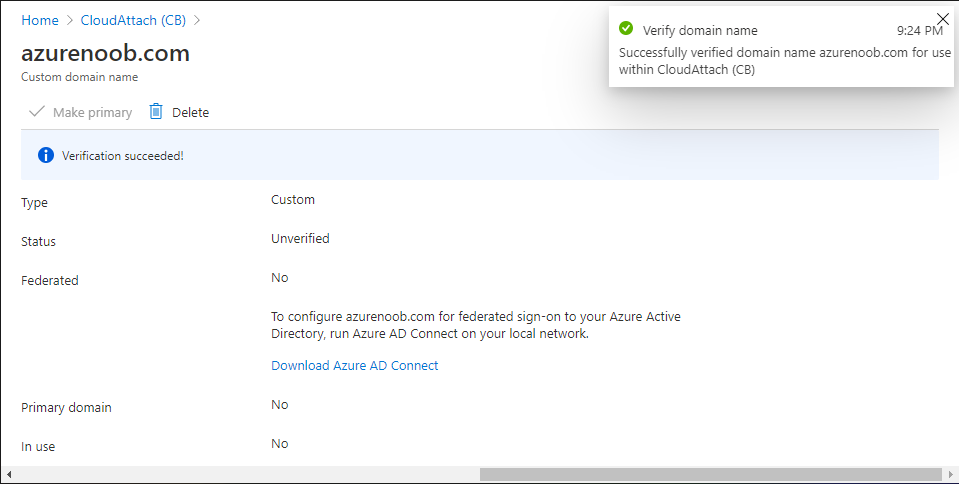

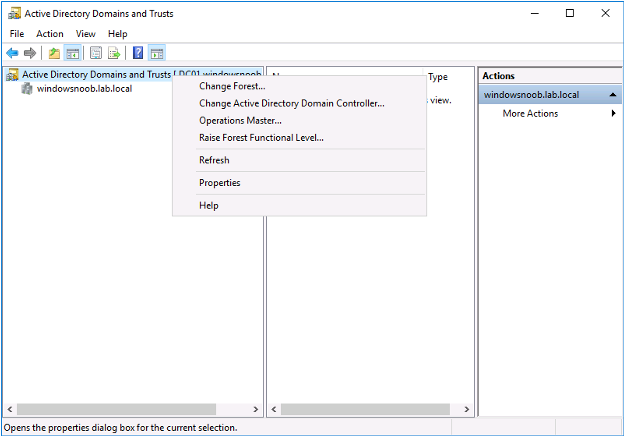
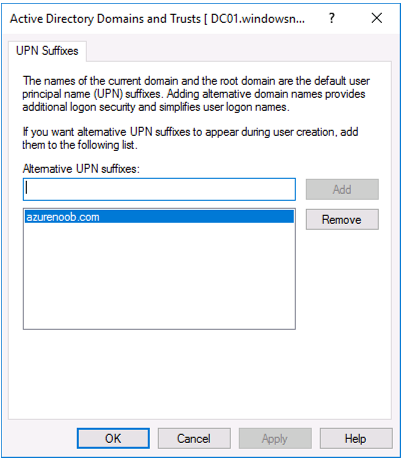
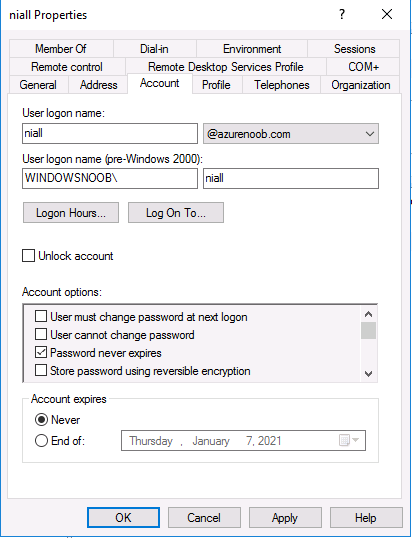
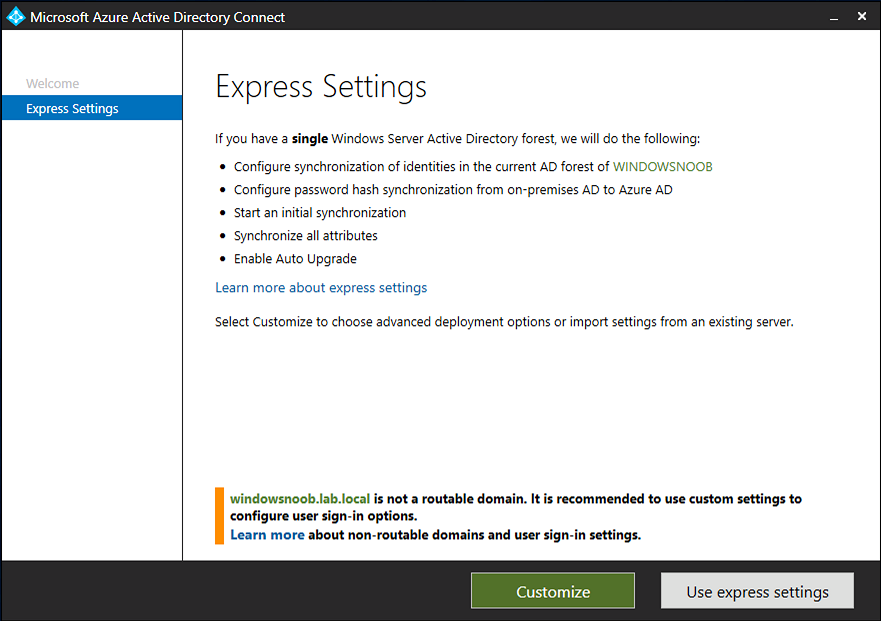

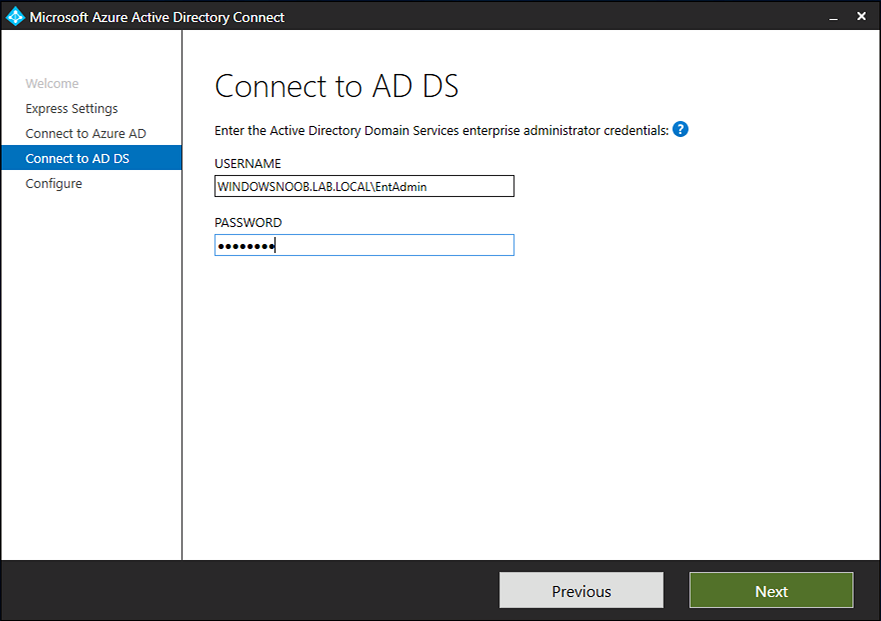
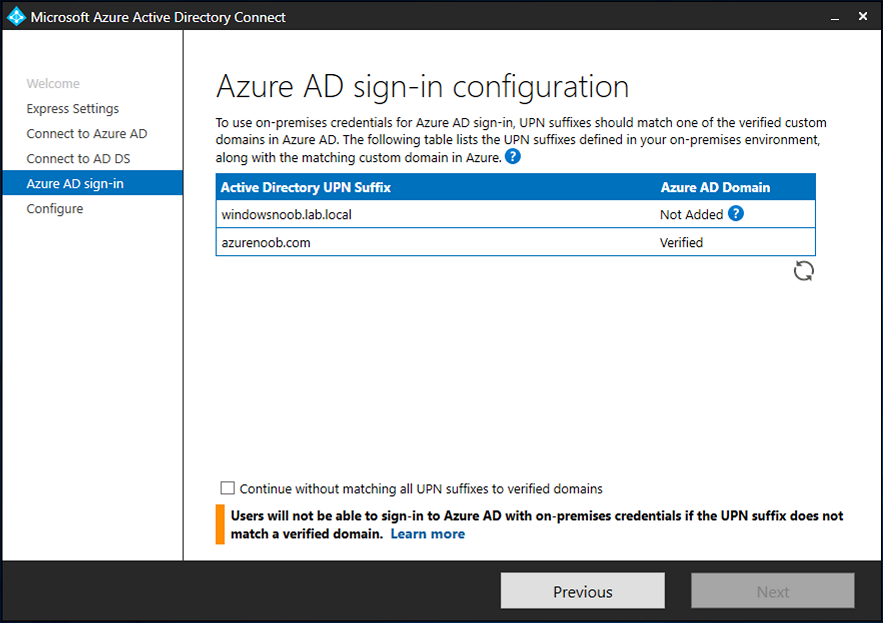
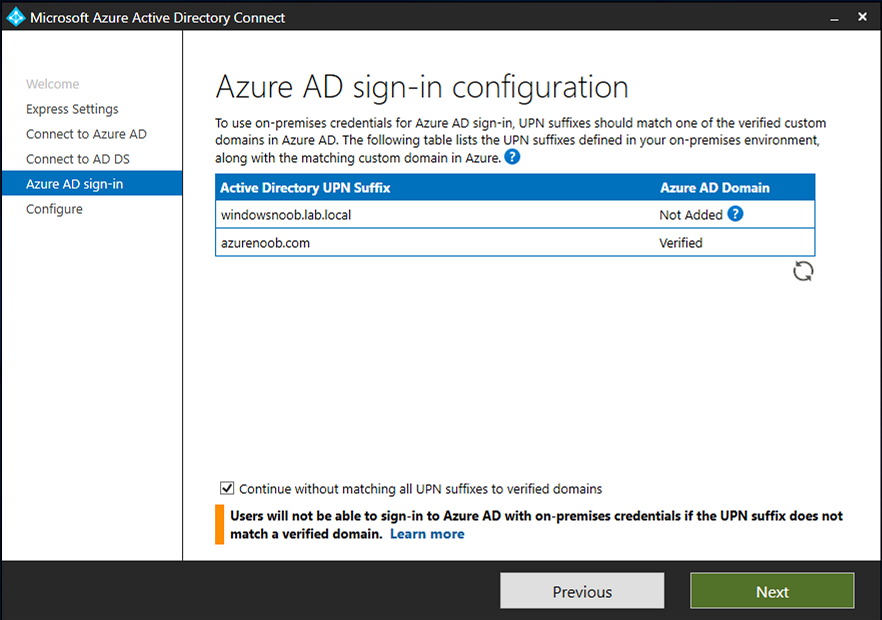

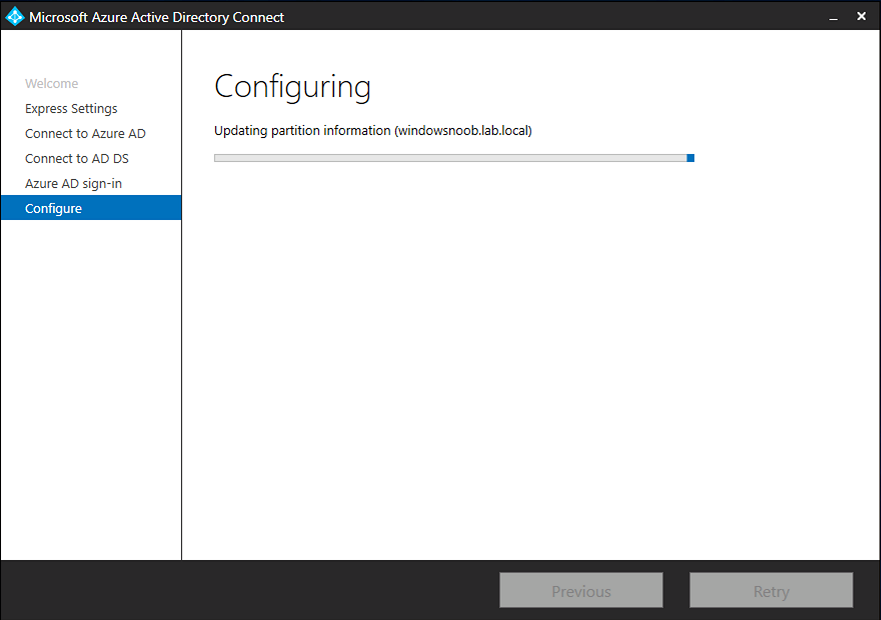
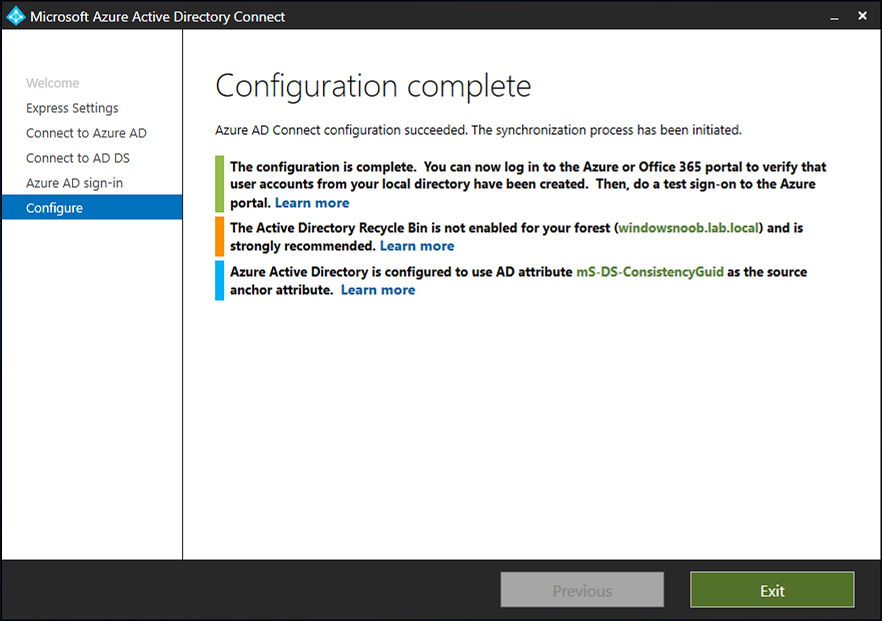

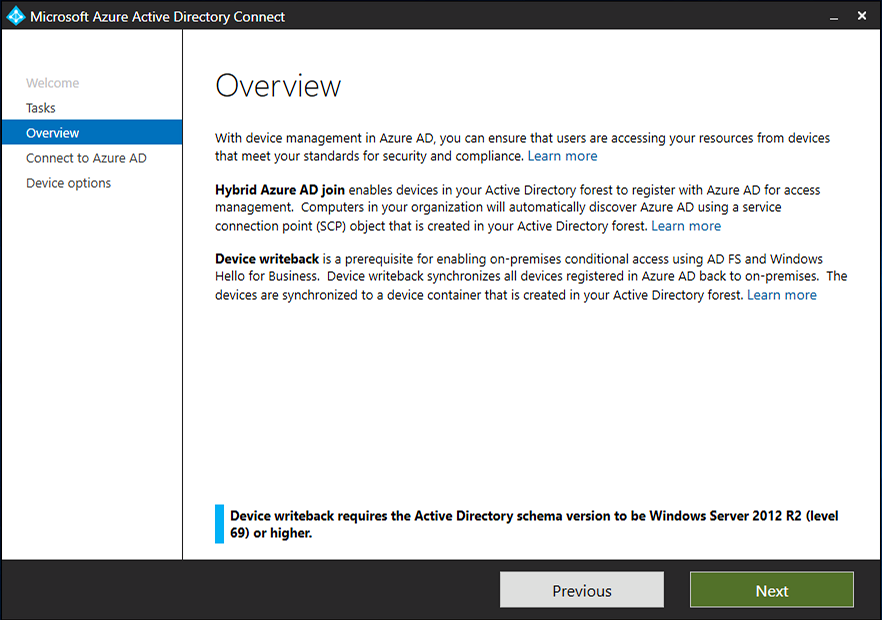
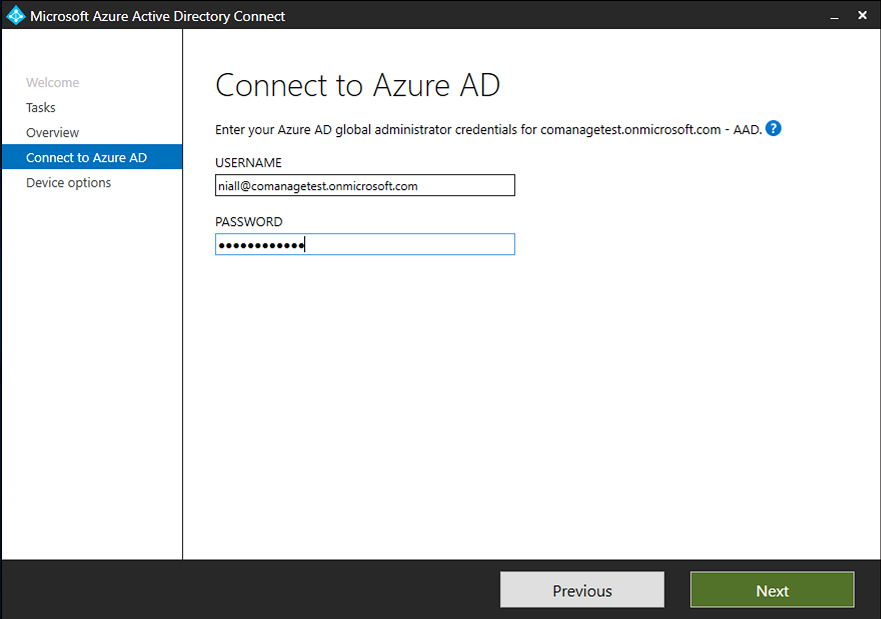
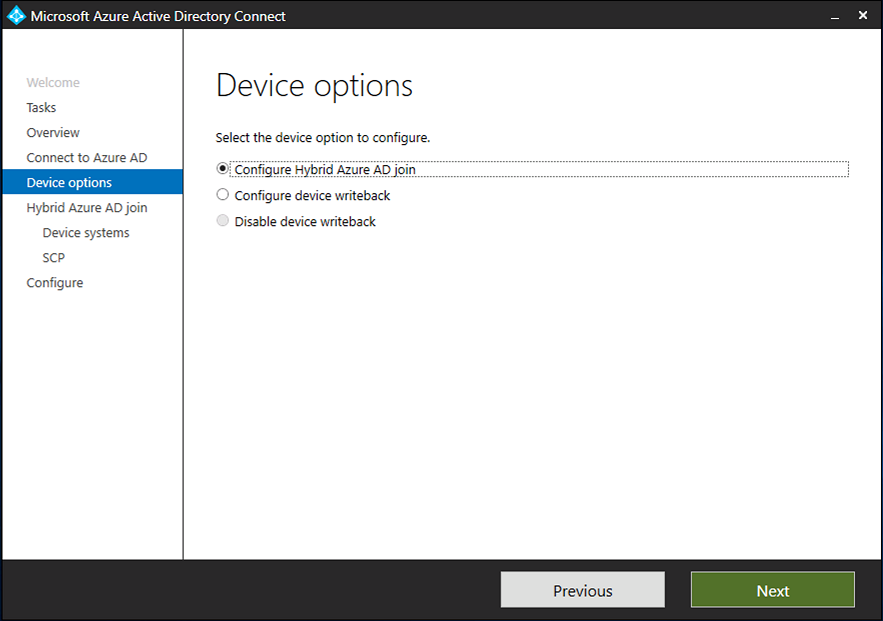
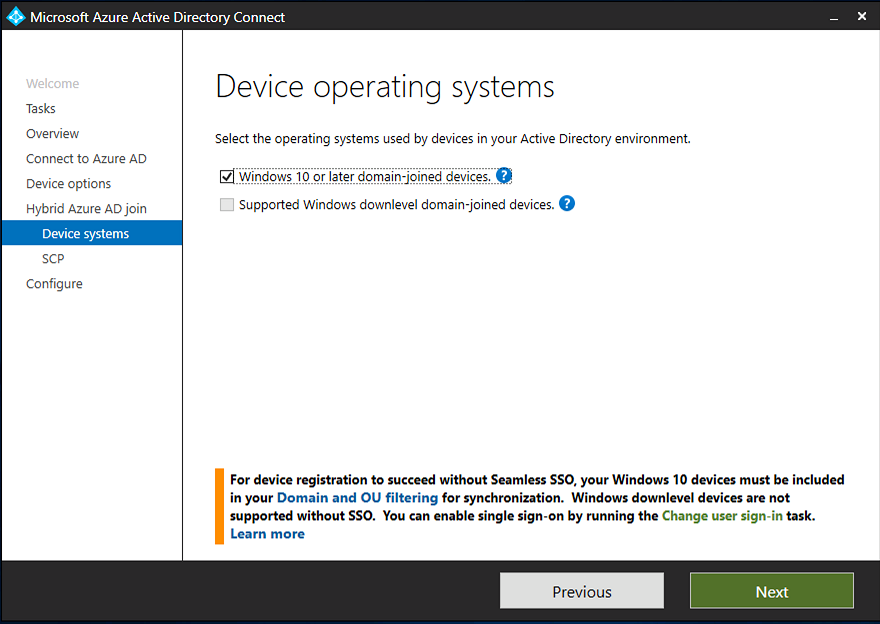
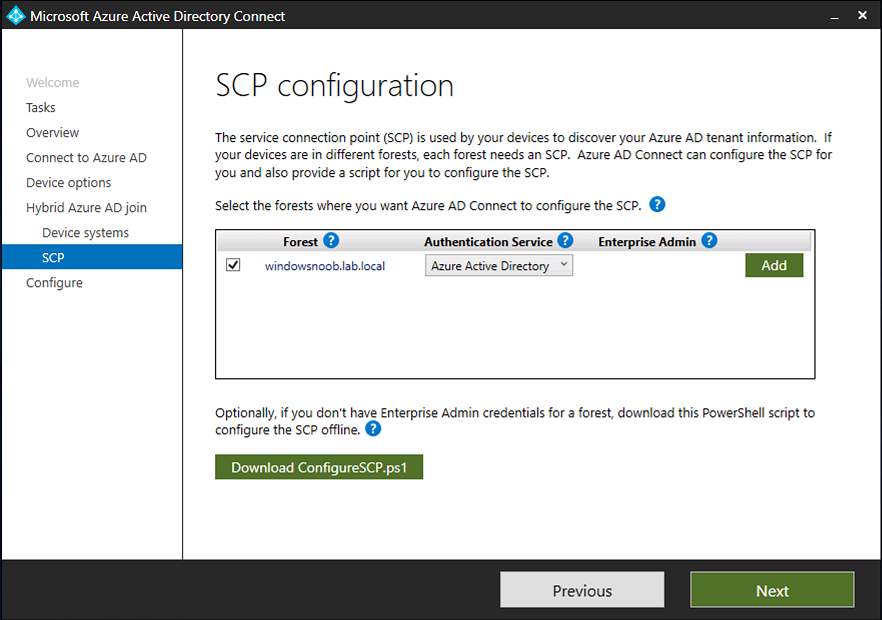
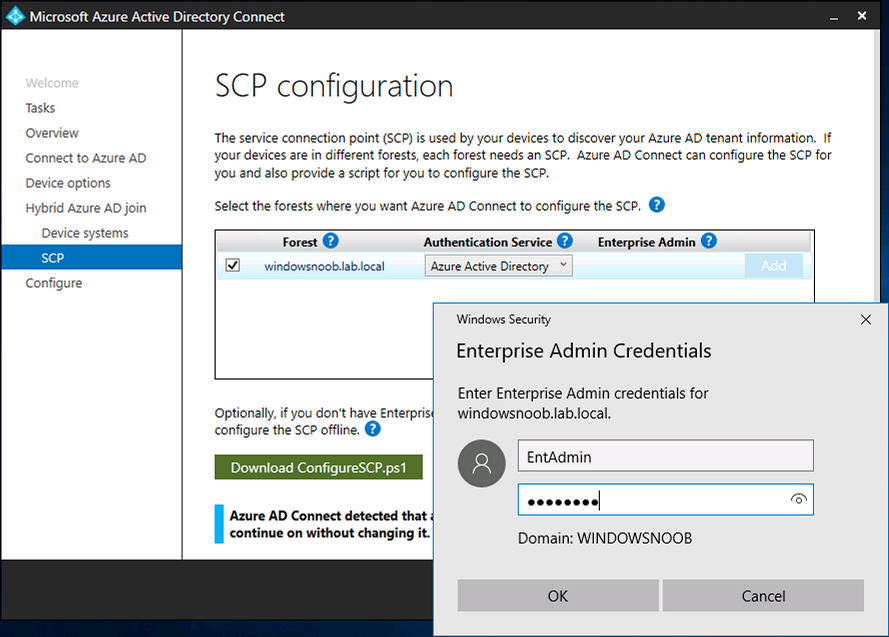
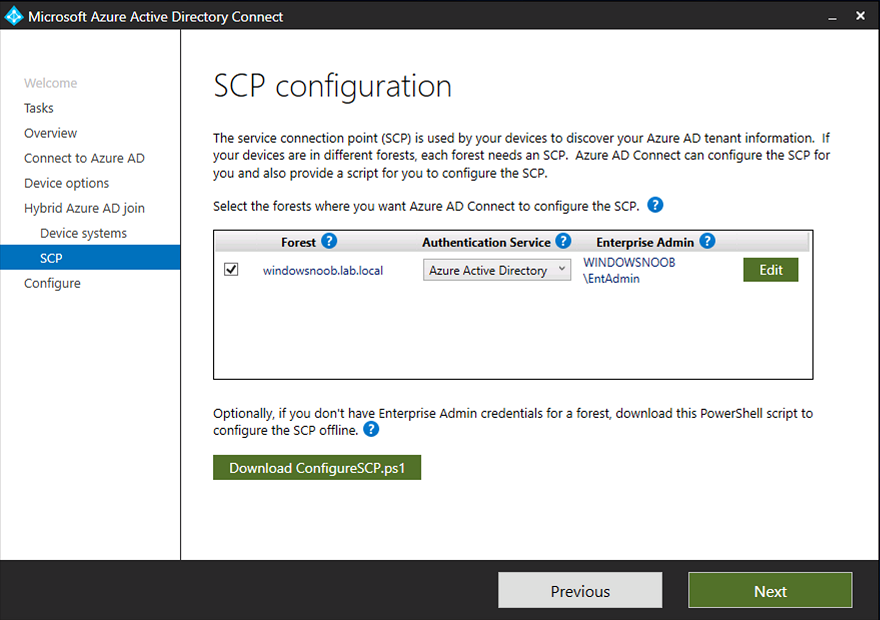
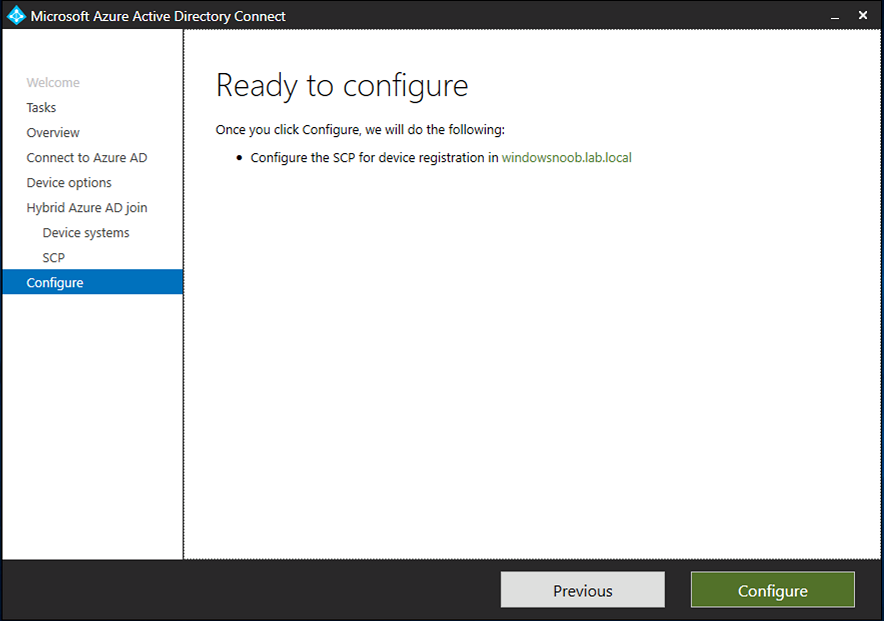
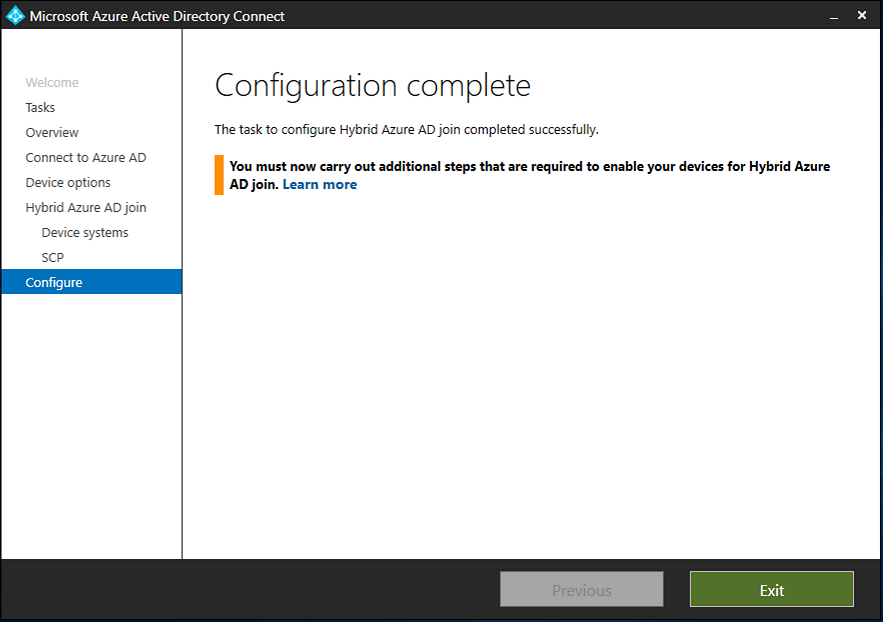
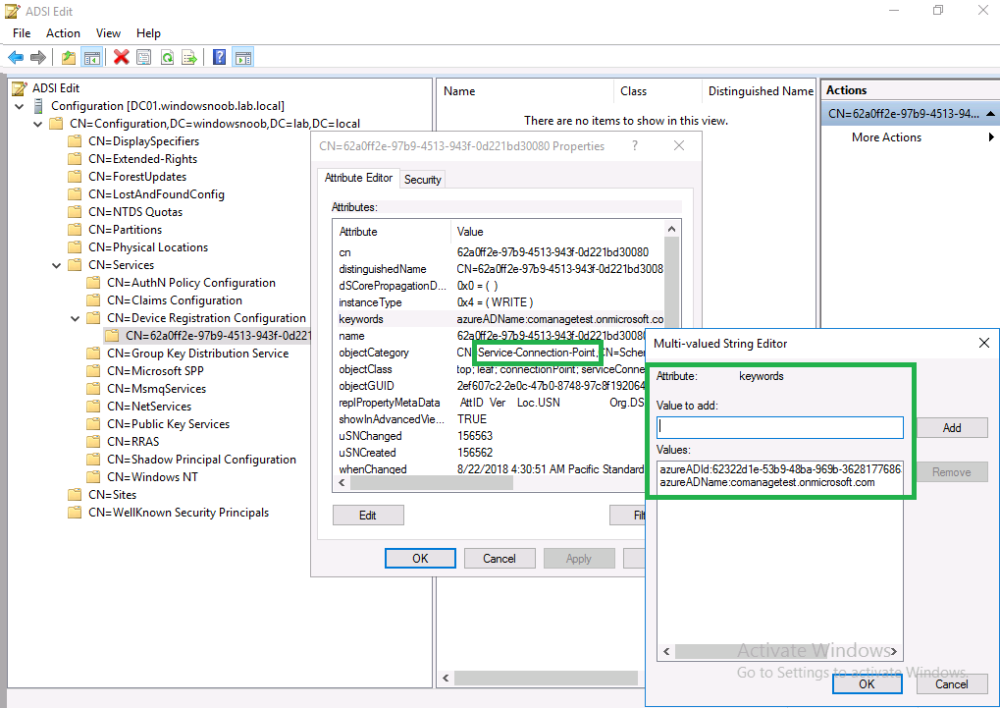 1 point
 -
That is cuz you are one crazy awesome dude Niall!!! Still have my fingers crossed that we get to have that drink this summer!! Waiting to find out if we are still going to have our CTG Summit in August! ?1 point
-
Turns out no Software Update point is needed, just needed to add an Operating System Upgrade package and point it to the CORRECT folder...1 point
-
Introduction Traditionally you deploy one operating system per task sequence but there are times when you might want to deploy more than operating system in the same task sequence. There are a variety of ways of doing this, for example you could use a MDT based User Driven Installation (UDI) task sequence which in turn requires you to use the UDI Wizard Designer to edit the Volume page and add, remove or re-order Operating System wim images which can then be displayed to the end user (shown below). This works well as long as you are willing to use UDI based task sequences and the associated UDI Designer Wizard and don't mind updating the MDT Toolkit Files package after doing so. Alternatively you could use a dynamic task sequence which uses a HTA FrontEnd (hypertext application or web page..) that is based on variables set in the task sequence itself. The HTA method is more dynamic as you do not need to update the MDT Toolkit files package every time you make a change to one of the operating systems included in the task sequence and you don't need to use a User Driven Installation based task sequence either. Here is what the FrontEnd looks like you can click on the drop down menus to select from the Operating Systems that you make available In addition you can use tooltips (by hovering over a drop down menu) in this task sequence to display helpful info to the end user about what each operating system is for. So how is it done ? I'll show you. Step 1. Get the Task Sequence Download the Multiple Operating Systems in a Task Sequence below. Multi-Image task sequence.zip You need to import it into your Configuration Manager server. To Import it, in the Configuration Manager console navigate to the Software Library and find the Operating Systems section, right click on Task Sequences and choose Import Task Sequence as shown below. browse to the UNC path where you downloaded the ZIP file above click next, you will get an import failure for the boot wim, select Ignore Dependency as shown below The task sequence is imported successfully. Step 2. Get the HTA Download the Multi Image HTA below Multi-Image.zip Unzip these files and copy them to a folder on your Configuration Manager server. Next, create a package by doing as follows, select Application Management in software Library, and choose Packages, right click and choose Create Package fill in some info about the package, call it Multi-Image Select do not create a program continue through the wizard until done Step 3. Distribute the package Right click on the Multi-Image package and choose Distribute Content, distribute it to all your distribution points as shown below continue until the wizard is complete. Step 4. Edit the Task sequence Right click on the Multiple Operating Systems in a Task Sequence task sequence and choose edit, you'll probably see the error below, it's ok we are going to add that package next... On the Display HTA step, click on the Browse button beside Package, and select the Multi-Image so it looks like below Once done, take a look at the three OSName variables, they are what is shown to the end user in the Multi-Image HTA. You can set these variables to match whatever three (or two or more) operating systems you are deploying in this task seqence. in addition you can define the two tooltips used in the HTA If you want the HTA to display make/model and serial number info then add a MDT Toolkit Files step, immediately followed by a MDT Gather step as shown below (this is optional, and requires MDT Integration with Configuration Manager 2012.) Now you need to add your operating system images, under the New Computer Group,click add,choose images and then apply operating system image as shown below click on browse and browse to your selected operating system image Next, select the Options tab, and add a condition (Task Sequence Variable) and enter the following info, ImageValue = OSValue1 as shown below repeat the above for each Operating System Image you want to deploy, however set the options value for the variable ImageValue to OSValue2 or OSValue3 as appropriate. You don't need to make all three available, you can simply disable one or two in the task sequence if you want and they won't appear in the HTA. Dynamic ! for the purpose of this task sequence, you can go ahead and add a boot wim and then deploy it for testing, obviously you'll want to customize the task sequence to do all the actions you normally do, below you can see that the second Operating System image was selected (OSValue2) and is being deployed as logged in SMSTS.log That's it, job done ! Summary Deploying multiple operating systems with Configuration Manager 2012 R2 is easy enough and there are many ways of doing it, this method is dynamic and I hope you try it out !. Related Reading CM12 in a lab - Part 16. Integrating MDT 2012 with Configuration Manager 2012 CM12 in a lab - Part 17. Using MDT 2012 with Configuration Manager 2012 CM12 in a lab - Part 18. Deploying a UDI Client Task Sequence Downloads You can download a Microsoft Word copy of this guide here. Multiple Wim Images in One Task Sequence.zip
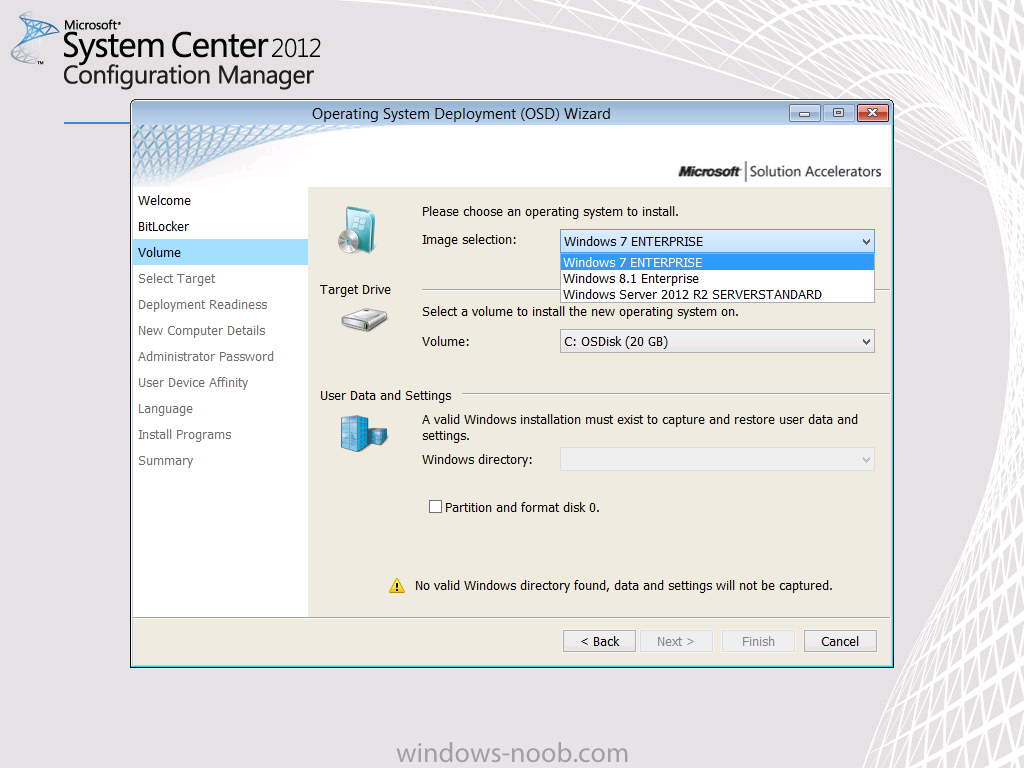


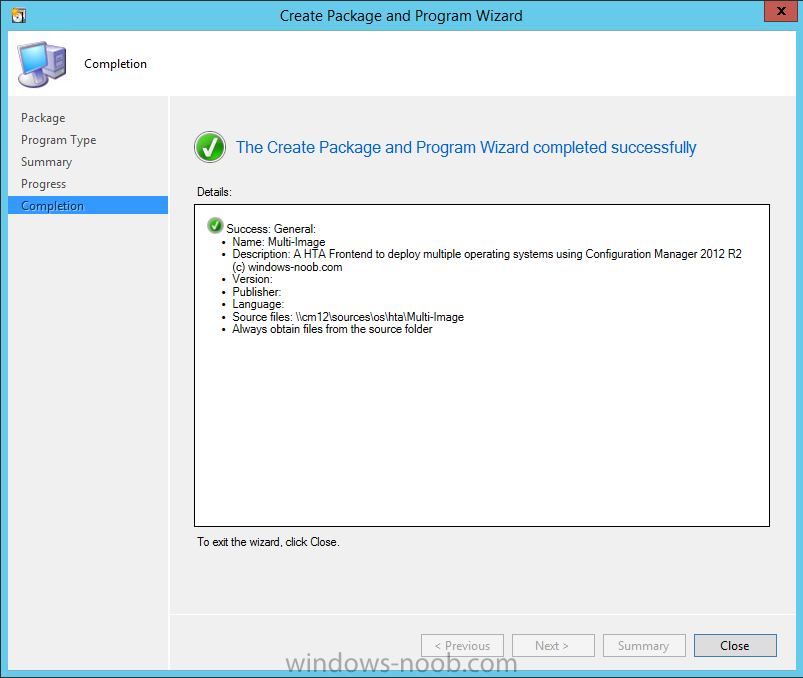


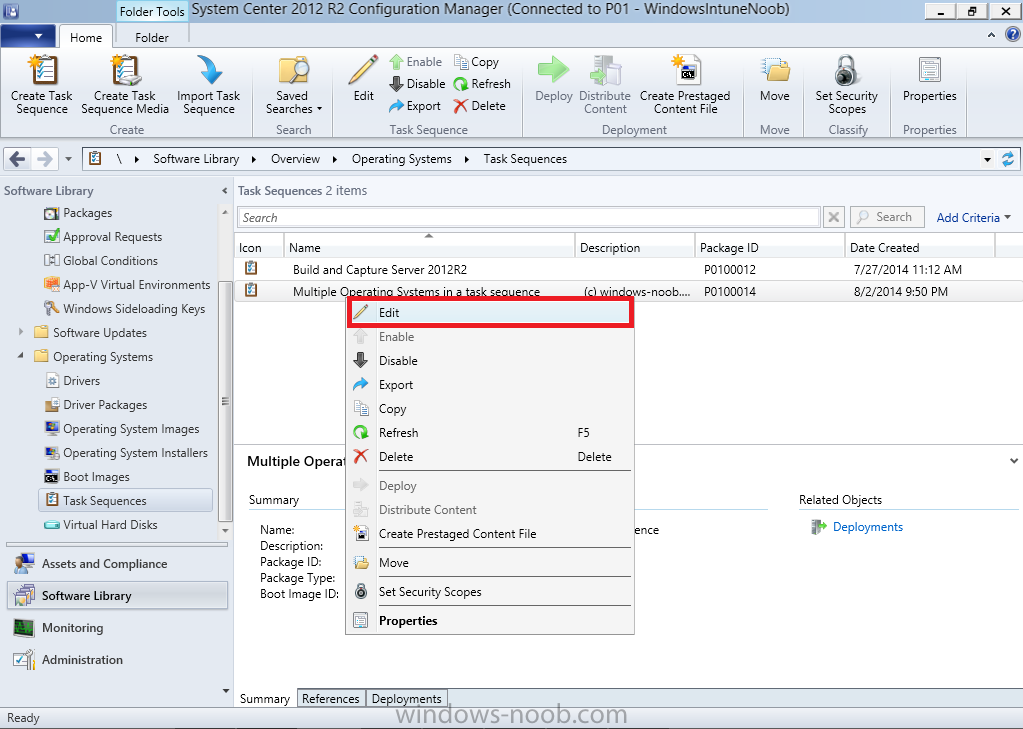

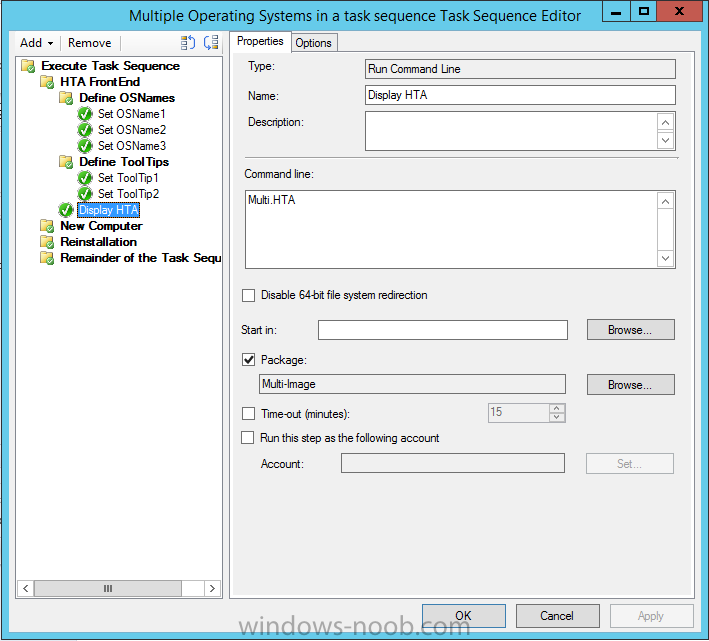
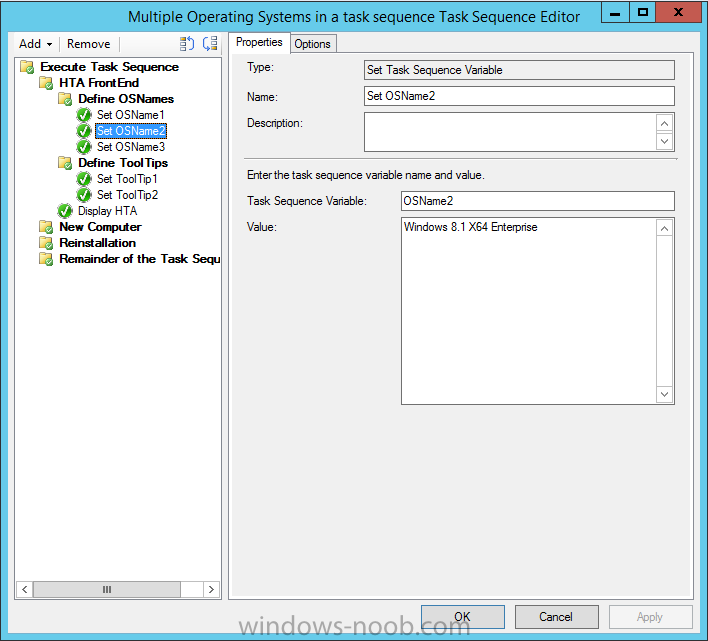


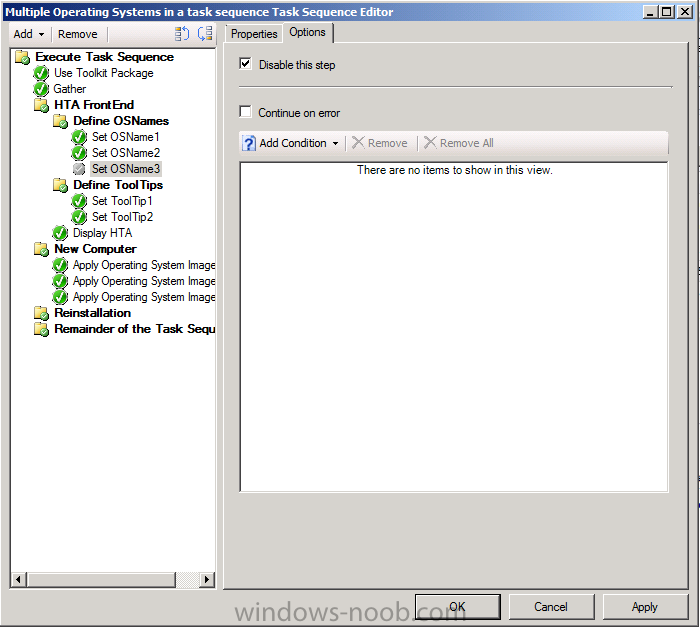
 1 point
 -
everything inside the LAB should be on a private network, that way everything in the lab can talk to itself without interference from the outside, if you map a switch to a network card then that effectively gives your lab access to anything on that network and vice versa, so if your network card is connected say to your internal company network, and you set your switch to External, using your onboard NIC, then your dhcp server could start handing out ip's on your company network, and you don't want that. so keep your lab private, and only share internet into the lab using a smoothwall or similar. if you want to 'test' deploying things (like operating systems or otherwise) to computers outside of the lab, then follow my guide here1 point
-
first things first do you have any details of what files were over written/infected ? and do you have valid virus free backups of the database and all other software1 point
-
Fantastic write up! When do you sleep honestly? It's very encouraging to see on prem, sccm cloud continue to developer further and further, especially when your livelihood depends on it!1 point
-
1 point
-
just make sure your Apply Driver Package step references that, as shown here.
 1 point
 -
Anyweb, I wanted to thank you for you help. I used this site to learn everything I know about SCCM, so I'm glad you do this. It's helped alot.1 point
-
Hi Everyone, I have question regarding Windows Server 2012 R2, that is it possible for us to reset windows server 2012 r2 to factory reset like microsoft client operating systems (7,8,10). If yes can you please help me out, how? Regards RMA1 point
-
It should not be a requirement to use the TS Variable _SMSTSMachineName in order to retain a known system's name with a refresh - CM will do this all by itself. If this is the same TS that is been used for known and unkown then remove this task sequence variable as per the reason above.1 point
-
Insider builds and any builds not known to your site will show up as Other. I have several computers running Win10 1703 (build 15063.332) that are showing as Other in my dashboard as well. Once I read this article from Jason Sandy's I gave up on the Servicing Dashboard and used Upgrade Task Sequences instead. Either way it would be nice to get accurate data and to be able to click on the rings to see which systems are being inventoried.1 point
-
of course you can do it using ConfigMgr, most people do it using MDT as it's quick and easy and well documented1 point
-
So did you enable remote errors like it suggests? https://www.enhansoft.com/blog/turn-on-remote-error-reporting1 point
-
Double check that you have all the IIS-Pre Reqs installed! got the same problem when i left out ASAPI Filters and something else.1 point