anyweb
-
Posts
9277 -
Joined
-
Last visited
-
Days Won
371
Everything posted by anyweb
-
sounds interesting go for it !
-
welcome to the site !
-

Reinstallation of WDS on SCCM2007
anyweb replied to SCCM4EVA's question in Windows Deployment Services (WDS)
thanks for the kind words as regards the wds service, did it ever start ? was it ever working ? what errors do you see in event viewer in relation to it not starting ? have you tried rebooting the server ? -
can you deploy a test package to the clients (like the firefox application example) ? if that works at least we know you have communication... is the firewall enabled on the clients ? what do the logs on your CLIENT tell you ? has the deadline for the software update been set? cheers niall
-
The kind folks at Microsoft have provided the following four new Guides for System Center Configuration Manager 2007, links below System Center Configuration Manager 2007 Deployment Guide This guidance provides information on how to design and deploy a Configuration Manager infrastructure within a healthcare organization. It allows the healthcare organization to be confident that the Configuration Manager infrastructure being designed and deployed is using current best practice. http://www.microsoft.com/downloads/details.aspx?displaylang=en&FamilyID=8b635615-b368-4e98-a4b3-d779611eced4 System Center Configuration Manager 2007 Operating System Deployment Guide This guidance helps healthcare organizations when implementing and using the operating system deployment feature of Configuration Manager. This guidance provides the information required to quickly become familiar with the operating system deployment feature and understand the appropriate decisions that need to be made in order to deploy and use the solution. It also provides step-by-step guidance showing how to install and configure the required components, and also how to use the most common features. http://www.microsoft.com/downloads/details.aspx?displaylang=en&FamilyID=defbf5ab-7d60-402b-a58e-5cccc4932a12 System Center Configuration Manager 2007 Software Distribution Guide This guidance provides the information required to quickly become familiar with the software distribution feature and understand the appropriate decisions that need to be made in order to deploy and use the solution. It also provides step-by-step guidance showing how to create the objects required within Configuration Manager to perform the software distribution. http://www.microsoft.com/downloads/details.aspx?displaylang=en&FamilyID=0a4a62eb-4335-4847-b22f-baeb915f3e24 System Center Configuration Manager Software Update Management Guide This guidance provides the information required to quickly become familiar with the software update feature, and understand the appropriate decisions that need to be made in order to deploy and use the solution. It also provides step-by-step guidance showing how to install and configure the required components, and how to use the most common features. http://www.microsoft.com/downloads/details.aspx?displaylang=en&FamilyID=27c44801-0d99-48a1-b371-56e27099c5d2 and if the above isn't enough for you, there's always the SCCM Guides right here on windows-noob.com cheers niall
-
try my guide please and then see what result you get ok ?
-
yes, you could use Collection variables or Computer Variables to define any variable set in the task sequence, and collection variables have the advantage of hiding the password value entered, I'll raise that in another post if I have time.
-
from the last log < so........ have you tried this ? http://www.windows-noob.com/forums/index.php?/topic/1543-how-can-i-capture-windows-7/
-
cleaning up an old post here's how to Capture Windows 7 http://www.windows-noob.com/forums/index.php?/topic/1543-how-can-i-capture-windows-7/ cheers niall
-
"With the latest releases of Opera, Google Chrome and Firefox continuing to push the boundaries of the web, the once-dominant Internet Explorer is looking less and less relevant every day. But we should expect Microsoft to go on the offensive at its upcoming MIX 2010 developer conference in Las Vegas, where, it has been speculated, the company will demonstrate the first beta builds of Internet Explorer 9 and possibly offer a preview release of the browser to developers. Several clues point to the possibility that the next version of IE will include broad support for HTML5 elements, vector graphics and emerging CSS standards. If Microsoft plays its cards right in Vegas, IE 9 could be the release that helps IE get its groove back in the web browser game."
-
During the Microsoft TechEd EMEA 2009 event in Berlin the first announcement was made that the ConfigMgr product team is working on a new solution accelerator named; The Configuration Manager dashboard. Last week the product team made the announcement that the first beta of this new dashboard is publicly available. What is a dashboard? A dashboard is basically a webpage containing multiple reports with graphs. This enables ConfigMgr administrators to have multiple information in reports on a single page. Requirements To run the dashboard there are several requirements to be aware of. First of all you need of course a Configuration Manager site running R2 or with Service Pack 2. read the rest on Jannes Alink's blog here
-
you are welcome, glad it's working now and now that you have it working, try and contribute to the forum
-
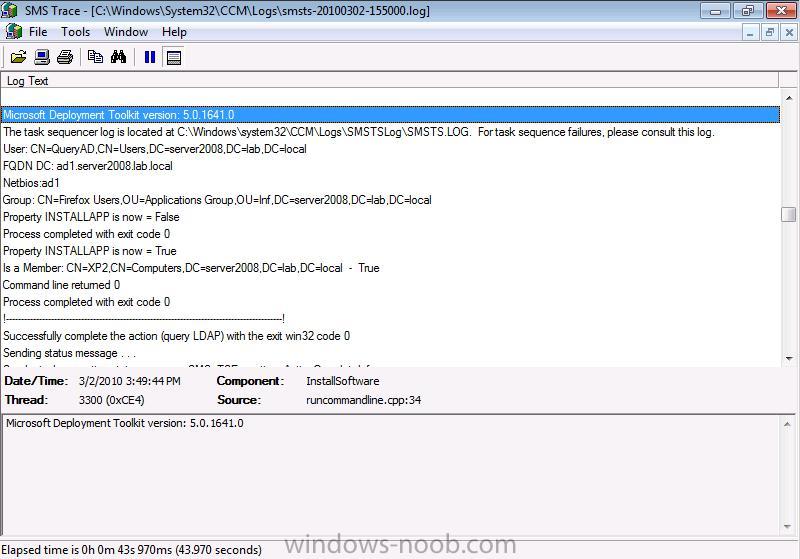
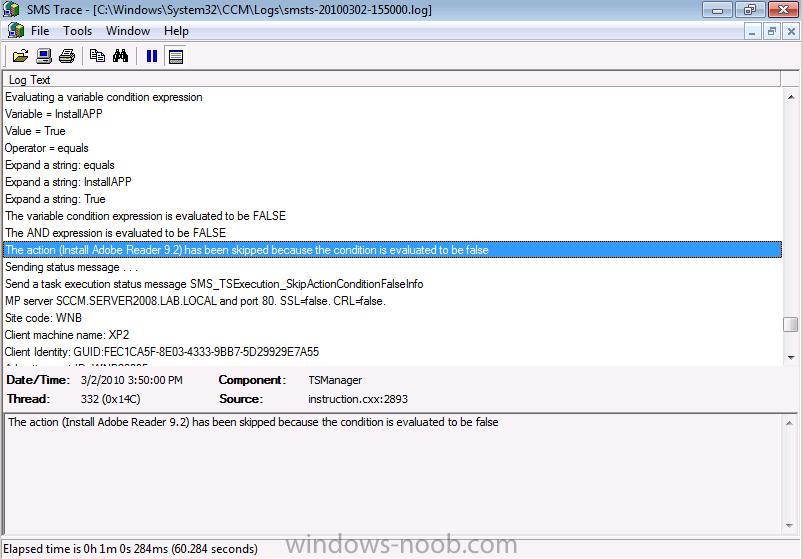
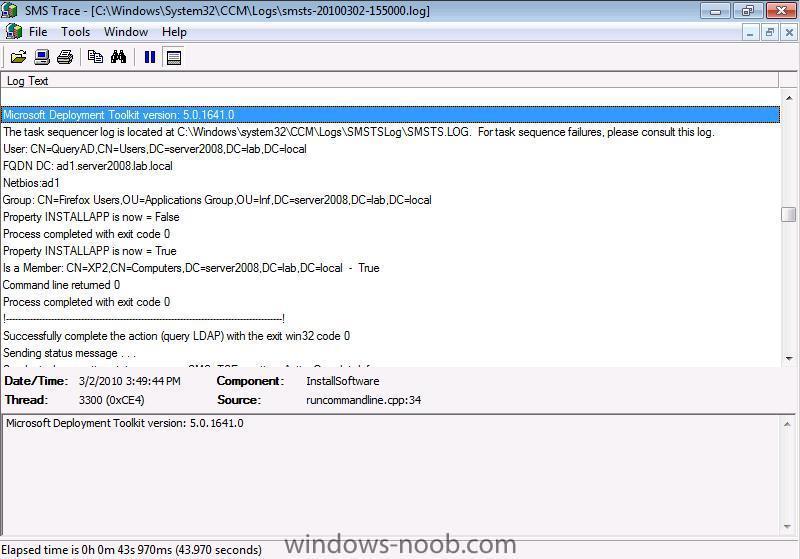
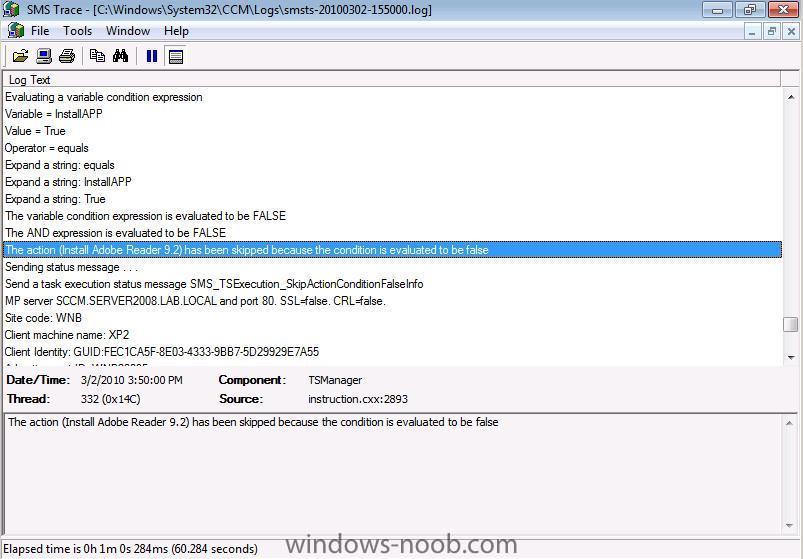
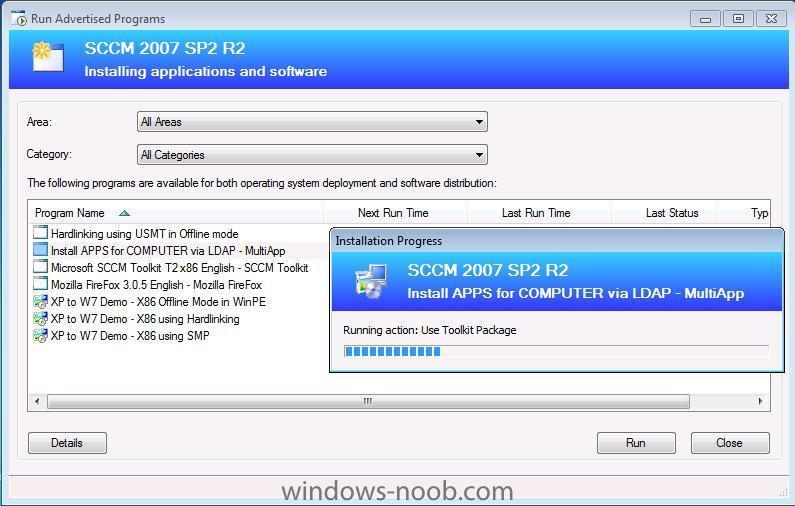
Troubleshooting the MultiApp Task Sequence Start the Task Sequence via RAP and verify that your applications install as part of the Task Sequence. The Custom_AppInstall.wsf script contains some debugging lines which will write to your SMSTS.log file during the task sequence being deployed, below is a sample where it has correctly found that a computer account is in an Active Directory Security Group and therefore sets the InstallApp variable to True. and the following is an application install being skipped because the computer account was not found in AD and therefore InstallAPP was set to False.
-
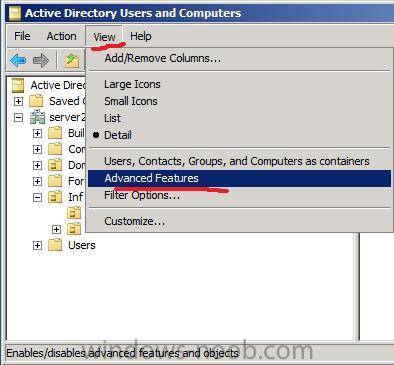
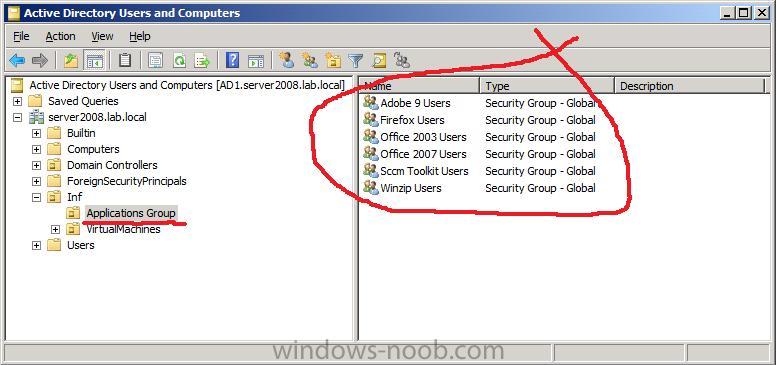
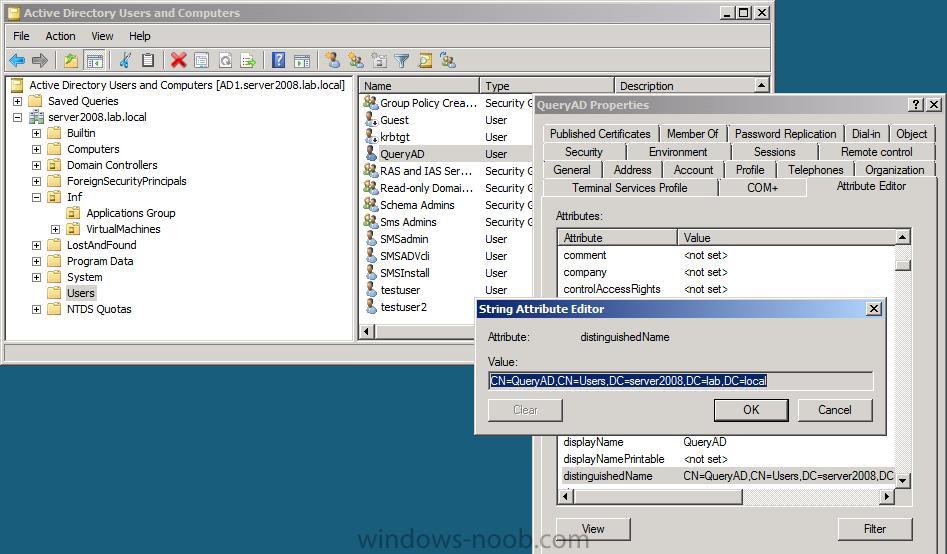
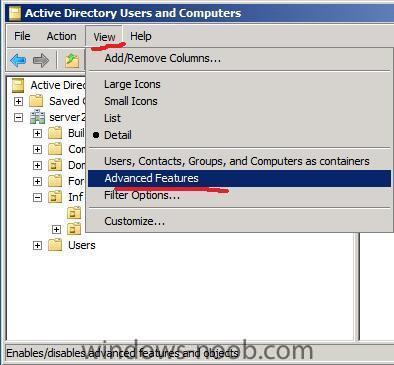
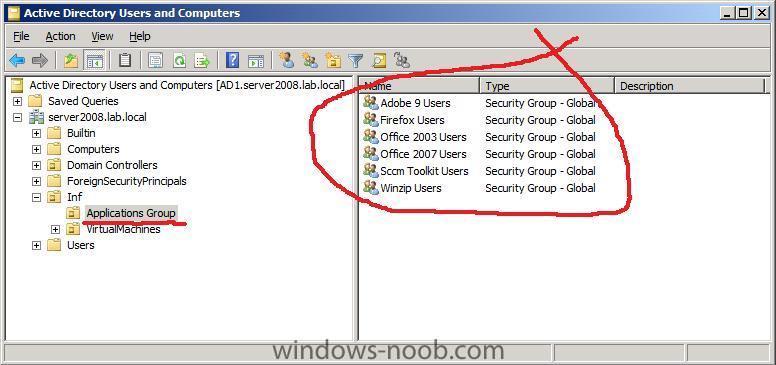
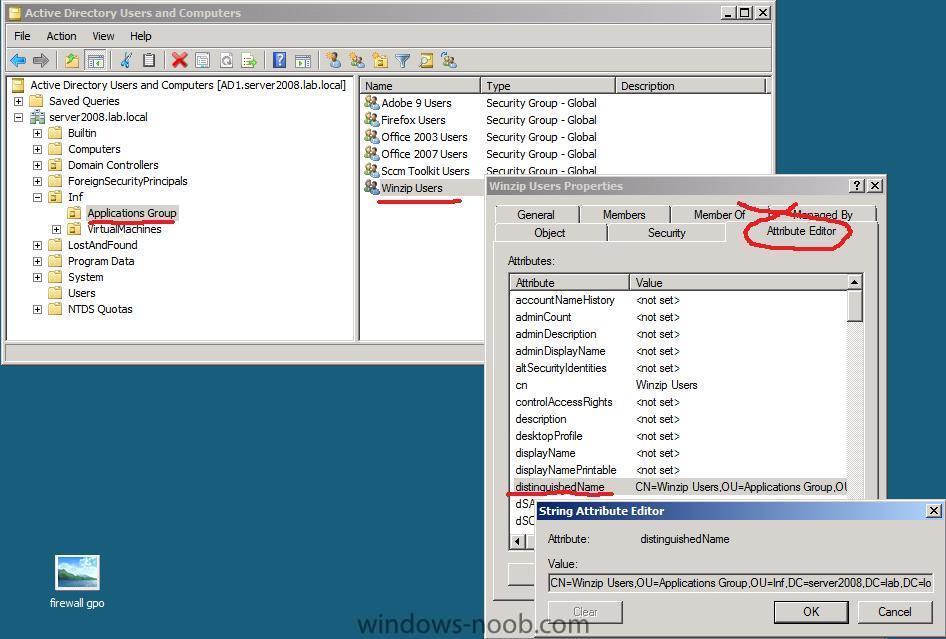
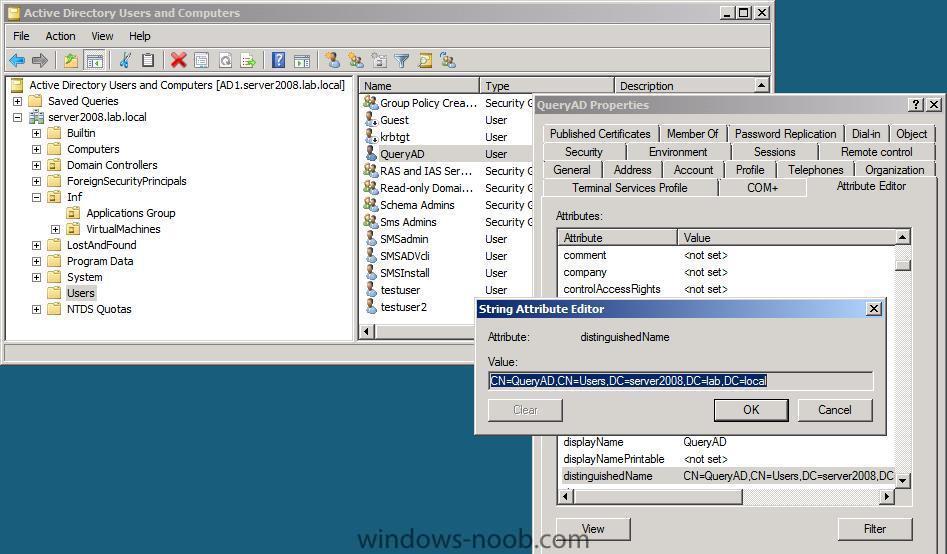
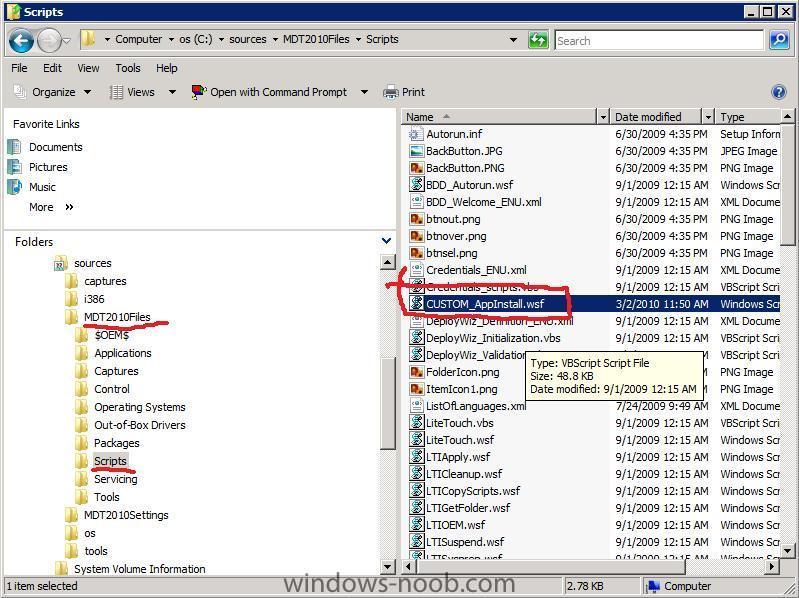
Getting the Distinguished Name info from AD One of the big requirements of this task sequence is correctly identifying the Distinguished Names of your Active Directory User and the Active Directory Security Group. Our applications groups may look something like this in Active Directory Computers and Users. So how do we find that info, On your AD, open up Computers and Users. Click on the View option and enable Advanced Features. Now you can browse to the Applications respective Security Group and right click on it, in the example below we are looking at the Winzip AD Security Group. Double click on the group, choose the Attribute Editor tab and scroll down to Distinguished Name. The result is what we need for our task Sequence. While you are at it, verify the Distinguished Name of your Active Directory QueryAD user.
-
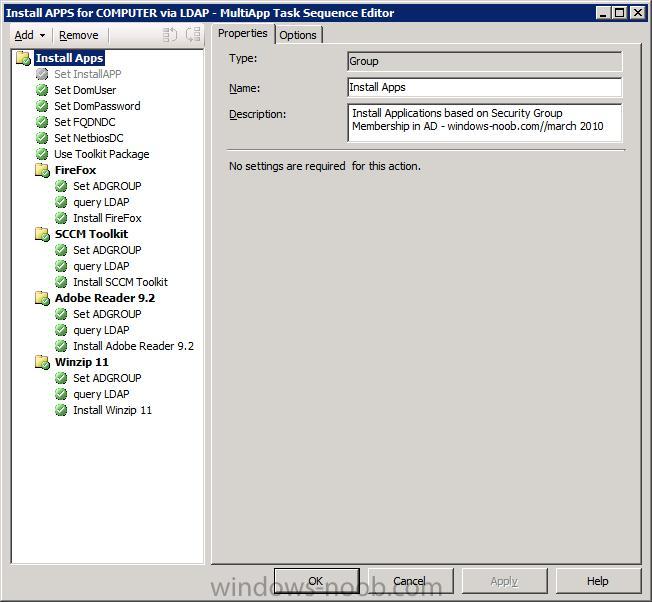
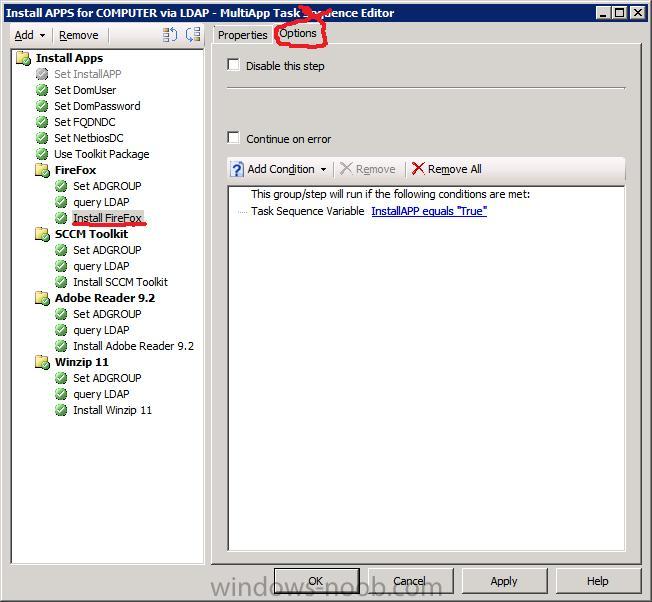
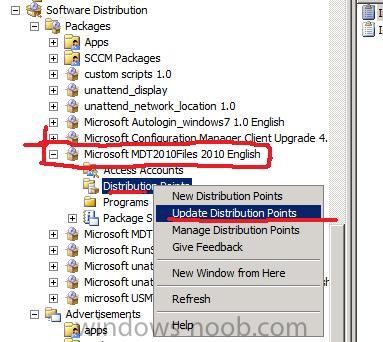
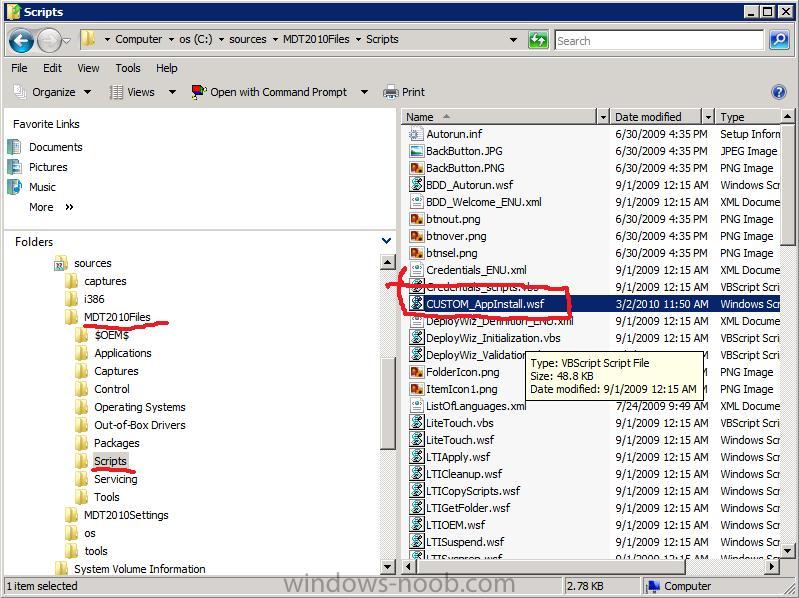
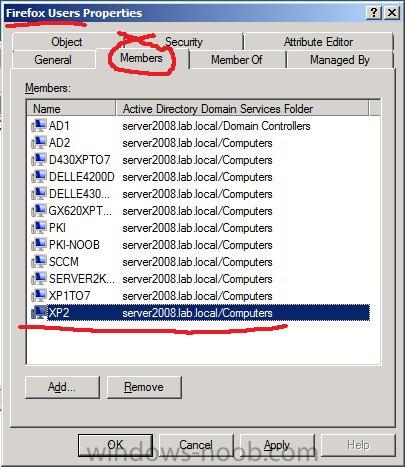
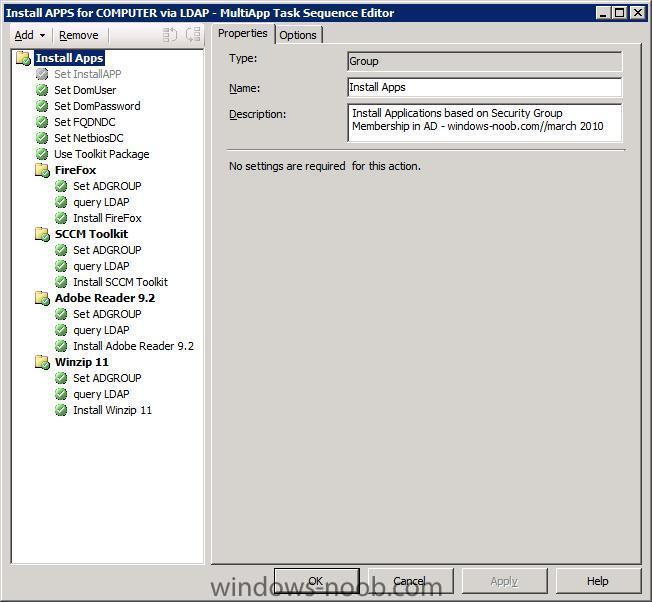
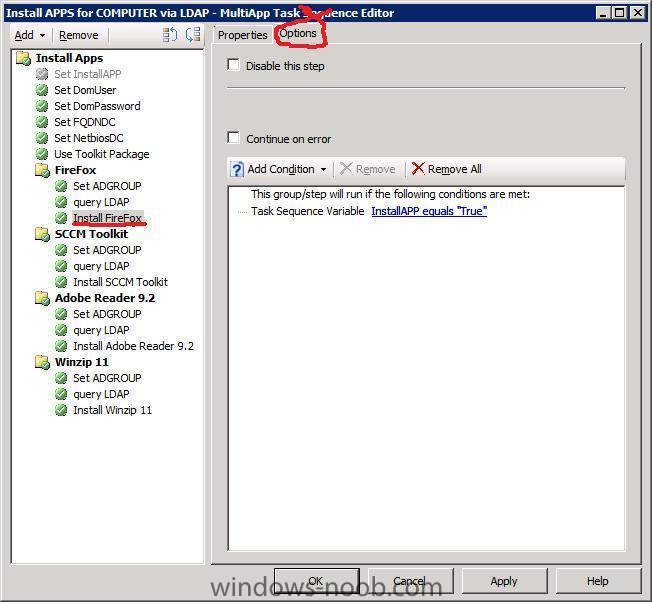
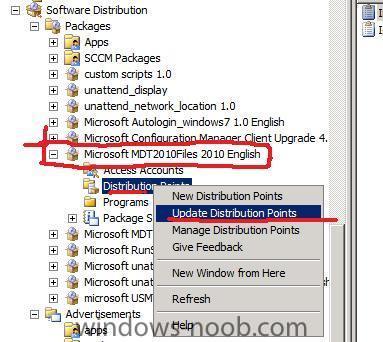
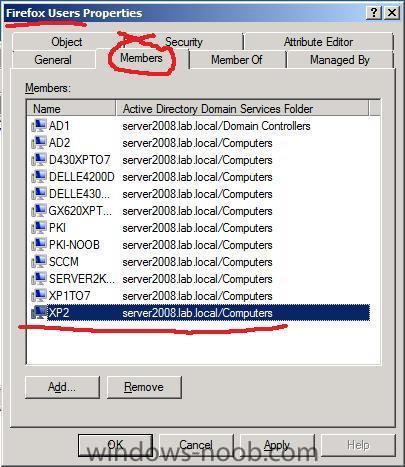
The following guide is based upon a post by Daniel Oxley on The Deployment Guys blog where he showed a MDT Task Sequence which could install applications based on Active Directory queries, I have modified the script provided and created a brand new Task Sequence for System Center Configuration Manager 2007. All you have to do is to import the Task Sequence into ConfigMgr and start dynamically installing applications. Note: This post is reproduced as a Webcast here. Ok first of all understand what this does and what you need done in the back-end. What does this do ? The task sequence will set some variables, make a call to Active Directory using a user you define within the task sequence, then based upon the results returned will set another variables value to True or False based on whether a COMPUTER is a member of an Active Directory Security Group. It can loop through this many times to install several applications 'on the fly' during an OSD task sequence, the advantage of this is that the Task Sequence becomes dynamic based upon where the COMPUTER is present in AD. In the above Screenshot, the computer XP2 (amongst others) is a member of the FireFox Users Active Directory Security Group. Therefore if we run the Task Sequence (and thus the script) on that computer it will return a value of True for membership of the FireFox Users Active Directory Security Group and therefore the FireFox application will be installed during the Task Sequence dynamically. What does it need ? You must have created some Active Directory Security Groups in AD for the applications you are intending to dynamically install and you should add the computer account to these groups, if the computer is not a member of the Active Directory Security Group then the software will not be installed via the task sequence. You must have some applications pre-created in SCCM which can install as part of a normal task sequence. You will need an Active Directory user which we will use to connect to AD to get the info. (I have created a standard user called QueryAd, for security reasons you should only grant this user the appropriate access in Active Directory). You will need full access to AD to add computers to the selected Active Directory Security Group(s) and to verify the Distinguished Names needed for the Task Sequence Steps. You will need MDT 2010 integrated with SCCM and you will need to add the custom script CUSTOM_AppInstall.wsf to the scripts folder contained within the MDT2010Files package. Once you have added the file you must update the Distribution Points for that package. Editing the Task Sequence Ok now that you have what is needed, let's put it into action. Import the following task sequence into SCCM. install APPS for COMPUTER via LDAP - multiapp.xml Ok let's go through the Task Sequence Step by Step. If you import the Task Sequence above you'll have all this work done for you and you'll just need to edit your application names/distinguished names/package/program location etc, but below is an explanation of how it all works and what it means. Set DomUser Here we set the username for the Active Directory User that we will use to connect to AD to verify if the Computer Account is a member of that Active Directory Security Group. Set DomPassword Password for the above user. As it's in clear text within the Task Sequence, you will want to set the users permissions accordingly in Active Directory. Set FQDNDC Set the Fully Qualified Distinguished Name for the Domain Controller, eg: ad1.server2008.lab.local Set NetbiosDC Set the Netbios name of your DC, eg: ad1 Use Toolkit Package This step is copied from a standard Microsoft Deployment Toolkit Task sequence within SCCM, and as such merely points to the MDTFiles package. FireFox This is just a group name of the application we want installed. Set ADGROUP Here we set the Fully Qualified Distinguised Name of the Active Directory Security Group that we want to check in AD. eg: CN=Firefox Users,OU=Applications Group,OU=Inf,DC=server2008,DC=lab,DC=local. To find out how to obtain the Distinguished Name, please read this. query LDAP Here we actually call the CUSTOM_AppInstall.wsf script from within the previously downloaded MDTFiles package. It will return two possible values, false or true based on whether or not it can find the computer account in the Active Directory Security Group specified in the ADGROUP step above. Install FireFox This is a standard package installer step (Install a single application) which will point to your chosen application package and the program contained within. If no Program appears in the drop down menu then verify that the Program options below are set: On the Environment tab of the program, * Program can run: whether or not a user is logged on * Run Mode: Allow users to interact with the program must be UNCHECKED (not selected). On the Advanced tab of the program, * select Allow this program to be installed from the Install Software task sequence without being advertised Note: Click on the options tab and set it as follows, click on the Add condition drop down menu, select Task Sequence Variable, for Variable name enter InstallAPP for Value set True Download the following:- Here is the CUSTOM_AppInstall.wsf file zipped, Unzip and follow the instructions above to use.. CUSTOM_AppInstall.zip
-
is the firewall enabled or disabled on the clients ? (disable it for testing purposes) is the client installation account a local administrator of the computers you are attempting to install the client on ?
-
i meant attach the log file not a screenshot of it in trace32.exe
-
can you attach the smsts.log file please
-
Microsoft Enterprise Desktop Virtualization 1.0
anyweb posted a question in Application Virtualization
Microsoft Enterprise Desktop Virtualization Planning, Deployment, and Operations Guide Updated: February 26, 2010 Applies To: Microsoft Enterprise Desktop Virtualization MED-V uses Microsoft Virtual PC to provide an enterprise solution for desktop virtualization. With MED-V, you can easily create, deliver, and manage corporate Virtual PC images on any Windows®-based desktop. MED-V is an integral component of the Microsoft Desktop Optimization Pack, a dynamic solution available to Software Assurance customers, which helps reduce application deployment costs, enables delivery of applications as services, and helps to better manage and control enterprise desktop environments. more > http://technet.microsoft.com/en-us/library/ee623013.aspx -
Learn App-V Intermediate Skills like App update, Dynamic Suite Composition & Metering, at the Online Labs via http://twitter.com/MSSpringboard
-
well spotted Peter !
-
a correctly functioning DNS server will return the DC (dns...) fqdn like in this example C:\Documents and Settings\Administrator>nslookup Default Server: windowsnoob.lab.local Address: 192.168.3.1
-
you need DNS otherwise osd won't work if your clients can't resolve the fqdn of your sccm server then you won't be able to do anything so, fix DNS and then the rest will be ok can you paste the results of nslookup (no ip after it) here...
-
find out what that is and verify that it's updated on the distribution points, then try again
-
the SMSTS.log file is found by enabling the F8 troubleshooting feature, infact that and many other tips/guides are found here. i'd suggest you bookmark that one in relation to the USMT packages, a normal USMT 4 package points to the installation folder of USMT 4 which is usually c:\Program Files\Windows AIK\Tools\USMT\ when creating the package... that way the normal USMT4 package contains two sub folders (x86 and x64) so it can handle both 32bit and 64bit state requests, the modified package we use in the beginning task sequence is merely one half of this, namely the X86 part, it's a separate package because we are doing an X86 scanstate.exe in this task sequence in windows PE, if we were using the X64 windows PE boot image we'd need the X64 scanstate bits instead, i know it's a bit confusing but it's the only way I know of to do this currently as I've found no documentation for it anywhere to say otherwise this workaround is only for doing Offline scanstate in Windows PE, all other USMT 4 tasks should be done with the standard USMT 4 package which contains both architectures.. cheers niall