anyweb
-
Posts
9259 -
Joined
-
Last visited
-
Days Won
371
Everything posted by anyweb
-
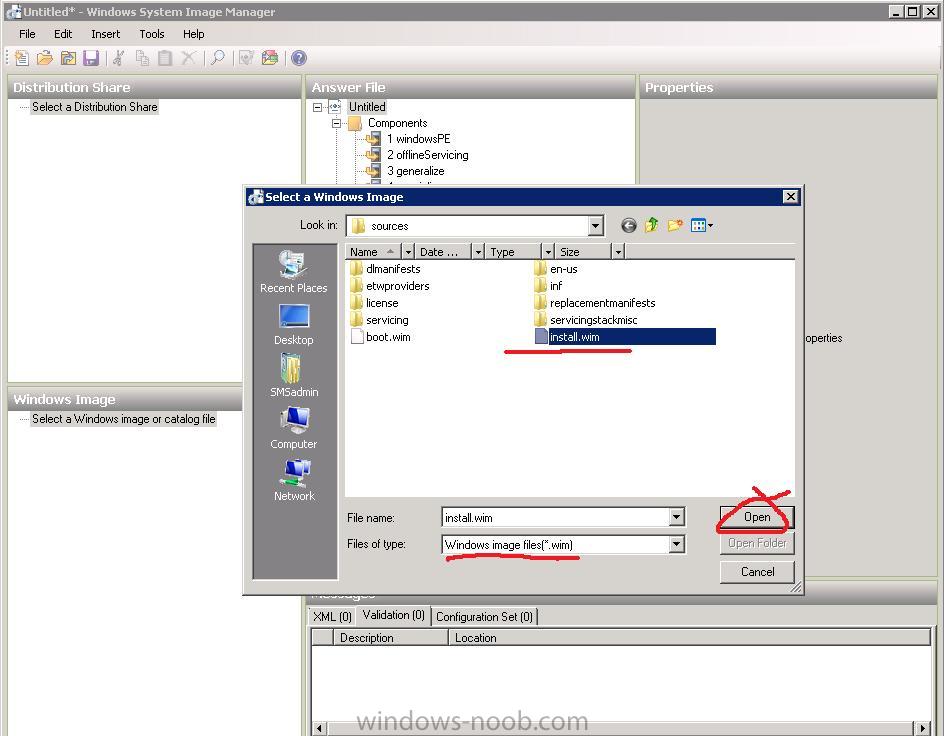
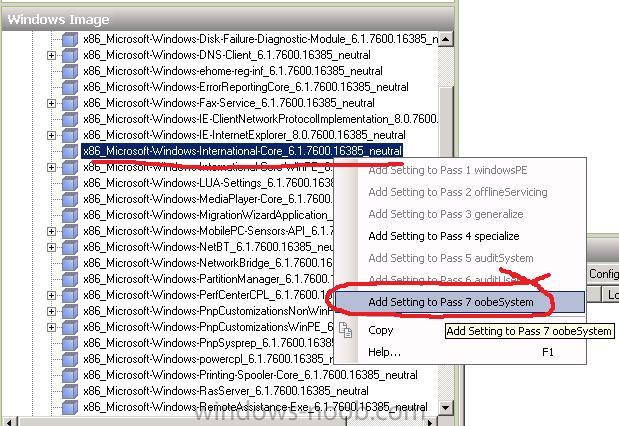
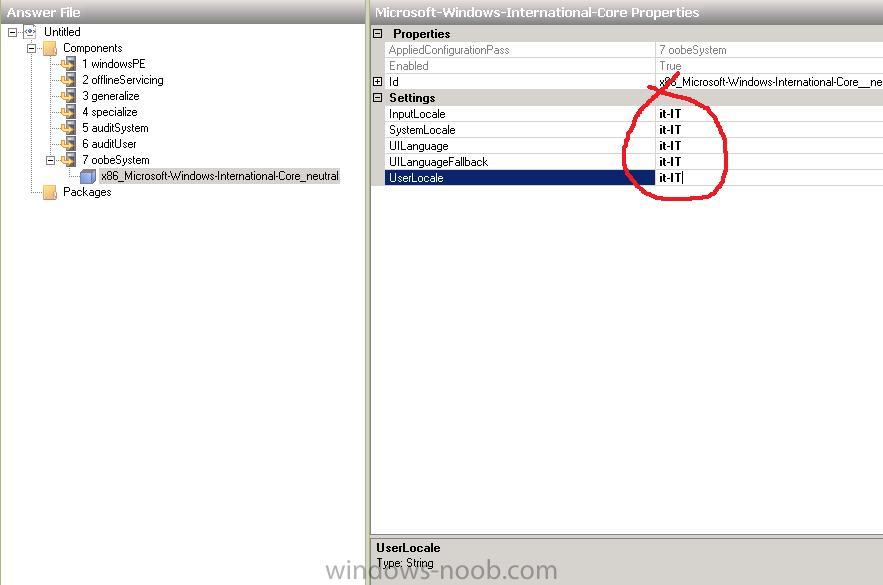
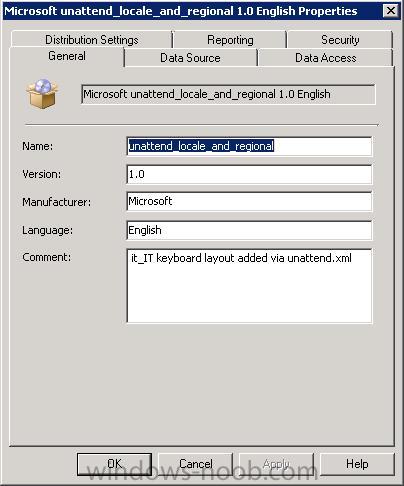
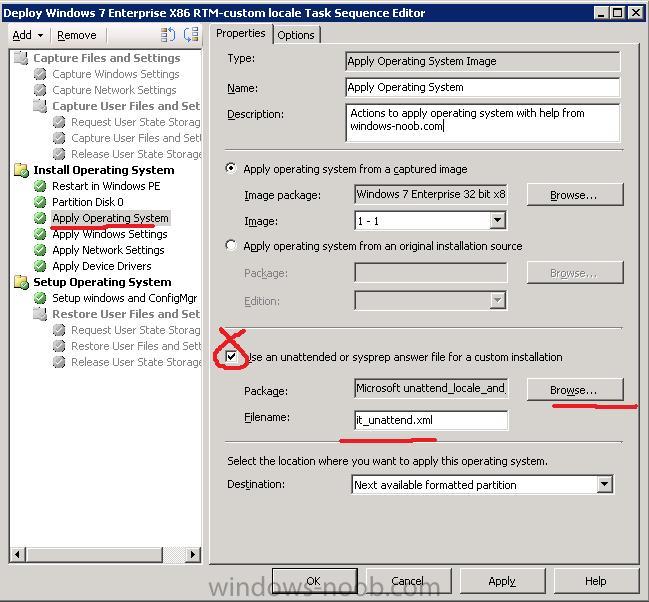
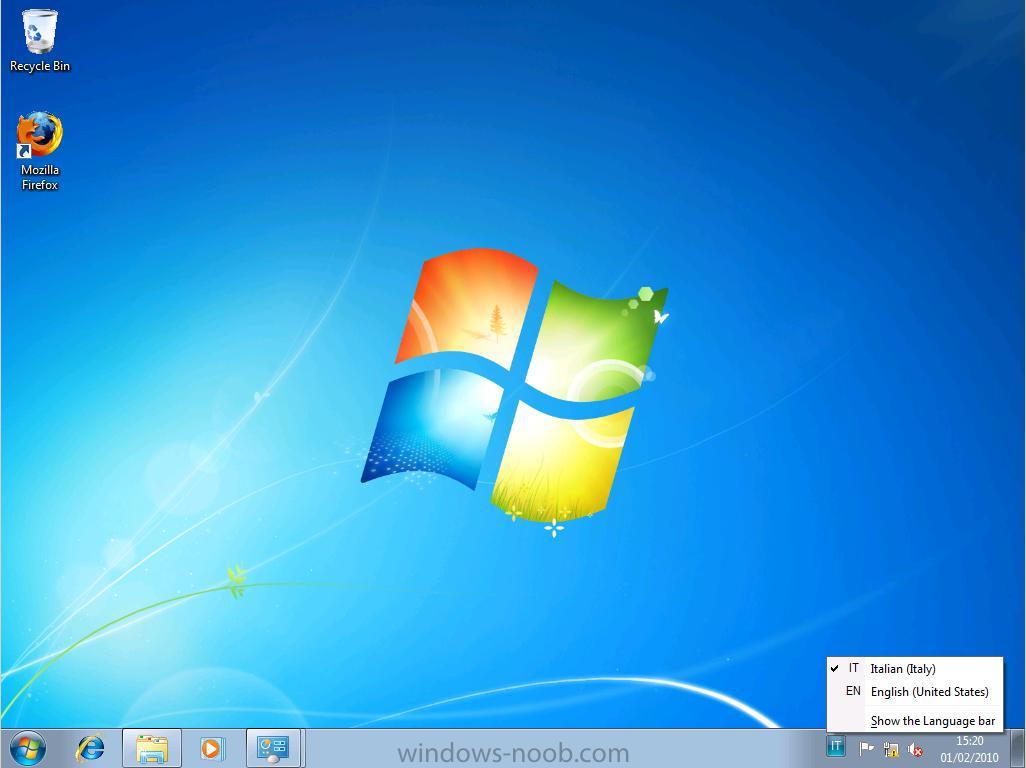
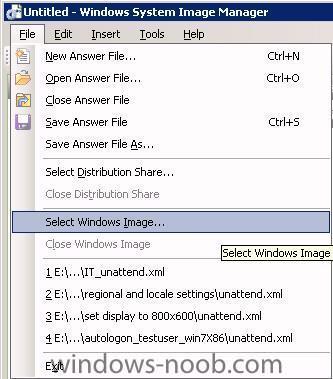
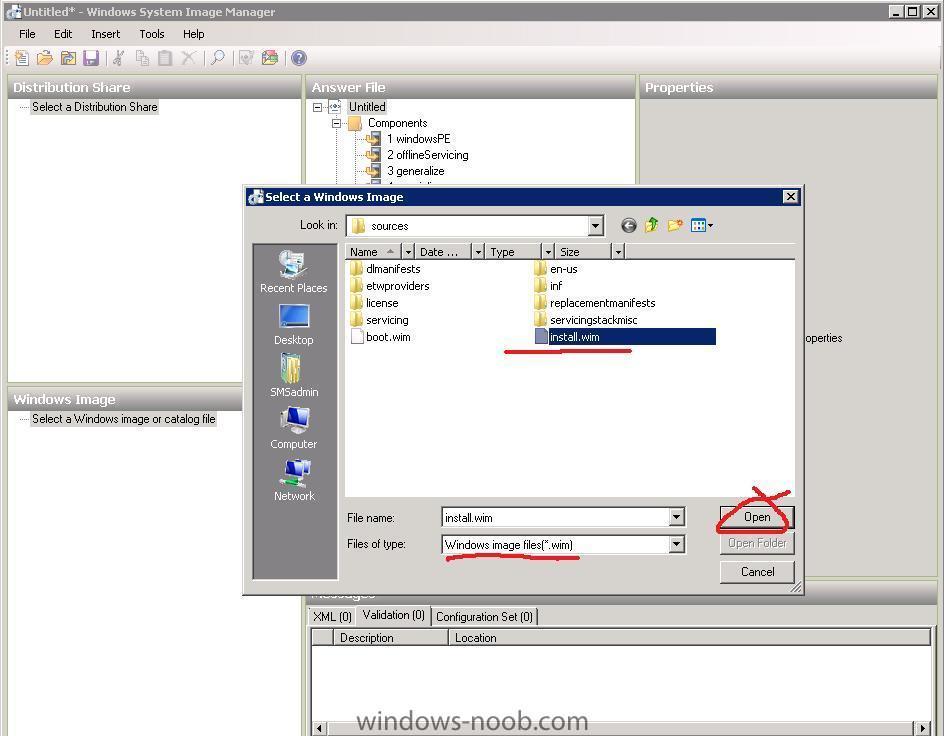
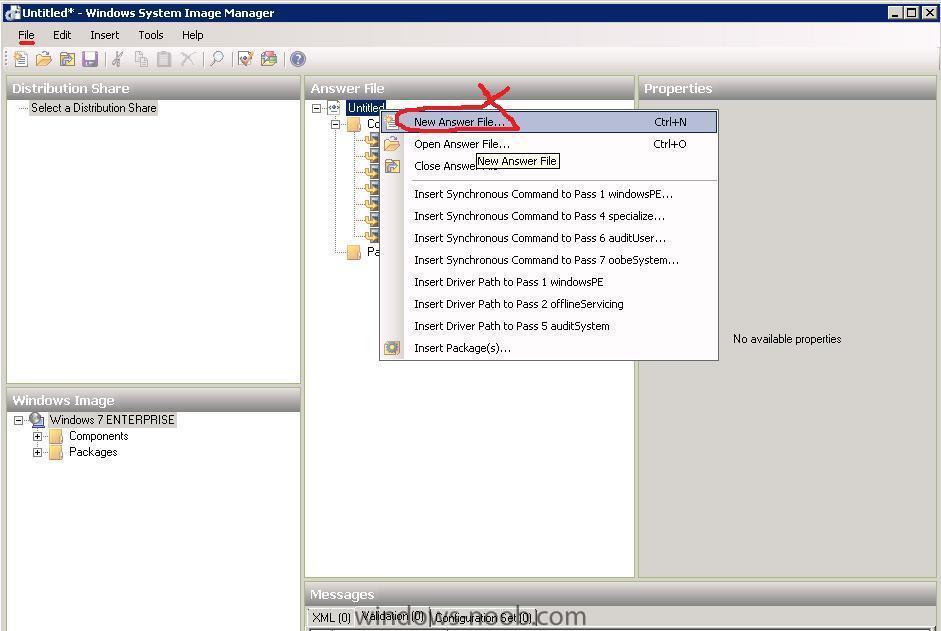
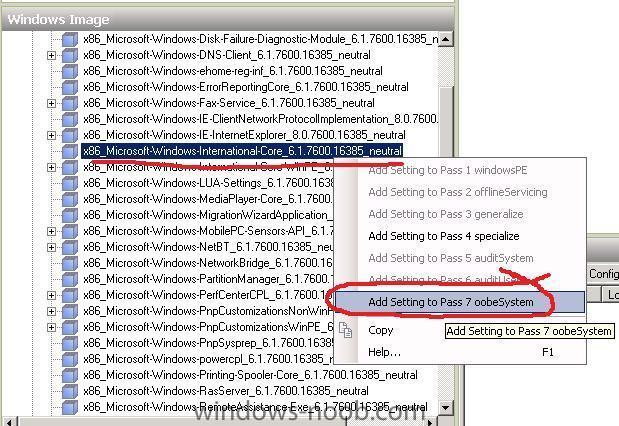
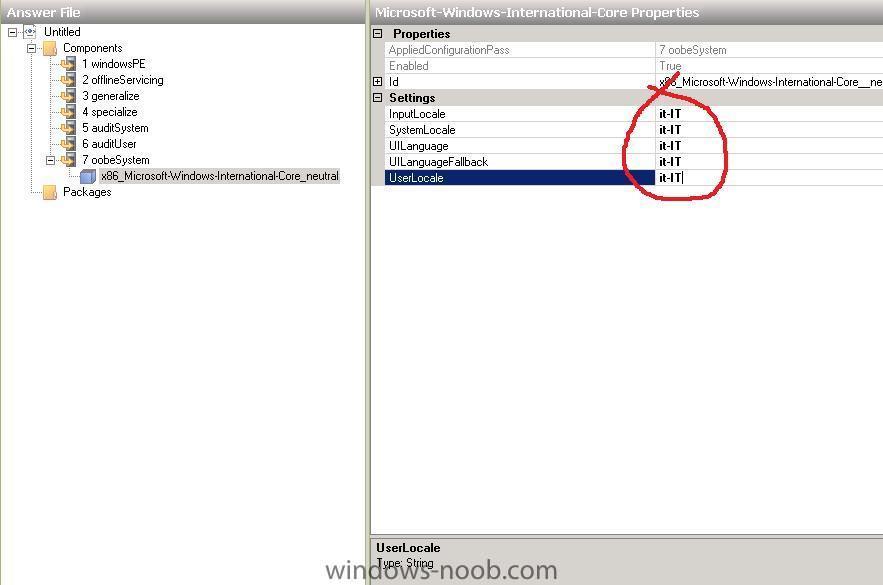
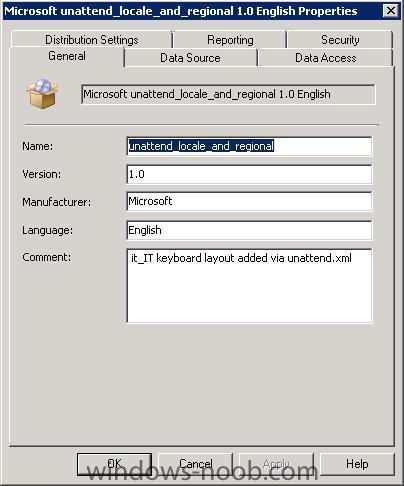
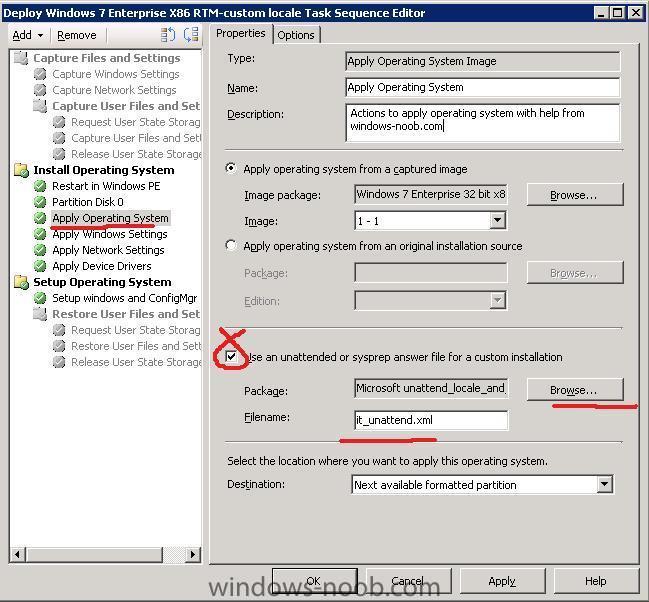
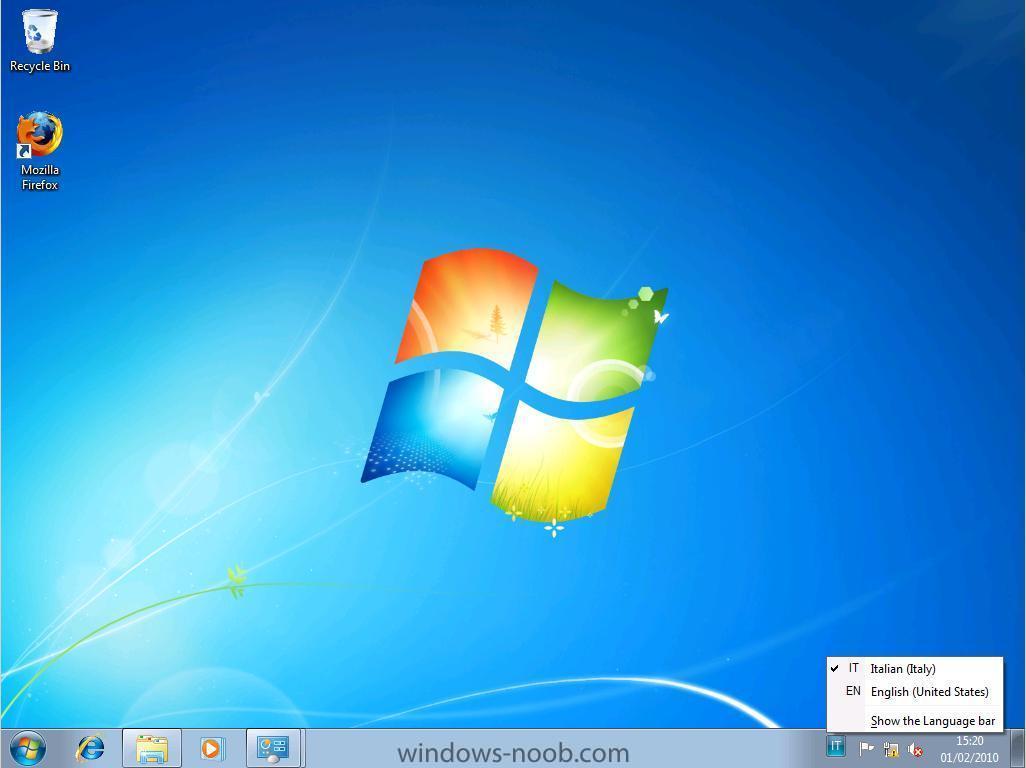
For Technet information on Multilingual deployments please see this post - http://technet.microsoft.com/en-us/library/dd744336%28WS.10%29.aspx This is a very common question, how can I change the regional, keyboard, locale etc in Windows 7, so I'll try and explain how i do it in this post. In this example we will make the Italian keyboard layout (it-IT) the default keyboard layout for Windows 7 login screen, location, keyboard layout. Now of course you can add many more changes to your Unattend.xml file and use them all together to apply changes to Windows 7, but this example is only to show you how to customise the file to add Italian keyboard/locale support within Windows 7, it's up to you to get creative after this !. Set up your LAB. You'll need to have a few things in place in order to get this working:- 1. You will need the Windows SIM (Windows System Image Manager) tool to edit your unattend.xml files. Windows SIM is part of the WAIK. So if you havn't already done so, on a lab server, download the WAIK for Windows 7 (Windows® Automated Installation Kit) and install it. 2. You will need an extracted copy of your chosen architecture Windows 7 Enterprise DVD copied to a temp folder on your lab server. We will be using this image to build our templates (unattend.xml files) which will include our customizations to Windows 7. So go ahead and copy the contents of your Windows 7 Enterprise Edition DVD to d:\temp\windows7\x86. In this example we are using the 32 bit version of Windows 7. If you want to make changes to the 64bit version of Windows 7, then you'll need to copy the contents of your Windows 7 Enterprise Edition X64 DVD to d:\temp\windows7\x64. 3. We'll need a working Deploy Windows 7 task sequence to test this with, make sure you have one that is working 100% everytime so that you can test this with it. Windows SIM actions Windows SIM - select a windows image Start Windows SIM and select a windows image. Point it to the sources Directory on the installation source. You can either select the install.wim file directly in the sources folder or use the Catalog file if you have one. For this guide we shall select the install.wim file. Once done, you may get prompted to create a Catalog file, answer Yes. The catalog file contains descriptions of what components and packages the image contains so may take a few minutes to generate. After the Catalog file is created, our Windows Image pane will list some new nodes called Components and Packages and you can expand them to see what lies within. Windows SIM - create a new answer file Now that we have our Windows Image loaded, we will want to configure it so in the Answer File pane, right click and choose New Answer File Expand the Components node in the Windows image pane, scroll down until you see x86_Microsoft-Windows-International-Core_6.1.7600.16385_neutral right click on it and choose Add setting to Pass 7 oobeSystem. Fill in the values on the Microsoft-Windows-International-Core Properties node so that it looks as follows:- InputLocale it-IT SystemLocale it-IT UILanguage it-IT UILanguageFallback it-IT UserLocale it-IT Now that we've made our changes, let's verify them so Click on Tools, Validate Answer File and verify that there are no errors reported in the Messages pane. Finally we want to save our Unattend.xml file so click on File, Save Answer File As and call the file IT_unattend.xml you can now close Windows SIM. Things to do on the ConfigMgr Server (SCCM) On the ConfigMgr Server Create a folder called Unattend XMLs and place that folder in a network share. Create a sub folder structure as follows: Unattend XMLs -X86 --regional and locale settings -X64 --regional and locale settings copy the IT_unattend.xml file into the Unattend XMLs\X86\regional and locale settings folder In the ConfigMgr console, expand Software Distribution and create a New package, call it unattend_locale_and_regional this package requires no program but we must point the data source to the share we created above eg: \\SCCM\sources\Unattend XMLs\X86\regional and locale settings Once done, Create distribution point(s) for the new package and update the package to the DP's. Adding the unattend.xml settings to our Task Sequence. Expand the Operating System Deployment node in ConfigMgr and select our Deploy Windows 7 task sequence. (you can import this one if you wish, but you'll have to edit the four references within it for boot sequence, configmgr client package and so on). deploy_windows_7_with_italian_locale.xml Select the Apply Operating System step and place a checkmark in Use an unattended or sysprep answer file for a custom installation. Browse and select our newly created package above, for the filename type in IT_unattend.xml. Save the Task sequence by applying your changes and advertise it to a collection, do a test deployment of Windows 7 and watch as the keyboard settings are changed to Italian. If you look in the screenshot below you'll see the IT box in the top left corner, that means we have Italian keyboard support at the Login Screen ! and below is what you would see once logged into Windows. Note: For a full list of supported language packs and settings see Locale Identifier Constants and Strings Note: #2, if you'd like to configure these settings using Collection Variables, check out this post from Kenny have fun ! cheers niall.

-

side-by-side migration of my old computers to a new configuration(XP to XP)a
anyweb replied to Eswar Koneti's question in USMT
have you added any computer to the collection that you've advertised the Capture ts to ? -
side-by-side migration of my old computers to a new configuration(XP to XP)a
anyweb replied to Eswar Koneti's question in USMT
what doesnt happen, is it optional or mandatory, if its optional you'll need to start it yourself, manually -
just make sure it's not added to any collection where software updates or software distribution are targetted. cheers niall
-
Setting computername during deployment
anyweb replied to anyweb's question in Troubleshooting, Tools, Hints and Tips
Gather gathers info, see below from the Print Ready Documentation, so it will Gather a value for %AssetTag% from the computers bios, next the task sequence above, that value is assigned in the Set Task sequence variable step, and then this is then used by the Configure command (listed below) or during the Setup Windows and ConfigMgr step if you bring up a command prompt (F8) and browse the c:\windows\panther\unattend\unattend.xml file you can see it gets changed during these steps to the values you selected Gather Configure -
Microsoft presented the results for its second quarter of the 2010 fiscal year yesterday, which ended on December 29 2009. As it turns out, thanks to sales of Windows 7, Microsoft experienced a record quarter, which is especially welcome after the previous two lacklustre ones. It sold 60 million Windows 7 licenses during this record quarter. Since I have no clue about these figures, I'll just copy them verbatim so I won't make any mistakes. Microsoft Corp. today announced record revenue of $19.02 billion for the second quarter ended Dec. 31, 2009, a 14% increase from the same period of the prior year. Operating income, net income and diluted earnings per share for the quarter were $8.51 billion, $6.66 billion and $0.74 per share, which represented increases of 43%, 60% and 57%, respectively, when compared with the prior year period. Windows 7 played a major, major role in the revenue jump. "Exceptional demand for Windows 7 led to the positive top-line growth for the company," says Peter Klein, chief financial officer at Microsoft, "Our continuing commitment to managing costs allowed us to drive earnings performance ahead of the revenue growth." Windows 7 has seen tremendous sales, with more than 60 million Windows 7 licenses leaving Redmond during the second quarter, making it the fastest selling operating system in history according to Microsoft. "This is a record quarter for Windows units," says Kevin Turner, chief operating officer at Microsoft, "We are thrilled by the consumer reception to Windows 7 and by business enthusiasm to adopt Windows 7." via > http://www.osnews.com/story/22808/Microsoft_Windows_7_Fastest_Selling_OS_in_History
-
not unless you are specifically using multicast, have you read somewhere where is says different ?
-
i'll test it in my lab, what settings were you playing with that it was ignoring ?
-
i'd leave it as unattend.xml but are you creating it in windows sim or ? what is in this package > LA20002A
-
the sp2 upgrade renders any custom boot images obsolete amongst other things, did you check your task sequences to see if they used a custom boot image ?
-
no, are you using Multicast ?
-
generate and possibly edit the following query and you should be good to go select SMS_R_SYSTEM.ResourceID,SMS_R_SYSTEM.ResourceType,SMS_R_SYSTEM.Name,SMS_R_SYSTEM.SMSUniqueIdentifier,SMS_R_SYSTEM.ResourceDomainORWorkgroup,SMS_R_SYSTEM.Client from SMS_R_System inner join SMS_G_System_ADD_REMOVE_PROGRAMS on SMS_G_System_ADD_REMOVE_PROGRAMS.ResourceID = SMS_R_System.ResourceId where SMS_G_System_ADD_REMOVE_PROGRAMS.DisplayName = "Microsoft Office Professional Plus 2003" or SMS_G_System_ADD_REMOVE_PROGRAMS.DisplayName = "Microsoft Office Enterprise 2003" or SMS_G_System_ADD_REMOVE_PROGRAMS.DisplayName = "Microsoft Office Standard 2003"
-
as of today, windows-noob.com is on Twitter officially, i've moved the test twitter posts from my twitter account (ncbrady) to it's own dedicated account, please do me and windows-noob.com a favor and follow windowsnoob on twitter all new topics from the RSS feed called todays topics, will be posted there every 15 minutes or so thanks ! cheers niall http://twitter.com/windowsnoob
-
Import Microsoft deployment task sequence Missing
anyweb replied to Slaris's question in Deploy Server 2008
you'll need to download and install mdt 2010 and then do the mdt integration with sccm, it'll become clearer once you install it -
that helps, best way to figure it out is via google and trial and error as the official documentation doesn't seem to always co-relate to real experience oh and after re-reading your original post, you can do alot of those things via Group Policy, cheers niall
-
well i'm not 100% sure, read this and i quote from the technet link in my testing it doesn't autologin, hence the registry hack feel free to find out how to get it to work though i'm as interested as you in this cheers niall
-
the standard build and capture task sequence uses registry 'hooks' to do its hidden magic (auto login and all that), if you can find a way of accessing them to get around this workaround then please share cheers niall
-
using windows SIM you can customise your unattend.xml file to do most of what you want above in your list read this guide for some pointers then when you have things customised, you'll end up with an unattend.xml file, create a package of that file and add it in the Apply Operating System step in the task sequence, select the Use an unattended or sysprep answer file for a custom installation option
-
as Chiners_68 says you need to enable command line support to find out how to do that, take a look at this list of SCCM guides I have put together, scroll down to troubleshooting.
-
yeah reinstall the SMP, easy to do. also before doing so, browse the smp store folder locally on the server, anything in it ???
-
the question is, how are you deploying windows 7 currently, are you using the install.wim file from the windows 7 DVD or are you installing windows 7 by using an Install Operating System source... *pointing it to the entire content of the dvd source...*
-
most likely its missing network drivers in your boot.wim file the only way to be sure is to read the SMSTS.log file, can you post it here please ?
-
having the client installed is one thing, it's the client agents that matter, they are the enablers: the below info is taken from Brian S Tuckers blog Below is a list of agents, some new and some old which are configurable in SCCM 2007 Beta. I’ll guess that many of these will not change between this version and the final, but wanted to give a heads up on the agents that are configurable. The only thing I’m still a bit confused on is that the first 3 agents are combined into the new Device Client Agent. I’m not sure if the first 3 are going to only be used for SMS 2003 clients and then Device Client Agent only for SCCM clients. I can see that being the configuration, but don’t see it in the documentation so far. More to come on that as I figure it out. Hardware Inventory Client Agent – Once enabled, determines what schedule to perform an inventory of hardware. Includes both hardware and installed software inventory. Default = 7 days Software Inventory Client Agent – Once enabled, inventories all .exe files on a SCCM client computer. Can be configured for alternate file extensions. However, be aware that by adding other file extensions, the SCCM SQL database will increase in size. Advertised Programs Client Agent – Once enabled, tells the SCCM client how often to poll the SCCM server for policy. Agent also allows for visual and or audio notifications. Computer Client Agent (New) – Allows configuration of the Network Access Account which grants access to advertised packages and configures the polling of the client for policy. Allows for custom notification text for Organization Name, Software Updates, Software Distribution and Operating System deployments. Allows for hour and minute mandatory reminders for software distribution. BITS enabled throttling from the SCCM client to the SCCM site server. Desired Configuration Management Client Agent (New) – Specifies that clients will evaluate their compliance with any configuration baseline that is assigned to that system. Also, this agent allows for the schedule of when to check for baseline compliance. When enabled, a new tab in the Systems Management application in the Control Panel will list the baselines. Device Client Agent (New) – Determines the poll interval between the client and the site server for new configuration and software. Agent also allows you to enable software and hardware inventory as well as Software distribution. File collection allows for inventory of specific file extensions similar to Software Inventory above. Remote Tools Client Agent - Enables remote tools to be used with SCCM clients. Allows for configuration of who can use remote tools and notifications on the client systems. Note: As with SMS 2003, remote assistance is the preferred method of connecting to a workstation running Windows 2000 Professional or above. Network Access Protection Client Agent (New) – When enabled, NAP will be applied to the client. SCCM allows you to configure security update policies for systems that are not properly patched. When not properly patched to the baseline, the system will be denied access to network resources. The system will then apply updates and be granted access to the network resource. Although the SCCM client will check for compliance every time the system access the network, policy is only updated once a day by default and can be configured on the Evaluation tab. Software Metering Client Agent – When enabled, will record use of specific applications such as Winword.exe (Word). The default schedule for sending client activity is 7 days. By default, 20 applications are monitored in Computer Management / Software Metering. Software Updates Client Agent (New)- When enabled, allows for software updates on the client and the schedule of how often the client initiate a software update compliance assessment (Default = 1 week). Allows the option to enforce all mandatory deployments as an override to individual advertisements. Deployment Re-Evaluation allows a custom schedule for previously deployed updates that are missing and still required. Software Update Client Agent Let me know if you have questions. Rather than adding pictures for everything, I only added ones that were key points of interest.
-
Office 2k3 Problems
anyweb replied to CPS_TECH_DTAFT's question in Deploy software, applications and drivers
if its not happening in the lab and is happening in production then you need to find out what could be causing it, usually the common suspects are group policies or advertisements that you are not aware of, so have you checked both ? can you zip up the entire ccm/logs folder on a client with the problem and post them here ?