anyweb
-
Posts
9277 -
Joined
-
Last visited
-
Days Won
371
Everything posted by anyweb
-

errors when creating a Task Sequence Media
anyweb replied to ticktock's topic in Configuration Manager 2012
of what ? the WIM file ? -
errors when creating a Task Sequence Media
anyweb replied to ticktock's topic in Configuration Manager 2012
what is this package ? CTG00009 -
errors when creating a Task Sequence Media
anyweb replied to ticktock's topic in Configuration Manager 2012
is it a large task sequence with lots of data or what ? how much free space do yo have on the c:\ of the server ? -
German site WinFuture.de has released a video of a leaked Windows 9 (codenamed Threshold build 9834) that shows the new start menu that could be coming to us in a couple of weeks if all goes well. Here's a screenshot of the new startmenu (source: winbeta) and here's the video of the startmenu in action https://www.youtube.com/watch?feature=player_embedded&v=--wgAsHWNRE

-
errors when creating a Task Sequence Media
anyweb replied to ticktock's topic in Configuration Manager 2012
have you tried disabling AV sofware and try again ? -
using SCCM 2012 in a LAB - Part 6. Deploying Software Updates
anyweb replied to anyweb's topic in Configuration Manager 2012
there's is no integrating, you have to install a new WSUS, get rid of the old and start afresh. have a read of this thread on Technet about the subject. cheers niall -
The CM12 BitLocker FrontEnd HTA
anyweb replied to anyweb's question in Frontends, HTA's and Web Services
that's possible but why have two hta's when you can keep it all in one ? -
The CM12 BitLocker FrontEnd HTA
anyweb replied to anyweb's question in Frontends, HTA's and Web Services
good choice and thanks ~! of course it can be changed it's just text files after all (the hta and back end code), here's an example of another HTA i did which allows for multiple operating system images to be selected, you could in theory integrate that code into this hta and hopefully that would do what you wanted, or did you want something else once you are in a task sequence, you cannot select another one, but you can reboot into another one, if that makes sense. -
if this is anything like the optiplex 9010, then I had the same issue this evening, simply download the chipset drivers for your model from support.dell.com and add those drivers as an apply driver package step before the setup windows and configmgr step. your logs are missing lots of info as they are overwriting themselves, please read this post to increase the smsts.log file size.
-
can you grab the smsts.log file before it reboots ?
-
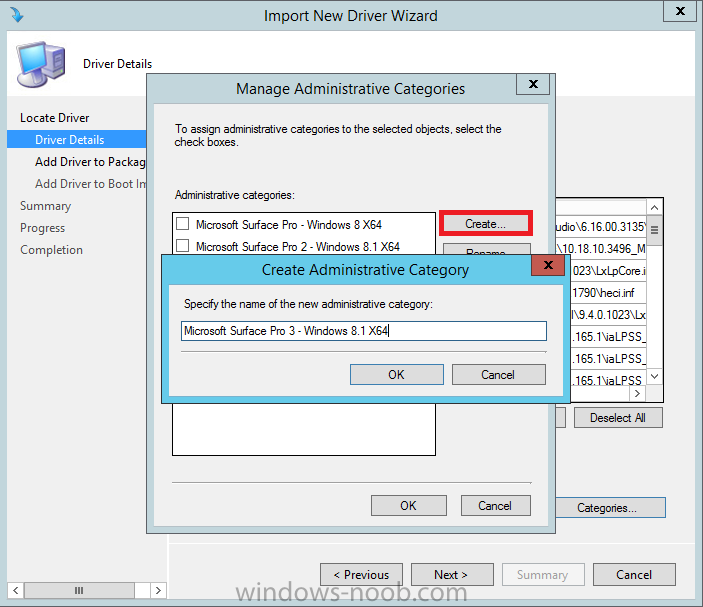
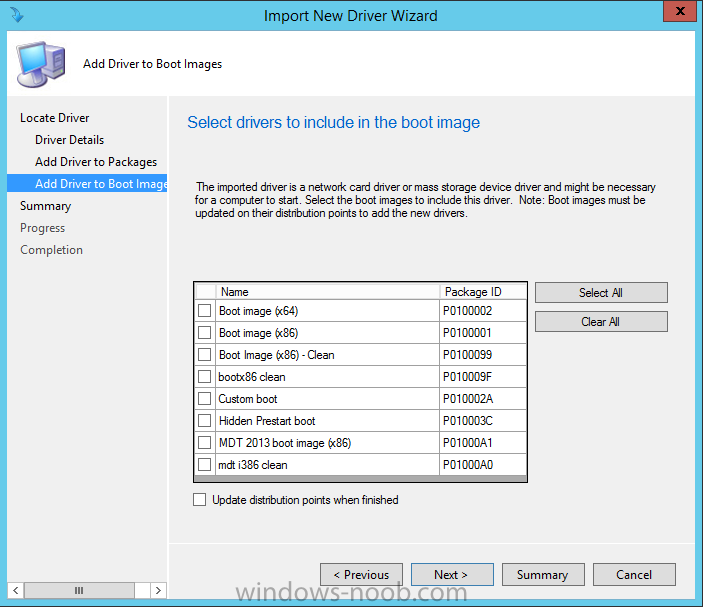
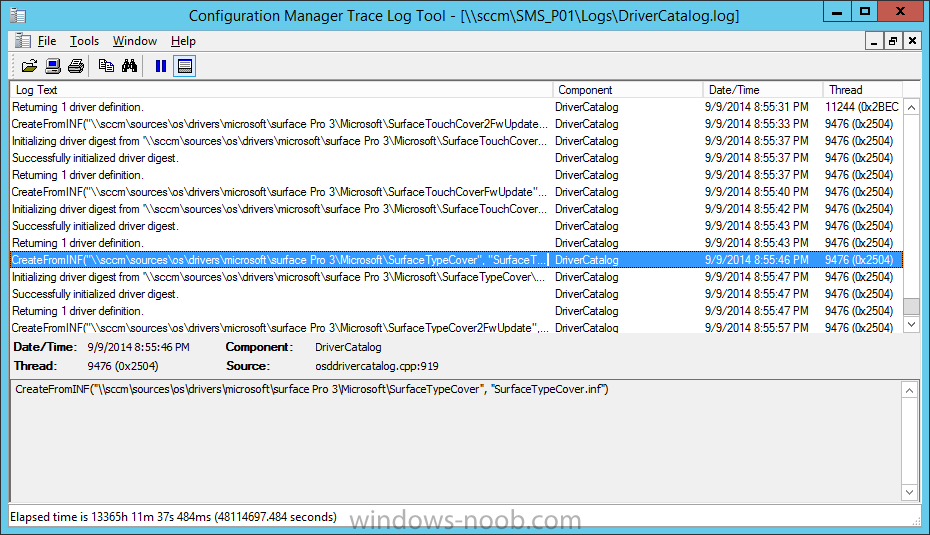
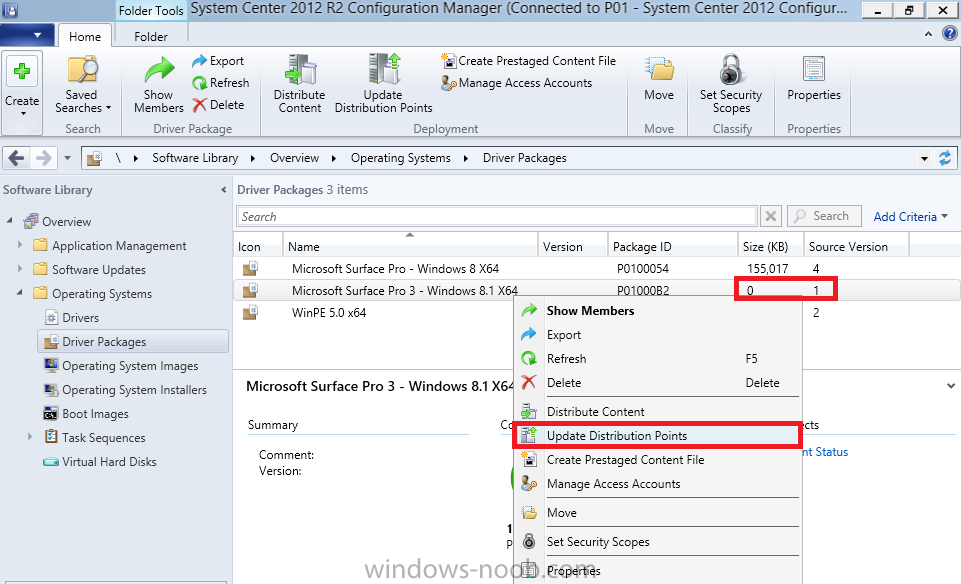
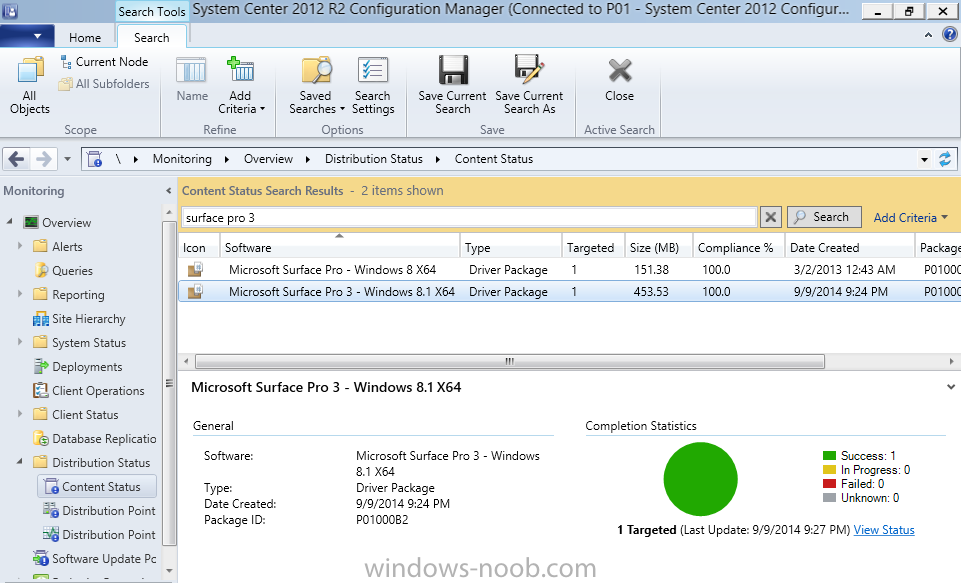
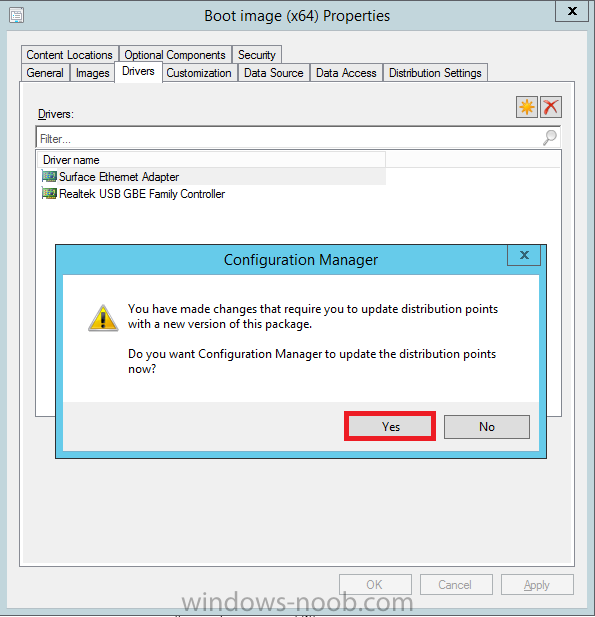
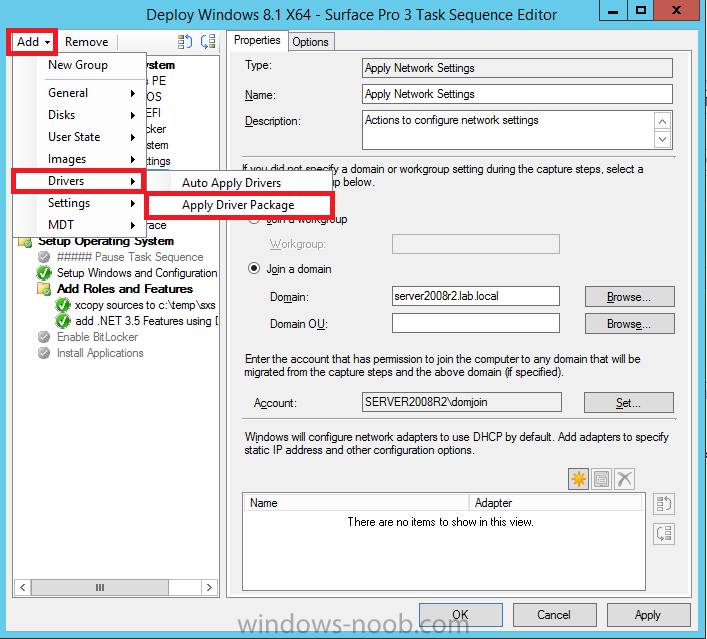
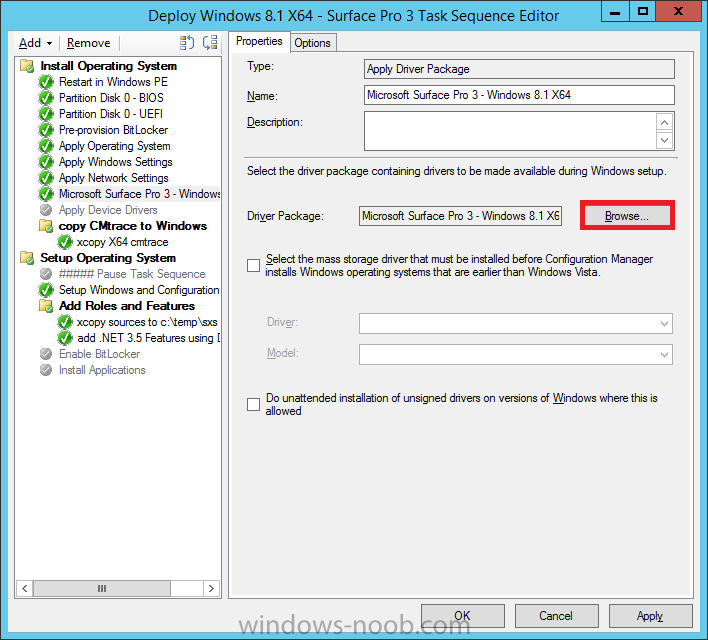
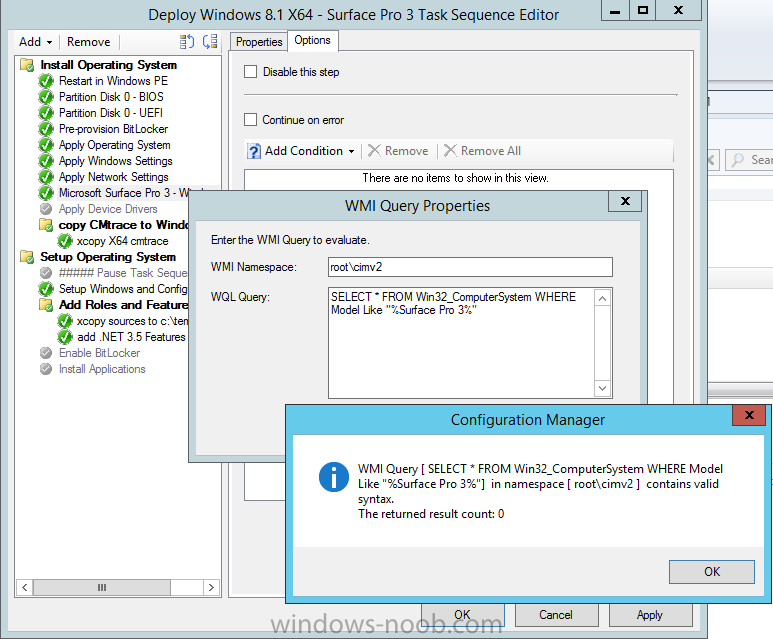
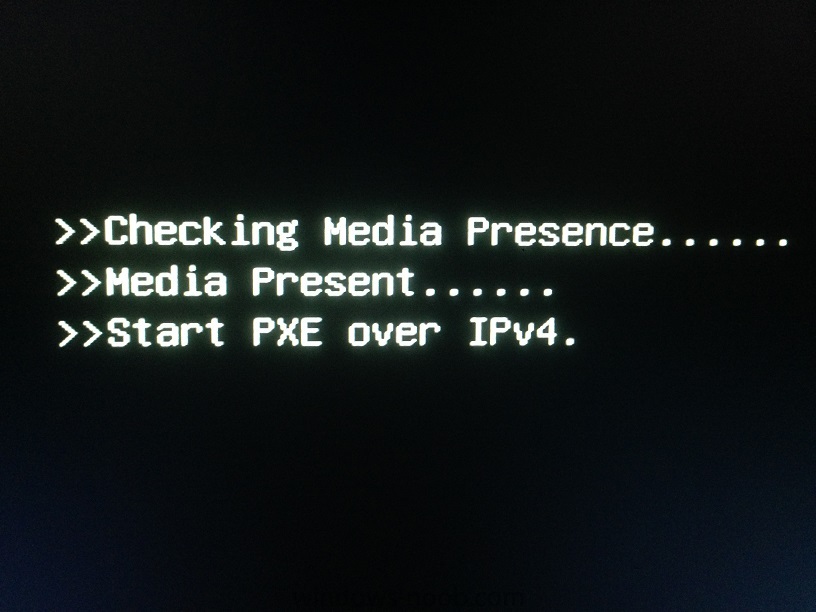
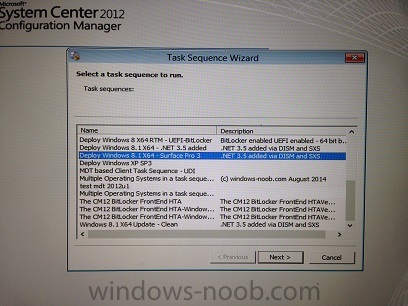
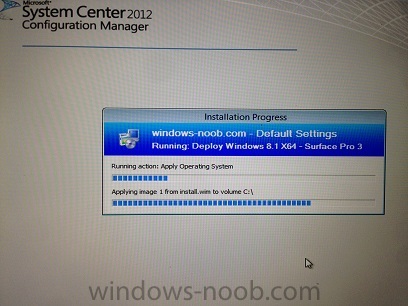
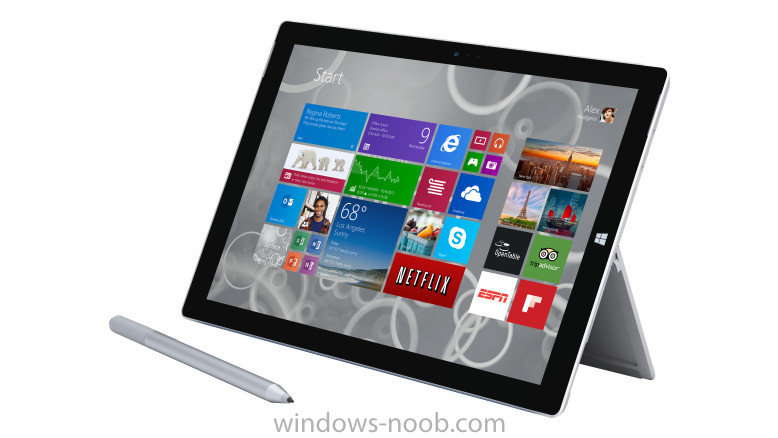
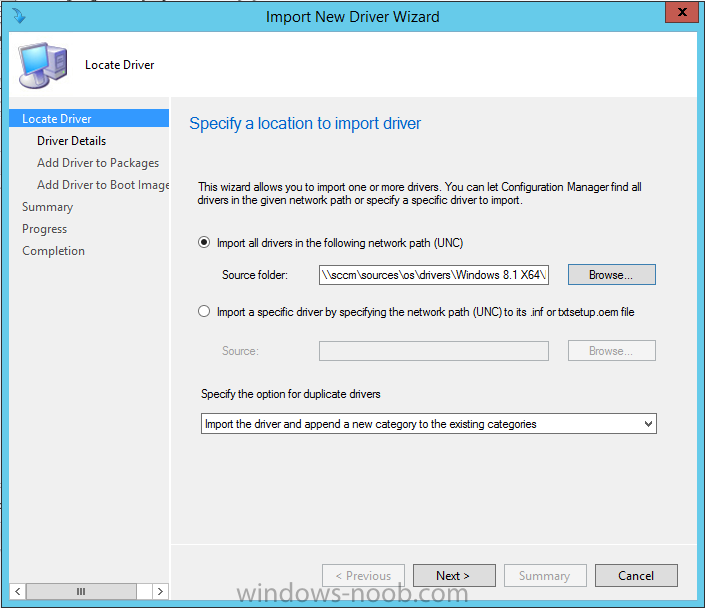
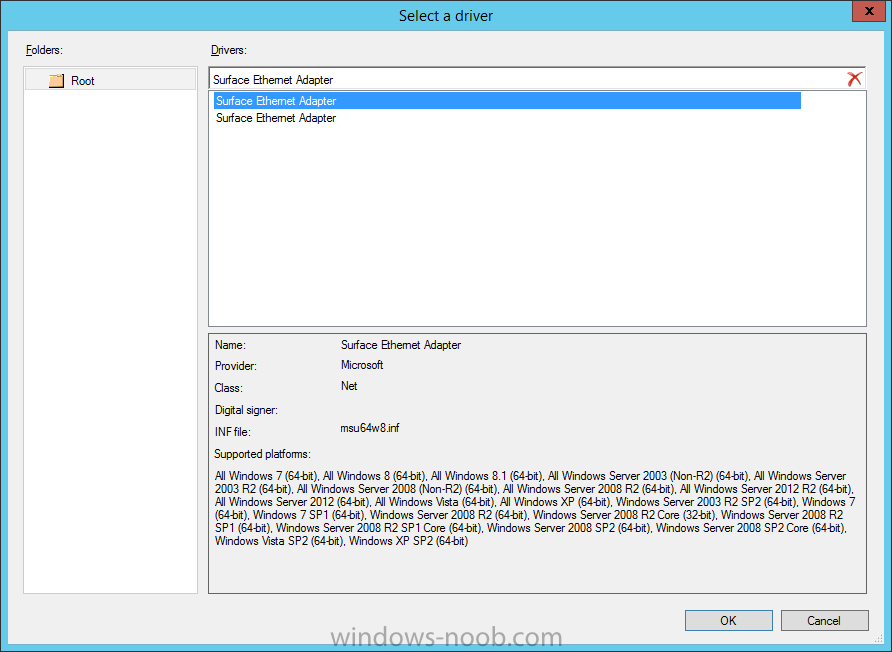
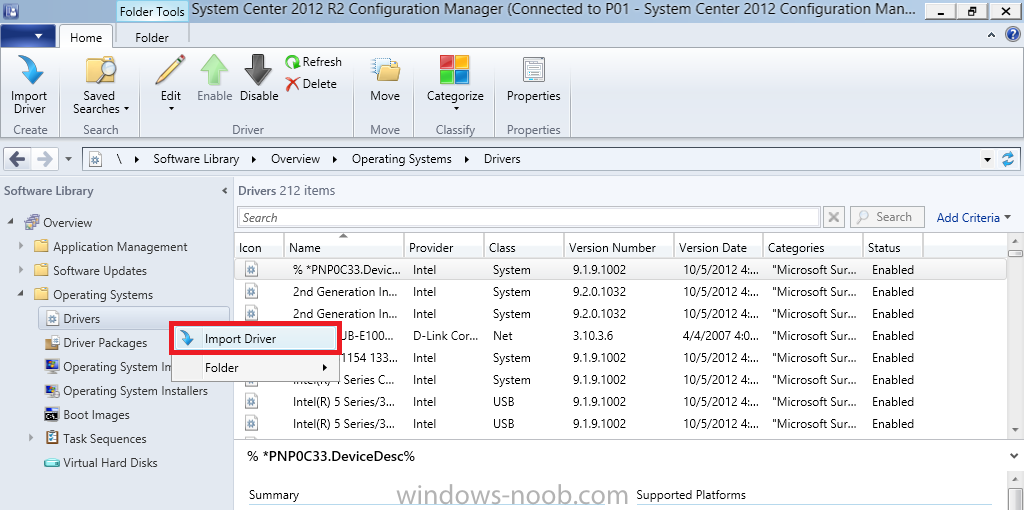
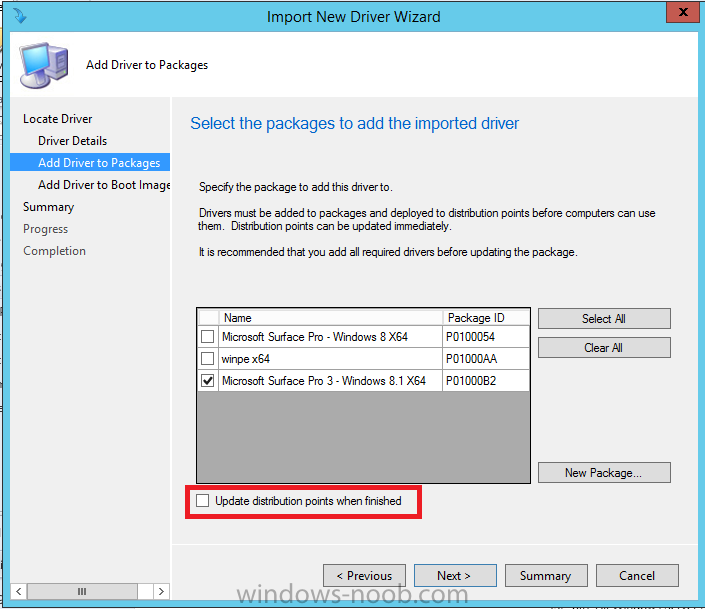
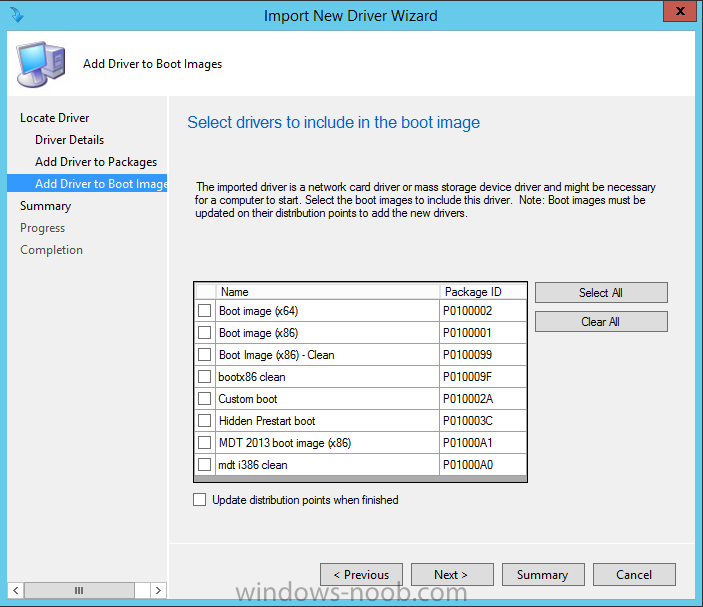
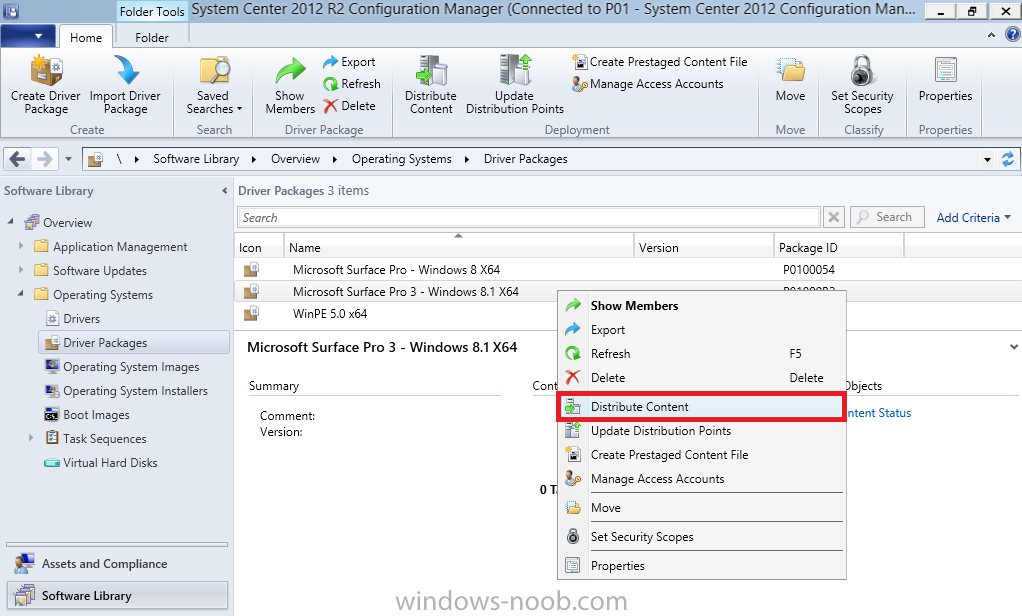
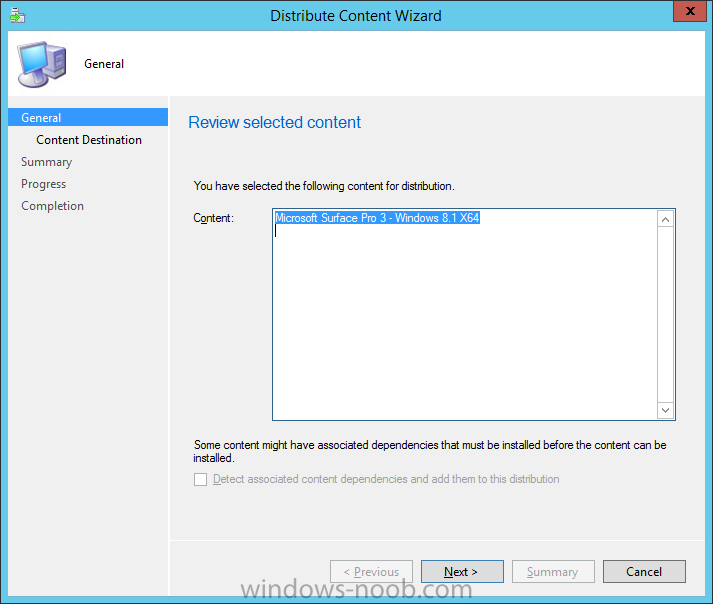
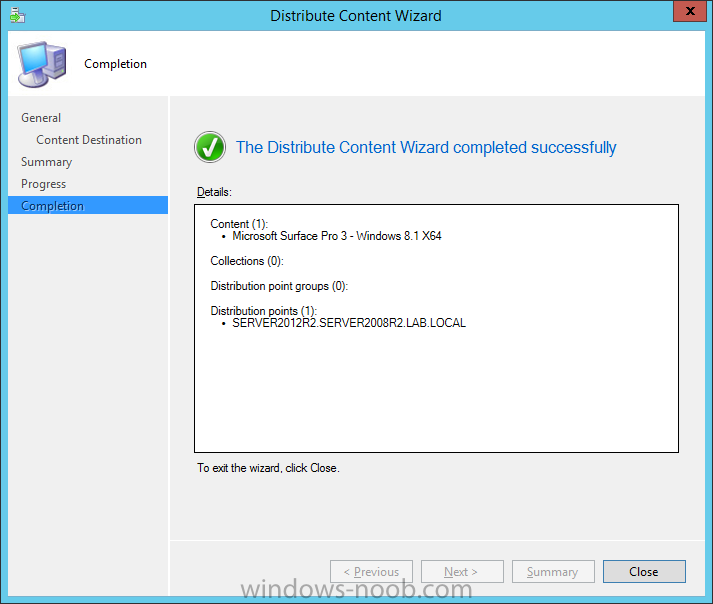
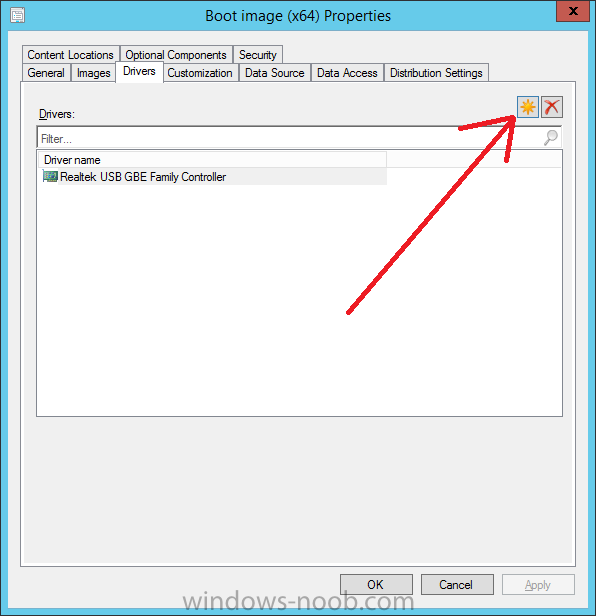
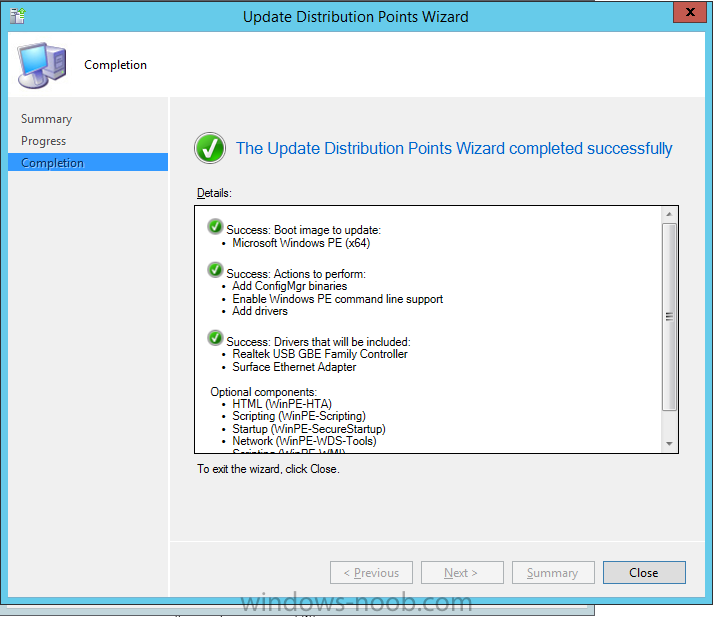
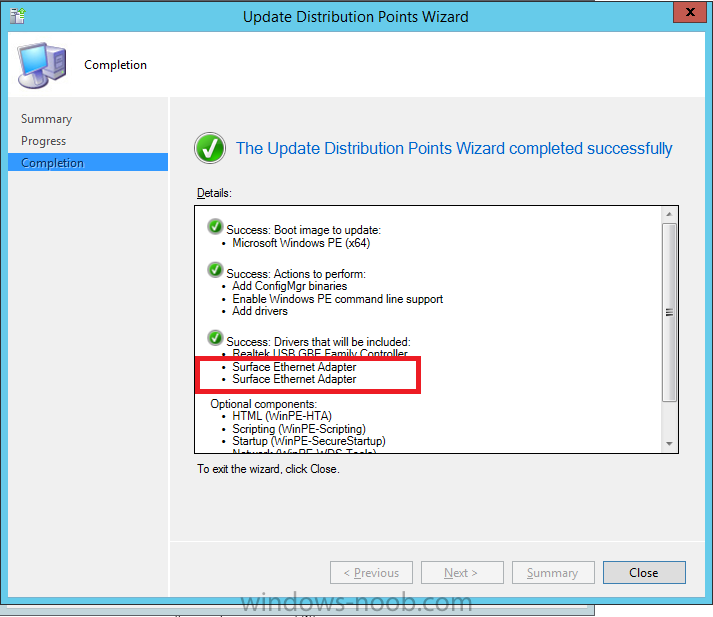
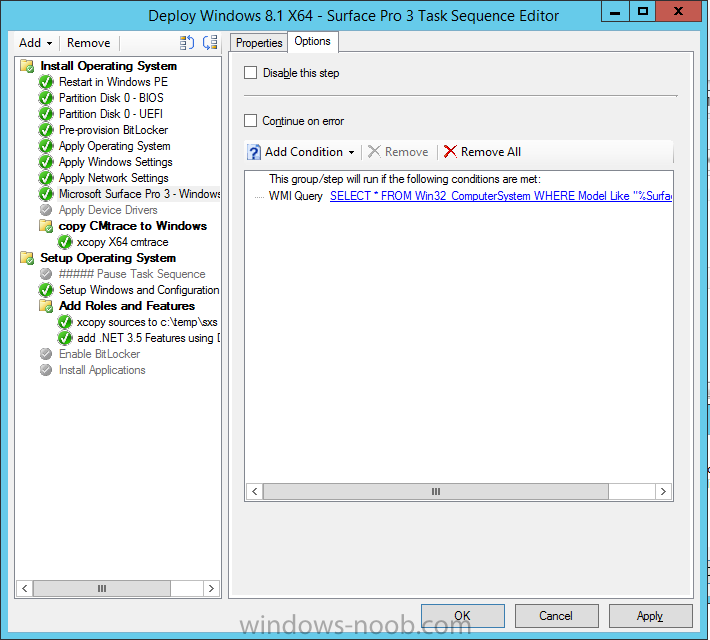
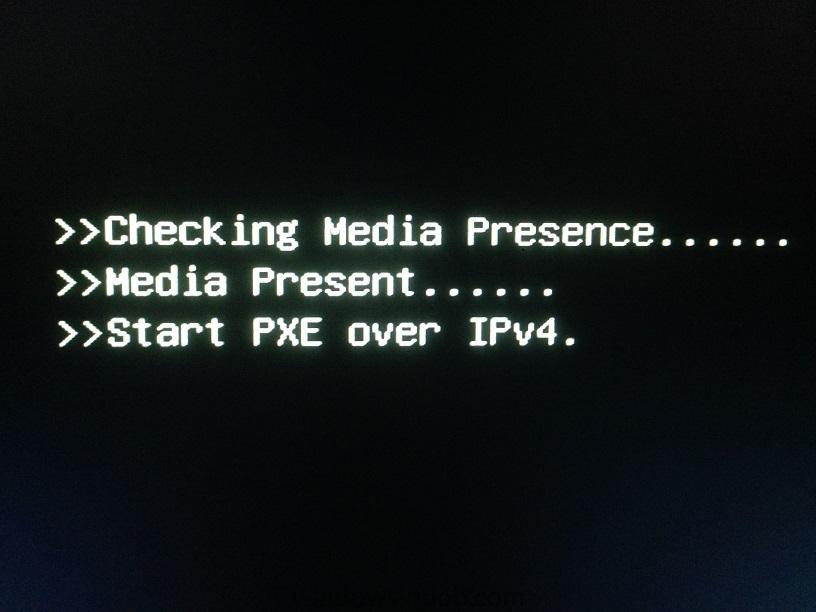
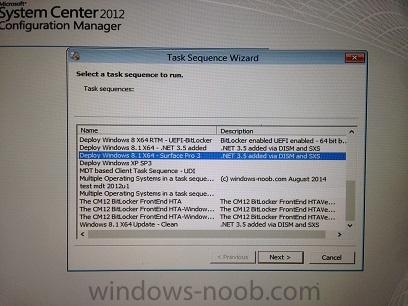
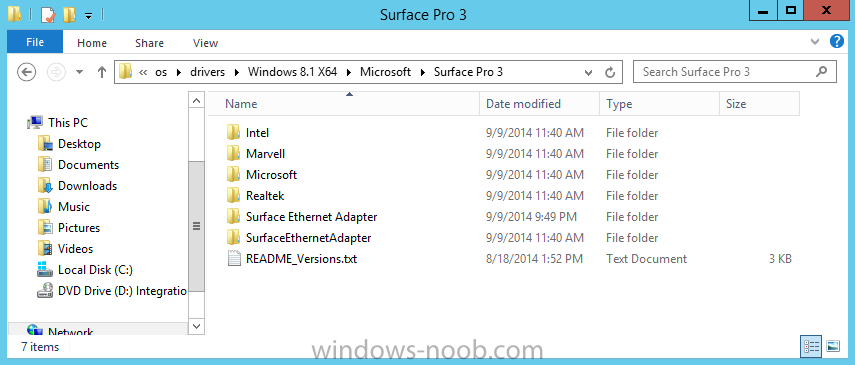
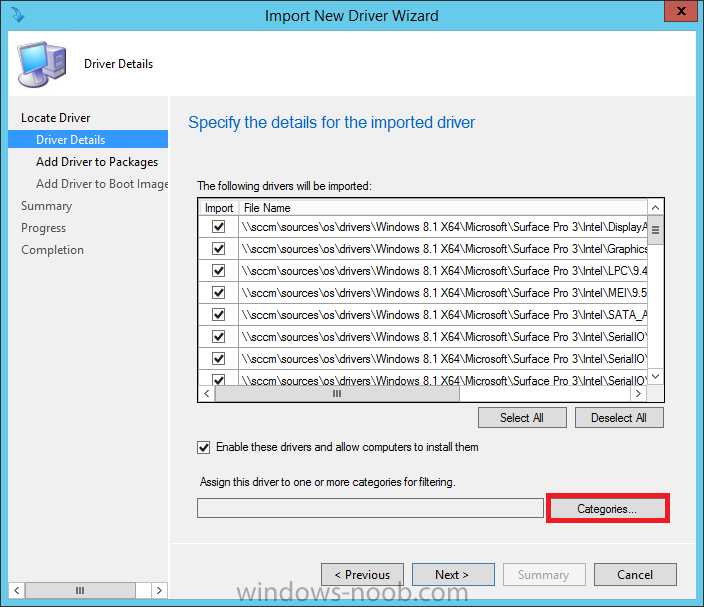
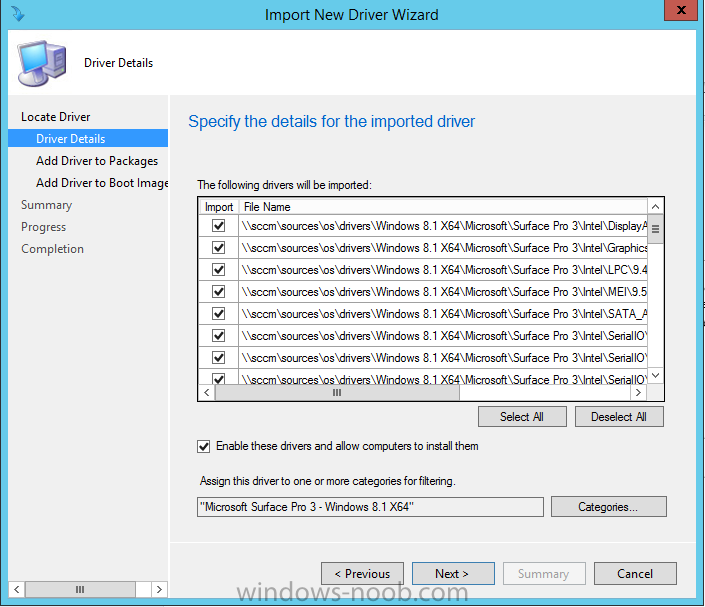
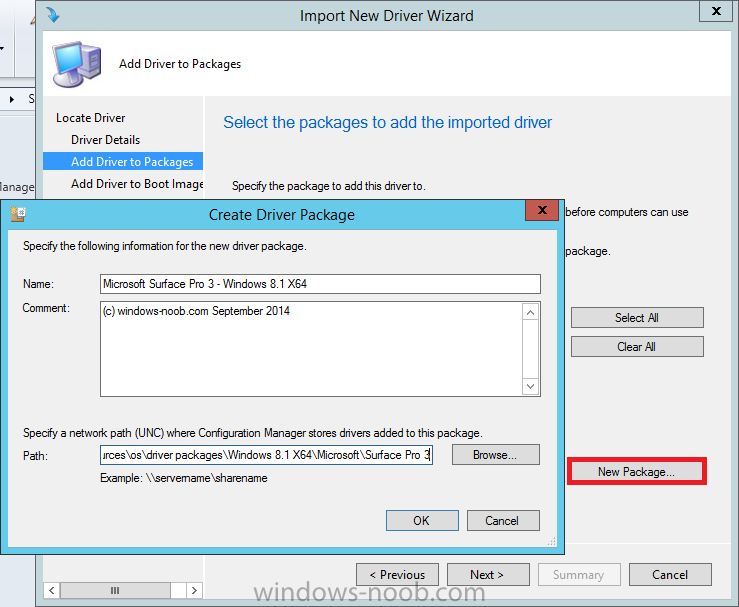
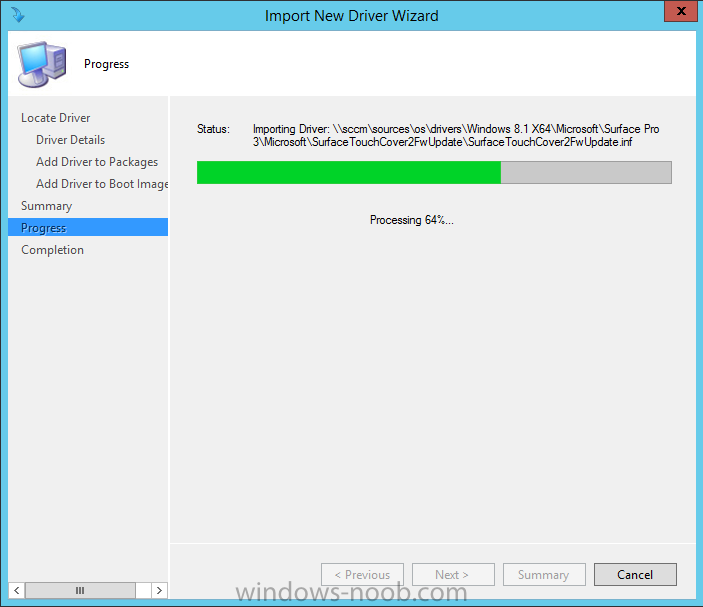
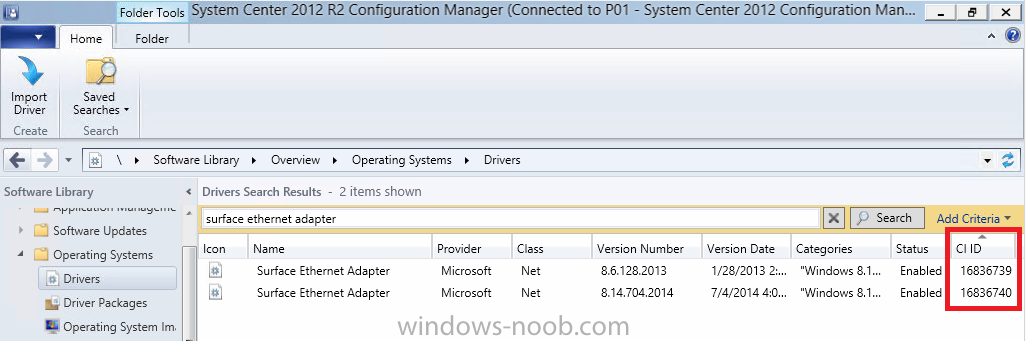
Introduction Now that the awesome Microsoft Surface Pro 3 is readily available and getting plenty of good press, customers are buying it and re-imaging the default Windows 8.1 Professional installation with their own corporate install. In this post I'll show you how to install Windows 8.1 X64 Enterprise using UEFI network boot via System Center 2012 R2 Configuration Manager. Step 1. Get the drivers Download the Microsoft Surface Pro 3 drivers from the following link. http://www.microsoft.com/en-us/download/details.aspx?id=38826 I'd recommend you choose whatever are the latest zipped drivers for the product, in my case that was those from August, namely Surface Pro 3 - August 19, 2014.zip. Extract the zip file to somewhere useful like \\server\sources\os\drivers\Windows 8.1 x64\Microsoft\Surface Pro 3\ as shown in the screenshot below Step 2. Import the drivers into Configuration Manager In the Configuration Manager console, expand Software Library and select the Operating System node, next select Drivers. Right click and choose Import Driver as in the screenshot below select Import all drivers in the following network path and use the Driver path that we specified above in Step 1, eg: \\server\sources\os\drivers\Windows 8.1 x64\Microsoft\Surface Pro 3\ as shown below As these are new drivers for a new product, we want to categorize them for searching later, so click on Categories click on Create and enter Microsoft Surface Pro 3 - Windows 8.1 X64 as the category name as shown below click on Ok so it shows like the screenshot below for the Add drivers to package screen, click on New Package and fill in the package details as shown below, for Path, make sure that you've pre-created a suitably named empty folder for your driver package to be stored such as the example below:- \\server\sources\os\driver packages\Windows 8.1 x64\Microsoft\Surface Pro 3\ before continuing, remove the check mark from Update Distribution Points when finished as we still need to distribute this new package to one or more distribution points and we will not be adding these drivers to the boot image so do not select any boot image, we will add the network driver to the boot image later in this guide. With boot images you only want to add the bare minimum drivers and only if needed. Click next and the driver import begins, Tip: You can monitor DriverCatalog.log in CMtrace on the site server to view details about device drivers that are been imported into the driver catalog. if all went well after a few minutes you'll get a completion message, Tip: If there were any problems with duplicate drivers you might want to try Jason Sandy's duplicate drivers helper script here. If you'd like to automate the above with a PowerShell script then try this one from Kent Agerlund or use the PowerShell script I've provided below. Note: the script below works fine in CM12 R2 CU3 but does not work correctly without modification in CU4 due to the cmdlet changing... #========================================================================================================== # Import Drivers and Create a Driver Package – SCCM 2012 # (c) windows-noob.com 2014/11/21 # Original script via http://model-technology.com/importing-drivers-creating-driver-packages-using-powershell/ # # Modified by Niall Brady to include Make and cleaned up some bug fixes. # Customized for Microsoft Surface Pro 3 # The order should be OS/MAKE/MODEL #========================================================================================================== # # Set variables # clear CD C: # get-childitem will fail otherwise if you re-run $sitecode = "P01:" #== Example: "Dell Optiplex 7010" or "Dell Latitude E6540" $Make = "Microsoft" $Model = "Surface Pro 3" #== Example: "Win7" or "Win8" $DriverOS = "Windows 8.1" #== Options are "x86" or "x64" $DriverArchitecture = "x64" #== Driver root source dir $DriverRootSource = "\\sccm\sources\os\Drivers" $DriverPkgRootSource = "\\sccm\sources\os\DriverPackages" #============================================================== # Begin #============================================================== #Put together variables based on model, os, and architecture $DriverPackageName = $DriverOS + " " + $DriverArchitecture + " - " + $Make + " " + $Model Write-Host "DriverPackageName = " $DriverPackageName $DriverSource = $DriverRootSource + "\" + $DriverOS + " "+ $DriverArchitecture + "\" + $Make + "\" + $Model Write-Host "DriverSource = " $DriverSource $DriverPkgSource = $DriverPkgRootSource + "\" + $DriverOS + " " + $DriverArchitecture + "\" + $Make + "\" + $Model Write-Host "DriverPkgSource = " $DriverPkgSource # Verify Driver Source exists. If (Get-Item "$DriverSource" -ErrorAction SilentlyContinue) { # Get driver files #Write-host "Importing the following drivers.." $Drivers $Drivers = Get-childitem -path $DriverSource -Recurse -Filter "*.inf" } else { Write-Warning "Driver Source not found. Cannot continue" Break } # Create Driver package source if not exists If (Get-Item $DriverPkgSource -ErrorAction SilentlyContinue) { Write-Host "$DriverPkgSource already exists… " } else { Write-Host "Creating Driver package source directory $DriverPkgSource" New-Item -ItemType directory $DriverPkgSource } # Import SCCM module Import-Module "C:\Program Files (x86)\Microsoft Configuration Manager\AdminConsole\bin\ConfigurationManager.psd1" CD $sitecode If (Get-CMDriverPackage -Name $DriverPackageName -ErrorAction SilentlyContinue) { Write-Warning "$DriverPackageName Already exists. Exiting" Break } else { Write-Host "Creating new Driver Package: " $DriverPackageName New-CMDriverPackage -Name "$DriverPackageName" -Path "$DriverPkgSource" -PackageSourceType StorageDirect $DriverPackage = Get-CMDriverPackage -Name $DriverPackageName New-CMCategory -CategoryType DriverCategories -Name $DriverPackageName -ErrorAction SilentlyContinue $DriverCategory = Get-CMCategory -Name $DriverPackageName foreach($item in $Drivers) { $DriverPackage = Get-CMDriverPackage -Name $DriverPackageName Import-CMDriver -UncFileLocation $item.FullName -ImportDuplicateDriverOption AppendCategory -EnableAndAllowInstall $True -DriverPackage $DriverPackage -AdministrativeCategory $DriverCategory -UpdateDistributionPointsforDriverPackage $False } } # distribute it ! Start-CMContentDistribution –DriverPackageName "$DriverPackageName" –DistributionPointName "sccm.server2008r2.lab.local" Write-Host "Operations are complete !, exiting." CD C: If there are other ssues with importing drivers please refer to the SMSProv.log for details of what failed and why. You can search that file for the name of the driver that failed to import. Step 3. Distribute the Surface Pro 3 Driver Package Now that our drivers are imported and a driver package created, we need to make them available to our computers to install, and to do that we need to distribute the driver package to one or more distribution points. Select Driver Packages, you'll see the new Microsoft Surface Pro 3 - Windows 8.1 X64 driver package, select it and right click, choose Distribute Content as shown below click next at the Review selected content screen Select Add and from the drop down choose Distribution Point then select one or more distribution points from the list, Tip: When testing new drivers it's a good idea to distribute them to one distribution point only until you've fully tested them and are happy with the driver package, once you are happy, distribute the driver package to the remaining distribution points. and complete that wizard Once done, if the driver package size show's as 0 KB, then right click on your driver package and choose Update Distribution Points so that the source version of the driver package is at least 2. the source version increments by 1 every time you update the driver package to your distribution points (when adding or removing drivers for example). answer ok when prompted to update the distribution points you can monitor the updating and distribution of the driver package in distmgr.log using cmtrace. or via the Monitoring Node, select distribution status and then content status and search for Surface Pro 3 as shown below Tip: The PowerShell script above automatically distributes the driver package above. Edit it to point to your distribution points. Below is the PowerShell line to distribute the driver package, note that you have to define the $DriverPackageName variable first if not using the whole script. # (c) windows-noob.com 2014/11/21 Start-CMContentDistribution –DriverPackageName "$DriverPackageName" –DistributionPointName "sccm.server2008r2.lab.local" Step 4. Add the network driver to our X64 boot wim As we will UEFI network boot we need the nic driver added to our X64 boot wim. Select the X64 boot wim and right click, choose Properties select the drivers tab and then click on the Yellow startburst to add a new driver to the boot wim Search for Surface Ethernet Adapter as shown below The driver shown above (msu64w8.inf) is the 100mbit driver (download the Surface Ethernet Adapter 100mbit driver from here for model 1552), the other driver (msu30x64w8.inf) is for gigabit (model 1663). Click ok and then click on Apply, answer Yes to the update distribution points question as shown below Once done you'll see this if you also added the 100mbit driver you'll see it listed twice, one is the 100mbit driver, the other is gigabit Tip: To add the driver above with PowerShell use the script below. Note that the DriverID is the Column setting labelled as CI ID in the screenshot below. # add driver to boot image by driver name # (c) windows-noob.com 2014/11/21, updated 2015/4/6 to get the CI_ID dynamically and to update the boot wim to your dp. # Import module Import-Module 'C:\Program Files (x86)\Microsoft Configuration Manager\AdminConsole\bin\ConfigurationManager.psd1' # Set Location to your site code Set-Location P01:\ # add driver to boot image using driver ID, there are two drivers, each with their own unique CI-ID (DriverID) $DriverName = "Surface Ethernet Adapter" $DriversToSearch = (Get-CMDriver -name $DriverName).CI_ID $BootImageName = "Boot Image (x64)" # look for drivers matching the DriverName foreach($DriverId in $DriversToSearch) { Write-Host "Importing the following driver: '$DriverName' with CI_ID:" $DriverId Set-CMDriverBootImage -SetDriveBootImageAction AddDriverToBootImage -DriverId $DriverId -BootImageName $BootImageName } Write-Host "Updating boot image: '$BootImageName' to distribution points" Update-CMDistributionPoint -BootImageName $BootImageName Write-Host "Completed." Step 5. Edit and then deploy a Windows 8.1 task sequence For the purpose of keeping this guide concise i'll assume you already have a Deploy Windows 8.1 X64 task sequence ready made, if not then please follow this guide and return here when done. Right click the task sequence, choose Properties and select the advanced tab, make sure the boot image is 64 bit and that it's the boot image you added the drivers to in step 4. Click Ok when done. Next, right click the task sequence and choose Edit, locate the Apply Network settings step and click it, next choose the Add drop down and select Drivers, select Apply Driver Package option as shown in the screenshot below name the step Microsoft Surface Pro 3 - Windows 8.1 X64 and click on browse to select the driver package we created earlier as shown below next click on the Options tab and select WMI Query from the drop down options, paste in the following code SELECT * FROM Win32_ComputerSystem WHERE Model Like "%Surface Pro 3%" and make sure to test the query as shown below before applying. here's the finished options step Once you are done with your edits, Deploy the task sequence to a collection that you've added a membership query for the computername/mac address of your Surface Pro 3 dongle. For the purpose of simplicity i'm not going into those details, you can review how to import that info into configuration manager in this post. Step 6. Start UEFI network boot and enjoy the show ! Once all the above is done you are ready to watch the deployment, so connect the Surface Pro 3 to your wired network and shut it down before continuing. Tip: To power it off, you can hold the power button on the top left for 13 seconds or so to force it off, or boot into Windows and choose Shutdown from the Start screen. Once the device is properly powered off (and not restarted) press and hold volume down (left side) and then press the power button briefly, this will tell the device to boot from UEFI network boot (if a usb dongle or docked nic is attached) or USB media. Below are a few photos of the UEFI network boot (sorry the iPhone takes less than optimal photos). Note: if your device takes forever to download the boot wim, please read this post for a solution. Job done ! Summary Imaging UEFI based computers with Windows 8.1 X64 is exciting, challenging and fun even if the technology has been around for a while. As more and more cool hardware like the Microsoft Surface Pro 3 are made available, being able to image them successfully with System Center 2012 R2 Configuration Manager is a dream come true. Related reading How can I deploy Windows 8.1 x64 to the Microsoft Surface Pro 3 using MDT 2013 ? - http://www.windows-noob.com/forums/index.php?/topic/11479-how-can-i-deploy-windows-81-x64-to-the-microsoft-surface-pro-3-using-mdt-2013/ Where do I find the MAC address of my Surface Pro 3 Ethernet Adapter in order to use UEFI network boot ? - http://www.niallbrady.com/2014/09/11/where-do-i-find-the-mac-address-of-my-surface-pro-ethernet-adapter-in-order-to-use-uefi-network-boot/ Why is my Surface Pro 3 not BitLockered after OSD via System Center 2012 R2 Configuration Manager ? - http://www.niallbrady.com/2014/09/18/why-is-my-surface-pro-3-not-bitlockered-after-osd-via-system-center-2012-r2-configuration-manager/ Why does my Surface Pro 3 take a very long time to UEFI Network Boot using System Center 2012 R2 Configuration Manager ? http://www.niallbrady.com/2014/09/09/why-does-my-surface-pro-3-take-a-very-long-time-to-uefi-network-boot-using-system-center-configuration-manager-2012-r2/ Surface Pro 3, Surface Pro 2, and Surface Pro firmware and driver packs http://www.microsoft.com/en-us/download/details.aspx?id=38826 Updating the UEFI firmware offline - http://blogs.technet.com/b/askpfeplat/archive/2014/10/20/how-to-update-the-surface-pro-3-firmware-offline-using-a-usb-drive.aspx Downloads You can download a Microsoft Word copy of this guide here. How can I deploy Windows 8.1 X64 to the Microsoft Surface Pro 3 using Configuration Manager 2012 R2.zip


-
as you said the operating system image was failing with hash errors did you do as I advised ? both of those actions should have alerted you to problems with the package as would monitoring the smsdpmon.log same goes for any other package with an issue on the affected dp glad it's working now
-
Server 2012 Multi-site Clustering - Heartbeat Fails
anyweb replied to SRKegger's topic in Windows Server General
have you tried using wireshark to confirm if the port is blocked ? -
What´s the sense of a build and capture task sequence?
anyweb replied to clickmaster's topic in Configuration Manager 2012
the logic behind it is to automate everything so that you dont have to do manual tasks, this becomes useful and apparent if you have to have many 'gold' images supporting servers, desktops and so on -
According to this data on finance.Yahoo.com Microsot's stock price is at it's highest trading level since 1999 when the dot-com boom was in full swing. Neowin have stated that this is probably due to a couple of factors. "The less likely (but still slightly plausible) reason is that Wall Street likes the new Lumias that were announced at IFA this week. What is more plausible is that the rumors of the upcoming announcement of the next version of Windows at the end of this month could be moving the needle forward." Personally I think that the new Microsoft Chairman is firmly making his mark, pushing out Office for IOS and focusing on “productivity and platforms.” This new vision and strong leadership is moving Microsoft in new directions and gaining public trust judging by the stock price high. Once the Windows 9 Technology Preview rolls out at the end of this month I think the stock price will continue to climb, let's wait and see ! What do you think is driving the high stock price ? cheers niall


-
Pushing a BAT file to servers and workstations, KMS repoint
anyweb replied to BWDenver's topic in Configuration Manager 2012
you can do it in many ways, if you want to use a batch file then create a package in software library, in that package create a program, the program should point to your batch file, here's an example you have no error checking in your batch file though and that might be a good thing, why not use vbs or powershell instead ? once you've created a working script, and packaged it as a package/program, distribute that package to at least one of your distribution points, once done, test it by deploying the package to a test virtual machine, monitor the behaviour and confirm it's doing what you want, if so, deploy it to a collection containing more computers, and so on... -
OSD - Setup Windows and Configuration Manager Step
anyweb replied to xc3ss1v3's topic in Configuration Manager 2012
this sounds like your osd deployments are actually failing and leaving the client in provisioned mode or you have boundaries incorrectly setup, the way to find out is to start looking for those things, for provisioned mode check the registry as described here http://blogs.technet.com/b/configurationmgr/archive/2012/10/23/support-tip-configmgr-2012-client-goes-to-provisioning-mode-after-running-the-ccmeval-task.aspx and here http://social.technet.microsoft.com/Forums/systemcenter/en-US/5f33afe9-ca61-4a41-a192-fdb08c5cc619/sccm-client-issues-during-task-sequence-issues -
you can setup a PXE enabled distribution point in server 2012 r2, and it supports UEFI network boot no problem.
-
or look at this, ignore the bitlocker part and focus on what it can do with data (network, share, smp, hardlinking.) CM12 in a Lab - The CM12 BitLocker FrontEnd HTA - video CM12 in a Lab - The CM12 BitLocker FrontEnd HTA
-
SQL server on primary server or dedicated server
anyweb replied to trumby's topic in Configuration Manager 2012
the advice from me is keep SQL on box, in other words, don't separate it from Configuration Manager, unless of course you like trying to figure out why things are not working as expected, later on. -
press f8 when it's running gather, and locate the smsts.log in x:\windows\temp\smstslog attach that file here.
-
Learning ressources for App-V
anyweb replied to christian.schroeder's question in Application Virtualization
something to get you started > http://www.niallbrady.com/2012/11/12/how-can-i-sequence-applications-using-app-v-version-5-for-configuration-manager-2012-sp1/ -
eh, you need to be more specific, what are you trying to do and can you attach some logs
-
add a boot image to your task sequence and try again.
-
do you have any QOS software/hardware on your network that could be causing issues ? have you checked if the switches inbetween the dp and the clients are ok ?