anyweb
-
Posts
9277 -
Joined
-
Last visited
-
Days Won
371
Everything posted by anyweb
-
hi, please have a read of this post to get a better overview http://www.windows-noob.com/forums/index.php?showtopic=1005 but essentially, you must have wds installed on the sccm server if you want to host the PSP role *pxe service point* on that server or you could host the psp role on another server with wds, for DHCP, the dhcp server can be on another server too but if so you'll have to set dhcp server scope options read the Prerequisites for Installing Configuration Manager on Technet to get the full picture... cheers
-
did it make a difference ?
-

Clients can not Download any Packages (Message ID: 10051)
anyweb replied to Wussel's topic in Configuration Manager 2007
on the client open a command prompt and type nslookup then paste the results of that here please -
Setting computername during deployment
anyweb posted a question in Troubleshooting, Tools, Hints and Tips
how to prompt for Computername during OSD If you want to be prompted for the computername during a deployment (works for the R2 release of SCCM 2007) try the following on your deployment collection, right click and choose modify collection settings create a new variable called OSDComputerName and leave it blank Advertise your task sequence to this collection, but make sure that the Task Sequence is not set to mandatory now, when the Task Sequence executes it will prompt you for the computername during OSD, cool huh ? click on the variable when you see it and enter your desired computername.. Can I script it ? oh and here's another way from the very talented Michael in Denmark easy way to change PC name during Deployment and here's a script sample Set env = CreateObject("Microsoft.SMS.TSEnvironment") Set SWBemlocator = CreateObject("WbemScripting.SWbemLocator") Set objWMIService = SWBemlocator.ConnectServer(strComputer,"root\CIMV2",UserName,Password) Set colItems = objWMIService.ExecQuery("Select * from Win32_BIOS",,48) For Each objItem in colItems env("OSDComputerName") = objItem.SerialNumber next _________________________ Just run this script after the Deploy OS step. It will set the SCCM variable "OSDComputername" to the serial, and the rest will take care of it self... Related reading:- here's the Technet version of the same -
problem in installing client agent
anyweb replied to reza's question in Troubleshooting, Tools, Hints and Tips
you have to fix this error first sounds to me like you have an authorisation problem, so.... did you configure IIS exactly as specified in the SCCM setup guides here ? including all the WEBDAV parts ? -
Edit: just use the following http://www.petervanderwoude.nl/category/USMT-40.aspx you can add /lac to that to append... this is great, well done on figuring it out, i'll be sure to return to this topic when i get the chance to test this, however, microsoft recommend that we DON't edit the mdt files directly, but instead apply changes via other methods... ie: to add additional command lines like /lac we need to customise that via the task sequence i've got that someone on my lab server and will find it and post it here later but that's for this info, it's great !
-
How to create a Virtual Application Package in ConfigMgr 2007
anyweb replied to Peter van der Woude's question in Application Virtualization
These are great posts, thanks Peter, I really appreciate seeing others doing howtos and guides on windows-noob thanks a million ! and keep up the great work -
it's the default IPB theme (invision power board) and that's what I use to host these forums, if I had lots of money and talented designers I'd change it but seeing as I fund this site myself and am not a skin designer we'll have to do with the default
-
did you add the Domain Administrator account into the Schema Admins account ? what user account are you trying to extend the AD schema as ? and what os is this ?
-
how can I setup Application Virtualization 4.5 CU1
anyweb replied to anyweb's question in Application Virtualization
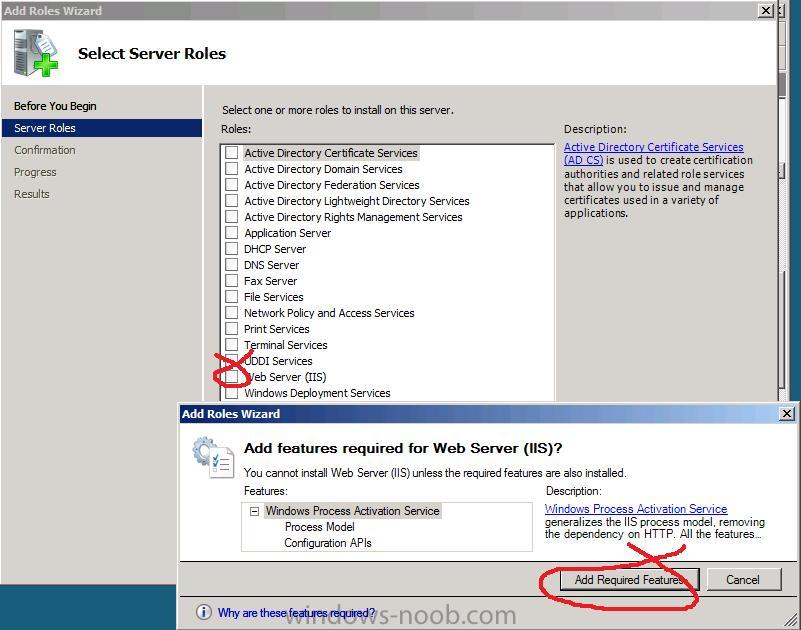
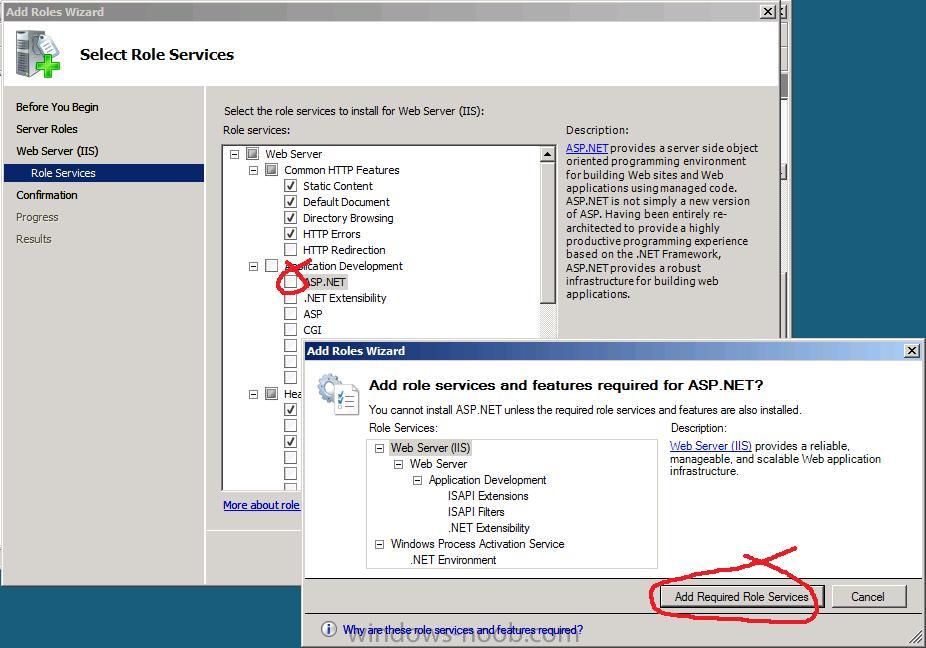
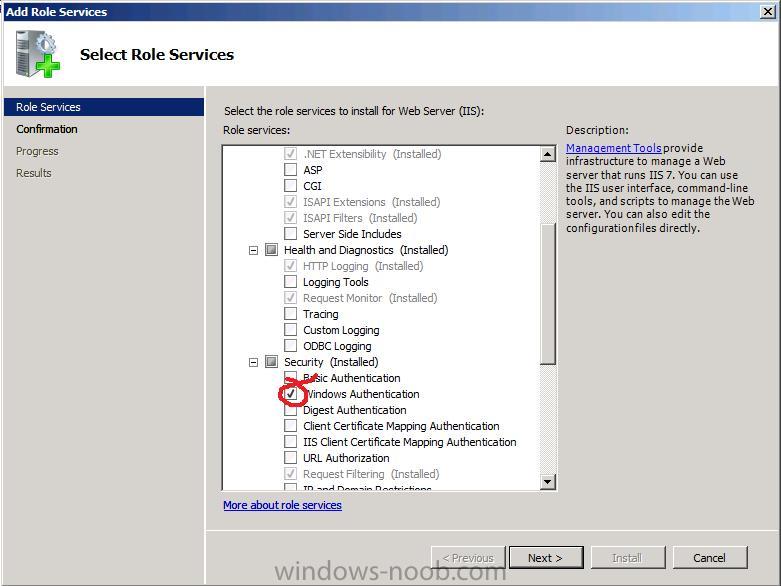
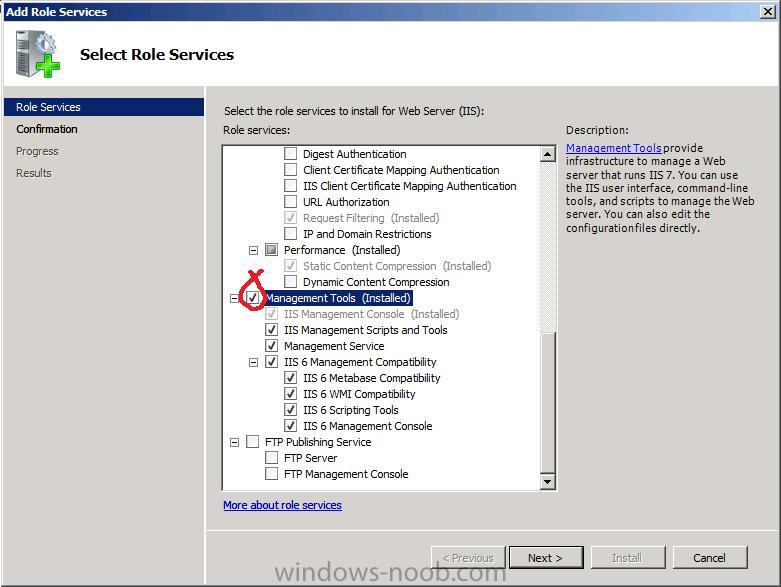
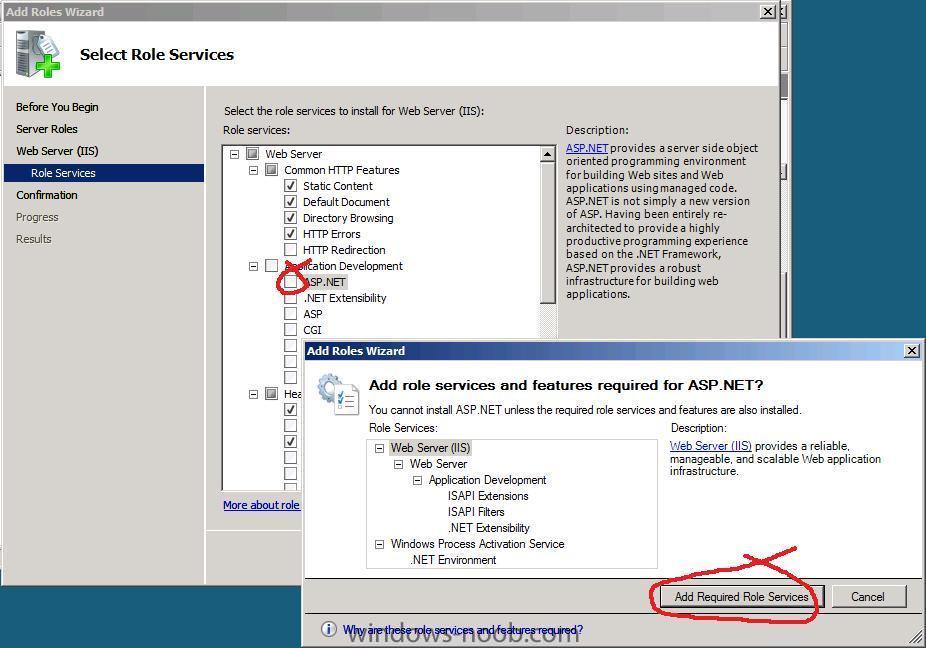
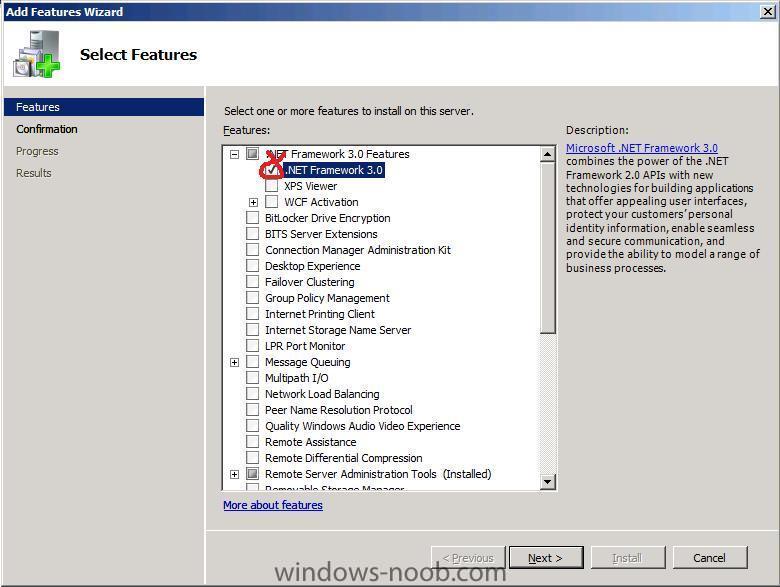
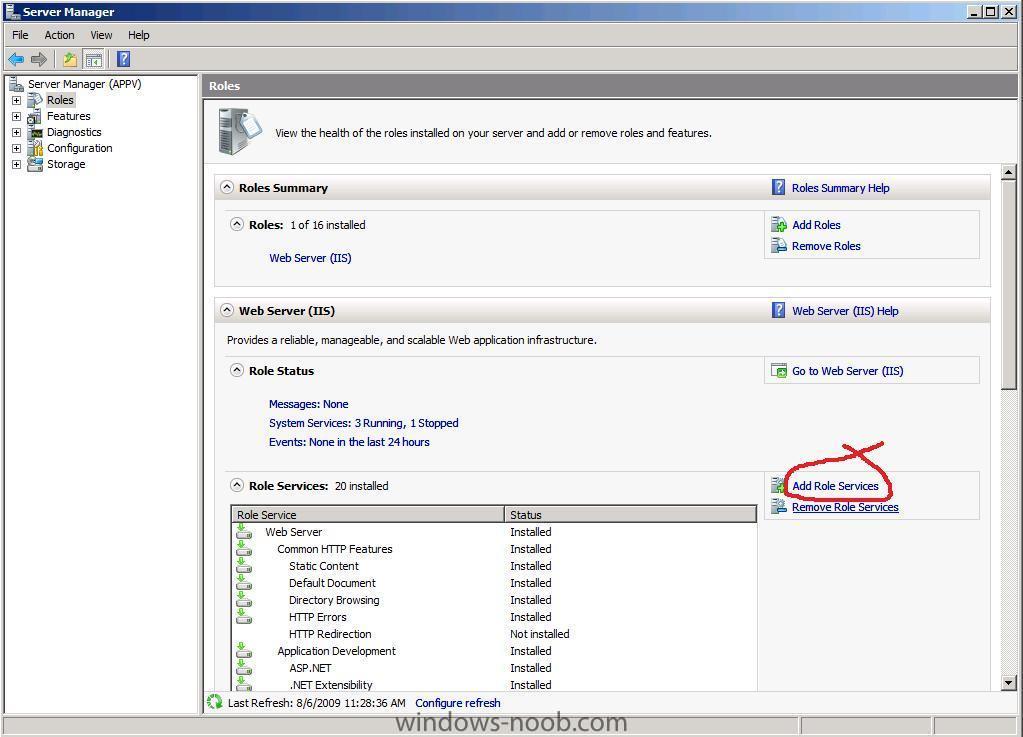
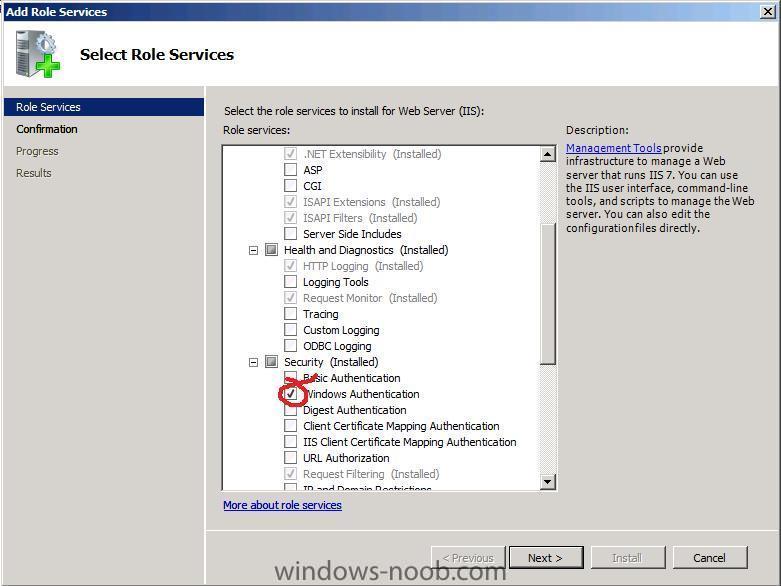
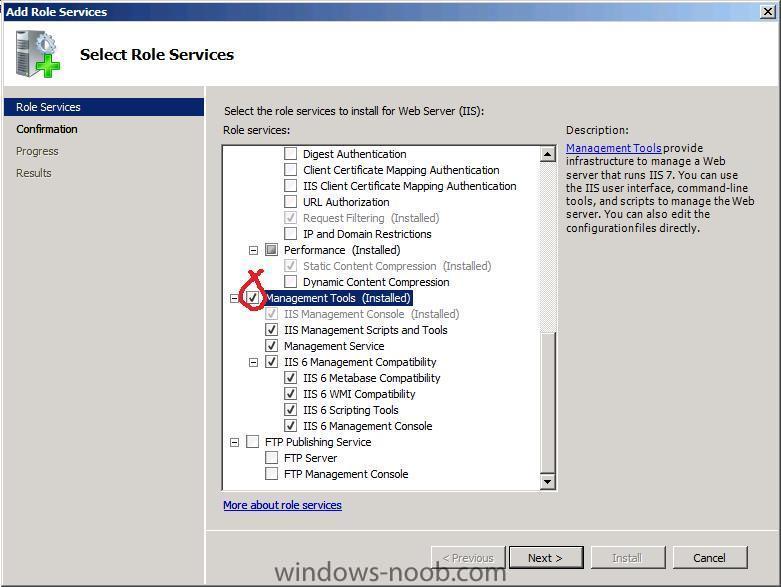
Step 4. Add IIS and other pre-requisites Perform the following on the APPv Server: Logon to the Appv server as the domain\appVadmin user. Start server manager and click on Add Roles Place a checkmark in the Web Server IIS box, and accept the Add Features required for Web Server IIS prompt. click next and then Select ASP.NET from the choices and accept the Add Features required for ASP.NET click next and then click Install. Reboot when done. After the reboot, go back into Server Manager and click on go To Roles, once done, click on Add Role Services to the right of Web Server (IIS) Scroll down to Security and place a checkmark in Windows Authentication scroll down and place a checkmark in Management Tools click next and click Install Once complete, click close, go back into Server Manager and click on Add Features, Select the .NET Framework 3.0 option and click Next.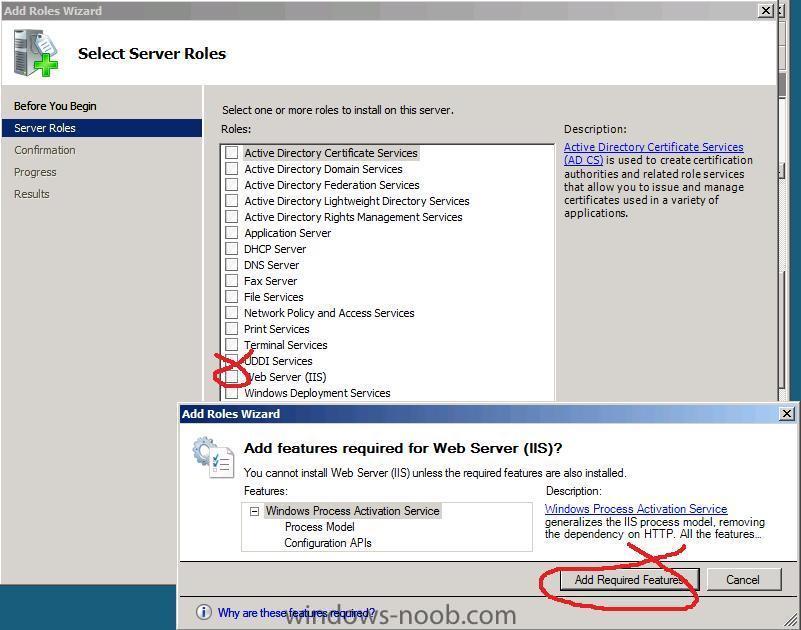
-
how can I setup Application Virtualization 4.5 CU1
anyweb replied to anyweb's question in Application Virtualization
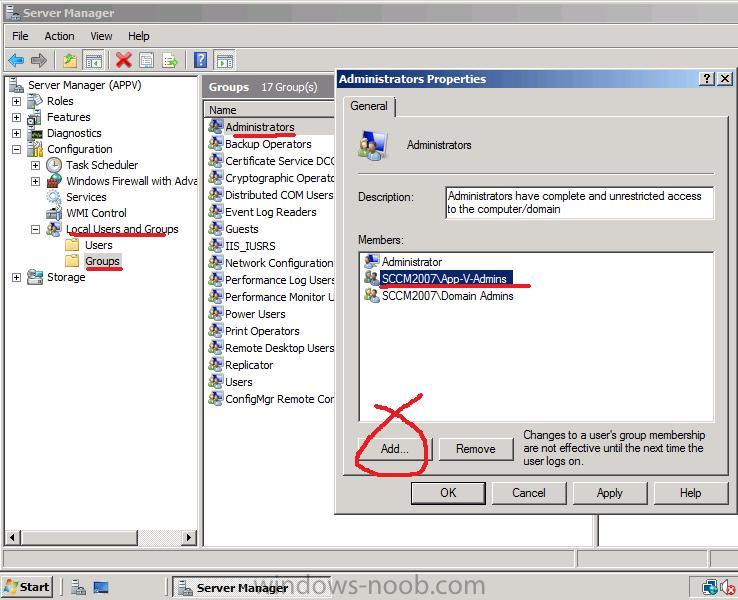
Step 3. Make App-V-Admins a member of Local Administrators Perform the following on the APPv Server: Note: At this point your Appv server must be joined to the Domain. Log on to your Appv server as a Domain Administrator or as a user with Local Administrative permissions on that server and start Server Manager, expand Configuration, Local Users and Groups and click on Groups Double Click on the Administrators group and click Add type in App-V-Admins and if prompted enter the user/pass of a user with permission on the Domain At this point you should now see your Domain Security Group App-V-Admins added to the local Administrators group on the appv server. Logoff and then logon as the domain\appVadmin user (which we added as a member of App-V-Admins earlier.)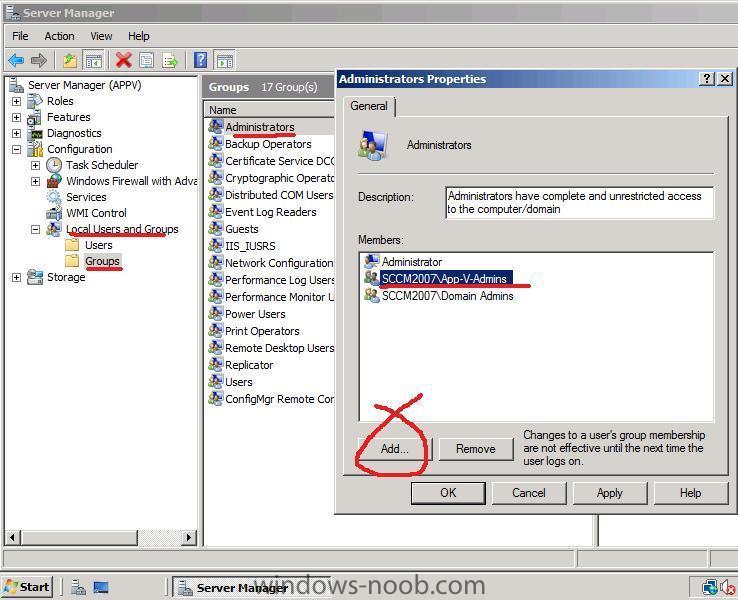
-
how can I setup Application Virtualization 4.5 CU1
anyweb posted a question in Application Virtualization
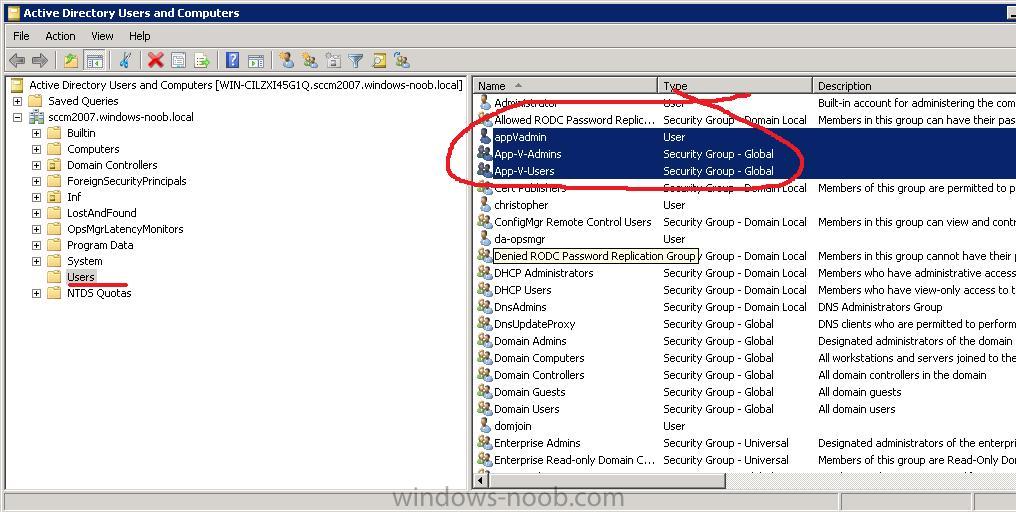
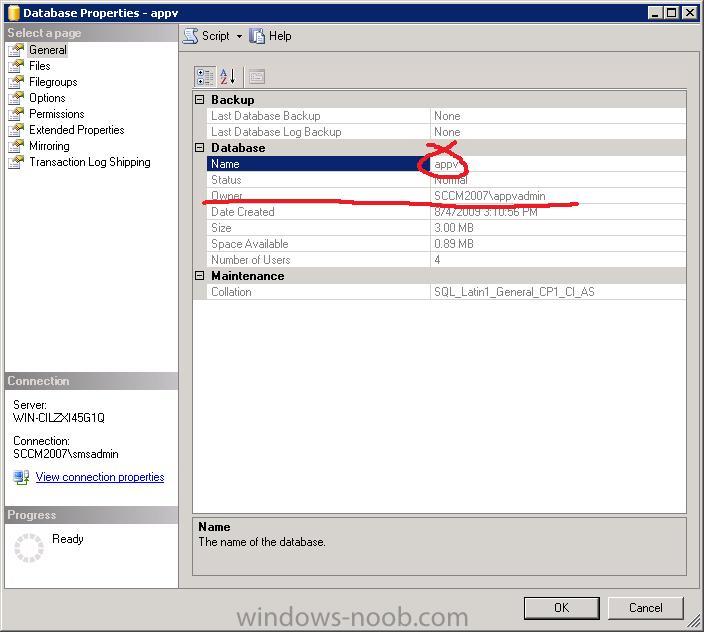
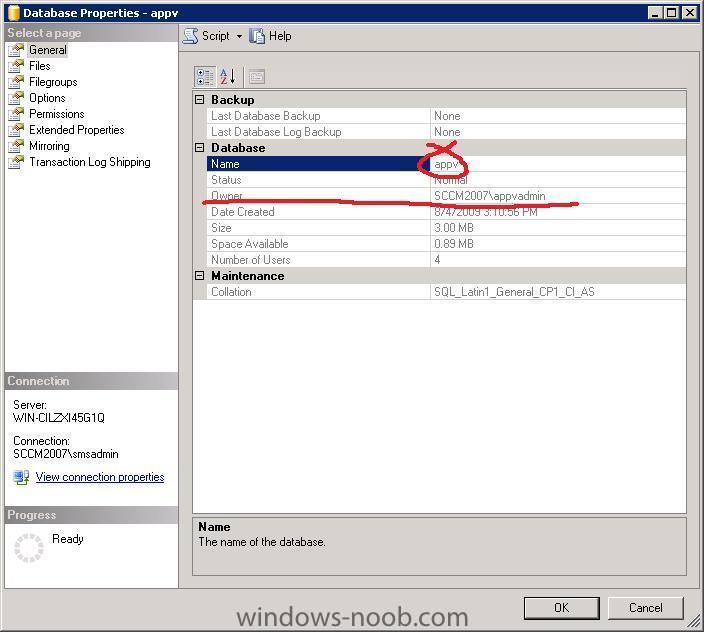
Post in progress - while this line appears the post is not yet complete!! This guide is based upon content available from Microsoft and others. This guide is designed to get you up and running quickly with Application Virtualization in a Lab Environment. For Production scenarios please refer to Technet for best practise recommendations. For news about updates to App V please consult their blog. In this guide we will use a Windows 2008 32 bit server for our Application Virtualization installation. We will be installing both the Application Virtualization Management Server and Application Virtualization Streaming Server on this server. The server will be a member of a Windows Server 2008 domain with Microsoft DNS. The guide assumes that you have an SQL 2005 sp3 or newer server installed within the Domain. Step 1. Create new Active Directory Security Groups Perform the following on the Windows Server 2008 domain controller: In Active directory Users and Groups, create two new Global Security Groups called App-V-Admins App-V-Users In addition create a user called appVadmin and make that user a member of App-V-Admins Step 2. Create the AppV database in SQL and assign a user as the DB owner Perform the following on the SQL Server: On the server that is hosting your SQL databases, create a new DB called appv and assign appVadmin as the db owner. If you cannot assign appVadmin as the db owner then add it to Logins within the Security section of SQL properties and then try again.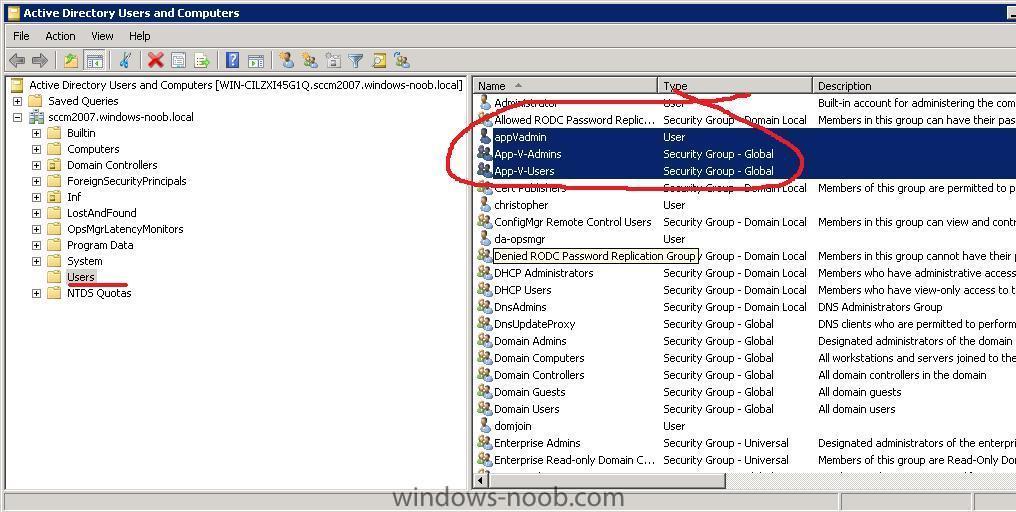
-
you use phase 1/phase 2/phase 3 as stages for applying patches and updates to selected sets of computers for example if you have 100 XP computers in your organisation, you will probably want to do a Test run of the patches on 5 computers in the first week, those computers are in the test collection which is a sub collection of phase 1 after all is ok, and a week has passed, you decide it's time to update 25 more machines, and you do so by targetting the phase 2 collection with the deployment Management task by editing it's Collection Tab value remember a collection can contain sub collections, and those sub collections can be Links to other collections so... you can create some XP collections like this Phase 1/test (5 xp computers) Phase 2/xp_phase2 (25 xp computers) Phase 3/xp_phase3 (the remaining xp computers) in my screenshots i have NOT implemented the above, because it's up to you to decide how to patch your systems, this is only one way of doing it.. by the time you have reached phase 1 all your XP computers are updated and you start the whole cycle again, and it takes a month from beginning to end...
-
How Can I move the SCOM Database to another Database server
anyweb posted a question in Configure SCOM 2007
Note: This article is a copy of this post. There may be certain situations where you need to move the Operations Manager database (OperationsManager) from one SQL Server 2005-based computer to another, including the following: · The current server is experiencing hardware issues and is not considered reliable. · The OperationsManager database is collocated on the same server as the Root Management Server and you have decided to dedicate a SQL Server 2005 for the database to improve scalability and performance. · You need to move the database and log file to a different volume because of space or performance reasons. · The current server is leased and is due to expire soon. · New hardware standards have been developed and approved, and you must upgrade your SQL Server-based computer to the new hardware specification. SQL Server 2005 supports the ability to change the location of the data files and of the log files between SQL Server-based computers, between instances on the same SQL Server-based computer, and different volumes on the same SQL Server-based computer. For more information about using this function in SQL Server, see the SQL Server 2005 documentation at http://go.microsoft.com/fwlink/?LinkId=93787. The following section describes the procedures to move the Operations Manager database from one SQL Server-based computer to another. Before You Start Go through this checklist before moving the OperationsManager database. · Make a current backup of all databases, especially the master database, from their current location. · Verify you have system administrator permissions on both SQL Server-based computers. · Verify you have installed and configured the new SQL Server-based computer as the existing one. · Verify you know the name and current location of the Operations Manager database. · Stop the OpsMgr services (OpsMgr Config Service, OpsMgr SDK Service, and OpsMgr Health Service for Root Management Servers and OpsMgr Health Service for Management Servers) on the Management Servers in the Management Group before proceeding. · Backup the secure encryption key on the Root Management Server using the SecureStorageBackup.exe utility. · Stop SQL Service if you want to copy the .mdf and .idf files to a different location. Note: If the SDK account is “LocalSystem” on the original system, you need to add that account to the new system. Specify OperationsManager as the default database for that account. Detaching the Database Perform the following steps on the SQL Server-based computer currently hosting the OperationsManager database: 1. Open SQL Server Management Studio. 2. In the Connect to Server dialog box, select the appropriate values in the Server type list, in the Server name list, and in the Authentication list, and then click Connect. 3. Right-click the OperationsManager database, point to Tasks, and then click Detach. Note: This menu is visible only if you are a member of the sysadmin fixed server role and the server to which you are connected is SQL Server 2005-based. 4. In the Detach Database dialog box, check the status of the database. To successfully detach a database, the Status should be The database is ready to be detached. Optionally, you can select to update statistics prior to the detach operation. 5. To terminate any existing connections from the database, click Clear. 6. Click OK. The database node for the detached database is removed from the Database folder. 7. Once the database has been detached, you can copy the OperationsManager.mdf and OperationsManager.ldf files to a destination directory on the new SQL Server-based computer. Note: The default location of the OperationsManager.mdf is Program Files\Microsoft SQL Server\MSSQL.1\MSSQL\Dataand the default location of the OperationsManager.ldf is Program Files\Microsoft SQL Server\MSSQL.1\MSSQL\LOG. Attaching the Database Perform the following steps on the SQL Server-based computer that will be hosting the OperationsManager database: 1. Open SQL Server Management Studio. 2. In the Connect to Server dialog box, select the appropriate values in the Server type list, in the Server name list, in the Authentication list, and then click Connect. 3. Right-click the Databases folder, and then click Attach. Note: This menu is visible only if you are a member of the sysadmin fixed server role and the server to which you are connected is SQL Server 2005-based. 4. In the Attach Database dialog box, click Add to specify the database to be attached. 5. In the Local Database Files dialog box, select the disk drive were the database resides and expand the directory tree to find and select the OperationsManager.mdf file. 6. Click OK, and the database node for the attached database will appear when you refresh Object Explorer by clicking Refresh on the View menu. Update the Database Server Name on the Management Servers After you have successfully moved the OperationsManager database, update the Registry on each Management Server in that Management Group to reference the new SQL Server-based computer. 1. Log onto the Management Server with administrator permissions. 2. Click Start, select Run, type regedit in the Open box, and then click OK to start Registry Editor. Note: Before editing the Registry, follow your site’s backup policies with regard to the registry. 3. Under HKEY_LOCAL_MACHINE\Software\Microsoft\Microsoft Operations Manager\3.0\Setup, double-click the value DatabaseServerName, and then change the value to the hostname of the SQL Server-based computer now hosting the OperationsManager database. 4. Click OK. 5. Close the Registry Editor. 6. After you have completed this step on all Management Servers in the Management Group, restart the OpsMgr Config Service, OpsMgr SDK Service and OpsMgr Health Service on the Root Management Server and restart only the OpsMgr Health Service on the remaining Management Servers. Important: Do not start the OpsMgr Config Service and OpsMgr SDK Service on the Management Servers, as these services should only be running on the Root Management Server. . Update the dbo.MT_ManagementGroup table 1. On the Windows desktop, click Start, point to Programs, point to Microsoft SQL Server 2005, and then click SQL Server Management Studio. 2. In the Connect to Server dialog box, in the Server Type list, select Database Engine; in the Server Name list, select the server and instance for your new Operations Manager database (for example, computer\INSTANCE1); in the Authentication list, select Windows Authentication; and then click Connect. 3. In the Object Explorer pane, expand Databases, expand OperationsManager, and then expand Tables. 4. Right-click dbo.MT_ManagementGroup, and then click Open Table. 5. In the results pane, scroll to the right to the column titled SQLServerName_<guid>. 6. In the first row, update the value to reflect the name of the new database server name, replacing the name of the old server. 7. Click File, and then click Exit. Setting ENABLE_BROKER Before you can run tasks and use the Discovery Wizard to install agents, you need to set the ENABLE_BROKER value: 1. Open SQL Server Management Studio. 2. In the Connect to Server dialog box, select the appropriate values in the Server type list, in the Server name list, in the Authentication list, and then click Connect. 3. Click New Query. 4. In the query window, enter the following query: ALTER DATABASE OperationsManager SET SINGLE_USER WITH ROLLBACK IMMEDIATE 5. Click Execute. 6. Enter the following query: ALTER DATABASE OperationsManager SET ENABLE_BROKER 7. Click Execute. 8. Close SQL Server Management Studio. Note: Closing SQL Server Management Studio closes the connection to the database in single user mode. Depending on your configuration, you may have to manually kill any process that is connected to the database before completing the ALTER query below. 9. Open SQL Server Management Studio. 10. In the Connect to Server dialog box, select the appropriate values in the Server type list, in the Server name list, in the Authentication list, and then click Connect. 11. Click New Query. 12. In the query window, enter the following query: ALTER DATABASE OperationsManager SET MULTI_USER 13. Click Execute. You can verify the setting for ENABLE_BROKER is set to 1 by using this SQL query: SELECT is_broker_enabled FROM sys.databases WHERE name=’OperationsManager’. Note: Before you can use discovery, you must restart the following services: OpsMgr SDK Service, OpsMgr Config Service, and OpsMgr Health Service. You may have to restart the following services: SQL Server and SQL Server Agent. Backup Custom Management Packs Perform the following steps to backup your custom Management Packs. 1. Log on to a Management Server with an account that is a member of the Operations Manager Administrators role for the Operation Manager 2007 Management Group. 2. In the Operations Console, click Administration. 3. In the Administration pane, click Management Packs. 4. In the Management Packs pane, right-click the Management Pack you want to export, and then click Export Management Pack. 5. In the Save As dialog box, type the path and file name for the Management Pack file, or click Browse to save the file to a different directory, and then click Save. -
absolutely, we can help you with the technology when it comes to it
-
and in case you missed it heres how to Extend AD
-
well you could do this in a variety of ways but the first two that come to mind are using Collection variables and HTA (hyper text application) i'd recommend the collection variables way because it is much easier to implement now you are probably thinking how would this work, well you could have variable checking in the task sequence which checks what domain or site you are in and based on that does X actions cheers niall
-
so should I be using the Installer files directly from the Cu1 iso and forget about the 4.5 iso, i.e. I should use the ISO below cn_ct_nl_en_fr_de_it_ja_ko_pt_pp_es_application_virtualization_4.5_for_ts_cumulative_update_1_x86_cd_x15-51720 ?
-
great stuff, keep it up ! the application that you must stream should be created in App-V correct ?
-
hi Peter, do you deploy the App-v client using SCCM or another way
-
ah great stuff, it must have been a bad driver somewhere, glad it's working now
-
how are you intending to deploy the machines ? using wds, mdt, sccm or other ?
-
yeah feel free to create some mockups of the new logo, I already have a friend doing one up and he created the logos for the sister site http://linux-noob.com this is the image template and it must says windows-noob.com in big letters with the catch phrase showing you how to do IT plus some graphical element so get cracking
-
if the computer has not received the application yet, and it's applicable then it will receive it, it all depends on your advertisement settings, but utilising AD groups is a great way of controlling how computers get software in SCCM
-
According to The Register, Intel plans to deploy Windows 7 on its employee's computers. When asked at a Technology Summit with reporters and analysts in San Francisco whether the company would wait until service pack 1 to deploy Windows 7, Intel's EVP and chief sales and marketing officer Sean Maloney said, "This time I think we'll go faster." This is good news for Microsoft since Intel and many other companies skipped Vista. The company's top salesman also sympathized with those who passed on Vista. "There was an excuse not to deploy Vista, because - rightly or wrongly - people said 'wait for service pack X' or 'we don't like the compatibility issues." But this time, things may be different. Maloney said, "There are really good reasons for the business client in terms of security, power management - lots of good reasons why you'd go for it." more via > http://www.neowin.net/news/main/09/07/30/intel-will-deploy-windows-7-on-employees-computers