anyweb
-
Posts
9273 -
Joined
-
Last visited
-
Days Won
371
Everything posted by anyweb
-
 wow, maybe you need Windows 10 v 1703 specific video drivers for that hardware ?
 -
is the user that you are using to browse the data, targeted by the WIP policy or not ?
-
hi, this topic is about Discovery, please post your boundaries question in a separate thread, thanks
-
Great article, very clear! thanks ! can you explain what you mean by 'devices which don't use WIP', once you've removed the user account from Access work or school, then the protected data is revoked as shown in my screenshot above
-
hi we are deploying Windows 10 v 1607 (and v1703) just fine with ADK 1703, don't be afraid to move to the new versions, there's lot of benefits
-
no problem, glad you identified the issue
-
has there been any change on the switch level, i.e. have iphelpers been configured ?
-
hi, this morning I performed a site upgrade (security update to version 4.2.4) which completed successfully (according to the upgrade process), except, it didn't. As a result, new users could not join, and people could not reply to posts or edit posts or start new posts, this affected users throughout Europe, Middle-East and Africa, but was resolved a few hours ago so US users probably didn't notice. I apologize for any inconvenience caused by this downtime, on the plus side, all blog posts (and other posts) were still readable during this time thanks to @hybrid (Peter) for fixing the problem this evening, cheers niall
-
hi well this is not covering an upgrade, it's a clean install so please raise this as a separate topic, thanks
-
this is a separate question to this topic right ?
-
sorry, what i mean is you need to modify the PowerShell script (Install SCCM Current Branch version 1606.ps1), and edit the corresponding section which creates the configuration.ini file.
-
we are using it in a SCCM 1702 CB environment with 1703 adk boot wims. no problems you have probably made a 'mistake' in the script editing, causing it to fail and reboot, you can test the scripts 'manually' by creating standalone media (usb) and testing that way... over and over
-
use what Microsoft supports and you should be fine, if in doubt, try it in a lab first
-
welcome !
-
sorry can you clarify, are you trying to update using Offline mode ?
-
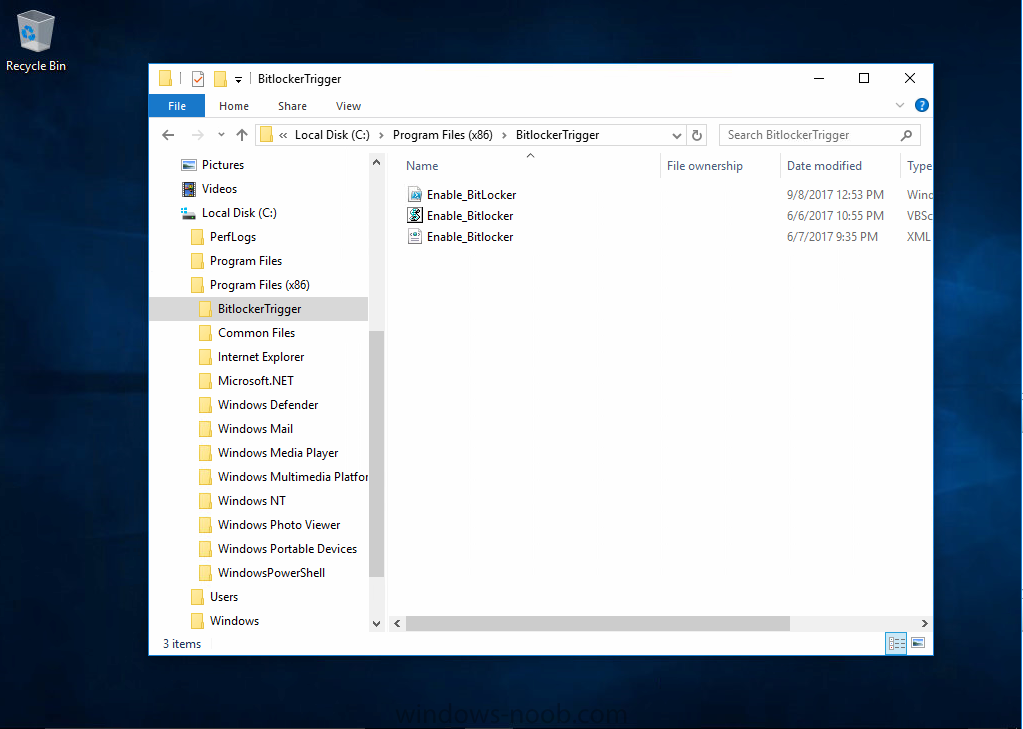
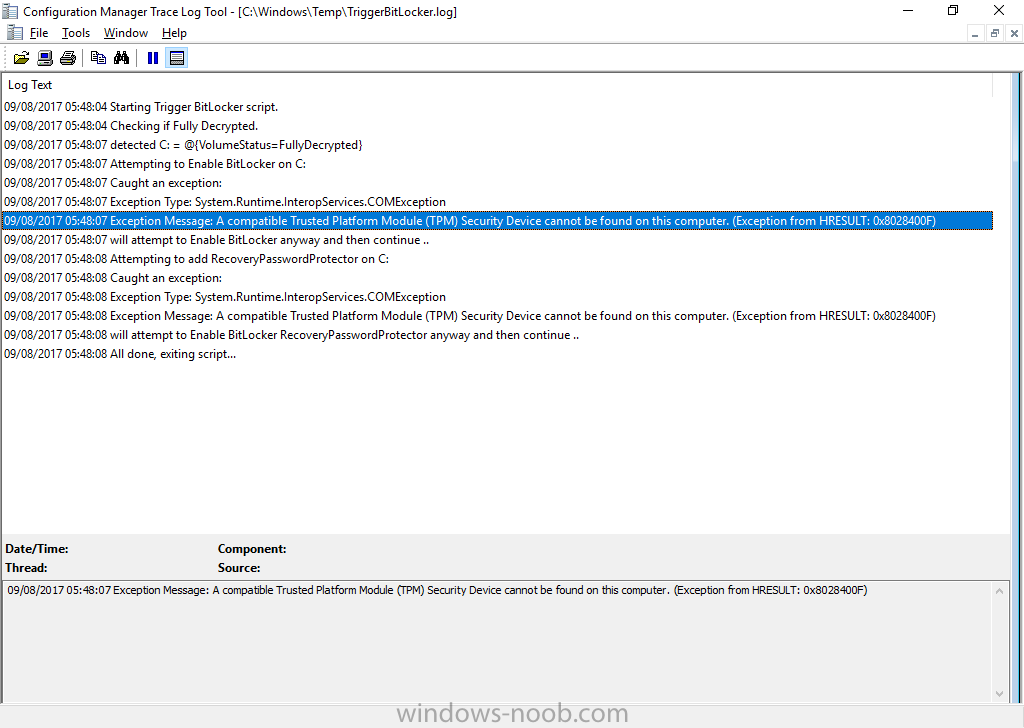
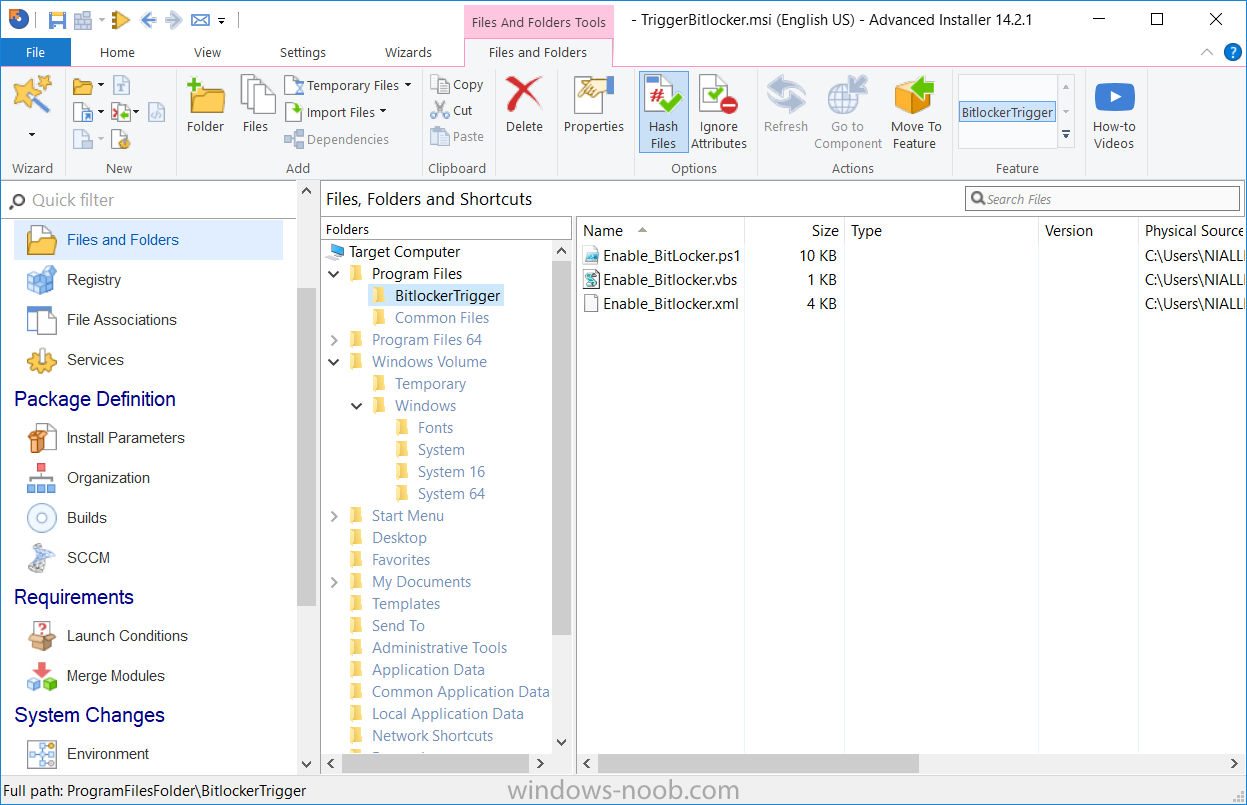
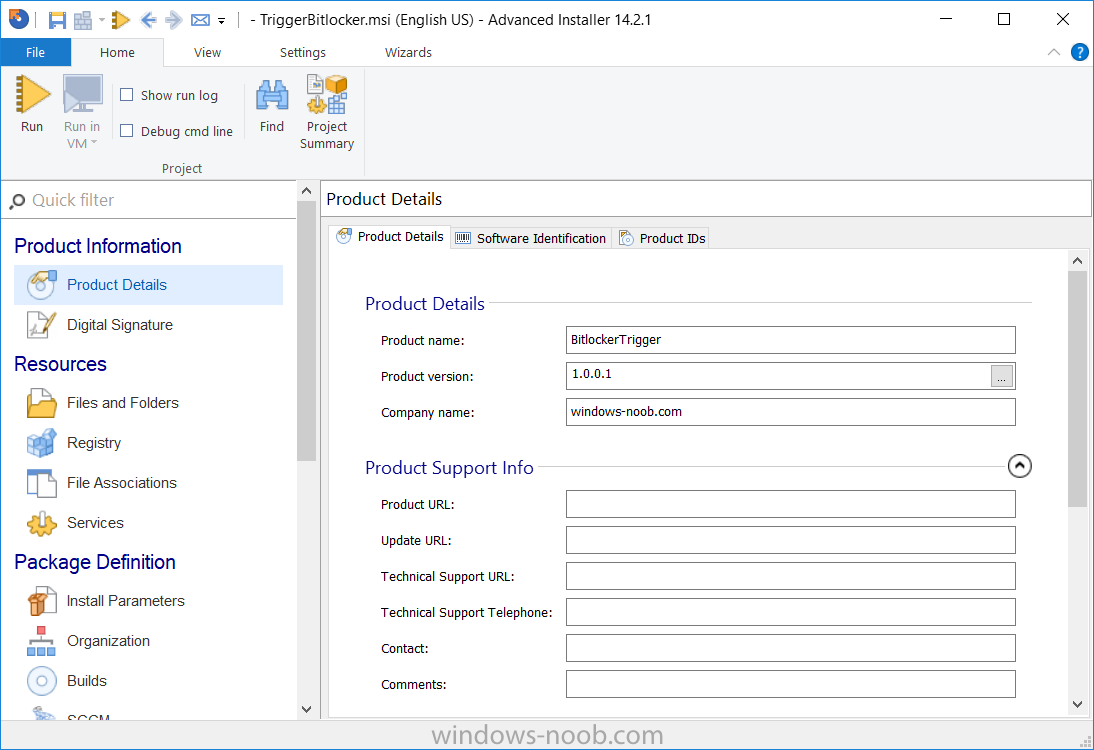
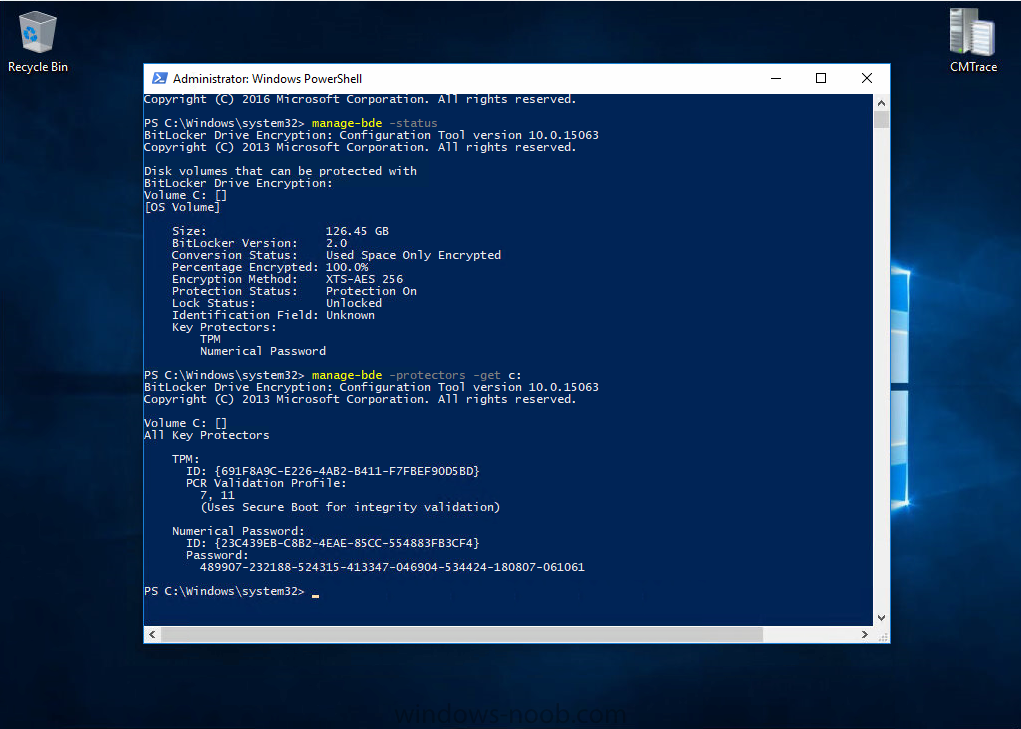
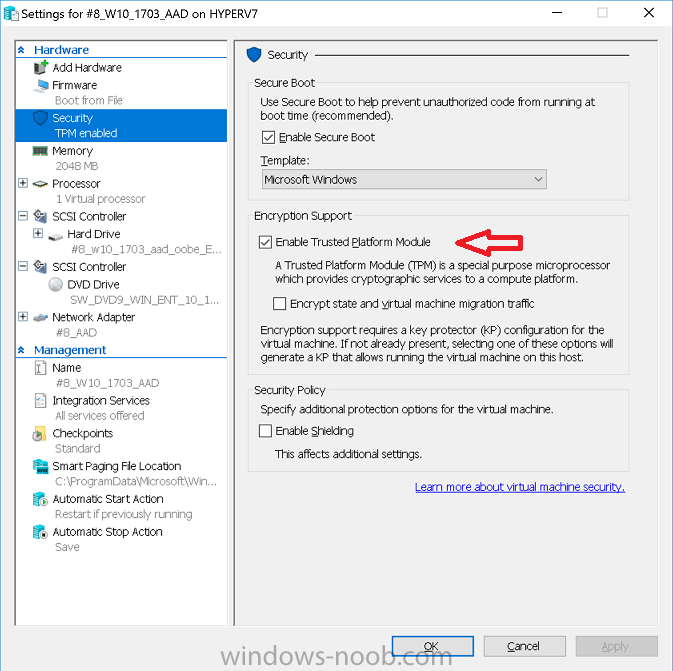
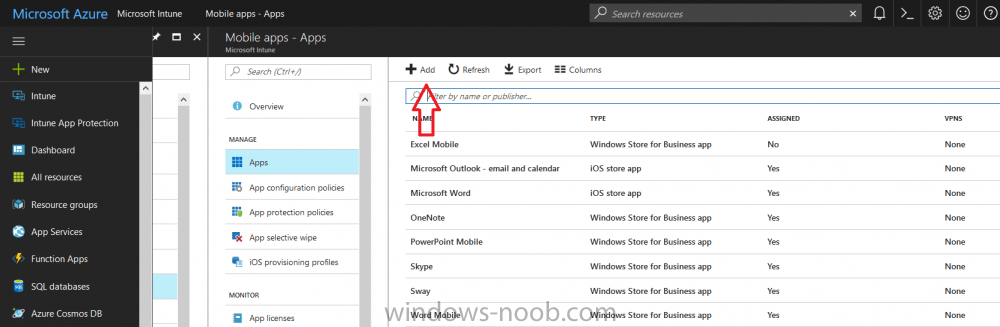
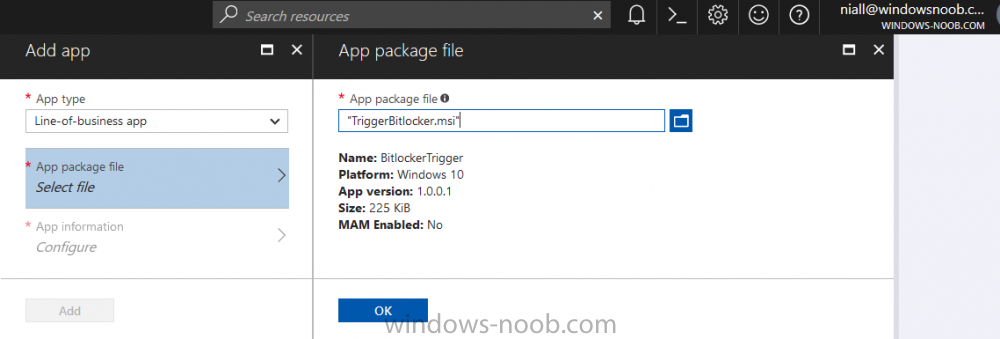
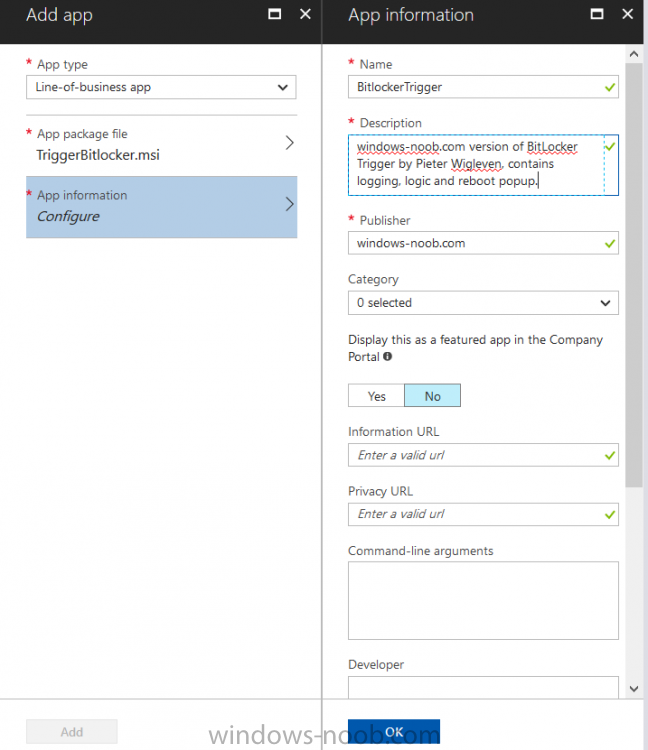
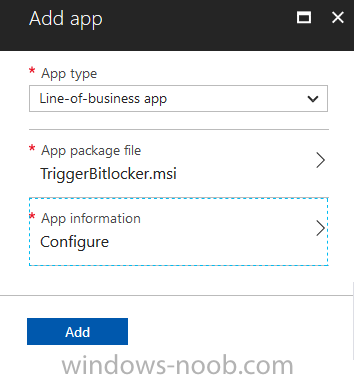
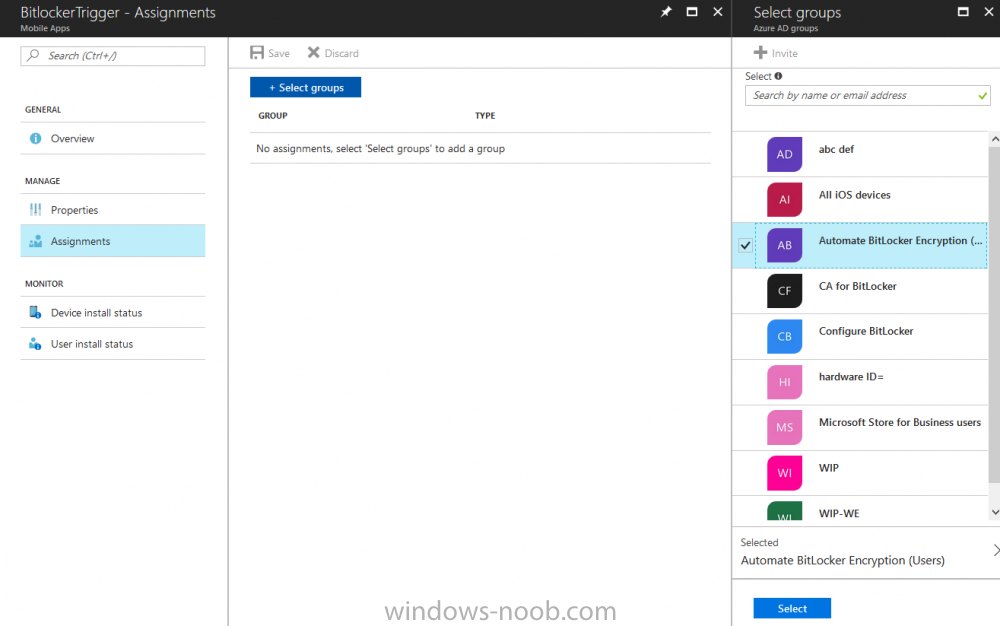
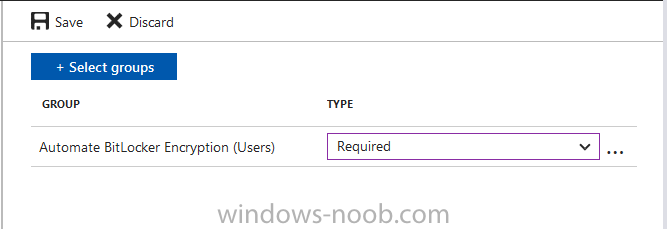
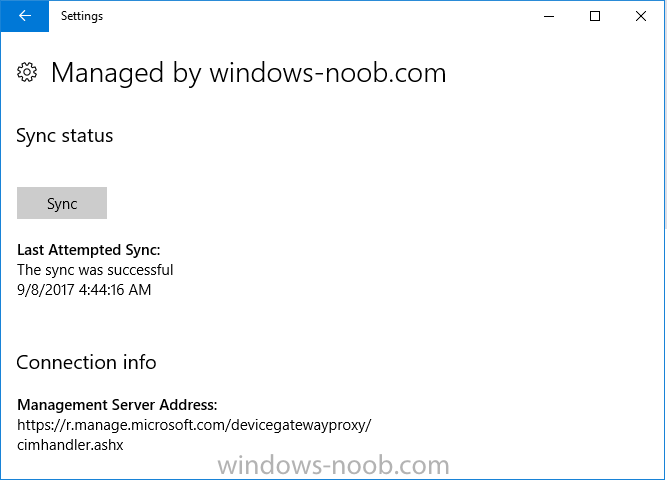
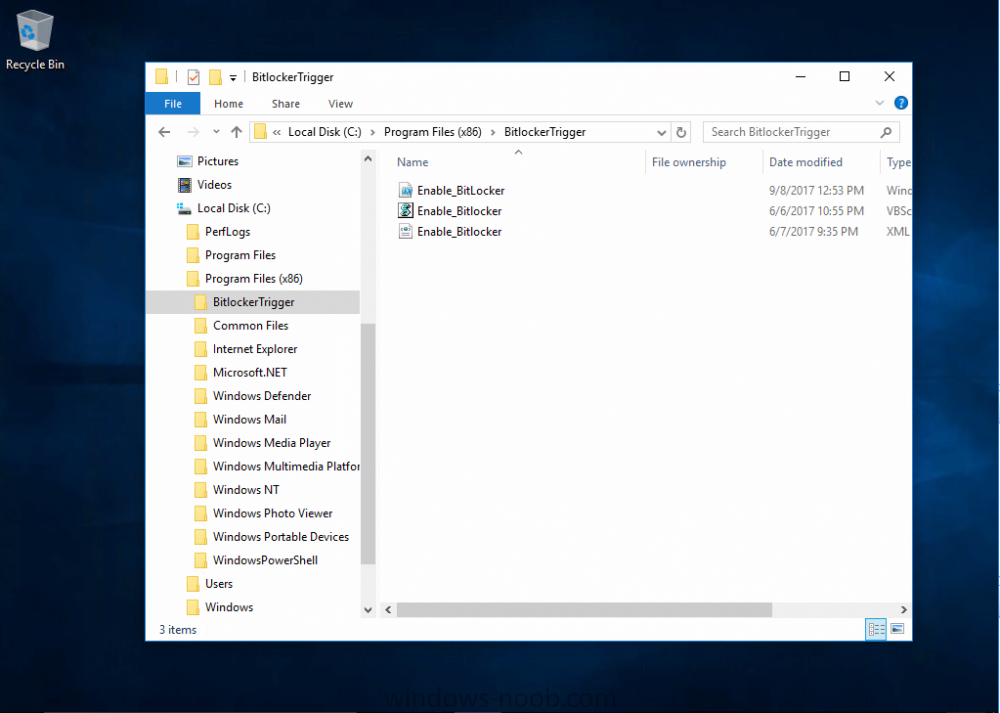
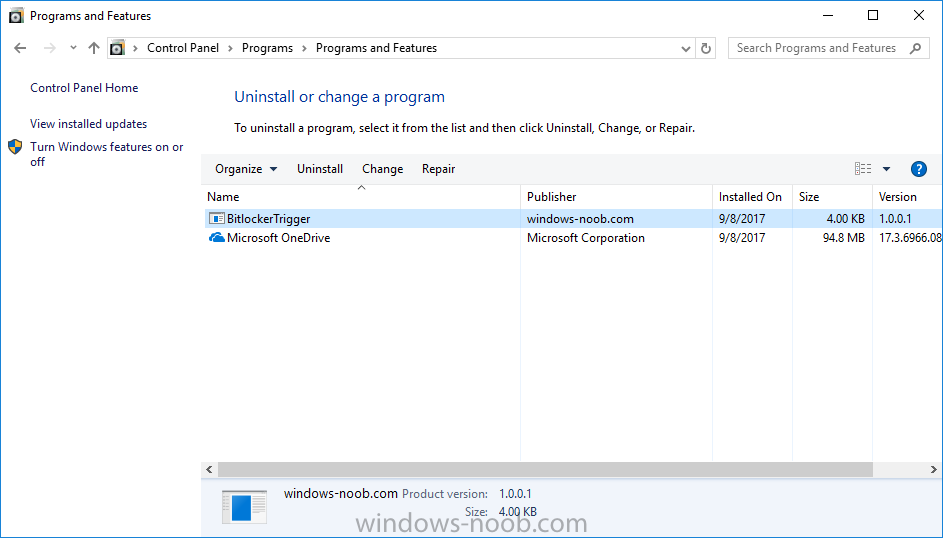
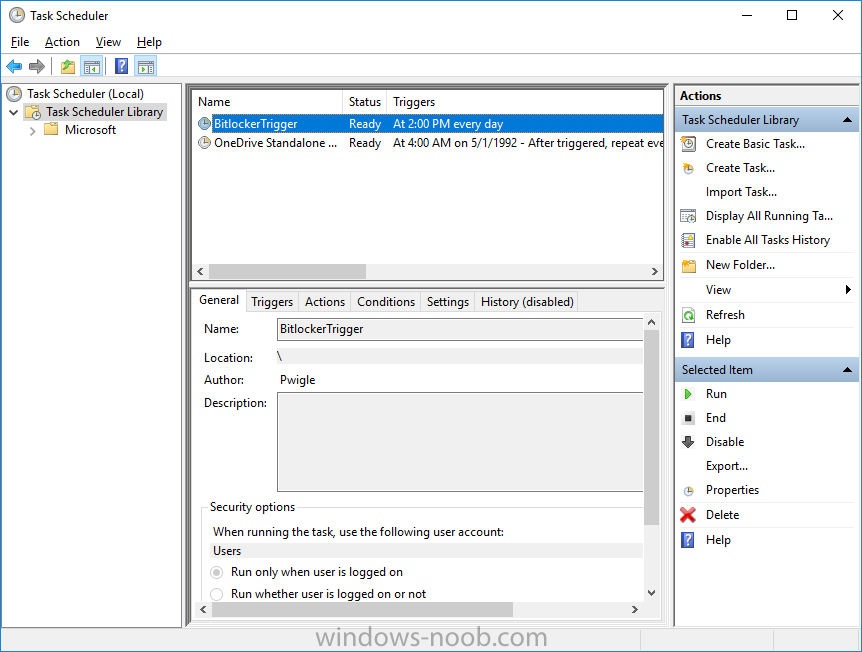
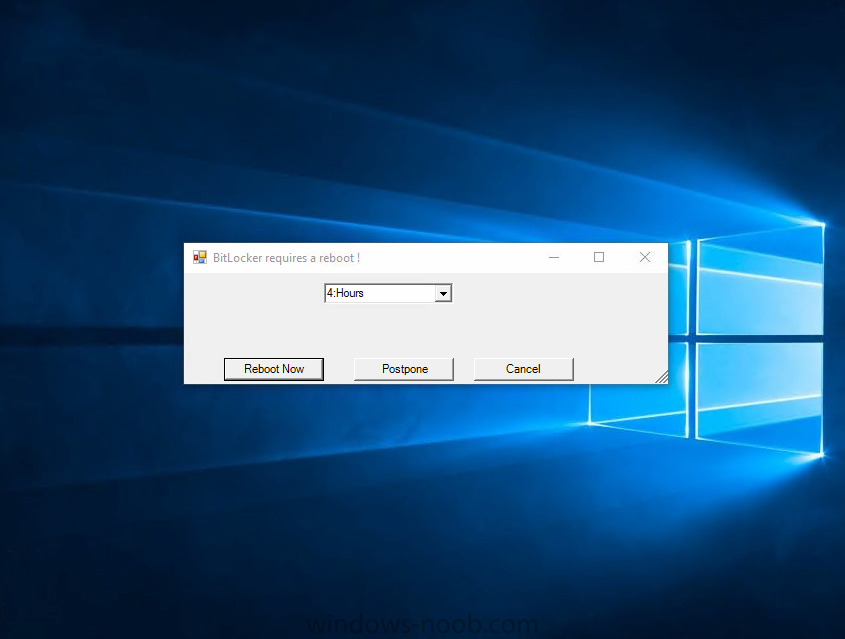
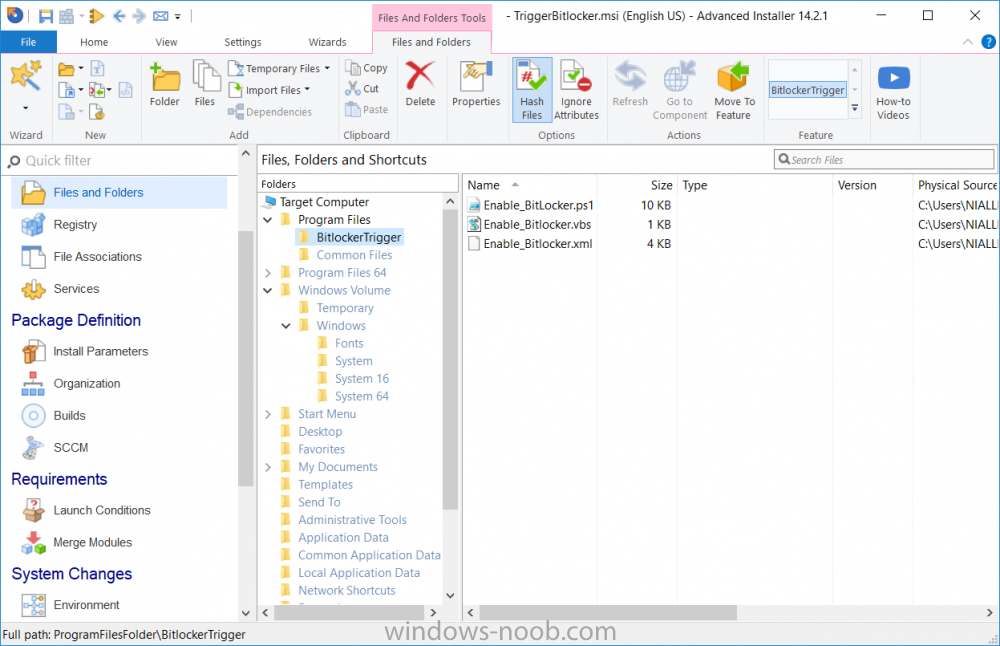
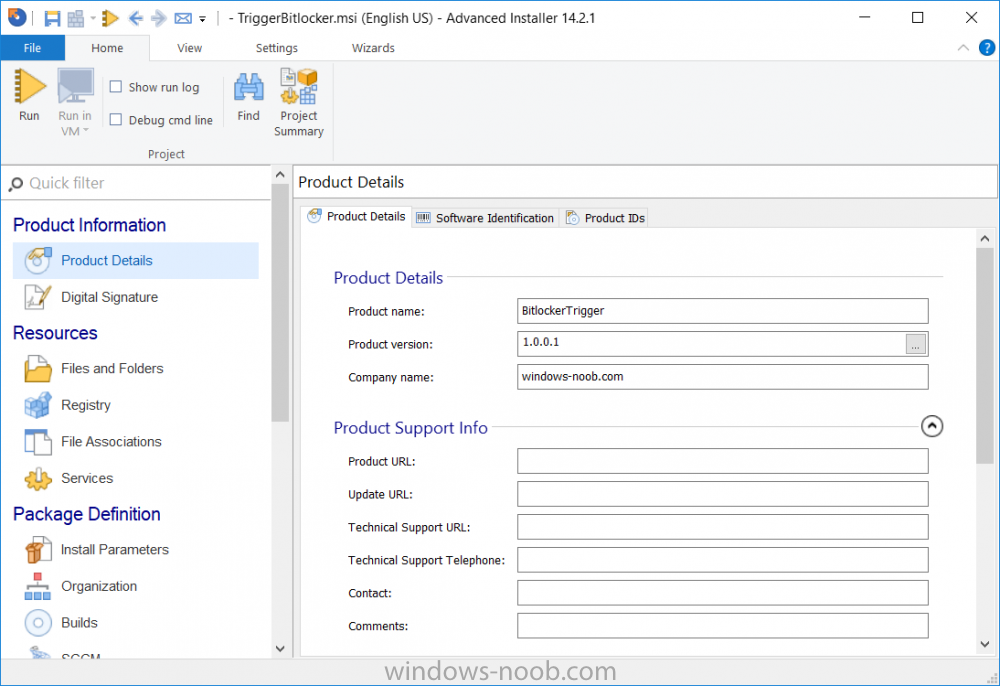
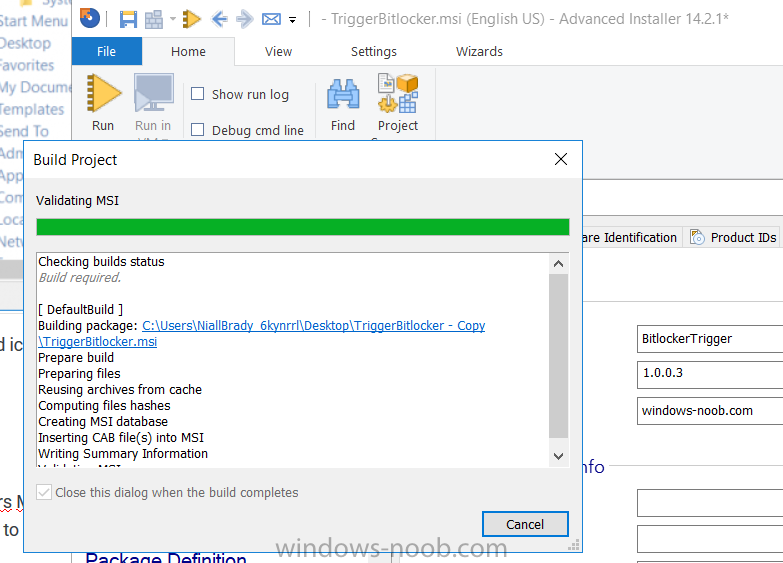
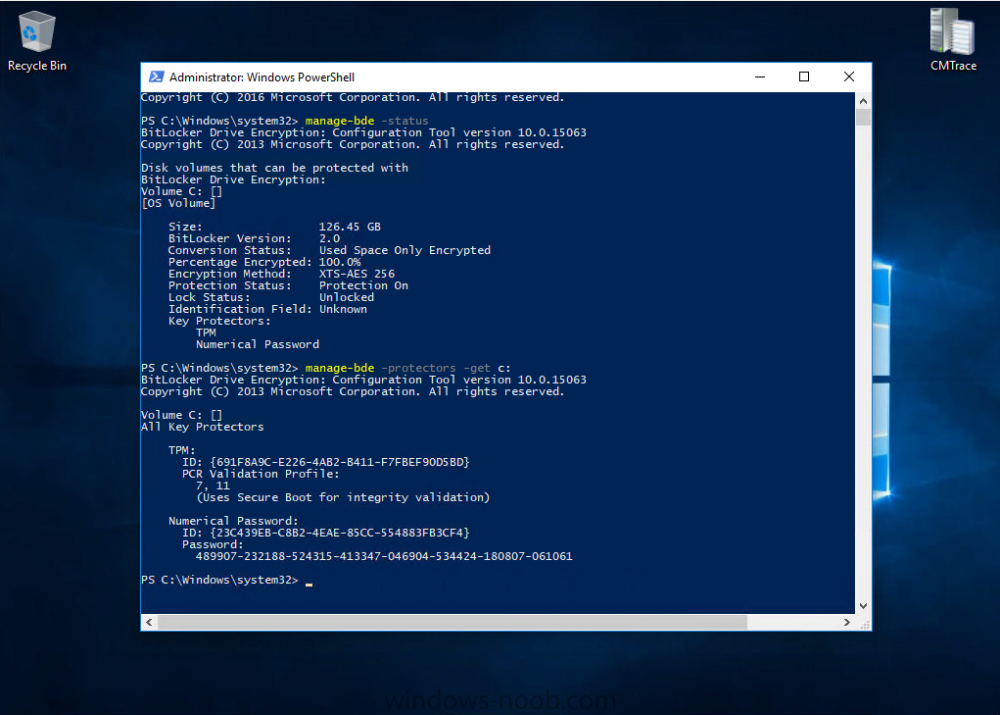
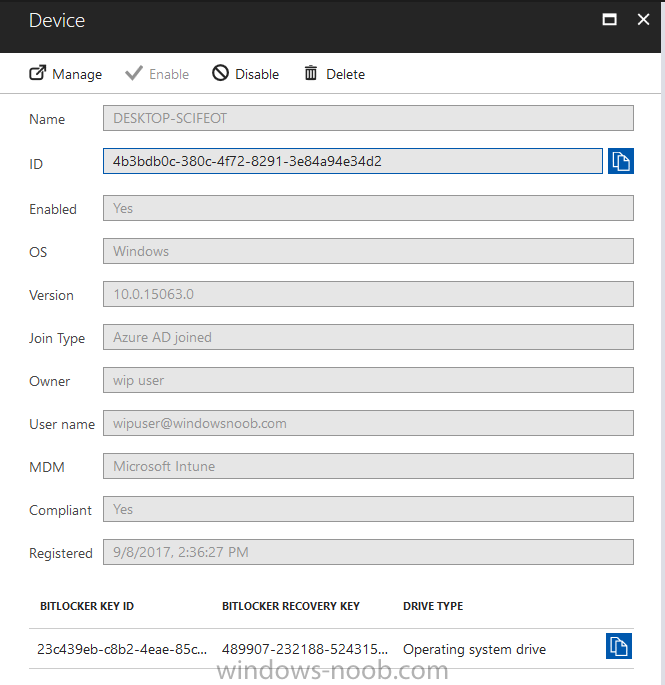
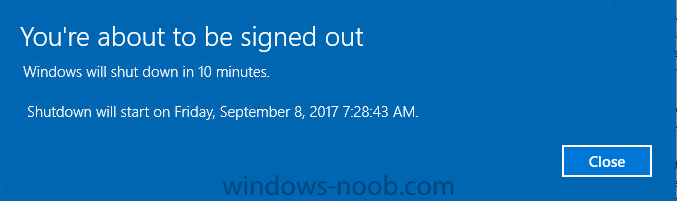
Introduction In Part 1 I showed you how you can configure BitLocker on Windows 10 devices using Microsoft Intune, but that method relies on the end user actually clicking on the notification in Windows and then continuing through the wizard until completion. In this post I'll show you how you can automate that part of the process, using an MSI that is based upon an MSI that was originally created by Pieter WigLeven. That MSI creates a scheduled task to run daily until the drive is encrypted. Pieter's solution was great but lacked some key features that I wanted such as logging (so that you can view errors which may occur during the encryption phase), logic and a user facing reboot prompt. Therefore, I decided to rewrite the PowerShell script included in the MSI and then re-package it for your benefit. Note: I'd recommend you test this solution in a lab environment, I used Windows 10 version 1703 Hyper-v based virtual machines (Generation 2) with a Virtual TPM enabled. Also to note, this MSI (and Pieters) does not check for the existance of a third party encryption tool, if you want that functionality then you'll need to modify the PowerShell script accordingly and then repackage it as described in Step 5. Enabling a Virtual TPM If you use Hyper-v VM's without a Virtual TPM enabled then the PowerShell script will exit logging errors and will not start the encryption. You can enable the Virtual TPM in the Security settings of your virtual machine (shown in the screenshot below) by placing a check mark in Enable Trusted Platform Module. Step 1. Download the MSI Note: In this guide I've used the windows-noob.com version of the MSI. I've modified the MSI as described in Step 5 and made it available in the Downloads section of this Guide, it includes new features such as Detailed logging Logic to check if encryption was enabled Reboot notification for end users Automatically remove the scheduled task once encryption is enabled You can get the the windows-noob.com version of the MSI in the Downloads section of this guide (scroll down....) or you can get the original MSI from Pieter. Keep in mind that if you are doing Azure AD join, that the user is automatically an Administrator, if however you are using Windows Autopilot then the user will not be an Administrator. The windows-noob.com version of the tool is based on the user being an Administrator. Step 2. Add the MSI as a LOB app in Intune Now that you have the MSI available, it's time to upload it into Intune. In the Intune service in Azure, select Mobile Apps, then Apps, then click on + Add to add an App. Select Line of Business app in the drop down, then select Select file and point it to the downloaded MSI file before clicking on OK. Next click on App Configuration and fill in some details about the application before clicking on OK finally click on Add. Step 3. Assign the app as Required to a User Group Next you will deploy the application (Assign) to a group of Users. In this guide I've created an Assigned User Group called Automate BitLocker Encryption (Users) which contains users that I want to target with this policy. Click on Assignment, then click on Select Groups, select the User Group you created previously and then click on Select. For Type, click on the dropdown and select Required and then click on Save. This will mean that any users in this User Group will be targeted by this required application and it will automatically download and run. Step 4. Verify the experience On a Windows 10 computer that is not yet BitLockered (and not encrypted by any third party encryption), Logon as a user that is a member of the above User Group. Keep in mind that they also need to have received the BitLocker Configuration created in Part 1 of this guide. That policy will set the BitLocker Configuration options (such as Encryption Algorithm), but it will not start encryption automatically. Trigger a Sync using the appropriate button. This will pull down the new policy and start the download and installation of the MSI which in turn will copy some files, and create a scheduled task. Once policy is received, you can see that the application is installed in Control Panel And three files are present in the File System at C:\Program Files (x86)\BitLockerTrigger. Note: The VBS kicks off the PowerShell script and the XML file is used in the creation of the Task Scheduler task. You can also check Task Scheduler to see the task is added, and that it is scheduled to run at 2pm. Tip: By default Windows Task Scheduler has the History tab disabled by default, to enable it you must start Task Scheduler as Administrator (Run as Administrator) and then click on Enable All Tasks History in the right pane. This will give you some details about the running task and whether it did run or not, but for more details about the task review the TriggerBitLocker.log file as described below. Running the Task You can wait until 2pm for the scheduled task to run or right click on the task and choose Run to run it now. after it has run, if everything was ok it will popup a reboot to the user, if things don't go according to plan use CMTrace.exe and navigate to C:\Windows\Temp and open the generated log file C:\Windows\Temp\TriggerBitLocker.log The log file should reveal any problems that occur. In the example below you can see what happens when you try to run the task on a computer without a TPM. The key takeaway here is that logging is now included with the MSI and the PowerShell logic will avoid popping up a reboot message to the end user in the event that it has not succeeded to enable Encryption. On a computer that meets the specifications (TPM), the PowerShell script enables encryption and the user will see the popup, they can delay for a few hours or accept the reality that they are getting Encrypted with BitLocker. and if they choose Reboot Now they'll see something like this After the reboot we can verify BitLocker encryption status and the recovery key is in Intune in Azure. job done ! Note: After successfully enabling BitLocker the script deletes the Scheduled Task so that it no longer re-runs. Step 5. (Optional) Edit the MSI with Advanced Installer If you'd like to update the MSI yourself, you can install the MSI on a vm, and pull the scripts from the folder shown above, then load it using Advanced Installer. Edit what you want in the package and edit the PowerShell script to suit your needs, once done copy the replacement scripts back into the MSI in the Files and Folders section below Once done, to build the package click on the Save icon in the ribbon. And use that compiled MSI in the guide above. Downloads Below is the windows-noob.com version of Pieters MSI, this version was compiled using Advanced Installer 14.2.1 (great product !) and contains improvements to the PowerShell script such as logic handling, logging to help with troubleshooting and a Reboot computer popup at the end of the script which only appears if encryption is enabled. windows-noob.com TriggerBitlocker.msi (version 1.0.0.2) - TriggerBitlocker.msi windows-noob.com TriggerBitLockerUser.msi (version 1.0.0.2TriggerBitlockerUser.msi Recommended reading Hardware independent automatic Bitlocker encryption using AAD/MDM https://blogs.technet.microsoft.com/home_is_where_i_lay_my_head/2017/06/07/hardware-independent-automatic-bitlocker-encryption-using-aadmdm/#comment-26696 Configuring BitLocker in Intune - Part 1. Configuring BitLocker https://www.windows-noob.com/forums/topic/15514-configuring-bitlocker-in-intune-part-1-configuring-bitlocker/ Download Advanced Installer http://www.advancedinstaller.com/download.html

-
if you've already extended the schema for ConfigMgr then you are good to go. to verify you can delete everything in the system mangement container using adsiedit and restart the sms_executive component, it should repopulate the system management container, if not it's not working or delegated correctly
-
yes you can, those workgroup machines can be Azure AD joined (and enrolled into MDM with Intune) or they can be simply workgroup machines enrolled into MDM or they can be workgroup machines that use MAM-WE
-
did you configure WSUS in any way ? I do not cover configuring WSUS in this guide, and I do not cover Client deployment in this guide. You can find those topics and more here.
-
hi Maninde, are these 2 problems occuring after completing my guide or something else ?
-
what does your smspxe.log tell you ? attach it here
-
On Microsoft's blog, they announced that RS3 (Redstone 3) aka Fall Creators Update is coming October 17th 2017. "Create and play this holiday with the Windows 10 Fall Creators Update coming Oct. 17" It offers the following new features Windows Inking Windows Inking keeps getting better, letting you ink directly onto PDF’s, making it easier and faster to comment and share with others, improving on what you could do with pen and paper alone. Smart Ink applies artificial intelligence to inking automatically making the squares you draw more perfect, or turning boxes into a table for you with no extra work. And you know how sometimes you can’t find your keys, wallet, and phone, sometimes it’s hard to find your pen to do the inking. Windows Find my Pen fixes that in the Fall Creators Update. Photos and Videos We have reimagined our Photos Application to deliver remixed experiences for telling your stories with photos, videos, music, 3D, and even inking. OneDrive Files On-Demand You can save all of your creations in OneDrive Files On-Demand, accessing your cloud files like any of your other files on your PC, without using up your local storage space. Gaming The fuel that often inspires creativity is play. With the Fall Creators Update, we’ve updated Game Mode, which allows your games to use the full processing power of your device as if it was an Xbox game console, right from a new button on the Game bar. And to take advantage of this power, we have a fantastic lineup of Xbox Play Anywhere games coming including, Cuphead, Forza Motorsport 7, Super Lucky’s Tale and Middle-earth: Shadow of War. And, if you love these Xbox play anywhere games, coming on November 7 you can play them on the most powerful console on the planet, Xbox One X. Security While you create and play, our goal is to keep you safe and secure. With the Fall Creators Update, Windows Defender is smarter and defends better than ever before. With behind the scenes cloud intelligence that enables new defenses against ransomware and exploits. I can’t talk about security without talking about Windows 10 S. Introduced last May, Windows 10 S is specifically designed for simplicity and security, with significant breakthroughs in battery life and performance. It’s off to a great start, with some of our highest customer satisfaction results yet. This is the core of Fall Creators Update, it’s all about unleashing your creativity and having some fun while at the same time keeping you safe and secure. Accessibility I also want to share some exciting new technology that speaks to our mission at Microsoft to create products which are inclusive by design. With the Fall Creators Update, we are making Windows more accessible for those with Lou Gehrig’s disease, a progressive neurodegenerative disease that impacts the brain’s ability to control your muscles. The one muscle it doesn’t impact, are the eyes. A new feature Eye Control implements incredible eye tracking technology that lets you type, and operate a mouse just using your eyes, this is life changing technology for those with Lou Gehrig’s disease. This is real advancement in accessibility that we are introducing to the world with the Fall Creators Update. Windows Mixed Reality Lastly, with the Fall Creators Update, we are enabling you to immerse yourself in a new reality, the world of Windows Mixed Reality. By combining our physical and digital worlds, we believe mixed reality is the next step in the evolution of human computing. For the first time, we are talking about a mixed reality system that fully immerses you in the experience not limited to a mobile device screen size. One that is easy to setup, not requiring you to mount cameras around the room, just put the headset on your head, plug it into your PC and get started, leaving your hands free to interact with the mixed world. It’s available from a wide range of partners around the world, like Acer, ASUS, Dell, HP, and Lenovo with headsets starting as low as $299. I am thrilled to announce that Windows Mixed Reality headsets will start to become available on October 17 when the Fall Creators Update ships. And if you find yourself without a headset, we will also deliver mixed reality experiences through the PC. With Mixed Reality Viewer, you can see 3D objects – either from the Remix3D.com community or your own creation from Paint 3D – mixed into your actual surroundings through your PC’s camera – and snapped and shared – for powerful ways to tell your story.
-
yes if you have an Upgrade issue then contact me at niall@windows-noob.com and i'll see what I can do
-
Boot Media - Now fails at network settings
anyweb replied to LOKI's topic in Configuration Manager 2012
try this script it will help -
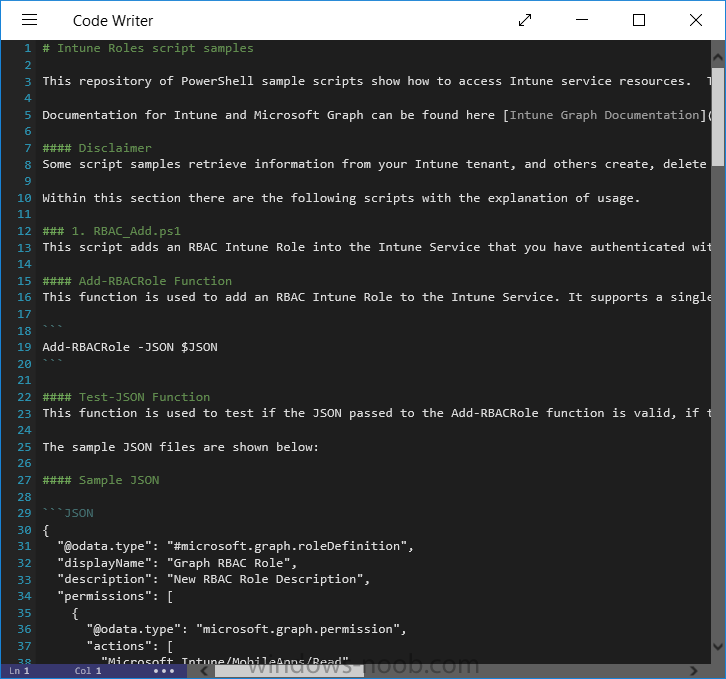
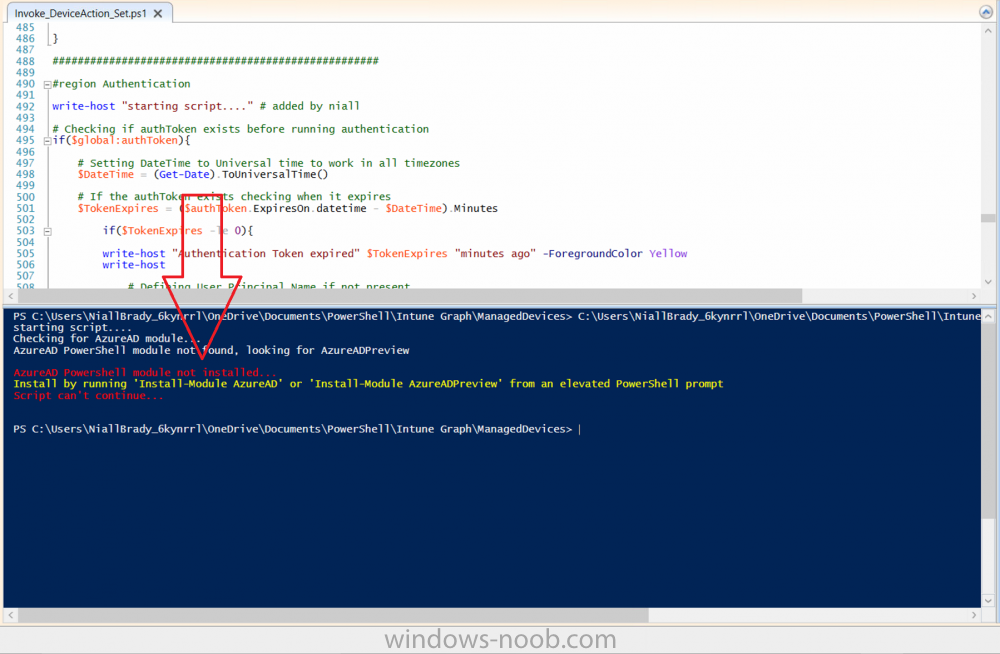
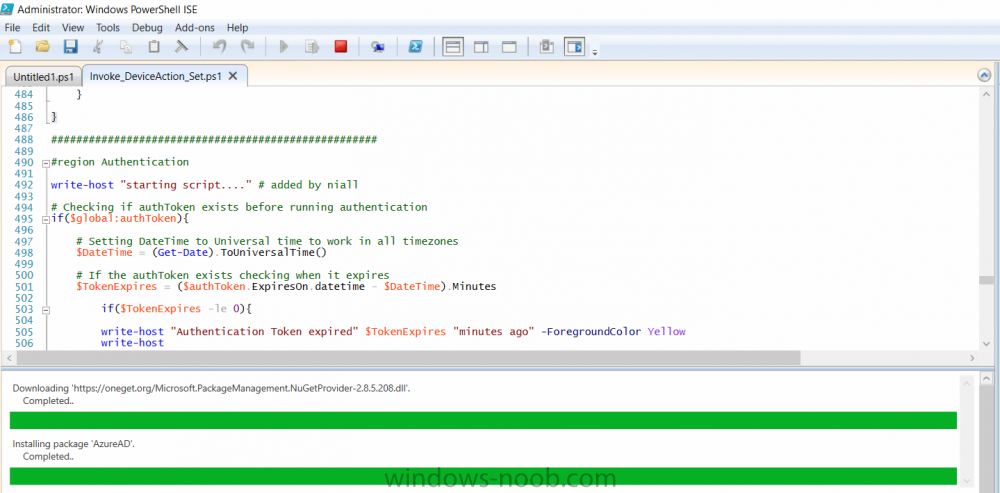
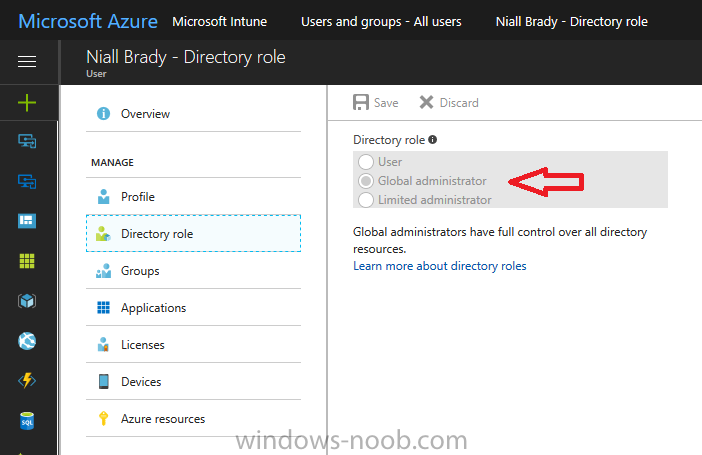
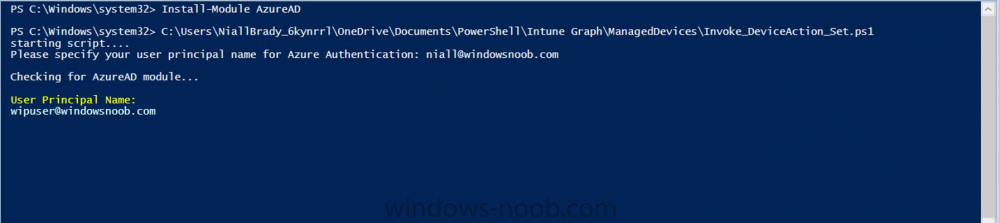
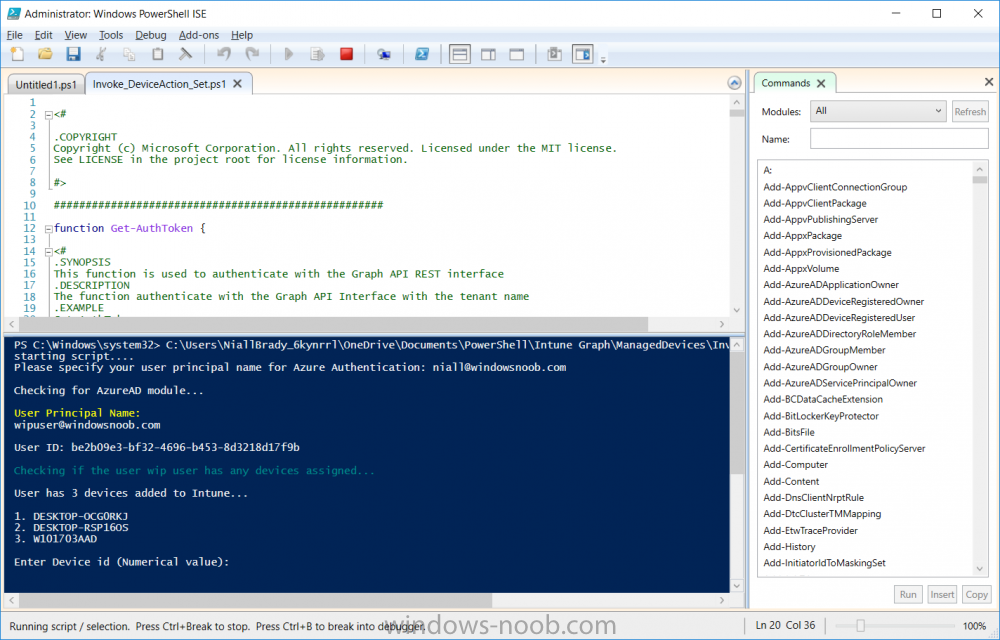
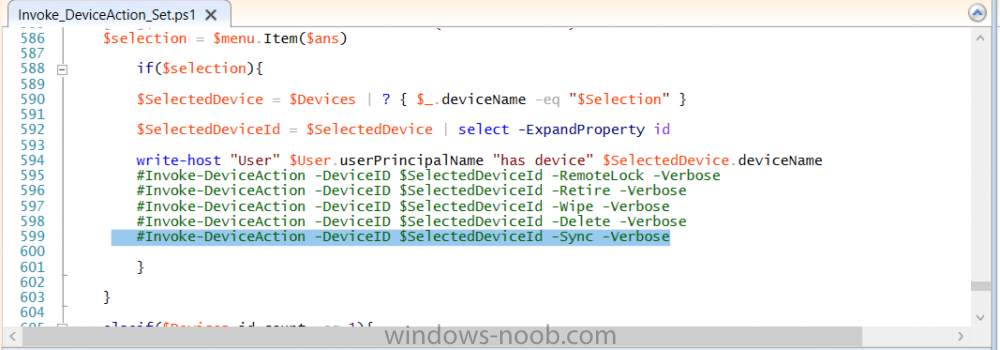
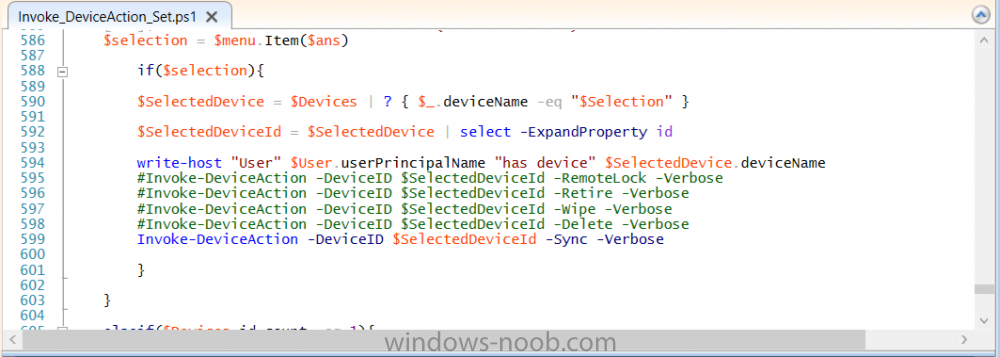
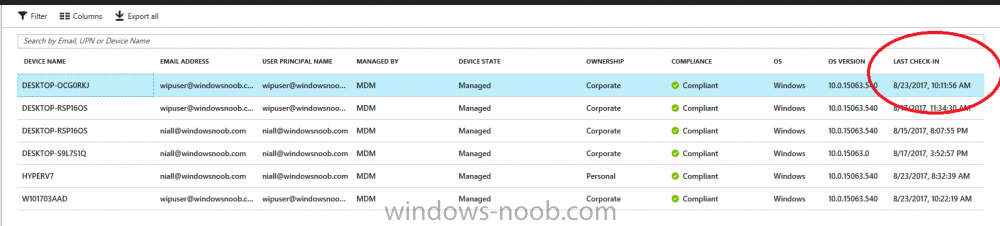
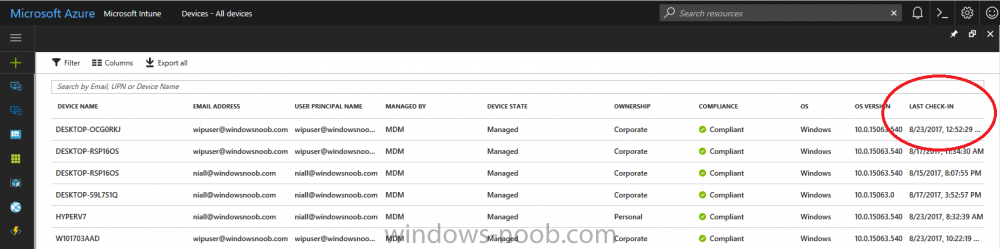
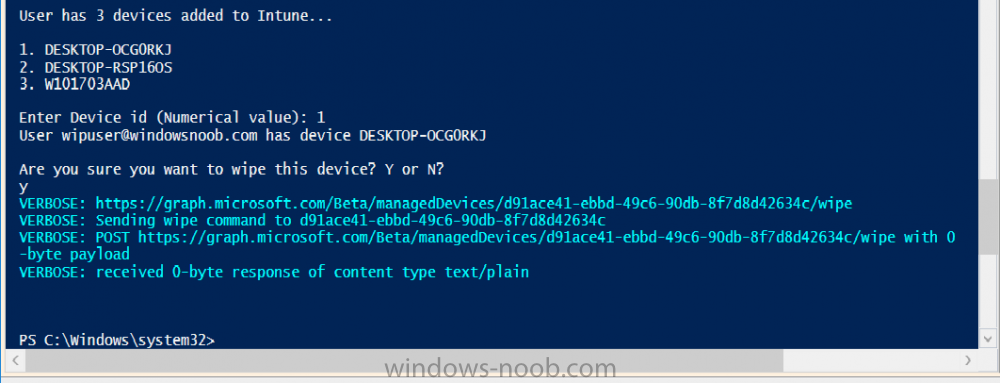
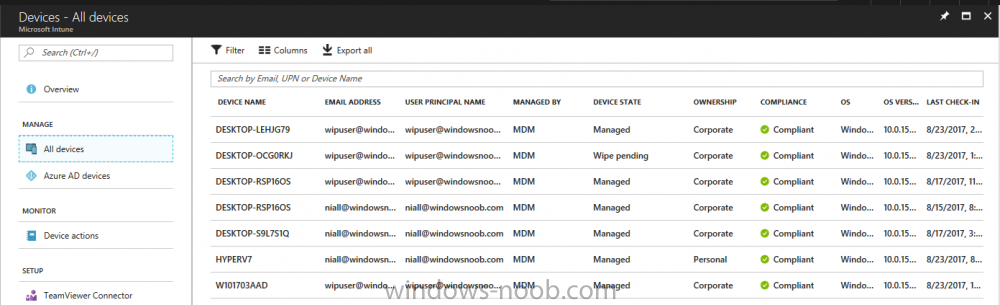
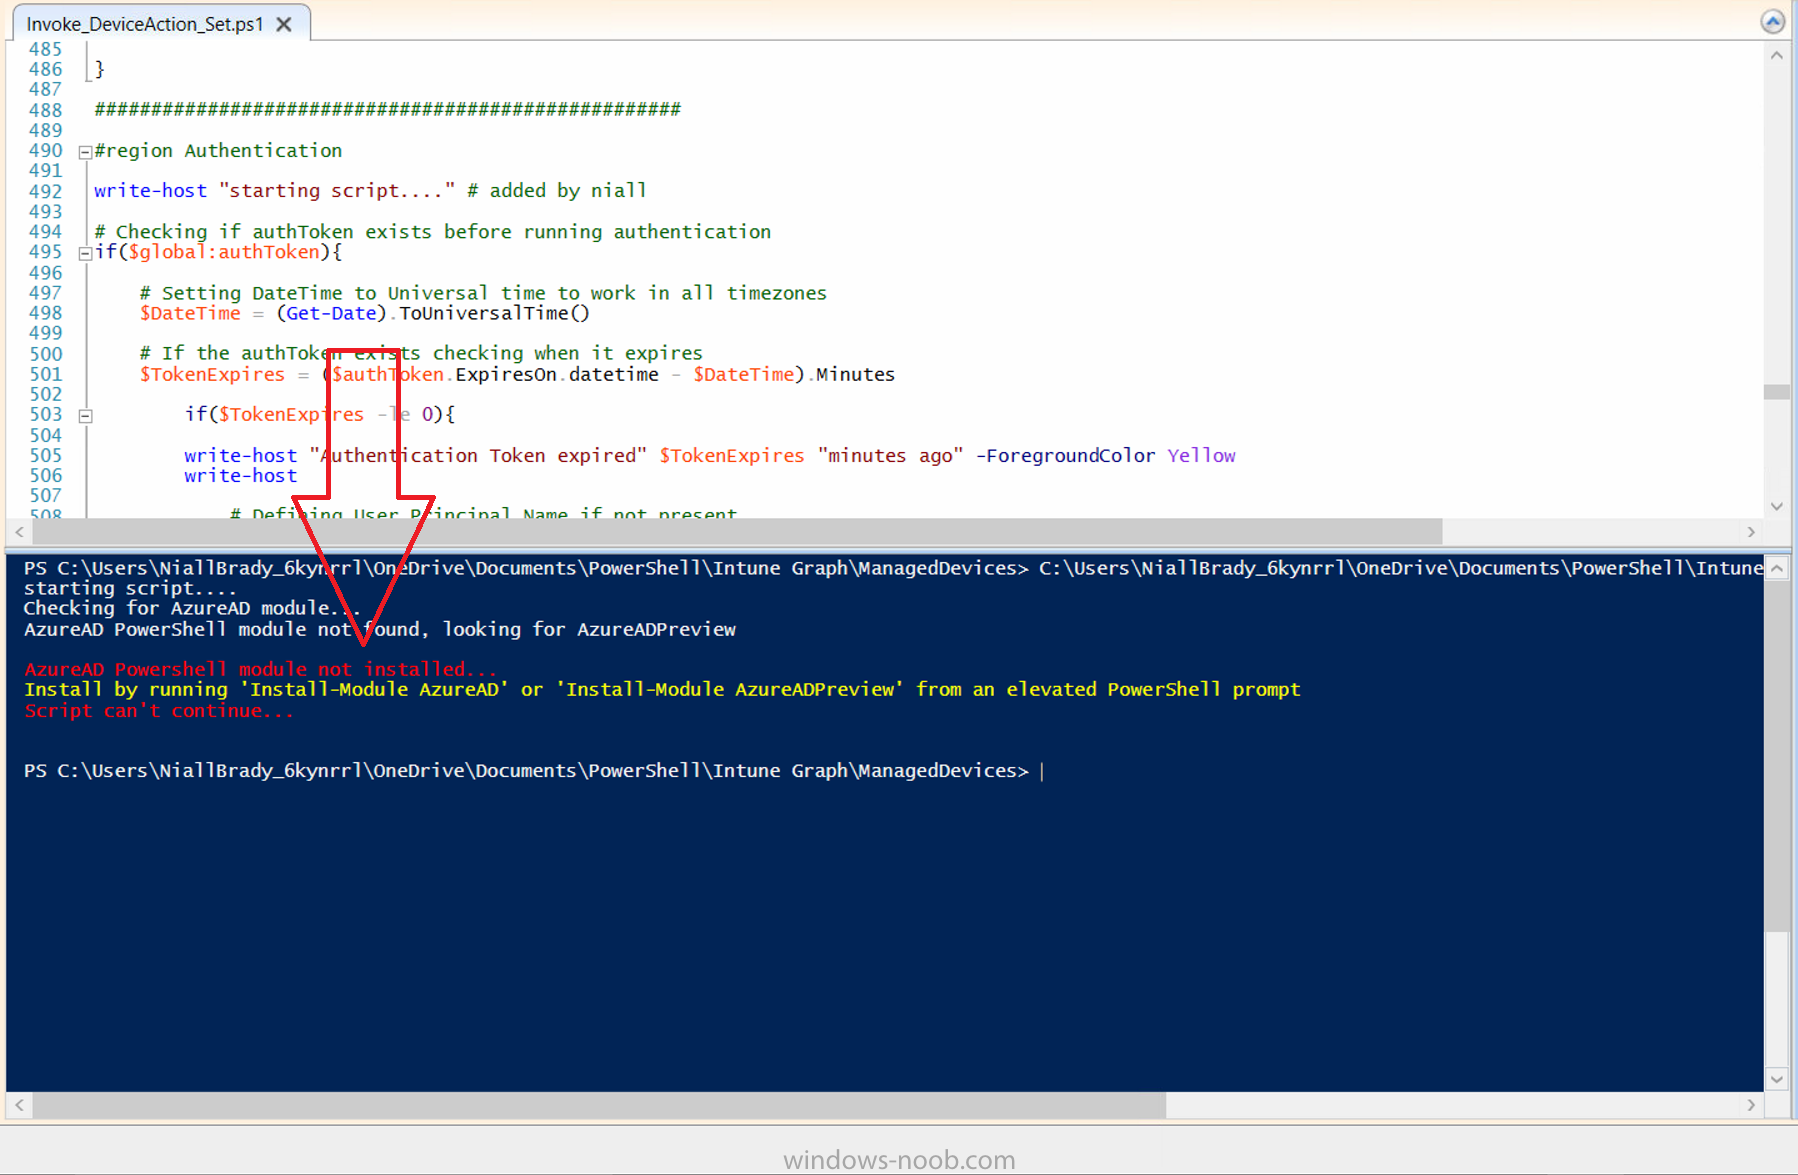
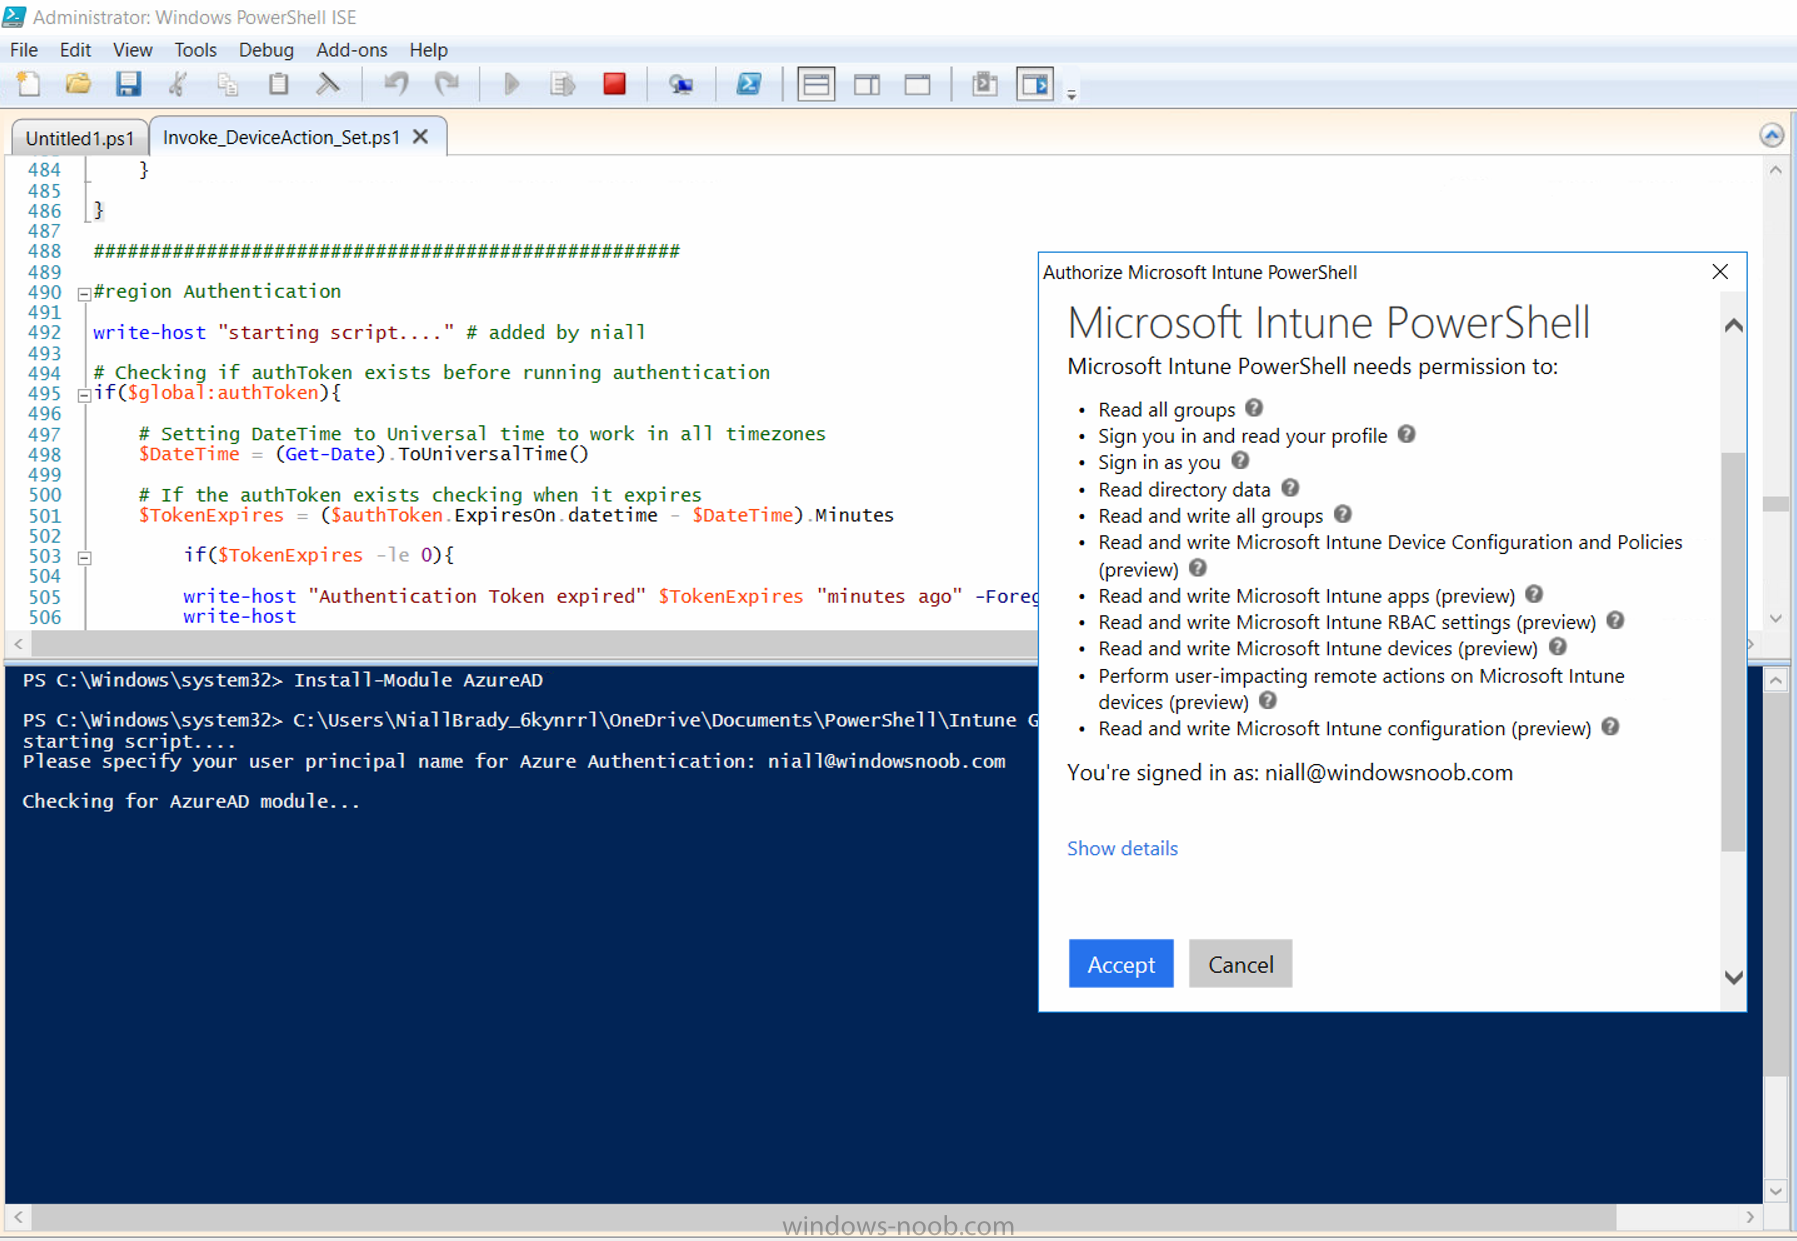
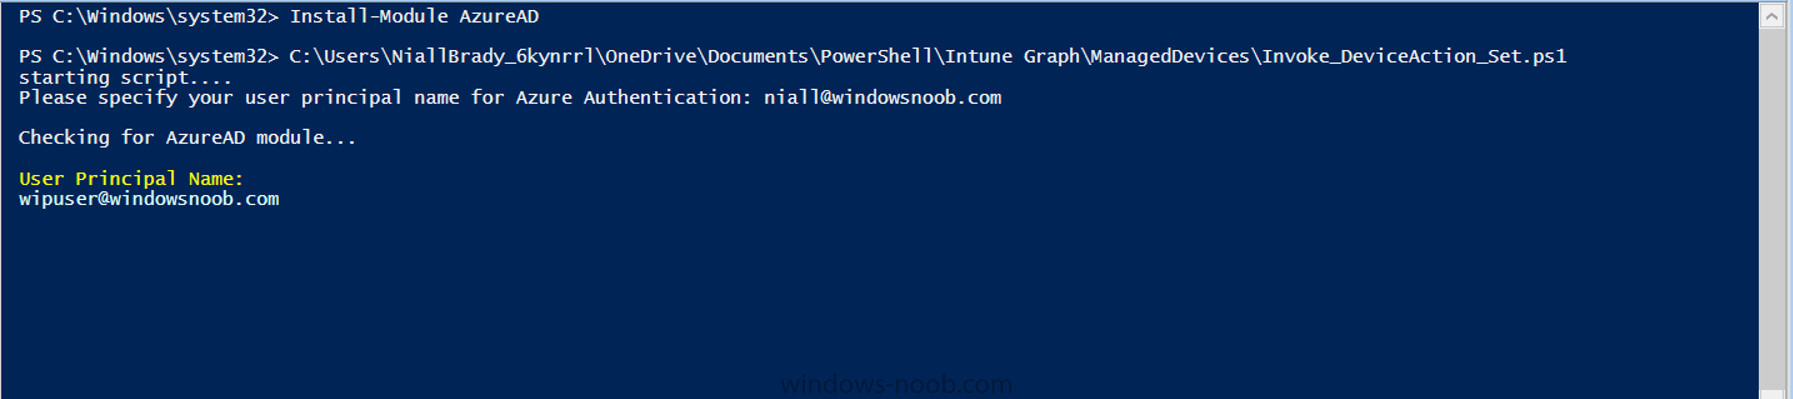
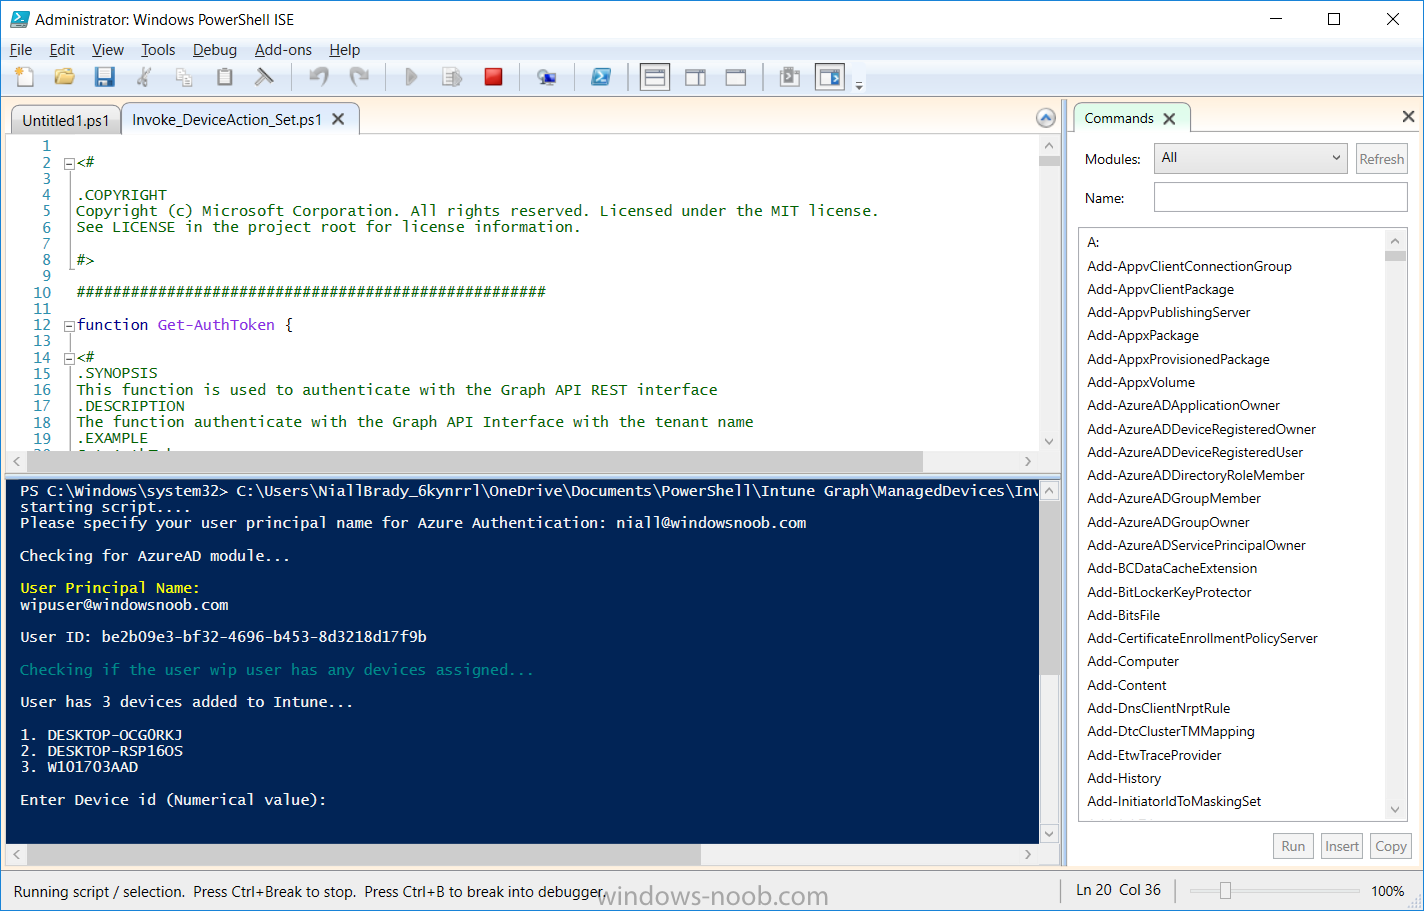
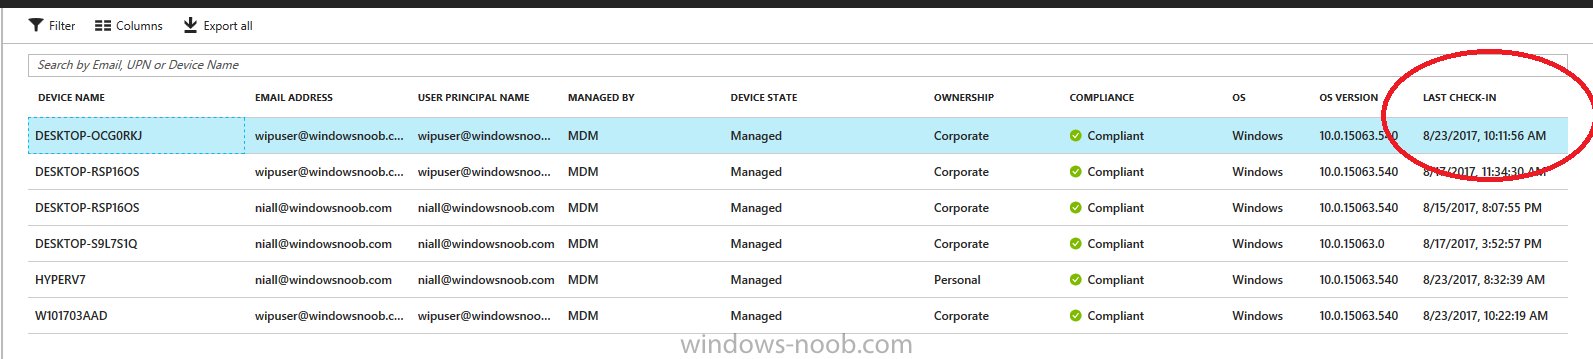
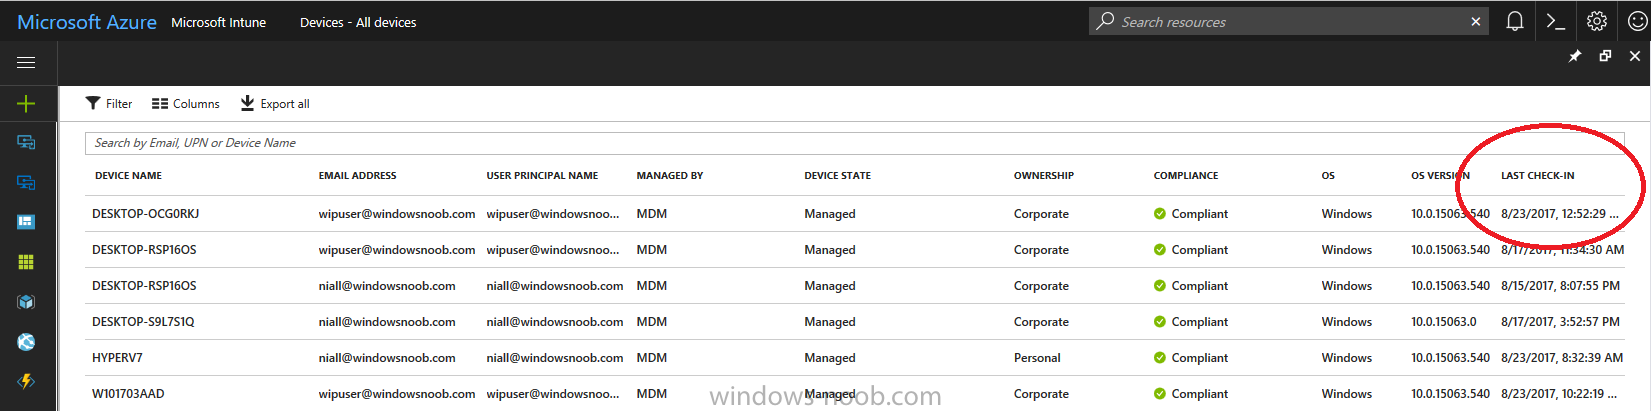
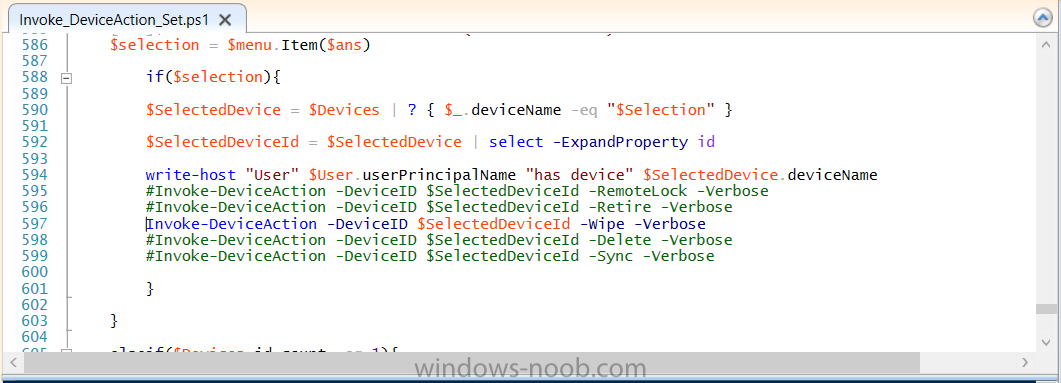
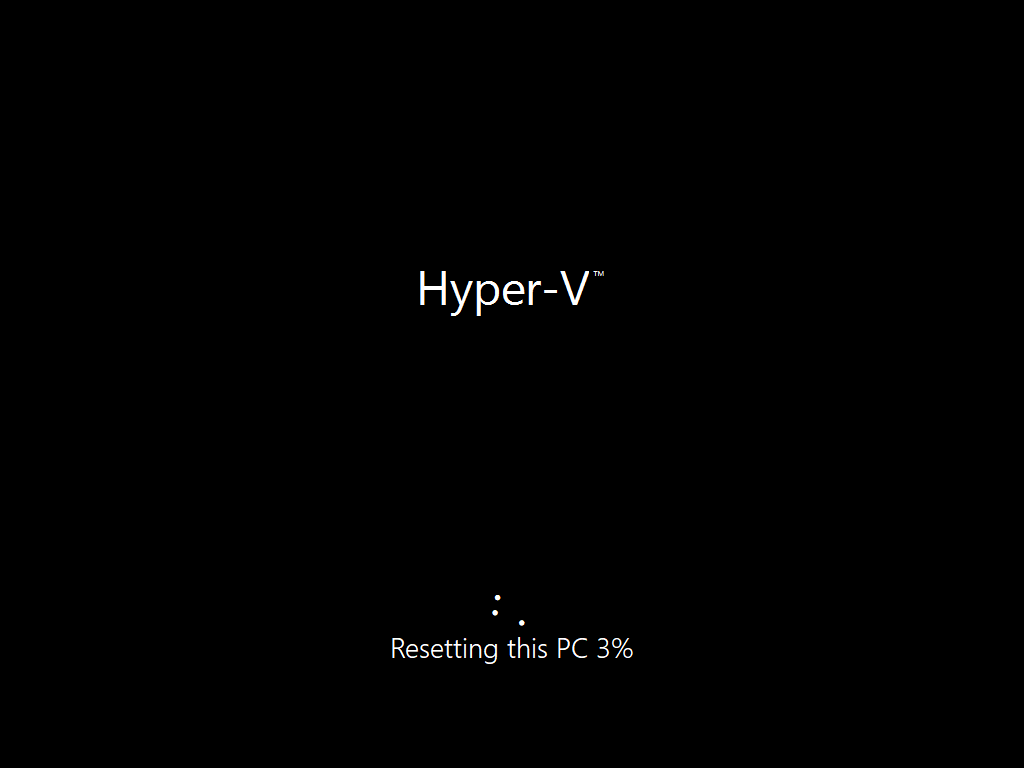
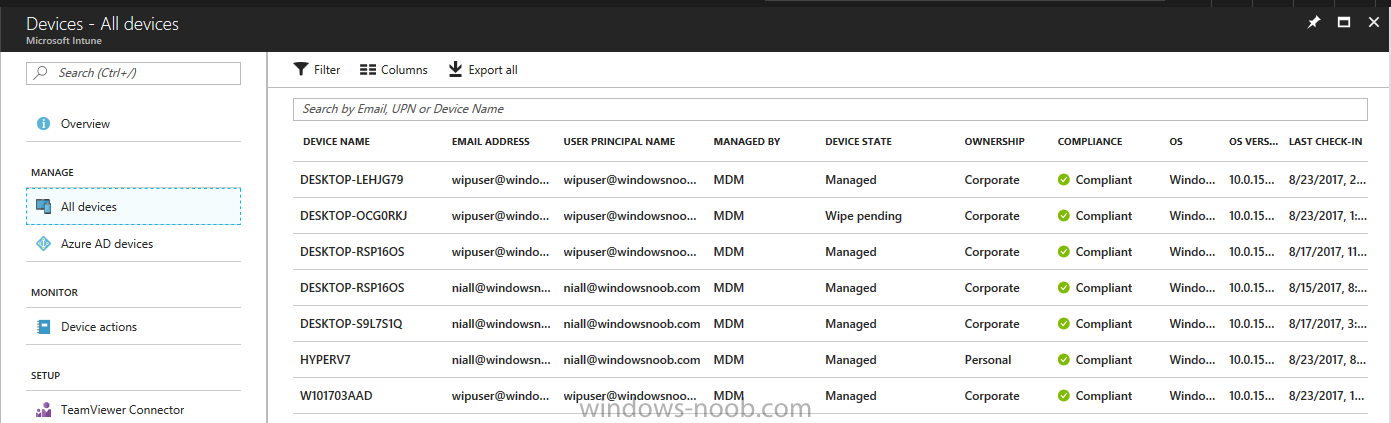
Introduction According to Microsoft, Microsoft Graph is: …your entry to automate things in the cloud via the Microsoft Graph API. This API gives you access to AzureAD, Excel, Intune, Outlook, OneDrive, OneNote, SharePoint, and more. Microsoft Graph is a RESTful web API that enables you to access Microsoft Cloud service resources. After you register your app and get authentication tokens for a user or service, you can make requests to the Microsoft Graph API. This API uses the following HTTP methods: Get Post Patch Put Delete For example, here is a Post action to RemoteLock a device: POST https://graph.microsoft.com/Beta/managedDevices/fd3e81ec-a7d0-4f35-af7c-1478213f56c7/remoteLock If you’d like to play with it right now then you can also check out Graph Explorer, which is a web based (web browser) gui for controlling Graph and it’s available here. OK that’s already a bit complicated for some people, so what does this mean in real terms for a Microsoft Intune admin that wants to automate things using PowerShell. In this guide I’ll show you step-by-step how to get up and running with Graph for Intune and how to begin automating actions using PowerShell. This is not for the feint hearted but I encourage you to take the time and effort to try this for yourself, you’ll be glad you did ! Note: In this guide I assume that you already have a Microsoft test Intune tenant setup and configured and that you have some PowerShell knowledge. At the time of writing (August 2017), Graph for Intune is still in Beta and is subject to change. Use of these APIs in production applications is not supported by Microsoft. Step 1. Download the sample PowerShell scripts Before you get started, you’ll need to download the PowerShell sample scripts. You can download the Graph PowerShell Intune samples from Github at the following address: https://github.com/microsoftgraph/powershell-intune-samples Make sure you have the latest scripts If you have the latest scripts, then skip this section. The scripts are updated from time to time, so if you downloaded them in the past, go to Github again and download the latest copy of the scripts, chances are that the scripts have been updated and that can mean bugs are fixed or behavior has changed. For example The following script Invoke_DeviceActionSet.ps1 had this content in June 2017 in the ManagedDevices section param ( [switch]$RemoteLock, [switch]$ResetPasscode, [switch]$Wipe, [switch]$Retire, [Parameter(Mandatory=$true,HelpMessage=”DeviceId (guid) for the Device you want to take action on must be specified:”)] $DeviceID ) The same script in August 2017 has been updated to include more ability param ( [switch]$RemoteLock, [switch]$ResetPasscode, [switch]$Wipe, [switch]$Retire, [switch]$Delete, [switch]$Sync, [Parameter(Mandatory=$true,HelpMessage=”DeviceId (guid) for the Device you want to take action on must be specified:”)] $DeviceID ) In addition there can be behavior changes within the script, for example in the below section (from June 2017) it invokes a RemoteLock action by default write-host “User” $User.userPrincipalName “has device” $Device.deviceName Invoke-DeviceAction -DeviceID $Device.id -RemoteLock -Verbose #Invoke-DeviceAction -DeviceID $Device.id -Retire -Verbose #Invoke-DeviceAction -DeviceID $Device.id -Wipe -Verbose The same script in August 2017 does not do any action by default, you’d need to un- comment the appropriate line if you want it to perform a specific action or just edit the script to your liking. write-host “User” $User.userPrincipalName “has device” $SelectedDevice.deviceName #Invoke-DeviceAction -DeviceID $SelectedDeviceId -RemoteLock -Verbose #Invoke-DeviceAction -DeviceID $SelectedDeviceId -Retire -Verbose #Invoke-DeviceAction -DeviceID $SelectedDeviceId -Wipe -Verbose #Invoke-DeviceAction -DeviceID $SelectedDeviceId -Delete -Verbose #Invoke-DeviceAction -DeviceID $SelectedDeviceId -Sync -Verbose What’s in the script samples ? The script samples are neatly organized into 15 different sections listed below: AppleEnrollment Applications AppProtectionPolicy Authentication CheckStatus CompanyPortalBranding CompliancePolicy DeviceConfiguration EnrollmentRestrictions ManagedDevices Paging RBAC RemoteActionAudit TermsAndConditions UserPolicyReport Within each section you’ll find one or more sample PowerShell scripts and there is a readme.md file included in each section which gives more details about what functions are contained in the scripts and what the scripts actually do. Step 2. Install the AzureAD PowerShell module The first time you attempt to run one of the scripts, a function within the script will check for the AzureAD PowerShell module and if not found it will prompt the user to install the module and it will then exit from the script. To avoid this, start PowerShell ISE as administrator, then issue the following command: Install-Module AzureAD After entering that command, you’ll get one or more popups asking if it’s OK to download and install NuGet, answer yes to all. and then it will start installing the module. You are now ready to test the scripts. Step 3. AzureAD admin versus target user When you run one of the sample scripts (for the first time, after installing the AzureAD module) you’ll get prompted for AzureAd credentials to access Intune resources, these are the credentials that you’d normally use to do administrative work in the Intune service in Azure. In this example you’ll use the Invoke_DeviceAction_set.ps1 script in the ManagedDevices section, open that script using PowerShell ISE as administrator. Click on the green triangle to Run the script. As you can see it prompts for the user principal name for Azure authentication. For this blogpost, I’m connecting to Azure using a user that has a Directory role of a Global Administrator. Tip: You can verify the directory role a user has in Intune, by selecting Users and groups – all users, user, Directory role. Global administrators have full control over all directory resources, if that’s not what you want you can customize the permissions using Limited Administrator and selecting the various options available. After entering the AzureAD user principal name, you’ll see a popup requesting permission to access various Intune resources, click Accept. The currently available actions in the Invoke_DeviceAction_Set.ps1 script are • RemoteLock • Retire • Wipe • Delete • Sync To use any of those actions on a device you’ll need to identify a target user (and their associated devices). To do this, enter the user principle name of that target user when prompted. This user is a regular user in Intune and not a Limited or Global Administrator. Step 4. Perform a Sync action Once entered, you’ll see any devices registered to that user, in this example, the specified user has 3 devices assigned. Press a number matching the device and… nothing will happen, the script exits. This is ok as the behavior of the script is modified to perform this way, let’s make a change so that instead of simply exiting, that it will perform a device Sync action. Locate line 599 in the script which contains this text and remove the hash in front of that line. Save the file. Before running the script again, verify the last sync time of the device you want to test automation against. You can verify last sync time by selecting All Devices, find the device in question and look at the Last check-in time column. Run the script again and notice the difference, now you are prompted if you want to sync the device. Go back into Intune and verify the Last Check-in time. It will have changed for that device. Success ! You’ve accomplished your first automation using PowerShell in Intune. Step 5. Perform a device Wipe Note: A Wipe will reset a device and remove all apps and data on the device, both Personal and Company owned data. Next, let’s try another action and one that would be very useful to Automate, that is the ability to remove data on a device. In PowerShell ISE, place a # infront of the Sync line again, and remove the # from the Wipe line. Save the changes. Run the script again, notice that you are prompted if you want to to wipe the device this time. and look what happens next ! and in the Intune service in Azure you can see this (Wipe Pending) Note: Just because you can see actions in a script does not necessarily mean that those actions will apply to your scenario, and they may infact generate an error, an example of that is the RemoteLock functionality which is not supported on Windows 10 desktop. Step 5. Perform a device Retire Note: a Retire action will un-enroll a device from Intune, and remove company data, meaning it is un-managed. All personal apps, data, photos on the device will remain untouched. In the screenshot below, you can see the Company Portal app installed on an Iphone. And below you can see the Retire action on that same iPhone. In this GIF you can see the line used for the Retire action, and then the fact that the iphone shows up as a device for the user. After running the action it no longer appears in the device list for that user as it has been removed from device management and is no longer enrolled. Summary In this blog post you learned a bit about Microsoft Graph, and how you can use it to automate the management of Intune using PowerShell. Awesome, really awesome. Recommended reading Sign up for Intune trial https://docs.microsoft.com/en-us/intune/free-trial-sign-up Get Intune PowerShell samples for Intune https://blogs.technet.microsoft.com/enterprisemobility/2017/05/15/get-intune-powershell-samples-for-microsoft-graph-api/ Download the scripts https://github.com/microsoftgraph/powershell-intune-samples Working with Azure Active directory Graph API from PowerShell https://blogs.technet.microsoft.com/paulomarques/2016/03/21/working-with-azure-active-directory-graph-api-from-powershell/