anyweb
-
Posts
9271 -
Joined
-
Last visited
-
Days Won
371
Everything posted by anyweb
-
 hi, I can't share it sorry, but I can give you an idea of what it contains, via these pointers *below*, you'll have to go and create one yourself for your Company cheers Niall <- Known software Incompatibilities Hardware requirements Preparation Required upgrade to the latest Windows 10 version 1709 What to do when the upgrade is completed Windows 10 features Incidents and issues
 -
Great walkover, we really appreciate sharing this kind of quality on one place thanks I would just add publishing SPN to this post, everything else is magnificent. so paste what you want and I'll add it !
-
you just need to add the model to the model supported check, or rem out that group entirely and move it to the task sequence, it's up to you
-
please download the scripts again, i can see you are using an older version, and the version i have has improvements/corrections and does not have that issue
-
what do you mean it failed, do you get an error, if so what error and what functions did you add to the hta ?
-
I was just about to create a similar script and found this, great work. thanks, also, I just checked the script, seems fine, those commands you mention are simply to help 'test' or 'debug' the script they don't change the functionality, look again at it.. so was it indeed this or something else you are referring to ? cheers niall

-
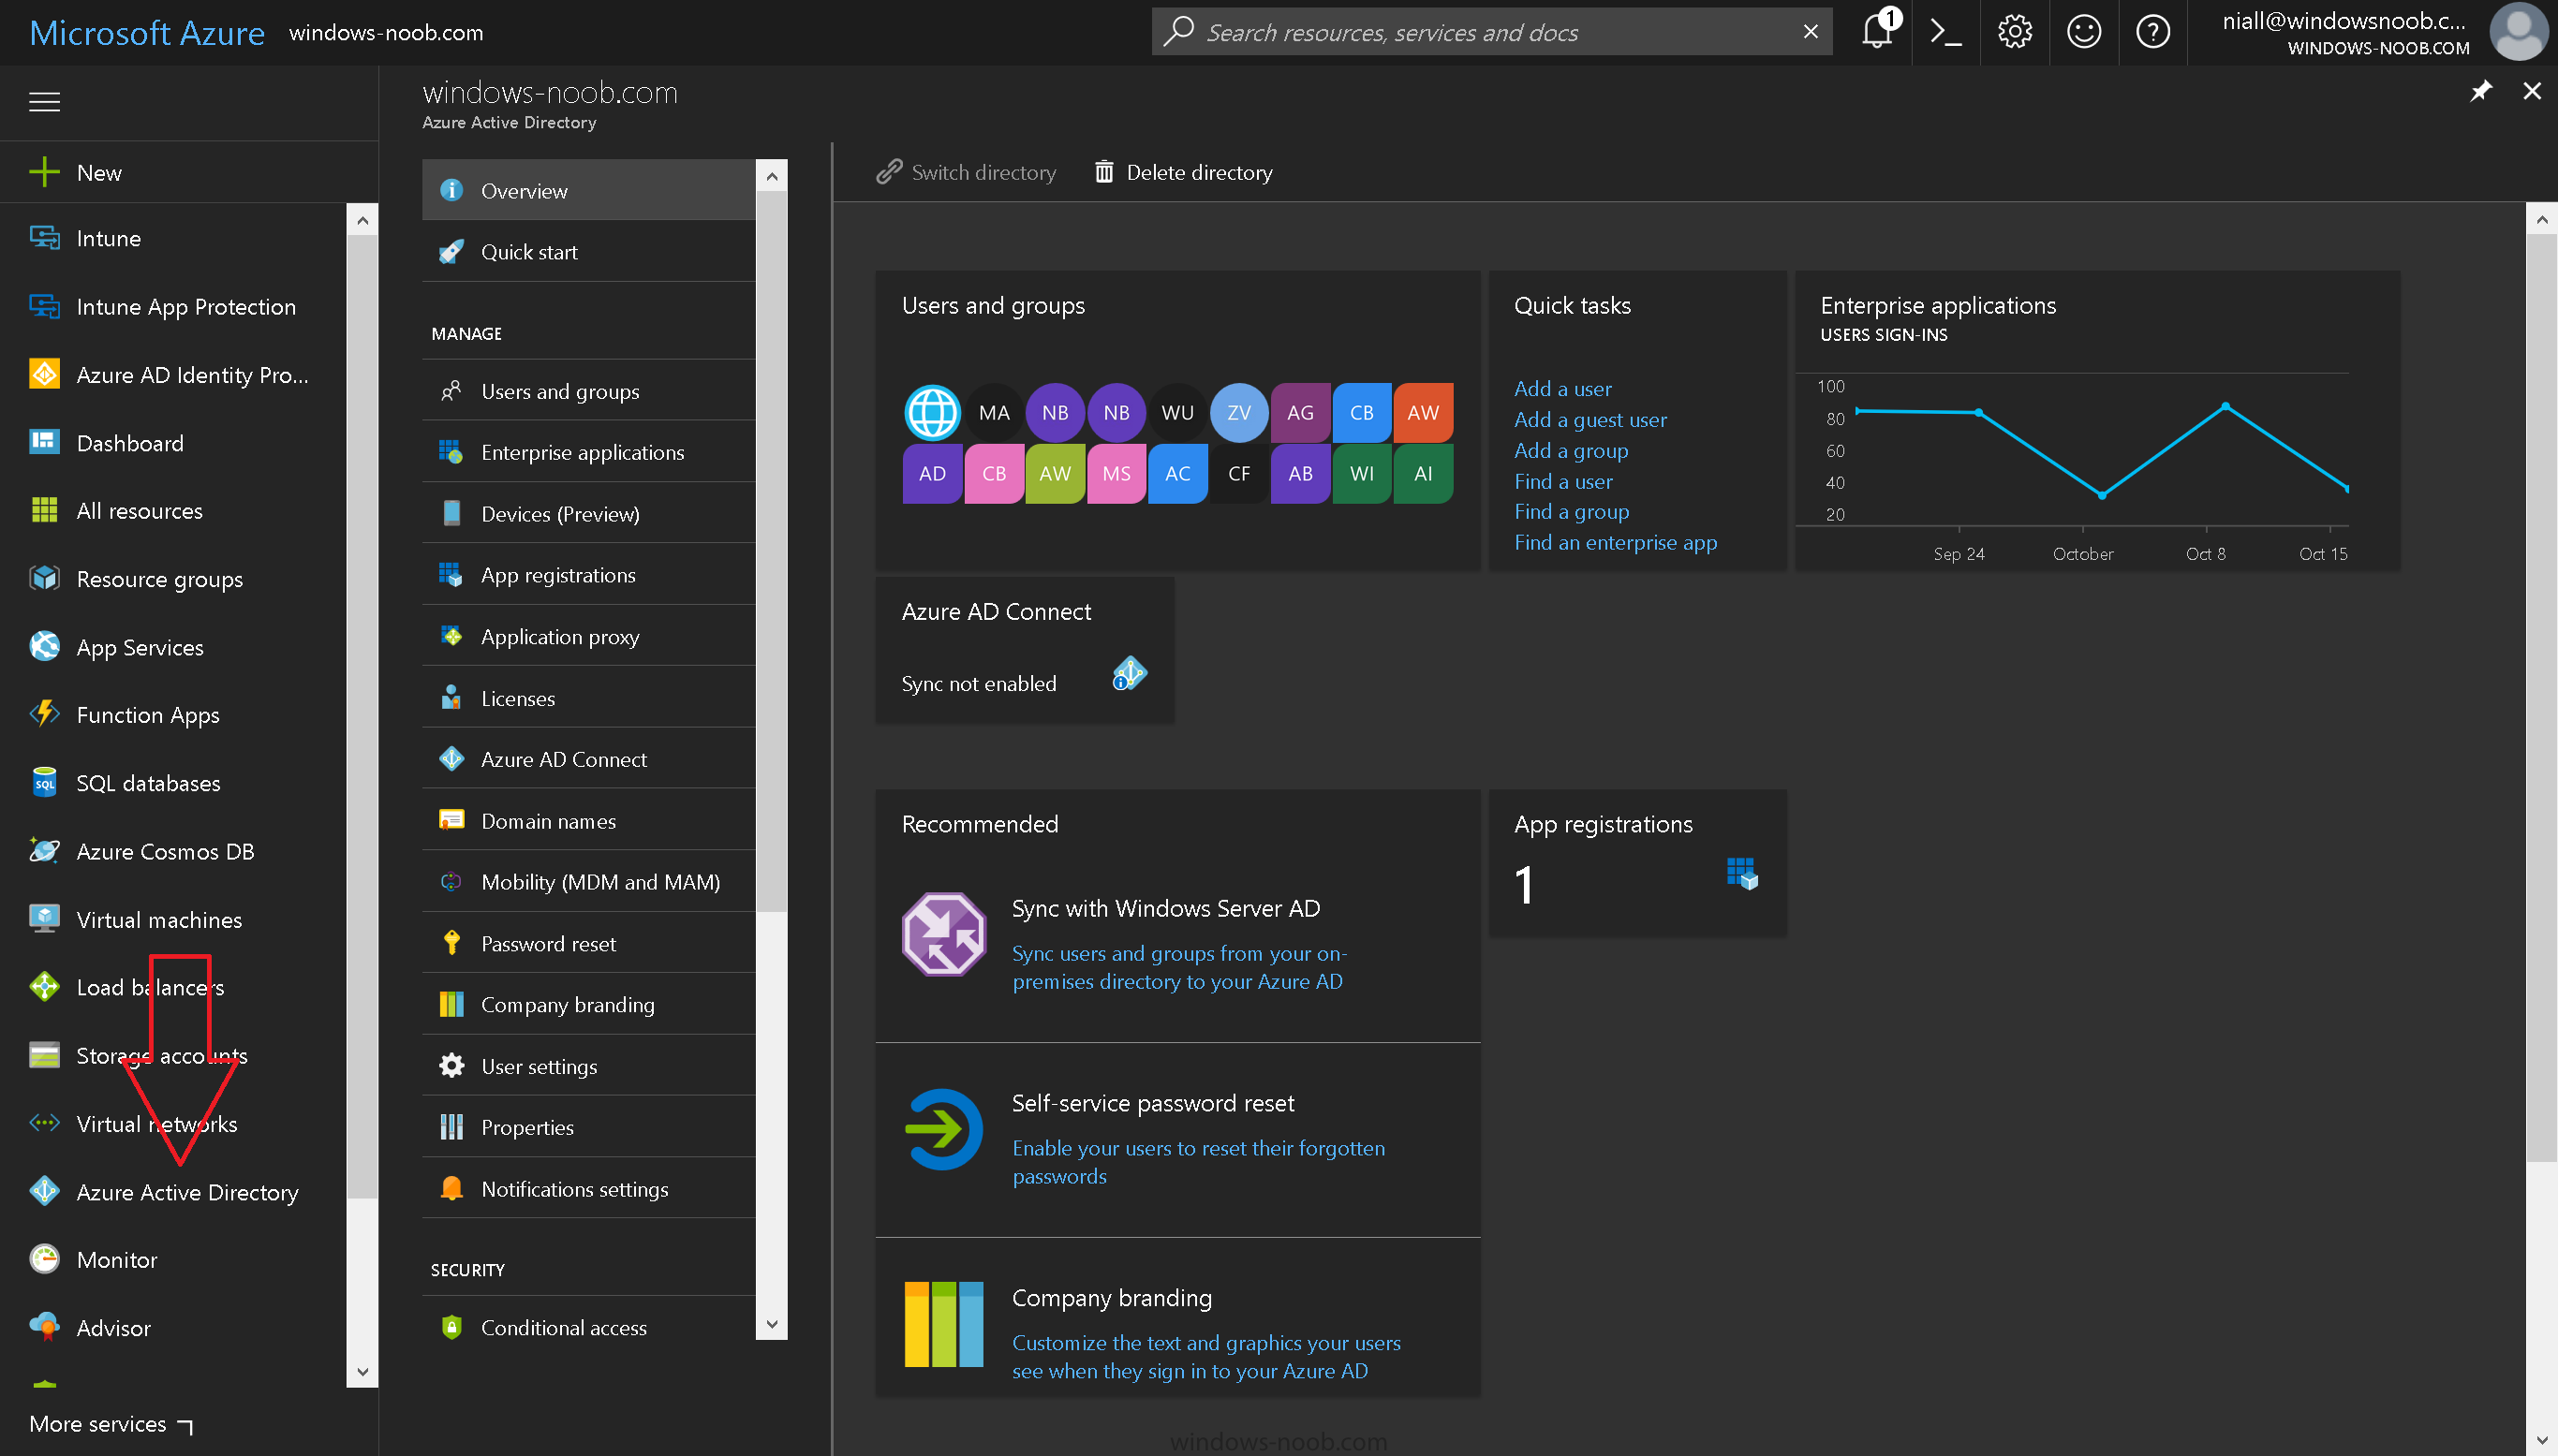
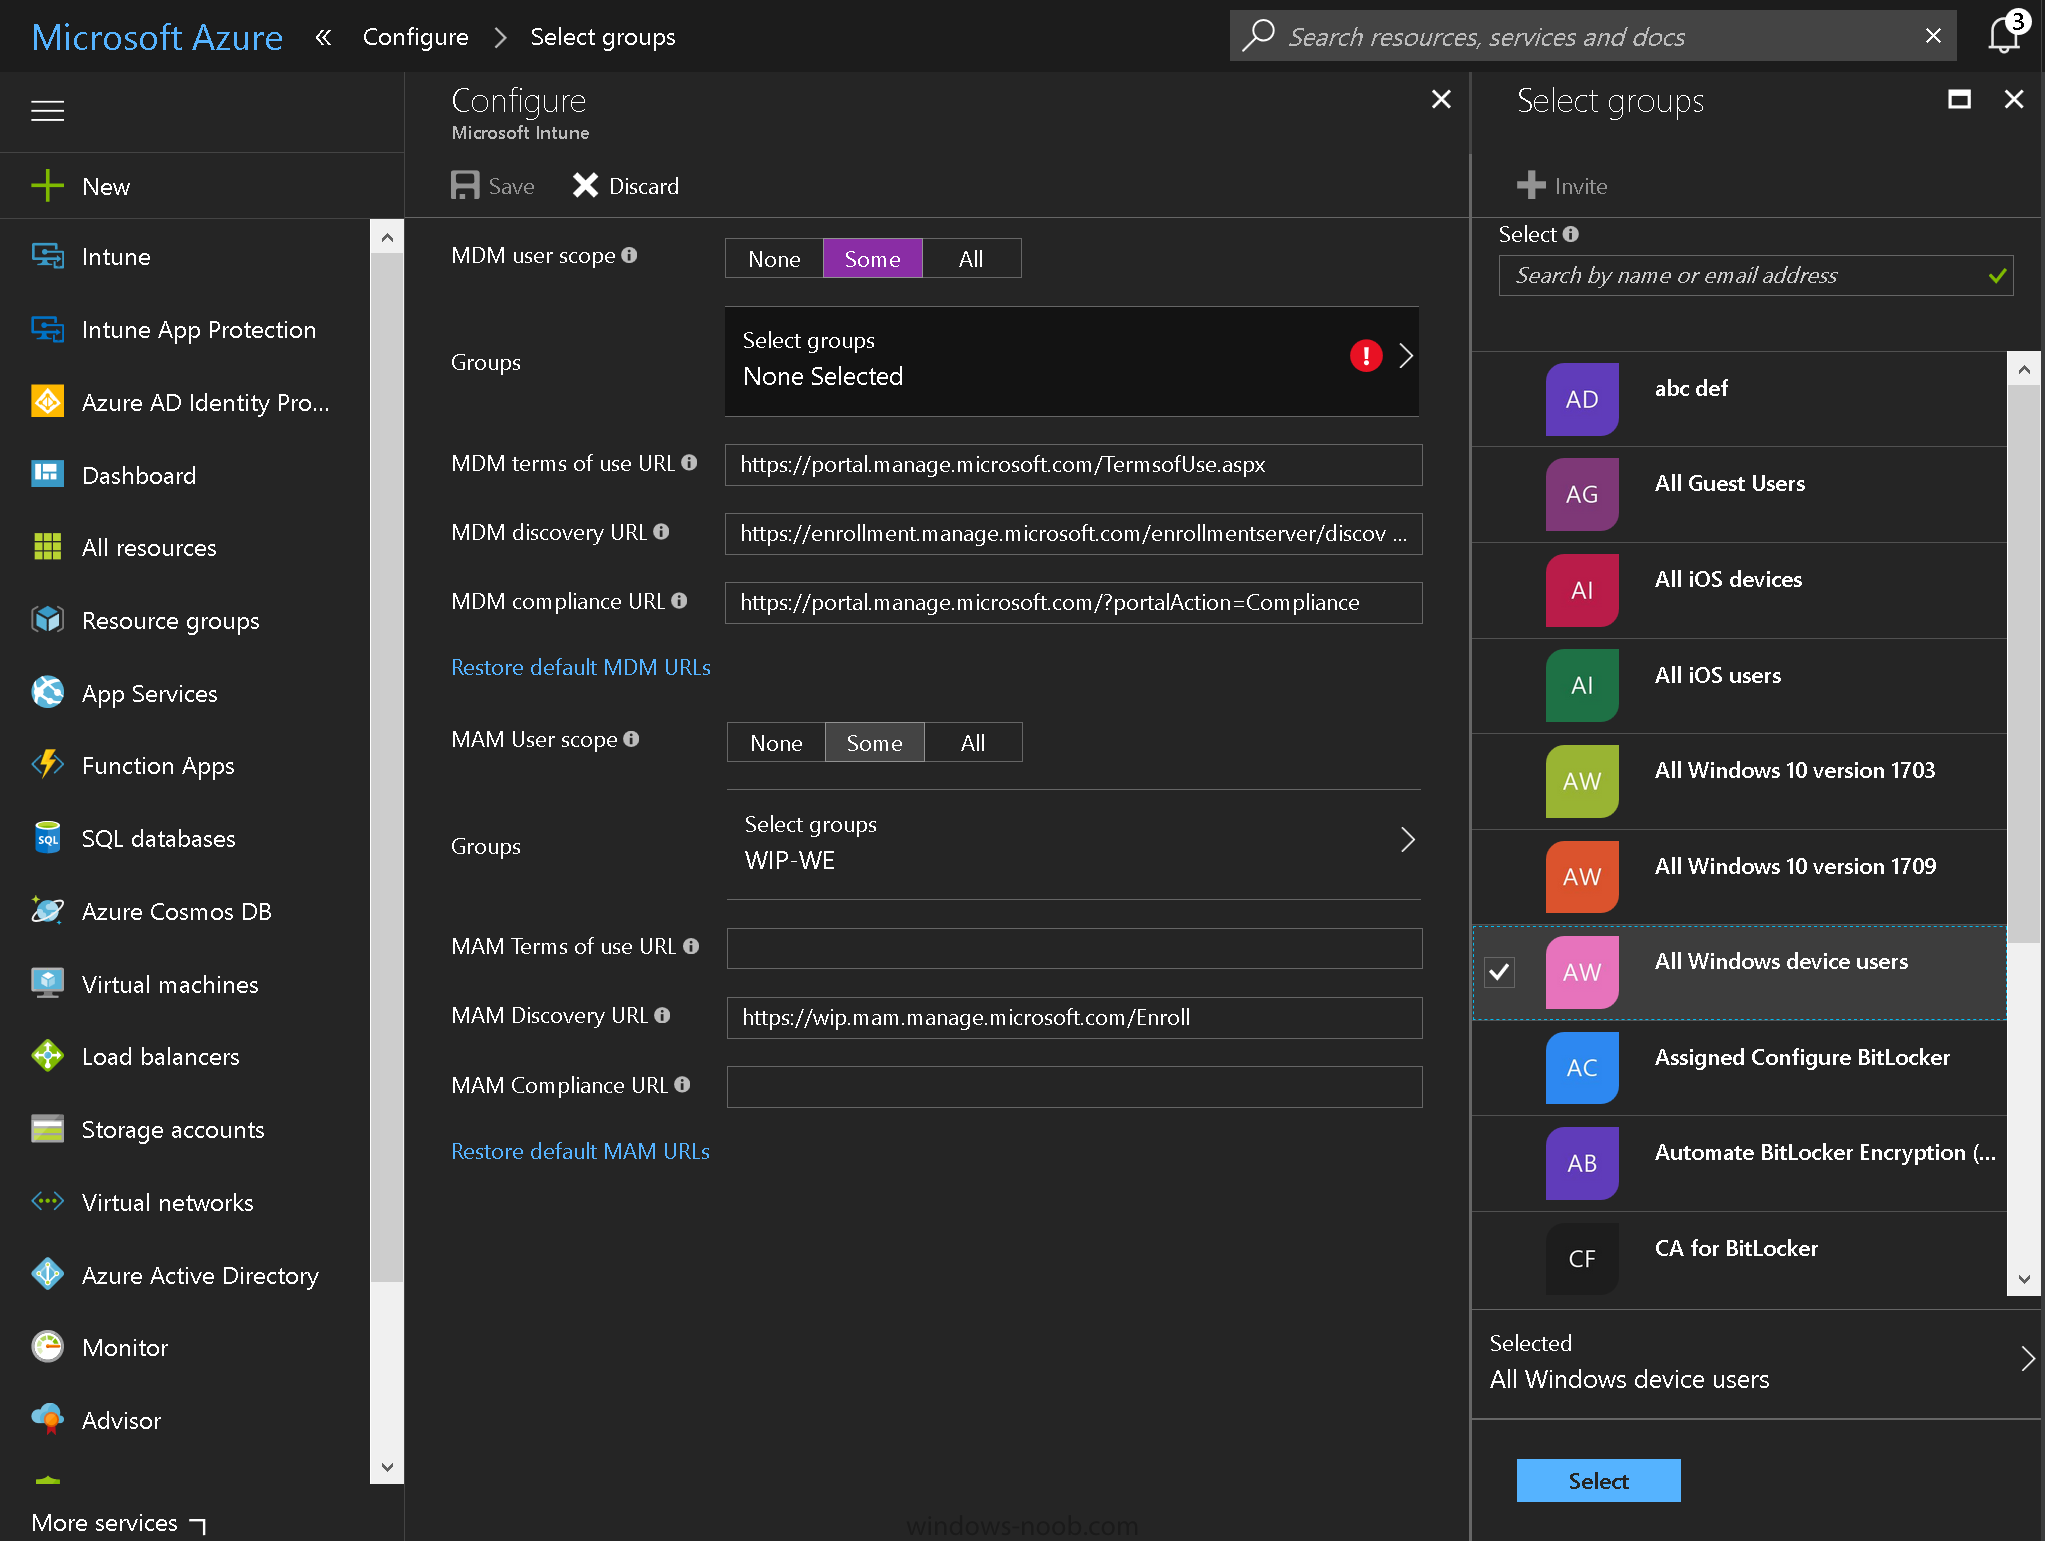
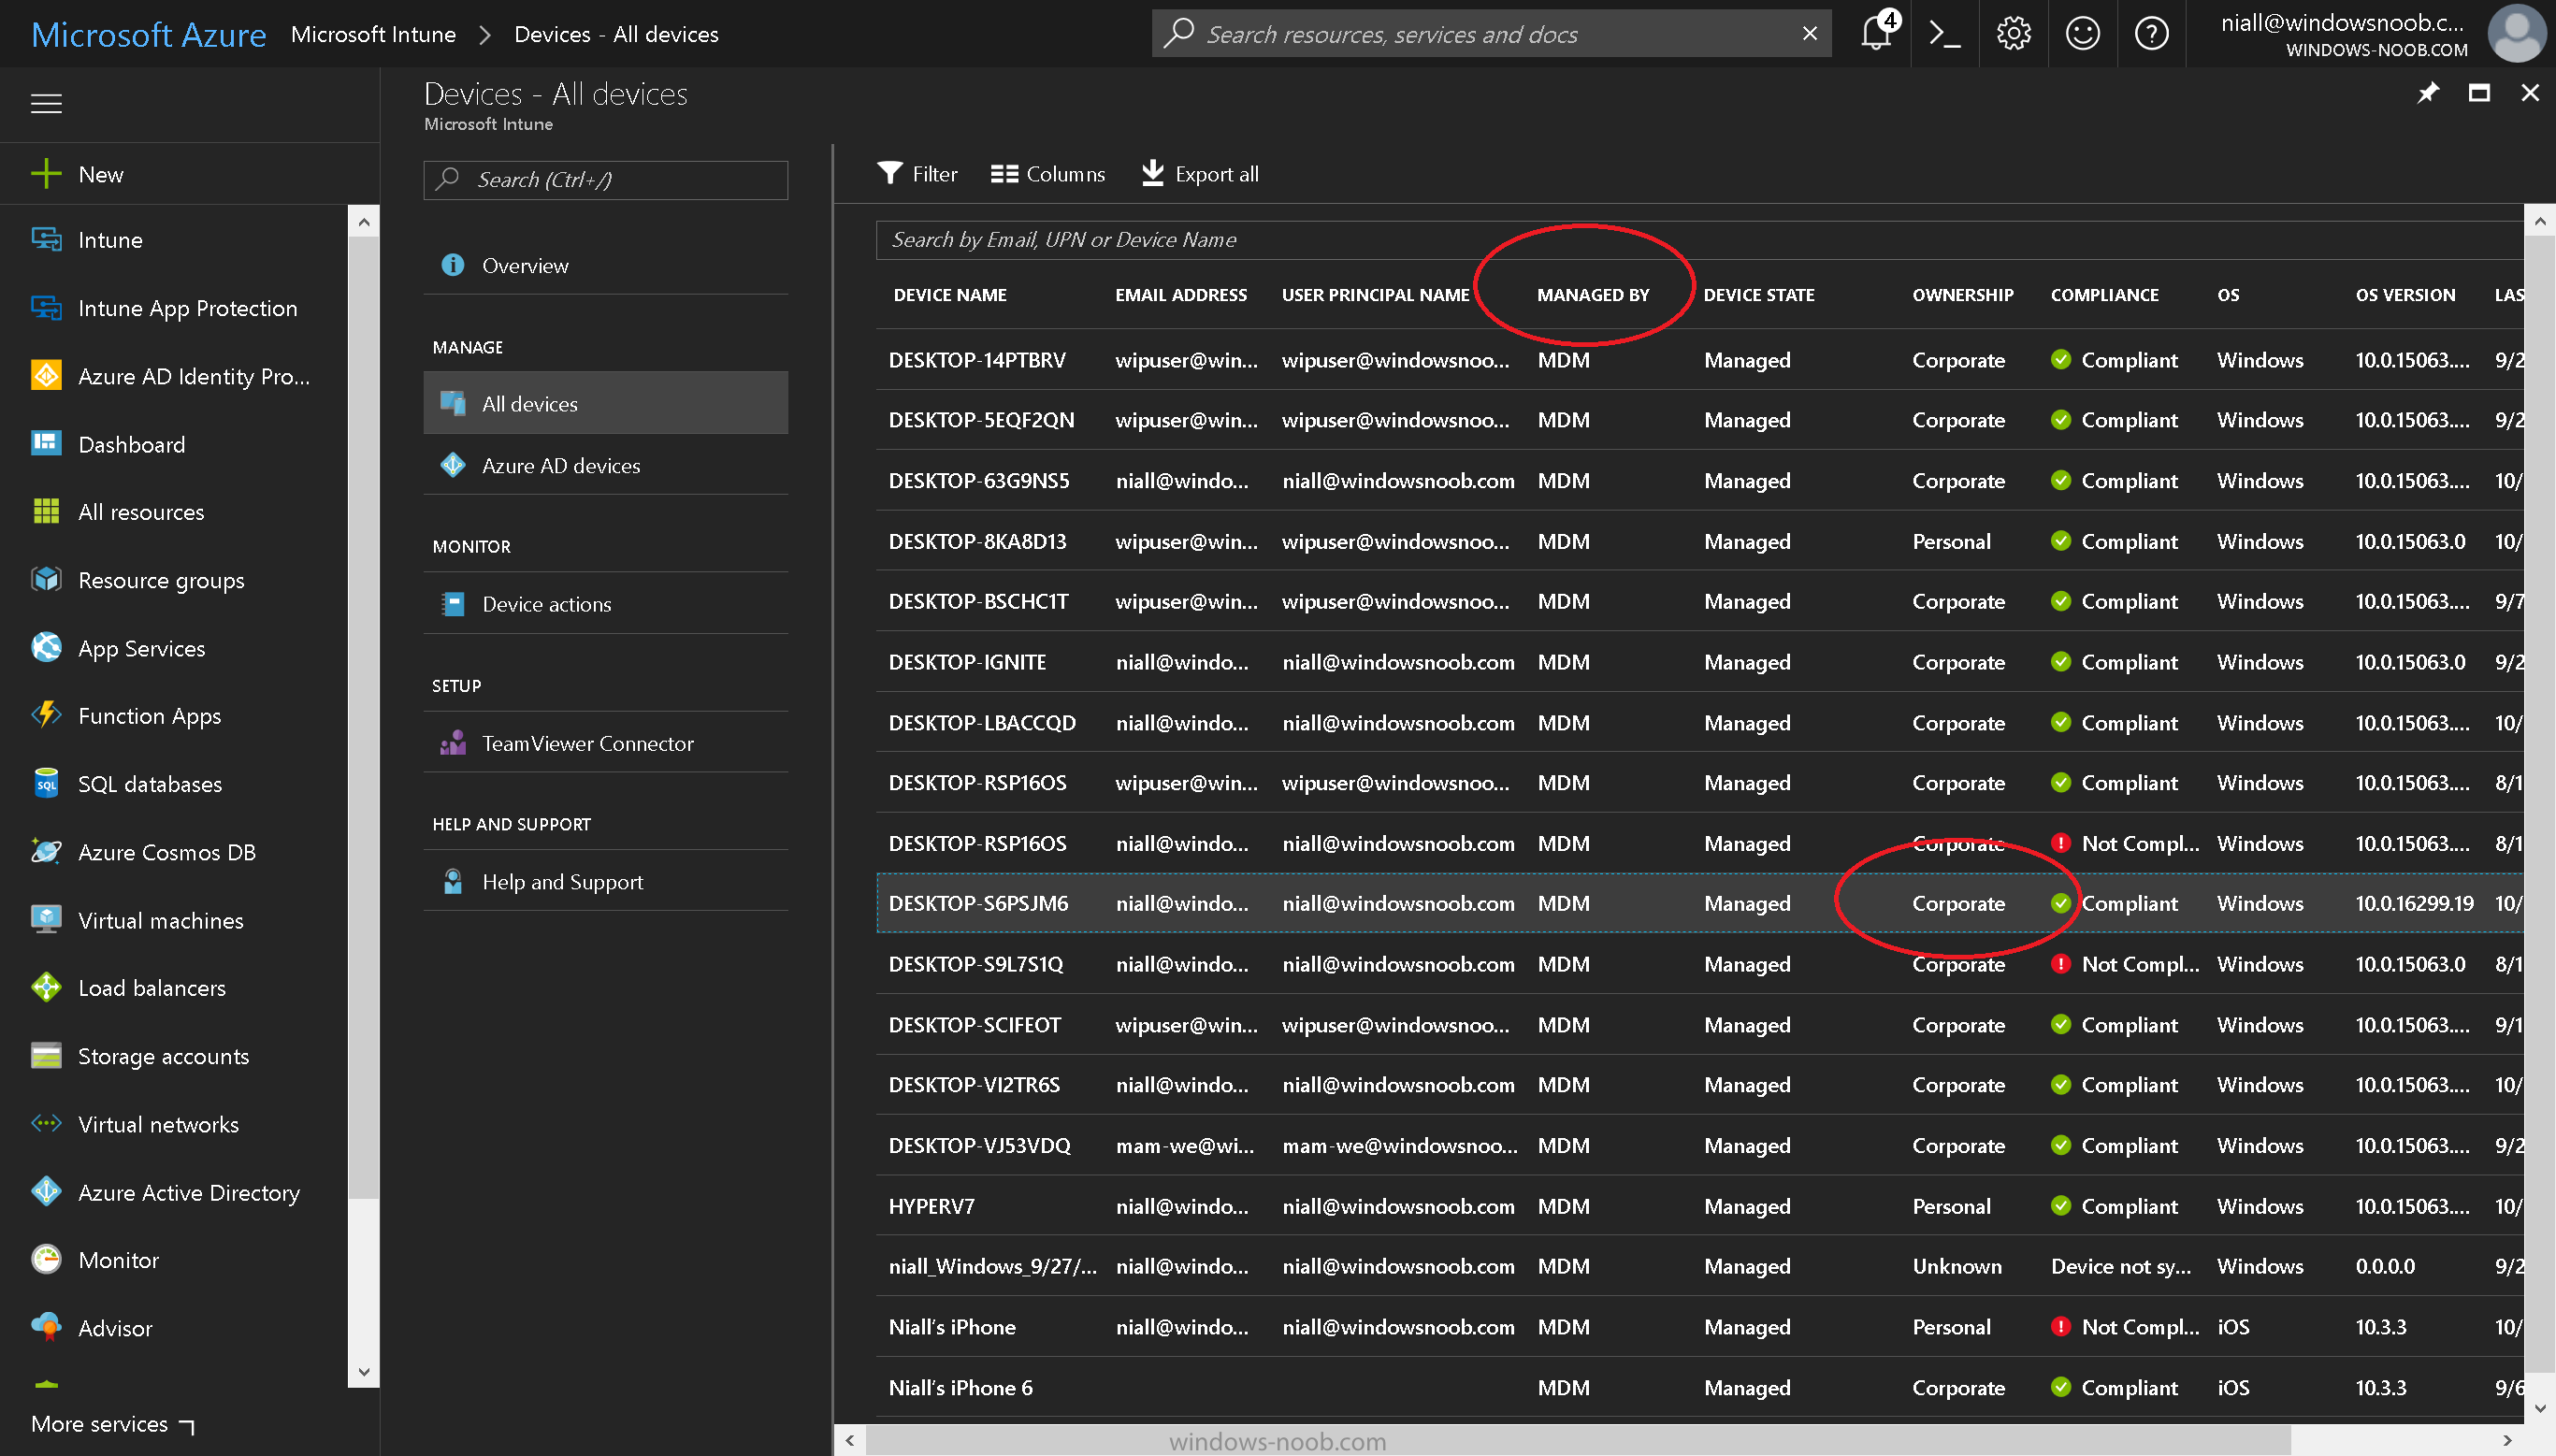
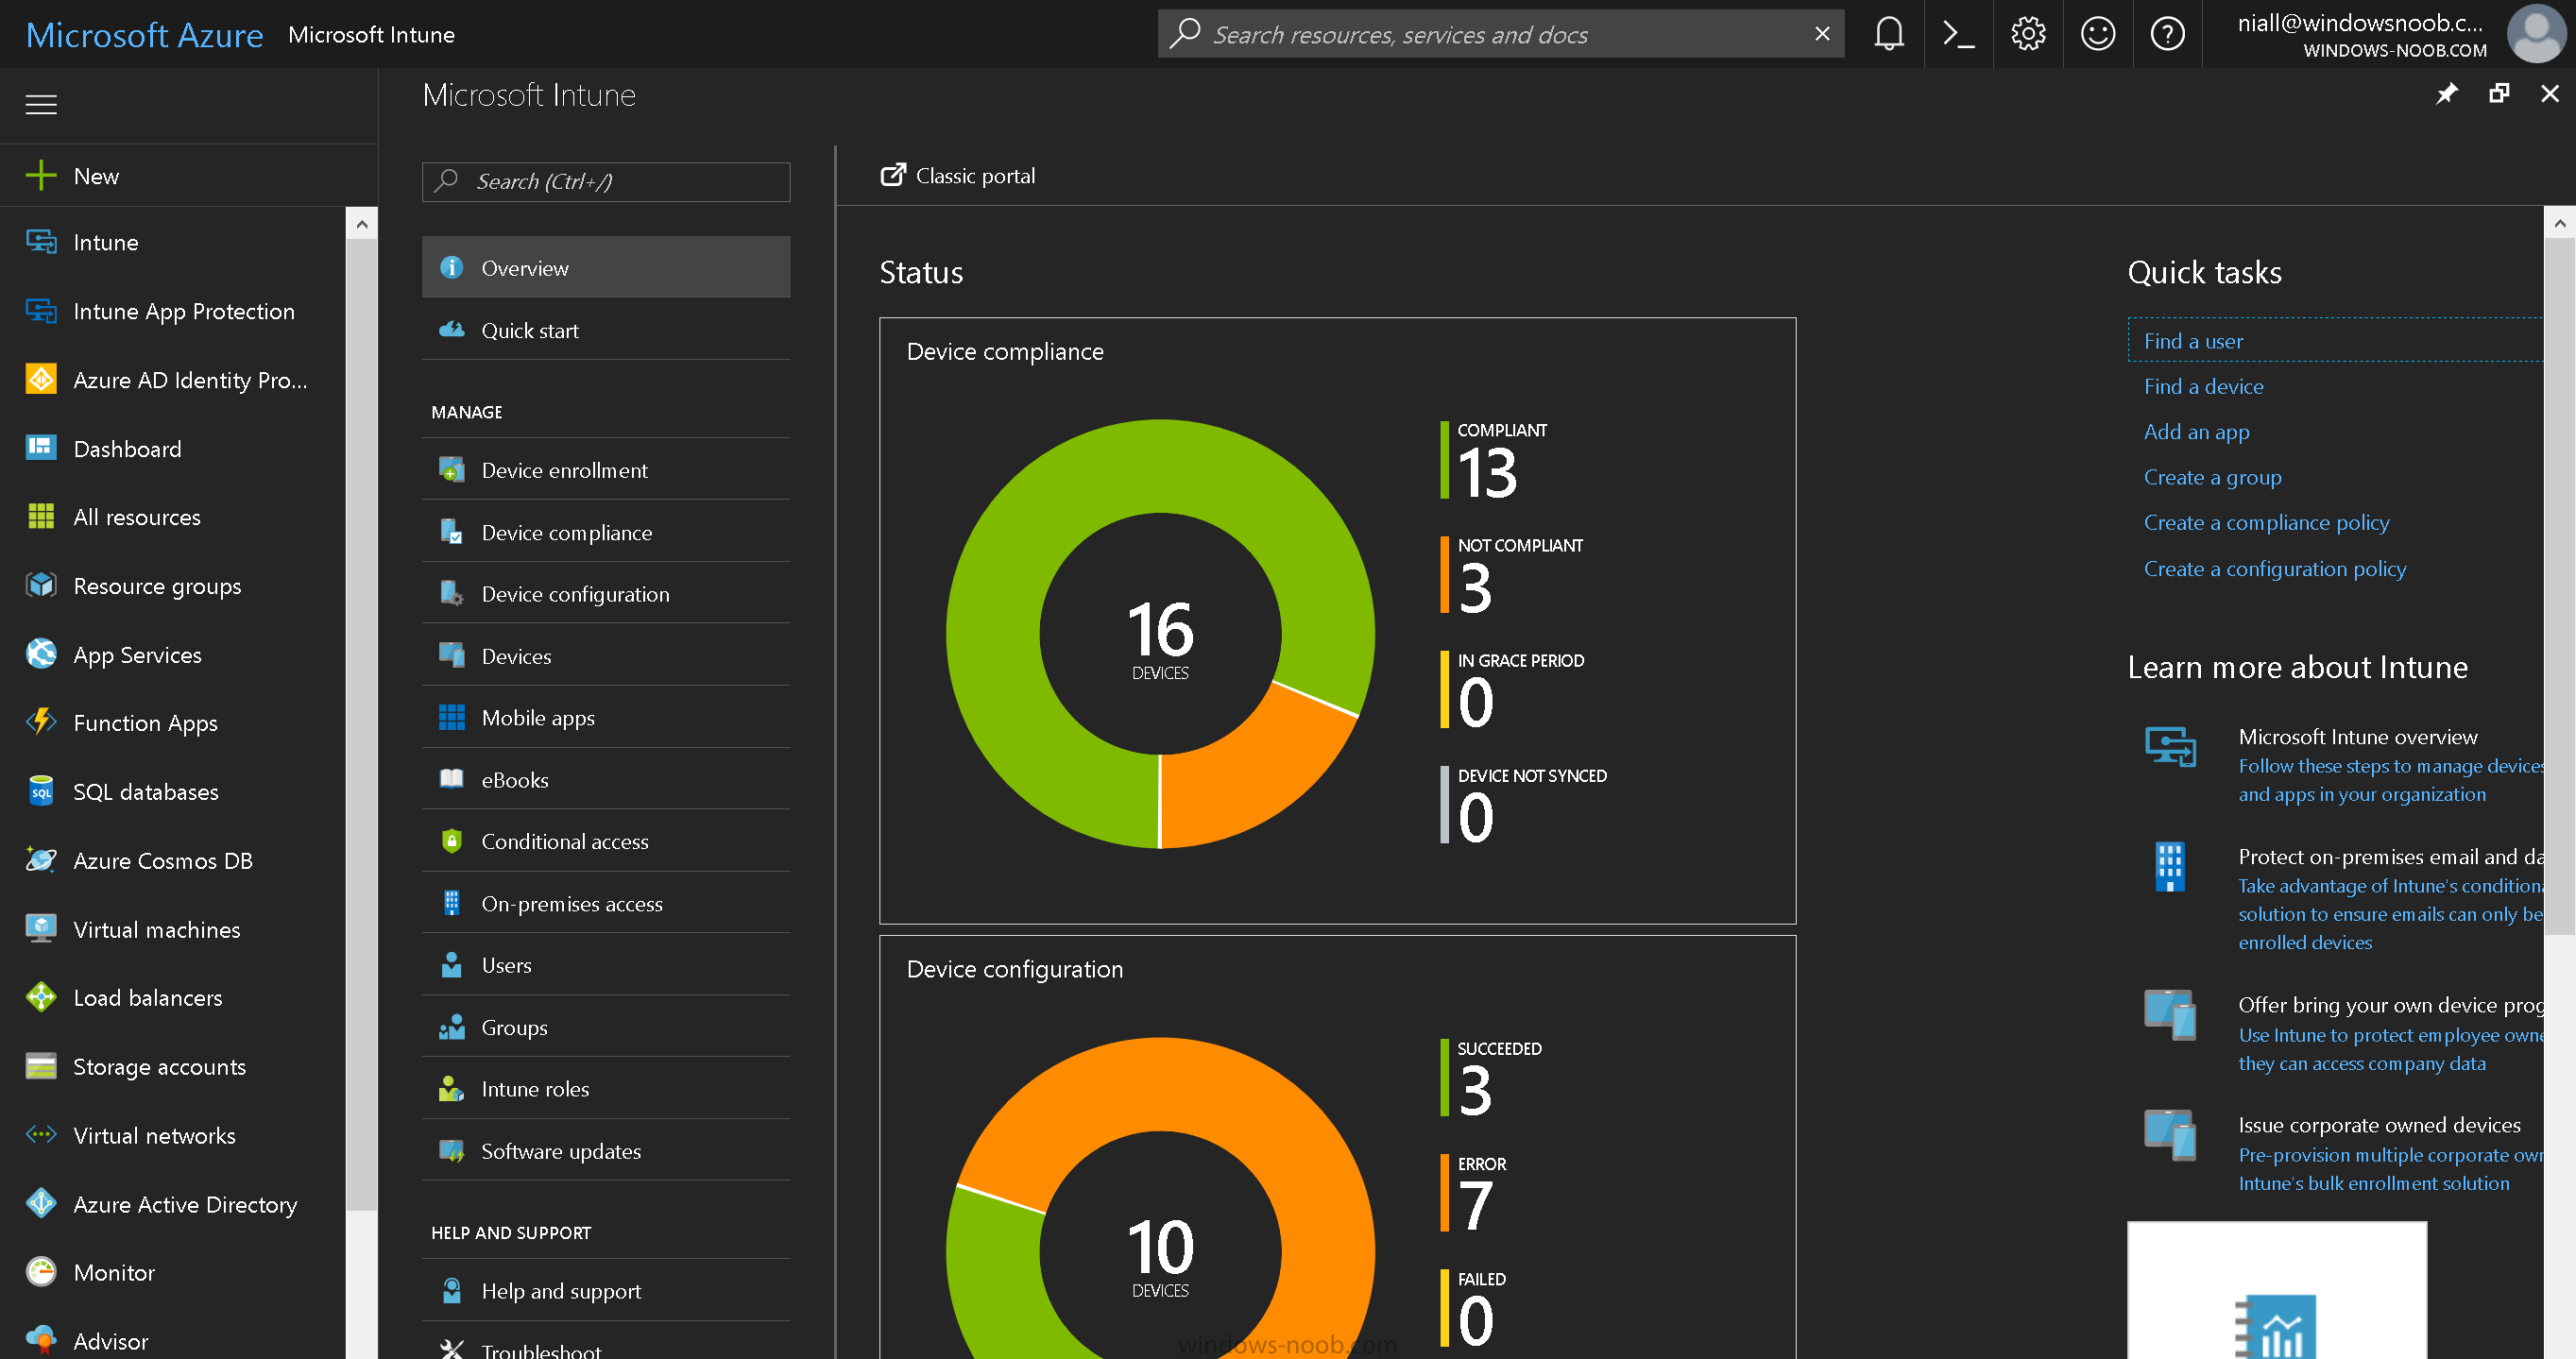
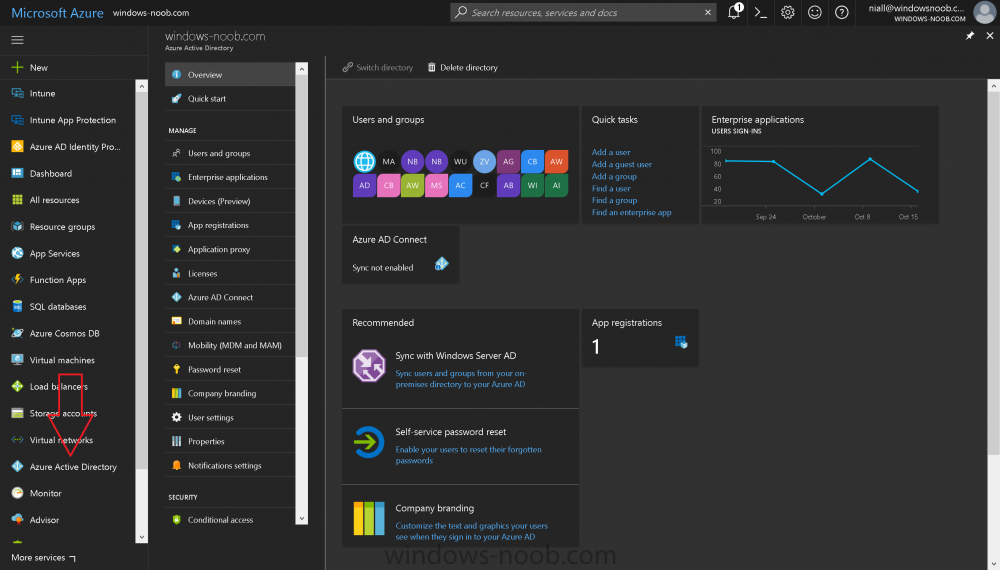
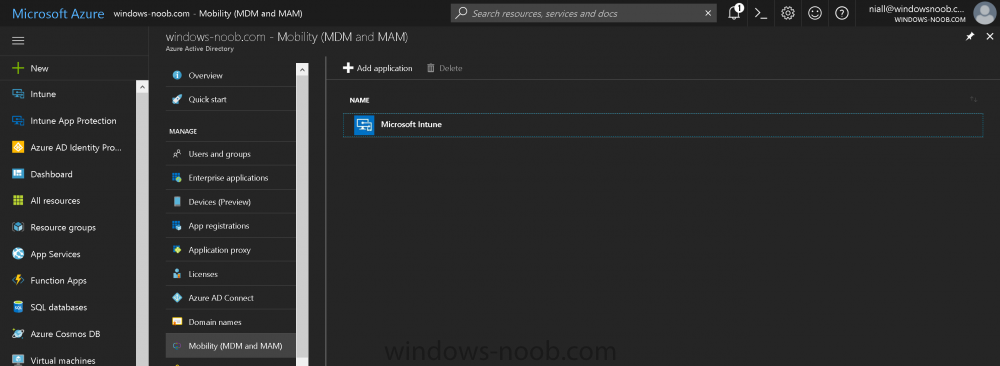
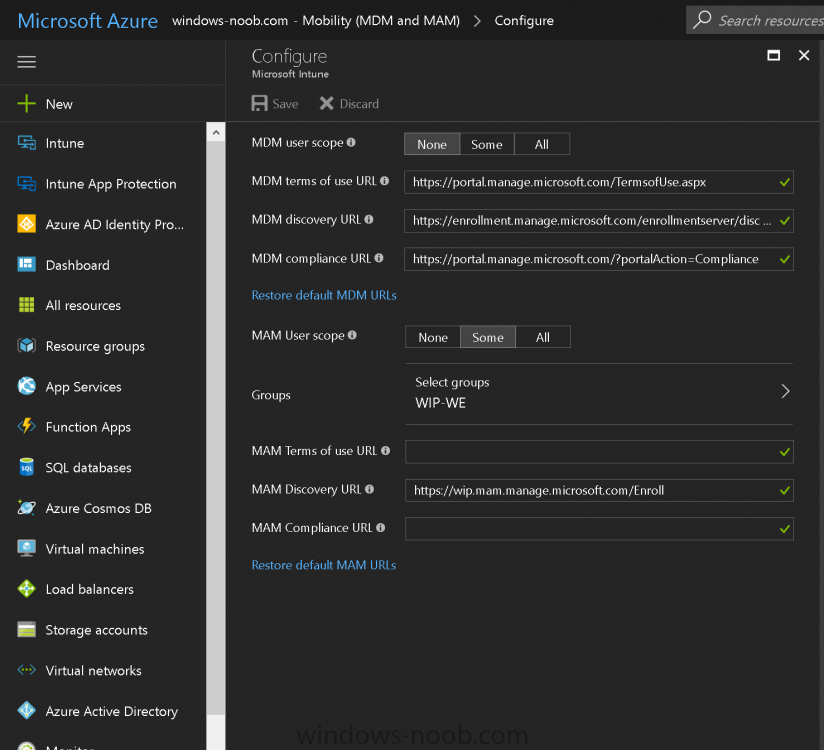
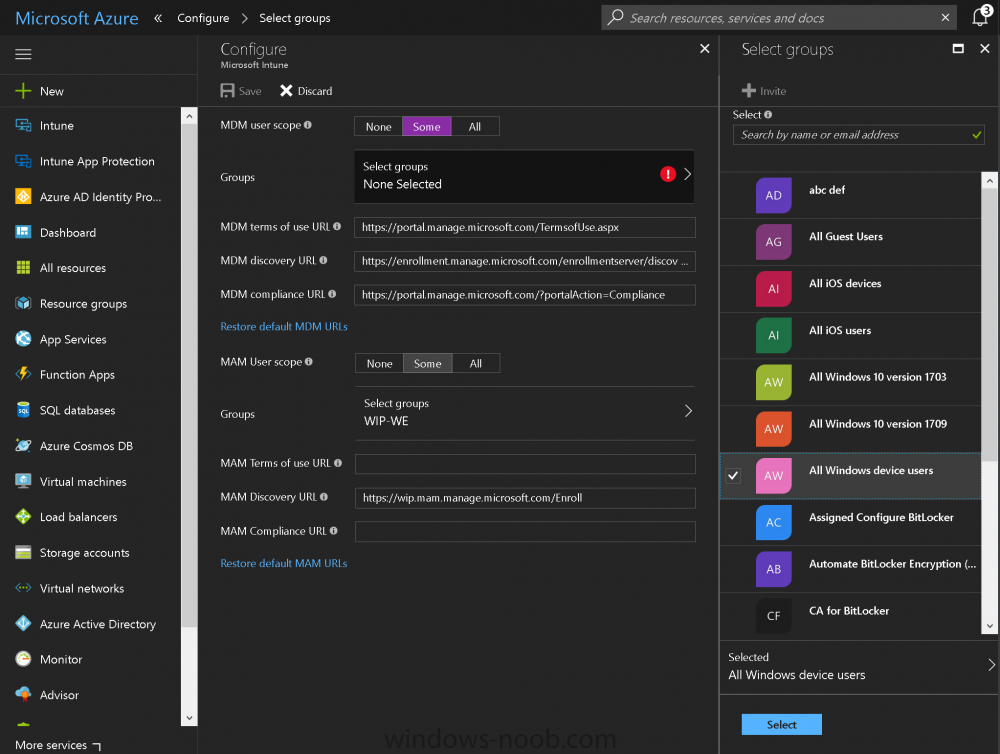
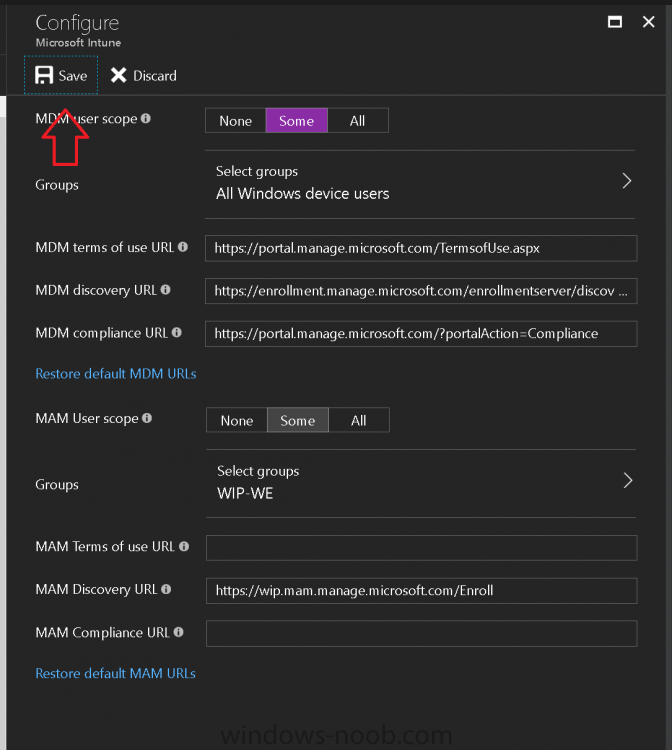
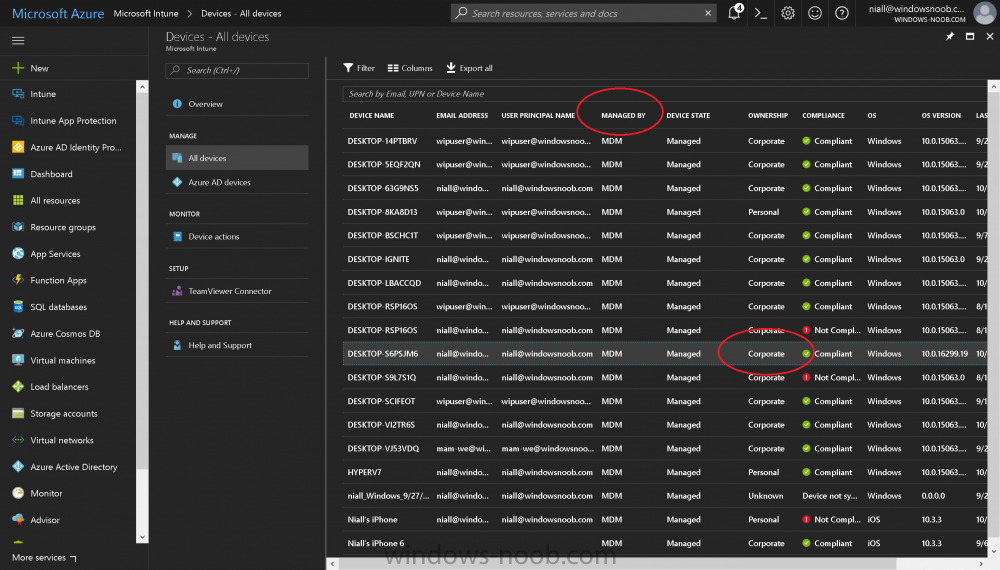
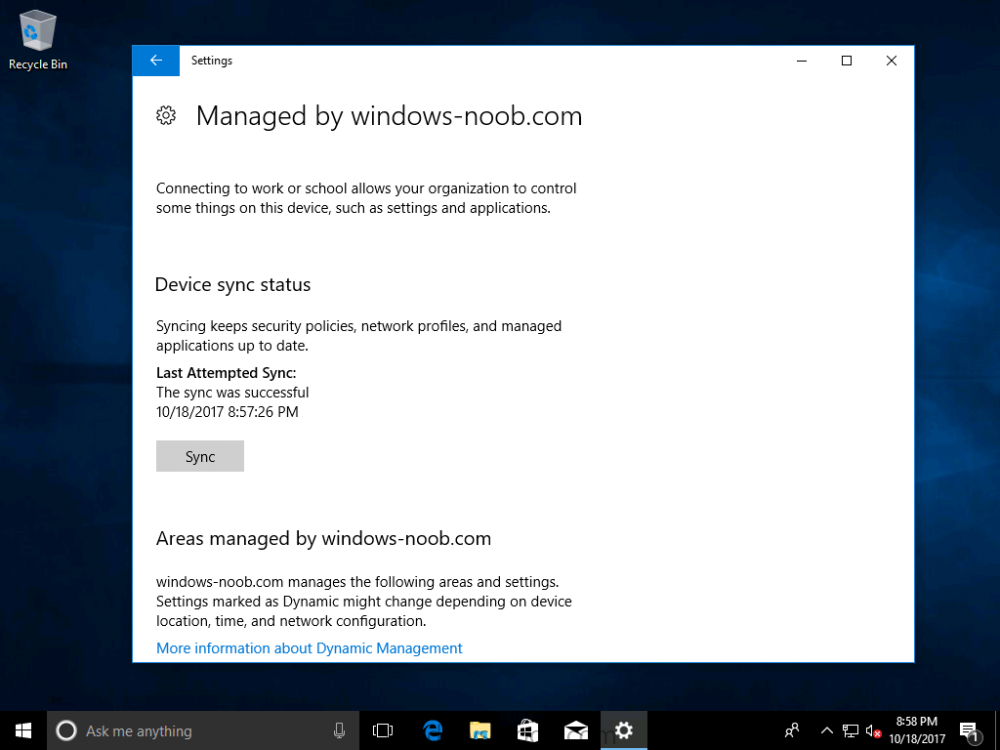
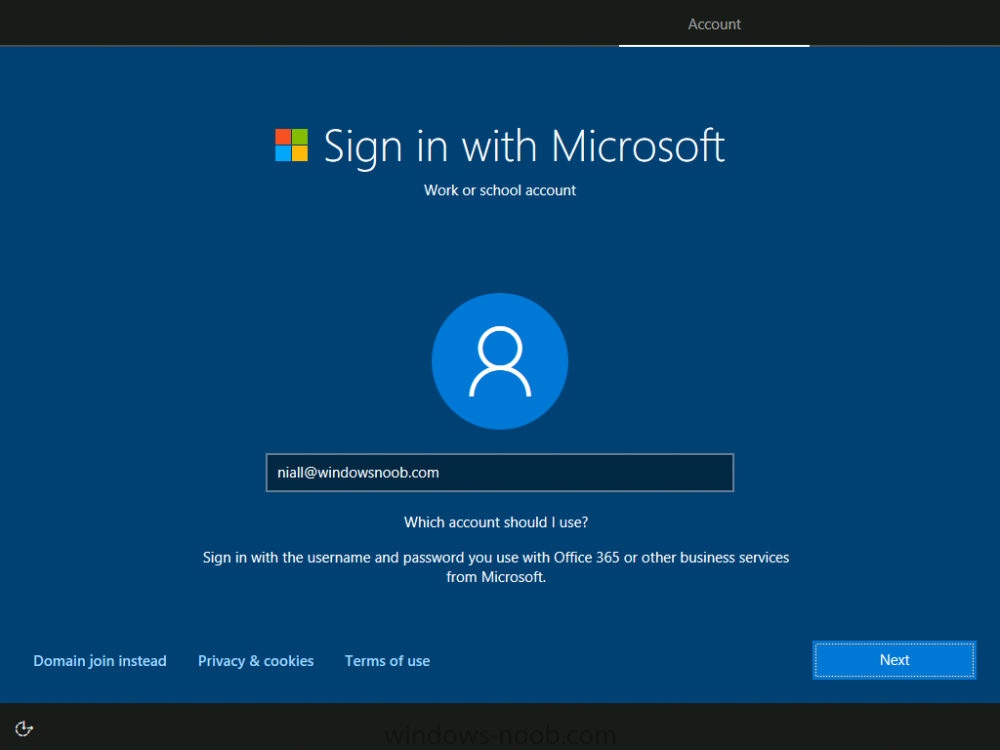
Introduction Devices can be enrolled into Microsoft Intune in many ways, the user can download the Microsoft Company Portal, and enroll the device using the wizard contained within that app, this would then mean the device shows up as Personal owned. Or, the admin can use Bulk Enrollment methods such as Apple Device Enrollment Program or Apple Configurator (which requires an Apple Mac to run the program) or for Windows devices, use Windows AutoPilot. Keep in mind that bulk enrollment is generally for new devices and not devices that have already been deployed. When you join new Windows desktop, mobile, holographic or Surface devices into Azure AD (Azure AD join as part of OOBE or Windows AutoPilot or via the options in the operating system) you can avail of a new MDM auto-enrollment capability which means that not only is the device Azure AD joined, but it will automatically become enrolled (and managed) by Microsoft Intune. This also means that the device will show up as Corporate owned and has the distinct advantage of not needing the end user (or admin) to have to download and use the Company Portal to enroll the device. To setup MDM auto-enrollment in Azure is fairly easy, and here's how to do it. You do need to have both Azure Active Directory Premium subscription and a Microsoft Intune tenant configured before doing this. Step 1. Login to Azure As a user with administrative permissions in Azure Active Directory, login to https://portal.azure.com and select the Azure Active Directory service highlighted here with the red arrow. Step 2. Configure MDM auto-enrollment Click on Mobility (MDM and MAM) and then select Microsoft Intune from the applications listed. The Configure Microsoft Intune blade opens. Notice the following text (by clicking on the information 'i' beside MDM User scope, which explains the capabilities. Use MDM auto-enrollment to manage enterprise data on your employees' Windows devices. MDM auto-enrollment will be configured for AAD joined devices and bring your own device scenarios. Click on Restore default MDM URLs and then select Some (to select one or more user groups you want to enable for MDM auto-enrollment), or All to apply to all users. In this example you will add a User Group (previously created, containing one or more Windows device users), so select Some, and then click on Select Groups to select the User groups you want this MDM auto-enrollment capability to apply to. When you are done with your selection, click on Select. Next click on Save to save your changes. You'll be notified in the top right corner of the success or failure of this action. That's it, job done, now go and Azure AD join a Windows device, using a user that is a member of the group you specified above. After joining Azure AD, it will also become MDM auto-enrolled by Microsoft Intune. You can verify this by going into Microsoft Intune service in Azure, and selecting Devices then All Devices, the device you just joined into Azure AD will now also be MDM Managed by Microsoft Intune (due to MDM auto-enrollment) and listed as a Corporate owned device. And on the device itself you can verify in All Settings, Accounts, Access work or school, and click on the username. For more info about this read https://docs.microsoft.com/en-us/intune/windows-enroll#enable-windows-10-automatic-enrollment


-
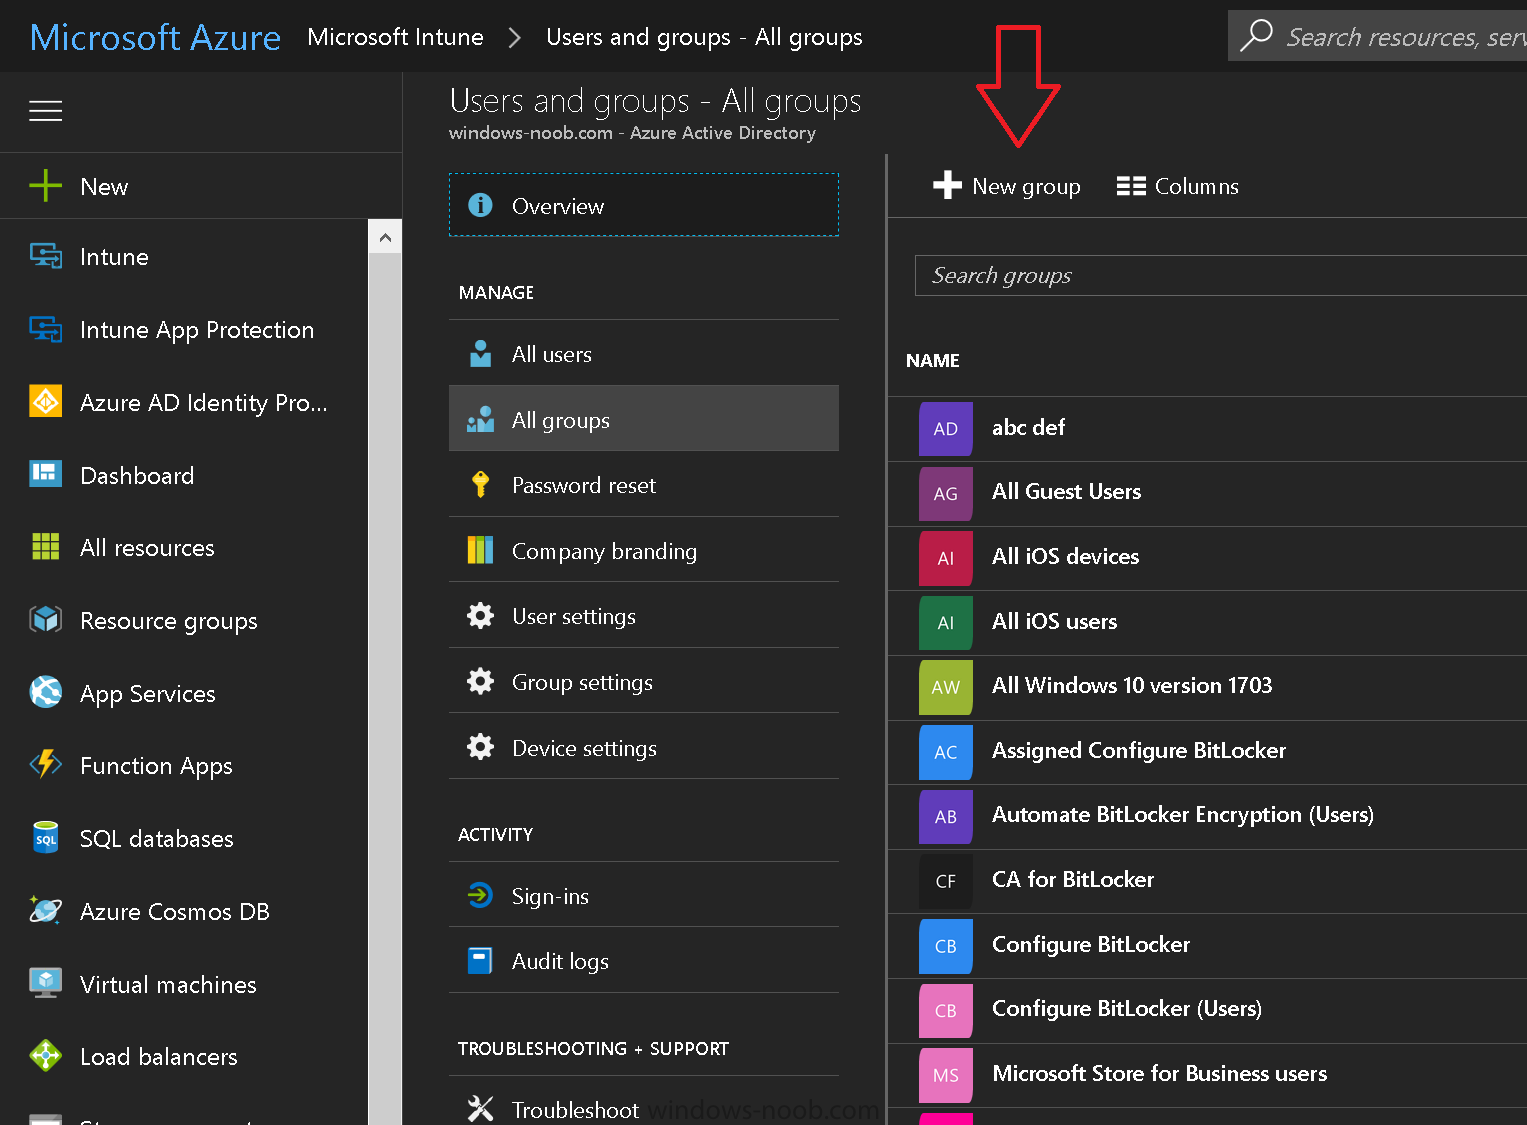
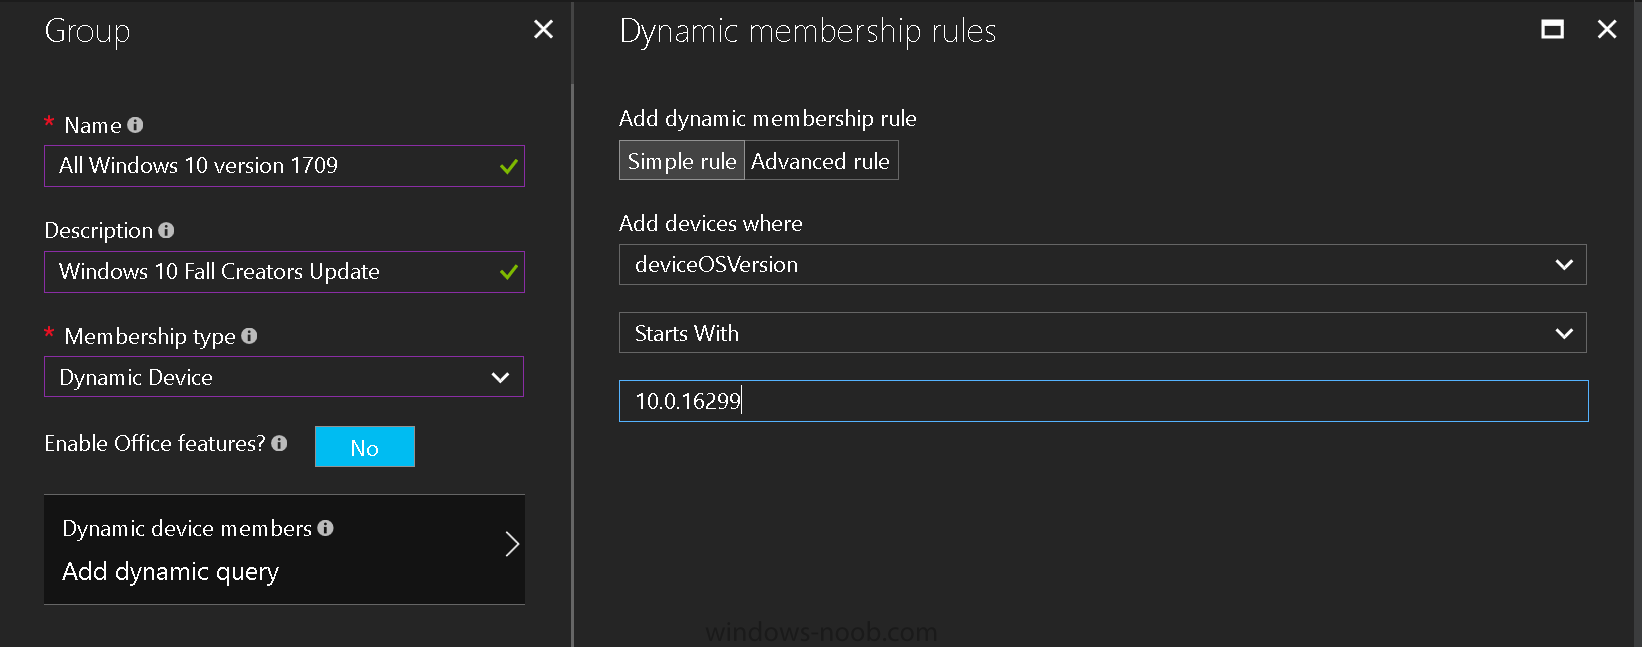
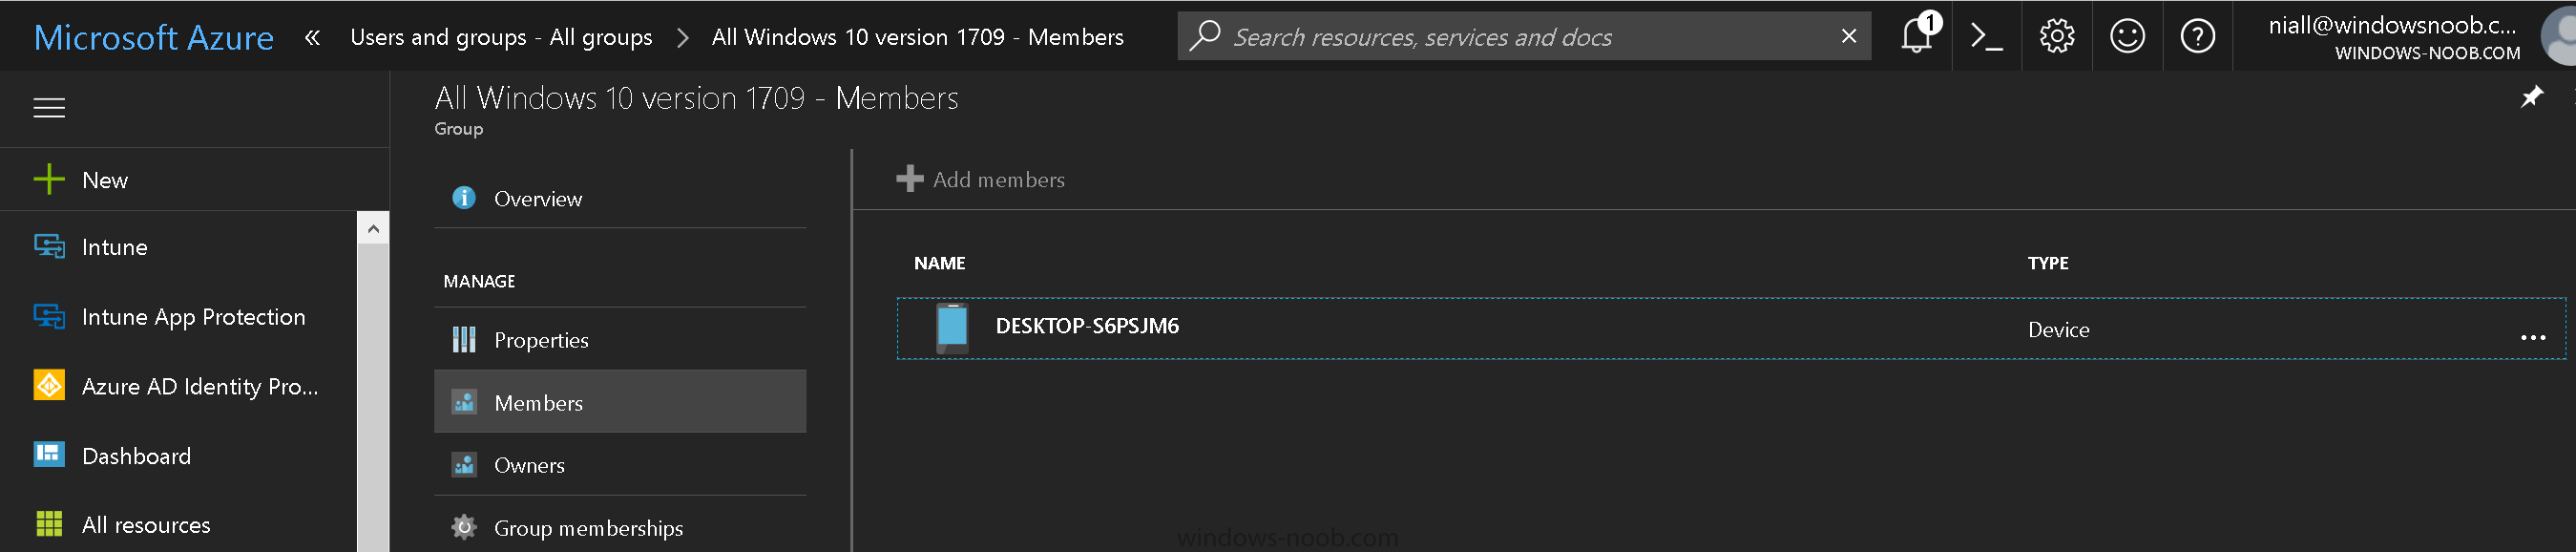
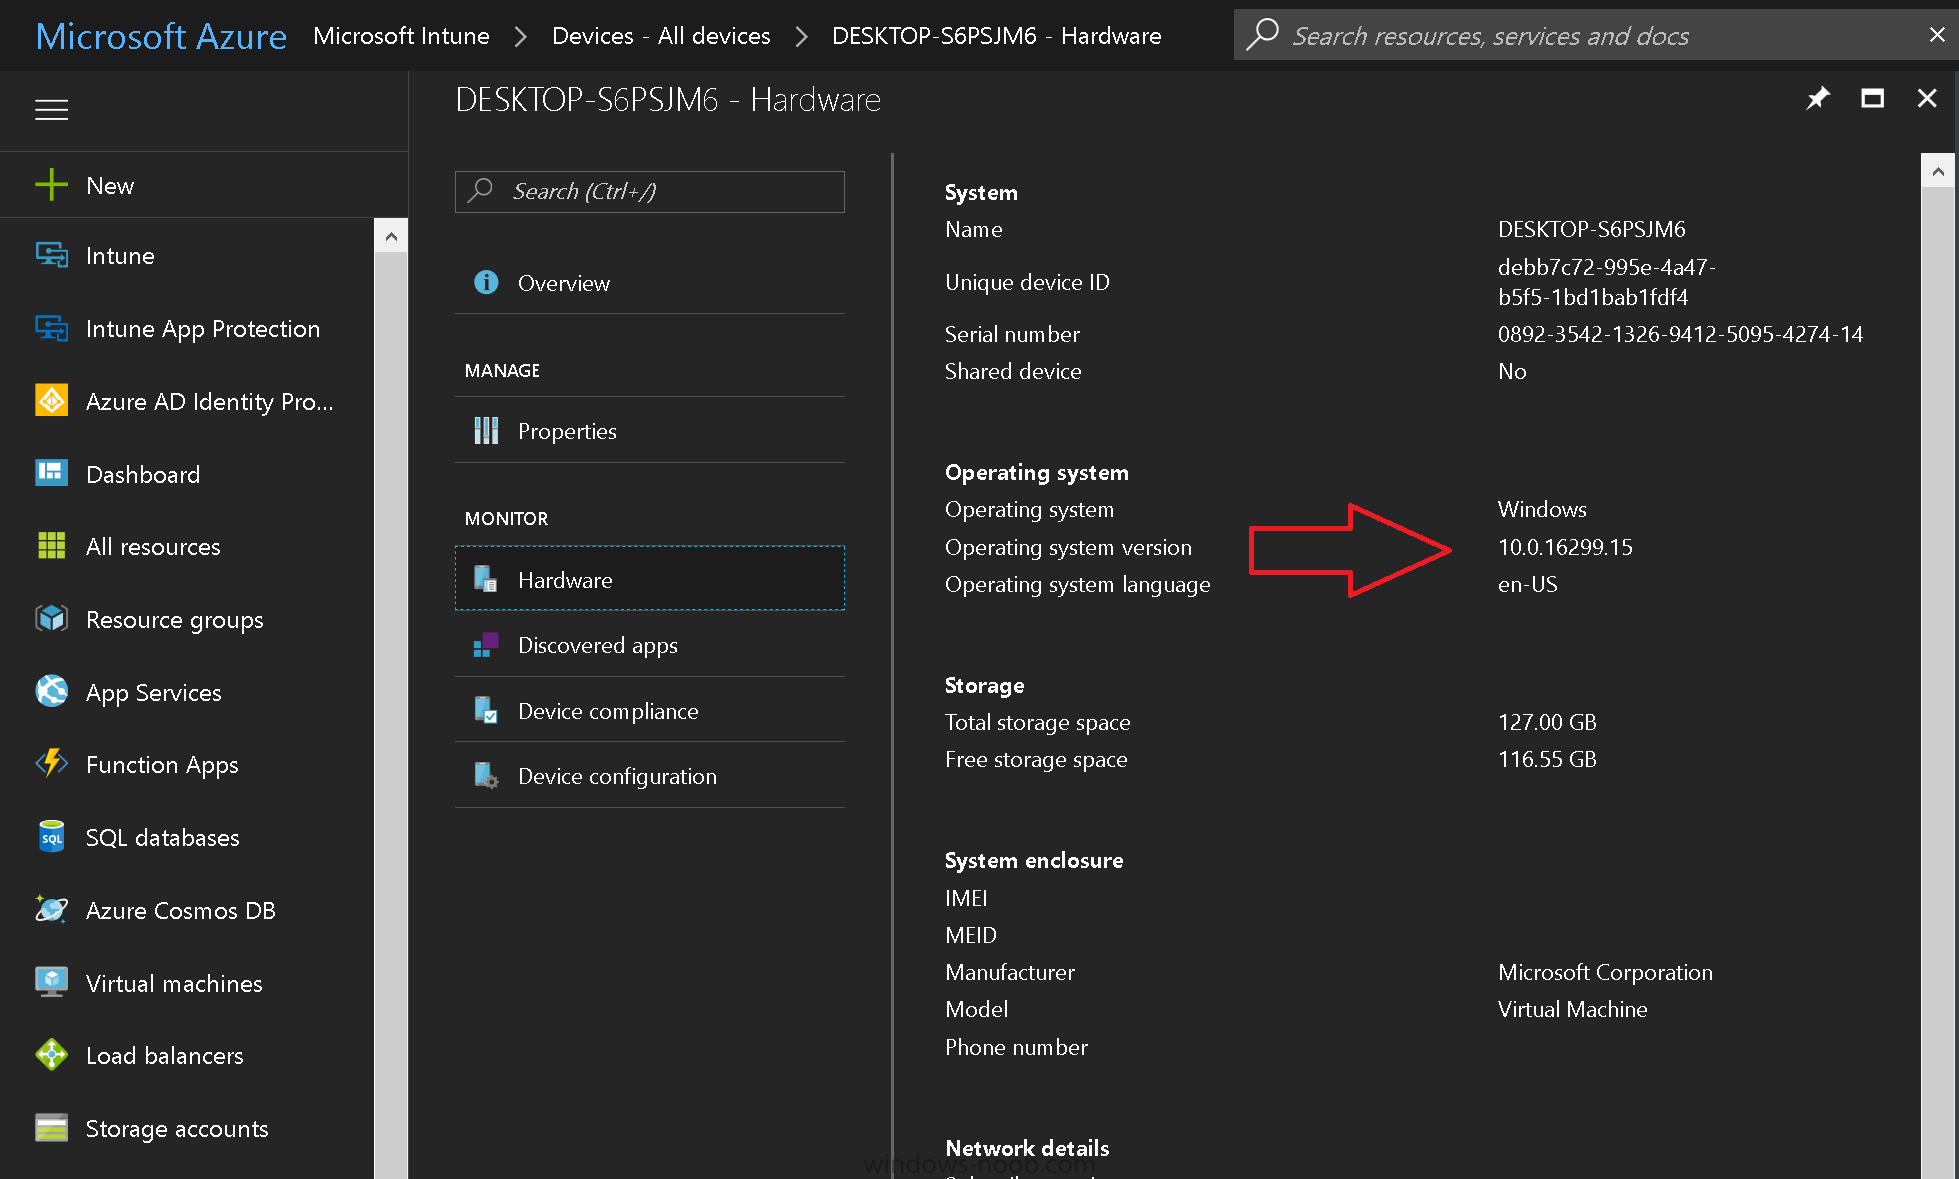
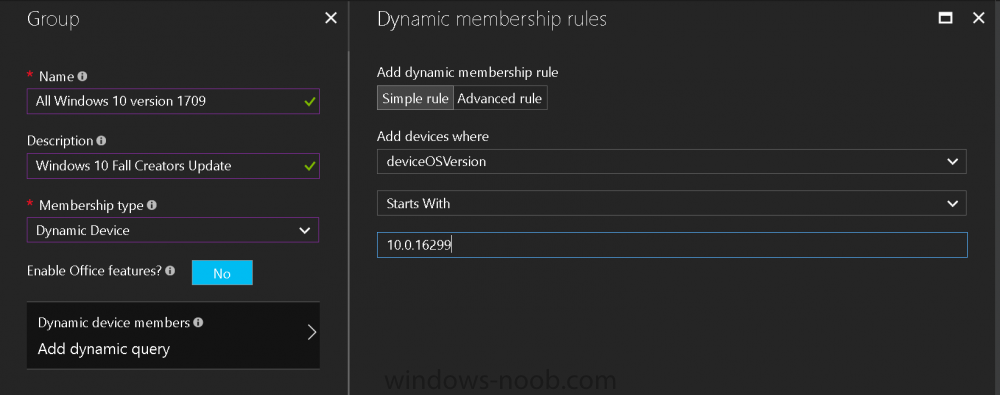
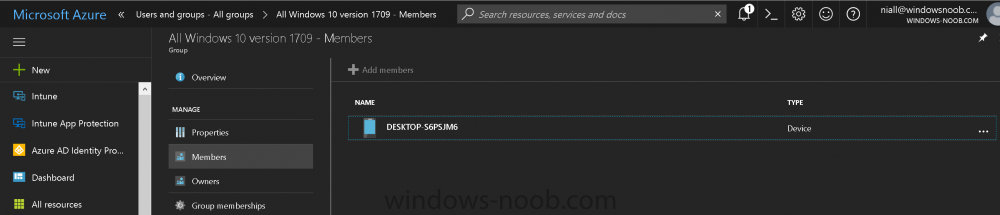
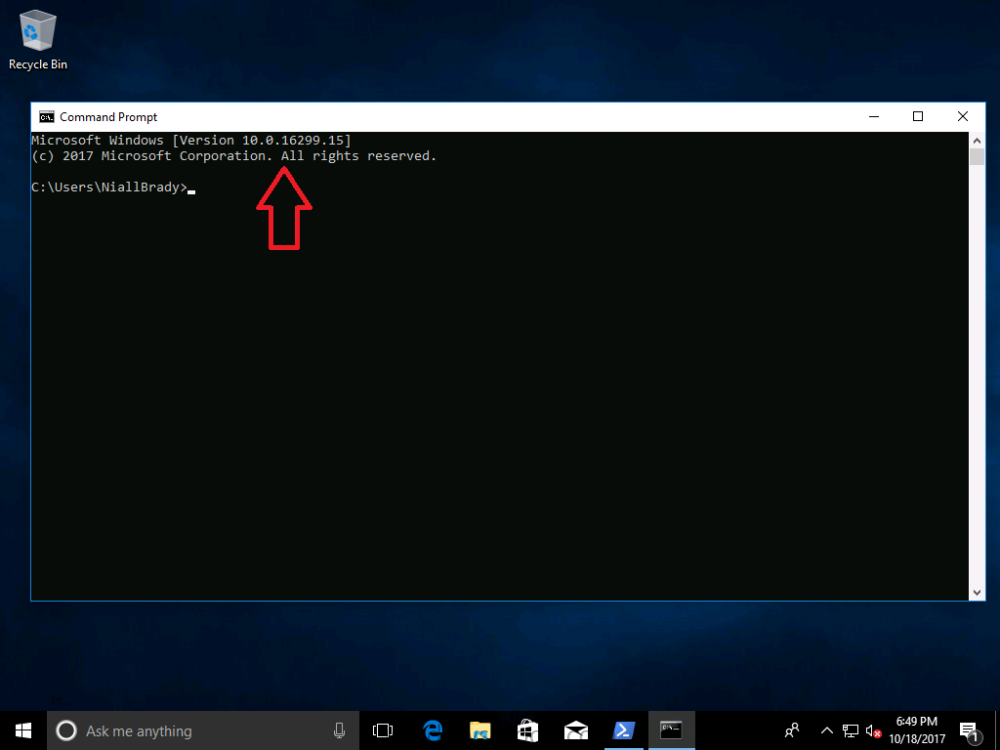
Introduction Microsoft released Windows 10 version 1709 to VLSC and MSDN yesterday, so of course people are deploying it and testing it in their environments. If you want to create a dynamic Group (that auto populates) of Windows 10 version 1709 in Microsoft Intune then do as follows. Note: In this blog post I assume you have configured MDM auto-enrollment in Azure. This isn't mandatory but makes enrollment into Microsoft Intune for Windows devices much easier. To see how to enable that functionality, click here. Step 1. Login to Azure Login to https://portal.azure.com and select the Intune service. Step 2. Create a dynamic devices group Click on Groups. Select New Group (highlighted with the Red Arrow). In the New Group blade, use the following options Name: All Windows 10 version 1709 Description: Windows 10 Fall Creators Update Membership Type: Dynamic Device In the Dynamic Device members Add Dynamic Query option, enter the following Add device membership rule: SimpleRule Add devices where DeviceOsVersion StartsWith 10.0.16299 Next, click on Add Query Followed by Create. You'll get a notification in the top right that the group was successfully created. Step 3. AzureAD join a Windows 10 version 1709 device Go through OOBE on a Windows 10 version 1709 device, at the account screen enter your Azure AD credentials. and after the device has joined Azure AD, it'll show up in Intune soon after in the correct Group. Job done ! You can verify the build number on a Windows 10 version 1709 device by opening a command prompt, in this screenshot it's 10.0.16299.15, the .15 at the end will increase as new cumulative updates are installed on this base build number. and that full string can be seen in Intune in Devices, select All Devices, select the device in question and click on Hardware. Note: If you'd like to create a collection in SCCM for Windows 10 version 1709 please see the following blog post. For a list of deployment resources for Windows 10 version 1709 please see here.


-
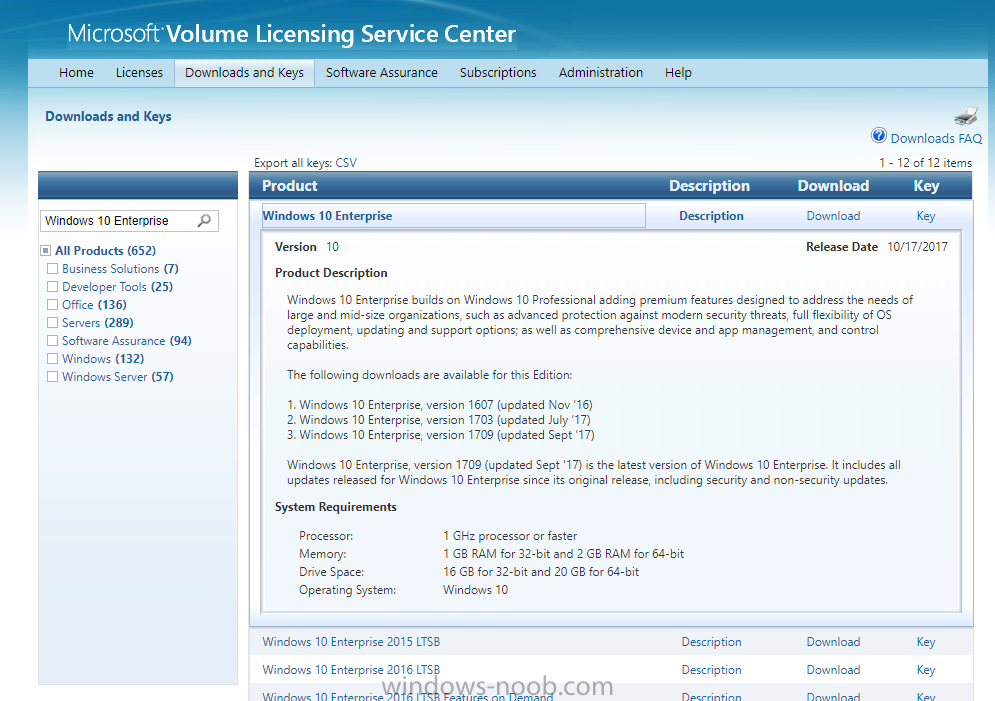
Windows 10 version 1709 (Fall Creators Update) is finally available on Microsoft’s Volume Licensing Service Center and MSDN. To see what’s new in Windows 10 1709 see the following post https://blogs.technet.microsoft.com/windowsitpro/2017/10/10/see-whats-new-for-it-pros-in-windows-10-version-1709/ To find out how to get it, see https://blogs.windows.com/windowsexperience/2017/10/17/get-windows-10-fall-creators-update/ Windows 10 ADK version 1709 With the release of Windows 10 version 1709, along comes the Windows Assessment and Deployment Kit (ADK) version 1709. You can download it from: Windows 10 Assessment and Deployment Kit (ADK). RSAT for Windows 10 version 1709 You can download the Remote Server Administration tools for Windows 10 version 1709 here. https://www.microsoft.com/en-au/download/details.aspx?id=45520 Recommended reading What's new in Windows 10 version 1709 https://docs.microsoft.com/en-us/windows/whats-new/whats-new-windows-10-version-1709 Windows lifecycle facts page updated with Windows 10 1709, including tentative end of service date, March 2019 https://support.microsoft.com/en-us/help/13853/windows-lifecycle-fact-sheet Windows 10 version 1709 ADK Windows 10 Assessment and Deployment Kit (ADK)

-
you'd just have to add a delay function on the associated button, either in the wrapper or the HTA itself
-
Introduction Here’s some links with videos of all the Microsoft Intune and Configuration Manager, Windows 10 & Office 365 ProPlus content @ Microsoft Ignite in Florida last month. Intune/ConfigMgr: Mobile device and app management overview with Microsoft Intune System Center Configuration Manager overview and roadmap Conduct a successful pilot deployment of Microsoft Intune Manage and secure Android, iOS, and MacOS devices and apps with Microsoft Intune Learn how to use Microsoft Intune with the new admin console and Microsoft Graph API Secure access to Office 365, SaaS and on-premises apps with EMS Manage and protect Office 365 mobile apps with Microsoft Intune Deploying and using Outlook mobile in the Enterprise Manage mobile productivity with EMS Windows 10 & Office 365 ProPlus: Microsoft 365: Modern management and deployment (general session with Brad and Rob) Overview: Modern Windows 10 and Office 365 ProPlus management with EMS Transition to cloud-based management of Windows 10 and Office 365 ProPlus with EMS Modernize deployment & servicing of Windows 10 & Office 365 ProPlus with EMS Secure Windows 10 with Intune, Azure AD and System Center Configuration Manager
-
hi, I've added it back now, thanks for noticing
-
All you have to do is set the following registry key via Michael Niehaus on Twitter
-
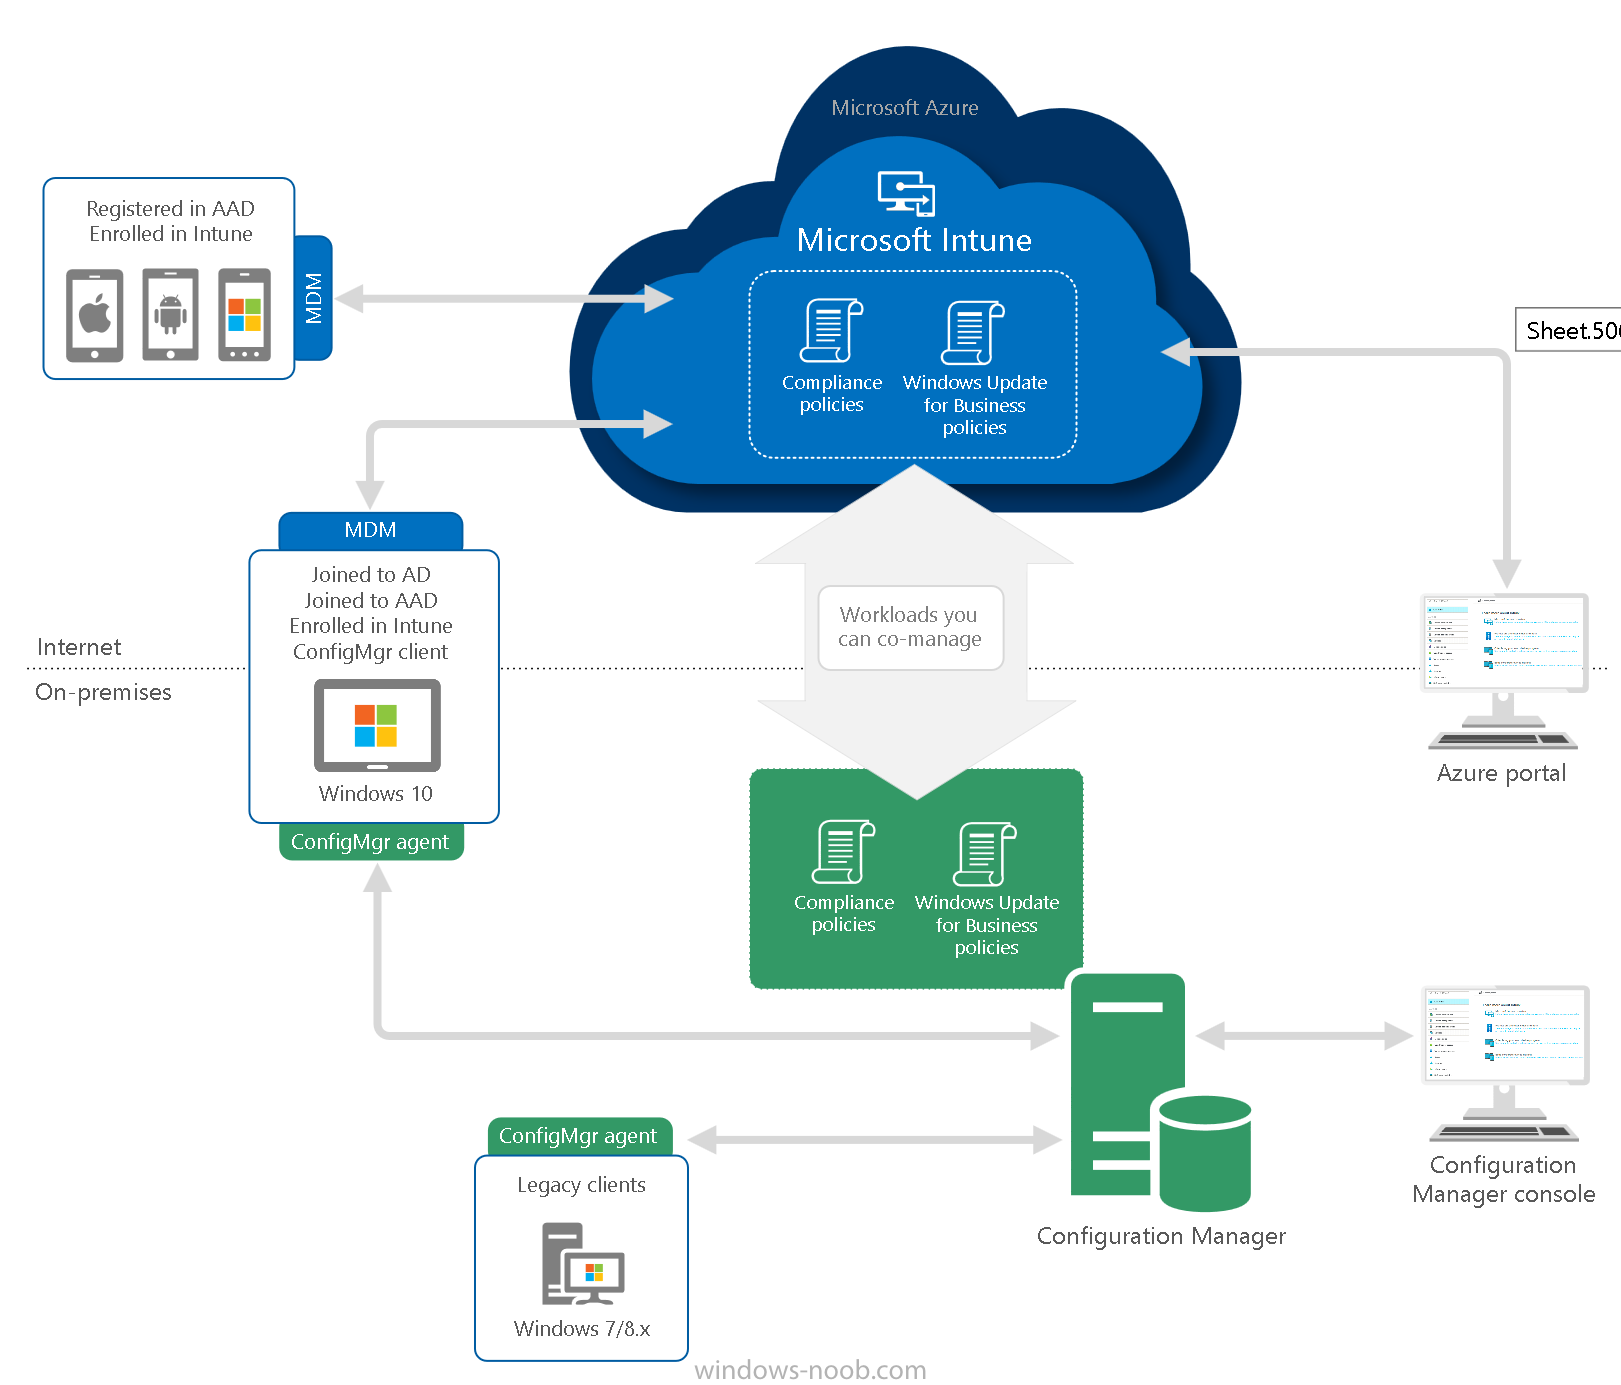
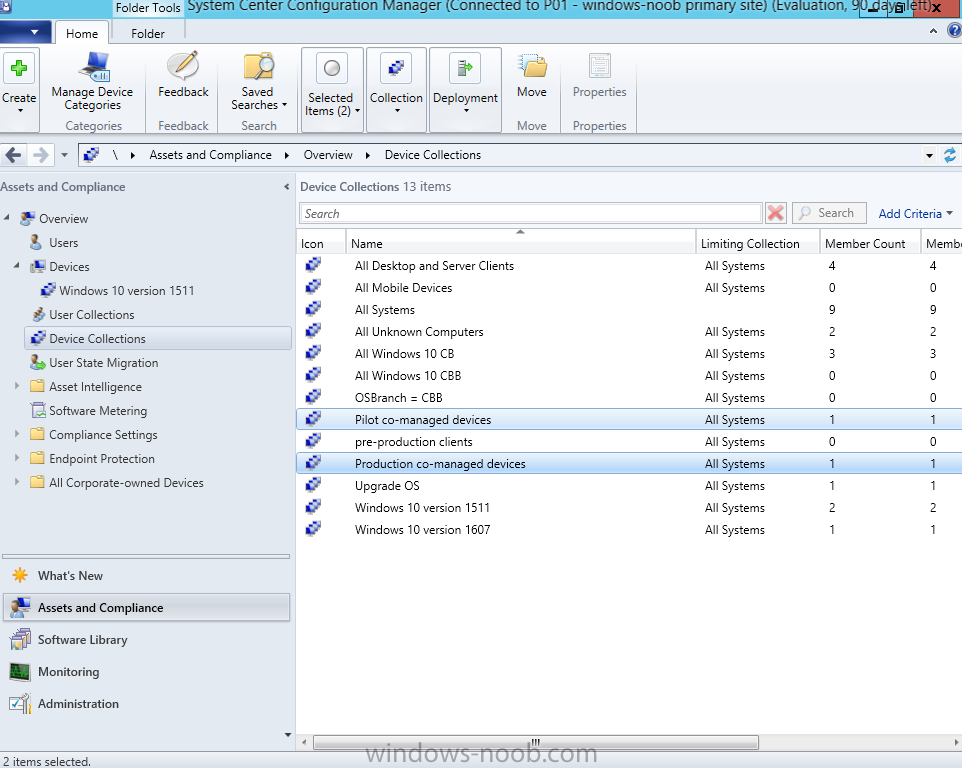
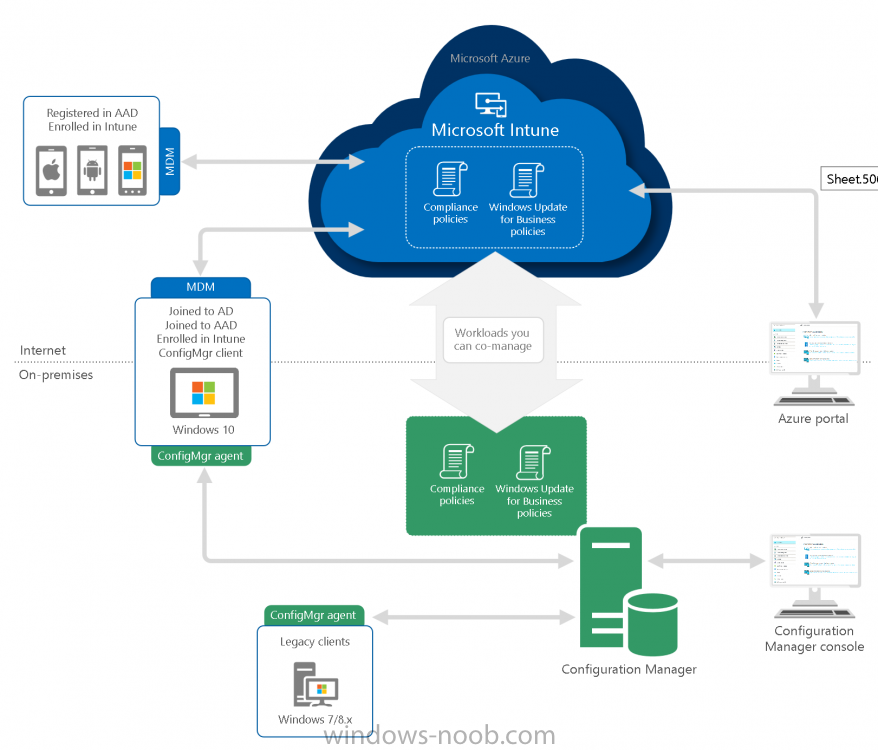
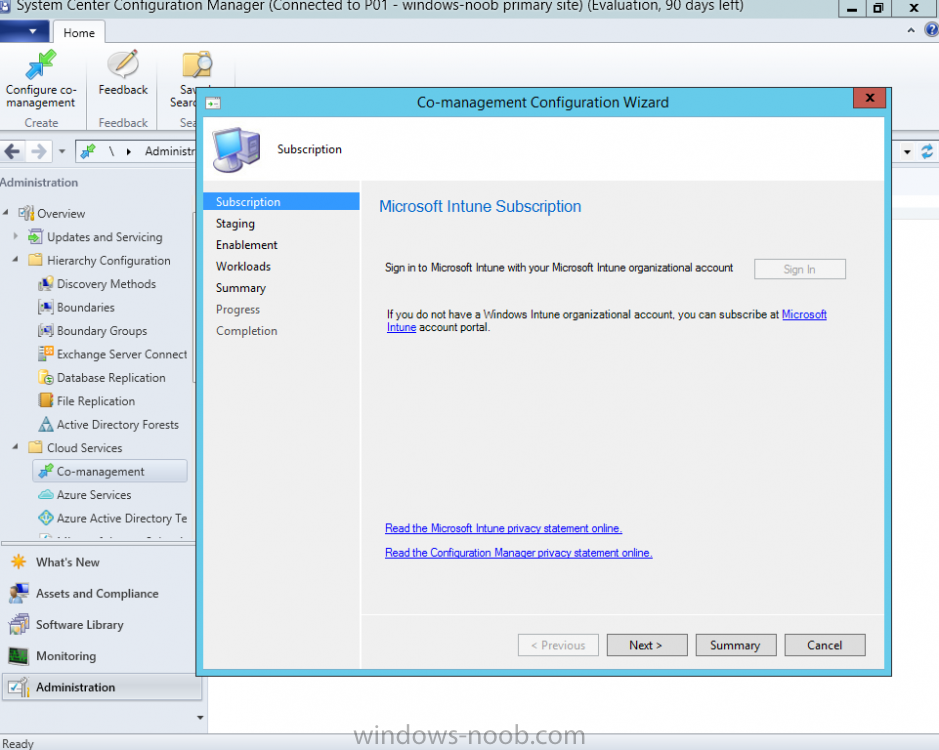
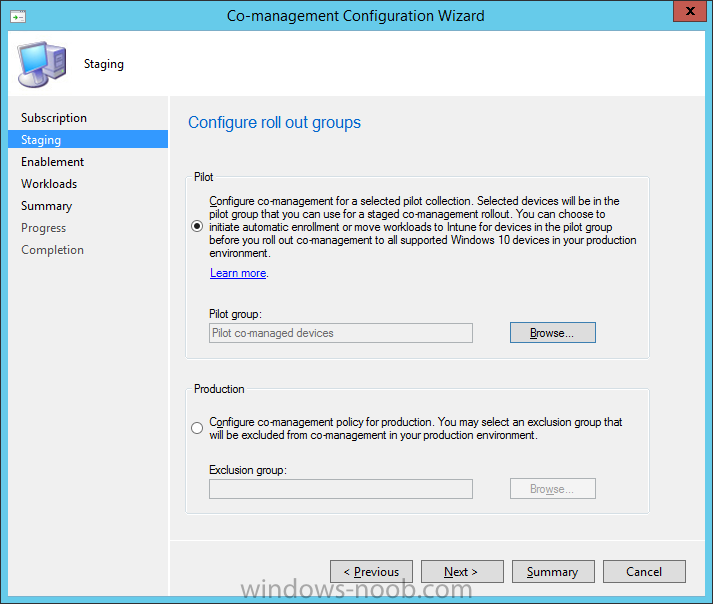
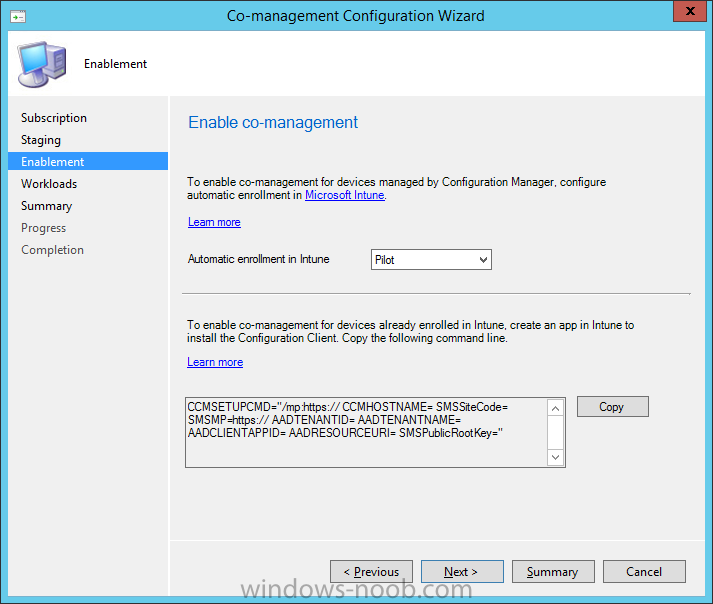
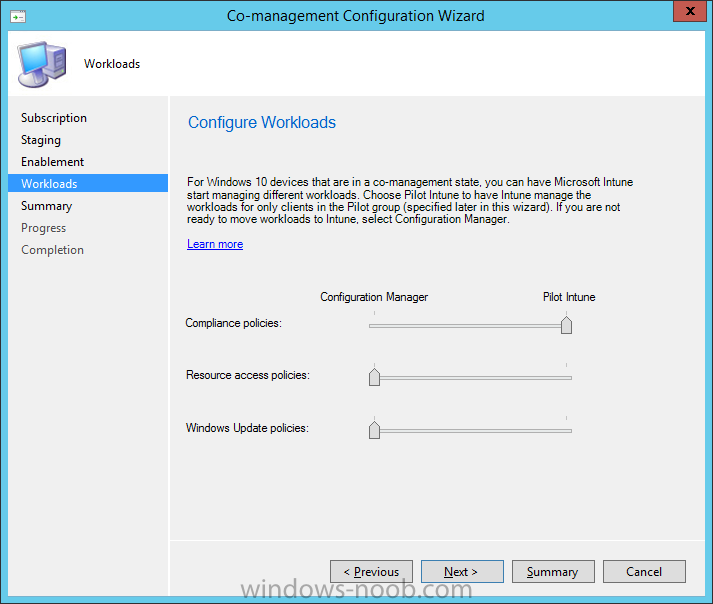
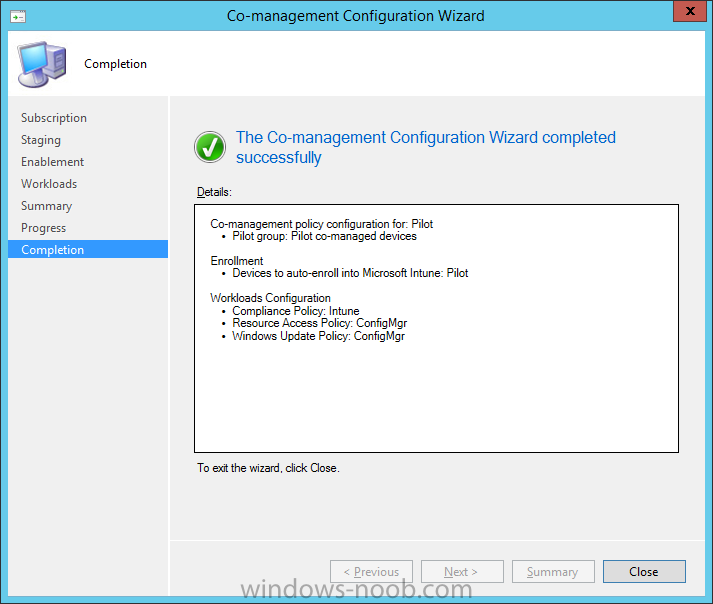
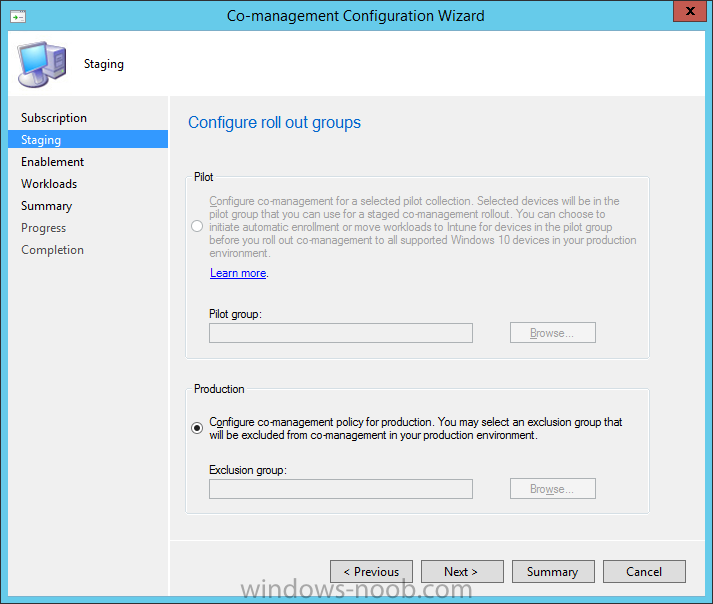
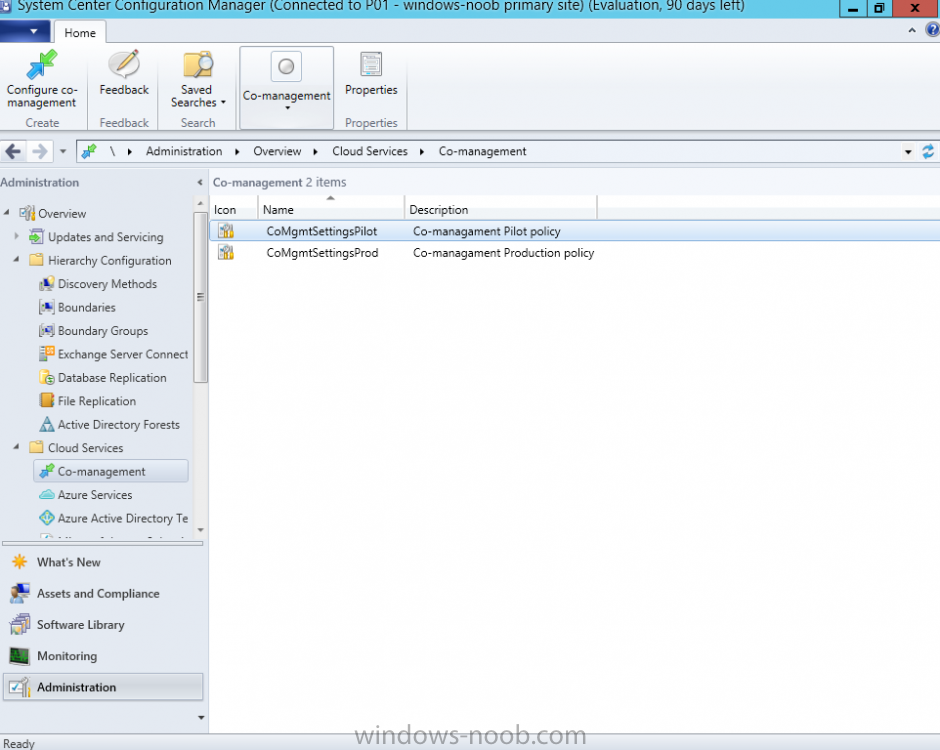
Introduction Microsoft has just released System Center Configuration Manager Technical Preview 1709, and that Technical Preview release allows you to configure co-management. Microsoft announced co-management at Microsoft Ignite (September 2017) and now with this release you can begin testing that scenario (however you still need the yet to be released Windows 10 Fall creators update edition, aka Windows 10 version 1709), so for now you'll need to test with a Windows Insider preview release. But what is co-management ? according to Microsoft it is... The graphic below shows you that scenario. Prerequisites The following are general prerequisites for you to enable co-management: Technical Preview for Configuration Manager version 1709 Azure AD EMS or Intune license for all users Intune subscription (MDM authority in Intune set to Intune) Additional prerequisites for existing Configuration Manager clients Windows 10, version 1709 (Fall Creators Update) and later Hybrid Azure AD joined (joined to AD and Azure AD) Additional prerequisites for new Windows 10 devices Windows 10, version 1709 (Fall Creators Update) and later Cloud Management Gateway in Configuration Manager Create some collections In SCCM Assets and Compliance, select Device Collections and create a device collection, called Pilot co-managed devices, and alternatively one called Production co-managed devices, populate them with some devices. Enabling co-management To configure Co-Management, select Administration, Cloud Services, and click on Co-Management. Enter the credentials of your Standalone MDM Intune tenant and click Sign In. Create a Pilot co-management policy To being with, you'll want to do a Pilot configuration of Co-Management. Select your Pilot group of co-managed devices by clicking on Browse and selecting the Pilot co-managed devices collection created above. On the Configure Enablement screen, set the drop down to Pilot Click on Copy to copy that line of text, the text will be something like this: CCMSETUPCMD="/mp:https:// CCMHOSTNAME= SMSSiteCode= SMSMP=https:// AADTENANTID= AADTENANTNAME= AADCLIENTAPPID= AADRESOURCEURI= SMSPublicRootKey=" Next, you can configure the workloads (on or off, there is no middle ground here) and continue the wizard through to completion. Create a Production co-management policy After creating the above policy, and once you've completed your pilot, create a new Production policy (Pilot will be greyed out). Now, the drop down can choose All (or none). and again configure workloads... The created policies are shown here. Recommended reading To get more info about this topic, please review the following blog posts from Microsoft. https://docs.microsoft.com/en-us/sccm/core/get-started/capabilities-in-technical-preview-1709#co-management-for-windows-10-devices https://blogs.technet.microsoft.com/enterprisemobility/2017/09/27/whats-new-with-microsoft-intune-and-system-center-configuration-manager-ignite-2017


-
ping me tomorrow and i can test it in my env, email me at niall @ windowsnoob . com
-
hi MDT is perfect for doing what you want and there are several PowerShell script here on windows-noob to automate the creation of your first MDT deployment share on Windows Server, here's an example - i'd suggest you use virtual machines to build and capture your images from and then deploy those captured images to your intended targets, good luck, cheers niall
-
happy to have helped ;-)
-
Are you planning to deploy Microsoft Intune and looking for straightforward technical guidance to help you accelerate this effort? Please join us as we share our deployment experience working with customers from all over the world, covering Intune pilot planning, deployment and management. At the end of this session, you will have a solid foundation to deliver a successful Intune pilot deployment in your organization. The above is a session I did with Peter Daalmans @ Microsoft Ignite on Friday 29th of September 2017, please check it out especially if you are interested in Microsoft Intune. cheers niall
-
good point so I've created this https://www.windows-noob.com/forums/forum/120-cloud/ which is where you can post about Azure, Office 365 and Intune
-
what does the cmupdate.log tell you ?
-
ok then you'd need to look at Azure Information Protection instead and secure the documents themselves and it's based on the identity to decide if you have access or not...
-
wow, maybe you need Windows 10 v 1703 specific video drivers for that hardware ?
-
is the user that you are using to browse the data, targeted by the WIP policy or not ?