anyweb
-
Posts
9255 -
Joined
-
Last visited
-
Days Won
371
Everything posted by anyweb
-
 it will wait until the user presses ok or until the step timesout, you can adjust the timeout on the step
 -
good point... so can you fill me in with why you want to do this, give me a scenario...
-
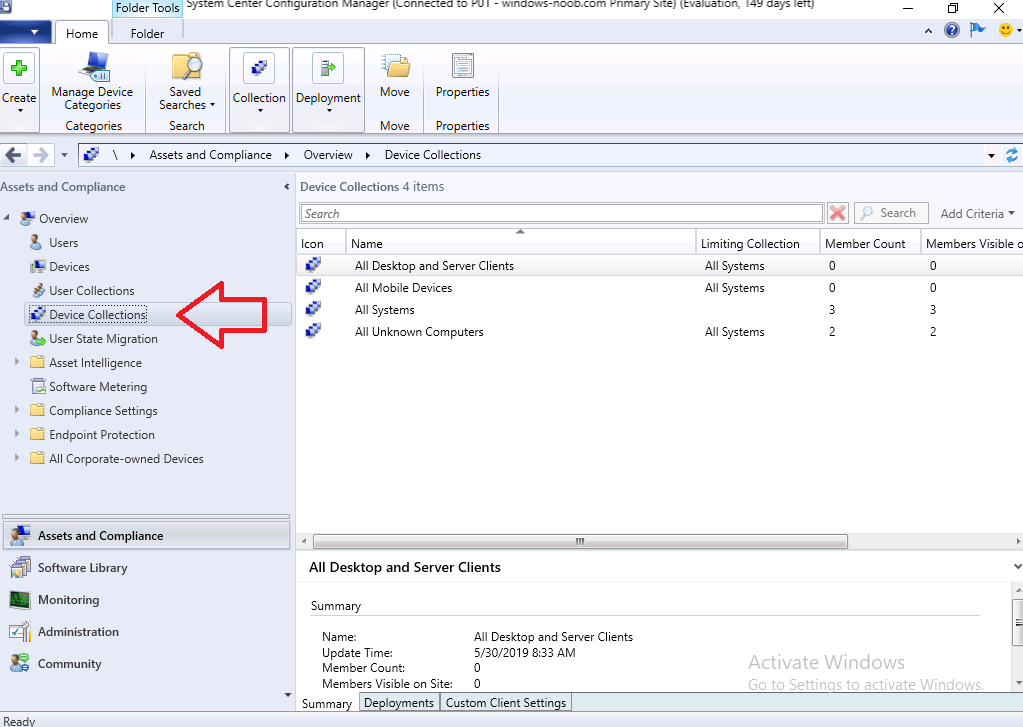
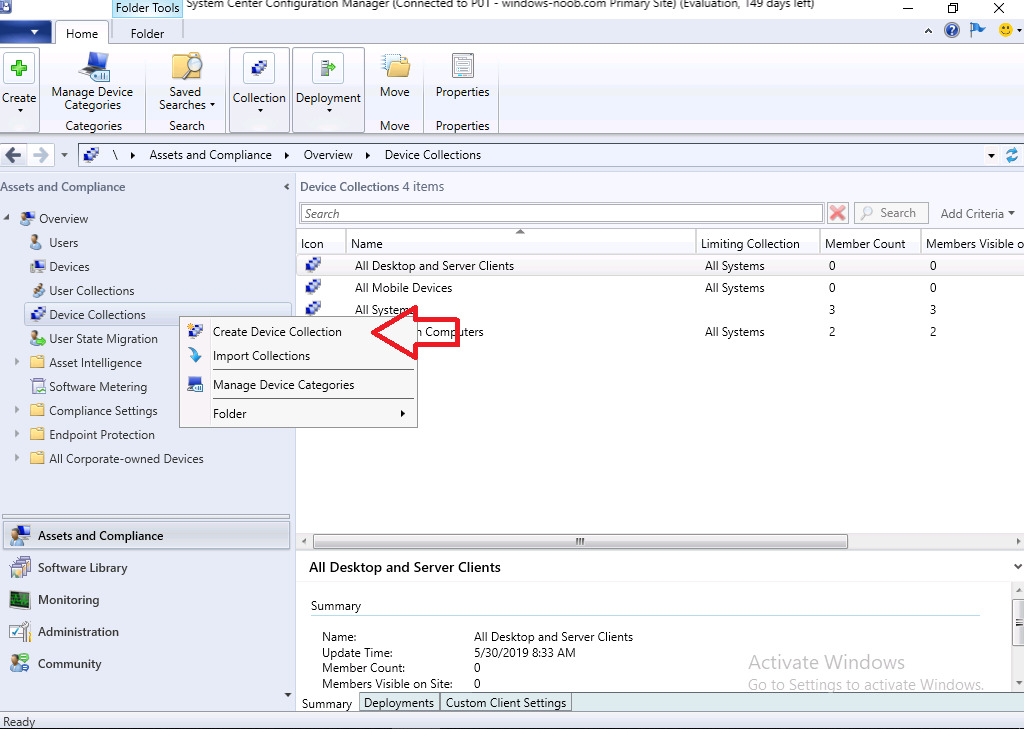
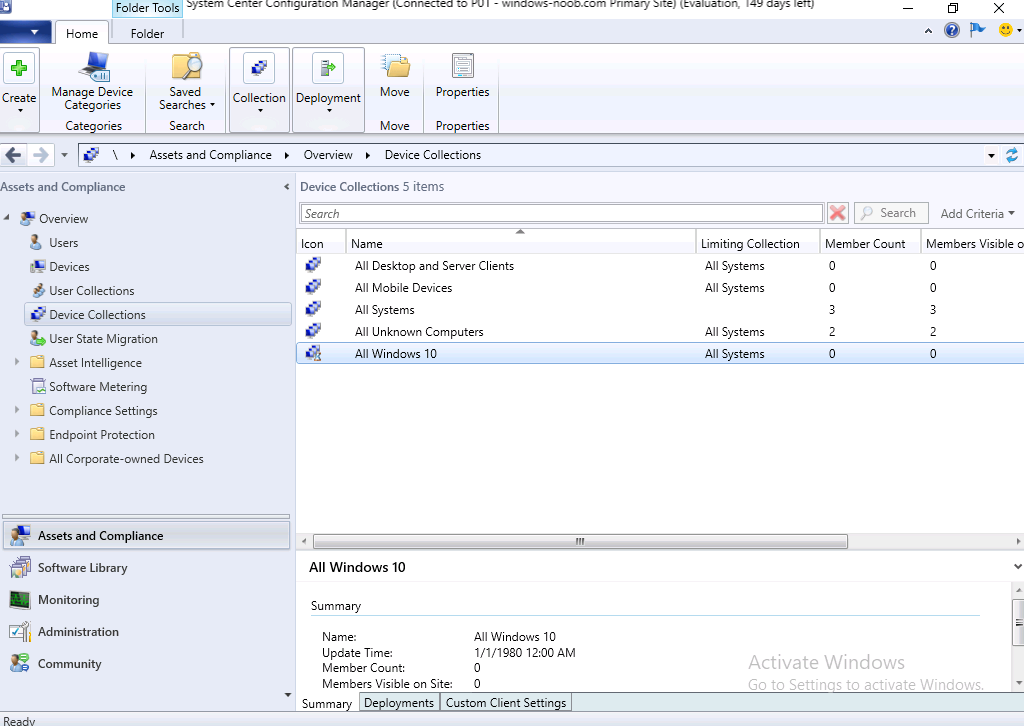
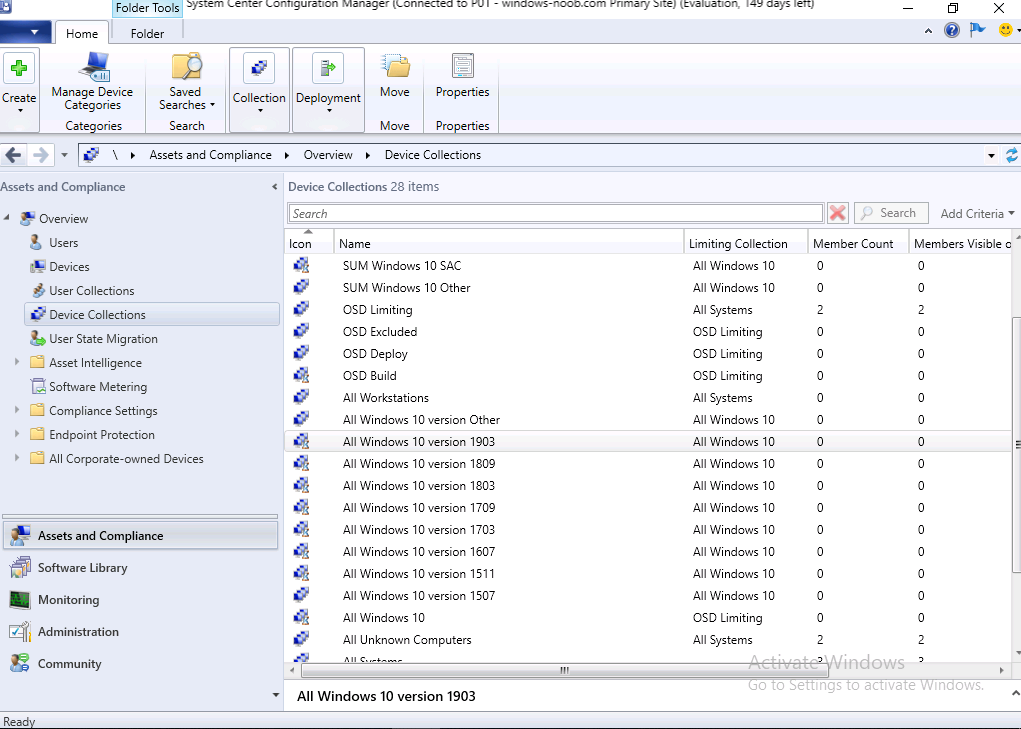
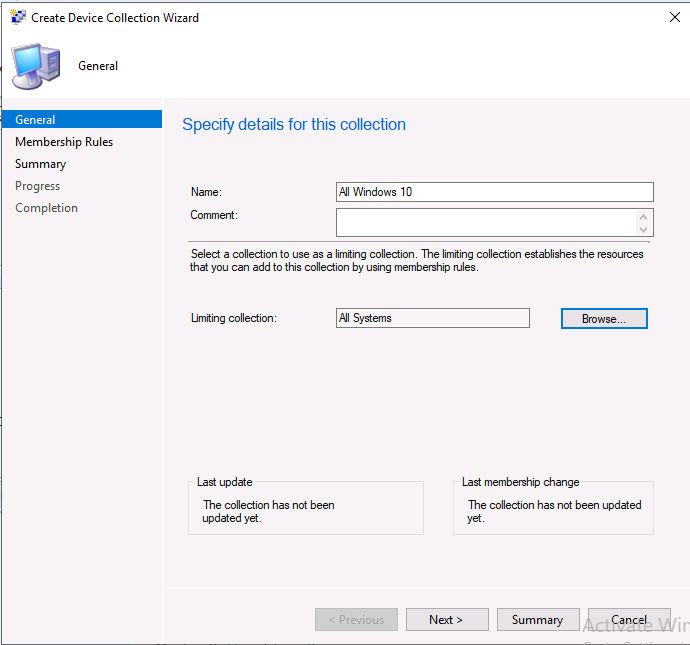
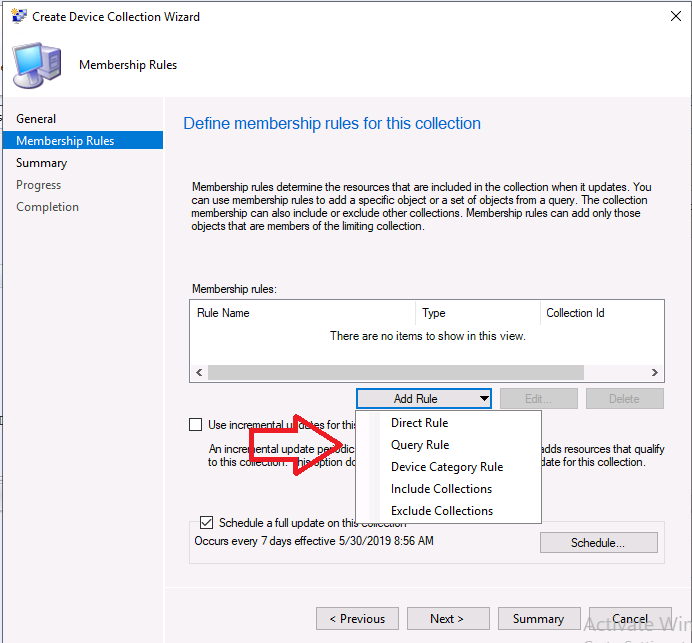
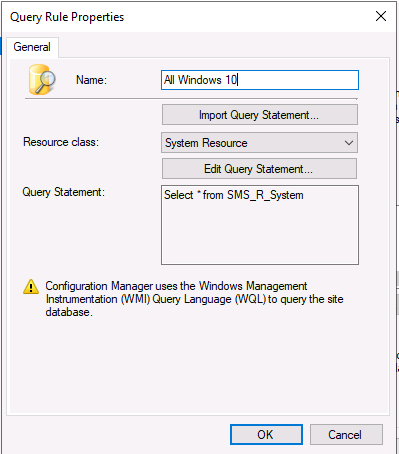
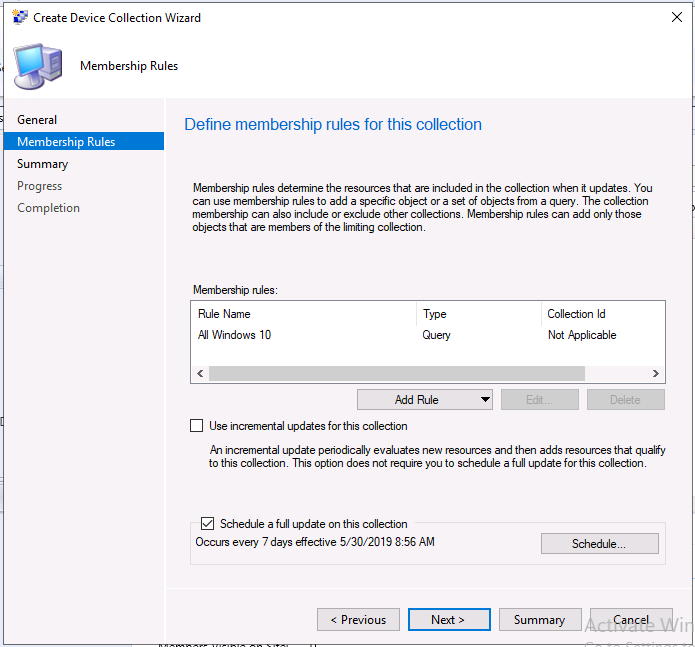
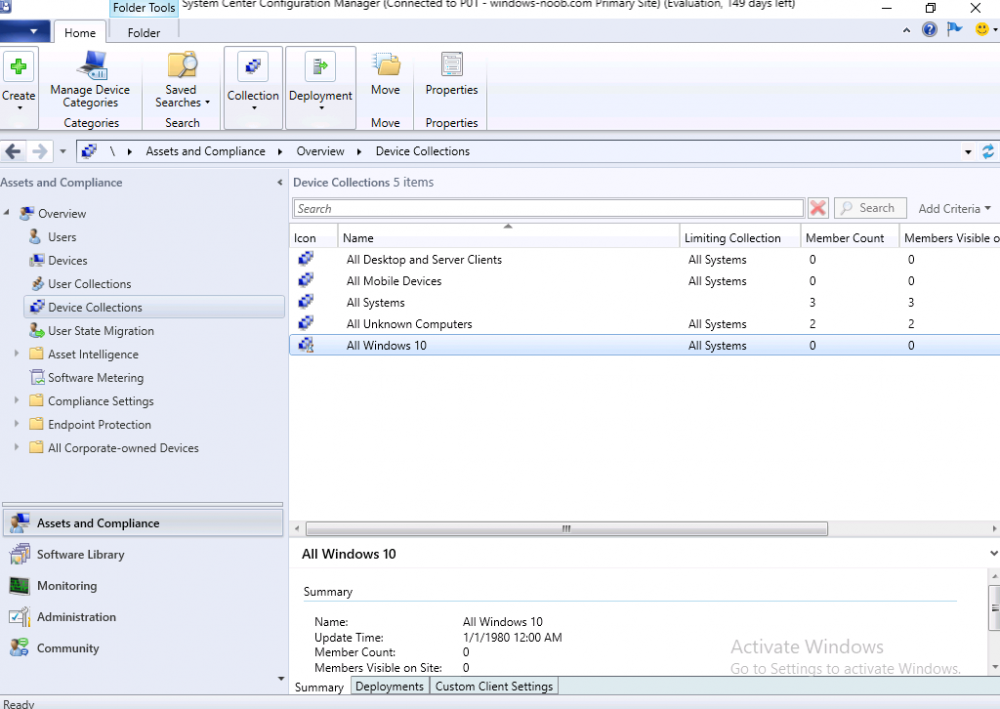
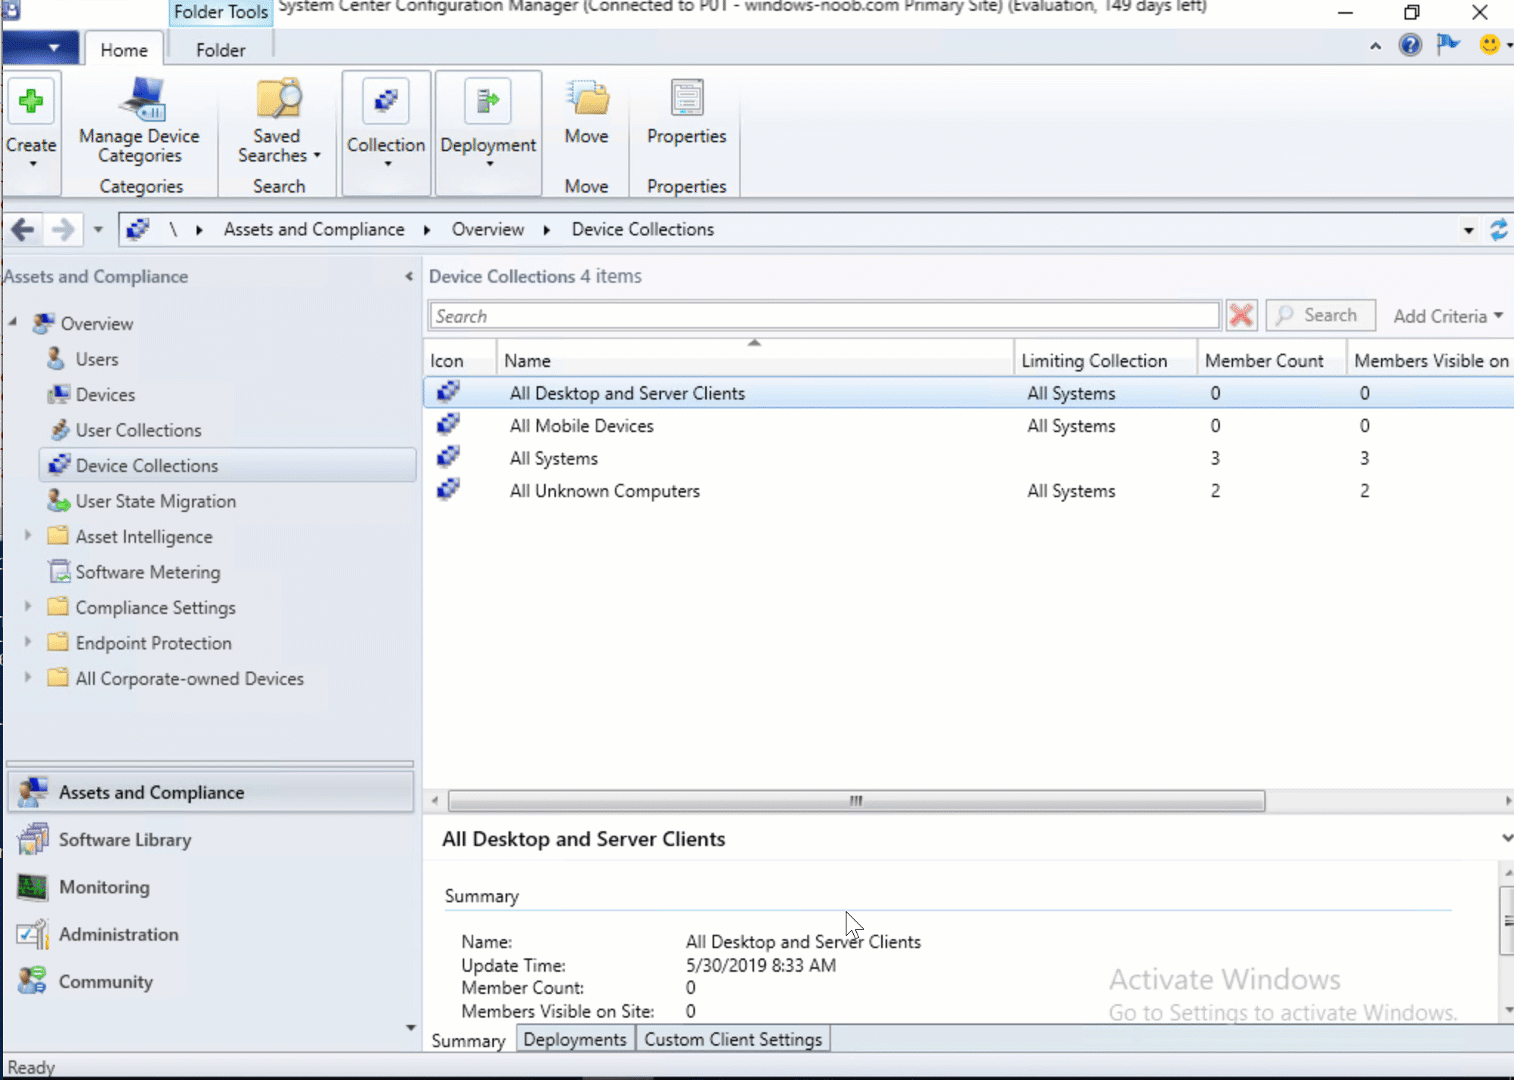
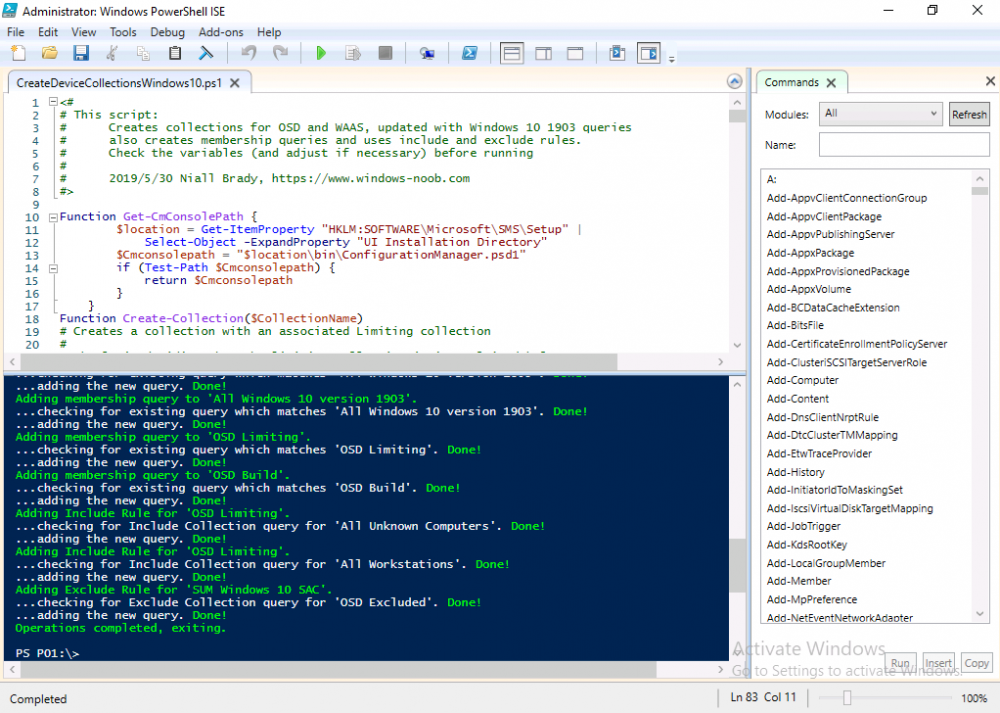
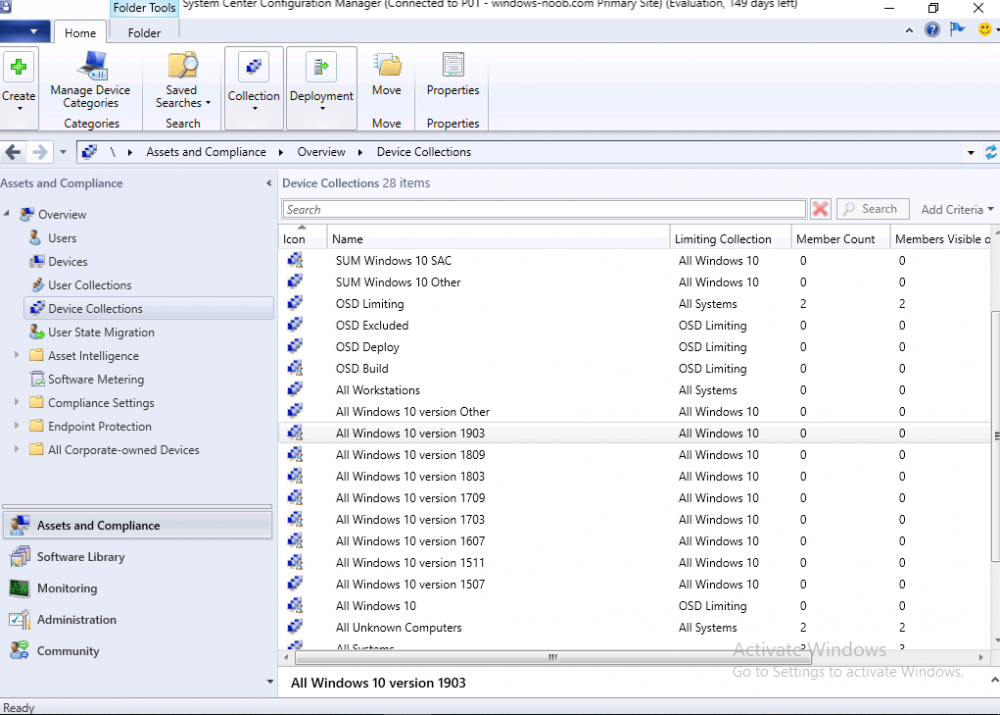
Introduction This multi-part guide will show you how to install the latest baseline version of Configuration Manager from Microsoft. The latest available baseline version is System Center Configuration Manager (Current Branch) version 1902 as of April the 10th 2019. I blogged how to upgrade to 1902 here. This guide is aimed a new installations of SCCM. Baseline media is used to install new ConfigMgr sites or to upgrade from supported versions, for more information about baseline media please see my blog post here. This series is broken down into the following parts:- Part 1 - Get the lab ready, configure ADDS Part 2 - Join CM01 to Domain, add users, create the Systems Management container, delegate permission Part 3 - Role and Feature installation, installation of WDS and ADK Part 4 - Configure and install SQL Server 2017 Part 5 - Configure and install SCCM 1902 Current Branch Part 6 - Create device collections (This part) Part 7 - Configuring discovery Part 8 - Configuring boundaries You can use this multi-part guide to get a hierarchy up and running on Windows Server 2019 using SQL Server 2017. The concept behind this is to guide you through all the steps necessary to get a working Configuration Manager Primary site installed (for lab use) using manual methods or automated using PowerShell. This gives you the power to automate the bits that you want to automate, while allowing you to manually do other tasks when needed. You decide which path to take. PowerShell knowledge is desired and dare I say required if you are in any way serious about Configuration Manager. I will show you how to do most steps via two methods shown below, it's up to you to choose which method suits you best but I highly recommend automating everything that you can, using PowerShell. Method #1 - Do it manually Method #2 - Automate it with PowerShell Downloads The scripts used in this part of the guide are available for download here. Unzip to C:\Scripts. The scripts are placed in the corresponding folder (Part 1, Part 2 etc) and sorted into which server you should run the script on (DC01 or CM01). Scripts.zip Step 1. Create device collections Note: Perform the following on the Configuration Manager server (CM01) as a Local Administrator In this part you'll create some device collections to prepare your lab for Servicing Windows 10, whether using WAAS (Windows As A Service) or using the Inplace Upgrade (IPU) Task Sequences built into ConfigMgr. The collections created include some based on the recently released Windows 10 version 1903. Method #1 – Do it manually You can create collections using the ConfigMgr console and clicking your way through the wizard, you'll need to add membership queries to populate the collections, and include Include or Exclude rules as appropriate. To create collections manually open the Assets and Compliance node and select Device Collections. Right click on Device Collections and choose Create Device Collection. In the wizard that appears give the collection a name, eg: All Windows 10 and limit it to another existing collection by clicking on Browse and selecting an existing collection to limit to for example All Systems. A limiting collection decides what collection members of this collection must be in first in order to appear within this collection. Next you decide how you want the collection to populate with members, the most common method of populating a collection is to use a query, so click on the Add Rule drop down box and selct Query Rule. Doing so brings up the Query Rule properties screen, give the query a suitable name such as All Windows 10. Next click on Edit Query Statement and then select Show Query Language Note: In a production environment be very careful about editing query statements on 'live' collections that have Task Sequences, Packages or Applications deployed to them, otherwise you can have unintended results by making a mistake with the query. In the Query statement properties screen, remove the current query (which basically selects EVERYTHING in your environment) and in its place, paste in a working (known good) query, for example for All Windows 10 use the following query. select SMS_R_SYSTEM.ResourceID,SMS_R_SYSTEM.ResourceType,SMS_R_SYSTEM.Name,SMS_R_SYSTEM.SMSUniqueIdentifier,SMS_R_SYSTEM.ResourceDomainORWorkgroup,SMS_R_SYSTEM.Client from SMS_R_System inner join SMS_G_System_OPERATING_SYSTEM on SMS_G_System_OPERATING_SYSTEM.ResourceID = SMS_R_System.ResourceId where (SMS_R_System.OperatingSystemNameandVersion = 'Microsoft Windows NT Workstation 10.0' or SMS_R_System.OperatingSystemNameandVersion = 'Microsoft Windows NT Workstation 10.0 (Tablet Edition)') Click OK to close the Query Rule Properties screen. Next you can optionally adjust the membership schedule by clicking on Schedule. Click your way through the rest of the wizard, once done, the All Windows 10 collection will appear. Repeat the above process to add all your other desired collections for Windows 10 and WAAS. Method #2 – Automate it with PowerShell To automate the creation of a bunch of device collections simply run the CreateDeviceCollectionsWindows10.ps1 Powershell script by starting PowerShell ISE as an Administrator on the ConfigMgr server (CM01). awesome ! Below you can see the script has run And after refreshing the console, all the new collections (with queries added) appear. Please join me in Part 7 where we'll configure discovery.


-
hi the powershell script is there, you just need to be logged in as a member to download it, so please try again. the reason your popup doesn't appear is because it's running as system context, so you never see it (but SYSTEM does...), that's why we use ServiceUI.exe to get around that problem
-
sorry, me too, I will get it done and hopefully add a part 7 also, I'll try and resume it this weekend, just other things have taken priority.
-
The Software Change Returned Error Code 0x87d01106
anyweb replied to Prasad24's topic in Configuration Manager 2012
the error means Failed to verify the executable file is valid or to construct the associated command line. Source: System Center Configuration Manager ----- so are you sure you've setup the correct switches for installing the software ? -
SCCM 2012 - Stand-alone Media greyed out
anyweb replied to Holmium's topic in Configuration Manager 2012
and here is the setting for anyone that was wondering...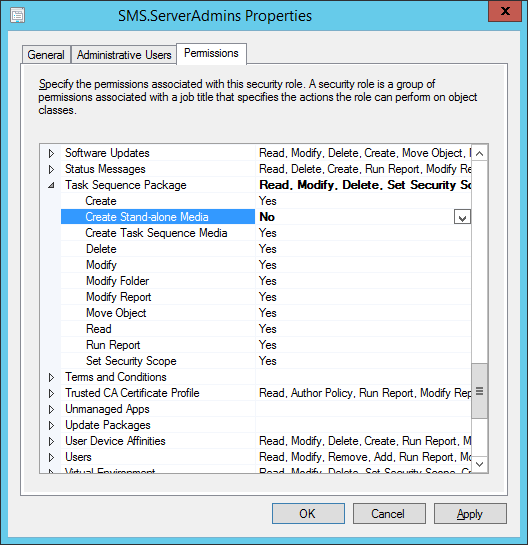
-
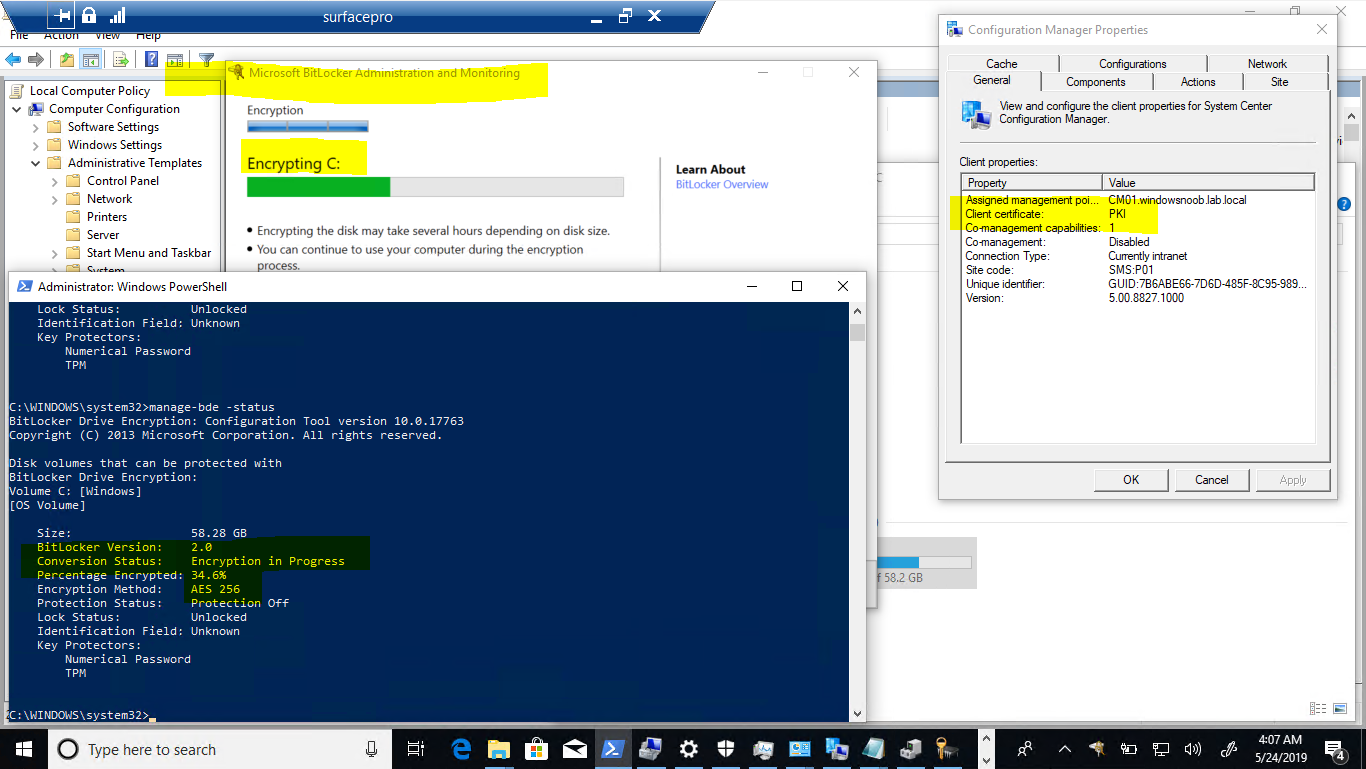
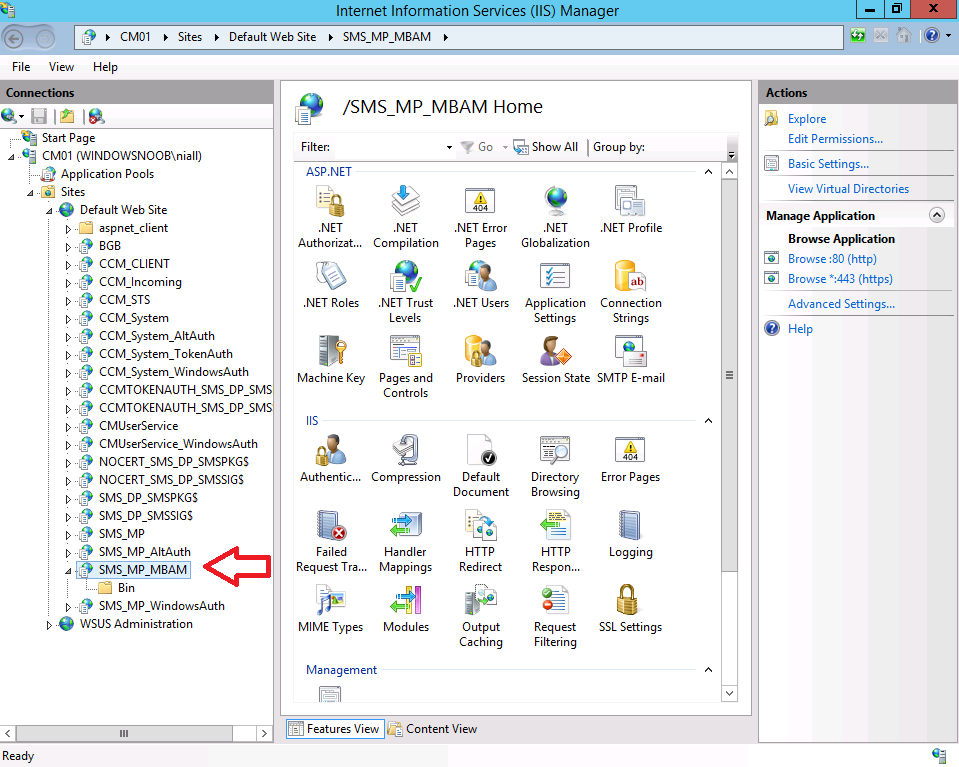
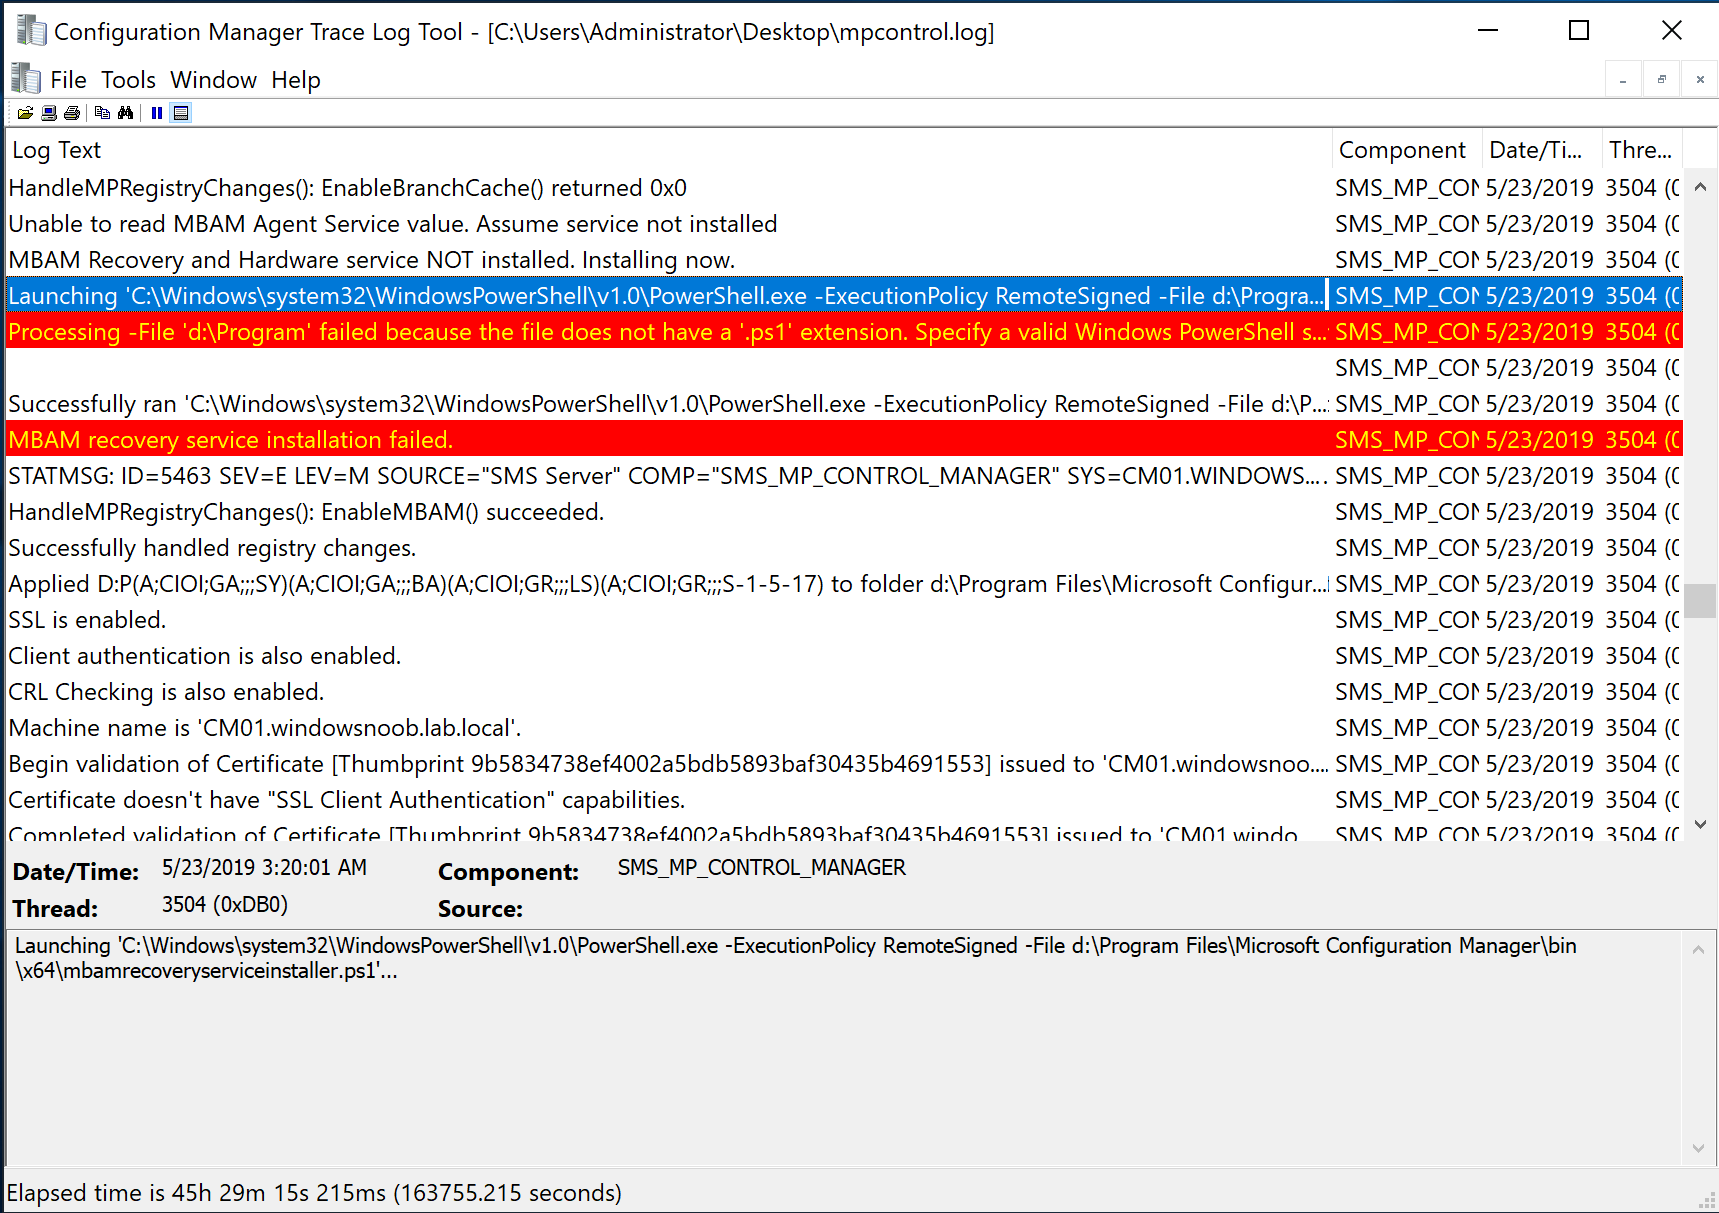
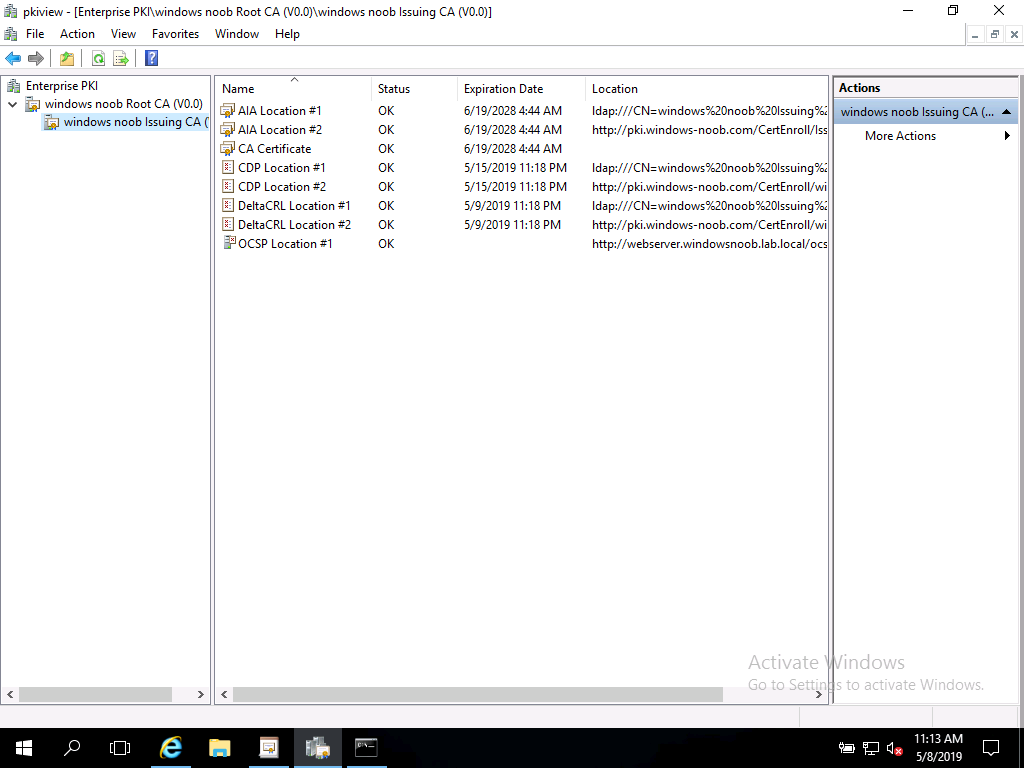
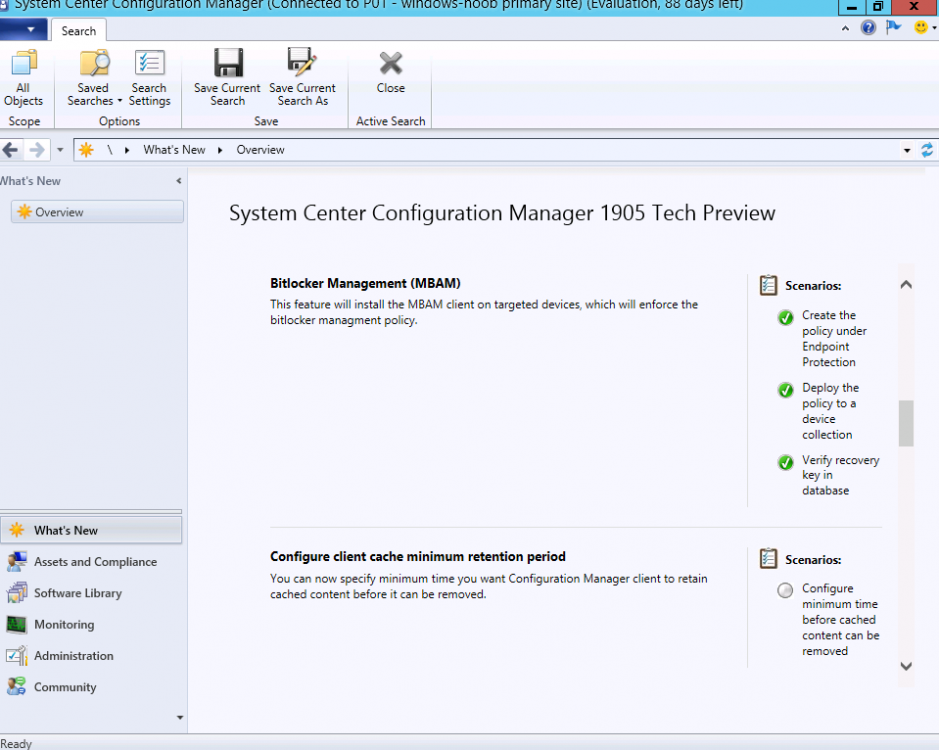
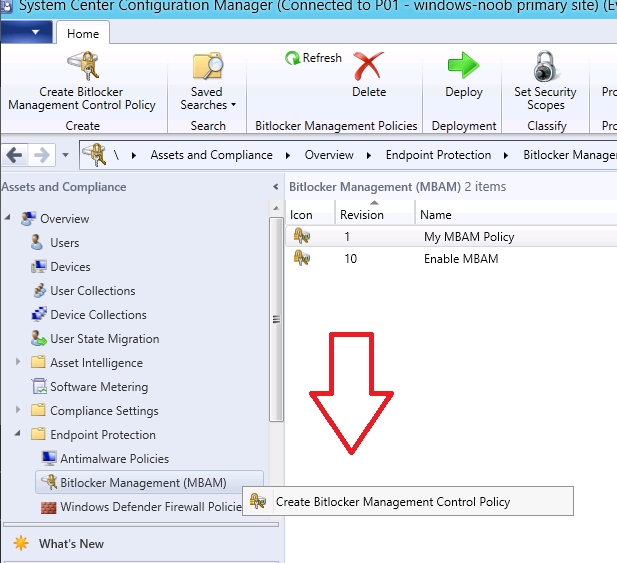
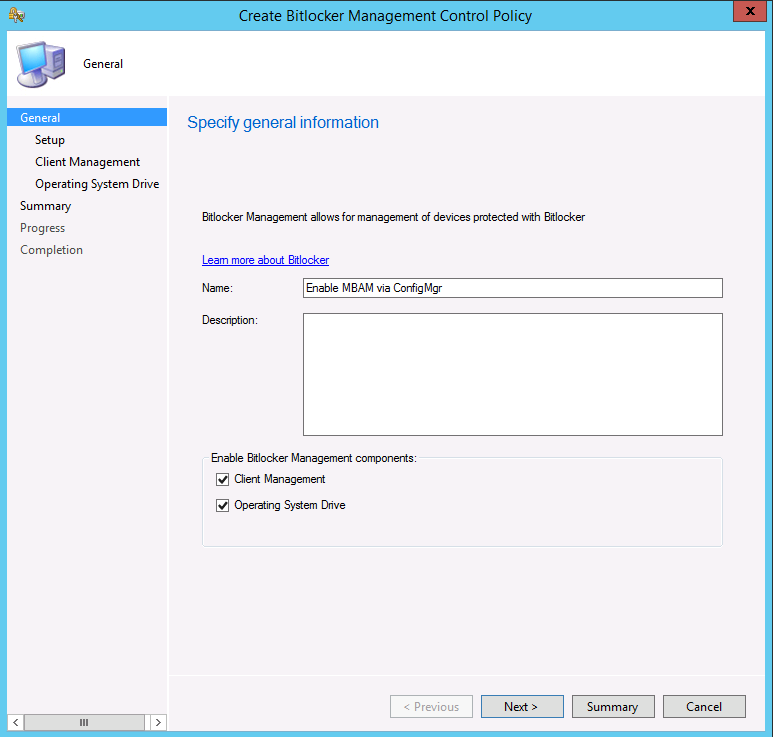
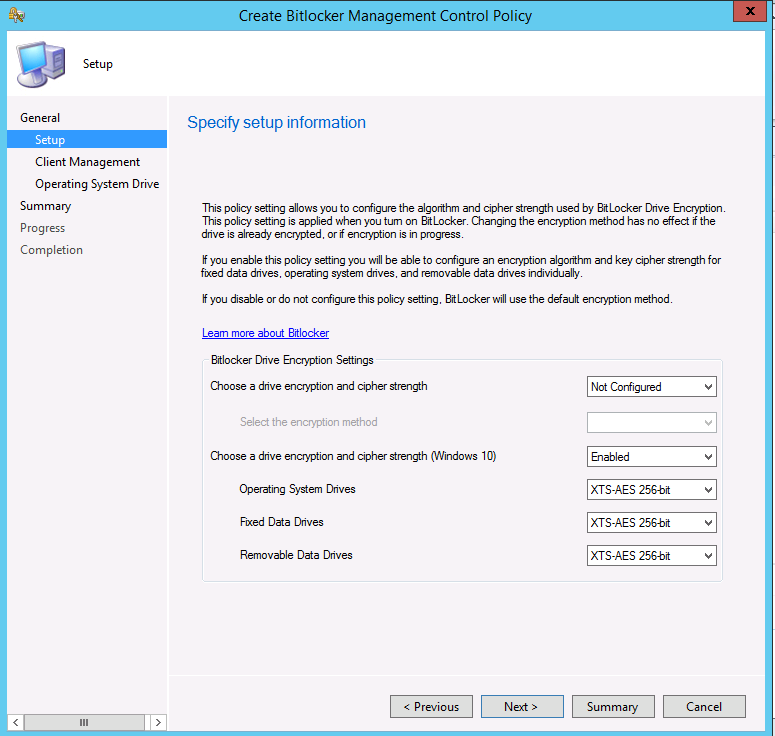
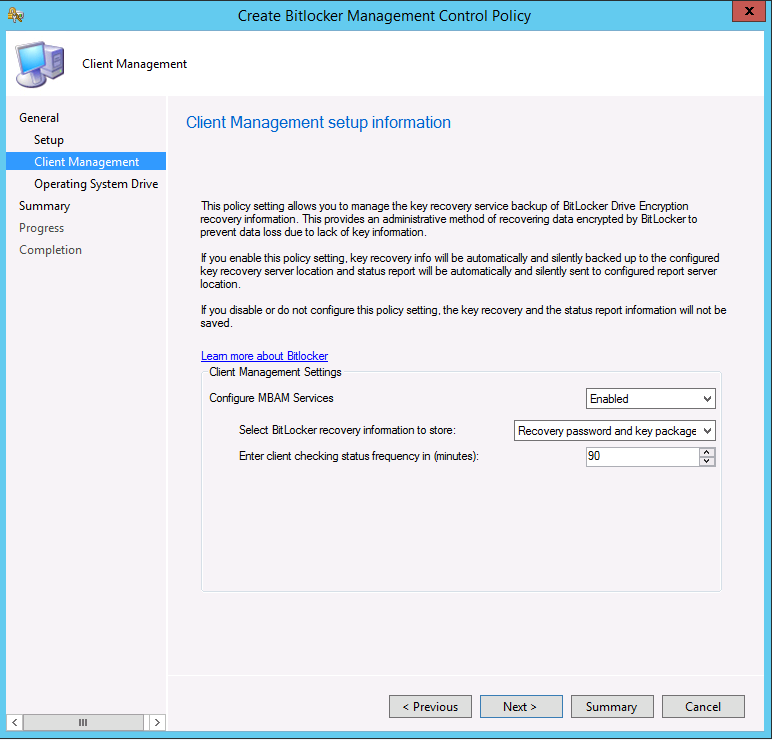
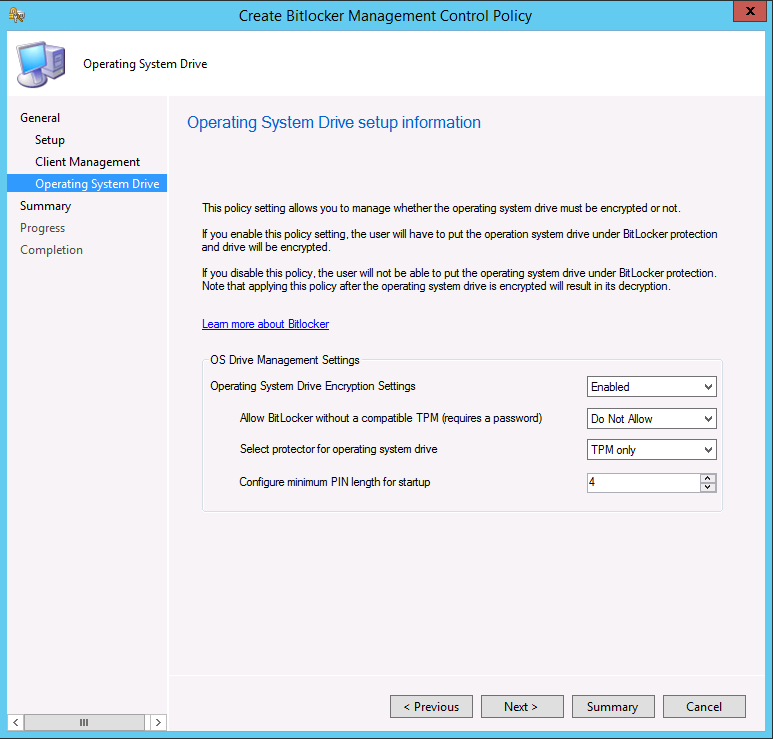
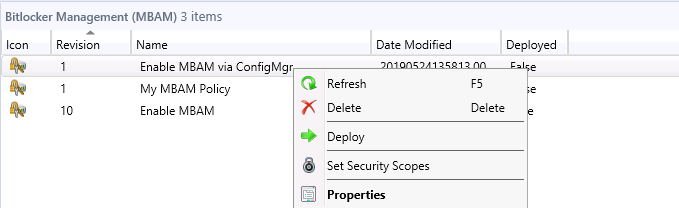
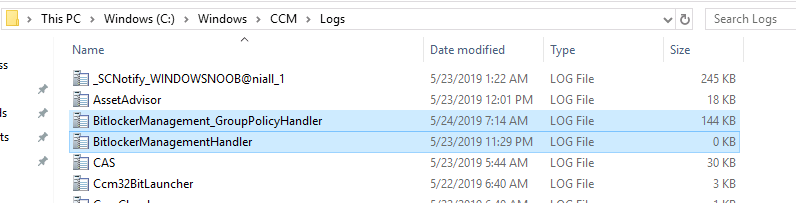
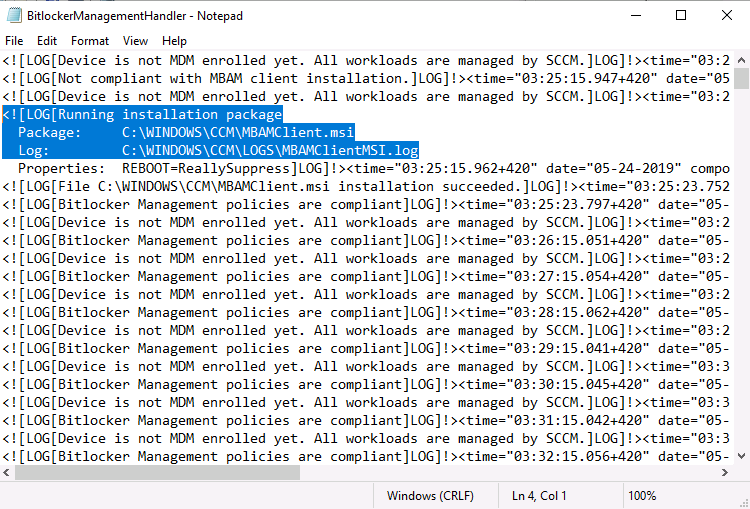
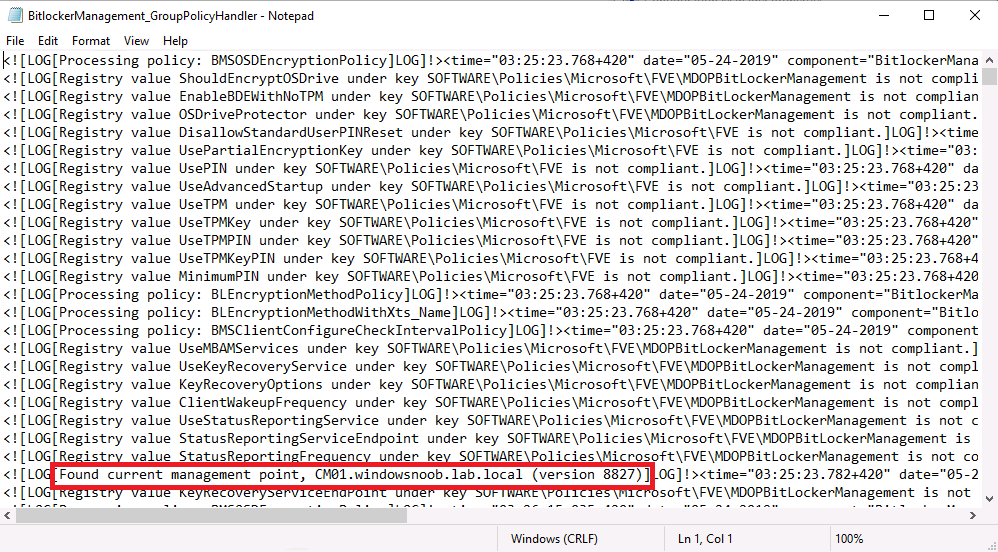
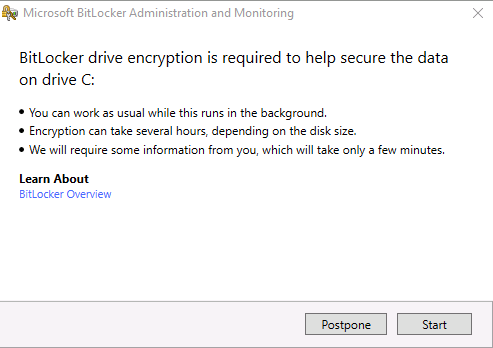
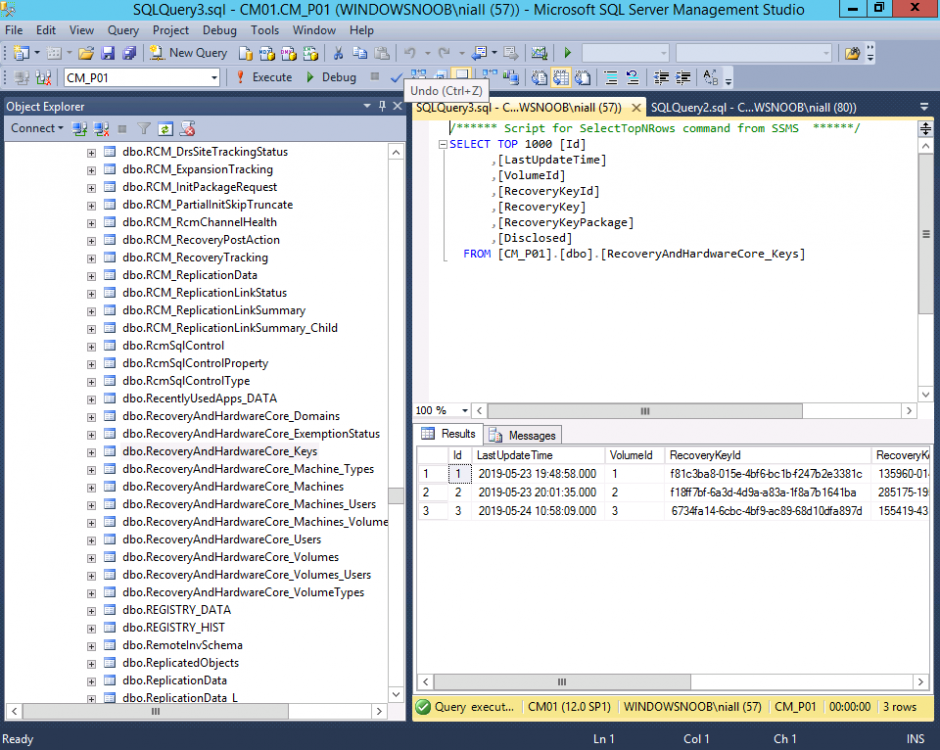
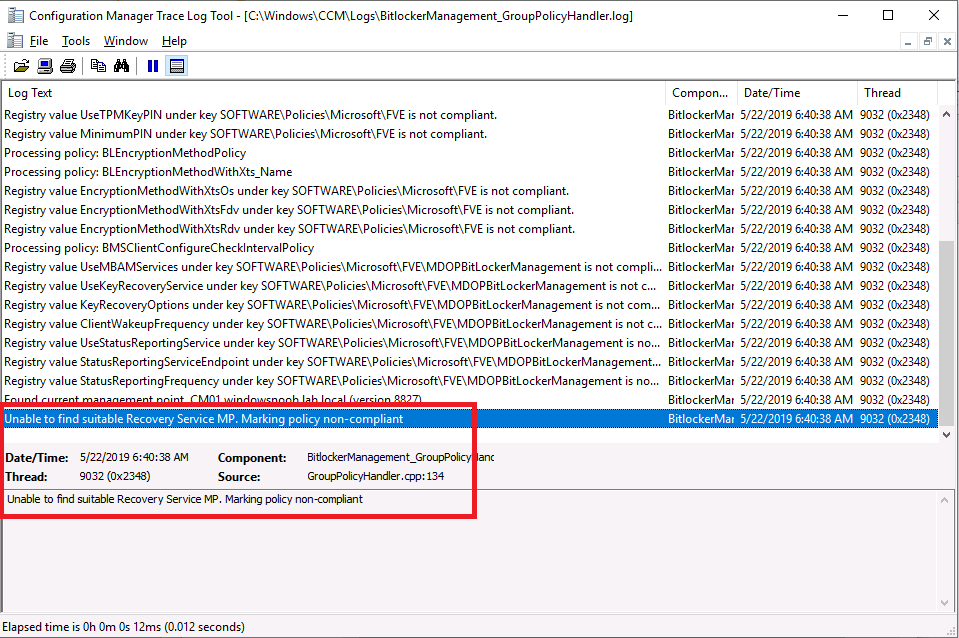
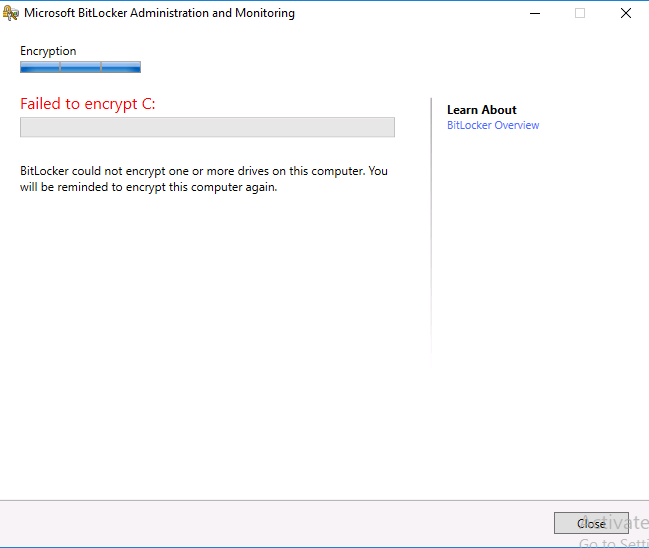
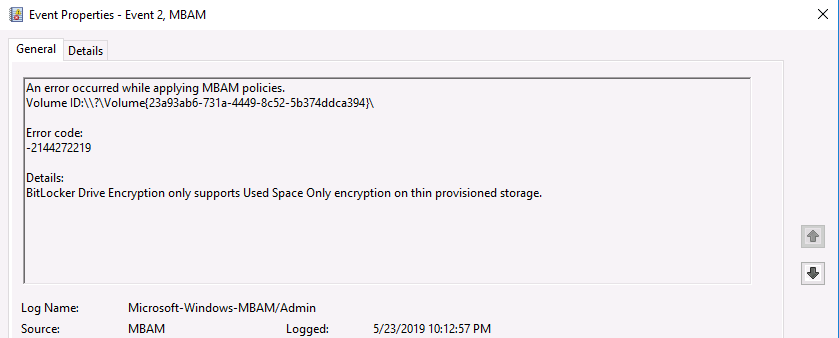
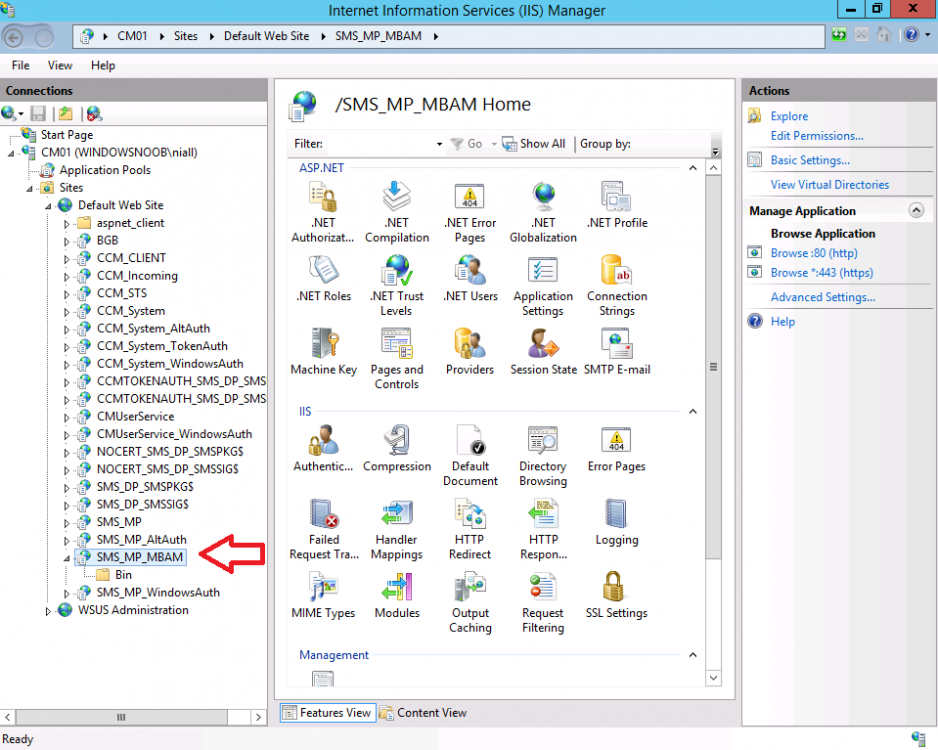
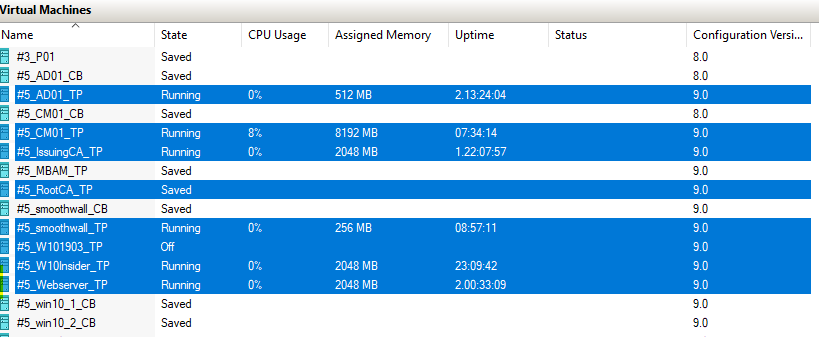
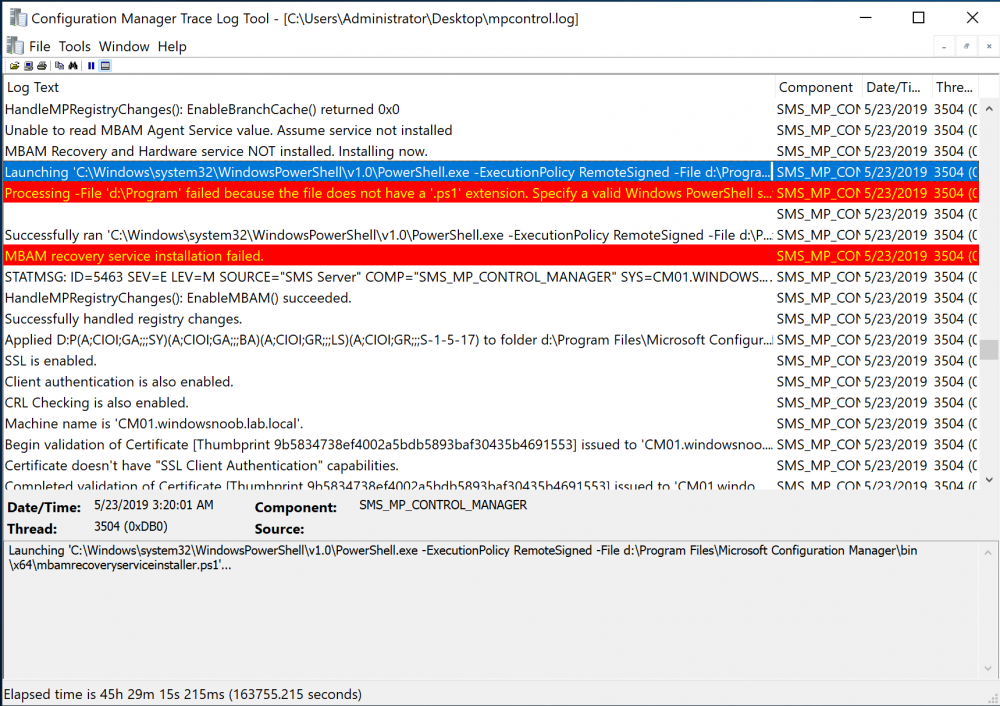
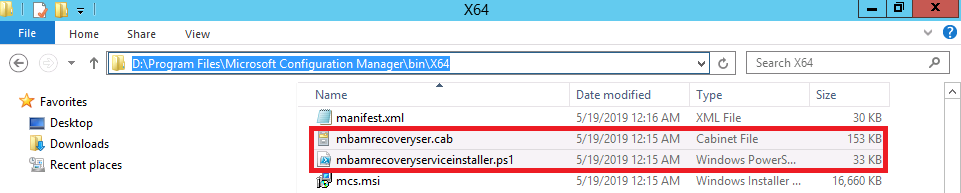
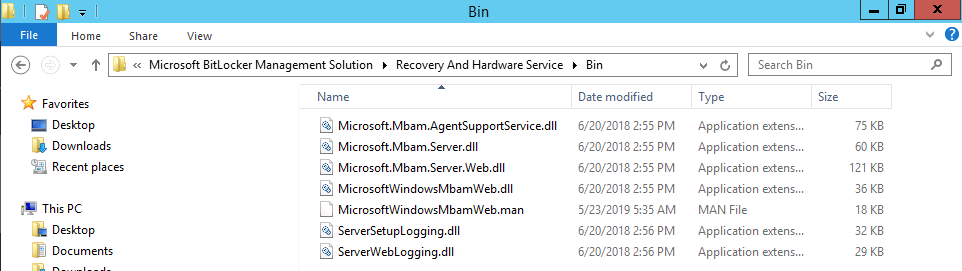
Update: December 2019. This guide was originally written when Microsoft were still developing Bitlocker Management integration. They have now released Microsoft Endpoint Manager Configuration Manager version 1910, with the Bitlocker Management feature integrated, I cover that in detail here. Videos BitLocker management – Part 1 Initial setup BitLocker management – Part 2 Deploy portals BitLocker management – Part 3 Customize portals BitLocker management – Part 4 Force encryption with no user action BitLocker management – Part 5 key rotation BitLocker management – Part 6 Force decryption with no user action BitLocker management – Part 7 Reporting and compliance BitLocker management – Part 8 Migration BitLocker management – Part 9 Group Policy settings BitLocker management – Part 10 Troubleshooting Microsoft released SCCM TP 1905 and it has to be one of their finest ConfigMgr releases yet, with so many new features it was hard to decide which would get my focus, but On-premises BitLocker Management was there so I focused on that. For those that don't know Microsoft BitLocker Administration and Monitoring (MBAM) is an ability to have a client agent (the MDOP MBAM agent) on your Windows devices (7,8 10) to enforce BitLocker encryption and to store the recovery keys in your database. This is something that has been around for quite some years now and is working great, however, MBAM is currently it's own separate solution. The following blog post from Microsoft details their future direction with regard to BitLocker Management and is a must read. https://techcommunity.microsoft.com/t5/Enterprise-Mobility-Security/Microsoft-expands-BitLocker-management-capabilities-for-the/ba-p/544329 In that blog post they detail 3 options for BitLocker management based on your needs, and I'm going to focus on the second option: Option 2 – On-premises BitLocker management using System Center Configuration Manager And I quote... This is the new capability we now see in TP1905, native BitLocker Management within SCCM. So let's get started. But first keep in mind that this is the first instance of this capability and it will no doubt get better and with more features based on customer demand and needs. Step 1. Enable PKI/HTTPS mode Update: Initially PKI/HTTPS was required (in TP1905) for BitLocker Management in SCCM, however from Technical version 1909 it was no longer required, and became optional (but recommended). But in CM1910 it was again, required. For more info see this blog post. I'm including the important note from that text below. In order to get MBAM functionality working with SCCM Technical Preview 1905, you need to be in HTTPS mode (Secure PKI) both on the client and in ConfigMgr itself. This is to ensure that back up encryption keys which protect the data on managed workstations are sent securely to the management point. Why is that ? well, data sent over HTTPS is secure, but data sent over HTTP can be sniffed and read, and therefore be compromised. Converting to HTTPS (PKI) is no easy task, I won't go into details but I did as follows: converted my lab from HTTP to HTTPS by first adding PKI to the lab by following this set of blog posts converted SCCM TP 1905 from HTTP to HTTPS by doing this. To add PKI and convert to HTTPS took me approx 4 hours in total but it was worth it. My Technical Preview lab is shown below, all the computers with _TP at the end are in the TP lab, and it's got a 2 tier PKI infrastructure also. This lab is one of many hosted on my Lenovo P1. Step 2. Create an MBAM Policy In the SCCM console, select Assets and Compliance, expand Endpoint Protection and select BitLocker Management (MBAM), right click and choose Create BitLocker Management Control Policy When the wizard appears, give the policy a name and select the two options if necessary On the next screen, you'll see two drop downs for enabling BitLocker Drive Encryption Settings, the first is for Windows 8, Windows 8.1 and the second is for Windows 10. On the next screen you have Client Management setup information settings, the client policy retrieval is set here, and the default period is every 90 minutes, in a lab you can bring that down to every minute but keep in mind that it will popup regularly until you are compliant. Note: If you enable Configure MBAM Services, key recovery info is automatically and silently backed up to the Configuration Manager site. On the OS Drive Management settings screen, configure it as appropriate for your environment. Continue through the wizard to completion. Step 3. Deploy the policy Right click on your newly created policy and deploy it to a collection containing your target computers. Step 4. Verify things on a client On a client computer, verify that it has received the policy, you'll know it has the policy when it generates two BitLocker related logs in the C:\Windows\CCM\Logs folder, shown below. The BitLockerManagementHandler.log will record installation of the MDOP MBAM client agent and the BitLockerManageMent_GroupPolicyHandler.log records details about communication with the SCCM Management Point to retrieve policy (which it then set's on the client) as a local group policy effectively. In Programs and Features you should see the client agent installed. And you can review the logs in Event Viewer in Applications and Services Logs, Microsoft, Windows, MBAM as shown below. Step 5. Review the MBAM Client agent prompting for encryption On a computer that has the policy you'll see the MBAM Client Agent popup (provided that you are NOT connected via RDP). Click Start to start the process, after a while you'll see the drive is getting encrypted ! Step 6. Getting keys from the Database The recovery keys are stored in the SCCM DataBase in the following location, dbo.RecoveryAndHardwareCore_Keys You can use SQL queries as i detail here to retrieve the data you need from there just as you do today with your existing MBAM infrastructure. I've checked Reports in TP1905 and didn't see any MBAM specific reports yet. Troubleshooting When testing in the TP1905 release make sure your client agent is using the TP1905 version, and that it's in PKI mode. You'll be alerted to this in the log file as shown below, note that it states Unable to find suitable Recovery Service MP. Converting your Management Point to HTTPS solves that error. Secondly, you may need to use real hardware to verify the encryption settings, results vary on virtual machines (at least they did for me in my TP1905 testing, in ConfigMgr 1910 where this was released, and with virtual machines using Windows 10 version 1809 or later, it works just fine !). Below is a typical error on a virtual machine after attempting to encrypt. The error will be visible in the event viewer. Details: BitLocker Drive Encryption only supports Used Space Only Encryption on thin provisioned storage. Note: If you see the error above, try using a Virtual machine running Windows 10 version 1809 or later. Verify that you have the sms_mp_mbam component installed in IIS If it's not there, review the MPControl.log to review why...below you can see why the MBAM installer initially failed on my lab, this was due to the PowerShell script that installs the service didn't check for spaces in the path. To resolve this I had to manually extract the files in the mbamrecoveryser.cab CAB file and keep running the mbamrecoveryserviceinstaller.ps1 PowerShell script until I got it to run without error. Once successful, it should be extracted to the SMS_CCM folder as shown below. With the following files present in the Bin folder... See it in action Please review my video below to see MBAM in action, both on the client and server side, great job from Microsoft ! Update: This guide was originally written when Microsoft were still developing this new MBAM integration. They have now released Microsoft Endpoint Manager Configuration Manager version 1910, with the MBAM feature integrated, I cover that in detail here (scroll down to the videos). Recommended reading https://docs.microsoft.com/en-us/sccm/core/get-started/2019/technical-preview-1905#bkmk_bitlocker https://techcommunity.microsoft.com/t5/Enterprise-Mobility-Security/Microsoft-expands-BitLocker-management-capabilities-for-the/ba-p/544329 https://docs.microsoft.com/en-us/windows/security/information-protection/bitlocker/bitlocker-management-for-enterprises Related reading https://docs.microsoft.com/en-us/microsoft-desktop-optimization-pack/mbam-v25/index


-
ok the reason the checkbox (and other tabs are missing) is because you have updated the ADK on your site and as a result, older versions of WinPE boot images look the way they do, to remedy you can use the method described at the bottom of this post (using wbemtest) https://www.niallbrady.com/2013/10/09/how-can-i-manually-add-winpe-5-boot-images-to-system-center-2012-configuration-manager-sp1-cu3/
-
hi Kevin, don't be sorry, i'm happy to see you using it, can you please attach your smsts*.logs for me, you can scrub data from them first if you want
-
Introduction I had the task to figure out how to install Windows 10 with a blocksize of 16k in order to align with the deduplication of data on a HPE 3PAR Thin Technologies when used with VMWare ESXi 6.5 Update 2. Note: You can use the info here to also modify Windows Server installs to avail of 64k blocksizes by adjusting the script. You can see some information about performance of VMWare virtual machines with different settings here. A quick look at the formatting steps in a default (or even an MDT based) task sequence did not offer any option for configuring block size. By default, Windows will be installed with a 4k block size, and you can determine the blocksize with the following PowerShell. Get-CimInstance -classname Win32_Volume | Select-Object Label, Blocksize | Format-Table -AutoSize You can clearly see the 4k blocksize (4096 bytes) listed below on a default Windows 10 installation. Step 1. Import the drivers into SCCM Note: This blogpost assumes you want to deploy Windows with custom blocksizes on ESXi 6.5 Update 2, if you are using different hardware, use the suppliers drivers as appropriate. After downloading, extracting the necessary drivers from here, create a driver package in SCCM and distribute it to your distribution points. Step 2. Add drivers to the boot image Next I needed to import storage and network drivers into my SCCM boot image namely VMXNET3 Ethernet Adapter PVSCSI Controller The other two Mouse vmware drivers are optional (but recommended). Note: I won’t go into detail about importing drivers into a boot image as that is not the focus of this blog post. You can obtain these drivers from the VMWare Tools iso on the ESXi or via here. Step 3. Edit a task sequence Edit an already created task sequence, locate the Initialization Group and add the following Group (before the Partition if necessary Group) called: Prepare variables for VMWare ParaVirtual On the Options tab of the new group, set it to run with the following Query. SELECT * FROM Win32_ComputerSystem WHERE model like "VMWare%" Create a new Set Task Sequence variable step where the variables name is OSDISK and the value is ? Create another Set Task Sequence Variable step where the variables name is BlockSize and the value is 16K In the Partition if necessary Group, create a new sub-group called Format custom BlockSize VMWare ParaVirtual On the Options tab of the new group, set it to run with the following Query. SELECT * FROM Win32_ComputerSystem WHERE model like "VMWare%" Next create a Run Command Line step called Create custom diskpart script and paste the following code into it, set the timeout to 1 minute. cmd.exe /c echo select disk 0 > x:\diskpart.txt & cmd.exe /c echo clean >> x:\diskpart.txt & cmd.exe /c echo convert gpt >> x:\diskpart.txt & cmd.exe /c echo create partition primary size=2048 >> x:\diskpart.txt & cmd.exe /c echo format quick fs=ntfs label="Windows RE Tools" >> x:\diskpart.txt & cmd.exe /c echo assign letter="T" >> x:\diskpart.txt & cmd.exe /c echo set id="de94bba4-06d1-4d40-a16a-bfd50179d6ac" >> x:\diskpart.txt & cmd.exe /c echo gpt attributes=0x8000000000000001 >> x:\diskpart.txt & cmd.exe /c echo create partition efi size=1024 >> x:\diskpart.txt & cmd.exe /c echo format quick fs=fat32 label="System" >> x:\diskpart.txt & cmd.exe /c echo assign letter="S" >> x:\diskpart.txt & cmd.exe /c echo create partition msr size=128 >> x:\diskpart.txt & cmd.exe /c echo create partition primary >> x:\diskpart.txt & cmd.exe /c echo format quick fs=ntfs label="OSDisk" unit=%BlockSize% >> x:\diskpart.txt & cmd.exe /c echo assign letter=%OSDISK% >> x:\diskpart.txt & cmd.exe /c echo list volume >> x:\diskpart.txt & cmd.exe /c echo exit >> x:\diskpart.txt This basically creates a txt file on x:\ called diskpart.txt which contains the info needed to format our chosen partition (in this case OSDISK) with a 16K BlockSize. You can modify the script as you wish to use say, a 64K size for Windows Server OS and change the desired partition structure. Next, create another Run Command Line step to do the following command cmd.exe /c diskpart /s x:\diskpart.txt Finally, add an if none of the conditions is true option on all the following Format groups (such as Script exists and non-NTFS partitions and Script does not exist or no partitions….) which is like so… and… Save the changes and close the task sequence editor. Step 4. PXE boot a VMWare Virtual machine running on your ESXi 6.5 host After PXE booting a VMWare virtual machine, select the task sequence above and verify that it creates the x:\diskpart.txt file as shown below. If you look at the highlighted line in the diskpart script, you can see unit=16K, which is the custom BlockSize variable defined earlier. Once the machine has finished deploying, you can verify the blocksize using the PowerShell commands at the start of this blogpost. Job done ! Note: If you find that your virtual machines are BSOD’ing during deployment with a Driver PNP Watchdog blue screen error, then power them off, and remove any snapshots. This appears to be a known bug with VMWare ParaVirtual and Windows 10.
-
WannaCry was a disaster that could have been prevented if people took notice. If you didn’t hear about it you must have been asleep, here is a refresher. After WannaCry, most businesses took notice and updated their operating systems, patched them and took measures to avoid a further outbreak. But today, May 14th, 2019, Microsoft has released information that warns of yet another WannaCry-like worm. Note: If you are using Windows 10, you are OK, you are not vulnerable to this CVE. If not, and if you are still on Windows 7 then start upgrading to Windows 10 by using the Inplace Upgrade Task Sequence I explain about here or if you cannot upgrade immediately, then patch Windows 7 to protect it from this vulnerability. Vulnerable in-support systems include Windows 7, Windows Server 2008 R2, and Windows Server 2008. Downloads for in-support versions of Windows can be found in the Microsoft Security Update Guide. Customers who use an in-support version of Windows and have automatic updates enabled are automatically protected. Out-of-support systems include Windows 2003 and Windows XP. If you are on an out-of-support version, the best way to address this vulnerability is to upgrade to the latest version of Windows. Even so, we are making fixes available for these out-of-support versions of Windows in KB4500705. If however you are running Windows XP, yes…. that old unsupported operating system then take warning ! Today, Microsoft has warned against the wormable capabilities from this CVE (critical Remote Code Execution vulnerability) and they blogged about what to do to avoid it happening to you. Read that blog post here: https://blogs.technet.microsoft.com/msrc/2019/05/14/prevent-a-worm-by-updating-remote-desktop-services-cve-2019-0708/ It’s very clear from their text that this is all about protecting customers from the next worm, so pay attention and if you have old operating systems that are in support and affected, then update immediately. Note: This is so serious that even Windows XP and Windows Server 2003 are getting updates from Microsoft for this vulnerability. You can download those updates from Microsoft Catalog here. https://support.microsoft.com/en-ca/help/4500705/customer-guidance-for-cve-2019-0708
-
Altaro launches new solution incorporating secure storage and centralized backup management: Altaro Office 365 Backup Altaro Office 365 Backup enables customers to back up and restore all their company's Office 365 mailboxes on an annual subscription. It automatically backs up Office 365 mailboxes to a secure cloud backup location on Altaro's Microsoft Azure infrastructure and enables users to centrally manage and monitor their backups through a cloud-based management console. Altaro successfully entered the Office 365 backup market a few months ago with its solution that enables managed service providers (MSPs) to provide their customers with Office 365 backup, recovery and mailbox backup storage services. The channel-focused company is now also extending this offering for use by businesses and organizations who do not wish to subscribe to an MSP model, and to the IT consultants and resellers that service them. A central component of data protection strategies As part of their data protection strategy, it is crucial that businesses back up their Office 365 mailboxes: Microsoft does not back up Office 365 subscriber data, so companies risk losing critical data due to malicious or accidental incidents, such as mailbox deletion and malware attacks. Altaro's latest solution meets this need by providing customers with reliable and constant backup and recovery services for Office 365 mailboxes – emails, attachments, contacts and calendars – coupled with automatic storage to Altaro's Azure infrastructure. Convenient, fuss-free Office 365 backup and recovery For one all-inclusive annual or multi-year fee, Altaro Office 365 Backup customers receive backup and recovery services, backup storage services, access to the cloud console for centralized backups management, and outstanding 24/7 support from a team of experts. This means customers can avoid the headache and expense of setting up local storage infrastructure or software to save backups to. Additionally, thanks to the product automatically backing up the mailboxes several times per day, customers can literally set it and forget it. Combating Office 365 data loss risks "Many Office 365 subscribers wrongly assume that their data is backed up as part of the Microsoft package – but this is not the case, as Office 365 was not intended to be a data protection tool. This means several organizations out there are currently vulnerable to data loss risks," said David Vella, Altaro CEO. "This is where Altaro Office 365 Backup comes in, providing robust backup, recovery, and backup storage and management services that customers can rely on," he explained. "We've built on our backup expertise and proven track record in the industry to help set Office 365 subscribers' minds at rest." Free trial Resellers, consultants and organizations wishing to try the solution can do so for free and with no commitment for 30 days, by registering here.

-
how can we suggest if it's a right design without knowing more about what you intend to do with this SCCM setup, how many clients will it manage, what type of clients, what locations, what operating systems...
-
hi Dave_23, thanks ! it works fine, you must be a logged on user of windows-noob.com to download the scripts, please try again.
-
what version of SCCM, what version of MDT ? if you look at the boot image properties, is the option still checked ? have you tried redistributing the boot image to the dp's after the change also, are you 100% sure that this boot image is the one you were working on, you should see the package id when booting...
-
have you looked at your client agent settings ? i would imagine that any setting configured in there is what makes the registry keys get set, perhaps you have some settings being applied which are not correct for these clients
-
Drivers
anyweb replied to sysadmin101's topic in System Center Configuration Manager (Current Branch)
it should only apply drivers from the package that windows deems necessary based on hardware found, you can verify this in the dism logs generated during windows setup -
great to hear it !
-
check this out https://social.technet.microsoft.com/wiki/contents/articles/3081.ad-cs-error-the-directory-name-is-invalid-0x8007010b-win32http-267.aspx
-
also, can you guys post screenshots of your issue(s) so we can try and figure out what the issue really is
-
odd, i've just checked my current PKI lab and although my certs were expired (it's a lab and was shut down since march), using certutil -crl on the IssuingCA republished my certs and all is ok now. I've tested the PKI lab guides 3 separate times (I built 3 completely unique labs based on my own guides, eg: Lab #9, Lab #10, Lab #11) and all suceeded 100% as you can see below in my #11 lab... I would suggest you guys try again and verify each and every step as you go, also, take checkpoints (snapshots) between each part so that you can always go back if you make a mistake, lastly, the pki.windows-noob.com webserver URL, will of course be your 'own' url, and it must be reachable by the issuing CA and others or pkiview.msc will list a bunch of errors/failures. Troubleshooting Tip: in PKIview.msc, highlight an entry and click on the Refresh button in the ribbon, it should re-verify the highlighted item.

-
they do but you still need to know if it's win7 or win10.... if you get time over teamviewer later i'd like to spend ten minutes with this to have a look