anyweb
-
Posts
9271 -
Joined
-
Last visited
-
Days Won
371
Everything posted by anyweb
-
 what version of sccm is it ?
 -
the only issue with technical preview is you can only manage 10 clients with it and it expires quickly, plus as it's changing quickly you'll need to update monthly. Unless you really want to experiment with new features that are only available in Technical Preview iId recommend you try the current branch releases (even in your lab). Here are a few guides to get you started with 1802 (the current baseline release). How can I install System Center Configuration Manager (Current Branch) version 1802 on Windows Server 2016 with SQL Server 2017 – Part 1 How can I install System Center Configuration Manager (Current Branch) version 1802 on Windows Server 2016 with SQL Server 2017 – Part 2 How can I install System Center Configuration Manager (Current Branch) version 1802 on Windows Server 2016 with SQL Server 2017 – Part 3 How can I install System Center Configuration Manager (Current Branch) version 1802 on Windows Server 2016 with SQL Server 2017 – Part 4 as regards your boundary, set it to whatever your ip address range(s) are within the lab, as I describe here
-
so you installed a CAS and a Primary in your lab using the Technical Preview ? why ? I would just install a single primary and that would be more than enough for a lab unless you specifically need to understand how CAS/PRI works... can you tell me what your aim is exactly (in your lab) and why you want to use Technical Preview over Current Branch cheers niall
-
well can you tell me if you've satisfied the other requirement, " has VC++ Redistributable " when you run it now are you getting the same error or a new one, ? are you running it on the site server or are you running it remotely on another computer ? more details about what you are doing/have tried will help with the troubleshooting
-
"The machine where the tool runs must be a x64 bit system and has VC++ Redistributable. Please refer to the tool's documentation for more details on prerequisites." is it?
-
Those of you that were interested in Microsoft Ignite in Florida recently, would have probably noticed me tweeting ecstatically that I was delighted about receiving a Lenovo P1 from @Joe Parker (Principal Engineer, Manager at Lenovo). This was the culmination of conversations held via twitter and email between myself and Joe, which basically started out from a need to replace my Hyper-v Lab. A month has come and gone and I’ve been busy working, and when I have time, getting my data migrated over from the old lab to the new, and now it’s pretty much done. A quick look at my previous lab But first, a bit of a background, my previous Hyper-v lab was an aging Intel i7 with 16GB of ram but with a whopping 5 TB of SSD storage (1 x 1TB and 1 x 4TB). That computer was my home lab machine for many years and it’s safe to say that pretty much the last 5 years of guides on windows-noob and niallbrady were done via virtual machines hosted on that computer. It did a great job but it lacked the power, speed and expand-ability that I needed for now and the future. It’s age was showing daily. Even exporting or importing virtual machines to external discs was slow, very slow, not to mention how little 16GB of ram feels in today’s lab environments. Not enough memory When starting labs such as my 8 part PKI lab mini series, I’d frequently get errors like this and that was after configuring those virtual machines to run on the bare minimum of ram:- Clearly, I had to do something as the computer was old and I needed something fast, and better able to handle newer operating systems and memory demands that those virtual machines in Hyper-v demanded. I knew I needed a Workstation, and as I often demo labs to others, I wanted it to be mobile. Joe @ Lenovo I reached out to Joe as I knew he was a friend of the community and Lenovo was producing some amazing new products of which they were rightly proud. I was no stranger to Lenovo having used them for years at home and in work so I knew they were reliable and good quality. Joe offered to help and I was more than happy to accept his help. Unboxing I received the new mobile workstation @ Microsoft Ignite and was straight away impressed with the package, it was delivered in a lovely ThinkPad box. Inside the box was dare I say it, a beautiful Lenovo P1 (brief specs below), for the full specs see this page. Intel® Xeon® E-2176M 6 Core Processor with vPro™ NVIDIA® Quadro® P2000 4 GB 32 GB DDR4 2666 MHz ECC (Xeon only) 2 TB PCIe SSD (Raid 0) 15.6″ 4K UHD (3840 x 2160) IPS multi-touch, anti-reflective, anti-smudge, 400 nits, 100% Adobe color gamut, 10-bit color depth 2 x Intel® Thunderbolt 3 (Type-C) 2 x USB 3.1 Gen 1 (Type A) Windows 10 Pro for Workstations One thing to note is it has 32GB of RAM, but it’s ECC ram (error correction) and this is the only option currently with the Xeon processor, if you want 64GB of ram, go for the i7 bundle instead. I think you can even put 64GB of non-ECC ram in the Xeon box but I havn’t tested it. I unboxed the P1 and was straight away impressed, it feels smooth to the touch and exudes great build quality and attention to detail. And it looks gorgeous. I mean, look at it ! Using the P1 When you start the P1, it’s hard to believe how fast it boots up, those NVMe discs are just so fast in a Raid 0 configuration (2 x 1TB in Raid 0) that Windows hello logs you in jiffy and you can start working right away. The first thing you’ll notice (apart from the speed) is the brilliantly bright and vibrant color screen, it’s 4K capable and touch enabled. The colors just jump out at you. The screen is really crystal clear and I can’t fault it other than you might see some hints of light on very dark screen’s around the edges when the brightness is turned up full, but that could be because my unit is an Evaluation Unit (pre production). I enabled the hyper-v feature on the P1 and started copying over some of my labs. Starting my labs is now both quick and easy, and I can start more than before, easily double with the 32GB of ram. But my goal is to utilize more ram per virtual machine as previously they were struggling with bare minimum amounts of ram. I did a non-scientific test, starting the very same 6 vm’s on my old versus new hyper-v host machine, here are the average results, where hyperv-7 is my old lab and hyperv-8 is the new lab. hyperv-7 19.70 seconds hyperv-8 9.50 seconds That’s quite an improvement ! When you think of a mobile workstation, most of you (including me) are all too familiar with big, chunky, heavy lumps of things that might have the power, but are so heavy and ugly that giving them a mobile description, is a stretch. Not so with the P1, you can pick it up with one hand easily, it’s very slim and light so it’s easy to carry around from one meeting to the next. Plus, this laptop looks great, so you won’t be embarrassed with it either, on the contrary it will be the opposite ! Trust me, this is probably the nicest, lightest mobile workstation you’ll ever pick up. It’s also well specked with Thunderbolt 3 (type C, 2 ports) so my plan is to buy an adaptor for my 4 TB SSD and connect it directly via Thunderbolt 3, that’ll give me 6TB of storage for my new lab. BenchMarks The NVIDIA Quadro P4000 Max-Q video card is ISV certified, meaning it’s designed for professional work and you can utilize the Nvidia control panel to select and customize your individual preferences. “The Quadro GPUs offer certified drivers, which are optimized for stability and performance in professional applications (CAD, DCC, medical, prospection, and visualizing applications). The performance in these areas is therefore much better compared to corresponding consumer GPUs.” To get detailed benchmarks for this video card please see the following site. I’ll come back in a few months to report on how my lab is working out on the Lenovo P1, but until then, thank you for reading and many many thanks to Joe and all the other great people @ Lenovo for making my dream come true ! Recommended reading https://www.lenovo.com/us/en/laptops/thinkpad/thinkpad-p/ThinkPad-P1/p/22WS2WPP101 https://www.notebookcheck.net/NVIDIA-Quadro-P4000-Max-Q-GPU-Benchmarks-and-Specs.239406.0.html https://ssd.userbenchmark.com/SpeedTest/413203/PM981-NVMe-Samsung-1024GB https://en.wikipedia.org/wiki/Standard_RAID_levels#RAID_0
-
<![LOG[The action (Partition Disk 0 - UEFI) has been skipped because the condition is evaluated to be false]LOG]!><time="14:50:41.848+480" date="11-02-2018" component="TSManager" context="" type="1" thread="1420" file="instruction.cxx:688"> so check your options on that step. specifically this,.., Expand a string: _SMSTSMediaType]LOG]!><time="14:50:41.848+480" date="11-02-2018" component="TSManager" context="" type="0" thread="1420" file="utility.cpp:805"> <![LOG[Expand a string: OEMMedia]
-
first question, why use Windows 7 it's EOL 2020, i'd recommend Windows 10 instead for a client based distribution point, secondly, you can enable branchcache but you will be limited to the number of concurrent connections per box as it's a client os and not a server os
-
did you confirm that the partition step is actually taking place and succeeding, can you attach your smsts.log ?
-
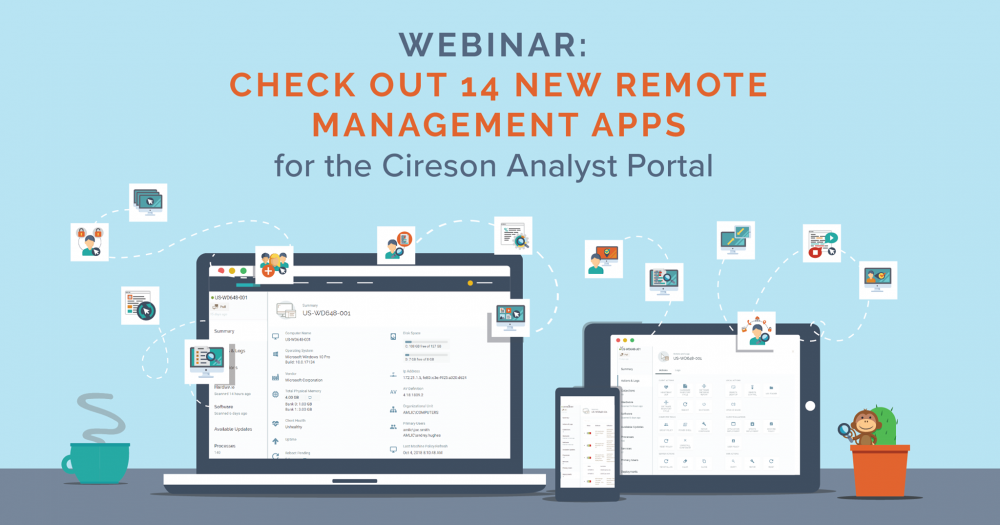
This week Cireson is launching 14 new Remote Management apps for the Cireson Analyst Portal for Microsoft Service Manager. They’re live on our website here: https://cireson.com/service-management/#remote_management They are offering a two-part webinar (in 3 regions) in November about these apps including deep dive demos. Registration is here: http://go2.cireson.com/af2?LinkID=CH00096971eR00000253AD Here’s a brochure with more information. sign up !
-
well that's why, once you've upgraded to one of the latest releases you'll see the easysetupfolder reduce to about 1.3GB or so
-
this is more than likely because you are using an earlier release of SCCM Current Branch, once you've upgraded to 1702 or later I believe that problem will be resolved. What version are you using ?
-
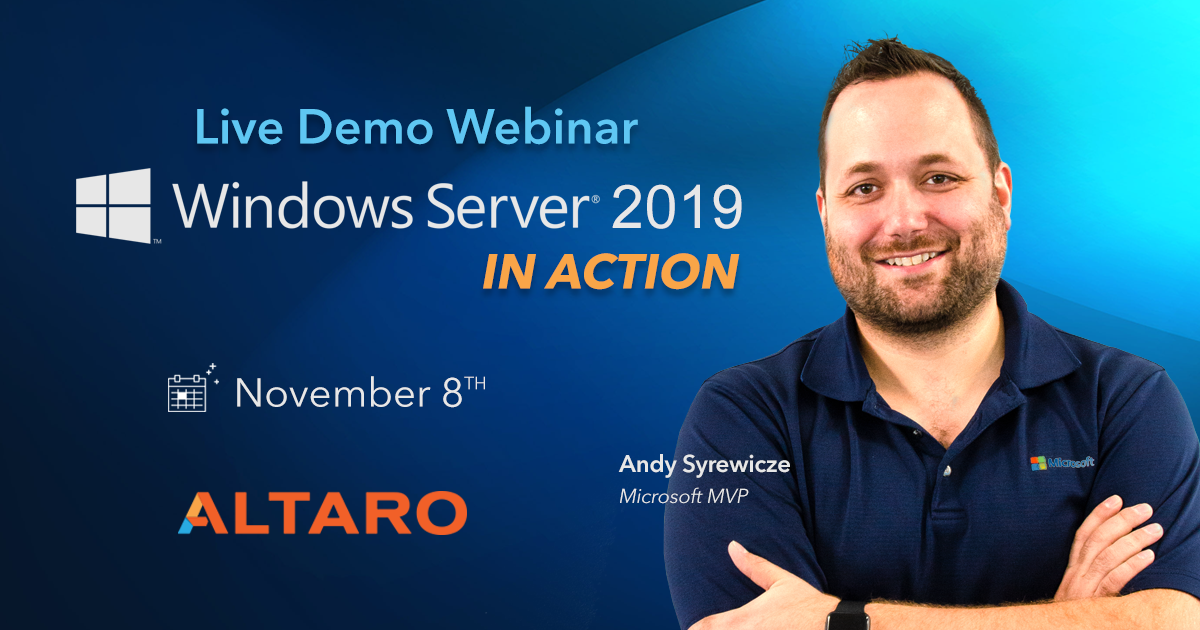
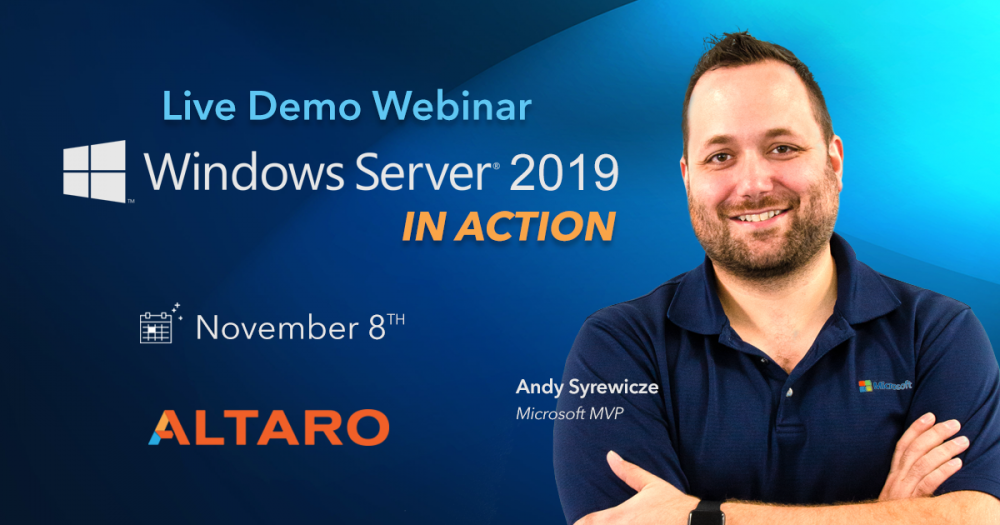
So you’ve heard all about Windows Server 2019 - now you can see it in action in a live demo webinar on November 8th! The last WS2019 webinar by Altaro was hugely popular with over 4,500 IT pros registering for the event. Feedback gathered from that webinar and the most popular features will now be discussed and tested live by Microsoft MVP Andy Syrewicze. And you’re invited! This deep-dive webinar will focus on: Windows Admin Center Containers on Windows Server Storage Migration Service Windows Subsystem for Linux And more! Demo webinars are a really great way to see a product in action before you decide to take the plunge yourself. It enables you to see the strengths and weaknesses first-hand and also ask questions that might relate specifically to your own environment. With the demand so high, the webinar is presented live twice on November 8th to help as many people benefit as possible. The first session is at 2pm CET/8am EST/5am PST and the second is at 7pm CET/1pm EST/10am PST. With the record number of attendees for the last webinar, some people were unable to attend the sessions which were maxed out. It is advised you save your seat early for this webinar to keep informed and ensure you don’t miss the live event. Save your seat: https://goo.gl/CgCSso
-
are you getting errors in dmpdownloader.log or cmupdate.log, can you attach the log file with the errors please....
-
enable cmd support in the boot image, then pxe boot and press f8 in the boot image before it reboots, open x:\windows\temp\smstslog\smsts.log what does it tell you ?
-
did you modify my powershell script in any way ? if not, can you show the set * variable steps ?
-
hi there i'd say start your investigation by reading through this topic, you can ignore the 'remote connection' part of it and focus on the WorkGroup bits..
-
can you include your smsts.log file so that we can see why it's failing, also what version of sccm is this and what version of the Windows ADK are you using
-
Introduction Microsoft Ignite 2018 (in Florida) has just come and gone but there’s still 644GB of sessions to get through, and all of them are online and available for you to review (or download). Ignite is an awesome experience but not everyone can attend, even if you could attend there’s no way you could see all the sessions you wanted to see, however now you can. In this blog post I’m going to add my notes about a session called “Learn how to leverage Intune support for Microsoft Graph and PowerShell to enable powerful automation and IT security” by these two clever guys. David Falkus, Rohit Ramu I do this because it’s great blogging and learning material and because it means that I can dissect these sessions in fine detail to see exactly what they were talking about and to expand upon it including code samples and links which you don’t get by simply clicking on a video. You can review it yourself here (20 minutes to watch): https://myignite.techcommunity.microsoft.com/sessions/64603 The session starts with a quick intro from David and Rohit before acknowledging that Rohit wrote the PowerShell modules for Intune. Good job Rohit ! (p.s. he’s also good at Music and is on soundcloud). Next, David points out that Intune totally rebuilt itself in 2017 when they decided to use Microsoft Graph API as the API of choice for use with the UI and to use Automation and Services to interact with Intune. Microsoft released GitHub PowerShell samples in 2017 (which I blogged about here). https://microsoftintune.uservoice.com/forums/291681-ideas/suggestions/8363319-add-powershell-support-to-manage-the-service As a direct result of that feedback, Microsoft is announcing the PowerShell Intune SDK module As a direct result of that feedback, Microsoft is announcing the PowerShell Intune SDK module But, it’s in preview mode right now, that said, you can download this PowerShell preview module from GitHub at https://aka.ms/intunepowershell This PowerShell preview module supports the following: The granular level of control with Microsoft Graph, also comes with complexity so Microsoft have also provided a user interface by way of the Azure Portal. The user interface (UI) abstracts away some of that complexity and makes it easier to get things done. The Intune PowerShell SDK has a 1:1 mapping between Graph and the SDK so whatever you can do in Graph, you can also do in the SDK but this comes with the same complexities that come in the Graph API, so to assist with that they will release modules (Scenario Modules). Rohit demos some of this in the session (and they want feedback on this, so if you have any suggestion or feedback, please provide it either to them directly or send it to me and i’ll pass it on). To begin with, browse to https://aka.ms/intunepowershell and scroll down to learn how to login, use the commands and so on. The scenarios mentioned by Rohit are found here –https://github.com/Microsoft/Intune-PowerShell-Management o get the modules, scroll up to the top and click on the Releases tab (in GitHub). In the releases, click on the link the ZIP file, download it and extract it, there are two folders, one for cross-platform (netstandard2.0) and the other for Windows only (to popup forms etc). In the net471 folder you’ve a bunch of files and the psd1 file is the most important, it’s the module manifest (it actually does stuff) and that’s the one you need to import to do things. Importing a PowerShell module To import this module you need to first open a PowerShell (or cmd prompt) using Administrative permissions. Next, browse to the folder where you extracted the Microsoft.Graph.Intune.psd1 file and then issue the following command in an administrative PowerShell cmd prompt. Import-module Microsoft.Graph.Intune.psd1 If you didn’t open a cmd/PowerShell prompt as an Administrator you’ll see the following error: Import-Module : The specified module ‘Microsoft.Graph.Intune.psd1’ was not loaded because no valid module file was found in any module directory. At line:1 char:1 + Import-Module Microsoft.Graph.Intune.psd1 if you then try to import the module and get the following error: Import-Module : Could not load file or assembly ‘file:///C:\Users\niall\Desktop\Intune-PowerShell-SDK-Release-6.1811.00642-preview\Release\net471\Microsoft.Intune.PowerShellGraphSDK.dll’ or one of its dependencies. Operation is not supported. (Exception from HRESULT: 0x80131515) At line:1 char:1 + Import-Module .\Microsoft.Graph.Intune.psd1 + ~~~~~~~~~~~~~~~~~~~~~~~~~~~~~~~~~~~~~~~~~~~ + CategoryInfo : NotSpecified: (:) [Import-Module], FileLoadException + FullyQualifiedErrorId : System.IO.FileLoadException,Microsoft.PowerShell.Commands.ImportModuleCommand to resolve this, you need to unblock the files, you can use the following PowerShell to do so, use the following command while you are in the folder containing the files you just downloaded. gci . | Unblock-File after which you can import the module without errors. After importing the module you want to log in to Graph. To do that, use the following PowerShell command: connect-msgraph This will popup a login prompt, enter your Microsoft Intune credentials Once done you are connected to your tenant. To see how many cmdlets are available in the SDK try the following PowerShell cmd: get-command -module Microsoft.Graph.Intune | measure which output’s something like this: PS C:\Users\niall\Desktop\Intune-PowerShell-SDK-Release-6.1811.00642-preview\Release\net471> get-command -module Microsoft.Graph.Intune | measure Count : 1287 .. So each of these 1287 cmdlets equates to an operation in Microsoft Graph. Amazing. These cmdlets were generated using the Graph MetaData and these are based upon the Microsoft Graph documentation. Here is an example of that. Get mobileApp And the cmdlet is based upon the info in the HTTP Request for example… get-deviceAppManagement_mobileApps and that will return a long list of apps in your tenant You can then fine tune the results to for example, select Publisher and Displayname get-deviceAppManagement_mobileApps -select publisher , displayname To further filter, you could say filter where the publisher contains the word, Microsoft. get-deviceAppManagement_mobileApps -select publisher, displayname -filter “contains(Publisher, ‘Microsoft’)” Ok that’s cool, but to do really cool things try this code. $createdApps = ‘https://www.windows-noob.com’, ‘https://www.niallbrady.com’, ‘https://www.linux-noob.com’ ` | ForEach-Object { ` New-DeviceAppManagement_MobileApps ` -webApp ` -displayName $_ ` -publisher ‘Niall’ ` -appUrl $_ ` -useManagedBrowser $false ` } and here’s the output and here’s the result of that.. $createdApps and you can verify that in the Intune console After this point, Rohit demo’d auditing of paged events as only 1000 events can be paged via Graph at one time. This is shown below. $auditEvents = Invoke-MSGraphRequest -HttpMethod GET -Url ‘deviceManagement/auditEvents’ Note that this doesn’t work in production currently, only special Beta tenants. So I’ve nothing to show here.. check the video for more details. Next try to add an iOS LOB app using 2 commands (well… a wee bit more than that) with the following code… $appToUpload = New-MobileAppObject ` -iosLobapp ` -displayName “Niall’s cool App” ` -description ‘A cool iOS LOB app’ ` -publisher ‘Niall’ ` -bundleId ” ` -applicableDeviceType (New-IosDeviceTypeObject -iPad $true -iPhoneAndIPod $true) ` -minimumSupportedOperatingSystem (New-IosMinimumOperatingSystemObject -v9_0 $true) ` -filename ‘niallbrady.ipa’ ` -buildNumber ‘v1’ -versionNumber ‘v1’ -expirationDateTime ((Get-Date).AddDays(90)) Now, go back to the Intune PowerShell SDK GitHub page here and scroll down to the scenarios link..you get a link to this page – https://github.com/Microsoft/Intune-PowerShell-Management which contains links to more samples and modules. Don’t forget to unblock the module before importing otherwise it will fail…make sure it points to the Apps folder which contains the scripts gci “C:\Users\niall\Desktop\Intune-PowerShell-SDK-Release-6.1811.00642-preview\Scenario Modules\Apps” | Unblock-File and then import the module… import-module ‘C:\Users\niall\Desktop\Intune-PowerShell-SDK-Release-6.1811.00642-preview\Scenario Modules\apps\Microsoft.Graph.Intune.Apps.psd1‘ the use the following command to upload your iOS LOB app called niallbrady.ipa (can be a text file for the purpose of this demo) $uploadedAppFile = New-LobApp -filePath ‘niallbrady.ipa’ -mobileApp $appToUpload And the app will appear in the Intune portal Next let’s try and get all apps and then group those apps by app type. $apps = Get-DeviceAppManagement_MobileApps $appsGroupedByType = $apps | Group-Object -Property ‘@odata.type’ and when you use the $appsGroupedByType variable, you see a load of values including count, name, group… then add the following code… to create x and y values… [string[]]$xvals = $appsGroupedByType | ForEach-Object {$_.Name.Replace(‘#microsoft.graph.’, ”)} [int[]]$Yvals = $appsGroupedByType | ForEach-Object {$_.Count} and then you can visualize the data using another of the scenario module scripts (which is in the Samples sub folder, see my screenshot below the code) which uses WinForms. .\VisualizeData.ps1 ` -Title ‘Intune apps by type’ ` -ChartType ‘Pie’ ` -XLabel ‘App Type’ -YLabel ‘Number of apps…’ ` -xValues $xvals -YValues $YVals and if you change Pie to Bar in the code snippet, you can run it again and see this Pretty awesome stuff, well done Rohit and David ! Recommended reading https://blogs.technet.microsoft.com/intunesupport/2016/10/04/using-the-microsoft-graph-api-to-access-data-in-microsoft-intune/ https://www.microsoft.com/en-us/microsoft-365/blog/2018/06/12/how-we-built-rebuilt-intune-into-a-leading-globally-scaled-cloud-service/ Microsoft GitHub PowerShell samples for Intune https://aka.ms/intunepowershell https://github.com/Microsoft/Intune-PowerShell-Management https://developer.microsoft.com/en-us/graph/docs/api-reference/v1.0/api/intune_apps_mobileapp_get
-
How can I customize the start menu in Windows 10 using Intune
anyweb replied to anyweb's topic in Microsoft Intune
what version of windows 10 are you testing on, I can re-verify -
hi, it's not available yet, coming soon, be patient
-
How can I customize the start menu in Windows 10 using Intune
anyweb replied to anyweb's topic in Microsoft Intune
once office is installed those icons will show in the start screen without you needing to do anything, you just need to be patient, this is EXACTLY what it looks like if you keep the start screen open and wait for office to install, once it installs it auto-populates the start screen
-
there are two main options: change the deployment schedule, when you deploy it you create a schedule, by default in my blog post it runs every day at 11am, you can change that to run every 2 days or whatever schedule you want, does that help ? the other place is a timer is in the upgrade.hta, in that if the user ignores the popup (clever users...) then it will auto-timeout after 8 hours or so, and reduce the deferals by one, here's the section of code to edit, it's in milliseconds so 8 hours... https://duckduckgo.com/?q=28800000+milliseconds+to+hour&t=ffab&ia=answer ' is the user ignoring the HTA ? if so, let's exit 99 and remove one deferral after <scheduled time> ' Note: this value must be LESS than the schedule of your deployment ' Note: this value must be MORE than the HTA countdown (pbwaitTime) iTimerID = window.setInterval("UserIgnoringHTA", 28800000)
-
thanks for sharing that info Dietmar !
-
are you referring to the 4 hour countdown that occurs after you run out of deferrals ? or something else