anyweb
-
Posts
9270 -
Joined
-
Last visited
-
Days Won
371
Everything posted by anyweb
-
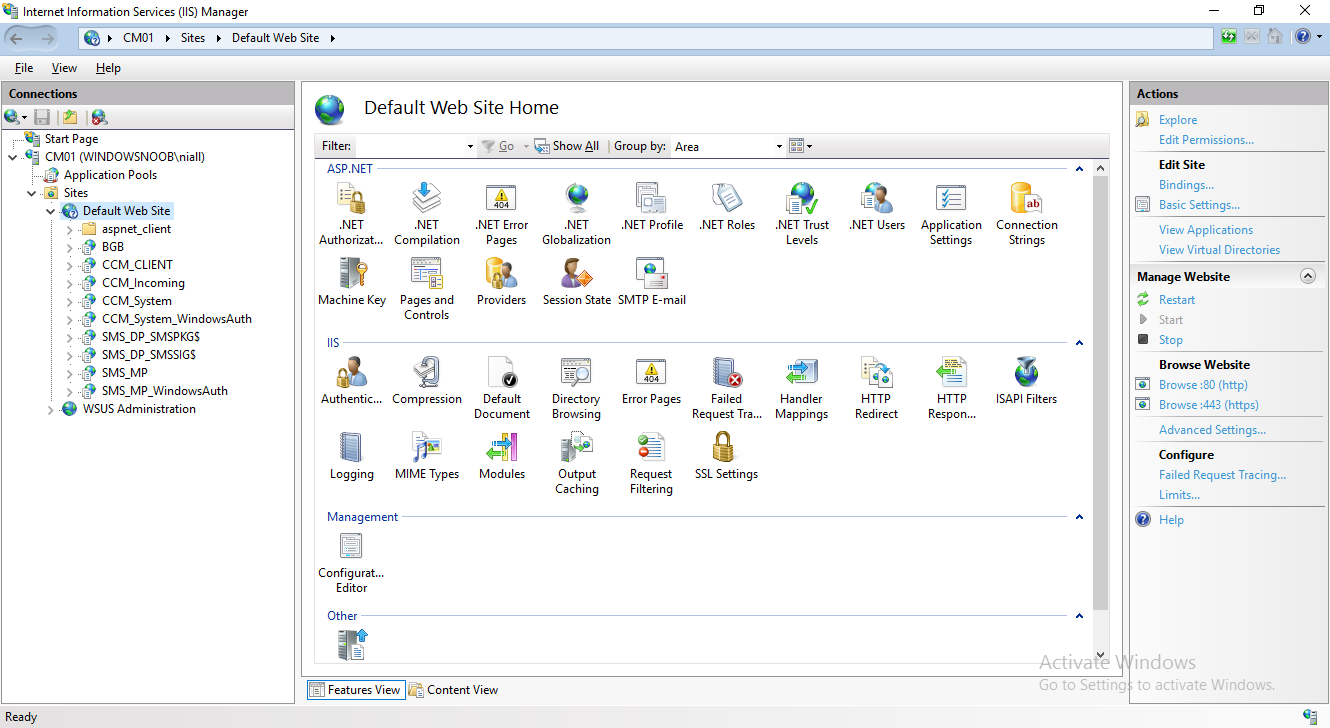
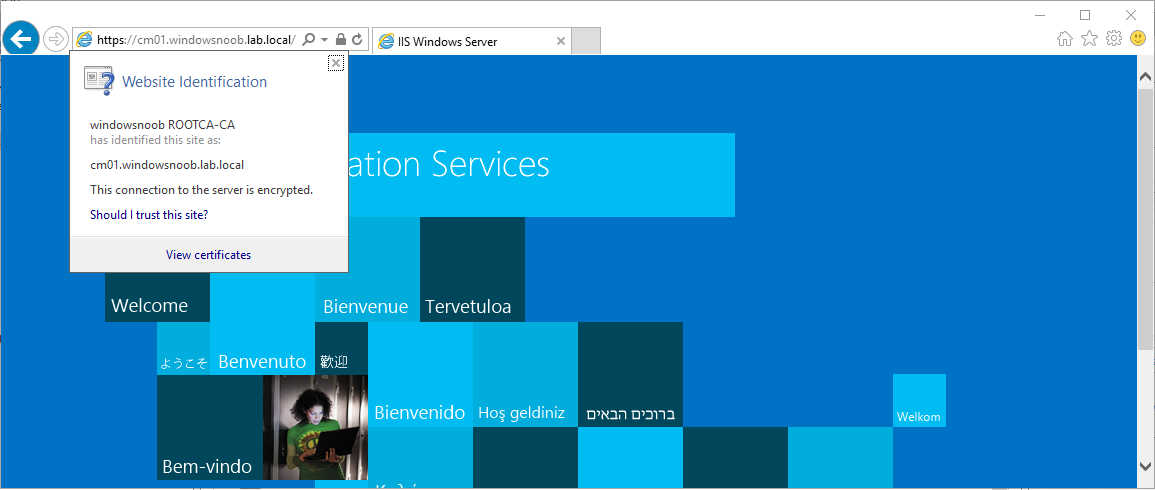
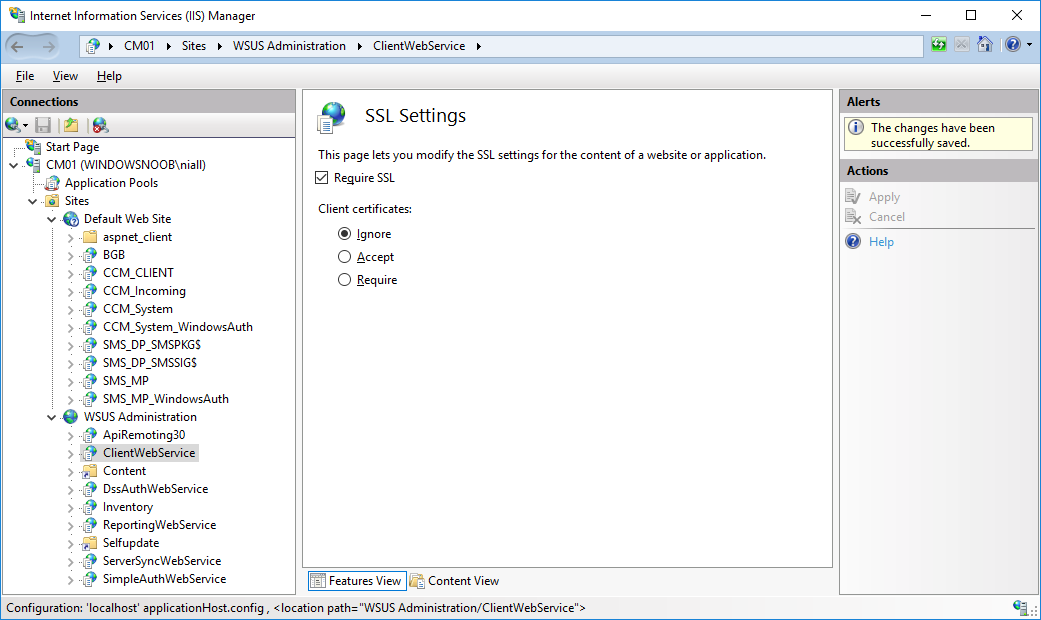
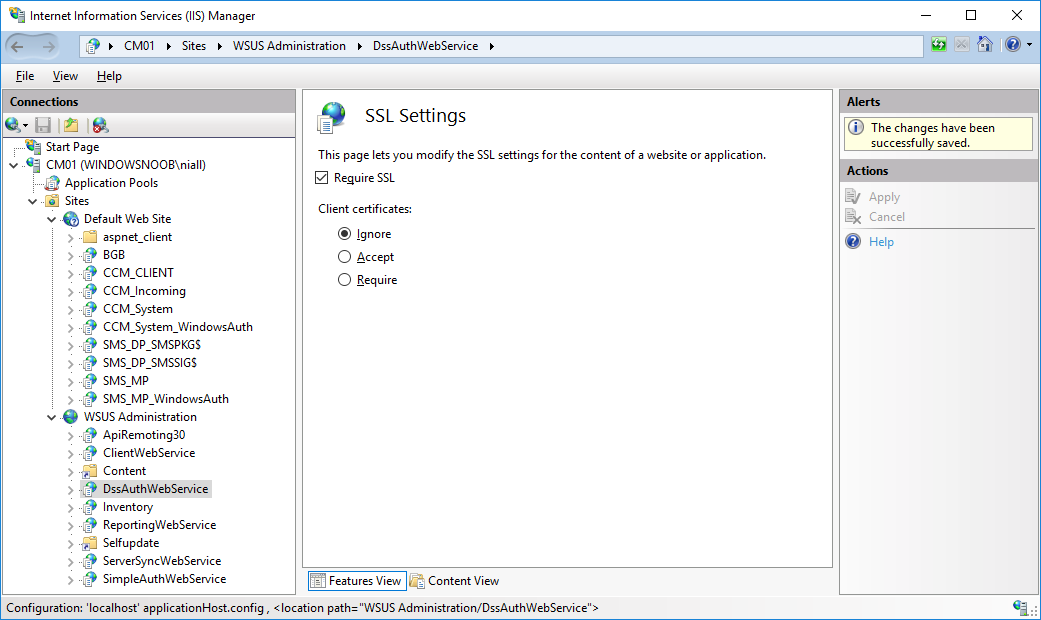
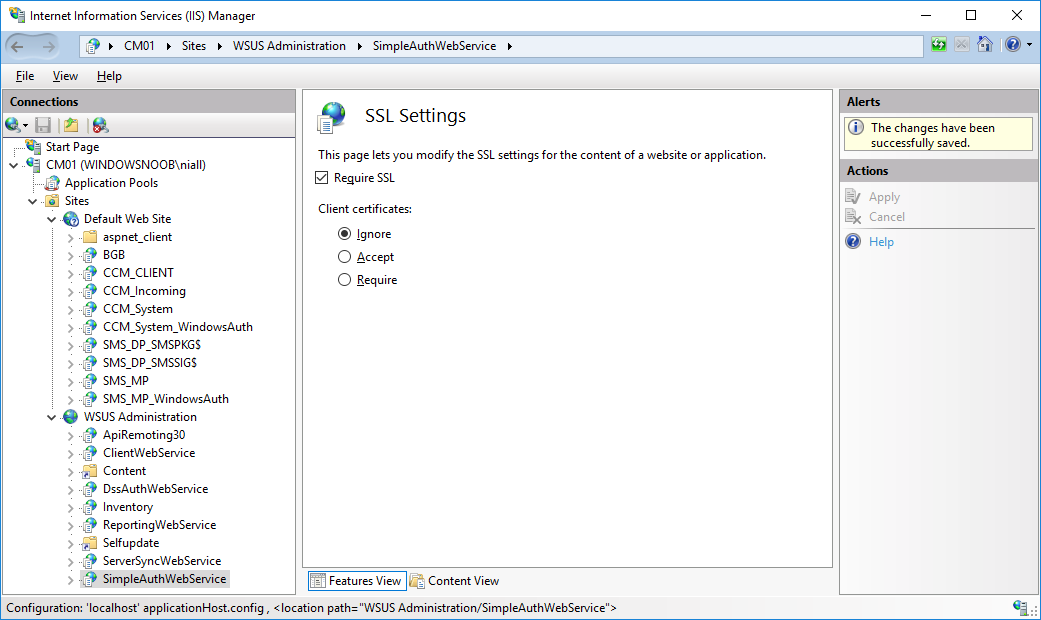
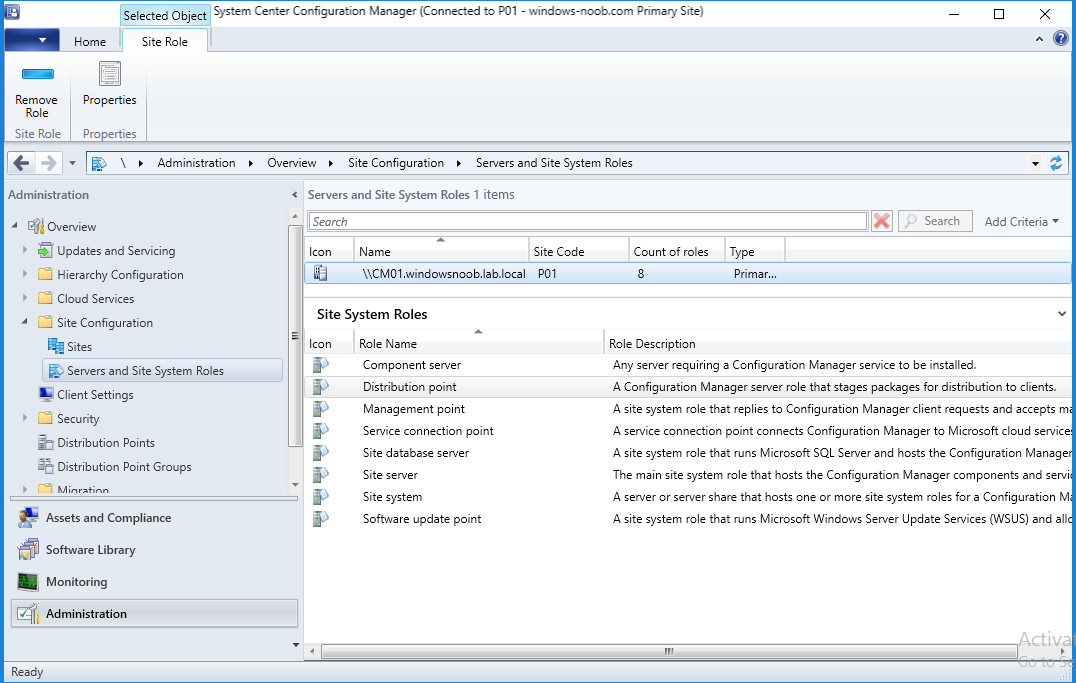
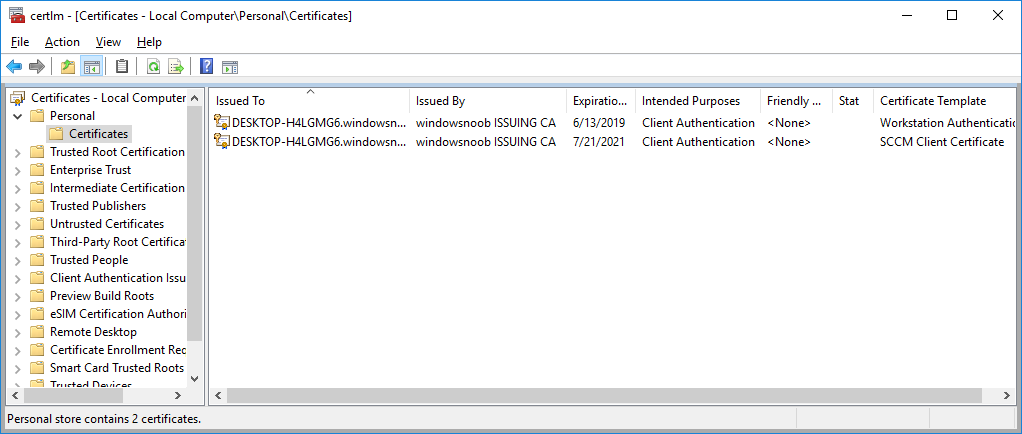
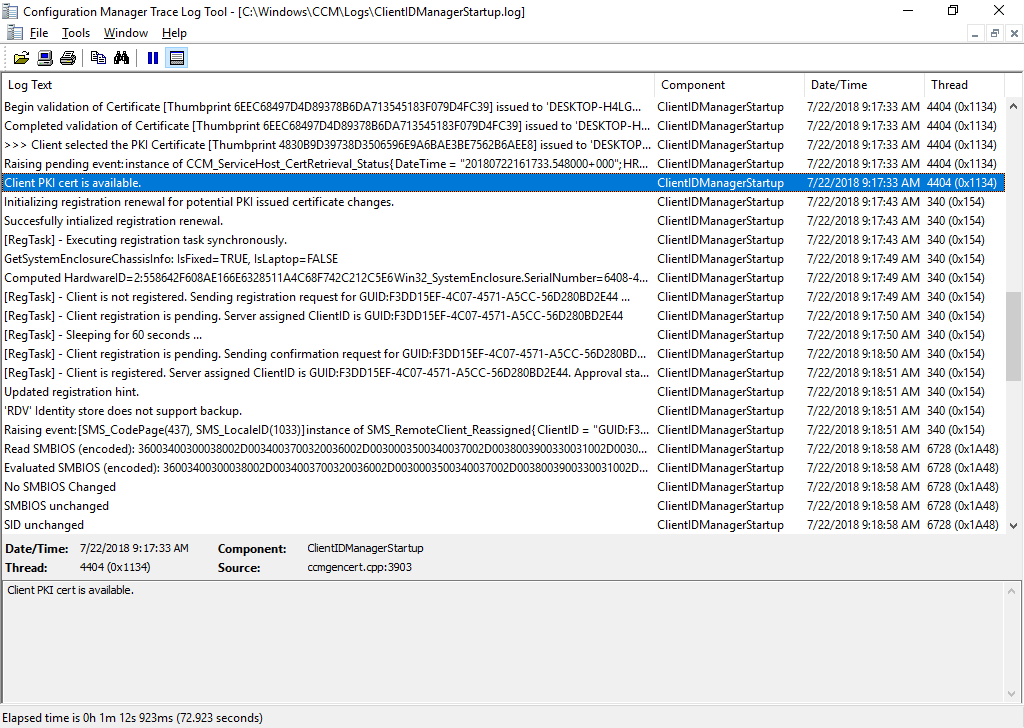
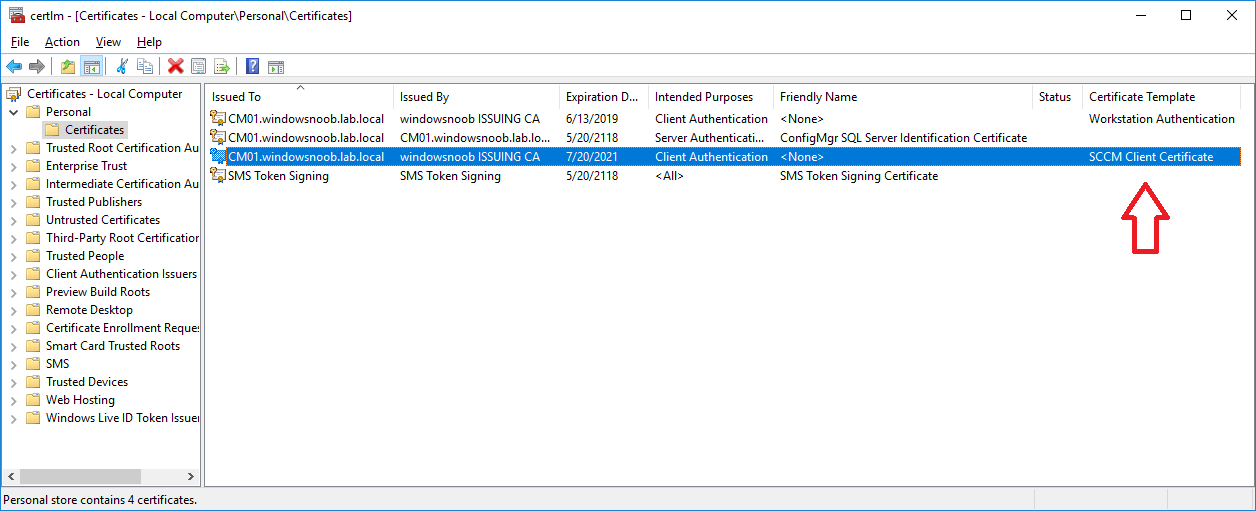
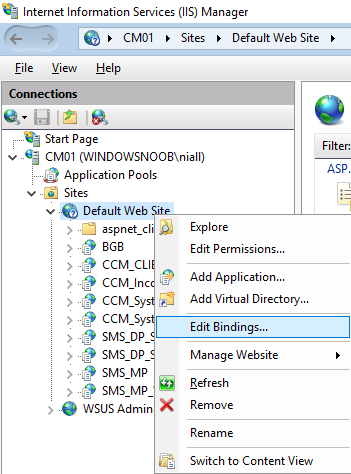
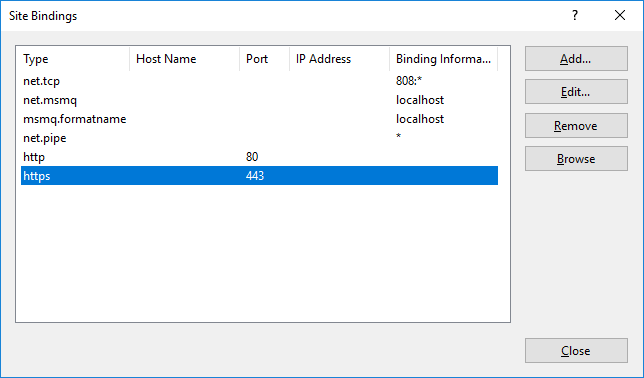
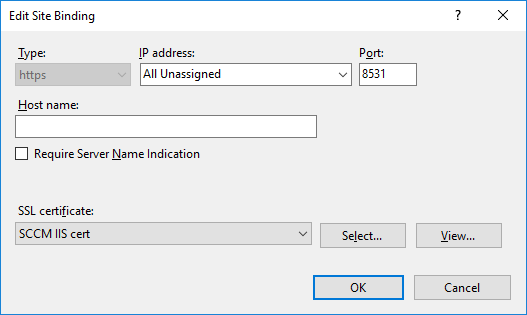
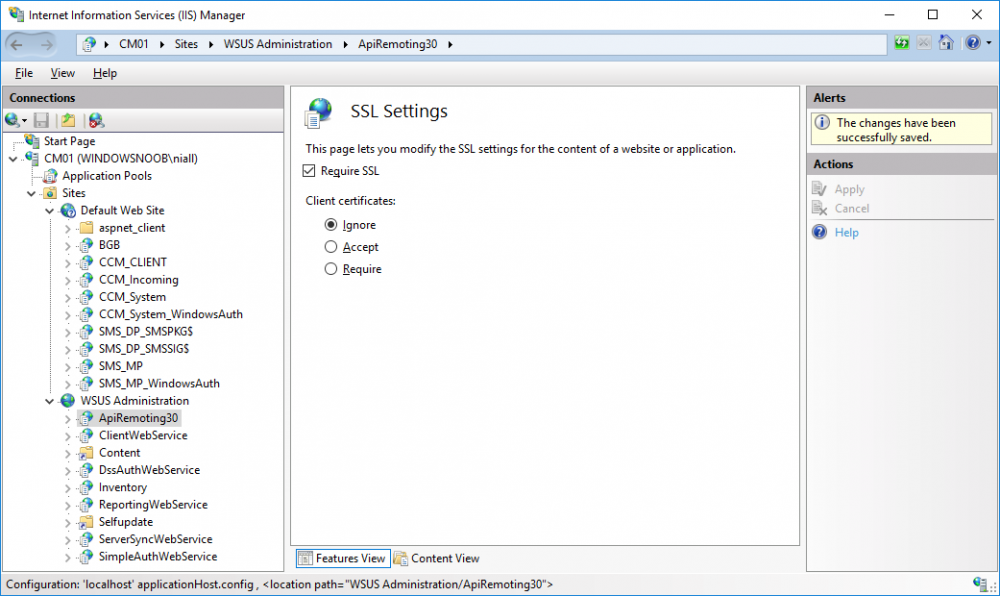
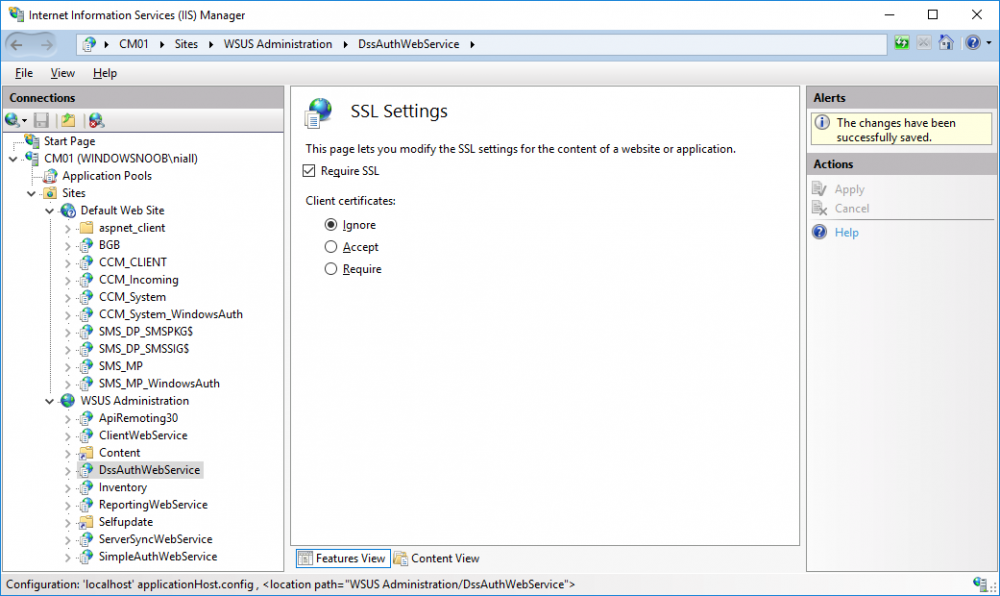
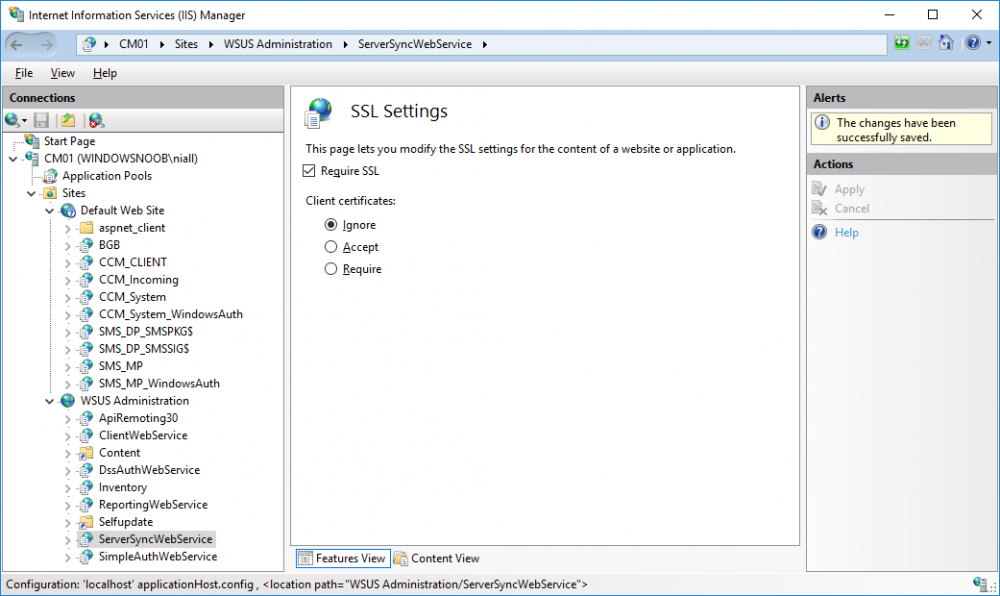
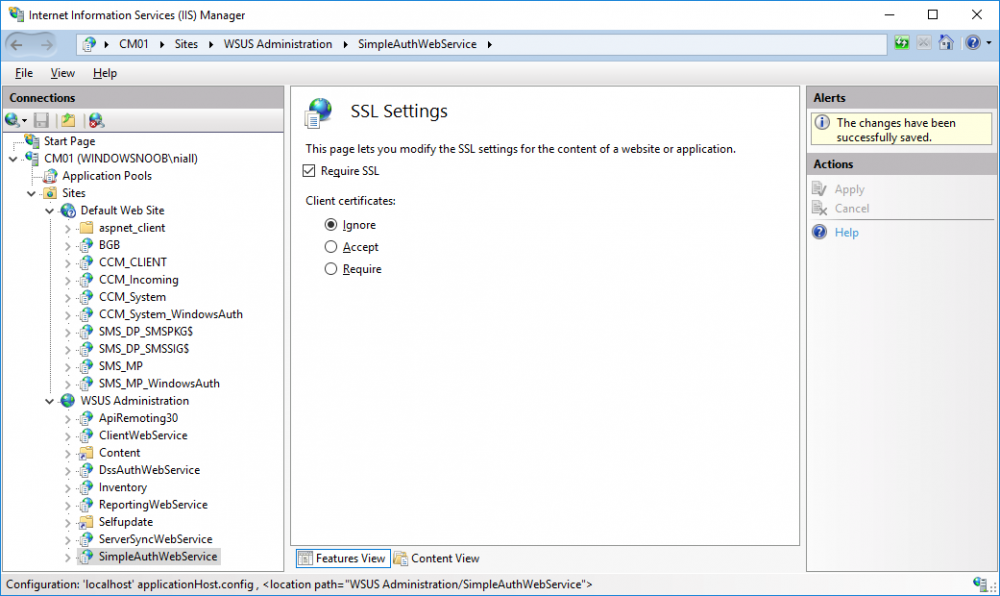
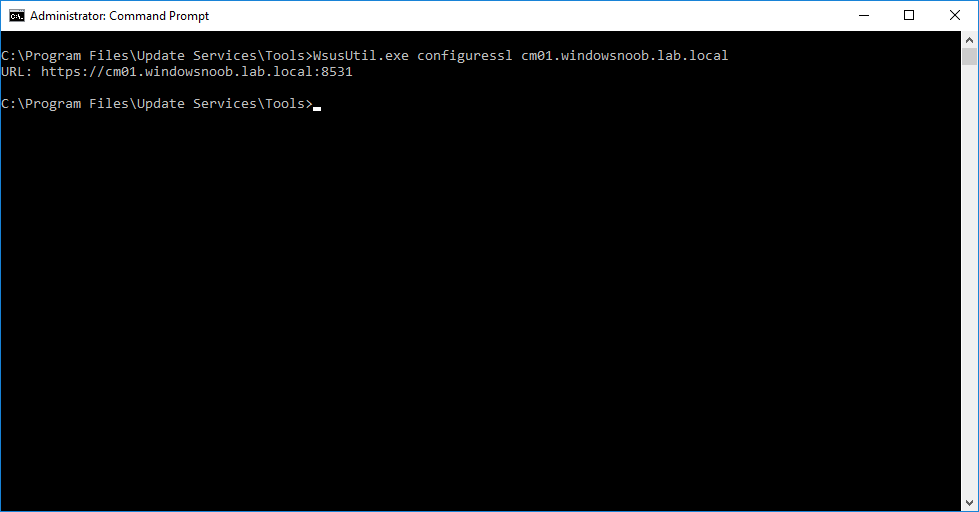
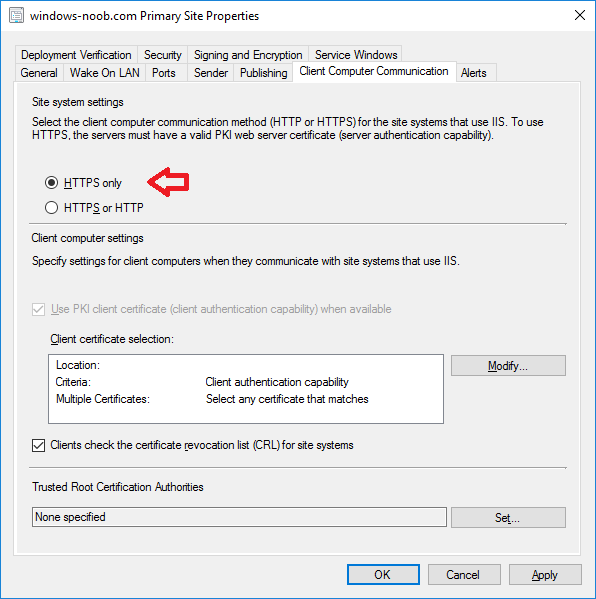
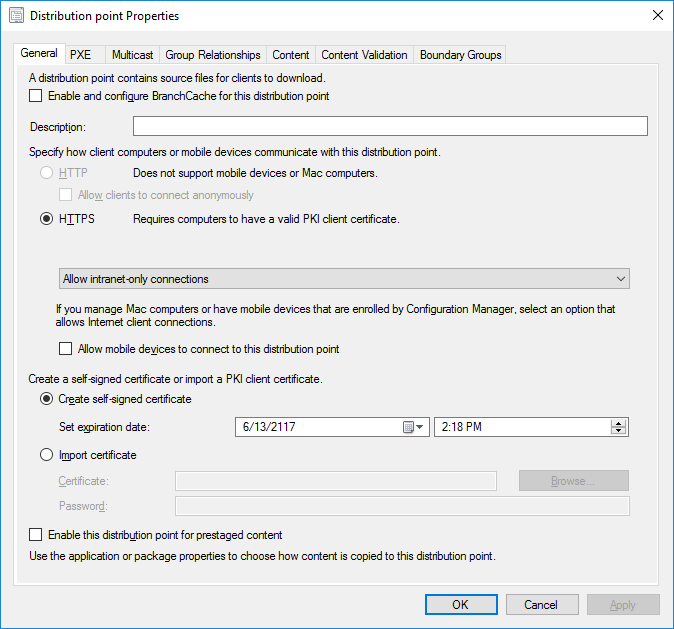
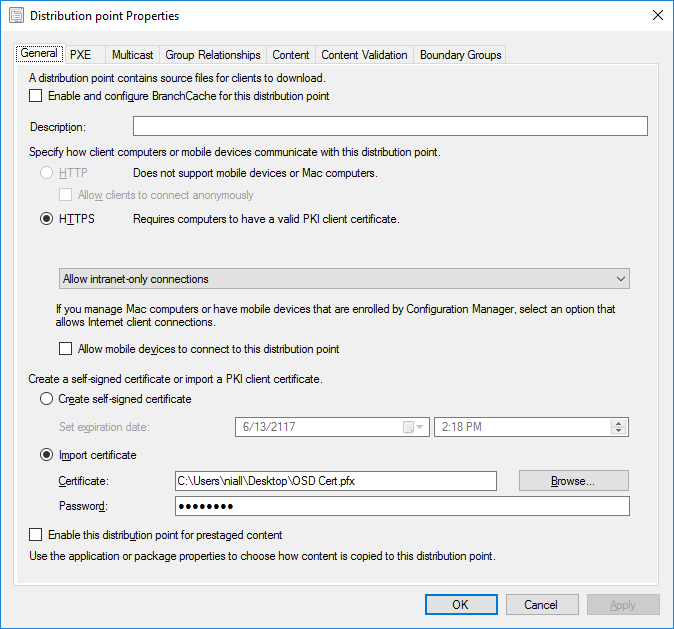
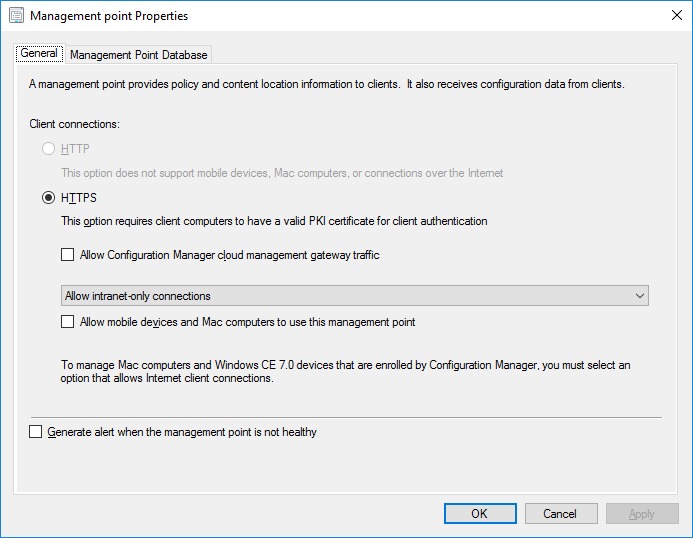
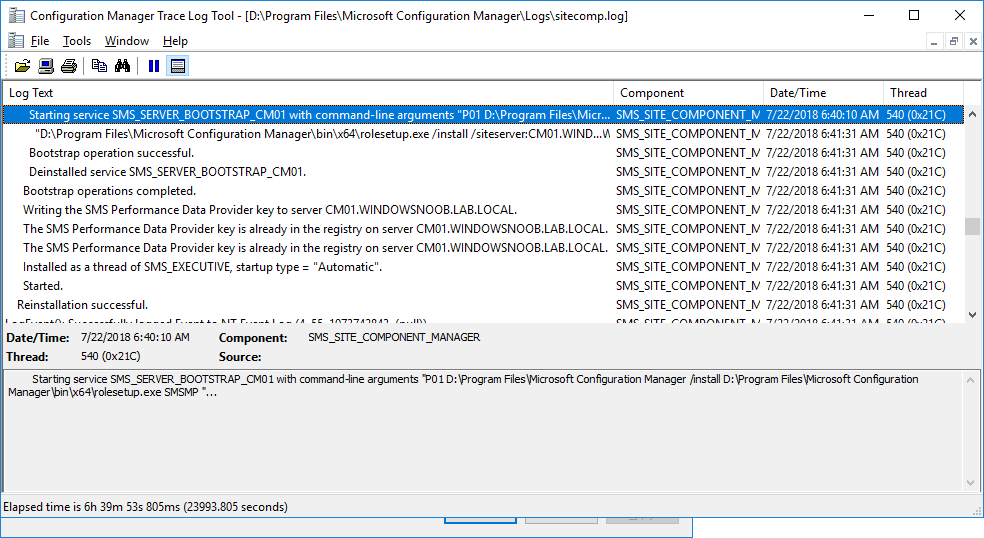
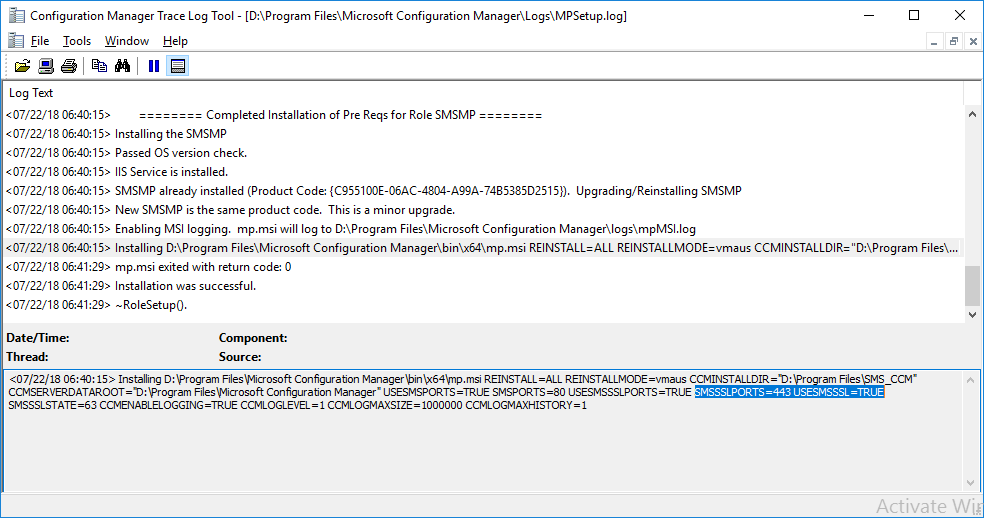
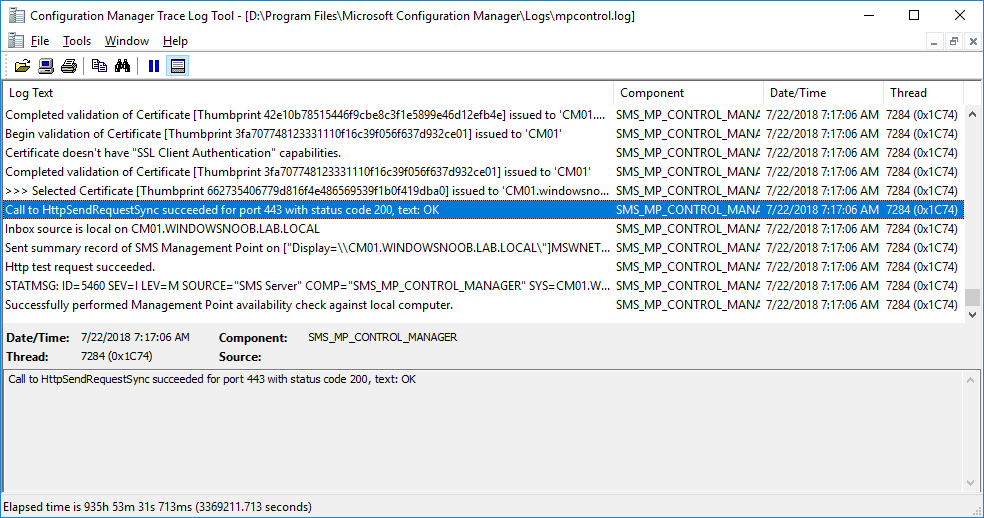
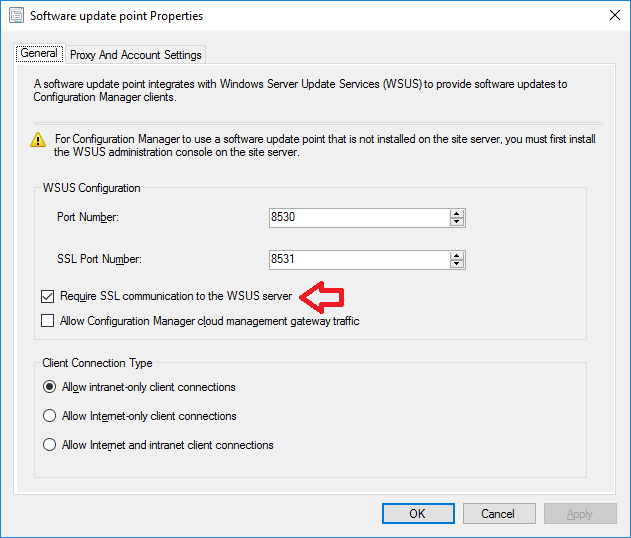
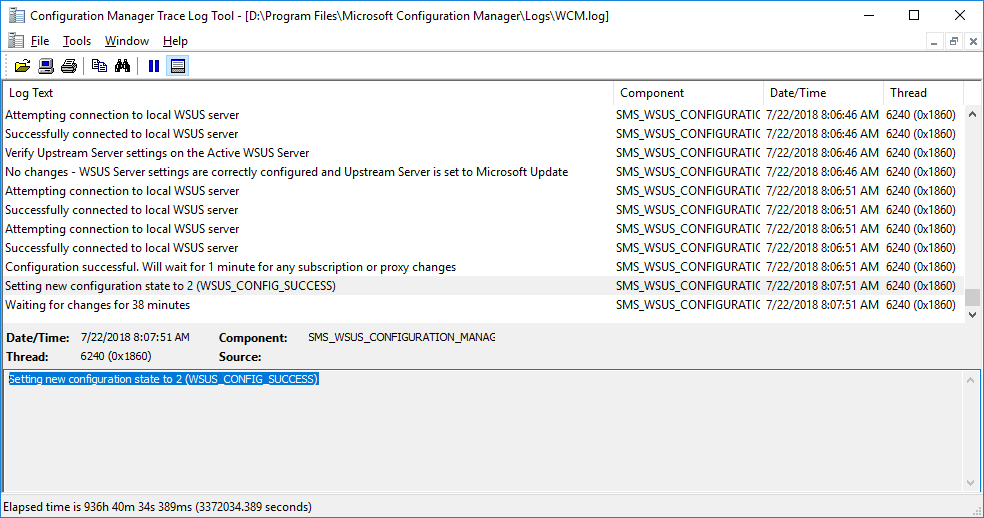
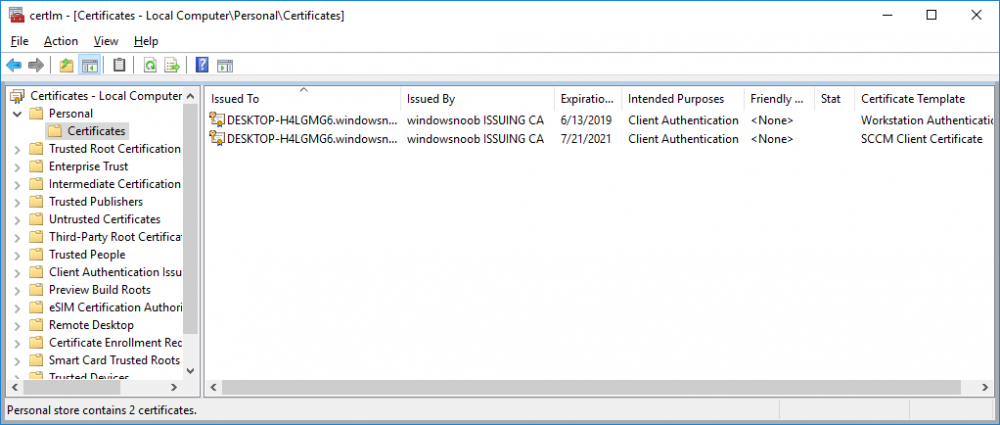
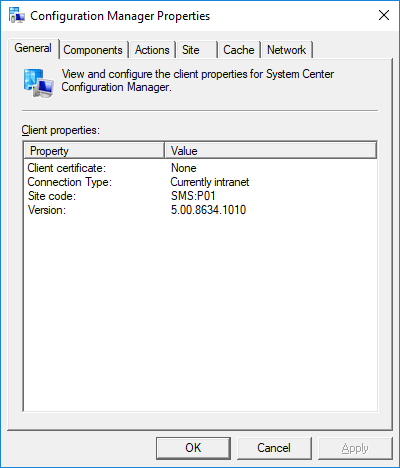
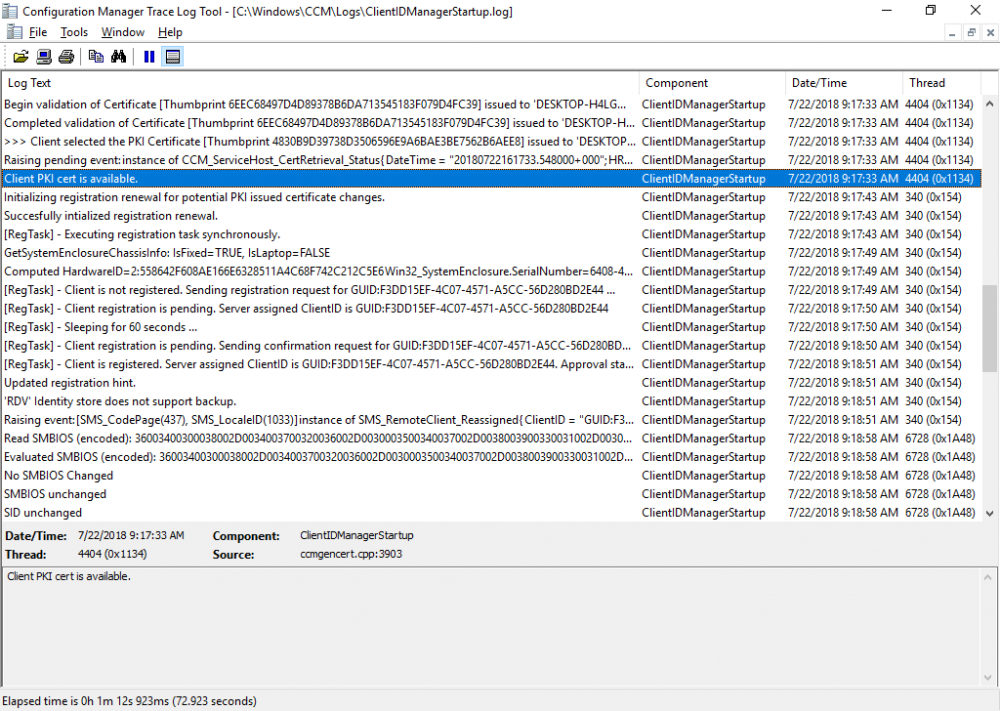
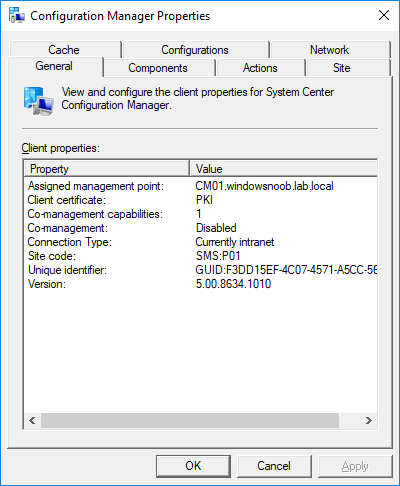
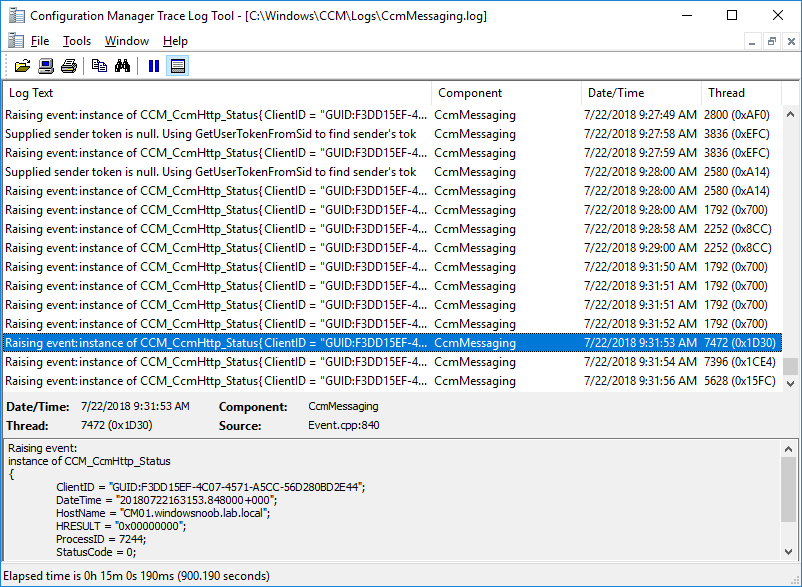
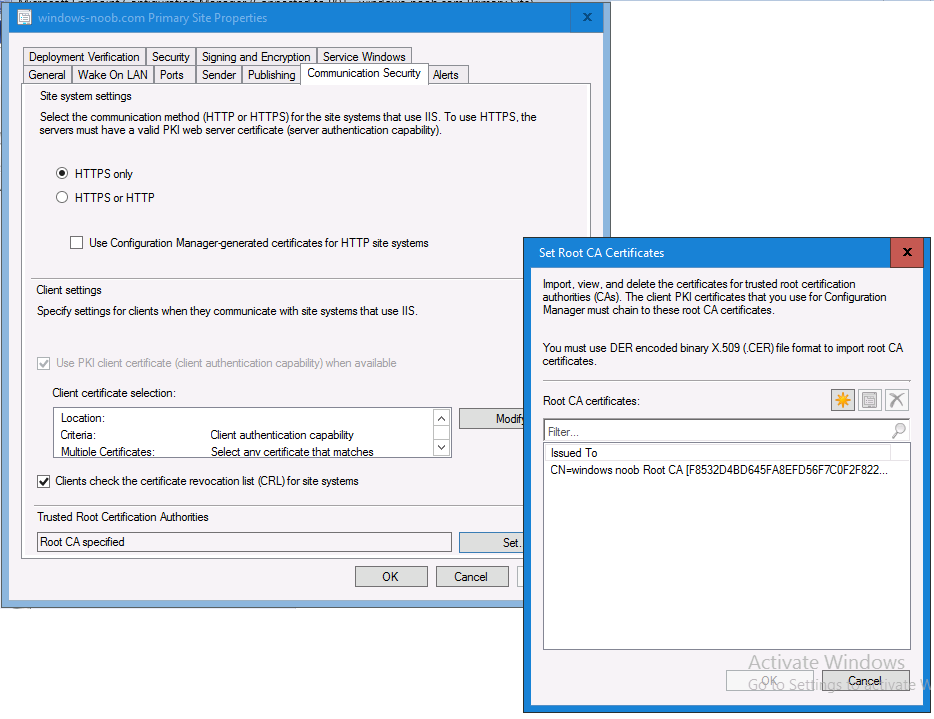
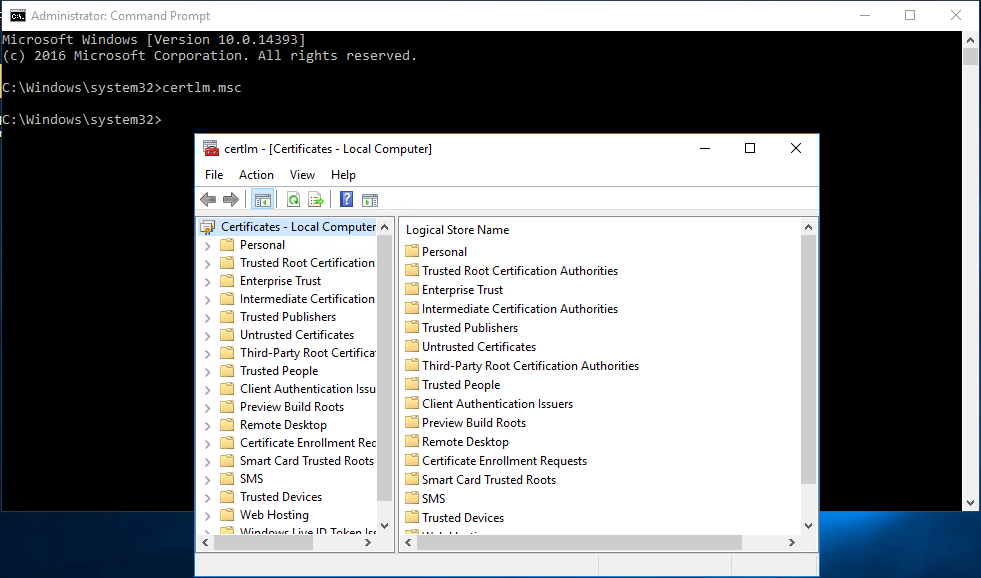
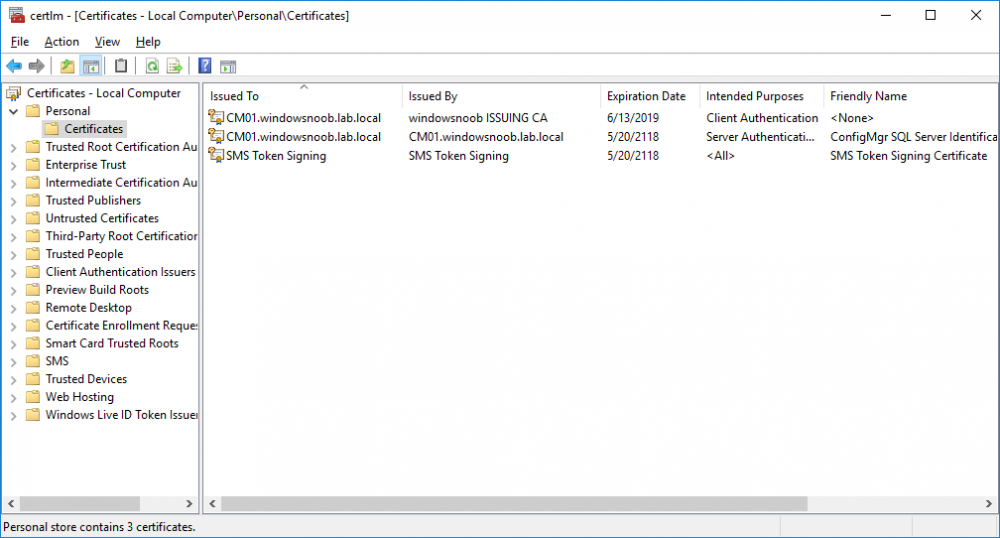
 In a previous series of guides I showed you how to configure PKI in a lab on Windows Server 2016. In another series, I also showed you how to install System Center Configuration Manager (Current Branch) version 1802 on Windows Server 2016 with SQL Server 2017. In this lab, I will show you how to configure SCCM to utilize that PKI environment. This series is based upon an excellent video by the talented former Microsoft Premier Field Engineer Justin Chalfant here. If you haven't seen it yet, do check it out. The intention here is that after you've completed this PKI enabled SCCM lab you can then use this in future guides, and to dig deeper into new technologies from Microsoft, for example enabling a Cloud Management Gateway and/or Cloud Distribution Point and using later on, using Co-Management. Note: To complete this lab you must first complete the PKI Lab series (8 parts) and then install a new virtual machine within that PKI lab running System Center Configuration Manager (Current Branch) version 1802 utilizing this series (4 parts), that installation of Configuration Manager will be in HTTP mode. In addition, you must configure the Software Update Point role (in HTTP mode) on CM01 See this guide (step 2 onward) for details. For details how to configure that, see this post. It will take some time to setup but you'll be glad you did. Also, don't do this in production without consulting with a PKI Expert. I don't claim to be one, I'm just helping you get it up and running in a lab. This is intended for use in a lab only. In part 1 of this series you created an Active Directory Security Group to contain your SCCM servers that host IIS based roles such as Distribution Point, Management Point and Software Update Point, you then rebooted that server after adding it (CM01) to the group. You then created 3 certificate templates for SCCM on the Issuing CA server (IssuingCA) and issued them so that they could be available to applicable computers. You verified that you had a GPO in place for AutoEnrollment before requesting the IIS and DP/OSD Certificates on the IIS Site System (CM01) using certlm.msc. Step 1. Edit bindings in IIS for the Default Web Site and WSUS Administration Websites On the SCCM server (CM01), start Internet Information Services (IIS) Manager, expand Sites so that you can see the Default Web Site and the WSUS Administration websites listed. Select the Default Web Site, this web site is where the management point, distribution point and other SCCM roles such as Application Catalog can be found (if they are installed). Edit bindings on the Default Web Site Right click on the Default Web Site and choose Edit Bindings from the options available. In the window that appears, select the https section (port 443) and choose Edit. In the SSL certificate dropdown menu, select SCCM IIS Cert. Click OK and then click Close. Verify changes made Once done, you can open up Internet Explorer and verify that it's reporting back in HTTPS mode for the default web site by browsing to the following addresses to verify the Netbios name and FQDN resolve in HTTPS mode. Click on the Lock in the address bar to get info about the connection. https://cm01 https://cm01.windowsnoob.lab.local/ Edit bindings on the WSUS Administration Web Site Repeat the above operation, on the WSUS Administration website (note that it uses port 8531 for https mode). click OK and Close when done. Step 2. Modify WSUS Administration SSL Settings WSUS itself requires some additional changes documented here (1) that we need to configure to allow WSUS to use HTTPS. In the Internet Information Services (IIS) Manager, expand sites and selct WSUS Administration. Select ApiRemoting30 under the WSUS Administration web site, in the right pane, click on SSL Settings and select Require SSL and verify that Ignore is selected before clicking Apply. Next, select ClientWebService under the WSUS Administration web site, in the right pane, click on SSL Settings and select Require SSL and verify that Ignore is selected before clicking Apply. Next, select DSSAuthWebService under the WSUS Administration web site, in the right pane, click on SSL Settings and select Require SSL and verify that Ignore is selected before clicking Apply. Next, select ServerSyncWebService under the WSUS Administration web site, in the right pane, click on SSL Settings and select Require SSL and verify that Ignore is selected before clicking Apply. Finally, select SimpleAuthWebService under the WSUS Administration web site, in the right pane, click on SSL Settings and select Require SSL and verify that Ignore is selected before clicking Apply. Step 3. Configure WSUS to require SSL In an administrative command prompt on CM01, browse to the location of WSUS installation files. cd C:\Program Files\Update Services\Tools Next issue the following command where CM01.windowsnoob.lab.local is the Fully qualified domain name of your ConfigMgr server hosting WSUS. WsusUtil.exe configuressl cm01.windowsnoob.lab.local The results are shown below: Step 4. Configure SCCM to use HTTPS In this step you will configure SCCM to operate in HTTPS mode. To do that, first bring up the site properties in the SCCM Console on CM01. To bring up the site properties, select the Administration workspace, select Site Configuration, select your site and in the ribbon choose Properties. Next, click on Client Computer Configuration, select HTTPS only from the options and then select Apply. Note: If you have both HTTP and HTTPS site systems in your environment, keep the second box checked (HTTPS or HTTP) and enable the Use PKI client certificate (client authentication capability) when available check box. Step 5. Configure Trusted Root Certification Authorities Note: If you fail to add the Root CA (ROOTCA_windows noob Root CA.crt) specified here, PXE boot will fail to download policy after entering the PXE password. In the site properties screen, click on Communication Security and then click on Set beside Trusted Root Certification Authorities, and click on the yellow star to add your Root CA, in this case, the Root CA for your lab (from the offline root ca), in other words point it to the ROOTCA_windows noob Root CA.crt file which is the Trusted Root Certificate for this site (the Root CA cert). Step 6. Verify that the Distribution Point, Management Point and Software Update Point are using SSL Next you need to verify the DP (and perform some additional configuration), MP and SUP roles are using SSL. To do this, select the Administration workspace in the console, click Site Configuration, select Servers and Site System roles, and select the Distribution Point role. Right click it and choose Properties to bring up the Distribution Point role properties. You should see that it is already configured for HTTPS. Next you need to add the certificate used by clients being imaged by operating system deployment in WinPE or for WorkGroup based clients, to do so, click on Import Certificate and select Browse, browse to the location where you saved the OSD Cert.pfx file (which you created in Step 5 of part 1 here), enter the password you specified, and click Apply. Click OK to close the Distribution Point role properties. For more info on the DP Cert requirements see - https://docs.microsoft.com/en-us/sccm/core/plan-design/network/pki-certificate-requirements Next, select the Management Point role properties, they are shown below, again, HTTPS is selected by default as you set it site wide with the HTTPS only option. When you selected HTTPS Only in the Client Computer Communication of the site properties, this initiated the Management Point to reinstall itself with the new settings, as you can see here in the sitecomp.log. In addition in the mpsetup.log you can see that it's configured for SSL Finally you can check mpcontrol.log this log logs the status of your Management Point, and in there you can verify that the Management Point is up and running and communicating OK in HTTPS mode and that it has successfully performed Management Point availability checks. Next, double click the Software Update Point role to review it's properties. Place a check in the Require SSL communication to the WSUS Server check box. Click Apply and click OK to close the Software Update Point properties. At this point open the WCM.log and look for a line that reads Step 7. Verify Client Received Client Certificate and SCCM Client Changes to SSL Logon to the Windows 10 1803 client and start and administrative command prompt, from there launch certlm.msc to bring up Certificates on the Local Machine. Browse to Personal and Certificates, and you should see the SCCM Client Certificate listed. Note: I assume you've already installed the ConfigMgr client agent using whatever method your prefer on the Windows 10 1803 virtual machine. Next, open the Control Panel and locate the Configuration Manager client agent in System and Security, and open it. If the client was just installed the Client Certificate will probably state Self-Signed (or None if you have just installed the client..). After a couple of minutes, close and then reopen the client and you should see that the Client Certificate states PKI. At this point, open the ClientIDManagerStartup.log in C:\Windows\CCM\Logs and you can see Client PKI cert is available. You can also verify client communication to the Management Point in the CCMMessaging.log and we can see it's successful in that communication. Job done ! You've successfully converted SCCM from HTTP to HTTPS using your PKI lab, and you've verified that the client is operating in HTTPS mode. In the next parts we'll look at the Cloud Management Gateway and Cloud Distribution Point. Recommended reading (1) - https://technet.microsoft.com/en-us/library/bb633246.aspx https://docs.microsoft.com/en-us/sccm/core/plan-design/network/pki-certificate-requirements https://www.enhansoft.com/how-to-setup-ssrs-to-use-https-part-1/


-
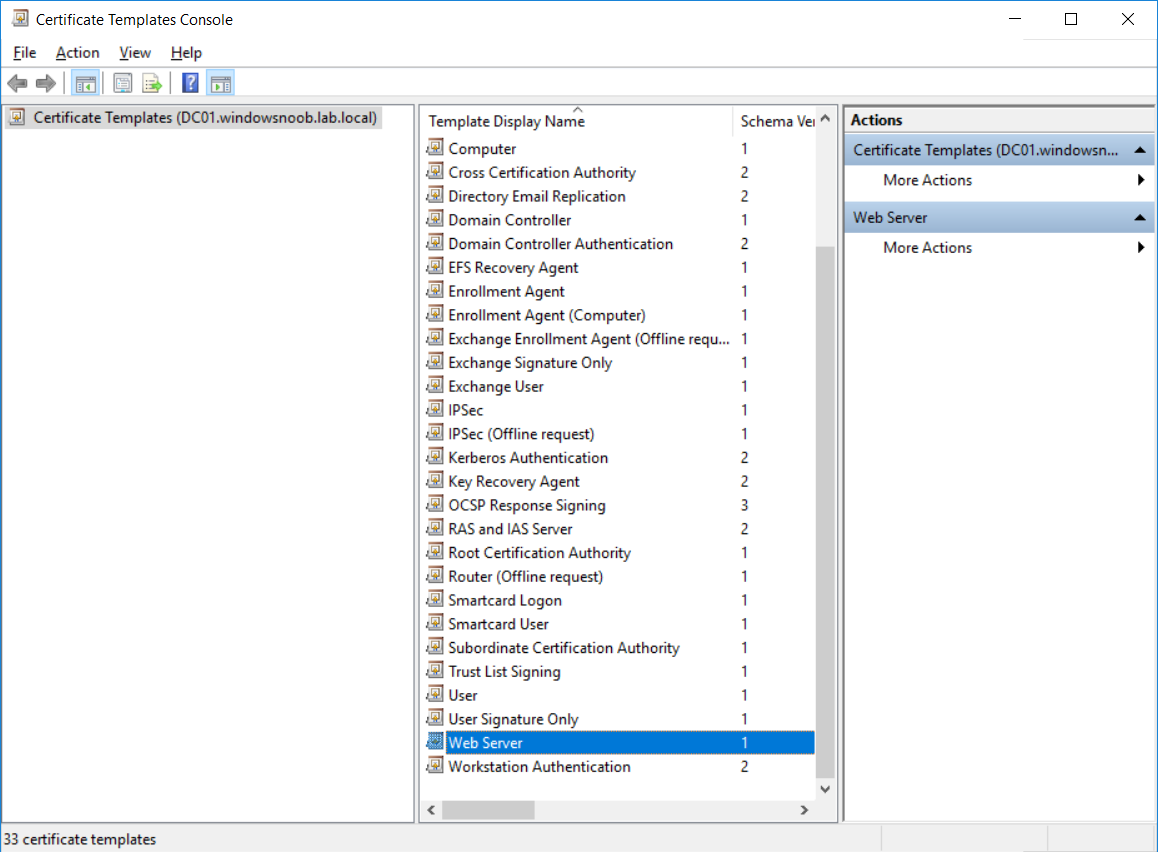
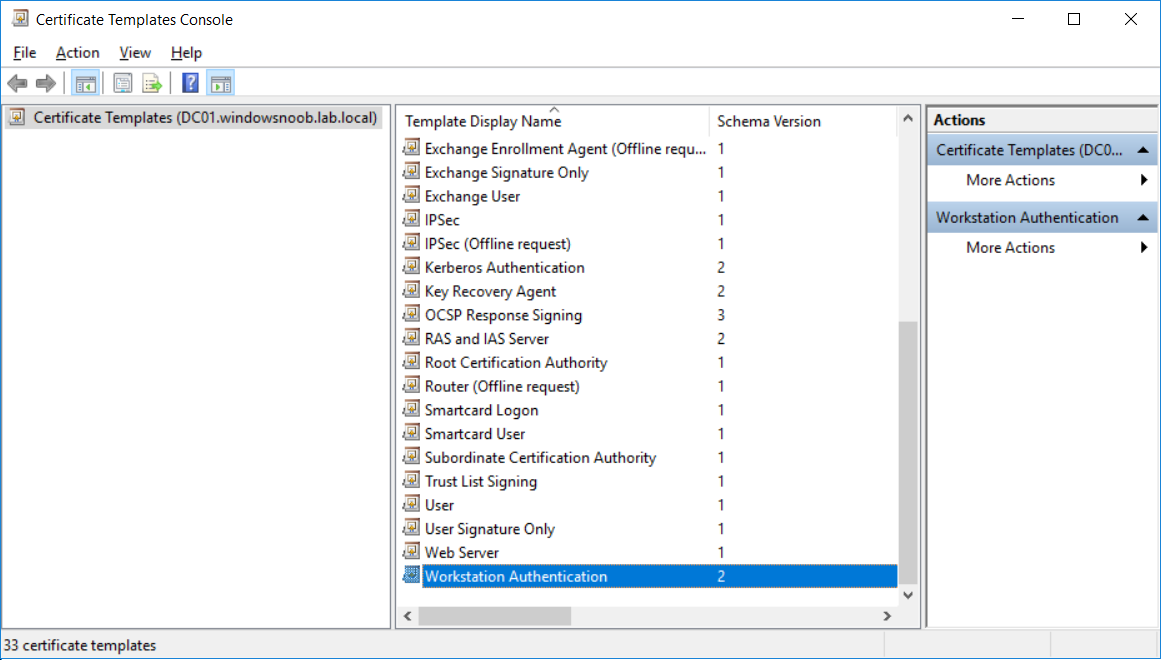
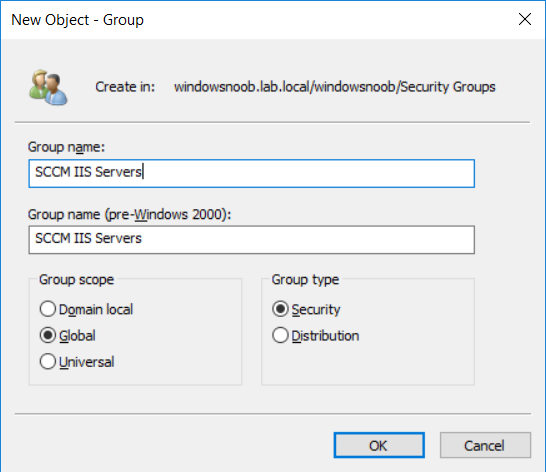
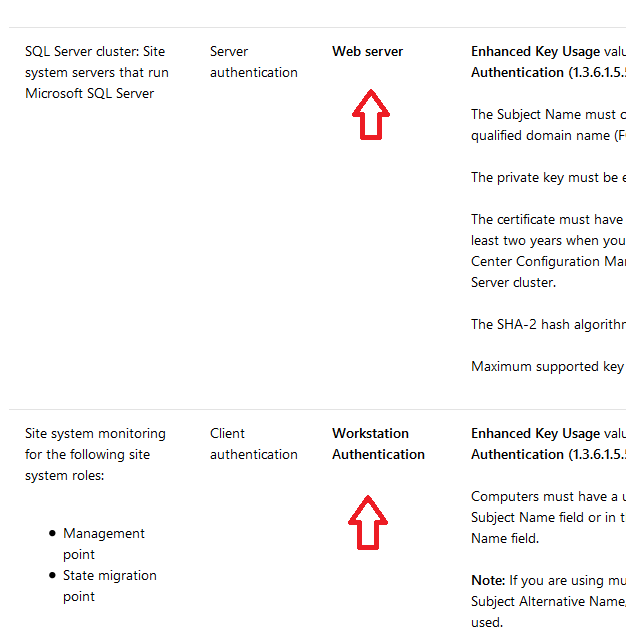
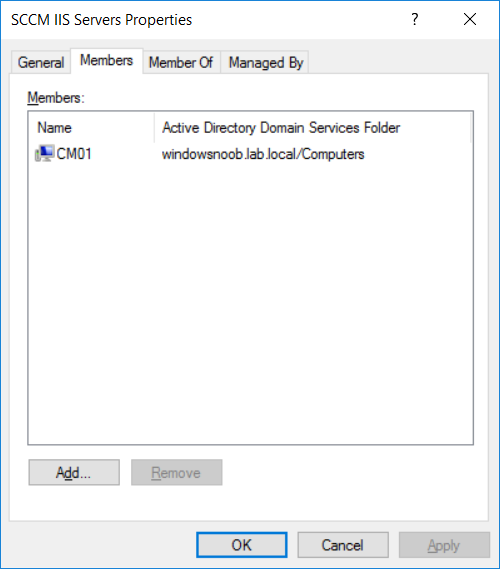
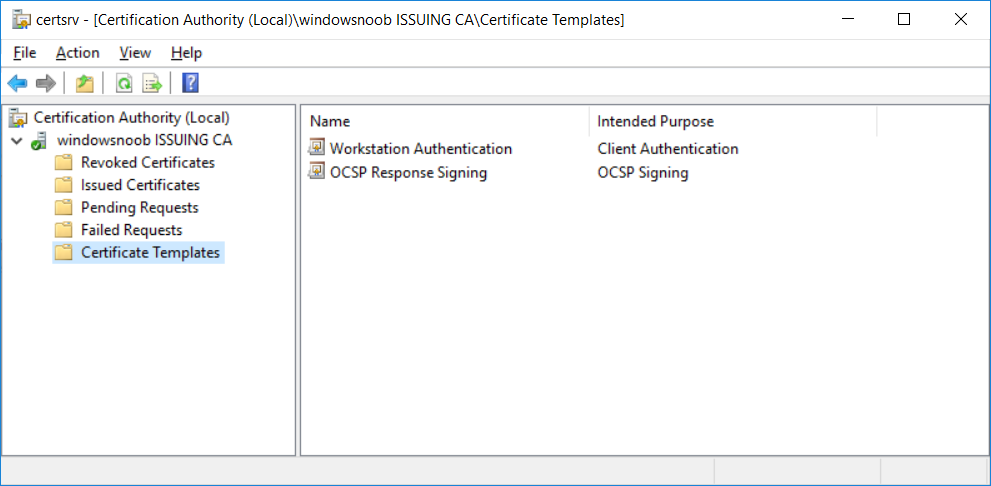
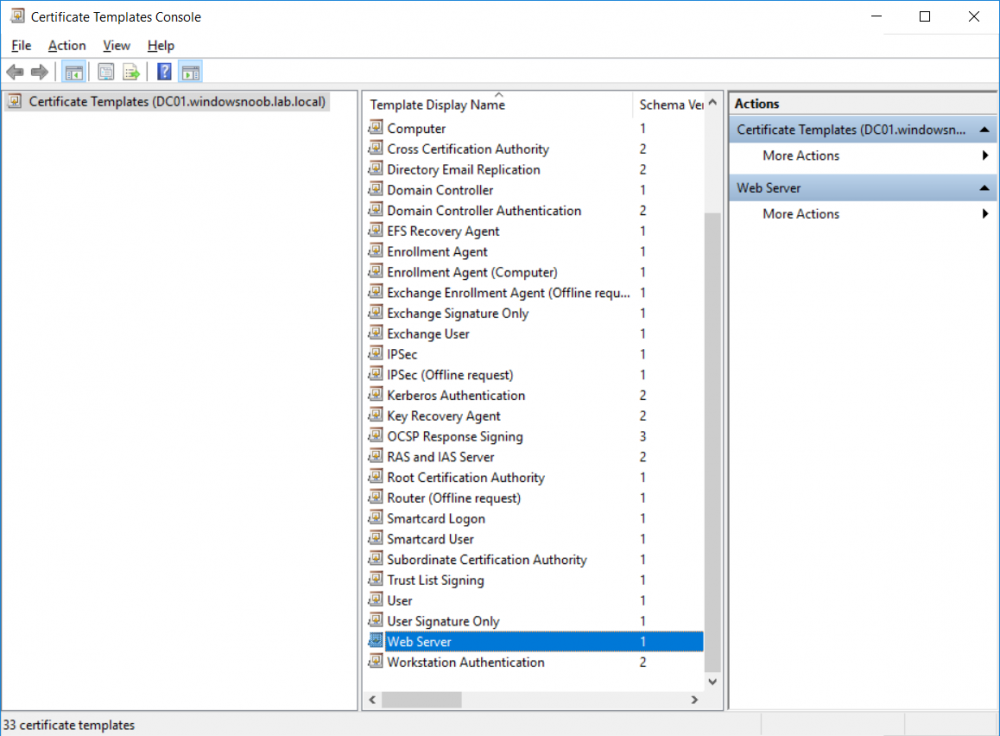
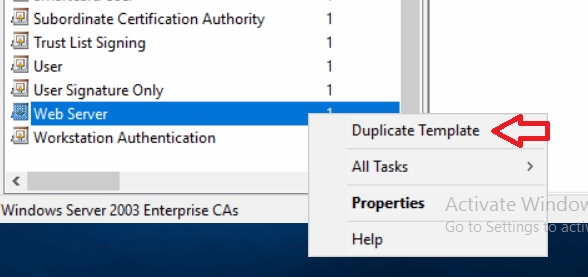
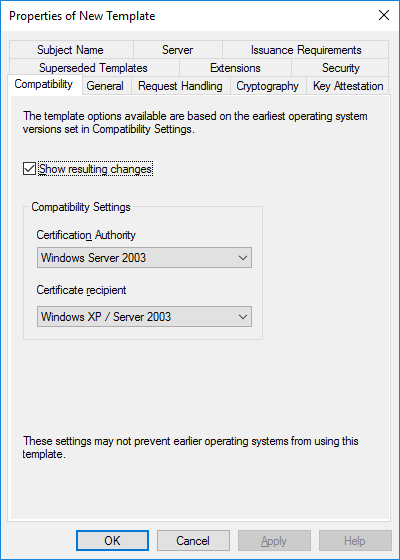
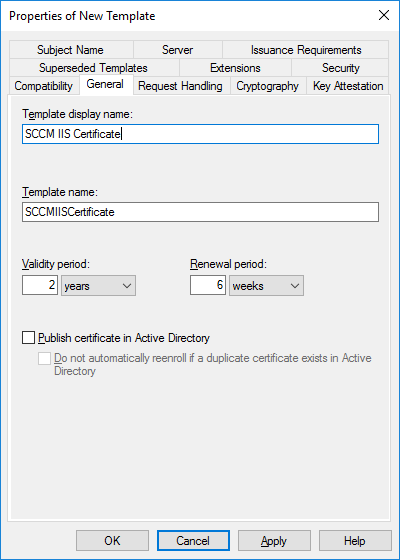
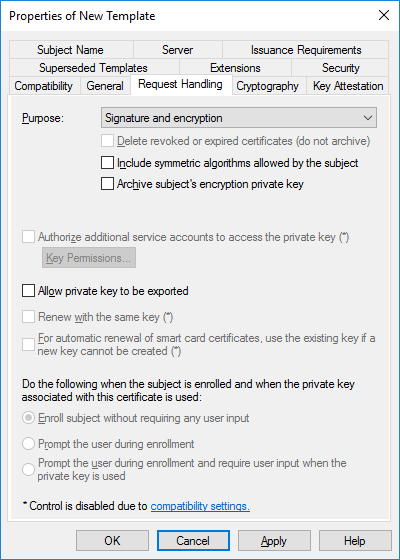
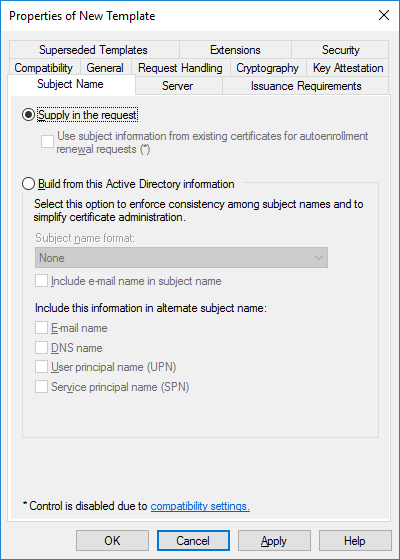
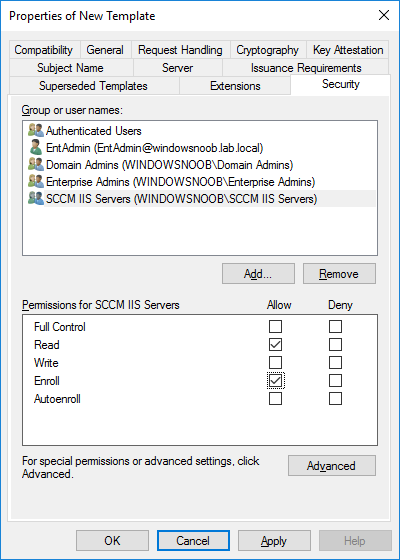
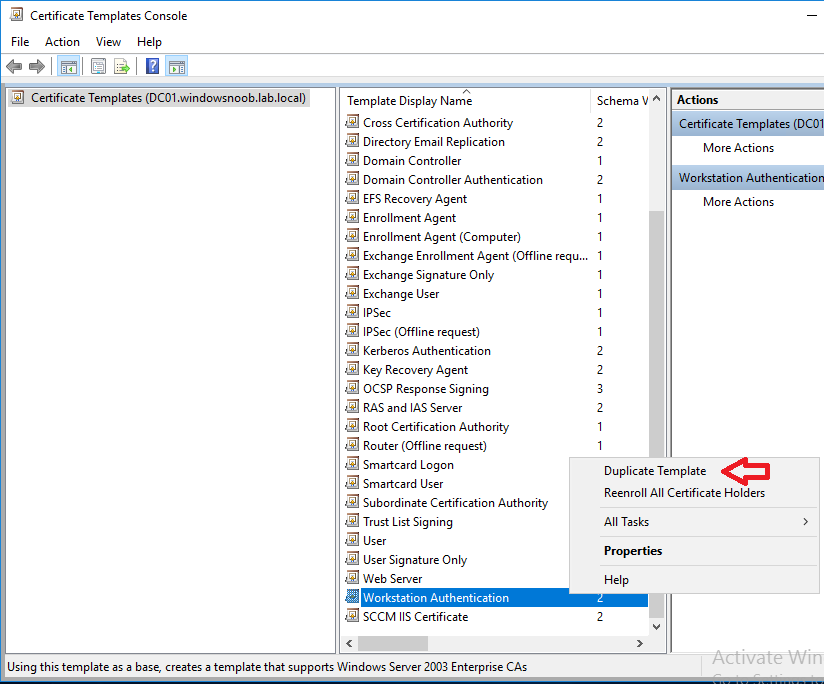
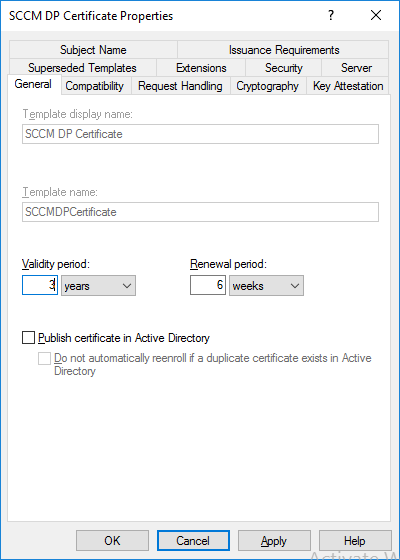
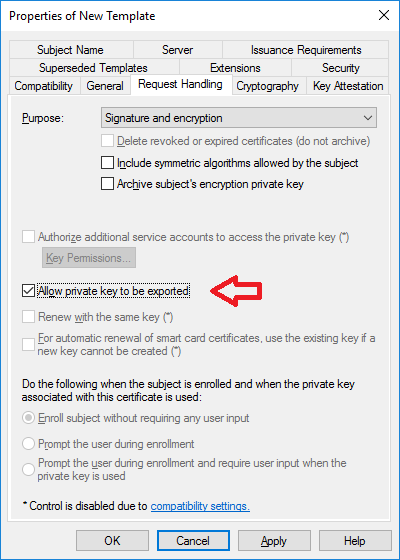
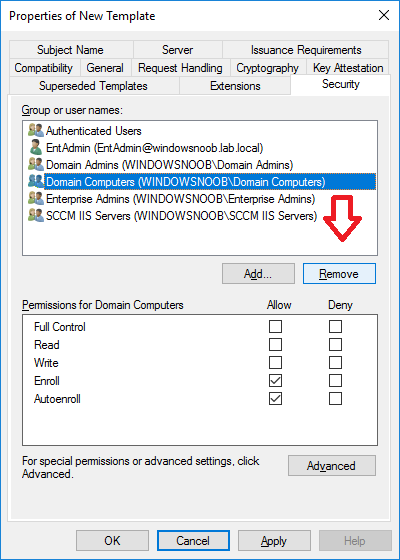
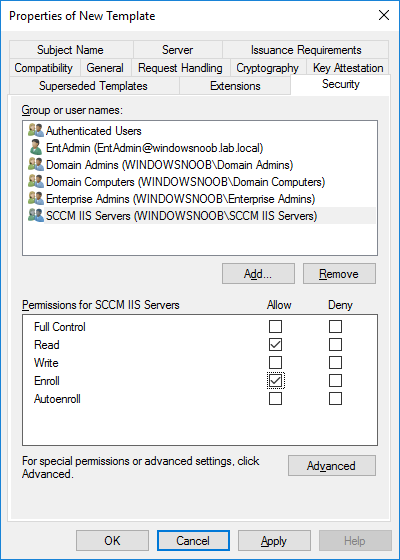
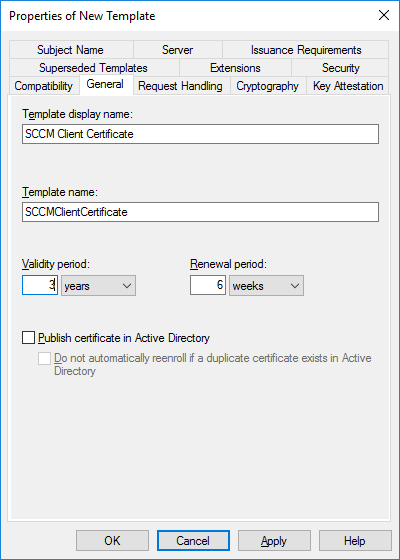
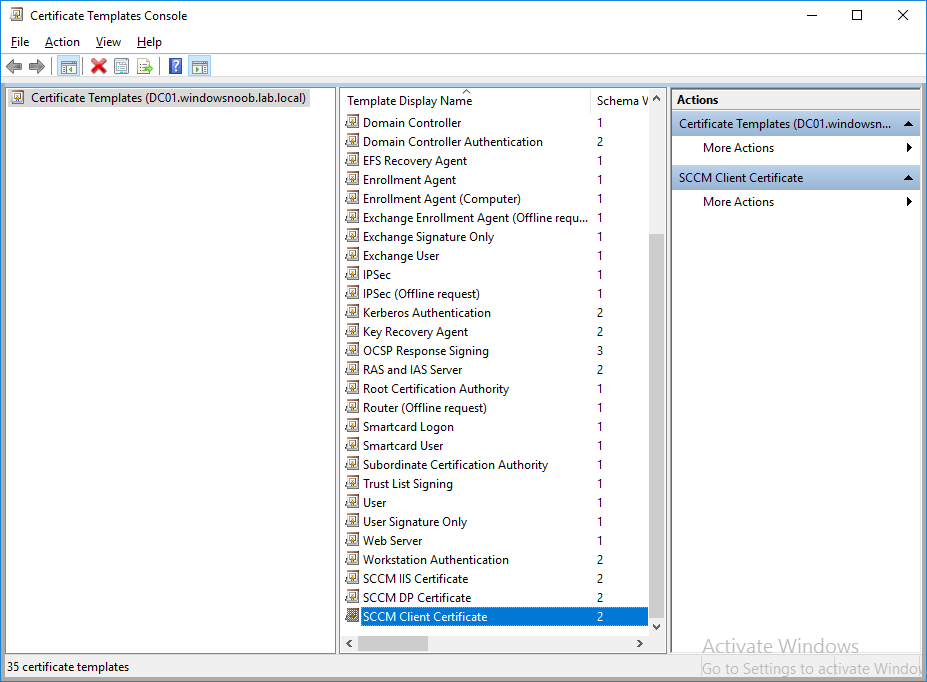
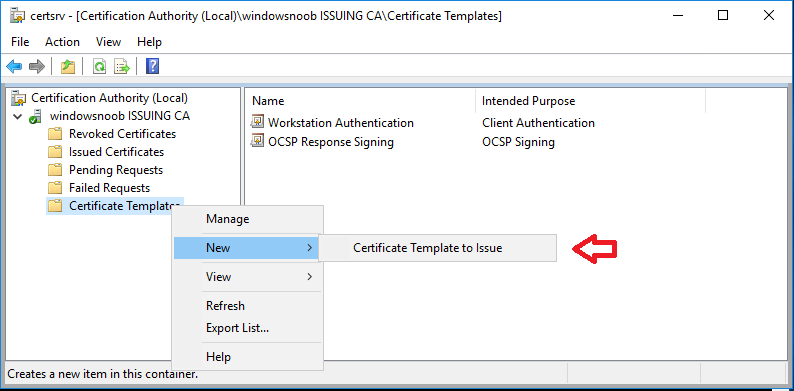
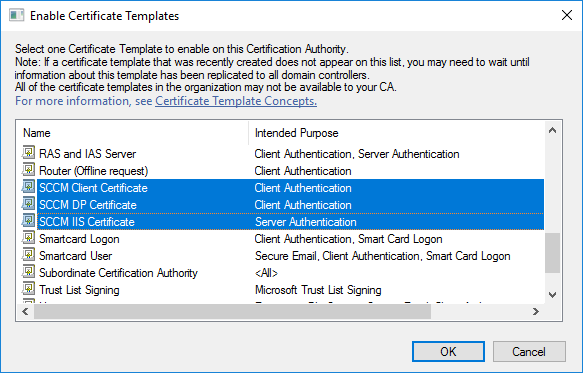
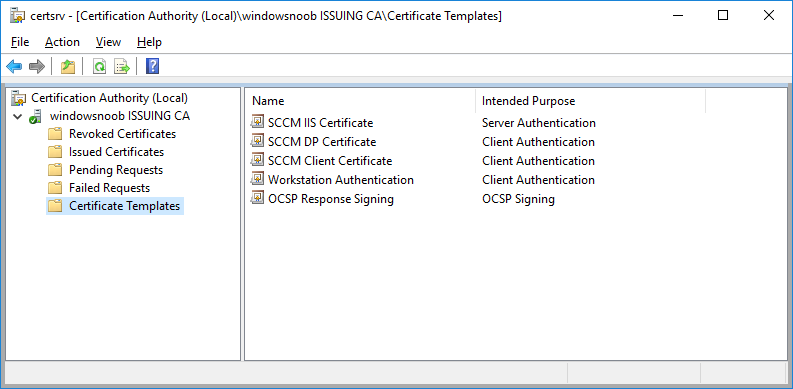
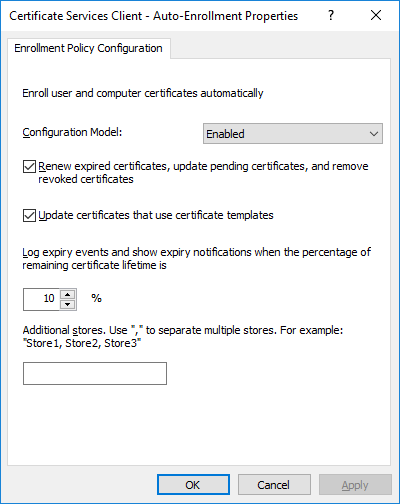
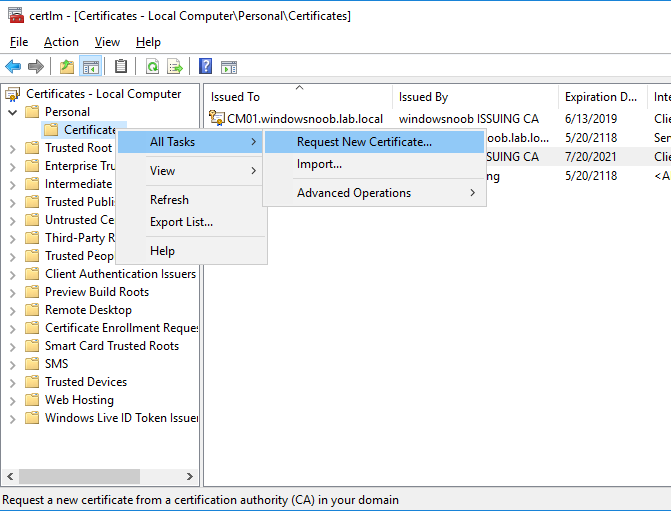
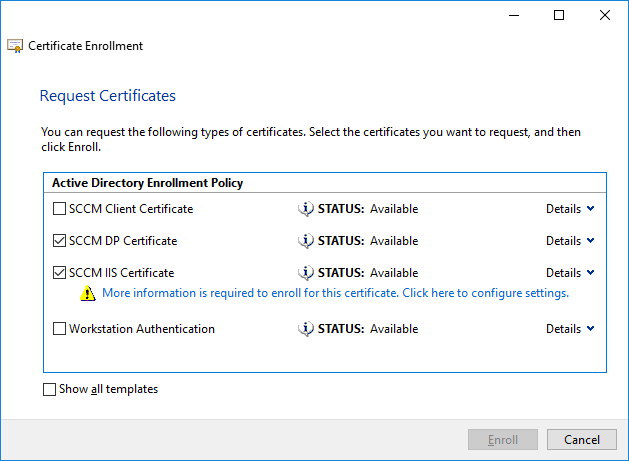
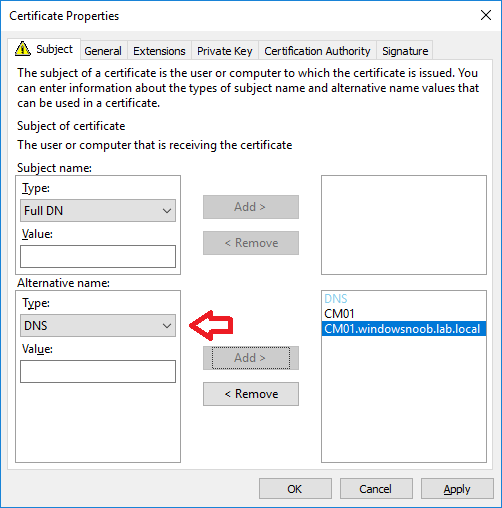
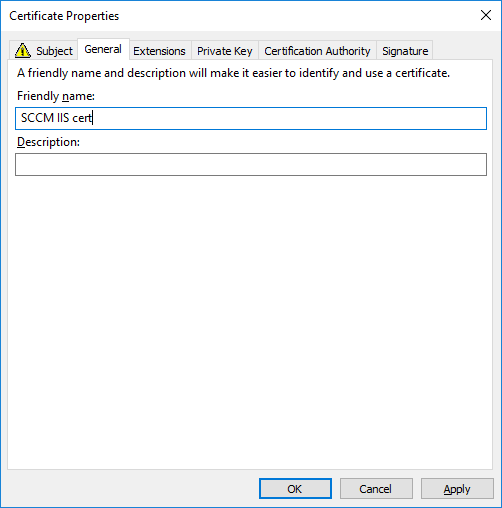
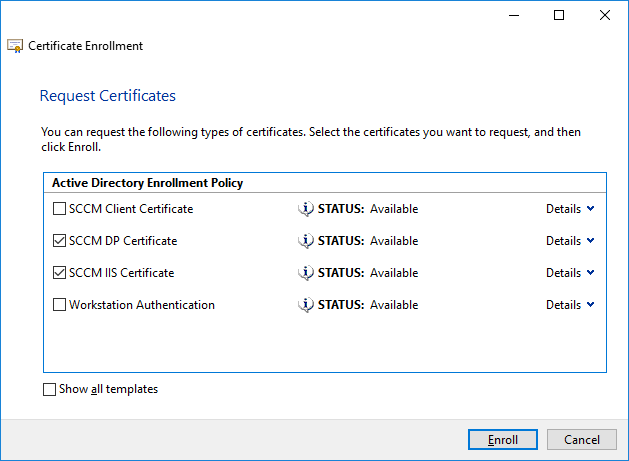
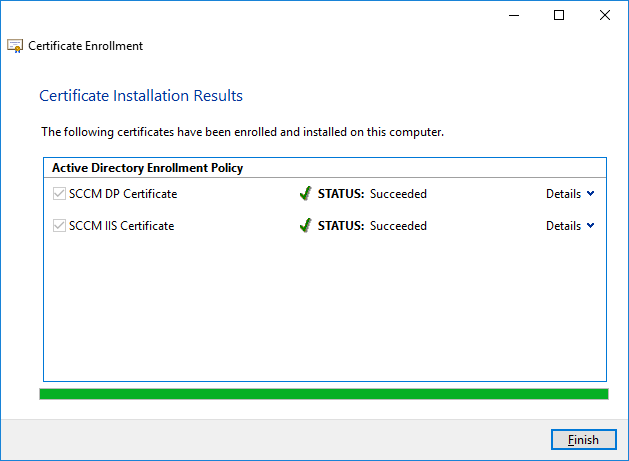
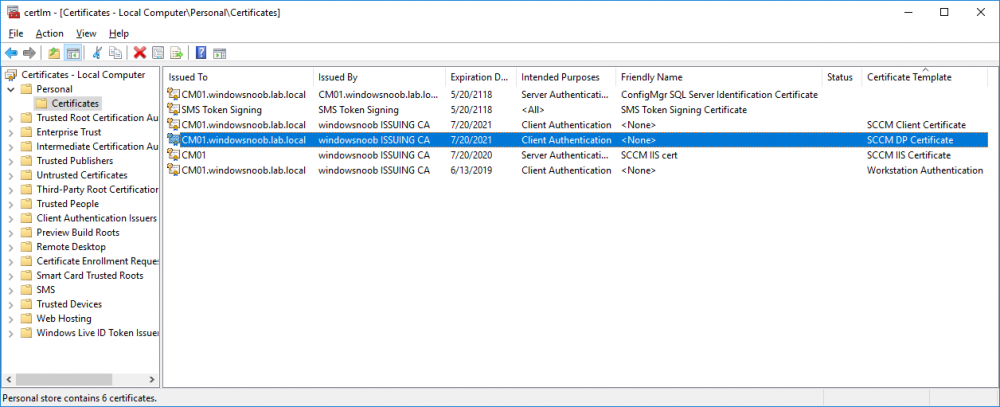
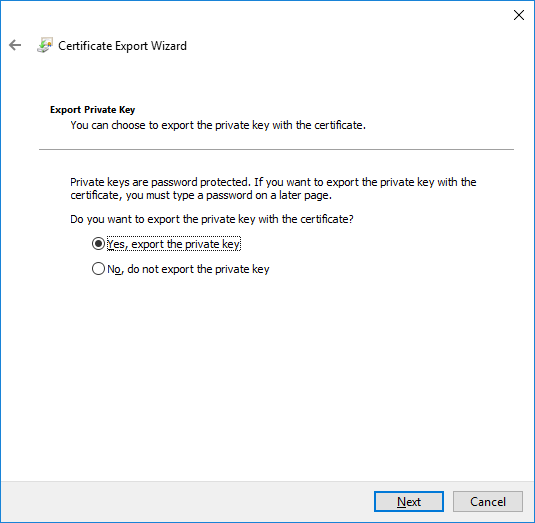
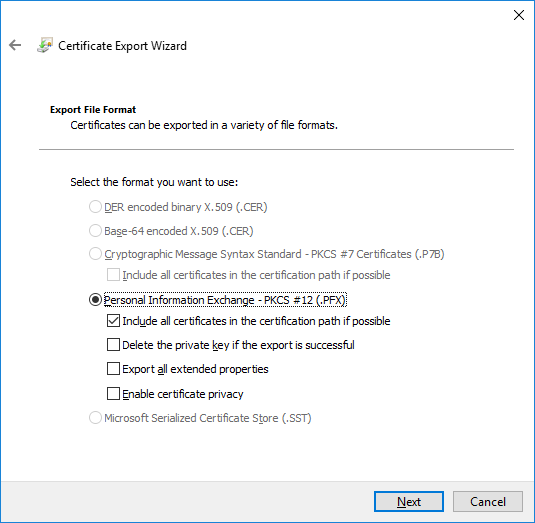
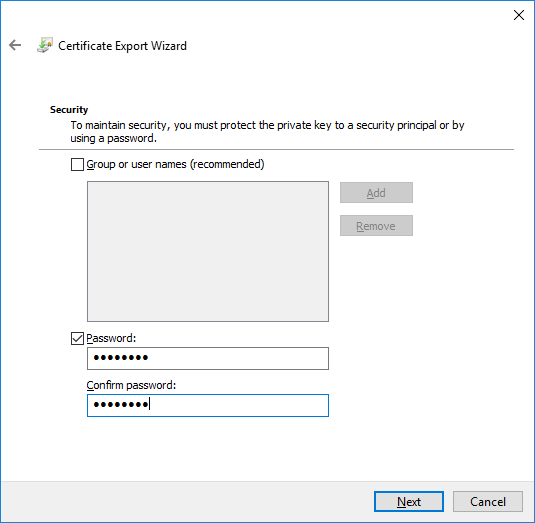
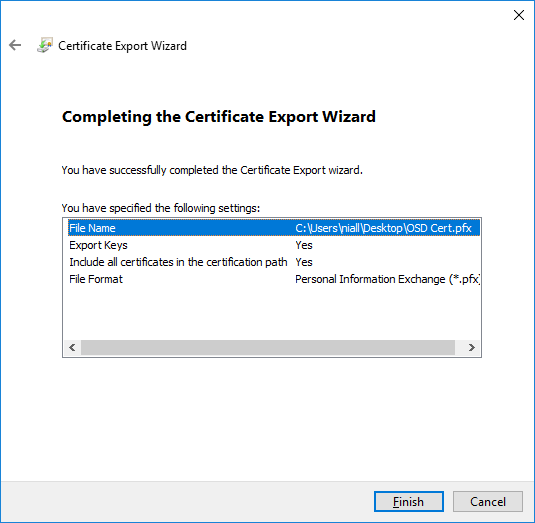
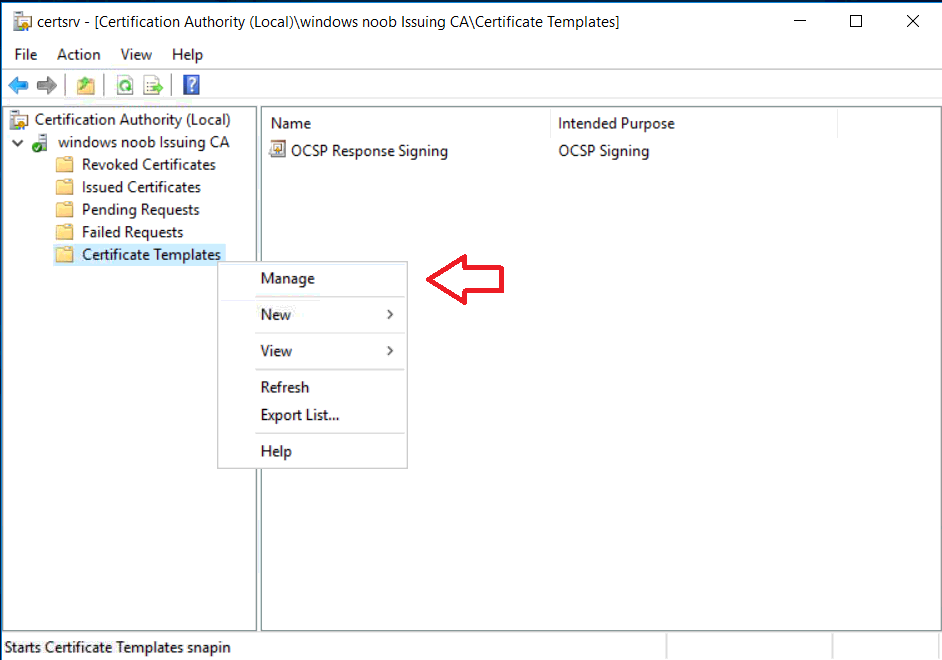
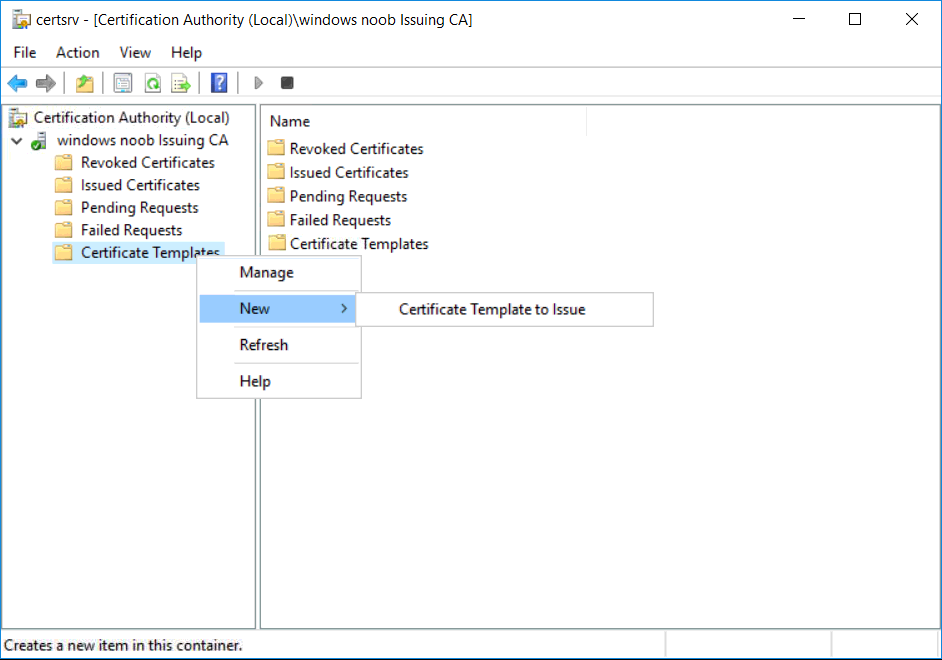
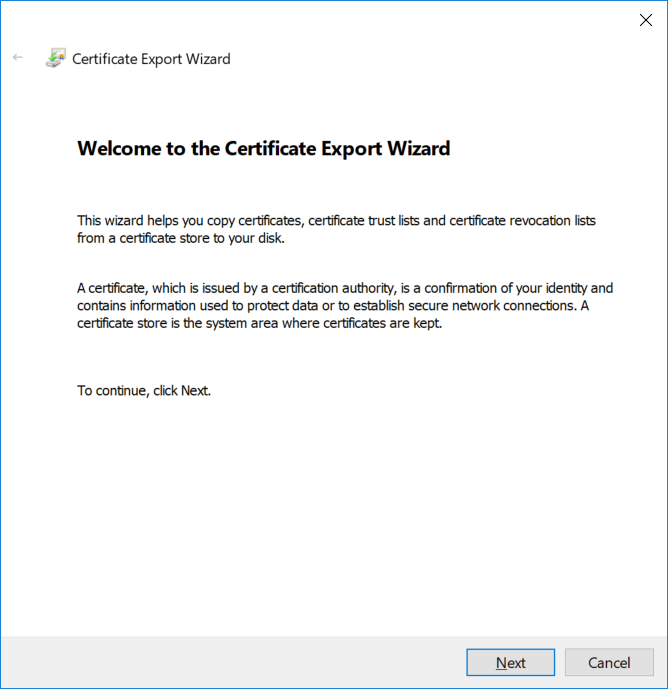
In a previous series of guides I showed you how to configure PKI in a lab on Windows Server 2016. In another series, I also showed you how to install System Center Configuration Manager (Current Branch) version 1802 on Windows Server 2016 with SQL Server 2017. In this lab, I will show you how to configure SCCM to utilize that PKI environment. This series is based upon an excellent video by the talented former Microsoft Premier Field Engineer Justin Chalfant here. If you haven't seen it yet, do check it out. The intention here is that after you've completed this PKI enabled SCCM lab you can then use this in future guides, and to dig deeper into new technologies from Microsoft, for example enabling a Cloud Management Gateway and/or Cloud Distribution Point and using later on, using Co-Management. Note: To complete this lab you must first complete the PKI Lab series (8 parts) and then install a new virtual machine within that PKI lab running System Center Configuration Manager (Current Branch) version 1902 utilizing this series, that installation of Configuration Manager will be in HTTP mode. In addition, you must configure the Software Update Point role (in HTTP mode) on CM01 See this guide (step 2 onward) for details. For details how to configure that, see this post. It will take some time to setup but you'll be glad you did. Also, don't do this in production without consulting with a PKI Expert. I don't claim to be one, I'm just helping you get it up and running in a lab. This is intended for use in a lab only. Step 1 - Create an Active Directory Security Group In this step you'll create an active directory group which will contain all your site systems that use Configuration Manager server roles which utilize IIS (Internet Information Systems) such as the below (1): Management point Distribution point Software update point State migration point Enrollment point Enrollment proxy point Application Catalog web service point Application Catalog website point A certificate registration point On the Active Directory domain controller (DC01), open Active Directory Users and Computers, and expand the windowsnoob organisational unit (OU) created in this Step 1, part 5 of this blog post. Click on Security Groups, and then right click and choose New, select Group. Give the group a name, SCCM IIS Servers. Once done, right click on the SCCM IIS Servers Active Directory Security Group, choose Properties and click on the Members tab, click on Add, for Object Types make sure Computers are selected. Add the Configuration Manager server (CM01) to that group. Once done, reboot the Configuration Manager server (CM01) using the following command otherwise you might get access denied when trying to request a certificate. shutdown /r Step 2. Create certificate templates on the Issuing CA In this step you will create three new certificate templates for use within SCCM by duplicating existing templates. Using the windowsnoob\Entadmin credentials, logon to the Issuing CA server (IssuingCA) and launch the certificate authority console (CertSrv.msc). In the three templates below, one uses the Web Server template, and the others use the Workstation Authentication template, you can verify which Microsoft certificate template to use by using the tables on the following blog post, of which i'm showing a screenshot below to make it clear. 1. SCCM IIS Certificate Right click on Certificate Templates and choose Manage. Scroll down to Web Server from the templates listed. Right click on the Web Server template and choose Duplicate Template. The Properties of New Template screen appears. Verify that the Certificate Authority Compatibility settings are set to Windows Server 2003. Note: When you use an enterprise certification authority and certificate templates, do not use the Version 3 templates (well you can but read this first). These certificate templates create certificates that are incompatible with System Center Configuration Manager. Instead, use Version 2 templates by using the following instructions. On the Compatibility tab of the certificate template properties, specify Windows Server 2003 for the Certification Authority option, and Windows XP / Server 2003 for the Certificate recipient option. (1) Click on the General tab and rename it to SCCM IIS Certificate. On the Request Handling tab, verify that Allow private key to be exported is not selected (default). On the Subject Name tab verify that the Supply in the Request is selected (default). On the Security tab, add the previously created Active Directory Security Group called SCCM IIS Servers and give it Read and Enroll access. Optionally you can remove Enroll from the Domain Admin and Enterprise Admins as it is mentioned in the docs. Click Apply to apply the changes and then close the Properties of New Template. 2. SCCM DP Certificate This template is used by the distribution point site system for Operating System Deployment (clients that are not domain joined). Next, right click on Workstation Authentication from the templates listed and choose Duplicate Template. The Properties of New Template screen appears. The Properties of New Template screen appears. Verify that the Certificate Authority Compatibility settings are set to Windows Server 2003. Click on the General tab and rename it to SCCM DP Certificate, change the validity period to something more reasonable, like 3 years. On the Request Handling tab, ensure that Allow private key to be exported is selected to allow us to export the certificate as a pfx file and we need the private key to do so, as we'll import that certificate into our console so that the clients can utilize it during imaging (workgroup members, to authenticate back to your site). On the Security tab, add the previously created Active Directory Security Group called SCCM IIS Servers and give it Read and Enroll access. Next, remove Domain Computers altogether. Click Apply to apply the changes and then close the Properties of New Template. 3. SCCM Client Certificate This template is used by clients to communicate with site systems. Next, right click on Workstation Authentication from the templates listed and choose Duplicate Template. The Properties of New Template screen appears. The Properties of New Template screen appears. Verify that the Certificate Authority Compatibility settings are set to Windows Server 2003. Click on the General tab and rename it to SCCM Client Certificate, change the validity period to something more reasonable, like 3 years. Under Subject Name verify that Build from Active Directory is selected. On the Request Handling tab, verify that Allow private key to be exported is not selected (default). On the Security tab, select Domain Computers and ensure that Read, Enroll and AutoEnroll permisions are selected. Click Apply to apply the changes and then close the Properties of New Template. The three SCCM templates are now shown below. Close the Certificate Templates console. Next you will issue these certificate templates. To do so, in the Certificate Authority (on the IssuingCA), right click on Certificate Templates and choose New, then Certificate Template to Issue. In the Enable Certificate Templates window, select the 3 previously created SCCM templates as shown below and click OK. They will now appear under Certificate Templates. Step 3. Verify Auto-Enrollment GPO is enabled for the Client Certificate In Part 8 of the PKI lab you enabled Auto Enrollment so that clients can request certificates automatically. As it is a lab, the setting is deployed in the default domain GPO. The setting is in Computer Configuration, Policies, Windows Settings, Security Settings, Public Key Policies, and Certificate Services Client - Auto Enrollment. The setting should look like so (Enabled). Step 4. Requesting the IIS and DP/OSD Certificates on the IIS Site System On the SCCM server (CM01), which hosts all those IIS ConfigMgr roles, start certlm.msc from an Administrative command prompt. if you expand Personal, then Certificates, you'll see certificates issued to that computer, there will be a few by default. In the administrative command prompt, run gpupdate /force to pull down group policy changes...and refresh the view in certlm. Below you can see the SCCM Client Certificate template was used to generate this Client Authentication certificate. Requesting New certificates Next, you will request certificates from Active Directory, to do so, right click on Certificates and choose All Tasks then Request New Certificate. click Next at the Before you begin screen, and verify that Active Directory Enrollment Policy is selected before clicking Next. Select the SCCM DP Certificate and SCCM IIS Certificate from those listed (you already have the SCCM Client Certificate from AutoEnrollment). You'll notice that for the SCCM IIS Certificate, more information is required to enroll, Click on the message to enter this info. For Alternative Name, choose the DNS option and then click on Add to add the hostname and fully qualified domain name of your SCCM server (CM01). Note: If you want this server to be available via IBCM you could also add the publicly available FQDN of the site here (eg: cm01.windowsnoob.com) Next Click on General, and give this cert a friendly name so we can distinguish it in IIS later when we bind it. click OK, then click Enroll. It should state a status of Succeeded for both certificates. If not look at the details to find out what went wrong. Click Finish to exit. Step 5. Exporting the Distribution Point certificate Next you need to export the Distribution Point certificate so that during OSD the client can authenticate to the management point in WinPE. To do that, refresh the view in Certificates (certlm.msc) and then select the client authentication certificate created with the SCCM DP Certificate template. Right click and choose All Tasks, then select Export. In the welcome to certificate export wizard click Next and choose to export the private key. stick with the defaults and give it a password that you will use when you import it back into the SCCM Console, I used P@ssw0rd Save the cert to your desktop with a filename of OSD Cert.pfx and continue through that wizard until completion. You should see that the export was successful. That's it for this part, please join me in part 2 where we will complete the configuration of SCCM to HTTPS. cheers niall Recommended reading (1) - https://docs.microsoft.com/en-us/sccm/core/plan-design/network/pki-certificate-requirements


-
How can I customize the start menu in Windows 10 using Intune
anyweb replied to anyweb's topic in Microsoft Intune
did you follow my guide 100% ? -
SCCM Task Sequence for BIOS (Legacy) to UEFI with secure boot ON.
anyweb replied to jockey's question in Microsoft Deployment Toolkit (MDT)
i'd recommend you look at the work of fellow MVP, MikeTerrill, as he's blogged this exact scenario very well. https://miketerrill.net/2017/09/06/windows-10-bios-to-uefi-in-place-upgrade-task-sequence-using-mbr2gpt/ -
if you have access to teamviewer i can remote in and help, do you ?
-
thanks I appreciate it ! as regards the %date% issue, can you tell me if you are you using MDT integrated with ConfigMgr or not ? as regards the progress bar not showing up, you probably need to modify the pixel settings as described in the blogpost, i'll include that info again here for you Tip: If you have rendering issues with the popup on different devices then edit the call ResizeWindow(425,335,500,375) values and ResizeWindow Function to fit your specific needs, I don't have access to too much hardware to test this on. The popup is fixed, if you want the user to be able to move it change the line caption="no" to caption="yes". If you want to programmatically use it then add a Window.moveTo(x, y) line.
-
PXE Boot Error "PXE-E53: No boot filename received"
anyweb replied to Newsy's topic in Configuration Manager 2012
you can't pxe boot on site B because you can't install Windows Deployment Services on Windows 7, you'll need a DP that supports WDS (Windows Server operating system) in order to PXE boot at that location. -
can you do a teamviewer session so i can remote in and see the problem ? if so, pm me the details, thanks if not, please raise a ticket with Microsoft CSS to get help thanks ! niall
-
what windows adk version are you using ?
-
if it's still failing, uninstall trend micro, reboot the server, and try again
-
what antivirus are you using ? can you disable it or add exclusions and try again ?
-
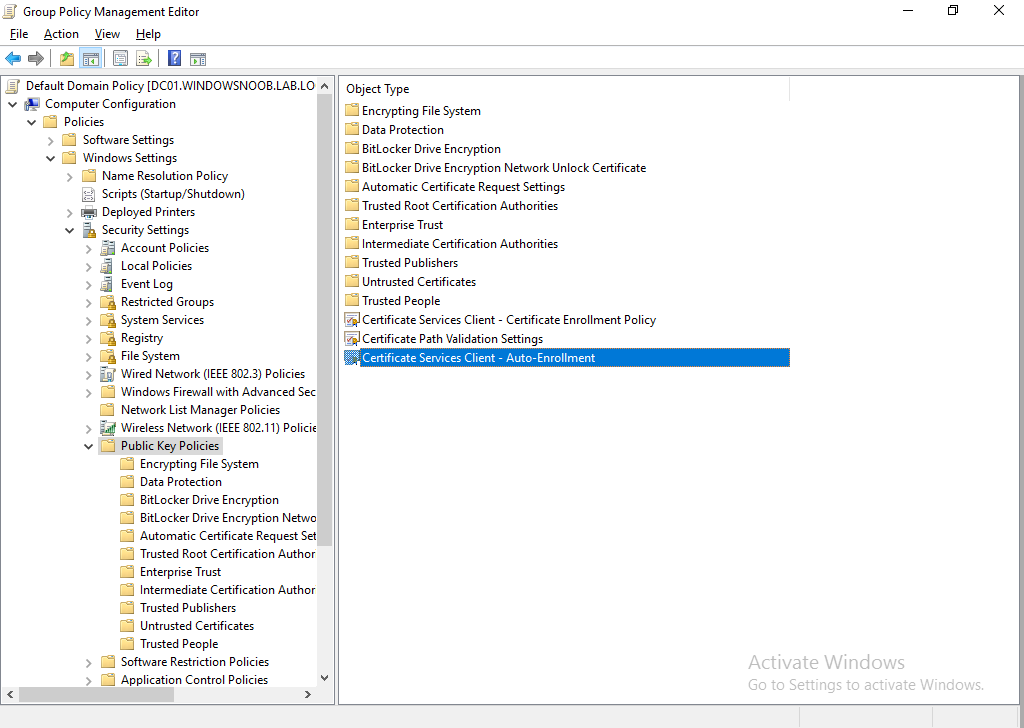
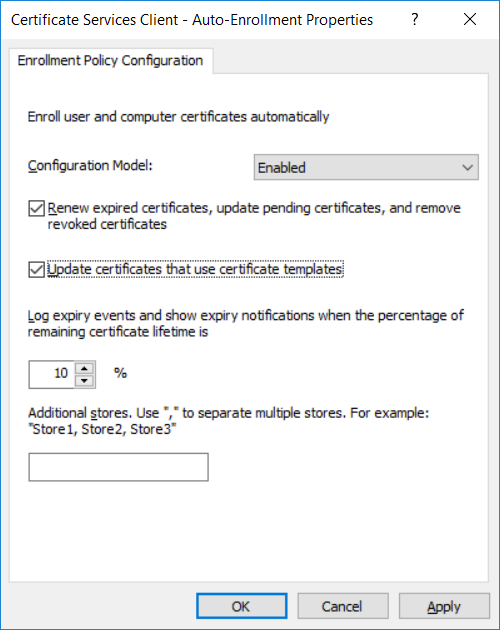
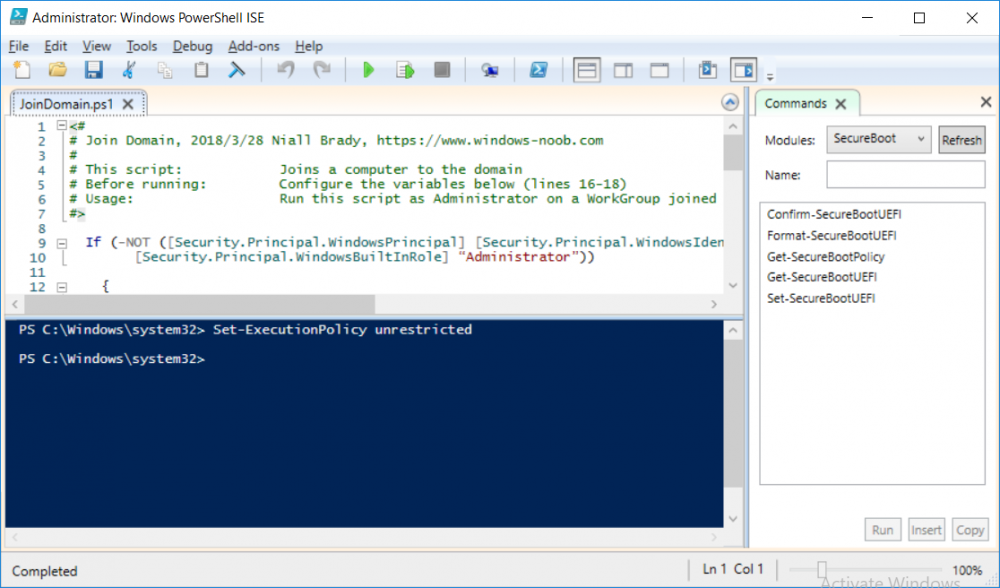
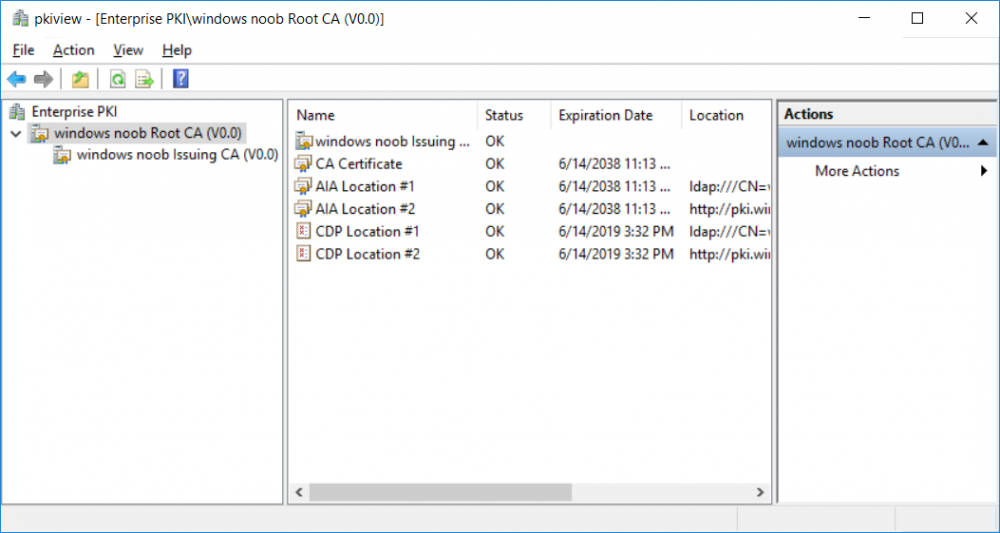
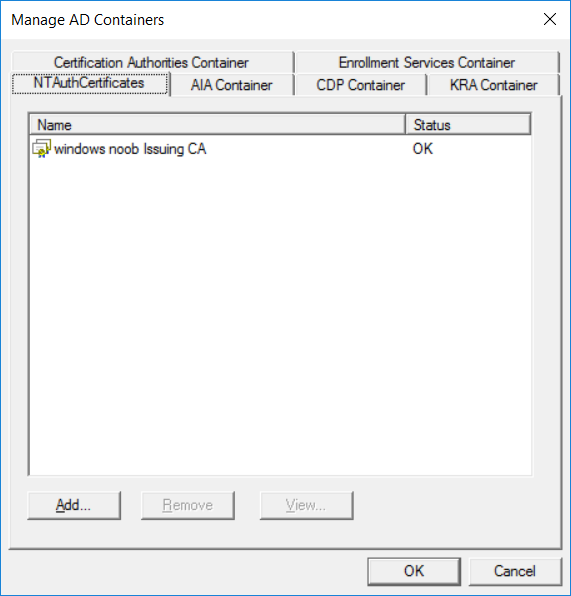
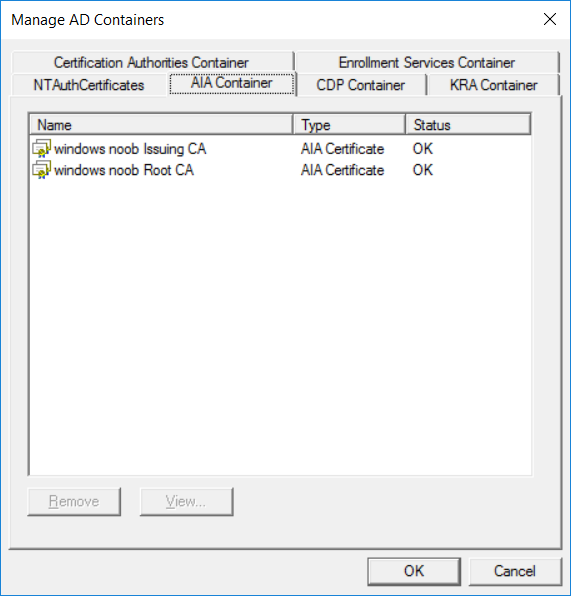
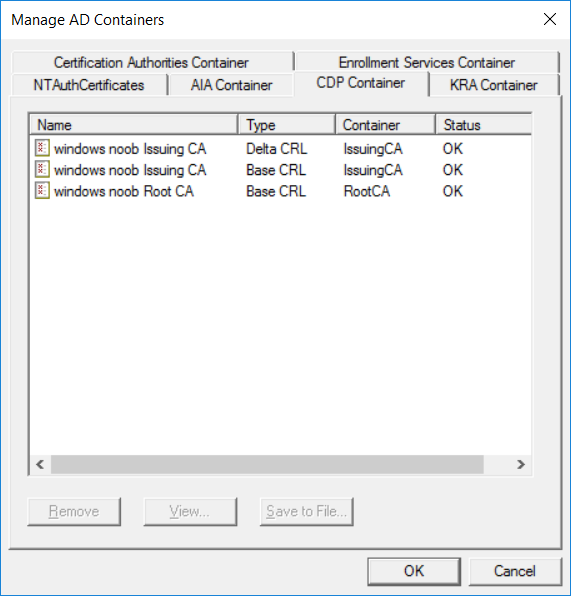
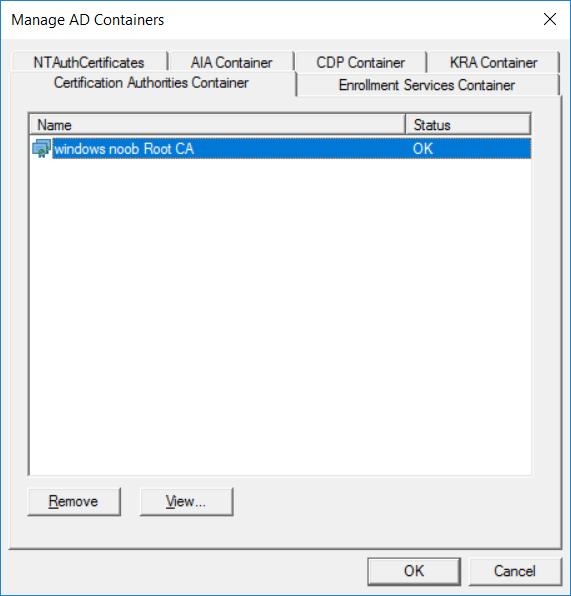
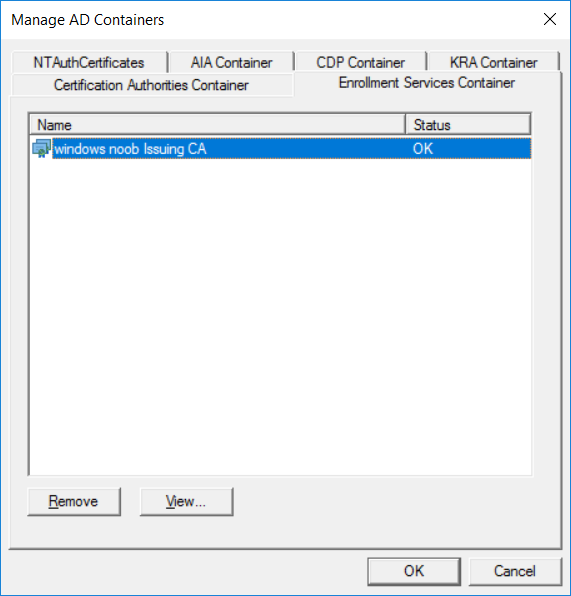
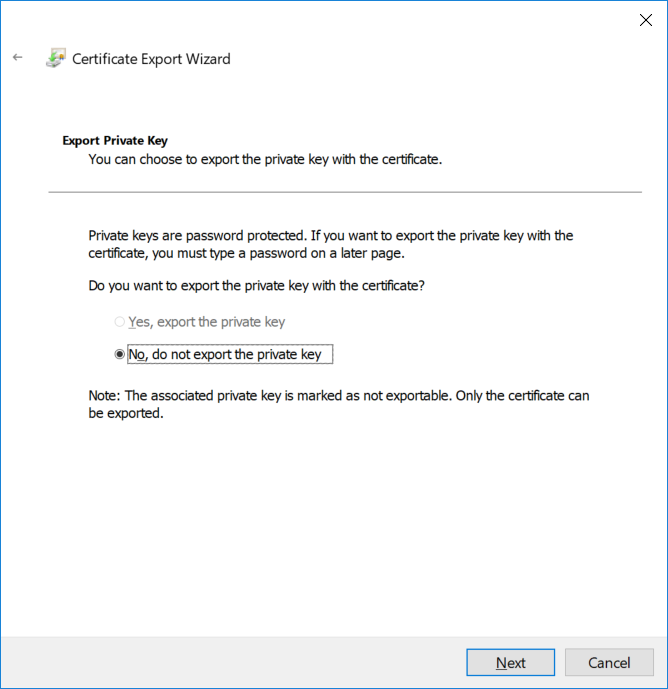
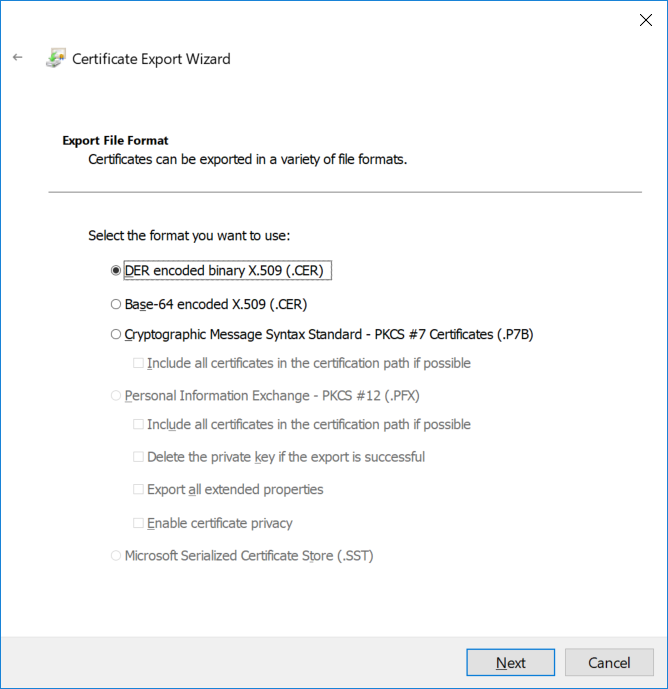
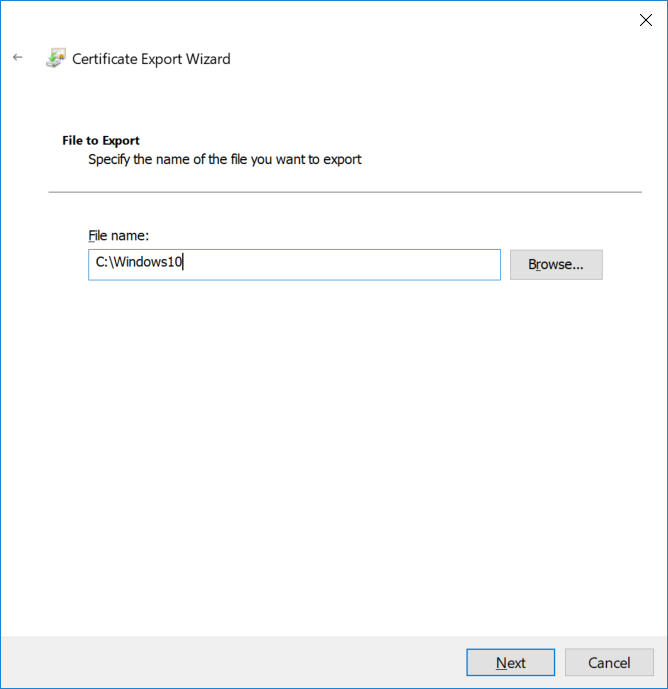
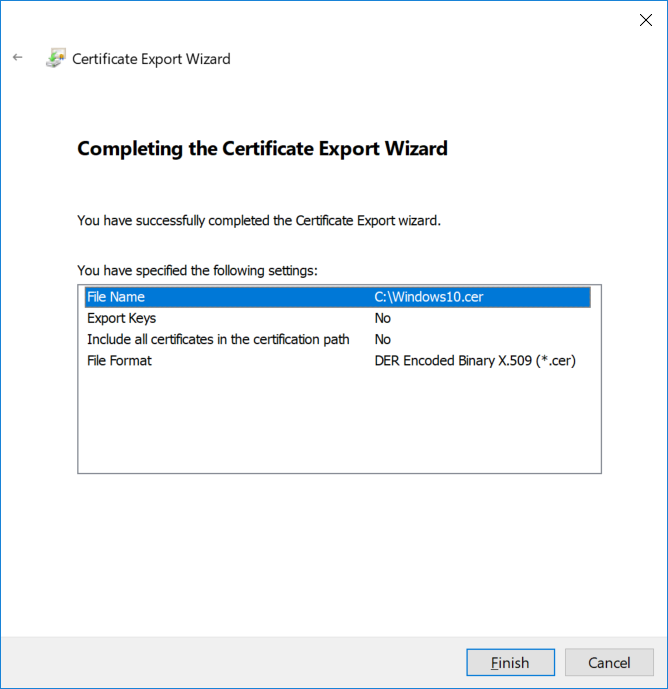
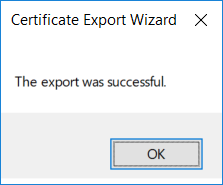
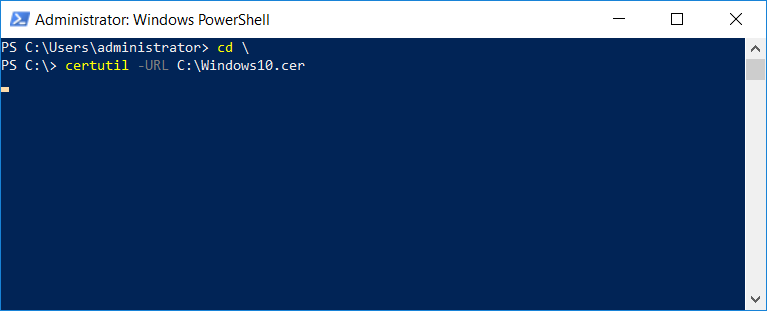
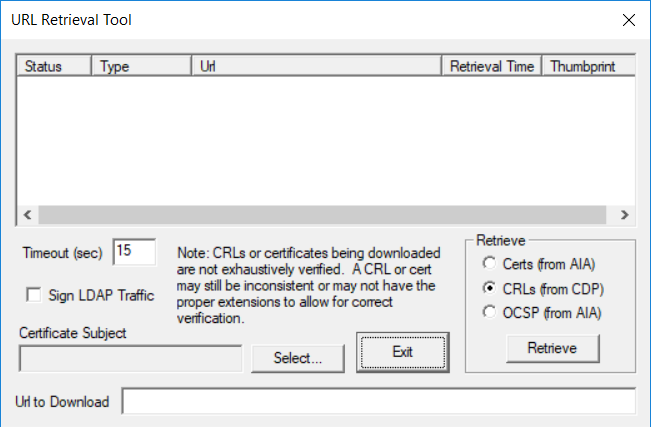
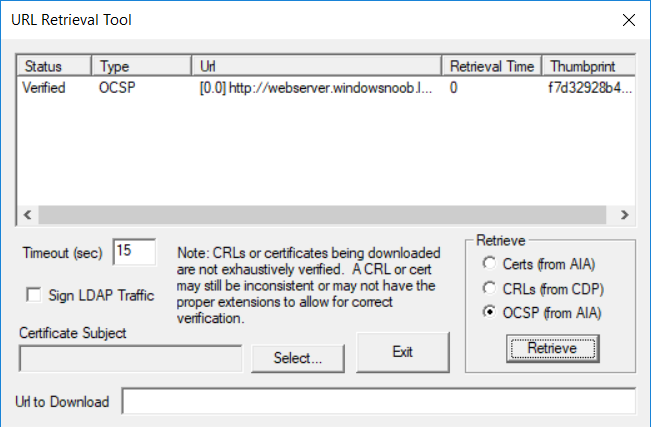
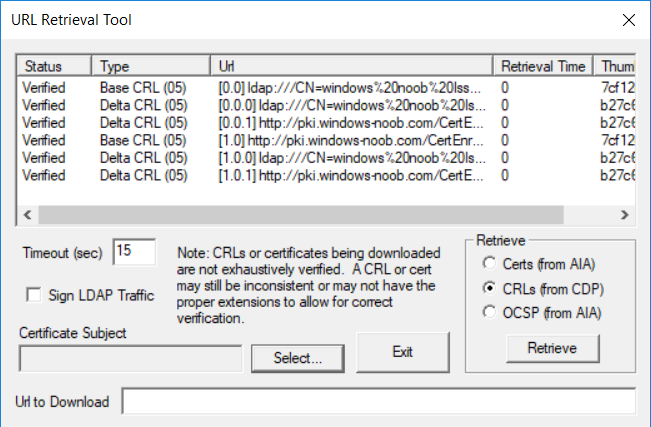
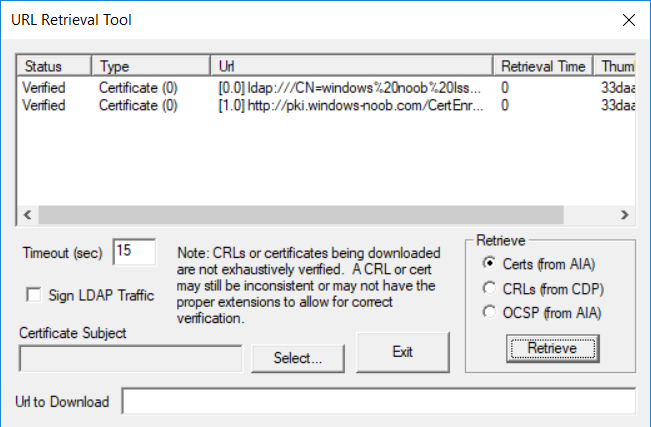
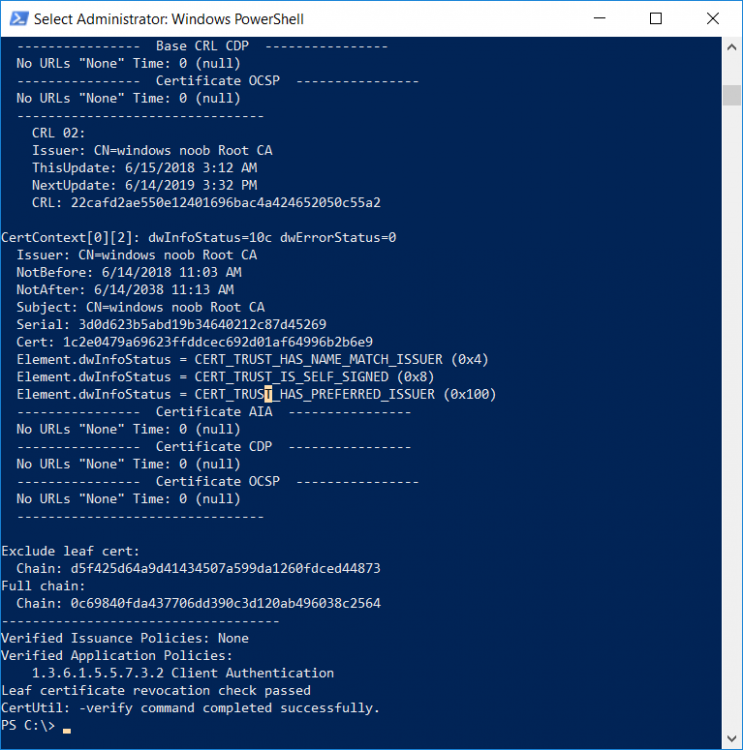
This series is comprised of different parts, listed below. Part 1 - Introduction and server setup Part 2 - Install and do initial configuration on the Standalone Offline Root CA Part 3 - Prepare the HTTP Web server for CDP and AIA Publication Part 4 - Post configuration on the Standalone Offline Root CA Part 5 - Installing the Enterprise Issuing CA Part 6 - Perform post installation tasks on the Issuing CA Part 7 - Install and configure the OCSP Responder role service Part 8 - Configure AutoEnroll and Verify PKI health (this part) In part 1 of this series, you configured your LAB for a 2 tier PKI hierarchy running on Windows Server 2016. You used PowerShell to create some virtual machines, and then installed Windows Server 2016, Windows 10 Enterprise version 1803 and optionally Smoothwall 3.1 before configuring the IP address scheme and Computer Names on the virtual machines. Finally you configured ADDS on DC01 so that you have a working Domain Controller for the rest of this LAB. In part 2 you installed and did the initial configuration on the Standalone Offline Root CA. In part 3 you prepared the HTTP Web Server for CDP and AIA Publication and you created a DNS record for the publicly available web server. In part 4 you performed post configuration on the Standalone Offline Root CA to set certificate revocation list (CRL) period registry settings using CertUtil, and then enabled object access Auditing and finally, you configured three locations for the Authority Information Access (AIA) and four locations for the Certificate revocation list Distribution Point (CDP), again using CertUtil. In part 5 you joined the IssuingCA computer to the windowsnoob domain before creating a new CAPolicy.inf file which was customized for the Issuing CA role. Next, you published the Root CA Certificate and CRL (both to Active Directory and the HTTP web server) and you installed the Enterprise Issuing CA before submitting a request to the StandAlone Offline Root CA. Next you installed the Issuing CA Certificate using the response files from the StandAlone Offline Root CA on the removable media. In part 6, you performed post installation and configuration of the IssuingCA server by configuring Certificate Revocation and CA Certificate Validity Periods, you then enabled auditing on the CA server, and configured the AIA and CDP. In part 7 you installed and configured the OCSP responder role service on the web server. Now you will configure Auto Enrollment and Verify PKI health. Step 1.Configure a GPO for Auto Enrollment Logon to to the Domain Controller (DC01) as windowsnoob\Administrator. Click Start, click Run, and then type gpmc.msc and press enter. Expand Forest, expand Domains, expand windowsnoob.lab.local, and then expand Group Policy Objects. Right click Default Domain Policy, then click Edit. Under Computer Configuration, expand Policies, expand Windows Settings, expand Security Settings, and then expand Public Key Policies. Select Certificate Services Client - Auto-Enrollment, right click and choose Properties. Change it from Not Configured to Enabled and enable the following 2 options. Renew expired certificates, update pending certificates, and remove revoked certificates Update certificate that use certificate templates As shown here. Click Apply when done, and close the Group Policy Management Editor and then close the Group Policy Management Console. Step 2. Configure AutoEnrollment for Workstation Authentication on the Issuing CA Ensure that you are logged on as windowsnoob\EntAdmin on the Issuing CA server (IssuingCA), start the Certification Authority console by entering certsrv.msc, ensure that windowsnoob Issuing CA is expanded. Right-click on Certificate Templates, then select Manage. In the Certificate Templates that appear, select Workstation Authentication. Right click it, and select Properties, click on the Security tab, select Domain Computers and ensure that AutoEnroll is selected, click Apply. Step 3. Join the Windows 10 computer to the domain Logon to Windows 10 version 1803 computer (Win101803) as Administrator, and copy the JoinDomain.ps1 script below to a folder called C:\Scripts. Open the script in PowerShell ISE as Administrator, then run Set-ExecutionPolicy to unrestricted before running the JoinDomain.ps1 PowerShell script by clicking on the Green Arrow in Windows PowerShell ISE. JoinDomain.ps1 Note: The computer will reboot by itself after joining the windowsnoob.lab.local domain. Step 4. Check PKI Health with Enterprise PKI To use the Enterprise PKI console to check PKI health, on the IssuingCA server, ensure that you are logged on as windowsnoob\entadmin. Run PKIView.msc from an administrative command prompt. Right click Enterprise PKI and then click Manage AD Containers. On the NTAuthCertificates tab, verify the windows noob Issuing CA certificate appears with a status of OK as shown below: On the AIA Container tab, verify both the windows noob Root CA and the windows noob Issuing CA certificates are present with a status of OK. On the CDP Container tab, verify that the windows noob Issuing CA has both Delta CRL and Base CRL, and that the windows noob Root CA has a Base CRL present and with a status of OK. On the Certification Authorities Container, verify that the windows noob Root CA certificate is present and with a status of OK. and finally on the Enrollment Services Container tab, verify that the windows noob Issuing CA certificate is present with a status of OK. Step 5. Configure Certificate Distribution on the Issuing CA To publish a certificate for computers in the enterprise do as follows. Logon to the IssuingCA computer as windowsnoob\EntAdmin. In the Certification Authority console (certsrv.msc), ensure that windows noob Issuing CA is expanded. Right-click Certificate Templates, select New and select Certificate Template to Issue. On the Enable Certificate Templates dialog box, select Workstation Authentication and then click OK. Step 6. verify certificate autoenrollment on the Windows 10 client To verify that autoenrollment of certificates on the Windows 10 compute do as follows. Log on to win101803.windowsnoob.lab.local as windowsnoob\Administrator. (Ensure that you switch user to log on as windowsnoob\Administrator) Click Start, type mmc and then press ENTER. Click File, and then click Add/Remove Snap-in. Click Certificates, then click Add, Select Computer Account, and then click Finish. Click OK. Expand Personal and select Certificates, if you do not see Certificates, in an Administrative Command prompt issue the following command gpupdate /force then refresh the view in the Certificates MMC. You should now see a Certificates folder and a certificate listed. This certificate was issued using AutoEnrollment which was configured above. Step 7. Verify PKI health on the issued certificate While logged on to W101803.windowsnoob.local.local as windowsnoob\Administrator, In the certificates console tree, expand Personal, click Certificates. In the details pane, right click the W101803.windowsnoob.lab.local certificate, click All Tasks, and then click Export. the Welcome to the certificate export wizard appears, click Next. Click Next at the No do not export the private key screen On the Export File Format page, click Next. [DER encoded binary X.509 (.CER) is the default selection]. in the File to Export, call it C:\Windows10 at the completing the certificate export wizard screen click Finish. you should be notified of the success of the export. Open an administrative command prompt and run the following commands: cd\ then certutil -URL C:\Windows10.cer The URL retrieval tool should appear. In the URL Retrieval Tool, select the OCSP (from AIA) option and then click Retrieve. Confirm that it shows status as Verified. In the URL Retrieval Tool, select the CRLs (from CDP) option and then click Retrieve. Confirm that it shows status as Verified. In the URL Retrieval Tool, select the Certs (from AIA) option and then click Retrieve. Confirm that it shows status as Verified. Click Exit to close URL Retrieval Tool. From the administrative command prompt run following command to thoroughly verify the certificate chain retrieval and revocation status. certutil -verify -urlfetch C:\Windows10.cer you'll see a lot of output similar to the following PS C:\> certutil -verify -urlfetch C:\Windows10.cer Issuer: CN=windows noob Issuing CA DC=windowsnoob DC=lab DC=local Name Hash(sha1): b500ca9b33a216fcc44492f25bb6e6b8bd6a5a78 Name Hash(md5): b0c8a9c15f77c9e2b7af24718ab3f3ec Subject: EMPTY (DNS Name=W101803.windowsnoob.lab.local) Name Hash(sha1): f944dcd635f9801f7ac90a407fbc479964dec024 Name Hash(md5): a46c3b54f2c9871cd81daf7a932499c0 Cert Serial Number: 1e000000057a5838e2727d5162000000000005 dwFlags = CA_VERIFY_FLAGS_CONSOLE_TRACE (0x20000000) dwFlags = CA_VERIFY_FLAGS_DUMP_CHAIN (0x40000000) ChainFlags = CERT_CHAIN_REVOCATION_CHECK_CHAIN_EXCLUDE_ROOT (0x40000000) HCCE_LOCAL_MACHINE CERT_CHAIN_POLICY_BASE -------- CERT_CHAIN_CONTEXT -------- ChainContext.dwInfoStatus = CERT_TRUST_HAS_PREFERRED_ISSUER (0x100) ChainContext.dwRevocationFreshnessTime: 3 Weeks, 1 Hours, 35 Minutes, 37 Seconds SimpleChain.dwInfoStatus = CERT_TRUST_HAS_PREFERRED_ISSUER (0x100) SimpleChain.dwRevocationFreshnessTime: 3 Weeks, 1 Hours, 35 Minutes, 37 Seconds CertContext[0][0]: dwInfoStatus=102 dwErrorStatus=0 Issuer: CN=windows noob Issuing CA, DC=windowsnoob, DC=lab, DC=local NotBefore: 7/6/2018 4:04 AM NotAfter: 7/6/2019 4:04 AM Subject: Serial: 1e000000057a5838e2727d5162000000000005 SubjectAltName: DNS Name=W101803.windowsnoob.lab.local Template: Workstation Authentication Cert: 9eae120ea27c064e609df51cacda77e286a223d6 Element.dwInfoStatus = CERT_TRUST_HAS_KEY_MATCH_ISSUER (0x2) Element.dwInfoStatus = CERT_TRUST_HAS_PREFERRED_ISSUER (0x100) ---------------- Certificate AIA ---------------- Verified "Certificate (0)" Time: 0 33daad0a6923fdbd02300d703264d13d70eedf42 [0.0] ldap:///CN=windows%20noob%20Issuing%20CA,CN=AIA,CN=Public%20Key%20Services,CN=Services,CN=Configuration,DC=windowsnoob,DC=lab,DC=local?cACertificate?base?objectClass=certificationAuthority Verified "Certificate (0)" Time: 0 33daad0a6923fdbd02300d703264d13d70eedf42 [1.0] http://pki.windows-noob.com/CertEnroll/IssuingCA.windowsnoob.lab.local_windows%20noob%20Issuing%20CA.crt ---------------- Certificate CDP ---------------- Verified "Base CRL (05)" Time: 0 7cf12cea65a271e322dcd148dafca9890381d68c [0.0] ldap:///CN=windows%20noob%20Issuing%20CA,CN=IssuingCA,CN=CDP,CN=Public%20Key%20Services,CN=Services,CN=Configuration,DC=windowsnoob,DC=lab,DC=local?certificateRevocationList?base?objectClass=cRLDistributionPoint Verified "Delta CRL (05)" Time: 0 b27c6e817abccb07e6d18c37c808013cc1377c1d [0.0.0] ldap:///CN=windows%20noob%20Issuing%20CA,CN=IssuingCA,CN=CDP,CN=Public%20Key%20Services,CN=Services,CN=Configuration,DC=windowsnoob,DC=lab,DC=local?deltaRevocationList?base?objectClass=cRLDistributionPoint Verified "Delta CRL (05)" Time: 0 b27c6e817abccb07e6d18c37c808013cc1377c1d [0.0.1] http://pki.windows-noob.com/CertEnroll/windows%20noob%20Issuing%20CA+.crl Verified "Base CRL (05)" Time: 0 7cf12cea65a271e322dcd148dafca9890381d68c [1.0] http://pki.windows-noob.com/CertEnroll/windows%20noob%20Issuing%20CA.crl Verified "Delta CRL (05)" Time: 0 b27c6e817abccb07e6d18c37c808013cc1377c1d [1.0.0] ldap:///CN=windows%20noob%20Issuing%20CA,CN=IssuingCA,CN=CDP,CN=Public%20Key%20Services,CN=Services,CN=Configuration,DC=windowsnoob,DC=lab,DC=local?deltaRevocationList?base?objectClass=cRLDistributionPoint Verified "Delta CRL (05)" Time: 0 b27c6e817abccb07e6d18c37c808013cc1377c1d [1.0.1] http://pki.windows-noob.com/CertEnroll/windows%20noob%20Issuing%20CA+.crl ---------------- Base CRL CDP ---------------- OK "Delta CRL (07)" Time: 0 b27c6e817abccb07e6d18c37c808013cc1377c1d [0.0] ldap:///CN=windows%20noob%20Issuing%20CA,CN=IssuingCA,CN=CDP,CN=Public%20Key%20Services,CN=Services,CN=Configuration,DC=windowsnoob,DC=lab,DC=local?deltaRevocationList?base?objectClass=cRLDistributionPoint OK "Delta CRL (07)" Time: 0 b27c6e817abccb07e6d18c37c808013cc1377c1d [1.0] http://pki.windows-noob.com/CertEnroll/windows%20noob%20Issuing%20CA+.crl ---------------- Certificate OCSP ---------------- Verified "OCSP" Time: 0 f7d32928b44de5b419a11bac19cc56fad7d4f9ee [0.0] http://webserver.windowsnoob.lab.local/ocsp -------------------------------- CRL 05: Issuer: CN=windows noob Issuing CA, DC=windowsnoob, DC=lab, DC=local ThisUpdate: 7/3/2018 7:02 AM NextUpdate: 7/10/2018 7:22 PM CRL: 7cf12cea65a271e322dcd148dafca9890381d68c Delta CRL 07: Issuer: CN=windows noob Issuing CA, DC=windowsnoob, DC=lab, DC=local ThisUpdate: 7/5/2018 7:02 AM NextUpdate: 7/6/2018 7:22 PM CRL: b27c6e817abccb07e6d18c37c808013cc1377c1d Application[0] = 1.3.6.1.5.5.7.3.2 Client Authentication CertContext[0][1]: dwInfoStatus=102 dwErrorStatus=0 Issuer: CN=windows noob Root CA NotBefore: 6/19/2018 4:34 AM NotAfter: 6/19/2028 4:44 AM Subject: CN=windows noob Issuing CA, DC=windowsnoob, DC=lab, DC=local Serial: 5600000002ff2362e624faf00a000000000002 Template: SubCA Cert: 33daad0a6923fdbd02300d703264d13d70eedf42 Element.dwInfoStatus = CERT_TRUST_HAS_KEY_MATCH_ISSUER (0x2) Element.dwInfoStatus = CERT_TRUST_HAS_PREFERRED_ISSUER (0x100) ---------------- Certificate AIA ---------------- Verified "Certificate (0)" Time: 0 1c2e0479a69623ffddcec692d01af64996b2b6e9 [0.0] ldap:///CN=windows%20noob%20Root%20CA,CN=AIA,CN=Public%20Key%20Services,CN=Services,CN=Configuration,DC=windowsnoob,DC=lab,DC=local?cACertificate?base?objectClass=certificationAuthority Verified "Certificate (0)" Time: 0 1c2e0479a69623ffddcec692d01af64996b2b6e9 [1.0] http://pki.windows-noob.com/CertEnroll/ROOTCA_windows%20noob%20Root%20CA.crt ---------------- Certificate CDP ---------------- Verified "Base CRL (02)" Time: 0 22cafd2ae550e12401696bac4a424652050c55a2 [0.0] ldap:///CN=windows%20noob%20Root%20CA,CN=ROOTCA,CN=CDP,CN=Public%20Key%20Services,CN=Services,CN=Configuration,DC=windowsnoob,DC=lab,DC=local?certificateRevocationList?base?objectClass=cRLDistributionPoint Verified "Base CRL (02)" Time: 0 22cafd2ae550e12401696bac4a424652050c55a2 [1.0] http://pki.windows-noob.com/CertEnroll/windows%20noob%20Root%20CA.crl ---------------- Base CRL CDP ---------------- No URLs "None" Time: 0 (null) ---------------- Certificate OCSP ---------------- No URLs "None" Time: 0 (null) -------------------------------- CRL 02: Issuer: CN=windows noob Root CA ThisUpdate: 6/15/2018 3:12 AM NextUpdate: 6/14/2019 3:32 PM CRL: 22cafd2ae550e12401696bac4a424652050c55a2 CertContext[0][2]: dwInfoStatus=10c dwErrorStatus=0 Issuer: CN=windows noob Root CA NotBefore: 6/14/2018 11:03 AM NotAfter: 6/14/2038 11:13 AM Subject: CN=windows noob Root CA Serial: 3d0d623b5abd19b34640212c87d45269 Cert: 1c2e0479a69623ffddcec692d01af64996b2b6e9 Element.dwInfoStatus = CERT_TRUST_HAS_NAME_MATCH_ISSUER (0x4) Element.dwInfoStatus = CERT_TRUST_IS_SELF_SIGNED (0x8) Element.dwInfoStatus = CERT_TRUST_HAS_PREFERRED_ISSUER (0x100) ---------------- Certificate AIA ---------------- No URLs "None" Time: 0 (null) ---------------- Certificate CDP ---------------- No URLs "None" Time: 0 (null) ---------------- Certificate OCSP ---------------- No URLs "None" Time: 0 (null) -------------------------------- Exclude leaf cert: Chain: d5f425d64a9d41434507a599da1260fdced44873 Full chain: Chain: 0c69840fda437706dd390c3d120ab496038c2564 ------------------------------------ Verified Issuance Policies: None Verified Application Policies: 1.3.6.1.5.5.7.3.2 Client Authentication Leaf certificate revocation check passed CertUtil: -verify command completed successfully. PS C:\> Review the output and make sure all the chain retrieval and revocation status are successfully verified. Job done ! That's it for this mini-series about setting up PKI in a lab, thanks for joining me, I hope you completed everything successfully and have a better understanding of how PKI works and how to set it up in a lab. Next steps If you'd like to see how SCCM works with HTTPS, see below:- How can I configure System Center Configuration Manager in HTTPS mode (PKI) - Part 1 How can I configure System Center Configuration Manager in HTTPS mode (PKI) - Part 2 cheers niall.


-
thanks, part 2 is linked at the bottom of the post, and you can see the other parts here
-
hi and welcome, thanks for buying the book ! and your kind words, i appreciate it, i'd suggest you bookmark this link and use the guides contained within to advance your knowledge, the book is still valid for many things like OSD and MBAM, however the link below contains guides that are up to date with the current branch infrastructure, https://www.windows-noob.com/forums/topic/13288-step-by-step-guides-system-center-configuration-manager-current-branch-and-technical-preview/ nowaday's, I build all my labs using Windows Server 2016 based on the following scripts and posts · How can I install System Center Configuration Manager (Current Branch) version 1802 on Windows Server 2016 with SQL Server 2017 – Part 1 · How can I install System Center Configuration Manager (Current Branch) version 1802 on Windows Server 2016 with SQL Server 2017 – Part 2 · How can I install System Center Configuration Manager (Current Branch) version 1802 on Windows Server 2016 with SQL Server 2017 – Part 3 · How can I install System Center Configuration Manager (Current Branch) version 1802 on Windows Server 2016 with SQL Server 2017 – Part 4 I hope this helps, if not, ask away here cheers niall
-
Configuring BitLocker in Intune - Part 2. Automating Encryption
anyweb replied to anyweb's topic in Microsoft Intune
do you have a possibility to do a teamviewer session with me so that i can see how you are testing this / -
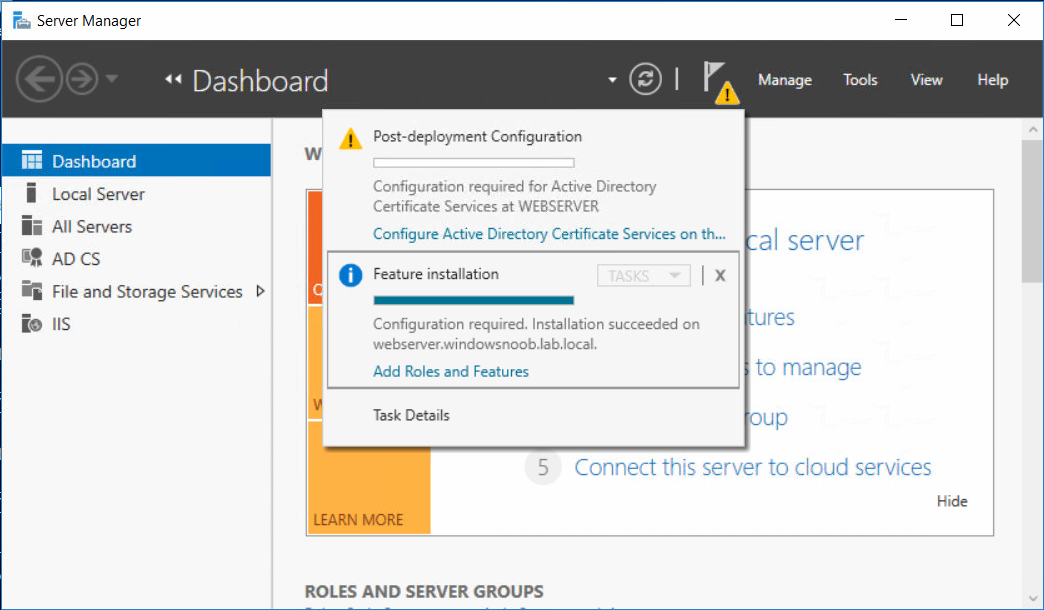
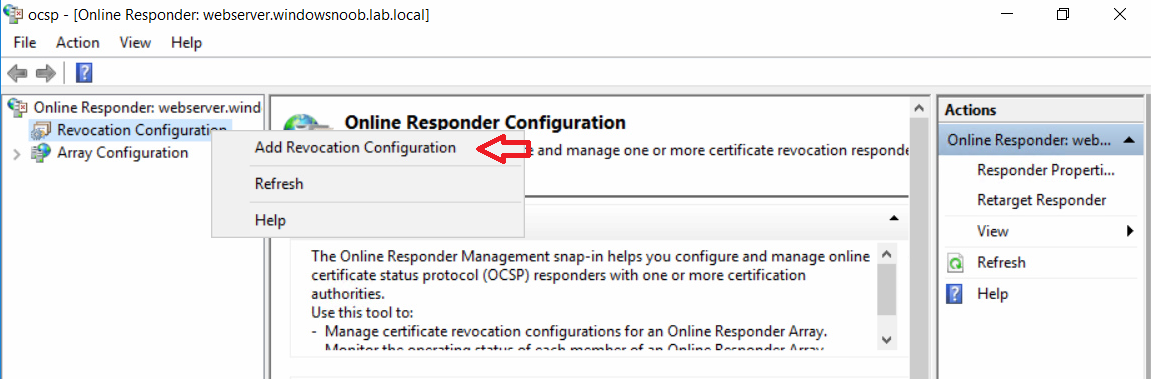
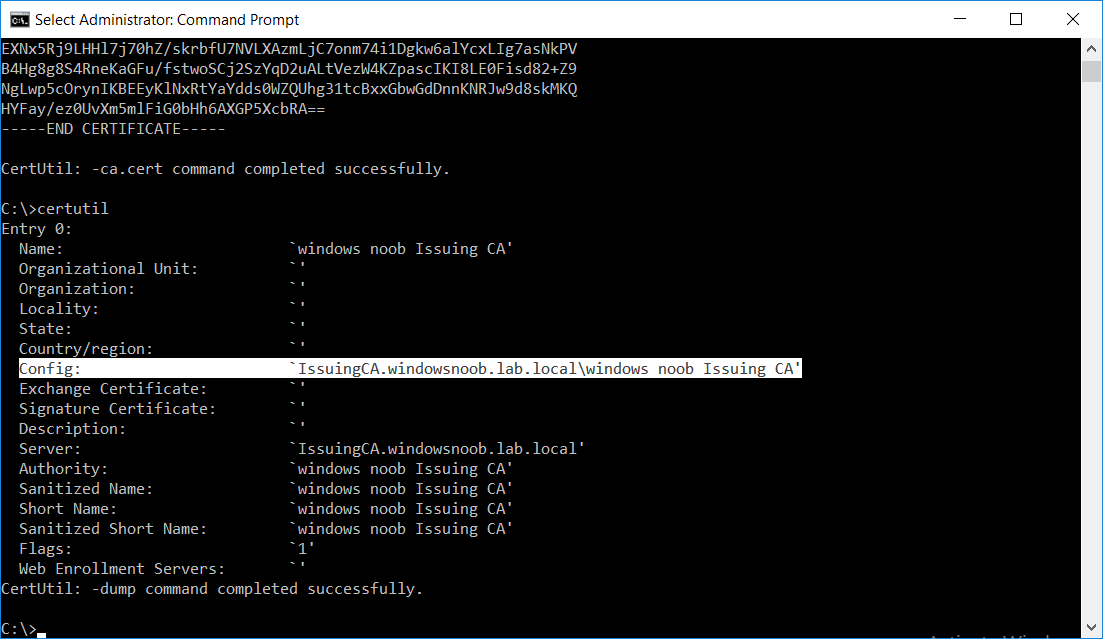
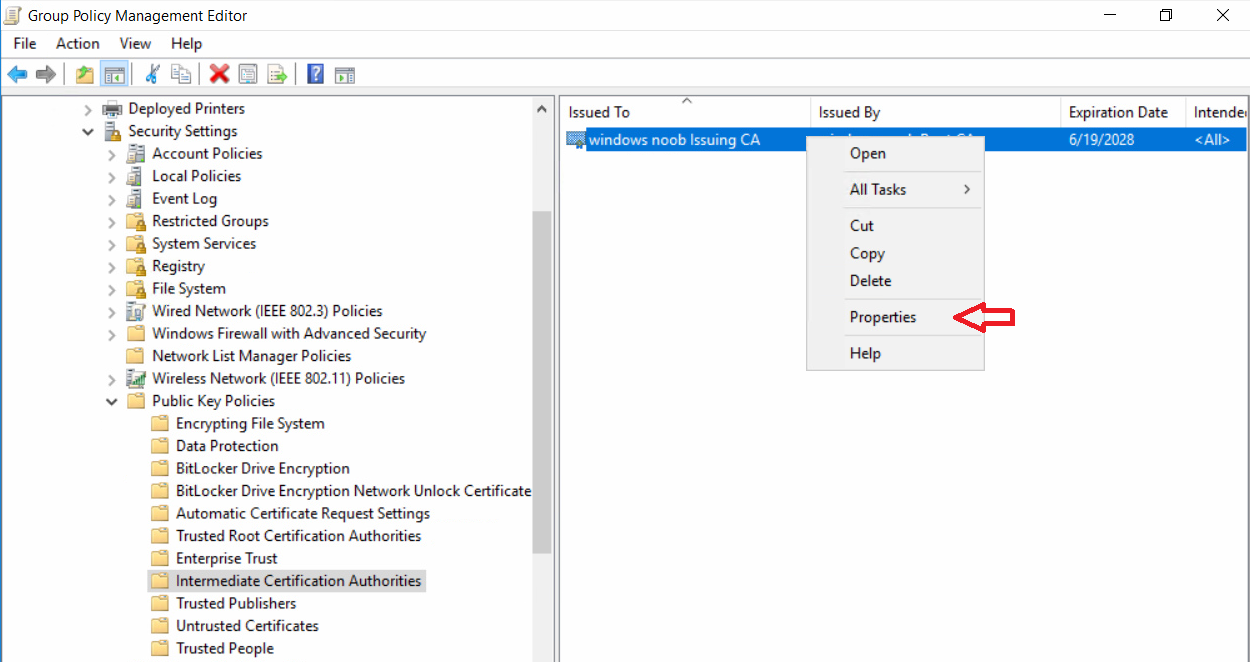
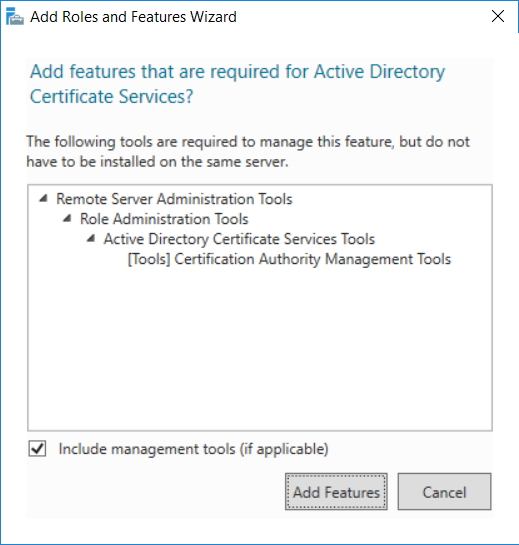
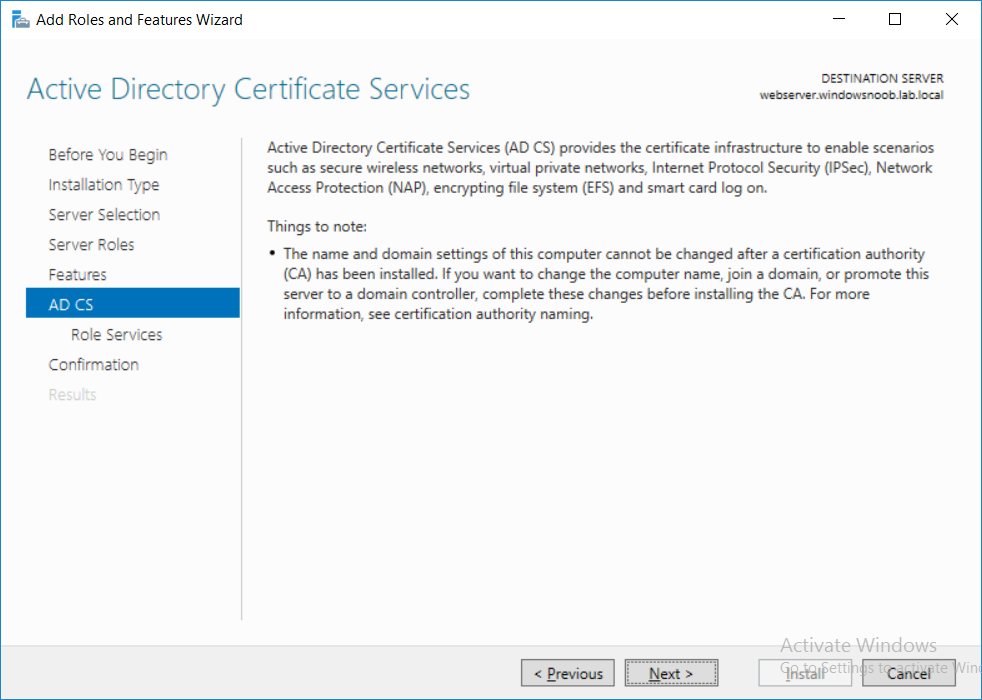
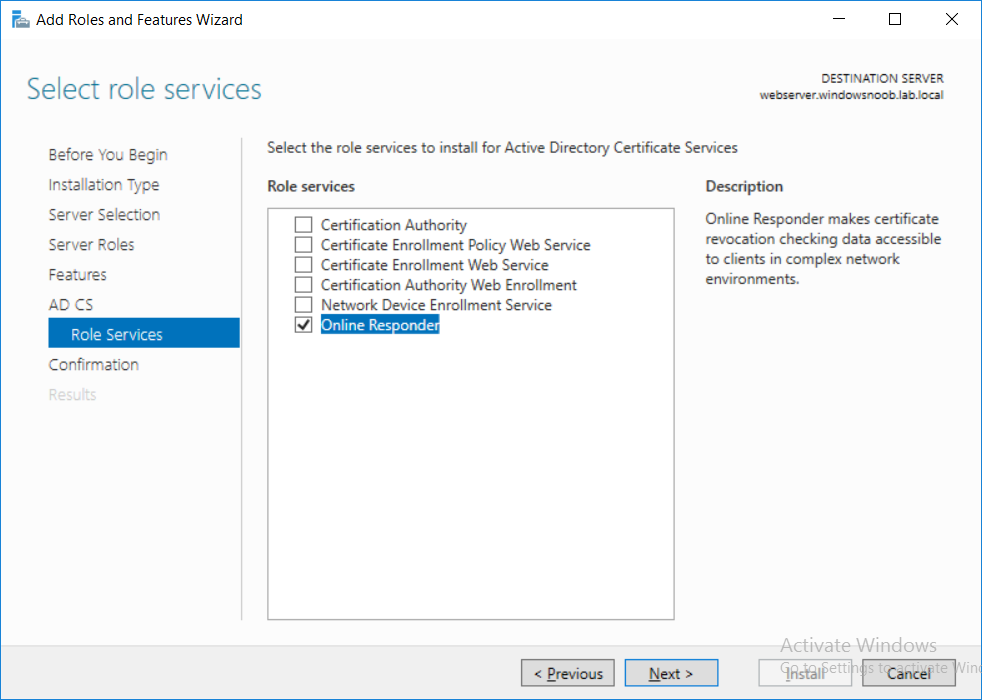
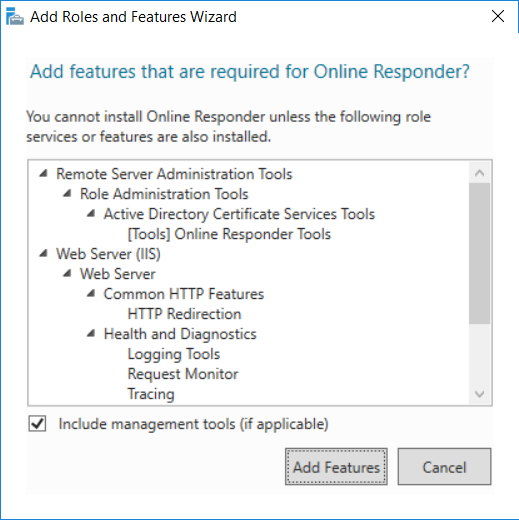
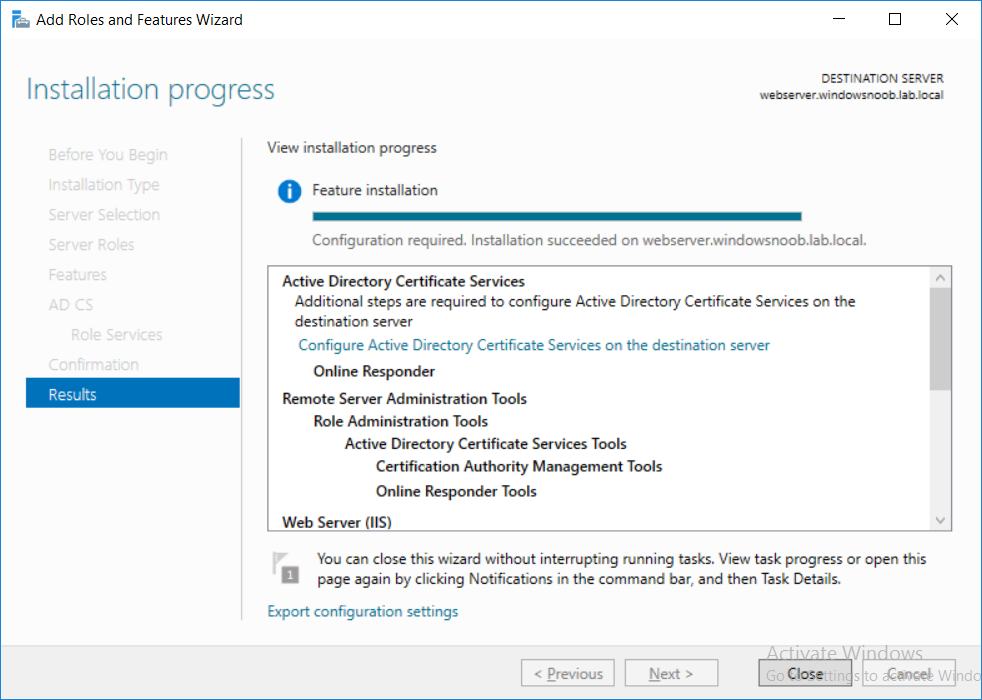
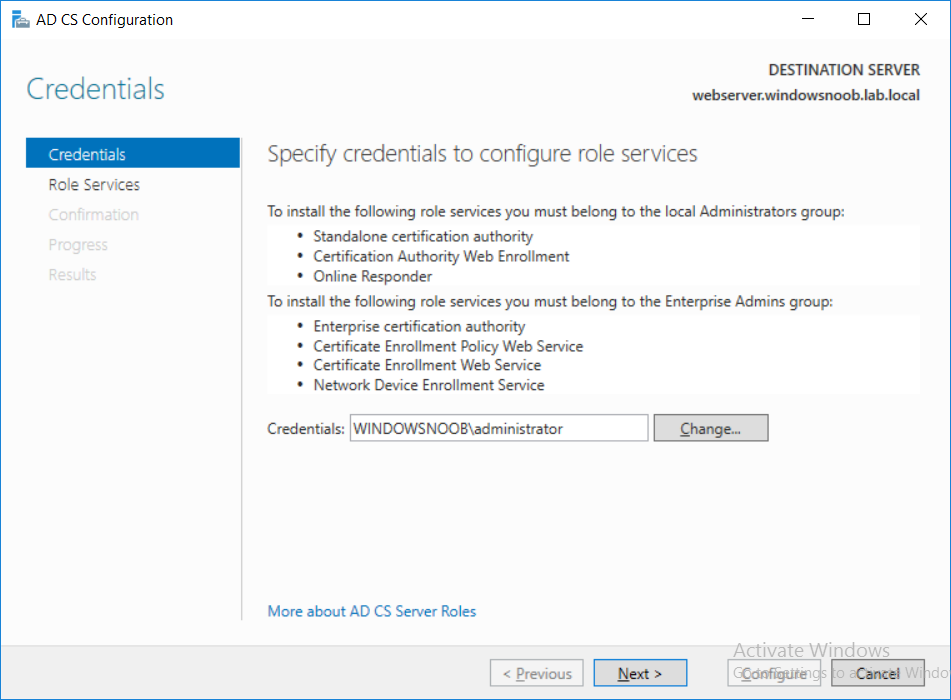
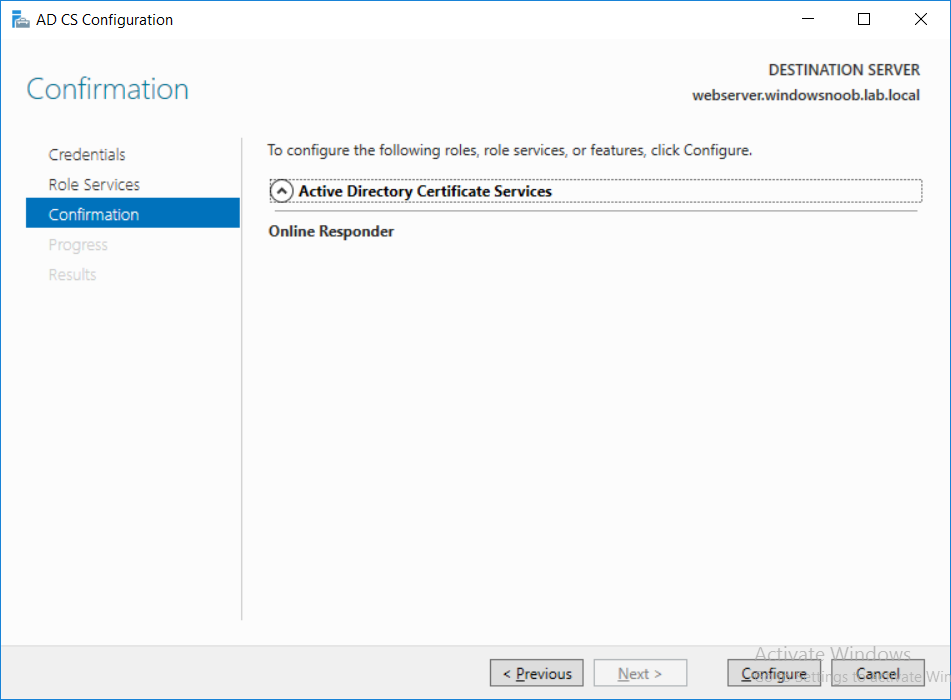
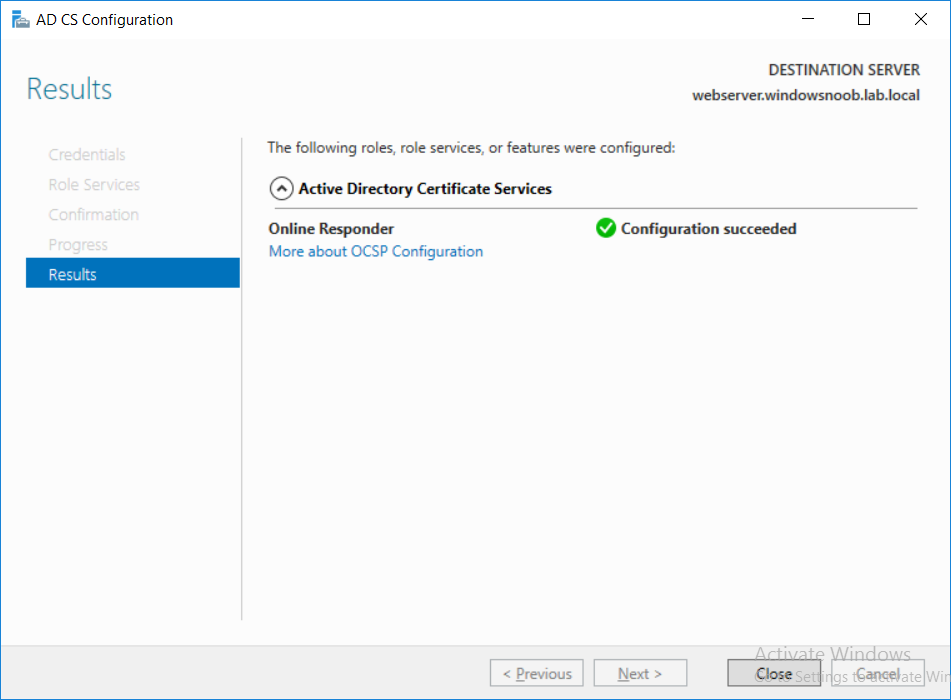
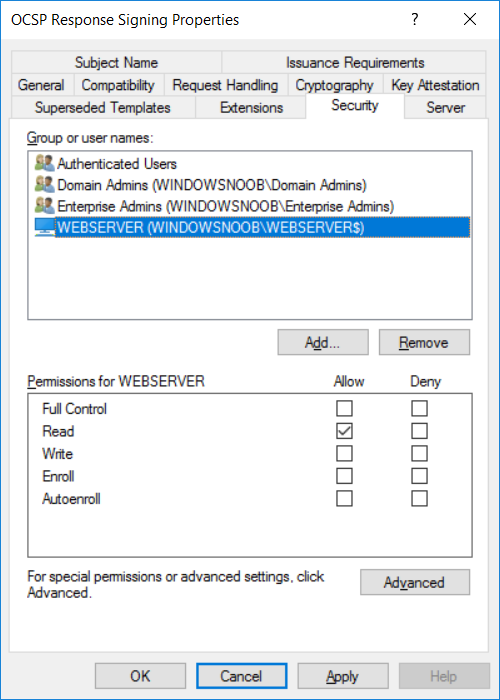
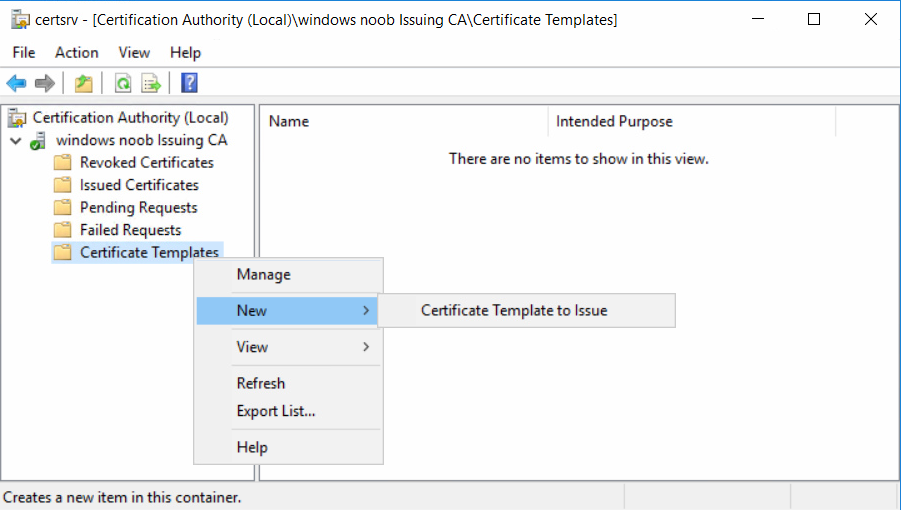
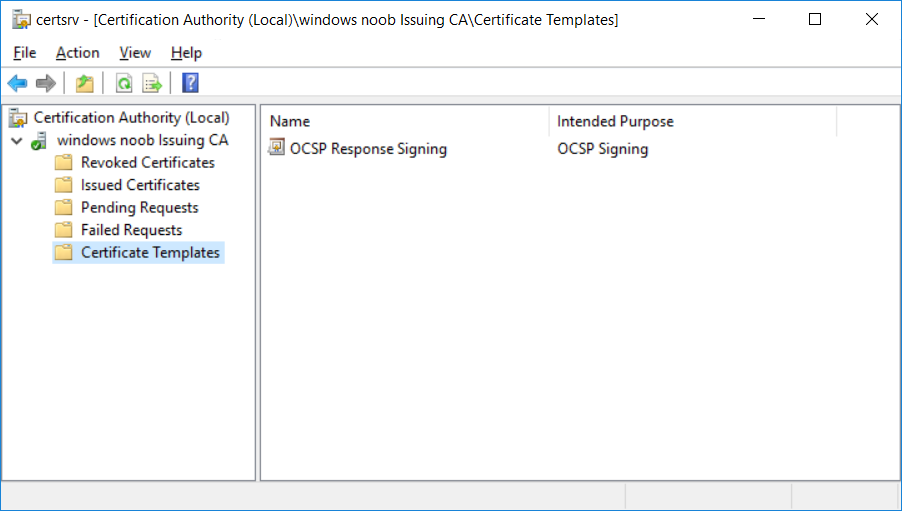
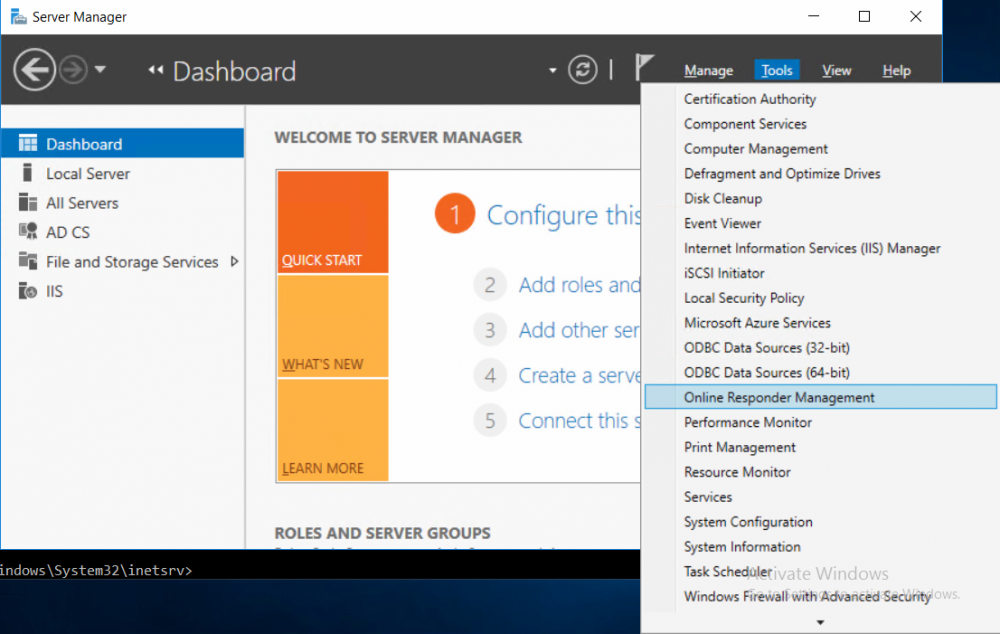
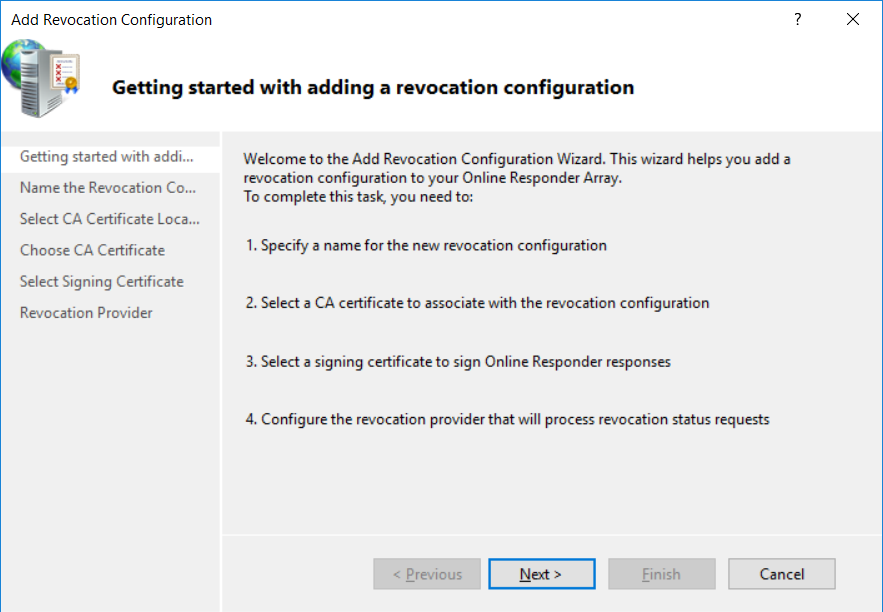
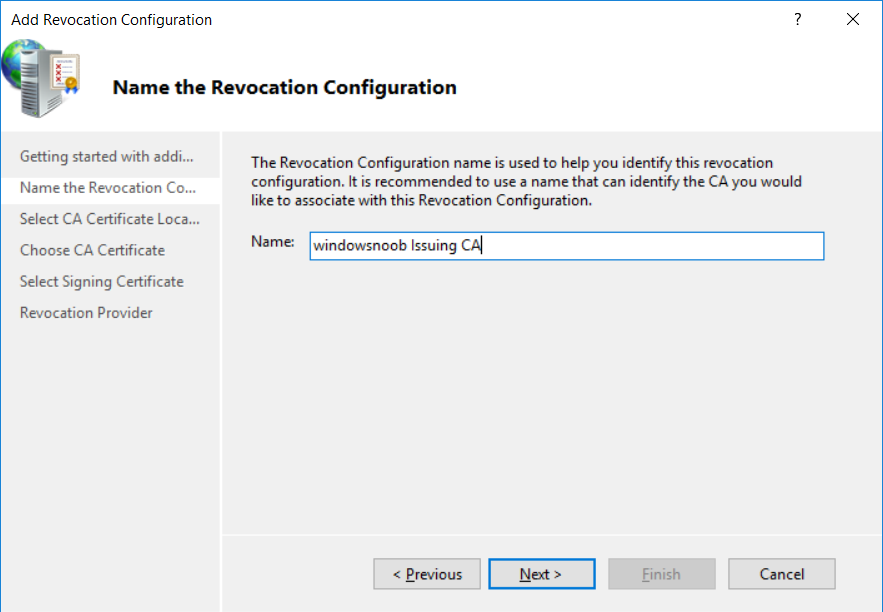
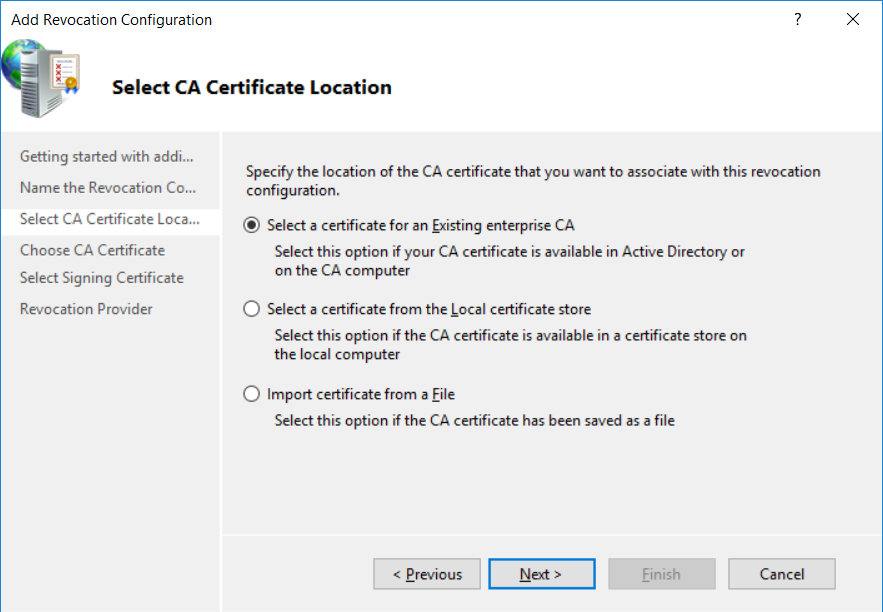
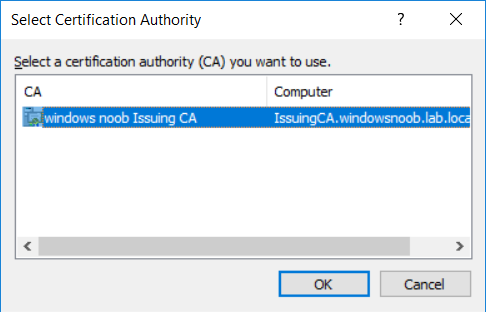
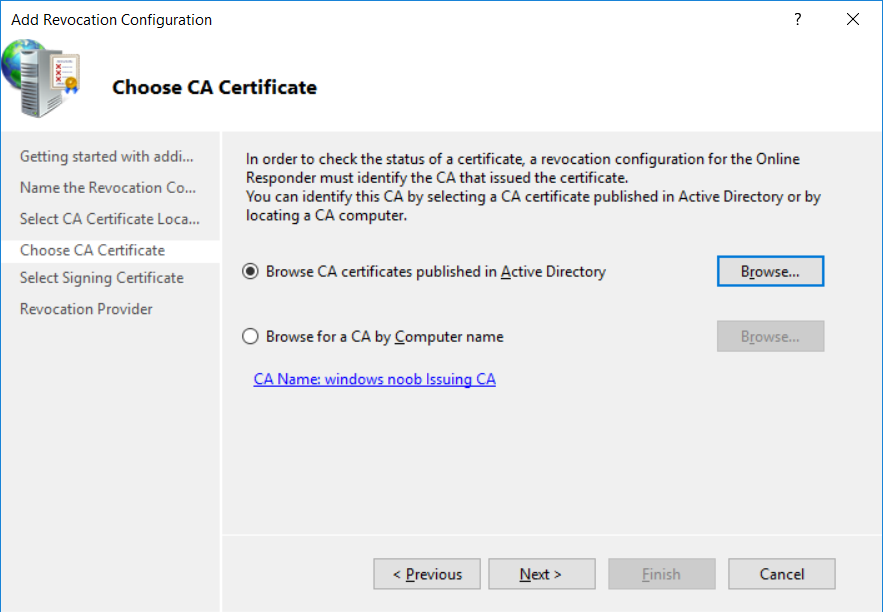
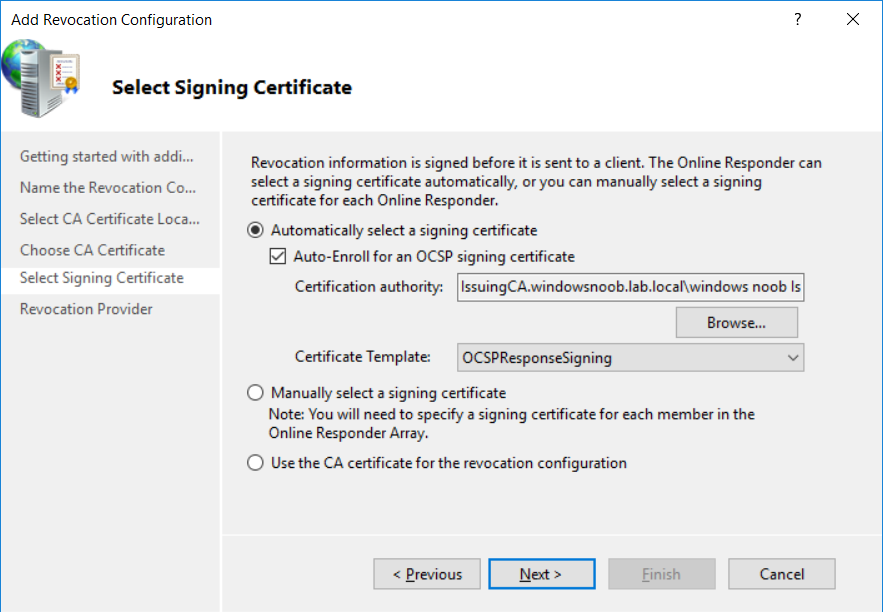
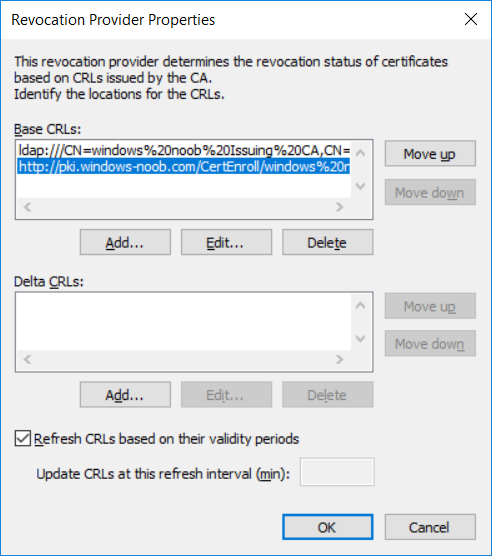
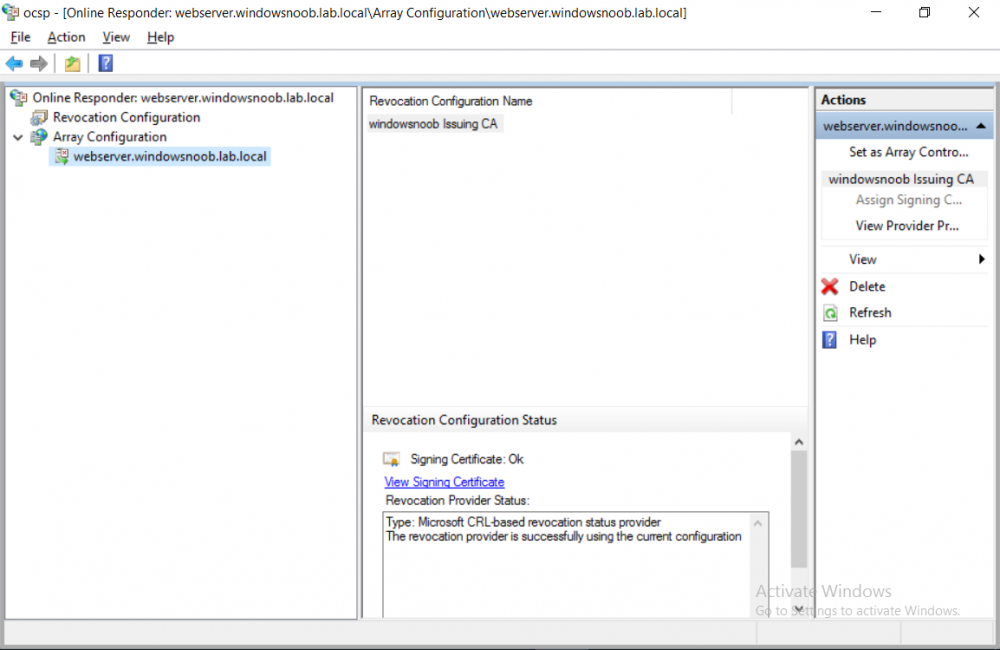
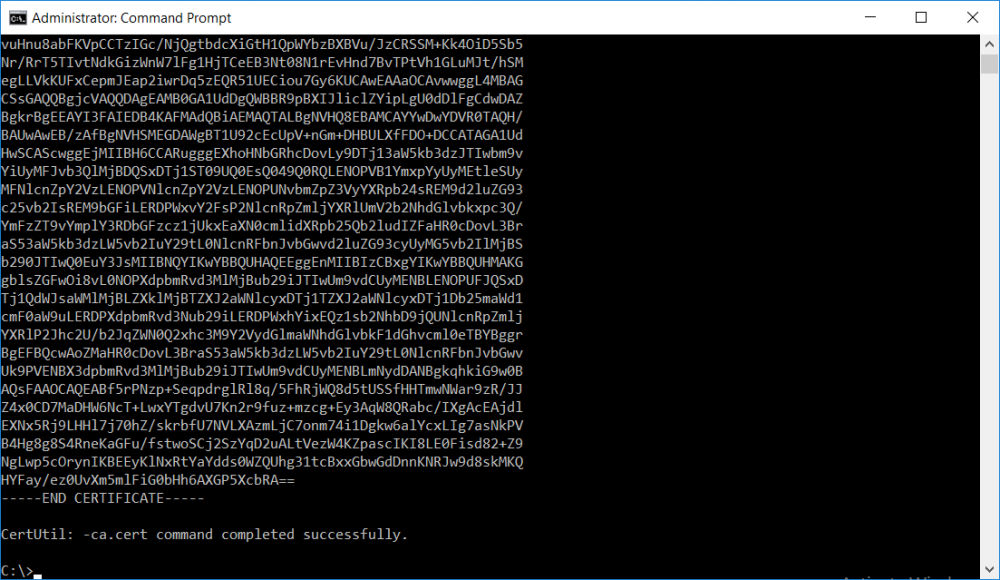
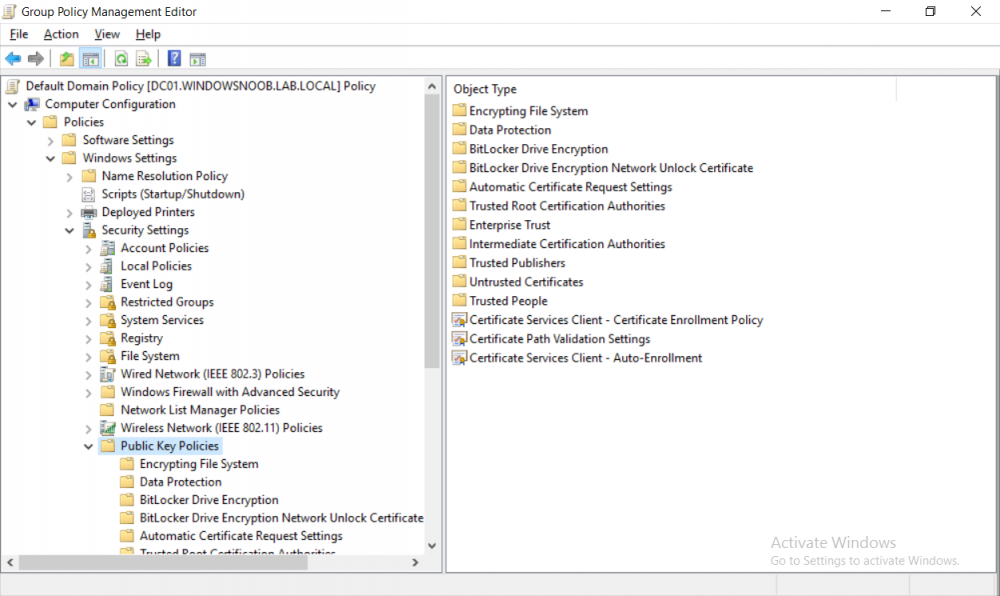
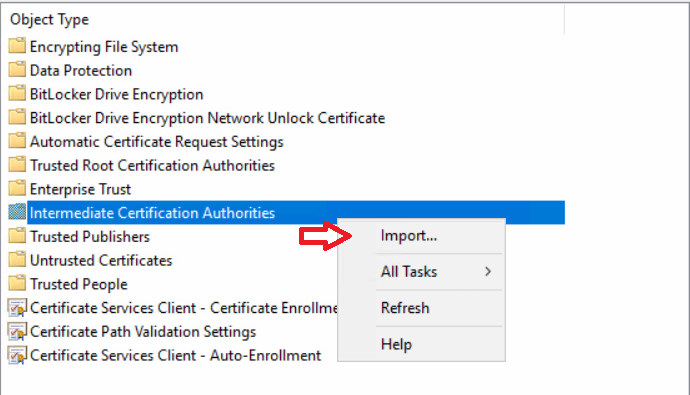
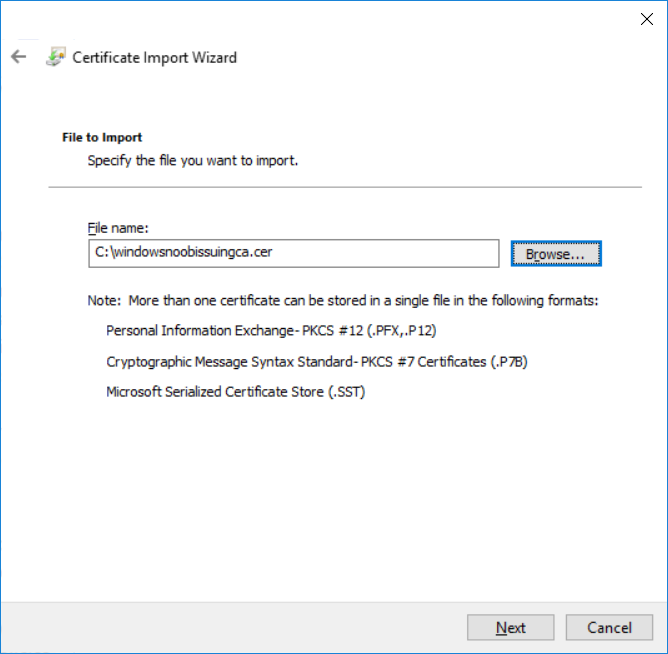
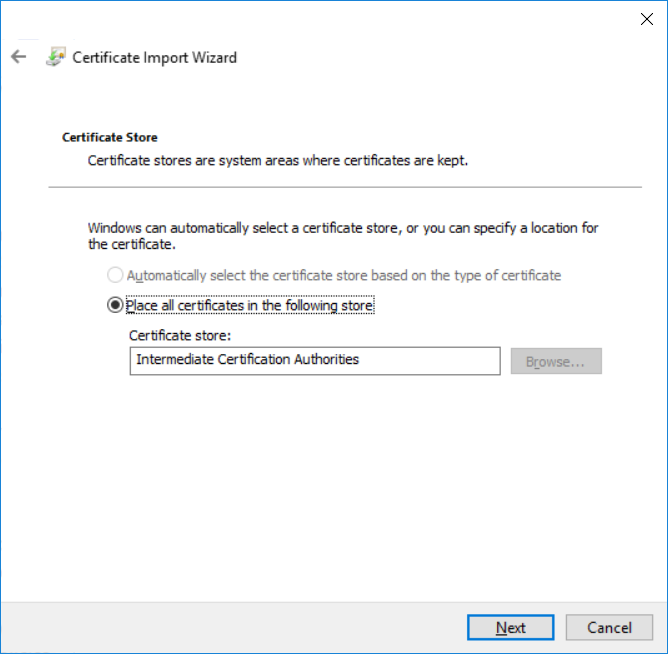
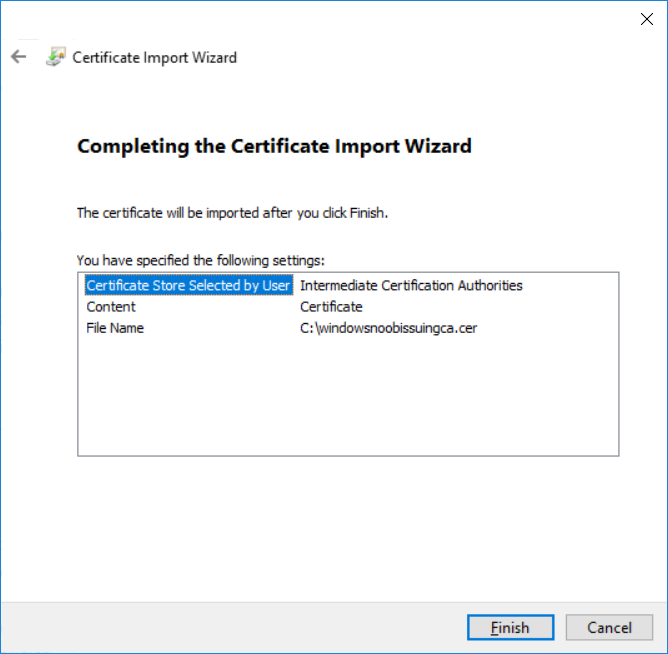
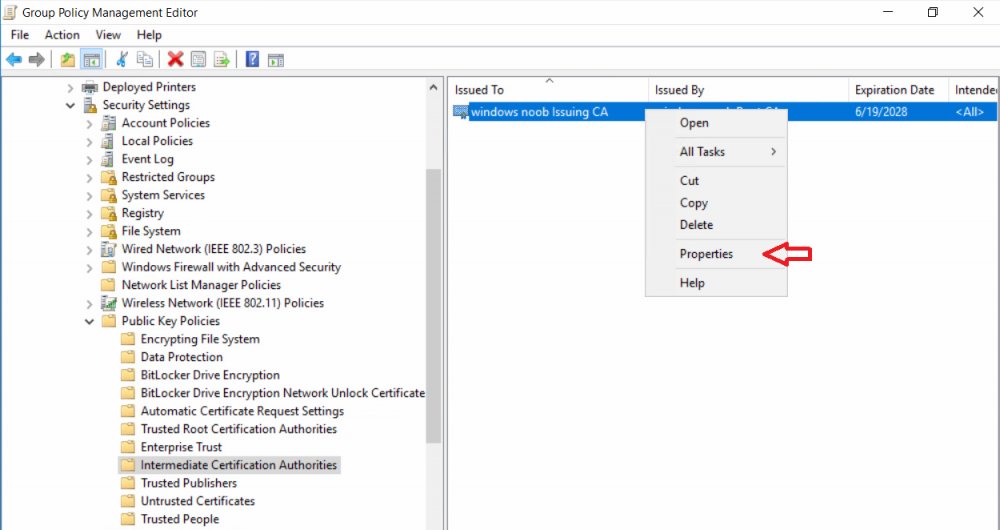
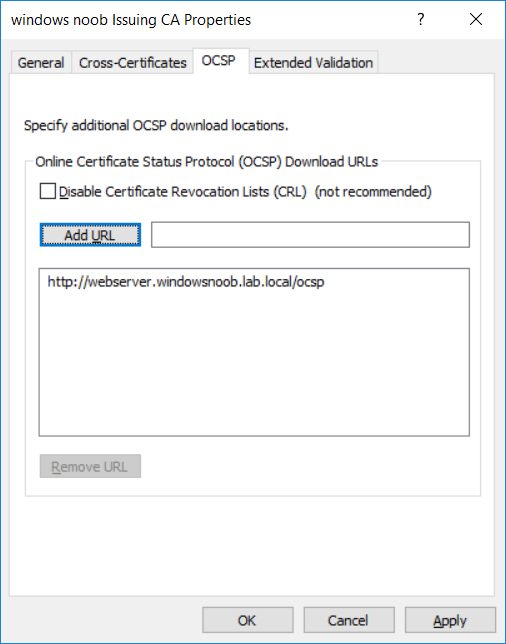
This series is comprised of different parts, listed below. Part 1 - Introduction and server setup Part 2 - Install and do initial configuration on the Standalone Offline Root CA Part 3 - Prepare the HTTP Web server for CDP and AIA Publication Part 4 - Post configuration on the Standalone Offline Root CA Part 5 - Installing the Enterprise Issuing CA Part 6 - Perform post installation tasks on the Issuing CA Part 7 - Install and configure the OCSP Responder role service (this part) Part 8 - Configure AutoEnroll and Verify PKI health In part 1 of this series, you configured your LAB for a 2 tier PKI hierarchy running on Windows Server 2016. You used PowerShell to create some virtual machines, and then installed Windows Server 2016, Windows 10 Enterprise version 1803 and optionally Smoothwall 3.1 before configuring the IP address scheme and Computer Names on the virtual machines. Finally you configured ADDS on DC01 so that you have a working Domain Controller for the rest of this LAB. In part 2 you installed and did the initial configuration on the Standalone Offline Root CA. In part 3 you prepared the HTTP Web Server for CDP and AIA Publication and you created a DNS record for the publicly available web server. In part 4 you performed post configuration on the Standalone Offline Root CA to set certificate revocation list (CRL) period registry settings using CertUtil, and then enabled object access Auditing and finally, you configured three locations for the Authority Information Access (AIA) and four locations for the Certificate revocation list Distribution Point (CDP), again using CertUtil. In part 5 you joined the IssuingCA computer to the windowsnoob domain before creating a new CAPolicy.inf file which was customized for the Issuing CA role. Next, you published the Root CA Certificate and CRL (both to Active Directory and the HTTP web server) and you installed the Enterprise Issuing CA before submitting a request to the StandAlone Offline Root CA. Next you installed the Issuing CA Certificate using the response files from the StandAlone Offline Root CA on the removable media. In part 6, you performed post installation and configuration of the IssuingCA server by configuring Certificate Revocation and CA Certificate Validity Periods, you then enabled auditing on the CA server, and configured the AIA and CDP. In this part you will install and configure the OCSP responder role service on the web server. The use of Online Responders that distribute OCSP responses (1) along with the use of CRLs, is one of two common methods for conveying information about the validity of certificates. Unlike CRLs, which are distributed periodically and contain information about all certificates that have been revoked or suspended, an Online Responder receives and responds only to requests from clients for information about the status of a single certificate. The amount of data retrieved per request remains constant regardless of the number of revoked certificate. For more information about why having an OCSP is a good thing in your PKI environment read here (2). Step 1. Install the Online Responder Role Service on the web server Ensure that you are logged on to webserver.windowsnoob.lab.local as windowsnoob\Administrator. Open Server Manager. Right click on Roles, click Add Roles. On the Before You Begin page, then select Next. On the Select Server Roles page, select Active Directory Certificate Services and then click Next. If you are prompted to add features, click Add features. On the Features page, click Next, on the introduction to Active Directory Certificate Services page, click Next. On the Select Role Services page, clear the Certification Authority option, and then select Online Responder as shown below: Note: You do not want to install a Certification Authority on the web server, so make sure you clear that checkbox. if you are prompted to add features required for the online responder, click Add features. On the confirmation screen, click Install and wait for the installation to complete successfully. When you see it has completed successfully, click close. Note: You must complete the post-deployment configuration. Click on the yellow exclamation mark in Server manager to start the post deployment configuration. On the specify credentials page, ensure you are logged on with a user account that has local administrator permissions before clicking next. on the Specify role services to configure, select Online Responder and click Next. On the Confirmation screen click Configure. That's it. On the configuration succeeded screen, click Close. Step 2. Add the OCSP URL to the windowsnoob Issuing CA To add the OCSP URL to the windowsnoob Issuing CA ensure that you are logged on to the IssuingCA server as windowsnoob\EntAdmin. In the Certification Authority console (certsrv.msc), in the console tree, right-click windowsnoob Issuing CA, and then click Properties. On the Extensions tab, under Select extension, select Authority Information Access (AIA), and then click Add. In Location, type http://webserver.windowsnoob.lab.local/ocsp and then click OK. Place a check mark in Include in the online certificate status protocol (OCSP) extension. Do not select the other option. Click Apply, when prompted by the Certification Authority dialog box to restart Active Directory Certificate Services, click Yes. Note: The windowsnoob Issuing CA will now include the http://webserver.windowsnoob.lab.local/ocsp URL as part of Authority Information Access (AIA) extension in all newly issued certificates issued or renewed or re-enrolled certificates, however, certificates enrolled from the windowsnoob Issuing CA prior to this change will not have this URL. Step 3. Configure and Publish the OCSP Response Signing Certificate on the Issuing CA To configure the OCSP response signing certificate on the windowsnoob Issuing CA server, do as follows. Ensure that you are logged on as windowsnoob\Entadmin. In the Certification Authority console, ensure that the windowsnoob Issuing CA is expanded in the console tree. Right-click on Certificate Templates and then click Manage. Note: If you do not use the EntAdmin account you'll see the following error: "windows could not create the object identifier list. the specified domain either does not exist or could not be contacted. certificate templates are not available". The Certificate Templates window should open and display the certificate templates stored in Active Directory. In the details pane (middle pane), scroll down and right-click on the OCSP Response Signing certificate template and then click Properties. On the Security tab click Add. Click Object Types. In the Object Types dialog box, select Computers and then click OK.In Enter the object names to select, type webserver and then click Check Names. Click OK Ensure that webserver is selected and in the Allow column, ensure that both the Read and Enroll permissions are selected before clicking Apply. Close the Certificate Templates MMC console. In the certsrv.msc console, right-click Certificate Templates, then select New and then select Certificate Template to Issue. In the Enable Certificate Templates dialog box, click OCSP Response Signing and then click OK Step 4. Configure Revocation Configuration on the Online Responder Logon to the web server as windowsnoob\administrator. Open Server Manager. In the console tree, click on Tools, expand Active Directory Certificate Services, and then expand Online Responder management. Right-click Revocation Configuration and then click Add Revocation Configuration. On the Getting Started with Adding a Revocation Configuration page click Next. In Name, enter windowsnoob Issuing CA, and then click Next. On the Select a CA Certificate Location page ensure that Select a certificate for an Existing enterprise CA is selected, then click Next. On the Choose CA Certificates page, ensure that Browse CA certificates published in Active Directory is selected, and then click Browse. On the Select Certification Authority dialog box, ensure that the windowsnoob Issuing CA is selected, and then click OK. Click Next. Leave the defaults on the Select Signing Certificate page, and then click Next. On the Revocation Provider page, click Provider. You can review the choices listed for the OCSP Responder in terms of where to download CRLs in the form of LDAP and HTTP locations, do not change the base CRL's. Clear the Refresh CRLs based on their validity periods check box. In the Update CRLs at this refresh interval (min) box, type 15, and then click OK. Click Finish. Note: Modifying this setting to download CRLs at a faster rate than the CRLs normal expiration makes it possible for the OCSP responder to rapidly download new CRLs rather than use the last downloaded CRLs normal expiration date. If you are setting up PKI in Production, consult with a PKI expert to determine if you should change the value chosen here. In the Certification Authority console, expand Array Configuration and then click the webserver.windowsnoob.lab.local computer. Verify that the Revocation Configuration Status in the middle pane is OK to ensure that there is a signing certificate present and that the status reports as OK. It should state: Type: Microsoft CRL-based revocation status provider The revocation provider is successfully using the current configuration Step 5. Configure Group Policy to Provide the OCSP URL for the windowsnoob Issuing CA on DC01 This configuration should only be needed to allow existing certificate holders to take advantage of a new OCSP responder without having to re-enroll new certificates with the required OCSP URL added in them. To do this configuration ensure you are logged on to DC01.windowsnoob.lab.local as windowsnoob\Administrator. Open an administrative command prompt and run the following commands: cd \ press Enter then, certutil -config "IssuingCA.windowsnoob.lab.local\windows noob Issuing CA" -ca.cert windowsnoobissuingca.cer the output should be something like this Tip: If you get an error from the above command line, you can verify the correct certutil syntax for your lab by simply typing certutil and make note of the Config line as shown below. Click Start, click Run, and then type gpmc.msc and press enter. Expand Forest, expand Domains, expand windowsnoob.lab.local, and then expand Group Policy Objects. Right click Default Domain Policy, then click Edit. Under Computer Configuration, expand Policies, expand Windows Settings, expand Security Settings, and then expand Public Key Policies. Right-click Intermediate Certification Authorities, and then click Import. On the Welcome to Certificate Import Wizard page, click Next. In File name, type C:\windowsnoobissuingca.cer, and then click Next. On the Certificate Store page, click Next. On the Completing the Certificate Import Wizard, click Finish, and then click OK. You should see "The import was successful". In the console tree, select Intermediate Certification Authorities. In the details pane, right-click the windowsnoob Issuing CA, then click Properties. On the OCSP tab, in the Add URL box enter http://webserver.windowsnoob.lab.local/ocsp, and then click Add URL. Click OK. You can now close the Group Policy Management Editor and then close the Group Policy Management console. That's all for this part, please join me in Part 8 where you will Configure AutoEnroll and verify PKI health. Recommended reading (1) - OCSP responses https://www.ietf.org/rfc/rfc2560.txt (2) - Introducing OCSP - https://blogs.technet.microsoft.com/askds/2009/06/24/implementing-an-ocsp-responder-part-i-introducing-ocsp/


-
Configuring BitLocker in Intune - Part 2. Automating Encryption
anyweb replied to anyweb's topic in Microsoft Intune
are you using the User version of the MSI or the other one ? -
Make sure you check out Altaro's contest where they'll be giving away Amazon eGift Cards to the first 100 eligible entries and 1 Grand Prize for 1 lucky winner. They have some fantastic options for the grand prize including a Playstation 4 Pro, a Microsoft Xbox One X, a 3-year membership of Amazon Prime and more, but it will be up to the Grand Prize winner to choose his/her Grand Prize. So in total, there will be 101 winners (if all are eligible entries). You can enter the contest by clicking here cheers niall

-
what version of MDT did you use for that ?, if you use teamviewer i can connect and take a look at your setup if you want
-
you should use whichever version matches the os you are deploying did you edit the powershell script in any way ?
-
it's failing to run the windowssetupcompatibilityscanresults.psq step here. Command line "C:\_SMSTaskSequence\Packages\00100224\ServiceUI.exe" -process:TSProgressUI.exe C:\Windows\sysnative\WindowsPowerShell\v1.0\powershell.exe -WindowStyle Hidden -NoProfile -ExecutionPolicy bypass -nologo -file WindowsSetupCompatibilityScanResults.ps1 returned 4294967295 probably because you are using the wrong version of serviceui.exe OR you made a mistake/edit in the powershell script which it does not understand,
-
from your log: Windows setup in 'scanOnly' mode returned exit code hexadecimal 0xC1900200 ( decimal 3247440384) . Failing task sequence step. this translates to Does not meet system requirements for Windows 10: 0xC1900200
-
can you attach your smsts.log file please?
-
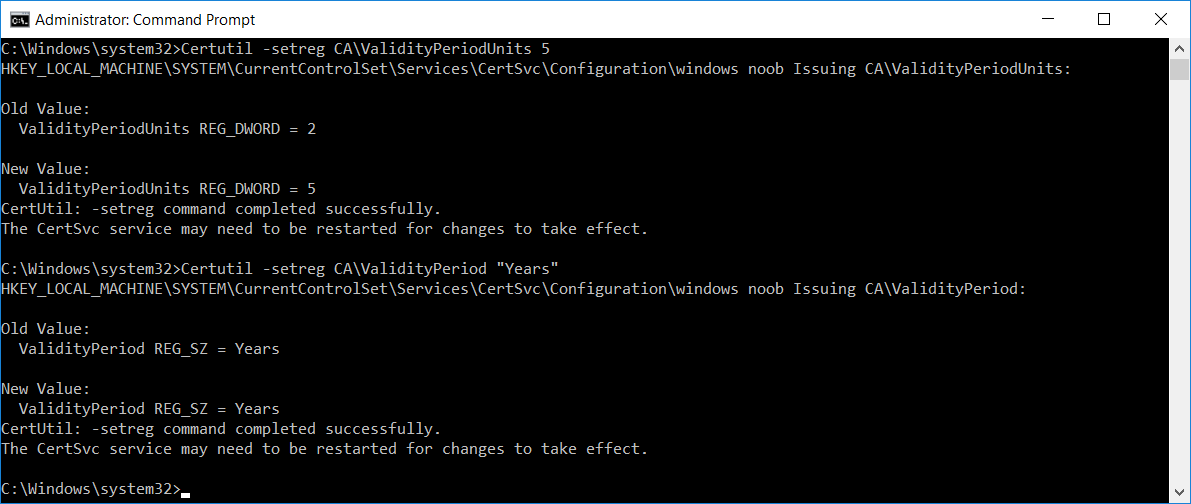
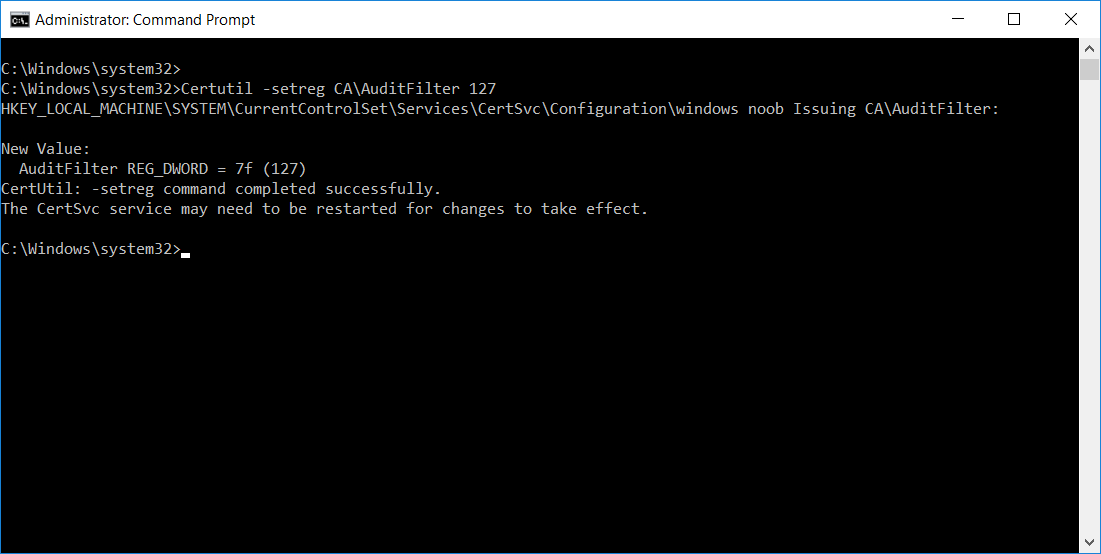
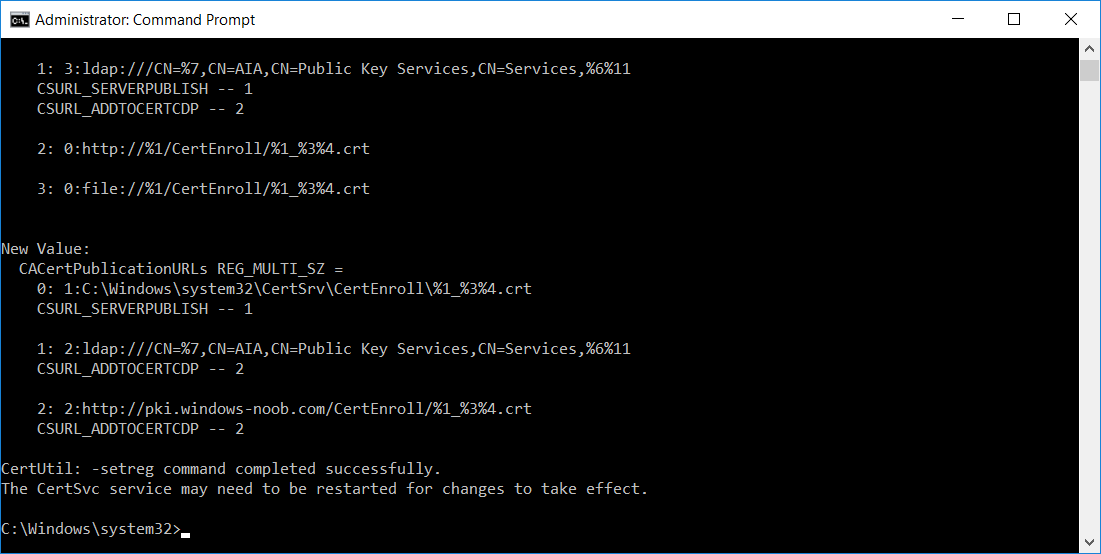
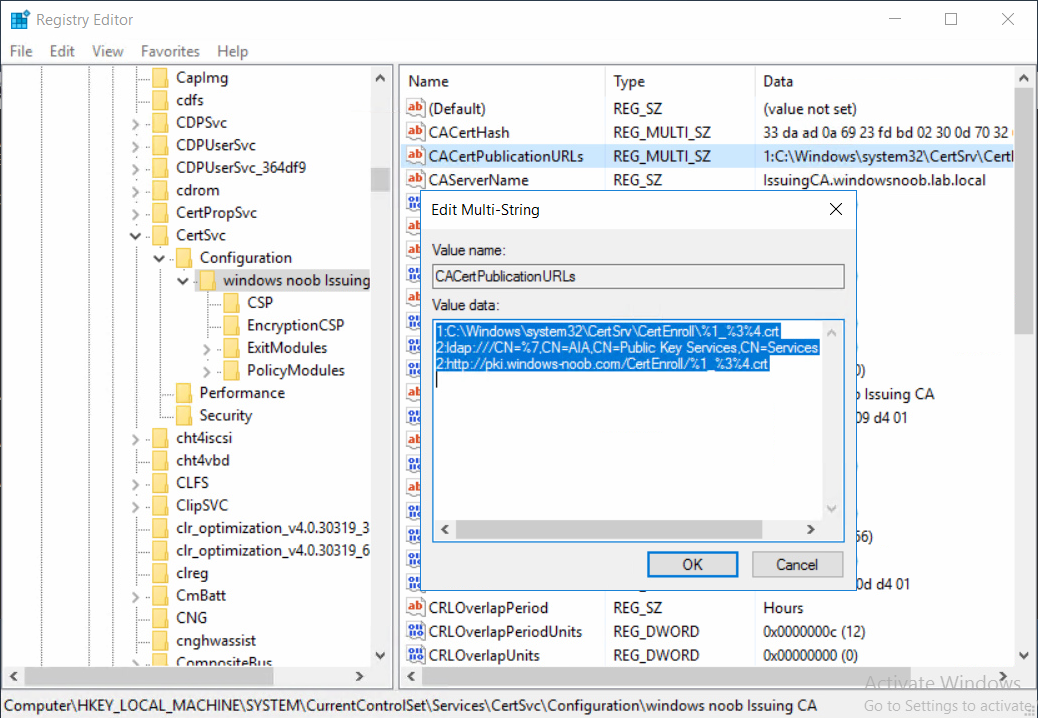
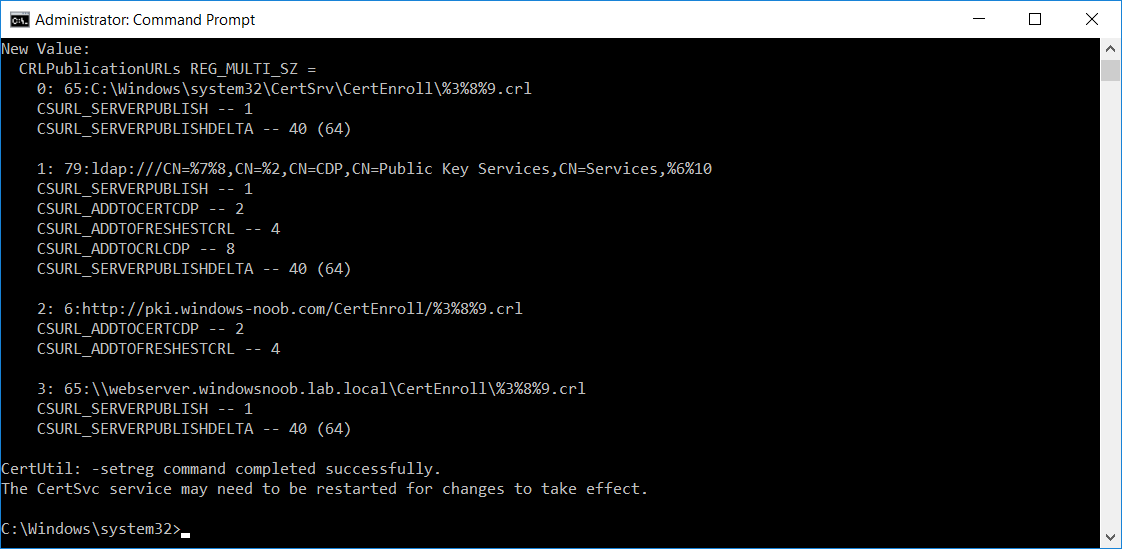
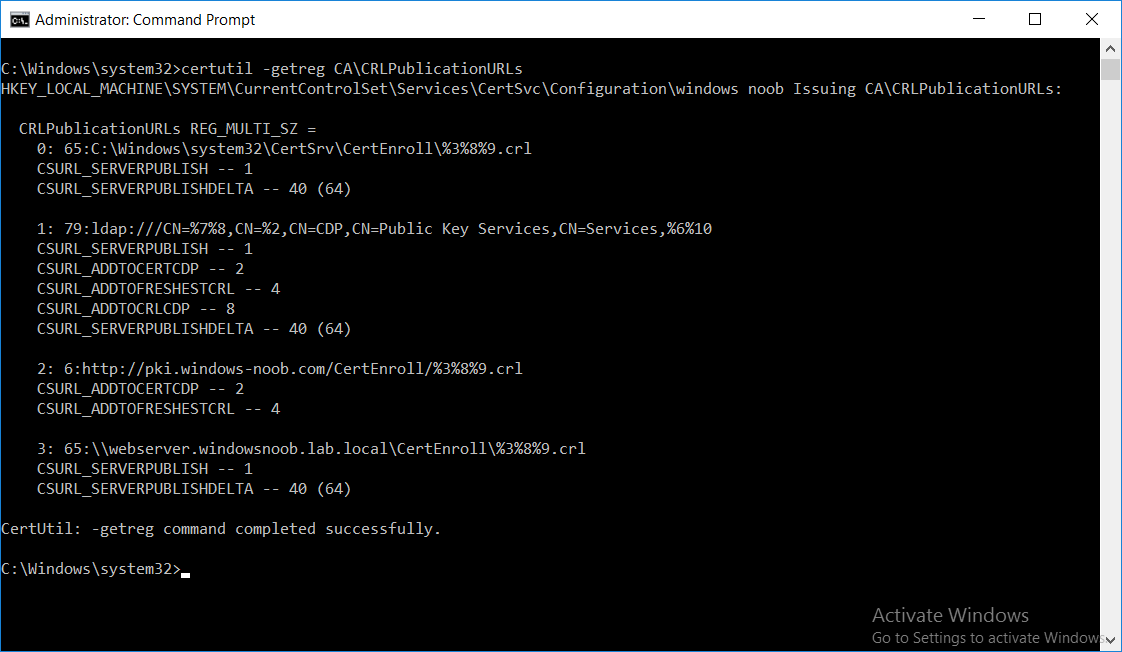
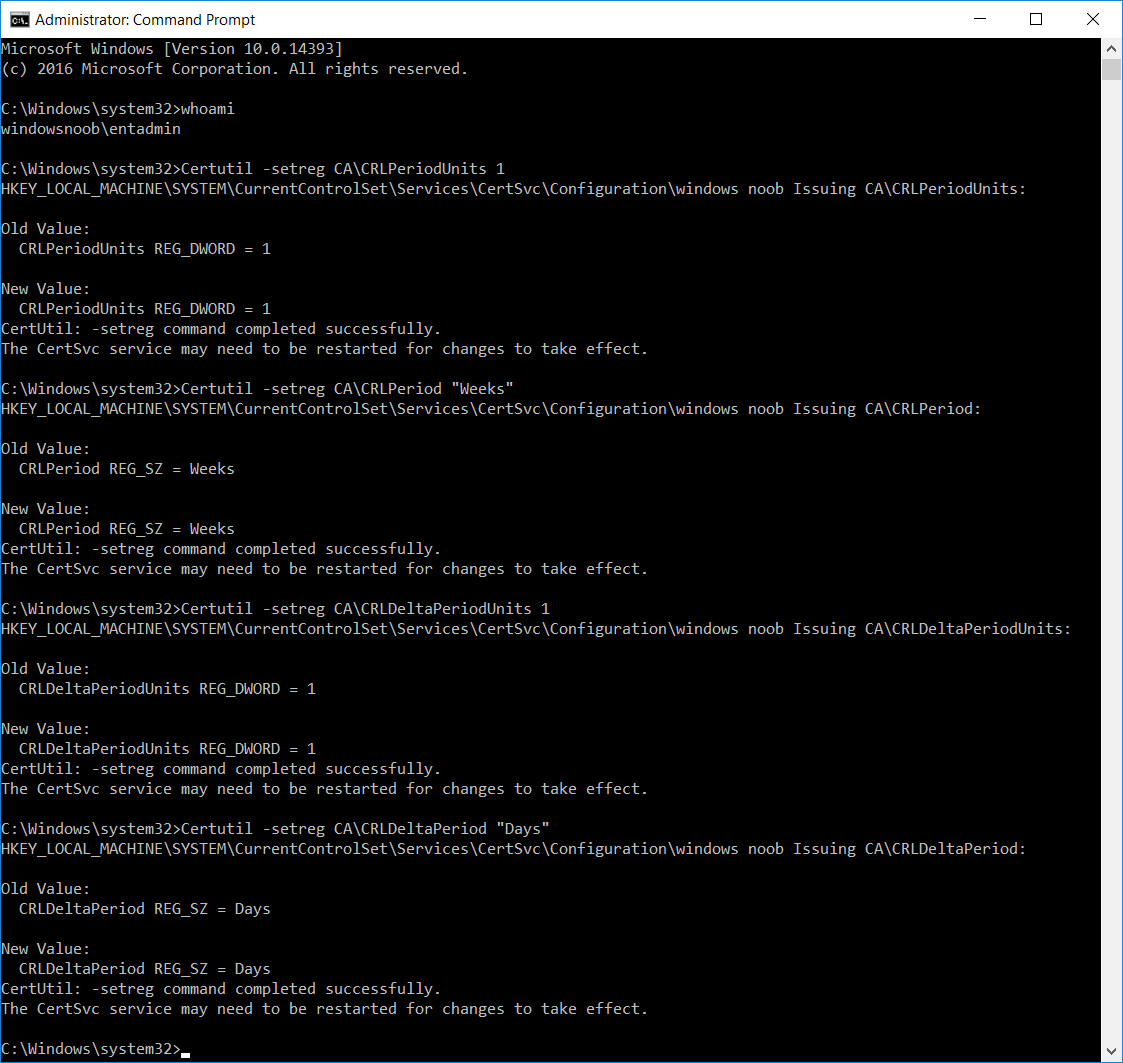
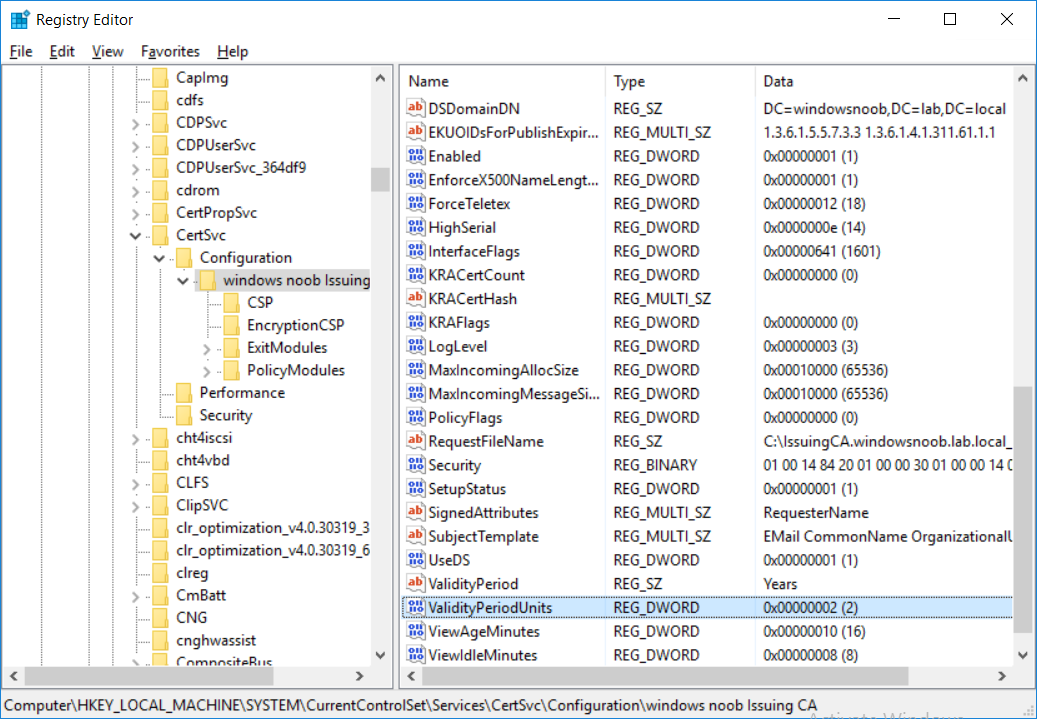
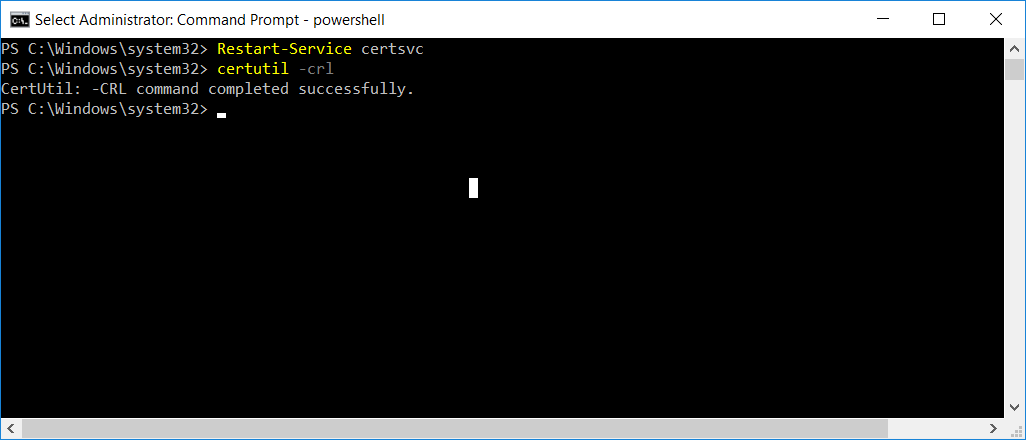
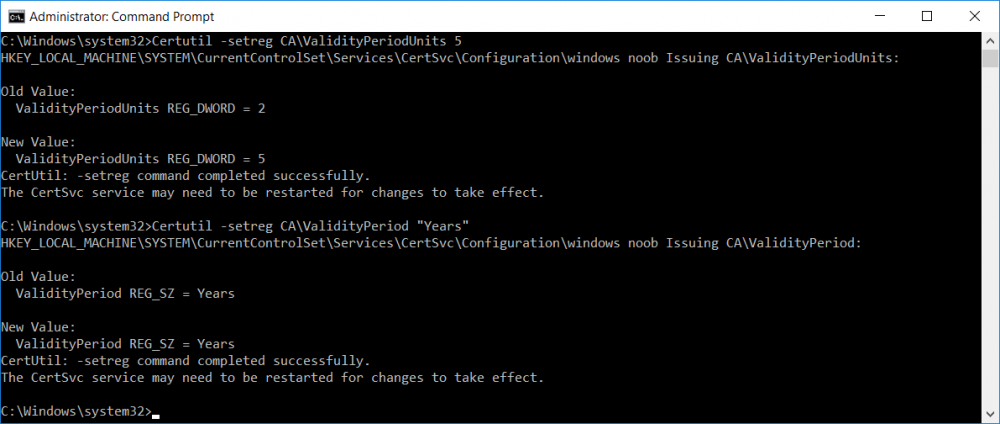
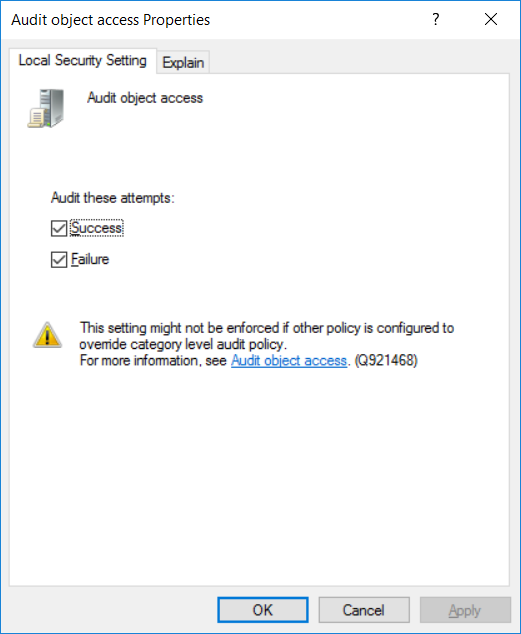
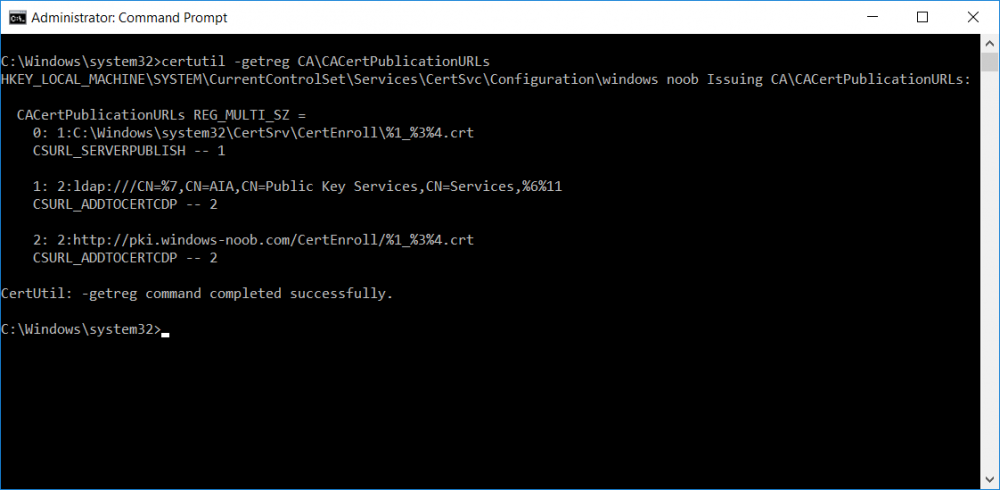
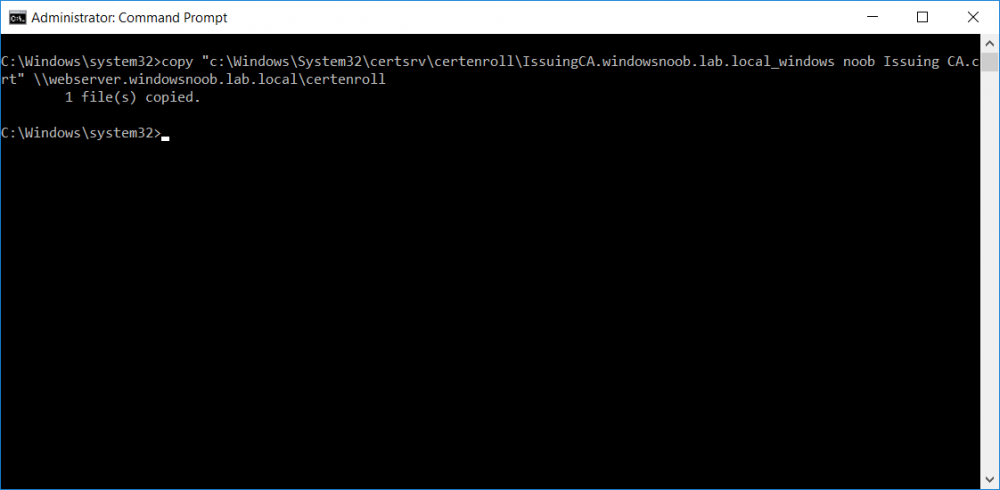
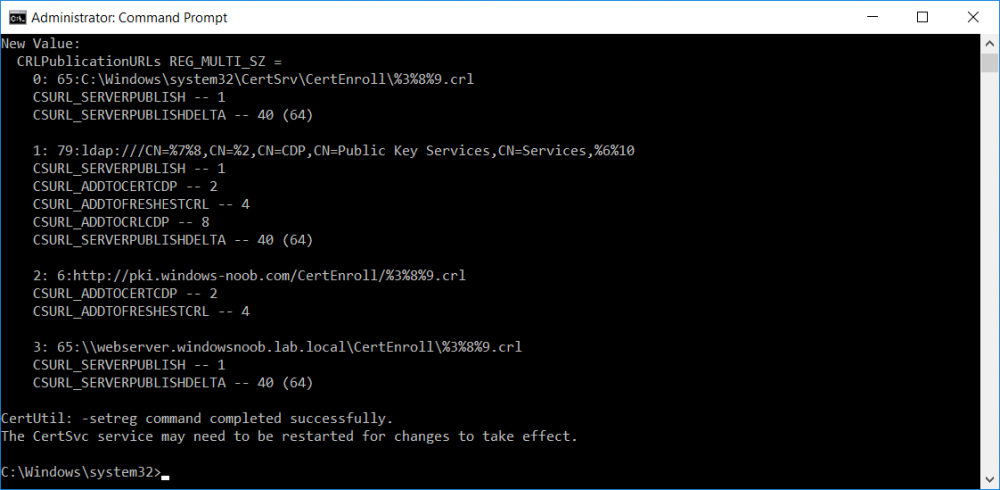
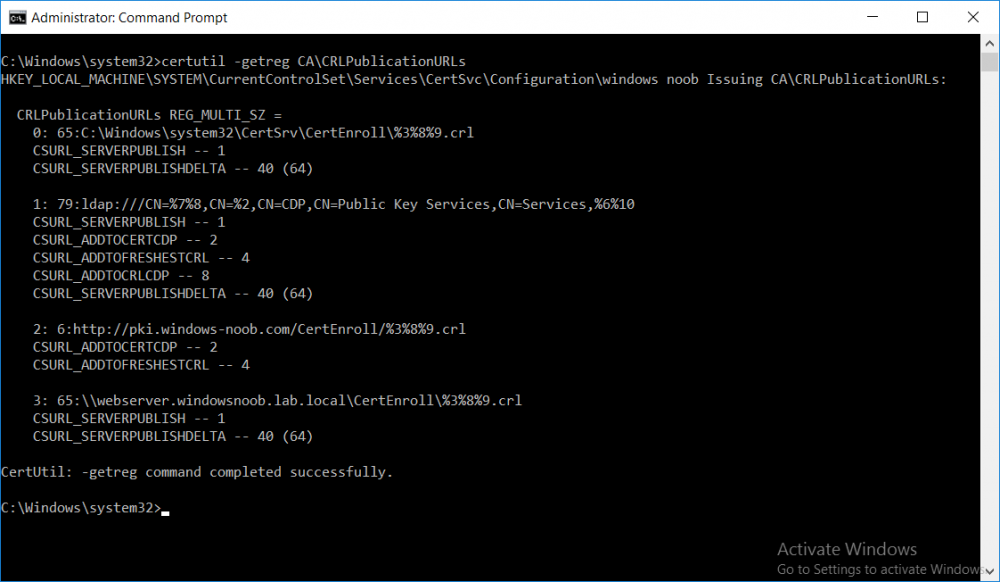
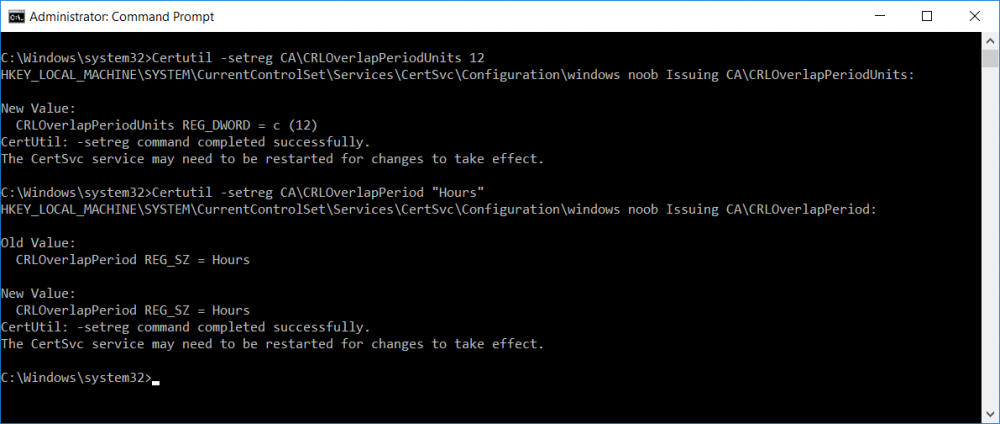
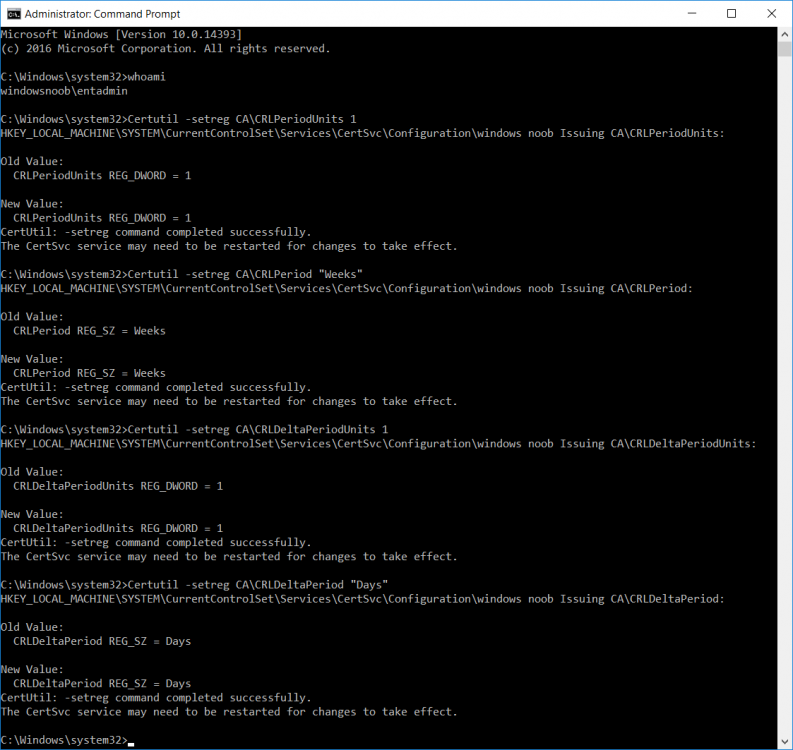
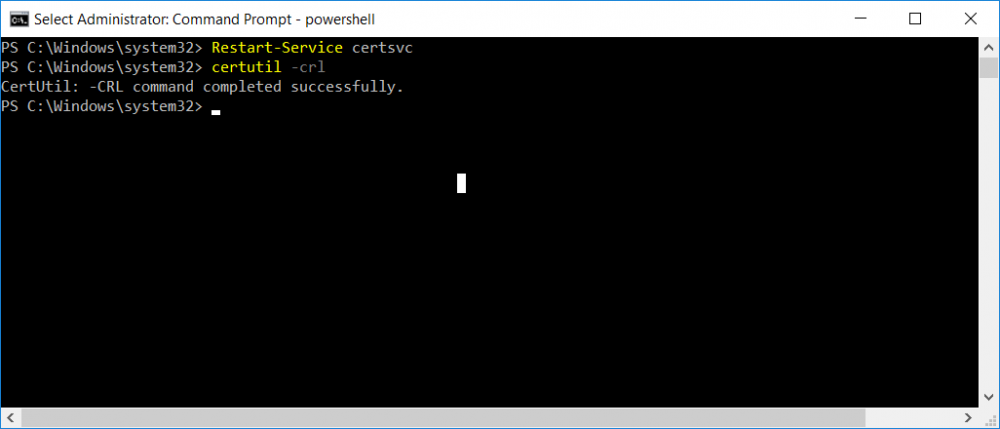
This series is comprised of different parts, listed below. Part 1 - Introduction and server setup Part 2 - Install and do initial configuration on the Standalone Offline Root CA Part 3 - Prepare the HTTP Web server for CDP and AIA Publication Part 4 - Post configuration on the Standalone Offline Root CA Part 5 - Installing the Enterprise Issuing CA Part 6 - Perform post installation tasks on the Issuing CA (this part) Part 7 - Install and configure the OCSP Responder role service Part 8 - Configure AutoEnroll and Verify PKI health In part 1 of this series, you configured your LAB for a 2 tier PKI hierarchy running on Windows Server 2016. You used PowerShell to create some virtual machines, and then installed Windows Server 2016, Windows 10 Enterprise version 1803 and optionally Smoothwall 3.1 before configuring the IP address scheme and Computer Names on the virtual machines. Finally you configured ADDS on DC01 so that you have a working Domain Controller for the rest of this LAB. In part 2 you installed and did the initial configuration on the Standalone Offline Root CA. In part 3 you prepared the HTTP Web Server for CDP and AIA Publication and you created a DNS record for the publicly available web server. In part 4 you performed post configuration on the Standalone Offline Root CA to set certificate revocation list (CRL) period registry settings using CertUtil, and then enabled object access Auditing and finally, you configured three locations for the Authority Information Access (AIA) and four locations for the Certificate revocation list Distribution Point (CDP), again using CertUtil. In part 5 you joined the IssuingCA computer to the windowsnoob domain before creating a new CAPolicy.inf file which was customized for the Issuing CA role. Next, you published the Root CA Certificate and CRL (both to Active Directory and the HTTP webserver) and you installed the Enterprise Issuing CA before submitting a request to the StandAlone Offline Root CA. Next you installed the Issuing CA Certificate using the response files from the StandAlone Offline Root CA on the removable media. In this part, you will perform post installation and configuration of the IssuingCA server. Step 1. Configure Certificate Revocation and CA Certificate Validity Periods To configure certificate revocation and CA certificate validity periods ensure that you are logged on to the IssuingCA server as windowsnoob\EntAdmin (you can use whoami in the command prompt to verify which user is logged on). Configure the CRL and Delta CRL settings Enter the following commands from an administrative command prompt: Certutil -setreg CA\CRLPeriodUnits 1 Press enter when done, then enter the following: Certutil -setreg CA\CRLPeriod "Weeks" Press enter when done, then enter the following: Certutil -setreg CA\CRLDeltaPeriodUnits 1 Press enter when done, then enter the following: Certutil -setreg CA\CRLDeltaPeriod "Days" The output of the above commands is shown below. Define CRL overlap settings Enter the following commands from an administrative command prompt: Certutil -setreg CA\CRLOverlapPeriodUnits 12 Press enter when done, then enter the following: Certutil -setreg CA\CRLOverlapPeriod "Hours" The output of the above commands is shown below. Configure the certificate validity period The default setting for ValidityPeriodUnits for certificates issued from the IssuingCA server is 2 years in the registry as shown here (HKLM\System\CurrentControlSet\Services\CertSvc\Configuration\windows noob Issuing CA). You can adjust this setting depending on your needs to define the lifetime of certificates issued from the IssuingCA server. It is recommended that you don't configure validity periods that are longer than half the total lifetime of the windows noob Issuing CA certificate (which was issued to be valid for 10 years based upon settings configured in the CAPolicy.inf you created on the IssuingCA in part 5, in particular, this line). RenewalValidityPeriodUnits=10 To limit issued certificates to 5 years, enter the following commands from an administrative command prompt: Certutil -setreg CA\ValidityPeriodUnits 5 Press enter when done, then enter the following: Certutil -setreg CA\ValidityPeriod "Years" Press enter. The output of the above commands is shown below. Step 2. Enable Auditing on the Issuing CA CA auditing requires system Audit Object Access to be enabled. To use Local Security Policy to enable object access auditing do as follows. Click Start, click Administrative Tools, and then select Local Security Policy. Expand Local Policies and then select Audit Policy. Double click Audit Object Access and then select Success and Failure then click OK. Close Local Security Policy editor. Configure Auditing for all CA related events Enable auditing for the CA by selecting which group of events to audit in the Certificate Authority MMC snap-in or by configuring AuditFilter registry key setting. To configure Auditing for all CA related events, run the following command from an administrative command prompt: Certutil -setreg CA\AuditFilter 127 The results of that command are shown below. Step 3. Configure the AIA The AIA is used to point to the public key for the certification authority (CA). Using a certutil command is a quick and common method for configuring the AIA. When you run the following certutil command, you'll configure the following: a static file system location a lightweight directory access path (LDAP) location a http location for the AIA. To configure AIA using certutil, open an administrative command prompt and enter the following command, pay close attention to the http address it's currently pointing to my http webserver. certutil -setreg CA\CACertPublicationURLs "1:C:\Windows\system32\CertSrv\CertEnroll\%1_%3%4.crt\n2:ldap:///CN=%7,CN=AIA,CN=Public Key Services,CN=Services,%6%11\n2:http://pki.windows-noob.com/CertEnroll/%1_%3%4.crt" The output of that command is shown below: After you have run that command, run the following command to confirm your settings: certutil -getreg CA\CACertPublicationURLs The result of that command is shown below: You can also confirm these settings in the registry by using regedit and browsing to the following path: HKEY_LOCAL_MACHINE\System\CurrentControlSet\Services\CertSvc\Configuration\windows noob Issuing CA you can confirm the CACertPublicationURLs by opening that REG_MULTI_SZ value. You should see the following: 1:C:\Windows\system32\CertSrv\CertEnroll\%1_%3%4.crt 2:ldap:///CN=%7,CN=AIA,CN=Public Key Services,CN=Services,%6%11 2:http://pki.windows-noob.com/CertEnroll/%1_%3%4.crt as shown below: You can also see this in the the CA (certsrv.msc) console. Click Start, select Administrative Tools, and then click Certification Authority. In the navigation pane, expand the Certificate Authority (Local). Right-click windows noob Issuing CA and then click Properties. On the Extensions tab, under Select extension, click Authority Information Access (AIA) and you will see the graphical representation of the AIA settings. Copy the windows noob Issuing CA certificate to the http AIA location To copy the windows noob Issuing CA certificate (crt file) to the http AIA location, use the following command on the IssuingCA server while logged in as windowsnoob\EntAdmin, your CRT file will more than likely be named differently, so change the command below accordingly. copy "c:\Windows\System32\certsrv\certenroll\IssuingCA.windowsnoob.lab.local_windows noob Issuing CA.crt" \\webserver.windowsnoob.lab.local\certenroll\ as shown below: Step 4. Configure the CDP Clients will use the CDP to locate the CRL and delta CRLs for certificates issued by the CA. This allows clients to ensure that the certificates have not been revoked. You can also configure the CDP using the user interface (certsrv.msc), certutil, and the registry. Using a certutil command is a quick and common method for configuring the CDP. When you run the following certutil command, you'll configure: a static file system location a LDAP location a http location a file system location Note: The file system location that you set will allow the CRL to be copied over the network to the web server (webserver.windowsnoob.lab.local), which is why we earlier allowed the Cert Publishers group access to the share and folder. All CAs are members of the Cert Publishers group, so we effectively allowed all CAs to copy to the CertEnroll folder on the webserver. Some administrators decide to configure a separate group of specific computers for that purpose or even grant permissions to the CAs individually. Adjust this command so that it points to your public web server http and file location address, then open a command prompt as Administrator and enter the following: certutil -setreg CA\CRLPublicationURLs "65:C:\Windows\system32\CertSrv\CertEnroll\%3%8%9.crl\n79:ldap:///CN=%7%8,CN=%2,CN=CDP,CN=Public Key Services,CN=Services,%6%10\n6:http://pki.windows-noob.com/CertEnroll/%3%8%9.crl\n65:\\webserver.windowsnoob.lab.local\CertEnroll\%3%8%9.crl" as shown below: After you run that command, run the following certutil command to verify your settings: certutil -getreg CA\CRLPublicationURLs as shown below: and of course, you can also verify it in the registry by browsing to : HKEY_LOCAL_MACHINE\SYSTEM\CurrentControlSet\Services\CertSvc\Configuration\windows noob Issuing CA using regedit, you should see the following values: 65:C:\Windows\system32\CertSrv\CertEnroll\%3%8%9.crl 79:ldap:///CN=%7%8,CN=%2,CN=CDP,CN=Public Key Services,CN=Services,%6%10 6:http://pki.windows-noob.com/CertEnroll/%3%8%9.crl 65:\\webserver.windowsnoob.lab.local\CertEnroll\%3%8%9.crl as shown below: Using an administrative command prompt, start PowerShell, then run the following commands to restart Active Directory Certificate Services and to publish the CRL. Restart-Service certsvc followed by: certutil -crl as shown below: That's it for this part, join me in Part 7 where you will Install and configure the OCSP Responder role service.


-
HPMIK...Worth it?
anyweb replied to itrider's topic in System Center Configuration Manager (Current Branch)
I'd recommend you install it to get a feel, and make sure to get your HP tam to guide you through it, i mean, that's what you are paying them for, it has some nice features and integrates nicely into SCCM when it works, have fun cheers niall- 1 reply
-
- 1
-