anyweb
-
Posts
9271 -
Joined
-
Last visited
-
Days Won
371
Everything posted by anyweb
-
 you could also review licensing of the new users
 -
Having issues booting to PXE (Current Branch)
anyweb replied to mas10's topic in Configuration Manager 2012
welcome to the forums ! first things first, you need to fix the mp before anything else, so when you reinstalled the mp, what do the mp.msi.log, mpcontrol.log and mpsetup.logs tell you about that reinstallation ? is the site in http or https mode ? -
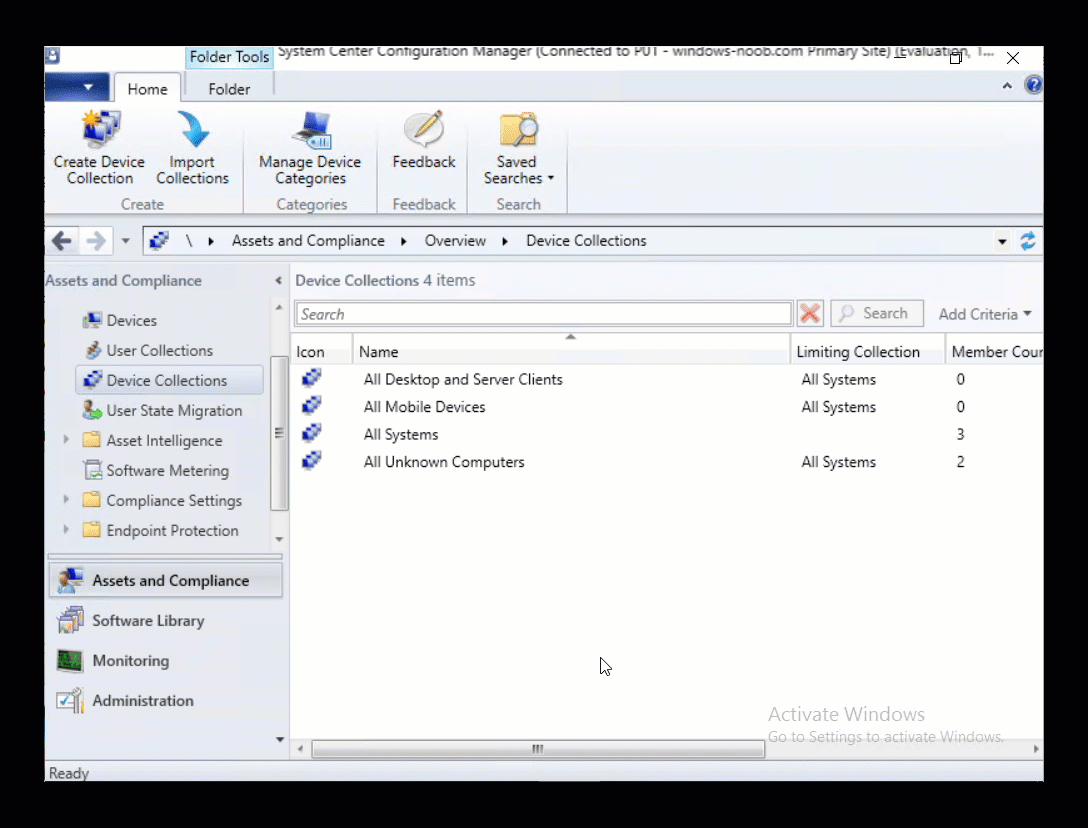
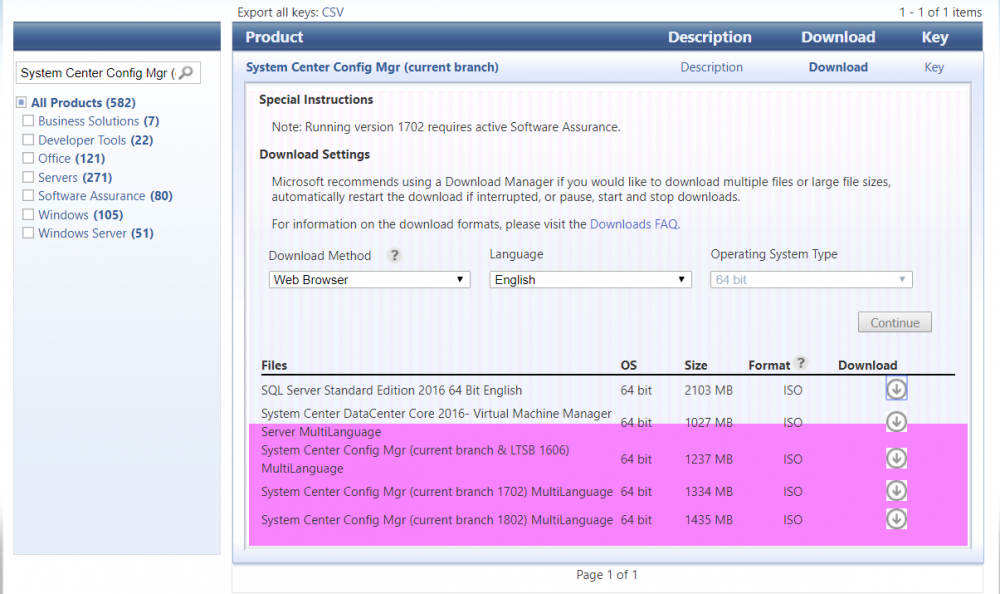
This multi-part guide will show you how to install the latest baseline version of Configuration Manager from Microsoft. The latest available baseline version is System Center Configuration Manager (Current Branch) version 1802 as of March 29th 2018. How can I install System Center Configuration Manager (Current Branch) version 1802 on Windows Server 2016 with SQL Server 2017 – Part 1 How can I install System Center Configuration Manager (Current Branch) version 1802 on Windows Server 2016 with SQL Server 2017 – Part 2 How can I install System Center Configuration Manager (Current Branch) version 1802 on Windows Server 2016 with SQL Server 2017 – Part 3 How can I install System Center Configuration Manager (Current Branch) version 1802 on Windows Server 2016 with SQL Server 2017 – Part 4 You can use this multi-part guide to get a hierarchy up and running on Windows Server 2016 using SQL Server 2017. The concept behind this is to guide you through all the steps necessary to get a working Configuration Manager Primary site installed using manual methods or automating it by using PowerShell. This gives you the power to automate the bits that you want to automate, while allowing you to manually do other tasks when needed. You decide which path to take. PowerShell knowledge is desired and dare I say required if you are in any way serious about Configuration Manager. I will show you how to do most steps via two methods shown below, it’s up to you to choose which method suits you best but I highly recommend automating everything that you can (if possible), using PowerShell. Method #1 – Do it manually Method #2 – Automate it with PowerShell In Part 1, you configured Active Directory Domain Services (ADDS) on AD01, then joined the Configuration Manager primary server (CM01) to the newly created domain. You then created users, usergroups and OU's in Active Directory and created the System Management Container. Finally you delegated permission to the Configuration Manager server to the System Management container. In Part 2, you configured Windows Server 2016 roles and features on the Configuration Manager primary server (CM01) and then you downloaded and installed Windows ADK 1709. Next you installed SQL Server 2017 CU5 with SQL Server Management Studio (SSMS) and Reporting Services before installing the WSUS role which uses SQL to store the SUSDB instead of the Windows Internal Database (WID). In Part 3, you downloaded and extracted the ConfigMgr content, you downloaded the ConfigMgr prerequisites and then you extended the Active Directory schema before installing System Center Configuration Manager (Current Branch) version 1802. In this part you'll create some device collections to prepare your lab for Servicing Windows 10, whether using WAAS or Upgrade Task Sequences built into ConfigMgr. The collections create include some based on the recently released Windows 10 version 1803. Step 1. Create some device collections Note: Perform the following on the Configuration Manager server (CM01) as a Local Administrator You can create collections using the ConfigMgr console and clicking your way through the wizard, you'll need to add membership queries to populate the collections, and include Include or Exclude rules as appropriate. Method #1 – Do it manually <to be added> Method #2 – Automate it with PowerShell To automate the creation of a bunch of device collections simply run the CreateDeviceCollectionsWindows10.ps1 Powershell script by starting PowerShell ISE as Administrator on the ConfigMgr server (CM01). Summary In this guide you created a whole bunch of collections to sort all your Windows 10 computers into easily identifiable groups based on Windows Version number, so that you can target them with policy or use Upgrade task sequences or Windows Servicing. Downloads The scripts used in this guide are available for download here. Unzip to C:\Scripts on both servers. The scripts are placed in the corresponding folder (Part 1, Part 2 etc) and sorted into which server you should run the script on (AD01 or CM01). Scripts.zip
-
there are plenty of guides here to help you with that, just search for bitlocker, they might be in the SCCM 2012 guides as well....
-
Help For Upgrade to 1802
anyweb replied to honestvip's topic in System Center Configuration Manager (Current Branch)
i can remote in via TeamViewer and take a look if you want, if so, pm me the details. -
hi Alejandro, first of all what version of hyperv host are you running ? if it's recent then you can use the new Virtual TPM functionality and won't need my guide here,
-
Help For Upgrade to 1802
anyweb replied to honestvip's topic in System Center Configuration Manager (Current Branch)
have you rebooted the server ? -
Help For Upgrade to 1802
anyweb replied to honestvip's topic in System Center Configuration Manager (Current Branch)
have you tried restarting sms_executive service ? any 3rd party AV software installed ? what does dmpdownloader.log tell you ? -
yes i had to raise an issue, i'll ping them again
-
ok i've updated the SQL server script with the new CU5 download link, plus included text in the script to inform users how and where to determine the CU download link should Microsoft change it again in the future
-
try https://download.microsoft.com/download/C/4/F/C4F908C9-98ED-4E5F-88D5-7D6A5004AEBD/SQLServer2017-KB4101464-x64.exe instead, thanks for pointing it out i\ll update the script shortly, you can get the download links by selecting the cu from hwerw https://support.microsoft.com/en-us/help/4101464 then looking at the HTML Source after clicking on Download
-
good point, you could change the logging location to the users home folder eg: C:\Users\JoeBlogs that way it would be dynamic for each user...
-
Really great guide. Thanks for creating it. :) thanks ! you can look at this index, and work your way down, start at Configuring Discovery Configuring Discovery - How can I configure discovery for System Center Configuration Manager (Current Branch)
-
I think the Windows 10 1709 driver issues are fixed in a recent Cumulative Update https://support.microsoft.com/en-us/help/4093105/windows-10-update-kb4093105 Addresses an issue that prevents certain devices from working on Windows 10, version 1709, machines when the “Disable new DMA devices when this computer is locked” Group Policy is active. The non-working devices are internal, PCI-based peripherals (wireless network drivers and input and audio peripherals). These peripherals can fail on systems whose firmware blocks the peripherals from performing Direct Memory Access (DMA) at boot. could that be your issue ?
-
good job !
-
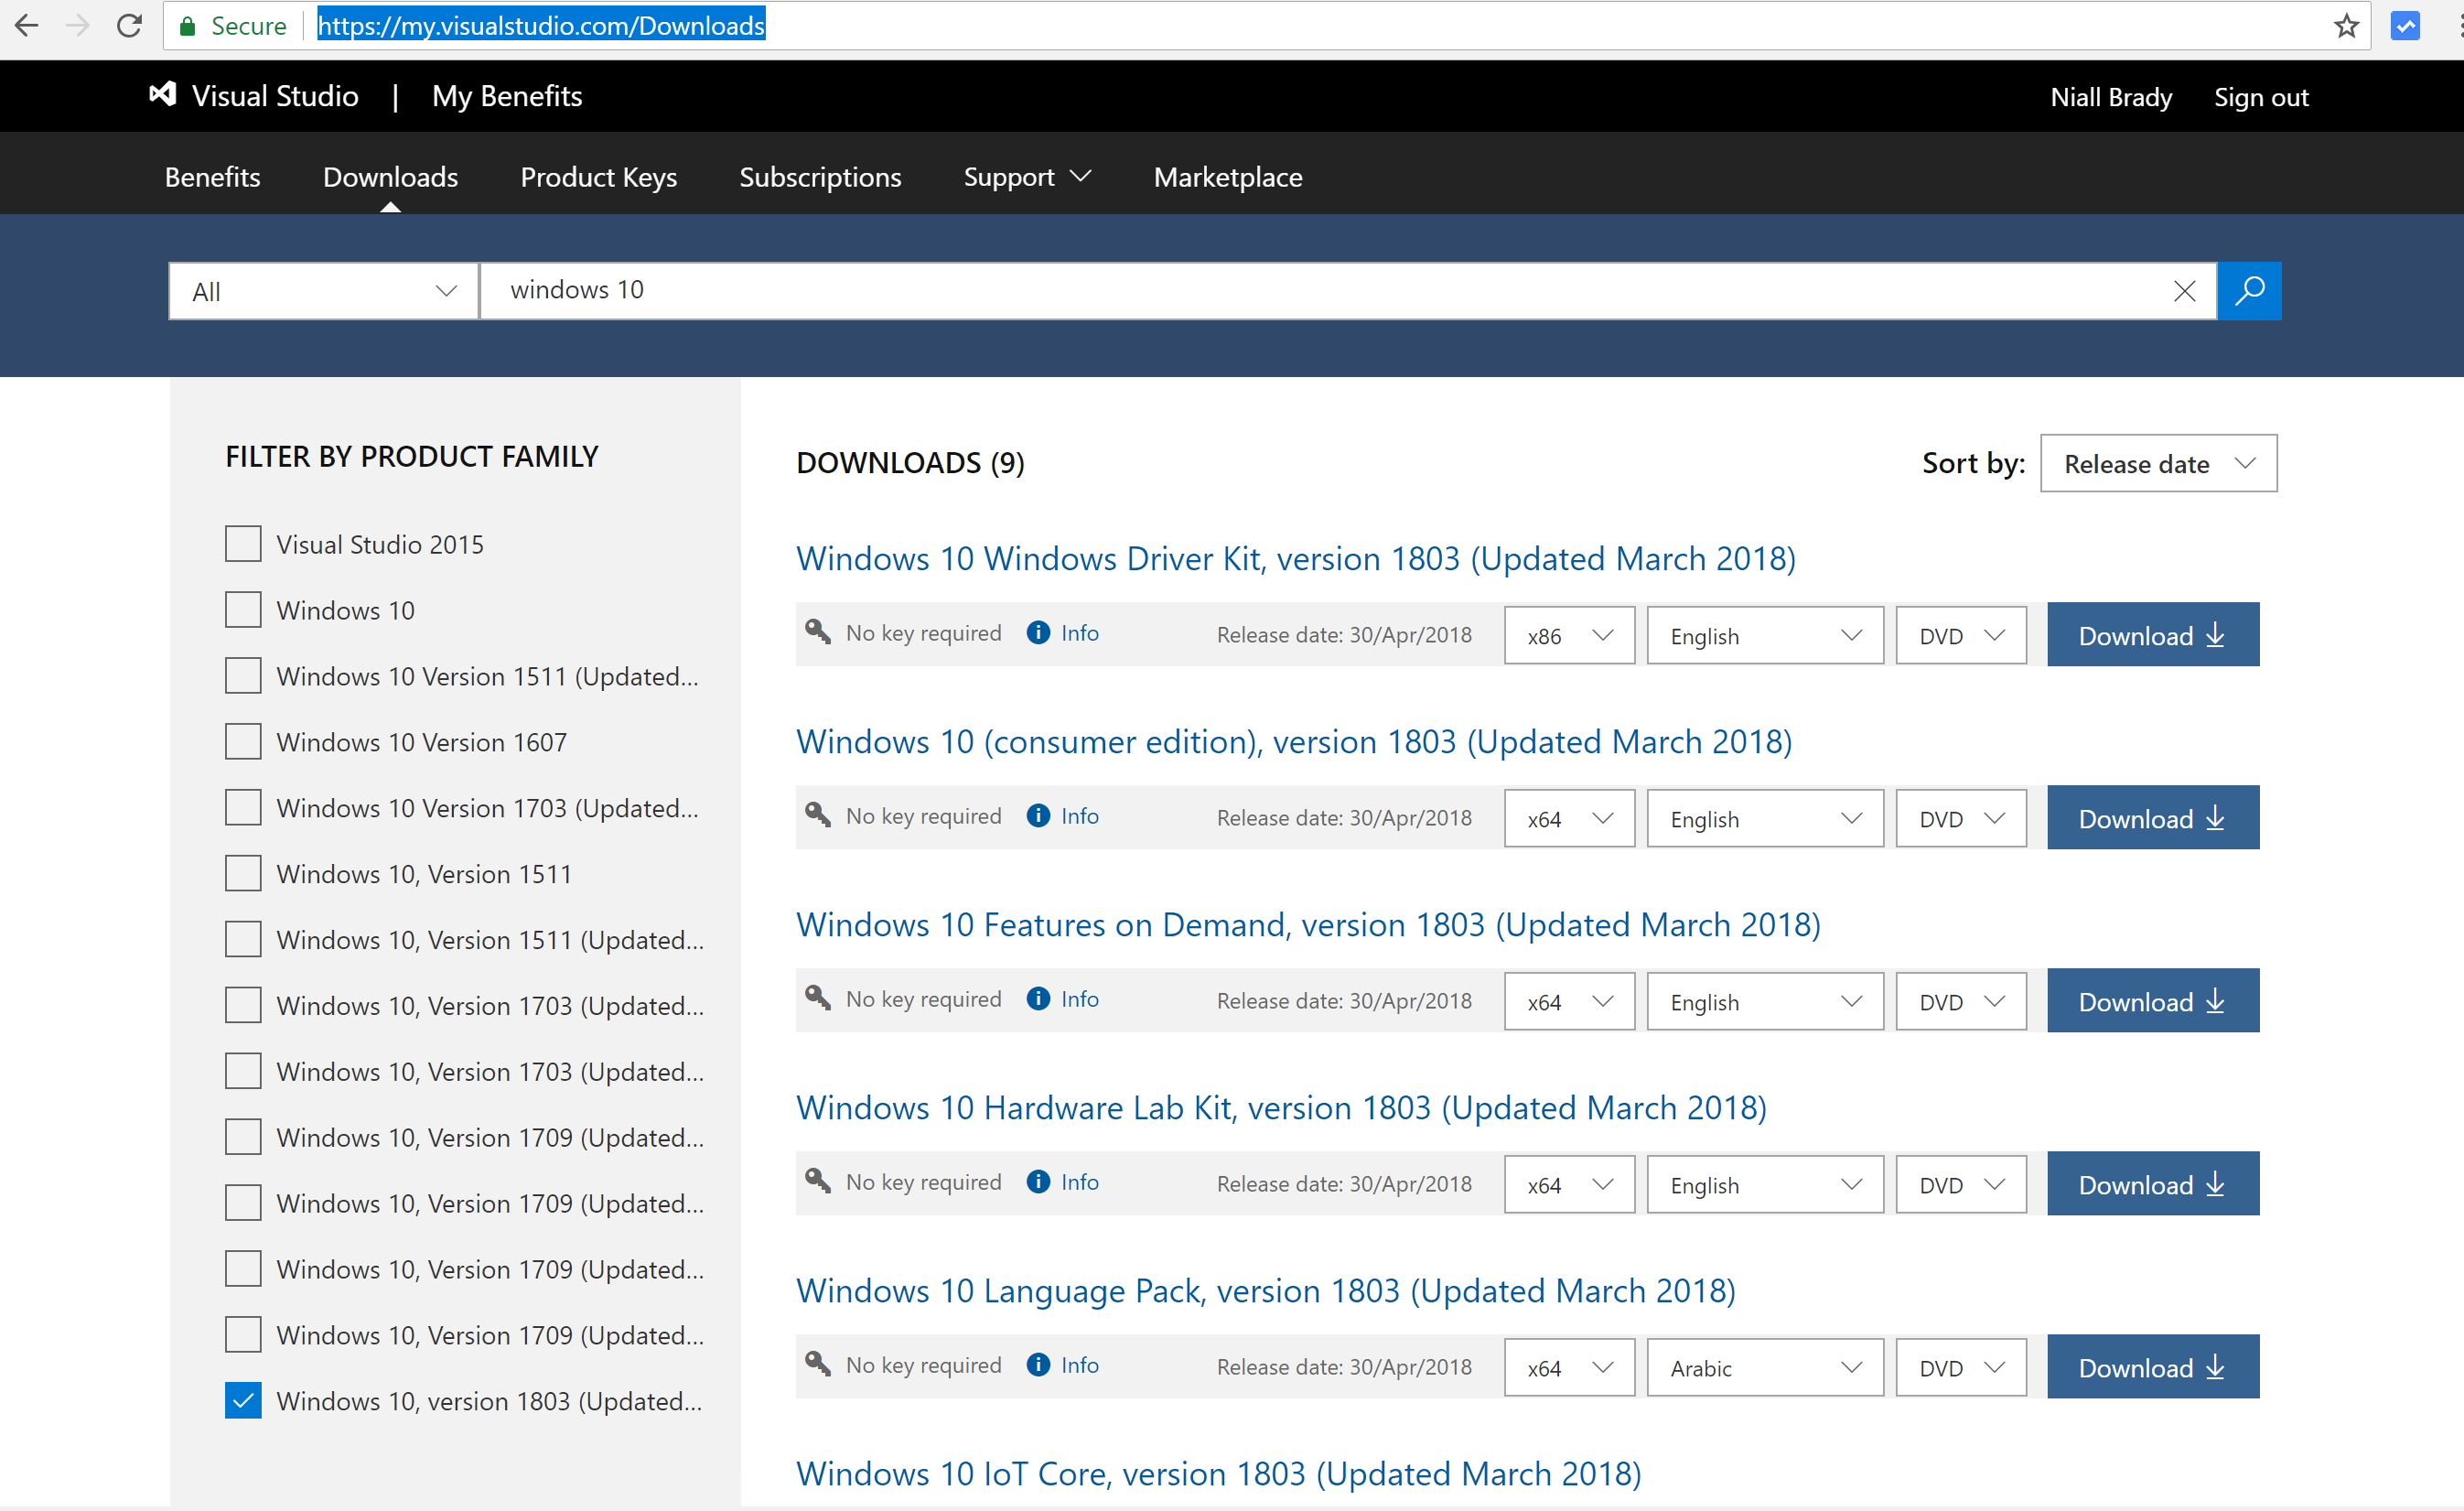
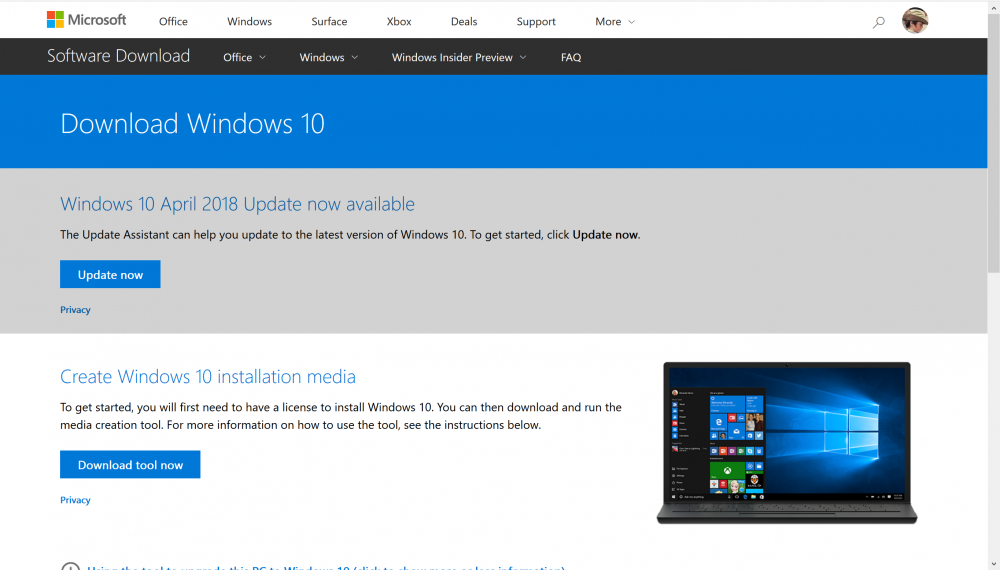
Windows 10 (code named Redstone 4) version 1803, is finally available for download on MSDN. This is the successor to Windows 10 Fall Creators Update (version 1709). It is also available for download here. https://www.microsoft.com/en-us/software-download/windows10 Here's a video about the new TimeLine functionality incuded in Windows 10 April 2018 Update. and for details about what's new, see here: https://docs.microsoft.com/en-us/windows/whats-new/whats-new-windows-10-version-1803 To get the feature update via Microsoft Update see the following Blog Post: https://blogs.windows.com/windowsexperience/2018/04/30/how-to-get-the-windows-10-april-2018-update/#.WudkRA_6qwM.twitter and here is the Windows 10 release information for all releases of Windows so far: https://www.microsoft.com/en-us/itpro/windows-10/release-information
-
what version of the sccm client are you using ?
-
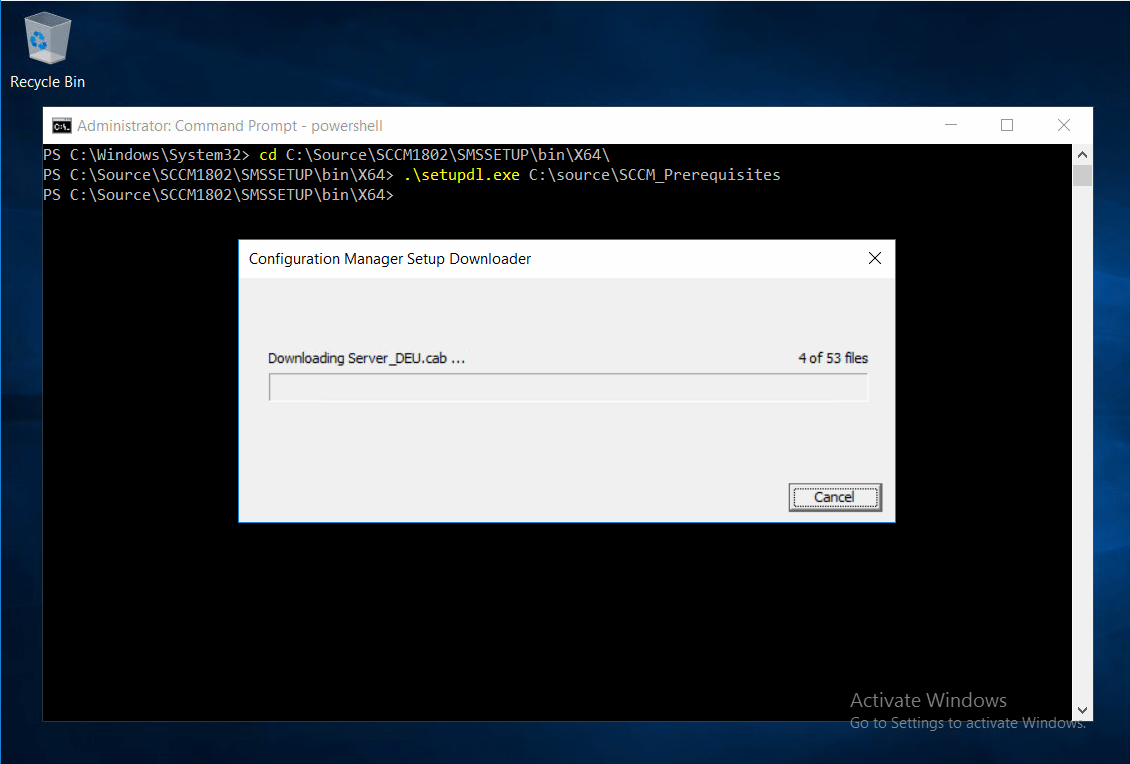
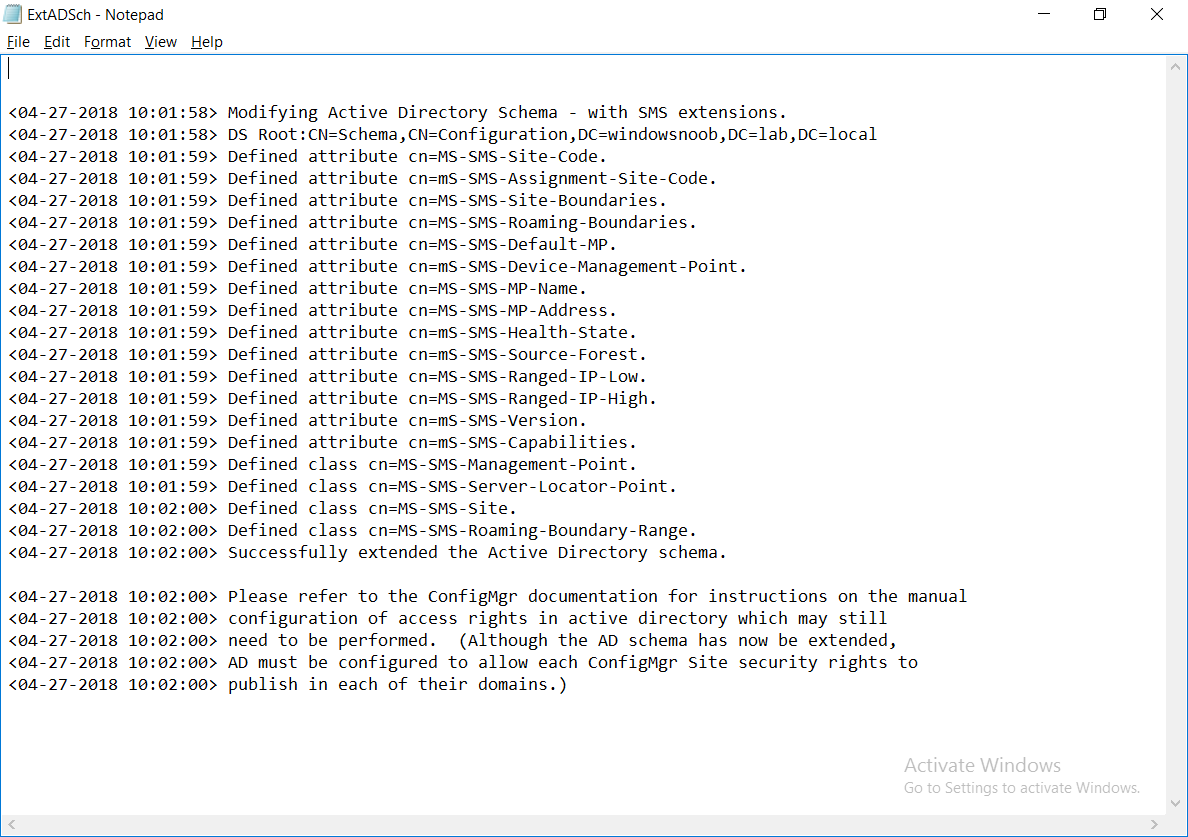
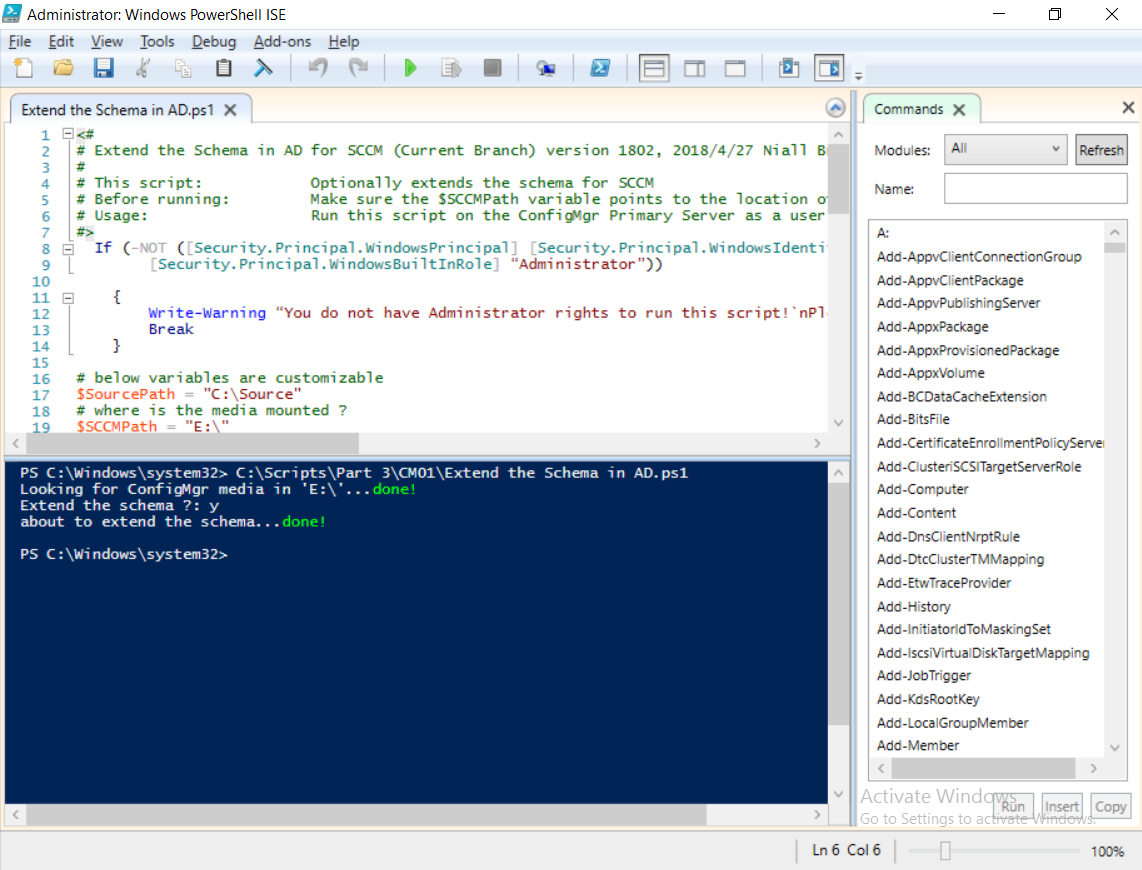
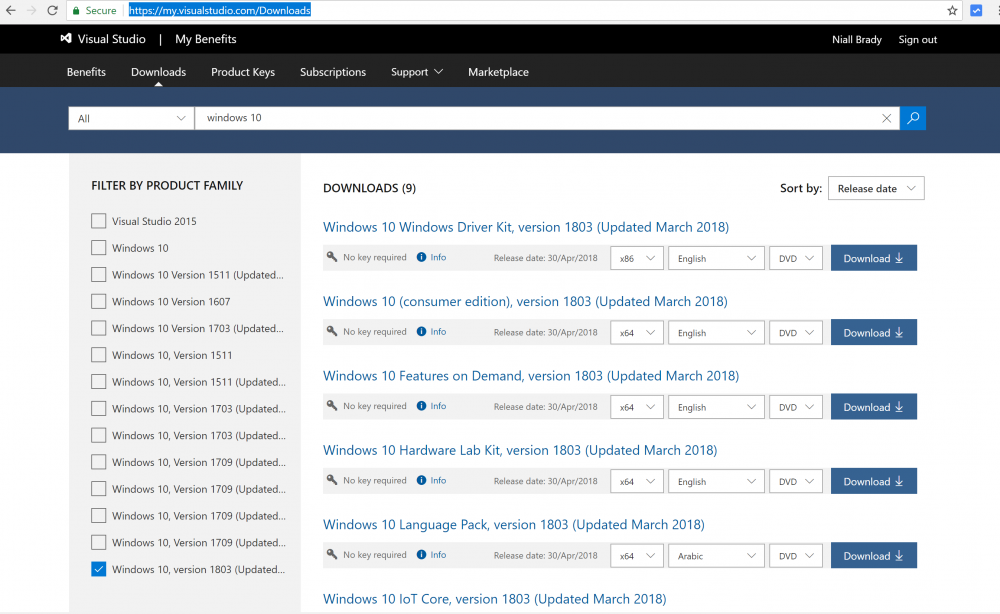
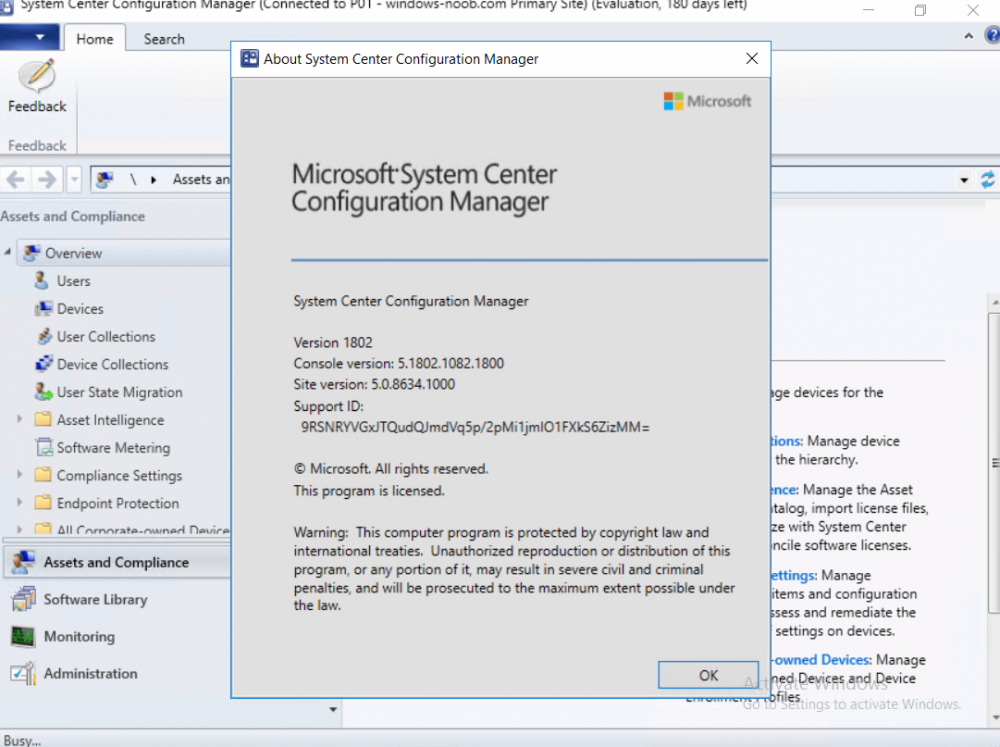
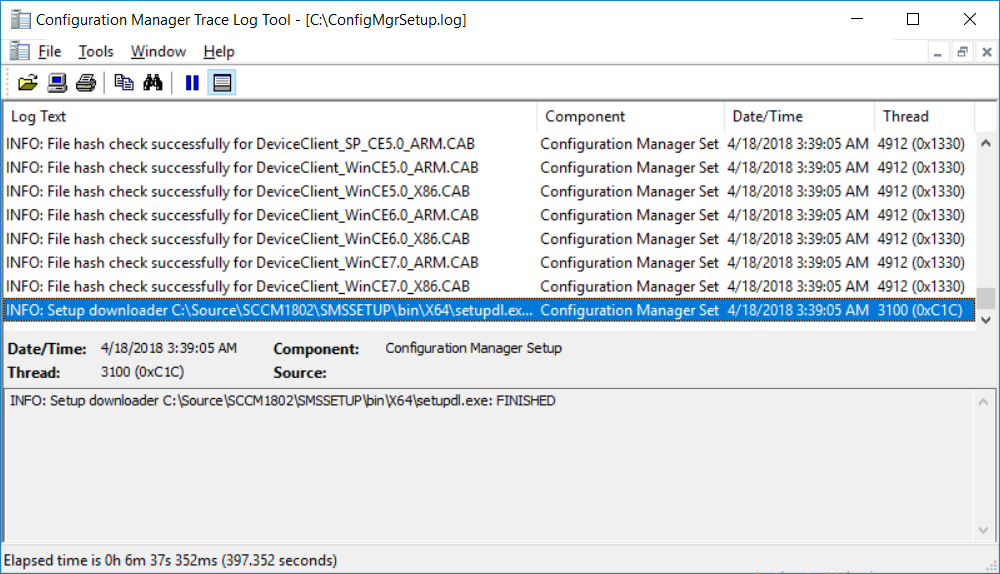
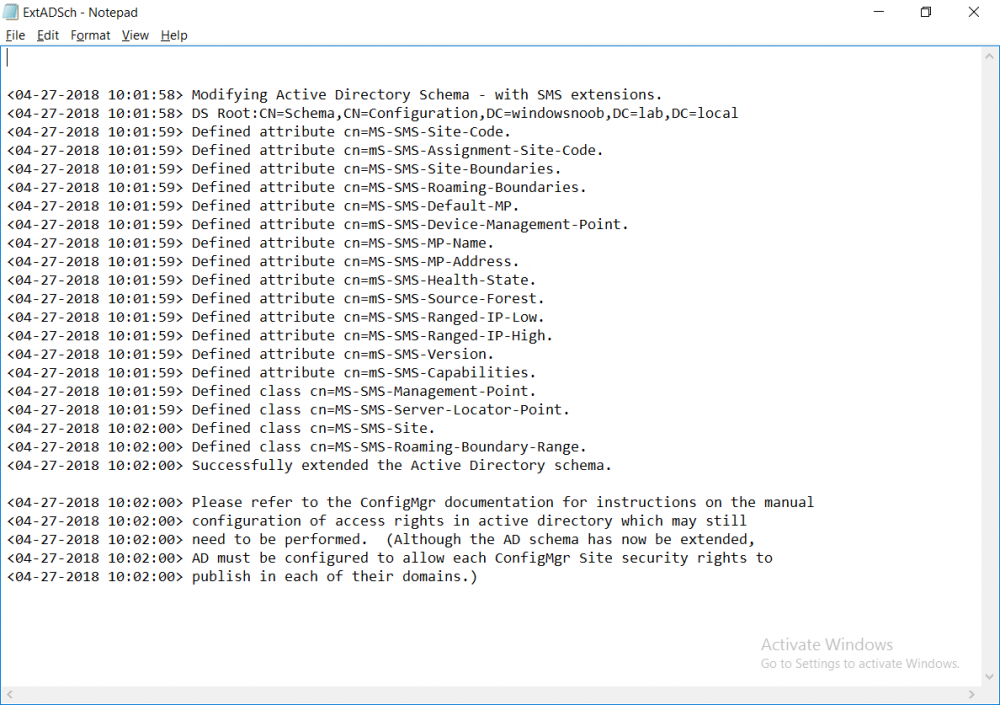
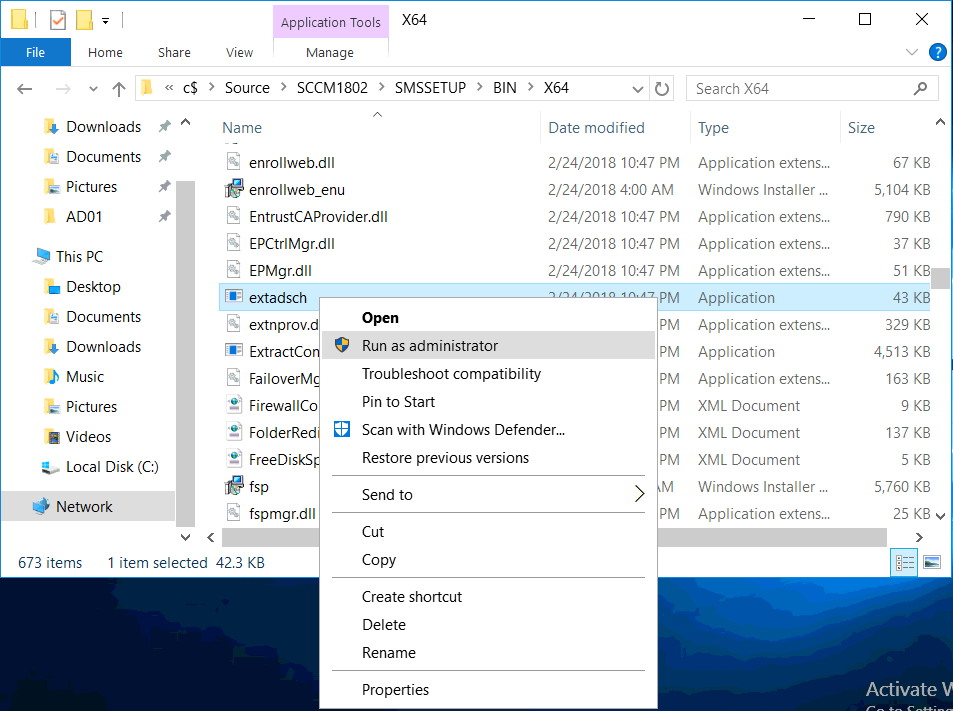
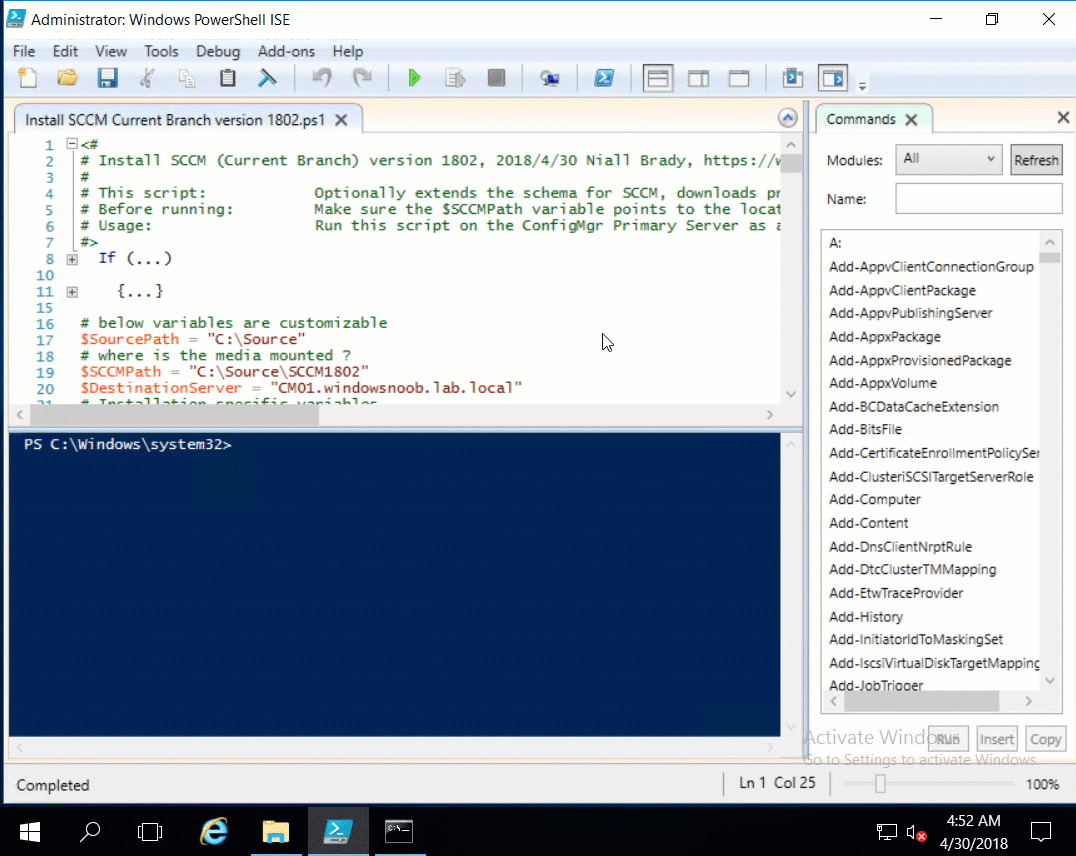
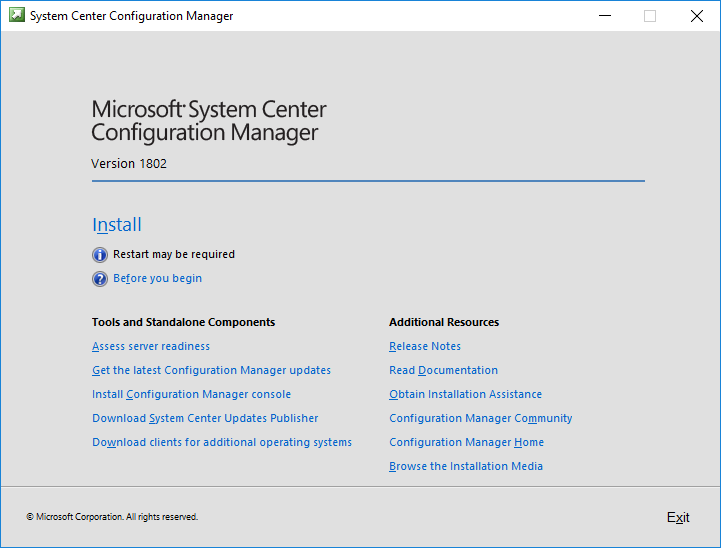
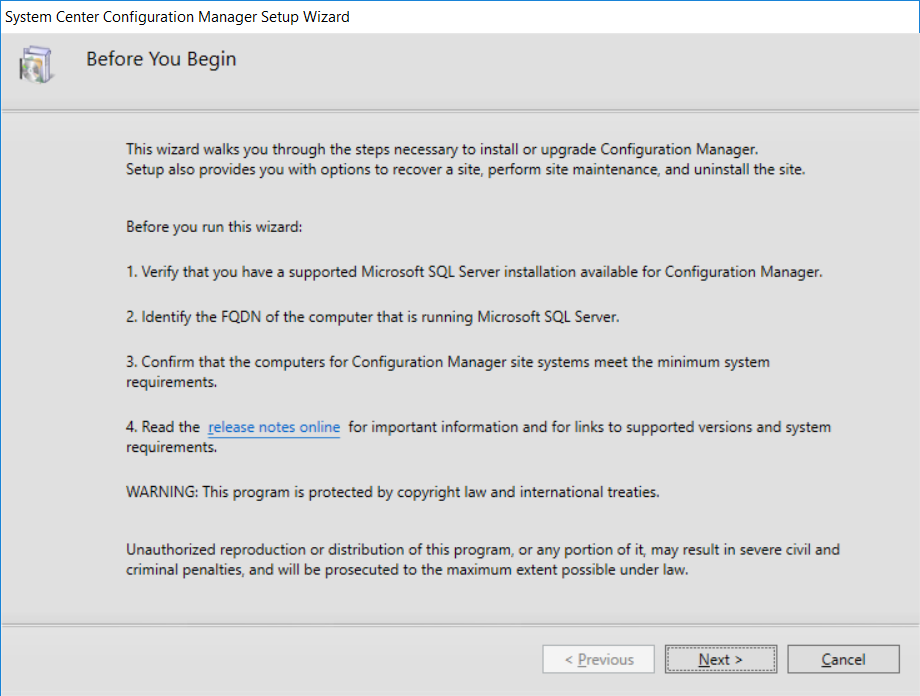
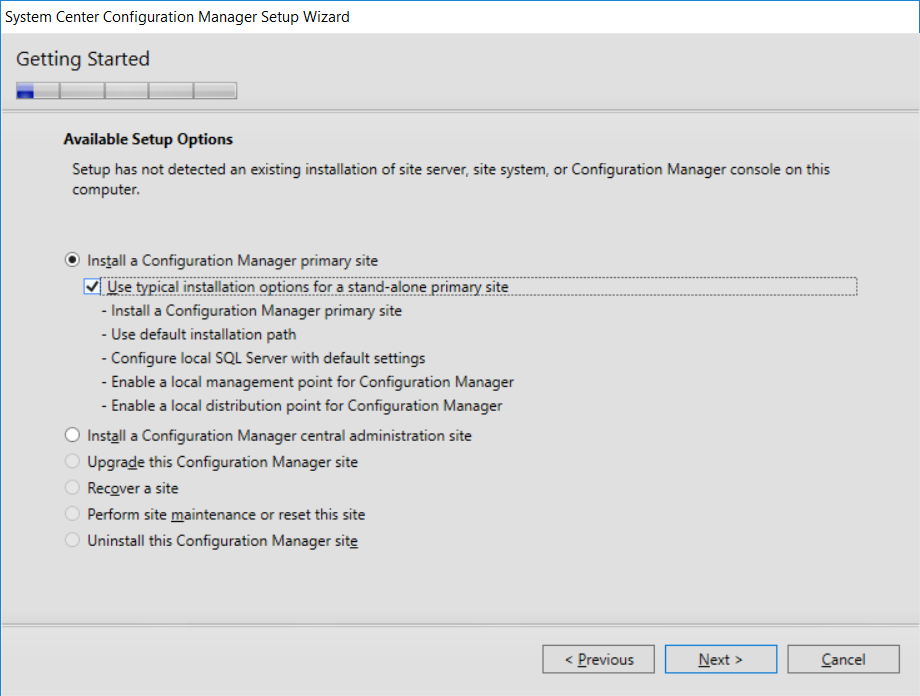
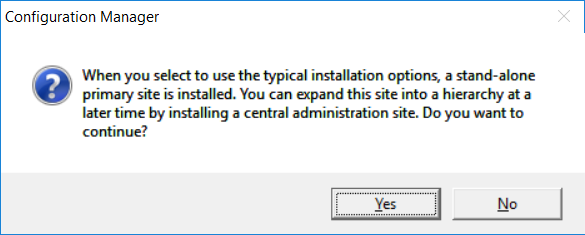
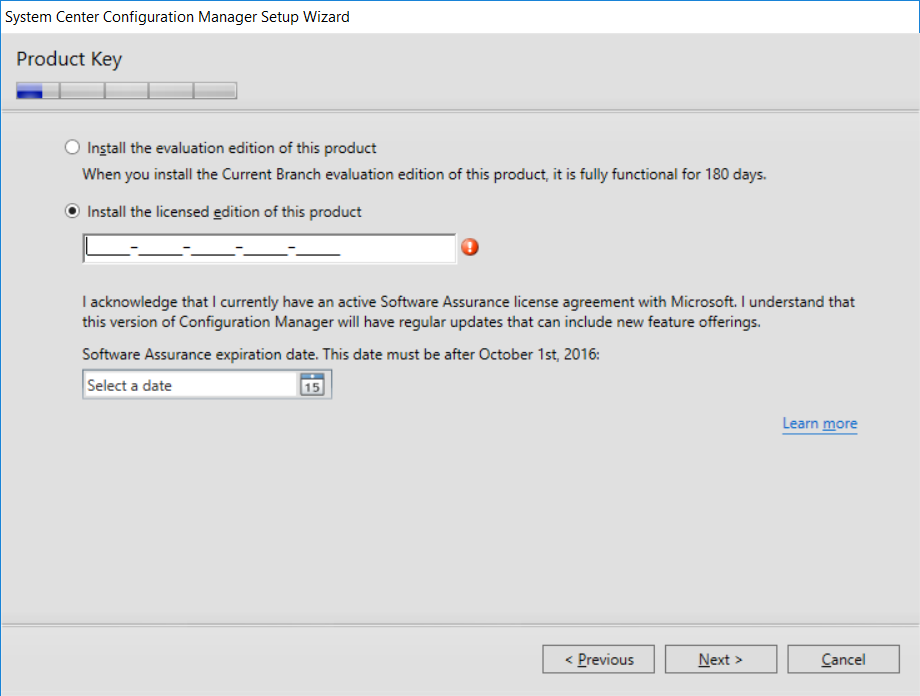
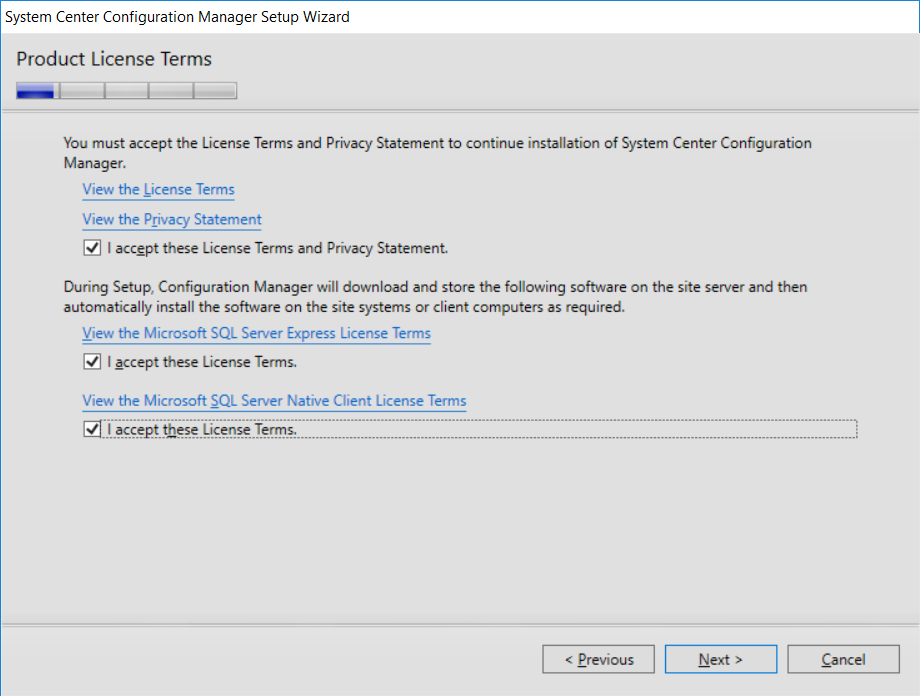
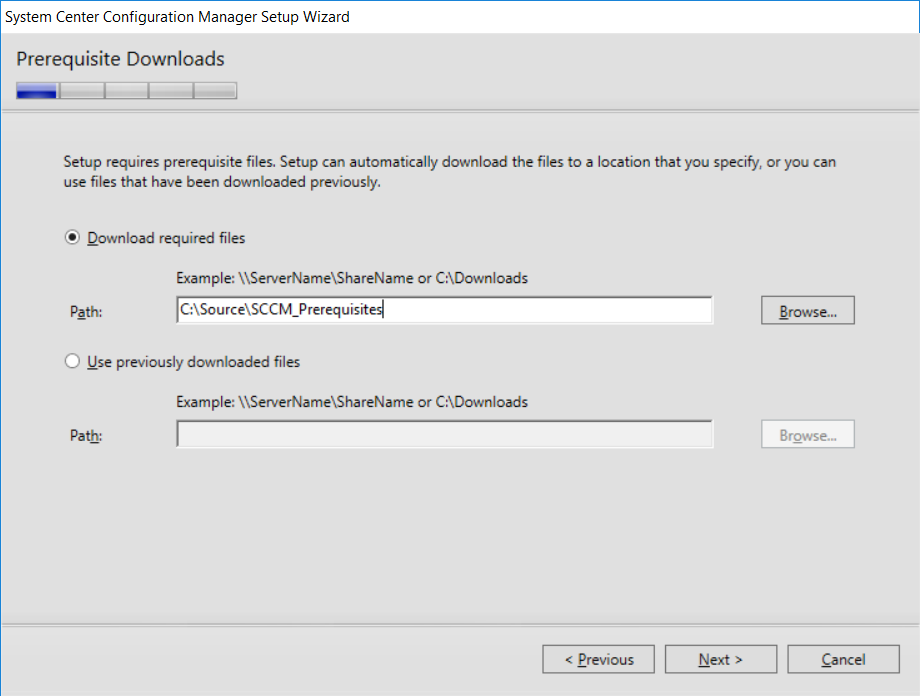
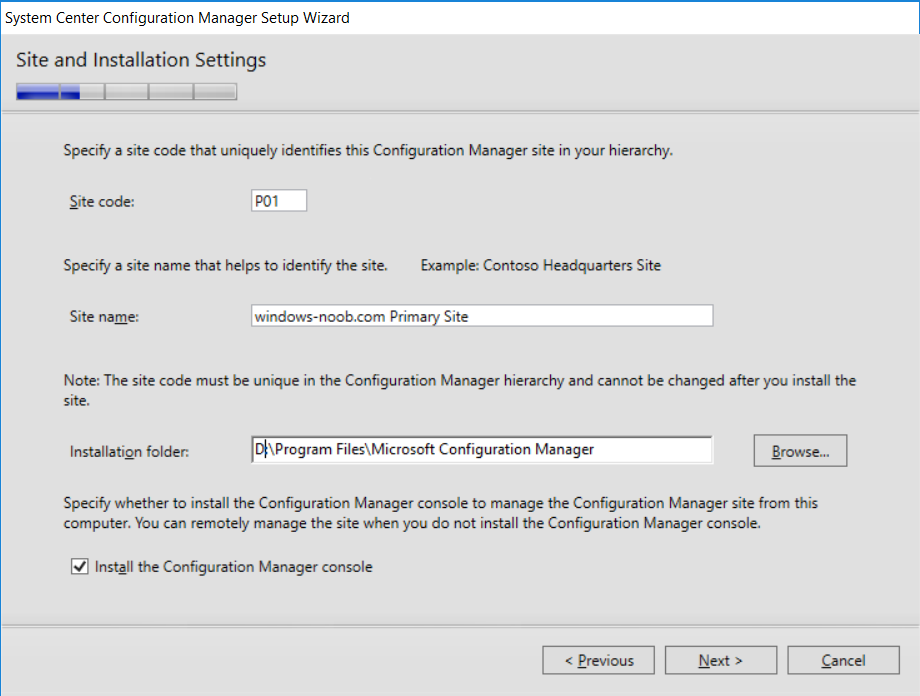
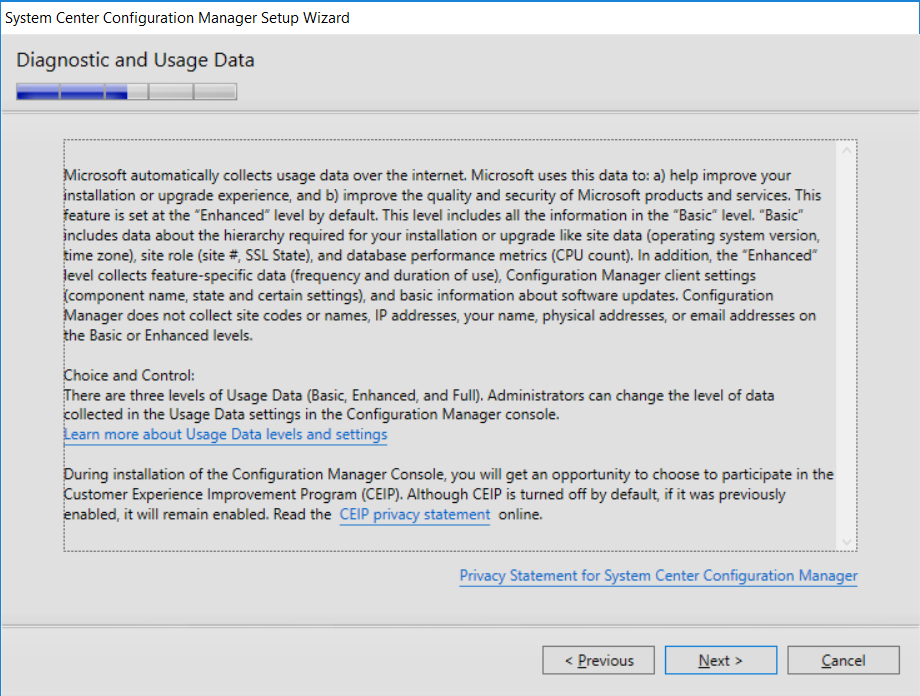
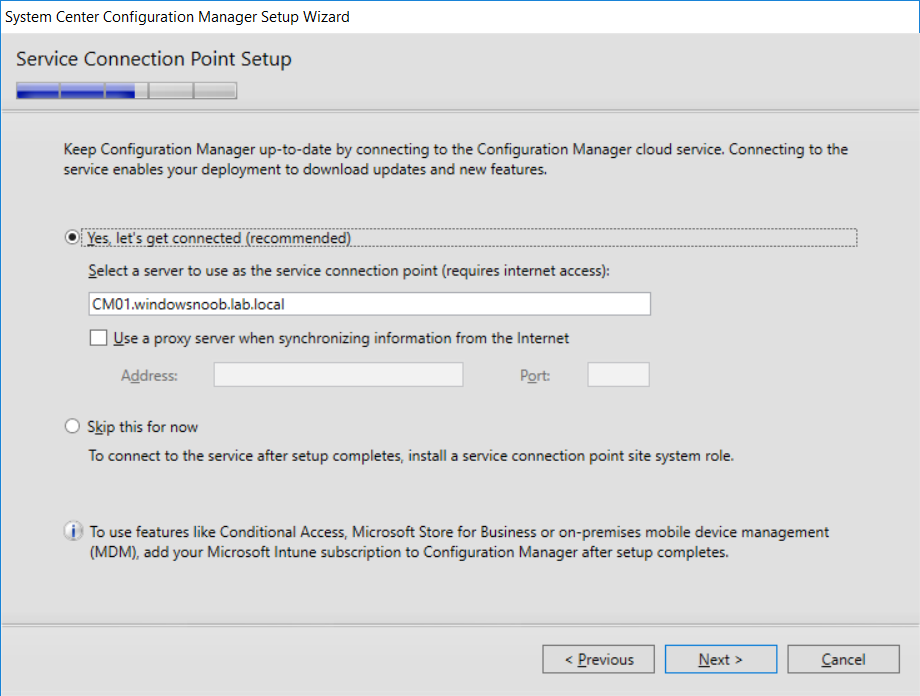
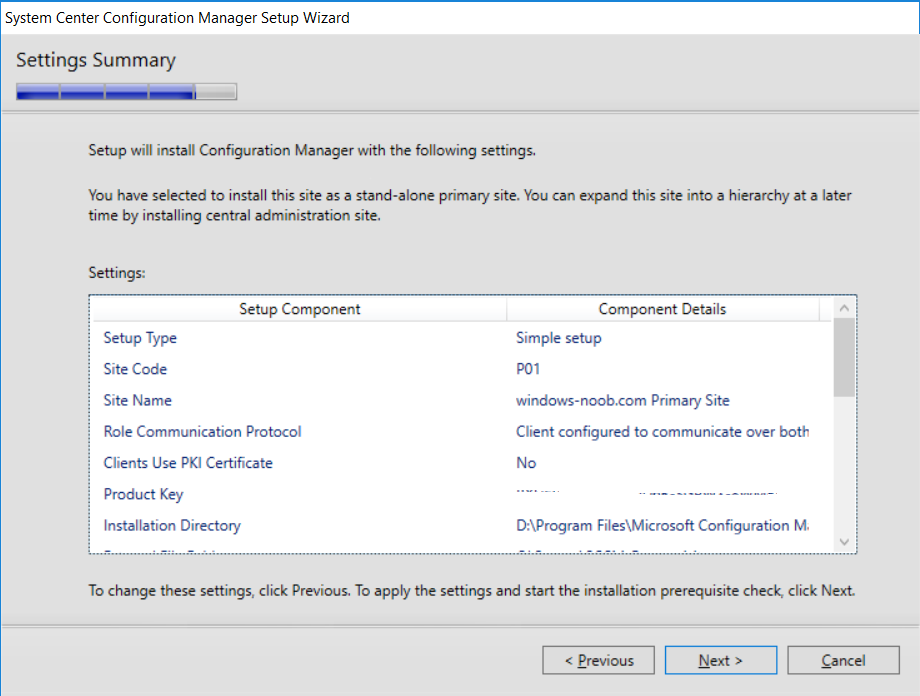
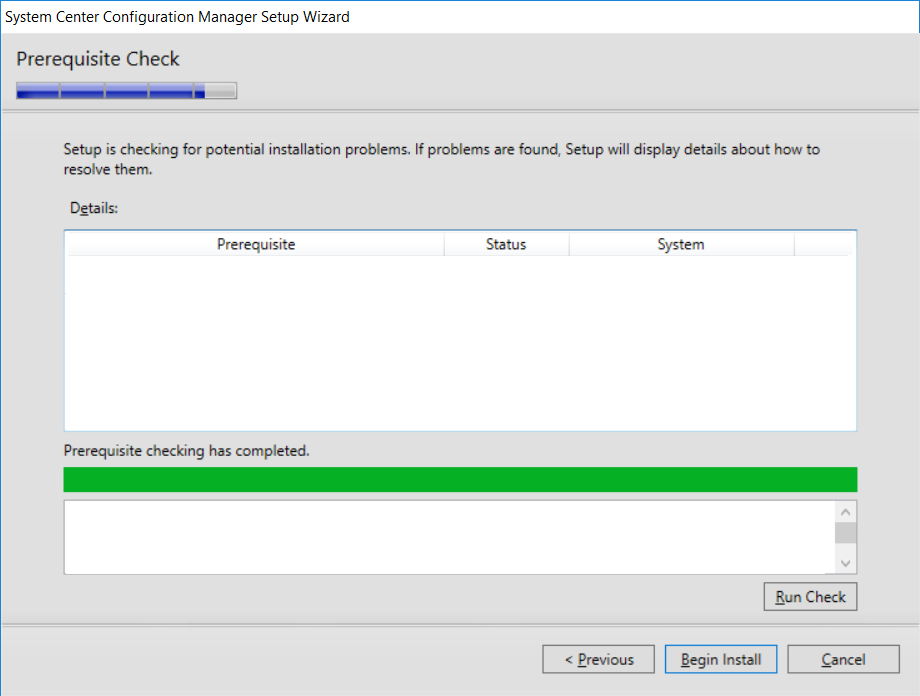
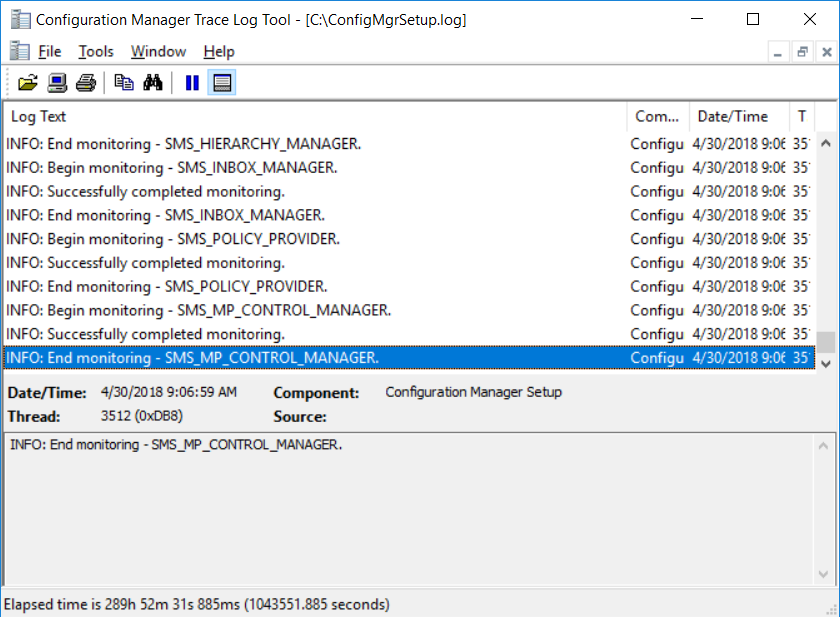
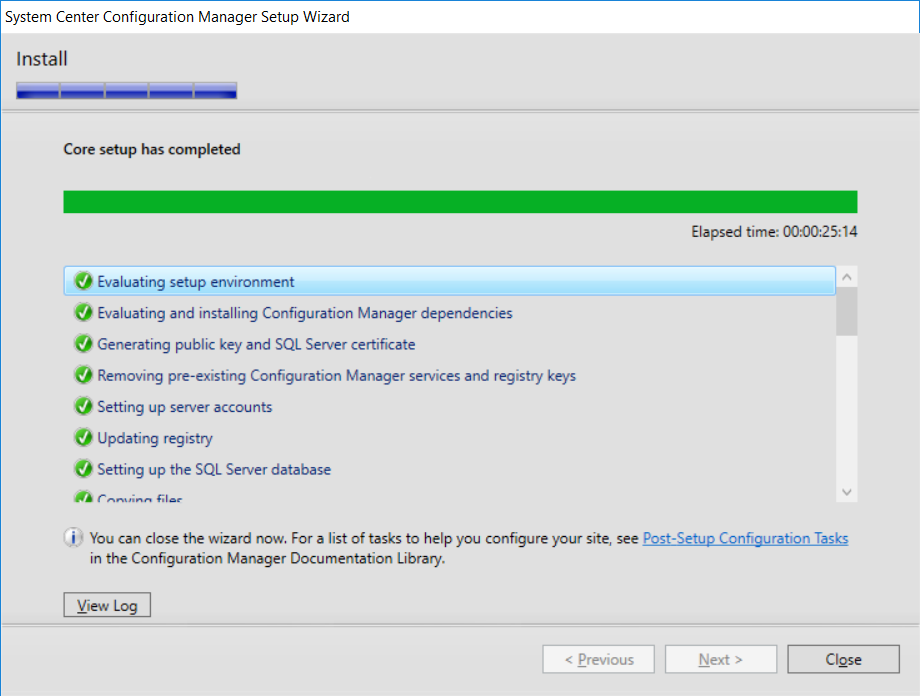
This multi-part guide will show you how to install the latest baseline version of Configuration Manager from Microsoft. The latest available baseline version is System Center Configuration Manager (Current Branch) version 1802 as of March 29th 2018. How can I install System Center Configuration Manager (Current Branch) version 1802 on Windows Server 2016 with SQL Server 2017 – Part 1 How can I install System Center Configuration Manager (Current Branch) version 1802 on Windows Server 2016 with SQL Server 2017 – Part 2 How can I install System Center Configuration Manager (Current Branch) version 1802 on Windows Server 2016 with SQL Server 2017 – Part 3 How can I install System Center Configuration Manager (Current Branch) version 1802 on Windows Server 2016 with SQL Server 2017 – Part 4 You can use this multi-part guide to get a hierarchy up and running on Windows Server 2016 using SQL Server 2017. The concept behind this is to guide you through all the steps necessary to get a working Configuration Manager Primary site installed using manual methods or automating it by using PowerShell. This gives you the power to automate the bits that you want to automate, while allowing you to manually do other tasks when needed. You decide which path to take. PowerShell knowledge is desired and dare I say required if you are in any way serious about Configuration Manager. I will show you how to do most steps via two methods shown below, it’s up to you to choose which method suits you best but I highly recommend automating everything that you can (if possible), using PowerShell. Method #1 – Do it manually Method #2 – Automate it with PowerShell In Part 1, you configured Active Directory Domain Services (ADDS) on AD01, then joined the Configuration Manager primary server (CM01) to the newly created domain. You then created users, usergroups and OU's in Active Directory and created the System Management Container. Finally you delegated permission to the Configuration Manager server to the System Management container. In Part 2, you configured Windows Server 2016 roles and features on the Configuration Manager primary server (CM01) and then you downloaded and installed Windows ADK 1709. Next you installed SQL Server 2017 CU5 with SQL Server Management Studio (SSMS) and Reporting Services before installing the WSUS role which uses SQL to store the SUSDB instead of the Windows Internal Database (WID). In this Part, you will download and extract the ConfigMgr content, you'll download the ConfigMgr prerequisites and then you'll extend the Active Directory schema before installing System Center Configuration Manager (Current Branch) version 1802. Step 1. Download and extract the ConfigMgr content Before installing System Center Configuration Manager version 1802 you'll need to download the content as it is a baseline version. You can download baseline versions of the ConfigMgr media from Microsoft's Volume licensing Service Center (VLSC) site for use in production or from MSDN (or the Microsoft Evaluation site) for use in a lab. The VLSC download can be found be searching for Config and then selecting System Center Config Mgr (current branch and LTSB) as shown below. Once you've downloaded the ISO, mount it using Windows File Explorer and copy the contents to somewhere useful like C:\Source\SCCM1802 on the Configuration Manager server. Step 2. Download the ConfigMgr Prerequisites Note: Perform the following on the Configuration Manager server (CM01) as a Local Administrator You can download the prerequisites during ConfigMgr setup or in advance. As you'll probably want to install more than one copy of ConfigMgr (one lab, one production) it's nice to have the prerequisites downloaded in advance. Method #1 – Do it manually To do that, open an administrative PowerShell command prompt and navigate to the following folder: C:\Source\SCCM1802\smssetup\bin\X64 Run the following line .\SetupDL.exe C:\Source\SCCM_Prerequisites Once the process is complete you can open C:\ConfigMgrSetup.log with CMTrace (or notepad) to verify the status of the download. Note: You can find the CMTrace executable in the SMSSetup Tools folder in the location that you extracted the ConfigMgr media, eg: C:\Source\SCCM1802\SMSSETUP\TOOLS. Method #2 – Automate it with PowerShell To automate the download of the prerequisites simply follow the instructions and run the Install SCCM Current Branch version 1802.ps1 Powershell script in Step 4 or use the Download SCCM prerequisite files.ps1. Step 3. Extend the Schema Note: Perform the following on the Domain controller server (AD01) as Administrator. You do not have to extend the Active Directory schema if it was already extended for Configuration Manager previously. Method #1 – Do it manually To do that, on the Active Directory domain controller (AD01), open Windows File Explorer and browse to the network path of the ConfigMgr server where you've copied the SCCM source, eg: \\cm01\c$\Source\SCCM1802\SMSSETUP\BIN\X64 In that folder, locate extadsch.exe and right click, choose Run as Administrator. After the schema has been extended for SCCM, you can open C:\ExtAdsch.log on the root of C:\ on the server you are performing this on, and review the success or failure of that action. Method #2 – Automate it with PowerShell To automate extending the schema, use the Extend the Schema in AD.ps1 PowerShell script. Run the script on the CM01 server using credentials that have the ability to extend the schema. Step 4. Install SCCM Current Branch (version 1802) Note: Perform the following on the ConfigMgr server (CM01) as Administrator. Method #1 – Do it manually To do that, on the Configuration Manager server (CM01), open Windows File Explorer and browse to the network path of the ConfigMgr server where you've copied the SCCM source, eg: C:\Source\SCCM1802\ In that folder, double click on splash.hta. The Installer appears, click on Install. At the Before You Begin screen click Next. In the Available Setup Options screen, place a checkbox in "Use typical Installation options for a stand alone primary site" When prompted if you want to continue click Yes. On the Product Key screen enter your Key (or choose the eval option), and set the Software Assurance Date (optional) On the Product License Terms screen, select the 3 available options and click Next. On the Prerequisite Downloads screen, select the first option and specify C:\Source\SCCM_Prerequisites as the folder to download the prerequisite files. Click Next to start the download. On the Site and Installation Settings screen, enter your chosen site code (eg: P01), your site name and the path where you want to install ConfigMgr. On the Diagnostics and Usage data screen, click Next. On the Service Connection Point Setup screen, enter your choices and click Next. On the Settings Summary, review your choices and when happy with them click Next. On the Prerequisite Check screen click Begin Install when ready. During the installation, click on View Log (opens C:\ConfigmgrSetup.log) to review the installation progress using CMTrace and when the installation is done, click Close. Method #2 – Automate it with PowerShell To automate the installation of ConfigMgr 1802 (including all the previous steps above), simply run the Install SCCM Current Branch version 1802.ps1 PowerShell script. Run the script on the CM01 server and when prompted to extend the schema, enter your choice (yes or no) and if you choose to extend the schema, provide suitable credentials when prompted. Once done with the schema extension, the installation will continue (as shown below). and once installed you can launch the console. Success ! Summary In this 3 part guide you used quite a bit of PowerShell to automate pretty much most of Installing System Center Configuration Manager Current Branch (version 1802), including installing and configuring SQL Server 2017 on Windows Server 2016. Doing it with PowerShell means you can safely say that you've got a handle on Automation using PowerShell. I hope you learned a lot from doing it this way, and until next time, adios ! Downloads The scripts used in this guide are available for download here. Unzip to C:\Scripts on both servers. The scripts are placed in the corresponding folder (Part 1, Part 2 etc) and sorted into which server you should run the script on (AD01 or CM01). Scripts.zip


-
good question which I (and Justin) answered on the facebook group here https://www.facebook.com/groups/windowsnoob/
-
How can I add a new driver to an existing Driver Package
anyweb replied to sccmmidi's question in Deploy software, applications and drivers
the issue with this is as soon as you add new content to an existing package, you need to update it to your distribution points, (otherwise your clients won't get the new drivers...) and when you do that, any live task sequence that references that package will fail on that package until the content is distributed, so, if you can time it so that you know no one will be using the task sequence, then sure you can use the existing driver package and simply update the content source with the new drivers, and then update the package to your dp's, if however you cannot guarantee down time for the task sequences, then your best option is to create a v2 of the same driver package but with the new content, then distribute that to all your dp's and once done, replace the reference in your task sequence with the v2 version of the driver package -
i'm happy to teamviewer in to take a look if you want, let me know
-
do you want to replace the current VPN gateway address with a new one or check for both ? are you using multiple VPNs ? If multiple then you'll need to edit line 300 to include nested If statements as described here
-
thanks for the thanks, ok, so after assigning the profile, you go through OOBE, when it prompts for credentials are you seeing the company name+logo you defined in AAD ?
-
are you testing this using a user that is a global admin in Azure, if so, then they will still be an admin (local) after autopilot is done