anyweb
-
Posts
9260 -
Joined
-
Last visited
-
Days Won
371
Everything posted by anyweb
-
yes of course, but how you build that windows 7 vm is what you have to decide, do it manually (not a good idea), do it automated using MDT 2013 (recommended) or use Configuration Manager 2012 to build it, (recommeded provided that you have that infrastructure in place)
-

How to make the .wim of Windows 7 for Pre installed software.
anyweb replied to niyaz Ahmed's question in Windows Deployment Services (WDS)
you should use MDT, but if you insist on using WDS itself, then read this -
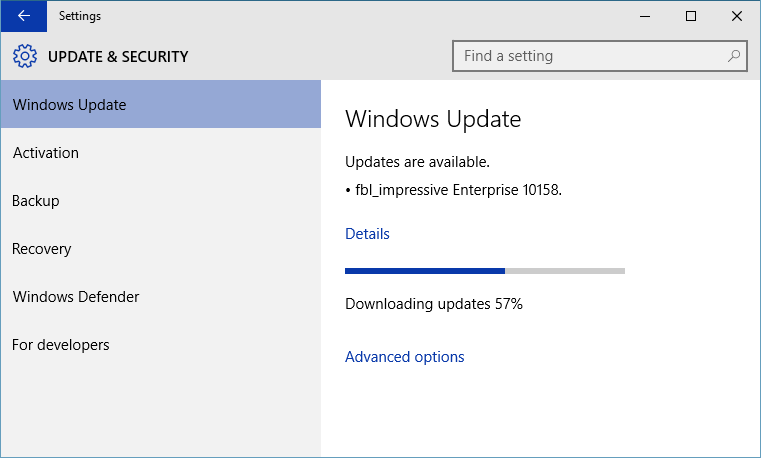
Just when I got my build 10158 Upgrade and New Computer scenario task sequences done, Microsoft releases..... build 10159 ! The new build has 300 bug fixes since build 10158 and a new wallpaper too (that one where they spent half a trillion US dollars on making the video which turned into a BMP), well ok, it wasn't quite that expensive, but it was a nice result :-) I nearly forgot, the blog post announcing the new build is right here http://blogs.windows.com/bloggingwindows/2015/06/30/whoa-another-pc-build/ get it, install it, deploy it, use it ! Windows 10 ftw :-)


-
sure there is, you can build and capture in SCCM as described here or do it with MDT as described by Johan and many others on Microsoft virtual academy
-
We have a new build for PCs releasing today to Windows Insiders in the Fast ring – Build 10158. This build is full of improvements to stability and quality as well as some additional UI polish. It also has some great new features included for Microsoft Edge as well. Here is what’s new in this build Microsoft Edge: The first thing that you’ll notice in this build is that the Microsoft Edge branding is now included. IMPORTANT: Microsoft Edge has a new app ID that will cause any favorites, cookies, history and Reading list items that you had saved in “Project Spartan” from previous builds to be lost after upgrading. If you want to keep these, make sure you back up your favorites before upgrading to Build 10158. To save your favorites, follow these steps before upgrading to the next build we release (do it now): Copy your favorites from %localappdata%/Packages/Microsoft.Windows.Spartan_cw5n1h2txyewy/AC/Spartan/User/Default/Favorites. Save them to %userprofile%/Favorites. After upgrading to the next build open Microsoft Edge, choose Settings, and you’ll see an option to import favorites from another browser. Choose Internet Explorer to import the favorites you saved in your %userprofile% directory into Microsoft Edge. There are also some great new features and improvements for you to try: One of the top pieces of feedback we’ve heard from Windows Insiders is that many of you really wanted a “home” button for Microsoft Edge. In this build, we’ve provided an option for you to add it via Settings > Advanced Settings and turn on “Show the home button”. We’ve added the ability for you to import favorites/bookmarks from other browsers into Microsoft Edge. There are new options for changing what you see when you first start Microsoft Edge. There are new customizations for the New Tab page. You can choose to either see top sites and suggested content – or just top sites. We’ve added password and form-fill support. Microsoft Edge now lets you manage your passwords for your favorite websites. Audio from Microsoft Edge plays while the app is minimized or in the background – another top request from Windows Insiders. You can drag and drop tabs to a new window. Another top request: we now have a dark theme! General UX improvements and refinement: You’ll continue to see general UX improvements and refinement in this build. For Continuum, you’ll see a lot of bug fixes as well as improved Tablet mode animations, improved support for Windows 8/8.1 apps and classic (Win32) apps in Tablet mode. And when using the Start Menu, you can swipe up on the left side to open All apps. This also works in Tablet mode, when you have opened up the left side of Start behind the hamburger menu. Additionally, in All apps – you can click on a letter to quickly go to apps on the All apps list under that letter (great for people with lots of apps installed). more > http://blogs.windows.com/bloggingwindows/2015/06/29/announcing-windows-10-insider-preview-build-10158-for-pcs/

-
Upgraded to SP1 and now cannot OSD Win10 to a HyperV Guest
anyweb replied to SM17's topic in Configuration Manager 2012
i'm happy to remote in and take a look, using teamviewer, let me know if you want me to check -
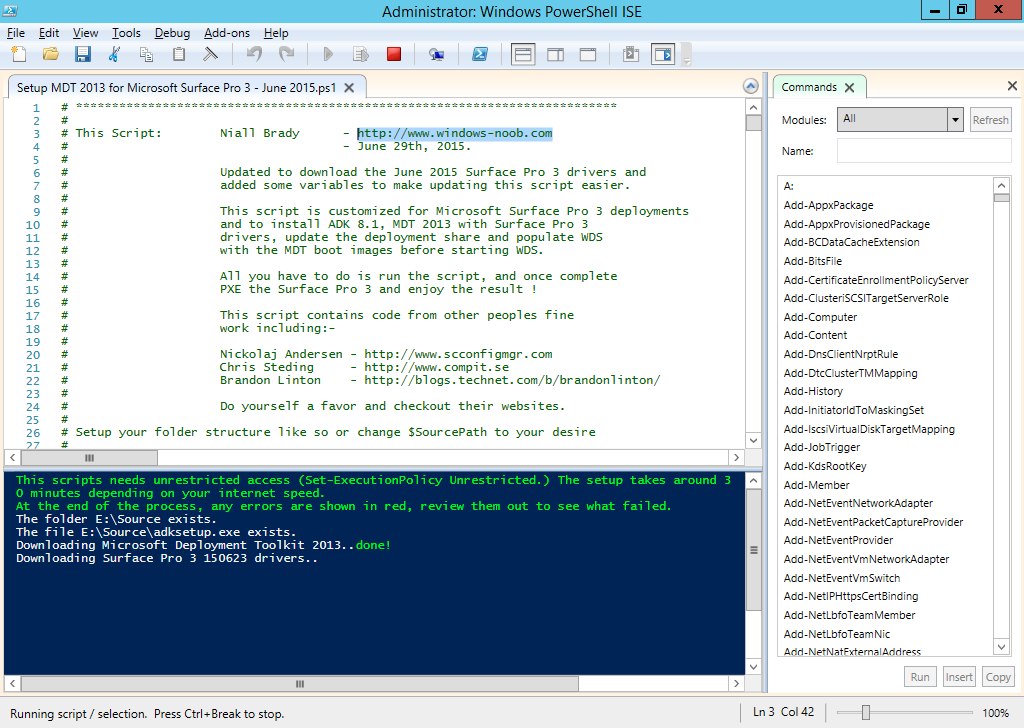
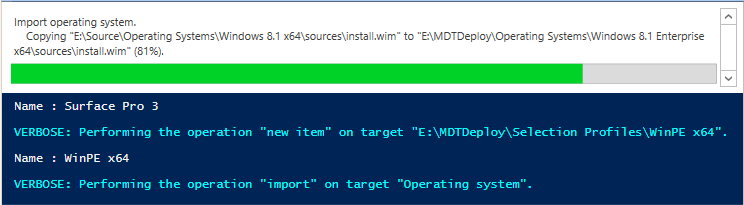
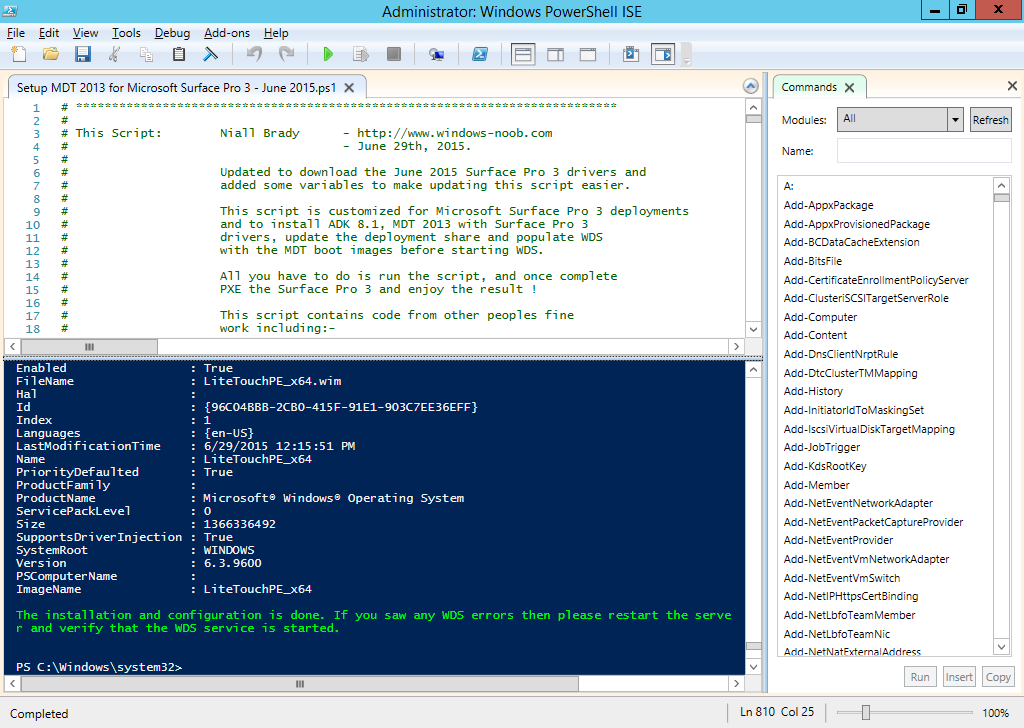
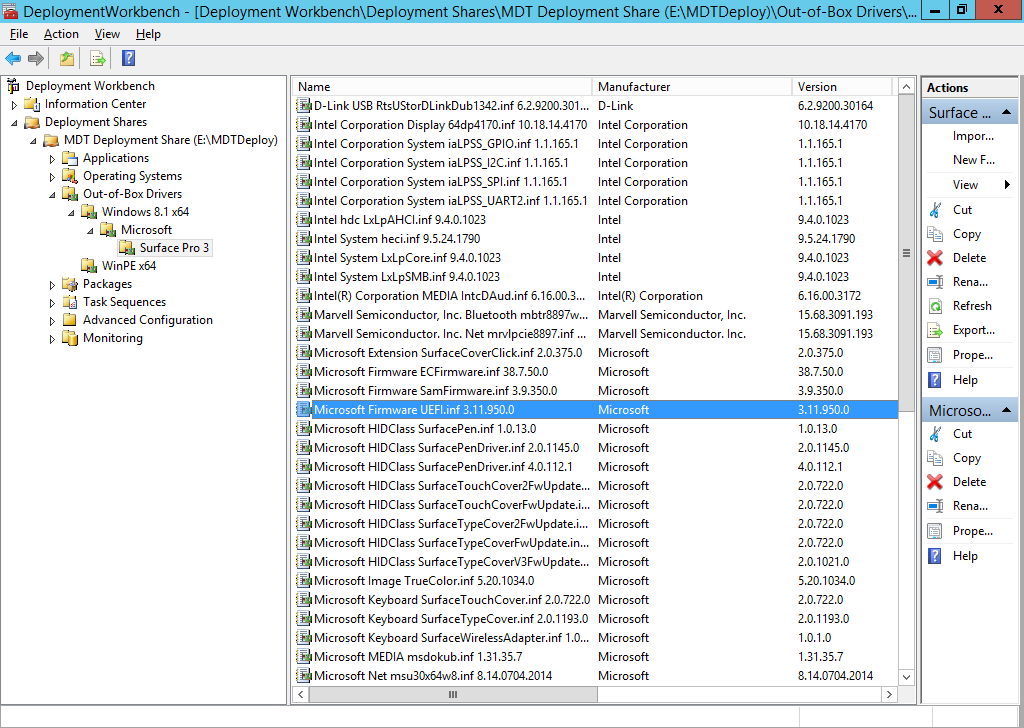
On June 25th, Microsoft released another driver update for the Surface Pro 3 here. As usual, i've updated my PowerShell script to allow you to deploy this awesome device using minimal effort via a MDT 2013 solution all built with PowerShell. I've updated the script somewhat to include a few more variables to allow for easily changing the source drivers going forward, to change them simply input the correct values for the following variables: You don't need to change this script now however, just download it, and run it on a Windows Server 2012 R2 in Windows PowerShell ISE as administrator, the script will do the rest. If you want to know how the script works then please see this post for more details. When the script is finished running it should look like this. you can review the installation of MDT 2013 which it has created for you complete with all the June 2015 drivers for the Surface Pro 3 by opening up the Deployment Workbench and seeing for yourself. which means you can PXE boot a Surface Pro 3 straight away and start imaging it The actual driver updates are listed below FIRMWARE: EC 38.7.50.0 ECFirmware.inf SAM 3.9.350.0 SamFirmware.inf TOUCH 426.27.66.0 TouchFirmware.inf UEFI 3.11.950.0 UEFI.inf DRIVERS: Accessory SurfaceAccessoryDevice 2.0.1012.0 SurfaceAccessoryDevice.inf Accessory SurfaceCoverAudio 2.0.722.0 SurfaceCoverAudio.inf Accessory SurfaceCoverClick 2.0.375.0 SurfaceCoverClick.inf Accessory SurfaceCoverTelemetry 2.0.722.0 SurfaceCoverTelemetry.inf Accessory SurfaceTouchCover 2.0.722.0 SurfaceTouchCover.inf Accessory SurfaceTouchCover2FwUpdate 2.0.722.0 SurfaceTouchCover2FwUpdate.inf Accessory SurfaceTouchCoverFwUpdate 2.0.722.0 SurfaceTouchCoverFwUpdate.inf Accessory SurfaceTypeCover 2.0.1193.0 SurfaceTypeCover.inf Accessory SurfaceTypeCover2FwUpdate 2.0.722.0 SurfaceTypeCover2FwUpdate.inf Accessory SurfaceTypeCoverFwUpdate 2.0.722.0 SurfaceTypeCoverFwUpdate.inf Accessory SurfaceTypeCoverV3FwUpdate 2.0.1021.0 SurfaceTypeCoverV3FwUpdate.inf Accessory SurfaceWirelessAdapter 1.0.1.0 SurfaceWirelessAdapter.inf Audio DockingStationAudioDevice 1.31.35.7 msdokub.inf Audio HdAudio 6.0.1.7198 HDXMSSDS1.inf Camera LifeCam 5.20.1034.0 TrueColor.inf Display DisplayAudio 6.16.00.3172 IntcDAud.inf Display Graphics 10.18.14.4170 64dp4170.inf Display SurfaceDisplayCalibration 2.0.1002.0 SurfaceDisplayCalibration.inf Network Bluetooth 15.68.3091.193 mbtr8897w81x64.inf Network SurfaceEthernetAdapter 8.10.0830.2013 msu64w8.inf Network SurfaceGigabitEthernetAdapter 8.14.0704.2014 msu30x64w8.inf Network WiFi 15.68.3091.193 mrvlpcie8897.inf Pen SurfacePen 1.0.13.0 SurfacePen.inf Pen SurfacePenSettingsDriver 4.0.112.1 SurfacePenDriver.inf System CapacitiveHomeButton 2.0.1179.0 SurfaceCapacitiveHomeButton.inf System CardReader 6.2.9200.30164 RtsUStor.inf System GPIO 1.1.165.1 iaLPSS_GPIO.inf System I2C 1.1.165.1 iaLPSS_I2C.inf System LowPinCount 9.4.0.1023 LxLpCore.inf System ManagementEngine 9.5.24.1790 heci.inf System SATA_AHCI 9.4.0.1023 LxLpAHCI.inf System SMBus 9.4.0.1023 LxLpSMB.inf System SurfaceIntegrationDriver 2.0.1182.0 SurfaceIntegrationDriver.inf System SurfacePciController 2.0.1151.0 SurfacePciController.inf Download the script Here's the script, download it, unzip, run it in Windows PowerShell ISE. Setup MDT 2013 for Microsoft Surface Pro 3 - June 2015.zip enjoy ! cheers niall


-
have you verified that your unattend.xml is actually populated with those variables ?
-
are you trying to start a task sequence from within Windows or via PXE ? if it's within Windows then have you deployed the task sequence to a collection that the computer you are testing with is a member of ? does that computer list the task sequence in software center ?
-
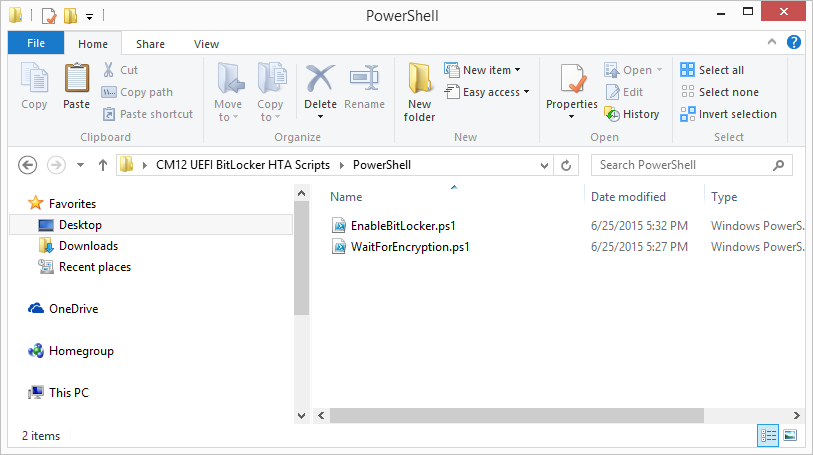
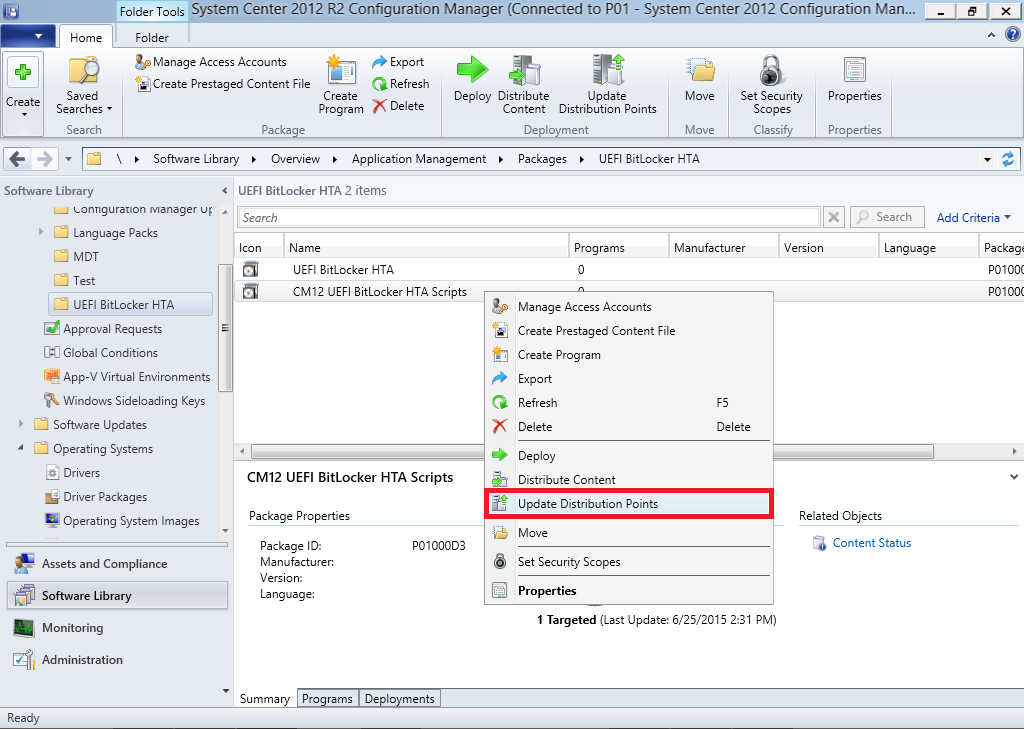
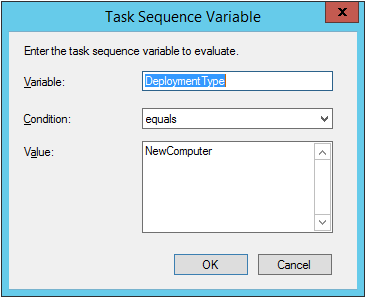
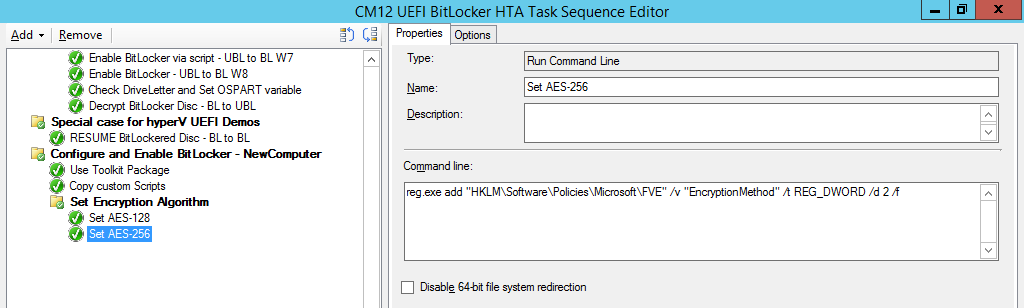
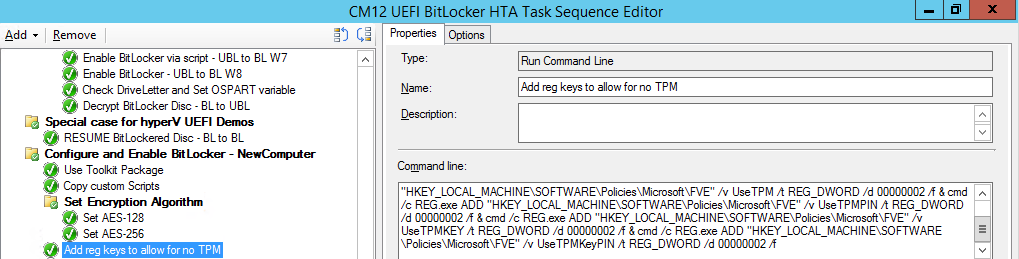
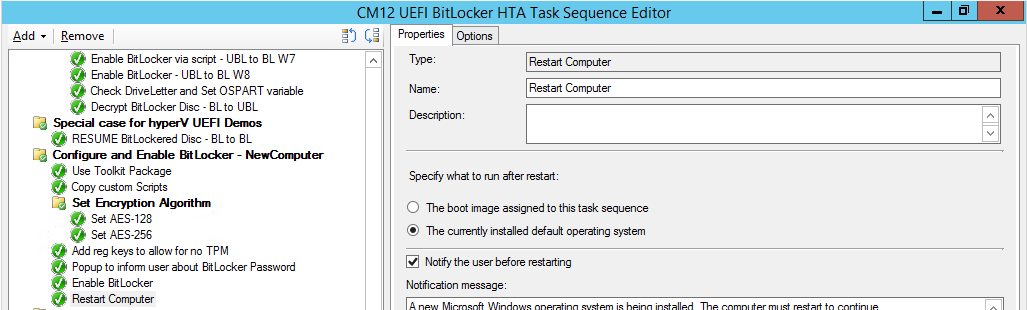
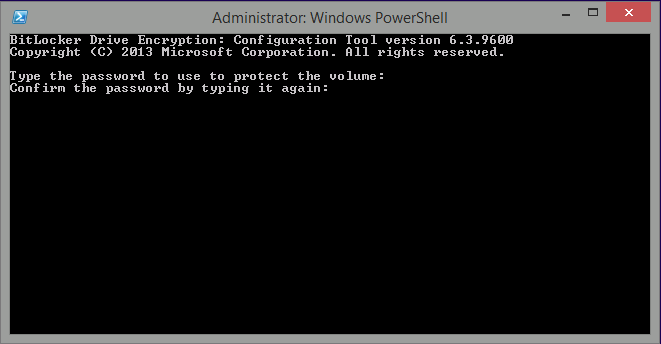
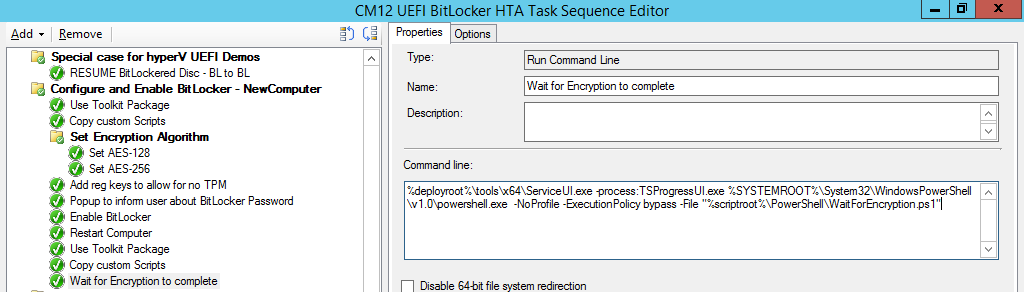
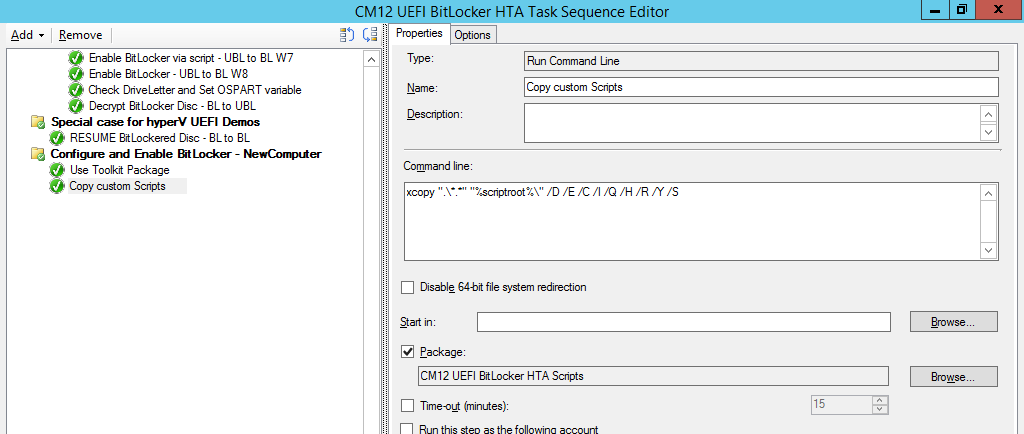
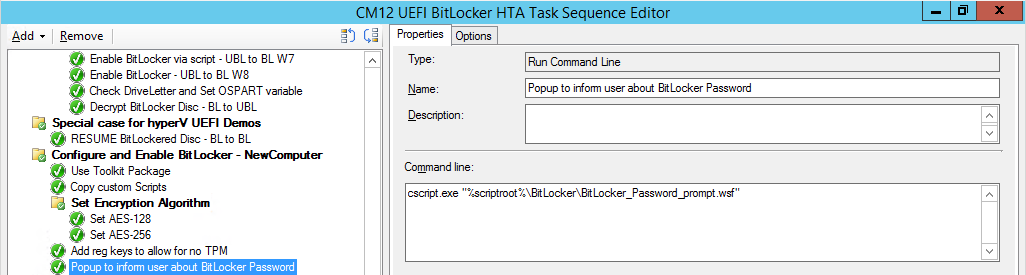
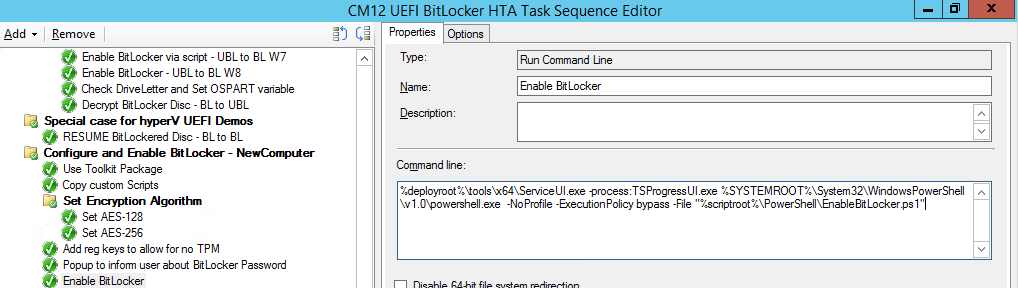
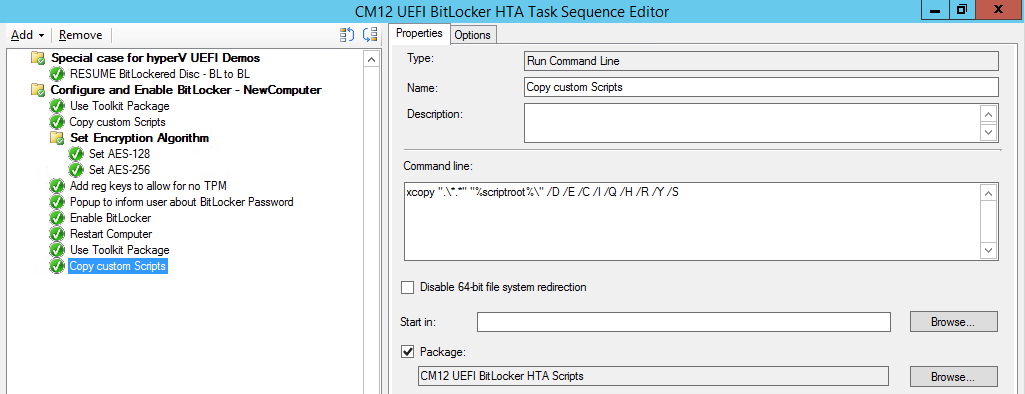
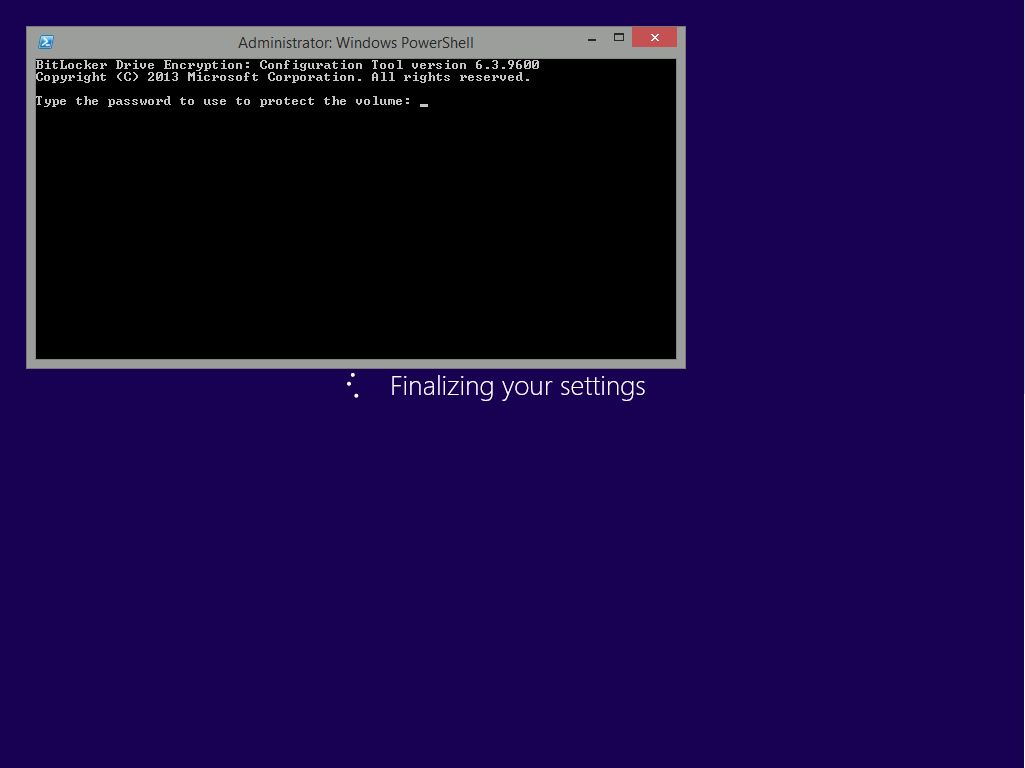
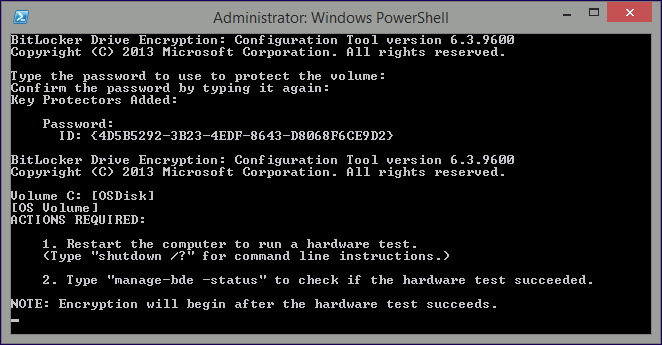
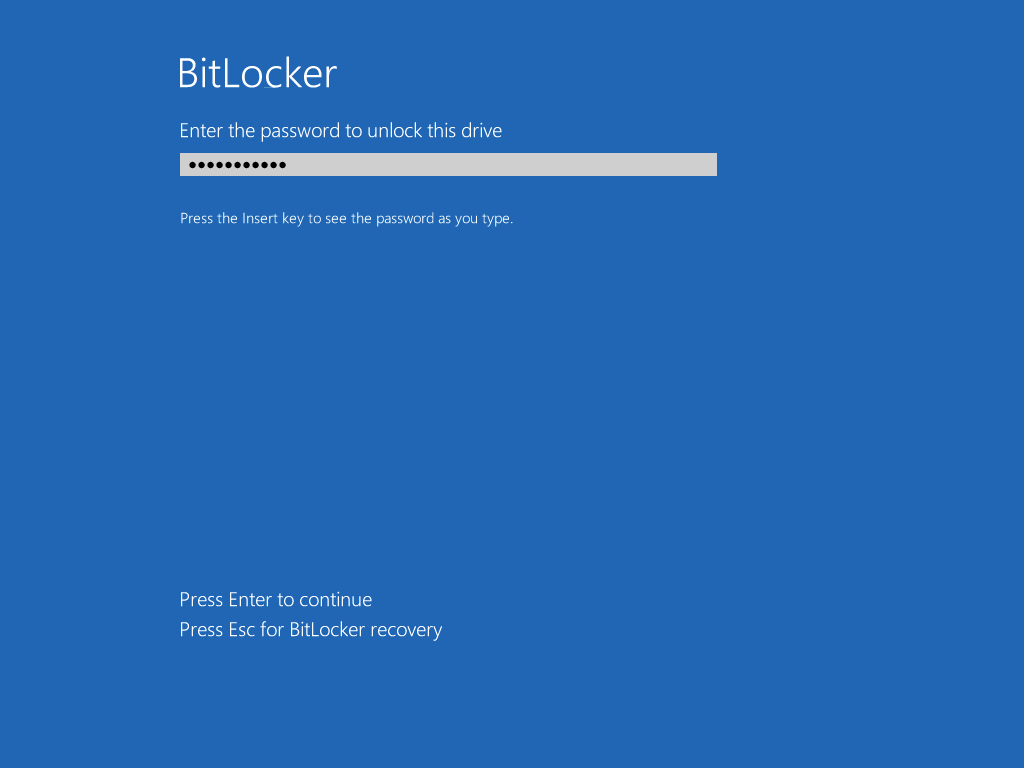
Introduction Enabling BitLocker during New Computer scenarios has been a task organizations have been using for years now, indeed you've had the ability to automate it fully using FrontEnd's such as this one. As Virtual technology (such as Microsoft Hyper-V Generation 2) has improved in leaps and bounds, so has the need to protect those assets. Of course you can BitLocker the Hyper-v host but wouldn't be nice to also BitLocker the virtual machines running on that host and do so using a task sequence in System Center 2012 R2 Configuration Manager. Up until now that's been a manual experience but with the steps below, it's semi-automated. I say semi because some user input is required in order to bypass the lack of TPM in a virtual machine. Tip: Rather than create all these steps you can download the entire task sequence and scripts required in the CM12 UEFI BitLocker HTA which was updated with these changes, June 25th, 2015. Step 1. Download the scripts. I've created a few PowerShell scripts which you can use to achieve this task. CM12 UEFI BitLocker HTA Scripts.zip Extract the scripts to a folder on your ConfigMgr server. Step 2. Create a Package for the scripts On the ConfigMgr server, create a new package called CM12 UEFI BitLocker HTA Scripts (or if you are already using the CM12 UEFI BitLocker HTA merge these files with the existing package and update it to your distribution points). Once the package is created, distribute it to the distribution points. Step 3. Add steps to a deploy task sequence In your deploy task sequence, add a new group by clicking on the Add drop down and select New Group. Give the group a new name called Configure and Enable BitLocker - NewComputer, click on the Options tab and select that the step runs if Task Sequence Variable DeploymentType = NewComputer as shown below. Create another New Group called Set Encryption Algorithm Next add a Use Toolkit Package step and directly after that create a new Run Command Line step to copy the scripts downloaded above to by doing as follows Name: Copy Custom Scripts Command Line: xcopy ".\*.*" "%scriptroot%\" /D /E /C /I /Q /H /R /Y /S Package: CM12 UEFI BitLocker HTA Scripts as shown here Next create a Run Command Line step listed below Name: Set AES-128 Command Line: reg.exe add "HKLM\Software\Policies\Microsoft\FVE" /v "EncryptionMethod" /t REG_DWORD /d 1 /f Set the corresponding options on those steps should be like so BitLockerValue = 128 Next create a Run Command Line step listed below Name: Set AES-256 Command Line: reg.exe add "HKLM\Software\Policies\Microsoft\FVE" /v "EncryptionMethod" /t REG_DWORD /d 2 /f Set the corresponding options on those steps should be like so BitLockerValue = 256 Next, create a new Run Command Line step outside of that group called Add reg keys to allow for no TPM and paste the following code into it, this code allows the Hyper-v Virtual Machine (Generation 2) to become bitlockered without a TPM and without having received Group Policy to do so. cmd /c REG.exe ADD "HKEY_LOCAL_MACHINE\SOFTWARE\Policies\Microsoft\FVE" /v UseAdvancedStartup /t REG_DWORD /d 00000001 /f & cmd /c REG.exe ADD "HKEY_LOCAL_MACHINE\SOFTWARE\Policies\Microsoft\FVE" /v EnableBDEWithNoTPM /t REG_DWORD /d 00000001 /f & cmd /c REG.exe ADD "HKEY_LOCAL_MACHINE\SOFTWARE\Policies\Microsoft\FVE" /v UseTPM /t REG_DWORD /d 00000002 /f & cmd /c REG.exe ADD "HKEY_LOCAL_MACHINE\SOFTWARE\Policies\Microsoft\FVE" /v UseTPMPIN /t REG_DWORD /d 00000002 /f & cmd /c REG.exe ADD "HKEY_LOCAL_MACHINE\SOFTWARE\Policies\Microsoft\FVE" /v UseTPMKEY /t REG_DWORD /d 00000002 /f & cmd /c REG.exe ADD "HKEY_LOCAL_MACHINE\SOFTWARE\Policies\Microsoft\FVE" /v UseTPMKeyPIN /t REG_DWORD /d 00000002 /f as shown below Next, create a new Run Command Line to popup a message box to inform the user about the coming BitLocker cmd prompt, name the step Popup to inform user about BitLocker Password. In the step, paste in the following line, note that this line depends on you copying the custom scripts previously from the cscript.exe "%scriptroot%\BitLocker\BitLocker_Password_prompt.wsf" The line above basically pops up a message and waits until the user clicks ok to continue. Next we Enable BitLocker using ServiceUI and PowerShell, via a Run Command Line step as specified below: Name: Enable BitLocker Command Line: %deployroot%\tools\x64\ServiceUI.exe -process:TSProgressUI.exe %SYSTEMROOT%\System32\WindowsPowerShell\v1.0\powershell.exe -NoProfile -ExecutionPolicy bypass -File "%scriptroot%\PowerShell\EnableBitLocker.ps1" On the options tab, select Continue on Error as there is no checking in the script to verify the passwords entered, (maybe coming in a later version...) Next we add a Restart Computer step as the computer needs to 'set' Encryption in motion and it needs to prompt for the password you entered above, the restart computer step should restart to the Currently installed default Operating System After restarting the computer, we need to add a Use Toolkit Package step, directly followed by a Copy Custom Scripts step as we did in the start of these modifications: and finally we add the Wait For Encryption to complete step which is another PowerShell script which first hides the task sequence progress and then waits for encryption to complete operations. This step is a Run Command Line step as specified here: Name: Wait for Encryption to complete Command Line: %deployroot%\tools\x64\ServiceUI.exe -process:TSProgressUI.exe %SYSTEMROOT%\System32\WindowsPowerShell\v1.0\powershell.exe -NoProfile -ExecutionPolicy bypass -File "%scriptroot%\PowerShell\WaitForEncryption.ps1" That's it, save the changes and start testing the task sequence. Step 4. Deploy a new virtual machine On a Hyper-v Generation 2 virtual machine, PXE boot and start the CM12 UEFI BitLocker HTA task sequence, after it installs the operating system it will stop with a prompt shown below: After carefully reading the prompt, click OK and the next phase begins..the task sequence progress window will appear briefly then disappear, an Adminstrative PowerShell cmd prompt will appear and it will prompt you to enter a BitLocker Password as shown below enter the BitLocker password and press enter, you'll be asked to confirm the password Note: While entering the password, no characters will appear in the cmd prompt, so enter it carefully ! after some moments, the following will appear confirming your entries and informing you that the Password protector has been set, shortly after (5 seconds later) it will restart automatcially and now, you enter the BitLocker password in your Hyper-v Virtual machine, this is necessary as there is no TPM to store the password. after entering the password correctly the vm will continue with the task sequence and start encrypting the drive ! in addition, the second PowerShell script will kick into action and wait for the task sequence to finish encrypting the drive and after completing that successfully, the task sequence finishes and you can login to review the BitLocker state. Note: Security comes with a price tag, and in this case, that is incovenience due to a lack of a TPM. As the computer is now BitLockered, it will prompt for a password on every reboot unless your suspend BitLocker before the reboot, therefore if you want to deploy anything to your virtual machine that needs a reboot, either be prepared to manually enter the BitLocker password, or suspend Bitlocker using the following command: manage-bde -protectors -disable c: cheers niall


-
We get an IP but pxe do not load
anyweb replied to anderson.poa's topic in Configuration Manager 2012
check the smspxe.log file on the server hosting the PXE role, that log file should reveal if the client computer is reaching it or not, search for the mac address. -
We get an IP but pxe do not load
anyweb replied to anderson.poa's topic in Configuration Manager 2012
it's recommended to use ip helpers instead of dhcp options, however, you say your network changed, what changed about it and is everything being routed correctly between one network and the next ? -
how is SQL server setup/entered in the wizard ?
-
why wouldn't a build and capture ts work for you, try it and see, most people recommend building your image in MDT and then capturing it there, deploying it in ConfigMgr, there are many videos about same on virtualacademy, however the native functionality of Configmgr can be used too, give it a try and see where it takes you
-
how to Upgrade Server Std2008R2 to Server Std2012R2
anyweb replied to niyaz Ahmed's topic in Windows Server General
this might help. http://blogs.technet.com/b/chrisavis/archive/2013/10/01/performing-an-in-place-upgrade-of-server-2008-r2-to-server-2012-r2.aspx -
check in C:\Windows\CCM\Logs
-
SCCM 2012 R2 SP1 - Error 0x80004005 during OSD and other
anyweb replied to gvlaarho's topic in Configuration Manager 2012
are you deploying software to clients that have the updated client or not ? -
intune standalone or hybrid ?
-
how about letting people know what it's about, before clicking, otherwise it's a bit of hit and miss...
-
does the user in question have read access to WMI on the remote site system.
-
what's the exact error you get ? you can attach the smsts.log file here so we can take a look check your custom boot image is set for the below on the data source tab "deploy this boot image from the pxe enabled distribution point"
-
did you read the 'error', it's basically telling you that you don't have enough permissions as the logged on user to do wat you need to do. So login as a user that has Full Administrator permssions and you should be able to accomplish things..
-
Microsoft Account notifications If you don’t have your Microsoft Account (MSA) connected to your PC, starting in the next build you’ll start seeing notifications asking you to do so. You’ll need to connect the MSA that you registered for the Windows Insider Program with (and accepted the “Microsoft Windows Insider Program Agreement”) in order to continue receiving new Windows 10 Insider Preview builds (both Fast and Slow rings) from Windows Update. If you already have your MSA connected to your account on your PC, then you’re all set. We’re introducing new infrastructure in Windows Update to help us deliver new builds more effectively to Windows Insiders, and ensure that we’re flighting builds to people who have registered and opted in to the program. Connecting your MSA also allows seamless access to Windows Insider-only functionality in the Windows Feedback app and Insider Hub too. This change is for the Windows Insider Program ONLY, and is specific to how we’re delivering the Insider Preview builds. Once available on July 29th, you do not need an MSA to upgrade Windows 10 on your Windows 7 or Windows 8.1 PCs if they are not receiving Insider Preview builds. You will not be required to use an MSA on new PCs that come with Windows 10 preinstalled or clean installed from media. Some features in Windows 10 do require an MSA to use, such as downloading apps in the Windows Store. Getting the final release on July 29thWindows Insiders running the Windows 10 Insider Preview (Home and Pro editions) with their registered MSA connected to their PC will receive the final release build of Windows 10 starting on July 29th. This will come as just another flight. I’ve gotten a lot of questions from Windows Insiders about how this will work if they clean installed from ISO. As long as you are running an Insider Preview build and connected with the MSA you used to register, you will receive the Windows 10 final release build and remain activated. Once you have successfully installed this build and activated, you will also be able to clean install on that PC from final media if you want to start over fresh. If you are running the Enterprise edition of the Windows 10 Insider Preview, to upgrade to the final release of Windows 10 Enterprise you will need to download and activate it from Volume Licensing Service Center. As a reminder, the Enterprise edition of the Windows 10 Insider Preview is not eligible for the free upgrade offer and can be upgraded to the final release of Windows 10 through an active Software Assurance agreement. Stay with us as a Windows InsiderAs we’ve announced before, the Windows Insider Program will continue even after we release Windows 10 on July 29th. Windows Insiders will continue to receive future flights as we begin to work on the next release immediately after Windows 10 ships. You’ll get to see the latest Windows fixes, features, and updates and give us feedback. So stay with us! Of course, we’ll provide you an option to leave the program and stay on the final build if you choose: but we hope that we’ll continue to provide you great reasons to remain a Windows Insider. Insider Hub & Windows Feedback appBecause we’re getting ready for the final release, we’re removing a few things we don’t expect to ship to everyone. So starting with the next build, the Insider Hub will no longer be pre-installed. Windows Insiders can reinstall the Insider Hub app through the following steps: Go to Settings, System, Apps & features Click Manage optional features then Add a feature Select the Insider Hub entry (the list is in alphabetical order) and click Install. You will have to go through this process with each build we flight prior to the final release on July 29th, but once we start flighting new builds after July 29th it will be preinstalled again. The Windows Feedback app will continue to be included in builds and in the final release. But as I noted above, the Windows Feedback app will have functionality specific to Windows Insiders who are registered for the program with their MSA connected to their PC. One more thing – Here comes Microsoft Edge!In the next build we release to Windows Insiders in the Fast ring, the “Project Spartan” name will officially change to Microsoft Edge. One result of this naming means that the Microsoft Edge app has a new app ID. This will cause any favorites, cookies, history and Reading list items that you had saved in the Project Spartan app to be lost after upgrading from a previous Windows 10 Insider Preview build. If you want to keep these, you will need to back up your favorites before the next flight! To save your favorites, follow these steps before upgrading to the next build we release (do it now): Copy your favorites from %localappdata%/Packages/Microsoft.Windows.Spartan_cw5n1h2txyewy/AC/Spartan/User/Default/Favorites. Save them to %userprofile%/Favorites. After upgrading to the next build open Microsoft Edge, choose Settings, and you’ll see an option to import favorites from another browser. Choose Internet Explorer to import the favorites you saved in your %userprofile% directory into Microsoft Edge. We expect to have new Insider Preview builds for you soon and think you’ll be excited about the continuing progress we’re making on Windows 10. We couldn’t have done it without you. via > http://blogs.windows.com/bloggingwindows/2015/06/19/upcoming-changes-to-windows-10-insider-preview-builds/
-
Hide Software Center while launching OSD TS
anyweb replied to mandy78's topic in Configuration Manager 2012
great to hear it, for the benefit of others having your problem, maybe you could share how you solved it.